

Page 1
PAT400 Series
Portable Appliance Testers
User guide
Page 2

Thank you for purchasing the Megger PAT400 portable appliance tester.
For your own safety and to get the maximum benefit from your instrument, please ensure that you read and understand the safety
warnings and instructions before attempting to use the instrument.
These instruments are designed and manufactured by:
Megger Instruments Ltd
Archcliffe Road
Dover
Kent
CT17 9EN
England
Megger Instruments Limited reserves the right to change the specification of these instruments at any time without prior notice
www.megger.comPAT400 - Portable appliance tester
2
Page 3

Contents
X.1 Unpacking the carton 5
X.2 Safety Warnings 6
X.3 Symbols used on the instrument 7
1. Instrument Layout 9
1.1 Overview of the PAT400 9
1.2 Instrument layout 9
1.3 Button functions 9
1.4 HOT KEY descriptions 10
1.5 Display information for home tab 11
1.6 Screen navigation 11
1.7 Text fields (free form box)
and Drop down boxes 12
1.8 Battery location, fitting and
replacement 13
1.9 Fuse location and replacement 13
2. Getting started 14
2.1 Switching ON the PAT 400 14
2.2 HOME screen explained 16
2.3 Switching off the PAT400 17
3. Testing with a PAT400 18
3.1 Connecting an asset to the PAT400 18
3.2 Testing an asset 19
3.3 Test progress 24
3.4 Remote probe and clip 24
3.5 Short circuit assets 29
3.6 Aborting a test 29
3.7 Completion of testing 29
6. Editing and deleting assets and results 41
6.1 Editing asset data 41
6.2 Deleting assets 42
7. DATA – Test results and data transfer 44
7.1 Backup to USB memory stick 45
7.2 Importing / restoring data
from USB memory stick 46
7.3 Export results to CSV 48
7.4 Accessing test results 49
8. Test groups 52
8.1 Creating a test group 52
8.2 Allocating test groups to Hotkeys 54
8.3 Editing a test group 56
8.4 Deleting a test group 57
8.5 Repeated Tests 57
9. Quick test - QT 59
9.1 Running a quick test 59
10. SETUP menu options 60
10.1 Clients 60
10.2 Locations 63
10.3 Company 66
10.4 Quick test configuration 67
10.5 Date / Time settings 68
10.6 Changing Language 69
10.7 Restoring default settings 70
10.8 ABOUT - PAT400 software
version and Megger contact details 72
3.8 Test fail screen 30
3.9 Visual inspection 30
3.10 Repair code 31
3.11 Cable compensation 32
3.12 WARNINGS 33
4. Using the memory 35
4.1 Important overview 35
4.2 Saving a test result 36
5. Adding assets to memory 38
5.1 Adding assets to memory
before testing 38
5.2 Copying the previously added asset 39
11. PAT400 Users, levels and access settings 73
11.1 User names, account status
and Login 73
11.2 Power Up and Log in/Log
out options 74
11.3 Managing accounts 76
11.3.1 Reverse L-N Polarity
(not available on all instruments) 87
11.3.2 Measure PE Option
(not available on all instruments) 89
11.4 Recovery Login 90
12. Care and Maintenance 91
13. Carry case 91
www.megger.comPAT400 - Portable appliance tester
3
Page 4

Appendix A Test types explained 92
A.1 Continuity & bond testing 92
A.2 Insulation testing 93
A.3 Leakage testing 93
A.4 Load testing 94
A.5 RCD testing 94
A.6 Power lead/extension lead testing 95
A.7 Flash testing (PAT450 only) 95
A.8 Parallel Earth Path WARNING: 95
A.9 PAT400 Factory Default Test Groups 97
Test Groups for UK PAT Variants: 97
Test Groups for Australian/
New Zealand PAT Variants: 99
Test Groups for International/
European PAT Variants: 100
Appendix B - Barcode sample table 108
Appendix C - Specification 111
Appendix D - Ordering information 114
Appendix E - Repair and Warranty 115
www.megger.comPAT400 - Portable appliance tester
4
Page 5
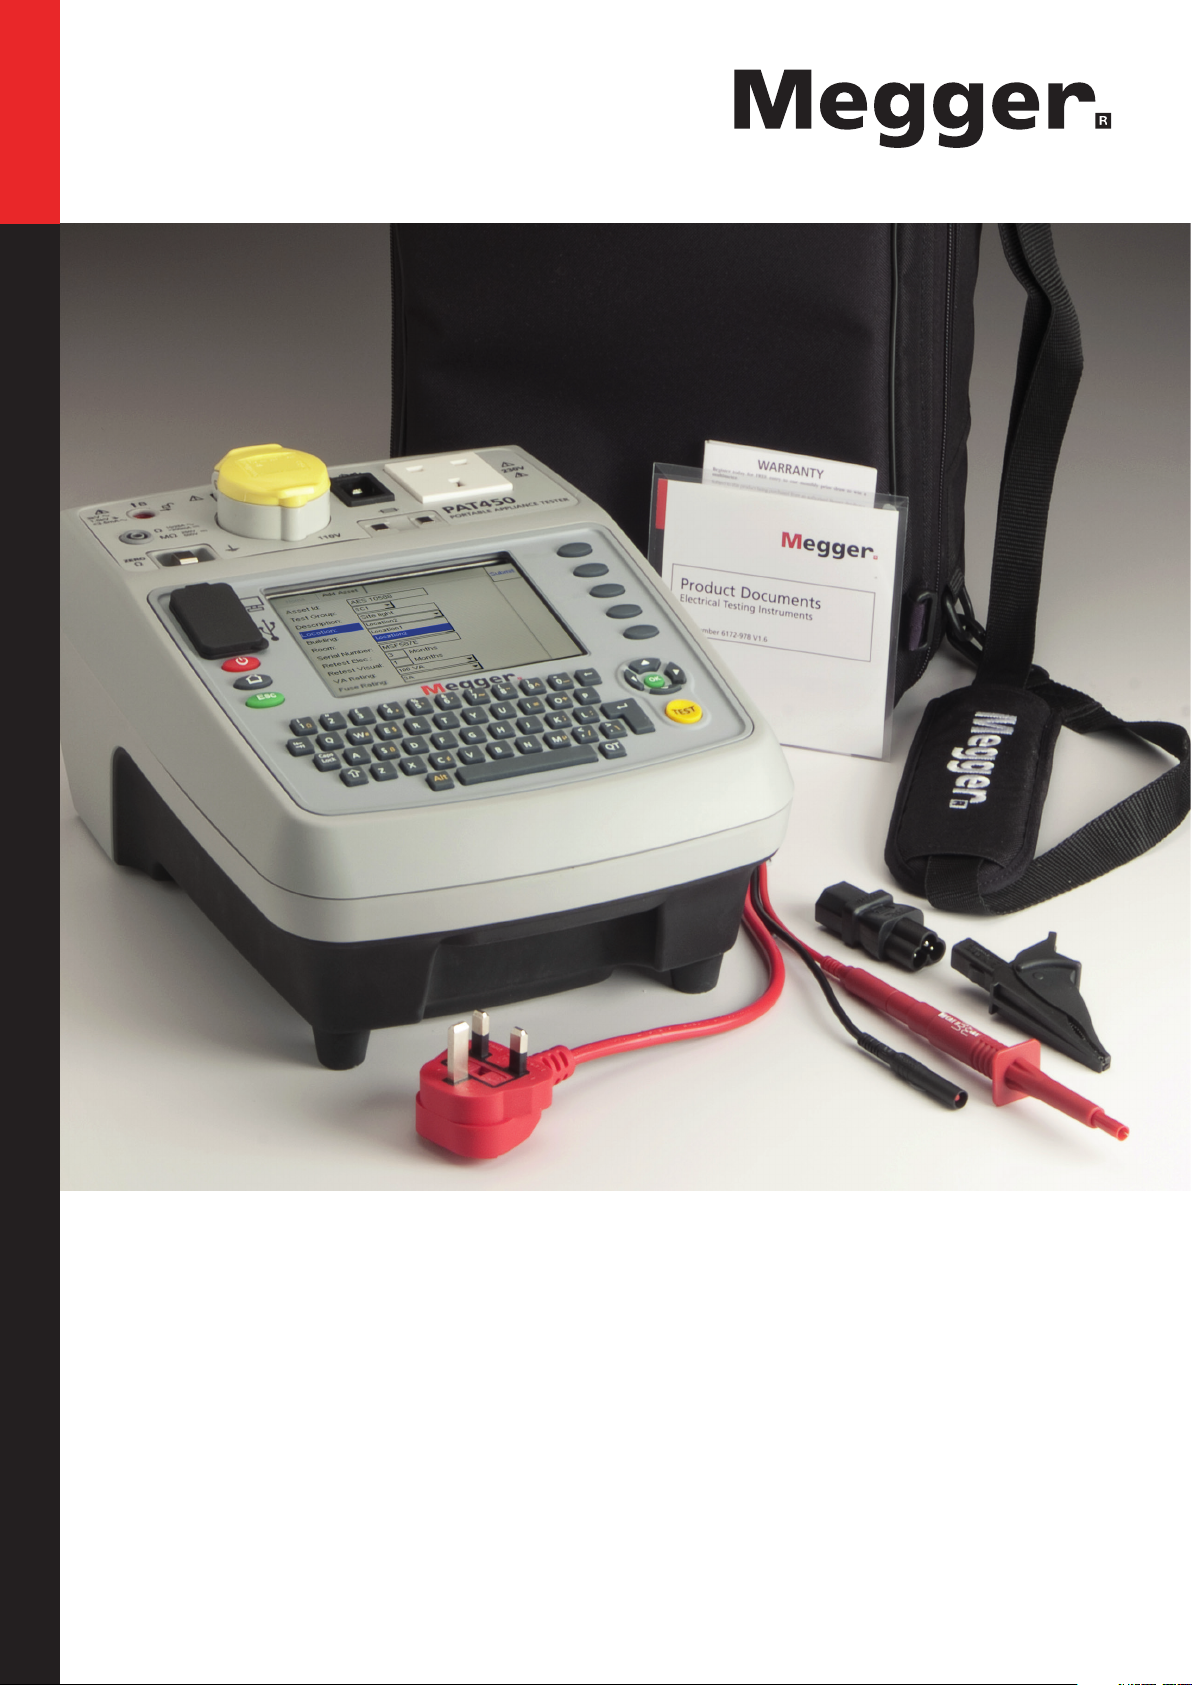
X.1 Unpacking the carton
Unpack the carton contents carefully. There are important documents that you should read and keep for future reference.
Please complete the pre-paid warranty card and return it to Megger Instruments Limited as soon as possible to help us reduce any
delays in supporting you should you need assistance.
UK carton contents European carton contents
PAT410, PAT420 and PAT450 PAT410, PAT420 and PAT450
1x PAT400 series appliance tester 1x PAT400 series appliance tester
1x Carry case + carry handle and strap 1x Carry case + carry handle and strap
1x Quick-start guide 1x Quick-start guide
1x Black test lead set with probe and clip 1x Black test lead set with probe and clip
1x IEC type power cord 30 cm (Extension lead adaptor) 1x IEC type power cord 30 cm (Extension lead adaptor)
1x PC power supply test adaptor 1x PC power supply test adaptor
1x Warranty card 1x Warranty card
1x Owners CD manual 1x Owners CD manual
1x Flash test lead (PAT450 ONLY) 1x Flash test lead (PAT450 ONLY)
1x 9 V PP3 rechargeable NiMH Battery 1x 9 V PP3 rechargeable NiMH Battery
www.megger.comPAT400 - Portable appliance tester
5
Page 6

X.2 Safety Warnings
The following safety warnings and precautions must be read and understood before the instrument is used. They must
be observed during use.
For safety, only connect the PAT to a supply that is properly earthed. If in doubt, the supply should be checked by a
qualified electrician.
Do not use the instrument if there are any signs of damage.
All test leads, probes and clips must be in good order, clean and with no broken or cracked insulation.
Probes and clips should be held behind the finger guard.
Test leads not used during a measurement should be disconnected from the appliance tester.
For dual voltage testers, both sockets can be live simultaneously.
Only connect one asset to the PAT during testing.
Tests should be carried out in the order recommended below. An appliance that fails a test should be repaired before
further testing is carried out.
Recommended sequence:
1. Earth bond / continuity of the protective earth conductor (Class I devices)
2. Insulation test (or earth leakage)
In addition further tests can be performed, but ONLY AFTER 1 & 2 above:
3. Operational test
4. Leakage test
Only perform an operational test after the earth bond and insulation tests have been completed, as this test operates
at mains voltage.
During testing, ensure no hazard will exist as a result of normal running or under fault conditions.
During testing the unit under test (asset) should not be touched, other than using the appropriate accessories, as
faulty appliances can present a shock hazard.
Do not touch the exposed parts of test leads during tests as hazardous voltages may be present due to potentially
faulty appliance.
Do not touch the IEC extension lead socket pins especially during a test, as hazardous voltages may be present due
to a potentially faulty appliance.
Assets should not be routinely flash tested. Where flash testing is required, refer to further guidance on Flash testing,
section A7.
Replacement fuses must be of the correct rating and type. Refer to section 1.9.
The USB connection marked thus ( ) should only be used by approved service personnel; nothing should be
connected to the USB port during testing.
Only use a NiMH rechargeable 8.4 V PP3 battery, do not use a non-rechargeable type as this could become
dangerous if charged by the instrument.
Serviceable fuses should only be replaced with those that are suitably rated.
In case of an emergency use an easily accessible power point
Only use Megger approved accessories with this product.
www.megger.comPAT400 - Portable appliance tester
6
Page 7
Installation Category Definitions:
CAT II
Measurement category II: Equipment connected between the electrical outlets and the user’s equipment.
CAT III
Measurement category III: Equipment connected between the distribution panel and the electrical outlets.
CAT IV
Measurement category IV: Equipment connected between the origin of the low-voltage mains supply and the distribution panel.
X.3 Symbols used on the instrument
F Caution: risk of electric shock
G Caution: refer to accompanying notes.
c Equipment complies with relevant EU Directives
Equipment complies with ‘C tick’ requirements
f Fuse
This equipment should be recycled as electronic waste
HV test lead in unlocked position
HV test lead in locked position
NIMH 8.4 V
PP3/6R31
Battery type fitted
230 V
Do NOT connect to mains supply
www.megger.comPAT400 - Portable appliance tester
7
Page 8

WEEE Directive
The crossed out wheeled bin symbol placed on Megger products is a reminder not to dispose of the product at the end of its life with
general waste.
Megger is registered in the UK as a Producer of Electrical and Electronic Equipment. The Registration No is WEE/HE0146QT.
For further information about disposal of the product consult your local Megger company or distributor or visit your local Megger
website.
Battery disposal
The crossed out wheeled bin symbol placed on the batteries is a reminder not to dispose of them with general waste at the end of
their life.
This product contains the following batteries - NiMH rechargable 8.4 V PP3 batteries.
They are located under the battery cover on the right hand side cover of the instrument.
They can be safely removed by following the instructions in the battery replacement section of this guide.
Dispose of batteries according to local authority regulations.
Megger is registered in the UK as a producer of batteries.
The Registration number is BPRN00142.
For Further information see www.megger.com
www.megger.comPAT400 - Portable appliance tester
8
Page 9

1 Instrument Layout
1.1 Overview of the PAT400
The PAT400 series of portable appliance testers are fully automated testers for the fast safety testing of portable electrical equipment.
The PAT400s will operate at 230 V AC (or for UK variants 230 V AC and 110 V AC supplies).
All warnings must be read and understood before the tester is used.
All operators should also be competent in the safety testing of electrical equipment and meet all the local legal requirements before
testing.
9 V PP3 rechargeable NiMH Battery is supplied - not fitted. This should be installed prior to first use. See section 1.8 for instructions.
1.2 Instrument layout
1. Qwerty Keypad
9
10
2. Escape button
3. Home button
4. Power off
5. USB interfaces
6. Lead null post
7. Bond/Continuity socket
8. 110 V test socket (UK ONLY)
9. Flash test socket
10. IEC/Extention lead return test socket
11. Mains test socket
12. Fuse checker
13. Hot keys
14. QVGA colour display
15. UP/DOWN/LEFT/RIGHT navigation keys
16. OK button
17. TEST button
8
7
6
5
4
3
2
1
11
12
13
14
15
16
17
18
PAT450 instrument layout
18. (QT) Quick test access button
1.3 Button functions
Button functions
Power down – Prevents battery discharge
Returns to HOME screen
Escape – Exit screen without saving
Hot keys. - Function depends on adjacent
display icon. Used for fast selection of options.
www.megger.comPAT400 - Portable appliance tester
9
Page 10
1.4 HOT KEY descriptions
Other Hotkeys
Home screen
Class 1 test groups
Class II test groups
Power/extension leads
Portable RCD
Add asset
SETUP screen
Test group manager
Change client
Add
Edit
Save
Find asset
Copy last asset
Copy last asset (& increment asset ID)
View test result
List test groups
Re-run test
Change location
Bond/Ext. lead null
Edit asset
Delete
Save/print-label
Print barcode
Login
Next page
Previous page
Repair code pop up box activation
www.megger.comPAT400 - Portable appliance tester
10
Page 11
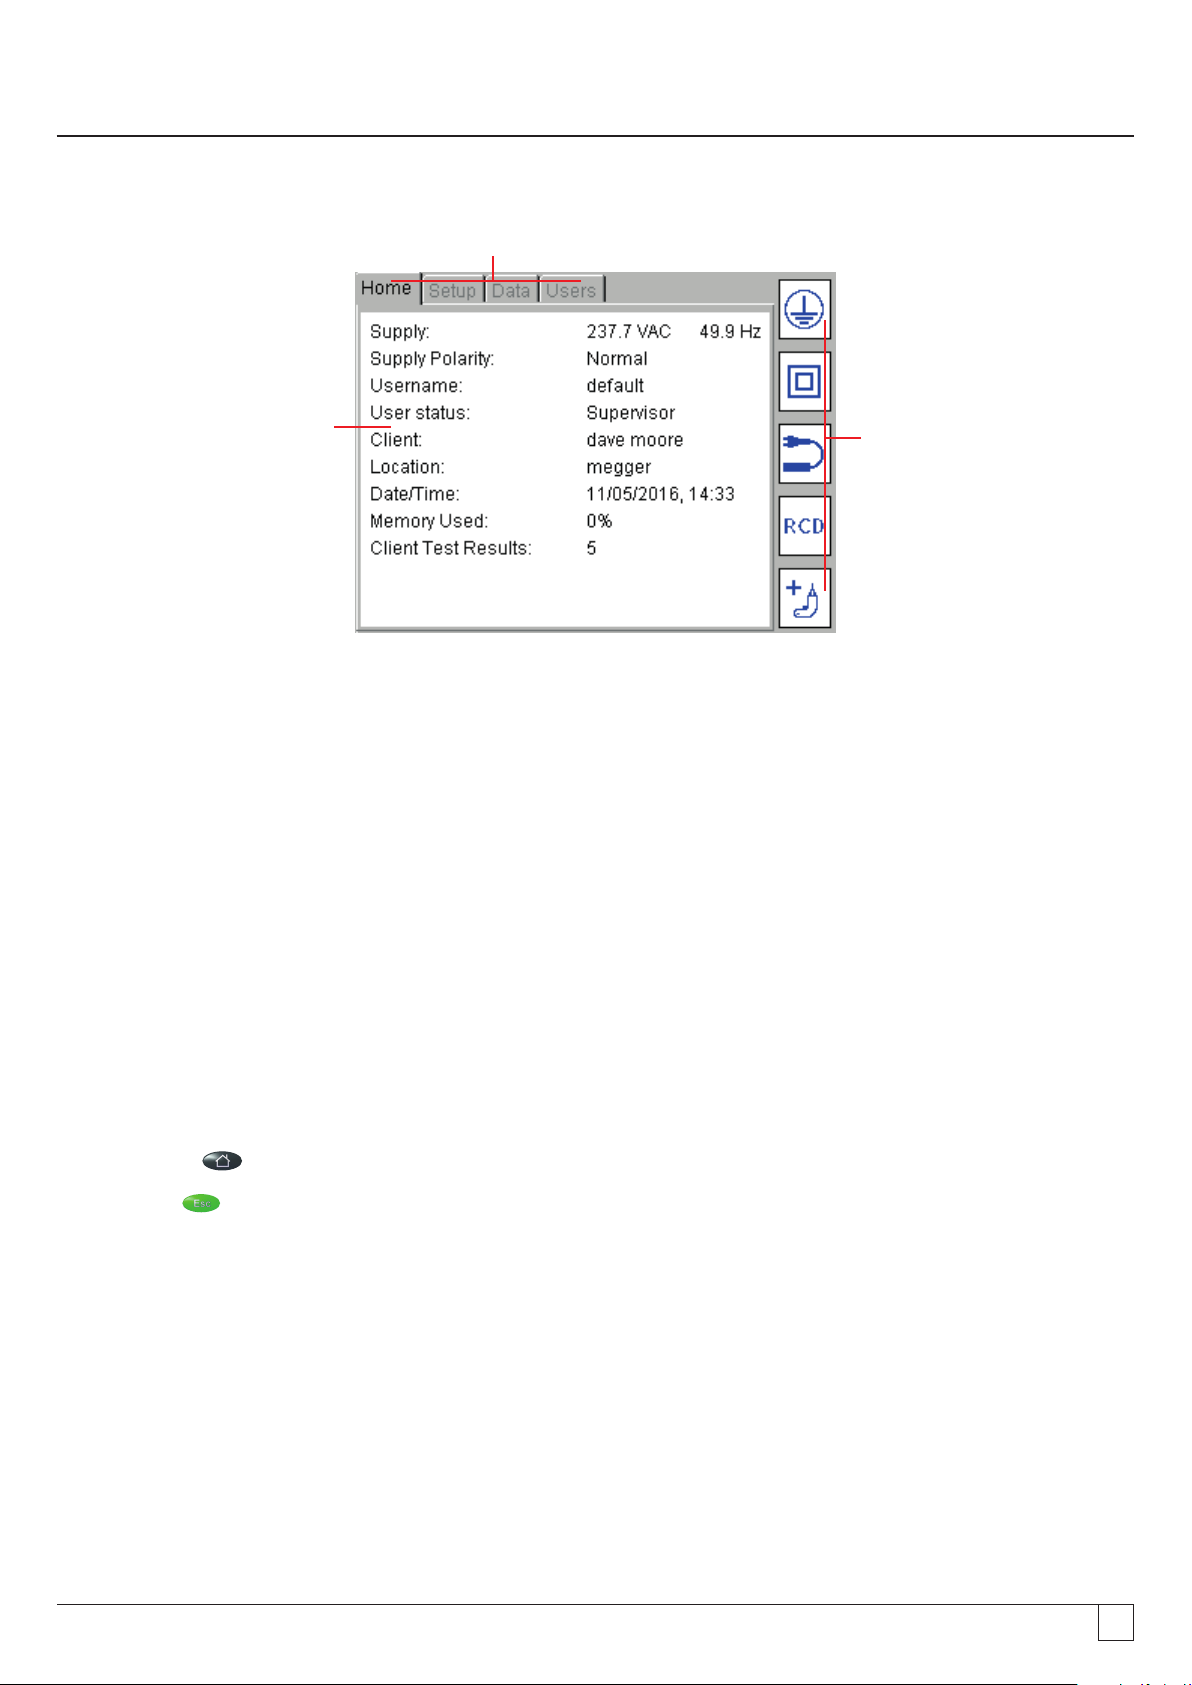
1.5 Display information for home tab
Menu bar
Main display area
PAT400 display
Menu bar
Provides navigation path and menu options. See NOTE below
Main display area
Display and test result information
Additional menu options
Hot keys
Quick access to frequently used test groups, and other options.
NOTE: Users tab is only available on Firmware version V2.4 and above.
Hot Keys
1.6 Screen navigation
Use the UP/DOWN and LEFT/RIGHT arrows to navigate around the menu and asset screens.
Use the OK button or CR (enter key) on the keyboard to select or confirm an action.
Use the HOME
Use the ESC
button to return to the main menu.
button to exit or abort a function.
www.megger.comPAT400 - Portable appliance tester
11
Page 12

1.7 Text fields (free form box) and Drop down boxes
When entering basic ASSET data, two types of text fields exist:
1. Free form boxes
2. Drop down box
Free form box
Text or numbers can be entered as required
Text can be entered from a keyboard or barcode scanner.
In some instances a “free form” box can become a “drop down” box, such as the asset ID field. In this case it will appear with the
drop down icon as below:
Drop down box.
Drop down boxes already contain a list of items. To access the list, navigate to the drop down box using the UP/DOWN arrows then
press the OK button.
Press OK to select from the available list.
Alternatively, enter the first letter or number of the contents you require, and the search engine will jump to that entry.
www.megger.comPAT400 - Portable appliance tester
12
Page 13

E.g. Enter “S” in the TEST GROUP box and the cursor will jump to SC1.
If no contents start with that letter or number, nothing will happen.
1.8 Battery location, fitting and replacement
Battery type: 1 x 8.4V NiMH rechargeable (PP3, IEC6F22, NEDA 1604,6HR61)
An 8.4V IEC6F22 NiMH rechargeable battery is included with all PAT400s and should be fitted prior to first use in the battery
compartment which is on the right hand side of the unit, secured with a screw. The battery is continuously charged whilst the PAT400
is powered. The battery provides a fast re-boot function when the PAT400 is unplugged, moved between locations and re-started
within 5 minutes. The battery shall only be replaced by an equivalent rechargeable battery when the re-boot facility ceases to work.
To replace the rechargeable battery:
1. Switch off the instrument.
2. Disconnect the instrument from any electrical circuits.
3. Remove the battery cover.
4. Remove the old battery and refit new battery following correct polarity (as marked on the battery compartment).
5. Replace the battery cover.
Warning: Only use NiMH batteries! Do not attempt to recharge non-rechargeable (Primary) cells in the
PAT400. Doing so may result in instrument damage and may cause personal injury.
1.9 Fuse location and replacement
Fuse type:
PAT400 EU, DE, AU, US 2 x 2A (F) HBC 50kA 600V (Part No. 90000-939)
PAT400 UK 1 x 250 V AC 100mA HBC 1.5KA (part No. 25413-295)
Warning: Fuses are at mains potential. The electrical supply MUST be disconnected prior to removing the fuse
cover which is located on the underside of the PAT tester, secured with a screw.
1. Switch off the instrument.
2. Disconnect the instrument from any electrical circuits.
3. Remove the fuse cover on the underside of the PAT tester.
4. Remove each fuse in turn and check for failure.
5. Replace as necessary.
6. If no fuses have failed, contact Megger Technical services group on 44 (0) 1304 502 102.
7. Replace fuse cover when complete.
NOTE: The
batteries are classified as Portable Batteries and should be disposed of in the UK in accordance with Local Authority requirements. For
disposal of batteries in other parts of the EU contact your local distributor.
Megger is registered in the UK as a supplier of batteries. The Registration number is BPRN00142
symbol on the batteries is a reminder not to dispose of them with general waste at the end of their life. Spent NiMH
www.megger.comPAT400 - Portable appliance tester
13
Page 14

2 Getting started
2.1 Switching ON the PAT 400
1. Connect the instrument to a suitable electrical supply, either 230 V AC (or 110 V AC for UK instruments).
For testing 230 V electrical equipment, connect the PAT tester to a 230 V electrical outlet.
For testing 110 V electrical equipment, connect the PAT tester to a 110 V electrical outlet, using the optional 110 V to 230 V supply
lead adaptor. Refer to section 3 for further details.
The appliance tester will automatically start when connected to the mains supply.
IMPORTANT: DO NOT connect any equipment to the PAT tester until it has been switched on and
passed its self-test.
Connected equipment will create a relay error and necessitate restarting the PAT tester.
Power should be disconnected and reconnected.
Start-up / initialisation
The first time the PAT tester is started the instrument will ask for the operating language, time and date to be set.
1. Use the UP/DOWN arrows to select the operating language from the options listed.
2. Press OK when complete
www.megger.comPAT400 - Portable appliance tester
14
Page 15
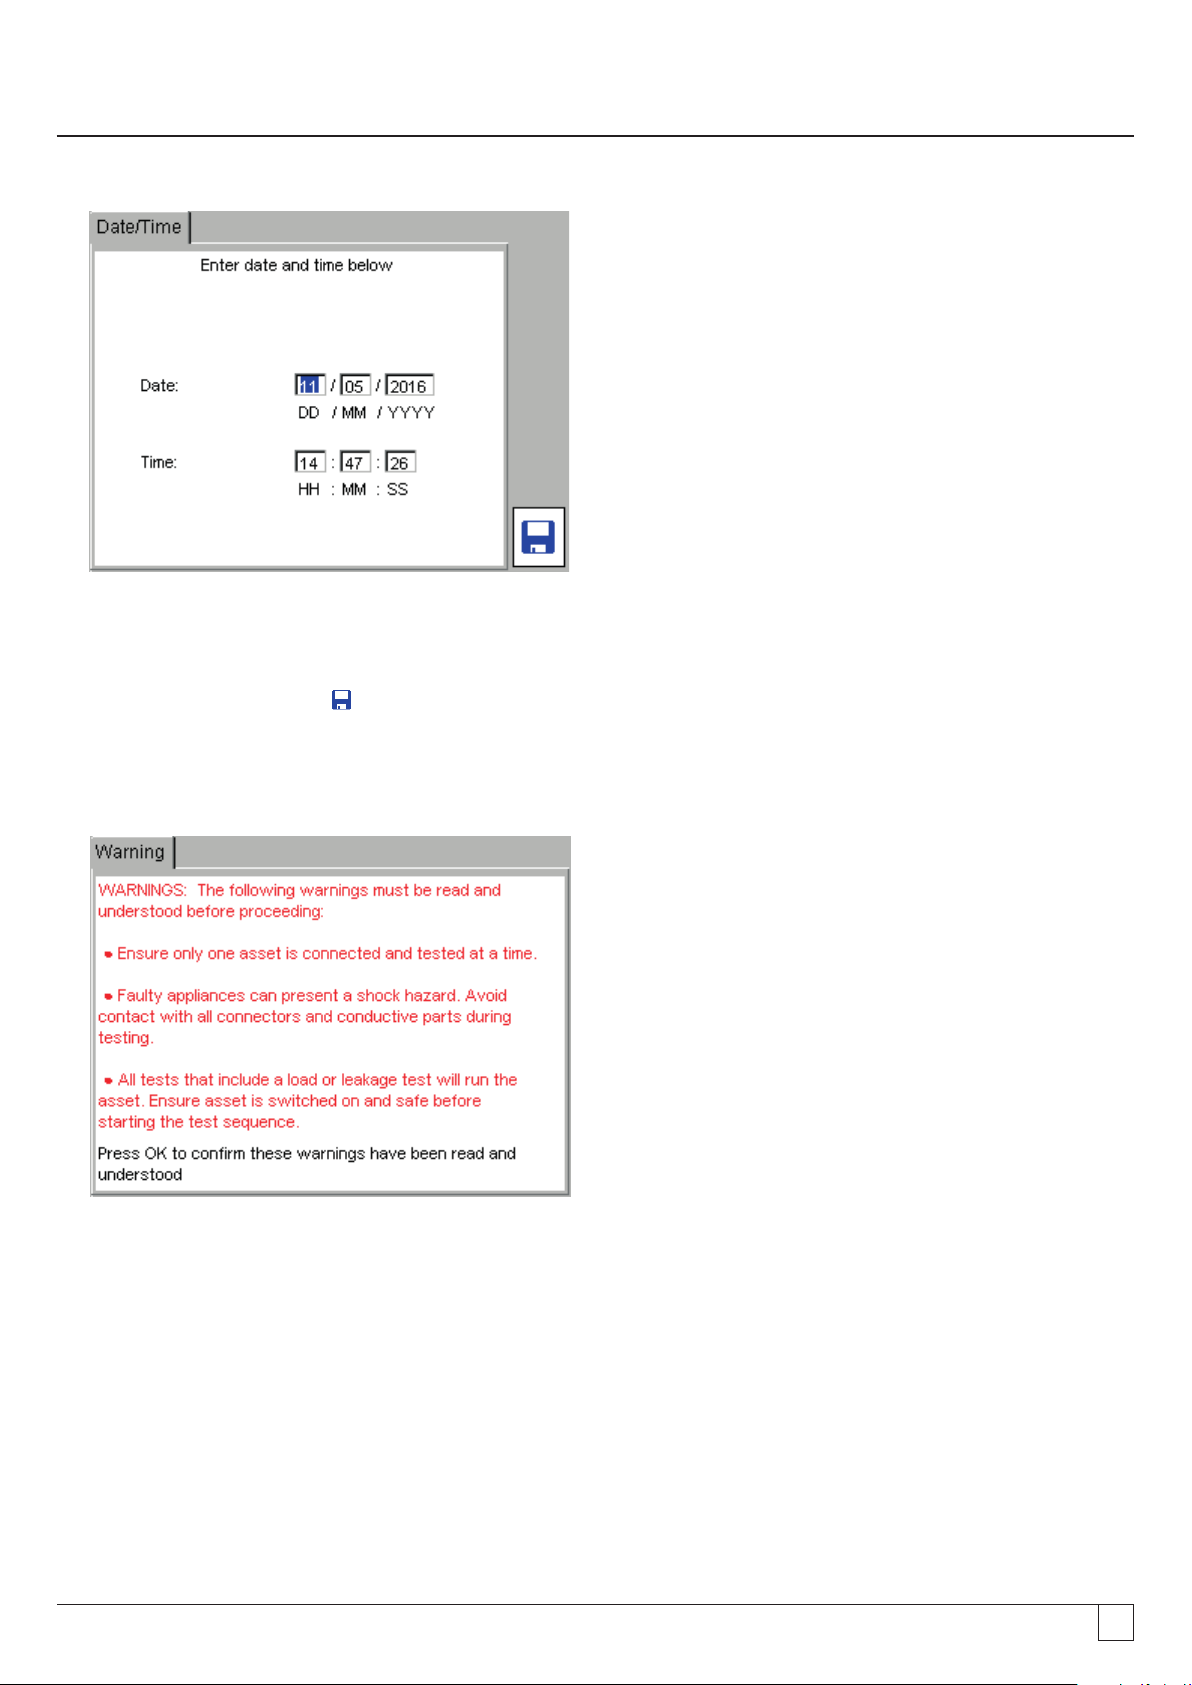
3. Use the RIGHT/LEFT and OK keys to enter the date and time
Date format is DD / MM / YYYY
Time format is 24 Hr Hr / Min / Sec
4. Press the SAVE
HOTKEY to accept changes.
Further changes can be made in the menu SETUP options section 10.5
On completion of the initialisation the following warning screen is displayed when the PAT tester is switched on.
PAT400 instruments Warning dialogue box
NOTE: This screen is not displayed if the PAT tester is re-started within five minutes of being un-plugged, or when the
PAT tester restarts from the same screen as before.
5. Press OK to confirm you have read and understood these warnings. The instrument will display the following HOME
screen when all initial tests have completed
www.megger.comPAT400 - Portable appliance tester
15
Page 16

2.2 HOME screen explained
The HOME screen is the start point of all testing
Menu Functions
Menu Functions
Class I test groups
Class II test groups
Class IEC (Power) and
extension lead test groups
Plug In RCD test groups
Add asset
Home
Test launch screen
HOT KEY access
Instrument status
Setup
Client
Location
Company
Quick test keys
Setup date/time
Language
Default settings
About
DATA
Backup to USB
Restore from USB
Export to USB
(CSV) View results
Users
Login / Logout
Expert Options
Manage Users
www.megger.comPAT400 - Portable appliance tester
16
Page 17

2.3 Switching off the PAT400
Normal Power-Off
To switch off the tester, press the RED off button . The display will show the message
The mains plug can now be removed from the supply.
Switching off using this button prevents the “FAST Re-start” battery from discharging unnecessarily.
FAST Re-start
If the tester is to be moved to a new location and testing continued, simply unplug the unit from the mains supply and reconnect it
in the new location. The appliance tester will enter a hibernation mode during the move. When power is restored at the new location
the PAT tester will resume to the same screen as when power was disconnected, without any delay.
Any test results are retained. On reconnection the previous test result can still be saved.
The rechargeable 8.4 V NIMH battery is used to maintain hibernation status whilst unplugged. This battery is continuously charged
whilst the appliance tester is connected to the mains supply.
Continuous use of the hibernation mode will discharge the battery. Should the move take longer than 5 minutes, the appliance tester
will leave hibernation mode and complete a full power down.
www.megger.comPAT400 - Portable appliance tester
17
Page 18
3 Testing with a PAT400
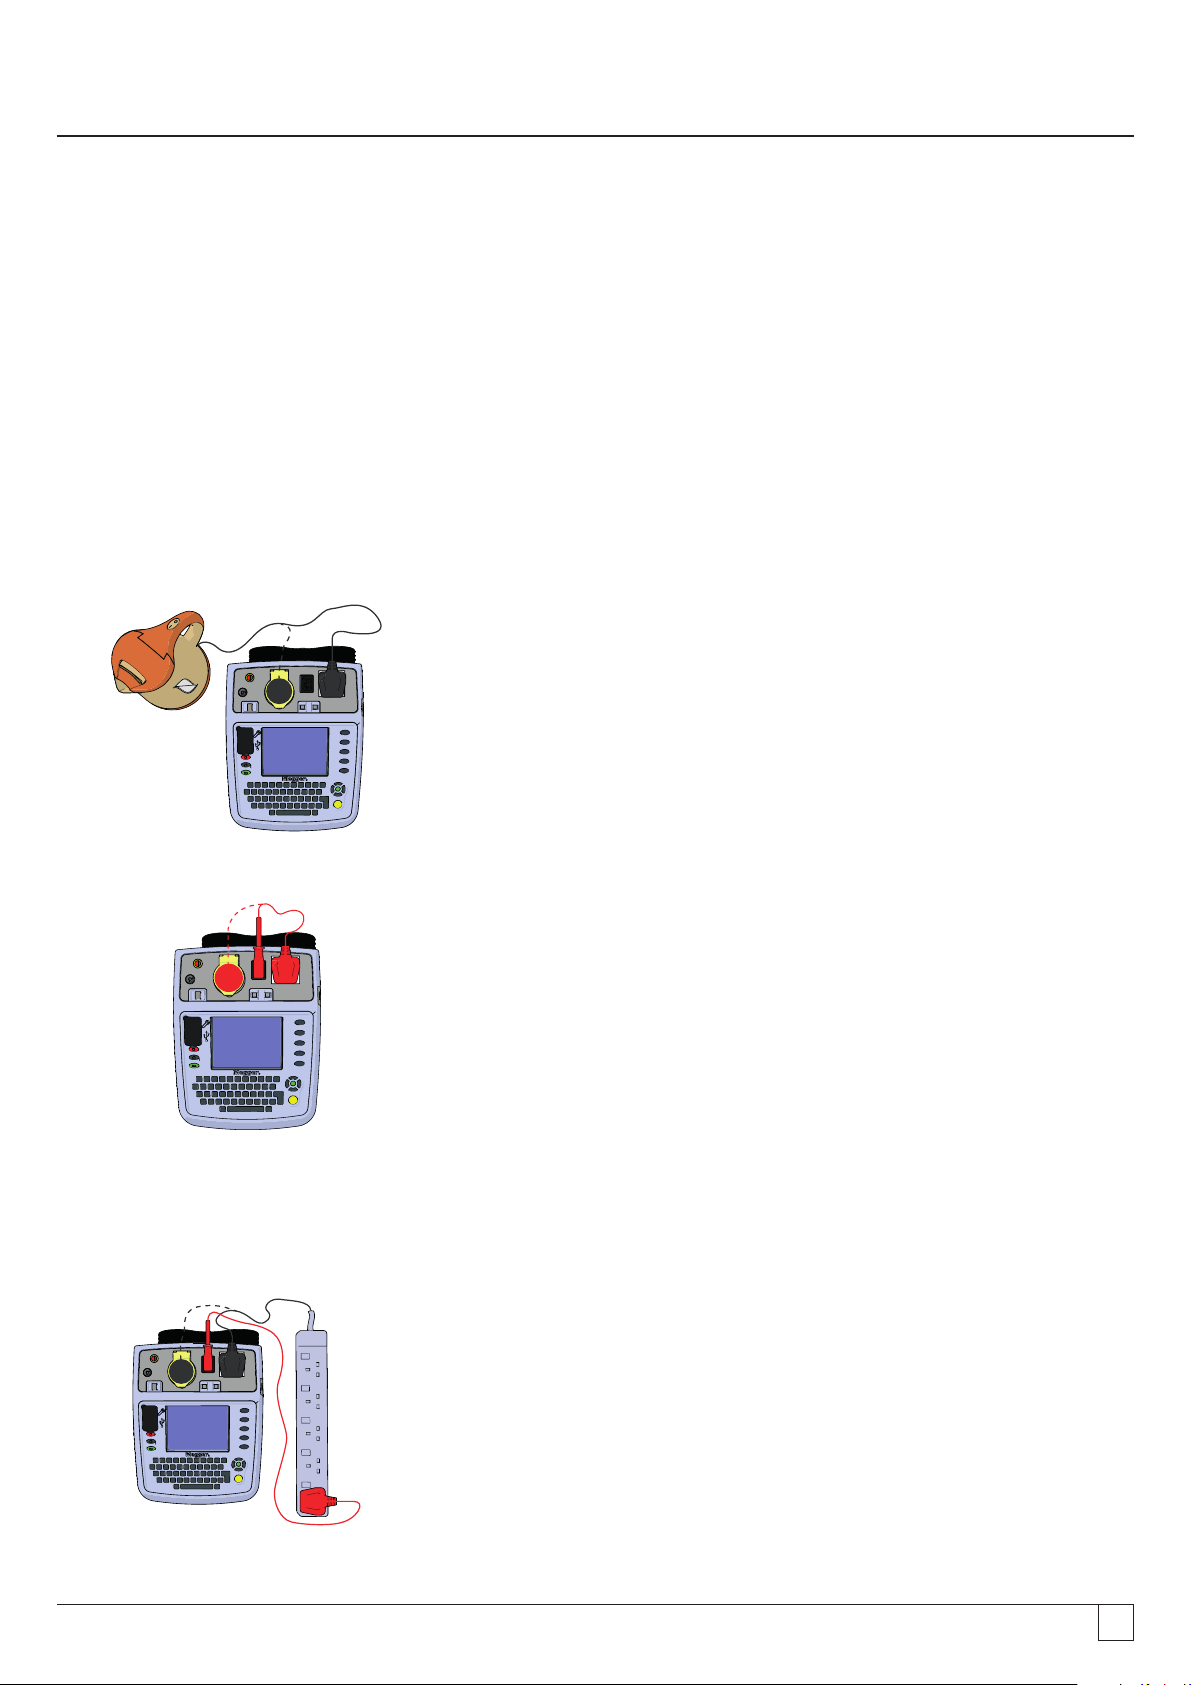
3.1 Connecting an asset to the PAT400
Assets are tested through the test connectors on the top of the instrument. An asset is simply plugged into the appropriate socket.
A power cord (IEC lead), or an extension lead needs to be “wrapped back” to the small IEC socket on the top of the instrument. This
allows automatic testing of continuity and polarity without connecting the remote probe.
Standard Class I and Class II assets will also use the additional remote probe for BOND, INSULATION or LEAKAGE testing. The
instruction to connect it is displayed on the screen at the appropriate time.
The following drawings show how the asset under test should be connected at the start of testing.
NOTE: The dotted line indicates where a 110 V asset would be connected (UK PAT testers only).
Other test leads may need to be connected during the test sequence. Follow on-screen instructions.
NEVER CONNECT MORE THAN ONE ASSET AT A TIME.
Connecting a Class I or Class II asset
To connect standard Class I or Class II equipment to the PAT400:
1. Plug the asset into the 230 V test socket on the PAT400.
To connect 110 V equipment to the PAT400:
1. Plug the asset into the 110 V test socket on the PAT400.
Connecting an IEC type power cord or 110 V (Power) lead
To connect a standard IEC type power cord (computer type power lead) to the PAT400:
1. Connect the mains plug to the mains test socket on the PAT400.
2. Connect the IEC plug to the IEC socket.
To connect a 110 V power lead, use the 110 V to IEC plug adaptor (see optional
accessories - Appendix D).
1. Connect the 110 V mains plug to the 110 V test socket.
2. Connect the free end of the 110 V power lead to the 110V adaptor plug.
3. Connect the 110 V adaptor IEC connector to the IEC socket on the PAT400.
Connecting an extension lead
To connect an extension lead to the PAT400:
1. Connect the mains plug to the mains test socket on the PAT400.
2. Using the extension lead adaptor, connect the furthest socket on the extension lead
to the IEC socket on the PAT400.
To connect a 110 V power lead, use the 110 V to IEC plug adaptor (see optional accessory
- Appendix D).
1. Connect the 110 V mains plug to the 110 V test socket.
2. Connect the free end of the 110 V power lead to the 110V adaptor plug.
www.megger.comPAT400 - Portable appliance tester
18
Page 19

3. Connect the 110 V adaptor IEC connector to the IEC socket on the PAT400.
Connecting a portable RCD
To connect a portable RCD to the PAT400:
1. Connect the RCD to the 230 V test socket on the PAT400.
2. Using the IEC test lead adaptor, connect the IEC plug of the adaptor lead into the IEC
socket on the PAT400.
3. Connect the mains plug of the IEC test lead adaptor into the RCD.
3.2 Testing an asset
The PAT400’s are designed to automatically test electrical equipment, using TEST GROUPS. A “TEST GROUP” is a specific group of
tests suitable for the type of asset being tested.
The PAT tester is shipped with a pre-defined set of test groups. However others can be added as required, up to a maximum of 100,
see section 8.
Before a test will run, a TEST GROUP must be selected. There are three options to start the test sequence:
OPTION 1 Select a test group from the HOTKEY options.
OPTION 2 Press the TEST button – This takes you to the TEST ASSET screen.
OPTION 3 Scan the asset ID with a bar-code scanner, then press TEST (asset details must already be stored in the PAT400),
otherwise PAT400 defaults to ADD ASSET screen.
Option 1: Starting a TEST – USING HOT KEYS
1. Select a Class I, Class II, IEC/extension lead or RCD test group by pressing one of the HOT KEY options: A list of TEST
GROUPS are displayed that are relevant to that type of equipment
2. Select one of the test groups by pressing the relevant number, then the TEST button.
Or
Press the number twice to start the test sequence.
Or
Scroll down to the required test group and press TEST.
Class I test groups
Class II test groups
Class IEC (Power) and
extension lead test groups
Plug In RCD test groups
Add asset
For more Information on test groups, adding, editing, configuration or deletion, go to section 8.
www.megger.comPAT400 - Portable appliance tester
19
Page 20

Option 2: Starting a TEST – PRESSING THE TEST BUTTON
1. From the HOME screen, press the TEST button. The display will show the TEST ASSET page, as below:
2. Type in the “Asset ID” if available and press OK.
If the asset is already in the database the details of the asset will be displayed as below:
Find asset
Search for TEST GROUPS
Press once for direct entry
Press twice for drop down
box.
Add ASSET
Edit ASSET
3. Press the TEST button and the test sequence will commence. Go to 3.3 TESTING PROGRESS.
Alternatively to search through the asset database, press the FIND ASSET
A drop down box of Asset IDs will appear.
If you know the Asset ID you wish to find, start typing in the Asset ID. The search engine will jump to the Asset IDs that start with
those characters.
To ADD an asset, simply press the ADD ASSET
4. If the entered asset is not in the database, the following information box will appear:
Hotkey.
Hotkey.
www.megger.comPAT400 - Portable appliance tester
20
Page 21
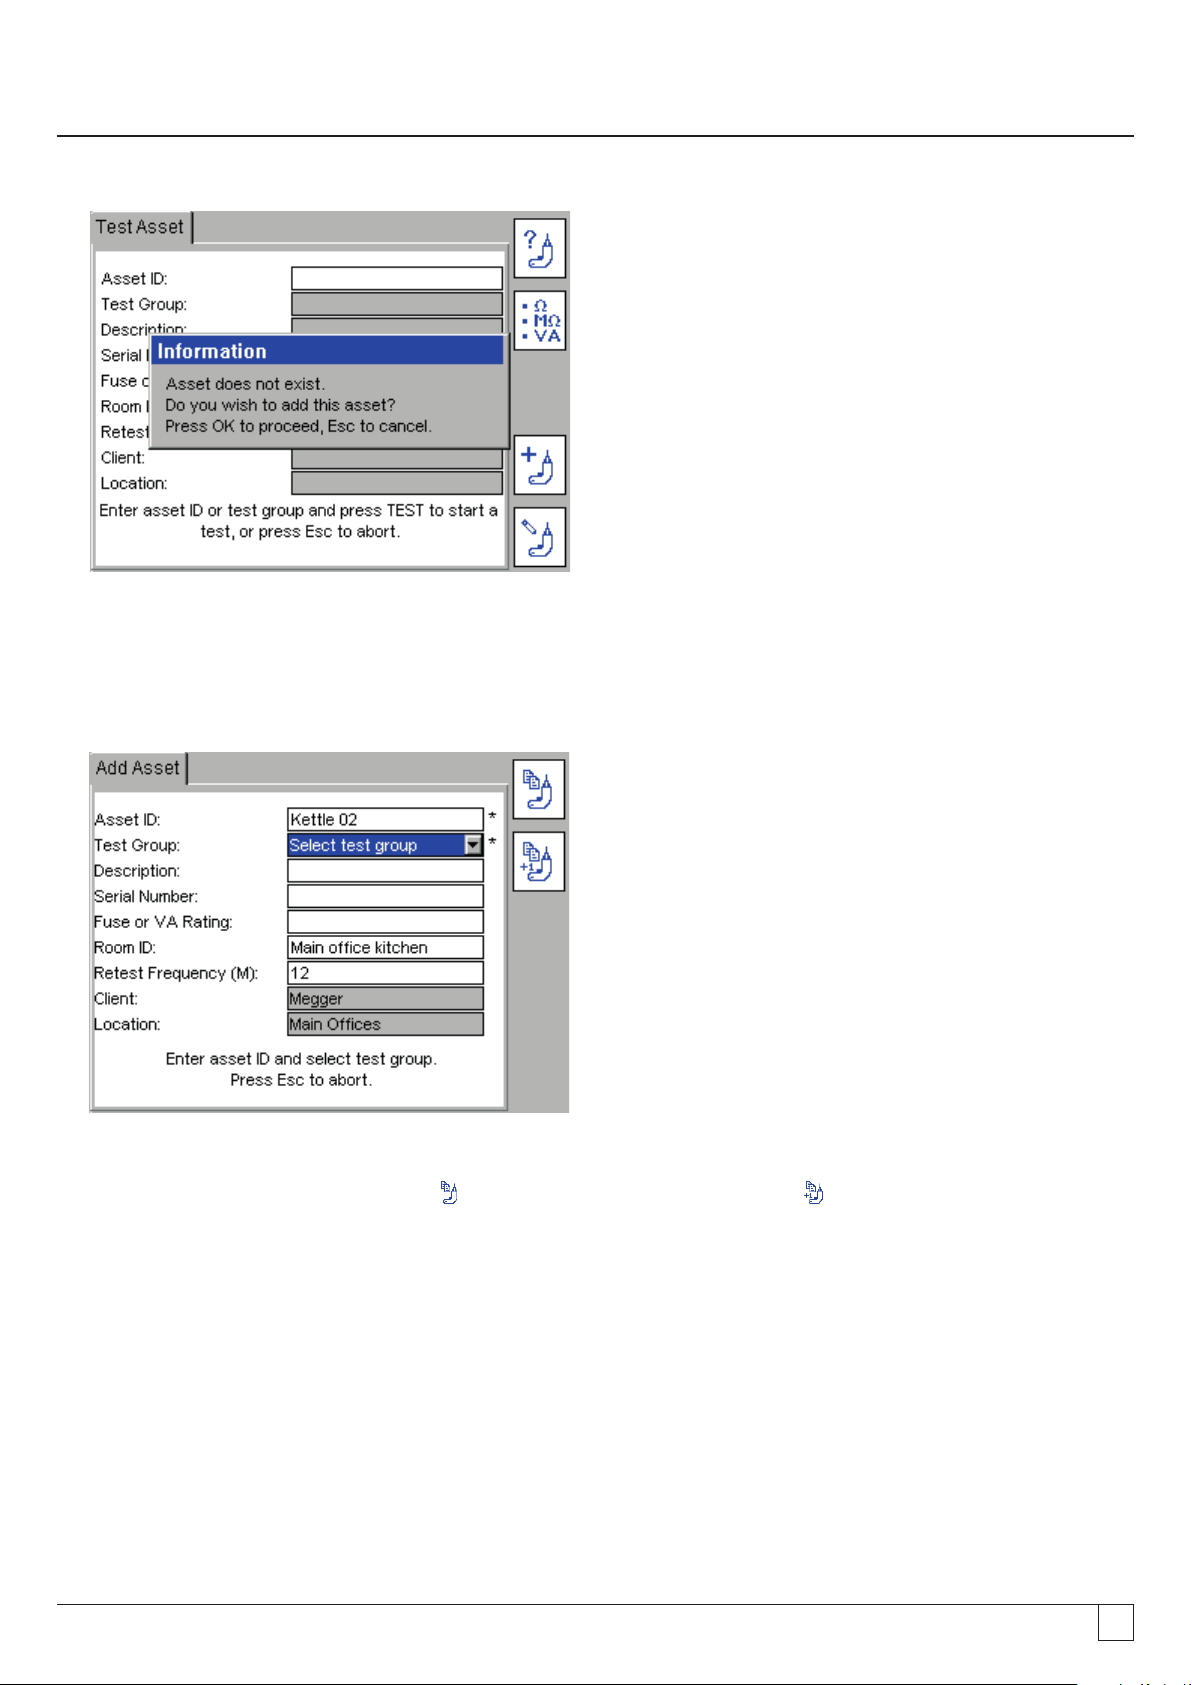
5. Press OK to add a new asset.
6. An Add Asset screen will appear with the Asset ID entered in the previous screen, and the current client name and
location.
If no client and location have been added, these will say “default”.
* Indicates mandatory fields that are required to save the asset data.
Further information on the COPY LAST ASSET
(A new asset ID can be added and saved at this stage, but it is recommended that this is added after testing is completed).
7. Press the DOWN arrow to access TEST GROUPS.
8. Press OK to access the drop down list of test groups.
Hotkey and COPY & INCREMENT ASSET ID Hotkeys can be found in section 5.
www.megger.comPAT400 - Portable appliance tester
21
Page 22

9. Use the UP/DOWN arrows to scroll through the list of test groups and then press OK
Or
Start typing the name of the test group. The cursor will jump to the relevant test groups with that letter or number.
Entering more than one letter will refine the search further. Then press OK.
10. Add any additional data in the available fields as required.
11. Press TEST to commence testing.
12. Go to section 3.3 Test Progress
NOTE: Only a TEST GROUP is required to start testing.
On completion of a test, only Asset IDs and Test groups have to be added before the test is completed.
All other data Is optional.
NOTE: If NO Asset ID is entered, press the Test Group Hotkey
Alternatively press the
scroll down the list to select desired test group and press OK to accept.
NOTE: Pressing the Right arrow key will “Page Down” the list.
Further details on adding assets can be found in section 5.
twice to select the test group drop down box. Press OK to list all test group options,
and type in the test group.
Option 3: Starting a TEST – USING A BARCODE SCANNER
1. From the home page, scan the Asset barcode with the optional barcode scanner.
If the ASSET ID does NOT exist in the PAT database, the PAT will jump to the ADD ASSET screen and the ASSET ID will appear.
1. If the asset information matches the asset to be tested the completed TEST ASSET screen will appear as below:
www.megger.comPAT400 - Portable appliance tester
22
Page 23

Find asset
Search for TEST GROUPS
Press once for direct entry
Press twice for drop down
box.
Add ASSET
Edit ASSET
2. Check the asset information matches the ASSET to be tested. If so, press TEST and go to section 3.3 TEST PROGRESS.
If the asset information does not match the asset to be tested, check the CLIENT is correct.
NOTE: The same ASSET ID can be used for different clients, but one client cannot have duplicate asset IDs.
If the asset ID does not exist the screen will jump to the Add Asset screen and automatically fill the ASSET ID field with the scanned
barcode data.
3. Press the DOWN arrow to move to Test Groups.
4. The TEST GROUP is selected by pressing OK and selecting from a drop down list.
Typing the first letters or numbers of the test group will allow the search engine to jump to those test groups without having to scroll
down the list.
Additional information can also be added, but this is not essential.
NOTE: When scanning an Asset ID that exists in the database under a location that is different to that set in the PATs current status,
a yellow warning indicator will show on the Location field as below. Go to section 10 for additional information on Clients and
locations.
5. Press the TEST button. Go to section 3.3 TESTING PROGRESS for further information on the test sequence.
www.megger.comPAT400 - Portable appliance tester
23
Page 24
3.3 Test progress
The PAT400 displays all tests to be performed within the selected test group.
Each test is run sequentially and the results displayed for each test before proceeding to the next test.
A “FAIL” on any test will prevent further testing for safety purposes.
Test screen example: Class I asset
List of tests in test group
Test results column
Green – Test passed
Test limits column
Amber – Test in progress
Grey – Test pending
Pass limit set for this test
Current test values or
Instructions during the
test sequence
Actual measurement result
Interruption to automatic testing
Testing proceeds automatically unless an action is required from the operator. Follow “on-screen” instructions as they appear.
3.4 Remote probe and clip
Some tests will require the use of the remote probe and clip. These are used where the asset under test has no earth return
(Class II assets). Tests using the remote probe include:
Insulation testing on Class II equipment
Continuity/bond testing on Class I equipment
Touch leakage testing
Differential leakage test on Class II
Substitute leakage on Class II
The PAT400 will instruct the operator when the remote probe needs to be connected.
Example of remote probe application
Class II insulation test (Riso)
Live and neutral are shorted together automatically in the PAT (RED LINK) and a voltage (250 V or 500 V) is applied between the
shorted L/N and the remote probe.
The probe is connected to any metallic locations on the “appliance under test” to ensure there is no breakdown of the insulation.
www.megger.comPAT400 - Portable appliance tester
24
Page 25
PAT Tester Applience
z
z
z
z
L
N
500 V
E
L
N
The insulation test probe is connected to all exposed metal parts to ensure electrical separation from earth.
3.4.1 Test lead resistance null
The resistance of the bond lead can be “nulled” to remove the lead resistance from the measured resistance. This is important when
testing very low resistances where the test limit is set to 0.1ohms.
Also, the resistance of an extension lead (IEC or Power cord) can be nulled, if the lead is longer than the red test lead supplied with
the PAT.
Symbols used:
Test lead null is set
Extension lead adaptor null is set, see section 3.4.2
Both test lead and extension lead adaptor null are set
To null the test lead resistance of a bond lead:
1. From the HOME screen, use the RIGHT arrow key to select the SETUP tab.
2. Press the NULL
Hotkey. The Lead Null screen will appear as below:
www.megger.comPAT400 - Portable appliance tester
25
Page 26

(If a lead null value is already set the lead null symbol z will be displayed)
z
3. Connect the black bond lead between the bond socket and the zero post on the front panel as below:
4. Press the TEST button. The PAT400 will display the value of the test lead as a Null SET value, and display the z
symbol in the top of the screen as below:
The
displayed in the tab row means an extension lead null is also set.
5. To remove the Bond Lead Null select the “Remove Lead Null” and press the TEST or OK button. The symbol will
disappear.
3.4.2 Extension Lead Adaptor Resistance Null
Some tests require using an IEC lead or the short extension lead adaptor supplied with every PAT tester. An example of this is testing a
multiple socket extension lead:
www.megger.comPAT400 - Portable appliance tester
26
Page 27

The resistance of the extension lead adaptor may be removed by performing an extension lead null.
z
1. From the HOME screen, use the RIGHT arrow key to select the SETUP tab.
2. Press the NULL
(If an extension lead null value is already set the lead null symbol will be displayed)
3. Connect the extension lead adaptor between the Mains test socket and the IEC socket on the front panel as below:
4. Scroll down to select “Set Extension Lead Null” on the menu.
5. Press the TEST button. The PAT400 will display the value of the test lead as a Null SET value, and display the º symbol
in the top of the screen as below:
Hotkey. The Lead Null screen will appear with the Set Lead Null option highlighted:
www.megger.comPAT400 - Portable appliance tester
27
Page 28

6. To remove the extension lead null select the “Remove Extension Lead Null” and press the TEST or OK button. The º
symbol will disappear.
www.megger.comPAT400 - Portable appliance tester
28
Page 29
3.5 Short circuit assets
Some assets may appear to the PAT400 to be short a circuit. This can be caused by large inductive loads. In such cases, the following
warning message will be displayed:
Warning: Asset may be short circuit.
Press TEST to continue, ESC to abort
Only if the operator is certain the equipment is not a short circuit, press TEST, otherwise press Esc to abort the test.
3.6 Aborting a test
All tests can be aborted at any time by pressing the TEST button or Esc (escape) button.
3.7 Completion of testing
On completion of testing all test fields should turn green as below. The test results are displayed in the centre column with the pass
limits for that test group on the right.
GRAPHIC
On completion of testing, the following options are available:
Re-test asset using current test group. Warning: test data will not be saved for the previous test.
Repair codes – Allows repair details to be added to asset test results – See section 3.10 below.
Save the test results to memory and print a barcode label (a Megger USB barcode printer must be
connected prior to requesting this function).
Repeat test sequence
Repair codes
Print barcode label & SAVE
results to memory
SAVE results to memory
Save test results to memory and return to the initial screen.
www.megger.comPAT400 - Portable appliance tester
29
Page 30

Go to Section 4 to learn about using the memory, or Section 4.2 Saving a test result to memory.
To return to the HOME screen without saving the results press HOME button.
3.8 Test fail screen
Should an asset fail a test at any stage, the test sequence is stopped and the screen message Asset FAILED is displayed:
Repeat test sequence
Repair codes
Print barcode label & SAVE
results to memory
SAVE results to memory
Example: Asset has failed the bond test.
Pass limit set to ≤ 0.1390 Ω, Measurement recorded at > 1.99 Ω.
The same options are available as an asset that has passed. See Section 3.7 for completion of testing.
3.9 Visual inspection
It is possible to perform a visual inspection only with no further electrical tests.
1. Press OK to Pass and skip electrical test.
If the current test group contains a visual inspection then the visual test popup will appear. This allows the user to log mechanical
faults on the asset under test, such as a broken plug or damaged appliance cord, the Esc key should be used to exit the test sequence
during the Visual Inspection and initiate a Visual Failure, as below:
1. During the Visual inspection option the “Visual Test” will be highlighted in yellow, as below:
www.megger.comPAT400 - Portable appliance tester
30
Page 31

2. Press the Esc key to initiate a Visual Failure. The display will show a Visual Test Failure screen as below:
3. Press OK to pass visual test and stop electrical tests (for visual test only).
4. Three types of information can be entered:
Check boxes Quick entry for standard failure types.
Notes To describe the type of failure.
Repair code See Section 3.10 below.
5. Press the TEST key to complete the test process. The display will now show the TEST FAILED screen.
6. Press the SAVE Hotkey to save the results or the SAVE and PRINT Hotkey to save the results and print a barcode label.
3.10 Repair code
A repair code can be entered at the completion of testing. To enter a repair code:
1. Press the Hotkey
and the following popup appears:
2. Enter any notes as appropriate then press OK, followed by the DOWN arrow.
3. Enter an appropriate repair code. Examples of the repair codes used in PowerSuite are given below:
Code Description Code Description
1 Replace internal fuse. 14 Replace Warning Labels
2 Refit plug 15 Renew 2core 1.00mm2 flex
www.megger.comPAT400 - Portable appliance tester
31
Page 32

3 Refit socket 16 Renew 2core 1.50mm2 flex
4 Replace cable 17 Renew 2core 2.50mm2 flex
5 Renew 415 V 5 pin 16 A 18 Renew 3core 0.75mm2 flex
6 Renew 415 V 4 pin 32 A 19 Renew 3core 1.00mm2 flex
7 Renew 415 V 5 pin 32 A 20 Renew 3core 1.50mm2 flex
8 Renew IEC connector 6 A 21 Renew 3core 2.50mm2 flex
9 Renew IEC connector 10 A 22 Tighten Cord Restraints
10 Renew IEC connector 16 A 23 Replace Control Knobs
11 Replace Main Switch 24 Tighten Case Fixings
12 Replace Fuse Holder 25 Replace Indicator Lamps
13 Replace Missing Screws 26 Replace Case Parts
On completion of the repair code screen press the TEST key to log the changes, then press the SAVE
Hotkeys to store the results.
or SAVE and PRINT
3.11 Cable compensation
A power cord, appliance lead or extension lead will frequently exceed the nominal length and consequently the resistance limit set in
the standard test groups.
Rather than having many test groups with different lead lengths, the “Cable Resistance Calculator” screen allows the limit of a Bond
or Continuity test to be modified after the measurement. On a failed test, entering the length of the lead and the conductor cross
section, the pass limit is adjusted to the correct resistance. The result is then passed or failed, as necessary.
To apply cable resistance calculation:
1. When a continuity or Bond test fails, the screen message alert will be displayed:
2. Press OK to access the Cable Resistance Calculator as below;
OR
Press Esc to fail the Asset and save or abort the results,
OR
Press “R” to re-run the continuity test.
www.megger.comPAT400 - Portable appliance tester
32
Page 33

]
3. Enter the cable Length in metres and the conductor Cross-Section (mm2) OR a Resistance can be entered if this is
known.
4. Press TEST to complete the test. The PAT400 will now proceed to the next test if the resistance was a PASS or to a fail
screen if the resistance was still outside the modified limit.
See also Section A.6 for cable length limitations and RCD protection on long leads.
3.12 WARNINGS
Live asset testing
Running a leakage or load test will operate the asset under test. Some assets, such as vacuum cleaners, disc cutters etc. can draw high
initial load currents (Inrush current). The PAT400 will under these circumstances report that the asset has a short circuit.
If this warning is displayed, it is recommended the following actions are taken:
1. Where possible check the asset does not have a short circuit (the fuse would normally be blown in such
circumstances, prior to it being replaced).
2. Proceed ONLY if you believe the asset is not a true short circuit, but has a high inrush current.
Reversed supply
UK instruments:
The PAT400 will detect a reversed polarity (Phase – Neutral) supply and abort the initialisation.
The display will show the warning:
ERROR 82 - Mains polarity reversed
European instruments:
The instrument will pass initialisation and display the Home screen.
The supply polarity will be shown as “Reversed”.
Supply earth fault
The PAT400 will test for a good supply earth during initialisation. A faulty or missing earth will return the error:
Error 73 – Mains supply Earth Fault
Parallel earth paths
If the PAT400 detects more than one earth path, the warning:
www.megger.comPAT400 - Portable appliance tester
33
Page 34

Unable to verify earth connection,
Parallel paths may exist.
Refer to user guide.
The PAT400 has detected more than one earth path during the Earth continuity, Earth bond, Insulation or Earth leakage tests. Refer to
Appendix A.8 for further details.
Database full
Exceeding the storage capacity of the database will create the following warning:
Error - Database Full. Unable to save data!
Press OK to continue
The test result will NOT be saved.
To free up memory for further test results:
1. Backup the existing database to a USB storage device.
2. Ensure the backup has been successful by confirming on a different PC/device.
3. Delete records from the PAT400.
See Section 4 for further information on PAT400 memory
www.megger.comPAT400 - Portable appliance tester
34
Page 35

4 Using the memory
4.1 Important overview
All records are stored under a “client”. The PAT400 can store up to 100 clients (50 clients on firmware releases prior to 2.20). Each
client can have up to 2000 locations (50 locations on firmware releases prior to 2.20).
There is a maximum of 25000 total locations per database.
The client and locations are configured in SETUP, refer to Section 10.
The PAT400s are shipped with the client and first location set to “default”. All results will be stored under this “default” client
and location unless changed in SETUP.
These can be left as default, but it is recommended these are changed to the name of the client and location of the test site. See
Section 10.
Assets are stored with a minimum of an “Asset ID”, and a “Test Group”.
A client CANNOT have duplicate Asset IDs, even if they are in several locations. However the same Asset ID can be used for different
clients.
Test results are stored and referenced to an Asset ID. The internal memory will store up to 10000 test results.
Entering an asset ID that already exists in the current client will generate a “duplicate asset ID” warning. Change the asset ID then
press save.
Assets can be saved to memory before or after testing. The add asset screen is shown below:
COPY last ASSET
COPY last ASSET and
Increment Asset ID
SAVE results to memory
www.megger.comPAT400 - Portable appliance tester
35
Page 36

Definitions of fields
Field Limit Description
Asset ID:* 10000 Unique number or combined letters and numbers. Enter by typing from the
keyboard or scanning a barcode. Separate clients can use the same ID. But one
Client cannot have two identical Asset IDs.
Test Group:* 100 Drop down box of available test groups. Press OK to access list, DOWN/UP arrow
to select and OK to enter.
Description: --- General description of asset (Cooling fan, hand drill etc).
Serial Number: --- The manufacturer’s serial number.
Fuse or VA Rating --- Fuse fitted to the mains plug (or internal fuse if using continental plugs); or VA
Rating of Asset
Room ID: --- Location of asset to room level.
Retest Frequency (M): --- Repeat test frequency in months. The default is set to 12 months
Client:* 1001 Customer’s name – This is created in SETUP.
Location:* 20001 Site details. Each client can have multiple locations – This is created in SETUP.
*Fields marked with (*) are mandatory fields. Data cannot be saved unless these are completed.
NOTE: Spaces can be saved as a Client or Location, but appear as blank fields when reviewed in Asset data
4.2 Saving a test result
On completion of a test sequence, the message “asset PASSED” and the SAVE key will appear.
1. Press the SAVE Hotkey
save.
Press (SHIFT) + (SAVE + PRINT) simultaneously to print a double length label for wrapping cables
2. If no Asset ID was entered before testing started, the asset screen will be displayed as below. The test group will
already be set, as this was selected when the test was run.
or press the SAVE and PRINT (a barcode label) Hotkey to print a barcode label and
3. Enter the Asset ID.
This can be via the keyboard or scanned in by barcode scanner.
If an Asset ID already exists in memory, a “duplicate Asset ID” warning will be displayed. In this case, enter a different
Asset ID number.
www.megger.comPAT400 - Portable appliance tester
36
Page 37

Examples of Asset ID formats: (Asset IDs are limited to 20 characters)
0001, 0002, 0179, 7082
MEGGER0001, MEGGER0002
AA0001, AA0002, BF0001, F0002
4. Press OK
5. Press the DOWN arrow and complete the additional asset data as required. Test Group, Client and Location cannot
be changed in this screen.
NOTE: Refer to retest data section 5.1
6. When completed, Press the SAVE
location.
To abort an “Add Asset” page, press Esc or HOME key. A warning will appear asking to confirm you wish to exit without saving data.
To edit asset information go to section 6.
Assets can be saved to memory after they are tested, as above, or before any testing starts.
Copying a previously added asset using the COPY ASSET
Section 5.2.
Alternatively: Asset data can be loaded from PowerSuite via a USB stick, Section 7.2.
Hotkey. The asset will be added to the memory under the current client and
SAVE results to memory
Hotkey or COPY ASSET AND INCREMENT ASSET ID Hotkey in
www.megger.comPAT400 - Portable appliance tester
37
Page 38

5 Adding assets to memory
5.1 Adding assets to memory before testing
1. From the HOME screen, press the ADD ASSET Hotkey. The following empty asset screen will appear:
COPY last ASSET ASSET
COPY last ASSET and
Increment Asset ID
2. Enter an ASSET ID, using the keyboard, or barcode scanner.
3. Select a TEST GROUP from the drop down list.
4. Completion of the remaining asset fields is optional.
SAVE results to memory
5. Press the SAVE
and return to the HOME screen.
Hotkey. The asset data will be saved to memory. The screen should display the SAVED message
6. Retest periods.
The asset screen of the PAT400 now supports retest periods.
In the ADD ASSET screens the ‘Retest frequency (M) window is available. This accepts a retest period in months, from 1 to 200
months. The default is 12 months.
www.megger.comPAT400 - Portable appliance tester
38
Page 39

Retest frequency
1 – 200 Electrical retest frequency in months
201 – 228 Visual and Combined retest (Lookup table)
Using retest frequencies from 201 to 228 include a VISUAL and Combined test, as per the table below.
Test frequency
code
201 Weekly 1 Month 216 3 Months 12 Months
202 Weekly 3 Months 217 3 Months 24 Months
203 Weekly 4 Months 218 3 Months 48 Months
204 Weekly 6 Months 219 4 Months 6 Months
205 Weekly 12 Months 220 4 Months 12 Months
206 Weekly 24 Months 221 4 Months 24 Months
207 Weekly 48 Months 222 4 Months 48 Months
208 1 Month 3 Months 223 6 Months 12 Months
209 1 Month 4 Months 224 6 Months 24 Months
210 1 Month 6 Months 225 6 Months 48 Months
211 1 Month 12 Months 226 12 Months 24 Months
212 1 Month 24 Months 227 12 Months 48 Months
213 1 Month 48 Months 228 24 Months 48 Months
214 3 Month 4 Months
215 3 Month 6 Months 229 - 255 Un-used Un-used
Example: Creating a Comma-Separated-Variable (CSV) file where the retest frequency entered is 210, will create a visual retest date of
1 month and a ‘Combined inspection and test’ period of 6 months in the appropriate columns.
Visual inspection Combined
inspection and
test
Test frequency
code
Visual inspection Combined
inspection and
test
The Barcode PASS label retest date is calculated using the ‘Combined inspection and test’ period, not the visual test period.
5.2 Copying the previously added asset
1. From the HOME screen, press the ADD ASSET Hotkey. The following empty asset screen will appear:
www.megger.comPAT400 - Portable appliance tester
39
Page 40

2. To recall the last asset to the screen press the COPY ASSET Hotkey. This will recall the last asset added to the
database of the current Client. The Asset ID will be highlighted in red, indicating it must be changed to a unique ID
for that client.
3. Change the Asset ID. The SAVE Hotkey becomes available after the ASSET ID has been changed.
Or
To recall the last Asset to the screen and increase the Asset ID by one, press the COPY and INCREMENT Asset ID
Hotkey.
4. Change any other asset information as necessary.
5. Press the SAVE
All asset data can be edited or deleted as required. For deletion of Test Groups see section 8.
For deletion of Client and Locations see section 10.
Hotkey to save the ASSET to memory.
www.megger.comPAT400 - Portable appliance tester
40
Page 41

6 Editing and deleting assets and results
6.1 Editing asset data
1. From the HOME screen, enter the SETUP menu option by pressing the RIGHT arrow key.
2. Press the EDIT ASSET Hotkey. The EDIT ASSET screen should be displayed.
Enter an Asset ID to be edited. Alternatively, to list the assets in the database, press the FIND ASSET
drop down box:
Assets are sorted alphanumerically in ascending order.
Press the OK key and then the DOWN arrow to scroll through the list, or use the RIGHT arrow key to page through the list. Or
Type the desired Asset ID to jump to the matching item in the list. The search engine will find the closest match as you type.
Hotkey. This will produce a
www.megger.comPAT400 - Portable appliance tester
41
Page 42

Note: The first 2000 Asset IDs are loaded into the drop down list. To access the next 2000 assets, press and hold the RIGHT ARROW to
scroll down to the bottom of the first 2000 assets. Select ‘Next…’ from the bottom of the list. The Asset ID list will now load the next
2000 assets.
Or
Where available type ‘next…’to jump to the end of the list or ‘previous’ to jump to the start of the list.
3. Edit the asset details as required and press the SAVE key to store changes.
NOTES: To move the location of an asset, simply change the location in the Location list.
It is not recommended to change the Client. Changing the Client will also change the appropriate asset list. However on exiting this
screen the Client will revert to the original Client prior to any changes made here.
6.2 Deleting assets
1. From the HOME screen, use the RIGHT ARROW key to select the SETUP tab.
2. Press the EDIT ASSET
3. Scroll down the Asset ID field as in 6.1 above. When the required asset is displayed, press the DELETE
Hotkey. The EDIT ASSET screen should be displayed.
Hotkey.
www.megger.comPAT400 - Portable appliance tester
42
Page 43

4. A screen message to confirm the deletion is displayed.
5. Press OK to confirm or Esc to abort.
WARNING: The asset and its associated test records will be deleted. This deletion is not reversible.
For Deletion of Clients and Locations see Section 10.
www.megger.comPAT400 - Portable appliance tester
43
Page 44

7 DATA – Test results and data transfer
Data storage – backup and restore
The PAT400 can store up to 10000 electrical assets with associated test records. Megger STRONGLY RECOMMEND this data is backed
up frequently.
MEGGER CANNOT ACCEPT RESPONSIBILITY FOR ANY LOST DATA HOWEVER CAUSED.
The backup and recall operations are extremely fast. 10000 records can be backed up to a USB stick in <20 seconds. Smaller
databases are significantly faster.
The file format for data backup is a db file. DO NOT ATTEMPT TO EDIT THIS FILE. Corruption of this file prevents further transfer back
to the PAT400 or to PowerSuite.
Test results can also be exported to a CSV (comma separated value) file. This can be viewed with Microsoft Excel.
DO NOT SWITCH OFF THE PAT400 DURING THE USB OPERATION!
WARNING: Importing or restoring a file will overwrite the existing assets, results, test groups, clients and
locations in the database.
Always ensure existing data has been backed up prior to importing new data
Important:
Do not connet the PAT400 directly to your computer using a USB cable unless instructed to do so!
Direct wired connection for service and firmware update only.
USB memory stick for all data communication including downloads, uploads, back-up and restore.
The PAT400 provides a convienient method of downloading and uploading data using a USB memory stick.
The two USB type 'A' ports on the PAT400 are used for data transafer by USB memory stick and are also used for connecting devices
such as barcode scanner and printer.
The single USB type 'B' port is for servicing and product firmware update only. it is important that the corrcet drivers are installed on
the host computer BEFORE the PAT400 is connected to it.
For registered users, further information and product firmware updates are avaliabel from:
www.megger.com
.
www.megger.comPAT400 - Portable appliance tester
44
Page 45

7.1 Backup to USB memory stick
If the USB device is not recognised the following message will be displayed.
This error can be caused by a faulty USB stick. Replace the USB stick with another type and try again. Note: A USB stick may take a
few seconds to be recognised by the PAT400.
1. Connect a USB stick to either of the type A USB sockets on the front of the PAT400. ‘Type A’ USB
2. Use the RIGHT ARROW to select DATA in the main menu options.
3. Use the DOWN arrow to select “backup to USB” and press OK.
socket.
www.megger.comPAT400 - Portable appliance tester
45
Page 46

4. Enter the name of the file you wish to create. The file name can be up to eight characters, A to Z and 0 to 9. Do not
use any other characters.
5. Press OK to initiate backup. If the file name clears without backup starting, the file name contains excluded
characters.
Only 0 to 9 and A to Z should be used.
6. On completion the display will show the message “Backup complete”. There are no limits to the number of times
you can back-up a database. The stored file is a “.db” file. Do not attempt to edit this file as this can corrupt the data
and prevent further use of that file.
7.2 Importing / restoring data from USB memory stick
Importing data from PowerSuite to the PAT400 or restoring data from a saved file are the same. The file must be in a .db format and
located in the root directory of the memory stick. This would either have been created by the PAT400 as a backup file or created from
PowerSuite for import into the PAT400.
1. Connect a USB stick (containing the .db file) to either of the Type A USB sockets on the front of the PAT400
(Type A’ USB socket).
2. Select the “Restore From USB” option in the DATA menu, as below:
www.megger.comPAT400 - Portable appliance tester
46
Page 47

WARNING: Importing or restoring a file will overwrite the existing assets, results, test groups, clients and
locations in the database.
3. Press OK to continue.
4. The PAT400 will search for any database files in the root directory. A drop down box appears.
Press the OK key and then the DOWN arrow to scroll through the list, or use the RIGHT arrow key to page through
the list.
Or
Type the desired file name to jump to the matching item in the list. The search engine will find the closest match as
you type.
5. Press OK to accept the file for import or restore. The PAT400 will display a message:
WARNING: This operation over writes all current data. Are you sure you want to proceed? Press OK to
confirm, ESC to continue.
6. Press OK to accept the file for import/restore.
www.megger.comPAT400 - Portable appliance tester
47
Page 48

7. The file will be imported. On completion a message will be displayed and the buzzer will sound.
NOTE: Databases restored from previous firmware versions will be automatically upgraded. Once upgraded, the database will no
longer be compatible with older firmware versions. To maintain compatibility between multiple PAT400s upgrade all PATs to the same
firmware version.
Databases restored from different PAT models may have tests that are incompatible with the model being imported into. For example
a PAT450 can have Bond testing setup, where PAT410 models do not have this test. In this case the test will be skipped during testing.
7.3 Export results to CSV
Assets and test results can be exported to a CSV file format. This file can be opened with a CSV viewer.
To export data and test results to CSV:
1. Connect a USB stick to either of the Type A USB sockets on the front of the PAT400.
2. Select Export Results to USB and press OK. The following screen will appear.
3. Enter a name for the CSV file. Up to 8 characters can be used. Use letters and/or numbers. Press OK when ready.
4. The CSV file will be saved to the USB memory stick. On completion the following message will be displayed and the
buzzer will sound.
www.megger.comPAT400 - Portable appliance tester
48
Page 49

NOTE: Exporting large amounts of data to CSV can take a significant time to complete. Once started a CSV export cannot be aborted.
7.4 Accessing test results
Test results for each asset can be viewed through the View Results menu option of the DATA tab as below. Only test results belonging
to the current Client and Location can be viewed.
To view a test result:
1. From the HOME screen, use the RIGHT ARROW key to select the DATA tab.
2. Use the DOWN arrow to select VIEW RESULTS and press OK
The ‘View Test Results’ screen will be displayed as below
3. Enter the Asset ID or press the FIND ASSET
seconds.
ADD asset
EDIT
Hotkey. If there are a large number of Assets IDs, this may take a few
www.megger.comPAT400 - Portable appliance tester
49
Page 50

4. When the desired Asset ID has been found, Press OK to accept. The VIEW TEST RESULTS Hotkey will appear as
below
VIEW TEST RESULTS.
5. Press the VIEW TEST RESULTS
6. To exit this screen press HOME or Esc.
NOTE: Barcodes can be printed by using the PRINT BARCODE
Hotkey. The Test Results screen will be displayed for that asset as below.
Hotkey
www.megger.comPAT400 - Portable appliance tester
50
Page 51

Printing barcode labels
Duplicate barcode labels can be printed from the VIEW TEST RESULTS page. This allows replacement of labels if they are damaged or if
multiple labels are required for an asset.
To print a barcode label:
1. Enter the Test Result screen as above.
2. Ensure the Brother P700 barcode label printer is switched on and connected to the USB port of the PAT400.
3. Press the PRINT BARCODE
4. If the PLite LED on the Brother P700 printer is illuminated, hold down the PLite button for 2 seconds to deactivate.
5. Press (SHIFT) + (PRINT) simultaneously to print a double length label for wrapping cables.
NOTE 1: A Brother P-Touch 2430PC or P700 must be connected to print a barcode label.
NOTE 2: A Zebra TLP-2824 plus printer is compatible for Australia only. Zebra printers can accept company logo’s (see Zebra software
provided with printer).
For the P-Touch 2430PC, before connecting the printer to the PAT400, the MODE switch located on the rear of the printer MUST be
switched to the lower “E” position. If “EL” is selected, communication will not be established and the PAT400 will report the error
message: “PRINTER NOT CONNECTED”
NOTE 3: Test and retest dates printed on cables are optional – parameters are set in the client setup screens.
NOTE 4: The PLite button on the Brother P700 printer must be deactivated to print labels from the PAT400. If the PLite button is
activated, communication will not be established and the PAT400 will report the error message: “PRINTER NOT CONNECTED”
Hotkey.
www.megger.comPAT400 - Portable appliance tester
51
Page 52

8 Test groups
Overview of test groups
Test groups are used to simplify the testing of an asset. A test group is a collection of tests that when run, perform all the tests
allocated to that test group.
The PAT400’s are shipped with a range of test groups for the majority of electrical equipment that will require testing, as detailed
below. Additional test groups can be added up to a limit of 100. Existing test groups can be edited or deleted as required.
8.1 Creating a test group
1. From the HOME screen, use the RIGHT ARROW key to select the SETUP tab.
TEST GROUP MANAGER
2. Press the TEST GROUP MANAGER
3. Press the ADD
NOTE: If the number of test groups reaches 100, the ADD
4. Complete the fields as required.
Hotkey to add a new test group. The Add Test Group screen will appear.
Hotkey
Add a TEST
Edit TEST GROUP
Delete a TEST GROUP
Hotkey will change to a
100%
Icon.
www.megger.comPAT400 - Portable appliance tester
52
Page 53

An example of a typical standard Class I test may look like
Definitions of fields:
NAME: Test group name. This can be up to 10 characters
DESCRIPTION: Text string - Keyboard or Barcode entry
SUPPLY: Asset operating voltage.
VISUAL: Check box
EARTH BOND Check box – configuration options available on second page
CONTINUITY Check box – configuration options available on second page
INSULATION Check box – configuration options available on second page
POLARITY Check box – configuration options available on second page
CLASS Drop down box. This is required so the instrument knows which
test connectors are to be used.
Options - Class 1
Class 2
EXT
FLASH Check box – configuration options available on second page
LEAKAGE Check box – configuration options available on second page
LOAD Check box – configuration options available on second page
RCD Check box – configuration options available on second page
The fields with an * shown in the screenshot require mandatory data. They cannot be left blank.
www.megger.comPAT400 - Portable appliance tester
53
Page 54

5. When complete, press the NEXT PAGE Hotkey. The test options for each of the selected tests will appear as
below:
6. Set the pass limits, test times and cycle settings for each selected test as required. The default settings will be shown.
Use the UP/DOWN arrow keys to navigate the screen. All options are drop down boxes. Press OK to access each
drop down list.
7. On completion press the SAVE
8. The test group can now be allocated to one of the test group HOT KEYS.
Hotkey.
8.2 Allocating test groups to Hotkeys
Test groups can be allocated to one of four TEST GROUP Hotkeys on the HOME screen.
To allocate a test group:
1. Press one of the four TEST GROUP Hotkeys
2. A list of test groups numbered 1 to 9 will appear. Blank fields indicate a number that has not yet been allocated a
test group.
.
Class I
Class 2
Power cord / Extension lead
Using the DOWN ARROW, navigate to the desired row (1 – 9) as below:
RCD
Add asset
www.megger.comPAT400 - Portable appliance tester
54
Page 55

Press OK to access the drop down list of available test groups.
3. Select the required TEST GROUP and press OK. The TEST GROUP will be allocated to the selected field.
NOTE: The TEST GROUPS can be freely allocated to any of the nine fields and in any of the four Hotkeys. If desired a CLASS I TEST
GROUP can be allocated to the RCD Hotkey for example
www.megger.comPAT400 - Portable appliance tester
55
Page 56

8.3 Editing a test group
Each test group can be edited or deleted
WARNING: When restoring a database the test groups will also be overwritten. Always backup your test data
before restoring a database.
To edit a test group:
1. From the HOME screen use the RIGHT ARROW key to select the SETUP tab.
2. Press the TEST GROUP
3. Press the EDIT TEST GROUP
4. Press the OK button to access the drop down list.
Hotkey.
Hotkey.
Select the test group to be edited and press OK to accept.
The test group settings can be adjusted and saved as per the test group ADD function above.
WARNING: Changing a Test Group will affect all assets that use that test group.
www.megger.comPAT400 - Portable appliance tester
56
Page 57

8.4 Deleting a test group
To delete a test group:
1. From the HOME screen use the RIGHT ARROW key to select the SETUP tab.
2. Press the TEST GROUP MANAGER
3. Press the DELETE
4. Press OK to activate the drop down list. Select the required test group then press OK.
5. Press the DELETE
Hotkey.
Hotkey.
Hotkey.
Delete
6. The display will ask for confirmation that the test group is to be deleted.
7. Press OK to accept, Esc to exit.
NOTE: A test group cannot be deleted whilst there are assets in the database that are using that test group.
8.5 Repeated Tests
It is possible to create test groups with repeated Bond, Continuity, Insulation and Flash tests. An example screen is shown below.
Repeated tests are setup by choosing an option in the Cycles column. Bond and Continuity test have the ability to be repeated a set
number of times (1 to 10) or repeated indefinably by choosing the ∞ symbol.
www.megger.comPAT400 - Portable appliance tester
57
Page 58

For example you may wish to test a multi way extension lead which has 4 sockets. In this case you would set the Bond Cycles option
to 4, this will automatically perform 4 Bond tests and record the worst Bond resistance.
An example screen is shown below:
If a Bond or Continuity test fails then the user is always allowed to repeat the test. If the test is repeated then the failed result is
disregarded. You may wish to repeat a test in this way if the test probe did not make proper contact with the appliance.
Insulation and Flash tests can also be repeated by selecting the
appliances that have multiple exposed conductive areas.
∞ symbol in the Cycles column. This feature is convenient for testing
www.megger.comPAT400 - Portable appliance tester
58
Page 59

9 Quick test - QT
The Quick Test (QT) key provides instant access to continuity, bond, insulation, leakage, RCD, load (Operational) and flash testing,
without having to create a test group.
NOTE: Some tests shown below may not be available, depending on the instrument being used.
9.1 Running a quick test
1. Press the QT key on the keyboard. The display will show a numerical list of options.
Example of QT screen options for a PAT450
2. Press the number key associated with the test you wish to run. Example - Earth Leakage
NOTE: Where a test has several options, such as Earth Leakage, a sub menu of options will appear.
3. Navigate through the sub-menu options if available.
4. Press OK or TEST key to start testing.
5. Follow on-screen instructions as necessary.
On completion of the test the final measurement will be displayed.
Quick test times can be changed in SETUP. Refer to section 10.4.
www.megger.comPAT400 - Portable appliance tester
59
Page 60

10 SETUP menu options
The SETUP menu options allow changes to the instrument configuration that cannot be accessed by Hotkeys.
10.1 Clients
The PAT400s are shipped with the CLIENT and LOCATION set to DEFAULT. This can be changed, or additional clients and locations can
be added, edited or deleted.
The DEFAULT CLIENT and LOCATION can only be deleted after other additional CLIENTS AND LOCATIONS are added.
Adding Clients
1. Select CLIENT from the SETUP menu and press OK.
2. The Client screen will be displayed with the ADD, EDIT and DELETE Client Hotkeys as below:
3. Select the ADD Hotkey to add a new Client to the database.
4. Complete the text fields with the necessary Client information.
Client Name is mandatory; once it has been saved the name cannot be changed. Additional data is optional.
5. On completion, press the SAVE
Hotkey.
6. The display automatically jumps to the ADD LOCATION screen.
7. Add the location details. Only Location name is mandatory.
www.megger.comPAT400 - Portable appliance tester
60
Page 61

8. On completion, press the SAVE Hotkey.
A new CLIENT and LOCATION has been added to the database.
The current CLIENT and LOCATION has been updated to the new CLIENT and LOCATION automatically.
Editing and Deleting Clients
This function should be used to change the details of a Client. If you wish to change to a different client, go to Section 10.1.3 below.
Edit Client:
1. Select CLIENT from the SETUP menu and press OK. In the Client screen select the EDIT
2. Select the desired Client then change the details as required.
Print Test Yes or No
Re-Test Yes or No
Hotkey.
After the details have been changed press the SAVE
hotkey.
www.megger.comPAT400 - Portable appliance tester
61
Page 62

Delete Client:
WARNING: Deleting a Client will also delete all assets, locations and test results associated with that
Client
1. Select CLIENT from the SETUP menu and press OK. In the Client screen select the DELETE hotkey.
2. Select the desired Client.
3. Press the DELETE hotkey.
4. A popup message will ask you to confirm.
Changing Clients
To change between different Clients in the PAT400:
1. From the SETUP tab press the SELECT CLIENT
Hotkey.
2. Press the OK key to open the drop down list. Select the desired Client and press OK.
3. Press the SAVE
4. The display will now change to the SELECT LOCATION screen.
Select the appropriate Location from the drop down list.
Hotkey to store the change.
www.megger.comPAT400 - Portable appliance tester
62
Page 63

5. Press OK to accept the new location.
6. Press the SAVE
Hotkey to store the change.
10.2 Locations
Up to a maximum of 2000 locations can be added for each client. Firmware revisions earlier than 2.2 were limited to 50 locations per
Client.
Adding Locations
NOTE: Ensure you have changed to the Client you want to associate this location with before you add a new location. Locations are
Client specific, you cannot change the name of the Client.
1. Select LOCATION from the SETUP menu and press OK.
The Location screen will be displayed with the Add, Edit and Delete Location Hotkeys as below:
2. Select the ADD Hotkey to add a new Location to the current Client.
3. Complete the text fields with the necessary Location information. Only the Location name is mandatory.
www.megger.comPAT400 - Portable appliance tester
63
Page 64

4. On completion, press the SAVE Hotkey.
Editing and Deleting Locations
Edit Location:
1. Select LOCATION from the SETUP menu and press OK. In the Location screen select the EDIT Hotkey.
2. Select the desired Location then press the NEXT PAGE
3. Change the Location details as required. It is not possible to change the associated Client.
Hotkey.
4. After the details have been changed press the SAVE hotkey.
Delete Location:
WARNING: DELETING A LOCATION WILL ALSO DELETE ALL ASSETS AND TEST RESULTS ASSOCIATED WITH
THAT LOCATION.
1. Select LOCATION from the SETUP menu and press OK. In the Location screen select the DELETE hotkey.
www.megger.comPAT400 - Portable appliance tester
64
Page 65

2. Select the desired Location then press the NEXT PAGE Hotkey.
3. Press the DELETE Hotkey.
4. A popup message will ask you to confirm.
www.megger.comPAT400 - Portable appliance tester
65
Page 66

5. Once the current location has been deleted, the instrument will ask you to choose or add a new location.
6. To select drop down of available locations for the current client, press OK. select new current location and press save.
Changing Locations
You may only change to a Location in the current client.
1. In the SETUP tab press the SELECT LOCATION
2. Select the desired Location and press OK.
3. Press the SAVE Hotkey to store the changes.
Hotkey.
10.3 Company
The Company page provides data entry for the testing company to add their company details to the PAT400.
The “Label Text” is a field that is used to add text to printed labels. For example you may wish to add the testers name to a label. This
field appears at the top of the barcode label.
1. From the HOME screen, enter the SETUP menu option by pressing the RIGHT arrow key.
www.megger.comPAT400 - Portable appliance tester
66
Page 67

2. Select Company from the menu options and press OK.
3. Enter the Company details; all of these fields are optional.
4. Press the SAVE Hotkey to store the changes.
10.4 Quick test configuration
QUICK TESTS are available to aid in commissioning and repair of electrical equipment. The QUICK TEST keys allow direct access to
individual tests without the need to use test groups.
The test times of the QUICK TESTS can be adjusted independently of test groups.
Test times can be adjusted for the following tests:
Insulation test
Bond test
Load (Operational) test
Leakage test
To adjust the QUICK TEST time settings:
1. Select QUICK TEST KEYS from the SETUP menu options.
www.megger.comPAT400 - Portable appliance tester
67
Page 68

2. Press OK to display the Quick Test Config screen.
3. Navigate to the desired field to adjust the test time.
4. Press ESC or Home to save and exit.
10.5 Date / Time settings
To change the Time or Date settings:
1. From the HOME screen, enter the SETUP menu option by pressing the RIGHT arrow key.
2. Use the DOWN arrow to select Date/Time as below:
3. Press OK to accept.
4. For DATE settings, use LEFT/RIGHT arrow keys to select the field to be changed. Enter the desired values using the
keyboard.
www.megger.comPAT400 - Portable appliance tester
68
Page 69

5. For TIME settings, use the DOWN arrow key to select TIME, then the LEFT/RIGHT arrow keys to select the fields to be
changed. Again, enter the desired values using the keyboard.
6. Press the save Hotkey to accept changes.
10.6 Changing Language
1. From the HOME screen, enter the SETUP menu option by pressing the RIGHT arrow key then select LANGUAGE as
below:
www.megger.comPAT400 - Portable appliance tester
69
Page 70

2. Press the OK key and the language selection screen will be displayed.
3. Use the UP/DOWN arrow keys to select the required language.
4. Press OK to save.
10.7 Restoring default settings
WARNING: Restoring factory default settings will overwrite all stored data and settings. Stored data will
be lost. Megger strongly recommend backing up all data prior to restoring factory settings. Backups can be
restored if necessary.
To restore the PAT400 to the factory shipped configuration
1. From the HOME screen, enter the SETUP menu option by pressing the RIGHT arrow key then select DEFAULT
SETTINGS option as below:
Existing records and test groups should be backed up prior to restoring factory settings.
www.megger.comPAT400 - Portable appliance tester
70
Page 71

2. Press OK to access the Restore Defaults screen.
3. Press OK to proceed, or Esc to abort.
4. A popup message will ask you to press Y to confirm restore to defaults.
5. The PAT400 will then reboot with the default settings.
www.megger.comPAT400 - Portable appliance tester
71
Page 72

10.8 ABOUT - PAT400 software version and Megger contact details
To select the product information and Megger contact details:
1. Using the RIGHT ARROW key, select SETUP in the top menu option, then the DOWN arrow to select ABOUT option.
2. Press OK to access the ABOUT screen.
3. To exit the ABOUT screen press Esc.
www.megger.comPAT400 - Portable appliance tester
72
Page 73

11 PAT400 Users, levels and access settings
The PAT400 includes the following features:
Multiple user accounts
Login (PIN) facilities
Security levels (Supervisor/User)
Experience levels (Expert/Novice mode)
The user functionality is located under the “Users tab” in the menu options as below:
11.1 User names, account status and Login
The PAT400 supports single or multiple operators. Each operator can be allocated a User Name (mandatory) and a PIN (optional) and is
referred to as an “ACCOUNT”.
There is a maximum limit of 100 accounts.
Each account name is limited to 25 characters.
When used with the barcode printer (optional accessory - Appendix D) the user account name will appear on the printed barcode
label.
PIN numbers are fixed at 4 numbers, using only numbers 0 to 9.
For territories such as Australia, users can enter their licence number, which is printed on barcode labels when using the Zebra printer.
An account can have “Supervisor” or “User” status. See Managing Accounts section 11.3.
An account can have “Expert Options” privilege. When this mode is enabled in the “Expert Options menu, all “advisory messages”
are removed during the testing sequence which consequently reduces test times. See Managing accounts section 11.3.
There must always be a minimum of one account. This account will always have “Supervisor” status.
The PAT400 is shipped with one account with the User name “default” as shown in the Home page below.
PIN password is not enabled on the PAT400 as shipped from the factory. This allows the PAT400 to power up and the operator to start
testing without the need for any configuration or Log in.
The default account can be changed or additional accounts added as required, see sections 11.3 Managing accounts, 11.3.4 Adding
Accounts and 11.3.5 Deleting accounts.
www.megger.comPAT400 - Portable appliance tester
73
Page 74

Username:
This can be changed as
required Additional users can
be added Maximum field
length - 30
User status:
Indicates the level of control
and configuration available to
the operator.
11.2 Power Up and Log in/Log out options
Factory default Power-up
When powering up the PAT400 for the first time there is no need to log in.
Unless a PIN is added or additional accounts created, the Login/Logout option is not enabled.
Power up and Login with PIN enabled
Unless an operator logs out of the PAT400, the operator will remain logged in, even when the PAT400 power is removed.
The default account may be PIN protected, see section 11.3.3 how to add PIN protection.
If the default account has a PIN protection, on powering up the PAT400 will display the log in screen as below, assuming the operator
has previously logged out of the PAT400. Otherwise the Warning screen will be displayed.
See section 11.3.3 for additional information on using PIN protection.
1. Switch on the PAT400.
2. Enter the PIN for this account and press the
3. The PAT400 will display the warnings screen. If the wrong PIN is entered, the display will show the warning:
Hotkey.
“Incorrect PIN entered”
Retry with the correct PIN.
www.megger.comPAT400 - Portable appliance tester
74
Page 75

4. Successful log in will then display the “Warnings” screen. Press OK to indicate you have read and understood the
warnings.
5. The PAT400 will display the HOME screen.
Power-up and login with multiple accounts
To add a PIN to the “default” account, see section 11.3.3 Using PIN numbers.
If additional accounts have been created, on power up the login screen will display the login screen
1. The screen will show the last “Username” that was logged into the PAT400
2. Enter the PIN for the “Username” shown, and press the Hotkey and go to (5) below,
Or
Press the UP arrow to highlight the Username field and press OK to show the drop down box of Usernames.
3. Use the UP/DOWN arrows to select the required User name and press OK.
4. Enter the PIN for the new “Username” and
5. Press the
Hotkey.
www.megger.comPAT400 - Portable appliance tester
75
Page 76

Logging Out & Power down
Unless the operator has logged out of their account on Power-down, the operator will remain logged in to the PAT400 on Power-up.
To log out of an account either:
1. Press the RED power OFF button. The display will show the Message:
“It is now safe to remove power”
“You will be logged out”
2. Remove power from the PAT400 (see note).
Or
1. Go to the “Users” menu and select Login/Logout (see note).
2. Press OK. The operator will be logged out. The PAT400 will display a Login screen.
3. Remove power to the PAT400.
NOTE: With a Default only account and no PIN set (as shipped from the factory) the Login/Logout options are not available
11.3 Managing accounts
Supervisor and User status
The PAT400 has two levels of account status, Supervisor and User. The account status is set when creating or editing an account:
1. Supervisor status – Supervisor box checked
An account with “Supervisor” status has unlimited access to all functionality and configuration of the PAT400.
Any account with “Supervisor” status can create additional accounts and control the status of other accounts,
including deleting other accounts.
2. User status – Supervisor box unchecked
An account with “User” status has limited access to functionality.
A “User” status account would be allocated to an operator where it would not be desirable to allow the operator full
access to the configuration of the PAT400, or the deletion of customer and test data.
www.megger.comPAT400 - Portable appliance tester
76
Page 77

Expert options
Expert Options appears as a check box when creating or managing accounts.
By ticking the “Expert options” on an account, the operator gets access to the following:
Switching ON or OFF the “Expert Mode”
Switching ON or OFF the Reverse L-N Polarity (see below)
With “Expert mode” switched ON, the testing advisory messages, normally displayed during testing, are disabled.
With “Expert mode” switched OFF, all warning and advisory messages are displayed. The Reverse Polarity function cannot be changed.
An operator with a “User” status account must seek someone with a “Supervisor” status account to enable these features. It is
recommended that only those operators that are experienced in using the PAT400 enable “Expert mode”.
To add “Expert” privileges to an account:
1. Use the arrow keys to select the “Expert Options” from the User menu.
2. Press the OK key to enable or disable the feature.
3. Press the SAVE
If the Feature is disabled, the Expert mode check box will be grayed out.
Reverse L-N Polarity (Only available in some models)
Refer to section 12 Reverse L-N Polarity.
Hotkey to save the change.
www.megger.comPAT400 - Portable appliance tester
77
Page 78

Changing the default Supervisor account
The factory set user account name is called “default”. This can be changed if required, see section below to change the default
account name:
1. From the HOME screen use the RIGHT arrow key to select the “Users” tab.
2. Using the DOWN arrow, navigate to “Manage Users” and Press OK
3. Press the EDIT Hotkey to edit the “Supervisor account” details.
4. Press the DOWN arrow to highlight the Username field and enter a name.
www.megger.comPAT400 - Portable appliance tester
78
Page 79

To edit the name press OK when highlighted.
Usernames must be between 3 and 30 characters, A-Z and 0-9 (upper or lower case).
5. When completed press OK.
6. To add a PIN, follow section 11.3.3 To add a PIN to an account step (3),
OR
If no PIN is to be entered, press the SAVE
Hotkey to save the change.
www.megger.comPAT400 - Portable appliance tester
79
Page 80

Using PIN numbers
PIN numbers on accounts are optional.
All test results are tagged and saved with the name of the account holder (the user name). Adding a PIN number to an account will
prevent un-authorised operators from logging into any account and using other operator’s names for testing.
To add a PIN to an account:
1. From the HOME screen use the RIGHT arrow key to select the USERS tab and select the Manage Users option.
2. Press the Edit Hotkey
3. Use the DOWN arrow to select the PIN field.
4. Enter a PIN number from 0000 to 9999. Only use numbers from 0 to 9.
www.megger.comPAT400 - Portable appliance tester
80
Page 81

5. Press the DOWN arrow to select the “Confirm PIN” field.
6. Enter the same PIN number.
7. Press the SAVE Hotkey to store the changes.
Once logged out, the operator will need to log into that account by entering a valid PIN.
To change a PIN:
To change the PIN of an account, either a “User” must be logged into the account, or the PIN can be changed from any “Supervisor”
account.
If the account has “Supervisor” status:
1. From the HOME screen use the RIGHT arrow key to select the USERS tab and select the Manage Users option.
www.megger.comPAT400 - Portable appliance tester
81
Page 82

2. Press the Edit Hotkey.
3. Use the DOWN arrow to select the PIN field.
4. Enter a new PIN number.
5. Press the DOWN arrow to select the “Confirm PIN” field.
6. Enter the same (new) PIN number.
7. Press the SAVE
Hotkey to store the changes.
www.megger.comPAT400 - Portable appliance tester
82
Page 83

If the account has “User” status:
1. From the HOME screen use the RIGHT arrow key to select the USERS tab and select the “Change PIN” option.
2. Enter a new PIN and press the DOWN arrow to the Confirm PIN field.
3. Enter the Same PIN.
4. Press the SAVE
Hotkey to store the changes.
To remove a PIN from an account:
If your account has “Supervisor” status:
1. Use the same method as to add change a PIN, but delete the PIN number entirely.
2. Repeat for the Confirm PIN field.
3. Press the SAVE
If your account has “User” status:
1. 1) Use the same method as to change a PIN for a User account above but delete the PIN number entirely.
2. 2) Repeat for the Confirm PIN field.
3. Press the SAVE
Hotkey to store the changes.
Hotkey to store the changes.
www.megger.comPAT400 - Portable appliance tester
83
Page 84

Adding additional accounts
NOTE: This action can only be performed by supervisor accounts.
1. From the HOME screen use the RIGHT arrow key to select the USERS tab .Using the arrow keys, navigate to “Manage
Users” option in the USERS Tab and Press OK.
NOTE: An additional Delete hotkey may be present if there is already more than one account.
2. Press the ADD
Hotkey to bring up the Add User screen.
www.megger.comPAT400 - Portable appliance tester
84
Page 85

3. Enter a user name. Names must be between 3 and 30 characters, A-Z and 0-9 (upper or lower case).
4. Press the DOWN arrow. Enter a PIN if required. The PIN must be 4 digits using only numbers 0-9.
5. Press the DOWN arrow. Enter the same PIN in the Confirm PIN field.
6. Press the DOWN arrow to Expert Options. Press OK to enable this option if required.
7. Press the Down arrow to Supervisor. Press OK if this account is to have Supervisor status.
8. Press the DOWN arrow to Reverse L-N Polarity. Press OK to enable this feature. (Note: this feature is not available on
all PAT400’s)
9. When complete press the SAVE Hotkey to save the change
Deleting accounts
1. From the HOME screen use the arrow keys to select the “Manage Users” option from the USERS tab. If the “Manage
Users” option is not available the account does not has “Supervisor” status.
www.megger.comPAT400 - Portable appliance tester
85
Page 86

2. Press the Delete Hotkey. The Delete User screen will be displayed with the current account displayed in the
Username field.
3. If this is the account to be deleted, press the Delete Hotkey.
Or
Press the OK key to display a list of accounts and use the DOWN/UP arrow keys to highlight the require account and
press OK.
4. Press the Delete
5. The Warning message will be displayed. Press OK to confirm or Esc to abort.
NOTES: Deleting an account whilst logged into the same account will log the operator out of the PAT tester.
Hotkey to delete the account.
www.megger.comPAT400 - Portable appliance tester
86
Page 87

11.3.1 Reverse L-N Polarity (not available on all instruments)
In countries where the power plug can be reversed in the socket (example: Schuko) the earth leakage tests can be configured to test
in normal “forward” polarity or “normal and reversed” polarity.
Checking the “Reverse L-N Polarity” box in the “Add User”, “Edit User” or “Expert Options” screen enables the forward and reverse
earth leakage testing.
Reversing the test is performed automatically and the worst of the two results are recorded.
The display will show the LN and NL symbols during the leakage tests when this mode is enabled.
To enable Reverse L-N Polarity testing:
This can only be managed from a “Supervisor” status account. To enable reverse L-N testing on a “User” status account, the change
must be made by a Supervisor.
1. From the HOME screen use the RIGHT arrow key to select the USER tab and select the Manage Users option.
2. Press the Edit
3. Use the DOWN arrow to select the “Reverse L-N Polarity” check box.
4. Press the OK key to enable the feature. A tick will appear in the box.
Hotkey.
5. Press the SAVE Hotkey to store the changes.
www.megger.comPAT400 - Portable appliance tester
87
Page 88

Operators who have “Supervisor” status or “Expert” user status may also configure the Reverse L-N Polarity feature in the Expert
Options screen.
1. Use the UP or DOWN arrow key to highlight the Reverse L-N Polarity check box.
2. Press the OK key to enable or disable the reverse L-N testing.
3. Press the SAVE Hotkey to store the changes.
www.megger.comPAT400 - Portable appliance tester
88
Page 89

11.3.2 Measure PE Option (not available on all instruments)
Some PAT testing practices allows the Protective Earth bond testing to be skipped if it is deemed impossible to access an exposed PE
contact area. For PAT testers configured to allow for such a situation there is a “Measure PE Option” checkbox made available in the
Expert Options screen.
Changing the existing state of the “Measure PE Option” checkbox will cause the Save
hotkey to save the new status of the checkbox.
When the checkbox is unchecked, the PAT tester will carry out normal bond or continuity test defined in a test group. When the
option is checked, the PAT will display a message to allow the user to choose between performing the test or to skip it.
An example of skipped continuity test is shown:
hotkey to appear. User must press the
www.megger.comPAT400 - Portable appliance tester
89
Page 90

11.4 Recovery Login
If it is not possible to log into an account, the operator has two options:
As a “Supervisor”, a new account can be added, or the account deleted and replaced by a new one with the same Username, as in
section 11.3.5 and 11.3.4 respectively.
Alternatively a user can reset the accounts in the PAT400 using the Recovery Login procedure as below. As a “User”, it is only possible
to reset the PT400 to a single “Supervisor” account with PIN, as below:
1. Remover power from the PAT400
2. Reconnect power while holding down the TEST button.
3. After 20 seconds the PAT400 will display :
Pressing OK will remove all users from the PAT400 and create a single Supervisor account. If necessary,
contact your supervisor before continuing, or press ESC to abort.
4. Press OK to continue.
5. The display will show a standard warning screen.
6. Press OK after reading and understanding the warnings given.
The PAT400 is now logged into a standard Default user account as a “Supervisor”.
www.megger.comPAT400 - Portable appliance tester
90
Page 91

12 Care and Maintenance
The PAT400 should only be opened or repaired by an approved Megger service centre or by Megger Instruments Limited.
To clean the instrument; disconnect the instrument from the power supply then use a clean cloth dampened with water or isopropyl
alcohol.
To clean the display window only use a lint free cloth. For warranty repairs see appendix E.
13 Carry case
The carry case for the appliance tester has a test lead storage pouch in the lid of the case when opened. This is designed for basic lead
and document storage.
Further items can be stored in the pouch. If it becomes difficult to close the case, the storage pouch can be removed from inside the
case and attached to the front using the straps on the reverse of the pouch.
These are passed through the D-loops on the outside of the case and secured to the underside of the pouch using the Velcro fixings.
An additional storage pouch is available from Megger Limited for extended storage, such that there is a pouch on both the inside and
outside of the carry case.
www.megger.comPAT400 - Portable appliance tester
91
Page 92

Appendix A Test types explained
Each test group is constructed from a series of individual tests. The tests are selected depending on the electrical construction of the
asset under test. The operator must understand the type of electrical construction of the asset before a correct selection of tests can
be made.
The tests available on the PAT400’s are as follows:
A.1 Continuity & Bond testing
Continuity and bond testing are both used to confirm the existence of a safety earth return path of a Class I asset. However they differ
in how they work and both have their benefits and drawbacks.
i. Continuity (low current or “Soft”) testing
This test uses a 200 mA test current at 4 to 5 Vdc. The test current is low so that there is no risk of damaging earth connections that
may only exist for functional, rather than safety reasons.
ii. High current (Bond) testing (not available on the PAT410)
Uses a 10 A or a 25 A AC test current at 8-9 V.
This test is used where concerns that an earth may be maintained by a few strands of wire or where poor surface contact by the
probes or clips could give a misleading reading.
This test is frequently the preferred test by many organisations.
Bond test current (auto switching)
To prevent the high current bond test from exceeding the 26A limit, testing of very low resistance loads (typically <0.030hms) will
automatically drop the test current to 10A.
iii. In situ bond testing (200mA)
In situ bond testing is the ability to measure the earth integrity of a class I asset that is “hard wired” to the electrical supply. Normally
there would be no convenient method to connect the asset to the PAT400 without disconnecting the equipment from the supply.
The PAT400 can be connected to an adjacent electrical outlet and a bond test conducted to the case of the asset. The measured
resistance will be:
The resistance of the asset to the earth circuit (wall plate or fused spur)
The resistance of the fixed wiring through the building to the earth point into which the PAT400 is connected.
This could be a few metres or 10’s of meters.
Allowance should be made for the additional building (fixed) wiring resistance when deciding if the asset is safe to use.
iv. Parallel earth paths
Parallel earth paths warnings apply to a range of measurements. See Appendix A.8 for further information.
v. 25A Bond limit exceeded
Testing a very low resistance circuit using the 25A Bond test can generate the message:
25A Bond limit exceeded,
10A Bond enabled.
www.megger.comPAT400 - Portable appliance tester
92
Page 93

To prevent the high current bond test from exceeding the 25 A limit, testing of very low resistance (typically <0.03 Ω) will
automatically drop the test current to 10 A.
vi. Excessive lead resistance
The bond test may fail due to the excessive length of the equipment supply cord. Extension leads may also fail due to increased
resistance induced by long cable lengths. When a bond test fails the PAT400 will display a lead compensation table, allowing the pass
limit to be modified. See section 3.11 and Appendix A.6 for further details on lead compensation.
A.2 Insulation testing
This is used to confirm there is separation between the live conductors (live and neutral) and any accessible conductive parts.
The instrument will short together the live and neutral conductors and then apply a 500 V or 250 V insulation test between the
temporarily connected live/neutral and the earth.
Typically a test voltage of 500 V is used. However on sensitive equipment or especially where there are surge protection devices fitted,
a 250 V option is available.
For Equipment with no return earth (Class II) the use of an external probe is required to provide the return.
In situ testing:
In situ insulation testing is not possible on the PAT400. However, the Touch Leakage test can be used in the same situation as the In
situ Bond test in Section A1(iii) above, as an alternative to the insulation test.
A.3 Leakage testing
i. Differential earth leakage test (IDIFF).
Also called protective conductor current
Test voltage: 230 V AC 50 Hz 19.99 mA
110 V AC 50 Hz 19.99 mA (UK models only)
The differential earth leakage test determines whether any current is flowing to earth. Normally appliances should have no, or very
little, earth leakage current. Class 2 (double insulated appliances) could exhibit earth leakage through its mountings or by operator
contact.
During the test the actual mains voltage is also measured at the appliance socket. In order to ensure that the equipment is safe even
when the mains supply rises to its maximum permitted value (253 V or 121 V) the PAT calculates and displays the leakage current that
would flow at nominal supply voltage.
WARNING: A differential test will operate the asset during the test. Make sure the asset is safe before the
test commences.
ii. Substitute leakage test (IPE).
Also called alternative earth leakage
Also called equivalent earth leakage
Test voltage: 40 V AC 50 Hz 19.99 mA
For this test the appliance has its phase conductors joined together within the PAT and a 40 V supply is applied between both phase
conductors and the protective conductor connection of the equipment under test in the case of Class 1 equipment. In the case of
Class 2 appliances the test lead and probe is connected to the PAT.
This probe is applied to any conductive parts on the appliance under test. The actual voltage is measured at the appliance socket.
From these readings the earth leakage current of the appliance is calculated and scaled to nominal supply voltage depending upon
appliance supply voltage.
www.megger.comPAT400 - Portable appliance tester
93
Page 94

iii. Touch Current Test (IF).
Also called absence of potential
Test voltage: 230 V AC 50 Hz 9.99 mA
110 V AC 50 Hz 9.99 mA
During this test the appliance under test is powered from its normal mains supply and the test lead and probe is connected to the PAT
terminal. This probe is applied to any conductive parts on the appliance under test. This probe performs a current measurement with
respect to earth. This test can also be performed on three phase appliances powered from their own supply.
WARNING: A touch leakage test will operate the asset during the test. Make sure the asset is safe before
the test commences.
A.4 Load testing
Also called Operation
Also called VA
Measuring the load (VA) of an appliance is a good indication of its operating condition. By setting a load VA limit in the test groups,
an appliance can be assessed automatically for excessive load.
The Load VA limit is usually set based on the fuse rating in the appliance or in the mains connector: Example 230 V AC with 3 A fuse
maximum VA Rating should be 230 x 3 = 690 VA
Select 750 VA pass limit
However some equipment can draw very high inrush currents when starting. This should be considered when setting pass limits.
WARNING: A Load test will operate the asset. Make sure the asset is safe before the test commences.
A.5 RCD testing
The PAT400 is capable of testing portable 230 V plug-in 30mA RCDs. These are used to protect the user from electrical faults on
individual items of electrical equipment.
Test options include a 30mA test or FULL test.
30mA test - Tests the manual test button on the RCD and the trip function at 30mA fault current.
FULL test Tests the following:
Manual test button Ensures correct operation
1/2x I test Ensures the RCD does not trip too easily
1xI test 30 mA trip to ensure trip function works correctly (ie <300 ms)
5 x I Ensures trip function works quickly on large fault currents (ie <40 ms)
The test result is stored as a single PASS or FAIL result, as there is no value in storing the individual trip times.
Test button failure
The RCD test sequences include an RCD test button check. This works by automatically monitoring the 230 V supply through the
RCD. If the RCD test button fails to trip the RCD the RCD has failed. However the PAT400 will wait for a trip. In this case a manual fail
is required. PRESS THE “ F ” key. This will log the test as a fail and allow the result to be saved.
www.megger.comPAT400 - Portable appliance tester
94
Page 95

A.6 Power lead/extension lead testing
Power cords and extension leads are tested in a similar way. The principle differences are the need to use an extension lead adaptor
when testing extension leads, as the lead must be looped back to the PAT400 to allow bond and polarity testing.
Extension leads or power leads with surge protection should be tested with an Insulation test voltage of 250 V. This prevents the surge
protection from operating and artificially failing the lead.
Extension leads fitted with RCDs should be tested as per an ordinary plug-in RCD. In addition the following tests can be used:
Bond test (continuity test)
Differential leakage test (The RCD must be switched on manually during the test).
The Insulation test will not test beyond the RCD and consequently has little value.
The bond test may fail due to the excessive length of the equipment supply flex. Extension leads may also fail due to increased
resistance induced by long cable lengths. When a bond test fails the PAT400 will display a lead compensation table, allowing the
pass limit to be modified. By changing the lead length and cross sectional area of the flex, a new pass limit is calculated and a revised
pass or fail will be displayed. Alternatively if the resistance of the supply lead is known, this can be entered directly into the lead
compensation calculator.
Lead length up to 50m can be compensated. However they can exceed the recommended length for their cross section. Maximum
recommended length for extension leads:
CSA of cores (mm2) Maximum length (m)
1.25 12
1.5 15
2.5 25
Any lead longer than the recommended length should be fitted with a Residual Current Device (RCD) with a rated operating current
not exceeding 30mA, as the earth resistance can be high enough that the operation of standard protective devices cannot be
guaranteed.
A.7 Flash testing (PAT450 only)
Flash testing measures the leakage current when high test voltages are applied to an asset.
Flash testing is NOT recommended for portable appliance testing as it is a destructive test. Repeated use on an asset can cause
premature failure or possible electrical damage.
A.8 Parallel Earth Path WARNING:
Occasionally there may be a parallel earth path between the asset under test and the system earth. This can arise from a Class I asset
touching other earthed metal equipment, or being electrically in contact with the floor. This can create a resistance path back to
the electrical supply earth that is in parallel with the asset’s own earth return. Under these circumstances the PAT400 will warn the
operator by displaying the message:
Warning:
"Unable to verify earth path connection, parallel earth paths may exist. Refer to User
Guide. Press TEST to proceed, Esc to fail."
This warning may be repeated on other tests while potential parallel paths exist. This message can appear on all tests and is caused by:
a) The equipment under test has an alternative earth path. This could be via the outer case of
the equipment touching other earthed equipment or from touching the ground. Parallel earth
paths affect measurement accuracy and in worst case situations can lead to equipment being
passed as safe when there is no proper earth connection through the electrical outlet.
www.megger.comPAT400 - Portable appliance tester
95
Page 96

b) A hardware fault in the PAT400.
c) A combination of the above.
Any reports of parallel paths should be investigated. Check to ensure If the BOND (continuity) lead is not connected to the null post
on the PAT400. If not, the asset must be checked for additional earth paths. These could be as high as 1.2 kΩ.
The PAT400 can be checked by disconnecting the equipment under test and re-starting the PAT400. If the PAT400 does not report a
fault, the problem exists on the equipment under test.
Testing an asset with multiple earth paths does not confirm the asset is safely earthed.
Additionally, parallel earth paths can affect the accuracy of the measured earth resistance, insulation test or leakage measurements,
therefore creating an unreliable PASS.
www.megger.comPAT400 - Portable appliance tester
96
Page 97

A.9 PAT400 Factory Default Test Groups
Test Groups for UK PAT Variants:
Test Group Class Description Test Applied Pass Limit Test
Duration
SC1 1 Standard Class 1
Earthed Equipment
SC1-RCD 1 Standard Class 1
Earthed Equipment with
RCD Protection
SC1B 1 Standard Class 1
Earthed Equipment
200 mA Continuity Test
SC1B-RCD 1 Standard Class 1
Earthed Equipment with RCD
Protection
200mA Continuity Test
SC2 2 Typical Class 2
Double Insulated
TO1 1 110 V Tools
Earthed Equipment
TO1F 1 110 V Tools Class 1 +
Flash Earthed Equipment
TO2 2 110 V Tools Double Insulated Visual Inspection UK only
Visual Inspection PAT420
Earth Bond at 10 A ≤ 0.1 Ω 5s
Insulation test at 500 V ≥ 1 MΩ 5s
Operation test (230 V) ≤ 3000 VA 5s
Differential Earth Leakage (230 V) ≤ 3.5 mA 5s
Visual Inspection PAT420
Earth Bond at 10 A
Operation test (230 V) ≤ 0.1 Ω 5s
Differential Earth Leakage (230 V) ≤ 3000 VA 5s
RCD 30 mA test ≤ 3.5 mA 5s
Visual Inspection PAT410
Earth Continuity ≤ 0.1 Ω 5s
Insulation test at 500 V ≥ 1 MΩ 5s
Operation test (230 V) ≤ 3000 VA 5s
Differential Earth Leakage (230 V) ≤ 3.5 mA 5s
Visual Inspection PAT410
Earth Continuity
Operation test (230 V) ≤ 0.1 Ω 5s
Differential Earth Leakage (230 V) ≤ 3000 VA 5s
RCD 30 mA test ≤ 3.5 mA 5s
Visual Inspection PAT410
Insulation test at 500 V ≥ 2 MΩ 5s
Operation test (230 V) ≤ 3000 VA 5s
Touch Current (230 V) ≤ 0.25 mA 5s
Visual Inspection UK only
Earth Bond at 25 A ≤ 0.1 Ω 5s
Insulation test at 500 V ≥ 1 MΩ 5s
Operation test (110 V) ≤ 1800 VA 5s
Differential Earth Leakage (110 V) ≤ 3.5 mA 5s
Visual Inspection UK only
Earth Bond at 25 A ≤ 0.1 Ω 5s
Insulation test at 500 V ≥ 1 MΩ 5s
Operation test (110 V) ≤ 1800 VA 5s
Differential Earth Leakage (110 V) ≤ 3.5 mA 5s
Flash test at 1500 V ≤ 3 mA User
controlled
Insulation test at 500 V ≥ 2 MΩ 5s
Operation test (110 V) ≤ 1800 VA 5s
Touch Current (110 V) ≤ 0.25 mA 5s
Used in
PAT450
PAT450
PAT420
PAT450
PAT420
PAT450
PAT420
PAT450
PAT420
PAT450
PAT450
PAT420
PAT450
www.megger.comPAT400 - Portable appliance tester
97
Page 98

TO2F 2 110 V Tools Class 2 +
Flash Double Insulated
FAN 2 Desk Fan
Double Insulated
PC 1 Personal Computer IT
Equipment
DRY 2 Hairdryers Double Insulated Visual Inspection PAT410
KET 1 Kettles
Earthed
KETB 1 Kettles
Earthed
200 mA Continuity Test
EL1 EXT 230 V Extension Leads 3 Core Visual Inspection PAT420
EL1B EXT 230 V Extension Leads 3 Core
200 mA Continuity Test
EL2 EXT 230 V Extension Leads 2 Core Visual Inspection PAT410
EL3 EXT 110 V Extension Leads 3 Core Visual Inspection UK only
EL4 EXT 4 way 230 V Extension Leads
3 Core
Visual Inspection Uk only
Insulation test at 500 V ≥ 2 MΩ 5s
Operation test (110 V) ≤ 1800 VA 5s
Touch Current (110 V) ≤ 0.25 mA 5s
Flash test at 3000 V ≤ 0.2 mA User
controlled
Visual Inspection PAT410
Insulation test at 500 V ≥ 2 MΩ 5s
Operation test (230 V) ≤ 200 VA 5s
Touch Current (230 V) ≤ 0.25 mA 5s
Visual Inspection PAT410
Earth Continuity ≤ 0.1 Ω 5s
Operation test (230 V) ≤ 500 VA 5s
Differential Earth Leakage (230 V) ≤ 3.5 mA 5s
Insulation test at 500 V ≥ 2 MΩ 5s
Operation test (230 V) ≤ 1500 VA 5s
Touch Current (230 V) ≤ 0.25 mA 5s
Visual Inspection PAT420
Earth Bond at 25A ≤ 0.1 Ω 5s
Insulation test at 500 V ≥ 1 MΩ 5s
Operation test (230 V) ≤ 2500 VA 5s
Differential Earth Leakage (230 V) ≤ 3.5 mA 5s
Visual Inspection PAT410
Earth Continuity ≤ 0.1 Ω 5s
Insulation test at 500 V ≥ 1 MΩ 5s
Operation test (230 V) ≤ 2500 VA 5s
Differential Earth Leakage (230 V) ≤ 3.5 mA 5s
Earth Bond at 25 A
Insulation test at 500 V ≤ 0.1 Ω 5s
Polarity ≥ 1 MΩ 5s
Visual Inspection PAT410
Earth Continuity
Insulation test at 500 V ≤ 0.1 Ω 5s
Polarity ≥ 1 MΩ 5s
Insulation test at 500 V
Polarity ≥ 2 MΩ 5s
Earth Bond at 25 A
Insulation test at 500 V ≤ 0.1Ω 5s
Visual Inspection PAT420
Earth Bond at 25A (x4)
Insulation test at 500V ≤ 0.1 Ω 5s
Polarity ≥ 1 MΩ 5s
PAT450
PAT420
PAT450
PAT420
PAT450
PAT420
PAT450
PAT450
PAT420
PAT450
PAT450
PAT420
PAT450
PAT420
PAT450
PAT420
PAT450
PAT450
www.megger.comPAT400 - Portable appliance tester
98
Page 99

EL4B EXT 4 way 230 V Extension Leads
3 Core
200 mA Continuity Test
RCD 1 Portable RCD 30 mA Visual Inspection PAT410
RCD FULL 1 Portable RCD (5 tests) Visual Inspection PAT410
PSC1 1 Portable or hand-held Class 1
equipment
Notes:
Description of RCD says "Portable RCD" in FW version 2.01 and below.
Description of RCD FULL says "Portable RCD 30mA (5 tests)" in FW version 2.01 and below.
Visual Inspection PAT410
Earth Continuity (x4)
Insulation test at 500V ≤ 0.1Ω 5s
Polarity ≥ 1MΩ 5s
RCD 30 mA test
RCD full test sequence
Visual Inspection PAT410
Earth Continuity ≤ 0.1 Ω 5s
Insulation test at 500V ≥ 1 MΩ 5s
Operation test (230V) ≤ 3000 VA 5s
Differential Earth Leakage (230V) ≤ 0.75 mA 5s
PAT420
PAT450
PAT420
PAT450
PAT420
PAT450
PAT420
PAT450
PAT410-DE and PAT450-DE Series
Test Group Class Description Test Applied Pass Limit Test
Duration
GERAT 1-MPE 1 Gerät SK1 - PE ist messbar Visual Inspection PAT410
Earth Continuity
Insulation test at 500V ≤0.3Ω 1s
Operation test ≥1MΩ 5s
Differential Earth ≤3700VA 5s
Leakage (Idiff) ≤3.5mA 5s
GERAT1-OPE 1 Gerät SK1 - PE ist nicht
messbar
H2OKOCHER 1 mit PE ohne berührbare
Metallteile
STEHLAMPE 1 Halogenfluter mit PE und
berühbare Metallteile
Visual Inspection PAT410
Insulation test at 500V
Operation test ≥1MΩ 5s
Differential Earth ≤3700VA 5s
Leakage (Idiff) ≤3.5mA 5s
Visual Inspection PAT410
Insulation test at 500V
Operation test ≥0.3MΩ 10s
Differential Earth ≤3700VA 10s
Leakage (Idiff) ≤3.5mA 10s
Visual Inspection PAT410
Earth Continuity
Insulation test at 500V ≤0.3Ω 1s
Operation test ≥1MΩ 5s
Differential Earth ≤3700VA 5s
Leakage (Idiff) ≤3.5mA 5s
Used in
PAT450
PAT450
PAT450
PAT450
www.megger.comPAT400 - Portable appliance tester
99
Page 100

HEIZGERAT 1 mit Netzkabel 3,5m Visual Inspection PAT410
Earth Continuity PAT450
Insulation test at 500V ≤0.3Ω 10s
Operation test ≥0.3MΩ 10s
Differential Earth ≤3700VA 10s
Leakage (Idiff) ≤3.5mA 10s
TOASTER 1 mit Netzkabel 2m Visual Inspection PAT410
Earth Continuity PAT450
Insulation test at 500V ≤0.3Ω 10s
Operation test ≥0.3MΩ 10s
Differential Earth ≤3700VA 10s
Leakage (Idiff) ≤3.5mA 10s
SK1-OB 1 Gerät SK1-geht nicht in
Betrieb Iea
SK1-IB 1 Gerät SK1- läuft an, ohne VA Visual Inspection PAT410
SK1-IT 1 Gerät SK1- läuft an, mit VA
ohne ISO
SK1-OPE 1 Gerät SK1-PE-keine
Schutzfunktion nur diff
SK1-PE 1 Gerät SK1- nur PE-Messung Visual Inspection PAT410
GERAT2-MT 2 Gerät SK2 mit berührbare leitf
Teilen
GERAT2-OT 2 Gerät SK2 ohne berührbare
leitf Teilen
LEUCHTE 2 Tischleuchte mit Netzkabel
2,5m
BOHRER1 2 Handbohrer mit Netzkabel 2m Visual Inspection PAT410
Visual Inspection PAT410
Earth Continuity PAT450
Insulation test at 500V ≤0.3Ω 4s
Substitute Earth ≥1MΩ 4s
Leakage (Iea) ≤0.5mA 4s
Earth Continuity PAT450
Insulation test at 500V ≤0.3Ω 4s
Differential Earth ≥1MΩ 4s
Leakage (Idiff) ≤3.5mA 4s
Visual Inspection PAT410
Earth Continuity PAT450
Operation test ≤0.3Ω 4s
Differential Earth ≤3700VA 4s
Leakage (Idiff) ≤3.5mA 4s
Visual Inspection PAT410
Differential Earth PAT450
Leakage (Idiff) ≤3.5mA 4s
Earth Continuity ≤0.3Ω 4s PAT450
Visual Inspection PAT410
Insulation test at 500V ≥1MΩ 5s PAT450
Operation test ≤3700VA 5s
Touch Current Leakage (Ib) ≤0.5mA 5s
Visual Inspection PAT410
Insulation test at 500V ≥1MΩ 5s PAT450
Operation test ≤3700VA 5s
Visual Inspection PAT410
Insulation test at 500V ≥2MΩ 5s PAT450
Operation test ≤3700VA 5s
Touch Current Leakage (Ib) ≤0.5mA 5s
Insulation test at 500V ≥2MΩ 5s PAT450
Operation test ≤3700VA 5s
Touch Current Leakage (Ib) ≤0.5mA 5s
www.megger.comPAT400 - Portable appliance tester
100
 Loading...