

Page 1

M
LTW300 Series
Earth Loop testers
User Guide
Page 2

2
G Safety warnings:
n Safety Warnings and Precautions must be read and understood before the instrument is used.
They must be observed during use.
n The earth loop impedance test creates a temporary low resistance path between live and earth for the
duration of the test. This is particularly hazardous with both an instrument fault and an installation fault.
Working practice and hazard avoidance must take care of this risk.
n Continuity of protective conductors and earthed equipotential bonding of new or modified installations
must be verified before carrying out an earth fault loop impedance test.
n Circuit connections and exposed metalwork of an installation or equipment under test must not be
touched.
n Do not leave the instrument connected to the mains supply when not in use.
n Do not leave the instrument connected to the mains supply when performing data download to a PC.
n Ensure that hands remain behind guards of probes/clips when testing.
n The instrument should not be used if any part of it is damaged.
n The battery cover must be in place whilst conducting tests.
n Test leads, probes and crocodile clips must be in good order, clean and with no broken or cracked
insulation.
n On test leads fitted with a outlet plug and flying leads, never connect test probes, clips, pins or other
objects to the 3 lead plugs because of the danger of electrocution. These leads should only be used by
a suitably trained, and competent person.
n Some national safety authorities recommend the use of fused leads for voltage measurement on high
energy systems. If loop tests are made it may cause the fuse to rupture, and so they must be used with
caution on voltage testing.
NOTE
THE INSTRUMENTS MUST ONLY BE USED BY SUITABLY TRAINED AND COMPETENT
PERSONS.
Users of this equipment and/or their employers are reminded that Health and Safety Legislation requires
them to carry out valid risk assessments of all electrical work so as to identify potential sources of electrical
danger and risk of electrical injury such as inadvertent short circuits.
!
CAT II
Measurement category II: Equipment
connected between the electrical outlets and the user’s equipment.
CAT III
Measurement category III: Equipment connected between the distribution panel and the electrical outlets.
CAT IV
Measurement category IV: Equipment connected between the origin of the low-voltage mains supply and the
distribution panel.
Symbols used on the instrument:
G Caution: refer to accompanying notes
t Equipment protected throughout by Double Insulation (Class II)
c Equipment complies with relevant EU Directives
Equipment complies with Australian and New Zealand C Tick requirements
Page 3

3
Contents
Introduction 4
General introduction 5
Unpacking the carton 5
LCD display 6
Top panels 7
Additional controls on the LTW335 8
Keypad controls 8
Range knob controls 8
Connection panel 9
Lid open/closure 9
Preparations for use 10
Preliminary test lead 10
Ingress moisture 10
General operating instructions 10
Backlight operation 10
Test leads 10
Test lead connection 11
Loop testing 12
Description of test methods 12
No-trip test (all instruments) 12
Symbols used during a normal loop test 12
High current test (all instruments) 13
High resolution test (LTW425 only) 13
Performing a loop test 13
Non-tripping loop test (NO TRIP) 13
No-trip testing using the mains socket test lead 13
Phase to Earth loop test 13
Phase to Neutral loop test 13
No-trip loop testing using the RED/GREEN test lead 14
Phase to Earth loop test 14
Phase to Neutral and Phase to Phase loop testing 14
Earth bonded metalwork testing 14
High current loop test 14
High current Phase to Neutral loop test 14
High current Phase to Phase loop test 15
High resolution loop test (LTW425 only) 15
Prospective fault current display (PFC) 15
PFC measurement 15
Possible source of error 15
MaxZ (LTW325, LTW335 and LTW425) 16
Diriving R1 + R2 (LTW325, LTW335 and LTW425) 16
Measuring Zref 16
Voltage and frequency measurement 17
Phase to Earth and Phase to Neutral voltage and frequency measurement 17
Phase to Phase voltage and frequency measurement 17
Saving and downloading test results (LTW335 only) 18
Storing LOOP test results 18
To store a result 18
To store subsequent result 18
To recall test result 18
Downloading results to a PC 19
Deleting test results 19
SETUP menu 20
Setup option selection 20
Fused or long test lead length 20
Backlight brightness adjust 21
Warning and status messages 22
Loop test inhibit or premature termination of a loop test 22
Replacing batteries and fuses 23
Low battery warning symbol 23
Procedure to replace batteries 24
Fuse blown indicator 24
Auto power down 24
Preventative maintenance 24
Technical specification 25
Accessories 26
Repair and Warranty 27
Page 4

4
Page 5

5
1. Introduction
Thank you for purchasing the Megger Earth Loop impedance tester.
For your own safety and to get the maximum benefit from your instrument, please ensure that you read and
understand the following safety warnings and instructions before attempting to use the instruments.
This user guide describes the operation and functions of the following LTW300 series of loop impedance
testers:
LTW315
LTW325
LTW335
LTW425
These instruments are designed and manufactured by:
Megger Limited
Archcliffe Road
Dover Kent
CT17 9EN
England
Megger reserves the right to change the specification of these instruments at any time without prior notice.
Page 6

6
2. General description
The LTW300 series loop testers are designed for the measurement of loop resistance (Impedance)
of fixed electrical installations on single and 3 phase systems.
2.1 Unpacking the carton
Unpack the carton contents carefully. There are important documents that you should keep for
future reference.
Please complete the pre-paid warranty card and return it to Megger as soon as possible to help us
reduce any delays in supporting you should the need arise.
Carton contents for the LTW315, LTW325, LTW335 and LTW425
1 x LTW series loop tester
1 x 2 wire test lead with prods with clips (Red/Green)
1 x Mains lead set (UK, Schuko or Australian, depending on instrument supplied)
8 x AA (LR6) batteries (fitted in instrument)
1 x Warranty card
1 x Certificate of test
1 x Calibration certificate
1 x Owners CD manual
1 x Hard carry case
1 x USB cable (LTW335 only)
1 x PC software CD (LTW335 only)
1 x Warning sheet (5172-238)
Page 7
7
RCD Trip
Indicator
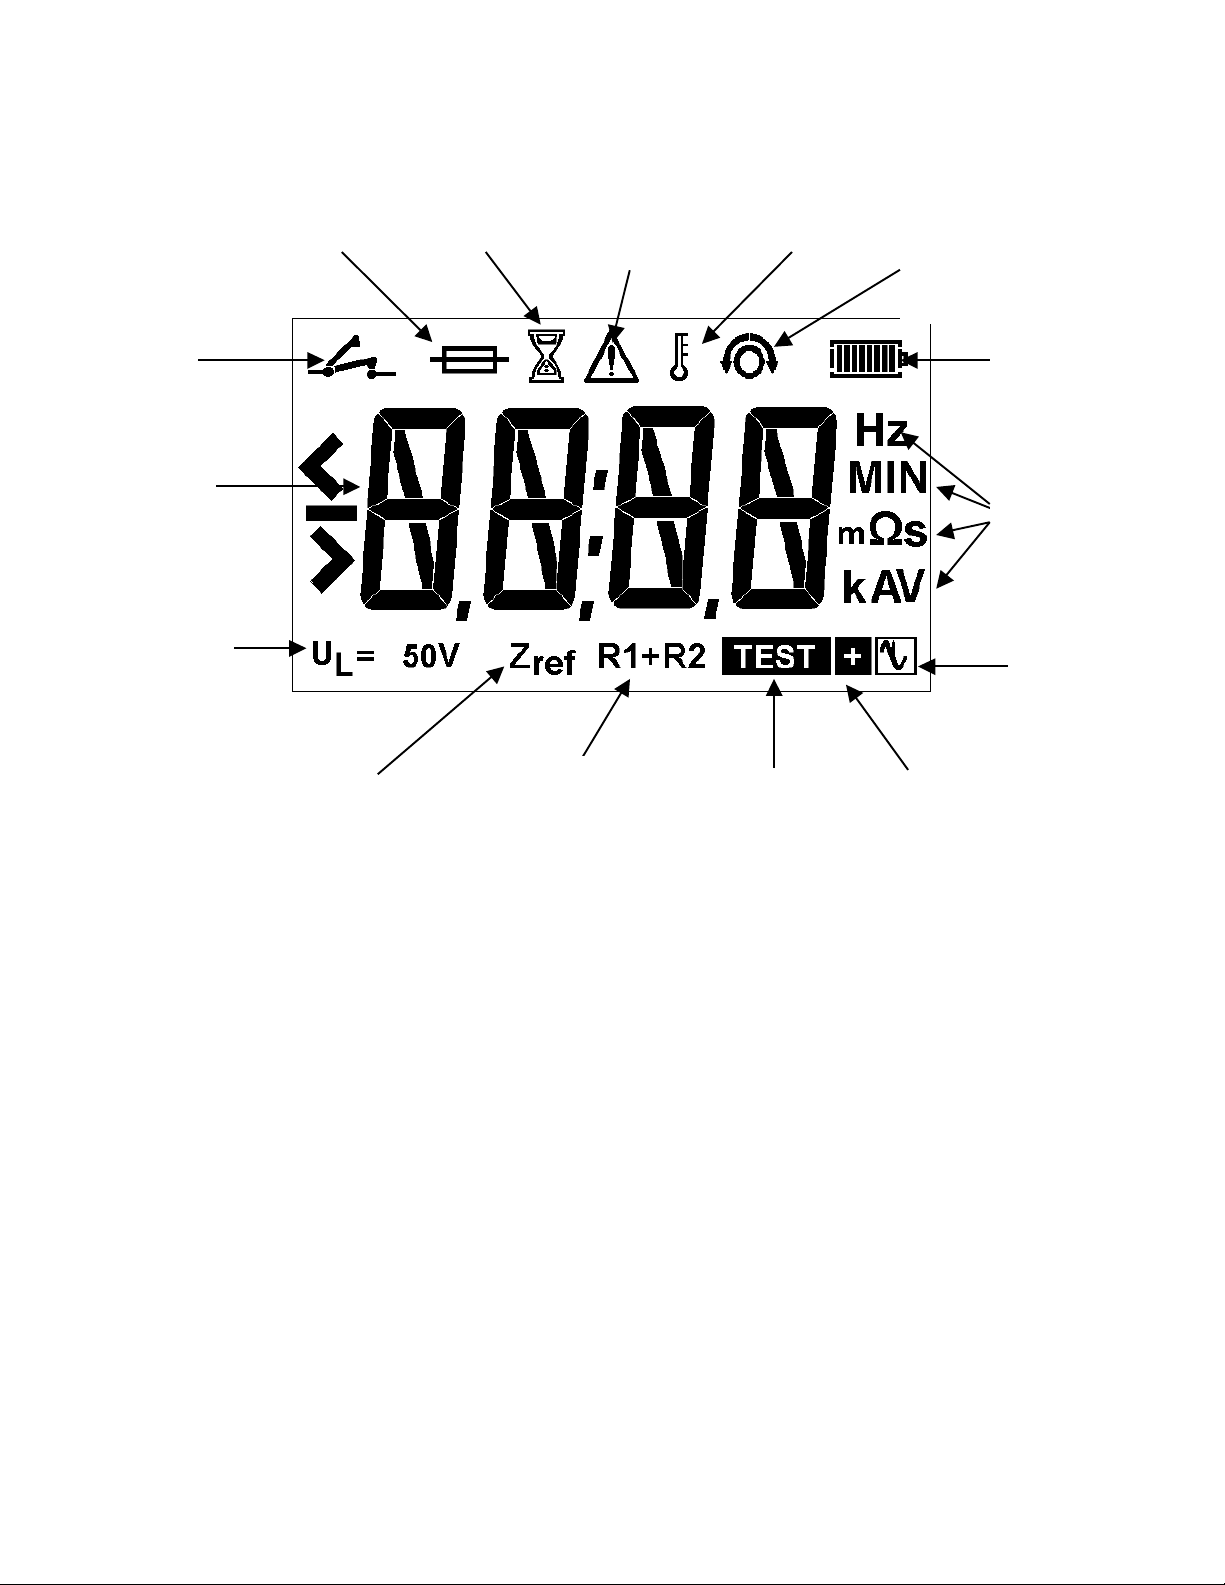
2.2 LCD display
Touch
voltage
selected
Measured
results
Fuse Blown
Refer to
User manual
Battery status
Ranges
Supply
noise
warning
R1+R2 Function
selected
Zref function selected
(required before R1+R2 can
be measured)
Loop test
active
Temperature
Wait
Loop test extended
(Mode 2 operation)
Test Lead NULLED
Indicator
Page 8
8
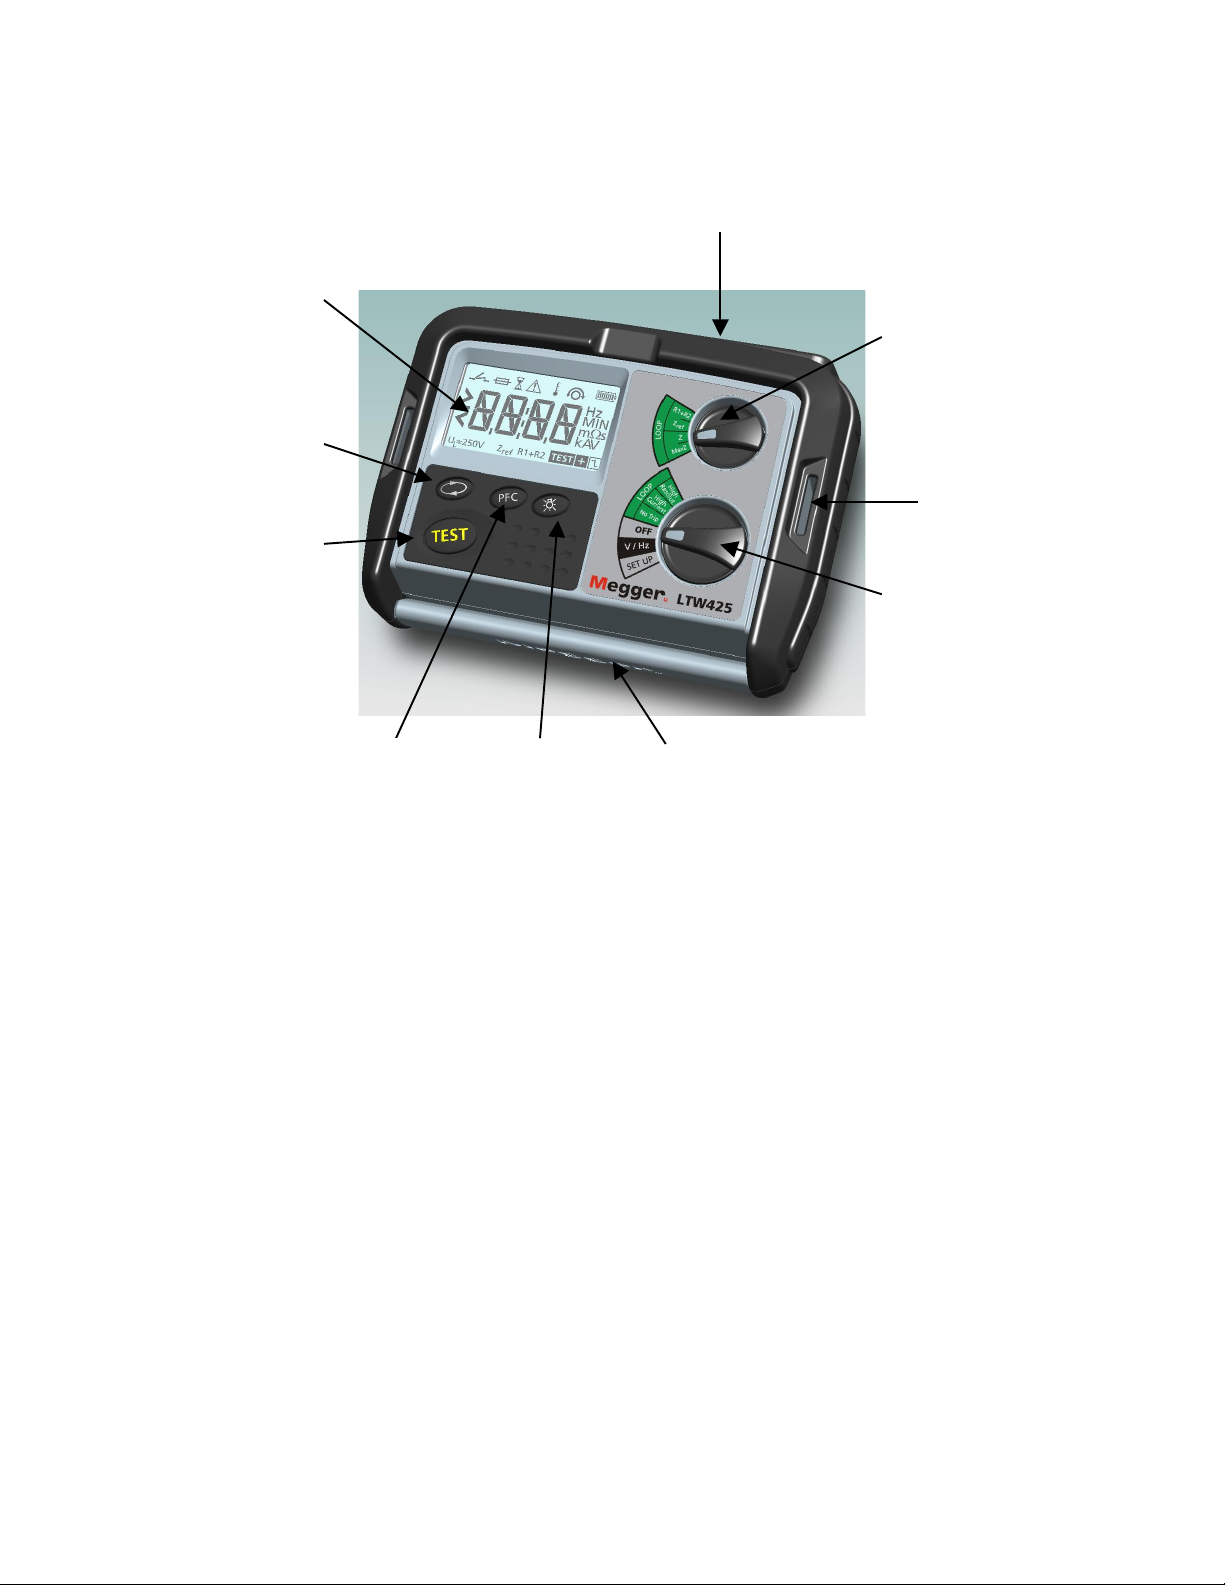
2.3 Top panels
LCD Display
Setup function
select
Test button
Backlight
On/Off
Test lead connections
See section 2.5
Loop test function:
(all except LTW315)
Z
MaxZ
R1+R2
Zref
Neck strap
slots
Range selector:
NO-TRIP
High Current
HIGH Res (LTW425)
Volts/Frequency
Setup
Front panel cover
(folded under instrument)
PFC display
key
Page 9

9
2.4 Additional controls on the LTW335 (storage and downloading instrument):
2.4.1 Keypad controls
2.4.2 Range knob controls
OK
Confirms a test result
delete request
ESC
Aborts a result save
process
UP/DOWN arrows:
Scrolls through circuit and
distribution board numbers
STORE
Stores last test result
LAST
As next
NEXT
Selects test type
Job,
Distribution board,
Circuit,
Phase etc
Last
result
Stored data
download
Test result
delete
Page 10

10
2.5 Connection panel
2.6 Lid open/closure
1. Open lid by lifting up front panel tab (1).
2. Foldaway underneath instrument (2 & 3) and push into retaining slot (4).
Single or 3 Phase
connection
Earth, Neutral or 2nd phase
connection
Warning
Read user guide
Maximum 300V
Phase to earth
USB connection to
computer port
LTW335 only
Page 11

11
3. Preparations for use
The instrument is supplied with batteries already fitted. However when fitting replacement batteries, refer to
section 10.2:
WARNING: -
Never use the instrument with the battery cover removed.
Incorrect battery cell polarity can cause electrolyte leakage, resulting in damage to the instrument.
Always fit a complete new set of batteries, never mix old and new cells.
Check that the Battery level indicator displays a full charge before using the instrument. A low battery
charge may indicate a reversed cell.
Note: Battery cells should not be left in an instrument, which may remain unused, for an extended period of
time.
3.1 Preliminary test lead check
Before each use of the instrument, visually inspect the test leads, prods and crocodile clips to confirm that
their condition is good, with no damaged or broken insulation.
3.2 Ingress of moisture
If it is suspected that moisture has entered the instrument, such as extended periods of cold and wet
conditions, the instrument should be dried out prior to use. This can be accelerated by removing the
battery cover to assist drying.
4. General operating instructions
4.1 Backlight operation
Pressing the BACKLIGHT [ ]button will toggle the backlight on and off.
The backlight will automatically switch on at the start and end of a test. It will switch off 5 seconds after the
end of the test.
Backlight brightness can be adjusted whilst in SETUP mode, see SETUP section 8.
4.2 Test leads
All test leads form part of the measuring circuit of the instrument and must not be modified or changed in
any way, or be used with any other electrical instrument or appliance.
The mains plug test lead supplied with the Megger Tester is a test lead that forms part of the measuring
circuit of the instrument. The overall length of this lead should not be altered. However if the power cord
plug is not suitable for your type of socket outlets, do not use an adapter. You may change the plug once
only, by cutting the cord as close to the plug as possible and fitting a suitable plug.
The colour code of the cord is:
Earth (Ground) Yellow/Green
Neutral Blue
Phase (Line) Brown
Non-standard test leads
Where fused or longer length leads may be used, the lead resistance will be higher than the value to which
the instrument is calibrated. To add additional offset in the loop measurement, refer to section 8,
instrument setup procedure.
Page 12

12
WARNING: A plug severed from the power cord must be destroyed, as a plug with bare conductors is
hazardous in a live socket outlet.
4.3 Test lead connection
The supplied test leads should be connected to the appropriate sockets on the rear of the instrument
marked L0/L2 and L1.
Standard test probes and crocodile clips and mains socket test lead are supplied for connection to the
circuit under test.
Page 13

13
5. Loop testing
Different loop testing options are available depending on the instrument used as below:
Instrum
ent
NO-
TRIP
High
Current
MaxZ
R1+R2
HIGH
Resolution
Result
storage
and
download.
50 V
-
440V
100 V
-
280 V
LTW31
5
n
n
n
LTW32
5
n n n
n
n
LTW33
5
n n n n
n
n
LTW42
5
n n n
n
n
n
5.1 Description of test methods
5.1.1 No trip test - (All instruments)
Designed not to trip circuits protected by an RCD ≥30mA.
Description:
A resistive load (15 KΩ) switched and rectified at Mains Frequency ÷6, in order to produce a test current at
the same frequency. The voltage produced by this test current is then used to calculate the loop
resistance. If the loop contains inductance, the inductive reactance will be largely ignored.
When testing in close proximity to the sourcing transformer, a system phase angle of 18° will cause an
additional error of 5%.
5.1.1.1 No-trip test modes
Two test modes are available in the [No Trip] loop test mode, providing:
Mode 1 = 10s
Mode 1 performs a 10 second loop test only. At the end of the test a result is displayed. If the noise symbol
[ ] is displayed at the end of a test the test should be repeated, or the test mode changed to mode 2,
refer to section 8 SETUP procedure.
Mode 2 = AUTO (Default setting)
In Mode 2 the LTW loop tester can detect noise on an electrical supply that could affect the measurement
accuracy, and automatically extend the loop test from 10 seconds up to 20 seconds as necessary. The [ ]
symbol is displayed to indicate an extended test is running.
If the noise symbol [ ] is displayed at the end of the extended test it is recommended the test be
repeated.
The instrument is shipped with mode 2 selected.
To change the test modes, refer to the SETUP procedure, section 8.
5.1.1.2 Symbols used during a normal loop test:
The [ ] symbol is displayed for the duration of an active loop test.
If electrical noise is detected during the loop test that could affect the accuracy of the answer, the following
additional symbols may appear:
Page 14

14
If a low level of electrical noise is detected in mode 2, the [ ] will be displayed to the right of the
[ ] symbol. The test time will be extended up to a further 10 seconds to improve the accuracy of the
test results. This only applies if the tester, is running in mode 2, see section 5.2.1.
If a high level of electrical noise is detected the symbol [ ] will be displayed. This indicates that
excessive noise was detected during the test. If this remains displayed at the end of the test it is
recommended the test is repeated.
5.1.1.3 High current test - (All instruments)
Performs a very fast loop test at a nominal 4A test current.
Description:
A resistive load (59 Ω) is used to measure voltage drop and calculate the loop resistance. If the loop
contains inductance, the inductive reactance will be largely ignored. The loading current duration varies
from 10 milliseconds to 640 milliseconds depending on the test condition.
When testing in close proximity to the sourcing transformer, a system phase angle of 18° will cause an
additional error of 5%.
5.1.1.4 High resolution test - (LTW425 only)
Performs a sequence of many high current loop tests to calculate a loop test
result to three decimal places.
Description:
Alternate voltage measurements on loaded and unloaded half cycles using a load resistor of approximately
59 Ω, as with the High Current test. The number of test cycles will be adjusted to obtain the optimum
performance.
When testing in close proximity to the sourcing transformer, a system phase angle of 18° will cause an
additional error of 5%.
ALL TESTS WILL OPERATE PHASE TO EARTH, PHASE TO NEUTRAL AND PHASE TO PHASE.
NOTE: THE LTW315 IS NOT RATED FOR PHASE TO PHASE MEASUREMENTS ON 240 VOLTS TO EARTH SYSTEMS
5.2 Performing a loop test
Note: Factory settings for the instrument are:
AUTO START enabled
Mode 2 (extended testing) enabled
5.2.1 Non-tripping loop test [No Trip]
The [No Trip] range is a 0,01 Ω resolution, low test current earth loop resistance measurement.
5.2.2 No-trip testing using the mains socket test lead:
The instrument is supplied with AUTO START enabled, and in Test Mode 2, which will automatically extend
a test if noise is detected.
5.2.2.1 Phase to earth loop test
1. Select the [No Trip] test range on the lower range knob, and [Z] on the upper range knob where present.
2. Connect the RED plug of the mains socket test lead to the instrument.
3. Connect the GREEN plug of the mains socket test lead to the instrument.
4. Insert the plug into the mains outlet socket.
5. Ensure the supply voltage is displayed.
The loop test will automatically start and the [ ] symbol will appear, and remain on, for the duration
of the test.
6. After a test period of 10 seconds the measured loop value is displayed and the [ ] symbol will
disappear.
To repeat the loop test press the [TEST] key.
Page 15

15
The symbols [ ] and [ ] may appear during the test. Refer to section 5.1.1.2 (Symbols) for an
explanation of their meaning.
5.2.2.2 Phase to neutral loop test
Phase to Neutral testing can be made using the No-Trip test, as described above for the Phase to earth
test. However a High Current test will not trip RCDs when making a P-N test and it is recommended that a
High Current test is used for this measurement.
5.2.3 No-trip loop testing using the RED/GREEN test leads
The [No-Trip] loop test can be carried out where a power socket is not available using the 2 wire lead set.
5.2.3.1 Phase to earth loop test
1. Select the [No Trip] test range on the lower range knob, and [Z] on the upper range knob where
present.
2. Connect the RED and GREEN test leads to the instrument.
3. Connect the RED test lead to the Phase conductor and connect the GREEN test lead to the Earth
conductor.
4. The loop test will automatically start and the [ ] symbol will appear, and remain on, for the
duration of the test.
5. After a test period of 10 seconds the measured loop value is displayed.
6. To repeat the loop test, press the [TEST] key.
The symbols [ ] and [ ] may appear during the test. Refer to section 5.1.1.2 (Symbols) for an
explanation of their meaning.
5.2.3.2 Phase to Neutral and Phase to Phase loop testing
Both Phase to Neutral and Phase to Phase testing can be made using the No-Trip test, as described above
for the Phase to earth test. However a High current test will not trip RCDs when making either a P-N or P-P
test, and it is recommended that a High current test is used for both these measurements.
5.2.4 Earth bonded metalwork testing
Repeat the test 5.2.3.1 (Phase to Earth) test above, but with the GREEN lead connected to the exposed
metalwork providing the earth return path.
5.3 High current loop test [High Current]
The [High Current] loop test performs a 2-wire high current test at around 4 A on a 230 V supply,
providing a very stable and fast loop test.
WARNING: This test is designed for non-RCD protected circuits.
Due to the high currents used the instrument adds a brief pause between tests
to prevent overheating. This is indicated by the [ ] symbol and appears for a
nominal 5 seconds between tests for voltages <260 V and 10 seconds for voltages
above 260 V.
5.3.1 High current Phase to Earth loop test
1. Select the [High Current] test range on the lower range knob, and [Z] on the upper range knob where
present.
7. Connect the RED and GREEN test leads to the instrument.
8. Connect the RED test lead to the Phase conductor.
9. Connect the GREEN test lead to Earth conductor.
This test can also be performed using the mains socket test lead, using the RED and GREEN
connectors).
10. The loop test will automatically start and the [ ] symbol will appear, and remain on, for the
duration of the test.
11. The measured loop value is displayed.
Note: The AUTO START function will not operate if the instrument is connected to a live supply BEFORE
the range knob is moved to [High Current]. This is to prevent tripping of RCDs by accidentally selecting the
Page 16

16
[High Current] test instead of [No Trip] test, with the leads connected to the supply. In which case pressing
the [TEST] button will start a test.
Subsequent connection of test leads will run the AUTO START test.
AUTO START can be disabled in the SETUP procedure as described in section 8.
5.3.2 High current Phase to Neutral loop test
Repeat test 5.3.1 with the Green lead connected to the Neutral conductor.
This test can also be performed using the mains socket test lead, using the RED and BLUE connectors.
5.3.3 High current Phase to Phase loop test
Repeat test 5.3.1 with the Green lead connected to another phase conductor.
NOTE: Both the High current and No Trip loop tests will operate Phase to Phase.
5.4 High resolution loop test [High Resolut] (LTW425 only)
The [High Resolut] Loop test performs a 2-wire high current loop test, providing a loop test result to one
milliohm (0.001 Ω) resolution. This test is designed for non-RCD protected circuits.
A limited number of these tests can be done before the instrument will indicate
over-temperature, display the [hot] warning and inhibit further tests. In which
case leave the instrument to cool down for a few minutes.
5.4.1 All the high current tests in section 5.3 can be performed with the
instrument set to [High Resolut].
Note: In order to protect instrument from overheating, it is necessary to introduce pause time during testing
thus extending the [High Resolut] test to 15 seconds for measurements on supplies of less than 260 V
a.c. and 30 seconds for measurements on supplies above 260 V a.c.
5.5 Prospective Fault Current display [PFC]
NOTES:
The PSCC of a circuit is the largest Prospective Fault Current (PFC). In a single-phase system, this would
be the larger of the earth loop PFC and the neutral loop PSCC. In a multi-phase system phase-phase loops
also need to be considered and are measured in the same way as single-phase supplies.
PFC measurement accuracy
An accurate PFC measurement requires an accurate measurement of the loop resistance. The difference of
a few digits in the loop resistance measured will have a large effect on the PFC displayed.
Calculation of PFC (and PSCC) is based on the measured voltage divided by the measured loop resistance
(in ohms).
Measured Voltage
=
PFC
Loop resistance
The displayed value of PFC is calculated from the test results of voltage and resistance BEFORE they have
been rounded for display. Consequently the displayed PFC may not exactly correspond to the result of
manual calculation using displayed results of voltage and resistance.
5.5.1 PFC measurement
1. On completion of any loop test press the [PFC] key.
2. The prospective fault current is displayed in Amps.
3. Press [PFC] key again to return to loop impedance result.
Page 17

17
5.6 Possible sources of error
The displayed reading depends on a measurement of the supply voltage and therefore noise or transients
caused by other equipment during the test could cause an error in the reading.
One way to check for these is to do two tests and look for any difference in value. The instrument may
detect some sources of noise and warn the user.
Test results may be adversely affected, by supply voltage fluctuations, voltage glitches, spikes or electrical
‘noise’ during a measurement. It is recommended that tests are repeated and the results verified. If
measurements are far apart results should be considered abnormal.
Errors can be reduced by:
§ Use the two-wire lead set with prods and a firm connection to clean conductors.
§ Making several tests and, taking the average.
§ Ensure that potential sources of noise in the installation are isolated (switched off), eg:
automatically switched loads or motor controllers
§ Ensuring that the instrument is calibrated.
§ Ensure the 4mm test probe sockets on the instrument are clean and free of grease and dirt by
using a cotton bud dipped in Isopropyl alcohol or similar solvent cleaner.
Further errors can be caused by proximity to transformers:
Testing in the close proximity of a transformer can cause errors in measurement because of the worsening
of the power factor caused by the large proportion of reactance in the measurement.
Worst case operating error calculated for Non Trip measurement mode in accordance with
IEC 61557-3:1997:
Intrinsic error or
influence quantity
Reference conditions or specified
operating range
Designation Code
Error
Intrinsic error
Reference conditions
A
0.05
Position
Reference position ± 90°
E1 0 Supply voltage
Battery voltage at 8 V to 13.2 V
E2
0.0042
Temperature
0°C and 40°C, using 10Ω loop measured
at 230V in Non Trip mode
E3
0.023
Phase angle
At a phase angle 0° to 18°
E6
0.0489
System frequency
Frequency of 49.5 Hz to 50.5 Hz
E7
0.024
System voltage
Voltage of 195.5 V to 253 V
E8
0.00038
B
±0.12
B[%]
±12%
Operating error:
)15.1(
2
8
2
7
2
6
2
3
2
2
2
1
EEEEEEAB ++++++±=
5.7 maxZ (LTW325, LTW335 and LTW425)
The maximum loop impedance value of any final ring circuit (or any series of loop measurements), can be
derived by using the [MaxZ] function:
1. Select the [MaxZ] test range on the top range knob.
2. Make a loop test measurement as described in section 5 above. The instrument will display and hold
the loop resistance value.
3. For subsequent loop tests the instrument will display the new loop value.
If this is higher than the previous result it will be held on the display. Lower values will only be
displayed for 2 seconds prior to reverting to the higher result.
5.8 Deriving (R1 + R2) (LTW325, LTW335, LTW425)
Automatic Derivation of an R1+R2 value
Page 18

18
The LTW325, LTW335 and LTW425 are able to derive the (R1+R2) circuit impedance from tests made on a
live installation. It is not possible to isolate R1 or R2 separately.
Application note for Zref and R1+R2 measurement:
On initial verification of a new electrical installation, the value for R1+R2 should be obtained by
continuity testing methods (dead testing) as per BS 7671:2001 or other international standards.
For periodic inspection reports (PIR) where it is not possible to isolate the supply, the user should first verify
the Circuit Protective Conductor (standard practice) prior to using the Zref and R1+R2 function on the
instrument.
Prior to measuring Zref, all main equipotential bonding must be in place.
Note: Measurements made on live installations by this method may be lower than the Ze + (R1+R2) from
those obtained by continuity testing methods, due the existence of parallel earth return paths from
extraneous conductive parts.
To make use of the R1+R2 test feature, the reference/distribution board (Ze or Zdb) result must be stored in
the instrument’s memory (Zref), prior to measuring R1 + R
2.
5.8.1 Measuring Zref
1. Switch the top range knob to [Zref]. The display will show the [ ] symbol to indicate a Zref test
mode is selected.
2. Select any loop test range as appropriate.
3. Connect the instrument to the circuit under test as described in section 5.2, 5.3 or 5.4 as required.
4. Press the [TEST] button to perform a loop test. The test result is displayed and stored internally as
Zref.
5.8.2 Measuring R1+R2
5. Switch the top range knob to the [R1+R2] range. The display will show the [ ] symbol to
indicate an R1+R2 test mode is selected.
6. All subsequent loop test measurements will have the Zref resistance subtracted.
7. To view the stored value of Zref press the PFC key, press the PFC again to return to the R1+R2 value.
8. If measured value of R1+R2 is less than zero, the display will show the measured value of R1+R2 for 2
seconds, then the error message [ ] will be displayed to indicate such error. In which case
repeat the R1+R2 measurement. If the error persists, repeat with a new Zref measurement followed by
R1+R2.
If a Zref measurement was not made prior to an R1+R2 test, an R1+R2 test will not be performed, and the
warning [ ] will be displayed for 2 seconds.
6. Voltage and frequency measurement
WARNING: The instrument must not be used on CATII, CATIII or CATIV systems with
voltages greater than 300V phase to earth and 440V Phase to Phase.
6.1 Phase to Earth and Phase to Neutral voltage and frequency measurement
To measure the voltage of the electrical supply using the mains socket test lead:
1. Set the instrument to the [V/Hz] range.
2. Connect the RED plug of the mains socket test lead to the instrument.
3. Connect the GREEN plug of the mains socket test lead to the instrument.
4. Insert the plug into the mains outlet socket.
5. The instrument will display the voltage and the frequency.
Page 19

19
To measure the Phase-Neutral voltage, connect the RED and BLUE plug of the mains socket test lead to the
instrument.
To measure the voltage of the electrical supply using the RED / GREEN test leads:
1. Set the instrument to the [V/Hz] range.
2. Connect the GREEN test lead to the Protective Earth (PE) and the RED test lead to the phase to be
measured.
3. The instrument will display the voltage and the frequency.
4. Alternatively the instrument can be connected Phase to Neutral to measure the Phase-Neutral voltage.
6.2 Phase to Phase voltage and frequency measurement
1. Set the instrument to the [V/Hz] range.
2. Connect the GREEN test lead to one phase and the RED test lead to another phase.
3. The instrument will display the voltage and the frequency.
7. Saving and downloading test results (LTW335 only)
7.1 Storing LOOP test results:
Test results storage has the following structure within the instrument:
Jb:00, Jb:01… 99 = Job number
db:01 , db:02, db:03 …99 = Distribution board Number
Ct:01 , Ct:02, Ct:03…99 = Circuit number
Ln:LL, Ln:LE, Ln:LN, Ln:NE = Line connection
Ph: 1, Ph: 2, Ph: 3 = Phase
tS:VF, tS:nt,tS:tr = Test type
R000 to R999 = Record number
Definitions:
Jb:00, Jb:01…………………………. Job number acts as work folders. Sets of results can be saved
to a particular job number and easily separated when
downloaded.
db:01, db:02………………………… Distribution board number. Results can be assigned a specific
distribution board number.
Ct:01, Ct:02… ……………………… Circuit reference. Results can be assigned a specific circuit
reference number.
Ln:LL, Ln:LE … …Line connection: Test lead connections (ie Live to Earth = Ln:LE)
Ph: 1,Ph: 2,Ph:… 3 Phase number: Each test can be stored under a particular phase, P1,
P2 or P3.
tS:VF, tS:nt, tS:tr ……… Test type: Each test result is automatically assigned the test
type. VF represents Voltage Frequency test, nt is no-trip test
and tr is high current test.
R000, R001Unique Record number: Each test result is assigned a unique record number,
from 0 to 999 logged automatically. This cannot be changed
by the user.
7.2 To store a result
1. Make a Z, MaxZ, Zref or R1+R2 loop measurement as described in Section 5.
2. Press STORE to enter the storage menu.
3. Select job reference number using the UP/DOWN keys then press NEXT. Hold the key down to scroll
quickly through the numbers.
4. Select distribution board number (db:01, db:02 etc) using UP/DOWN keys then press NEXT.
5. Select circuit number (Ct:01,Ct:02 etc) using the UP/DOWN keys then press NEXT.
6. Select Ln:LL, Ln:LE, Ln:LN, Ln:NE by pressing the UP/DOWN keys, then press NEXT.
7. Select the Phase using the UP/DOWN keys then press NEXT. The screen will display a unique record
number, which is attached to that particular test.
8. Press OK to save the result.
9. Press ESC to skip at any point.
7.3 To store a subsequent result:
To save the next test under the same job number, distribution board etc.
1. Make another measurement as described earlier and press STORE.
2. The last Job number will be displayed. Press OK.
Page 20

20
Note: To change any setting before saving a result, scroll down through the result using the NEXT/LAST
keys. Change the distribution board, circuit number etc, using the UP/DOWN keys and press OK.
7.4 To recall test result:
1. Set the lower range knob to RECALL.
2. The last unique record number is displayed.
3. Use the UP/DOWN keys to select the test record to recall.
4. Use the LAST or NEXT keys to scroll through job number, distribution board, circuit number etc,
associated with the test result.
5. Press OK and the test result will be displayed.
6. Each recalled result will have two values. Use the LAST and NEXT buttons to switch between the two
values. In the case of Voltage/Frequency tests, one result will be voltage in volts and the other result
will be the frequency in Hz.
In the case of Z, MaxZ and Zref tests, one result will be the impedance in ohms and the other result will
be the circuit voltage (allowing PFC to be calculated).
In the case of the R1+R2 test, one result will be Zref and the other will be R1+R2
7. Press ESC to go back to the record number.
Repeat from step 3 to recall other test records.
7.5 Downloading results to a PC:
1. Run Megger PowerSuite Professional or Megger Download Manager on the PC.
2. Select the appropriate downloading instrument from the list. Ensure the LTW300 driver is selected (ie
MIT/LTW/RCDT) and NOT (MIT/LT/RCDT)
3. Select "Download" from the software tool bar.
4. Connect the tester to the PC using the USB download lead.
5. Set the lower range knob to [SEND].
6. The instrument will automatically download its contents to the PC. A bar graph shows the status of the
download.
WARNING: On completion of the download, disconnect the USB lead before
commencing further testing.
7.6 Deleting test results
To delete the latest test result:
WARNING: This operation is not reversible.
1. Set the lower range knob to [DEL]. The display will show the test record to be deleted (ie d034).
2. Press the OK button. The last test result will be will be deleted.
3. Repeat step 2 to delete another record.
To delete all test data:
WARNING: This operation is not reversible. All data will be deleted.
1. Set the lower range knob to [DEL]. The display will show the test record to be deleted.
2. Press the UP or DOWN key. The display will show "dALL" and the warning symbol [ ].
3. Press the OK button. All the test results will be will be deleted. The display will show “d---“ to indicate
all records are deleted.
Page 21

21
8. SETUP menu
The SETUP mode allows the following functions to be configured:
Section
option
Function
Options
Factory
setting
AoFF
AUTO OFF time
The automatic switch off time of the instrument can be
extended if required.
2min / 20min
2min
buZZ
Buzzer ON/OFF
The buzzer can be disabled for working in office
environments.
ON / OFF
ON
tVl
Touch Voltage limit
This is the voltage the earth wiring or CPC can be allowed to
rise to, whilst performing a loop test. This is set to 50 V but
can be adjusted to 25 V where necessary.
25V / 50V
50V
Null
Lead null
Allows additional test lead resistance of longer or fused test
leads to be nulled from the test results. See 8.2 below.
0.00 Ω
to
0.99 Ω
0.00 Ω
tESt
No-trip Test mode
The instrument can be set to perform a 10 second loop test,
or an automatic loop test that extends the test time up to 20
seconds, if it detects any supply changes that could affect
test results.
10s, Auto
Auto
AuSt
Automatically starts loop test
Starts loop test on contact with circuit without the need to
press the TEST button.
ON, OFF
ON
RSt
Restores factory settings
Restore
-
8.1 Setup option selection
1. Select [SETUP] on the lower range knob. Instrument firmware revision will be displayed briefly. Wait for
the instrument to display SEt.
2. Press the [ ] key to cycle through the SETUP options until the required setup option is displayed.
3. Press [TEST] to select the function.
4. Press the [ ] key to cycle through the options available for that function. Once the desired option is
displayed press [TEST] to store setting. The display will show “Ok” and then return to the function
heading. To select another function, repeat from step 2.
5. To go back to main menu ‘SEt’, press [PFC] button.
6. To exit SETUP mode turn the lower range knob to any other position.
8.2 Fused or long test lead length
The test lead resistances of the supplied test leads are already calibrated into the instrument. However,
should the optional fused leads or a longer lead set be used, the additional resistance can be set in the
instrument so as not to affect the loop test result.
To establish additional resistance of new lead set:
NOTE: The high current loop test should be used for this adjustment to ensure accurate measurements.
1. Ensure the top range knob is set to [Z] (does not apply to the LTW315).
2. Select the High Current test range on the instrument lower range knob.
3. Connect the standard (supplied) RED and GREEN test leads to the instrument.
4. Connect the RED test lead to the Phase conductor.
5. Connect the GREEN test lead to the Earth conductor or to the Neutral conductor if the circuit is RCD
protected.
6. Press the [TEST] key. The measured loop value is displayed.
7. Note down the loop test value.
8. Repeat the same loop test with the new test leads and note down the value. This value
should be higher than the first test result.
Page 22

22
9. Subtract the first test result from the second test result to obtain the additional loop resistance created
by the new lead set.
If the result is negative, the second lead set resistance is less that the standard supplied lead set and
should not be used for loop testing on this instrument.
If the result is greater than 0.99 Ω, the instrument will not be able to take fully into account of the extra
lead resistance. In this instance do not use the lead set or manually subtract the difference from every
subsequent measurement.
To enter the additional lead resistance to correct the instrument measurements:
10. Select [SETUP] on the instrument lower range knob
11. Press the [ ] button until the display shows ‘Null’.
12. Press the [TEST] button to select the function.
13. Press the [ ] button until the display shows the additional resistance required.
14. Press the [TEST[ button to store the offset. The display will show Ok to confirm setting has been
saved.
15. The display will show the [ ] as a reminder to warn of there is a loop resistance offset selected.
To remove loop test Offset:
16. Select [SETUP] on the instrument lower range knob
17. Press the [ ] button until the display shows ‘Null’.
18. Press the [TEST] button to select the function.
19. Press the [ ] button until the display shows 0.00. Button can be held down to automatically
count up.
20. Press the [TEST] button to store the offset.
21. The [ ] symbol will now disappear.
8.3 Backlight brightness adjust
The backlight has four levels
• OFF (Disabled)
• Low (Default)
• Medium
• High
To adjust the backlight brightness (or disable backlight completely):
1. Select [SETUP] on the instrument lower range knob
2. Press the backlight button [ ] repeatedly to achieve the desired setting.
Exit SETUP mode by turning the lower range knob to any other position.
Page 23

23
9. Warning and status messages
9.1 Loop test inhibit or premature termination of a loop test:
A loop test may stop or even be prevented from starting if there is a connection problem with the test leads
or instrument fuse, an earth problem on the circuit being tested, or a supply voltage or frequency out of
range.
Test inhibit
If an out of range voltage or frequency exists on the circuit under test, testing will be automatically inhibited
and the corresponding information will be displayed.
The following ‘Exceptions’ and ‘Warning’ screens may be displayed during
testing:
UNSERVICEABLE - Instrument needs to be returned for repair.
Circuit voltage may also be displayed.
Test aborted due to excessive noise present during test. Retest or
investigate source of noise.
Instrument needs calibration. Further testing is possible but not recommended.
Noise symbol [ ] displayed at end of test indicates result may have been
adversely affected by electrical noise during test. Test should be repeated.
Instrument overheated. Allow to cool down.
Hot warning. Thermometer symbol [ ] flashes. Allow instrument to cool down, but
testing can continue if necessary.
Supply interrupted or lost during test (eg test probe slipped). This will disappear after
2 seconds and the tester will attempt to repeat the test.
Ready to test No-trip loop test. No supply voltage connected.
Ready to test using High Current loop test. No supply voltage connected.
‘TEST IN PROGRESS’ messages.
Supply voltage missing or low.
UNSERVICEABLE - Fuse failed.
Circuit voltage may also be displayed.
Touch voltage limited measurement to 1000 Ω. Check earth bonding of installation
before further testing.
Page 24

24
10. Replacing batteries and fuses
Batteries:
Battery type: 8 x LR6 (AA), 1.5 V Alkaline, or 8 x 1.2 V NiMH
10.1 Low battery warning symbol
The battery condition is continuously displayed by the following symbols.
If the battery symbol drops to two bars the batteries will need replacing.
To replace the batteries follow the procedure in 10.2 below. Please dispose of
exhausted batteries carefully.
In addition, the main display warns that batteries need replacing. No further testing is possible until
batteries
have been replaced.
Note: NiMH rechargeable batteries show a lower charge than Alkaline batteries, and may not give much
warning before becoming exhausted.
Faulty, stuck key or switch position.
Instrument malfunction. If repeated follow returns procedure.
Any E followed by a number, ie E001, E002…
Over voltage warning.
For LTW315 the warning will be <280 V.
No Zref value stored, or test result lower than stored Zref.
Zref measurement required before an R1+R2 measurement can be made.
Loop test result out of display range.
Supply frequency out of range. Display switches between
frequency and voltage. Display shows <49.00Hz or >51.00Hz.
Severe noise on supply. Re-test.
Page 25

25
10.2 Procedure to replace batteries
WARNING: Do not switch the instrument on with the battery cover removed.
The rear cover must not be opened if the test leads are connected.
1. Switch off the instrument and disconnect (the instrument) from any electrical circuits.
2. To avoid the possibility of electric shock, do not press the test button or touch the fuse when changing
batteries.
3. To remove the rear cover, remove the retaining screw from the rear of the battery cover and lift the
cover off.
4. Remove the dead batteries and refit new batteries, observing the correct polarity as marked on the
battery compartment.
5. Replace the cover and retaining screw.
6. Switch on instrument and check battery indicator.
WARNING: - Incorrect battery polarity may prevent instrument operation or can
cause electrolyte leakage or damage the instrument. If the battery condition
indicator does not show a full charge, a cell may be reversed.
Note: Batteries should not be left in an instrument, which may remain unused for an extended period.
10.3 Fuse Blown indication
If the fuse has blown after contact with a live supply, the fuse blown symbol [ ] and the ‘UnS’
message will be displayed and the instrument will start beeping. These symbols and a periodic beeping will
continue until the instrument is switched off. This will only happen if a serious internal fault has occurred.
Please contact Megger Limited at the contact address at the end of this guide, or call Technical support on
+44 (0)1304 502 102 for further assistance.
The fuse must not be replaced until advice has been received from Megger Limited.
11. Auto power down
To extend battery life the instrument will automatically switch off two minutes after the last operation. It can
be switched off by selecting ‘OFF’ with the lower range switch, or switched back on again by pressing the
[TEST] button.
To extend the auto switch off time to 20 minutes, refer to section 8, SETUP options.
12. Preventive maintenance
Clean only with a damp cloth. Do not use any alcohol based cleaning fluids as they may leave a residue.
Isopropyl alcohol (or similar solvent cleaner) should only be used to clean the 4mm probe sockets on the
instrument on a regular basis.
Page 26

26
13. Technical specification
13.1 General specification
Only values with tolerances or limits are guaranteed data. Values without tolerances are for information
only.
Accuracy;
All accuracy statements are based on:
Ambient temperature: 23ºC ± 2ºC
Nominal source voltage: 230 V a.c ± 1%
Voltage measurement.
(a.c only) 50 V to 440 V
Accuracy: ±2% ±1 V
Frequency measurement
Range: 25 Hz to 99.99 Hz
Accuracy: ±0.1 Hz
A warning will be shown if applied voltage exceeds 440 V. Damage will occur if applied voltage exceeds
600 √rms.
Loop testing
NO-TRIP loop and high current loop test (LTW315)
Source voltage: 100 V to 280 V (49 Hz to 50.1 Hz)
Display range: 0.01 Ω to 2000 Ω
Accuracy: ±5% ±0.03 Ω @ 230 V a.c. ±10% ±0,03 Ω @ 100 V a.c. and 280 V a.c.
NO-TRIP loop and high current loop test (LTW325, LTW335 and LTW425)
Source voltage: 50 V to 440 V (49 Hz to 50.1 Hz)
Display range: 0.01 Ω to 2000 Ω
Accuracy: ±5% ±0.03 Ω @ 230 V a.c.
±10% ±0.03 Ω @ 100 V a.c. and 300 V a.c. (LTW325 and LTW425)
±10 ±0.02 Ω (LTW425)
±15% ±0.03 Ω @ 50 V a.c. (LTW325, LTW335 and LTW425)
Nominal test current:
No-Trip loop test 15 mA at nominal 230 V a.c supply
High current loop test 4 A at nominal 230 V a.c supply
EN61557 operational range: 0.30 Ω to 1000 Ω
High resolution loop test (LTW425 only)
Source voltage: 50 V to 440 V (50 Hz)
Display range: 0.001 Ω to 2000 Ω
Accuracy: ±5% ±0.01 Ω
Nominal test current: 4 A at nominal 230 V supply
EN61557 operational range: 0.300 Ω to 1000 Ω
Prospective Fault Current (PFC)
Prospective fault current = Measured voltage / Loop resistance
Maximum range: No Trip mode: 20 KA
High current mode: 20 KA
Hi resolution mode: 40 KA
Accuracy is derived from loop test and voltage measurement.
Page 27

27
Environmental
Temperature and humidity
Operating Range: -10°C to +60°C
Operating Humidity: 90% R.H. non-condensing at +40°C max.
Storage Range: -25°C to +70°C
Maximum altitude: 2000m to full safety specification
Dust and water ingress: IP54
Safety
Designed to IEC61010-1, and IEC 61557 part3 1997
Designed for 300 V to Earth Category IV, With Phase to Phase voltages to 440 V.
Fuse protected to 600 V rms a.c.
A warning will be shown if applied voltage exceeds 440 V.
Damage will occur if applied voltage exceeds 500 V rms.
IEC61557
Complies with the following parts of EN61557, Electrical safety in low voltage systems up to 1000V ac and
1500V dc- Equipment for testing, measuring or monitoring of protective measures:
Part1-General Requirements
Part3-Loop resistance
E.M.C. In accordance with IEC61326-1
Operational inaccuracies: Refer to www.megger.com
Power supply
Battery: 8 x 1,5 V cells IEC LR6 type (AA alkaline).
Rechargeable: 8 x 1.2V NiMH cells
Battery life: 2000 consecutive tests
Mechanical
Weight: 1000g ±10% excluding test leads
Dimensions: 203 x 148 x 78 mm
14. Accessories and equipment
14.1 Supplied with appropriate instruments:
Optional accessories:
Alternatively specific units will be supplied with the following alternative to (ii) above:
1 x Mains plug test lead (AS/NZS 3112)
1 x Mains plug test lead CEE 7/7
Patents:
The loop testing technologies used in these instruments are subject to the following patent applications:
UK Patent no. 0518089.9
European Patent no. 06119110.2
US and Canadian patent application.
Page 28

28
15. Repair and Warranty
The instrument contains static sensitive devices, and care must be taken in handling the printed circuit
board. If an instrument’s protection has been impaired it should not be used, but send for repair by suitably
trained and qualified personnel.
The protection is likely to be impaired if for example; it shows visible damage; fails to perform the intended
measurements; has been subjected to prolonged storage under unfavourable conditions, or has been
subjected to severe transport stresses.
NEW INSTRUMENTS ARE GUARANTEED FOR 3 YEARS FROM THE
DATE OF PURCHASE BY THE USER.
NOTE: Any unauthorized prior repair or adjustment will automatically invalidate the Warranty.
CALIBRATION, REPAIR AND SPARE PARTS
For service requirements for Megger instruments contact:
Megger Limited or Megger
Archcliffe Road Valley Forge Corporate Centre
Dover 2621 Van Buren Avenue
Kent CT17 9EN Norristown PA 19403
England U.S.A.
Tel: +44 (0) 1304 502 243 Tel: +1 610 676 8579
Fax: +44 (0) 1304 207342 Fax: +1 610 676 8625
Megger operate fully traceable calibration and repair facilities, ensuring your instrument continues to
provide the high standard of performance and workmanship you expect. These facilities are complemented
by a worldwide network of approved repair and calibration companies which offer excellent in-service care
for your Megger products.
Returning your product to Megger - UK and USA service centres
1. When an instrument requires recalibration, or in the event of a repair being necessary, a Returns
Authorisation (RA) number must first be obtained from one of the addresses shown. You will be asked
to provide the following information to enable the Service Department to prepare in advance for
receipt of your instrument, and to provide the best possible service to you.
§ Model, e.g. LTW300
§ Serial number, (e.g. 61110357050305/1234)
§ Reason for return, (e.g. calibration required, or repair)
§ Details of the fault (if the instrument is to be repaired)
2. Make a note of the RA number. A returns label can be emailed or faxed to you if you wish.
3. Pack the instrument carefully with plenty of padding, but no pressure on window or glass.
4. Ensure the returns label is attached, or that the RA number is clearly marked on the outside of the
package and on any correspondence, before sending the instrument, carriage paid, to Megger.
5. You may track the progress of your return on line by accessing the Service/Support facilities at
www.megger.com
Approved Service Centres
A list of Approved Service Centres may be obtained from the UK address shown. If outside UK/USA please
consult your distributor for the most convenient Service Organisation.
Page 29

29
M
Megger Limited
Archcliffe Road, Dover
Kent CT17 9EN England
T +44 (0)1 304 502101
F +44 (0)1 304 207342
E uksales@megger.com
Megger
4271 Bronze Way, Dallas,
Texas 75237-1019 USA
T +1 800 723 2861 (USA ONLY)
T +1 214 333 3201
F +1 214 331 7399
E ussales@megger.com
Megger
Z.A. Du Buisson de la Couldre
23 rue Eugène Henaff
78190 TRAPPES France
T +33 (0)1 30.16.08.90
F +33 (0)1 34.61.23.77
E infos@megger.com
Megger Pty Limited
Unit 26 9 Hudson Avenue
Castle Hill
Sydney NSW 2125 Australia
T +61 (0)2 9659 2005
F +61 (0)2 9659 2201
E ausales@megger.com
Megger Limited
Unit 106-550 Alden Road
Markham, Ontario L3R6A8
Canada
T +1 416 298 9688 (Canada only)
T +1 416 298 6770
F +1 416 298 0848
E casales@megger.com
Megger products are distributed in 146 countries worldwide.
This instrument is manufactured in the United Kingdom.
The company reserves the right to change the specification or design without prior notice.
Megger is a registered trademark
Part No. LTW300_Series_UG_en_V08 0315
www.megger.com
 Loading...