

Page 1

5kV Digital Insulation Testers
MEGGER
®
BM11D
MEGGER
®
BM21
User Guide
Guide de l’utilisateur
Gebrauchsanleitung
Guía del usuario
MEGGER
®
Page 2
Safety Warnings 3
General Description 4
Features and Controls 5 - 6
Operation
Instrument Controls 7 - 8
Features 8
Testing Procedures 9
Battery 9 - 10
Guard Terminal 10 -11
Condition and Warning Indicators 11 -12
Application Notes
Preventive Maintenance 13
Insulation Testing Techniques 14
Short Time or Spot Test 15
Polarization Index (PI) Test 15
Stress Conditions 16
Specification 17 -19
Accessories 20
Repair and Warranty 21
Guide Utilisateur 22 - 37
Betriebsanleitung 38 - 53
Guîa del Usuario 54 - 69
2
Contents
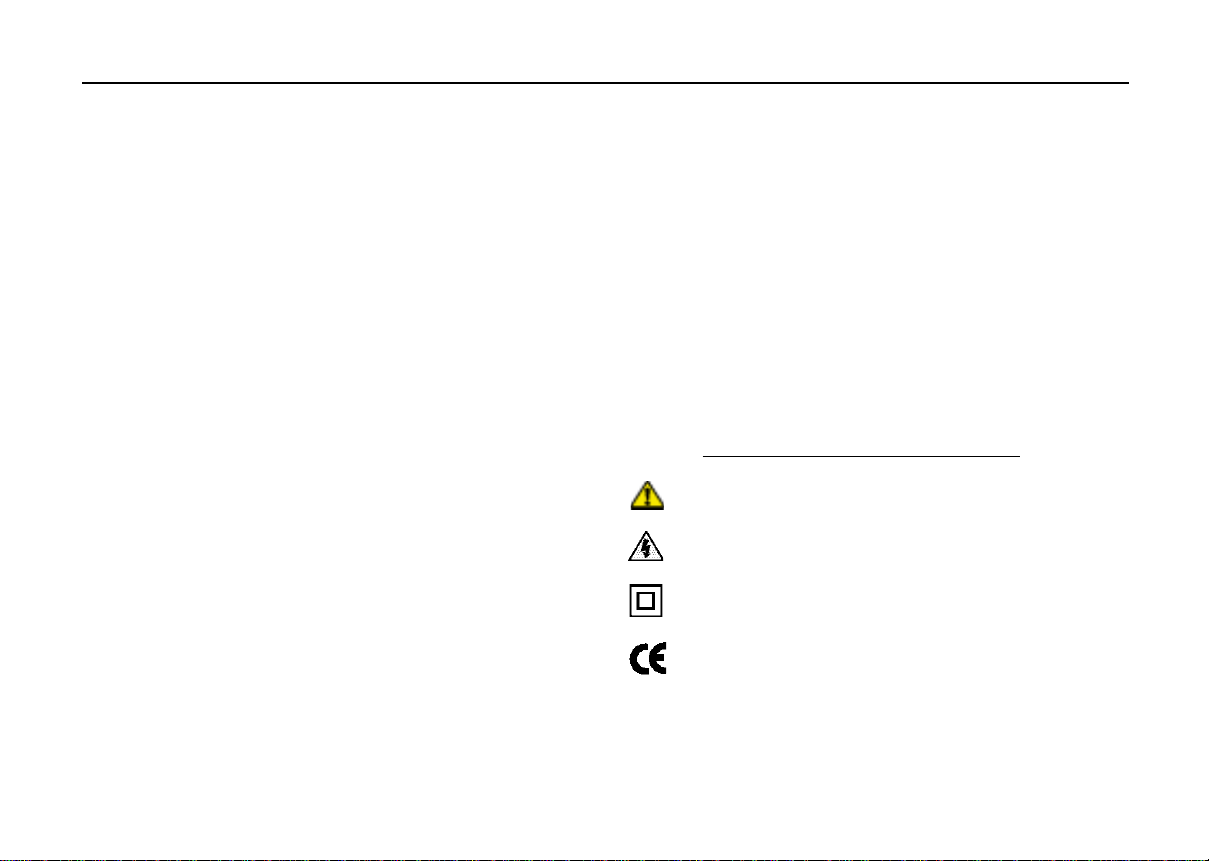
Symbols used on the instrument are:
Caution: Refer to accompanying notes.
Risk of electric shock.
Equipment protected throughout by Double
Insulation (Class
II).
Equipment complies with EU Directives
Page 3
3
SAFETY WARNINGS
• The circuit under test must be switched off, de-energised and isolated before insulation test connections
are made.
• Circuit connections must not be touched during an insulation test.
• After insulation tests, capacitive circuits must be discharged before disconnecting the test leads.
• Turning the instrument off, and manually discharging of circuits on completion of tests is recommended as
standard procedure, before touching any connections.
• In certain circumstances, break-down of the circuit under test may cause the instrument to terminate the
test in an uncontrolled manner, possibly causing a loss of display while the circuit remains energised. In this
event, it is even more important that the ‘ON/OFF’ key is pressed, and the circuit manually discharged
before touching any connections.
• Test leads including crocodile clips must be in good order, clean and with no broken or cracked insulation.
• Replacement fuses must be of the correct type and rating.
• The instrument should not be used if any part of it is damaged.
• If water is present in the charger recess, the instrument must not be used. It is recommended that the
instrument is not used in wet weather conditions.
• See Battery Charging Power Cord on page 4.
NOTE
THE INSTRUMENT MUST ONLY BE USED BY SUITABLY TRAINED AND COMPETENT PERSONS.
Page 4

The BM11D and BM21 are compact, battery powered, high
voltage d.c. insulation testers with resistance measurement
capabilities to around 1 TΩ. The BM11D has a digital full scale
of 500 GΩ whilst the BM21 can measure up to 5 TΩ. The
BM21 can be set to display leakage current instead of
resistance and this mode of operation also allows higher
resistances to be measured, possibly up to 500 TΩ.
The instruments are microprocessor controlled and feature a
large, clear LCD combining digital and analogue readings of
insulation resistance.
Both instruments have test voltage positions of 500 V, 1000 V,
2500 V and 5000 V. The BM21 has an additional range with a
variable output voltage of 25 V to 5000 V in 25 V steps.
An integral timer is started automatically on commencement of
the test, and displays elapsed minutes and seconds since the
start of the test. The BM21 timer can be used to set the
duration of test, and will automatically stop the output voltage
when the time has expired.
At the end of a test, capacitive loads are discharged
automatically and the decaying voltage is displayed as the
value returns to zero. The test leads should not be
disconnected until the item has been discharged fully. Similarly,
during a test the test leads should not be removed, and the item
under test should not be touched. A flashing LED, and flashing
high voltage symbols on the LCD remind the user that
hazardous voltage is present.
A battery symbol is displayed continuously showing the
condition of the battery.
Power is obtained from internal mains rechargeable batteries.
To recharge the batteries requires an input voltage within the
range 95-265 V a.c., 50-60 Hz. The power input and fuses are
located in a splashproof recess on the front panel.
Battery Charging Power cord:
If the power cord plug is not suitable for your type of socket
outlets (receptacles), do not use an adaptor. You should use a
suitable alternative power cord, or if necessary change the plug
by cutting the cord and fitting a suitable plug. The colour code
of the cord is:
Earth (Ground) Yellow/Green
Neutral Blue
Phase (Line) Brown
If using a fused plug, a 3 Amp fuse to BS 1362 should be fitted.
Note: A plug severed from the power cord should be destroyed,
as a plug with bare conductors is hazardous in a live socket
outlet (receptacle).
4
General Description
Page 5
5
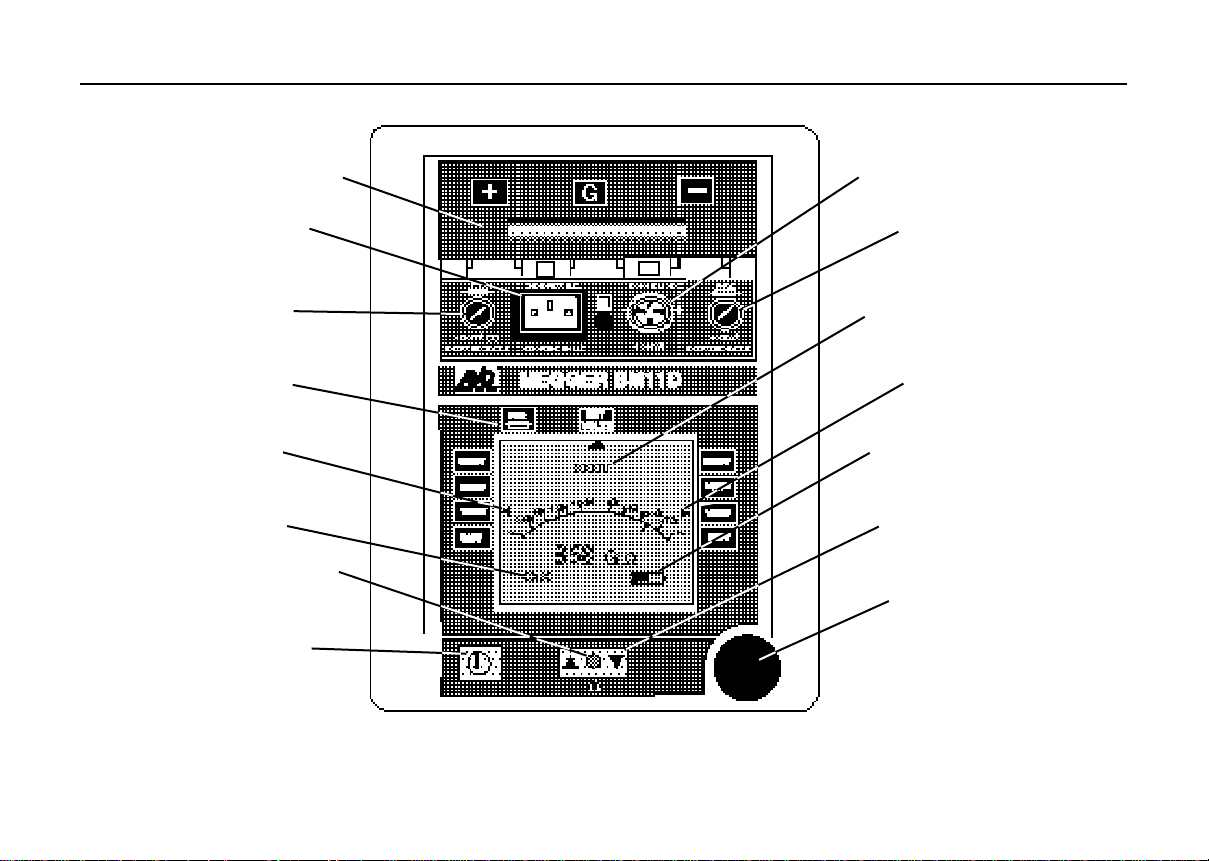
Features and Controls
BM11D Front Panel Layout
12 V Charger Input
Mains Socket
Sliding Cover (open)
Terminal Voltage
Cursor
Cursor
Timer
Selector Keys
On / Off Button
Fuse FS2
Fuse FS1
Warnings
Battery Symbol
Test Button
HV Warning LED
Page 6
6
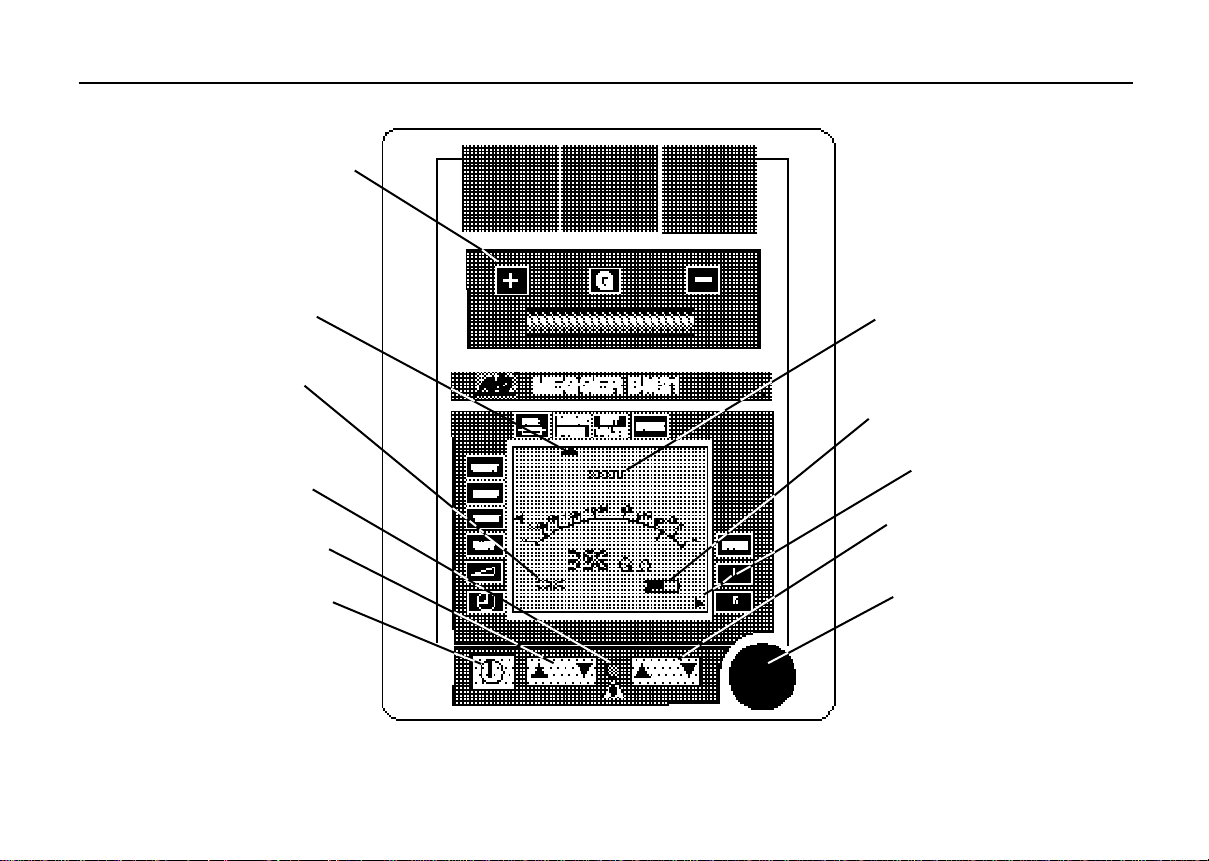
BM21 Front Panel Layout
On / Off Button
Sliding Cover (closed)
Terminal Voltage
Battery Symbol
Cursor
Range Keys
Selector Keys
Warnings
Timer
Test Button
HV Warning LED
Page 7
INSTRUMENT CONTROLS
On/Off Button.
Pressing the On/Off button starts the instrument and initiates a
self check and calibration. All LCD segments appear for 5
seconds, then the word ‘CAL’ appears for about 5 seconds.
When the word ‘CAL’ disappears, the instrument is ready for
use, and is in standby mode. To switch the instrument off, press
the on/off button once. (Auto switch off will occur after 10
minutes of non-use).
Selector Keys
The test voltage is selected by moving the cursor. When the
test button is pressed the instrument will operate at the voltage
indicated.
BM21: In addition to the fixed test voltages the cursor can be
used to select the variable voltage and test duration positions.
Range Keys (BM21 only)
The range keys have two purposes. The first purpose is to
select the measuring range, whether insulation resistance,
leakage current or burn mode. The second function is indicated
by two arrows which appear above the keys when either the
variable voltage or test duration positions are selected. Using
the range keys in this mode will raise and lower the applicable
parameter. The change in voltage is shown at the top of the
display, and the change in test duration is indicated in the
bottom left hand corner of the display.
Test Button
Pressing the large ‘TEST’ button for more than one second will
initiate a test at the selected voltage, simultaneously starting
the timer. Pressing the button again will terminate the test and
connect the internal discharge resistors across the output.
If more than 50 V exists across the terminals, this will be
indicated on the display. If the current flowing into the terminals
exceeds 2 mA it will not be possible to start a test.
A test may be terminated if;
1) The test time is exceeded.
2) The insulation under test suffers a complete breakdown.
3) The battery becomes exhausted.
4) Excessive electrical interference (>2mA at 5 kV) (BM21 only).
Battery Symbol
When the battery is fully charged, all segments of the battery
symbol will be indicated. As the battery is used the segments
will recede. The symbol flashes when the battery capacity is
excessively low (See ‘Battery’).
Cursor
The cursors on either side of the display indicate the ranges
selected.
Condition and Warning Indication
Factors which may affect or inhibit a test are indicated by a
large flashing cursor next to the appropriate warning label.
(See ‘Condition and Warning Indicators‘).
FS1: Mains input fuse.
FS2: Guard fuse.
12 V Charger input
The rechargeable batteries within the instrument can be
charged from a 12 V supply. Connection is made through this
socket. – +
Mains socket
To recharge the internal batteries a mains input of 95-265 V a.c.
7
Operation
Page 8

(50/60Hz) is required. The socket accepts a “Euro” plug.
Sliding cover
The sliding cover ensures that the input and the output
terminals cannot be accessed simultaneously.
Terminals
The terminals marked ‘+’, ‘–’ and ‘G’ lock the test leads into the
case to prevent accidental disconnection.
Terminal Voltage
At the end of a test, any voltage remaining on the terminals will
be indicated until it has decayed to less than 50 V.
BM21:Output terminal voltage is indicated during a test.
Timer
BM11D:The timer automatically starts when the test button is
pressed. It indicates the time elapsed. Maximum test duration is
60 minutes, when the test will be stopped automatically.
BM21: The test time can be set by the user. Selecting
using the selector keys, and using the range keys to ramp the
time up or down will set the duration of test. (Maximum 90
minutes). The timer will automatically start when the test button
is pressed, and will stop when the test duration has elapsed
(unless stopped in one of the other ways). Setting the timer to
zero minutes effectively disables the instrument. A test time of
10 minutes is useful for Polarisation Index (PI) testing.
For more information on PI testing, see ‘Application of Test
techniques’.
FEATURES
Automatic Discharge
Internal discharge resistors will be selected automatically
1) At the end of a test
2) If the instrument is switched off
3) If an internal error is detected
Variable Voltage (BM21 only)
The variable voltage position provides the user with the option
to select a non-standard voltage between 25 and 5000 V d.c.,or
to continuously vary the voltage selected (in 25 V steps) during
a test.
When operating on this range, the measurement range (either
‘R’, ‘I’ or ‘BURN’) cannot be changed. The measurement range
must therefore be selected before the variable voltage position
is chosen.
To select the test voltage required, move the cursor to the
position and adjust the output terminal voltage using the Range
keys. The terminal voltage is shown at the top of the display.
BURN Mode (BM21 only)
Selecting ‘BURN’ mode will enable testing to continue after a
breakdown, for fault location. Under some conditions, the
breakdown will cause erratic display operation.The burn mode
can only be selected before a test is started.
The detachable lid
Specially designed lid hinges enable the lid to be removed and
replaced as required, and will protect the lid from strain or damage
by unclipping itself if unintentionally opened past its full extent.
To replace the lid, hold it vertically and push the hinges back
into their clips again while restraining the instrument. Then fold
the lid shut.
8
Page 9

TESTING PROCEDURES
When not testing, i.e. when in standby mode, the instrument acts
as a voltmeter.
1. Select the required test voltage with the selector keys.
2. To start a test, press the red test button for more than one
second. The HV warning LED on the front of the instrument
flashes, together with the display HV warning symbols.
When testing resistive or moderately capacitive loads (up to
about 1 µF) the test voltage will appear within a few seconds.
On large capacitive items the voltage rise will be noticeably
slower and on low resistance (less than 10 MΩ) the voltage may
never rise to its nominal value.
Insulation resistance readings are updated once every second for
readings up to about 100 MΩ. For readings between 1 GΩ and
infinity the sample rate will slow down to once every 20 seconds.
Changing the voltage during a test will upset the reading
temporarily. The correct reading will appear when the new
voltage has been stable over a full sample period.
3. When the test is terminated the item under test will be
automatically discharged. The test can be stopped manually
by pressing the red test button. The test will be stopped
automatically if the test duration is reached, the instrument is
turned off, an internal error occurs, a fuse blows or if
excessive noise is detected (except in Burn mode on the
BM21). When the test has stopped the final reading will be
held on the digital display.
4. (BM21 only) Pressing either of the selector keys will change
the display to show the capacitance of the item under test.
N.B. The capacitance reading is only available if the test has
run for more than one minute, and provided the reading was
not over-range.
Reading Limitations
The BM11/D can measure currents down to 10 nA. The
highest digital readings obtainable are therefore 50 GΩ at
500 V but rising to 500 GΩ at 5000 V. The analogue display
works at all voltages up to 1 TΩ.
The BM21 is considerably better at the high end of the scale.
The highest digital readings obtainable are 500 GΩ at 500 V
and 5 TΩ at 5000 V. It is possible to read even higher
resistances by switching from ‘R’ to ‘I’ mode (using the right
Range keys). The digital display then shows leakage current,
resolving to 0.01 nA. Using this method it is theoretically
possible to measure resistance up to 500 TΩ at 5000 V but it
will be necessary to perform an open circuit calibration test to
establish measurement circuit offset current and test lead
leakage. (This is ±0,2 nA at normal temperatures with new,
clean test leads). Note that if the variable voltage has been
selected, the decision to read ‘R’ or ‘I’’ must be made before the
test is started.
BATTERY
The instrument is powered by two rechargeable, sealed, leadacid batteries. The state of charge is indicated by the battery
symbol on the display. It is not possible to over charge or over
discharge the batteries. When the last battery segment flashes
there is very little energy left, probably less than 1 hour of
testing. Turning the instrument off completely between tests will
conserve the remaining battery energy. When batteries are
completely exhausted the battery symbol will flash and the
instrument will switch off. For maximum reliability, try to keep
the batteries in a fully charged state and do not charge at
extreme ambient temperatures. The batteries normally last
9
Operation
Page 10

about 5 years; less if subjected to high temperatures for much
of the working day. To reduce the chances of sudden failure,
two batteries are used, operating in parallel. If either battery
fails, the instrument will continue to operate on the good battery
but the ‘FS2’ indication will flash constantly . (See ‘Condition
and Warning Indicators’).
Charging the batteries should be done in a dry environment
(the instrument is not waterproof with the charging cover open).
Unplug the test leads and slide the charging cover open. (This
operation renders the test lead sockets inaccessible and
therefore prevents any danger of having the test leads
connected to dangerous voltages). Connecting a.c. (50/60 Hz)
voltages (95 V to 265 V) to the IEC socket will commence
charging, which is indicated by the red lamp. An overnight
charge will normally be sufficient. Turning the instrument on will
show the state of charge.
It is possible to charge the batteries from a 12 to 15 V d.c.
supply using the round socket. However, this is slow and
unlikely to provide a full charge. Applying more than 15 V is
likely to overcharge the batteries.
Battery Charging Notes
1) Do not leave batteries in a totally discharged state
2) If instrument is not used, recharge the batteries for at least
24 hours every 6 months. (More frequently if the storage
temperature is >40 °C).
3) 16 hours charging (from a fully discharged state) will
achieve at least 90% of a full charge. It is beneficial to
continue charging for several days and no harm will be
done if the charger is left on indefinitely.
4) The battery should only be charged at temperatures in the
range 0 °C to 40°C.
GUARD TERMINAL
The guard terminal is at the same voltage as the negative
terminal. A fuse (FS2) protects the low impedance guard circuit
from the application of external voltage. Guard fuse failure will
be indicated on the display only when the guard circuit is in
use. To check whether the fuse has blown, connect the positive
terminal to the guard terminal and start a 500 V test. If the
display flag flashes by ‘FS2’ the fuse has blown (see
‘Condition and Warning Indicators‘). FS2 is located in the
charger recess.
Using The Guard Terminal
For basic insulation tests the guard terminal will not be used.
Most insulation tests can be performed by connecting the
specimen between the ‘+’ and ‘–’ terminals. These tests will
show up any deficiencies in the insulation, whether they are
caused by leakage through the insulator body or across its
surface.
To distinguish between body leakage and surface leakage the
guard terminal ‘G’ may be used. In this way surface leakage
current is removed before it enters the measurement circuit via
the ‘–’ terminal.
10
to ‘G’ terminal
to ‘+’ terminal
Cable Core
Leakage path
Outer Sheath
to ‘-’ terminal
Covering
Page 11

In cable testing, there may be a path of leakage across the
insulation between the bared cable and the external sheathing,
perhaps due to the presence of moisture or dirt. Where it is
required to remove the effect of this leakage, particularly at high
testing voltages, a bare wire may be bound tightly around the
insulation and connected via the third test lead to the guard
terminal ‘G’.
Since the leakage resistance is effectively in parallel with the
resistance to be measured, the use of the guard causes the
current flowing through the surface leakage to be diverted from
the measuring circuit. The tester, therefore, gives more nearly
the true insulation resistance.
CONDITION AND WARNING INDICATORS
FS2
A failed guard fuse will not be detected unless the guard
terminal is in use. If the FS2 indicator flashes when the guard
lead is in use it is likely that the guard fuse (FS2) has ruptured.
If the FS2 indicator flashes when the guard lead is not
connected, it indicates failure of one of the batteries or a battery
fuse (which is not accessible externally). The instrument will
operate normally in this condition, although the operating time
between charges will be reduced, no capacitance readings will
be provided and no warning will be given if the guard fuse
blows.
BREAKDOWN
The BM21 has a breakdown detector which terminates the test
if a breakdown of the circuit occurs. The ‘BREAKDOWN’
indicator cursor will then flash to identify the cause of the test
termination. Selecting the ’BURN’ mode prior to the test
disables the ‘BREAKDOWN’ indicator.
The BM11D does not have a breakdown detector and is
therefore effectively in permanent ‘BURN’ mode. When using
the BM11D (or BM21 in ‘BURN’ mode) testing will continue if
a breakdown occurs in the circuit under test. In very dry
conditions, a high frequency arc can be generated. This may
cause a disturbance to, and possibly a complete loss of the
instrument display. In these circumstances it is important to
remember that the circuit may still be energised.
If in any doubt, switch the instrument to ‘OFF’ and
manually discharge the circuit before touching any
connections.
EXT VOLTS
Display of the ‘EXT VOLTS’ cursor, indicates that the voltmeter
is reading a voltage which originates from an external source.
The voltmeter will show d.c. voltage of either polarity or a.c.
voltage.
NOISE (BM21only)
If an external interference (normally 50 Hz or 60 Hz hum
current) is excessive (>2 mA at 5 kV), testing will terminate, and
the noise indicator will flash.
(Note: trips at approx. 1,5 mA at <2 kV).
Error Numbers
Internal faults and errors will cause the display to show ‘E’
followed by a number. These error numbers can be invoked by
extreme cases of electromagnetic interference or by internal
faults, in which case the number is of little significance. The
only meaningful error numbers are E5 and E11 which indicate
that a negative current has been measured.
Calibration Errors
At switch-on there is a calibration check which automatically
Operation
11
Page 12

adjusts the measurement system against an internal voltage
and resistor. The calibration sequence will not finish unless the
measurement system is giving consistent results within preset
limits.
If the startup screen does not progress beyond the segment
check or stops with ‘CAL’ displayed, calibration has failed.
12
Page 13

Application Notes
13
Preventive Maintenance
The proverb ‘A stitch in time saves nine’ inspired the title of an
AVO International booklet on insulation testing, as it neatly
sums up the benefits of preventative maintenance. The savings
come in financial terms from costly repairs, lost production, lost
profits and in human terms, from lives saved in the event of
dangerous electrical faults.
Regular insulation testing of electrical equipment can help to
detect deteriorating insulation. The effects which cause
insulation to deteriorate include mechanical damage, vibration,
excessive heat or cold, dirt, oil, moisture and localized voltage
stresses - all of which can arise on most industrial or utility
equipment.
Insulation tests are sometimes used in isolation as absolute
measures of the
quality of the insulation. This is most
appropriate when equipment is being installed and checked for
compliance with a specified ‘Pass’ level. For operational
equipment the key factors are
trends in the insulation readings.
It is therefore important that records of insulation readings are
kept, relating to each piece of equipment or ‘Asset’ in your
testing regime.
AVO supplies test record cards to assist with
such record keeping.
There are also a number of influences on the insulation
readings - temperature, humidity and surface leakage for
example and a range of test techniques have been developed to
help with the interpretation of your insulation tests.
Test Record Example
Page 14

3. Conduction or Leakage current.This is a small steady
current that can be sub-divided into two:-
(a) A current flowing along conduction paths
through
the insulation material.
(b) A current flowing along conduction paths
over the
surface of the insulation material.
As the total current depends upon the time for which the
voltage is applied, Ohm’s Law theoretically applies at infinite
time.
The charging current falls relatively rapidly as the equipment
under test becomes charged up. The actual length of time
depends upon the size and capacitance of the item under test.
Larger items with more capacitance will take longer e.g. long
supply cables. The absorption current decreases relatively
slowly compared with the charging current. In essence it
depends upon the nature of the insulation material.
The conduction or Leakage current builds up quickly to a
steady value and then remains constant for a particular applied
voltage under stable conditions. It is this current that is affected
by moisture, dirt etc. and the degree to which it flows bears a
direct relation to the quality of the insulation, and consequently
to the value of the insulation resistance measured. An
increase in the leakage current is a pointer to possible future
problems.
14
Insulation Testing Concepts
Insulation resistance can be considered by applying Ohm’s Law.
The measured resistance is determined from the applied voltage
divided by the resultant current,
R = V
I
There are two further important factors to be considered.
These are (i) the nature of the current through and/or over the
insulation, and (ii) the length of time for which the test voltage is
applied. These two factors are linked. The total current that flows
is made up of three separate currents:-
1. Capacitance charging current. This current is initially high
and drops as the insulation becomes charged up to the
applied voltage.
2. Absorption current. This current is also initially high but
drops at a much slower rate than the charging current.
Components of insulation test current
Page 15

Short time or Spot Test
This is the simplest insulation test, giving a reading of insulation
resistance in MΩ. The test is applied for a short but specific
period of time, immediately after which a reading is taken. The
time is typically 30 or 60 seconds and the
BM21 will allow you
to set this time and the test will finish automatically. The reading
will not necessarily be the maximum value but if the same time
is used each test, then the same point on the curve of
increasing apparent resistance is being compared. On
installation these readings will be compared to the required
minimum specification. Further readings taken for maintenance
purposes must be monitored for any trend that they show. The
readings are subject to variation from temperature and humidity
and these factors may require the insulation reading to be
corrected. Information on temperature correction is given in the
AVO publication ‘A Stitch in Time’. Alternatively, a Polarization
Index (PI) test may be used.
Polarization Index (PI) Test
This test method is a particular
example of the time resistance
method. Time resistance tests
take successive readings at
specified times and are
independent of temperature.
They can often help in the
situation where past test
record frequency are limited.
Good insulation generally
shows an increase in
resistance over a 10 minute
period.
MΩ
Time
10 Minutes
0
With contaminated insulation, absorption effects are masked by
high leakage currents and the readings are therefore fairly flat.
The PI test takes the ratio of the values at 10 and 1 minutes this is the Polarization Index. The PI test also has the
advantage of not requiring temperature correction. The value of
PI can give a rough guide to condition of insulation, although the
figures should always be interpreted in the context of the
equipment history and your experience.
There are two specific conditions to be aware of when
interpreting PI tests results, particularly if a history of the
equipment is unavailable.
1) Dry, brittle insulation (e.g. on windings) on can give a high
PI but fail under shock conditions.
2) If multi-layered insulation fails in one of the layers while the
others retain high resistances, the effect on the test current
will tend to increase the PI value, masking possible
problems from surface leakage caused by dirt and
contamination.
Application Notes
PI TEST RESULT INSULATION CONDITION
<1,0 Unsatisfactory
1,0 to 2,0 Dubious
2,0 to 4,0 Good
>4,0 Very Good
15
Page 16

Figure 3. shows a problem which can occur. If one end of the
sample is grounded and this is required to be connected to the
positive terminal, then the negative (measurement) lead is
surrounded by a 5 kV field. This is likely to cause at least 1 nA of
unwanted leakage current, representing a 5 TΩ resistance in
parallel with the sample under test.
Figure 3.
When taking measurements above 100 GΩ therefore, the user
should where possible ground the Guard Lead as shown in
figure 2, otherwise parallel leakage paths may occur.
Stress Considerations
Measurement above 100 GΩ
Figure 1. shows the stresses and subsequent leakages
which will occur between the test leads if neither is
connected to earth (ground). These leakages have
significant effect and occur through the air itself.
Figure 1.
Figure 2. shows the effect of connecting the guard lead to
the ground. This reduces the stray leakage into the negative
(measurement input) terminal considerably, but this
technique is only permissible if the item under test is
isolated from the ground. (‘Isolated’ means insulated by a
resistance of at least 5 MΩ for the positive terminal or 10 kΩ
for the negative terminal).
Figure 2.
16
Page 17

Test Voltages (d.c.): 500 V, 1000 V, 2500 V & 5000 V
BM21 only; 50 to 5000 V variable in 25 V steps
Accuracy (0 °C to + 30 °C): ±5% of nominal test voltages (load resistance >100 MΩ)
Insulation Range: 100 kΩ to 1 TΩ analogue
BM11D: 10 kΩ to 500 GΩ digital
BM21: 10 kΩ to 5 TΩ digital
Accuracy (0 °C to + 30 °C): BM11D:±5% 1 MΩ to 100 GΩ at 5 kV
±5% 1 MΩ to 10 GΩ at 500 V
±20% outside these limits (above 100 kΩ)
BM21:±5% 1 MΩ to 1TΩ at 5 kV
±5% 1 MΩ to 100 GΩ at 500 V
±5% 1 MΩ to 10 GΩ at 50 V
±20% outside these limits (above 100 kΩ)
For extended temperature range -20°C to + 50°C the percentage error doubles
Short Circuit Current: 2
mA nominal
17
Specification
Resistance under test (Ω)
Page 18

Typical Terminal Voltage Characteristics
18
Page 19

Timer: BM11D: 0 to 60 minutes
BM21: 0 to 90 minutes: User selects test duration
Hum Rejection: 1 mA rms per kV test voltage
2 mA rms maximum
Voltage range: BM11D: 50 to 1000 V a.c. or d.c.
BM21: 50 to1000 V a.c. or d.c.
(N.B. Display does not distinguish between V a.c. and V d.c.)
Accuracy (0 °C to +30 °C): ±2% ±1 V
Guard Terminal: Will guard out parallel resistances to a minimum of 250 kΩ.
When measuring 100 MΩ under these conditions, the additional error will be less
than 5%.
Capacitor charging time: 5s per µF to charge to 5 kV
Capacitor discharging time: 2s per µF to discharge to <50 V
Maximum continuous overload: 1 kV rms
Temperature coefficient: 0,2% per °C (test current >100 nA)
0,1% per °C for test voltage
Temperature range: Operating: -20 °C to +50 °C (Errors double outside range 0 to 30 °C)
Storage: -25 °C to +65 °C
Power supply: Two 12 V, 2 Ah Lead-acid rechargeable batteries. Recharge time: 16 hours
Battery life: typically 8 hours continuous testing
Environmental protection: IP54 (with the charging recess cover securely closed)
Altitude: 2000 m max. to operate within specification
Fuses: FS1: 100 mA (T), 250 V IEC 127/1
FS2: 100 mA (F), 250 V IEC 127/1
Mains Power cord fused plug (when applicable): 3 A fuse to BS 1362
Safety: The instruments meet the requirements for double insulation to IEC 1010-1 (1995) EN
61010-1 (1995) to installation Category III*, 300 Volts phase to earth (ground) and 500
Volts phase to phase
E.M.C: The instruments meet EN 50081-1 and EN 50082-1 (1992)
19
Specification
Page 20

Supplied with the instrument Part Number Cat. Number (US only)
User Guide 6172-033
HV lead set, 3 m long 6121-403
Set of 3 High voltage test leads, 3 m long (210968)
Accessory Pouch 6420-096
Mains (line) power cord
A
vailable as an optional extra
HV lead set, 8 m long (x3) 6121-451
HV lead set, 15 m long (x3) 6121-452
12V d.c.charging lead with automotive cigarette lighter plug, 3 m long. 6231-584
5 kV Shielded Lead set 6311-080
5 kV Calibration Box - CB101 6311-077
Carrying case (218748)
Publications
‘A Stitch in Time’ AVTM21-P8B
20
Page 21

The instrument circuit contains static sensitive devices, and
care must be taken in handling the printed circuit board. If the
protection of an instrument has been impaired it should not be
used, and be sent for repair by suitably trained and qualified
personnel. The protection is likely to be impaired if, for example,
the instrument shows visible damage, fails to perform the
intended measurements, has been subjected to prolonged
storage under unfavourable conditions, or has been exposed to
severe transport stresses.
New Instruments are Guaranteed for 1 Year from the Date
of Purchase by the User.
Note: Any unauthorized prior repair or adjustment will
automatically invalidate the Warranty.
Instrument Repair and Spare Parts
For service requirements for MEGGER® Instruments contact:-
A VO INTERNATIONAL or
A VO INTERNATIONAL
Archcliffe Road Valley Forge Corporate Centre
Dover 2621 Van Buren Avenue
Kent, CT17 9EN. Norristown PA 19403
England. U.S.A.
Tel: +44 (0) 1304 502243 Tel: +1 (610) 676-8579
Fax: +44 (0) 1304 207342 Fax: +1 (610) 676-8625
or an approved repair company.
Approved Repair Companies
A number of independent instrument repair companies have
been approved for repair work on most
MEGGER®
instruments, using genuine MEGGER® spare parts. Consult
the Appointed Distributor / Agent regarding spare parts, repair
facilities and advice on the best course of action to take.
Returning an Instrument for Repair
If returning an instrument to the manufacturer for repair, it
should be sent freight pre -paid to the appropriate address. A
copy of the Invoice and of the packing note should be sent
simultaneously by airmail to expedite clearance through
Customs. A repair estimate showing freight return and other
charges will be submitted to the sender, if required, before work
on the instrument commences.
21
Repair and Warranty
Page 22

AVO INTERNATIONAL
Archcliffe Road P.O. Box 9007 4651 S. Westmoreland Road Megger SA
Dover Valley Forge Dallas 29 Allée de Villemomble
Kent, CT17 9EN. PA 19484-9007 TX 75237-1017 93340 Le Raincy
England. U.S.A. U.S.A. Paris, France
Tel: +44 (0) 1304 502100 Tel: +1 (610) 676-8500 Tel: +1 (800) 723-2861 (U.S.A. only) Tel: +33 (1) 43.02.37.54
Fax: +44 (0) 1304 207342 Fax: +1 (610) 676-8610 Tel: +1 (214) 330-3203 (International) Fax: +33 (1) 43.02.16.24
Fax: +1 (214) 337-3038
This instrument is manufactured in the United Kingdom.
The company reserves the right to change the specification or design without prior notice.
MEGGER is a registered Trade Mark of AVO INTERNATIONAL LIMITED.
Copyright © AVO INTERNATIONAL LIMITED.
Part No. 6172-033 - Edition 8 - Printed in England - 6EE
LEET
 Loading...