


Entire contents © Megatech 2003
www.megatech.com
www.megatech.comwww.megatech.com

If you have questions about operating or installing your new Megatech
product, or if you are missing parts... Please Call Megatech First!
DO NOT RETURN THIS PRODUCT TO THE STORE
Call our Customer Service Department at:
(201) 662-2800
10:00am - 5:00pm, EST Monday through Friday (except holidays)
Technical assistance is also available on-line at www.megatech.com
or by e-mail to info@megatech.com
Congratulations! You have just purchased a radio controlled micro
model airplane that incorporates some of the most technically advanced
electronics available. Your new Megatech® X-EC DiversionTM is packed
with on-board microprocessor-controlled thrust-vectoring, an advanced
self-righting elliptical wing and a pre-programmed failsafe landing
mode. All of this technology combines to make the X-EC Diversion
incredibly stable and one of the easiest R/C airplanes in the world to
fl y. Even if this is your fi rst R/C airplane, successful fl ights with the XEC Diversion are virtually guaranteed. You must, however, follow the
instructions.
Please read this entire fl ight manual carefully before you attempt
to build or fl y your X-EC Diversion.
If you experience any problems, DO NOT take your X-EC Diversion
back to the store! Call one of our MegaTechnicians at:
1-888-MEGA-911 or send an e-mail to: info@megatech.com
10:00am-5:00pm EST, Monday through Friday (except holidays)
Technical assistance is also available on-line at www.megatech.com
or by e-mail to info@megatech.com
DO NOT RETURN THIS PRODUCT TO THE STORE
TABLE OF CONTENTS
Getting Acquainted with your X-EC Diversion...............................................3
Safety Warnings ...............................................................................................4
The Radio Transmitter .....................................................................................5
Attaching the Landing Gear ................................................................................6
The Flight Pack Battery ....................................................................................7
Preparing For Your First Flight ...........................................................................8
Flying Your X-EC Diversion .............................................................................9
Landing Your X-EC Diversion ........................................................................10
Ordering Spare Parts ......................................................................................11
Troubleshooting .............................................................................................12
Helpful Hints ...................................................................................................13
Crash Warranty ..............................................................................................13
Limited Warranty.............................................................................................14
2
Table of Contents
Important! Before you begin, please read the warnings
listed on the following page. Failure to comply with the
following recommendations could lead to bodily harm or injury.
The Megatech X-EC Diversion is not intended for those under 12
years of age without proper adult supervision.
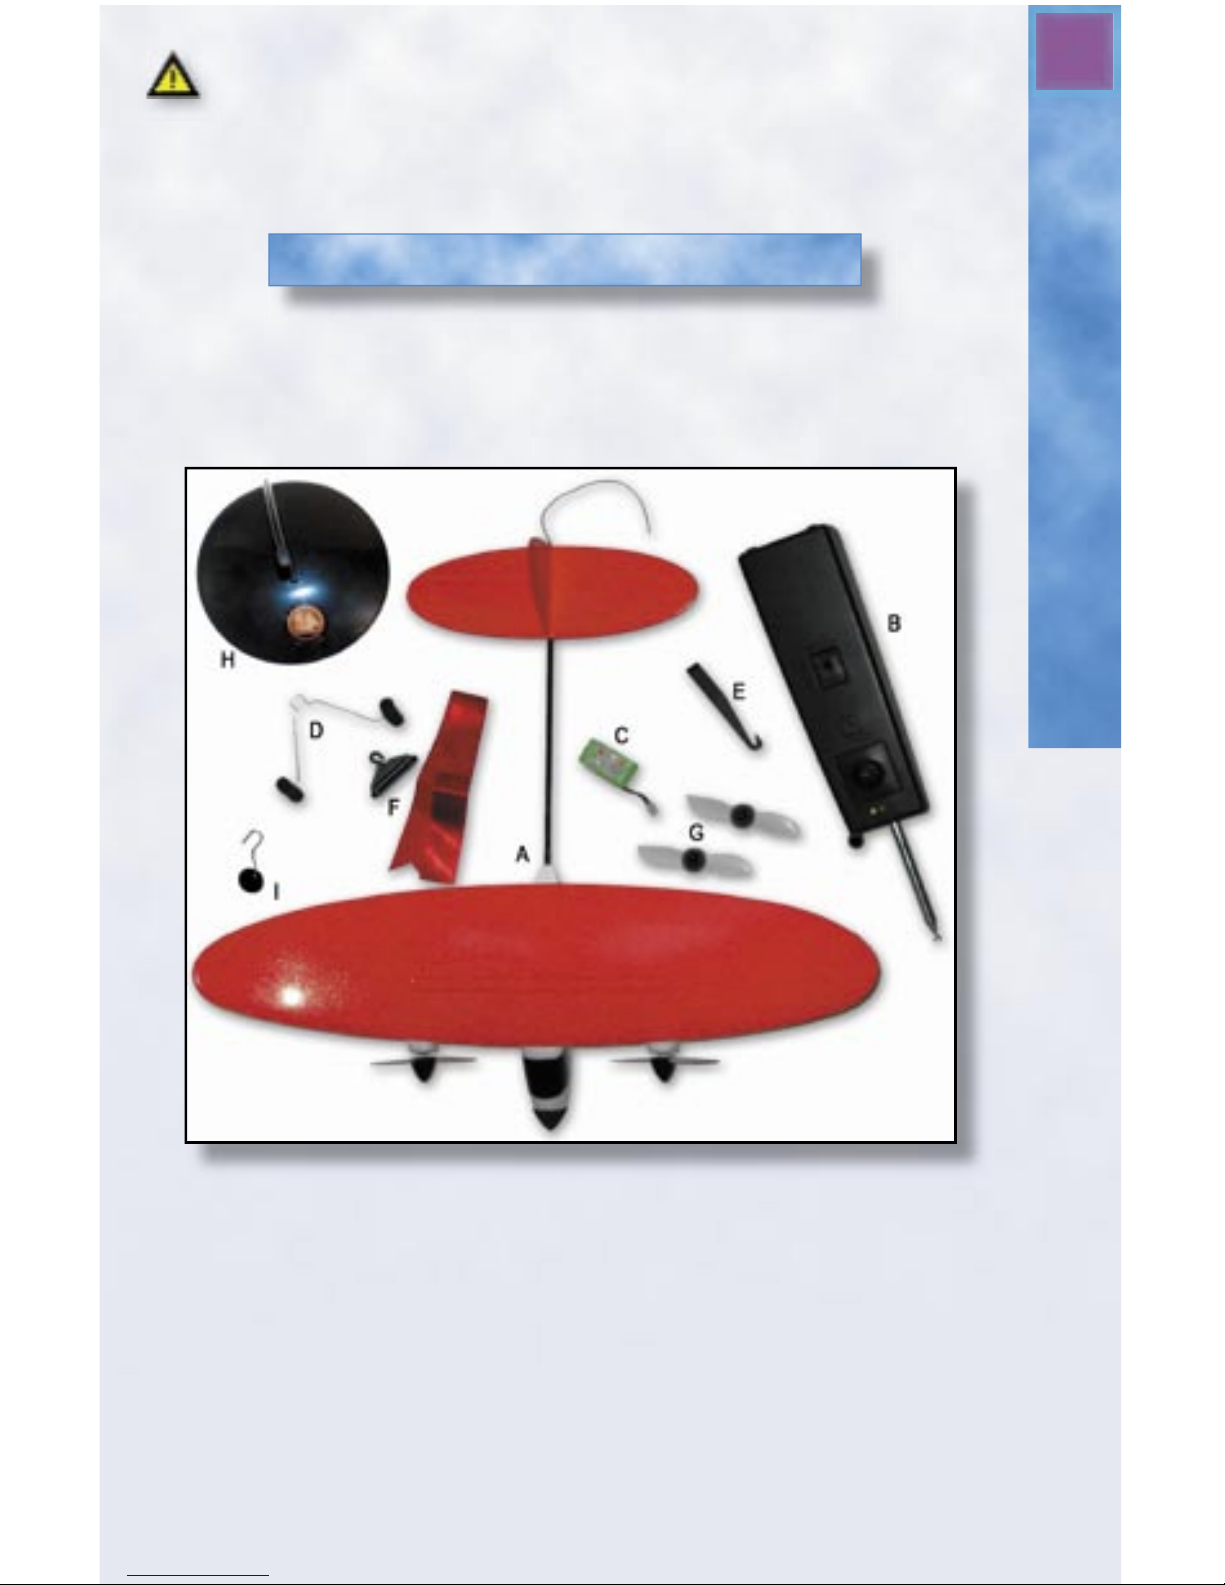
PACKAGE CONTENTS
Before going any further, please check that your X-EC package
contains all of the following items, using the picture below as a guide:
3
Package Contents
Getting Acquainted with Your X-EC
A. X-EC Diversion Aircraft H. Display Stand
B. Radio Transmitter/Charger Unit I. Rear Landing Gear
C. Rechargeable Battery Pack
D. Landing Gear
E. Hook and Compartment Tool - “Dual-Tool”
F. Transmitter Frequency Flag/Wind Gauge
G. Spare Propellers
If any of these items are missing from your package, please contact
Megatech.
4
Safety Warnings
Safety Warnings
Please read before operating your X-EC Diversion.
General
• You alone are responsible for operating your aircraft in a safe
manner. When fl ying, you are responsible for your own safety
and the safety of others around you. Follow these basic safety
guidelines at all times.
• When operating/fl ying always be aware of spinning propellers. Be
careful not to let them come close to your person, others and/or loose
clothing.
• Fly in wide-open areas free from obstructions such as trees or
telephone poles and wires.
• Do not fl y your airplane if other models are being operated in the
area on the same frequency (49 MHz or 27 MHz).
• Do not attempt to disassemble any of the airplane’s components or
allow them to get wet. Electrical damage may occur.
• Never fl y your airplane from roadways or after dark.
• Keep spectators behind you when fl ying.
• Before fl ying, make sure you perform a range check to be sure you
can maintain control at least 25-feet from transmitter to model with
the transmitter antenna collapsed.
• Since your airplane is controlled by a radio link it is very important to
always use fresh alkaline batteries in the transmitter. We recommend
Megatech’s Golden Power series, designed for R/C products.
• Never use solvents or liquid cleaners to clean this aircraft. Doing so may
damage the foam. Only use a dry, soft cloth for cleaning.
Batteries
• Always turn on the
radio before
installing the fl ight
pack battery.
Installing the fl ight
pack battery before
turning on the
transmitter turns
on the airplane’s fail safe system and there
is no control of the
plane.
Flight Pack
Battery
5
Radio Transmitter
• Never leave the fl ight pack battery unattended while charging.
Constant monitoring is required while charging the fl ight pack
battery. Only charge the fl ight pack battery until its indicator turns
from yellow to orange. It will become warm, but don’t let it get too
hot. Approximately 2-4 minutes with fresh transmitter batteries is
usually enough.
• To prevent fl ight pack battery from overheating, allow it to cool
completely after each fl ight before recharging. The battery indicator
will turn yellow when it has cooled enough to recharge.
• The fl ight pack battery should never be left in the model while it is
not in use.
Radio
• Safe radio operation tip: The transmitter should always be the fi rst
thing turned on and the last thing turned off.
• The transmitter’s antenna must be fully extended for optimum radio
link during fl ight. Never fl y with the antenna down.
• Do not trim the airplane’s antenna. It is cut to a specifi c frequency
length and to do so would drastically affect radio range.
• Never disassemble any of the radio components or expose them to
moisture.
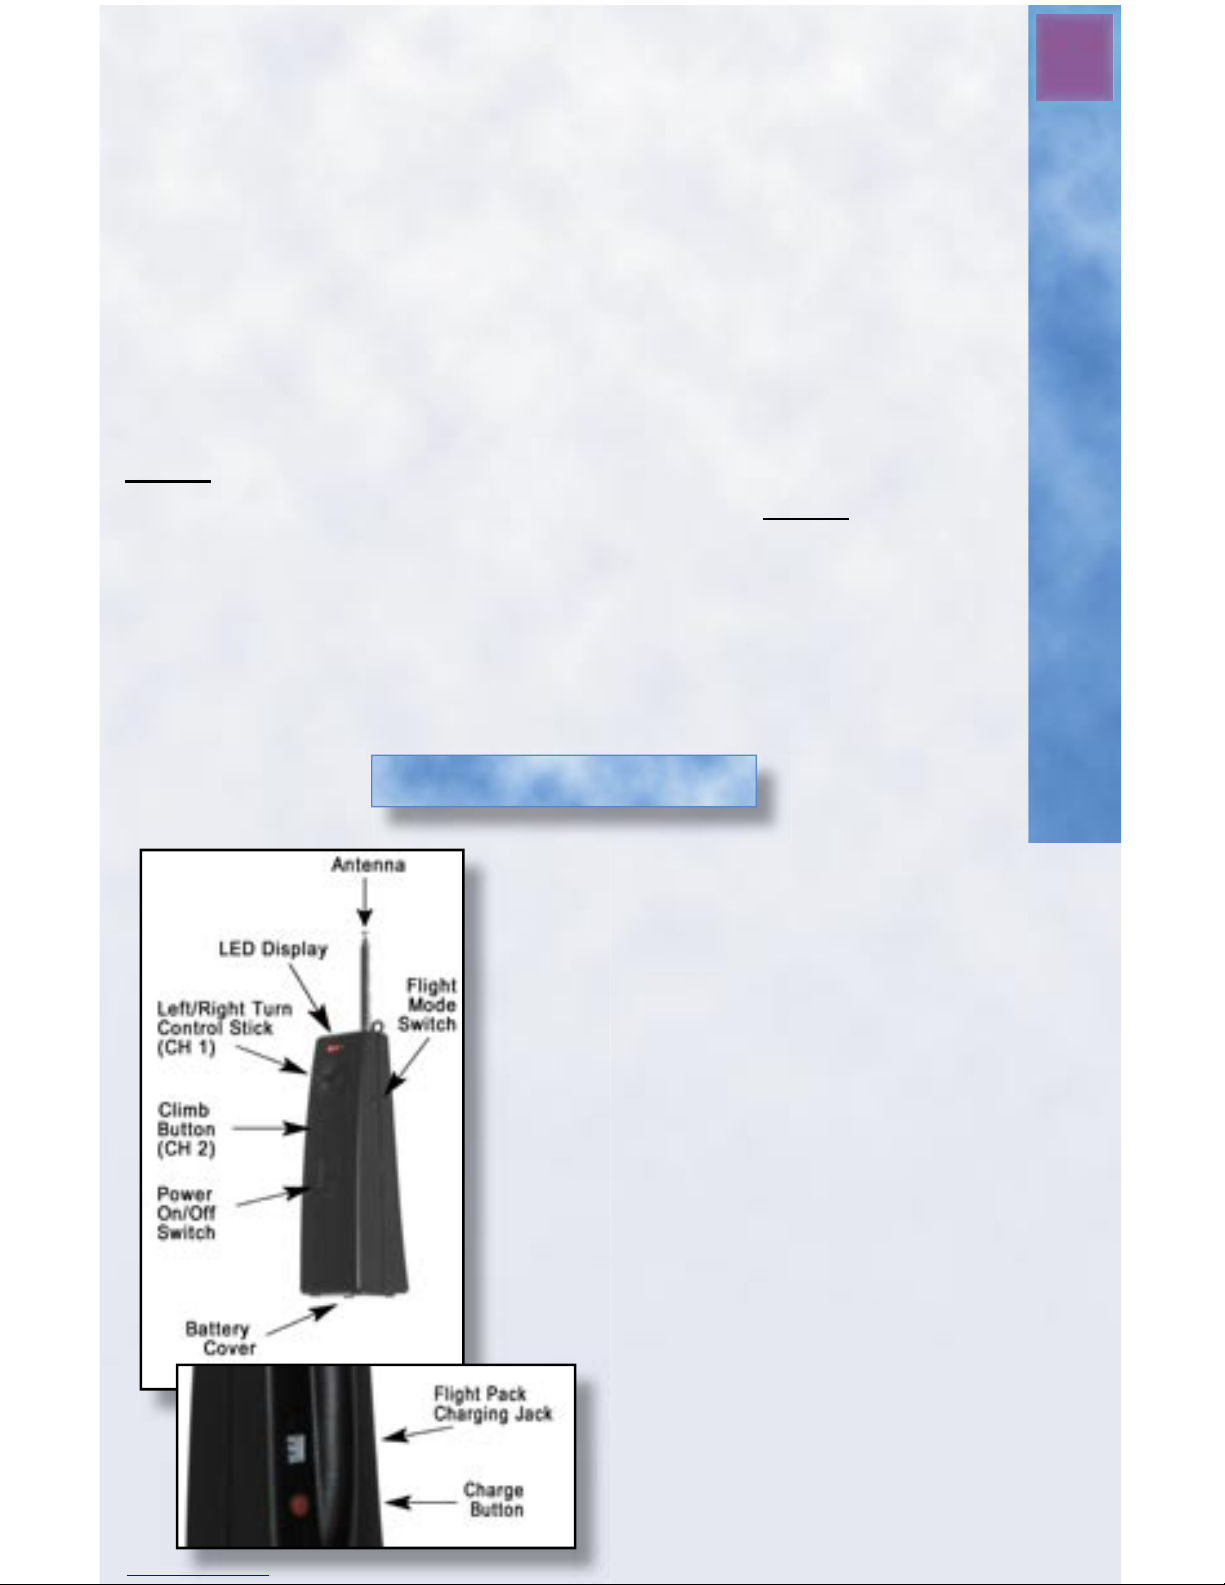
Radio Transmitter
Antenna: Emits signal from the
transmitter to the airplane’s on-board receiver.
LED display: Glows when transmitter is on
and also shows battery condition. (All three will
glow when the batteries are at full
capacity): Green—full capacity
Yellow—half capacity
Red—low capacity (time to replace
transmitter’s “AA” batteries)
Left/Right Turn Control Stick (CH 1): Used
to steer the airplane. Pushing the stick right
or left causes the airplane to turn right or left.
(When fl ying in Mode II, this stick will also
activate motors.)
Flight Mode Switch: When the
switch is down, it is in Mode I. This
means that only the Climb Button
will turn on the twin motors. When it
is in Mode II (switch up), the twin
motors can be turned on with either
the Climb Button or by pressing
forward on the Control Stick.
6
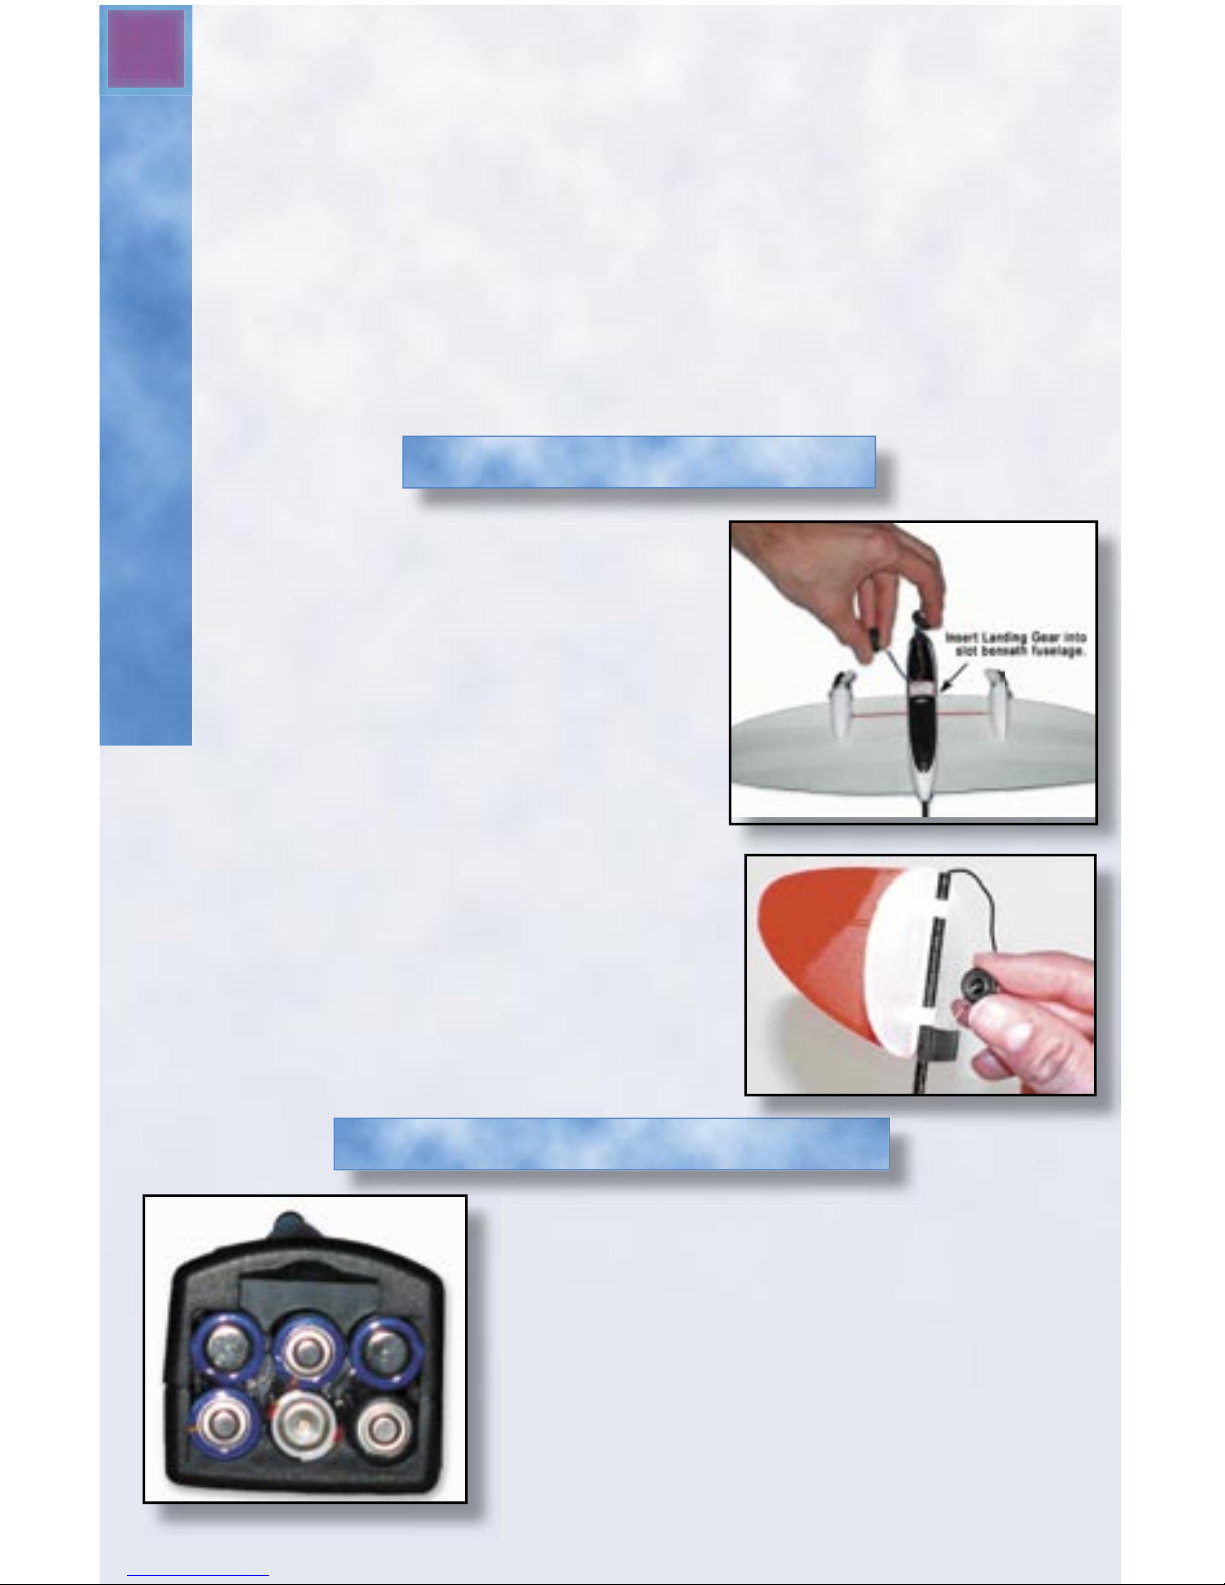
Attaching Landing Gear
Installing the Transmitter Batteries
Attaching the Landing Gear
Climb Button (CH 2): Press this button to turn on both of the twin
motors for takeoffs and for climbing altitude.
Power On/Off Switch: Turns the transmitter on and off. When the
transmitter is on and its batteries are at full capacity, the LED display
will light.
Battery Cover: Cover for compartment that holds six (6) “AA”
alkaline batteries.
Flight Pack Charging Jack: Used to charge the airplane’s fl ight pack
battery.
Grasp the legs of the main landing gear.
Gently squeeze the legs together, and
then push the gear into the slot on
the bottom of the fuselage in front of the
battery door. Press fi rmly, but gently
until it is in all the way. Then release the
pressure on the gear legs and give them a
gentle tug to make sure they are secure.
When properly inserted, the legs will be
angled forward slightly. To remove the main
gear, simply squeeze the gear legs together to
release the gear from the housing.
Insert the rear landing gear as shown until snug.
• The transmitter uses six “AA” batteries (use
only alkaline or NiMH batteries).
• Remove the battery compartment hatch using
the supplied Dual-Tool.
• Install the six fresh “AA” batteries paying
careful attention to proper “+” and “-”
polarity.
• Press the hatch cover back into place until you
hear it “click”.
Rear Landing Gear

7
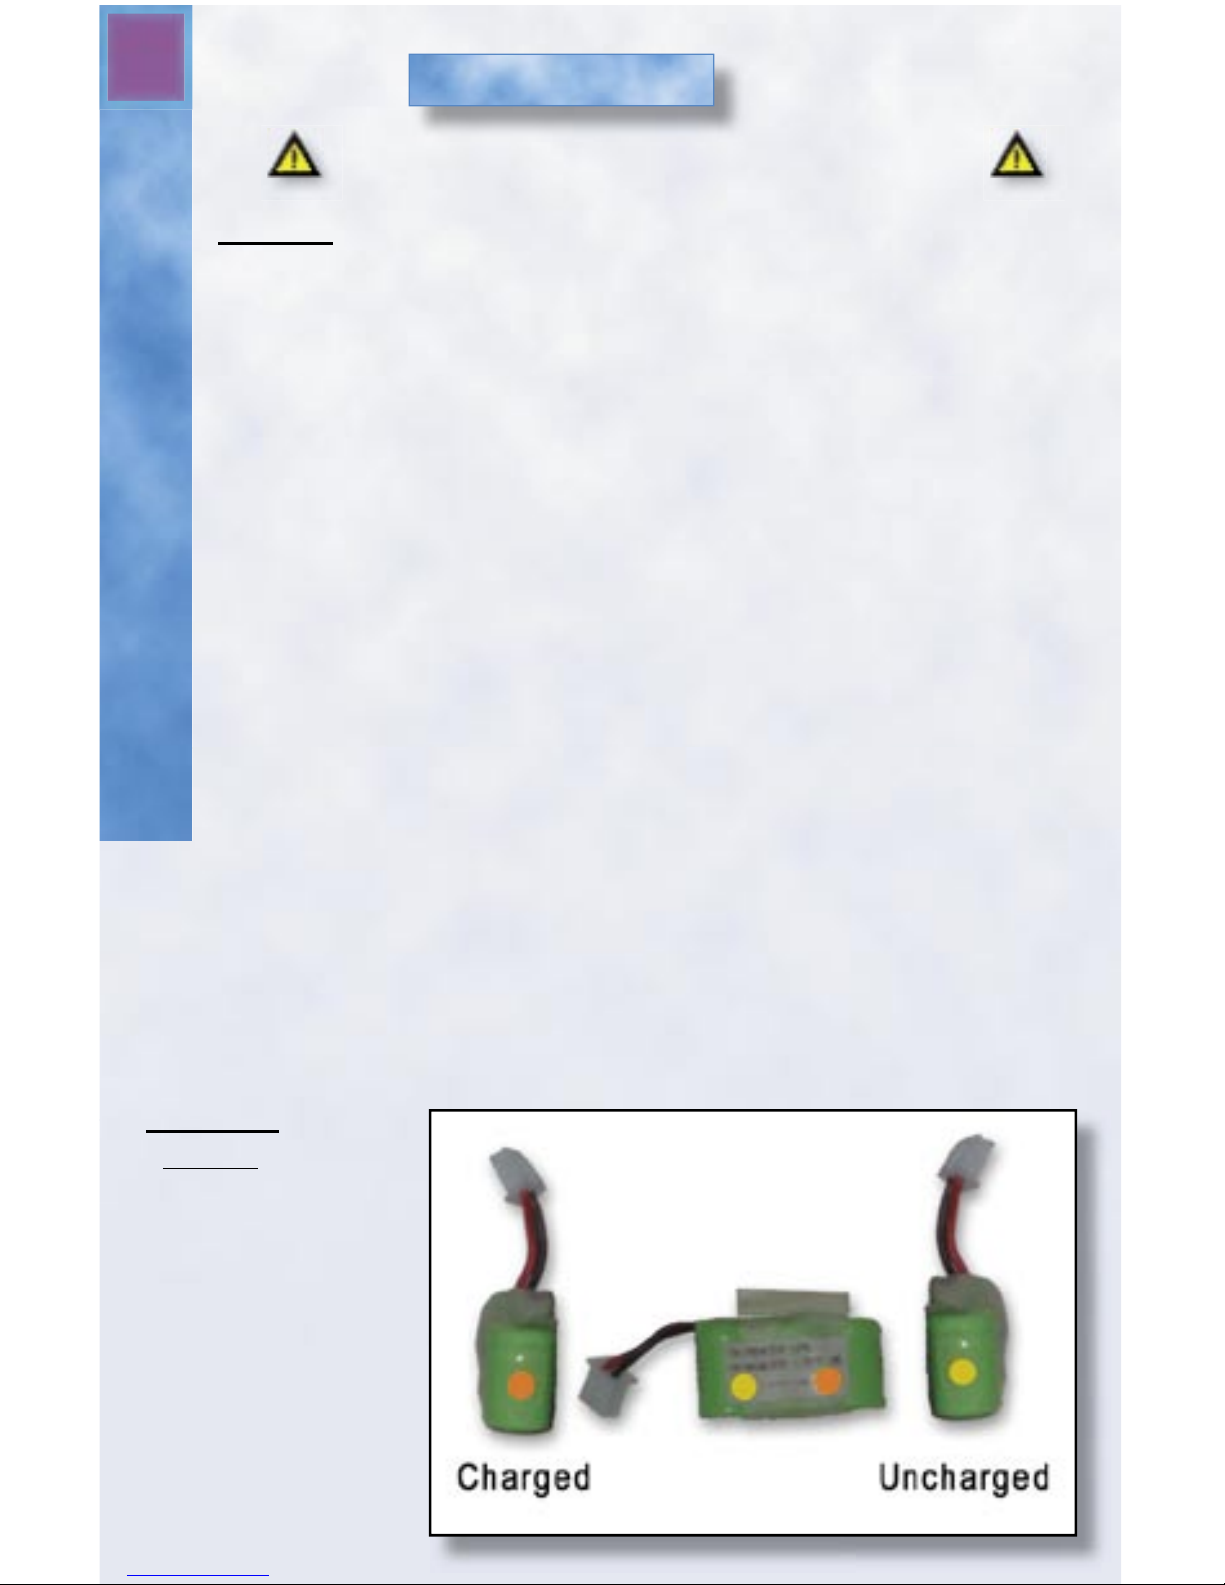
The Flight Pack
Charging the Flight Pack Battery
• The X-EC Diversion uses Symbiotic
Charging™ from the transmitter.
This means the fl ight pack is
charged directly off of the
transmitter, an extremely convenient
method for charging in the fi eld.
• The back of the transmitter features
a charging jack. Simply plug the
fl ight pack into the charging jack
and hold down the red button until
the battery indicator turns orange.
• NEVER LEAVE A CHARGING BATTERY UNATTENDED!!!
• Your fl ight pack will naturally get good and warm, but do not let it
get extremely hot. The charge time should take about 2-minutes to
4-minutes, depending on the condition of your transmitter batteries.
• The X-EC uses the latest NiMH (nickel-metal-hydride) battery
technology available. While NiMH batteries offer the best performance
available, they don’t come up to full potential until they have gone through
3 or 4 charge and discharge cycles. After that, you should be getting fl ight
durations of 4 to 6 minutes.
• Turn the transmitter on fi rst!
Because the X-EC has no
on-board “on-off” switch,
plugging in the fl ight pack
automatically turns on the
electronics aboard the plane.
If you do not turn your
transmitter on fi rst, your
Firefl y will run out of
control. Remember, the
transmitter is always to be
switched on before the fl ight pack is installed and should never be switched
off until after the on-board fl ight pack is removed.
• Remove the battery hatch beneath the X-EC’s fuselage by pushing the
release tab toward the front of the model and pulling up.
• Using the hook end of the supplied Dual-Tool, gently remove the X-EC’s
battery extension jack from inside the battery compartment beneath the
fuselage.
• Plug in your charged fl ight pack battery and replace the battery hatch.
Installing the Flight Pack

8
Preparing For Your First Flight
Preparing For Flight
Before your fi rst fl ight, it is important to “cycle” the X-EC’s
batteries at least twice.
Here’s how: Charge the battery pack as instructed on page 7. Fully
extend the radio transmitter antenna. Next, turn on the radio
transmitter. Always remember to turn on the transmitter fi rst then
install the fl ight pack into the plane. Firmly hold the X-EC at the
center of the fuselage so the propellers are unobstructed and away
from fi ngers, loose clothing, etc. Now press the climb button (CH 2)
on the transmitter to start the propellers spinning. Continue to run the
motor until it stops. Allow the battery pack to cool, and then recharge
it again. Perform this process of running the motor until the battery is
drained at least twice. The battery pack will now supply more power
and make your fi rst fl ights much easier and safer!
Before you attempt to fl y the X-EC you should fi rst familiarize
yourself with the basic modes of fl ight and how they are controlled
using the transmitter.
Flight Orientation
Climbing (gaining altitude): The airplane will climb when the transmitter’s
climb button (Channel 2) is pressed. When the climb button is pressed both
motors operate at full-speed and the model gains altitude (climbs). In Mode II
(recommended for advanced pilot) both motors can be activated in the same
way by pushing the turn-control stick forward.
Descending (losing altitude): Descending, or losing altitude, is also controlled by the climb button. Releasing the climb button will shut off the twin
motors and the model will slowly descend (lose altitude).
Right Turning: This is accomplished by moving the turn-control stick to the
right. This action causes the right motor to slow while the left motor stays at
full speed causing a right-hand turn bank. Tapping the stick right will cause
momentary slowing to gently turn the plane right.
Left Turning: This is accomplished by moving the turn-control stick to the
left. This action causes the left motor to slow while the right motor stays at
full speed causing a left-hand bank. Tapping the stick left will cause
momentary slowing to gently turn the plane left.
NOTE: To observe the above fl ight modes in action, grasp the X-EC at the
center of the fuselage so the propellers are facing away from you,
unobstructed and away from fi ngers, loose clothing, etc. Then try all of the
plane’s functions with the transmitter. To save time, you can do this while
cycling (discharging/recharging) the fl ight pack.

9
Flying Your Firefl y
Choosing a Flying Area
The X-EC is both an indoor and outdoor fl yer. Generally, look for
a space approximately the size of half a regulation sized basketball
court, and one that is totally clear of obstructions like poles, trees,
wires, people and houses. We recommend that you begin fl ying your
X-EC outdoors since there is more room for new pilots to get acquainted with the controls. A grassy fi eld (baseball fi eld, soccer fi eld,
etc.) is the best type of outdoor site to look for.
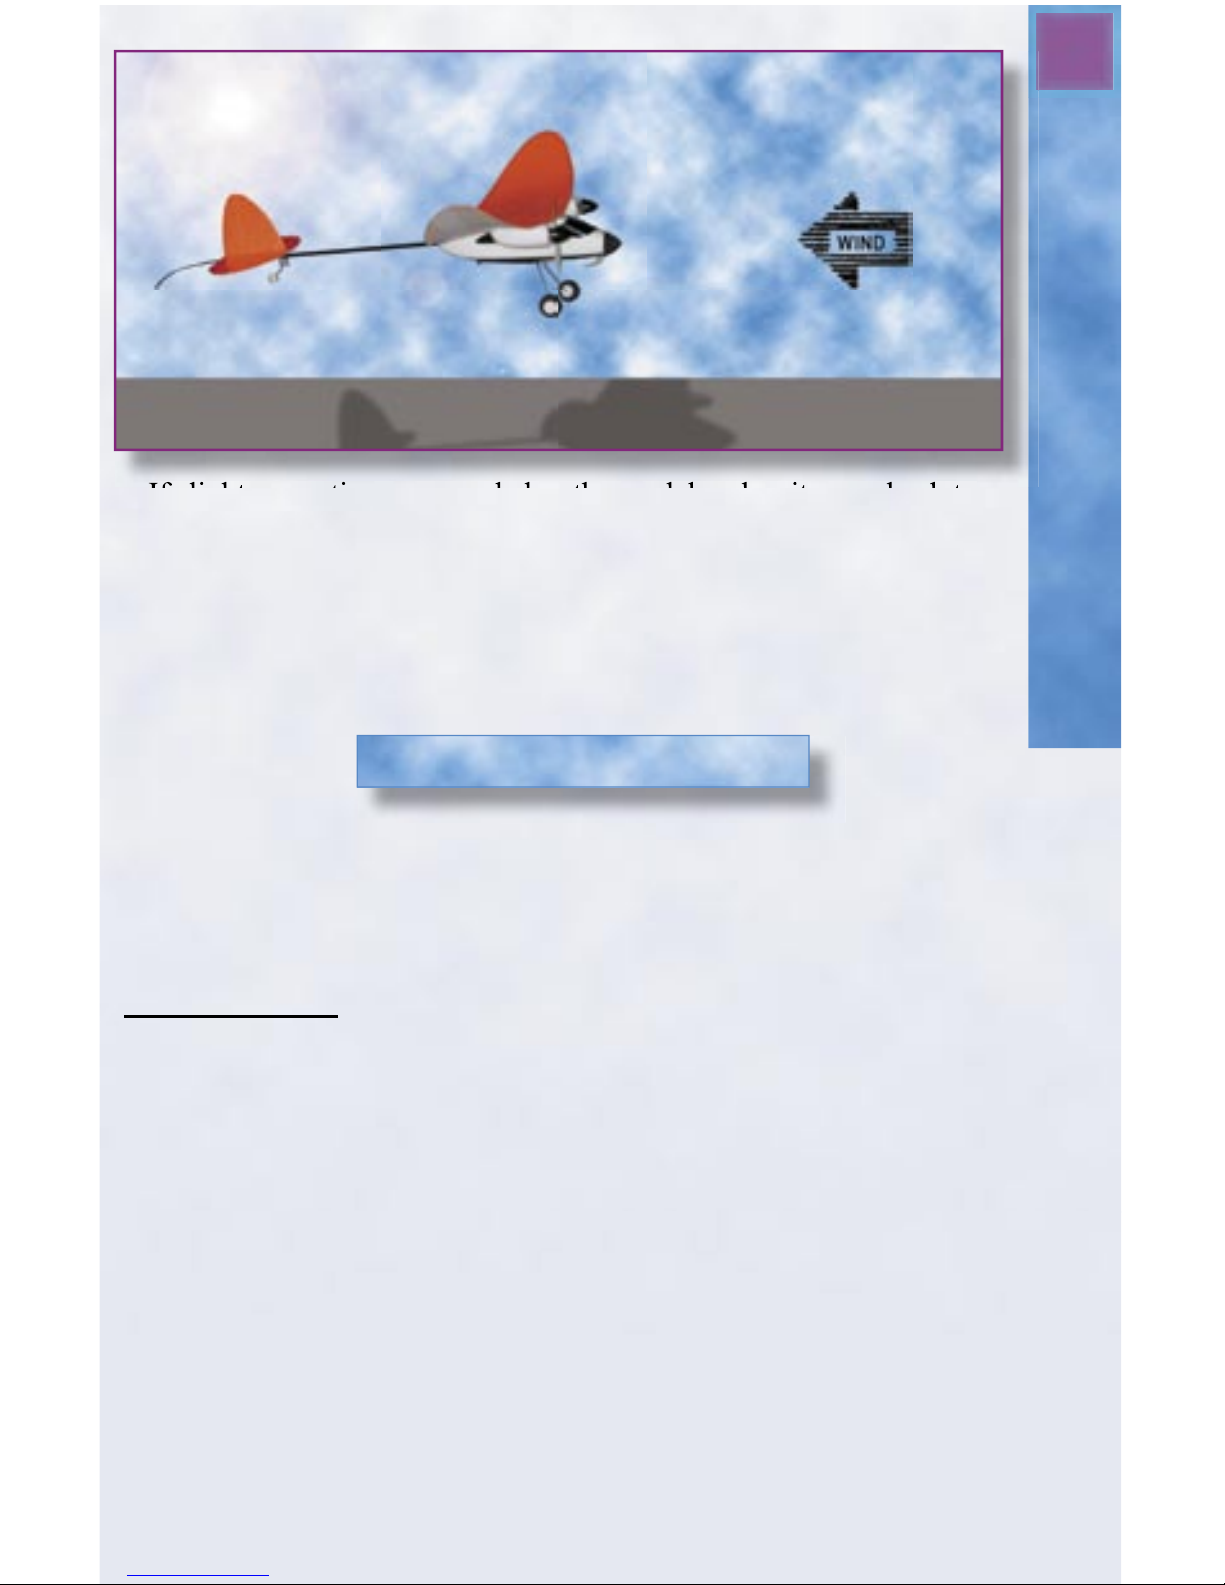
Picking a Day
Until you become acclimated with fl ying the X-EC outdoors, it is best
to choose a day with no wind at all. (The X-EC is extremely light (ap-
proximately 48 grams), so it can fl y indoors, but this means it may be
affected by even light winds.) We strongly recommend that you wait
for a calm day. You should not fl y in winds greater than 4mph. If
the wind is blowing hard enough to make the Frequency Flag/Wind
Indicator hang at an angle greater than 30-degrees from the vertically
held transmitter antenna, wait for a calmer day.
Flying Your X-EC Diversion
Launching Your X-EC Diversion
1. Turn on the radio transmitter.
2. Install the fl ight pack and close the battery hatch.
3. Gently grab the fuselage under the wing, making sure the propellers are
unobstructed and away from fi ngers, loose clothing, etc. While holding the
transmitter in your other hand, press the climb button (CH 2) to test the
motors.
4. If there is any breeze present, make sure you launch the airplane directly
into it. While pressing the climb button (CH 2), hold the model at
approximately shoulder level and gently push and release it straight and
level into the wind. Do not toss the model up or down. (Helpful hint:
Using the horizon as a reference aiming point will help you release the
model in a straight and level manner.)

10
Landing Your Firefl y
5. Allow the airplane to fl y straight away from you holding the climb
button down at all times so as to gain altitude. Your X-EC will
naturally descend (lose altitude) somewhat when making turns, so
do not attempt a turn until it has reached a safe altitude (50 to 75
feet). Altitude will be gained simply by holding the climb button
(CH 2) down and keeping the model going straight.
6. To keep the model going straight as you climb to a safe
altitude, it may be necessary to give momentary right or left
movements of the turn-control stick. Be sure to make only enough
adjustment to keep the plane climbing straight because longer turns
at low altitudes may result in a turn that is too low to the ground.
7. You do not want the model to get too far away from you, so once
it gets to a safe altitude tap the turn-control stick to the direction
(right or left) you want the model to turn while still holding the
climb button. The model will start to turn. Once it has turned in the
direction you want, release the turn-control stick.
8. Continue to make gradual turns in one direction to keep the model
circling you at a fairly constant altitude. If the model starts getting
too high, release the climb button and the model will start to descend but you will still be able to steer it with the turn-control stick.
Now try some turns in the other direction.
9. If the model gets too low to the ground (25-feet for beginners) just add
motor thrust by pressing the climb button.
Important tip! When the model is coming toward you, the controls are
reversed. (Moving the stick left will make the model turn to your right and
vica-versa). This is the most important thing to get used to. Trying to imagine
that you are actually sitting in the model’s cockpit will help you.
Helpful hint: When the model is coming toward you, move the turn-control
stick toward the wingtip that is tipping lower than the other one.
Your new X-EC Diversion is equipped with landing gear, enabling it to glide in
for an exciting rolling landing.
• Before fl ying, try to locate a good level landing area, such as a deserted
driveway, parking lot or smooth ground.
• Always try to land into the wind keeping the wings as level as possible.
• Setup for a landing by making gentle shallow turns until the plane is facing
into the wind and heading in the direction of your landing area.
• When the plane is level, facing into the wind and descending toward the
landing area you’ve selected, release both the climb button and the
turn-control stick and the model will descend to the ground.
Landing Your X-EC Diversion
11
• If slight corrections are needed as the model makes its way back to
the ground, briefl y tap the turn-control stick in the appropriate
direction. Turns at this point must be brief to keep the plane
descending on a straight heading. Over-controlling will put the
airplane into another turn, which can make it crash if you are too
close to the ground. Make small momentary turn corrections to keep
the model fl ying straight until it glides safely in for a landing.
Ordering Spare Parts
Should you require spare parts for your Megatech X-EC Diversion, you
should fi rst contact your local certifi ed Megatech dealer. Should you not be
able to locate the parts locally, you can contact Megatech directly. The following are spare parts that are available for the Firefl y along with the part numbers for your reference.
Spare Parts List
Part Numbers & Descriptions
770001 Micro Receiver
770002 Pcm Transmitter
770003 Transmitter Battery Cover
770004 Transmitter Antenna
770005 Fuselage Battery Hatch Cover
770006 Propeller 4pk
770007 Vertical/horizontal Tail
770008 Battery Connectors ( Male & Female Set)
770099 Xec Replacement Plane
770010 3 Cell 100mah Nimh Battery Pack
770011 Display Stand
Ordering Spare Parts

12
Troubleshooting Guide
PROBLEM CAUSE RECOMMENDATION
No power to radio 1. Power switch is 1. Move switch to the
control transmitter in the “off” position. “on” position.
or charger. 2. Batteries are 2. Make sure batteries
incorrectly installed. are installed correctly
3. Batteries are 3. Replace the batteries
exhausted. with new alkaline
batteries.
Flight pack is not 1. Battery is not 1. Double check the
charging. properly connected. connection.
2. Batteries are 2. Replace the batteries
exhausted. with new alkaline
or NiMH batteries.
X-EC is not under 1. Radio control 1. Slide the switch to the
control. transmitter is not “on” position.
turned on.
2. Transmitter 2. Fully extend the
antenna is not fully antenna.
extended.
3. Windy or bad 3. Stop fl ying at once and
weather. try again on another day.
4. Batteries are 4. Replace the batteries
exhausted. with new alkaline
or NiMH batteries.
5. You have fl own 5. Be careful not to let
out of range. your X-EC get too far
away from you.
Flight duration has 1. Charger Batteries 1. Replace the batteries
grown short. are exhausted. with new alkaline
or NiMH batteries.
2. Flight pack is 2. Allow fl ight pack
overheating. time to cool.
Lights on transmitter 3. Batteries have 3. Land immediately and
have gone out. died. replace with new alkaline
batteries.
Troubleshooting
Limited Warranty
Megatech International guarantees this item to be free from defects, for a
period of 90 days from date of purchase. If any component of this product
fails to function properly, due to defects in materials or manufacturing
process, during this 90-day period, the manufacturer’s obligations are limited
and the manufacturer may choose to either repair or replace the item.
This warranty is void if the product in question has been altered, modifi ed or
repaired by anyone other than Megatech International or an authorized agent.
Under no circumstances will Megatech International, or any of its
representatives, be held liable for injury to persons or damage to property
resulting from assembly or use of the product. Megatech is not liable if
any outside radio frequencies interfere with the product’s frequency,
causing loss of control.
Megatech International will not be held liable for any personal injury or
property damage resulting from an out-of-control model, caused by use or
misuse of the product.
Megatech International expressly excludes any and all express warranties not
specifi cally stated here and all implied warranties of merchantability and
fi tness for a particular purpose. There are no warranties which extend beyond
the description of the warranties contained herein.
Contact the Megatech International Service department before returning
any item that is defective according to the limitations listed above. Please
be sure to pack the item(s) carefully. The customer must return the product
along with proof of purchase, a letter stating the problem and the customer’s
address and telephone number. At this point in time, we will either repair or
replace the defective part and return it to the customer. Return shipping and
handling in the 48 contiguous states is $12.99. Shipping outside of the 48
states will be quoted by location.
This warranty does not cover any damage caused by use, misuse, alteration,
accident, or neglect. Nor does it cover normal wear and tear of the product.
Product returned to us which falls under this category will be submitted to
our service department for repair. We reserve the right to charge any service
and parts fees incurred when repairing the item.
Megatech International
8300 Tonnelle Avenue
North Bergen, NJ 07047
(201) 662-2800
www.megatech.com
13
• Bring several extra batteries with you for longer fl ying time.
• 6 AA alkaline batteries are recommended.
• Check the direction and speed of the wind before you begin to fl y.
The Wind Indicator Ribbon will point in the direction the wind is
blowing.
• Check the power light on the transmitter often during a fl ight. If the
green and yellow lights become dark or go out, land the plane as
soon as possible to avoid losing control. Then change the batteries
in the transmitter.
• Always stay far away from trees, buildings and elevated land.
Unexpected air currents can quickly alter your X-EC’s course and
possibly lead to an accident.
• Always keep the plane in front of you. Never fl y your X-EC
directly overhead, as it is easy to lose your sense of direction.
• If the main wing on your Firefl y becomes damaged, simply
apply clear packing tape to the affected area.
Helpful Hints
For a period of 1 year from date of purchase, if your X-EC Diversion is badly
damaged in a crash, for whatever reason, Megatech will replace the entire
airplane (no questions asked) for a nominal fee of $39.00 (shipping included
for Continental US orders, for international orders the actual shipping charges
will apply.) Simply return the damaged model to Megatech with its proof of
purchase receipt (very important!) and a brand new X-EC Diversion will be
immediately shipped out directly to you. ATTENTION! DO NOT return the
transmitter or fl ight pack! These items are to be kept by you and will work
perfectly with your brand new replacement X-EC Diversion.
MEGATECH
ATT: WARRANTY DEPT
8300 TONNELLE AVENUE
NORTH BERGEN, NJ 07047
Crash Warranty
Helpful Hints

14
Limited Warranty
Megatech International guarantees this item to be free from defects
for a period of 90 days from date of purchase. If any component of
this product fails to function properly due to defects in materials or
manufacturing process during this 90 day period, the manufacturer’s
obligations are limited and manufacturer can choose to either repair or
replace the item.
This warranty is void if the product in question has been altered or
repaired by anyone other than Megatech International or an
authorized agent.
Under no circumstances will Megatech International or any of its representatives be held liable for injury to persons or property damage
resulting from assembly or use of the product. Megatech is not liable
if any outside radio frequencies interfere with the product’s frequency
causing loss of control. Megatech International will not be held liable
for any injury to persons or property damage resulting from an out-ofcontrol model caused by use or misuse of the product. Megatech International expressly excludes any and all express warranties not specifi cally stated here and all implied warranties of merchantability and
fi tness for a particular purpose. There are no warranties which extend
beyond the description of the warranties contained herein.
Contact the Megatech International Service Department before
returning any item that is defective according to the limitations listed
above. Please be sure to pack the returned item(s) carefully. The customer must return the product along with proof of purchase, a letter
describing the problem and the customer’s address and telephone
number. At this point in time we will either repair the defective part or
replace it and return it to the customer. Return shipping and handling
in the 48 contiguous states is $12.99, please include a check or money
order. Shipping outside of the 48 states will be quoted by location.
This warranty does not cover any damage caused by use, misuse, alteration, accident, or neglect, nor does it cover normal wear and tear of
the product. Product returned to us which falls under this category will
be submitted to our service department for repair. We reserve the right
to charge any service and parts fees incurred when repairing the item.
Megatech International
8300 Tonnelle Avenue
North Bergen, NJ 07047
(201) 662-2800
Megatech® Limited Warranty
15
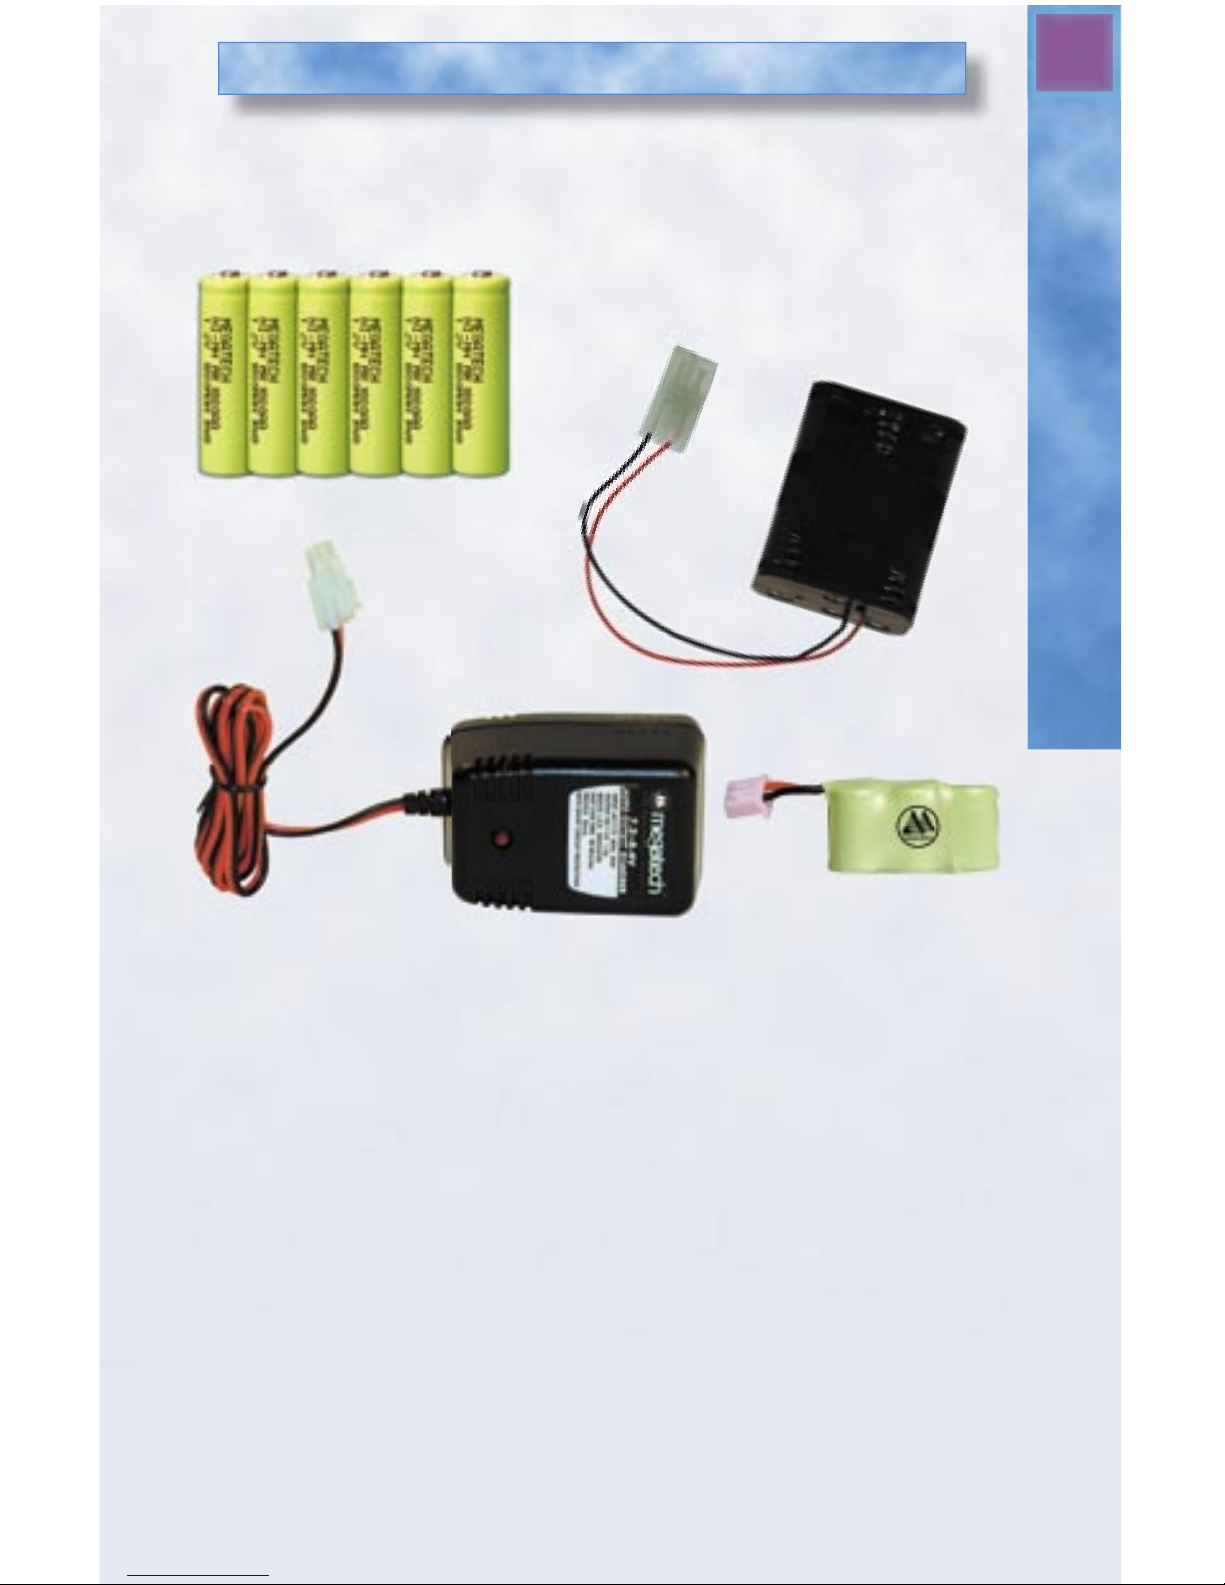
Eliminate your alkaline battery purchases with the included rechargeable transmitter batteries and charger set. The 110v wall
charger charges transmitter batteries safely and to the maximum
capacity in one hour without fear of overcharge. The fl ight pack can
be recharged off the transmitter batteries over 20 times before the
transmitter batteries need to be recharged.
FOR OPTIMUM PERFORMANCE
AND FLIGHT DURATION
WITH YOUR FIREFLY
SET INCLUDES:
• Six Rechargeable Megatech 1800MaH “AA” NiMH
Transmitter Batteries
• 110v Wall Charger with heavy-duty 20-gauge wiring,
electronic timing, 10-second reset logic and 6-cell
battery box
• One 3-cell +NiMH fl ight pack
MTC770012
MEGATECH SUPPORT PACK

Megatech International
8300 Tonnelle Avenue
North Bergen, NJ 07047
(201) 662-2800
MTC7701
H2O ELECTRIC MICRO
R/C SPEEDBOAT
MTC7702
OCEAN EXPLORER 1 R/C SUBMARINE
LOOK FOR THESE OTHER FINE MEGATECH PRODUCTS
MTC8210
HELICHOPPER
ELECTRIC HELICOPTOR
www.megatech.com
 Loading...