

Page 1
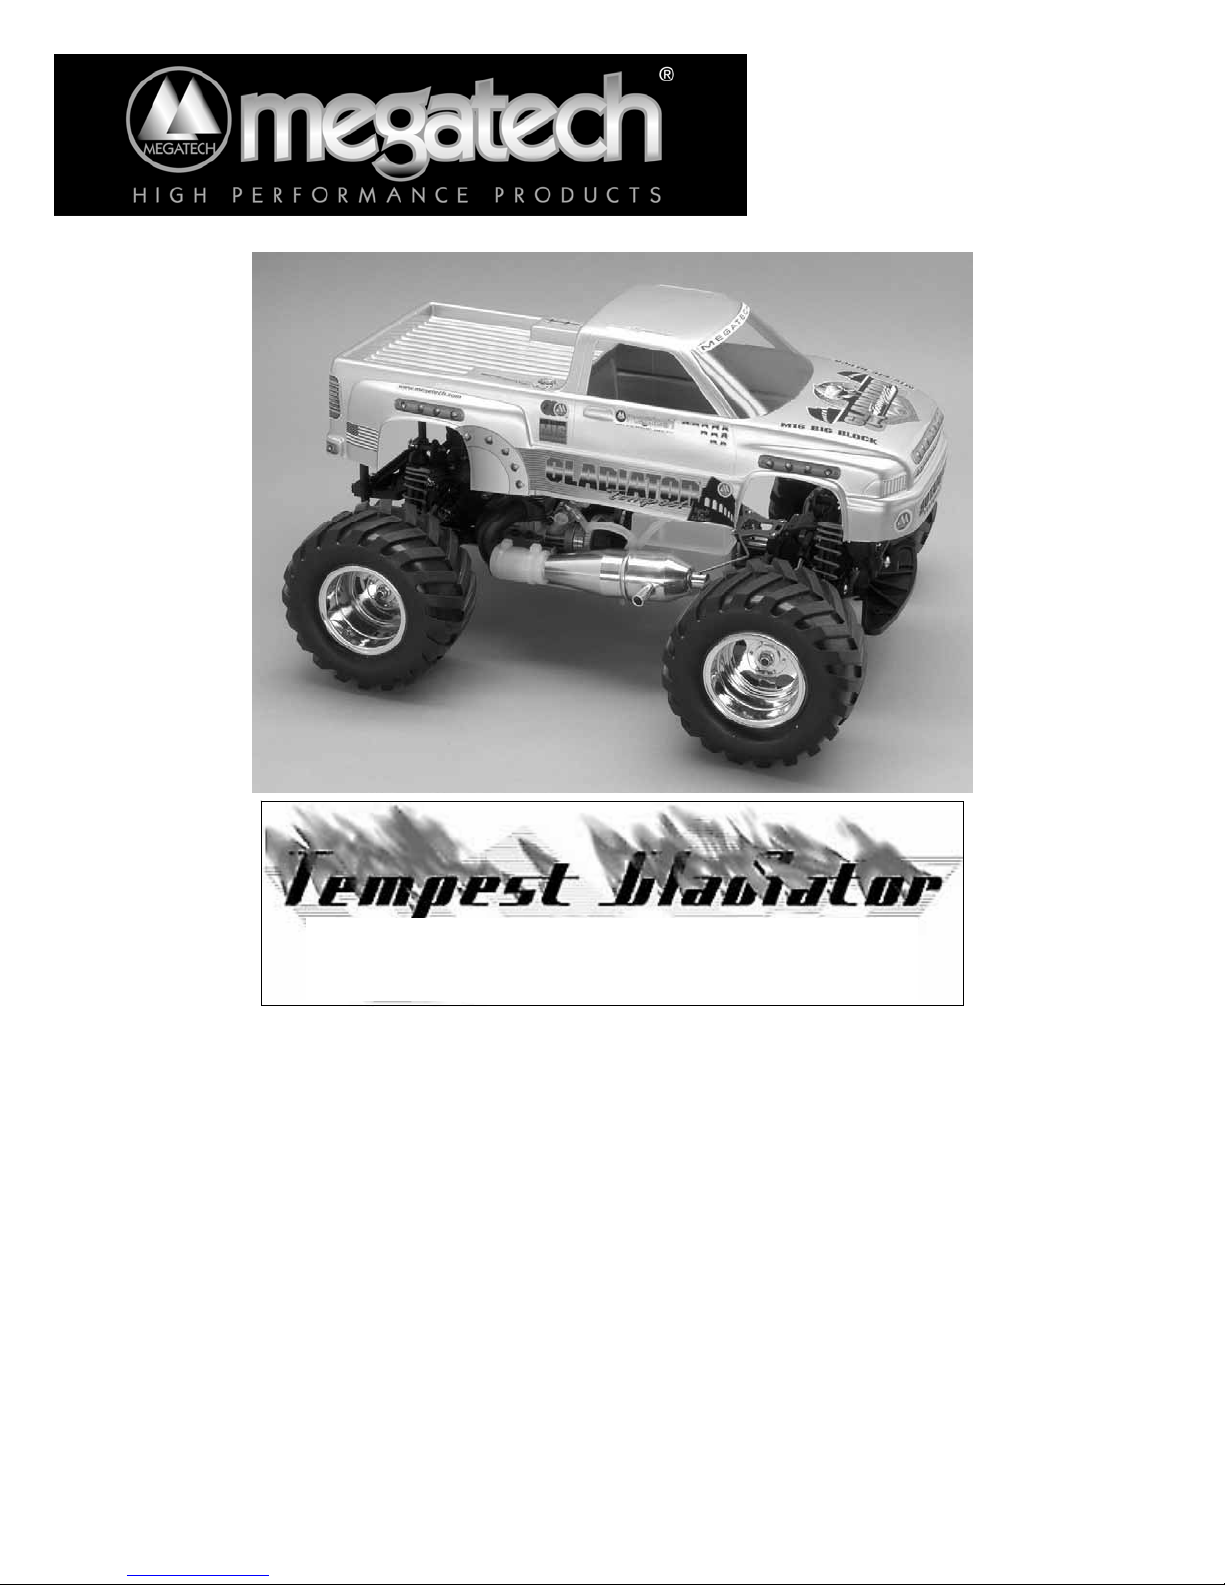
Monster Truck
Stock Number MTC 7805
1/10 Scale Radio Controlled Ready to Run Monster Truck
Operating Instructions
and Owner’s Manual
Megatech International
8300 Tonnelle Ave.
North Bergen, NJ 07047
Replacement Parts / Tech Support 201-662-2800
Fax Orders 201-221-8030
Website http://www.megatech.com
Page 2

Glossary
Break-In - The first 20-40 minutes that a model truck engine runs, during which the metal parts establish the correct clearances and “fit” with each other. Break-In actually means that the parts rub together (with lubrication from the fuel oil) and
wear away slightly. This critical phase determines how well your engine will run for the rest of its service life.
Camber - The angle between the vertical axis of the left wheel and the vertical axis of the r ight wheel as seen from the
front. If the top of the tires are a little father apart than the bottom of the tires, then the suspension has positive camber. If
the bottom of the tires are a little farther apart then the top, the suspension has negative camber. Your Tempest Gladiator
has the correct amount of positive camber is set at the factory.
Glow Plug - The small hex-shaped piece that screws into the top of the engine, with a littl e tip on the e nd. There is a very
small wire coil inside this plug, which glows re d hot when you apply electric voltage. This glowing wire ignites the fuel/air
vapor inside the engine to make power. Once the engine is running, the heat from burning fuel keeps the wire glowing.
Glow Plug Igniter - A small battery with an electrical connector t hat provides the electricity to heat the wire inside the
gl o w p lug. A small re c har gea b le glo w igni t e r s uch as Megate ch’s M ega N i t e r is s a f e a nd c o nv enient, and can b e le ft o n t he
truck during Break-In.
LED - Light Emitting Diode, a tiny “light bulb” . The LED’s on the transmitter glow when the batteries are fully charged.
Mixture - The amount of fuel vapor mixed w ith air that the engine burns. More fuel vapor in the air is a “ rich” mi xt ur e,
less fuel vapor in the air is a “lean” mixture. The mixture is controlled by the High Speed Needle Valve at full throttle, and
the Low Speed Needle Valve at low-medium throttle.
Nee dle Valve - A thin needle-tipped screw in the carburetor that allows the liquid fuel to flow. Screwing the needle valve
closed allows less fuel into the carburetor, creating a “lean” mixture. Unscrewing the needle valve open allows more fuel
and creates a “rich” mi xt ure .
Nitro - Nitro-Methane, an additive to racing fuel that increases the explos ive power of the fuel when burned. Nitro is used
in high perfor mance model engines, as w ell as in full-size dragsters and “Funny Cars”. 25% Nitro fuel (rec ommended) has
25% Nitro-Methane added to the fuel.
Receiver - The electronic device that picks up the radio signal from the transmitter and sends commands to the servos.
Ride Height - Also known as “Spring Pressure”, the amount of compression put on the suspension springs, which affects
how high the truck sits above the ground at rest. This affects how “hard” or “soft” the truck rides over bumpy roads.
Servos - Electric devices that turn the receiver’s commands into physical force to steer the wheels or move the carburetor.
Slide Car buretor - A carburetor that ope ns and closes by sliding a bar rel-shaped insert with an air opening back and fort h
in the main carburetor body.
Synthetic Lubricant - High-temperature, high- per formance ma n-made lubrication oil that provides far greater engi ne
protection than natural oils. Only fuel using synthe tic oil, such as Megatech’s High Velocity 25% Nitro racing fuel, is recommended for your Tempest Gladiator.
Toe-In - The angle between the horizontal axis of the front left wheel and t he horizontal axis of the front right wheel when
viewed from above. If the front of the tires are a little closer together than the rear of the tires, the suspension has Toe-In. If
the rear of the tires are a little closer together than the front of the tires, the suspension has Toe-Out. Toe-In provides stabil-
ity, allow ing the truck to go straight by itself. Toe-Out creates a very unstable condi tion, where the truck would swerve out
of contr ol easily, just like driving a car in r everse. Your Te mpest gladiator has the corr ect Toe-In is set at the factor y, however the Toe-In setting is fully adjustable for advanced drivers.
Transmitter - The transmitter takes your steering and throttle/brake commands from the steering wheel and throttle trigger,
turns them into electronic signals, and sends these signals through the air to the receiver.
Tempest Gladiator 2
Page 3
Warnings
Engi ne – The Tempest Gladiator is equipped with the Megatech M-16 high-output engine, producing over one horsepower,
featuring a race-tuned alumi num e xhaus t syste m. The engine and exhaust bot h become very hot d uring and after operation,
and can ca use serious bur ns and other injuries. Do not ever touch the engine or exhaust sys tem whi le the y are operating or
w hi le t hey ar e ho t a ft e r o p e ra t i o n. The engi ne pr o d uc e s p o isono us Car b on Monoxid e gas when r u n ning. D o not ru n the engine indoors or in any closed space, or anywhere without good ventilation.
Fuel – The Tempest Gladiator uses Nitro model car/truck fuel. Always follow the precautions and safety warnings on the fuel
container. Always keep this fuel out of reach from a nimals, chi ldren and away from any source of fla me or electric current.
Do not smoke, cook, or allow open flame within 25 feet of model engine fuel.
Model engine fuel is almost invisible when it burns.
Always keep a fire extinguisher nearby when using model engine fuel. This fuel is dangerous, poisonous, and highly flammable. Use a fuel dispenser with a lo ng fueling probe to fill the fuel tank. Do not pour fuel into the tank directly from a gallon
can and/or use loose funnels or any method which can spill raw fuel.
Radio – Always use new heavy duty Alkaline batteries in the Tempest Gladiator’s radio transmitter and receiver battery
holder. Weak or low quality batteries can cause a loss of control, resulting in injury to others and damage to your truck. The
Tempest Gladiator can be affected by radio interference from other radio controlled vehicles or from other sources. Radio
interference can cause momentary loss of control, and you must always operate the vehicle so that unexpected momentary
loss of control will not cause a crash or injury.
Introduction
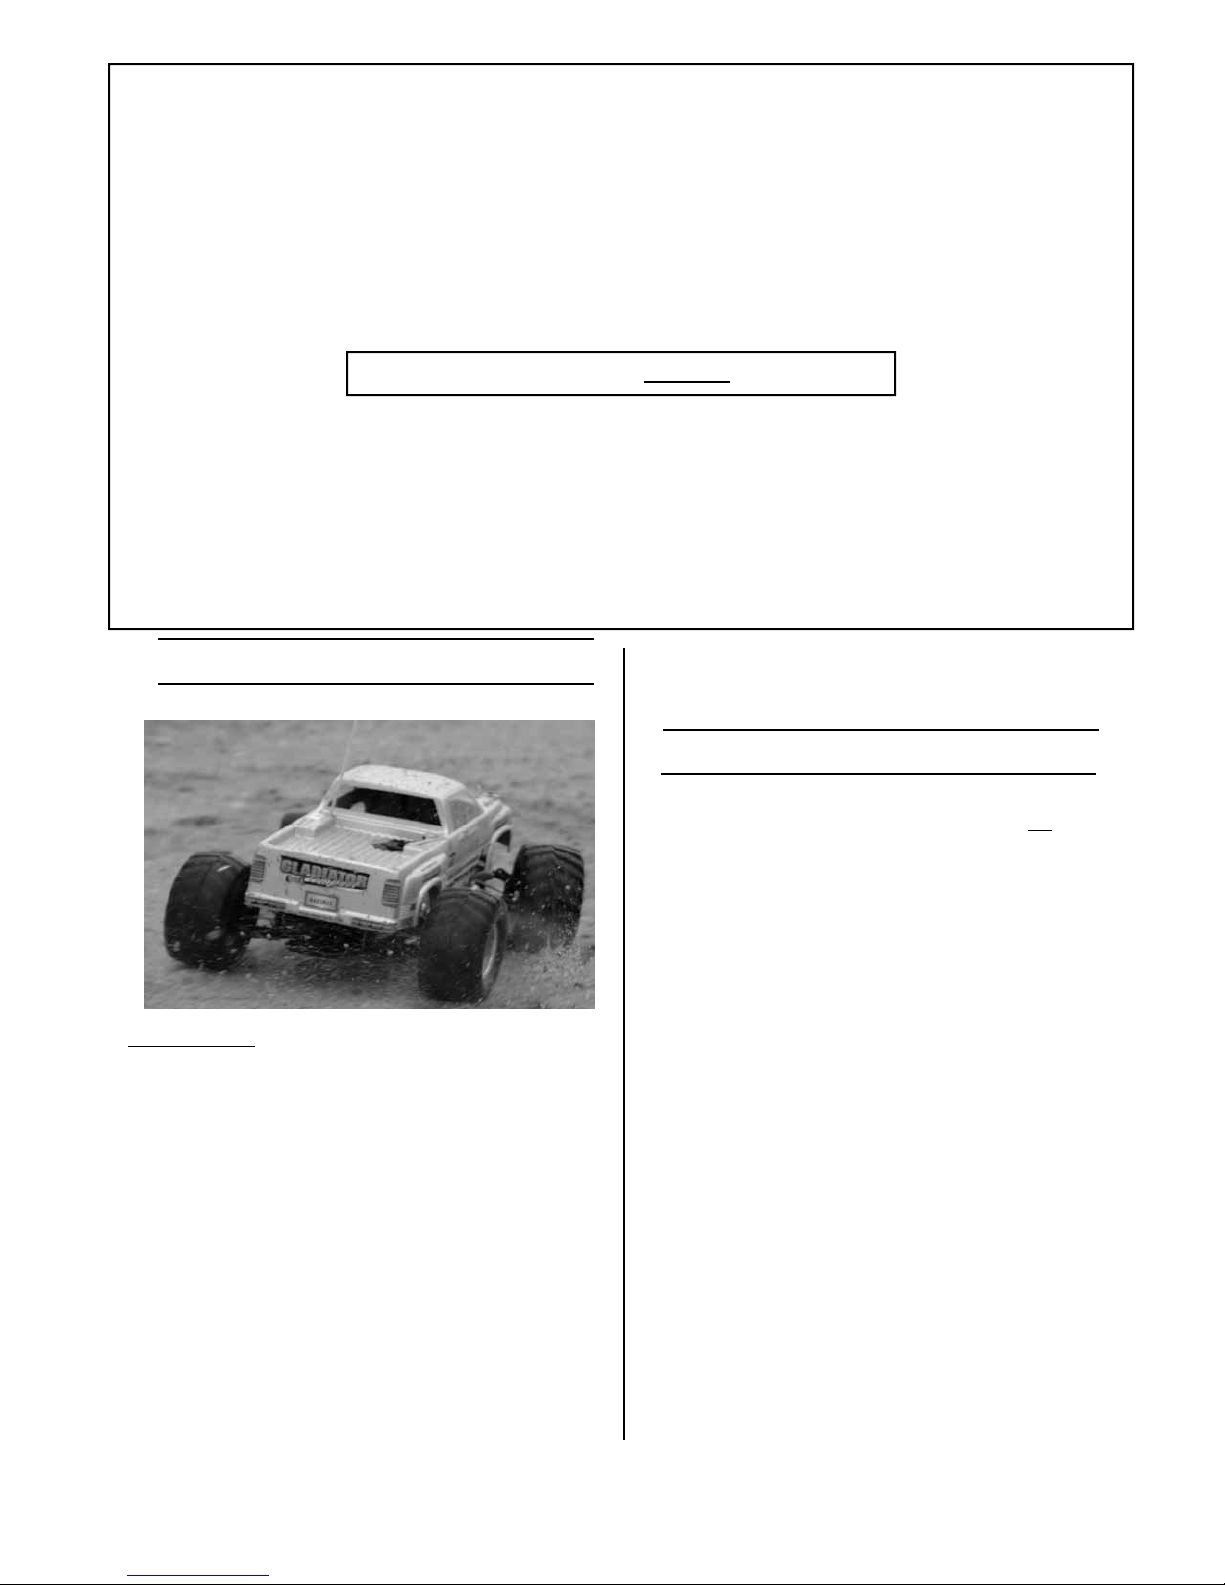
Congratulations on purchasing yo ur Te mpest Gladiator,
the Big Block Nitro Monster Truck from Megatech.
Megatech has put precision engineering, cutting-edge
design features, and years of racing e xperience into your
Tempest Gladiator to give you the best truck that ever hit
the dirt. An enormous amount of resear ch and testing has
gone into this product, so please follow all the instructions, warnings, and operating procedures in this manual,
and your tr uck will give yo u years of hi gh p er for manc e
contest-winni ng fun. Regardless of whether you are a
novice, intermediate, or experienced R/C 4-Wheeler,
please read through the entire owner’s ma nual before you
attempt any setup or operation of your Tempest Gladi ator
truc k. Failure to follow the instructions and warnings will
ca use signi fic ant d ama ge to yo ur tr uck, w hic h will voi d
the w ar ranty a nd r el eas e Mega tec h fro m any a nd all responsibility to repair or replace the product. Should you
have any questions about the safe and enjoyable use of
this product, call Megatech at 201-662-2800 during b usiness hours.
Hazards
The Tempest Gladiator is a contest quality, advanced
hobbyist class r emote controlled vehicle. It is not a “toyclass” vehicle. This is a high-performance vehicle with
the capability to exceed 45 MPH and cause serious injury
and damage. The Te mpest Gladiator i s designed for operation by or under the supervision of a responsible adult.
Do not ever operate this vehicle -
in a manner that causes or risks injury to people or
animals, or
in a manner that causes or risks damage to private
or public property, or
in a manner could cause a mo tor vehicle accident.
Do not operate this vehicle on public or private
roads or highways, or in large crowds of people.
Do not operate this vehicle during times or in locations
where the engine’s noise is objectionable to others.
If you are sens itive to engine noise, wear hearing protection.
Megatech shall not be liable for any loss or damages
due to operator negligence, misconduct, intentional or
accidental mis use of this product or any related products
and accessories.
Tempest Gladiator 3
Page 4
Your Tempest Gladiator
Features
Your new Tempest Gladiator features the high-
output M-16 Big Block Nitro race engine, capable of producing over one horsepower!
Polished aluminum high-performance tuned ex-
haust that lets the engine put out all that power
without conventional muffler power losses.
Race-tested sl ide carburetor features fully adjust-
able high end, mid-range, and idle settings.
Fully automatic 2-speed, adjustabl e transmission
with Delrin gears and 4WD shaft drive
Heavy Duty anodized aluminum chassis/radio
plate with sealed receiver and battery box
Adjustable oil filled coil-over shocks with pow-
der coated springs
All ball bearings
Fully adjustable front and rear sway bars
Fully adjustable suspension with turnbuckles to
set camber, ride height, steering and toe-in
Pistol grip 2 channel radio system
Best of all, the Tempest Gladiator comes fully factory
assembled and set up, with all components installed, tires
installed and glued, a nd the engine installed and adjusted
for break-in. The body is fully painted with decals in
place… You’ re almost Ready to Rumble when you open
the box! (After engine break-in)
Tempest Gladiator Specifications
Length: 15.375” (390mm)
Width: 12.75” (325mm)
Height: 9” (227mm)
Weight: 55 oz. (1540g)
Drive: Full 4 Wheel Drive
Transmission: 2 speed automatic
Engine: .16 cu. in. M-16 Nitro
Radio: Pistol Grip 2 Channel
Required Equipment
For the bes t performance a nd maximum enjoyment, your
Tempest Gladiator will require several additional items for
proper operation and adj us tme nt. We highly recommend
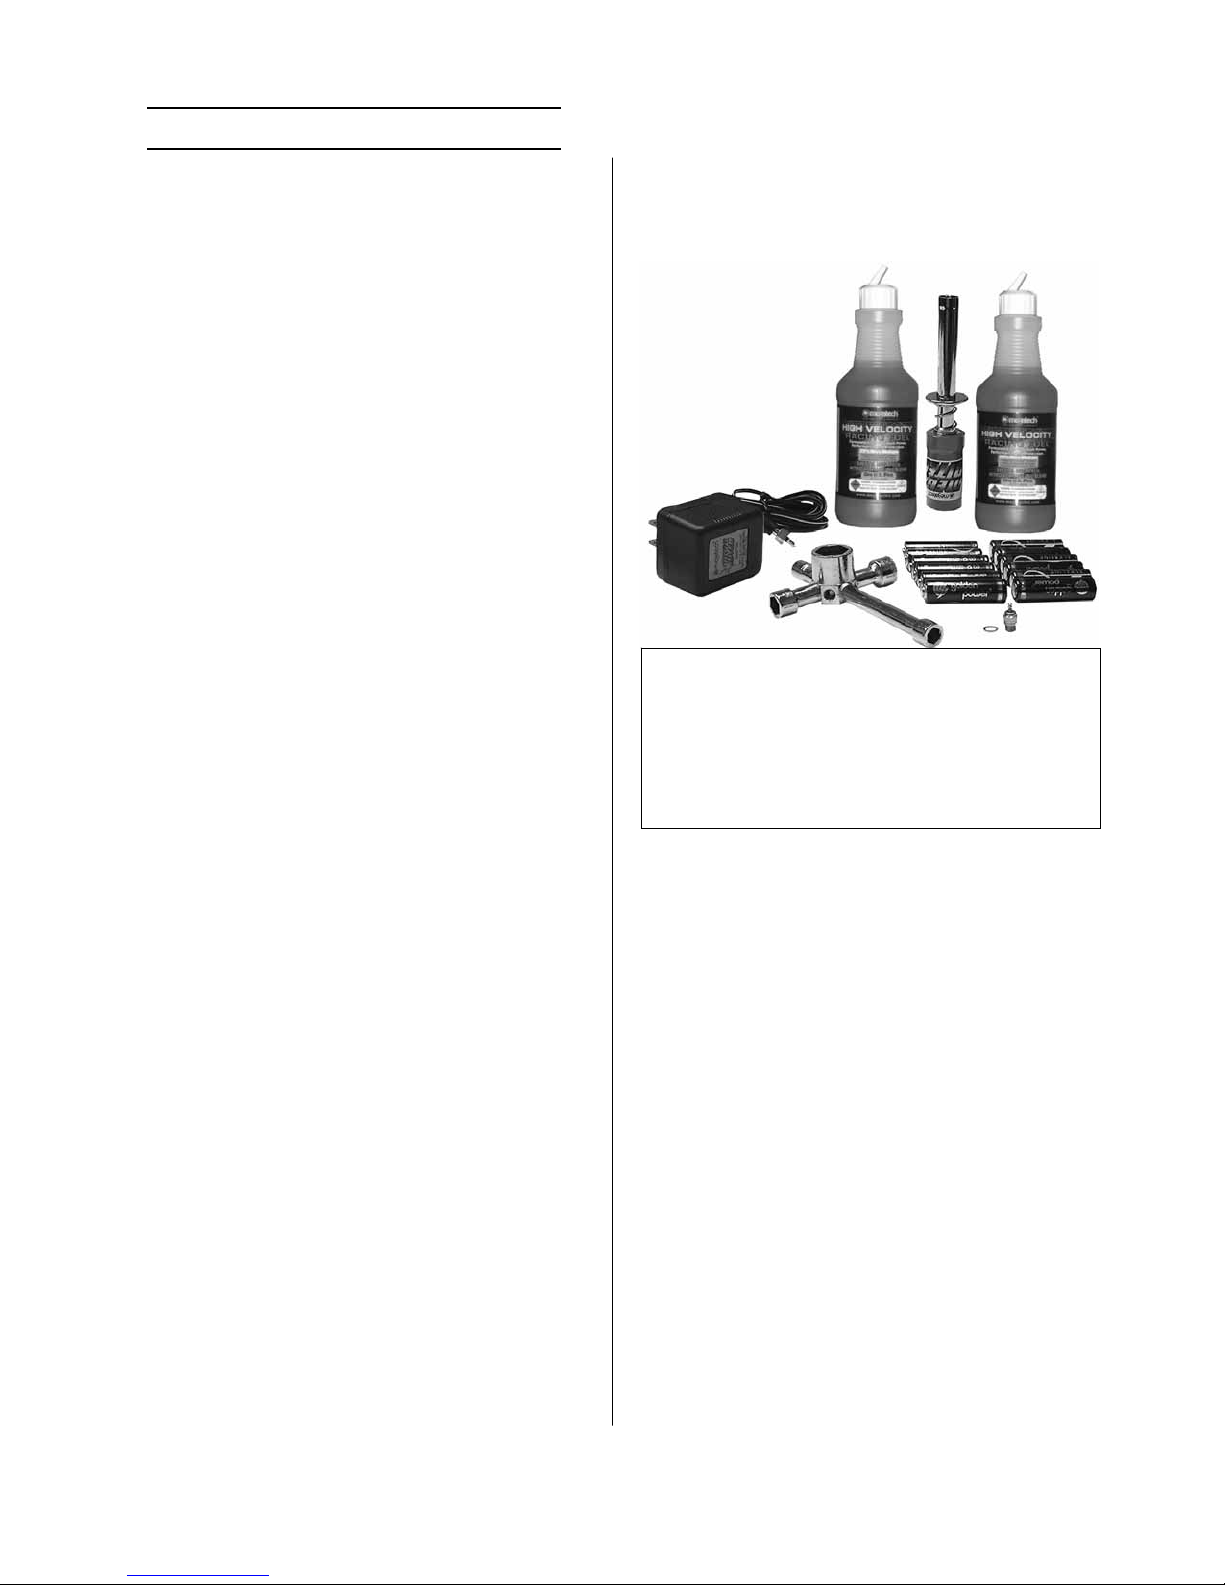
purchasing Megatech’s Gas Car/Truck completer kit,
MTC 7500, which contains many of these items. The
items should be available through your local hobby shop.
The list of items you will need are:
+ 12 new heavy duty AA size Alkaline batteries for
transmitter and receiver
+ Fuel for model car/truck engines (MTC 502 rec-
ommended)
+ Rechargeable glow plug igniter (MTC1160)
+ Spare glow plug
+ 4-Way wrench (MTC 1200)
+ Small/medium Phillips & flat head screwdrivers
+ Small adjustable open end wrench or wrench set
+ Allen wrench set
Megat ech’s G as Car /Truck Complet er Kit ,
# MTC 750 0, c ontai ns m any it em s yo u wil l
need to operate your Tempest Gladiator,
including fuel, glow plug igniter & charger,
radio batteries, multi-wrench, and spare
glow plu g.
Radio
Your Mega tech Tempes t Gl a di a tor i s e qui pp e d w i th a top
quality 2 channel pistol grip radio control unit. The components are co mpletely i nstalled and set up at the factor y.
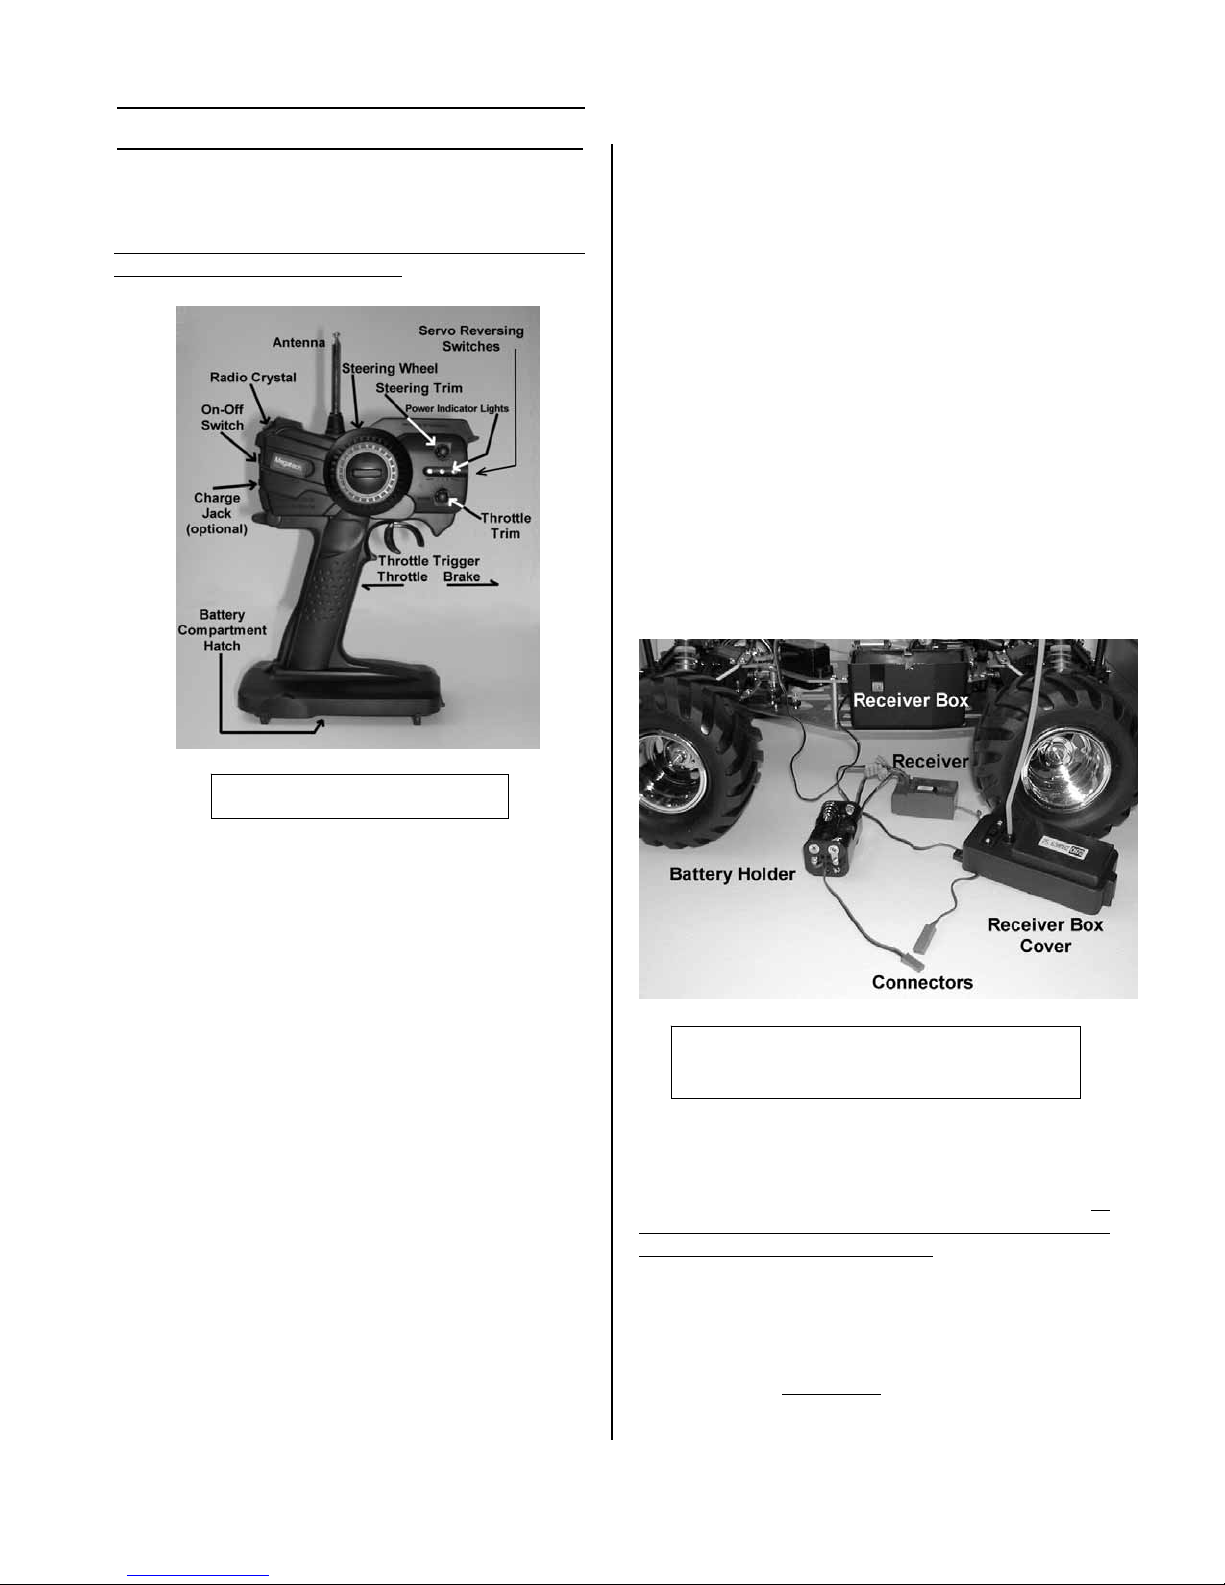
Please see the transmitter photo for the location of the
controls, trim knobs and other features. The radio control
unit operates on either the 27 or 75 mhz band. Your radio
includes:
• Transmi tter (takes your steering and throttle control inputs, turns them into radio signals, then
sends the radio signals through the air to the
truck)
• Receiver (takes the transmitter’s radio signals,
decodes them, and sends the proper electronic
commands to the truck’s servos)
• Servos (which turn the Receiver’s electronic
commands into physical force that steer the
wheels or operate the slide carburetor)
• On-Off Switch for Transmitter and Receiver
• Battery Holders for Transmitter and Receiver
Tempest Gladiator 4
Page 5
Setup
The Tempest Gladiator comes fro m the factory fully assembled and almost ready to run. There is only a very
small amount of setup and adj ustment needed, however
pro p e rly s e t tin g up the t r uck is critical t o ma xi mi z i n g t he
performance and enjoyment you get from your truck.
Setup Step 1- Battery Installation
Alw a ys turn t he tr a ns mi tte r on fi r st, a nd t ur n t he tr ans mitter off last. Do not leave the truck electric power switch on
without the transmitter power switch on. Without the
transmitter power on, the truck will be affected by stray
radio signals and can be damaged, or cause injury and
damage if the engine is running.
Install a set of new AA Alkaline batteries in the Transmitter. Open the battery access panel on the bottom of the
transmitter, and install 8 AA batteries in position as shown
by the markings inside the battery compartment. Take
extra care to insure the batteries are pointing in the right
direction. Replace the battery access panel, and turn on the
transmitter power switch on the rear edge o f the transmitter. The LED power indicator lights should glow brightly,
showing full batter y power. If the “full” LED light is not
glowing, remove the battery access panel and re-install the
batteries in their correct positions until the “full” LED
light is glowing.
Remove the 4 body cl ips holding the Tempest Gladiator
body in place on the chassis, and re move the body. Carefully open the retaining clips on the side and rear of the
black receiver/battery compartme nt on the truck chassis.
Move the co mpartment cover and the radio receiver aside,
Transmitter Controls
and remove the battery holder. Unfold the batter y connector wire out of the way, and install, four new AA Alkaline
batteries in the battery holder, ma king s ure to i nstall them
in the correct direction as shown by the markings in the
battery slots. With the switch in the off position, plug the
red battery connector into the red receptacle attached to
the on-off switch. Tur n on the transmitter power switch,
then the truck electric power switch, and listen for the
servos to move slightly. Move the steering control wheel
and the throttle trigger on the transmitter, making sure that
the steering control operates the front wheels, and that the
throttle trigger operates the slide carburetor. When the
trigger is pulled toward the pistol grip (full throttle), the
throttle servo should pull the carburetor throttle slide away
from the engine. If the servos do not respond, remove the
batteries and re-install them in their correct position.
Tur n off the truck switch first, then the transmitter switch.
Carefull y put the battery holder back in the compartme nt,
followed by the receiver , and tuck in any loose w ires. Replace the receiver/battery compartment cover, making sure
the snaps on the side and rear are engaged properly.
Setup Step 2 – Spring Setting
The Te mpes t Gla dia tor i s s hippe d wi th the truc k se cure ly
tied to the box w ith plastic straps. To prevent the springs
from becoming “set” in this position during shipping, the
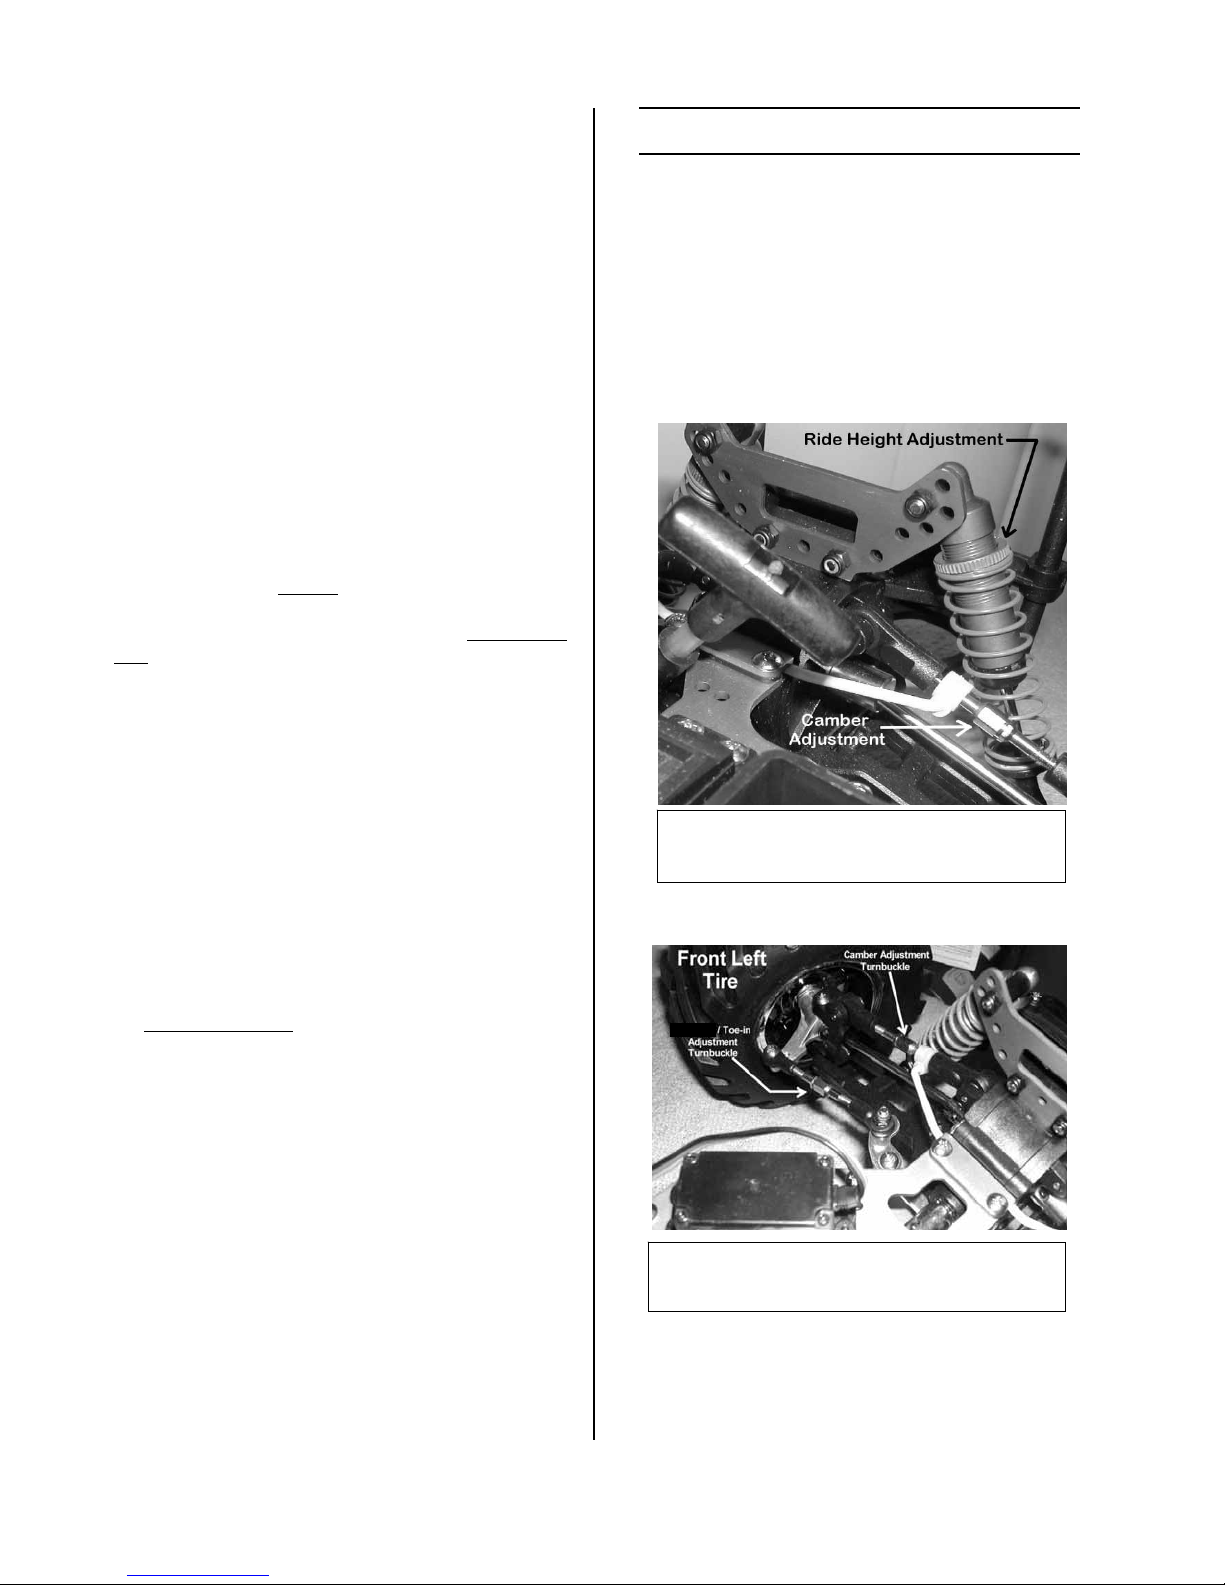
Ride Height / Spring Pressure adjustment rings are
shipped in the fully relaxed position. Be fo re t he ne xt ste p
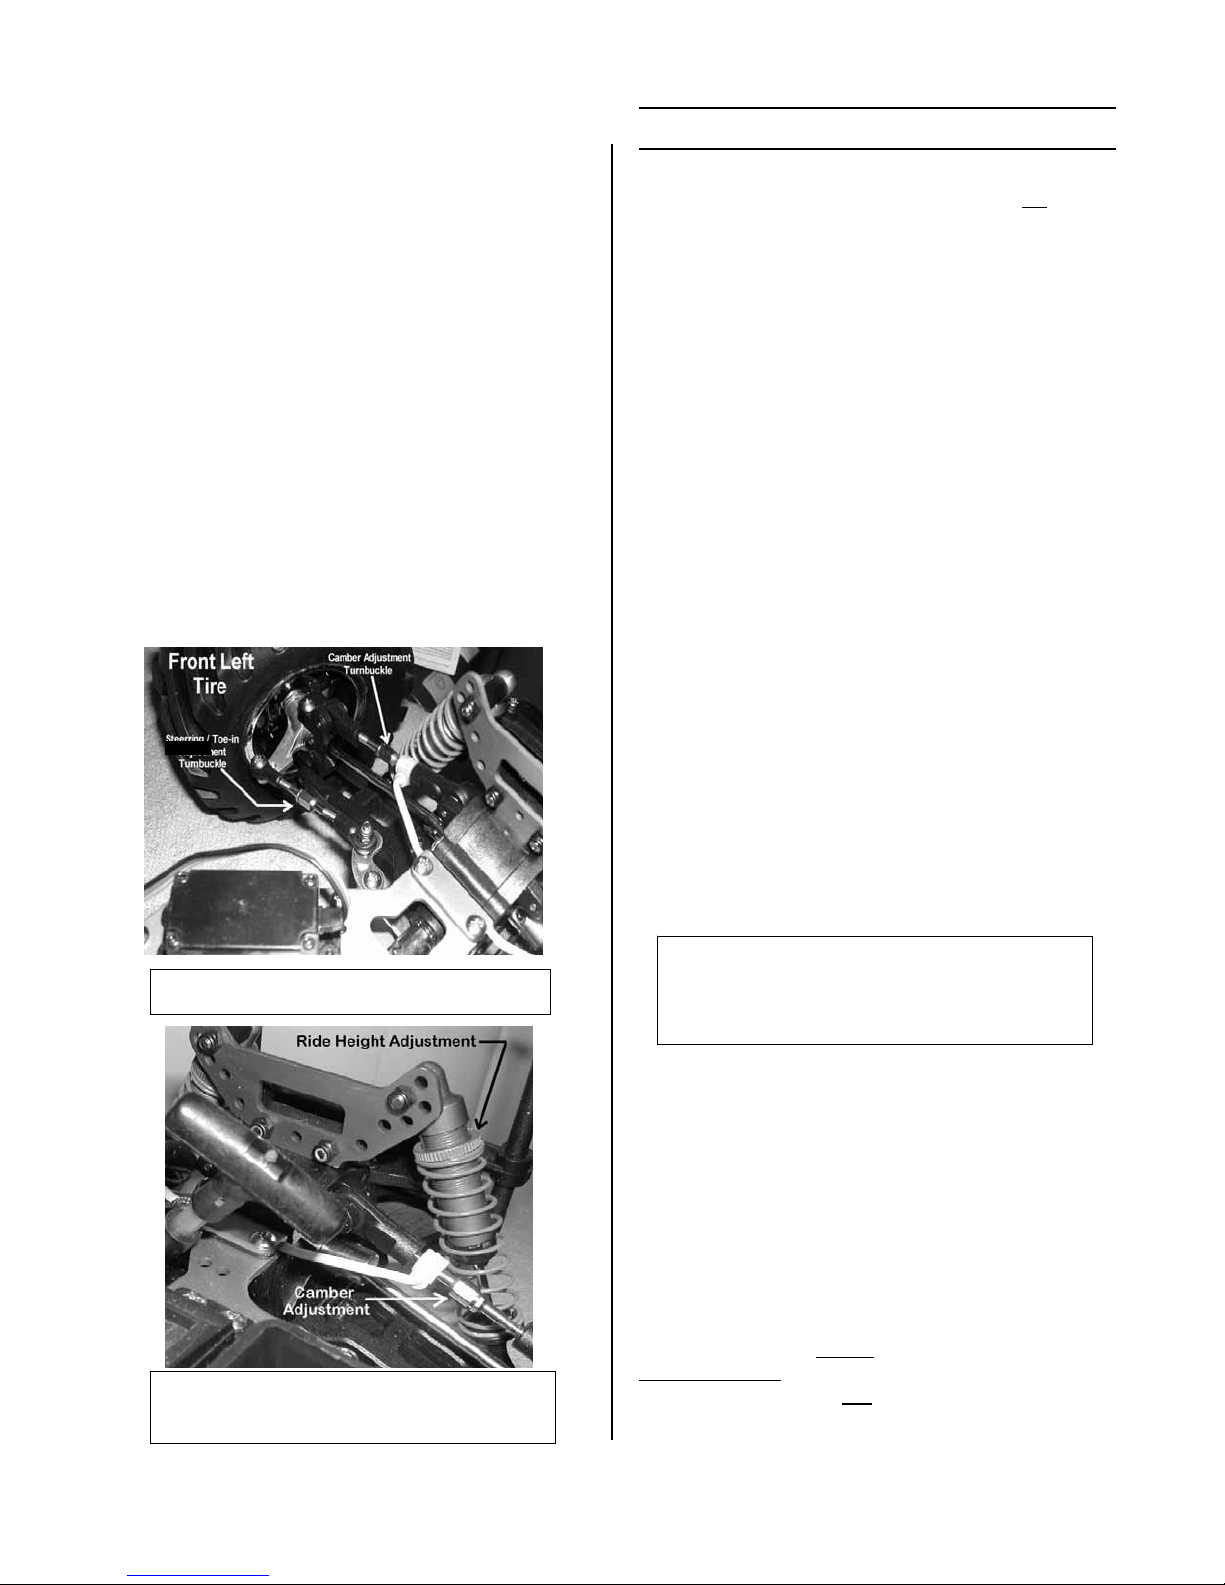
i n se tti n g up yo ur tr uc k, yo u mus t a dj ust the s pr in g pr e ssure on the suspension to the factory recommended setting. Turn the rings until 8 screw threads are visible
above the ring on the rear shock struts, and 6 threads are
visible above the ring on the front s hock struts. See the
photos regarding Ride Height adj ustment for the location
of the spring pressure adjustment rings. The factory set-
Receiver Box, Receiver, Battery
Holder, Receiver Box Cover
Tempest Gladiator 5
Page 6
ting is optimum for general on and off road r unning, but
the spring pressure and ride height is fully adjustable for
different tracks and conditions.
Setup Step 3 - Steering Trim
Altho ugh the Tempest Gladiator is factory assembled and
set up, it is important to finely adjust the steering trim
before operation. Turn on the transmitter, then the receiver, but do not start the engine. Position the steering
trim knob in the neutral (center) position.
On a smooth, level, paved surface roll the truck forward a
few feet at a time, and verify tha t the tr uck rolls straight,
not turning towards one side or another. Also check the
st e e r ing fu nc t i on. If the t ruc k d o e s no t ro ll st r a ig ht , a d just
the steering trim knob until the truck rolls straight on its
own. (In the event of damage or excessive wear, you can
also adjust the steering arms on the truck using a s mall
open end wrench or adjustable wrench on the he x shaped
portion of t he metal rod. Adjusting the steeri ng arms this
way also requires that you adjust both of the steering arms
to maintain the correct toe-in setting at the same time.)
Steering
Adjustments for Steering and Toe-In
Adjustments For Ride Height
and Camber (rear)
Operation
The Tempest Gladiator is a contest quality, advanced
hobbyist class remote controlled vehicle. It is not a “toyclass” vehicle. This is a high-performance vehicle with the
capability to exceed 45 MPH and cause serious injury and
dama ge. The Temp es t Gl a d i ato r i s d e si gned fo r op e ra ti on
by or under the supervision of a responsible adult.
Do not ever operate this vehicle in a manner
that causes or risks injury to people or animals, or
in a manner that causes or risks dama ge to pri-
vate or public property, or
in a manner that could cause a motor vehicle ac-
cident.
Do not operate this ve hicle on p ublic or private roads or
highways, or in large crowds of people. Do not operate
this vehicle during times or in locations where the engine’s noise is objectionable. If you are sensitive to engine
noise, wear hearing protection.
Me g atech s ha ll not be lia b le for any loss or damages due
to operator negligence, misconduct, intentional or accidental mis use of this product or any related products and accessories, and in all cases Megatech’s limit of liability
shall be a maximum of USD $1.00
Your new Tempest Gladiator will provide year s of on and
off road fun, deliver thrilling performance, and awesome
ac ti on fo r yo u a nd yo ur s p ec ta to rs i f op er a ted s afe l y a nd
responsibly. The Tempest Gladiator is suitable for sport
and competition on:
Paved Tracks
Dirt Tracks
Off-Road
Grass
The Tempest Gladiator is NOT designed for:
Rock Climbing
Curbs
Brush
Tall Grass
De molition Derby
Crashes
Operating your Tempest Gladiator under these unapproved cond i ti o ns i s uns a fe for people and property, will
void the warranty, and release Megatech from any and all
liabilities. Never operate any Nitro or gas powered vehicle
in dry brus h, dry grass, or dr y leaves! T his creates a ver y
Gravel
Sand
Standard Jumps
Standard Obstacles
Tempest Gladiator 6
Page 7
dangerous f ire ha z ard that can cause loss of life and property.
Engine safety
Be fo re you at t empt to s t a r t your engi ne , it i s imp o r t ant fo r
you to be familiar with the correct method of shutting off
the engi ne when necessary. To shut o ff the engi ne, use
needle nose pliers or a surgical hemostat clamp to squeeze
the fuel supply line closed. The fuel supply tube is the
clear silicone r ubber tube that connects the bottom of the
fuel tank to the carburetor on the engine. Squeezing this
tube closed for a few seconds is the only method you
should use to stop the engine safely.
Do NOT re move the fuel tube, or attempt to stop the engine by touchin g o r ho ld in g any p a rt o f the e n gi ne, t r ansmission, or wheels! Do not use your fingers to squeeze the
tube because you can be burned by touching the very hot
engine or exhaus t syste m. Wrap several layers of thick
tape around the jaws of the pliers or hemos tat to prevent
cutting or damaging the fuel line.
Fueling
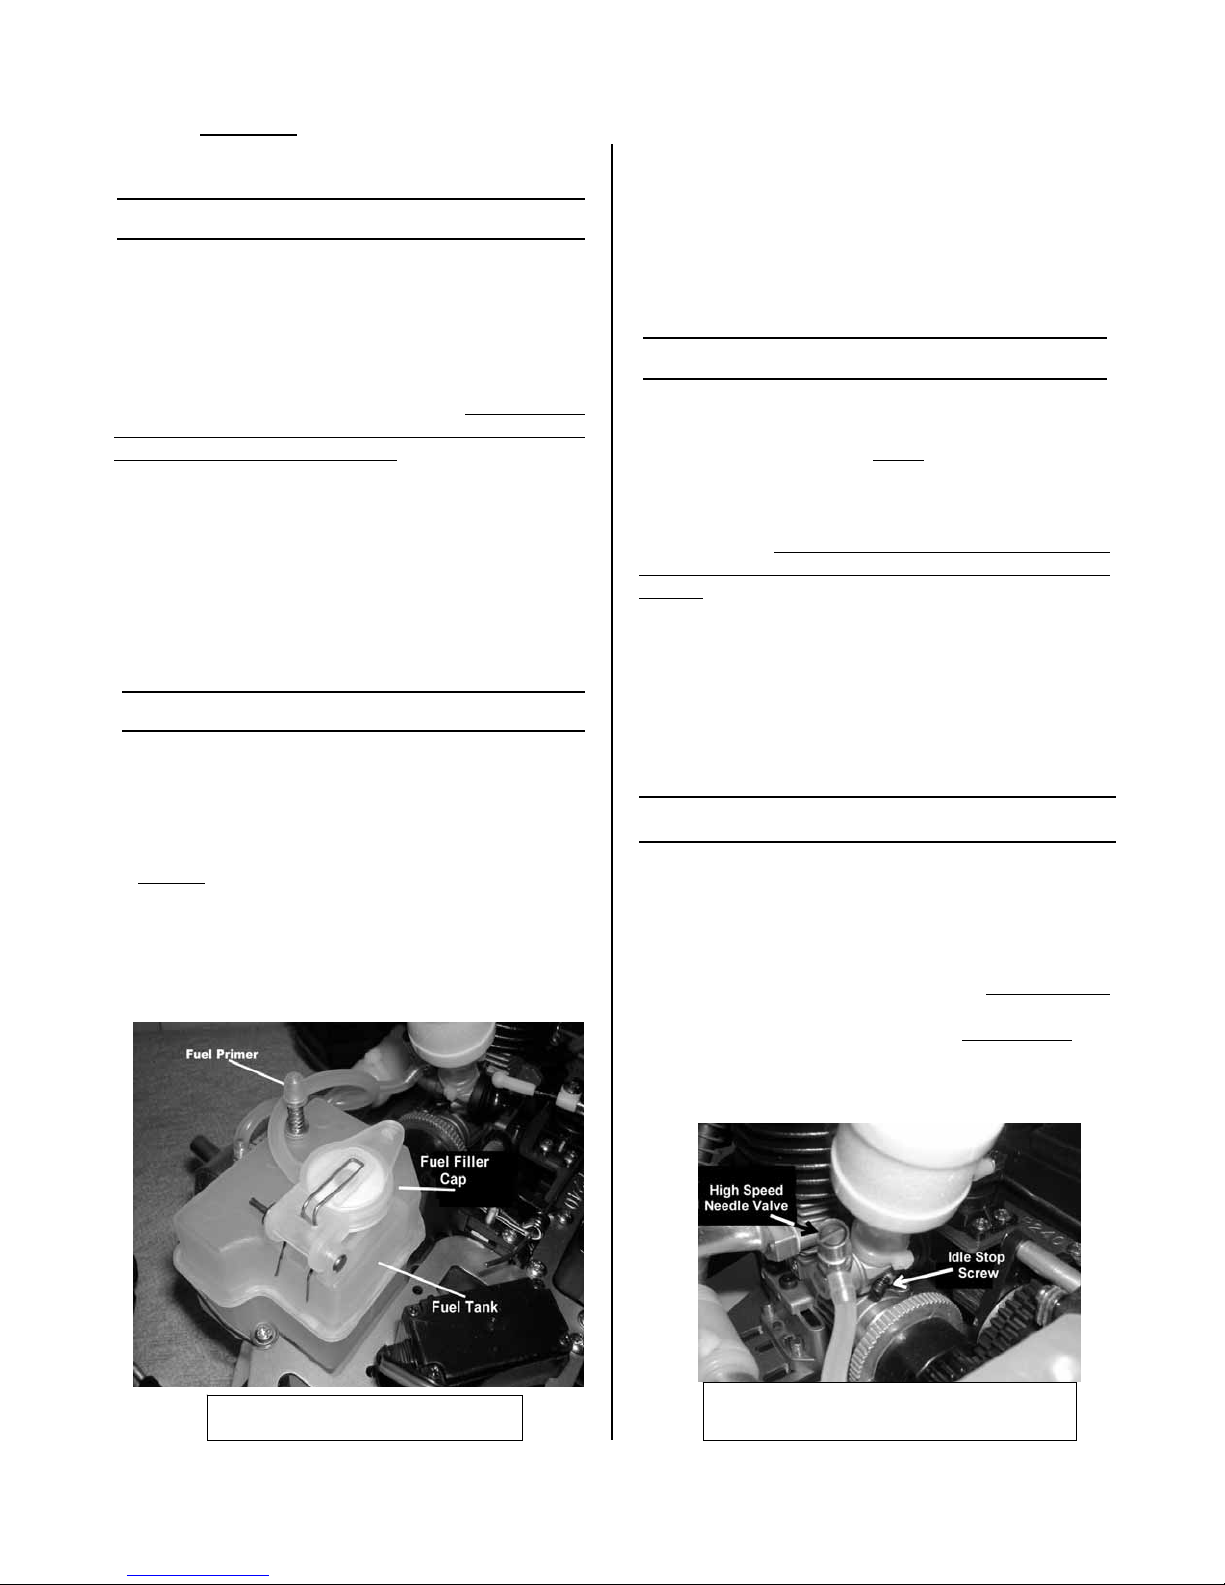
The Tempest Gladiator is equipped with a competition
fuel tank and priming system. T he fuel tank uses a springloaded filler cap over a wide filler neck for fast, easy fueling. Simply pull the cap open and it spri ngs bac k closed
when you remove the nozzle. Use a fuel filler bottle with
an attached long nozzle tha t can be inserted into the filler
neck. Do NOT pour fuel from an open can into the tank
or attempt to use funnels or loose parts to fuel your truck.
We recommend Megatech’s “High Velocity” 25% Nitro
fuel, or other premium quality car/truck fuel with 25%
Nitro content.
The fuel tank is equipped with a pri mer pump to allow
easier and safer engi ne starting. The primer is located on
the top of the fuel tank next to the filler cap. To prime the
engine, fill the tank with fuel, close the filler cap, and
press the spring-loaded primer 5 to 8 ti mes until you see
fuel pus hed through the fuel s upply line all the way to the
carburetor. Then press t he primer two more times o nly, to
inject a small amount of fuel i nto the engine. The fuel line
and engine are now ready to start.
Engine break-in
Important! For the best performance, maximum enjoyment, and longest service, your Megatech M-16 engine
must be properly broken in before yo u adjust t he e ngine
for maximum power. The M-16 is a close-tolerance, precision machined engine, which needs to be broken in so that
the matching surfaces and parts establish the correct running tolerances. Proper break-in during first few tanks of
f uel de te rmi ne s ho w we l l yo ur en gi ne w i ll r un for i ts e ntire life.
This is an easy process that requires only three full-tank
engine runs at reduced power settings. Only after the
br e ak- i n pe ri od c an the e ngi ne be ad j us ted f or ma xi m um
power. The break-in period is also an excellent opportunity to get used to driving your Tempest Gladiator and
become familiar with the truck’s great handling qualities.
Break-in Settings
The M-16 engine is adjusted at t he factory for the correct
settings to break-in the engine. If for some reason you lose
the settings, close both the high speed and slow speed needle valves (clockwise), then
open the high speed needle valve three full turns
(counter-clockwise), and
open the low speed needle valve four full turns
(Important! Do not force the needle valves closed firmly;
only close them until you feel slight resistance)
Fuel Tank, Filler Cap, Primer
Location of High Speed Needle
Valve and Idle Stop Screw
Tempest Gladiator 7
Page 8
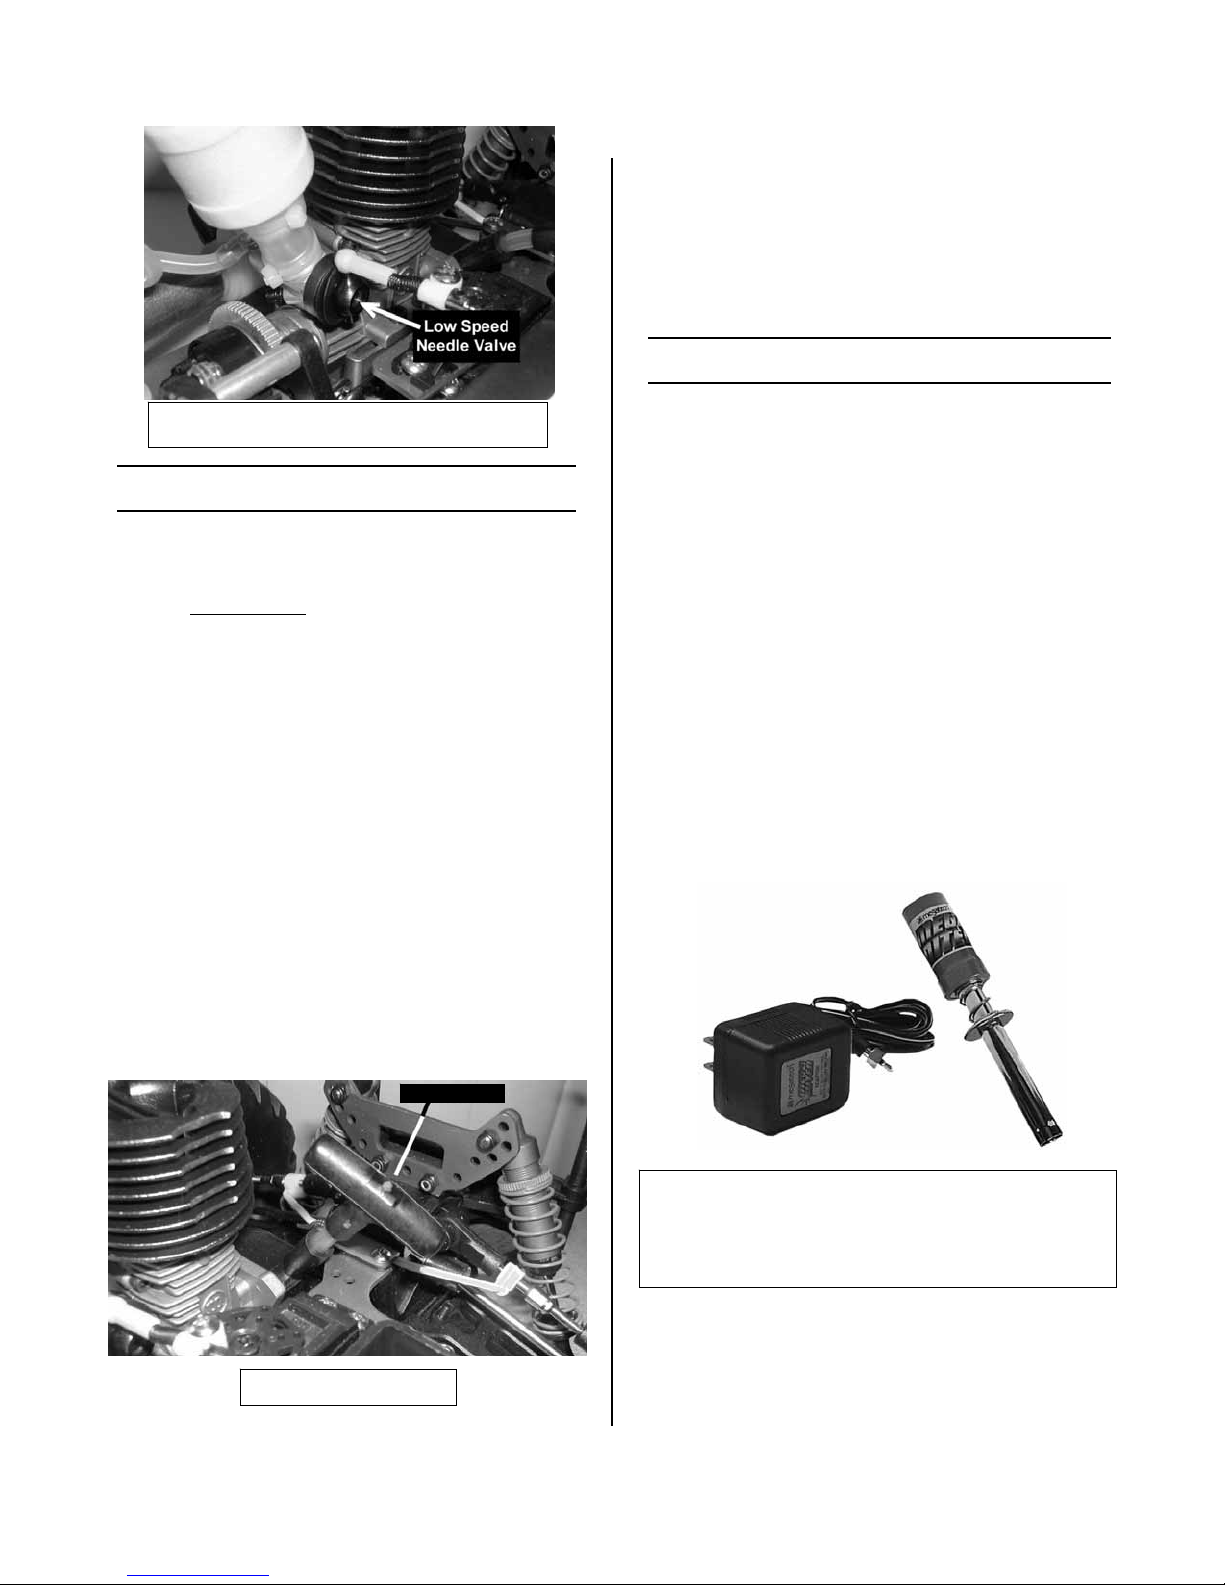
Location of Low Speed Needle Valve
Starting Engine
Ge ne ral – During break-i n, it may be necessary to l eave
t he gl o w p lug ig nit e r a t ta ched to the engi ne t o ke e p i t r unning while the fuel-air mixture is adjusted “rich” for
break-in. This is normal.
The high speed needle valve adjusts the fuel-air mixture
only at higher throttle settings and will not affect low
speed. The low speed needle valve affects the fuel-air
mixt ure only fro m idle through mid-range. T he idle speed
stop screw is a mechanical stop that determines only how
far the carb uretor barrel will close, and has no effect on
fuel-air mixture. There must be approximately a 1mm
opening in the carburetor barrel when the carburetor is
closed (idle position). If this adjustment is not correct,
(and the engine idle speed is too slow) it will be nearly
impossible to set the low speed needle valve properly.
Af ter pri ming t he e ngi ne, and t ur nin g on t he tra nsmi tte r
and receiver, pull the engine starter handle two or three
times to circulate the fuel in the engine.
Starter Handle
Important! Whenever you start the engine, always pull
the starter handle with short, quick pulls straight away
from the engi ne. Do NOT pull the handle all the way out,
or at any angle that allows the cord to contact a ny part of
t he e ngi ne or tr uc k. Al wa ys le t t he s ta rt er ha nd l e b ac k i n
slowly after each pull, do not let go and allow the handle
to snap back into the engine. Make sure the throttle trigger is set at idle speed.
Break-In procedure
Attach a fully charged 1.5 volt glow plug igniter to the
en gi ne, a nd w a it thr ee s ec ond s to al l ow the gl ow p lug to
hea t up . Sta rt the e ngi ne usi ng s hor t, q uic k pul ls on t he
starter handle. Once the engine is running, observe the idle
speed. If the speed is too high (above 3000 RPM), open
the low speed needle valve (counterclockwise) until the
engine speed slow s to a safe idle. If the engine stops or
runs too “rich” (lots of smoke and liquid fuel droplets
coming from the exhaust), then close the low speed needle
valve (clockwise) until the engine reaches a reliable idle
speed. Adjust the low speed needle valve so that the engine idles as “rich” as possible w hile still runni ng. If the
engine will not keep runni ng reliably at idle speed during
this time, turn the idle speed stop screw ½ turn clockwise
to increase the minimum speed.
As soon as you a re abl e to keep t he engi ne running (wi th
t he gl ow i gni ter a tta c hed if ne ce ss a ry) at a r el ia bl e, ult ra rich idle, run two full tanks of fuel through the engine at
the rich idle setting.
Starter Handle
Megatech’s MegaNiter rechargeable glow
plug igniter allows easy starting, and can be
left on to keep the engine running reliably
during the rich mixture break-in period.
If the cylinder head te mperature reaches 230 degrees F,
shut down the engine, let it cool completely, and start it
again.
After idle break-in, the low speed needle valve can now be
adjusted for optimum low and mid-range running. With
Tempest Gladiator 8
Page 9
the engine runni ng, reduce the throttle to idle speed for
about 5 seconds, then apply full throttle very briefly and
observe the engine response. If the engine accelerates
slowly with lots of smo ke and liquid fuel drops ( too rich
of an air-fuel mixture), turn the low speed needle valve
clockwise 1/8 of a turn at a time until the engine accelerates briskly and reliably. Make sure to test the throttle
response after each adjustment to the low speed needle
valve.
Whe n yo u s h ut d own the en gi ne, yo u c an al s o s ee if the
low speed needle valve is set properly. When you pinch
the fuel line closed, the engine sho uld speed up just a little, then quit. If it quits instantly with no increase in speed,
the low speed setting i s too “lean” and you must turn the
needle valve counter-clockwise. If the engine speeds up
excessively and runs for a long ti me, the low speed mi xture is too rich, and you must adjust the low speed needl e
valve by turning it clockwise.
After the idle and mid-range adjustments, slowly increase
the engine speed to approximately 50% of full throttle, but
no further . Adjust the high speed needle valve so the engine agai n runs a s rich a s p o ss ib le (you want it to be producing lots of oily smoke a nd spi tti ng oil droplets from
the exha ust). Again, you may need to leave the glow plug
igniter attached to keep the engine running.
Run the Te mpest Gladiator on a smooth surface at low to
medium throttle setting for another tank of fuel, being
careful not to ma neuver it too harshl y, or use any more
than half throttle. Leave the truck body off for maximum
cooling. Leaving the glow plug i gniter attac hed will often
al l ow the e ngi ne to ke ep ru nni ng d ur i ng t hi s r i ch mi xt ur e
phase.
Now you may begin adjusting the high speed needle
valve. Carefully turn the high speed needle valve in clockwise 1/8 of a turn at a time, which will allow the engine to
run faster and at a higher pitch sound. Your truck will start
running faster and s moother. As you beco me more familia r wi th the Te mpes t Gl adi ator , yo u ma y co ntin ue to adjust the high speed needle valve 1/8 of a turn at a time
until maximum speed and power are produced. When the
truck starts to lose acceleration and performance, and
overheats, you have adjusted the hi gh speed needle valve
too far (the ai r-fuel mi xture has become too “lean”), and
you must turn the valve out counter-clockwise to richen
the air-fuel mixture.
The optimum high speed setting (after break-in) is
achieved by first adjusting the high speed needle valve so
the vehicle runs at the highes t possible straight-line speed
(without overheating), the n tur ning the hi gh speed needle
valve counter-clockwise 1/8 of a tur n (richen the fuel-air
mixture) to give a slight safety margin.
Be patient and make the adjustments slowly, until your
Tempest Gladiator has smooth and predictable response
through the full range of throttle settings and driving conditions.
Important! The engine needle valve adjustments can only
be ma d e a c c ura t e ly when t he t ruck is ru n ning on a c ours e
or a track. NEVER run the engine with t he wheels off the
ground, because it can cause damage to the engine, the
truck, and cause injury to you.
Note: If the engine does not run properly, or the adjustments are difficult to make accurately, always chec k that
both fuel tubes betwee n the fuel tank and engine are not
cut, cr acked, or have pinholes i n t hem.
Make sure there are no blockages or
dirt present.
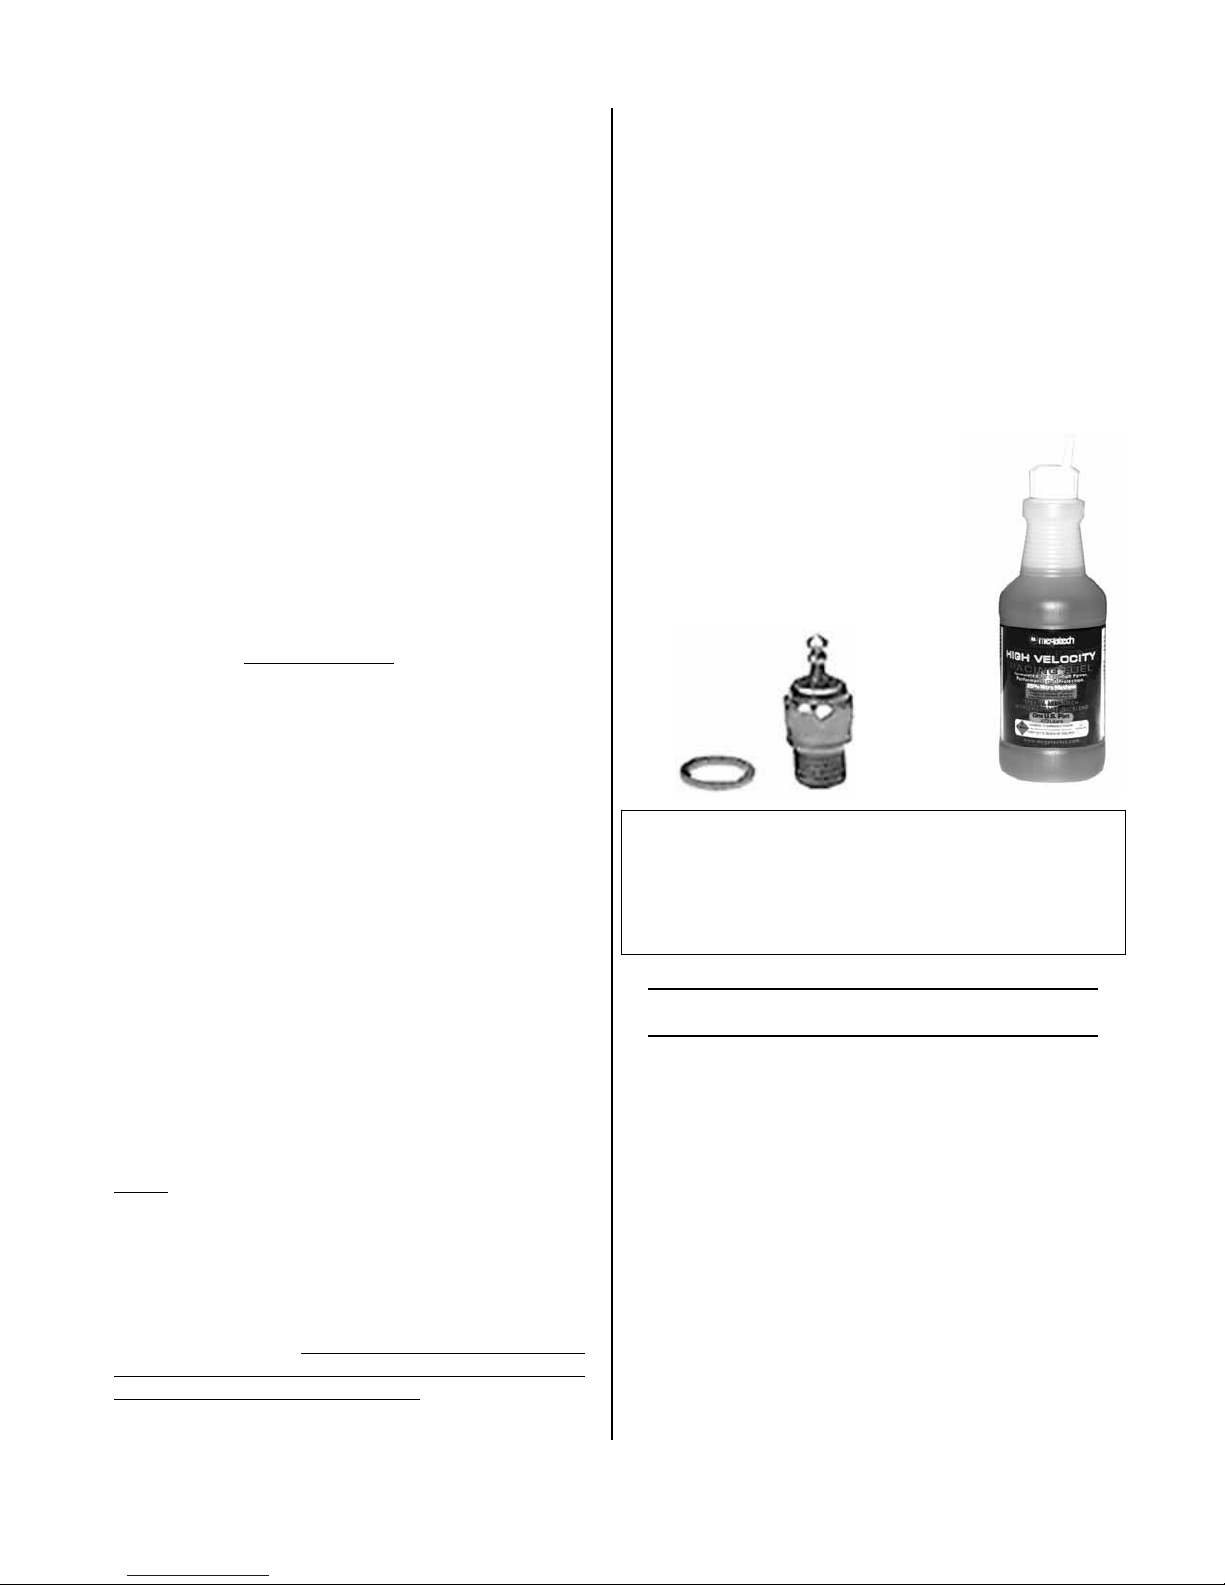
We recommend the Megatech high performance replacement glow plug, and Megatech
“High Velocity” 25% Nitro racing fuel, available
through your hobby dealer or direct from
Megatech Replacement Parts / Tech Support
Operational Reliability
We highly recommend using a fuel filter.
Always have fresh fuel, spare glow pl ugs, air filter
elements, and fresh batteries.
Change or clean the ai r filter el eme nts often. Dust
and dirt are the primary destroyer of model engines.
Changi ng the type of fuel or glow plug will always
have an effect on the performance and engine settings, which may need to be re-adjusted to suit.
Changes in humidity, altitude, and temperature will
also have a n effect o n the engine’s perfor mance
and settings.
Tempest Gladiator 9
Page 10

Engine Replacement Parts
Please see your local hobby dealer first. If replacement
parts are not available through your dealer, you may order
the parts through Megatech Replaceme nt Parts/Tech Support.
Phone orders can be placed by calling 201-662-2800
Orders can also be mailed to:
Megatech Replacement Parts / Tech Support
8300 Tonnelle Ave nue
North Bergen, NJ 07047
Or visit Megatech online at www.megatech.com
Radio Trim Adjustments
Steering - Adjust the steering tr i m knob to keep the truck
rolling in a straight line with the steering w heel centered.
If the truck requires excessive amounts of trim, check
thoroughly for damage or excessive wear in the suspension or steering parts of the truck.
Throttle – The throttle trim adjusts the center point of the
throttle servo, allowing you to fine-tune the operation of
the transmitter throttle trigger.
Ongoing Maintenance, repair
and troubleshooting
Proper care and maintenance of your Tempest Gladiator is
crucial to keeping it perfor mi ng well and operating reliably.
The single most important thing you must do is check the
truck thoroughly after eac h run, to make sure there have
been no bent or broken parts. Continuing to drive the
Tempest Gladiator with bent or broken parts (knowingly
or un k no win gly) wil l c aus e d amage t o t he t ruc k, p r e s e nt a
safety hazard to people and property, and void your warr a nt y. Che ck all screws, fasteners, bolts, and hardware for
tightness after each run. Check all running gears, transmission, and drive joints after each run for wear and excessive
“play” or looseness.
It is important to thoroughly clean your truck after each
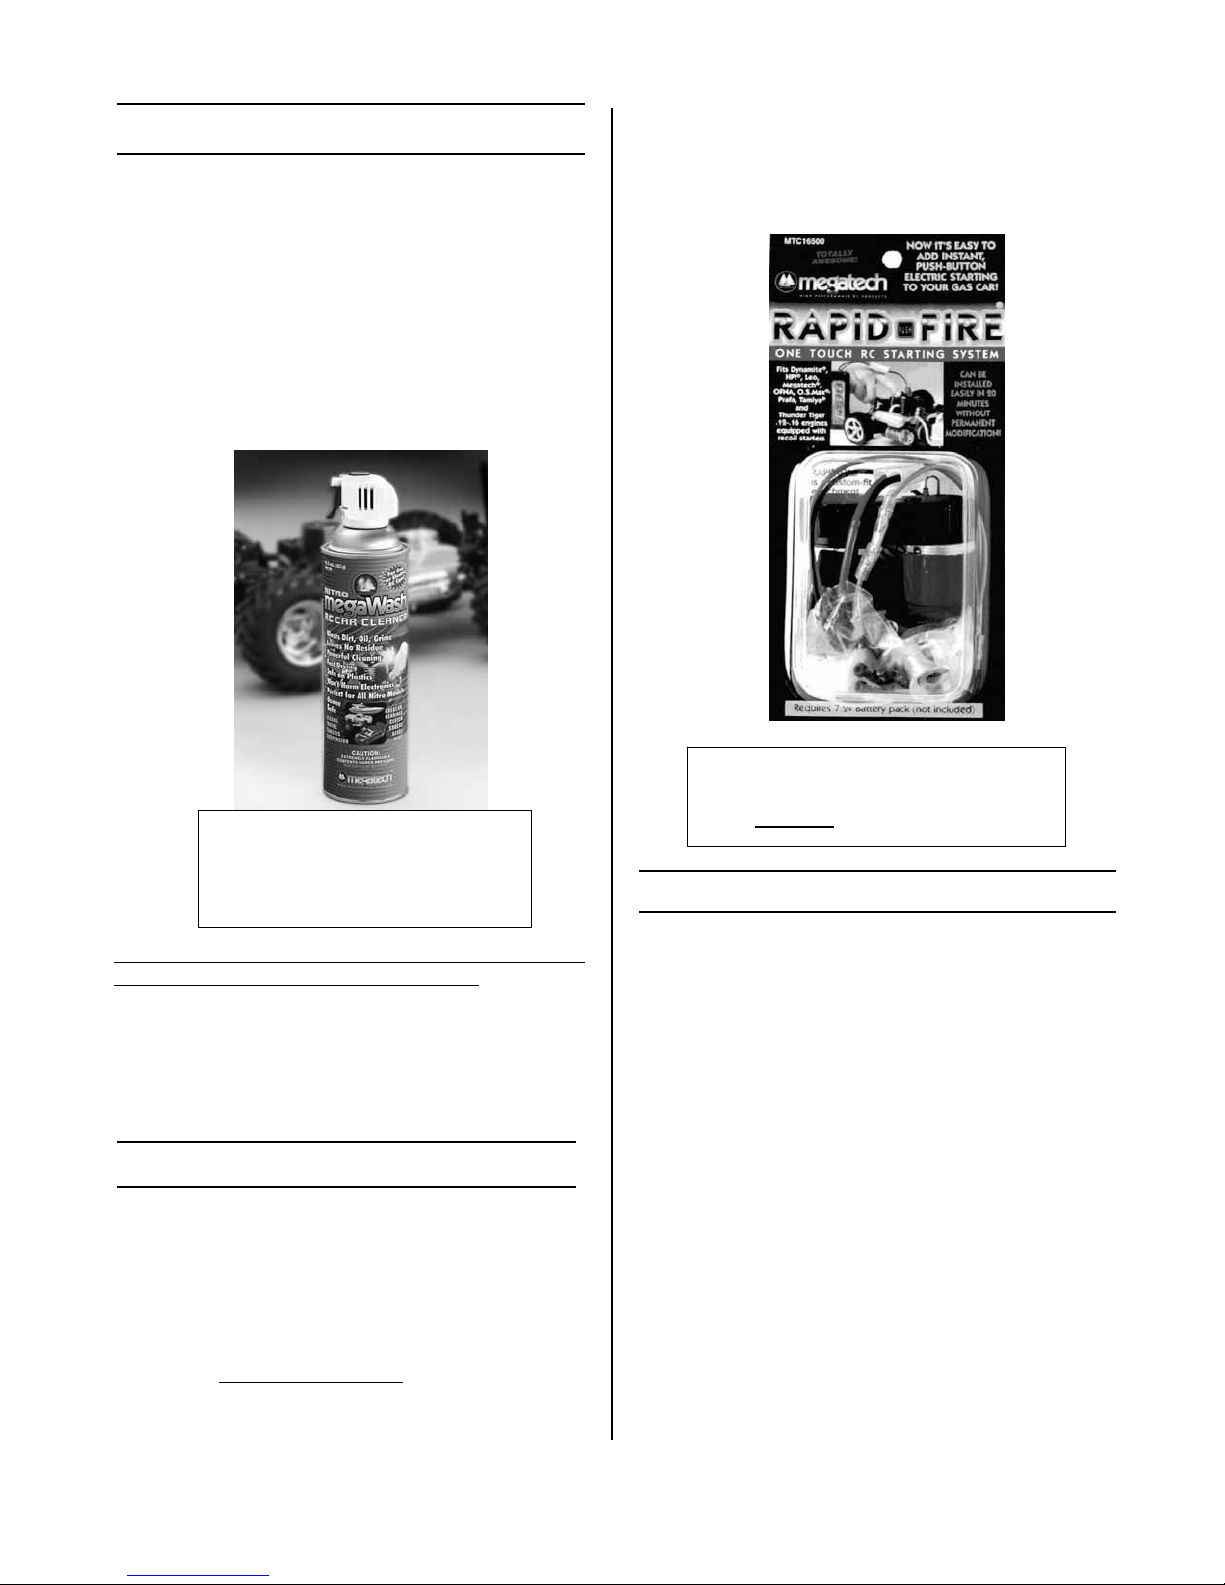
time you run it, and remove oil, fuel, and dirt. We recommend Megatec h’ s Me gaWas h, a safe a nd e ffec ti ve s pr ay
cleaner.
Important! Never leave any fuel in the truck’s fuel tank
or e ngi ne! The Nitro f uels used in high perfor ma nce R/C
vehicles contain chemicals that can cause corrosion and
damage to the engine. Whenever possible, use up the entire tank of fuel until the engine quits, leaving no fuel in
the tank, the fuel tubes, or the engine.
After each session, use a good engine “after-run” oil. Remove the screw at the top of the carburetor air filter and
remove the yellow filter cover. With the carburetor barrel
fully open (full throttle), put three of four drops of afterrun oil into the carburetor, and then replace the filter cover
and retaining screw . Pull the engine starter handle three of
four times to distribute the oil through the engi ne. This
will provide protection against rust and congealed fuel
from clogging the engine.
In addition to the regular checks after each run, periodically check the faste ners, screws, nuts and bolts on the
Tempest Gladiator for tightness. Do not over-tighten the
screws and fasteners! Where screws are threaded into
plastic, simply check periodically for a snug fit. On screws
that thread directly into metal, you ma y remove and reinstall the screws using s mall amounts of thread locking
compound (“Loctite”, etc.) to secure fasteners against
loosening because of vibration. Taking the time to use
thread locking compo und once in the beginni ng can save
many hours of re-tightening over the life of your truck.
Should you find that any mechanical or suspension parts
are bent or broken, you must repair or replace them
immediately before operating the Tempest Gladiator
again. Very few parts can be safely straighte ned or readjusted if damaged, and it is far more likely that the parts
will need to be replaced. See your local hobby dealer firs t
for replacement parts.
Should you find that any gears, transmission, or drive
joints are loose, w orn, or have developed excessive play,
replace these parts immediately. See your local hobby
dealer first for replacement parts, repair, or technical advic e o n the c ondi tion o f your truck. I f p a rt s are not av a ilable through your local hobby dealer, a full line of replacement parts is available thro ugh Megatech’s Replacement Parts / Tech Support department at 201-662-2800.
If you experience problems with your Tempest Gladiator,
see your local hobby dealer firs t, or call Megatech’s Tec h
Support departme nt at 201-662-2800 for assistance. Some
common problems and their solutions are:
Radio transmitter LED’s not glowing
Re move lowe r batte ry compar tment ha tch, a nd re-i nstal l
new batteries in the correct direction. If the LED power
indicator still does not glow when the transmitter is
switched on, seek help from your local hobby dealer or
Tempest Gladiator 10
Page 11
Megatech Tech Support.
Radio Receiver does not work
Remove the receiver cover, and re-install new batteries
in the correct direction. Check for water or fuel in this
compartment, and re move all moisture or liquid. Ma ke
sure servo connectors are plugged in to the receiver
co rr ectly. Ma ke s ure b at ter y hol der is p lug ged i nto r eceiver correctly. Make sure receiver antenna wire is not
cut or missing. Make sure the transmitter is switched on
and the LED power indicators are glowing. If the servos
still do not function, seek help from your local hobby
dealer or Megatech Tech Support.
Engine does not start
Fill fuel tank with fresh fuel, push primer button until
fuel is seen flowing from the tank into the carburetor,
then push the primer button twice more, and pull the
sta r ter ha ndl e tw i c e wi tho ut t he glo w i gni te r a tta ched to
circulate the fuel. Adjust the high speed and low speed
needle valves to the settings shown i n the Starting Engine section. Remove the glow plug and inspect the
inside for the presence of excess liquid fuel or oil/dirt.
Attach a fully charged glow igniter to the glow plug
and verify the glow wire is glowing brightly. Replace
t he gl o w p lug if ne c e s s ary. R e - ins t a l l the glo w p lug and
re-start the engine.
Starter handle will not turn over engine
Remov e glo w p lug, turn truck up s id e d o wn b rie f l y, and
watch for liquid fuel dripping out of the glow plug hole.
If liquid fuel drips out, the engine may be “flooded”
with too much fuel. Allow all excess fuel to drip from
t he gl o w p lug ho le , re -inst a l l glo w p lug and re - s t a r t e ngi ne . If s ta r ter handl e s ti l l wi ll not tur n e n gi ne, r emov e
t he gl o w p lug and a tt em p t t o t urn e n gi ne by ha nd , us i n g
the silver knurled ring mounted between the engine and
transmission. If engine turns freely, the starter cord assembly has frozen, a nd you sho uld co ntac t your local
hobby dealer for the parts and assistance to replace
starter cord assembly. If t he engine cannot be turned by
ha nd wit h t he glo w pl ug r e mo v e d , t he engi ne p ist on ha s
seized in the cylinder, and the engine mus t be repaired.
Seek help from your local hobby dealer or Megatech
Tech Support.
In all cases where you experience any difficulty that
cannot be resolved per the above troubleshooting tips, if
you have damaged parts, or are uncertain about the condition, safety, or operability of your Tempest Gladiator,
seek help from your local hobby dealer or Megatech
Tech Support before continuing.
Suspe nsion Ad ju stme nt s
The Te mpe st Gl adi ator wa s des igned w ith full y adj ustable suspension components, allowing adjustments, repairs, and co mpeti tion tuning. The steering and toe-in
adjustment is a metal tur nbuckle located on the 2 steering links. The camber adjustment is the metal turnbuckle located on the 4 upper suspension links. Be careful when adjusting the suspension settings on your
truck, using a small adjustable open end wrench.
Suspension Adjustment Points For
Ride Height and Camber (rear)
Steering
Suspension Adjustment Points For
Steering, Toe-In, and Camber (front)
Storage
Tempest Gladiator 11
Page 12
Important! Always remove the used batteries from the
transmitter and the receiver box if the truck will be stored
for more than a few days. Old batteries leak chemicals and
gases over ti me that can seriousl y damage your tr uck’s
electronic components.
Before storage, use clean paper towels and a degreaser to
clean the parts of the truck, remove oil residue, dirt, and
gri me. Always sto re yo ur tr uck in a c le an co nditi on, because fuel a nd oil drips and runs can leave poisonous and
flammable materials behind.
Never store your truck, fuel, oils , or tools di rectly on carpet, wood flooring, or on a ny poro us surface. Never store
your truck near electrical outlets and wiring, water heaters,
stoves, or open flame, or near children and pets. We
strongly recommend storing your truck o n a no n-porous
sheet of plastic in its original box, in a garage or outside
covered storage.
Megatech’s MegaWash is a
convenient spray cleaner t hat
safely cle ans fue l resi due an d
dirt from your truck
Competition hop-ups
Always the leader in high performance co mpetit ion qual-
ity products, Megatech offers a growing l ine of hop-ups ,
racing upgrades, and high performance options. Visit
Megatech online at www.megatech.com for the latest
available upgrades/hop-ups for your Tempest Gladiator.
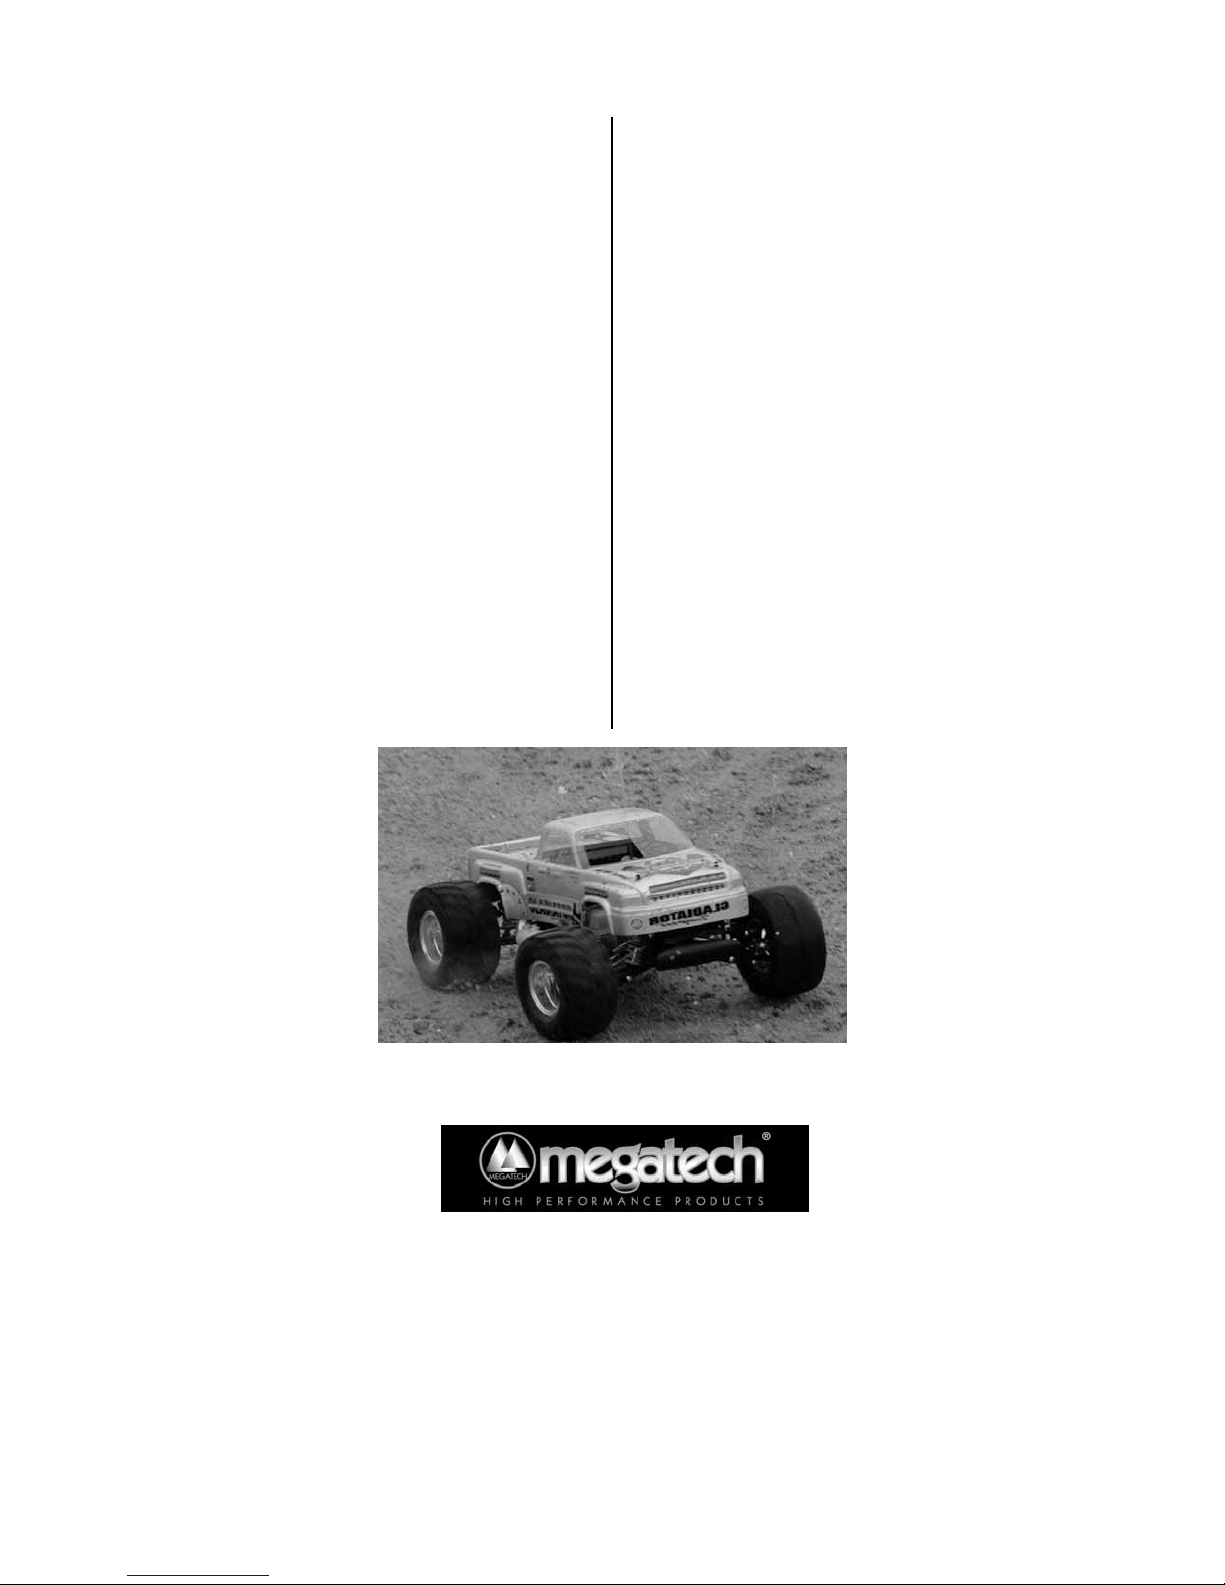
Megatech’s Rapid Fire one to uc h R /C sta r ti n g sys t e m
allows easy, instant electric starting o f yo ur M-1 6 e ngi ne ,
replacing the stock pull starter. Simply hook up a 7.2 volt
starting battery, touch the Rapid Fire start button, and your
Tempest Gladiator engine is running. Disconnect the starting battery, and the truck is ready for competition without
lugging around the extra weight of the battery!
Megatech’s Rapid Fire one touch
R/C starting system offers convenience without
lots of extra weight!
Warranty
Megatech 90 Day Limited Warranty
Megatech warrants this product to be free from original
manufacturing defects upon purchase by the consumer.
Megatech makes no express or implied claims regarding
this product once it has been assembled. This warranty
does not cover damage from intentional misuse, abuse,
fire, flood, or other damage unrelated to the use of this
product for the purpose of which such products are normally intended. This warranty does not cover damage
from products used with this item that are not approved
for use with this product. The purchaser of this prod uct
acknowledges and understands that they alone assume all
risk and liability for personal or property damage and/or
injury resulting from the buyer’s use of this product. Under no circumstances shall Megatech’s limits of liability
from use of this product exceed USD $1.00. The express
warr anties contained above are in lieu of all other warranties, expressed or implied, including but not limited to the
warranty of merchantability and/or fitness for a particular
purpose, nor shall Megatech, its divisions or assigns be
liable for any incidental or consequential dama ges, costs
Tempest Gladiator 12
Page 13
or expenses incurred by the purchaser of this product.
This warranty gives you specific legal rights, but other
rights t hat vary from state to state may be available to
you.
For a period of 90 Days from the date of purchase the
radio manufacturer will REPAIR OR REPLACE defective
equipment covered by this warranty, otherwise the purchaser and/or co nsumer is responsible for any charges for
the repair or replacement of the radio. This warranty does
not cover cosmetic damages and damages due to the acts
of God, accident, misuse, abuse, negligence, improper
installation, or damages caused by alterations by unauthorized persons or entities. This warranty only applies to
Megatech products purchased and used in the United
States of America, Canada, and Mexico. Batteries, plastic
cases and gears are not covered by this warranty.
THIS WARRANTY IS IN LIEU OF ANY AND ALL
OTHER WARRANTIES, WHETHER FOR MERCHANTA BILITY OR FITNESS FOR A PARTIC ULAR
PURPOSE AND WHETHER EXPRESS OR IMPLIED.
REPA IR OR REPL ACEME NT AS PRO VIDED UND ER
THIS WARRANTY IS THE EXCLUSIVE REMEDY.
NEITHER MEGATECH NOR THE RADIO MANU-
FACT URER SHA LL BE LIABLE FOR ANY INCI DENTAL OR CONSEQUENTIAL DAMAGES FOR
BREACH OF ANY EXPRESS OR IMPLIED WARRANTY RELATING TO THIS PRODUCT, EXCEPT TO
THE EXTE NT PROHIBITE D BY APP LICABLE LA W,
ANY IMPLIED WARRANTY OF MERCHANTABILITY OR FITNESS FOR A PARTICULAR PURPOSE ON
THIS PRODUCT IS LIMITED IN DURAT ION TO T HE
DURAT ION OF THIS W ARR AN TY.
Some states do not allow the exclusion or limitations on
how long an i mpl ied warr anty lasts, so the above l imitati ons ma y no t ap pl y to yo u. T his wa rr a nty gi v es yo u sp e ci fic l ega l rights, a nd you may ha ve ot her ri ghts , w hich
vary from state to state.
Replacement Parts / Tech Support 201-662-2800
Megat ech Intern a tio n al
8300 Tonn el le Ave.
North Bergen, NJ 07047 USA
Fax Orders 201-221-8030
Website http://www.megatech.com
Tempest Gladiator 13
Page 14
Tempest Gladiator 14
Page 15

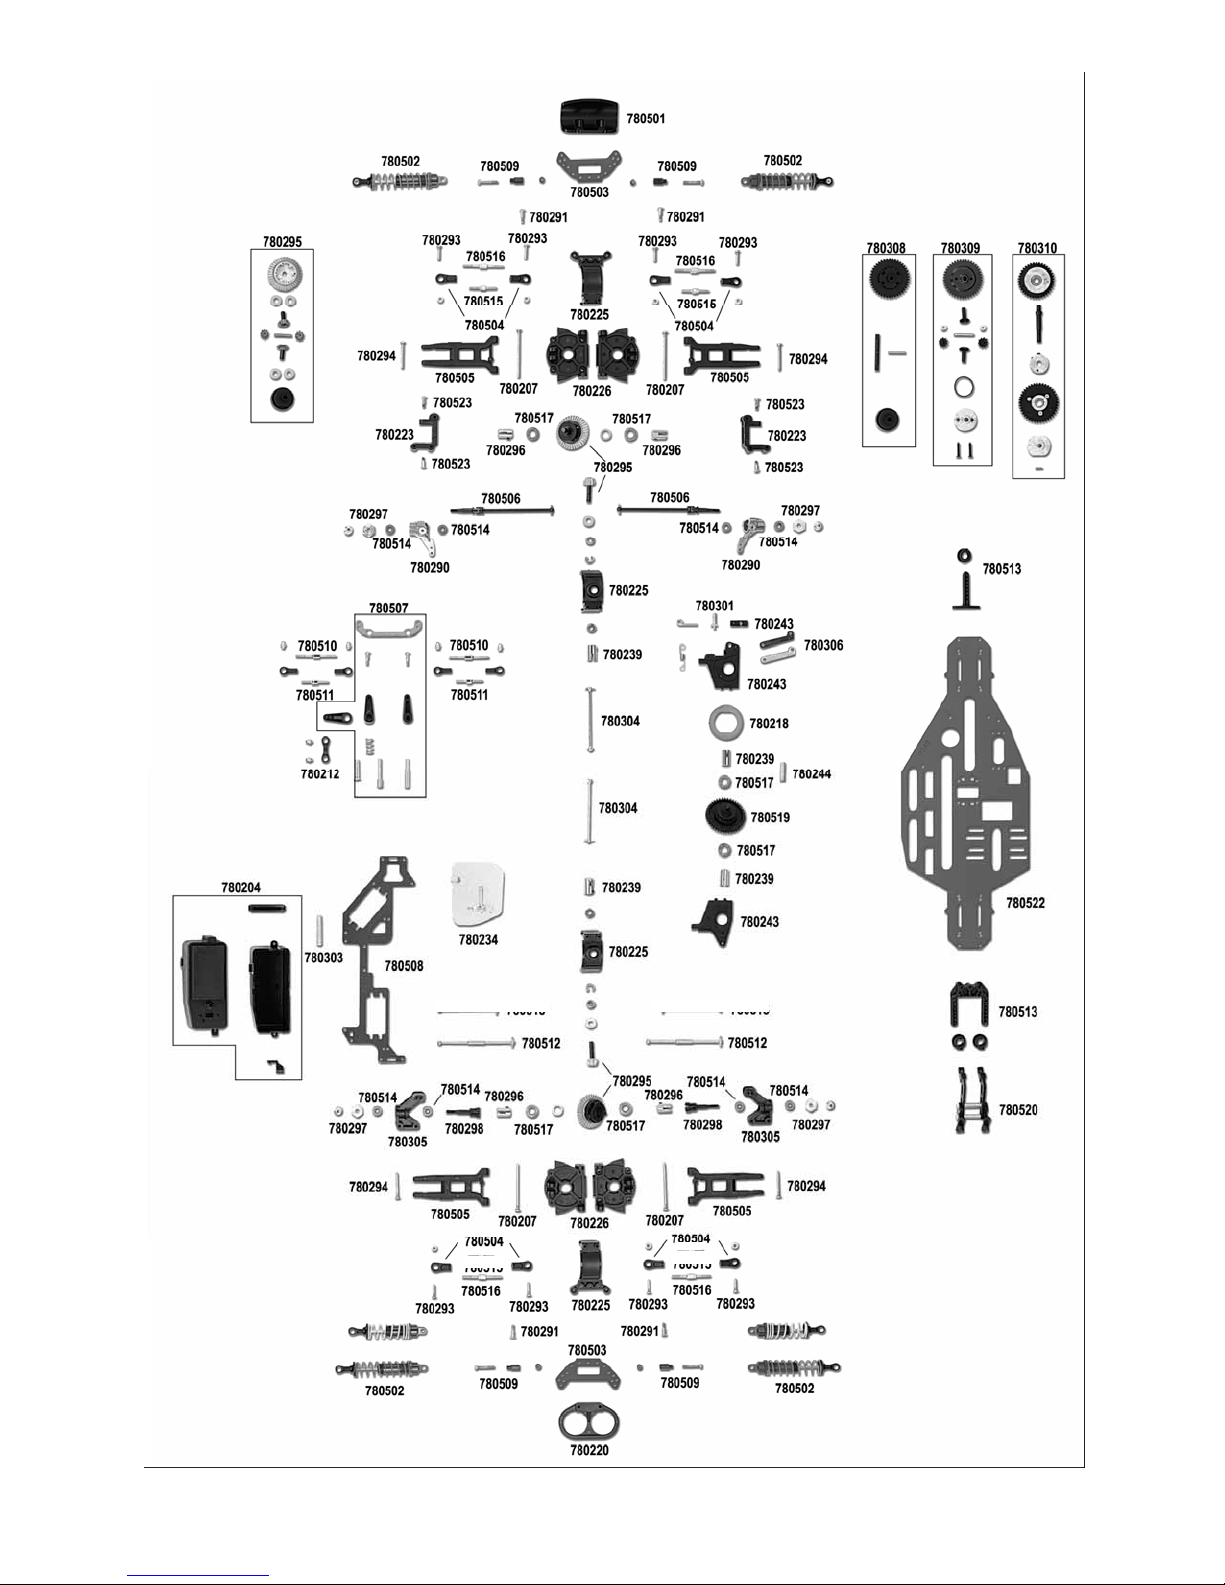
Tempest Gladiator Parts List
Stock Number MTC 7805
MTC780204 RADIO BOX
MT C780207 SUSPEN SION HINGE PINS 50MM
MTC780212 STEERING LINKS
MTC780218 BRAKE DISC
MTC780220 REAR BUMPER/HANDLE
MTC780223 HUB CARRIERS
MTC780225 GEAR CASE SHELL
MT C780226 GEAR CASE SIDES
MTC780234 100CC QUICK-FILL FUEL TANK
MTC7 80239 CENTER DIFFERENT IAL DRIVE JOINTS
MT C780243 CENT ER DIFFERENTIAL MOUNTS WIT H BRAKE CAM
MT C780244 ALUM INUM BRAKE SPACER
MT C780290 FRO NT STEERING HUBS
MTC7 80291 SHOCK MOUNT SCREWS
MTC780293 SUSPENSION HINGE PINS 13.5MM
MT C780294 SUSPEN SION HINGE PINS 23MM
MTC7 80295 COMPLETE DIFFERENTIAL W/ AL UMINUM SPUR & PINION
MTC780296 DIFFERENTIAL JOINT
MTC780297 HEX DRIVE WASHERS
MTC780298 WHEEL SHAFT
MTC780301 BRAKE ACTUATOR CAM
MTC7 80303 ALUMINUM RADIO TRAY POST
MTC7 80304 CENTER DRIVE SHAFTS
MTC780305 REAR HUBS
MTC780306 BRAKE PADS
MT C780308 MIDDLE GEAR ASSEMBLY
MTC780309 42T MIDDLE DIFFERENTIAL GEAR
MT C780310 2 SPEED ASSEMBLY
MTC780501 FRONT BUMPER
MTC780502 SHOCK ABSORBERS
MTC7 80503 TITANIUM SHOCK TOWER
MTC780504 3MM BALL END
MTC780505 SUSPENSION ARMS
MTC780506 UNIVERSAL DOGBONE
MT C780507 SERVO SAVER S ET
MTC7 80508 TITANIUM RADIO PLATE
MTC780509 SHOCK HUB
MTC780510 ROD HEAD SET
MTC780511 STEERING ROD
MTC780512 SWING SHAFT
MTC780513 BODY SUPPORT
MTC780514 5 X 10 X 4 METAL BUSHING
MT C780516 STEERI NG TIE RODS
MT C780517 8 X 14 X 4 BAL L BEARING
MT C780519 CENTER DIFF. GEAR ASS’Y
MTC7 80520 REAR WING MOUNT
MTC780521 KINGPIN SCREWS
MT C780522 TITANIUM MAI N CHASSIS
MTC780523 ALUMINUM RACING WHEELS
MTC780524 FRONT SHOCK MOUNT
Phone Orders / Tech Help 201-662-2800
Megat ech Intern a tio n al
North Bergen, NJ 07047 USA
Fax Orders 201-221-8030
Website http://www.megatech.com
8300 Tonn el le Ave.
 Loading...