

MegaTech Sky Trooper Instruction Manual

Do not touch the running rotor blades!
Do not fly above people’s heads!
Adult supervision is required
BATTERY CAUTIONS:
• Never charge your Sky Trooper for more than 30 minutes.
• Never attempt to charge non-rechargeable batteries.
• Allow the built-in ight pack to cool for 10 minutes after ying before
recharginging.
• Never mix new and used batteries or dierent types of batteries.
• Batteries must be inserted into the transmitter with proper polarity.
• Do not short-circuit the battery terminals.
CARE AND MAINTENANCE:
• Always remove the batteries from the transmitter when it is not being
used.
• Keep the Sky Trooper away from heat.
• Do not submerge theSky Trooper in water or allow its components to get
wet.
SPECIAL NOTE TO ADULTS:
• Periodically check the charging system, wire, battery pack and all
electrical connections for damage. In the event of damage, the parts
should not be used until properly repaired or replaced.
• This product is not intended for children under 8 years old.
• Only charge the Sky Trooper with the included charger.
• Do not attempt to charge any other batteries with the included charger.
SAFETY PRECAUTIONS
• Do not modify or disassemble the unit or its components. Doing so will void your warranty and may cause electrical damage.
• Keep hands, ngers, hair and loose articles of clothing away from the rotor blades.
• Turn o the transmitter and the helicopter when not in use.
• Always remove batteries from your transmitter when you have nished ying for the day. Do not store batteries inside the transmitter.
• Adult supervision is required.
• Always use fresh alkaline batteries in the transmitter for optimum performance.
• Replace the batteries as soon as the use of the helicopter becomes impaired.
• Please read this manual completely before operating and keep this information for reference.
• The helicopters’s charger is specically designed for the battery in the airplane. Do not attempt to charge any battery than the one in the helicopter.
FCC STATEMENTS
This device complies with part 15 of the FCC rules. Operation is subject to the following two conditions:
1) This device may not cause harmful interference and
2) This device must accept any interference received, including interference that may cause undesired operation.
NOTE: This equipment has been tested and found to comply with the limits for a class B digital device, pursuant to Part 15 of the FCC Rules. These limits
are designed to provide reasonable protection against harmful interference in a residential installation. This equipment generates, uses and can radiate
radio frequency energy, and if not installed and used in accordance with the instructions, may cause harmful interference to radio communications.
However, there is no guarantee that interference will not occur in a particular installation. If this equipment does cause harmful interference to radio or
television reception, which can be determined by turning the equipment o and on, the user is encouraged to try correcting the interference by one or
more of the following measures:
• Reorient or relocate the receiving antenna.
• Increase the separation between the equipment and receiver.
• Connect the equipment into an outlet on a circuit dierent from that to which the receiver is connected.
• Consult the dealer or an experienced radio/TV technician for help.
PACKAGE CONTENTS
A. Sky Trooper micro helicopter
B. Transmitter w/ integrated peak charger
C. Spare tail rotor blade
D. Transmitter Antenna
Flight Manual
A.
B.
C.
D.
WARNING:
Changes or modications to this unit not expressly approved by the party responsible for
compliance could void the user’s authority to operate the equipment
FLYING TIPS
1. The Sky Trooper will normally hover with only a little more than half throttle.
2. If the spins or turns as you take-o without you moving the right stick, you need to use the trim dial to adjust it. Use the following diagram.
REPAIRING YOUR SKY TROOPER
• If the tail rotor breaks during ight, gently pull o the damaged rotor and press on the new tail rotor blade until it can not go any further.
• Use foam safe glue to repair cracks or damage to the fuselage assembly.
TROUBLESHOOTING
TRANSMITTER
A. Throttle Control Stick - When it is all the way pulled back, the motor is o. Full power
is reached when the throttle control stick is positioned all the way forward.
B. Tail Rotor Control Stick - Makes the Sky Trooper turn left and right.
Note: You can only use the directional control stick when throttle input is given.
C. Tail Rotor Trim Dial - This adjusts for straight and stable ight when the tail rotor
control stick is in the neutral position.
D. Charging Cord - Located inside a compartment at the base of the transmitter and used
when charging the Sky Trooper.
E. Channel Switch - This switch needs to be set to H for your helicopter to operate.
F. Power LED - Illuminates red, the transmitter power is ON and you have adequate
power to control your helicopter.
G. Power Switch - Turns your transmitter on and o.
H. Charging LED - Illuminates green when the transmitter is in charging mode.
IMPORTANT NOTE: The transmitter has an auto shutoff feature. If the transmitter power is left ON for 10 minutes without any control input or charger
output, the transmitter will turn off. You will need to flip the power switch OFF and ON to reset the transmitter.
FLYING PREPARATION
BATTERY INSTALLATION - TRANSMITTER:
Make sure the power switch on the helictoper and transmitter are in the o position.
1. Use a Philips head screwdriver to unscrew the battery hatch screws.
2. Put 6 AA size batteries in the transmitter, paying close attention to the polarity symbols (+ & -)
3. Replace the cover and tighten the screw.
BATTERY CHARGING:
1. Open the compartment on the front of your transmitter that contains the charging cord.
2. Turn o the power switch on the helicopter and turn on the power switch on the transmitter. The red LED on the
transmitter should illuminate.
3. Plug the charging cord into the Sky Trooper into the charging socket on the plane below the On/O switch. Pay
attention to the polarity of the charging connector.
4. The green LED will illuminate while the helicopter is charger and will turn o when charging is complete.
FLIGHT AREA AND WEATHER SUGGESTIONS:
1. Fly in areas in open areas free from obstacles.
2. If ying indoors, breezes from fans, air conditioning or even a person walking can aect performance .
3. Only y outdoors when there is no wind. Your helicopter is extremely light and its performance can be aected.
FLYING YOUR HELICOPTER
1. Turn ON the transmitter rst, then turn ON the Sky Trooper.
2. Extend the transmitter antenna fully.
3. Place the Sky Trooper on the ground about 5 feet in front of you.
4. The transmitter has a safety feature that prevents the helicopter from turning on too soon. To deactivate it, move the throttle all the way forward then
all the way back.
5. Slowly push the throttle stick forward.
6. Once at the desired altitude, use the right stick to turn the helicopter right or left.
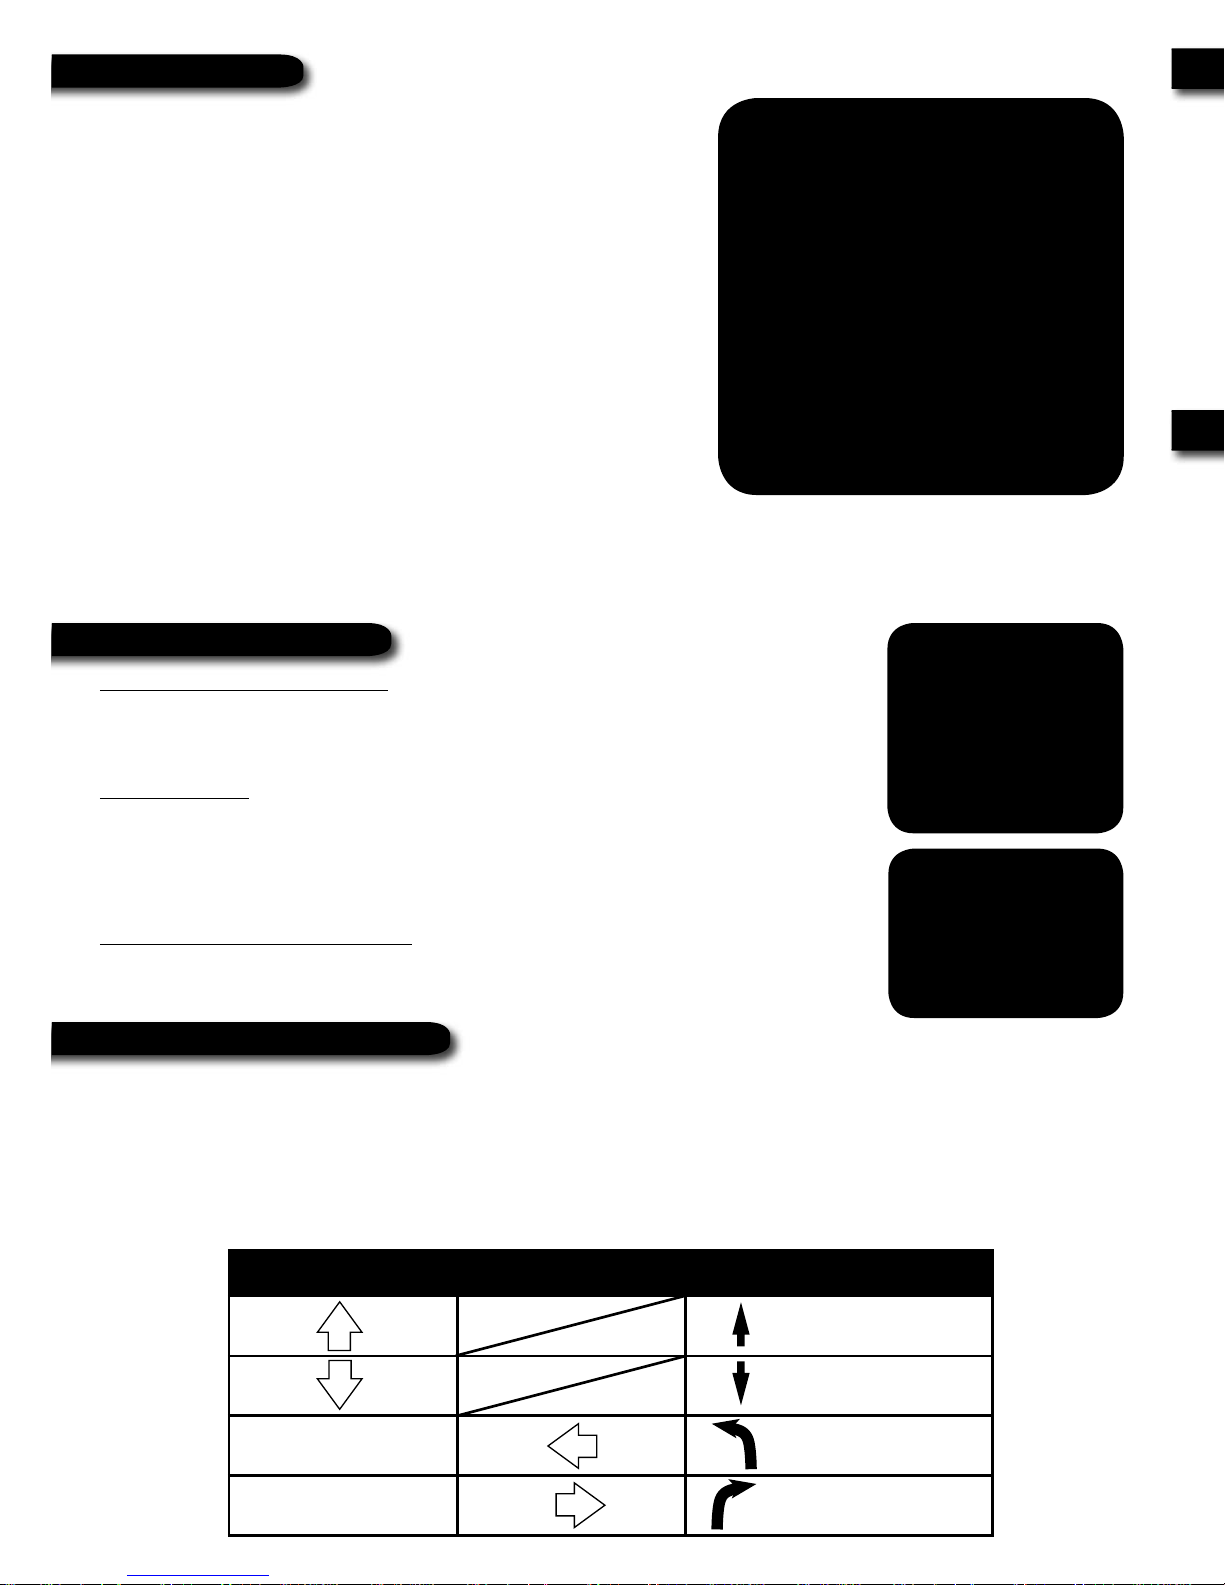
7. Refer to the table below for the transmitter controls.
8. Landing: Throttle down slowly and let your Sky Trooper land on the ground gently.
Left Stick Right Stick Action
Take o and go up
Go down and land
Enough to keep altitude Turn left
Enough to keep altitude Turn right
TURN TRIM DIAL
COUNTER-CLOCKWISE
TURN TRIM DIAL
CLOCKWISE
SKY TROOPER SPINS RIGHT SKY TROOPER SPINS LEFT
A.
B.
C.
D.
E.
F.
G.
H.
 Loading...