


MTC8209 ORANGE
MTC8210 GREEN
MTC8209 ORANGE
MTC8210 GREEN
Entire contents © 2003 Megatech
HeliChopper Manual.indd 1 10/14/2003, 12:37:29 PM

2
If you have questions about operating or installing your new Megatech
product, or if you are missing parts... Please Call Megatech First!
DO NOT RETURN THIS PRODUCT TO THE STORE
10:00am - 5:00pm, EST Monday through Friday (except holidays)
Technical assistance is also available on-line at www.megatech.com
Congratulations on your purchase of a Megatech® HeliChopperTM. The
self-stabilizing GyroHelix™ rotor design makes the HeliChopper the
easiest to fl y radio-control helicopter ever offered. Flying has never
been more fun! Get ready to launch into a new world of high-fl ying
Table of Contents
excitement! Your new HeliChopper comes completely assembled and
within minutes of opening the box, it will be ready to soar through the
sky at heights up to 60 feet. You simply charge the batteries and take
off on your new adventure.
Please read this entire fl ight manual carefully before you attempt
to fl y your HeliChopper.
Call our Customer Service Department at:
(201) 662-2800
or by e-mail to info@megatech.com
If you experience any problems, DO NOT take your HeliChopper
back to the store! Call one of our MegaTechnicians at
1-888-MEGA-911 or send an e-mail to:
info@megatech.com
10:00am-5:00pm EST, Monday through Friday (except holidays)
Technical assistance is also available on-line at www.megatech.com
or by e-mail to
info@megatech.com
DO NOT RETURN THIS PRODUCT TO THE STORE
TABLE OF CONTENTS
Safety Warnings ................................................................................... 3
Getting Acquainted with your HeliChopper........................................... 4
Installing the Batteries ......................................................................... 5
Charging the Batteries ......................................................................... 5
Preparing For Your First Flight ............................................................. 6
Flying Your HeliChopper ..................................................................... 6
Landing Your HeliChopper .................................................................. 7
Troubleshooting .................................................................................. 8
Ordering Spare Parts ........................................................................ 10
Crash Warranty ................................................................................. 10
Limited Warranty................................................................................ 11
HeliChopper Manual.indd 2 10/14/2003, 12:39:15 PM
Important! Before you begin, please read the warnings
listed on the following page. Failure to comply with the
following recommendations could lead to bodily harm or injury.
The Megatech HeliChopper is not intended for those under 12
years of age without proper adult supervision.
Safety Warnings
Please read these before operating your HeliChopper.
•
manner. When fl ying, you are responsible for your own safety and
the safety of others around you. Follow these basic safety guidelines
at all times.
• The spinning main rotor and tail rotor on this aircraft can be
dangerous! When operating/fl ying, always be aware of the spinning
rotors. Be careful not to let them come close to your body, other people
or loose clothing. Keep your hands, fi ngers and any article of clothing
away from the rotors. Keep spectators behind you when fl ying.
• Fly only
diffi cult (if not impossible) to control your helicopter
properly.
• Do not attempt to disassemble or modify any of the HeliChopper’s
components or allow them to get wet. Electrical damage may occur that could
affect safe operation.
• Only use the rechargeable battery pack provided with your HeliChopper. Using
any other type of battery will damage your helicopter and possibly make it dangerous to operate.
• Since your HeliChopper is controlled by a radio link, it may be subject to inter-
ference from outside radio sources. Do not fl y your helicopter if other models are
being operated on the same frequency in the area. (27Mhz)
• It is very important to always use fresh alkaline batteries in the transmitter. We
recommend Megatech’s Golden Power battery series, designed specifi cally for
R/C products.
• Always fl y your helicopter in a wide-open area, free from wires, trees, buildings
and other obstructions.
• Never fl y your HeliChopper after dark.
• Always take off from the heliport base. Never hold the HeliChopper when
launching. A sudden wind shift could send the helicopter in your direction, possibly resulting in injury.
• Avoid fl ying in very hot or very cold weather. Your HeliChopper features an
automatic temperature guard. When the helicopter gets too hot, it will automatically shut down and land to prevent overheating and protect the internal circuitry.
on calm days. Gusty winds and winds over 5 MPH will make it
3
Safety Warnings
HeliChopper Manual.indd 3 10/14/2003, 12:40:18 PM
4
• Always have an adult install the batteries into the transmitter and
charger/heliport. Never mix old and new batteries. Do not use
rechargeable batteries for the charger/heliport or the transmitter.
Avoid mixing alkaline and other types of batteries.
• After every two or three fl ights, let your HeliChopper cool down
for 10-15 minutes. This will help prolong the life of your
helicopter.
• Always remove the batteries from your charger when you fi nish
fl ying for the day. Do not store batteries inside the charger or
transmitter.
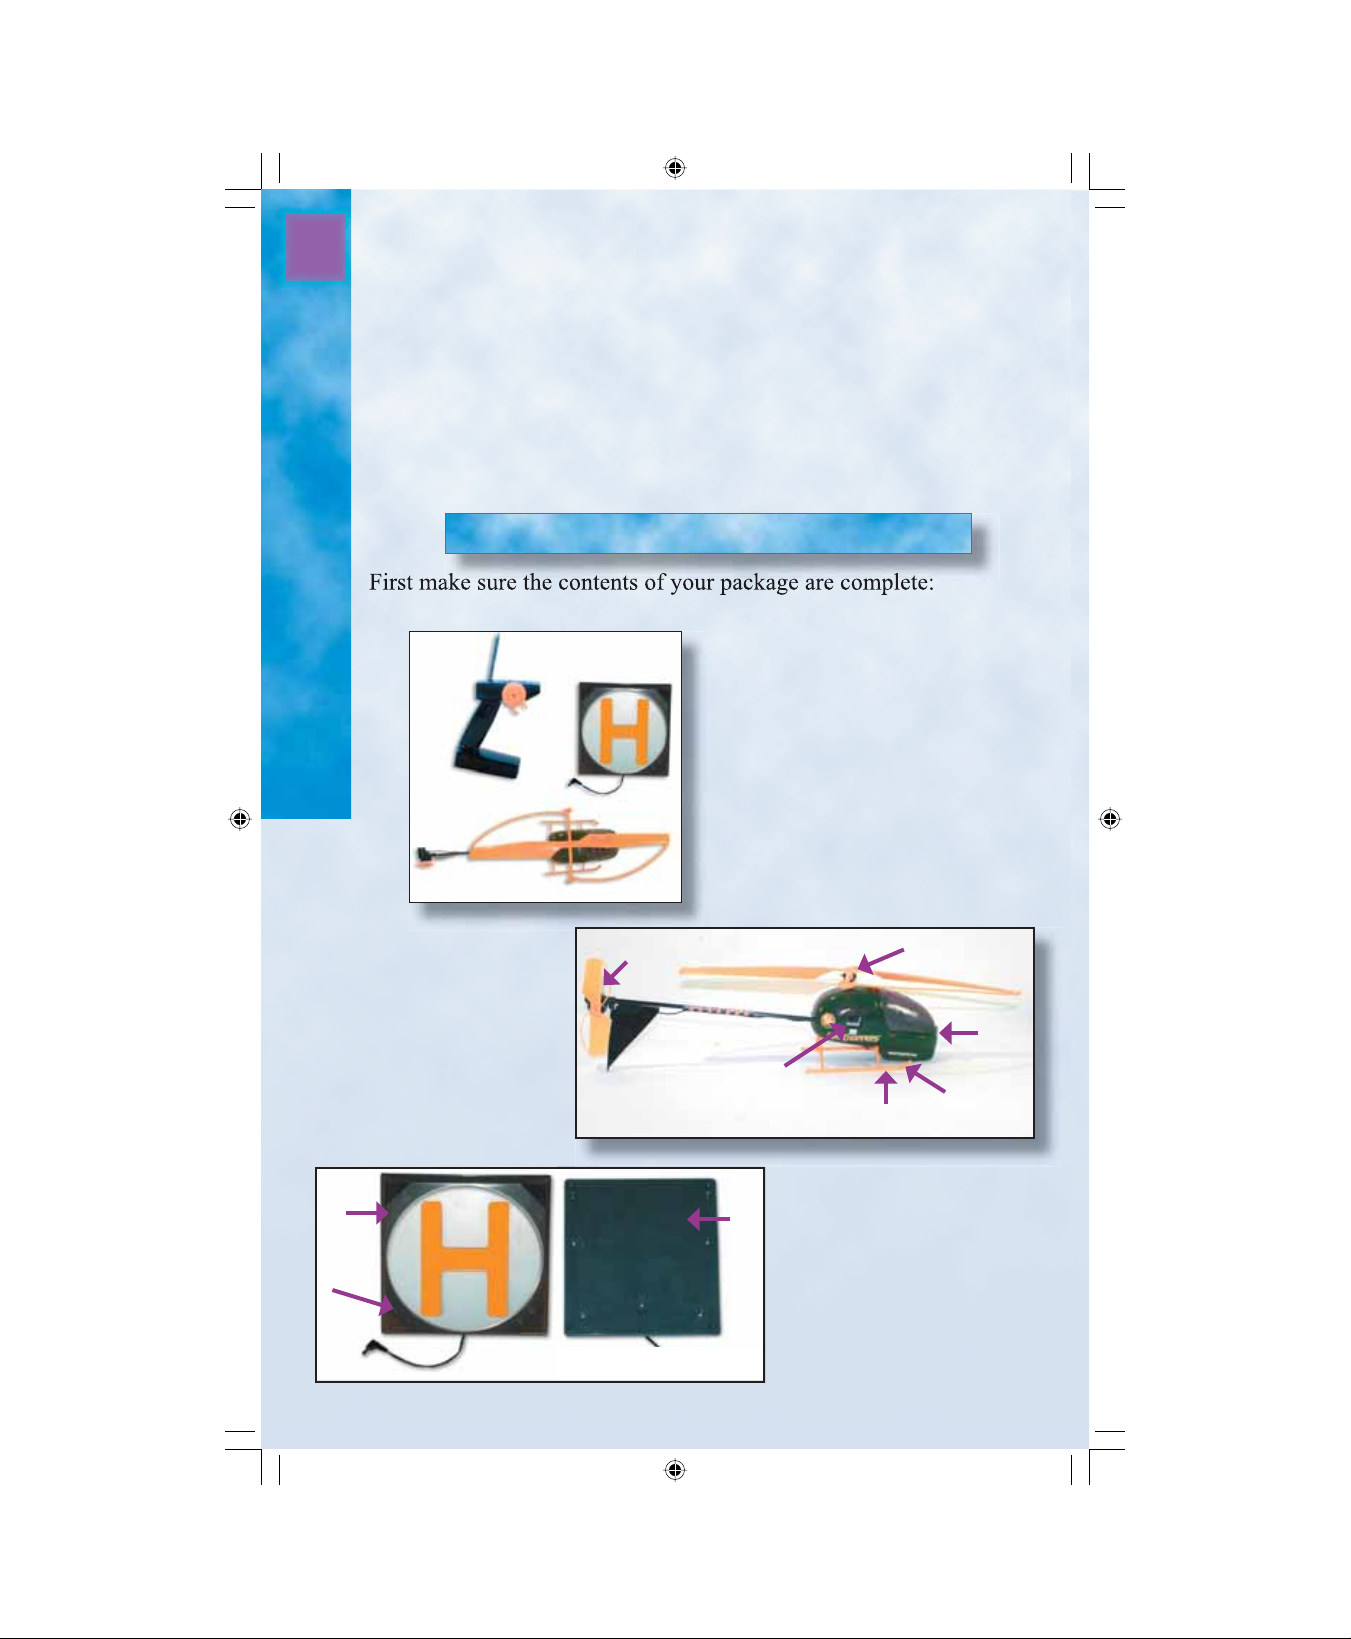
Getting Acquainted with Your HeliChopper
HELICOPTER
B
A
Your HeliChopper Package
A. Radio Control
Transmitter
B. Charger/Heliport
C. HeliChopper
C
1. Fuselage
2. Main Rotor
6
2
3. Landing Gear
4. Charging Port
5. Charging/Off/On
Switch
6. Tail Rotor
5
1
4
3
CHARGER/HELIPORT
1
1. Launch Pad
4
2. On/Off Switch
3. Charger Link
2
4. Battery Compartment
3
Top Bottom
HeliChopper Manual.indd 4 10/14/2003, 12:41:42 PM

CONTROLLER
1. Antenna
2. Power Light
3. Battery Hatch
4. On/Off Switch
5. Trigger/Throttle
6. Directional Control Knob
NOTE:
Keep the box and packaging to
safely store your HeliChopper
between fl ights. Proper storage
will prevent the rotors from warping and help maintain fl ight
performance.
1
4
2
6
5
Bottom
3
Installing the Batteries
Using a Philips screwdriver, unscrew the battery hatch. Paying careful
attention to their direction, install 8 D-size alkaline batteries. Reattach
the battery hatch and securely tighten the screws.
NOTE: For best results, replace the 8 D-size alkaline batteries in the
Charger/Heliport after every 15-20 fl ights.
5
Installing/Charging Batteries
The Radio Controller
Using a Philips screwdriver,
unscrew the battery hatch. Install
6 AA alkaline batteries. Be sure
the batteries are properly
arranged or your controller will
not function. Reattach the battery
hatch and securely tighten the
screws.
Charging Your HeliChopper
hydride) battery that must be charged before each fl ight.
1. Begin by moving the Off/On switch on your HeliChopper to the “Off”
position (all the way to the left, or toward the tail of the helicopter). If
the switch is in the “On” position, your helicopter will not charge.
2. Plug the Charger Link into the charge port beneath your HeliChopper.
Make sure it is securely connected or charging will not occur.
HeliChopper Manual.indd 5 10/14/2003, 12:43:34 PM

6
3
4
7
3. Place the HeliChopper onto the Charger/Heliport.
4. Move the switch on the Charger/Heliport to the “On”
position. The red light should start blinking. This indicates that
it is charging the batteries on your HeliChopper.
5. When the red light stops fl ashing and a green light begins to
glow, your battery is fully charged.
6. You may now disconnect the HeliChopper from the Charger/
Heliport.
Preparing for Flight
Switch in Off Charger Link Charger lights
position. plugged in. show charging is
in progress.
Preparing For Your First Flight
least twice.
Here’s how: Charge the battery pack as instructed on page
transmitter antenna. Next, turn on the radio control transmitter fi rst and then
the receiver. Always remember to turn on the transmitter fi rst. Firmly hold
the helicopter at the center of the fuselage so the main rotor and tail rotor are
unobstructed and away from fi ngers, loose clothing, etc. Now slowly squeeze
the throttle trigger on the transmitter to start the rotors spinning. Continue to
run the motor until it stops. Allow the battery pack to cool, and then recharge
it again. Perform this process of running the motor until the battery is drained
at least twice. The battery pack will now supply more power and your fi rst
fl ights will be much easier and safer!
5. Fully extend the
Flying Your HeliChopper
1
the radio control transmitter.
2 Switch on the radio control
transmitter. A red light on
the transmitter will glow to
indicate power. Never attempt
to fl y if the red light on the
transmitter is not glowing.
HeliChopper Manual.indd 6 10/14/2003, 12:45:31 PM
Radio turned on. Power Light

3. Slide the switch on the HeliChopper to the “On” position (all
the way to the right or front of the helicopter). Always switch
on the transmitter before you switch on the helicopter.
4. Center the helicopter on the
Charger/Heliport with the landing
gear straddling the “H” as shown.
This is important. It keeps the
HeliChopper from sliding before
it lifts off.
5. Step back at least 5 yards and face
the helicopter.
6. Double check to make sure that
your fl ying area is clear of people,
trees, buildings, electric lines or
other obstructions.
7. Grip the transmitter in your left hand, so that the trigger/throttle
is controlled by your left index fi nger. Use your right hand to
operate the Directional Control Knob.
8. Squeeze the trigger/throttle gradually until the rotors begin
to spin. The rotors need to spin for 1.5-2 seconds to build up
energy before lifting off.
9. As the helicopter lifts off, it may be shaky. Allow the HeliChopper to
stabilize before attempting to turn. Trying to turn while your helicopter
is unbalanced will make it diffi cult to control and may lead to a crash.
10. You determine how high your HeliChopper will fl y with the
proportional trigger/throttle. The harder you squeeze the trigger, the
higher your helicopter will fl y.
11. Turn your HeliChopper by using the Directional Control Knob like a
steering wheel. Turn it left to turn to the left, right to turn to the right.
Be careful not to turn too much. Small turns should be all you need
to hold your HeliChopper in a stable hover. NOTE: Any wind will
make your HeliChopper move, so be ready to correct.
12. HeliChopper average fl ight time on a full charge is between 3 and 6
minutes. If your fl ight times are less than this, you should change the 8
D-size alkaline batteries in your Charger/Heliport.
7
Flying and Landing
Landing Your HeliChopper
1. Find a soft, grassy area to land. Although built to be incredibly tough,
your HeliChopper may be damaged by harsh landings.
2. To land, slowly ease off on the throttle trigger until your HeliChopper
starts to slowly descend in a spiral. Do not ease off too much or the rotors
will stop and your HeliChopper may crash.
HeliChopper Manual.indd 7 10/14/2003, 12:47:30 PM

8
y
Troubleshooting
extend the antenna.
position.
2. Batteries are 2. Make sure batteries are
incorrectly installed correctly.
installed.
3. Batteries are 3. Replace the batteries with
exhausted. new alkaline batteries.
PROBLEM CAUSE RECOMMENDATION
No power to radio control 1. Power switch is 1. Move switch to the “on”
transmitter or charger. in the “off” position.
HeliChopper Manual.indd 8 10/14/2003, 12:49:14 PM
plugged into the
charge port on the
HeliChopper.
No blinking red light when 1. Charge nozzle is 1. Double check the
charging. not properly connection.
2. Power switch on 2. Set switch to “on”
charger is in the position.
“off” position.
3. Batteries are 3. Replace all 8
exhausted. D-Size Batteries.
Chopper is not under control. 1. Radio control 1. Slide the switch to the
transmitter is not “on” position.
turned on.
2. Transmitter 2. Full

9
turned
on
Troubleshooting
.
extended.
3. Windy or bad 3. Stop fl ying at once and
weather. try again on another day.
2. Transmitter 2. Fully extend the antenna.
antenna is not fully
not fully charged.
Chopper is not fl ying high enough. 1. Charger Battery 1. Replace with new
life is nearly batteries.
exhausted.
2. Battery pack is 2. Recharge the HeliChopper.
Helicopter can not rotate left or 1. HeliChopper needs 1. Pause and let the helicopter
right. time to steady and steady itself and then try
balance itself. again. If it does not steady,
to fl y.
the wind may be too strong
2. Battery is losing 2. Land immediately and
power. recharge the battery.
HeliChopper crashed to the 1. You may have 1. Try again and release the
ground while landing. released the trigger more slowly to
down for a landing.
quickly or too far. slow and spiral
throttle/trigger too allow the helicopter to
HeliChopper Manual.indd 9 10/14/2003, 12:50:39 PM

10
p
p
Ordering Spare Parts
Spare, repair and replacement parts are readily available for your
aircraft. Should you need parts, visit your local hobby dealer fi rst. If
unavailable, you may contact Megatech. Use this sheet as a guide.
Part Number Description
8209-01 Main Rotor Blade Orange
8210-01 Main Rotor Blade Green
8209-02 Tail Rotor Blade Orange
8210-02 Tail Rotor Blade Green
8209-03 Transmitter Orange
8210-03 Transmitter Green
8210-04 Rechargeable Ni-MH Heli Battery Pack
8209-05 Landing Gear Orange
8210-05 Landing Gear Green
8210-06 Transmitter Battery Hatch
Obtaining Spare Parts
8209-07 Base/Heliport Orange
8210-07 Base/Heliport Green
8210-08 Base/Heliport Battery Hatch
Contact us at:
Megatech Parts Department
8300 Tonnelle Avenue
North Bergen, NJ
Telephone: (201) 662-2800
Fax: (201) 662-1450
E-mail: info@megatech.com
HeliChopper Manual.indd 10 10/14/2003, 12:52:20 PM

Megatech® Limited Warranty
11
period of 90 days from date of purchase. If any component of this product fails to function properly due to defects in materials or
manufacturing process during this 90 day period, the manufacturer’s
obligations are limited and manufacturer can choose to either repair or
replace the item.
This warranty is void if the product in question has been altered or
repaired by anyone other than Megatech International or an authorized
agent.
Under no circumstances will Megatech International or any of its
representatives be held liable for injury to persons or property damage
resulting from assembly or use of the product. Megatech is not liable
if any outside radio frequencies interfere with the product’s frequency
causing loss of control. Megatech International will not be held liable
for any personal injury or property damage resulting from an out-ofcontrol model caused by use or misuse of the product. Megatech
International expressly excludes any and all express warranties not
specifi cally stated here and all implied warranties of merchantability
and fi tness for a particular purpose. There are no warranties which
extend beyond the description of the warranties contained herein.
Contact the Megatech International Service department before returning any item that is defective according to the limitations listed above.
Please be sure to pack the returned item(s) carefully. The customer must
return the product along with proof of purchase, a letter stating the problem, the customer’s address and telephone number. At this point in time
we will either repair the defective part or replace it and return it to the
customer. Return shipping and handling in the 48 contiguous states is
$12.99. Shipping outside of the 48 states will be quoted by location.
Limited Warranty
This warranty does not cover any damage caused by use, misuse, alteration, accident, or neglect, nor does it cover normal wear and tear of the
product. Product returned to us which falls under this category will be
submitted to our service department for repair. We reserve the right to
charge any service and parts fees incurred when repairing the item.
Megatech International
8300 Tonnelle A venue
North Bergen NJ 07047
(201) 662-2800
www.megatech.com
HeliChopper Manual.indd 11 10/14/2003, 12:53:46 PM

LOOK FOR THESE OTHER FINE MEGATECH PRODUCTS
www.megatech.com
MTC9932
COSMIC FLYER R/C EASY FLYER
MTC7702
OCEAN EXPLORER 1 R/C SUBMARINE
MTC7701
H2O ELECTRIC MINI R/C SPEEDBOAT
Megatech International
8300 Tonnelle Avenue, North Bergen, NJ 07047
(201) 662-2800
www.megatech.com
HeliChopper Manual.indd 12 10/14/2003, 12:55:26 PM
 Loading...