

Page 1
Entire contents © Megatech 2007 Rev. 20070227
Flight
Manual
www.megatech.com
Page 2

If you have questions about operating or assembling your new Megatech product...
Please Call Megatech First!
DO NOT RETURN THIS PRODUCT TO THE STORE
Call our Customer Service Department at:
(888) MEGA-911 or send an email to:
9:30am - 5:30pm, EST Monday through Friday (except holidays)
Technical assistance is also available on the web at www.megatech.com
Or, by email to [email protected]
Congratulations! You have just purchased Megatech’s Micro-Fly the most stable, readyto- y helicopter ever o ered—period! The precision synchronization of its CBR-Drive™
(Contra Balanced Rotational Drive), keeps the twin rotors rotating in exact harmony.
Accordingly, the Micro-Fly performs rock-steady hovering right out of the box. Also
adding to Micro-Fly’s fantastically easy-going ying characteristics is centrifugal
stabilization o ered by the weighted y-bar; a feature normally found on more
expensive model helicopters.
READ ENTIRE MANUAL FIRST BEFORE ATTEMPTING TO FLY
TABLE OF CONTENTS
Safety Precautions........................................................................ 3
Package Contents ......................................................................... 4
Getting Acquainted with your Micro-Fly ............................. 4
Installing the Transmitter Batteries ........................................ 5
Charging your Micro-Fly ............................................................ 5
Flying your Micro-Fly ................................................................. 6
Flight Selector Switch ................................................................. 7
Troubleshooting ........................................................................... 8
Parts List ........................................................................................... 8
Notes ................................................................................................. 9
Warranty ........................................................................................ 10
2
Page 3
Important! Before you begin, please read all safety precautions and
warnings. Failure to comply with any of the following could lead to bodily
harm or injury. The Megatech Micro-Fly is not intended for those under 12
years of age without proper adult supervision.
SAFETY PRECAUTIONS
TRANSMITTER SAFETY
This device complies with part 15 of FCC rules.
Operation subject to the following two conditions:
1) This device may not cause harmful interference and
2) This device must accept any interference received, Including interference that may cause
undesired operation.
• Before you begin to y, look at the frequency sticker on the back of your transmitter and make
sure no one in the area is on the same frequency. Do not y your Micro-Fly if other radio control
devices are being operated on the same frequency.
• Since your model is controlled by a radio link it is very important to always keep fresh alkaline
batteries in the transmitter.
SAFETY GUIDELINES
• You alone are responsible for operating your model in a safe manner. When ying, you are
responsible for your own safety and the safety of others around you. Follow these basic safety
guidelines at all times.
• The spinning rotor blades on this aircraft can be very dangerous! When operating/ ying, always
be aware of the spinning rotors. Do NOT let them come close to your body, other people and
loose objects such as clothing or jewelry.
• Always y your helicopter in a wide-open room. Make sure that the area is free from
obstructions. Do not y around people who are unaware that you are ying a model
helicopter, and never y over people’s heads.
• Do not attempt to disassemble any of the model’s components or allow them to get wet or
electrical damage may occur.
• Never y your model from roadways or after dark.
• Keep spectators behind you when ying.
• Never use solvents or liquid cleaners to clean this model. Doing so may damage the unit or
electronics. Only use a dry, soft cloth for cleaning.
• Do NOT hold the Micro-Fly when launching.
RECHARGEABLE BATTERY WARNINGS AND PRECAUTIONS
• ALLOW MICRO-FLY TO COOL FOR 10-15 MINUTES AFTER EACH FLIGHT BEFORE ATTEMPTING TO
RECHARGE
• Never use anything but the charging system in the transmitter to charge the Micro-Fly
• Never leave helicopter unattended while charging.
• Always remove batteries from your transmitter when you nished ying for the day. Do not
store batteries inside the transmitter.
Nickel-metal hydride batteries must be disposed of properly.
For current regulations in your area and proper disposal sites please
call 1-800-822-8837 or visit www.rbrc.org
3
Page 4
PACKAGE CONTENTS
4.
5.
6.
7.
1.
2.
4.
6.
7.
8.
9.
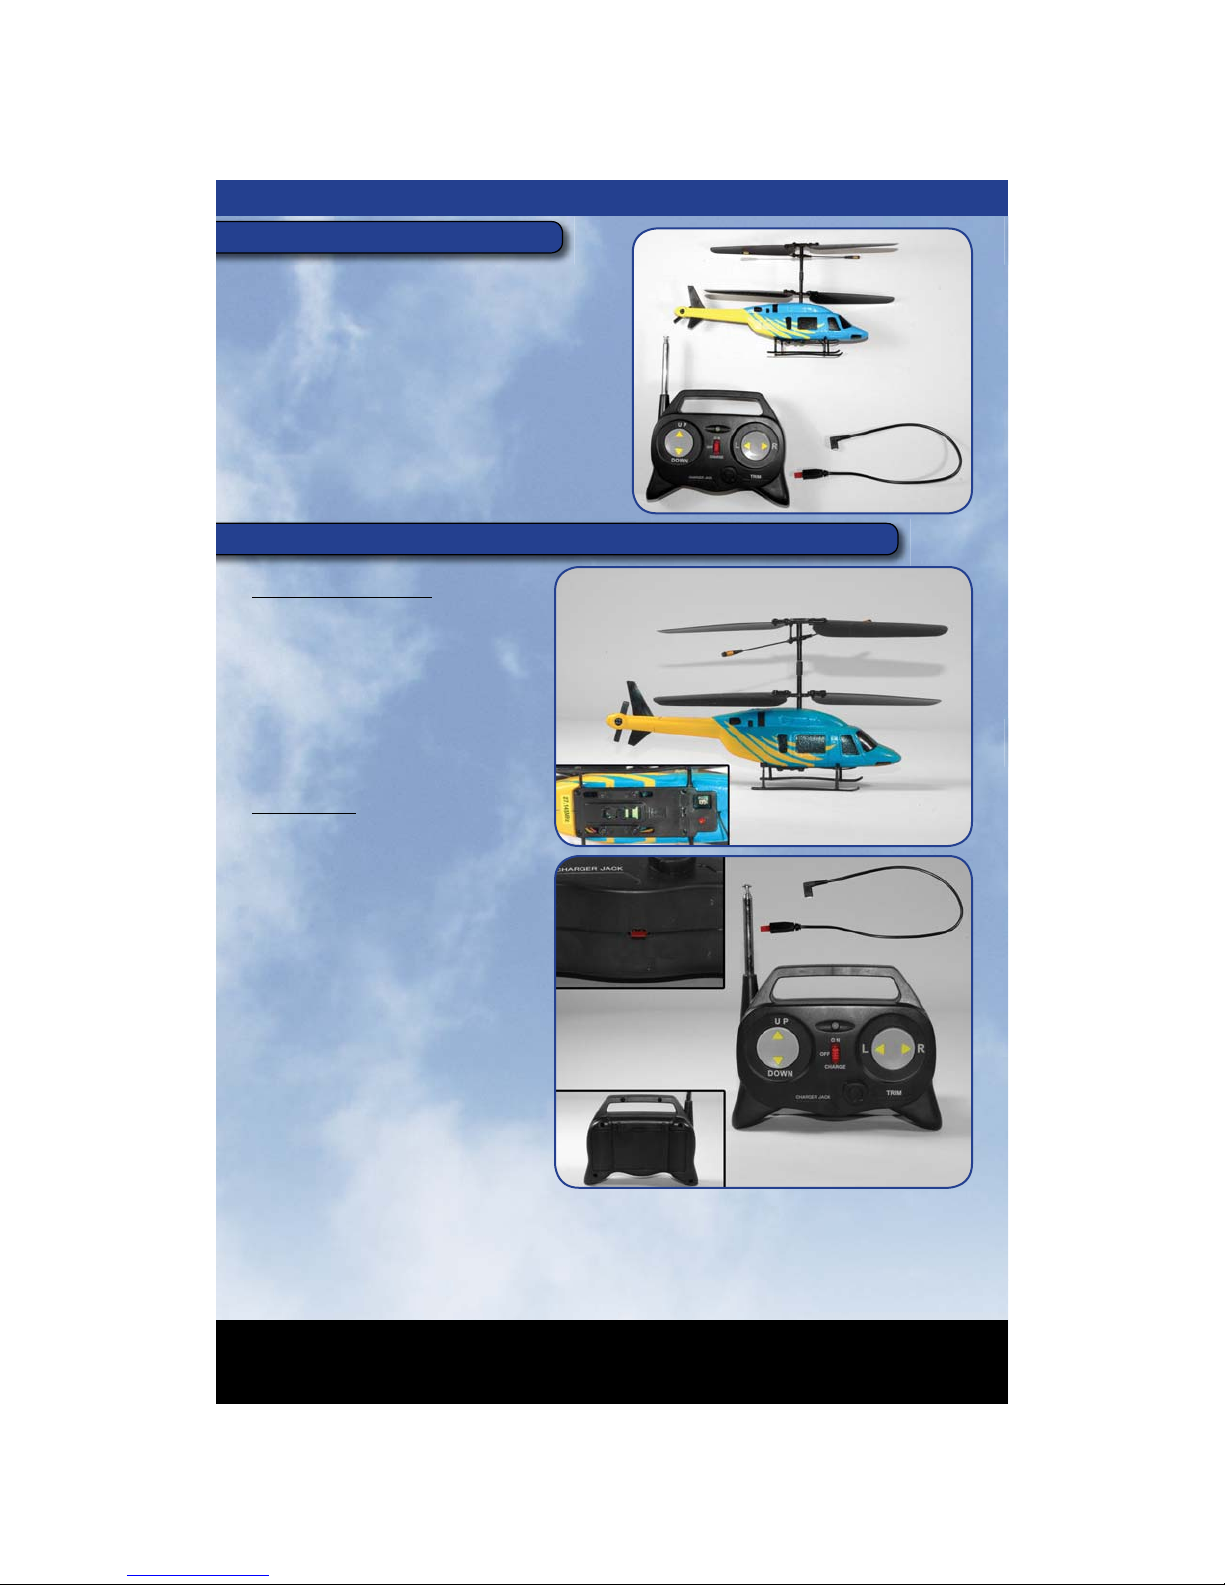
Before getting started you will need:
• 8 “AA” Alkaline batteries (sold separately)
First make sure the contents of your package
are complete:
A. Micro-Fly
B. Charging Cord
C. R/C Transmitter
C.
A.
B.
GETTING ACQUAINTED WITH YOUR MICRO-FLY
Micro-Fly Helicopter
1) Fuselage
2) Main Rotors
3) Landing Skids
4) Charging Port
5) Charging/On/O Switch
6) Power Indicator Light
7) Flight Selector
Transmitter
1) On/O & charge switch
2) Charging Status LED
3) Charger Link Cord
4) Battery Compartment
5) Antenna
6) Throttle Control (up & down)
7) Directional Control (left & right)
8) Yaw trim adjustment
9) Charging output port
NOTE: Keep the box and packaging to
safely store your Micro-Fly between
ying sessions. Proper storage will
prevent the rotors from warping and
help maintain ight performance.
ALSO: To make sure your antenna does not get caught in the blades during ight,
loop it around the skids of helicopter.
7.
9.
4.
4.
5.
6.
5.
6.
2.
3.
1.
2.
1.
7.
8.
3.
4
Page 5
INSTALLING THE TRANSMITTER BATTERIES
+
+ + + +
+ + +- - - -
- - - -
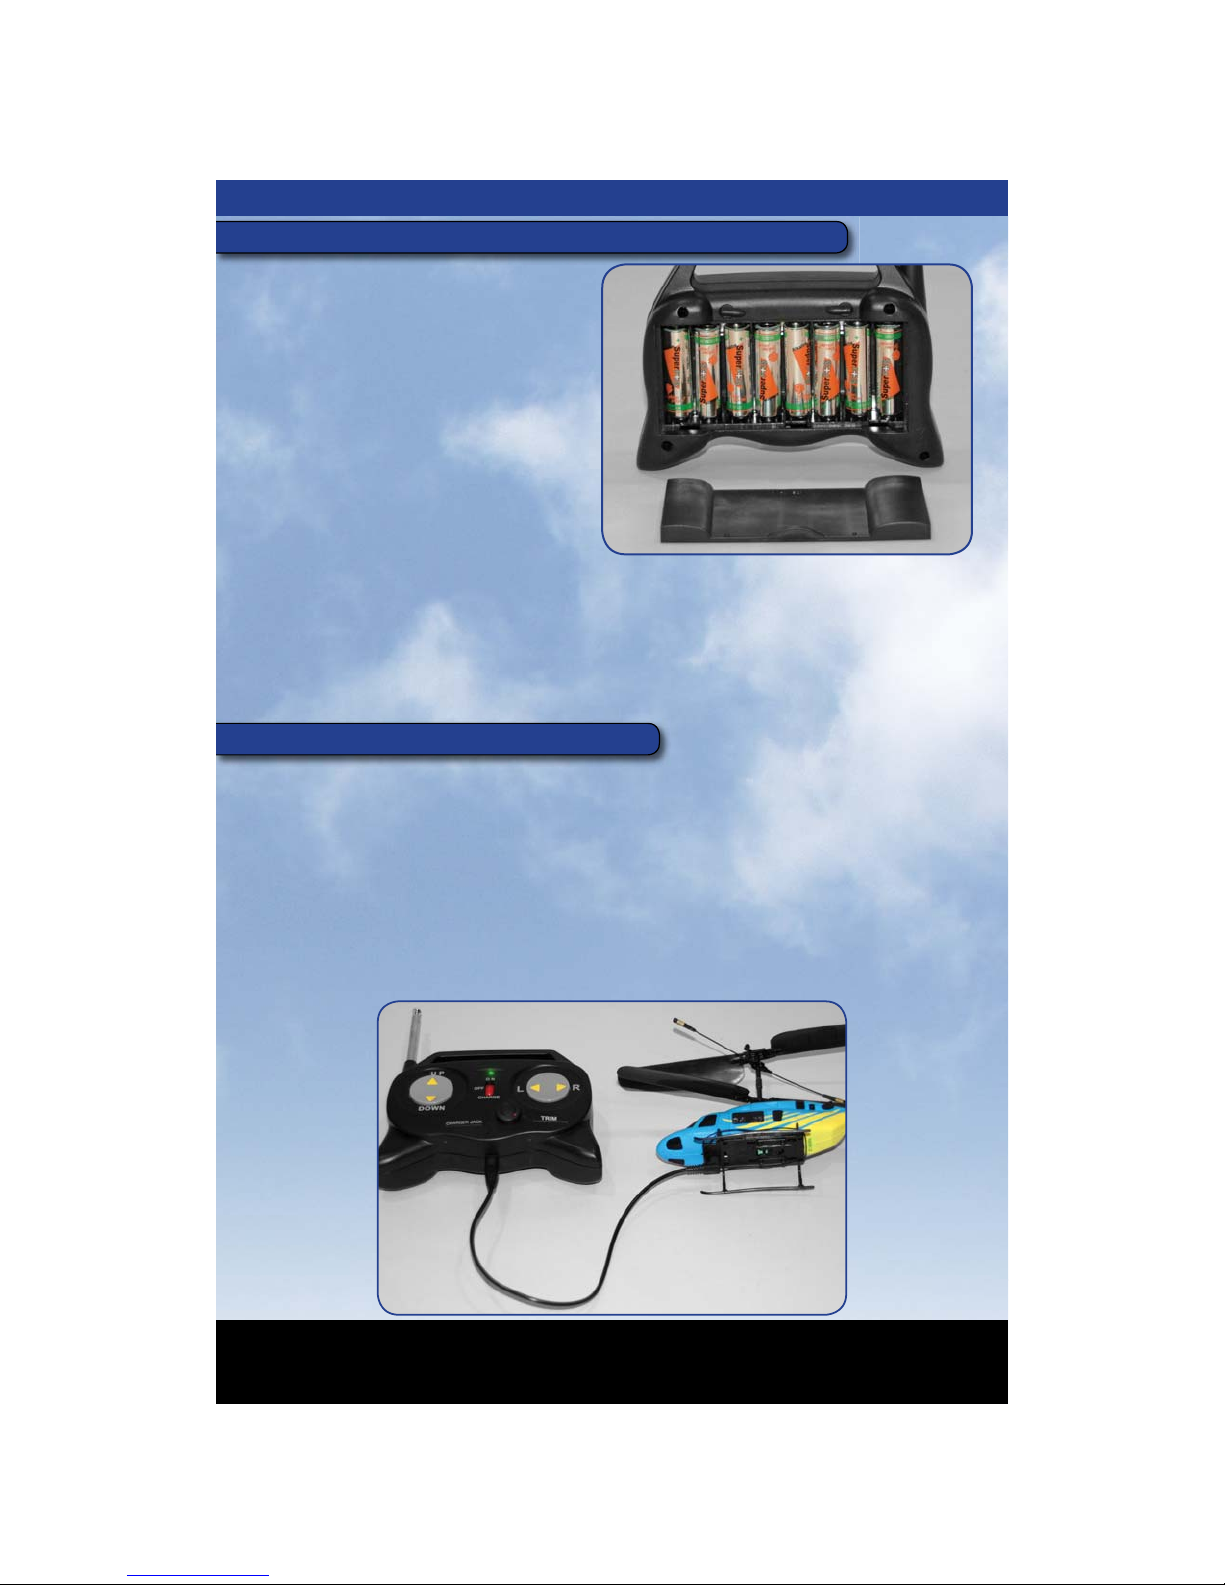
• Using your ngers, rotate the two
battery compartment cover retaining
tabs 90-degrees until they are in the
horizontal position. You’ll have to lift the
tabs slightly to move them o of their
retaining posts.
• Remove the battery compartment cover
• Paying close attention to each battery’s
polarity (+ and -) use the diagrams cast
onto the battery compartment back wall
to install them correctly. Install 8 “AA”size alkaline batteries.
NOTE: If your batteries are not installed properly the transmitter will not function,
and could become damaged.
• Use 8 NEW alkaline batteries. We recommend Megatech’s Super Plus brand.
• Replace the battery compartment cover and rotate the retaining tabs 90-degrees or
until the tabs are in the vertical position. Again, you’ll hear a “snap” indicating the tabs
are in the most secure position.
CHARGING YOUR MICRO-FLY
Your Micro-Fly features built-in Megatech extended run time high-performance
rechargeable NiMH (Nickel-Metal Hydride) battery that must be charged before each
ight (approximately 4-6 minutes charging time). NiMH technology indicates that
battery performance improves as you cycle them (charging them up, and running
them down). Optimum performance will be realized after the fourth or fth cycle. Your
transmitter also features a built-in charger that is equipped with an automatic timer. It
will automatically shut o when the Micro-Fly’s batteries are charged. The approximate
charge time is 4-6 minutes. NOTE: Never charge for more than 10 minutes or leave
unattended while charging. If you notice reduced run time, you may need to change
the transmitter batteries.
5
Page 6

To Charge:
1) First make sure the power switch on your Micro-Fly model is in the “OFF” position. If
the switch is NOT in the OFF position, your helicopter will not charge.
2) Plug the Charging Link Cord into the charge port on the bottom of the Micro Fly and
make sure it is securely connected. (Note: Wire faces forward.)
3) Place Micro Fly next to the transmitter.
4) Now plug the other end of the Charging Link Cord into the charging port located on
the bottom of the transmitter.
5) Now move the switch on the front of the transmitter to the “charge” position. The
LED indicator light on the front of the transmitter will glow “green”. This indicates
that your Micro Fly is charging.
NOTE: If red LED light does NOT illuminate “green”, unplug the Micro-Fly and check
the transmitter batteries.
6) When the transmitter’s LED light shuts o , your Micro-Fly is fully charged.
7) Disconnect Charger Link cord from the Micro-Fly
FLYING YOUR MICRO-FLY
1) Make sure your transmitter has eight (8) fresh “AA” alkaline batteries installed in it
and that your Micro-Fly has been fully charged.
2) Turn on the transmitter, then turn on the Micro-Fly by switching the on-o switch
(located on the bottom of the model) to the “on” position.
Note: the transmitter is always turned on rst, and is the last to be turned o .
3) Place the Micro-Fly on the ground approximately 10-feet in front of you.
Important! DO NOT press either the UP/DDOWN or the LEFT/RIGHT button on the
transmitter control unit until the Hopper-Fly is placed on the ground and 10-feet
from your person and any onlookers.
4) Press the “UP” on the UP/DOWN button at least once (twice if needed) to make your
Micro-Fly lift o the ground. Your Micro-Fly is equipped with three hovering rotor
speeds. The rst two speeds are activated by pressing and releasing the “UP” side
of the UP/DOWN button. The third speed is achieved by pressing and holding “UP”.
When you release the button the rotor speed will automatically return to the 2nd
speed. To slow down or stop the rotor speed, you need to press the “DOWN” side of
the UP/DOWN button.
5) To reach an altitude you desire you may have to push “UP” three times. When unit
is at desired height, release “UP” and the Micro Fly should hover at the 2nd speed
setting.
6) Turning your Micro-Fly is simply accomplished by pushing the appropriate yellow
arrow on the right-hand button of the transmitter. To turn the Micro-Fly to the right,
push the arrow on the right side of the button. To turn the model to the left, push
the arrow on the left side of the button. The Micro-Fly will continue to turn as long as
you are holding arrow down.
7) To adjust the Micro-Fly for neutral (no turning), “hands-o ” hovering ight, use the
6
Page 7
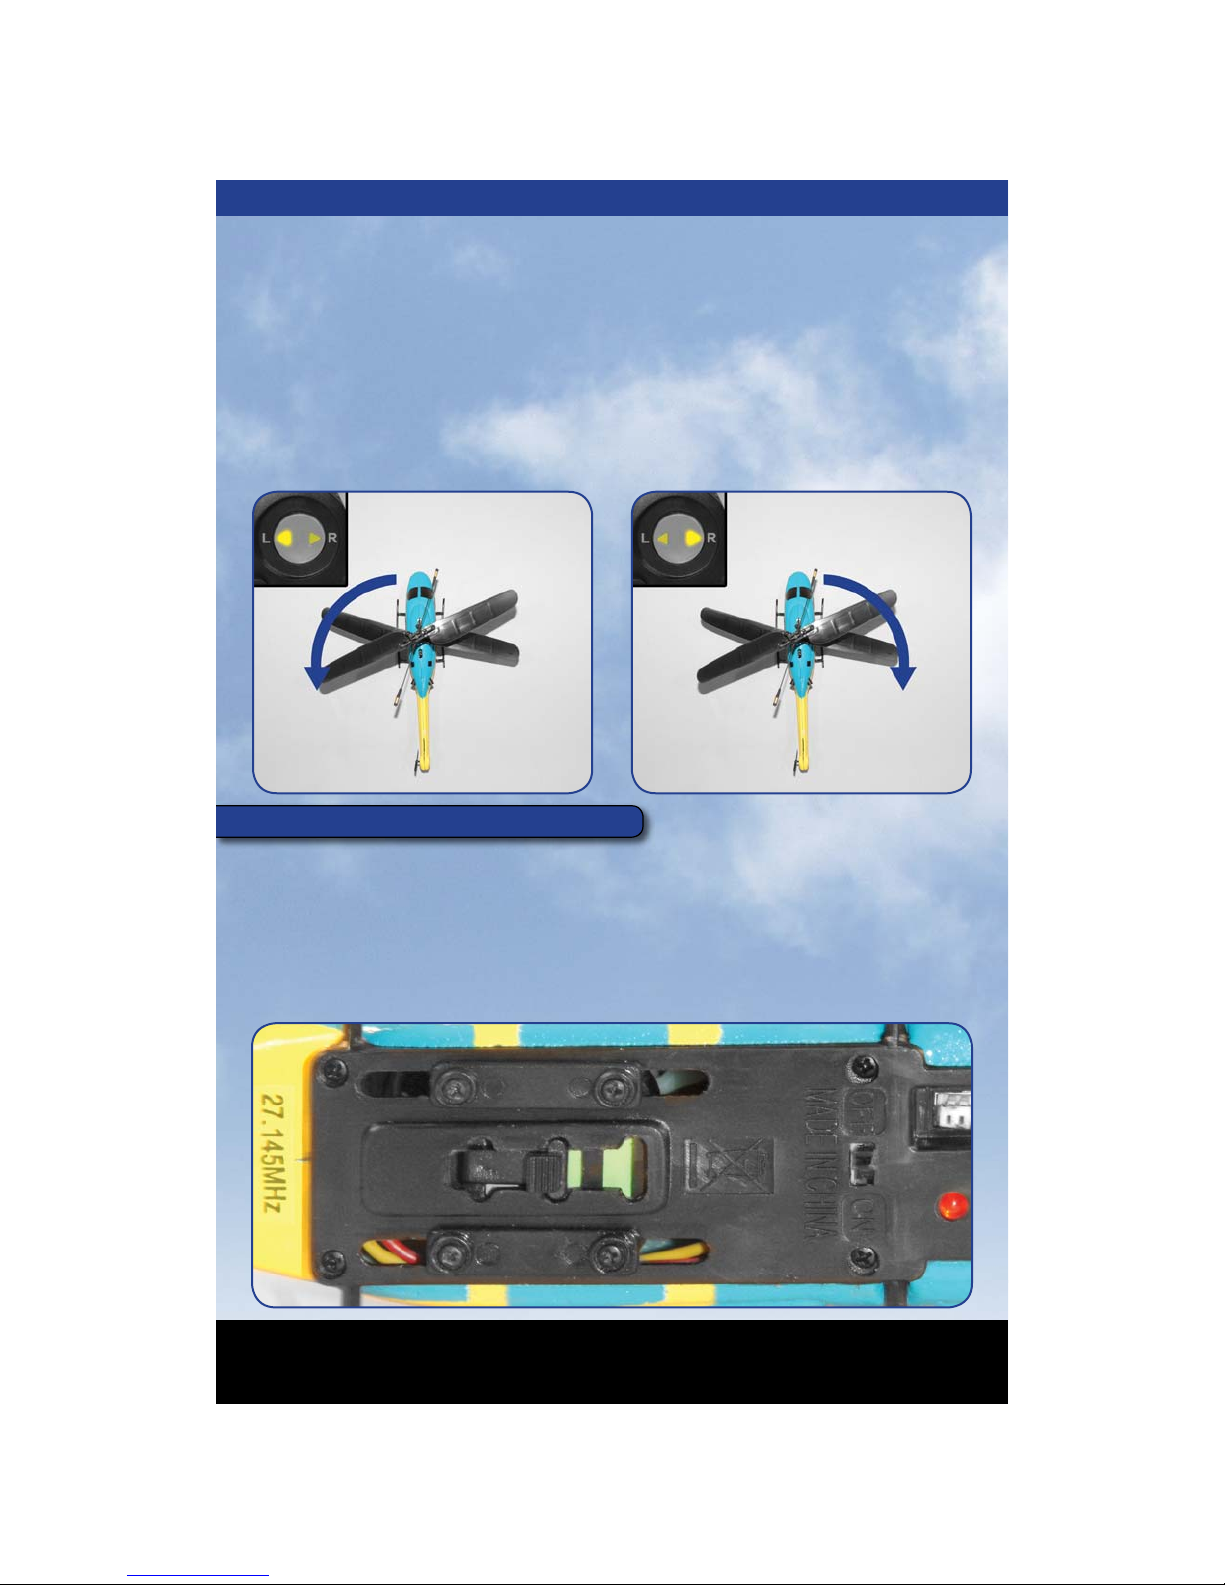
trim-knob to the lower left of the right-hand turning button. Turn this knob until the
Forward
(Fast)
Hover
Forward
(Medium)
Micro-Fly does not move left or right during hands-o hovering.
8) Landing is accomplished by reducing rotor speed to the 1st rotor speed setting
where upon the Micro-Fly should gently land on the ground.
9) Practice your rst landings by only raising your Micro-Fly 12 to 24-inches o the
ground so as not to damage the model on rough landings from higher altitudes.
Once you feel con dent, you may then take the Micro-Fly to greater altitude.
10) The Micro-Fly is designed for indoor use. However, if you wish to y it outdoors, it
must be own in no wind conditions. If the Micro-Fly happens to get caught in an
unexpected gust of wind, land it before it gets carried too far away in the breeze.
FLIGHT SELECTOR FEATURE
Your Micro-Fly is equipped with a ight selctor switch located on the bottom of
the model. The back switch position is for the “hovering-mode”, the center switch
position is for the “medium forward- ight-mode”, and the front switch position is for
the “fast forward- ight-mode”. We suggest that until you are familiar with the ight
characteristics of your Micro-Fly that you initially y in “hovering-mode” while you are
learning. Once you feel a bit con dent, go ahead and give the other two modes a try.
We think you’ll nd “fast forward- ight-mode” a lot of fun, after you practice.
Forward
(Medium)
Hover
Forward
(Fast)
7
Page 8
TROUBLESHOOTING
If you are experiencing trouble, please follow these guidelines or call one of our
MegaTechnicians at 1-888-634-2911. We will have you up and ying in no time!
Problem: No power to radio control transmitter or charger
Cause 1: Batteries are incorrectly installed
Solution 1: Make sure batteries are installed in the correct direction
Cause 2: Batteries are exhausted
Solution 2: Replace the batteries with new alkaline batteries
Problem: No “green” light when charging
Cause 1: Charge Cord is not properly plugged into the transmitter’s charge port
and/or the Micro Fly’ charge port.
Solution 1: Check Charge Cord’s connection at both ends.
Cause 2: Batteries are exhausted
Solution 2: Replace ALL 8 “AA”-Size batteries with NEW Megatech Super Plus
Alkaline Batteries.
Problem: Helicopter is not ying high enough
Cause 1: Transmitter/Charger battery life is nearly exhausted
Solution 1: Replaces ALL 8 “AA”-Size batteries with NEW Megatech Super Plus
Alkaline Batteries.
Cause 2: Helicopter battery may beed to by cycled
Solution 2: Drain battery by holding unit safely and starting the power. When
rotors stop spinning, let the unit cool 10 minutes, then recharge.
Problem: Micro-Fly crashed to the ground while landing
Cause: You may have reduced the three-step throttle too quickly or too much
Solution: Try again and release the button more gradually to allow the
helicopter to slowly settle in for a landing.
PARTS LIST
PART# DESCRIPTION
MTC950801 Upper Rotor Blades
MTC950802 Lower Rotor Blades
MTC950803 Tail Rotor Blade
MTC950804 Battery Charger Lead
MTC950805 Transmitter Antenna
8
Page 9

NOTES
9
Page 10

WARRANTY
MEGATECH® CRASH WARRANTY
For a period of 1-year from the date of purchase, if your Micro-Fly is
badly damaged in a crash, for whatever reason, Megatech will replace
the entire helicopter (no questions asked) for a nominal fee of $39.00
including regular ground shipping to the 48 continental states (AK, HI,
& PR add $10; for international orders the actual shipping charges will
apply).
Follow these steps and a brand new Micro-Fly will be immediately
shipped directly to you:
1) Pack the damaged item(s) carefully and place in a sturdy shipping
carton
2) Return the product along with proof of purchase
3) Include a postal money order for the proper amount as indicated
above.
MEGATECH® LIMITED WARRANTY
Megatech® International guarantees this item to be free from defects
for a period of 30 days from date of purchase. This warranty does not
extend beyond the initial pre ight testing. Carefully check parts and
operation BEFORE your rst ight. Damage incurred during ying,
landing, crashing or modi cation is not covered under the warranty.
If you discover defects during the very rst pre ight testing during this
30-day period, please call our Support Team toll free at 1-888-634-2911
for Return Authorization. If in our opinion after inspecting the product,
we determine it to be defective; we will repair or replace it at our
discretion.
Contact the Megatech® International Service Department before
returning any item that is defective according to the limitations listed
above.
If you are issued return authorization and asked to send the item to our
Service Department please follow these steps:
1) Remove the alkaline batteries from the transmitter.
10
Page 11

2) Pack the returned item(s) carefully and place in a sturdy shipping
carton
3) Return the product along with proof of purchase
4) Include a letter describing the problem
5) Include your address and telephone number
6) Include $12.99 for return shipping & handling (AK, HI & PR add $10;
for international shipments actual shipping charges apply)
Megatech International
ATTN: Service Department
8300 Tonnelle Avenue
North Bergen, NJ 07047
(201) 662-8500
This warranty does not cover any damage caused by use, misuse,
alteration, accident, or neglect, nor does it cover normal wear and tear
of the product. Products returned to us who fall under this category will
be submitted to our service department for repair. We reserve the right
to charge any service and parts fees incurred when repairing the item.
Although this warranty does not cover any damage caused to the
helicopter after the initial pre ight testing, spare parts and service are
available. Please see pg. 8 of this manual.
Under no circumstances will Megatech® International or any of its
representatives be held liable for injury to persons or property damage
resulting from assembly or use of the product. Megatech® is not liable
if any outside radio frequencies interfere with the product’s frequency
causing loss of control. Megatech® International will not be held liable
for any personal injury or property damage resulting from an out-ofcontrol model caused by use or misuse of the product.
This warranty is void if the product in question has been altered or
repaired by anyone other than Megatech International or an authorized
agent.
11
Page 12

Megatech® International
8300 Tonnelle Avenue
North Bergen, NJ 07047
(201) 662-8500
 Loading...