

Page 1
Entire contents © Megatech 2008 Rev. 200808041520
Flight Manual
www.megatech.com
Page 2

2
If you have questions about operating or assembling your new Megatech product...
Please Call Megatech First!
DO NOT RETURN THIS PRODUCT TO THE STORE
Call our Service Department at:
(201) 662-8500
or email support@megatech.com
10am - 5pm EST Monday through Friday (except holidays)
Technical assistance is also available on the web at www.megatech.com
READ ENTIRE MANUAL FIRST BEFORE ATTEMPTING TO FLY
IMPORTANT NOTE: The warranty covers manufacturer’s defects only and does NOT cover
damage caused by operator error. Spare parts, baeries, and accessories are available.
TABLE OF CONTENTS
Safety Precautions ........................................................................ 3
Package Contents ......................................................................... 4
Radio System ................................................................................. 4
Installing the Batteries ................................................................ 5
Charging Your Interceptor .......................................................... 6
Pre Flight Check ............................................................................ 7
Flight School .................................................................................. 8
Repairing your Interceptor...................................................... 11
Parts List ......................................................................................... 11
Troubleshooting ......................................................................... 12
Warranty ........................................................................................ 14
RF Emissions Information ........................................................ 15
Page 3

3
Important! Before you begin, please read all safety precautions and warnings.
Failure to comply with any of the following could lead to bodily harm or
injury. The Megatech Interceptor is not intended for those under 8 years of
age without proper adult supervision.
SAFETY PRECAUTIONS
TRANSMITTER SAFETY
(See Page 15 for complete FCC and RF Emissions information)
• Since your model is controlled by a radio link it is very important to always use fresh alkaline batteries
in the transmitter. When the red LED light becomes dark, flashes or does not glow on the transmitter,
immediately install fresh batteries. Failure to do so could result in loss of control and (most likely) a
crash.
• Never mix old and new batteries. Do not mix Alkaline, Standard Carbon-Zinc or rechargeable (Nickelcadmium, Nickel-metal Hydride or lithium).
• Always remove batteries from your transmitter when you have nished ying for the day. Do not store
batteries inside the transmitter.
• Before you begin ying, look at the frequency sticker on the bottom of your Interceptor and make
sure no one in the area is on the same frequency. Do not fly your Interceptor if other radio controlled
devices are being operated on the same frequency.
SAFETY GUIDELINES
You alone are responsible for operating your Interceptor in a safe manner. When flying, you are
responsible for your own safety and the safety of others around you. Follow these basic safety guidelines
at all times.
• Even though the Interceptor is made of High Impact EPP foam, care must be taken in handling the
plane. Do not crush, step or sit on your Interceptor.
• Although the propellers on the Interceptor are very small and exible they should still be treated with
respect and caution! Use care when operating your Interceptor. Keep your hands, ngers and any
article of clothing away from the spinning propellers.
• Your Interceptor may be own inside (i.e. school gymnasium) or outside. If you chose to y outside,
the wind must be no stronger than 5 MPH as the Interceptor is extremely light. If the wind is any
stronger the Interceptor’s flight path could be dramatically affected.
• Always y your Interceptor in a wide-open area. Make sure that the area is free from obstructions such
as buildings, electric power lines, trees, roads, other people and vehicles.
• Do not y around people who are unaware that you are ying a model airplane, and never y over
people’s heads. Keep spectators behind you when flying.
• Do not attempt to disassemble any of the Interceptor’s components or allow them to get wet or
electrical damage may occur. If the Interceptor ever comes in contact with any moisture, dry it
carefully and allow it to stand overnight before attempting to use it again.
• Never use solvents or liquid cleaners to clean this model. Doing so may damage the unit or
electronics. Only use a dry, soft cloth for cleaning.
• Keep the Interceptor away from heat or re. Never leave the Interceptor or transmitter in direct
sunlight for any length of time.
RECHARGEABLE BATTERY WARNINGS AND PRECAUTIONS
• The Lithium Polymer battery is factory installed into your Interceptor and provides superior
performance, but has specic charging requirements dierent than that of other battery types such
as NiCad, NiMH & other rechargeable batteries. Improper handling of Lithium Polymer batteries could
result in the battery from overheating, so please follow all warnings and instructions.
• ALLOW INTERNAL FLIGHT PACK TO COOL FOR 10 MINUTES AFTER EACH FLIGHT BEFORE ATTEMPTING
TO RECHARGE.
• Never leave the Interceptor plugged into the charger when it is not in use. Damage to the on-board
battery can occur.
• See charging safety under the charging section on page 6 for additional warnings.
Page 4
4
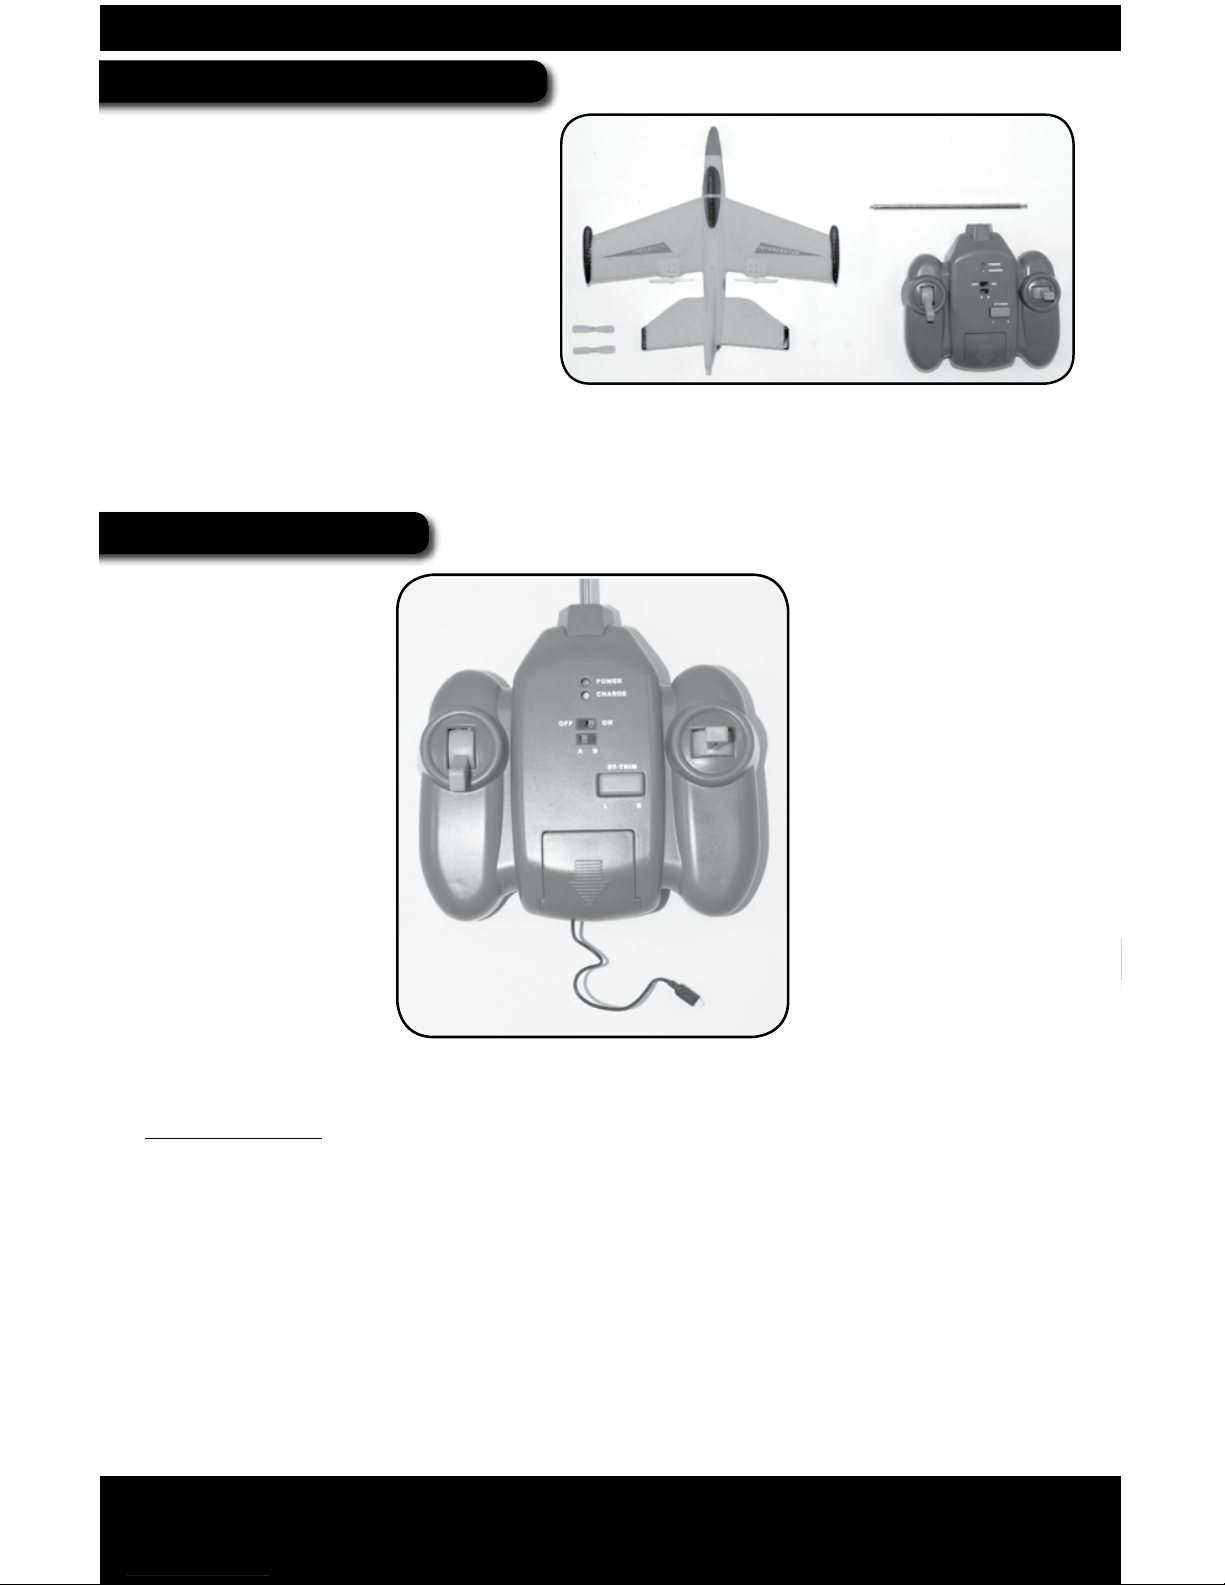
PACKAGE CONTENTS
Before getting started you will need:
• 6 “AA” 1.5V Alkaline batteries
(sold separately)
First make sure the contents of your
package are complete:
A. Interceptor micro jet
B. Transmitter with integrated
peak charger
C. Spare propellers (2)
D. Transmitter antenna
RADIO SYSTEM
A 2-channel FM transmitter featuring proportional radio control guides the Interceptor.
THE CONTROLS
A. Throttle Control Stick - When it is all the way in the “down” (or pulled back)
position, the motors are off. For safety, make sure the throttle control stick is in
the “down” position before switching on the Interceptor so the propellers do not
unexpectedly go on.
The propeller speed increases as the throttle control stick is moved up (or forward).
The Interceptor gains altitude as power is increased, and descends as power is
decreased.
Full power is reached when the throttle control stick is positioned all the way
forward.
A.
B.
C.
D.
E.
F.
G.
A.
B.
C.
D.
Page 5
5
B. Directional Control Stick - Makes the plane turn left and right.
Note: You can only use the directional control stick when throttle input is given.
C. Directional Trim Switch - This adjusts for straight ight when the directional
control stick is in the neutral position.
D. Charging Cord - Located inside a compartment at the base of the transmitter and
used when charging the Interceptor.
E. Channel Switch - This switch is marked with the letters A and B to indicate the
channel that the plane is operating on. You must always make sure that the channel
switch is set to the correct channel or the Interceptor will not operate correctly.
Please see the Interceptor or box for indication of the proper channel.
F. Power & Charge LEDs - The bottom most LED illuminates green when the
transmitter is in the charging mode. When the top most LED illuminates red, the
transmitter power is ON and you have adequate power to control your Interceptor.
If the red LED light becomes dark, flashes or does not glow on the transmitter, the
transmitter batteries are low and must be replaced. Never attempt to y when the
red LED light is dim, flashing or does not glow! This will result in loss of control and
a possible crash. Contact our service center at 201-662-8500 if you think there may
be a problem with your radio system.
G. Power Switch - Turns your transmitter on and o.
IMPORTANT NOTE: The transmitter has an auto shutoff feature. If the transmitter
power is left ON for 10 minutes without any control input or charger output,
the transmitter will turn off. This is to prevent the transmitter batteries from
discharging if the transmitter was left ON in error. You will need to flip the power
switch OFF and ON to reset the transmitter.
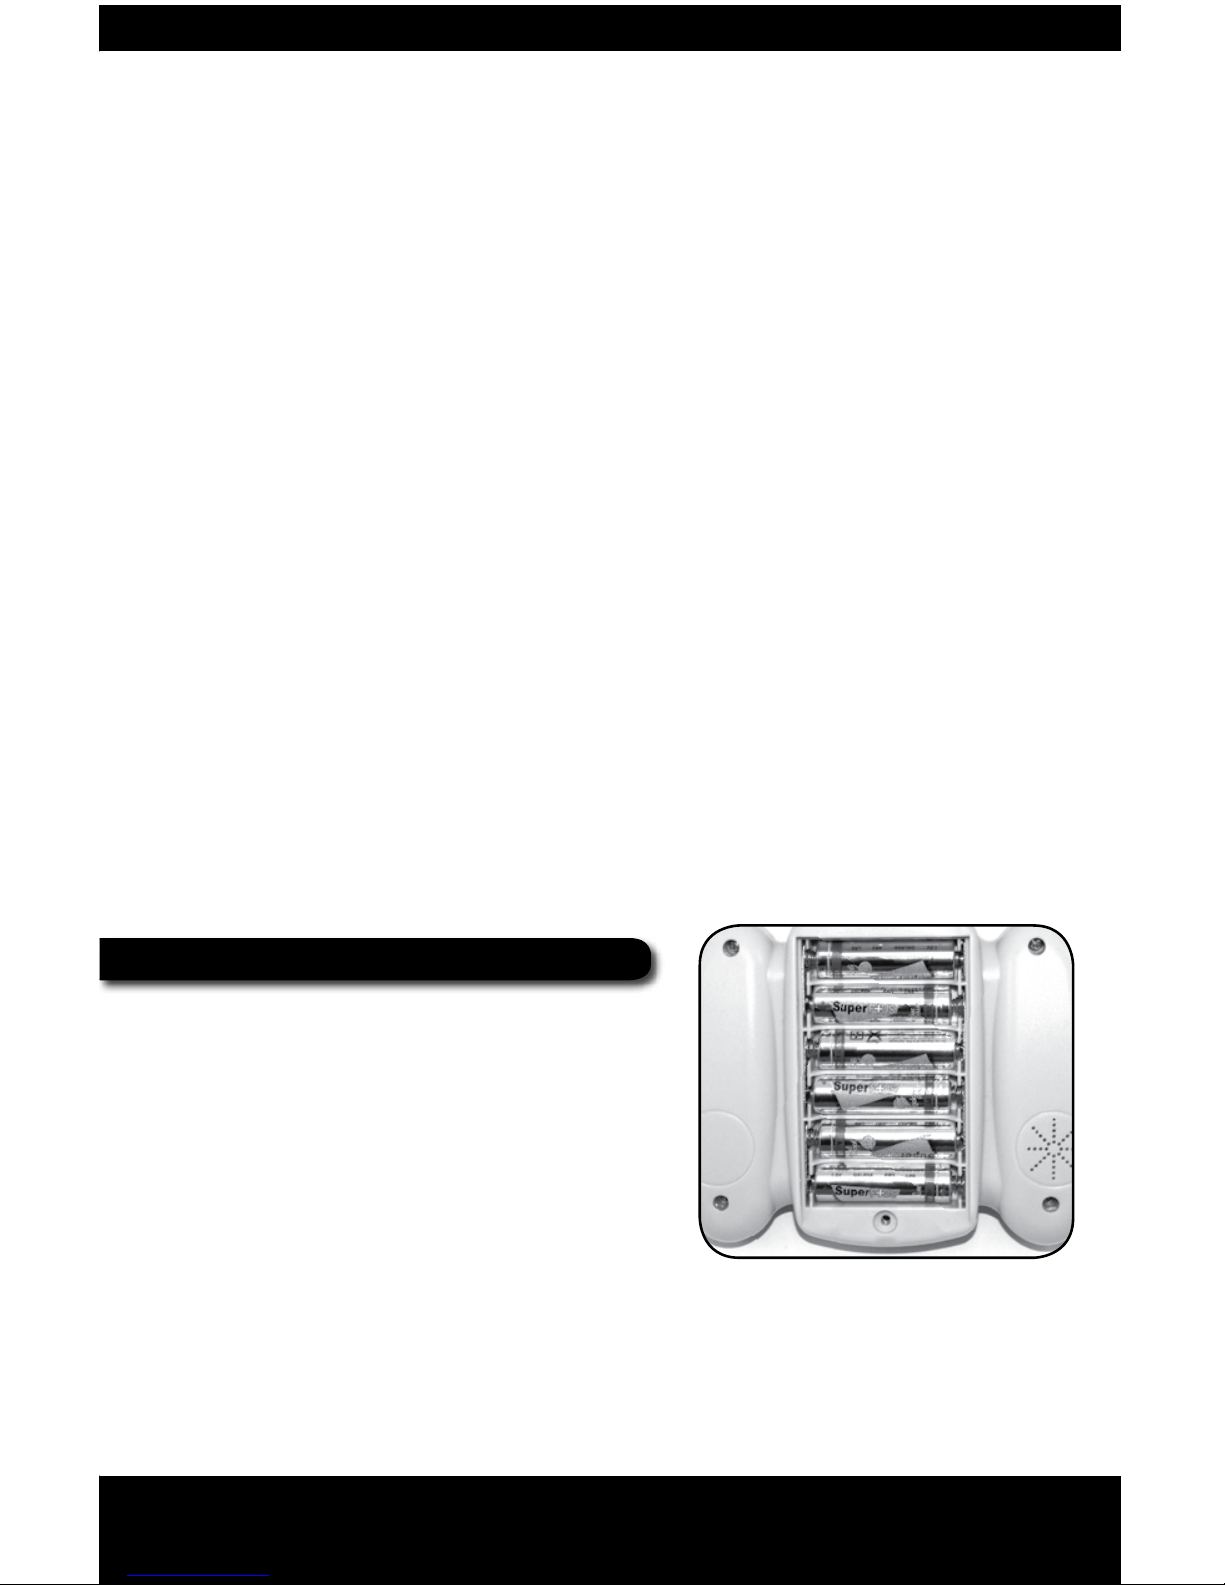
INSTALLING THE BATTERIES
Transmitter requires 6 “AA” 1.5V Alkaline batteries
(sold separately)
1) Be sure that both the transmitter and plane
power switches are in the “OFF” position.
2) Using a Philips Head screwdriver, unscrew the
battery hatch hold-down screw, and remove the
hatch.
3) Install 6 fresh AA 1.5V alkaline batteries in the
transmitter, paying close attention to the polarity symbols. (+ & -)
IMPORTANT! If the transmitter batteries are not installed according to proper
polarity, the transmitter will not function and electrical damage may occur.
4) Reattach the battery hatch and secure with hold-down screw. (Do not over tighten)
5) Locate the transmitter antenna. Insert and thread the antenna into the top of the
transmitter and rotate the antenna clockwise until it is tight.
Page 6

6
6) Turn the transmitter ON to make sure that the red LED illuminates bright and the
transmitter powers up and then turn the transmitter OFF. Fresh Alkaline batteries
will provide about 3-hours or more of power to the transmitter depending on use.
NOTE: If the Red LED does not illuminate, flashes or is dim change the transmitter batteries with fresh
alkaline batteries. If the transmitter LED still does not illuminate contact Megatech Service Department
at (201)662-8500 for further assistance.
CHARGING YOUR INTERCEPTOR
1) The Interceptor features an automatic peak-sensing
charging circuit built into the transmitter.
2) The charging cord is located behind the door on the
bottom of the transmitter. Slide the door down and lift
in order to open the compartment and access the cord.
3) Make sure that the power switch on the Interceptor is
set to “OFF”, and the transmitter power switch is set to
“ON”. The red LED on the transmitter should illuminate.
4) Plug the charging cord into the Interceptor charging receptacle located under the
on/off switch. Pay close attention to the polarity of the charging connector.
5) The green LED on the transmitter will illuminate when charging is in process and will
automatically turn off when charging is complete.
Note: Charge time may vary depending on how much power the Interceptors built-in
battery has and also how much power is left in the transmitter batteries.
CAUTION
READ THIS SECTION BEFORE CHARGING YOUR BATTERY PACK FOR THE FIRST TIME!
• NEVER CHARGE YOUR INTERCEPTOR FOR MORE THAN 30 MINUTES.
• ALLOW INTERNAL BATTERY PACK TO COOL FOR 10 MINUTES AFTER EACH FLIGHT BEFORE
ATTEMPTING TO RECHARGE.
• Never use anything but the charging system in the transmitter to charge the Interceptor.
Using any other charger could result in damage to the battery and possible re.
• The battery charger is part of the transmitter and is designed specically for the built-in
battery in your Interceptor. It should not be used to charge any other type of battery.
Attempting to charge a battery other than the type included with the Interceptor will
result in damage to both the charger and the battery.
• Never leave the Interceptor unattended while charging.
Note: Please be aware that it is normal for the transmitter to become warm during the
charging process.
ATTENTION PARENTS: The charging system, wire, and all electrical connections need to be
periodically examined for potential conditions that may result in the risk of re, electrical
shock, or injury to persons. In the event of such conditions, the hazardous parts should not
be used until properly repaired or replaced.
Page 7

7
NOTE: THE TRANSMITTER IS ALWAYS THE FIRST TO BE
SWITCHED ON, AND THE LAST TO BE SWITCHED OFF!
PRE-FLIGHT CHECK
Before you switch ON your Interceptor ALWAYS make sure to release the throttle control stick (left) so
the propellers do not start up unexpectedly when the Interceptor is switched ON. Always follow the
safety start up procedure.
RADIO RANGE CHECK
Important Tip: Always perform a motor-check and radio-range check with the help of a friend or parent.
Doing so alone may cause the Interceptor to get away from you and cause damage.
1) Make sure both the Interceptor and transmitter power is ‘OFF’.
2) Make sure the throttle control stick is in the “down” (back) position.
3) Now turn ON the transmitter, and then turn ON the
Interceptor. Make sure to keep the antenna collapsed.
4) Have a friend/parent hold the nose of the Interceptor’s
fuselage with the tail pointing away from him/her and
away from any loose clothing.
5) Walk 25-ft away from Interceptor.
6) Check the motor and directional controls as follows.
Always remember to point the transmitter at the plane.
MOTOR CHECK
• Advance the throttle very slowly — The propellers should speed up.
• Move the throttle stick back — The propellers should slow down and then stop
when the control stick is in the back position.
DIRECTIONAL CONTROL CHECK
• Advance the throttle ¼ forward and hold it there.
• Move the right control stick to the right — The right motor should slow down and
the left motor will continue to run.
• Move the right control stick to the left — The left motor should slow down and
the right motor will continue to run.
7) Once you have nished turn the Interceptor OFF and then turn OFF the transmitter.
If your Interceptor does not respond from 25 feet away, do NOT attempt to fly. Contact Megatech at
(201)662-8500 for further assistance.
25 FEET
MOTOR CHECK
ADVANCE
THROTTLE
STICK
Page 8

8
FLIGHT SCHOOL
PRE-FLIGHT NOTES
• The transmitter is always rst to be turned ON, and the last to be turned OFF.
• Check to make sure the red power LED on the transmitter is glowing, if it is not, change
the transmitter batteries.
• Check to make sure the directional and throttle controls are working properly.
LAUNCHING YOUR INTERCEPTOR
1) Turn ON the transmitter rst, and then turn ON the Interceptor.
2) Extend the transmitter antenna fully.
3) Grip the Interceptor underneath the fuselage directly
beneath the center of the main wing, using your thumb
and pointing nger.
4) Move the throttle control stick forward to ²/₃ power.
5) Keeping the wings as level as possible, gently toss
the Interceptor into the air like a dart. (That is, with the nose pointing straight and
level, not pointing up or down.) The Interceptor will begin to climb upon release.
Keep in mind that you will have to cut back on the throttle control stick a little, once
the Interceptor is tossed into the air, so that it does not stall or accidentally loop
on takeo. After practice, you will notice that the Interceptor will y without much
throttle control input.
TIPS ON CONTROL STICK MOVEMENTS AND TRIM ADJUSTMENTS
• Keep your control stick movements smooth, not abrupt or “jerky”. The Interceptor
will actually fly all by itself and light control stick movements are all that you need to
fly your Interceptor. Full quick control stick movements will be needed for flying in
smaller areas or for aerobatic maneuvers. Just remember, smooth and gentle inputs!
• After launching the Interceptor, allow the aircraft to y directly away from you and
gain a desired altitude prior to making your rst turn. If the Interceptor turns with no
control input, correct the flight path by gently moving the directional control stick
in the appropriate direction. If trimming the Interceptor for level and stable flight
is needed, adjust the directional control trim button next to the directional control
stick. Adjust the trim accordingly so that the Interceptor naturally ies straight. For
example, if the Interceptor is drifting slightly to the right then press the trim button
INTERCEPTOR TURNS RIGHT
PRESS LEFT SIDE
OF TRIM BUTTON
INTERCEPTOR TURNS LEFT
PRESS RIGHT SIDE
OF TRIM BUTTON
Page 9

9
to the left, assuming the aircraft is pointing away from you. Continue to press the
trim button until the aircraft naturally flies level
• Remember that once the Interceptor has reached the desired altitude you can ease
back on the throttle a bit and enjoy.
• Aerobatics can be accomplished easily by moving the left control stick forward to
full throttle. If you need to slow down and return to stable flight, reduce the throttle
amount and use the right control stick if needed to level off. The Interceptor will
naturally level itself so only use the right control stick if needed.
• It is important to remember when ying that the Interceptor “knows” how to y. So
all you have to do is gently direct its flight path.
TURNING YOUR INTERCEPTOR
Turning the Interceptor is done with directional control stick movements. Assuming
the Interceptor is flying away from you, moving the directional control stick right will
turn the plane right and moving the directional control stick left will turn the plane
left.
1) Start the turn by feeding in a small amount of directional control stick input in the
direction you wish to go.
2) As the Interceptor turns and the nose drops, gently feed in a bit of throttle just
enough to keep the nose level.
3) Bring the directional control stick back to neutral as the Interceptor completes the
turn.
4) When the Interceptor is ying in the desired direction, feed in just a bit of opposite
directional control stick input to level the wings. If the Interceptor is climbing
excessively, cut back on the throttle a little.
NOTE: If the Interceptor is flying directly at you, directional control input is “reversed”. This
can be confusing at first. Here’s a simple tip: When the Interceptor is flying toward you,
simply push the directional control stick in the direction of the wing tip that is dipping low
and the aircraft will right itself. Fairly soon this will become second nature and you’ll be off
and flying!
LEFT TURN RIGHT TURN
Page 10

10
• During the rst ight, execute gentle circles keeping the Interceptor in front of
you. Remember not to fly over your head as this can be disorienting. This is very
important for having a successful rst ight.
• Should you over-control your Interceptor or lose orientation, it’s possible that
you’ll nd yourself in a downward spiral. Should this occur, remain calm and
simply release the directional control stick! The Interceptor will stop turning by
itself, and will exit the spiral dive with the nose pointed down. Add some power
and start flying again. If you see that you’re going to crash, immediately cut the
power to allow the Interceptor to glide and land. Doing so will minimize the
possibility of damage to the Interceptor.
LANDING YOUR INTERCEPTOR
• When the motor slows down the nose will drop slightly. This is normal under
reduced or no power. Use the directional control stick to steer the Interceptor
toward a landing pattern.
• Always set up landings using very small amounts of control stick input. It’s good
to land before the motor power gets too low. This way you can always get out of
trouble with power and try again. At an altitude of about 2-feet, gently pull back on
the throttle to shut the motor off before touchdown. The Interceptor will glide in for
a smooth landing and once the aircraft touches down your landing is complete.
• If you are done ying always remember to turn the Interceptor OFF rst and then
turn OFF the transmitter.
Page 11

11
REPAIRING YOUR INTERCEPTOR
• Fix and repair minor wing or tail assembly tears with clear tape. If the damage is
major you can use foam safe glue to make the repair.
• Use foam safe glue to repair cracks or damage to the fuselage assembly.
• If any glued parts come loose, please use foam safe glue to reattach.
• If a propeller disengages or breaks during ight gently pull o the damaged
propeller. Press on the new propeller included with your kit. Make sure the beveled
side of the propeller faces forward. Do not press the new propeller onto the motor
shaft too far or the motor will bind.
Important Note: Since the propellers are counter rotating the left and right side
propellers are different. Assume the nose of the Interceptor is pointing away from
you. The left side propeller is marked on the center hub with the “L” and the right
side propeller is marked on the center hub with the “R”. Do not install the wrong
propeller type. This will cause the plane not to function properly.
NOTE: Remember that it is important to use as little additional material for repair as
possible. The Interceptor is lightweight and balanced. Make sure to always balance
your Interceptor after a repair. An example would be if you glue one wing tip and the
Interceptor seems to lean or go to one side, you can add similar weight to the other
side for balance.
SPARE PARTS LIST
Spare, repair and replacement parts are readily available for your Interceptor. Should
you need parts, visit your local hobby dealer rst. If unavailable, you may order directly
from Megatech.
PART# DESCRIPTION
MTC992002 REPAIR GLUE (½ OUNCE TUBE)
MTC960101 REPLACEMENT TRANSMITTER
MTC960102 TRANSMITTER ANTENNA
MTC960103 TRANSMITTER BATTERY COVER
MTC960104 COMPLETE REPLACEMENT PLANE - CHANNEL A (RED)
MTC960105 COMPLETE REPLACEMENT PLANE - CHANNEL B (BLUE)
MTC960106 REPLACEMENT PROPELLER SET (LEFT & RIGHT)
Telephone Orders: (201) 662-8500 Website: www.megatech.com
Fax Orders: (201) 662-1450 Email: sales@megatech.com
Page 12

12
TROUBLESHOOTING GUIDE
If you are experiencing trouble, please follow these guidelines or call one of our Technicians at
(201)662-8500. We will have you up and running in no time!
Always make sure your transmitter batteries are fresh and your Interceptor is fully charged, as this can
be the cause of many operational issues.
PROBLEM CAUSE SOLUTION
Motors/propellers do
not move
Propeller may be binding
against motor
Check to make sure propellers
spin freely
Motors only run for
short time before
turning off OR
Motors pulse OR
Control signal is lost
Transmitter is too far
or too close from the
Interceptor
Move the transmitter closer or
further from the Interceptor
until you regain signal.
Transmitter Antenna is
not fully extended
Extend transmitter antenna
fully
You may have radio
interference
Try a different location
Interceptor does not
fly straight
Interceptor was
improperly launched
Review launch procedure on
page 8
Interceptor not trimmed
correctly
Make sure the motors are
trimmed to neutral or for stable
flight
Tail is not securely
mounted on the fuselage
Use clear tape or foam safe
glue to secure the tail
Interceptor loses
altitude rapidly during
turns
Too much directional
control input is being
used
Use smaller gentle inputs
No power to radio
control transmitter
and charger or the
transmitter red LED is
flashing
Batteries in the
transmitter are incorrectly
installed
Make sure batteries are
installed correctly
Batteries in the
transmitter are exhausted
Replace the batteries with new
“AA” 1.5V alkaline batteries
Power switch is in the
“OFF ” position
Move power switch to the “ON”
position
Page 13

13
PROBLEM CAUSE SOLUTION
No green light
on transmitter
when charging or
Interceptor will not
charge
Power switch on the
Interceptor and/or the
transmitter is not in
the correct position for
charging
Set the transmitter power
switch to “ON” and then make
sure the Interceptor power
switch is set to “OFF”. Plug
the charge cord into the
Interceptor and the green LED
on the transmitter will come
on.
Charger cord is not
properly plugged into the
Interceptor charge port
Check charger cord’s
connection
Interceptor is not
flying high enough
You are not using good
throttle control
Increase throttle control stick
input to allow the Interceptor
to climb or for the aircraft to fly
at a desired altitude.
Interceptor is
constantly looping
and not flying level
You are not using good
throttle control
Reduce the amount of throttle
input around ½ or until the
plane flies level and stable.
Interceptor crashed
to the ground while
landing
You may have used too
much directional control
stick input
Reduce the amount of
directional control stick input.
Only use very little input to
keep the Interceptor level
when landing.
You may have reduced
the throttle control stick
too quickly or too much
Lower the throttle control stick
more gradually to allow the
Interceptor to slowly glide in
for a landing.
Page 14

14
LIMITED WARRANTY
Megatech® International guarantees this item to be free from defects for a
period of 30 days from the date of purchase. If any component of this product
fails to function properly due to defects in materials or the manufacturing
process during this 30 day period, the manufacturer’s obligations are limited
and the manufacturer can choose to either repair or replace the item.
This warranty is void if the product in question has been altered or repaired by
anyone other than Megatech International or an authorized agent. Under no
circumstances will Megatech International or any of its representatives be held
liable for injury to persons or property damage resulting from assembly or use
of the product. Megatech is not liable if any outside radio frequencies interfere
with the product’s frequency causing loss of control. Megatech International
will not be held liable for any injury to persons or property damage resulting
from an out-of-control model caused by use or misuse of the product.
Megatech International expressly excludes any and all express warranties
not specically stated here and all implied warranties of merchantability and
tness for a particular purpose. There are no warranties which extend beyond
the description of the warranties contained herein.
Contact the Megatech International Service Department before returning
any item that is defective according to the limitations listed above. Please be
sure to pack the returned item(s) carefully. The customer must return the
product along with proof of purchase, a letter describing the problem
and the customer’s address and telephone number. At this point in time we
will either repair the defective part or replace it and return it to the customer.
Return shipping and handling in the 48 contiguous states is $9.99.
Shipping outside of the 48 states will be quoted by location.
This warranty does not cover any damage caused by use, misuse, alteration,
accident, or neglect, nor does it cover normal wear and tear of the product.
Product returned to us which falls under this category will be submitted to our
service department for repair. We reserve the right to charge any service and
parts fees incurred when repairing the item.
Megatech® International
8300 Tonnelle Avenue
North Bergen, NJ 07047
(201) 662-8500
www.megatech.com
Email: support@megatech.com
Page 15

15
RF EMISSIONS INFORMATION
NOTE: This equipment has been tested and found to comply with the limits for
a class B digital device, pursuant to Part 15 of the FCC Rules. These limits are
designed to provide reasonable protection against harmful interference in a
residential installation. This equipment generates, uses and can radiate radio
frequency energy, and if not installed and used in accordance with the instruc-
tions, may cause harmful interference to radio communications. However,
there is no guarantee that interference will not occur in a particular installation. If this equipment does cause harmful interference to radio or television
reception, which can be determined by turning the equipment off and on, the
user is encouraged to try correcting the interference by one or more of the following measures:
• Reorient or relocate the receiving antenna.
• Increase the separation between the equipment and receiver.
• Connect the equipment into an outlet on a circuit dierent from that to
which the receiver is connected.
Consult the store of purchase or experienced radio/TV technician for help. If
you cannot eliminate the interference, the FCC requires that you stop using
your product.
Caution: changes or modications not expressly approved by the party
responsible for compliance could void the user’s authority to operate the
equipment.
This device complies with part 15 of the FCC rules.
Operation is subject to the following two conditions:
1) This device may not cause harmful interference and
2) This device must accept any interference received, including interference
that may cause undesired operation.
Page 16

Megatech® International
8300 Tonnelle Avenue
North Bergen, NJ 07047
(201) 662-8500
www.megatech.com
Email: support@megatech.com
 Loading...