

Page 1
Entire Contents ©2004 Megatech International
Page 2
If you have questions about operating or installing your new Megatech
product, or if you are missing parts... Please Call Megatech First!
DO NOT RETURN THIS PRODUCT TO THE STORE
Call our Customer Service Department at:
(201) 662-2800
10:00am - 5:00pm, EST Monday through Friday (except holidays)
Technical assistance is also available on-line at www.megatech.com
or by e-mail to [email protected]
2
Introduction
..................................3
Safety Warnings ...............................................................................3
The Radio System ............................................................................4
Fuel & Preparations .........................................................................5
Installing Antenna & Batteries .........................................................6
Steering Trim & Operation ..............................................................7
Engine Break In ...............................................................................8
Starting Your Engine ........................................................................9
Your First Run ................................................................................10
Brakes & Throttle Trim ..................................................................11
Maintenance ...................................................................................12
Limited Warranty ...........................................................................13
Parts List ........................................................................................14
TABLE OF CONTENTS
Congratulations on your purchase of a Megatech® Nitro-Powered
High-Speed Dragster. Racing has never been more fun! Get ready
to speed into a new world of racing excitement! Your new Dark
Thunder is so easy to prepare, within minutes of opening the
box, it will be ready to race at speeds over 60 MPH.
Please read through these directions before you proceed any
further. If for some reason you think the Dark Thunder is not
what you want, do not continue any further. Your hobby dealer
absolutely cannot accept a Dark Thunder for return or exchange
after it has been run, or after any of the parts bags have been opened.
If you experience any problems, DO NOT take your Dark Thunder back
to the store! Call one of our MegaTechnicians at 1-888-MEGA-911 or
send an e-mail to: [email protected]
Page 3
3
Your New Dark Thunder
Getting Acquainted with Your Dark Thunder
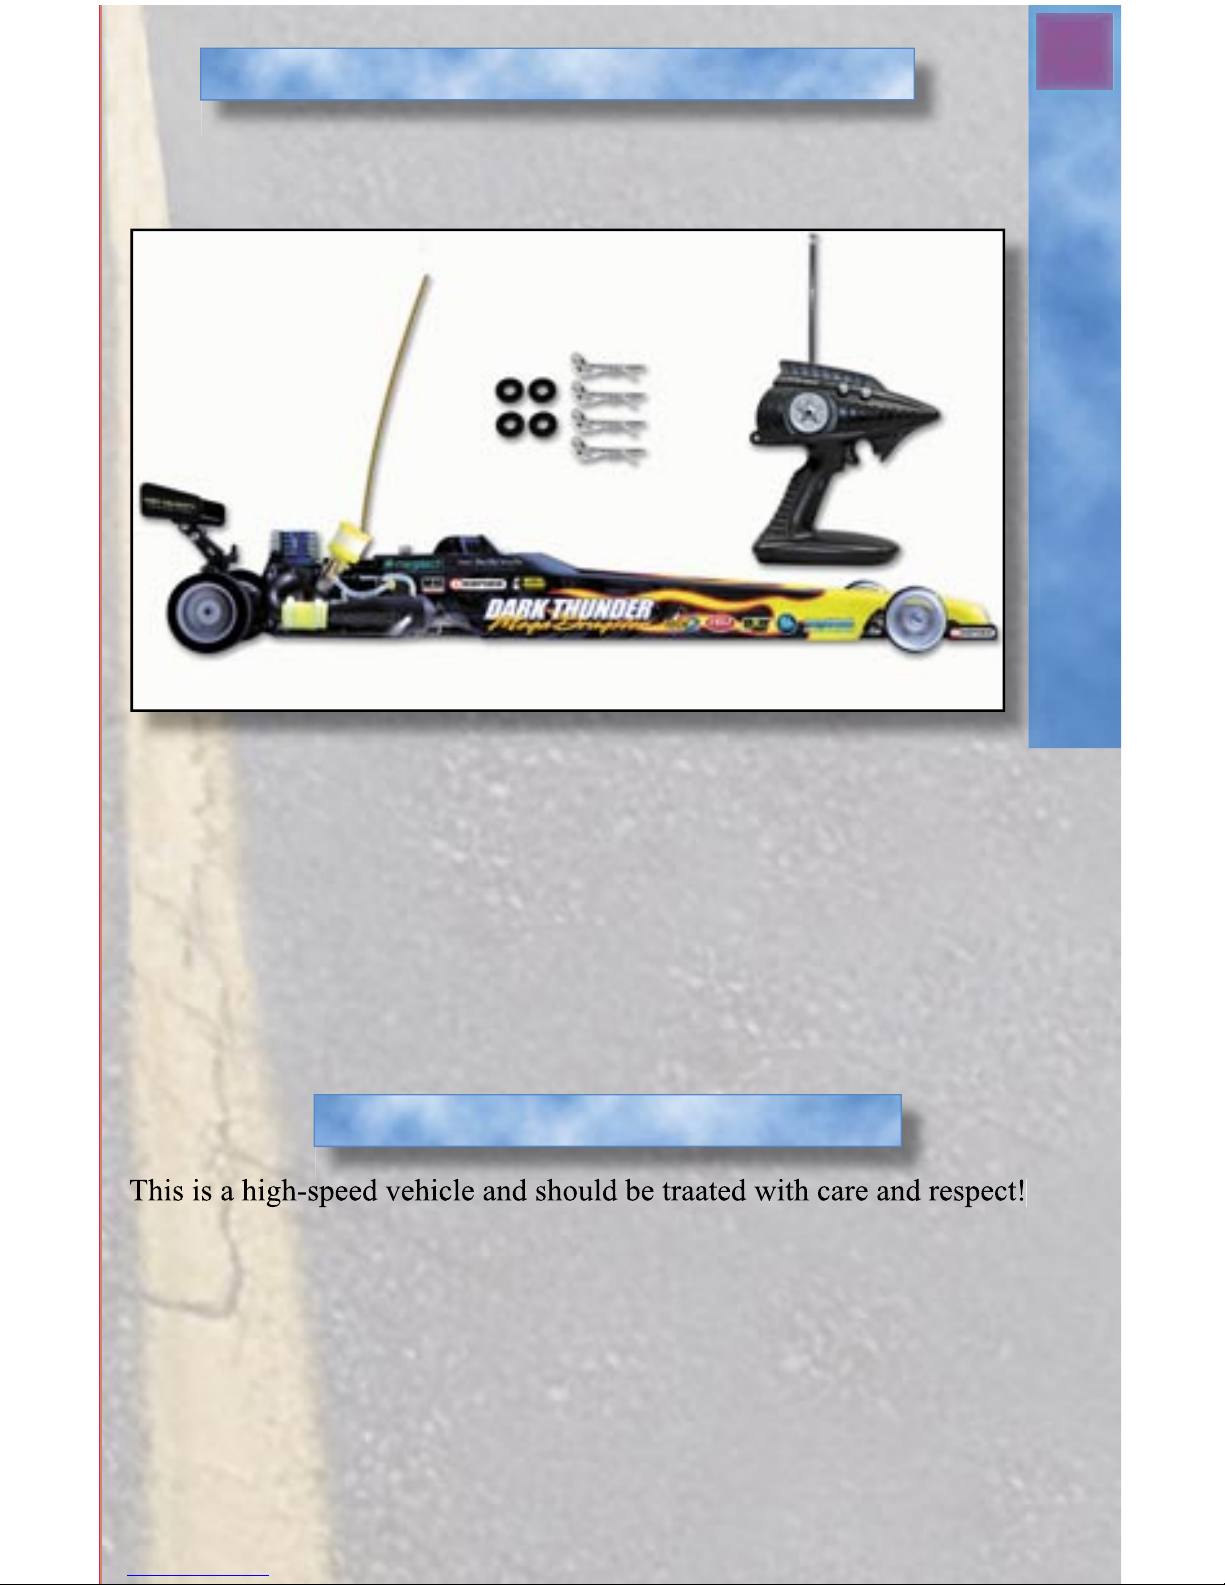
Review the components of the Dark Thunder to ensure that your kit
is complete before you begin nal assembly. (See Figure 1)
Kit Contents:
A. Dark Thunder Nitro-Powered High-Speed Dragster
B. 2-Channel Radio Transmitter
C. Antenna Guard (Factory Installed)
D. Spare Body Washers and Clips
Make sure that you have received all parts shown.
If something is missing, call Megatech toll-free at 1-888-MEGA-911
Use extreme caution when operating your Dark Thunder. Keep your hands,
ngers and any article of clothing away from the wheels and gears.
Model engine fuel is almost invisible when it burns. Always keep a re
extinguisher nearby when using model engine fuel. This fuel is dangerous,
poisonous, and highly ammable. Use a fuel dispenser with a long fueling
probe to ll the fuel tank. Do not pour fuel into the tank directly from a can
or any other method which can spill raw fuel.
A
B
C
D
Figure 1 - Dark Thunder Contents
Safety Warnings
Page 4
4
The Radio System
This vehicle is not a toy and must be operated by an adult who will
handle this car safely and take responsibility to avoid any injury.
This model is designed to be operated only in appropriate areas.
If all of the precautions are followed and your Dark Thunder is operated in a safe and responsible manner, it is an exciting, safe and fun
hobby for you and all who watch.
Required Running Equipment
To operate your Dark Thunder, you will need the following items,
which should be available from your local hobby shop.
1. 12 AA alkaline batteries: 8 “AA” alkaline batteries for the
transmitter and 4 “AA” alkaline batteries for the receiver*
2. Glow plug igniter*
3. Glow plug wrench*
4. Racing Fuel (We recommend
Megatech’s High Velocity
Racing Fuel)*
5. Fuel- ller bottle*
6. Phillips and at head screw drivers
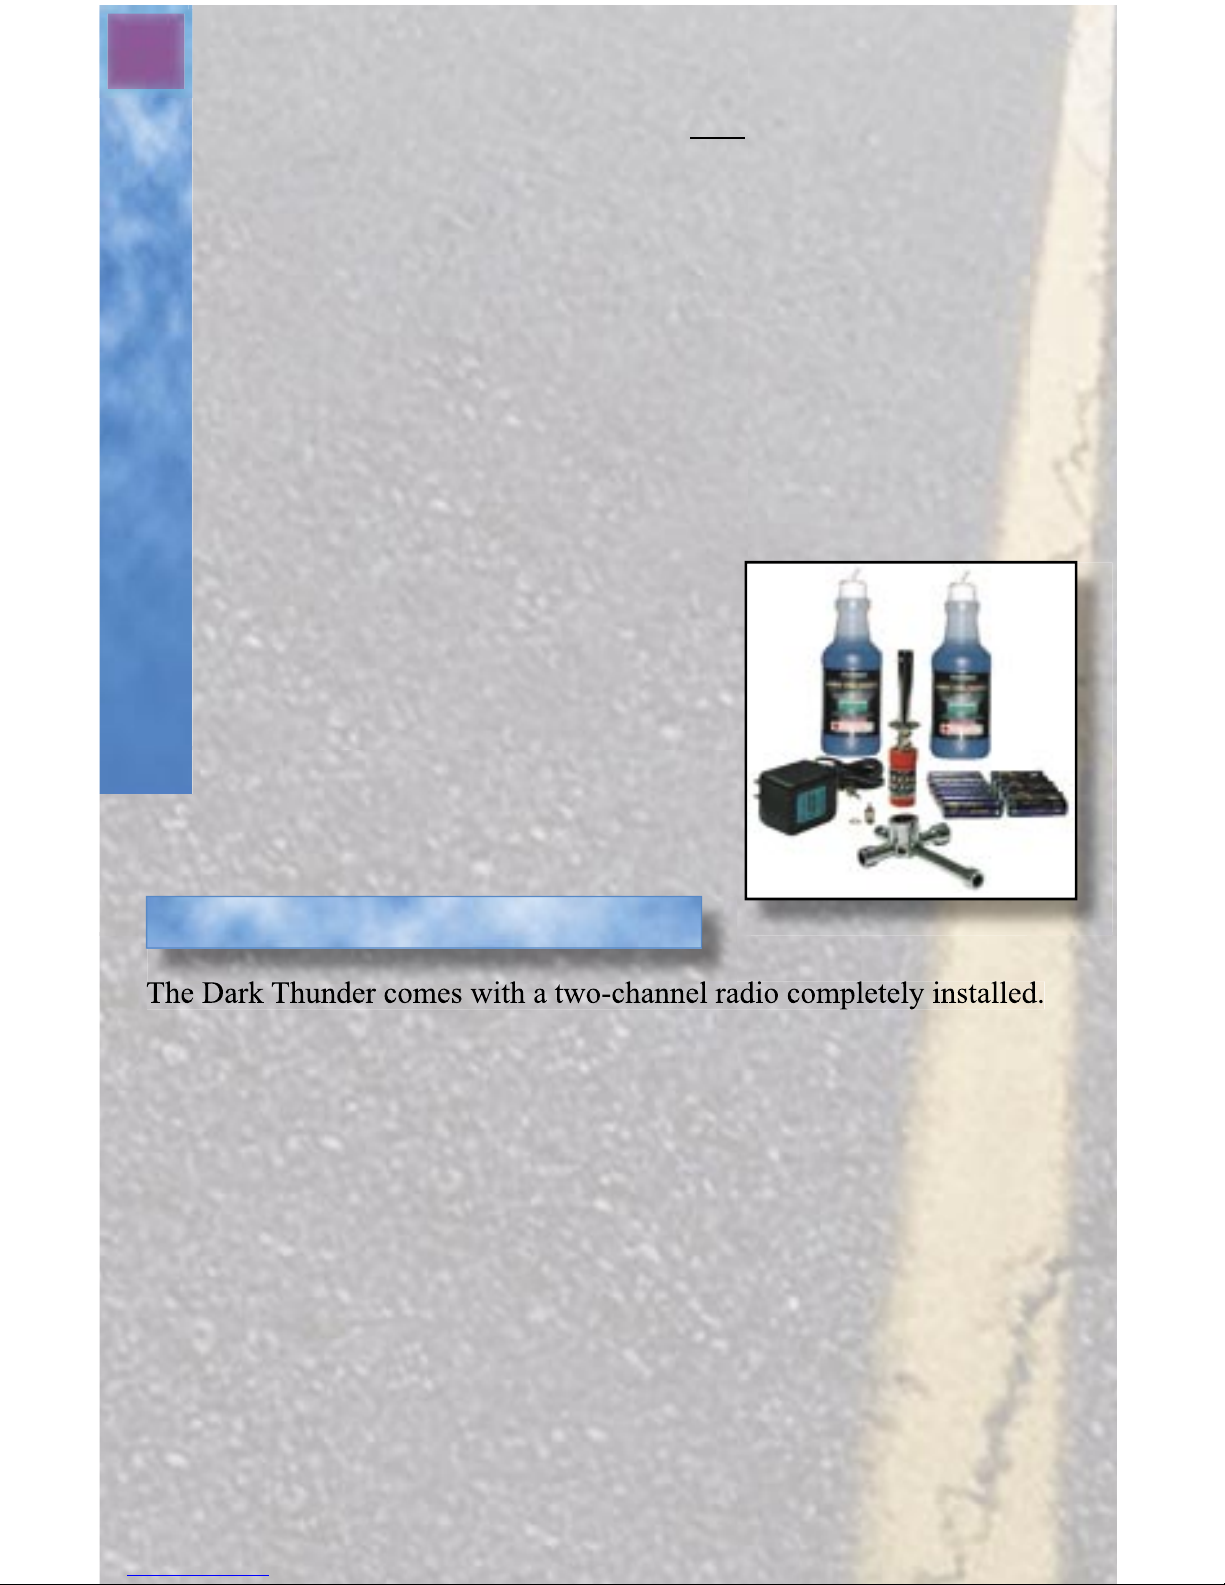
* These items are available in Megatech’s
Gas Car/Truck Completer Kit, #MTC 7500
(Pictured right).
The transmitter has one channel for proportional steering and one channel
for proportional throttle control. The receiver and receiver batteries sit in the
sealed radio box. Before running the vehicle, always turn on the transmitter
rst and then the receiver. When nished running your Dark Thunder for the
day, always turn the receiver off rst, then the transmitter.
WARNING
THE TRANSMITTER IS ALWAYS THE FIRST TO BE SWITCHED ON
AND THE LAST TO BE SWITCHED OFF. NEVER TURN THE
TRANSMITTER OFF WHILE OPERATING THE CAR. THIS WILL
CAUSE THE Dark Thunder TO RUN OUT OF CONTROL AND CAUSE A
DANGEROUS CONDITION.
The Dark Thunder Radio System
Fuel
Figure 2 - Completer Kit
Page 5
5
Fuel & Preparations
properly. Improper fuels will cause hard starting, poor performance,
and excessive wear on the engine. Fuel for your vehicle must
contain a blend of BOTH synthetic oil and castor oil. Use a highquality blended fuel. We only recommend Megatech’s High
Velocity Racing Fuel or another premium quality car/truck fuel with
25% Nitro content.
CAUTION: ALWAYS FOLLOW THE PRECAUTIONS PRINTED
ON THE CONTAINER OF FUEL. KEEP IT AWAY FROM OPEN
FLAMES AND CHILDREN. THE MIXTURE IS FLAMMABLE
AND POISONOUS.
Your Dark Thunder features a competition fuel tank and priming
system. The tank uses a spring-loaded ller cap over a wide ller
neck for fast, easy fueling. Simply pull open the lid and it will spring
closed when you remove the nozzle. Remember to use a fuel ller
bottle with an attached long nozzle that can be inserted into the ller
neck. Never pour fuel from an open can into the tank or use a funnel.
Fuel
from the box. Very little setup is required, however, proper
preparation is crucial to maximizing the performance and enjoyment
of your vehicle.
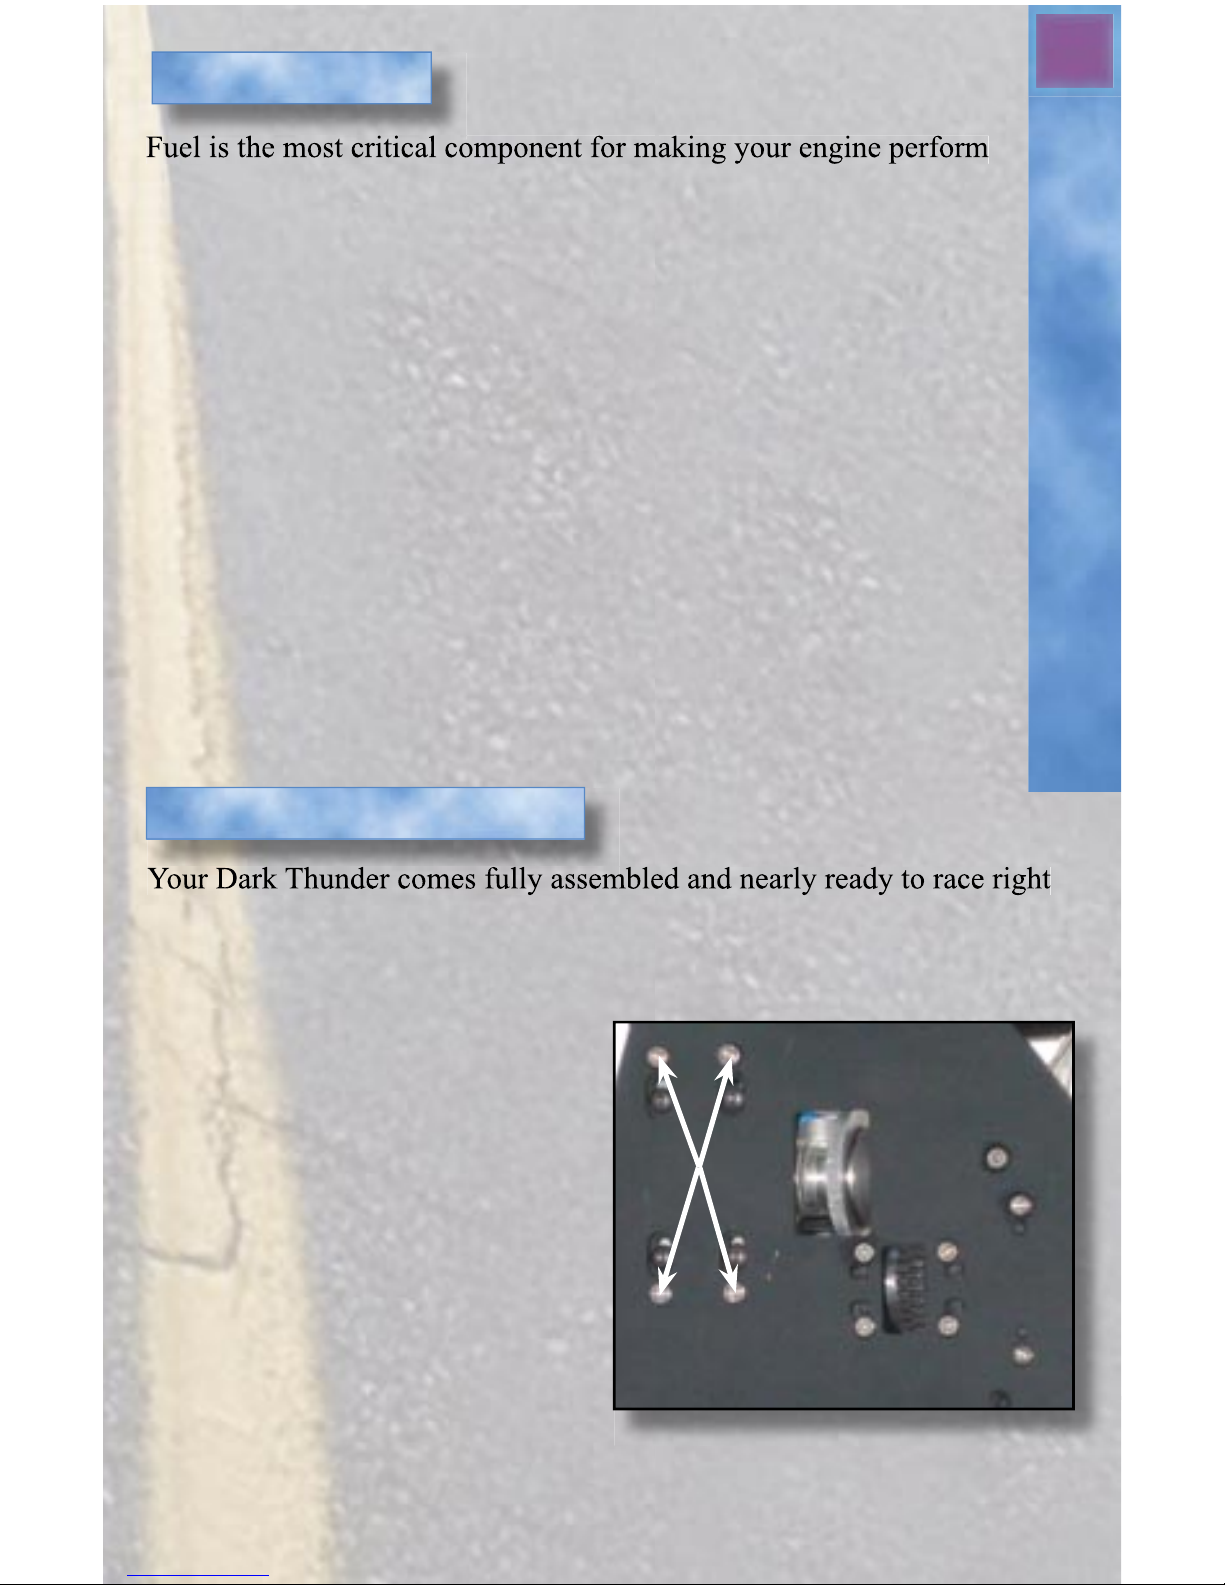
First we do recommend that you
tighten down all of the bolts, as they
may have come lose in transit. Be
especially careful with the engine
mounting bolts as shown in
Figure 3. Because the engine has
such high RPMs, it is important to
make sure the bolts have not
vibrated loose after every use.
Preparing to Race
Figure 3 - Tighten engine mounting bolts
Page 6
6
Installing Antenna & Batteries
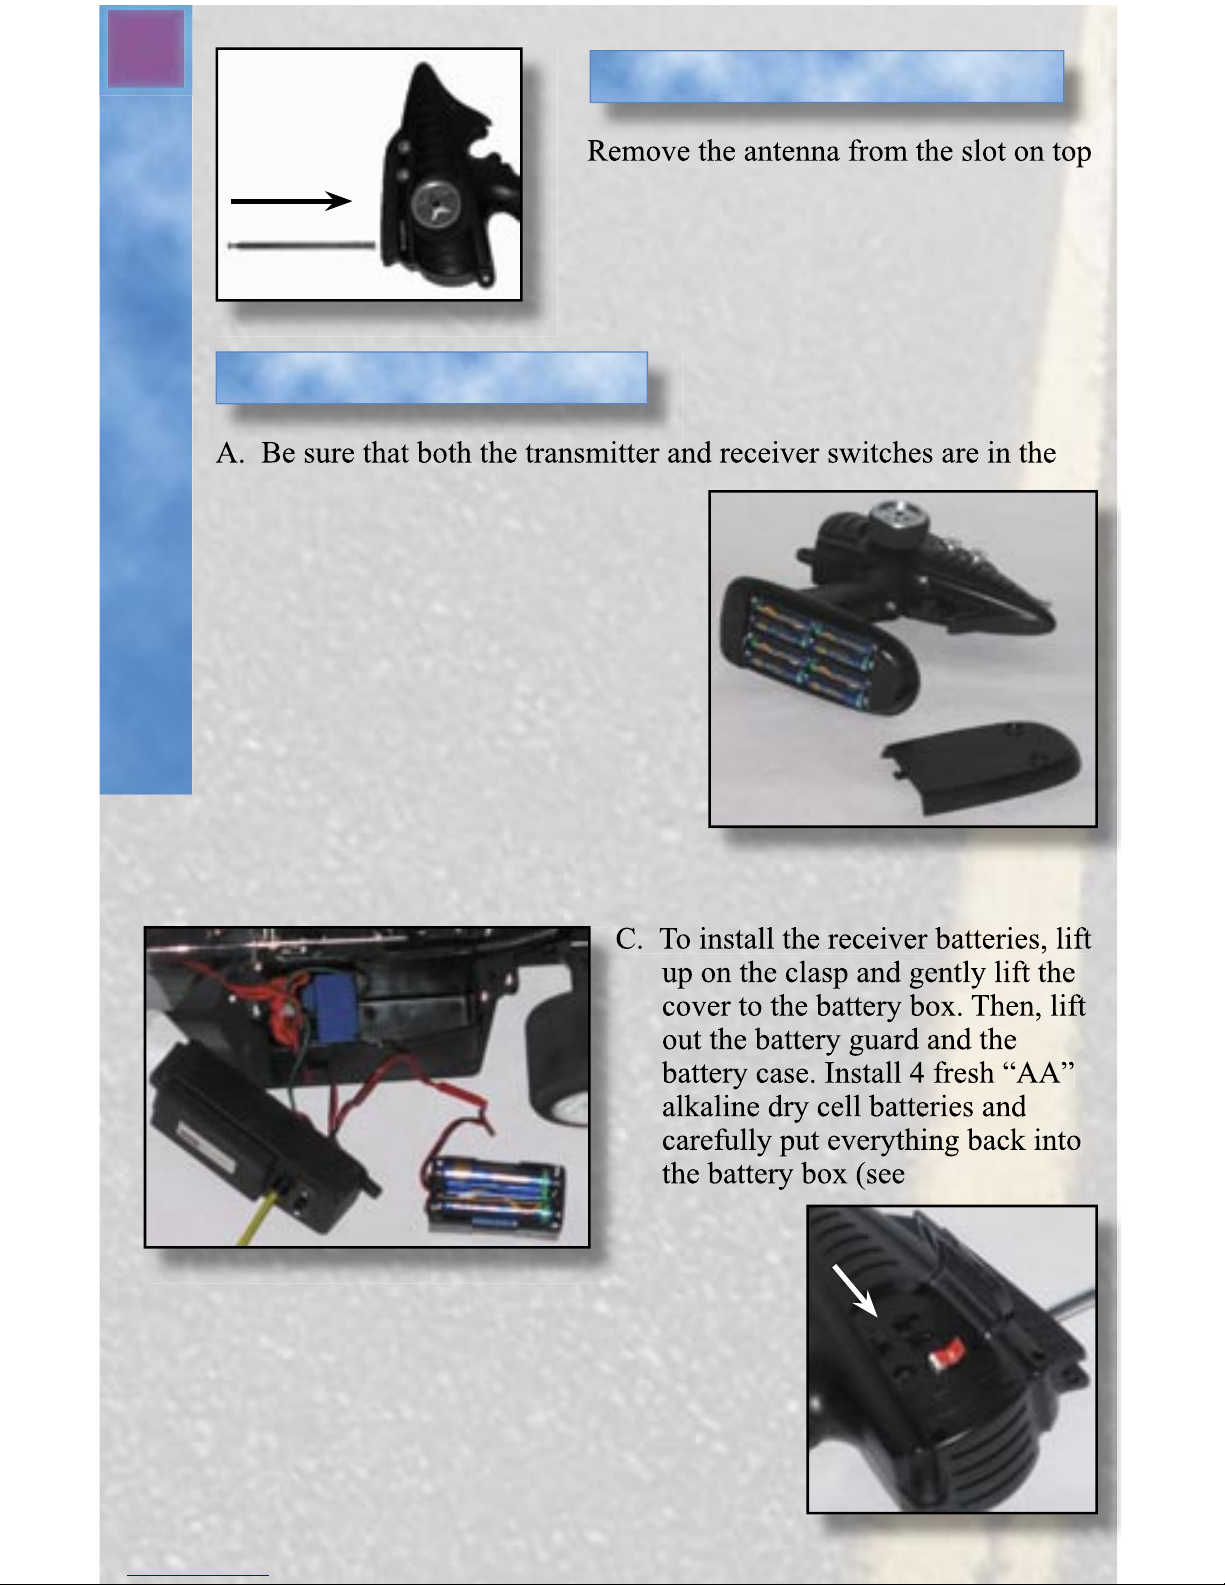
of the transmitter. Slide it into the hole
on top of the transmitter and turn clock
wise until snug. Do not over-tighten.
“off” position.
B. Install 8 fresh “AA” alkaline dry
cell batteries in the transmitter
(see Figure 5) paying careful
attention to proper “+” and “-”
polarity. Turn the transmitter on to
make sure the LED light glows
green. Fresh batteries will provide
2 hours of power to the
transmitter. When the red LED
light glows, immediately install
Installing the Antenna
Installing the Batteries
Figure 5 - Transmitter Batteries
fresh batteries. Failure to do so will result
in loss of control and (most likely) a crash.
Figure 6).
D. Turn on the transmitter power switch, located
inside the door on the back of the transmitter
(see Figure 7). Next turn on the vehicle’s power
switch and listen for the servos to move slightly.
Move the steering control wheel and the throttle
trigger on the transmitter, making sure that the
steering control operates the front wheels and
Figure 4 - Install Antenna
Figure 6 - Vehicle Batteries
Figure 7 - Power Switch
Page 7
7
Steering Trim & Operation
the throttle trigger operates the slide carburetor. If the servos do not
respond, remove the batteries and make sure they are installed
correctly.
E. Turn off the power switch on the car and then on the transmitter.
important to nely adjust the steering trim before operating.
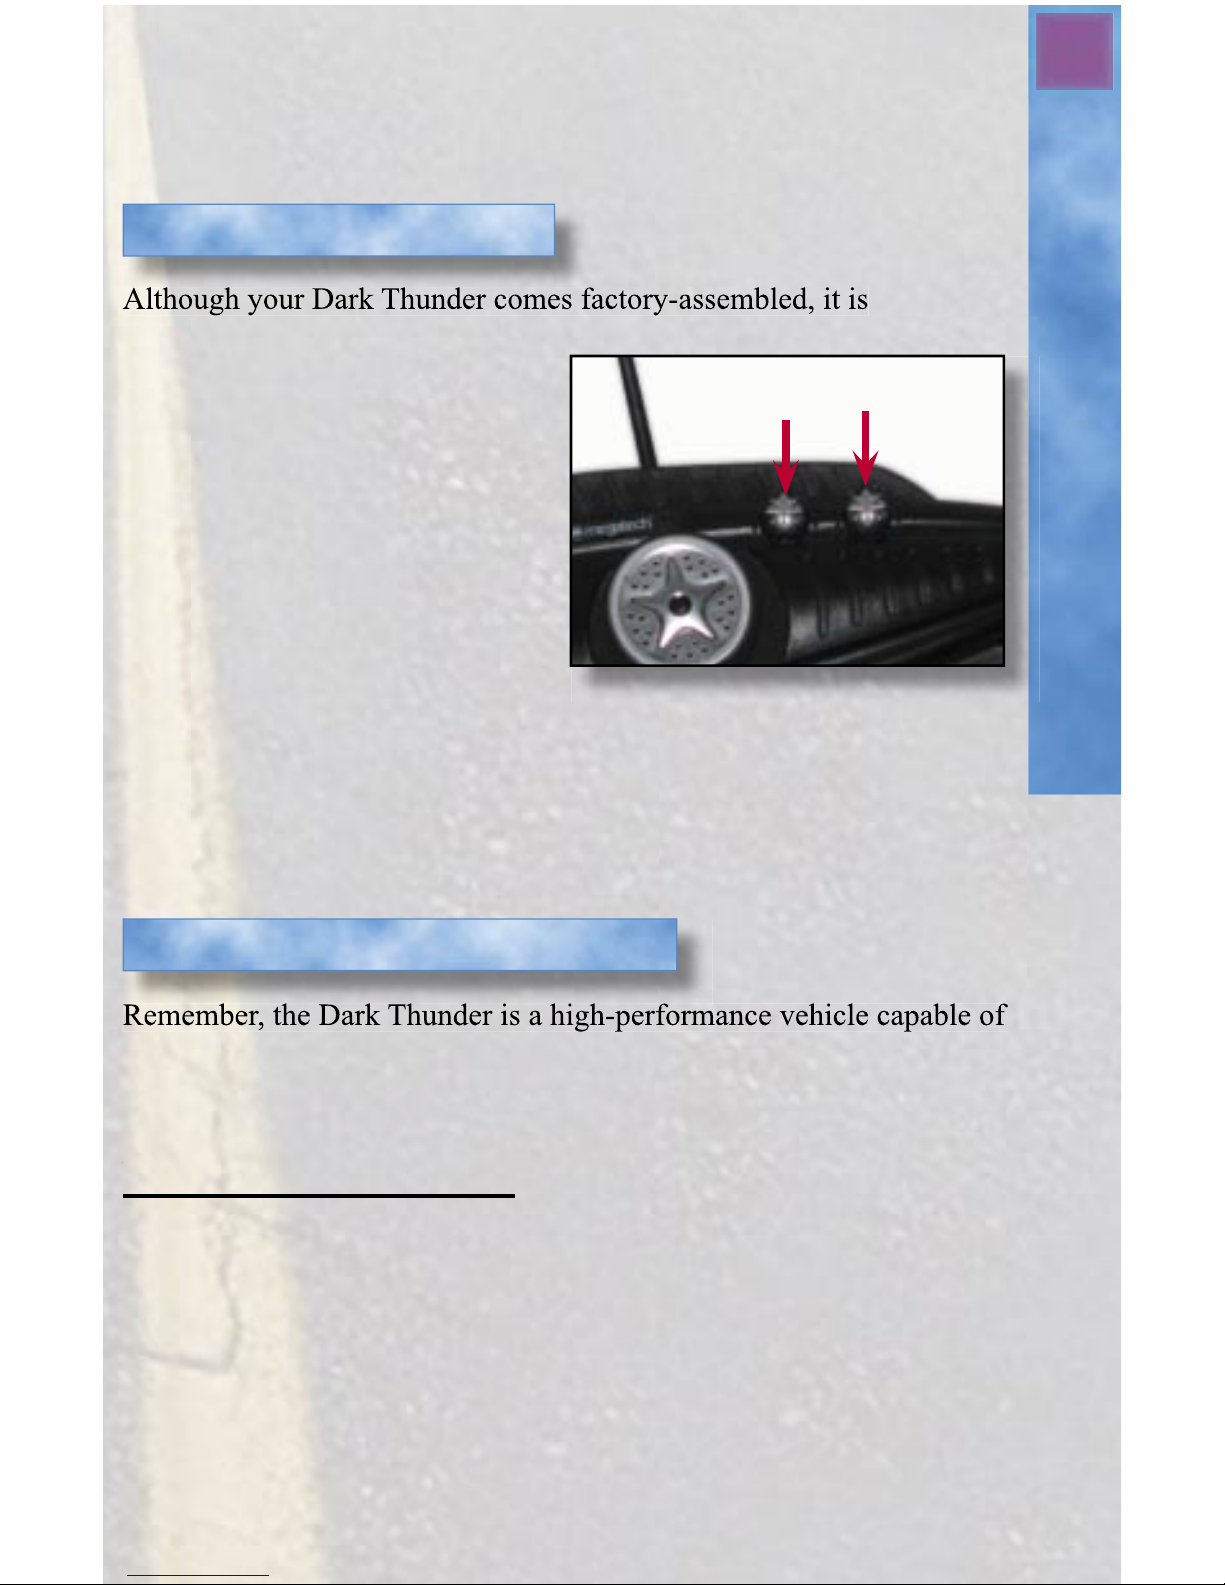
1. Turn on the transmitter and
then the receiver, but do not
start the engine. Position the
steering trim knob into the
neutral (center) position
(see Figure 8).
2. On a smooth, level, paved
surface, roll the car forward a
few feet at a time. Make sure
it rolls straight, not veering left
or right. If it does not roll
straight, adjust the steering knob until the vehicle rolls straight on
its own.
Steering Trim
Neutral
Figure 8 - Set Trim to Neutral
3. It’s also a good idea to test the steering functions while you are checking
the trim. Just like in a car, turning the wheel on the transmitter to the left
makes the vehicles wheels turn left and vice versa.
reaching speeds of over 60 MPH. It is capable of causing serious injury or
damage if not operated properly. Your Dark Thunder is not a toy. It is
designed for operation by or under close supervision of a responsible adult.
Finding the Right Location
Always drive your car in a wide open area, free from trees, cars and other
obstructions. Do not operate this vehicle on highways or in large crowds of
people. Never operate in heavy winds, rainy weather or after dark. Do not
operate your Dark Thunder at times or in locations where the engine’s noise
will be objectionable. Wear hearing protection if you are sensitive to engine
noise. Never operate any Nitro- or gas-powered vehicle in dry bush, dry
grass or dry leaves! This creates a very dangerous re hazard.
Operating your Dark Thunder
Page 8
8
Engine Break In
service, your Megatech M-16 engine must be properly broken in before
you adjust it for maximum power. Breaking in your engine enables
matching surfaces and parts to establish the correct running tolerances.
Properly breaking in the engine during the rst tanks of fuel will
determine how well your engine will run for its entire life.
Breaking in simply requires you
to run three tanks of fuel
through the engine at reduced
power. It’s a great opportunity
to get used to driving your
Dark Thunder before it
reaches maximum speed. After
the break in, you may adjust
your engine for maximum
power.
The engine is adjusted at the
factory for the correct break in
Breaking In Your Engine
settings. If your settings somehow
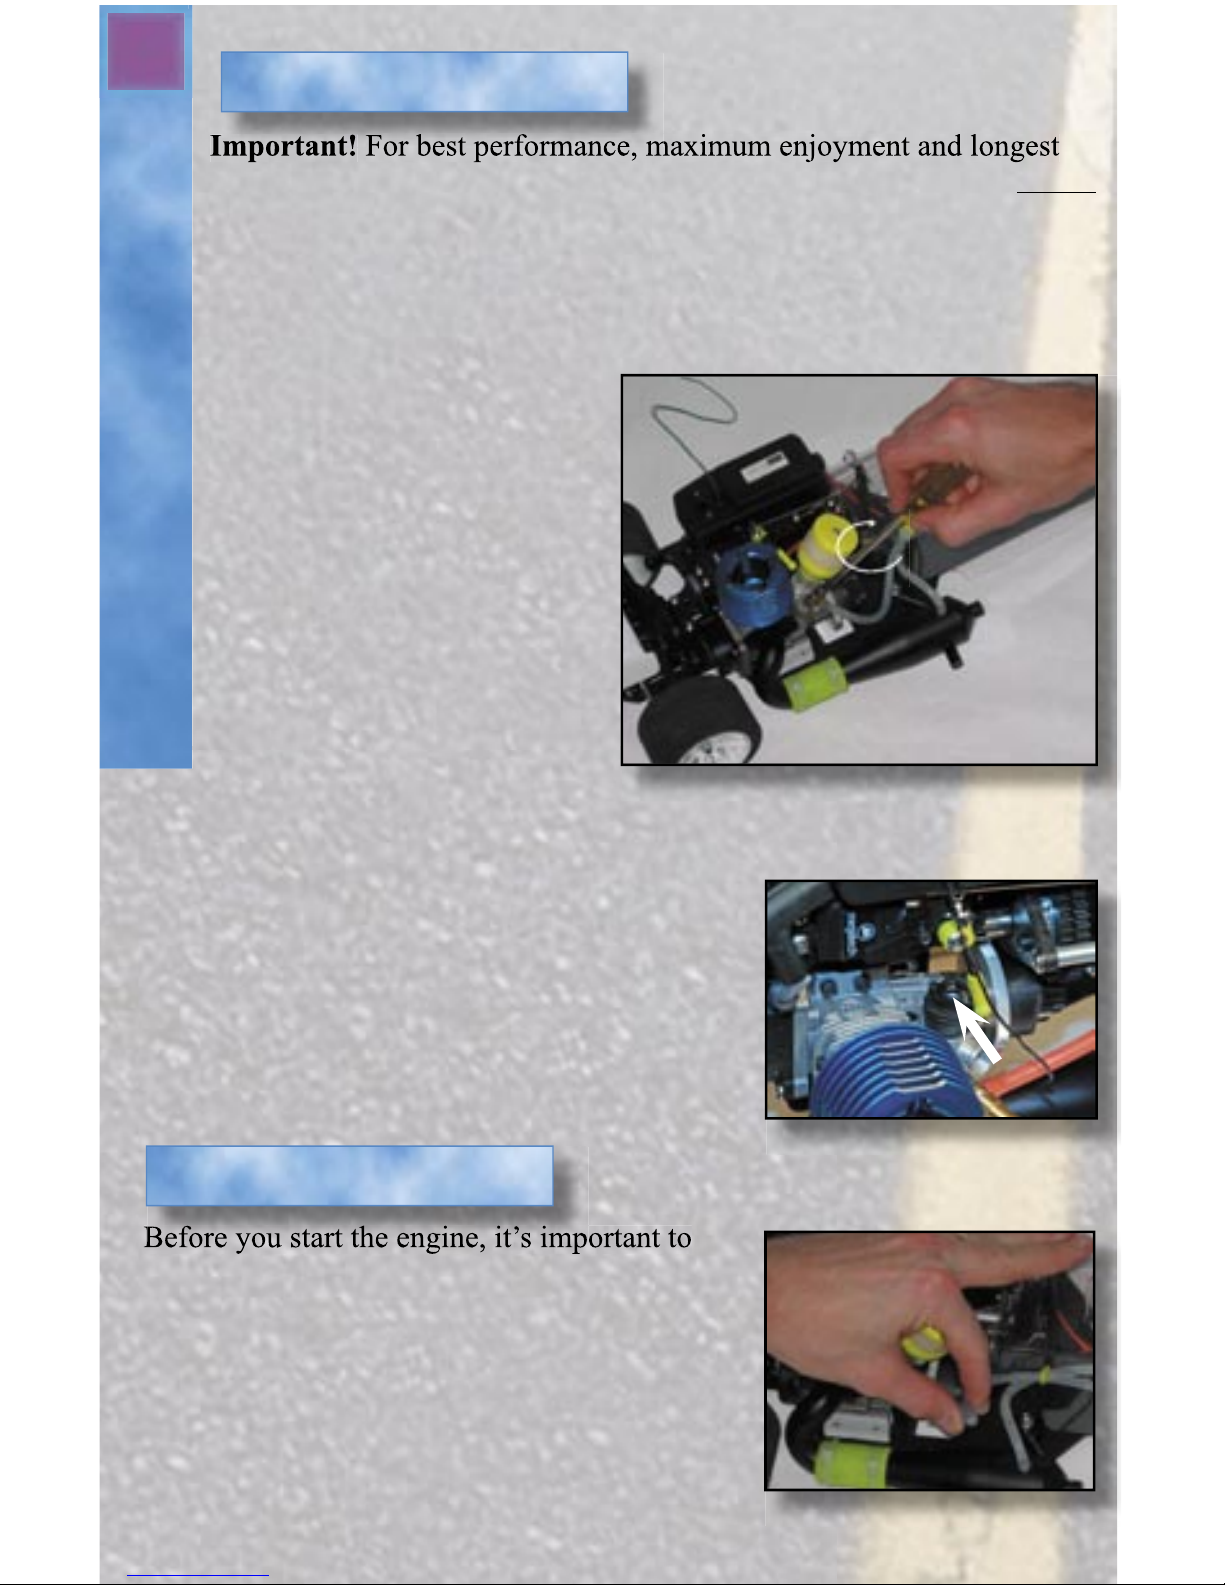
get changed, simply close both the high speed and slow speed needle valves
by turning them clockwise, then:
• open the high speed needle valve three
complete turns
counterclockwise
• open the slow speed needle valve four full
turns
NOTE: Never force the needle valves closed .
Only close them until you feel slight resistance.
know the correct way of shutting it off. To do
this, carefully use needle nose pliers or your
ngers to squeeze the fuel supply line closed. If
you use your ngers to squeeze the tube, use
care or you might get burned. You should wrap
thick tape around the jaws of the pliers to
prevent damaging the fuel line. Squeezing this
tube closed for a few seconds is the only method
you should use to stop the engine.
Figure 9 - Closing the high speed valve
Figure 10- slow speed valve
Shuting Off Your Engine
Figure 11- stop the engine
Page 9
9
Racers, Start Your Engines
green light ever goes dark or the red light comes on, your transmitter
batteries are low. You should replace them right away. Next turn on
the car’s receiver.
After lling the fuel tank, prime the
engine by pressing the priming button
three times. Then pull the engine starter
handle two or three times to circulate the
fuel into the engine.
Attach a fully charged 1.5 volt glow
plug igniter to the engine and wait three
seconds to allow the glow plug to heat
up (See Figure 13). During break in, it
may be necessary to leave the
glow plug igniter attached to the
engine to keep it running while the
air-fuel mixture is adjusted.
Starting Your Engine
Megatech’s MegaNiter rechargeable glow
plug igniter allows easy starting, and can be
left on the engine to keep it running reliably
during break in.
Important: Start the engine using short quick
pulls on the starter handle straight away from
the engine. Do not pull the handle all the way
out or at an angle. Always let the starter handle
back in slowly after each pull. Do not let the
handle go and snap back into the engine.
Once the engine is running, make sure the
throttle trigger is set at idle. If the speed is
too high, open the low speed valve
(counterclockwise) until the engine speed slows to a safe idle. If the
engine stops or runs too rich (lots of smoke and liquid fuel droplets
coming from the exhaust), then close the low speed needle valve
(clockwise) until the engine reaches a reliable idle speed. Adjust the low
speed needle valve so the engine idles as rich as possible while still
running. If the engine will not keep running consistently at idle, turn the
idle speed screw 1/4 turn clockwise to increase minimum speed.
Figure 14- Use short, quick
pulls
Page 10
10
Your First Run
for another full tank of fuel. Be careful not to maneuver it too harshly or
use any more than half throttle.
To adjust the high speed needle valve, carefully turn the high speed needle
valve clockwise 1/8 of a turn at a time. This allows the engine to run
faster and at a higher pitch sound. Your vehicle will now run faster and
smoother.
When you begin operating your Dark Thunder, it might be wise to hold the
radio horizontal to the ground with the wheel side up. Then the wheel acts
like a steering wheel in a car (see Figure 15). Turn the wheel right and the
car goes right. Turn the wheel left and the car goes left. If you nd your
Dark Thunder going to one direction or another without any
steering input, you will need to adjust the steering trim. Simply turn the
steering trim knob in the opposite direction that the Dark Thunder is
pulling (See Steering Trim on page 7). If the vehicle requires excessive
amounts of trim, check for damage, loose parts or excessive wear in the
steering parts.
Once you are able to keep the engine running (with the glow plug
igniter attached if necessary) at a reliable ultra-rich idle, run two full
tanks of fuel through the engine at the rich idle setting.
If the cylinder head temperature gets too hot (260 degrees F), shut
down the engine, let it cool completely and start again.
After you complete the break in, the low speed needle valve can now
be adjusted for performance. Start by running the throttle at idle
for 2 seconds. Then apply full throttle brie y and carefully listen
to the engine. If it accelerates slowly with lots of smoke and liquid
drops of fuel, your air-fuel mix is too rich and you should turn the
low speed needle valve clockwise 1/8 of a turn at a time until the
engine accelerates briskly and reliably. Retest the throttle after each
adjustment.
After this is set correctly, slowly increase the engine speed to
approximately 50% of full throttle. Adjust the high speed needle
valve so the engine again runs as richly as possible. (You actually
want it to be producing lots of oily smoke and spitting oil droplets
from the exhaust).
Run your Dark Thunder on a smooth surface at low to medium speed
Your First Run
Page 11
11
Brakes and Throttle Trim
The Brake System
Before running your Dark Thunder, be
sure to do a brake check. With the car
runing at idle, roll it forward. It should roll
freely. Now roll the car forward again and
push the throttle trigger forward. The car
should come to a stop almost immediately.
If it does not stop instantly, adjust the brake
actuation rod to give more grip to the brake
pads. If the vehicle does not roll freely, then
adjust the rod in the opposite direction.
Adjusting the Throttle Trim
If your Dark Thunder accelerates or stalls while in the neutral position, you
will need to adjust the throttle trim control. The throttle trim adjusts the
center point of the throttle servo, allowing you to ne tune the
operation of the transmitter throttle trigger.
Figure 15- Turn the wheel
right and the car goes right.
Turn the wheel left and the
car goes left.
Figure 16- brake actuation rod
Page 12

12
Maintenance
Maintenance
Proper care and simple maintenance should keep your Dark Thunder
running well for a long time.
Make sure you thoroughly check your vehicle after each run to
make sure no parts were bent or broken. Also check to make sure
the screws, fasteners, bolts and hardware are secure and tight after
each run. Should you nd that any parts are bent, broken or show
excessive wear, you must repair or replace them immediately before
attempting to operate your Dark Thunder again. See your local
hobby dealer rst for replacement parts. The list on page 3 provides
a handy guide.
Thoroughly clean your Dark Thunder after each run to remove oil,
fuel and dirt. We recommend Megatech’s MegaWash, a safe and
effective spray cleaner.
Important: Never leave any fuel in the vehicle’s fuel tank or engine.
The Nitro fuels used in these high-performance vehicles may cause
corrosion and damage your engine. Whenever possible, use up the
fuel in the engine by running the vehicle until it quits, leaving no
fuel in the tank, fuel tube or engine.
Always remove the used batteries from the transmitter and the receiver
box if the vehicle is going to be stored for more than a few days. Also
place two drops of Mega Metal-Guard (after-run oil) down the carburetor
and two drops down the glow plug hole and turn the engine over by pulling on the pull-starter a few times.
Page 13

13
Limited Warranty
Limited Warranty
Megatech® International guarantees this item to be free from defects
for a period of 90 days from date of purchase. If any component of
this product fails to function properly due to defects in materials or
manufacturing process during this 90-day period, the manufacturer’s
obligations are limited and manufacturer can choose to either repair
or replace the item.
This warranty is void if the product in question has been altered or
repaired by anyone other than Megatech® International or an
authorized agent.
Under no circumstances will Megatech® International or any of
its representatives be held liable for injury to persons or property
damage resulting from assembly or use of the product. Megatech® is
not liable if any outside radio frequencies interfere with the product’s
frequency causing loss of control. Megatech® International will not
be held liable for any injury to persons or property damage resulting
from an out-of-control model caused by use or misuse of the
product. Megatech® International expressly excludes any and all
express warranties not speci cally stated here and all implied
warranties of merchantability and tness for a particular purpose.
There are no warranties which extend beyond the description of the
warranties contained herein.
Contact the Megatech® International Service Department before
returning any item that is defective according to the limitations
listed above. Please be sure to pack the returned item(s) carefully.
The customer must return the product along with proof of purchase,
a letter describing the problem and the customer’s address and
telephone number. At this point in time we will either repair the
defective part or replace it and return it to the customer. Return
shipping and handling in the 48 contiguous states is $16.99.
Shipping outside of the 48 states will be quoted by location.
This warranty does not cover any damage caused by use, misuse,
alteration, accident, or neglect, nor does it cover normal wear and
tear of the product. Product returned to us which falls under this
category will be submitted to our service department for repair. We
reserve the right to charge any service and parts fees incurred when
repairing the item.
Megatech® International
8300 Tonnelle Avenue
North Bergen, NJ 07047
(201) 662-2800
www.megatech.com
Page 14

14
1685 5*8*2.5 PREMIUM BEARING (2 PACK)
780296 INNER DIFF JOINTS F/R GEARBOX
780304 CENTER DRIVE SHAFTS (2)
780299 3MM COPPER BALL (4)
780301 BRAKE ACTUATOR CAM
780239 CENTER DIFF DRIVE JOINTS
780294 SUSPENSION HINGE PINS 23MM (4)
780293 SUSPENSION HINGE PINS 13.5MM (4)
16109 SIDE EXHAUST HEADER
781013 MUFFER GASKET (2)
781014 CLUTCH NUT
7802100 CLUTCH SHOES (3)
780242 CLUTCH SPRING
780201 AIR FILTER
781018 AIR FILTER REFILL
781019 BALL END (8)
780243 CENTER DIFF MOUNTS W/ BRAKE CAM
781021 ALUMINUM BRAKE SPACER
780245 SERVO MOUNT SET
780305 REAR HUBS (2)
780203 FLYWHEEL
780204 RADIO BOX
781026 REAR WING
781027 TUNED PIPE
781028 SUPER TRACTION REAR SLICKS W/ RIMS
781029 FRONT AXLE
781030 STEERING SERVO MOUNT (2)
781031 TIE ROD SET (2)
781032 STEERING/REAR RIDE HEIGHT ROD SET (1)
781033 FRONT STEERING KNUCKLES (2)
781035 FRONT COIL SPRING
781036 FRONT WING
781037 WING MOUNT SET
Parts Listing
Page 15

15
781038 BODY MOUNT SET
781039 COMPLETE SCREW SET
781040 CENTER RING GEAR & PINION
781042 MAIN CHASSIS
781043 RAIDO TRAY
781044 KING PIN (2)
781045 FRONT SUSPENSION ARMS
781046 FRONT TIRE O-RING (2)
781047 ALUMINUM FRONT RIMS (2-BLACK)
781048 SERVO SAVER
781053 2 SPEED CLUTCH BELL
780248 2-SPEED ONE-WAY BEARING
780279 2-SPEED CLUTCH ASSEMBLY
780205 2-SPEED SPUR GEAR 42T
780206 2-SPEED SPUR GEAR 38T
781060 REAR AXLE SHAFTS (2)
780297 HEX DRIVE WASHERS (4)
780207 SUSPENSION HINGE PINS (50MM)
780234 100CC QUICK-FILL FUEL TANK
780215 BRAKE PADS (PR)
780218 BRAKE DISC
780238 ADJUSTABLE ENGINE MOUNT
780222 SUSPENSION ARMS
780224 UPPER ARMS (PR.)
780225 GEARBOX SHELL
780226 GEAR CASE SIDES
780227 DRIVE SHAFTS (45MM)
781072 RADIO PLATE STABILIZER (2)
781073 ENGINE MOUNT SPACER PLATES (2)
781074 DRAGSTER BODY UNPAINTED
781075 DRAGSTER BODY PAINTED (FLAMES)
780310 2 SPEED TRANSMISSION
Page 16
LOOK FOR THESE OTHER FINE MEGATECH PRODUCTS
www.megatech.com
Megatech International - 8300 Tonnelle Avenue
North Bergen NJ 07047 - (201) 662-2800
MTC7805
TEMPEST GLADIATOR 4WD RTR
TRUCK W/ RADIO AND M16 ENGINE
MTC7501
CHRIS CHIANELLI SIGNATURE
Q-SERIES COMPLETER PACK
FOR AUTO START VEHICLES
MTC7502
CHRIS CHIANELLI SIGNATURE
Q-SERIES COMPLETER PACK
FOR PULL START VEHICLES
MTC16161
CHRIS CHIANELLI SIGNATURE SERIES
MEGANITOR DELUXE GLOW PLUG
IGNITOR W/ METER AND AC ADAPTOR
MTC16192
CHRIS CHIANELLI
SIGNATURE SERIES
Q-SERIES OFF-ROAD
GLOW PLUG
 Loading...