

Entire contents © 2003 Megatech
www.megatech.com

If you have questions about operating or installing your new Megatech
product, or if you are missing parts... Please Call Megatech First!
DO NOT RETURN THIS PRODUCT TO THE STORE
Call our Customer Service Department at:
(201)662-2800
10:00am - 5:00pm, EST Monday through Friday (except holidays)
Technical assistance is also available on-line at www.megatech.com
or by e-mail to info@megatech.com
Congratulations! You have just purchased one of the EASIEST planes to
fl y in the world! Learning to fl y has never been so fun! Get ready to launch
into gravity-defying action with Megatech’s Cosmic Flyer! Climb to heights
over 500 feet, at speeds over 25 MPH/40KPH... no experience needed!
Cosmic Flyer’s clever design and easy-to-use controller make it simple to go
from beginner to expert in minutes!
Please Read ALL Instructions Carefully Before
Attempting to Fly!
If you experience any problems, DO NOT take your Cosmic Flyer back to
the store! Call one of our MegaTechnicians at 1-888-MEGA-911 or send
an e-mail to: info@megatech.com
TABLE OF CONTENTS
Safety Warnings ..........................................................................3
Getting Acquainted with your Cosmic Flyer .................................4
Installing the Transmitter Batteries ..............................................4
Charging the Flight Pack Battery ................................................5
Attaching the Tail & Landing Gear ............................................5
Attaching the Main Wing .............................................................6
Installing the Flight Pack into the Fuselage ................................7
Pre-fl ight Test ..............................................................................7
Flying Your Cosmic Flyer ...........................................................8
Landing Your Cosmic Flyer .........................................................9
Helpful Hints ................................................................................9
Ordering Spare Parts ...............................................................10
Limited Warranty .....................................................................11
2
Table of Contents

SAFETY WARNINGS
Please read these before operating your Cosmic Flyer.
General
• Do not fl y your airplane if other models are being operated on the
same frequency in the area.
• Do not attempt to disassemble any of the airplane’s components or
allow them to get wet. Electrical damage may occur.
• Never fl y your airplane from roadways or after dark.
• Always fl y your airplane in a wide open area, free from wires,
trees and other obstructions.
• When operating/fl ying, always be aware of the spinning propeller.
Be careful not to let it come close to your body, other people or loose
clothing. Keep spectators behind you when fl ying.
• Since your airplane is controlled by a radio link, it is very important
to always use fresh dry cell batteries in the transmitter.
• Before fl ying, make sure you perform a range check and can
maintain control at least 25 feet from transmitter to plane with the
transmitter antenna collapsed.
• No solvents or liquid cleaners should be used to clean this model.
Doing so may damage the plane. Use a dry, soft cloth for cleaning.
Please read these before operating your
Batteries
• Never leave the fl ight pack battery unattended while charging. It can get
very hot. Only charge the fl ight pack battery until it becomes warm, not too
hot. This should take 1-2 hours.
• To prevent damage to your fl ight pack battery from overheating, allow the
pack to cool completely after each fl ight before recharging.
Radio
• Safe radio operation tip: The transmitter should always be the fi rst thing
you turn on - and the last thing you turn off.
• The transmitter’s antenna must be fully extended for optimum radio link
during fl ight.
• The fl ight pack battery should never be left in the plane while not in use.
• Do not trim the airplane’s antenna. It is cut to a specifi c frequency length.
To do so would drastically affect radio range.
• Never-never-never disassemble any of the radio components or expose
them to moisture.
3
Safety Warnings
Caution: Never mix old and new batteries. Only use fresh alkaline
(non-rechargeable) batteries in the transmitter to assure best radio
signal link. The transmitter requires 8 “AA” batteries.
• Install the transmitter antenna by screwing it
into the hole in the top of the transmitter as
shown.
• Remove the battery compartment hatch on the
back of the transmitter.
• Install 8 fresh “AA” alkaline batteries, paying
careful attention to proper “+” and “-” polarity.
• Slide the battery hatch cover back into place
until it locks.
• Turn your transmitter on by sliding the “on”
switch on the front of the transmitter. Both the
green and red lights on your transmitter should
be illuminated. If they are not, make sure you are using all fresh alkaline
batteries and recheck that the batteries have been inserted using the proper
polarity. If you still have problems, contact Megatech.
DO NOT ATTEMPT TO FIX THE TRANSMITTER ON YOUR OWN.
Installing the Transmitter Batteries
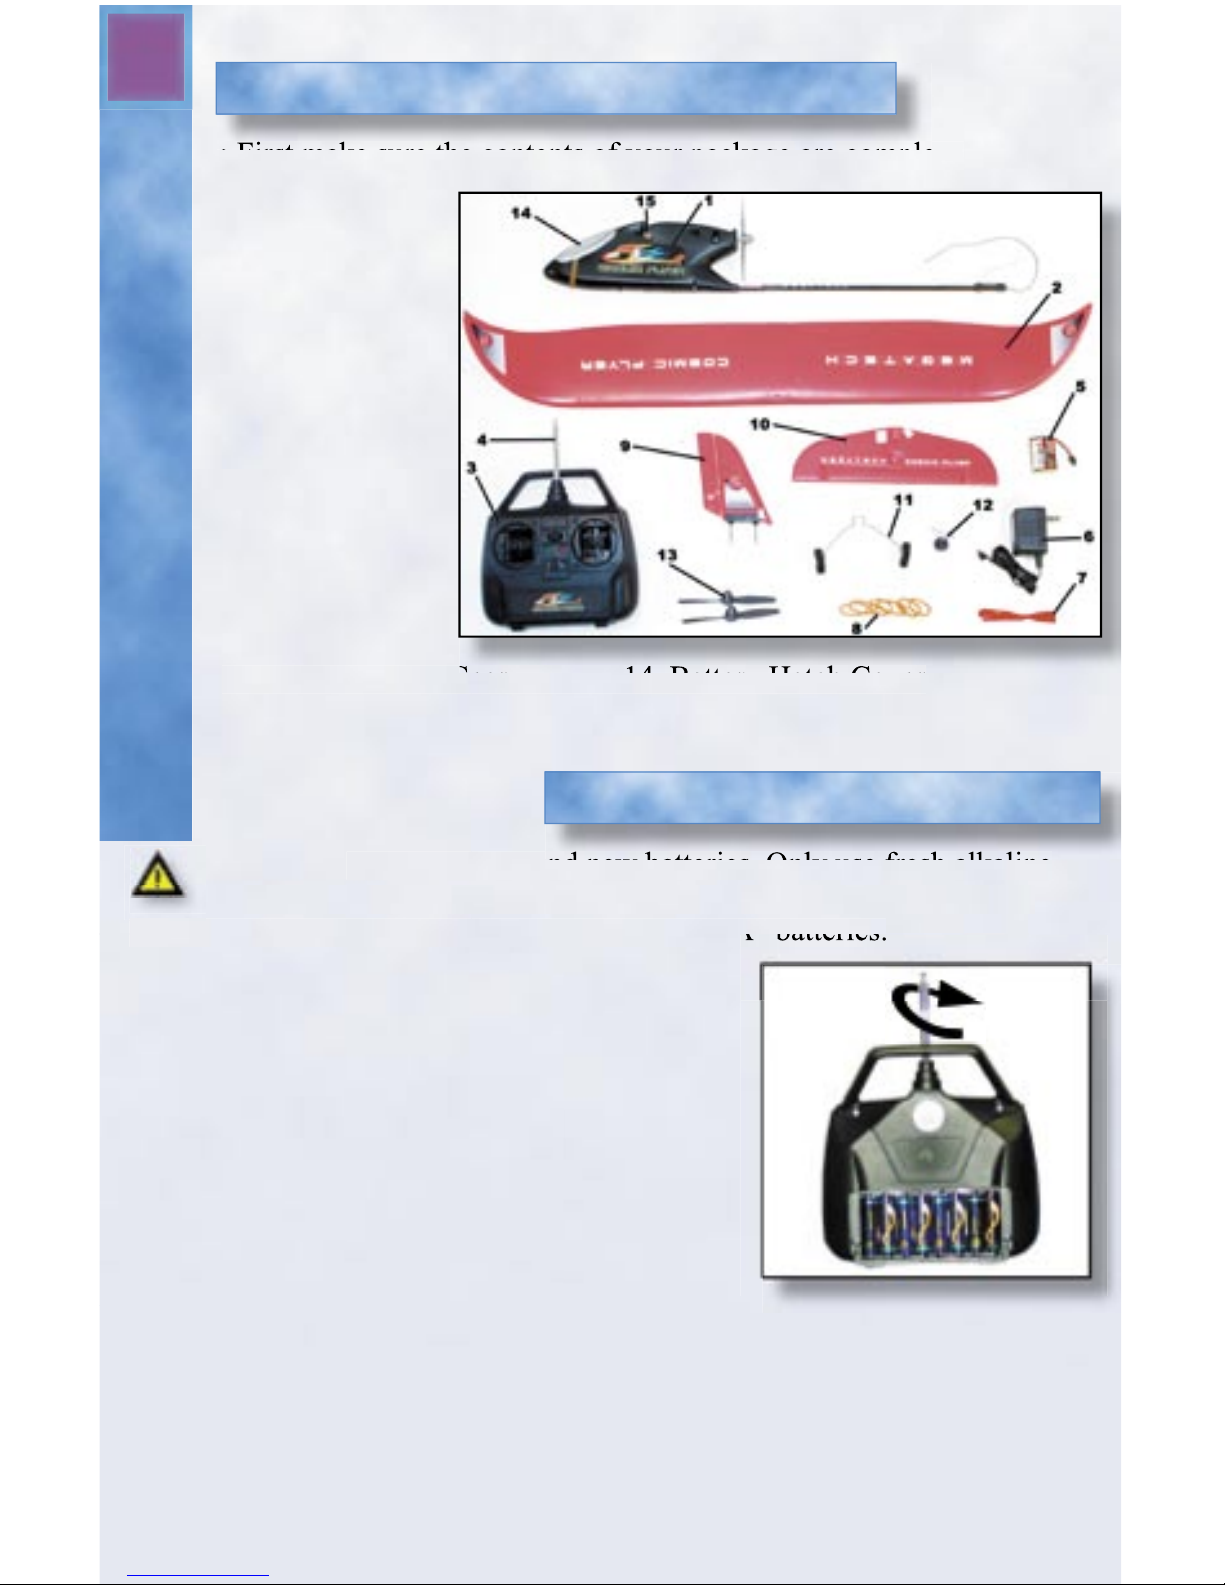
• First make sure the contents of your package are complete:
1. Cosmic Flyer
Fuselage
2. Main Wing
3. Transmitter
4. Transmitter
Antenna
5. Battery
6. Charger
7. Wind Detection
Ribbon
8. Wing Bands
9. Vertical Tail
10. Horizontal Tail
11. Main Landing Gear 14. Battery Hatch Cover
12. Rear Landing Gear 15. Motor Start Button
13. Propellers
Getting Acquainted with Your Cosmic Flyer
(non-rechargeable) batteries in the transmitter to assure best radio
4
Parts & Transmitter Batteries

Charging the Flight Pack Battery
• We use the latest NiMH (nickel-metal hydride) technology available. Do not
be alarmed by short fl ight times at fi rst.
NiMH batteries do not achieve their full
potential until they have been charged and
discharged 3 or 4 times. After that, you
should be attaining full fl ight times.
NEVER LEAVE A CHARGING
BATTERY UNATTENDED!!
Always let the fl ight pack cool before
recharging.
• Connect the battery to the wall charger.
• Note: Only use the included charger or one that is approved for use
with this battery.
• Plug the charger into an electrical outlet.
• Children must have parental supervision during the charging process.
• Charge the battery for 1-2 hours.
• Always monitor the charging process. The fl ight pack should
become good and warm, but do not let it become extremely
hot! DO NOT OVERCHARGE THE BATTERY. Use extra
caution when touching the battery because it may become very
hot.
hydride) technology available. Do not
be alarmed by short fl ight times at fi rst.
NiMH batteries do not achieve their full
potential until they have been charged and
discharged 3 or 4 times. After that, you
should be attaining full fl ight times.
NEVER LEAVE A CHARGING
BATTERY UNATTENDED!!
Always let the fl ight pack cool before
recharging.
with this battery.
5
Flight Pack & Tail
Attaching The T-Tail & Landing Gear
• Remove the nuts from the threaded shafts on the Vertical Tail/Rudder and put
them in a safe place as you will need them to complete the assembly process.
• Slide Vertical Tail/Rudder through the Horizontal Tail/Elevator making sure to
line up A to A and B to B as shown (Figure 1).
• Locate the wire pushrod which is attached to the tail boom of the airplane.
Slide the end of the pushrod through the outermost hole of the control horn
located on the Vertical Tail/Rudder as shown (Figure 2).
Figure 1 Figure 2

6
Tail & Wing Assembly
Attaching the Main Wing
• Place the main wing onto the fuselage with the wingtips curving upward
and pointing toward the tail (Figure 7).
• Make sure the small arrows imprinted into the wing are centered over the
fuselage (Figure 8).
• Connect the Wing Bands to the posts on the fuselage and wrap them across
the wing in an “X ”pattern and then a “II ”pattern as shown (Figure 9).
Figure 7 - Wingtips point
up and back
Figure 8 - Wing is centered Figure 9 - Wing Band
placement
Attaching the Propeller
• Holding the fuselage of the airplane as
shown (Figure 6) push the propeller
onto the prop shaft with a steady, fi rm
push until propeller is approximately
6mm from the fuselage.
• Slide the tail unit through the tail boom of the airplane (Figure 3) until
t-tail unit is fl ush with the tail boom.
• Slide the Rear Landing Wheel onto the t-tail shafts as shown (Figure 4)
making sure to keep the wheel closest to the rear of the airplane.
• Now take the 2 nuts that you set aside earlier and attach to the t-tail shafts
until snug. DO NOT OVER TIGHTEN
• Locate the main landing gear and the main landing gear slot on the bottom of the fuselage. Squeeze the wheels together as you slide the unit into
the slot on the fuselage as shown (Figure 5). Once inserted completely,
release and spread the wheels apart.
Figure 3 Figure 4 Figure 5
Figure 6

Installing the Flight Pack into the Fuselage
• Gently lift and open the battery hatch on the front of the
Cosmic Flyer fuselage.
• Leave all foam pieces inside of the
fuselage to ensure proper placement
of the fl ight pack.
• Place battery into fuselage with the
wide section of the battery toward
the front as shown. (Figure 10)
• Attach the battery connector to the
connector inside the fuselage,
gently close the hatch and secure w/
rubber band around fuselage
Figure 10 - Battery Placement
Pre-fl ight Test
• Begin by centering the trim tabs
on your transmitter (Figure 11).
• Turn your transmitter on fi rst, then
install a charged battery into your
plane.
• Hold your plane in one hand, with
your fi ngers and loose objects away
from the propeller.
• Move the right control stick of your transmitter all the way to the right.
a. The vertical part of the tail should move to the right.
b. Now move the right control stick all the way to the left. The
opposite function should occur.
• Now press the Motor Start Button on the side of the fuselage. The motor
should not start until this safety switch is pushed. Now push the left
control stick forward. The propeller should now spin rapidly and stop
when the control stick is back in its neutral state.
Caution: Keep hands, clothing and loose objects away from the propeller!
Figure 11 - Trim Tabs
Control Stick Left
Control Stick Right
7
Flight Pack & Pre Flight

8
Flying Your Cosmic Flyer
Flying Your Cosmic Flyer
• Always fl y your airplane in a wide open area, free from wires,
trees and other obstructions. For your fi rst fl ight, pick a day
with little or no wind. Never fl y in heavy winds or rainy weather.
• Fully extend your antenna and turn the transmitter on. Then install
the fl ight pack. Make sure both lights on your transmitter are lit.
Note: If the green light ever goes dark, your transmitter batteries
are low. You should land your plane and change them right away.
• Make sure the transmitter antenna is fully extended for maximum
radio link. Attach the Wind Indicator Ribbon to the end of your
transmitter antenna to determine the direction of the wind.
Always launch your airplane into the wind.
• Hold your plane in one hand, keeping clear of the propeller. Next
press the red Start Button on the side of the fuselage and push the
left control stick completely forward. Gently toss the plane into the
wind, level with the horizon. If the plane is tilted upward or
downward, your launch may not be successful.
• Allow the plane to climb to a safe altitude (50-75 feet) before attempting
turns. You do not want the airplane to get too far away from you, so once
it is at a safe altitude, move the right control stick gently in the direction
you wish to turn. Once it has turned toward the direction you want, release
the right control stick.
• If you begin to gain too much altitude, release the left control stick and let
the Cosmic Flyer glide to a more comfortable level. When the plane gets
too low to the ground, add motor thrust by pushing the left control stick
forward.
Important Tip! When the airplane is coming toward you, the controls are
reversed (moving the stick left will make the plane turn to your right). This
is an important characteristic to get used to. Try to imagine you are actually
sitting in the airplane’s cockpit. This will help you.
• Do not panic if you see the plane begin to spin or make erratic
movement. Simply release both control sticks and the Cosmic Flyer’s
Self-Righting Mechanism will kick in. Within a few seconds, you will
return to a steady glide.

9
When piloted properly, your Cosmic Flyer should glide gracefully
in for a landing and slide gently to a stop.
• Always try to land into the wind, keeping the wingtips as level as
possible.
• Set up for a landing by making a gentle, shallow turn to face the
airplane into the wind.
• When the airplane is level and facing into the wind, release both
control sticks and the plane will descend to the ground.
• If slight corrections are needed as the airplane makes its way to the
ground, move the right control stick in the appropriate direction,
but only for a moment, so as to keep the airplane descending on a
straight heading. Over-steering will put the airplane into another
turn, which could make it crash if you are too close to the ground.
Keep the Cosmic Flyer fl ying straight until it lands safely.
Landing Your Cosmic Flyer
• Flight time is about 10-15 minutes. When the power on the plane
is low, the motor will shut off, however, the servos will still work,
so you can land the plane. Land the plane as soon as possible when
the power runs out.
• Bring several extra batteries with you for longer fl ying time.
• 8 AA alkaline or NiMH batteries are recommended.
• Check the direction and speed of the wind before you begin to fl y.
The Wind Indicator Ribbon will point in the direction the wind is
blowing.
• If the plane drifts right while fl ying, move the rudder trim tab
(located under the right control stick) to the left to correct the
problem. If the plane drifts left, move the rudder trim tab to the
right.
• Check the power light on the transmitter often during a fl ight. If the
green light becomes dark or goes out, land the plane as soon as
possible to avoid losing control. Then change the batteries in the
transmitter.
• Always stay far away from trees, buildings and elevated land.
Unexpected air currents can quickly alter your Cosmic Flyer’s
course and possibly lead to an accident.
• Always keep the plane in front of you. Never fl y your Cosmic
Flyer directly overhead, as it is easy to lose your sense of direction.
• If the main wing on your Cosmic Flyer becomes damaged, simply
apply clear packing tape to the affected area.
Helpful Hints
Landing & Helpful Hints

10
Spare Parts
Ordering Spare Parts
Spare, repair and replacement parts are readily available for your
Cosmic Flyer. We recommend that you visit your local hobby dealer
first. If the parts are unavailable there, you can contact Megatech. Use
the list below as a guide.
Spare Parts List
Part Number Descriptions
993201 Main Wing
993202 T-Tail Assembly
993203 Landing Gear
3902 6V Rechargeable NiMH Battery Pack
3815 110V Charger
SV-024 Rubber Wing Bands
735002 Transmitter Battery Cover
SV-012 Propellers (2)
3812 Peak Detection AC/DC 4-8 Cell Charger
Contact us at:
Megatech Parts Department
8300 Tonnelle Avenue
North Bergen, NJ
Telephone: (201) 662-2800
Fax: (201) 662-1450
E-mail: info@megatech.com

11
Limited Warranty
Megatech International guarantees this item to be free from defects for a
period of 90 days from date of purchase. If any component of this product
fails to function properly due to defects in materials or manufacturing process during this 90 day period, the Manufacturers obligations are limited
and manufacturer can choose to either repair or replace the item.
This warranty is void if the product in question has been altered or repaired
by anyone other than Megatech International or an authorized agent.
Under no circumstances will Megatech International or any of its representatives be held liable for injury to persons or property damage resulting
from assembly or use of the product. Megatech is not liable if any outside
radio frequencies interfere with the product’s frequency causing loss of
control. Megatech International will not be held liable for any personal
injury or property damage resulting from an out-of-control model caused
by use or misuse of the product.
Megatech International expressly excludes any and all express warranties
not specifi cally stated here and all implied warranties of merchantability
and fi tness for a particular purpose. There are no warranties which extend
beyond the description of the warranties contained herein.
Contact the Megatech International Service department before returning
any item that is defective according to the limitations listed above. Please
be sure to pack the returned item(s) carefully. The customer must return the
product along with proof of purchase, a letter stating the problem, the customer’s address and telephone number. At this point in time we will either
repair the defective part or replace it and return it to the customer. Return
shipping and handling in the 48 contiguous states is $12.99. Shipping outside of the 48 states will be quoted by location.
This warranty does not cover any damage caused by use, misuse, alteration,
accident, or neglect, nor does it cover normal wear and tear of the product.
Product returned to us which falls under this category will be submitted to
our service department for repair. We reserve the right to charge any service
and parts fees incurred when repairing the item.
Megatech International
8300 Tonnelle Avenue
North Bergen NJ 07047
(201) 662-2800
www.megatech.com
eMail: info@megatech.com
Limited Warranty

Megatech International
8300 Tonnelle Avenue, North Bergen, NJ 07047
(201) 662-2800
MTC7702
OCEAN EXPLORER 1 R/C SUBMARINE
MTC6901
NIRVANA R/C RACING CLASS
SAILBOAT
LOOK FOR THESE OTHER FINE MEGATECH PRODUCTS
MTC8245 GREEN
MTC8246 ORANGE
FIREFLY R/C MICRO FLYERS
www.megatech.com
 Loading...