

MegaTech B3 Flight Manual
Entire contents © Megatech 2008 Rev. 200808221530
Flight Manual
www.megatech.com
TM

2
If you have questions about operating or assembling your new Megatech product...
Please Call Megatech First!
DO NOT RETURN THIS PRODUCT TO THE STORE
Call our Service Department at:
(201) 662-8500
or email: support@megatech.com
10am - 5pm EST Monday through Friday (except holidays)
Technical assistance is also available on the web at www.megatech.com
READ ENTIRE MANUAL FIRST BEFORE ATTEMPTING TO FLY
IMPORTANT NOTE: The warranty covers manufacturer’s defects only and does NOT cover
damage caused by operator error. Spare parts, baeries, and accessories are available.
TABLE OF CONTENTS
Safety Precautions ........................................................................ 3
Package Contents ......................................................................... 4
Charging your B3 .......................................................................... 4
Installing the Batteries ................................................................ 5
Cycling the Battery Pack .............................................................6
Pre Flight Check ............................................................................ 6
Flight School .................................................................................. 7
Flight Tips ...................................................................................... 10
Repairing your B3 ....................................................................... 10
Parts List ......................................................................................... 11
Troubleshooting ......................................................................... 12
Warranty ........................................................................................ 13
FCC Emissions Information ..................................................... 14

3
Important! Before you begin, please read all safety precautions and warnings.
Failure to comply with any of the following could lead to bodily harm or
injury. The Megatech B3 is not intended for those under 10 years of age
without proper adult supervision.
SAFETY PRECAUTIONS
TRANSMITTER SAFETY
(See Page 14 for complete FCC and RF Emissions information)
• Before you begin to y look at the frequency sticker on the back of your transmitter & make sure
no one in the area is on the same frequency.
• Since your model is controlled by a radio link it is very important to always use fresh alkaline
batteries in the transmitter. When only the red LED glows on the transmitter, immediately land
your airplane and install fresh batteries. Failure to do so could result in loss of control and a crash.
• Never mix old and new batteries. Do not mix Alkaline, standard Carbon-Zinc or rechargeable
(Nickel-Cadmium, Nickel-Metal Hydride or Lithium).
• Alays remove batteries from the transmitter when you have nished ying for the day. Do not
store batteries inside the transmitter
SAFETY GUIDELINES
• You alone are responsible for operating your model in a safe manner. When ying, you are
responsible for your own safety and the safety of others around you. Follow these basic safety
guidelines at all times.
• When operating always be aware of the spinning propellers. Be careful not to let the propellers
come in contact with yourself, others and/or loose clothing.
• Always y your airplane in a wide-open area. You will need at least 300ft worth of area that is free
from obstructions such as buildings, electric power lines, trees, roads, other people and vehicles.
• Do not y around people who are unaware that you are ying a model airplane, and never y
over people’s heads.
• Do not attempt to disassemble any of the model’s components or allow them to get wet.
Electrical damage may occur.
• Never y your model from roadways or after dark.
• Keep spectators behind you when ying.
• Before ying, make sure you perform a range check to be sure you can maintain control at least
50-feet from the transmitter to the model with the transmitter antenna fully collapsed.
• Never use solvents or liquid cleaners to clean this model. Doing so may damage the unit or
electronics. Only use a dry, soft cloth for cleaning.
• Never allow the B3 to get wet. If the model ever comes in contact with any moisture, dry it
carefully and allow it to stand overnight before attempting to use it again. Moisture can cause a
short-circuit and severe damage.
• Keep the B3 away from heat or re. Never leave the model or transmitter in direct sunlight for any
length of time.
RECHARGEABLE BATTERY WARNINGS AND PRECAUTIONS
• ALLOW BATTERY TO COOL COMPLETELY BEFORE ATTEMPTING TO CHARGE
• Never attempt to charge a battery that appears damaged.
• Always disconnect the battery from the charger when charging is complete.
• See page 4 for full charging safety and warnings.
Nickel-Metal Hydride batteries must be disposed of properly. For current
regulations in your area and proper disposal sites please call 1-800-822-8837 or
visit www.rbrc.org
4
PACKAGE CONTENTS
Before getting started you will need:
• 8 “AA” 1.5V Alkaline batteries (sold separately)
First make sure the contents of your package are complete:
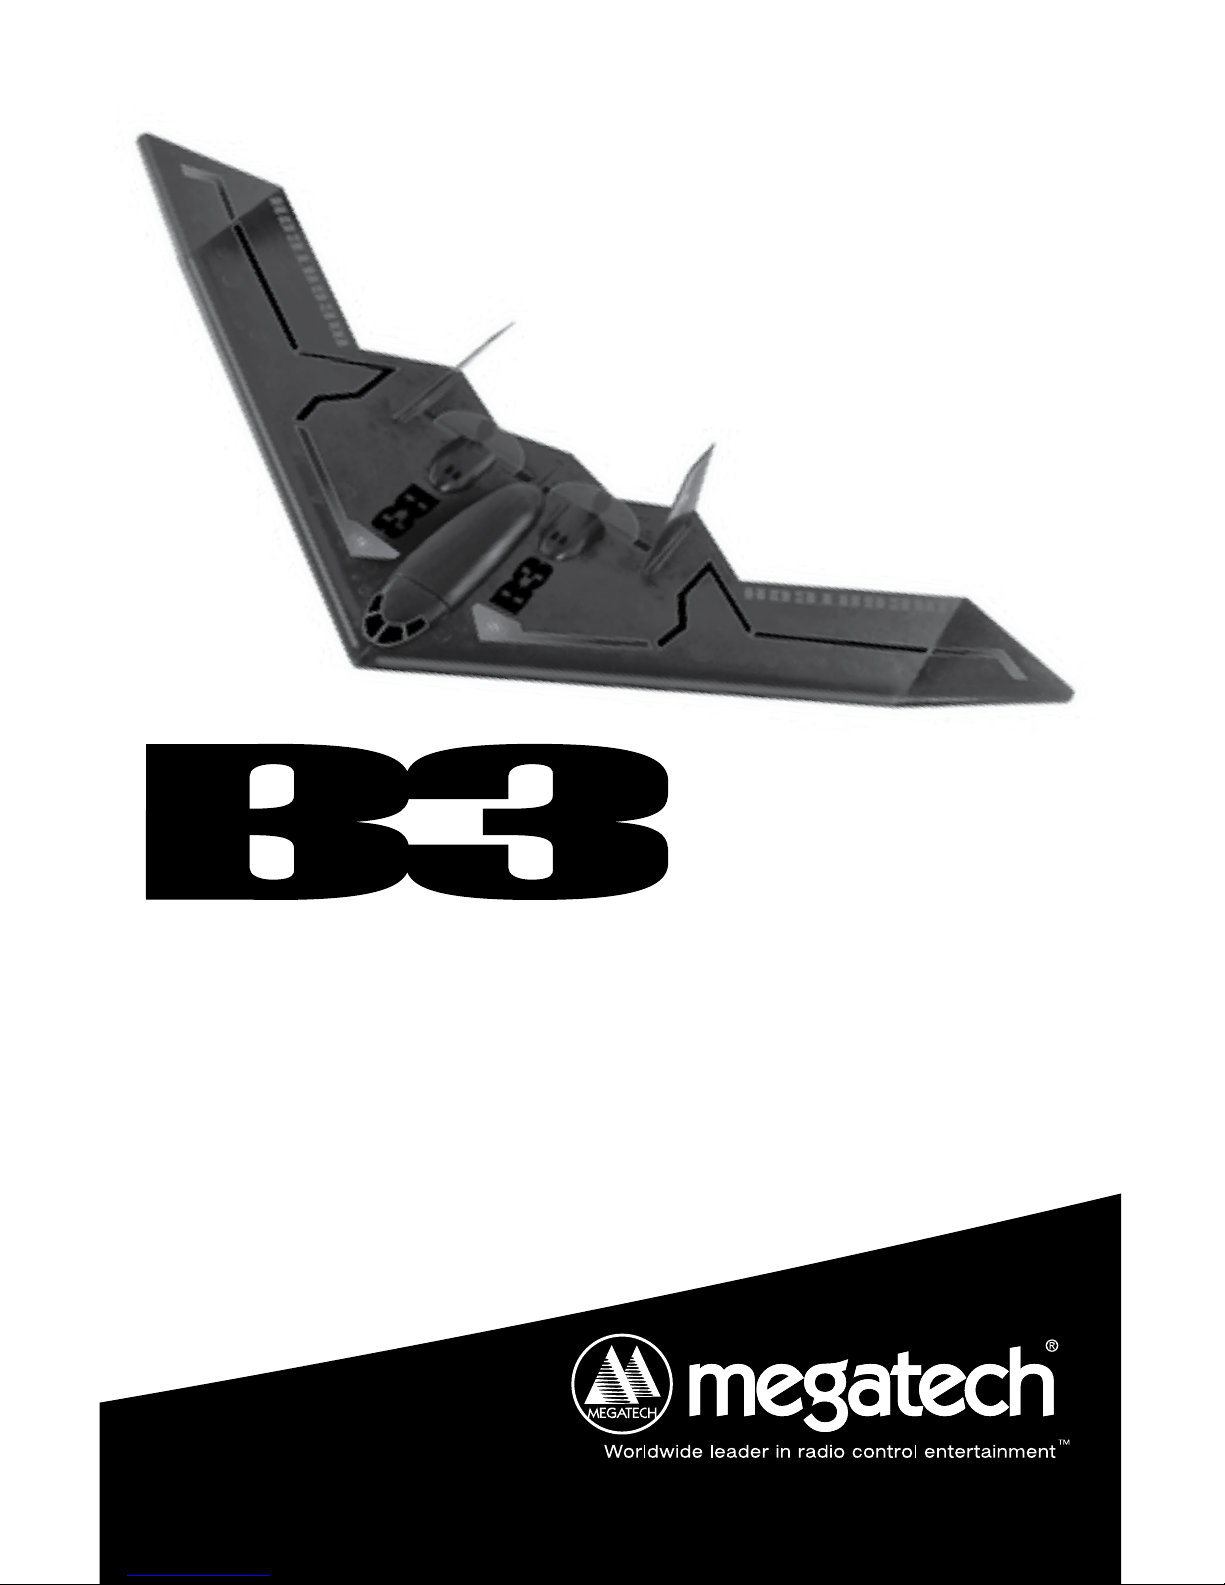
A. Fuselage
B. Transmitter
C. Transmitter Antenna
D. Battery Flight Pack
E. DC Quick Charger
F. Wind Direction Ribbon
G. Spare Propellers (2)
H. Propeller Removal Tool
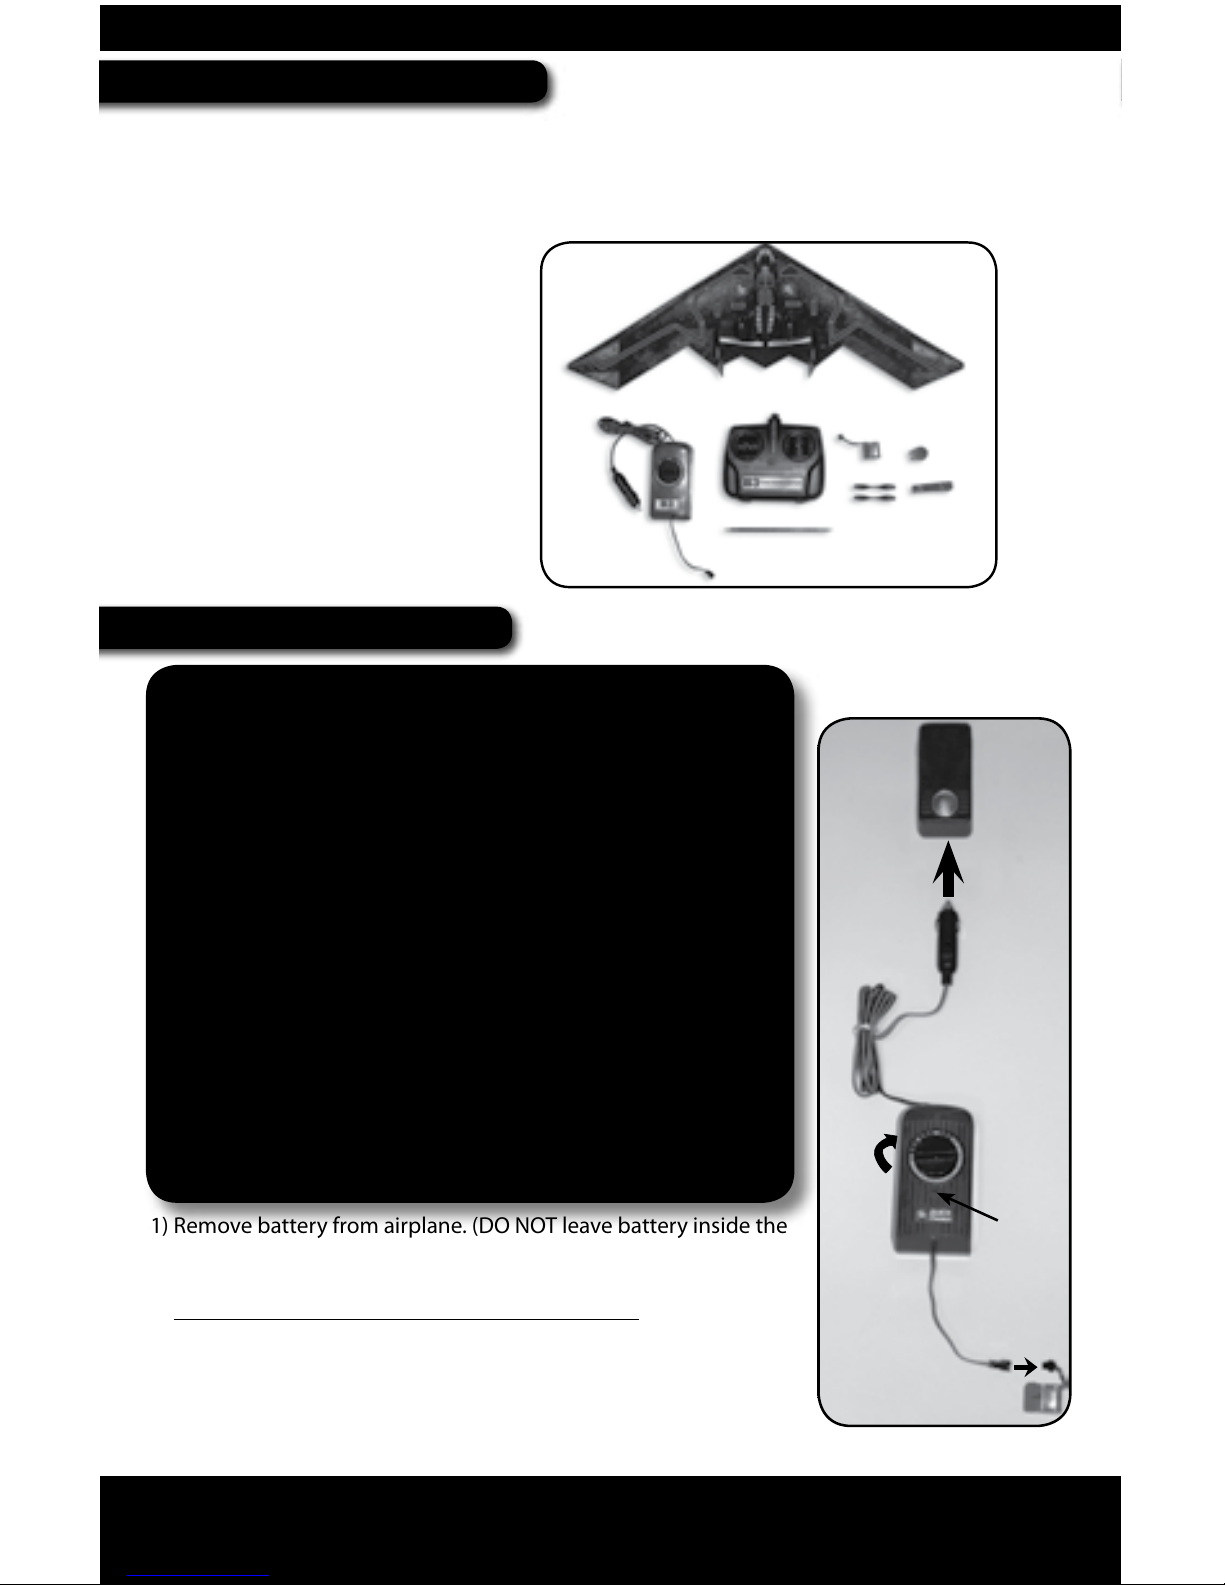
CHARGING YOUR B3
1) Remove battery from airplane. (DO NOT leave battery inside the
airplane while charging)
2) Plug battery into the charger.
3) Make sure the automobile engine is not running and plug the
charger into the vehicle’s cigarette lighter.
4) Rotate the timer dial to the 15 minute mark. The LED on the
charger will illuminate.
5) Once the LED goes out, the battery will be warm to the touch
and is completely charged. Disconnect at once.
A.
B.
C.
E.
F.
G.
D.
H.
CAUTION
READ THIS SECTION BEFORE CHARGING
YOUR BATTERY PACK FOR THE FIRST TIME!
•MAKESURETHEBATTERYISCOMPLETELYCOOLBEFORE
ATTEMPTINGTOCHARGE.FAILURETODOSOMAYCAUSE
PERMANENTDAMAGETOTHEBATTERYANDPOSSIBLEBODILY
HARM.
•Neverchargetheightpacklongerthan15minutes.
•Whenusingthecharger,placethebatteryandchargerontheground
outsidethecaronaameandheatresistantmaterialsuchasanoven
mitt.Neverplaceachargingbatteryorchargerinsideyourcar.
•Neverleavethebatteryandchargerunattendedwhilecharging.
•Neverhavethevehicle’senginerunningduringthechargingprocess.
Thismaycauseoverchargingandpossibledamagetothebattery.
NOTE:Checkyourvehicleowner’smanualforfulldetailsonhowyour
poweroutletoperates.
ATTENTION PARENTS:Thechargingwalladapter,wire,batterypack
andallelectricalconnectionsneedtobeperiodicallyexaminedfor
potentialconditionsthatmayresultintheriskofre,electricalshock,
orinjurytopersons.Intheeventofsuchconditions,thehazardous
partsshouldnotbeuseduntilproperlyrepairedorreplaced.
DC
Source
Battery
Pack
Quick
Charger
LED
TURN
5
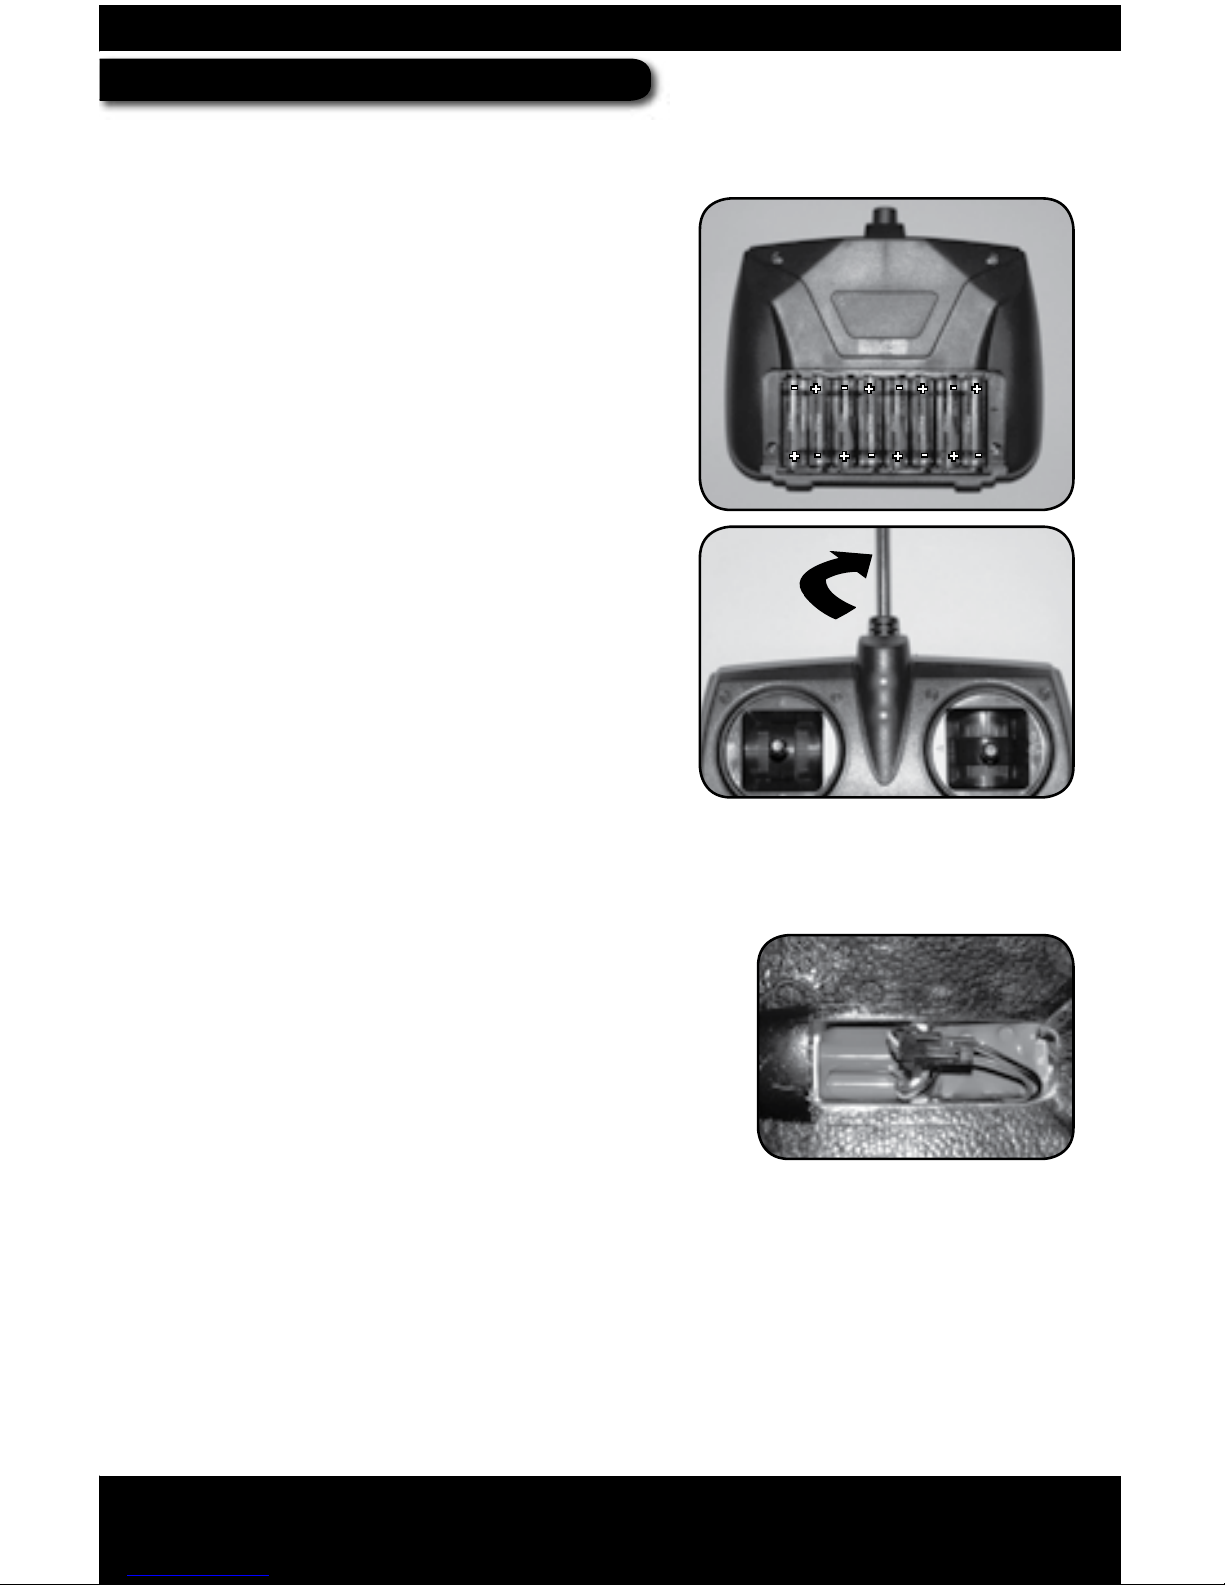
INSTALLING THE BATTERIES
Transmitter requires 8 “AA” 1.5V Alkaline batteries (sold separately)
Remove the battery compartment cover located 1)
on the back of the transmitter by sliding it
down.
Insert 8 “AA” 1.5V Alkaline batteries. Be sure 2)
to match the ‘+’ and ‘-’ polarity symbols in the
transmitter with each battery.
Replace battery compartment cover. 3)
Locate the transmitter antenna, insert it into the 4)
top of the transmitter and tighten it clockwise.
DO NOT over tighten!
Locate the wind direction ribbon and tie one 5)
end to the tip of the transmitter antenna.
Turn the transmitter ‘Power’ switch to the 6)
‘ON’ position. The red and green LED lights
will illuminate. Turn the transmitter off once
complete.
NOTE: If the LEDs do NOT illuminate, DO NOT attempt to fly
your B3. Make sure you are using all fresh alkaline batteries
and check the batteries for correct polarity placement. If the
LEDs still fail, contact Megatech at 1-888-634-2911 for assistance.
Installing the Flight Pack into the Fuselage
1) Locate the release mechanism on the bottom of the
fuselage located directly behind the ON/OFF switch.
2) Once the release mechanism is pushed toward the
front of the plane gently lift and remove the battery
hatch on the top of the B3 fuselage.
3) Place the battery into the fuselage so the side of the
battery with wires is facing the rear of the plane as
shown.
4) Attach the battery connector to the connector inside the fuselage. Make sure all
wires are carefully tucked into the battery compartment.
5) Reattach the battery hatch by inserting the front of the hatch rst into the front of
the nose. Make sure to insert the rear latch into the rear of the hatch correctly.
6) Gently close the hatch cover until the rear and front section of the hatch are secure.
Make sure that the release latch for the hatch on the bottom of the plane is secure
and locked.
Twist
to
Attatch
 Loading...