

Mosquito Trap
Operation Manual
Premier
Pub. No: USA Version P1006
Model MCP800

Contents Page
Important Safety Instructions 1
Introduction 2
Features of Mega-Catch PREMIER Mosquito Trap 2
Initial Set Up Instructions 3
What Your Mega-Catch Mosquito Trap Will Do 4
Installing and Siting the Mega-Catch Mosquito Trap 5-6
Stand Assembly Instructions 7
Operation of the Programmable Timer 8-9
Mosquito Catching Systems 10
Using the Liquid Catch Container 10
Using the Catch Bag 11
Fitting of External Skirt 12-13
Care of Your Trap 13-14
Replacement of U.V. Bulb 14
Mega-Catch Octenol Fragrance Strip 15
Optional Accessories 16
Maintenance and Repair of Your Trap 17-19
Removal of Timer 20
Frequently Asked Questions 21
Problem Solving 22
Specifications 22
Parts List 23

Important Safety Instructions
Do not operate the Trap indoors.
Keep children and pets away from the Trap.
Always disconnect power before cleaning, servicing or inspecting the inside of the Trap.
To avoid injury from the High-Speed Fan inside the Trap, always disconnect power before
opening the Door. Keep the Door locked and remove the Key while the Trap is operating.
Plug the Power Cord into a properly grounded electrical outlet protected from weather.
Do not allow the Trap, Transformer, Power Cord or plug to be immersed in water.
Do not operate the Trap with a damaged Transformer, Power Cord or plug.
Do not use any extension cord other than the Extension Cord supplied with the Trap.
Ensure Power Cords are placed carefully to avoid causing a tripping hazard.
Ensure the Trap is properly installed in accordance with this operation manual.
Read and follow instructions in this operation manual carefully before operating the Trap.
Your Mega-Catch Mosquito Trap should be used in conjunction with other sensible control
measures designed to manage mosquito problems:
Eliminate standing water in low spots, ditches, gutters and similar areas.
Empty receptacles that collect water (e.g. bird baths and pot plant saucers).
Reduce breeding sites by keeping grass mown.
Mosquito netting/screens can be used to provide mosquito-free areas.
Light coloured clothing is less attractive to some mosquito species and if tightly woven,
can give some protection against biting.
DEET is considered the most effective mosquito repellent, but should not be used too
heavily.
1

Introduction
Mosquitoes have been described as the most dangerous creatures on Earth.
Aedes mosquitoes may carry yellow fever and dengue fever. Culex mosquitoes may carry several
strains of encephalitis (including St. Louis Encephalitis, Eastern Equine Encephalitis and West
Nile Virus), and Anopheles mosquitoes may carry malaria.
Male mosquitoes do not bite. The real risk is from female mosquitoes which bite when in search
of blood to provide protein for their eggs.
Scientific research over the past 50 years has shown that female mosquitoes find their prey
using a combination of sensory cues including light, shape, color, heat, vibration, sweat and
other by-products of human activity.
Using that research and with the benefit of extensive field testing (including tests by the United
States Department of Agriculture in Gainesville, Florida), Mega-Catch has developed one of
the worlds most advanced mosquito traps: the Mega-Catch PREMIER Mosquito Trap.
Features of Mega-Catch PREMIER Mosquito Trap
The Mega-Catch PREMIER Mosquito Trap has been designed for indoor or outdoor use.
(NOTE: when operating the PREMIER Trap indoors, remove the Mega-Catch Octenol Fragrance
Strip.)
The PREMIER can operate unattended for long periods. It can be programmed to start and stop
according to peak mosquito activity in your area. It features an electronically controlled diode
lighting system that produces intermittent light at oscillating frequencies selected to coincide
with spectral sensitivity peaks for many mosquito species. It also features a low-intensity U.V.
or black light bulb.
Mosquitoes attracted to the PREMIER by visual and other cues seek to land on and probe
specially designed surfaces and enter the Trap where they are collected in the Catch Bag or
Liquid Catch Container.
2

Initial Set Up Instructions
Before attempting operation of your PREMIER Trap, follow these instructions:
1. Remove the Trap from the carton.
2. Remove the box containing the Stand from the carton.
3. Assemble the Stand (see Page 7 - Stand Assembly Instructions section).
4. Remove the box marked Accessories from the base of the carton.
5. Fit the External Skirt to the outside of the Trap by sliding the skirt on from the top of
the Trap so that the opening is directly in front of the Door (see Page 12 - Fitting of
External Skirt section).
Note: Failure to position the Skirt correctly will result in a NIL mosquito catch.
6. Your PREMIER Trap has two mosquito collection methods: a dry-catch system using
a Catch Bag and a wet catch system using a Catch Container. In most circumstances
the wet-catch system offers superior catch performance to the dry-catch system. The
dry-catch system using the Catch Bag is better for mosquito species identification.
7. If you wish to catch mosquitoes using the Catch Bag, then attach the Catch Bag to the
base of the Fan inside the Trap. The Catch Bag has an elastic top to facilitate attachment
(see Page 10 - Mosquito Catching Systems section).
8. If you wish to catch mosquitoes using the wet-catch system, fill the Liquid Catch
Container two-thirds full with fresh water. Add 2 or 3 drops of liquid detergent / soap
to break the surface tension of the water. Also add 3 or 4 teaspoons of a non-diet
(sugar-based) soft drink. Then place the Liquid Catch Container in the Trap using the
locating feet on its base.
9.. Remove the Mega-Catch Octenol Fragrance Strip from its pouch being careful not to
touch the exposed holes on its surface. Place the strip inside the Trap (see Page 15 Mega-Catch Octenol Fragrance Strip section).
Wash your hands after this procedure has been completed.
10. Reinstall the Door by locating the base of the Door in the Trap and then pushing firmly
until Door clicks into place. Lock the Door using one of the two Keys provided with the
Trap and then remove the Key. (NOTE: Removing and reinstalling the door is designed
to require a reasonable amount of force to make it difficult for children.)
11. Hang the Trap from the hook on the Stand
Instructions. To achieve this, hold the Trap in an upright position so that the top of the
Trap is next to the hook on the stand. Then swing the bottom of the Trap outwards
(through an arc of about 45 degrees) and you will see that the top of the Trap will fit
through the gap in the hook. This is a design feature to prevent the Trap falling off the
stand accidentally.
in the direction shown in the Stand Assembly
3

12. Your PREMIER Trap comes with a low-voltage transformer and a 60-foot (18-meter)
low-voltage extension cord with weatherproof connectors. Plug the extension cord into
the Trap connection turning the connector clockwise until tight. Plug the extension
cord into the transformer cable turning the connector clockwise until tight.
Then plug into the power supply.
(NOTE: The connectors are designed to be a tight fit to ensure that they are weatherproof.)
13. Turn on the power. A display should appear on the face of the Timer. (If it does not,
see Page 8 - Operation of the Programmable Timer section). Set the Timer to "ON" for
continuous running or to "AUTO" to program operating times. See Page 8 - Operation
of the Programmable Timer section for programming instructions.
14. When the Trap is operating, the Fan should be running, the four diode lights should be
flashing intermittently and the U.V. Bulb light should be on. If the Trap is not operating
correctly then re-read these instructions or refer to Page 22 - Problem Solving section
or email us at info@megacatch.com.
What Your Mega-Catch Mosquito Trap Will Do
Your Mega-Catch Mosquito Trap is designed to reduce mosquito populations, but it will not
permanently eliminate them. Operate the Mega-Catch Mosquito Trap daily for several weeks.
Over this time you should notice a decline in mosquito numbers. This means your Trap is doing
its job.
The Mega-Catch Mosquito Trap is not designed to compete with humans in close proximity
eg: at a barbecue. If you are planning an outdoor function, operate the Trap for several days
before the function.
NOTE: Your Mega-Catch Mosquito Trap should be used in conjunction with other sensible
control measures designed to manage mosquito problems.
4
Installing and Siting the Mega-Catch Mosquito Trap
Installation of Trap:
Your Mosquito Trap comes fully assembled. To install, first follow the instructions
on Page 3
- Initial Set Up Instructions section.
The Initial Set Up Instructions assume that you have decided to install your Mega-Catch
Mosquito Trap on the Stand that is supplied with the Trap.
Alternatively you may decide to hang the Trap from a tree or a fixed post using a chain, nylon
rope or wire connected to the attachment hole at the top of the Trap. We recommen a height
of around 3 feet (1 meter) from the ground to the top of the Mega-Catch Mosquito Trap.
However, you may need to adjust the Traps height depending on the type of mosquitoes you
are catching.
Your Mega-Catch Mosquito Trap is supplied with a 60-foot (18-meter) low-voltage extension
cord with weatherproof fittings. To avoid the cord posing a tripping hazard or being damaged,
(e.g. by a lawn mower) we recommend that, if possible, it be placed 2-3 inches (50-75 mm)
underground. This can be easily achieved by using a spade which is inserted into the ground
and moved backwards and forwards to create a shallow slit trench into which the cord can
be pushed before the ground is replaced by standing on the top of the slit trench.
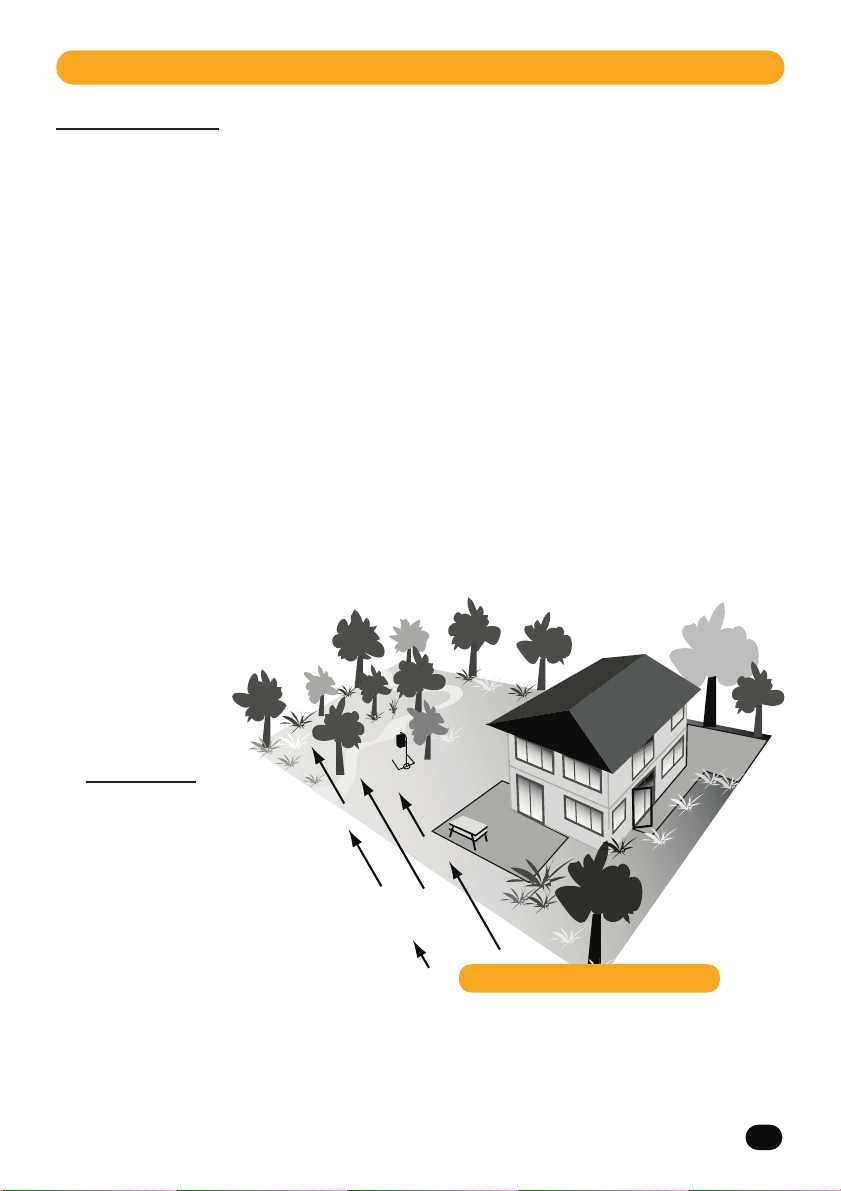
Mosquito
source
Siting of Trap:
Tra p
Prevailing
Wind Direction
FIG 1 - Trap Positioning
For the best performance from your Mega-Catch Mosquito Trap, first determine the source
of the mosquito nuisance (Mosquitoes breed in wet areas like streams, marshland,
5

wooded areas and gardens). Then use these rules to site the Trap:
Rule 1: Place the Trap between the mosquito source and areas of human activity.
Rule 2: Place the Trap as far away from people and as close to the mosquito source as possible.
(Attract them to the Trap and not to you.)
Rule 3: Place the Trap upwind of the mosquito source but only if you can comply with Rule
1. (Mosquitoes sometimes use the wind to navigate.)
Rule 4: Place the Trap in a predominantly shaded area. (Most mosquitoes avoid direct sunlight.)
Rule 5: Place the Trap in a location protected from rain and strong wind. (Mosquitoes dont
fly in strong winds.)
Rule 6: If severe weather conditions are predicted then store the Trap out of the weather.
For maximum stability, point the small "U" shaped leg at the back of the Stand into the
prevailing wind and pin the base to the ground using the wire staples supplied with the Stand.
While your Mega-Catch Stand is zinc-plated and powder-coated, when not in use, we
recommend that it be stored out of the weather.
6

Stand Assembly Instructions
To assemble the Stand supplied with the Trap, follow the instructions shown in figure 2 below.
Fix external skirt then tip the Trap on its side and slide onto hook.
U.S. Design Patent No 449,091
Wind
direction
Fit top section over bottom section of upright - then fit bolt
and tighten firmly
FIG 2 - Trap Assembly Instructions
Assemble stand base components as illustrated here - fit all bolts and
washers before tightening bolts firmly. Screw feet into bottom of stand base.
3 x 4" Wire staples are supplied to secure frame to ground.
NOTE: For optimum performance place the trap in a predominantly shaded area (located between
your dwelling and the source of the mosquitoes) which is protected from rain and wind. (Mosquitoes
do not fly in strong winds or severe weather conditions.)
For maximum stability the 'U' shaped leg at the back of the stand should be pointed in the direction
of prevailing winds. The wire staples supplied with the trap (or a cinder block placed on the back of
the stand) can be used to increase stability.
7

Operation of the Programmable Timer
Your Mega-Catch Mosquito Trap is equipped with a high tech Programmable Timer. The Timer
enables you to program the Trap to operate at times when mosquitos are most active in your
area.
The timer is equipped with an automatically recharging battery. This battery can operate for
up to three months when fully charged. Your Mega-Catch Mosquito Trap may need several
hours of running to charge up the battery upon initial use.
NOTE: If no display appears on the Programmable Timer when the power is switched on, the
battery may be discharged. To fully recharge the battery, run the Trap for 24 hours.
You can choose to operate the Mega-Catch Mosquito Trap in 3 ways:
1. ON The Mega-Catch Mosquito Trap will run 24 hours a day while connected to a
power source.
2. OFF the Mega-Catch Mosquito Trap will not operate.
3. AUTO you can program when the Mega-Catch Mosquito Trap will start and stop.
How to Program:
FIRST SET THE TIME.
To set the day and time, press and hold the CLOCK button while
pressing the DAY or HOUR or MINUTE button (as the case
requires). This is the only function that requires two buttons to
be pressed at once.
THEN PRESS PROGRAM TO START PROGRAMMING.
Start time program 1. Enter start time with HOUR/MINUTE
buttons. For 7 days per week operation select the DAY display,
which shows all 7 days.
For individual day operation select the DAY display desired, e.g.
Su for Sunday.
THEN PRESS PROGRAM.
Stop time program 1. Enter stop time with HOUR/MINUTE buttons.
THEN PRESS PROGRAM.
8
Mega Catch
AM
12:33
R
FIG 3.1
Mega Catch
Mo Tu We Th Fr Sa Su
AM
_ _ _ _
ON
1
R
FIG 3.2
RESET
RECALL
RESET
RECALL
Fr
33

Start time program 2. Enter start time with
HOUR/MINUTE buttons.
THEN PRESS PROGRAM.
Mega Catch
Mo Tu We Th Fr Sa Su
AM
_ _ _ _
1
OFF
Stop time program 2. Enter stop time with
HOUR/MINUTE buttons. To enter more programs (up to 6)
repeat previous steps.
THEN PRESS CLOCK TO RETURN TO NORMAL OPERATION.
R
FIG 3.3
Mega Catch
Mo Tu We Th Fr Sa Su
AM
_ _ _ _
ON
2
R
FIG 3.4
Mega Catch
Mo Tu We Th Fr Sa Su
AM
_ _ _ _
2
OFF
R
RESET
RECALL
RESET
RECALL
RESET
RECALL
Press the ON/AUTO/OFF button to change position of the
mode indicator.
ON = system will be operating at all times.
AUTO = system will be operating only during programmed
times.
OFF = system will not operate at all
NOTE: If the Trap does not operate when the program mode
is set to AUTO it may be in "stop time program." To check,
switch the program mode to ON, which should start the Trap,
before returning the program mode to AUTO.
FIG 3.5
Mega Catch
AM
12:33
R
FIG 3.6
RESET
RECALL
Fr
33
9

Mosquito Catching Systems
Your Mega-Catch Mosquito Trap comes complete with a Catch Bag and a Liquid Catch
Container. You may choose to collect mosquitoes using either of these systems. Our research
has shown the Liquid Catch Container system to be more effective. This is because when the
Mega-Catch Mosquito Trap is operated using a Liquid Catch Container, the air plume emanating
from the bottom of the Trap is humidity enriched. Depending on local temperatures, evaporation
may mean that it is necessary to replenish water in the Liquid Catch Container weekly or even
more frequently. The Catch Bag system requires less frequent attention and therefore may be
your preferred mosquito catching system. Smaller biting insects (eg: no-see-ums) are best
caught using the Liquid Catch Container because the mesh size on the standard Catch Bag
may be too large to capture them.
Using the Liquid Catch Container
To prepare your Mega-Catch Mosquito Trap, follow these steps:
1. Ensure that the Trap is switched off by disconnecting the power (Attention: High-
Speed Fan inside the Trap may cause injury if the power is not disconnected.)
2. Unlock and remove the Lockable Door.
3. Slide the Liquid Catch Container out from beneath the Fan. This container has locating
feet on its base.
4. Fill the container with water until it is approximately two-thirds full. Add 3 or 4 drops
of liquid detergent/soap and stir thoroughly. This breaks the surface tension of the water
ensuring that mosquitoes drown upon capture.
5. Add 3 or 4 teaspoons of a non-diet (sugar-based) soft drink. This duplicates the fructose
content of nectar on which mosquitoes feed.
6. Reinstall the Liquid Catch Container into the Mega-Catch Mosquito Trap. Replace and
lock the Door and remove the Key for child safety. Reconnect power.
7. Before removing the Liquid Catch Container, remember to disconnect the power to your
Mega-Catch Mosquito Trap so that the Fan is not operational. Dispose of the contents
well away from your dwelling so as to not attract ants.
It may be necessary to replenish or replace the water solution in the Liquid Catch
Container at weekly or more frequent intervals to take account of evaporation. This will
depend on relevant climatic conditions.
10

Using the Catch Bag
To prepare your Mega-Catch Mosquito Trap, follow these steps:
1. Ensure that the Trap is switched off by disconnecting the power (Attention: High-
Speed Fan inside the Trap may cause injury if the power is not disconnected.)
2. Unlock and remove the Lockable Door.
3. Reach inside the Trap and stretch the open neck of the Catch Bag around the corners
of the base of the Fan just above the Fan Safety Guard (see figure 4). The Catch Bag
has an elastic neck to facilitate attachment.
4. Replace and lock the Door and remove the Key for child safety. Reconnect power.
5. Before removing the Catch Bag, remember to disconnect the power to your MegaCatch Mosquito Trap off so that the Fan is not operational. Then pull the drawstring
tight so that any mosquitoes that remain alive cannot escape. Crush the top of the
Catch Bag down on its base to kill any mosquitoes that do remain alive. Dispose of the
contents well away from your dwelling so as not to attract ants.
Mosquitoes collected in the Catch Bag will usually die very quickly without access to
moisture. In cooler climates they may live for a longer period. In times of heavy infestations
of mosquitoes, it may be necessary to empty the Catch Bag on a regular basis in order
to ensure optimum operation of the Trap.
FIG 4 - Fitting of Catch Bag
Stretch open neck of
Catch Bag over corners
of fan housing base.
Trap
Fan Housing
Catch Bag
Catch Bags should be hand washed in warm soapy water from time to time. Catch Bags are
a consumable item and replacements are available from your Authorized Distributor.
11

Fitting of External Skirt
Your Mega-Catch Mosquito Trap comes with an External Skirt which fulfils two important
functions. First its color and texture provides a visual attractant for several species of mosquitoes.
Secondly, it acts as a baffle directing the air plume out of the bottom of the Trap.
There are two methods which you can use to fit the Skirt (Method One is the easiest):
Method One:
1. Place the Mega-Catch Mosquito Trap on a table or other flat surface.
2. Slide the Skirt on from the top of the Trap (over 2 corners initially) with the elastic band
at the top.
3. The Skirt is properly fitted when the elastic band is seated over the lower horizontal
rib, just below the inlet holes (see figure 5). The opening in the Skirt should be located
at the front of the Trap so as to facilitate removal of the Door without having to remove
the Skirt. The hook-and-loop fastening on this opening should be closed when the Trap
is running.
12
U.S. Design Patent No 449,091
FIG 5 - Fitting External Skirt
External Skirt
Hook-and-loop fastening

Method Two:
1. Hang the Mega-Catch Mosquito Trap from the Stand (see Page 4 - Initial Set Up
Instructions section - paragraph 11).
2. Slide the Skirt up from the bottom of the Trap (over 2 corners initially) with the elastic
band at the top.
3. The Skirt is properly fitted when the elastic band is seated over the lower horizontal
rib, just below the inlet holes (see figure 5). The opening in the Skirt should be located
at the front of the Trap so as to facilitate removal of the Door without having to remove
the Skirt. The hook-and-loop fastening on this opening should be closed when the Trap
is running.
NOTE: Failure to position the skirt correctly will result in a NIL mosquito catch.
The Skirt is not manufactured from a U.V.-resistant material but this will not be an issue if
the Trap is operated in shaded conditions as recommended. The Skirt can be reversed should
one side begin to fade from exposure to U.V. light. The Skirt is a consumable item and
replacements can be obtained from your Authorized Distributor.
Care of Your Trap
Your Mega-Catch Mosquito Trap requires very little maintenance. The Catch Bag and Liquid
Catch Container should be cleaned and washed when required. Heavy catches of mosquitoes
may result in a build-up of material in the internal casing and blade tips of the Fan. There may
also be a build-up of material on the Fan Safety Guard. If this happens use the following
cleaning technique:
1. Ensure the power to your Mega-Catch Mosquito Trap is disconnected. (Attention:
High-Speed Fan inside the Trap may cause injury if the power is not disconnected.)
2. To remove the Trap from the Stand, tip the Trap on its side and slide if off the hook.
3. Unlock and remove the Lockable Door. Then lay the Trap on its side with the Door
opening being face up.
4. Reach inside the Trap and remove the Fan Safety Guard (attached to base of Fan) by
turning it counterclockwise (see figure 6).
5. Using a small sponge or toothbrush and warm soapy water, reach into the Trap and
carefully clean the inside casing of the Fan and the Fan Blades.
6. Ensure that water is not allowed to enter into the Fan Motor. Never hose water into
the Fan.
7. Clean and then replace the Fan Safety Guard.
8. Leave the Trap to dry for at least 24 hours before reinstalling it on the Stand and
recommencing operation.
13

FIG 6 - Removal of Fan Safety Guard
Bottom plate
Lug
To remove safety guard,
turn counterclockwise
until lugs release.
To fit, align 4 lugs on
fan housing with 4 slots
on safety guard, then turn
clockwise until tight.
Rotate clockwise to fit
and tighten
Slot
Lug
Lug
Slot
Lug
Slot
Slot
Rotate counterclockwise
to remove
The casing of your Mega-Catch Mosquito Trap is made from polypropylene, which is extremely
strong and durable. Its appearance is best maintained by a plastic protector of the type used
on plastic car fenders. Do not use wax.
In order to prolong the life of your Mega-Catch Mosquito Trap store it and the Mega-Catch
Stand in a dry place when not in operation. Your Mega-Catch Mosquito Trap should be
serviced at the end of each season (see Page 17 - Maintenance and Repair of Your Trap
section).
Replacement of U.V. Blub
The U.V. Bulb is a consumable item and replacements can be obtained from your Authorized
Distributor. To install a new U.V. Bulb refer to Page 17 - Maintenance and Repair of Your
Trap section.
14

Mega-Catch Octenol Fragrance Strip
Some, but not all, mosquito species are attracted to minute quantities of a chemical called
octenol (1-OCTEN-3-OL). Each Mega-Catch Mosquito Trap comes with a Mega-Catch
Octenol Fragrance Strip. NOTE: When operating the PREMIER Trap indoors DO NOT USE a
Mega-Catch Octenol Fragrance Strip.
To install or replace the Octenol Fragrance Strip:
1. Ensure the power to your Mega-Catch Mosquito Trap is disconnected.
2. Unlock and remove the Lockable Door.
3. Remove the Mega-Catch Octenol Fragrance Strip from its pouch and be careful not
to touch the exposed holes on its surface. Place the strip inside the Trap in the position
shown in figure 7 below. Replace and lock the Door and remove the Key for child safety.
Reconnect power. Wash your hands after this procedure has been completed.
FIG. 7 Placement Position for Mega-Catch Octenol Fragrance Strip
Octenol Fragrance Strip
Trap
Place Mega-Catch Octenol Fragrance Strip in the trap as shown.
Slot
Mega-Catch Octenol Fragrance Strips should be effective for up to 30 days depending on
weather conditions. Mega-Catch Octenol Fragrance Strips are a consumable item and
replacements can be obtained from your Authorized Distributor.
NOTE: Octenol can improve the rate of capture of some mosquito species. Other species [e.g.
the Asian Tiger Mosquito], may not be attracted - or even repelled- by octenol. You should
determine what is best in your area by experimenting without the Mega-Catch Octenol
Fragrance Strip in place.
ATTENTION: Keep Mega-Catch Octenol Fragrance Strips out of reach of children. Read
directions and Important Safety Instructions carefully before use.
15

Optional Accessories
1. Battery Terminal Power Cable
The Mega-Catch Mosquito Trap can be operated using a 12-volt car battery as a power source.
Your Authorized Distributor can supply a factory-approved Power Supply Cable complete with
positive and negative alligator clips.
NOTE: Failure to connect the red positive + connector to the positive battery terminal and
the black negative to the negative battery terminal can result in major damage to your MegaCatch Mosquito Trap and may void your warranty.
2.
Cigarette Lighter/Car Accessory Terminal Cable
The Mega-Catch Mosquito Trap can be operated from your vehicles accessory terminal using
the factory-approved Accessory Cable. Your Authorized Distributor can supply a factoryapproved Accessory Cable.
NOTE: Failure to use only the factory-supplied Cable could result in damage to your MegaCatch Mosquito Trap and may void your warranty.
16

Maintenance and Repair of Your Trap
Opening the two halves of the Mega-Catch mosquito Trap will be necessary for the following
purposes:
Replacement of U.V. Bulb (The U.V. Bulb should last for approximately two mosquito
seasons, but, as with all light bulbs, life expectancy is variable depending on actual
usage and climate.)
Annual service (At the end of each season, the Internal Plates, heated reflective surface
and Fan should be cleaned using warm soapy water and allowed to dry thoroughly.)
Battery removal (The Programmable Timer contains a Nickel-Cadmium Battery. This
must be disposed of correctly when the Trap reaches the end of its life.)
Opening the Trap (refer to figure 8.1):
ATTENTION: Always disconnect the power to your Mega-Catch Mosquito Trap before
opening the Trap.
The two halves of the Trap are held together with 12 stainless-steel screws and nuts - six
facing one way and six the other way.
Place the Trap on a table ensuring the Programmable Timer is on the side facing down. Remove
the six screws facing toward you using a hex-head screwdriver.
Then turn the Trap over (so that it is "timer-side" up) and remove the remaining six screws and
nuts.
Then lift the top half of the Trap away from the bottom half as if it was hinged at the top. The
top half should now be "timer-side" down on the table and still connected to the bottom half
by electrical cables.
The Top Plate holds the Mega-Catch Control Box (upperside of Top Plate) and the U.V. Bulb
and holders (underside of Top Plate). (NOTE: the Mega-Catch Control Box is a sealed unit
and must not be opened.)
The Bottom Plate holds the heated reflective surface (upperside of Bottom Plate) and the Fan
(underside of Bottom Plate).
17

Replacement of U.V. Bulb (refer to figure 8.2):
Remove the U.V. Bulb by twisting the tube gently until it is able to be removed. Then slot a
new U.V. Bulb into the connector ends and twist the tube gently until it is firmly in position.
Reinstallation of Plates:
You should not have any reason to remove the plates from the Trap. If however you do, merely
slot the plates back into the ribs so that the Control Box is on the upper-side of the Top Plate
and the Fan is on the under-side of the Bottom Plate. There are arrows on each plate that
points to the back of the Trap (i.e. the half that does not contain the Timer) when the plates
have been properly installed.
Connection of Wires:
You should not have any reason to remove any of the electrical connections except as part
of the battery disposal process (see Page 20 - Removal of Timer section). All electrical
connections are by push-in pin connectors. Provided these are not forced it is not possible to
plug any connector into the wrong connector hole.
There are three connector holes on the underside of the Top Plate. The two smaller two-pin
connector holes are for the Fan and Heater Cables. These two connections are interchangeable
so it doesnt matter which of these two connector holes the Fan and Heater are plugged into.
The third connection on the underside of the Top Plate is a three-pin hole and fits only the
U.V. Bulb Connection Cable. The connection holes into the Control Box on the upperside of the
Top Plate are all different sizes and fit the remaining cables.
Re-assembly of Trap:
With the Top and Bottom Plates in place replace the "timer-side" or top half of the Trap ensuring
that each plate slots into the locating ribs. The 12 screw holes should now be aligned for
replacement of the screws and nuts. Hold the nuts into the pre-formed hexagonal holes and
carefully screw in the screws.
(NOTE: Do not overtighten the screws. This could cause the nuts to rotate and damage the
pre-formed hexagonal fittings in the plastic housing.)
18

FIG. 8.1 Opening the PREMIER Trap
U.V. cable plugs into
3 pin socket on
underside of top plate
Fan cable plugs into 2 pin
socket on underside of top plate
Heater cable plugs into 2 pin
socket on underside of top plate
Top plate
mounts into
top slot in body
Control Box
Timer cable
plugs into
Control Box
Power cable
plugs into Control Box
Bottom plate
mounts into
lower slot in body
Light fittings
UV Bulb
Turn to remove
Top Plate
FIG. 8.2 Replacement of U.V. bulb
19

Removal of Timer
The Mega-Catch Mosquito Trap contains one Nickel-Cadmium Battery, which is used to
energize the Programmable Timer. This battery is fitted in a sealed compartment at the rear
of the Timer Unit. This battery must be recycled or disposed of properly.
To Remove the Timer Unit (refer to figure 8.3):
Having opened up the two halves of the Trap:
1. Disconnect the cables from the Timer to the Mega-Catch Control Box by pulling the
Timer Cable Pin from the Control Box
2. Using either your fingers or a screwdriver, lift up the two locating arms at the top and
bottom of the Timer and then push the Timer Unit out from the inside of the Trap.
Back of Timer
Retaining clip
Spread retaining clips each side of timer
with flat screwdriver
Once released, push unit
out through trap body.
Retaining clip
FIG. 8.3 Removal of Timer Unit
Disposal of Timer
It is illegal in many states and environmentally undesirable to dispose of the Timer Unit
containing the battery in municipal trash. A fee has been paid to the Rechargeable Battery
Recycling Corporation (RBRC) to collect these batteries and recycle them rather than incinerate
or bury them. For information on our battery recycling program, call our toll-free consumer
assistance number 1-800-231-9786 or call RBRC at 1-800-822-8837 for instructions on proper
disposal.
20

Frequently Asked Questions
1. Will my Mega-Catch Mosquito Trap permanently eliminate mosquitos in the area?
No. There is no single silver-bullet to eliminate mosquitos. The best you can do is devise an
effective mosquito management plan for your area, using the best available control strategies,
including one or more Mega-Catch Mosquito Traps.
2. How often do I need to operate my Mega-Catch Mosquito Trap?
Before using your Mega-Catch Mosquito Trap note the time of day when mosquito activity
is greatest. If, for example, this is in the morning and the evening, then you should set the Trap
(using the Programmable Timer) to operate at these times. Where your mosquito problem
involves night time biters, we recommend operation of the Trap between 7pm and 11pm and
4am and 8am. If mosquito activity is all day, then you may need to operate the Trap 24 hours
per day until the mosquito population declines.
3. Is the Mega-Catch Mosquito Trap harmful to me or my pets?
No. The Mega-Catch
provided it is operated in accordance with the instructions in this operation manual. Ensure
you read the Important Safety Instructions at the start of this operation manual. Do not operate
the
PREMIER Trap indoors without first removing the Octenol Fragrance Strip.
4. How many traps should I buy for around my house?
This depends on the size of your property. Generally we recommend one or two Traps depending
on the number and location of mosquito breeding areas on your property. A Mega-Catch
PREMIER Mosquito Trap can, in favorable weather conditions, attract mosquitoes from up to
120 feet away.
PREMIER Mosquito Trap can be used around humans and pets
5. Will Mega-Catch Mosquito Traps catch biting flies?
The Mega-Catch
(no-see-ums) and some other biting insects.
6. Can I stop my Mega-Catch Mosquito Trap from catching moths?
The Mega-Catch Mosquito Trap incorporates a low-intensity U.V. Bulb that emits light at a
frequency that our research has shown to attract certain mosquito species. Unfortunately it
can also attract small quantities of non-target species like moths. If this is a problem, the
Fluorescent U.V. Bulb can be removed (refer to Page 17 - Maintenance and Repair of Your
Trap section).
PREMIER Mosquito Trap will catch sandflies, black flies and biting midges
21

Problem Solving
If your Mega-Catch Mosquito Trap fails to operate:
Check that the Power Cable is properly connected to both the Trap and the mains, and
that the power is switched on.
Check that the power cable has not been damaged, e.g. by a lawn mower or animals
(squirrels, dogs or racoons).
Check that the Programmable Timer is set to the "ON" position.
Check that the Programmable Timer, if set to AUTO, is set to operate at the time you
are checking its operation.
If these steps fail then email us at info@megacatch.com - or call the Service Centre number
shown on the separate Warranty Certificate.
If the lights in the Mega-Catch Mosquito Trap come on but the Fan fails to operate:
Check whether there has been a build up of material in the Fan and/or Fan Safety Guard
which is preventing the Fan blade from turning (Refer to Page 13 - Care of Your Trap
section).
If these steps fail then email us at info@megacatch.com - or call the Service Centre number
shown on the separate Warranty Certificate.
NOTE: Do not attempt to access the internal electronic components of your Mega-Catch
Mosquito Trap. Opening of sealed units will void your warranty.
Need Help?
For service, repair or any questions concerning Mega-Catch products, email us at
info@megacatch.com - or call the Service Centre number shown on the separate Warranty
Certificate. Do NOT return products to the place of purchase. Do NOT return products to an
Authorized Distributor. You may also want to consult our website: www.megacatch.com.
Specifications
Power Source AC Adaptor YL-25-12
CSA Listing E207075 37XZ
Input 120V AC 60Hz
Output 12V AC 2.08A 25W
22
U.S. Design Patent No: 449,091
U.S. Patent No: 6,199.316
U.S. Trade Mark Reg. No: 2,679,688

Parts List
19
1
2
1
9
0
,
9
4
4
o
N
t
n
e
t
a
P
n
g
i
s
e
D
.
S
.
U
3
4
6
7
10
9
Cross-section, side profile
20
11
14
15
16
Description Part No.
449,091
nPatentNo
Desig
U.S.
1. Mega-Catch Premier Mosquito
Trap MCP-800
2. Programmable Timer MC-P01
3. Key MC-PU208
5
4. Lockable Door MC-PU203
5. External Skirt MC-PU112
6. Power Connection
7. Control Box MC-PU05
8. Top Plate MC-PU205
2
8
12
13
9. Light emitting Diodes
10. Internal Power Plugs
11. UV Tube MC-PU2
12. Reflective Surface MC-PU211
13. Bottom Plate MC-PU206
14. Fan Unit MC-PU210
15. Fan Safety Guard MC-PU209
16. Catch Bag MC-PU111
18
17. Liquid Catch Container MC-PU204
18. Octenol Fragrance Strip MC-PU224
19. 60ft Extension Cord MC-PU7
20. Transformer MC-P20
16
17
15
14
11
18
23

info@megacatch.com www.megacatch.com
Mega-Catch
Product made in China for:
Envirosafe Technologies NZ Limited
16th Floor, 120 Albert Street
Auckland, New Zealand
Pub. No. USA P1006
Printed in China
is a trademark of Envirosafe Technologies NZ Ltd.
 Loading...