

Page 1
Monopod / Walking Stick
Thank you for making MeFOTO your choice for professional photographic
equipment. your MeFOTO gear is manufactured to provide years of
dependable service. In order to obtain optimum satisfaction and
performance, we suggest that you carefully read these instructions.
R
独脚架/手杖
感谢您 选用美孚专 业摄影器材 ,美孚产品 提供值得您 信赖的售后 服务。为了 让您对美孚
产品的 使用更加满 意,我们建 议您仔细阅 读下面的使 用说明。
使用方法
www.m ef oto.com
Page 2
R
1 2
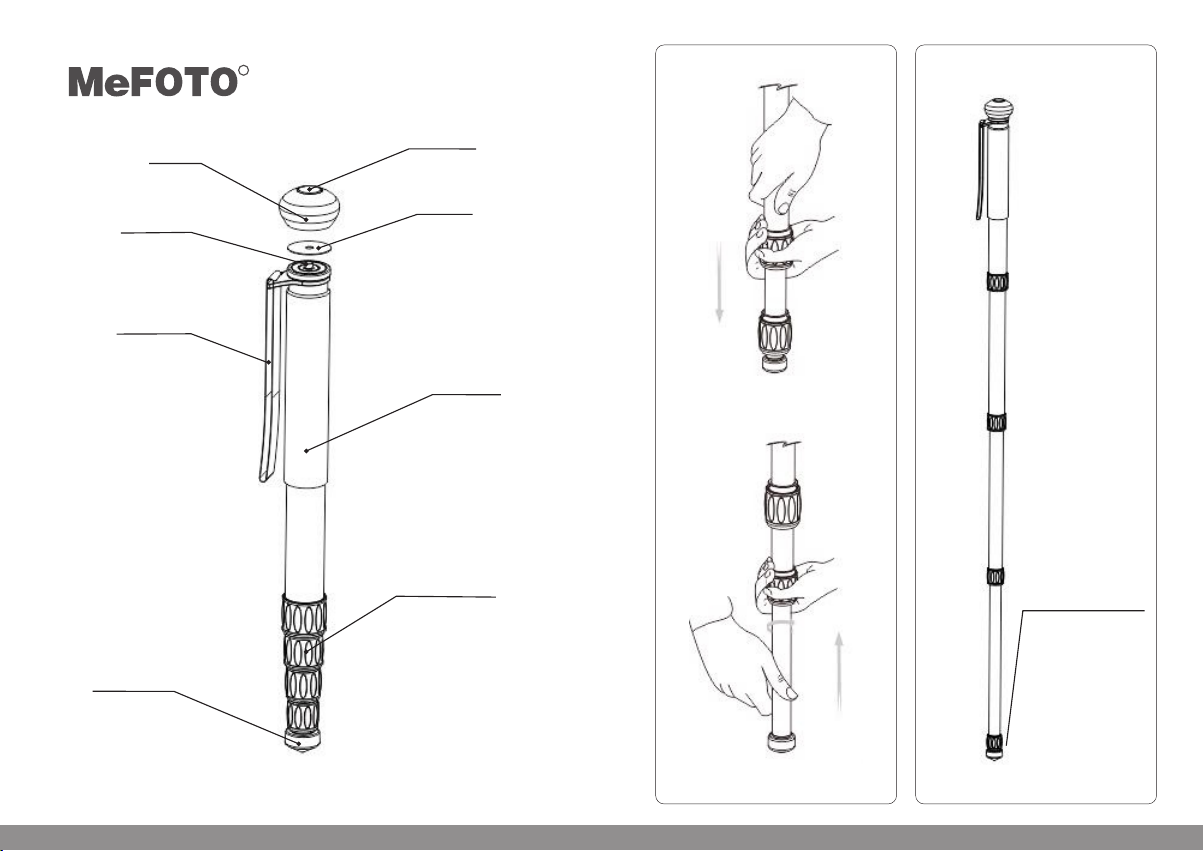
相机螺丝
Top Pla te
Mount Screw
手挽带
Wri st S tr ap
橡胶脚垫
Rubber Foot
手柄
Knob
指南针
Compass
垫片
Head
Protector Pad
海绵套
Closed Cell
Foam Grip
脚管锁紧旋钮
Leg Lock Grip
拐杖 模 式 :该 模 式 下
不伸 尾 管 。
Wal kin g St ic k
Mode- No te: S ma llest
diame te r leg s ec tion
not ext en ded .
www.m ef oto.com2 3
Page 3

MO NO PO D OPE RATIO N
Befor e using you r Monopod , adjust ea ch Leg Se ct ion to th e desired h eight.
Make su re that the M onopod is f irmly res ting on a sta ble sur fa ce and, w it h the Hea d
Prote ctor Pad in p lace moun t your came ra secu re ly on the Top P late by s cr ewing i t
on secu rely, bu t not too tig htly.
If you ar e using a sep arate Tilt He ad or Bal lHead, ma ke sure it is t ightly sc rewed on
to the Top Plate fir st. Always e ngage any s afety loc ks on the Hea d to prev en t any
accid ental dis mountin g.
FOR BES T RESULTS: Do not r aise the Mo nopod h ig her tha n ne cessa ry and exte nd
the lar gest diam eter Leg Se ctions fi rst.
NOTE: N ever carr y your Mono pod wit h ca mera ge ar a ttach ed.
Leg Sec tion Adjustm ent (FIGU RE 1)
Each Le g section c an be adjus ted to the de sired l en gth by tu rn ing the L eg Lock Gri p
1/2 tur n (180°) cl ockwise u ntil the Le g is free t o sl ide in or o ut . Once th e desired
lengt h is achiev ed, turn th e Leg Lock Gr ip coun te r-clo ck wise un ti l the Leg S ection
is secu rely lock ed. Repea t this step f or each Leg s ectio n un til the M on opod is s et t o
the des ired heig ht.
NOTE: To prevent a ny accide ntal dama ge to your ge ar, always r emove any
mount ed equipm ent (came ra, etc.) f rom the M on opod be fore adju sting the L eg
Secti ons.
WALKIN G STICK OPE RATION ( FIGUR E 2)
Befor e using you r Wal king Stic k, adjust a ll but the bo ttom Le g Se ction t o the
maxim um height . For most pe ople this w ill posit ion the Walkin g Stick a t th e optim um
level b ut you may re quire fur ther fine a djustme nt base d on p erson al p refer ence.
Make su re that the Top Grip/C ompass (w ith the Hea d Prote ct or Pad in p la ce) is
mount ed secure ly on the Top Plate.
FOR BES T RESULTS: Do not r aise the Walki ng Stick hi gher th an n ecess ar y and
exten d the large st diamet er Leg Se ct ions fi rs t.
USER NOTICE
Do not ex ceed the ma ximum spe cified lo ad capaci ty
(see sp ecifica tions on th e package l abel or vis it www.m ef oto.c om ).
Alway s ensure th at Leg and He ad Lock s ar e tight ly e ngage d be fore
mount ing any gea r on your Mon opod.
Do not us e any Monop od below te mpera tu res of −4 °F o r above + 158°F
(−20° C / +70°C).
Alway s clean and d ry any Mono pod after i t has bee n ex posed t o we t,
dusty, sandy or s alty cond itions. You r Monopod i s not recom mended fo r
use in sa lt water. If r equired , clean Mon opod us in g a mild so ap s oluti on
appli ed with a sof t cloth, ri nse with fr esh wat er a nd dry wi th s oft tow el.
Remov e any dust, d irt or sand f rom all Leg L ocks, L eg S ectio ns a nd all
movin g parts.
Do not le ave any Mon opod in the s un for prol onged p er iods an d av oid
high te mperatu re exposu re.
Avo id leavin g any Monop od unatte nded in are as wher e pe ople
could t rip over th e gear and ge t hurt.
Remov e camera, l ens, and al l gear from a ny Mono po d when tr an sport ing.
For you r safety, don't let y our MeFOTO gear co me in conta ct with any
elect rical pow er source .
LI MI TE D WARR AN TY C OV ER AG E
Your MeFOTO produc t has been ca refully m anufact ured, has p assed man y quali ty
assur ance chec ks and has be en thorou ghly te st ed befo re s hipme nt . It is war ranted
in the co untry fro m which you p urchase d it base d on t he date o f pu rchas e to the
origi nal owner, a gainst de fects in ma terials a nd work ma nship . Pl ease co ntact you r
local M eFOTO d ealer for f urther in formati on and deta ils abo ut y our Warran ty. The
Warranty d oes not app ly to damag es caused b y mishand ling, d ro pping , or l eakin g
batte ries, nor m odifica tion or ser vicing pe rform ed b y other s.
Speci fi cat io ns and de si gn ar e su bject t o ch ang e wi thout n ot ice .
www.m ef oto.com4 5
Page 4

独脚架使用步骤:(简体中文)
在使用独脚 架前,把独脚架 的高
度调整到合 适的位置,确保 独脚 架能
平稳地放置 在一个水平面上 ,然 后把
相机固定在 独脚架顶部的面 板上 面,
确保相机锁 紧,防止照相机 意外 滑落,
不要过度锁 紧。
如果您要使 用单独的独脚架 云台
或者球型云 台,先把云台固 定在 顶部
的面板上面 ,请确保云台的 安全 锁紧
旋钮处于安 全状态,防止照 相机 意外
滑落。
最佳使用状 态:独脚架的高 度不 要升
到您所使用 的高度以上,在 使用 时,
先伸长管径 最大的第一节脚 管。
注意事项: 在携带时,禁止 相机 安装
在独脚架上 。
独脚架高度调节 :( 如图1 所 示)
顺时针180° 旋转脚管锁紧旋 钮, 直
到每节脚管 都可以自由伸缩 ,调 节独
脚架的每节 脚管到要求的长 度, 然后
逆时针旋转 脚管锁紧旋钮, 直到 脚管
完全锁紧。 重复以上操作, 调节 独脚
架到您所需 要的高度。
注意:在调 节脚管时,务必 取下 相机
等设备,避 免意外损坏。
手杖使用方法( 见图2)
在使用手杖 之前,调节每节 脚管 (除
尾管)到最 大高度。对大部 分人 来说,
这个高度已 经达到了手杖的 最佳 使用
效果,但是 您也可以根据个 人需 要重
新调节。请 确保顶部的手柄 完全 锁紧。
最佳使用状 态:手杖的高度 不要 升到
您所使用的 高度以上,在使 用时 ,先
伸长管径最 大的第一节脚管 。
注意事项:
使用此 产品时,请 不要超过规 定的最
大承重 (详细参数 请参考产品 吊卡或
者美孚 官网。)
使用此 产品时,为 了避免意外 损坏相
机,在 安装相机之 前,请务必 确认产
品的各 个锁紧系统 处于安全状 态。
请勿在 零下20度或高 于零上70度的 温
度下使 用本产品。
在潮湿 ,泥沙,风 尘等环境中 使用过
后,一 定要用干布 将琐紧螺牙 , 和可
能藏有 泥沙的部分 清除干净, 可使用
无水酒 精,消毒酒 精,清洁剂 等擦洗。
不推荐 在海水中使 用本产品。
请勿长 时间将产品 放置在太阳 下,避
免长时 间将产品放 置在高温下 , 例如
靠近汽 车玻璃数小 时。
在公共 场所使用本 产品时, 请勿 离人,
避免小 孩靠近, 造成 意外伤害。 在危
险的地 方使用时, 请 谨慎操作。
禁止搭 载设备(相 机)等一起 携带移
动。
为了人 身安全,使 用本产品时 ,请勿
靠近高 电压区域, 或 与强效化学 接触。
保修范围
您所使用的 美孚产品是经过 精密 加工,
多项严密质 量检测,所有功 能严 格测
试才完整包 装出厂的。所有 材料 或者
工艺方面的 瑕疵,可以在您 所购 买的
区域免费维 修或者更换。详 细的 质量
保修可以联 系您所在地的经 销商 。所
有人为原因 所造成的产品损 坏不 在保
修范围内, 例如:错误操作 ,严 重摔
落,或者电 池漏电液体损坏 。
独脚架使用步骤:(繁体中文)
在使用独脚 架前,把独脚架 的高
度调整到合 适的位置,确保 独脚 架能
平稳地放置 在一个水平面上 ,然 后把
相机固定在 独脚架顶部的面 板上 面,
确保相机锁 紧,防止照相机 意外 滑落,
不要过度锁 紧。
如果您要使 用单独的独脚架 云台
或者球型云 台,先把云台固 定在 顶部
的面板上面 ,请确保云台的 安全 锁紧
旋钮处于安 全状态,防止照 相机 意外
滑落。
最佳使用状 态:独脚架的高 度不 要升
到您所使用 的高度以上,在 使用 时,
先伸长管径 最大的第一节脚 管。
注意事项: 在携带时,禁止 相机 安装
在独脚架上 。
独脚架高度调节 :( 如图1 所 示)
顺时针180° 旋转脚管锁紧旋 钮, 直
到每节脚管 都可以自由伸缩 ,调 节独
脚架的每节 脚管到要求的长 度, 然后
逆时针旋转 脚管锁紧旋钮, 直到 脚管
完全锁紧。 重复以上操作, 调节 独脚
架到您所需 要的高度。
注意:在调 节脚管时,务必 取下 相机
等设备,避 免意外损坏。
手杖使用方法( 见图2)
在使用手杖 之前,调节每节 脚管 (除
尾管)到最 大高度。对大部 分人 来说,
这个高度已 经达到了手杖的 最佳 使用
效果,但是 您也可以根据个 人需 要重
新调节。请 确保顶部的手柄 完全 锁紧。
最佳使用状 态:手柄的高度 不要 升到
您所使用的 高度以上,在使 用时 ,先
伸长管径最 大的第一节脚管 。
注意事项:
使用此 产品时,请 不要超过规 定的最
大承重 (详细参数 请参考产品 吊卡或
者美孚 官网。)
使用此 产品时,为 了避免意外 损坏相
机,在 安装相机之 前,请务必 确认产
品的各 个锁紧系统 处于安全状 态。
请勿在 零下20度或高 于零上70度的 温
度下使 用本产品。
在潮湿 ,泥沙,风 尘等环境中 使用过
后,一 定要用干布 将琐紧螺牙 , 和可
能藏有 泥沙的部分 清除干净, 可使用
无水酒 精,消毒酒 精,清洁剂 等擦洗。
不推荐 在海水中使 用本产品。
请勿长 时间将产品 放置在太阳 下,避
免长时 间将产品放 置在高温下 , 例如
靠近汽 车玻璃数小 时。
在公共 场所使用本 产品时, 请勿 离人,
避免小 孩靠近, 造成 意外伤害。 在危
险的地 方使用时, 请 谨慎操作。
禁止搭 载设备(相 机)等一起 携带移
动。
为了人 身安全,使 用本产品时 ,请勿
靠近高 电压区域, 或 与强效化学 接触。
保修范围
您所使用的 美孚产品是经过 精密 加工,
多项严密质 量检测,所有功 能严 格测
试才完整包 装出厂的。所有 材料 或者
工艺方面的 瑕疵,可以在您 所购 买的
区域免费维 修或者更换。详 细的 质量
保修可以联 系您所在地的经 销商 。所
有人为原因 所造成的产品损 坏不 在保
修范围内, 例如:错误操作 ,严 重摔
落,或者电 池漏电液体损坏 。
美孚保留 随时变更设 计及说明书 内资料权利 ,恕不另行 通知。
美孚保留 随时变更设 计及说明书 内资料权利 ,恕不另行 通知。
www.m ef oto.com6 7
 Loading...