

Page 1
USER NOTICE
Do not exceed the maxim um spec ified l oad cap acity
(see specifi catio ns on the p ackag e label o r visit w ww.mefoto.com).
R
Always ensure that Le g and Hea d Locks a re tigh tly eng aged be fore mounting
any gear on your Tr ipod.
Do not use any Trip od belo w tempe ratur es of −4° F or abov e +158° F
(−20°C / +70°C).
Always clean and dry an y Tripod a fter it h as been e xpose d to wet, dusty, sa ndy
or salty condi tions . Your Tripo d is not re comme nded for use in salt water. If
required, clean tri pod usi ng a mild s oap sol ution a pplie d with a soft cloth, rinse
with fresh water and dr y with so ft towe l. Remo ve any du st, dir t or sand from all
Leg Locks, Leg Sectio ns and al l movin g parts .
Do not leave any Tr ipod in t he sun fo r prolo nged pe riods a nd avoid high
temperature expos ure.
Avo id leav ing any Tr ipod un attended in areas where people could tr ip over t he
gear and get hurt.
Remove camera, lens , and all g ear fro m any Trip od when t ransporting.
For your safety, don 't let yo ur MeFOTO gear c ome in co ntact w ith any e lectr ical
power source.
LI MI TE D WAR RA NT Y CO VE RA GE
Your MeFO TO pr oduct has be en care fully manu factured , has pas sed many qua lity assur ance
checks and h as been thor oughl y tested bef ore shipme nt. It is w arr anted i n the countr y from wh ich
you purcha sed it based o n the dat e of pu rchas e to the origi nal own er, ag ainst d efects in ma teria ls
and workma nship. Ple ase con tac t your lo cal MeFOTO deal er for fu rther info rmation an d detai ls
about your Warrant y. The Wa rrant y does not app ly to damage s cause d by mishand ling, drop ping,
or leaking b atteries , nor mod ificatio n or servici ng perf orm ed by oth ers.
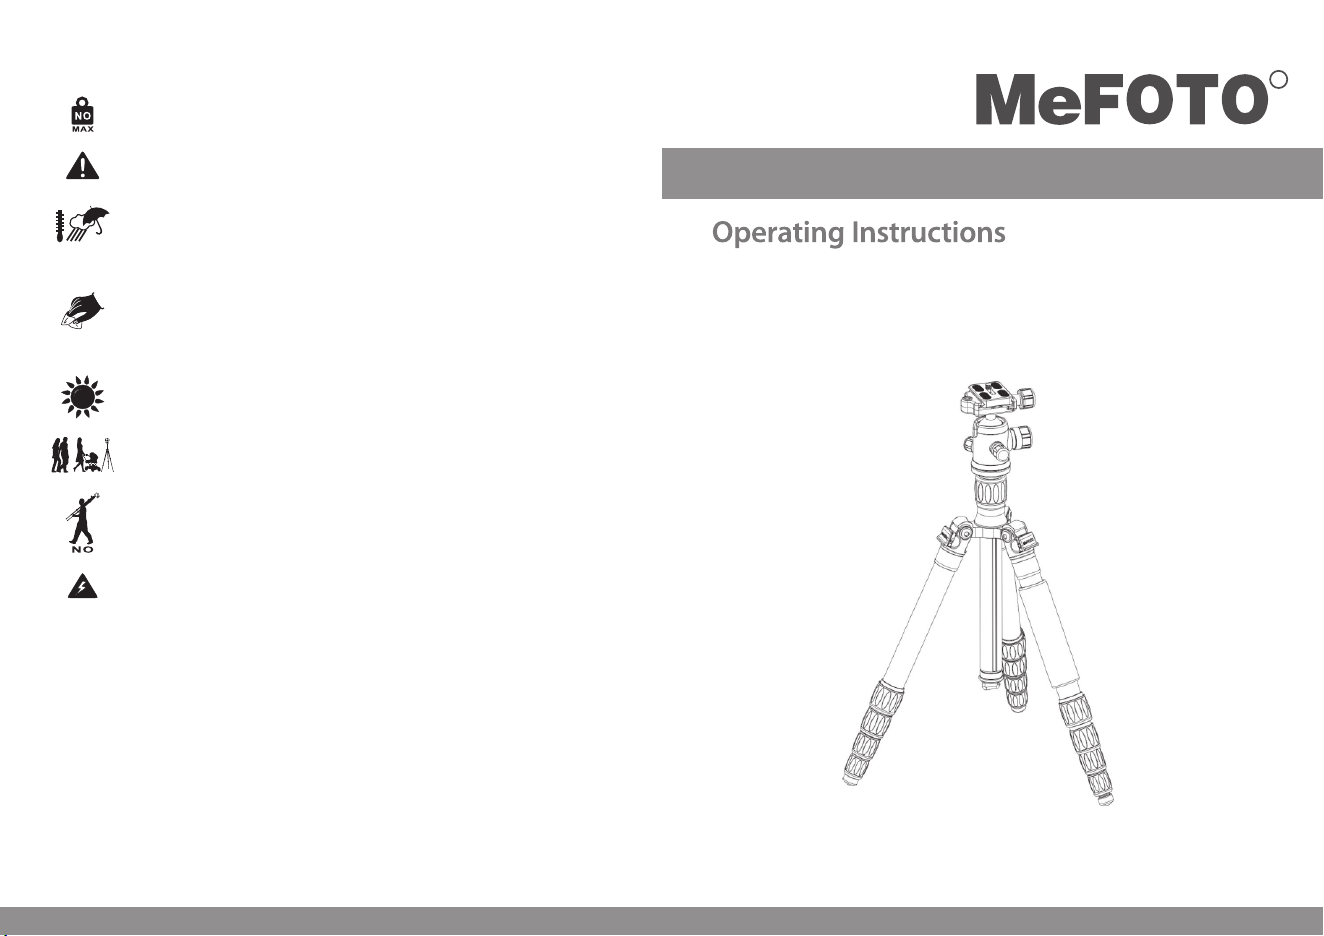
TRAVEL TRIPOD KITS
Thank you for making MeFOTO your choice for professional photographic
equipment. Your MeFOTO gear is manufactured to provide years of
dependable service. In order to obtain optimum satisfaction and
performance, we suggest that you carefully read these instructions.
保修范围
您所使用的 美孚产品是 经过精密加工, 多项严密质量检测,所有功 能严格测试才完
整包装出厂 的。所有材 料或者工艺方面 的瑕疵,可以在您所购买的 区域免费维修或
者更换。详 细的质量保 修可以联系您所 在地的经销商。所有人为原 因所造成的产品
损坏不在保 修范围内, 例如:错误操作 ,严重摔落,或者电池漏电 液体损坏。
Speci fi cat io ns and de si gn are su bject t o ch ange wi thout n ot ice.
绚彩系列脚架套 装
感谢您选用 美孚专业摄 影器材,美孚产 品提供值得您信赖的售后服 务。为了让
您对美孚产 品的使用更 加满意,我们建 议您仔细阅读下面的使用说 明。
使用方法
www.mef ot o. co m
Page 2
R
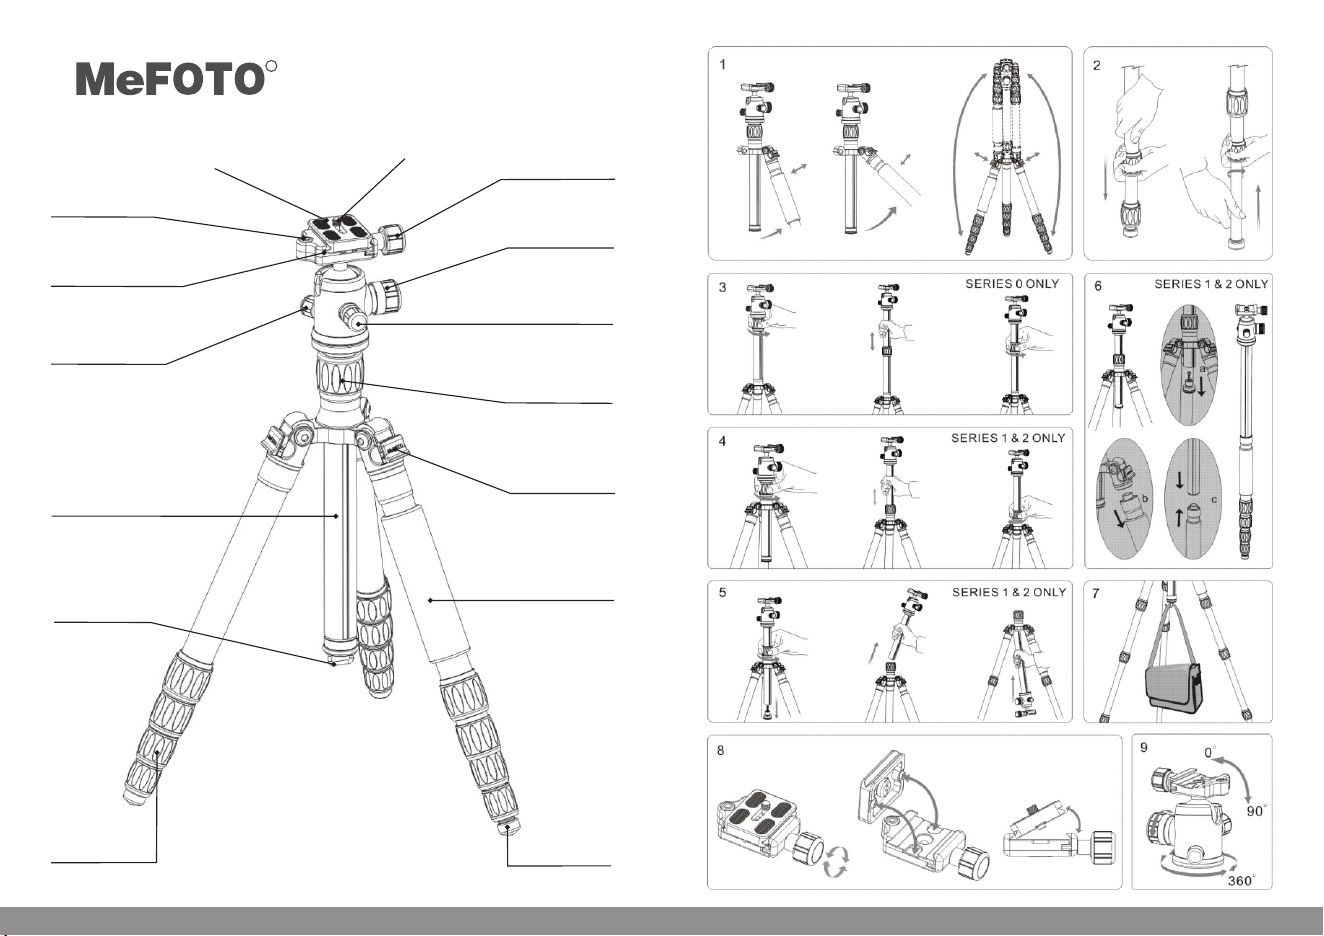
Quick R el ease Pl at e
水平仪
Bubbl e Le vel
安装平 台
Mount in g Platf or m
水平调 节 旋钮
Pan Loc ki ng Knob
中轴
Rever si ble
Cente r Co lumn
挂钩
Retra ct able
Wei gh t Hook
快装板
相机螺 丝
Camer a Sc rew
快装板 锁 紧旋钮
Quick R el ease
Locki ng K nob
主体锁 紧 旋钮
Head Lo ck ing
Knob
阻尼调 节 旋钮
(仅限1#、2 # )
Drag Co nt rol Kno b
(SERI ES 1& 2 ONLY)
中轴锁 紧 旋钮
Cente r Co lumn
Locki ng C ollar
调节片
Leg Angl e
Adjus tm ent Loc k
海绵套
Close d Ce ll
Foam Gr ip
脚管锁 紧 旋钮
Leg Loc k Gr ip
橡胶脚 垫
Rubbe r Fo ot
www.mef ot o. co m2 3
Page 3

TR IP OD O PE RAT IO N
Bef ore usi ng your Tr ipod, a djust e ach Leg S ectio n to the de sired h eight a nd Leg Ang le Sett ing. Ma ke sure
tha t the Trip od is fir mly res ting on a l evel su rface a nd moun t your ca me rase curel y on the Tri pod Hea d.
Alw ays sen gage an y safet y locks o n the Trip od Head t o preve nt any ac ciden tal dis mount ing.
FOR B EST RES ULTS: Do not raise th e Trip od hi gher th an nece ssary a nd exte nd the la rgest d iamet er Leg
Sec tions f irst. O nly ext end the C enter C olumn i f requi red to re ach max imum he ight or t o fine- tune th e
ver tical p ositi on.
FOR E XTRA STAB ILI TY: Ca reful ly hang y our cam era bag o r other w eight o n the Ret racta ble Spr ing-L oaded
Wei ght H ook a t the bot tom of th e Cente r Colum n.
NOT E: Neve r carry y our Trip od with c amera g ear att ached .
Leg Angl e Adjust ment (FIGU RE 1)
To acco mmoda te unev en terr ain, aw kward s hooti ng situ ation s or for lo w angle s hooti ng, you r MeFot o Tripod
inc ludes a 2 -posi tion Le g Angle Adjustment Sli din g Loc k. Each L eg can be a djust ed by pul ling th e Leg Angl e
Loc k out and s elect ing one o f the two p ositi ons. Pl ease ma ke sure t hat the L eg Angle L ock is se curel y
pus hed bac k into th e lock po sitio n after y ou have s elect ed the de sired L eg Angle . After use, the Leg An gle
Adj ustme nt Slid ing Loc k relea ses the u nique Tr ipod Le gs so the y can be fo lded up 1 80°ma king it e xtrem ely
com pact fo r easy ca rryin g and pac king.
Leg Sectio n Adjust ment (FIGU RE 2)
Eac h Leg sec tion ca n be adju sted to t he desi red len gth by tu rning t he Leg Lo ck grip 1 /2 turn ( 180°)
clo ckwis e until t he Leg is f ree to sl ide in or o ut. Onc e the des ired le ngth is a chiev ed, tur n the Leg L ock
Gri p count er-cl ockwi se unti l the Leg S ectio n is secu rely lo cked. R epeat t his ste p for eac h Leg unt il the
Tripod is set to the d esi red h eig ht.
NOT E: To pre vent an y accid ental d amage t o your ge ar, alwa ys remo ve any mo unted e quipm ent
(ca mera, e tc.) fr om the Tri pod bef ore adj ustin g the Leg S ectio ns.
Raising an d Lowering t he Tel escop ing Center C olumn – Seri es 0 (FIG URE 3 )
To rais e or lowe r the Teles cop ing Cen ter Col umn , turn th e Cente r Colum n Locki ng Knob c ounte r-clo ckwis e
and s et the Co lumn to t he desi red pos ition . While h oldin g the Col umn in po sitio n, turn t he Cent er Colu mn
Loc king Kn ob cloc kwise t o secur e the Col umn in pl ace. Do n't ove r-tig hten th e Cente r Colum n Lock, a s this
cou ld dama ge the th reads .
Raising an d Lowering t he Cent er Co lumn- (FIGURE 4)Series 1 & 2
To rais e or lowe r the Cen ter Col umn, tu rn the Ce nter Co lumn Lo cking C ollar c ounte r-clo ckwis e and set t he
Col umn to th e desir ed posi tion. W hile ho lding t he Colu mn in pos ition , turn th e Cente r Colum n Locki ng
Kno b clock wise to s ecure t he Colu mn in pla ce. Don 't over -tigh ten the C enter C olumn L ock, as t his cou ld
dam age the t hread s.
NOT E: Take s pecia l care wh en rais ing or lo werin g the Cen ter Col umn, if a c amera o r equip ment is m ounte d
on th e Tripod. Never loose n the C ent er Co lumn Lo cking K nob wit hout ho lding t he Cent er Colu mn. Fai lure
to fo llow th ese ins truct ions co uld res ult in da maged e quipm ent.
Reversib le Center Co lumn (FIGURE 5)-Series 1 & 2
Your Tripod has the ab ili ty to r eve rse the C enter C olumn f or clos e-up ph otogr aphy, copy wo rk an d for
dif fic ult t o reach o bject s. To rev erse th e Cente r Colum n, unsc rew the R etrac table Weig ht Ho ok lo cat ed on
the b ottom o f the Cen ter Col umn. Lo osen th e Cente r Colum n Locki ng Coll ar and pu ll the Ce nter Co lumn ou t.
Ins ert the C enter C olumn t hroug h the bot tom wit h the Mou nting P late up side- down an d retig hten th e Cente r
Col umn Loc king Co llar se curel y.
NOT E: Do not r evers e the Cen ter Col umn whe n a camer a or equi pment i s mount ed.
Transfunc tional Fea ture – Co nve rting t o a Monopod – Se ries 1 & 2 (FIGU RE 6)
To asse mble as a m onopo d first u nscre w the Ret racta ble Wei ght H ook and p ull the C enter C olu mn
(wi th Head ) out. Un screw t he Sing le trip od leg (t he one wi th the fo am grip ). Scre w the ent ire Cen ter Col umn
(wi th Head ) onto th e top of th e Singl e Leg.
Retracta ble Weight Hook ( FIGUR E 7)
To help s tabil ize the t ripod d uring w indy co nditi ons, ha ng a came ra bag, s andba g or othe r simil ar item f rom
the r etrac table w eight h ook.
NOT E: Take c are not t o overl oad the t ripod w ith ext ra weig ht as thi s could h ave a rev erse ef fec t on
inc reasi ng the st abili ty of the t ripod .
HEAD OP ERATIO N
The M eFoto D ouble -Acti on Ball h eads fe ature t hree op erati ng Knob s. Drag c ontro l is manu ally ad juste d
and l ocked , along w ith ind epend ent Pan ning. P lus a Uni versa l Quick R eleas e Clamp w ith sec ondar y Safet y
Loc k Syste m is inco rpora ted.
Universa l Quick Rele ase Pla te Sy stem
The D ouble -Acti on Ball h eads fe ature a U niver sal Qui ck Rele ase Pla te syst em. It of fer s a quick m ethod o f
mou nting o r relea sing a Ca mera or E quipm ent fro m the Hea d. It's i mport ant tha t the cor rect Qu ick Rel ease
Pla te be use d along w ith the p roper m ounti ng scre w (1/4– 20 is inc luded a s the sta ndard s ize but s pare
1/4 –20 and 3 /8 plat es of var ious le ngths a re avai lable a s acces sorie s). Ext ra Plat es are re comme nded as
you c an scre w one to ea ch Came ra or Len s for eve n great er conv enien ce when r apidl y mount ing and
dis mount ing gea r. And because of compat ibi lit y with th e Unive rsal sy stem, m ost pla tes and s pecia l
bra ckets f rom oth er manu factu rers ca n be used a s well.
Quick Rele ase Lock (FI GURE 8)
Whe n used pr operl y, the Q uick Re lease L ock off ers t wo le vels of s ecuri ty for yo ur gear. To remov e the
Qui ck Rele ase Pla te, tur n the Qui ck Rele ase Loc king Kn ob coun ter-c lockw ise. A part ial ope ning of t he
cla mping m echan ism all ows the Q uick Re lease P late to s lide on t he Moun ting Pl atfor m for pro per bal ance
and p ositi oning . Two St op Scre ws (rem ovabl e) on the b ottom o f the Qui ck Rele ase Pla te prov ide thi s first
lev el of sec urity. An a ddi tiona l count erclo ckwis e turn of t he Quic k Relea se Lock ing Kno b opens t he clam p
ful ly so tha t the Qui ck Rele ase Pla te can be t ilted o ut to be re moved . Rever se the pr ocess a nd tigh ten the
Qui ck Rele ase Loc king Kn ob to sec ure the Q uick Re lease P late.
Ballhead C ontrols (F IGURE 9 )
A larg e Head Lo cking K nob loc ks the Ba llhea d in plac e. Once t he Knob i s turne d count er-cl ockwi se and
loo sened , the Bal lhead c an move f reely a llowi ng the Mo untin g Platf orm to be p ositi oned an ywher e withi n
a 0–9 0° vert ical or ienta tion. T his m oveme nt is exp anded b y the use o f the Pan L ockin g Knob wh ich add s
a 360 ° Panni ng rang e. The Pa n con tro l is full y indep enden t and pos ition ing can b e adjus ted eas ily and
acc urate ly by usi ng the Gr aduat ed Pann ing Sca le and Po inter o n the Bas e of the Ba llhea d. When t he Head
Loc king Kn ob is rel eased , it is pos sible t o move th e Ballh ead wit h some re sista nce or Dr ag. To achi eve t he
pro per deg ree of Dr ag, mou nt the in tende d camer a or equi pment o nto the B allhe ad. Whi le hold ing the
cam era/l ens loo sen the H ead Loc king Kn ob unti l it is rel eased . Turn the Drag Control K nob c loc kwise t o
inc rease D rag, an d count er-cl ockwi se to dec rease i t.
FOR O PTIMU M RESULT S: Ad jus t the Dra g under t he weig ht capa city, tempe rat ure a nd co nditi ons und er
whi ch the Ba llhea d will be u sed.
NOT E: Do not o ver tig hten an y Locki ng Knob s as this c ould da mage th e Ball he ad lock ing mec hanis m.
www.mef ot o. co m4 5
Page 4

操作步骤(简体 中文)
在使用 三脚架前, 把脚架的高 度和角度调 整到合
适的位 置,以确保 三脚架能平 稳地放置在 一个水
平面上 ,然后把相 机固定在三 脚架云台上 面,确
保脚架 和云台完全 锁紧,防止 照相机意外 滑落。
三脚架 角度调节: (如图1所示)
为了适 应凹凸地面 或者低角度 拍摄,美孚 脚架外
拔式角 度调节片, 更容易调节 高低两个角 度。调
整好角 度后,请确 保把角度调 节片推到锁 紧的位
置。使 用完脚架后 ,拔出脚管 角度调节片 ,美孚
独特的 脚管可进行 反向 180°折 叠,以便减 少占
用空间 ,利于携带 。
三脚架 高度调节: (如图2 所示)
顺时针1 80°旋转脚 管锁紧旋钮 ,直到每节 脚管
都可以 自由伸缩, 调节三脚架 的每支脚管 到要求
的长度 ,然后逆时 针旋转脚管 锁紧旋钮, 直到脚
管完全 锁紧。重复 以上操作, 调节三脚架 到您所
需要的 高度。
注意: 在调节脚管 时,务必取 下相机等设 备,避
免意外 损坏。
可伸缩 二级中轴-仅限0 #:(如图3所示 )
逆时针 拧开中心管 锁紧旋钮, 拉伸中轴调 到合适
位置, 然后顺时针 旋转中心管 锁紧旋钮锁 紧中轴,
记住不 要过度锁紧 中心管锁紧 旋钮,这样 会毁损
坏螺纹 。
注意: 装有相机等 设备时,小 心调节中轴 ,松开
中心管 锁紧旋钮时 务必握紧中 心管,请遵 照说明
书进行 操 作。
可伸缩 中轴-仅限1#、2#: (如图4所示)
逆时针 拧开中轴锁 紧旋钮,把 中轴调到合 适位置,
然后顺 时针旋转中 轴锁紧圈锁 紧中轴,记 住不要
过度锁 紧中轴,这 样会毁损坏 螺纹。
中轴倒 置-仅限1#、2#:( 如图5所示)
倒置中 轴可以拍摄 特写镜头、 复制图片和 拍摄难
接近的 物体。将挂 钩座组件拧 开,拧松中 轴锁紧
圈将中 轴取出,将 中轴倒置然 后锁紧,中 轴有防
转槽, 反转安装中 轴时注意要 将防转槽对 齐切口。
注意: 倒置中轴时 ,请务必卸 下安装在中 轴上相
机或其 他器材。
三脚架 转换为独脚 架-仅限1#、2#:(如图6所 示)
a、将弹 簧挂钩从中 轴旋出,拿 出中轴;
b、将带 海绵套的脚 管从脚管接 头旋出;
c、中轴 云台组件与 脚管组件装 配;
完成三 脚架到独脚 架的转换。
可伸缩 挂钩(如图7所 示)
在刮风 时,需要挂 上重物增加 三脚架的稳 定性,
可在挂 钩上挂上沙 袋,照相机 袋或类似的 物品。
注意不 要超重,否 则反而会影 响三脚架的 稳定性。
云台使 用说明
美孚双 重保险球型 云台带有三 个旋钮,通 过阻尼
进行调 节与锁紧, 有独立的水 平调节功能 ,并且
通用快 装夹带有二 代安全锁紧 装置。
通用快 装板
带有通 用快装板的 双重保险球 型云台,可 以快速
取下相 机以及摄影 设备。快装 板上使用的 是
1/4 -20的标准 螺丝,且带 有3/8的相机 螺丝便于使
用不同 长度的摄影 配件,附带 的快装板与 其他快
装板兼 容,并方便 快速安装与 释放相机和 镜头。
快速锁 紧装置:( 如图8所示)
快速锁 紧装置提供 摄影设备双 重保险。取 下快装
板,逆 时针松开锁 紧旋钮,快 装板可在快 装夹上
滑动, 进行平衡定 位,快装板 上的两颗可 拆螺丝
达到首 要安全保险 效果,逆时 针松开旋钮 ,即可
取出快 装板,反之 ,即可锁紧 快装板。
云台操 作:(如图9所 示)
逆时针 松开大旋钮 ,云台可在 垂直方向90度 自由
定位, 位于云台底 座的水平调 节旋钮可进 行360度
水平调 节。松开锁 紧旋钮,可 带阻尼调节 云台。
取下相 机等摄影设 备时,应握 住摄影设备 ,再松
开主体 锁紧旋钮, 顺时针调节 阻尼旋钮增 加阻尼,
反之, 则减少阻尼 。
最佳状 态:在适当 的承重范围 、温度等条 件下调
节和使 用云台。
注意事项:
使用此 产品时,请 不要超过规 定的最大
承重( 详细参数请 参考产品吊 卡或者美
孚官网 。)
使用此 产品时,为 了避免意外 损坏相机,
在安装 相机之前, 请务必确认 产品的各
个锁紧 系统处于安 全状态。
请勿在 零下20度或高 于零上70度的 温度
下使用 本产品。
在潮湿 ,泥沙,风 尘等环境中 使用过后,
一定要 用干布将琐 紧螺牙, 和可 能藏有
泥沙的 部分清除干 净,可使用 无水酒精,
消毒酒 精,清洁剂 等擦洗。不 推荐在海
水中使 用本产品。
请勿长 时间将产品 放置在太阳 下,避免
长时间 将产品放置 在高温下, 例 如靠近
汽车玻 璃数小时。
在公共 场所使用本 产品时, 请勿 离人,
避免小 孩靠近, 造成 意外伤害。 在危险
的地方 使用时, 请谨 慎操作。
禁止搭 载设备(相 机)等一起 携带移动。
为了人 身安全,使 用本产品时 ,请勿靠
近高电 压区域, 或与 强效化学接 触。
操作步骤(繁体 中文)
在使用 三脚架前, 把脚架的高 度和角度调 整到合
适的位 置,以确保 三脚架能平 稳地放置在 一个水
平面上 ,然后把相 机固定在三 脚架云台上 面,确
保脚架 和云台完全 锁紧,防止 照相机意外 滑落。
三脚架 角度调节: (如图1所示)
为了适 应凹凸地面 或者低角度 拍摄,美孚 脚架外
拔式角 度调节片, 更容易调节 高低两个角 度。调
整好角 度后,请确 保把角度调 节片推到锁 紧的位
置。使 用完脚架后 ,拔出脚管 角度调节片 ,美孚
独特的 脚管可进行 反向 180°折 叠,以便减 少占
用空间 ,利于携带 。
三脚架 高度调节: (如图2 所示)
顺时针1 80°旋转脚 管锁紧旋钮 ,直到每节 脚管
都可以 自由伸缩, 调节三脚架 的每支脚管 到要求
的长度 ,然后逆时 针旋转脚管 锁紧旋钮, 直到脚
管完全 锁紧。重复 以上操作, 调节三脚架 到您所
需要的 高度。
注意: 在调节脚管 时,务必取 下相机等设 备,避
免意外 损坏。
可伸缩 二级中轴-仅限0 #:(如图3所示 )
逆时针 拧开中心管 锁紧旋钮, 拉伸中轴调 到合适
位置, 然后顺时针 旋转中心管 锁紧旋钮锁 紧中轴,
记住不 要过度锁紧 中心管锁紧 旋钮,这样 会毁损
坏螺纹 。
注意: 装有相机等 设备时,小 心调节中轴 ,松开
中心管 锁紧旋钮时 务必握紧中 心管,请遵 照说明
书进行 操 作。
可伸缩 中轴-仅限1#、2#: (如图4所示)
逆时针 拧开中轴锁 紧旋钮,把 中轴调到合 适位置,
然后顺 时针旋转中 轴锁紧圈锁 紧中轴,记 住不要
过度锁 紧中轴,这 样会毁损坏 螺纹。
中轴倒 置-仅限1#、2#:( 如图5所示)
倒置中 轴可以拍摄 特写镜头、 复制图片和 拍摄难
接近的 物体。将挂 钩座组件拧 开,拧松中 轴锁紧
圈将中 轴取出,将 中轴倒置然 后锁紧,中 轴有防
转槽, 反转安装中 轴时注意要 将防转槽对 齐切口。
注意: 倒置中轴时 ,请务必卸 下安装在中 轴上相
机或其 他器材。
三脚架 转换为独脚 架-仅限1#、2#:(如图6所 示)
a、将弹 簧挂钩从中 轴旋出,拿 出中轴;
b、将带 海绵套的脚 管从脚管接 头旋出;
c、中轴 云台组件与 脚管组件装 配;
完成三 脚架到独脚 架的转换。
可伸缩 挂钩(如图7所 示)
在刮风 时,需要挂 上重物增加 三脚架的稳 定性,
可在挂 钩上挂上沙 袋,照相机 袋或类似的 物品。
注意不 要超重,否 则反而会影 响三脚架的 稳定性。
云台使 用说明
美孚双 重保险球型 云台带有三 个旋钮,通 过阻尼
进行调 节与锁紧, 有独立的水 平调节功能 ,并且
通用快 装夹带有二 代安全锁紧 装置。
通用快 装板
带有通 用快装板的 双重保险球 型云台,可 以快速
取下相 机以及摄影 设备。快装 板上使用的 是
1/4 -20的标准 螺丝,且带 有3/8的相机 螺丝便于使
用不同 长度的摄影 配件,附带 的快装板与 其他快
装板兼 容,并方便 快速安装与 释放相机和 镜头。
快速锁 紧装置:( 如图8所示)
快速锁 紧装置提供 摄影设备双 重保险。取 下快装
板,逆 时针松开锁 紧旋钮,快 装板可在快 装夹上
滑动, 进行平衡定 位,快装板 上的两颗可 拆螺丝
达到首 要安全保险 效果,逆时 针松开旋钮 ,即可
取出快 装板,反之 ,即可锁紧 快装板。
云台操 作:(如图9所 示)
逆时针 松开大旋钮 ,云台可在 垂直方向90度 自由
定位, 位于云台底 座的水平调 节旋钮可进 行360度
水平调 节。松开锁 紧旋钮,可 带阻尼调节 云台。
取下相 机等摄影设 备时,应握 住摄影设备 ,再松
开主体 锁紧旋钮, 顺时针调节 阻尼旋钮增 加阻尼,
反之, 则减少阻尼 。
最佳状 态:在适当 的承重范围 、温度等条 件下调
节和使 用云台。
注意事项:
使用此 产品时,请 不要超过规 定的最大
承重( 详细参数请 参考产品吊 卡或者美
孚官网 。)
使用此 产品时,为 了避免意外 损坏相机,
在安装 相机之前, 请务必确认 产品的各
个锁紧 系统处于安 全状态。
请勿在 零下20度或高 于零上70度的 温度
下使用 本产品。
在潮湿 ,泥沙,风 尘等环境中 使用过后,
一定要 用干布将琐 紧螺牙, 和可 能藏有
泥沙的 部分清除干 净,可使用 无水酒精,
消毒酒 精,清洁剂 等擦洗。不 推荐在海
水中使 用本产品。
请勿长 时间将产品 放置在太阳 下,避免
长时间 将产品放置 在高温下, 例 如靠近
汽车玻 璃数小时。
在公共 场所使用本 产品时, 请勿 离人,
避免小 孩靠近, 造成 意外伤害。 在危险
的地方 使用时, 请谨 慎操作。
禁止搭 载设备(相 机)等一起 携带移动。
为了人 身安全,使 用本产品时 ,请勿靠
近高电 压区域, 或与 强效化学接 触。
美孚保留 随时变更设 计及说明书 内资料权利 ,恕不另行 通知。 美孚保留 随时变更设 计及说明书 内资料权利 ,恕不另行 通知。
www.mef ot o. co m6 7
 Loading...