

MEERA MTNTB785IPS User Manual

Tablet PC
User Manual
1

Content
1 Announcement
2 Introduction
2.1 Instructions on Keys.
2.2 Features Overview
2.3Technical Specifications
3 Quick Guides
3.1 Switch On/Off.
3.2 Power Saving Modes and Power off
3.3 Battery management.
3.4 Definition for the icons of the Functions
3.5 USB Function
3.6 TF Card Storage
4 Network Access
4.1 Network Access by Wi-Fi
5 Storage
...........................................................................................................................................
6 Main Functions Introduction
6.1 Audio Function
6.2 Picture&Video Function
6.3 Record Function
6.4 Internet Browser
6.5 Email Function
6.6 APK Installer
6.7 Camera
7 System Settings
7.1 Wireless & Networks Setting
7.2 Sound Setting
7.3 Display Setting.
7.4 Screenshot Setting
7.5 Security Setting.
7.6 Applications Setting.
7.7 Backup&reset Setting.
7.8 Storage Setting.
7.9 Language & Input Setting.
7.10 About Tablet Setting.
.................................................................................................................................................
8 FAQ
................................................................................................................................
.....................................................................................................................................
..............................................................................................................
.................................................................................................................
..........................................................................................................
....................................................................................................................................
........................................................................................................................
......................................................................................
............................................................................................................
...............................................................................
..........................................................................................................................
......................................................................................................................
................................................................................................................................
.......................................................................................................
.........................................................................................................
.....................................................................................................................
.......................................................................................................
...................................................................................................................
..................................................................................................................
.....................................................................................................................
.........................................................................................................................
.................................................................................................................................
..............................................................................................................................
...............................................................................................
.......................................................................................................................
....................................................................................................................
...............................................................................................................
...................................................................................................................
............................................................................................................
.........................................................................................................
....................................................................................................................
...................................................................................................
.........................................................................................................
3
4
4
5
6
6
6
7
7
8
8
9
9
9
10
10
10
12
13
14
16
17
20
21
22
22
22
22
22
22
22
22
22
22
22
2

1 Announcement
1 . Please keep the device away from moist and dust.
2 . Do not put the device in High-temperature environment, especially closed car in hot weather.
3 . Do not drop or strike the device.
4 . Do not shake the device violently, especially the LCD Screen part. Or, it will cause abnormal
5 . Please choose proper volume when using the earphone which will be good for your ear.
6 . Please charge the device when
(1) The power icon shows lowest power.
(2) The device is turned off automatically, and when you turn it on, it is turned off
(3) No response when operating the buttons.
7 . Do not disconnect the device from PC when downloading, uploading or formatting, otherwise,
8 . Do not dismounting the device privately without professional guidance.
9 . Do not use alcohol, thinner or benzene-chemical to clean the surface of the device.
10 . Do not use the device in forbidden place, like airplane.
11
. Please back-up your files in device’s memory always. The manufacturer is not responsible for
12
. The manufacture reserves all right of device’s technology and design, and will have no
13
. The device is NOT water-proof; please keep it away from water.
14
. The turn on time of this device is about 40 seconds; please don’t operate the device when it is
Thanks for buying the Tablet PC. The manual is to introduce the functions of the device, as well as
matters which need attention. Please read this manual carefully to create the enjoyment with the
tablet.
display on the screen.
automatically again.
【Note】Please use the charger offered by manufacturer to charge, other chargers may cause
damage to the device.
it will cause programming errors on the device.
the clear of files after damage or repair of the device.
obligation to inform the user if there are new versions or designs developed.
turned on with the 40 seconds.
3
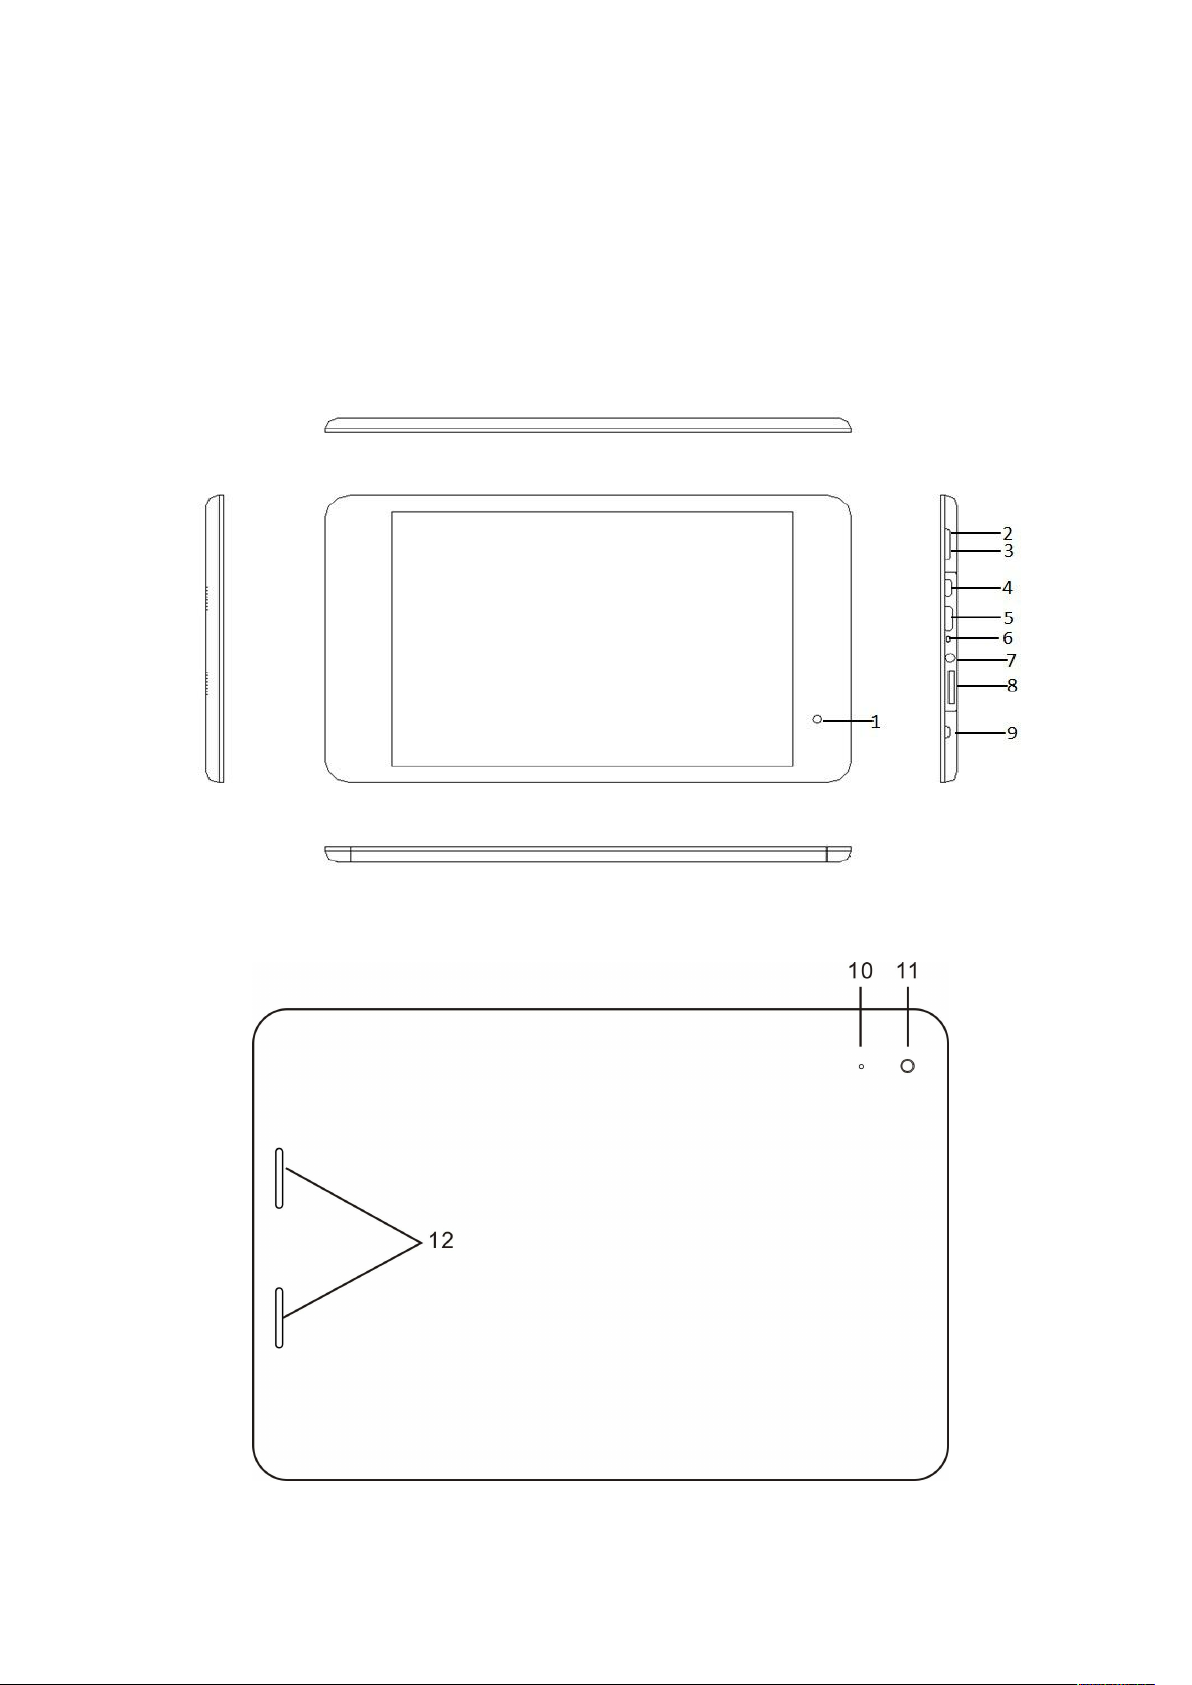
2.1 Instructions on Key
2 Introduction
Appearance
4

1. Front Camera
Name Description
POWER
Press this button shortly to enter sleeping/wake up mode,
long press to switch ON/OFF
TF Card Slot For external TF card, 1GB to 32GB
Stereo Earphone Jack 3.5mm Standard earphone jack
Micro-USB OTG Port
Host Port for external USB devices:
Mouse,
keyboard, etc(2.0)
Client port for USB Port
DC-Power
Volume Down Decrease the volume
Volume Up Increase the volume
CPU: RK3188, Quad-core, Cortex A9 with up to 1.6GHz. With Android4.2
7.85" IPS LCD display, 1024X768pixel resolution.
Support 7.85" Capacitive multi-touch
Support built-in Flash Memory, support up to 32GB external TF card.
Support Medias playing: Video, audio, pictures, Ebooks, etc.
Built-in Wi-Fi and Bluetooth.
Various applications are available.
Support built-in microphone.
Support USB OTG function.
Support TF Card
Support G-sensor rotation function.
Support earphone jack and speaker.
Supports multiple languages.
Support Camera.
The device can be used as USB portable hard disk, driver not needed for WIN2000 or above.
2. VOL- Button
3. VOL+ Button
4. USB/OTG/DC
5. HDMI
6. MIC
7. Earphone Jack
8. TF Card
9. Power Button
10. Reset Button
11. Back Camera
12. Speaker
Long Press: Press the item for more than 2 seconds.
2.2 Features Overview
5
2.3Technical Specifications
Screen
CPU Chipset: Rk3188; Quad-core ARM Cortex A9;
RAM DDR3 1G
Storage
System Android 4.2
Camera Front 2.0M, Rear: 5.0M
Network
Applications APK format applications
Video RM, AVI, MOV, WMV, MP4, 3GP, TS, MKV, MPEG,FLV,VOB,MPG,MTS
Music MP3, WMA, WAV, APE, FLAC, AAC, OGG,
Pictures JPG, BMP, PNG,GIF,TIF
7.85 inch Capacitive Touch Screen. Multi-touch
Resolution:1024x768.
16GB
External inserted TF card be extendable from 1GB to 32 GB.
Wi-Fi: Built-in Wi-Fi Module. IEEE 802.11b/g/n.
VPN: Built-in VPN protocol support
Support Bluetooth
EBooks TXT, PDB, EPUB.
Office Files Supported files: Word, Excel, PDF, PPT
USB Micro-USB2.0 OTG
Battery Built-in Lithium Battery
3 Quick Guides
3.1 Switch On/Off.
Switch On and Unlock: When the device is in the OFF mode, press and hold “Power” key for 3
seconds to turn on the device, it needs about 40 seconds enter into the system desktop, when the
LCD is under locked mode, please press and pull the
will unlocked automatically, see the figures below,
icon to the green point, then the LCD
6

3.2 Power Saving Modes and Power off
Press the “POWER” key shortly after starting up, system enter to power save and lock mode.
Press the “POWER” key, system will return to bright in 1 second
The primary operation of the device will not stop under the power save mode, just the LCD is
Switch OFF: When the device is in the on mode, press and hold the “POWER” key for 3
Please don’t charge the device in high temperature.
OFF with black screen. For example: playing music, movie, etc
seconds, the screen will display the power off interface, choose the power off button to
confirm, the system will shut automatically
【Note】When the device is with low battery it will alarm and shut automatically without charging.
If the device can not start up please check if the battery is low, and try it again after the battery is
charged.
3.3 Battery management
1) Charge the battery for 8-12 hours to make sure the battery is fully charged when firstly use.
2) Insert adaptor into DC slot on the device, and connect the other side with the power socket.
Then the desktop icon of the battery keep rolling which shows it is charging, please wait until the
battery is fully charged, don’t disconnect the power when charging. Once the battery is fully
charged, the Icon on the desktop will stop rolling.
【Note】In order to keep the battery working in the best conditions, please pay attention to the
following items:
7
No need to release the power for this Li- battery, you can charge the device even there is still
some power in the battery, no need to wait it runs out.
In order to keep the battery in good condition, please make sure to charge the device once per
two weeks if you don’t use this device for a long time.
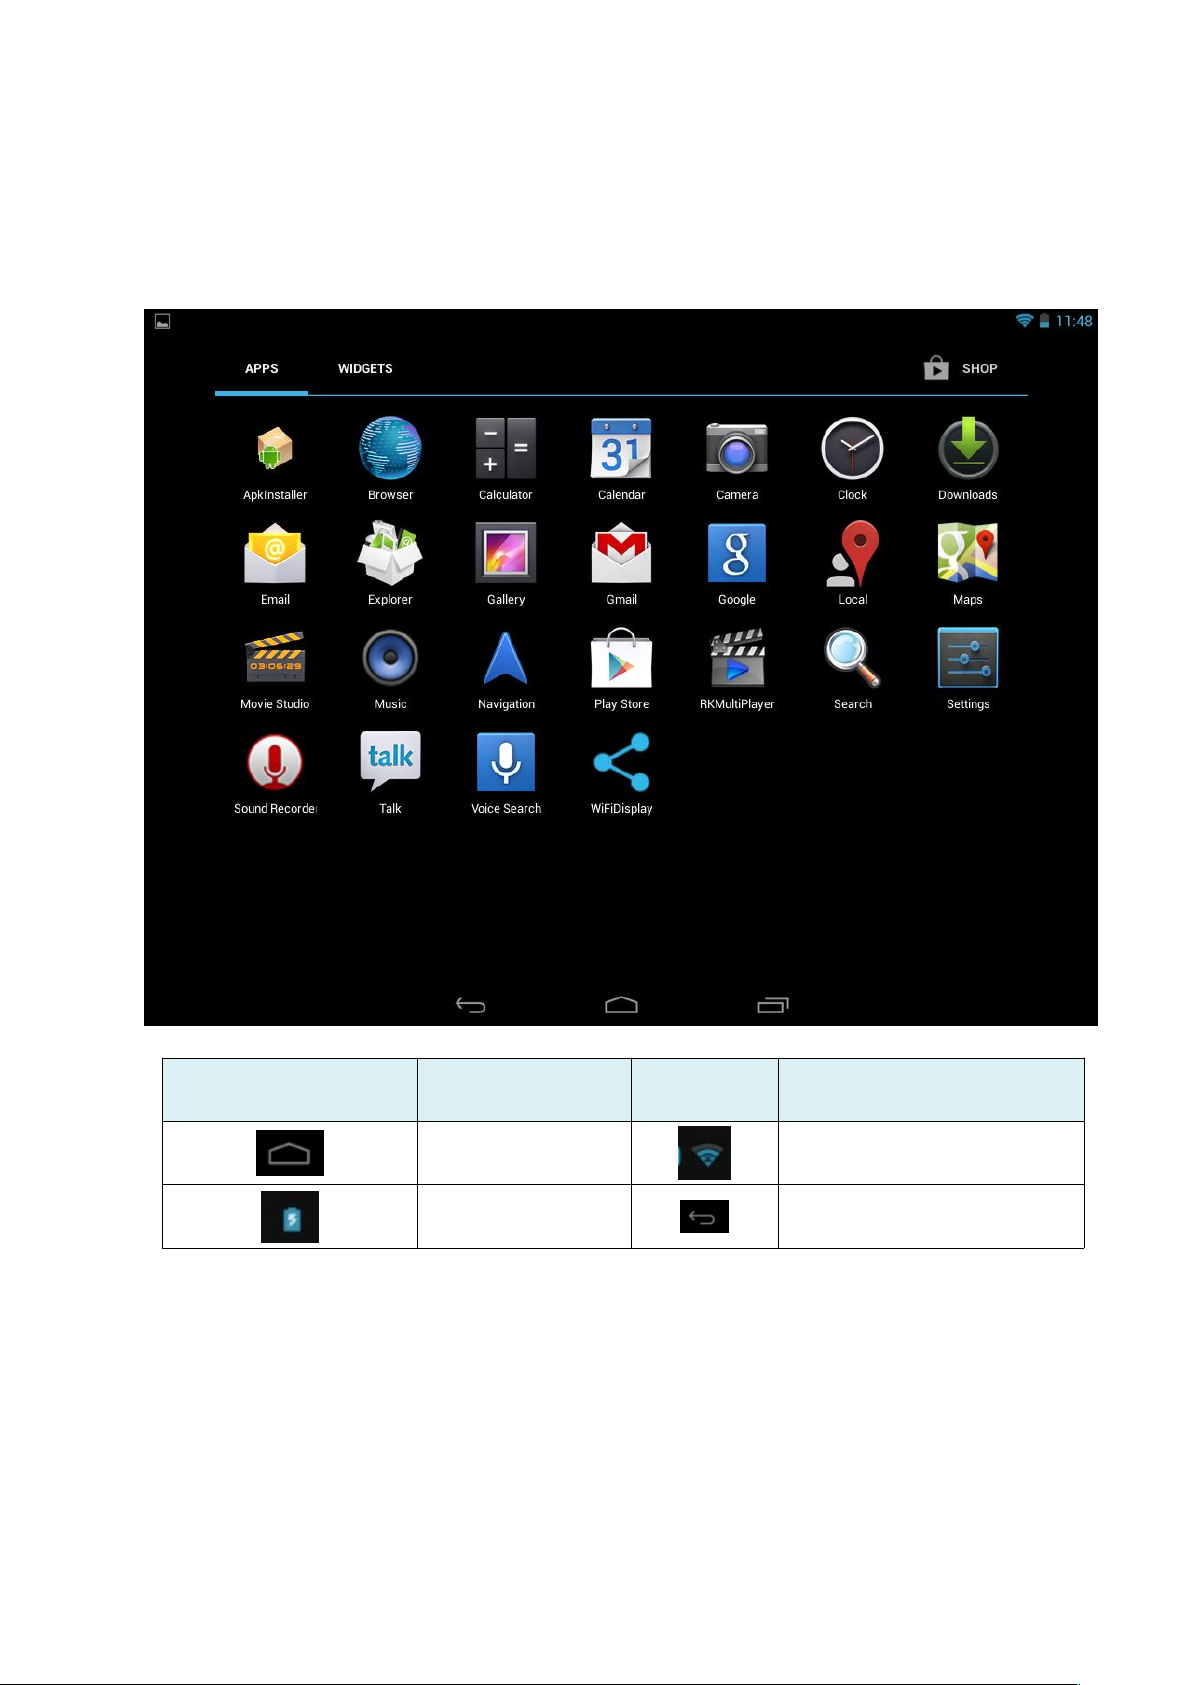
3.4 Definition for the icons of the Functions
Icon
Function
instruction
Back to main menu Wi-Fi signal
Show current
power status
3.5 USB Function
3.5.1 USB- HOST Definition
The Micro USB on the device can be used as USB Host.
3.5.2 Read U-disk:
Insert the U-disk into the HOST port, press the
enter into u-disk.
8
Icon Function instruction
Back
Resource manager
in the desktop, press
USB
 Loading...