

Page 1
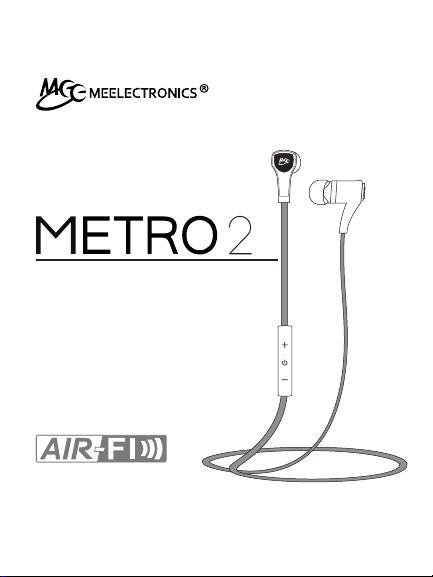
BLUETOOTH STEREO
EARPHONES
model: AF72
USER MANUAL
Page 2

TABLE OF CONTENTS
EN
Quick Start Guide
Product Overview
Charging
Powering On and Off
Proper Wear and Fit
Pairing with Bluetooth® Devices
Connecting with Paired Devices
Multipoint
Phone Functionality & Controls
Controlling Media Playback
Indicator Lights and Tones
Factory Reset
Warning
Cleaning Instructions
Care and Safety
Storage
Specifications
Troubleshooting
MEElectronics and its logo are registered trademarks of S2E, Inc. All rights reserved.
iPhone®, iPad®, iPod touch® is a registered trademark of Apple Inc.
Android™ is a registered trademark of Google Inc.
Windows® Phone is a registered trademark of Microsoft Corporation in the United States and other countries.
The Bluetooth® word mark and logos are registered trademarks owned by Bluetooth SIG, Inc.
and any use of such marks by MEElectronics is under license. Other trademarks and trade names
are those of their respective owners.
1
2
3
4
5
7
8
9
10
12
12
13
13
14
14
14
14
14
Page 3
QUICK START GUIDE
1. CHARGE THE METRO2 BEFORE FIRST USE
Open the charging port cover on the right ear piece and plug in the
micro-USB charging cable into the Metro2 and a powered USB port.
(See Page 3 for more information)
2. SELECT PROPER SIZED EAR TIPS AND INSTALL STABILIZER FINS
Try all three sizes of ear tips to find the best fit. Install the supplied stabilizer fins and adjust for best stability. Configure the cable clips as shown
below if desired. (See Page 5 for more information)
3. PAIR WITH YOUR DEVICE
Press the multifunction button for 8 seconds until the red & blue
indicator lights flash in an alternating manner. Go to the Bluetooth menu
on your device and select “Air-Fi Metro 2” to initiate pairing.
(See Page 7 for more information)
multifunction button
indicator
light
EN
Page 4
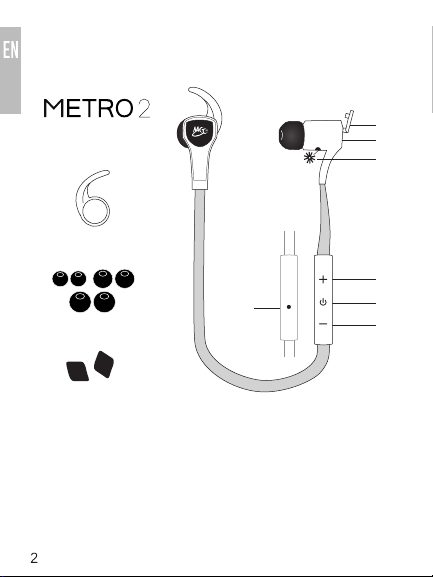
PRODUCT OVERVIEW
Bluetooth Stereo
Earphones
A
B
C
Stabilizer fins, 1 pair
A
Small / medium /
B
large ear tips
Cable clips, 1 pair
C
Charging port cover
D
Micro-USB
E
charging port
G
LED indicator light
F
Microphone
G
Volume up / previous
H
song button
Multifunction button
I
Volume down /
J
next song button
D
E
F
H
I
J
Page 5
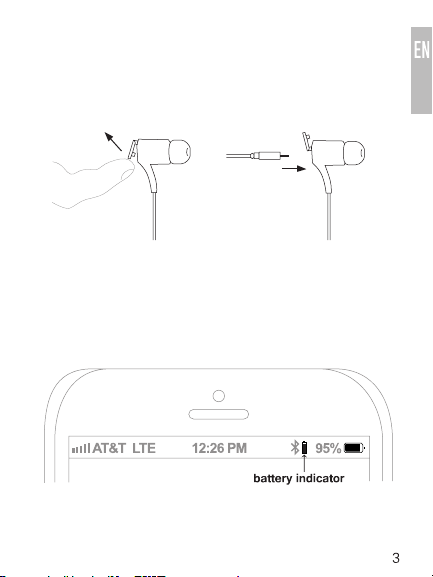
CHARGING
*** You must completely charge the headset before the first use ***
Open the charging port cover on the right ear piece and plug in the
micro-USB charging cable into the Metro2 and a powered USB port. The
red indicator light will stay on while charging and turn off when charging is
complete. Charge time is typically 2 hours.
Open the charging port
cover on the right ear
piece
Notes:
• TheMetro2willnotworkwhilethechargingcableispluggedin.
• AppleiOSdevicessuchastheiPhone®,iPad®,andiPodtouch®will
display a battery indicator in the top right corner of the screen when the
Metro2 is connected.
Plug in the micro-USB
charging cable into the
Metro2
Page 6
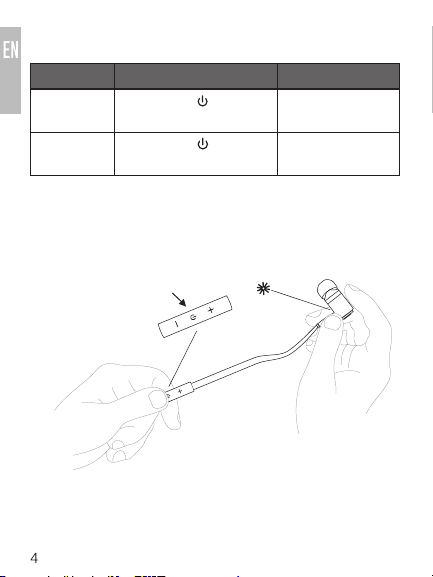
POWER ON/OFF
FUNCTIONS OPERATION TONE
Power on Press and hold button for
Power off Press and hold button
Note: In order to save power, the headset will power off automatically if not
connected within 5 minutes of being turned on.
about 4 seconds until the blue
indicator light flashes
for about 4 seconds until red
indicator light flashes
Four increasing tones
Four decreasing tones
multifunction button
indicator light
Page 7

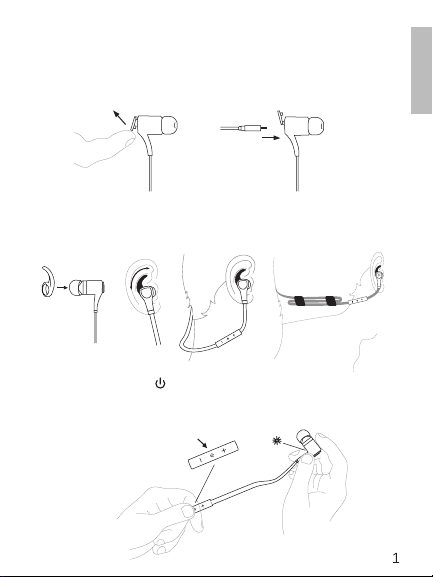
PROPER WEAR AND FIT
1. INSTALLING FINS, EAR TIPS AND CABLE CLIPS
a) Install stabilizer fins on the headset and rotate to find a suitable position
as shown:
b) Choose the eartips best suited for your ear size. Wear as follows:
c) Configure the cable management clips to reduce cable slack for a more
secure and comfortable fit.
Page 8

PROPER WEAR AND FIT (Continued)
2. CHANGING EAR TIPS
The Metro2 is an in-ear headphone and requires the ear tips to seal
with your ear canal. An airtight seal between the ear tip and ear canal is
important for getting the best sound. Three sizes of ear tips are included to
help you achieve the best fit and comfort.
3. REMOVING EAR TIPS
Hold the ear tip firmly in one hand and the earpiece in the other and pull the
ear tip straight off the earphone nozzle.
4. INSTALLING EAR TIPS
a) Hold the earpiece in one hand and the ear tip in the other with its open
end facing the earpiece
b) Push the ear tip tube against the nozzle at a 45 degree angle
c) Push the ear tip completely onto the nozzle and wiggle the ear tip
until the bottom of the ear tip is flush against the base of the earphone
nozzle.
d) Gently pull on the ear tip to make sure it is installed securely. If it isn’t
installed securely, either push it onto the nozzle until it is or remove and
repeat steps a) through c)
6
Page 9

PAIRING WITH BLUETOOTH DEVICES
Prior to using the headset for the first time, you have to pair it with a
Bluetooth-enabled audio device.
*** It is only necessary to pair your Metro2 once with each device ***
1. PAIRING
a) Open the Bluetooth menu (see sections 2 through 4 below) on the
device you wish to pair. Some devices require you to select “search for
devices” or “add new devices” in order to create a Bluetooth pairing.
b) Make sure the Metro2 is off and within 1 meter of your device.
c) Initiate pairing mode by pressing the multifunction button for 8
seconds until the red & blue indicator lights flash in an alternating
manner. (Note: The Metro2 will enter standby mode if not paired within
2 minutes.)
d) Select “Air-Fi Metro 2” when it appears on your device. If “Air-Fi Metro
2” doesn’t appear in the Bluetooth menu of your device, ensure the red
and blue indicator lights on the headset are flashing alternatively and
Bluetooth is enabled on your device.
If your device asks for a pin, enter “0000”.
e) The device will pair and then connect. After successful connection, the
blue indicator light on the Metro2 will flash twice every 4 seconds.
2. LOCATING THE BLUETOOTH MENU ON AN IPHONE, IPAD, OR IPOD
TOUCH
a) On your device, go to Settings
b) Select Bluetooth (Bluetooth is under the General menu in iOS 5.1.1
and older); if Bluetooth is not on, turn it on. The iPhone/iPad/iPod will
automatically search for new devices
7
Page 10

PAIRING WITH BLUETOOTH DEVICES (Continued)
3. LOCATING THE BLUETOOTH MENU ON ANDROID ™ PHONES AND
TABLETS
a) On your device, go to Settings menu
b) Select Bluetooth (Bluetooth is under the Wireless & Networks menu in
older Android devices); if Bluetooth is not on, turn it on.
c) Select “Search for Devices” if your phone or tablet does not
automatically search for new devices
4. LOCATING THE BLUETOOTH MENU ON WINDOWS® PHONE 8 DEVICES
a) On your device, go to Settings
d) Select Bluetooth. If Bluetooth is not on, turn it on. The Windows Phone
will automatically search for new devices
If pairing fails after several tries, please refer to your device’s user manual
for further information.
For instructions on pairing other devices, please refer to your device’s user
manual.
CONNECTING WITH PAIRED DEVICES
When the Metro2 is turned on, it will automatically connect to previously
paired devices that have Bluetooth turned on and are within range, with
priority given to the most recently connected device.
The headset can remember 8 paired devices; when the number of paired
devices exceeds 8, the first paired device will be replaced.
If the Metro2 is in standby mode (turned on but no device connected), a
short press of the multifunction button will connect to the most recently
connected device that has Bluetooth turned on and is within range.
Notes:
• On some Bluetooth devices, such certain Nokia and Blackberry phones,
the settings must allow for automatic connection. Please refer to your
device’s manual for further information.
• On some Mac and PC computers you will need to manually enable Bluetooth audio every time you connect
8
Page 11

MULTIPOINT
Multipoint allows two Bluetooth devices to be connected to the Metro2
simultaneously.
1. TURNING ON MULTIPOINT: MULTIPOINT IS OFF BY DEFAULT. ENABLE
MULTIPOINT AS FOLLOWS:
a) Put the Metro2 in standby mode (turned on but with no devices
connected to it). Bluetooth may need to be turned off temporarily on
nearby devices so that they do not connect to the Metro2
b) Long press and + buttons in standby mode, and release them when
you hear four beeps of increasing tone.
2. SIMULTANEOUS CONNECTION OF TWO DEVICES
a) Pair two devices by following the pairing procedure for each device.
Both devices will need to be paired before multipoint can be used.
b) With multipoint enabled, when turned on the Metro2 will automatically
connect to the last 2 devices that have Bluetooth enabled and are
within range.
c) If a device that has already been paired does not connect automatically,
select “Air-Fi Metro 2” from the Bluetooth menu of the device.
d) To avoid connecting to multiple devices, disable Bluetooth on the
devices you do not want connected to the Metro2 or disable multipoint
(see page 10).
e) If you no longer want the Metro2 to connect to a device, remove the
“Air-Fi Metro 2” pairing from the Bluetooth menu of that device.
3. MULTIPOINT FUNCTIONALITY
Switching audio between two devices during media playback
a) Pause audio playback on the active device
b) Start audio playbck on the other connected device; it may take up to 10
seconds for the audio to switch.
Incoming calls will always take precedence over media. If media is playing
on one device and an incoming call is received on the other device, the
Metro2 will pause the media on the active device and activate the device
with the incoming call. Once the call is ended, the Metro2 will reactivate the
original device and resume playback (with most media applications).
9
Page 12

MULTIPOINT (Continued)
4. TURNING MULTIPOINT OFF
We recommend keeping multipoint off if you don’t use this feature, which will
result in the best connectivity and battery life. Disable multipoint as follows:
Long press and — buttons in standby mode (see Section 1a on Page 9 for
standby mode instructions) and release them when you hear four beeps of
decreasing tone.
PHONE FUNCTIONALITY & CONTROLS
1. CONTROLLING PHONE CALLS
HEADSET
STATUS
Incoming
call
Active call End call Short press
One active
call, one
incoming
call
Two active
calls
Note: Pressing the answer button on a connected device with a call coming in
will activate the phone handset, not the Metro2. Long press for 2 seconds
to transfer the call to the Metro2.
FUNCTION OPERATION TONE
Answer call Short press
Reject call Long press
Answer incoming call
and end current call
Answer incoming call
and place current call
on hold
Switch between
active calls
End current call and
switch to call on hold
once
for 2 seconds
once
Short press
once
Double press
button
Double click
button
Short press
once
Two increasing
tones
Two decreasing
tones
Short tone
N/A
N/A
N/A
N/A
10
Page 13

PHONE FUNCTIONALITY & CONTROLS (Continued)
2. DIALING
FUNCTION OPERATION TONE
Voice dial / Siri Short press and + button
Redial the last
number
3. IN-CALL CONTROLS
FUNCTION OPERATION TONE
Volume up Short press + button Short tone when maximum
Volume down Short press — button Short tone when minimum
Mute
microphone
Cancel mute Long press + for 2
Note: Phone functionality may differ depending on the device type, OS, and
version. Please refer to your mobile phone user’s manual in the event of a
discrepancy.
simultaneously
Long press for 2 seconds Two decreasing tones
Long press + for 2
seconds
seconds
Short tone
volume is reached
volume is reached
Two decreasing tones; Two
short tones every 10 seconds
while mute is active
Two increasing tones
11
Page 14

CONTROLLING MEDIA PLAYBACK
FUNCTION OPERATION
Volume up Short press + button
Volume down Short press — button
Previous track Long press + button
Next track Long press — button
Pause Short press button
Play Short press button
Notes:
• The Metro2 will beep when trying to adjust the volume above or below the
maximum or minimum settings.
• Remote control functionality requires your Bluetooth device to support the
AVRCP profile.
INDICATOR LIGHTS AND TONES
STATUS INDICATOR LIGHTS (LED) TONE
Turning on Blue LED lit for 1 second Four increasing tones
Turning off Red LED lit for 2 seconds Four decreasing tones
In pairing mode Red and blue LED flash in an
Paired with device Blue LED lit for 1 second Long tone, then short
On but not
connected to a
device
alternating manner
Blue LED flashes once every
2 seconds
Two increasing tones
upon entering pairing
mode
tone when paired
N/A
12
Page 15

INDICATOR LIGHTS AND TONES (Continued)
STATUS INDICATOR LIGHTS (LED) TONE
Connected with a
device
Incoming call or
making a call
Call in progress Blue LED flashes once every
Low battery Red LED flashes instead of
Blue LED flashes every 4
seconds
Blue LED flashes continuously N/A
2 seconds
blue LED
Single tone at time
of connection
N/A
Five low pitched
tones at five minute
intervals
FACTORY RESET
Performing a factory reset will clear all of your paired devices and can be used
as a troubleshooting method. Use the following steps to perform a factory reset:
a)
Plug a charging cable into the Metro2
b)
Press and hold the Volume Up “+” button until you see both the blue
and red LEDs turn on. There will be four long tones. The red LED will
remain on until the Metro is disconnected from the charger.
Note: The first time the Metro2 is turned on after the factory reset, it will enter
pairing mode automatically. If the Metro2 was previously paired with a device,
the pairing must be deleted from the device and the pairing process will need
to be repeated.
WARNING
Turn down the volume prior to using the headphones; adjust the volume to
the desired level once they are connected. Do not use headphones at high
volumes for extended periods of time as doing so will result in permanent
hearing damage. It is advised you keep volume levels moderate to low at all
times for your safety, even when loud background noise is present.
Visit www.osha.gov for more info.
Follow all laws governing use of headsets while driving, cycling, walking, and/
or running. Do not insert both earphones while driving a car, cycling, operating
machinery, or performing other activities that require hearing surrounding
sounds.
13
Page 16

CLEANING INSTRUCTIONS
a) Remove the ear tips and the stabilizer fins from the earphones
b) Take a cotton swab that is either dry or has been dampened by a small
amount of rubbing alcohol or soapy water
c) Swab around the nozzle of the earphone
d) Swab the ear tip including the inside of the eartip
e) Swab the inside of the stabilizer fin ring
Note: Ear tips and stabilizer fins can also be submerged fully in rubbing
alcohol or hydrogen peroxide
f) Wait for the earphones and ear tips to dry completely
g) Put the ear tips and fins back on the earphone, making sure they are
fitted securely. Always make sure ear tips are installed properly on the
earphone nozzle to avoid an ear tip coming off in your ear.
Clean the cable and earphone housing as necessary using a cloth dampened
with soapy water, and then again with a damp cloth. Using chemical cleaners
on the Metro2 may cause discoloration and hardening of the cable and is not
recommended.
CARE AND SAFETY
• Do not use your wireless headset around flammable gases as fire or
explosion may occur.
• Keep the device and packaging out of reach of children.
• There are no user replaceable/reparable parts in the headset. Disas-
sembly will void your warranty.
• Do not expose the headset to excessive heat or cold, moisture, sweat,
water, or other liquids. Doing so will void your warranty.
• Do not drop the device.
STORAGE
When not in use or charging, store the Metro2 in the included carrying case.
Storing or transporting the Metro2 in a pocket or bag without using the case
may decrease the lifespan and void the warranty.
SPECIFICATIONS
See the Air-Fi Metro2 product page at www.meelec.com for product
specifications
TROUBLESHOOTING
Visit www.meelec.com/bluetooth for troubleshooting information
14
Page 17

www.meelec.com
 Loading...