

Page 1

USER
MANUAL
M9B
Stereo Wireless Earphones
Please read this manual in its entirety
to ensure best fit and sound.
Page 2
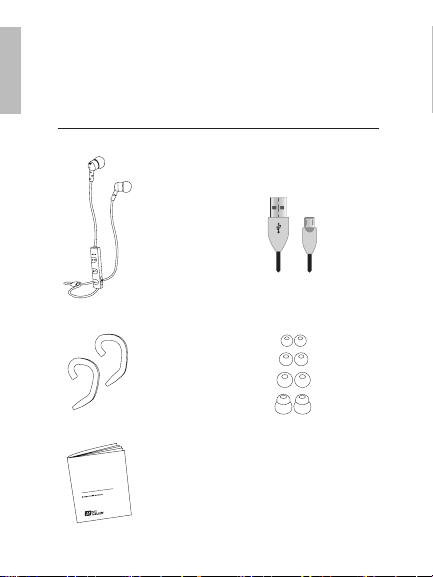
PACKAGE CONTENTS
EN
R
M9B
Stereo Wireless
Earphones
M9B
Stereo Wireless
Earphones
1 pair
of cable
guides
R
E
S
U
NUAL
A
M
9
M
e
r
e
t
S
e
s
a
e
l
P
User
s
e
n
B
o
h
manual
p
r
a
E
s
s
le
e
ir
W
o
y
t
re
i
t
n
e
s
t
i
n
i
l
a
u
n
a
m
s
i
h
t
d
a
re
Micro-USB
charging
cable
4 pairs of
eartips
1
Page 3
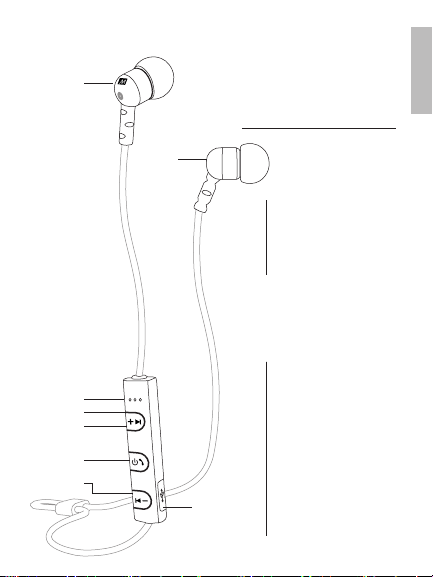
PRODUCT OVERVIEW
1
R
3
4
5
6
7
EN
M9B
Stereo Wireless
Earphones
2
Earpieces
12Right earpieces
Left earpieces
Remote
3
Microphone
4
LED status
indicator light
5
Volume up / next
track button
6
Multifunction button
7
Volume down /
8
previous track button
8
Micro-USB
charging port
2
Page 4

CHARGING
Connect the charging cable to any powered USB port and to the charging
port located on the headset’s remote control.
The status indicator light will stay red while charging and turn blue when fully
charged.
When the battery is low, the headset will say “battery low” and a red light on
the remote will flash twice every two seconds.
Apple® devices such as the iPhone®, iPad®, and iPod touch® will also
display an on-screen headset battery indicator when the M9B is connected.
Note: the lifetime of the battery will be significantly reduced if your headset
is not charged for a long period of time. It is recommended to charge your
headset at least once a month.
3
Page 5

WEARING THE EARPHONES
Wearing the M9B correctly will ensure the most comfortable and secure fit.
STEP 1:
Select and install the correct eartips.
The M9B is an in-ear headphone and relies on a tight seal between eartip and
ear canal to deliver great sound and bass. Four sizes of ear tips are included
to help you achieve the best fit.
We recommend trying all of them and selecting the ones with the best sound
and comfort for your ears.
STEP 2 (Optional):
For a more secure sport-style fit, install the over-the-ear cable guides as
shown.
continued on next page
4
Page 6

WEARING THE EARPHONES
STEP 3:
Put the earphones in your ears. Adjust the earpieces for an airtight seal.
When worn correctly, the earphones will reduce outside noise and deliver
good bass impact. If you do not get much bass or hear tinny sound with
excessive treble presence, re-adjust the fit of the earphones in your ears
and/or try a different size of eartips.
STEP 4 (Optional):
Adjust the cable cinch to reduce cable slack for a more secure and
comfortable fit.
Cable over the earCable down
5
Page 7

BLUETOOTH® PAIRING
Your headset must be paired to a Bluetooth device before it can be used.
It is only necessary to pair your headset once with each device.
Make sure the M9B is turned off and within 3 feet (1 meter) of the
1.
device you wish to pair. Press and hold the Multifunction button for
about 4 seconds until the headset says “Pairing”. The status indicator light
will flash red and blue in an alternating pattern while the M9B is in pairing
mode.
Note: The M9B will remain in pairing mode for 5 minutes or until paired.
Open the Bluetooth menu on the device you wish to pair.
2.
iPhone, iPad, and iPod touch
On your device, open the
a)
Select
Bluetooth.
b)
The iPhone/iPad/iPod® will automatically search for new devices.
Android™ Phones and Tablets
On your device, open the
a)
Select
Bluetooth
b)
found in the
Wireless & Networks
on. Select “Search for Devices” or “Refresh” if your phone or tablet does
not automatically search for new devices.
Windows® Phone 8 devices
On your device, open the
a)
Select
Bluetooth. If Bluetooth is not on, turn it on.
b)
Windows Phone 8 will automatically search for new devices.
Computers, Laptops, and Other Devices
Visit the Bluetooth Support Page at
www.MEEaudio.com for pairing and setup information.
Wait until you see “M9B” on the screen of your device.
3.
Select “M9B” on your device and follow any further prompts to pair.
4.
Use “0000” if a pin is required. Once connected, the headset will say
“Connected” and the blue indicator light will flash three times every 9
seconds.
If pairing fails after several tries, please refer to your device’s
user manual for additional information. Visit the Bluetooth Support Page at
www.MEEaudio.com for instructional pairing videos and troubleshooting
information.
Settings
If Bluetooth is not on, turn it on.
(on older Android devices
menu
Settings
menu
Bluetooth
menu). If Bluetooth is not on, turn it
Settings
menu
is
6
Page 8

CONNECTING TO PAIRED DEVICES
When turned on, the M9B will automatically connect with the last paired
and/or connected Bluetooth device that is powered on and within range.
If the headset does not connect automatically, open the Bluetooth menu
on your device and select “M9B” from the list of paired devices.
CONNECTING TO PAIRED DEVICES (MULTIPOINT)
Multipoint allows two Bluetooth devices to be connected to the M9B
simultaneously. Both devices will need to be paired before multipoint
can be used by following the pairing procedure described in the Bluetooth
Pairing section for each device.
To use two Bluetooth devices with the M9B, turn the unit on and wait until
it connects to the last paired device. Then, select “M9B” from the Bluetooth
menu of second device you wish to connect. The headset cannot be connected with more than two devices simultaneously.
To switch between the two devices, pause audio playback on the active device and start audio playback on the other connected device. It takes several
seconds for the audio to switch.
Incoming calls will always take precedence over media. When a call comes
in, the M9B will automatically activate the device with the incoming call. Some
devices, such as computers and standalone audio transmitters, do not allow
audio switching except when a phone call occurs.
If you no longer wish to connect to multiple devices, disable Bluetooth on the
device you do not want connected to the M9B or remove the “M9B” pairing
from the Bluetooth menu of that device.
7
Page 9

FUNCTIONALITY & CONTROLS
Headset Status Function Operation
Powered off Power on
Power off
Powered on
Incoming
phone call
Phone call in
progress
Call in progress,
second incoming
call
One call active,
one on hold
Media playing
No phone calls in
progress
* You may need to bring your media player up on the screen for initial playback to start
** Not all devices/applications support this functionality
Raise or lower volume
Answer phone call Press the Multifunction button.
Reject phone call
End phone call Press the Multifunction button.
Mute/unmute
microphone
End current call and
answer new call
Answer new call, put
current call on hold
Reject new call
End current call and
switch to call on hold
Switch active call Double press the Multifunction button.
Play/pause media* Press the Multifunction button.
Next track
Previous track
Redial** Double press the Multifunction button.
Activate Siri/voice
command**
Press and hold the Multifunction
button for 3 seconds.
Press and hold the Multifunction
button for 3 second.
Press the Volume up or Volume down
button. Headset will produce a tone
when maximum or minimum volume
is reached.
Press and hold the Multifunction
button for 2 seconds.
Press and hold the Volume down for
2 seconds to mute. Repeat to unmute.
Headset will produce two tones when
muted or unmuted.
Press the Multifunction button.
Double press the Multifunction button.
Press and hold the Volume up and
Volume down buttons at the same
time for 1 second.
Press the Multifunction button.
Press and hold the Volume up button
for 1 second.
Press and hold the Volume down
button for 1 second.
Press and hold the Multifunction
button for 2 seconds. Repeat to cancel.
8
Page 10

FACTORY RESET
A factory reset will clear all paired devices from memory. To perform a factory
reset, put the headset in pairing mode as described in the Bluetooth Pairing
section, then press and hold the Volume up and Volume down buttons at the
same time for 2 seconds. The headset will produce three tones and the blue
indicator light will flash twice to indicate the memory has been cleared. The
headset will need to be paired with a Bluetooth device before use.
SAFETY AND CARE
To clean, remove the eartips and rinse them under running water.
•
Clean the earphones using a cotton swab damp with a small amount of
rubbing alcohol. Allow the earphones and eartips to dry completely before
resuming use.
Use only the supplied Micro-USB charging cable or a compatible
•
replacement from a reputable manufacturer.
Battery performance will be severely decreased when stored in extreme
•
temperatures: below -10°C/14°F or above 50°C/122°F, including direct
sunlight.
If the device comes in contact with liquids, quickly wipe away.
•
If submersed in water, do not turn the device on until completely dried.
Note: liquid submersion voids the warranty.
Do not use around flammable gasses as fire may occur.
•
Keep the device and packaging out of reach of children.
•
9
Page 11

WARNING
Using headphones at high volumes for extended periods of time will result in
permanent hearing damage. It is advised you keep volume levels moderate
to low at all times for your safety. Turn the volume all the way down after
connecting your earphones, then gradually increase the volume until you
reach a comfortable listening level. Do not use while driving a car, cycling,
operating machinery, or performing other activities that require hearing
surrounding sounds.
TROUBLESHOOTING
Visit the Bluetooth Support Page at www.MEEaudio.com for troubleshooting
procedures.
SPECIFICATIONS
Visit the M9B product page at www.MEEaudio.com for product
specifications.
WARRANTY:
The M9B is covered by a 1-year manufacturer warranty.
For more information, visit www.MEEaudio.com
Have a question?
Email support@meelec.com
MEE audio and its logo are registered trademarks of S2E, Inc. All rights reserved.
iPhone®, iPad®, iPod®, iPod touch®, and Siri® are registered trademarks of Apple Inc.
Android™ is a registered trademark of Google Inc.
Windows® Phone is a registered trademark of Microsoft Corporation in the United States and other countries.
The Bluetooth® word mark and logos are registered trademarks owned by Bluetooth SIG, Inc.
and any use of such marks by MEE audio is under license. Other trademarks and trade names
are those of their respective owners.
10
Page 12

www.MEEaudio.com
support@meelec.com
 Loading...