

Page 1

BLUETOOTH SUPPORT PAGE
Please visit the Connect Support Guide at
www.MEEaudio.com/ConnectSupportGuide
for easy-to-follow video setup guides and
the latest troubleshooting information.
POWERED BY Qualcomm aptX® AND Bluetooth
®
HD WIRELESS SOUND FOR YOUR HDTV
BLUETOOTH WIRELESS HEADPHONE
SYSTEM FOR TV
Model: T1H1
USER MANUAL
English
Page 2
BLUETOOTH PAIRING
Make sure the Venture2 is turned off and within 3 feet (1 meter)
of your device. Put the headset in pairing mode by holding the
Multifunction
button for about 6 seconds until the status indicator
light begins to flash red and blue in an alternating pattern and the
headphone says “Ready to Pair”.
Phones and tablets
Open the Settings menu and
select Bluetooth. If Bluetooth
is not on, turn it on. Select
“Search for Devices” or
“Refresh” if your phone or
tablet does not automatically
search for new devices.
Other devices
Visit www.MEEaudio.com/Bluetooth for pairing & setup
information.
Wait until you see “MEE audio Venture2” on the screen of your
device. Select it and follow any further prompts to pair. Use “0000”
if a pin is required. Once connected, the status indicator light will
turn blue.
Note: It is only necessary to pair your headset once with each
device.
If pairing fails, please refer to your device’s user manual for
further information. Visit the Bluetooth Support Page at
www.MEEaudio.com/Bluetooth for instructional pairing videos
and troubleshooting information.
RECONNECTING TO PAIRED DEVICES
The Venture2 can remember previously paired devices. Any time
it is powered on, it will automatically connect with the last paired
Bluetooth device that is on and within range. If the headset does
not connect automatically once turned on, re-pair it by following
the procedure outlines in the Bluetooth Pairing section or open the
Bluetooth menu on your device and select “MEE audio Venture2”
from the Bluetooth device list.
CONNECTING WITH OTHER DEVICES
The Venture2 can be connected with other Bluetooth audio devices such as phones
and tablets by following the pairing procedure in the Bluetooth Pairing section. The
headset only needs to be paired once with each new device.
STEP 1: POWERING ON
When used while plugged in to USB, the
Connect
will use USB power and the
internal battery will be charged. When unplugged from USB power, the
Connect
will use its internal battery. Please allow the unit to charge fully before using it on
battery power for the first time.
A. Plug the included Micro-USB charging cable into a powered USB port** and
the charging/power port of the
Connect
.
B. The green charging indicator light will pulse slowly while the
Connect
is
charging. Charging time is approximately 90 minutes.
C. Slide the power switch to the “on” position to turn the
Connect
on.
D. When unplugged from USB power, the
Connect
will use its internal battery.
When the battery is low, the green power LED will blink once every second.
Note: When using USB power, there is no need to turn the
Connect
off after each use.
**The USB outputs of some TVs do not provide a stable current.
It is recommended to use a computer or USB wall charger to charge the
Connect
.
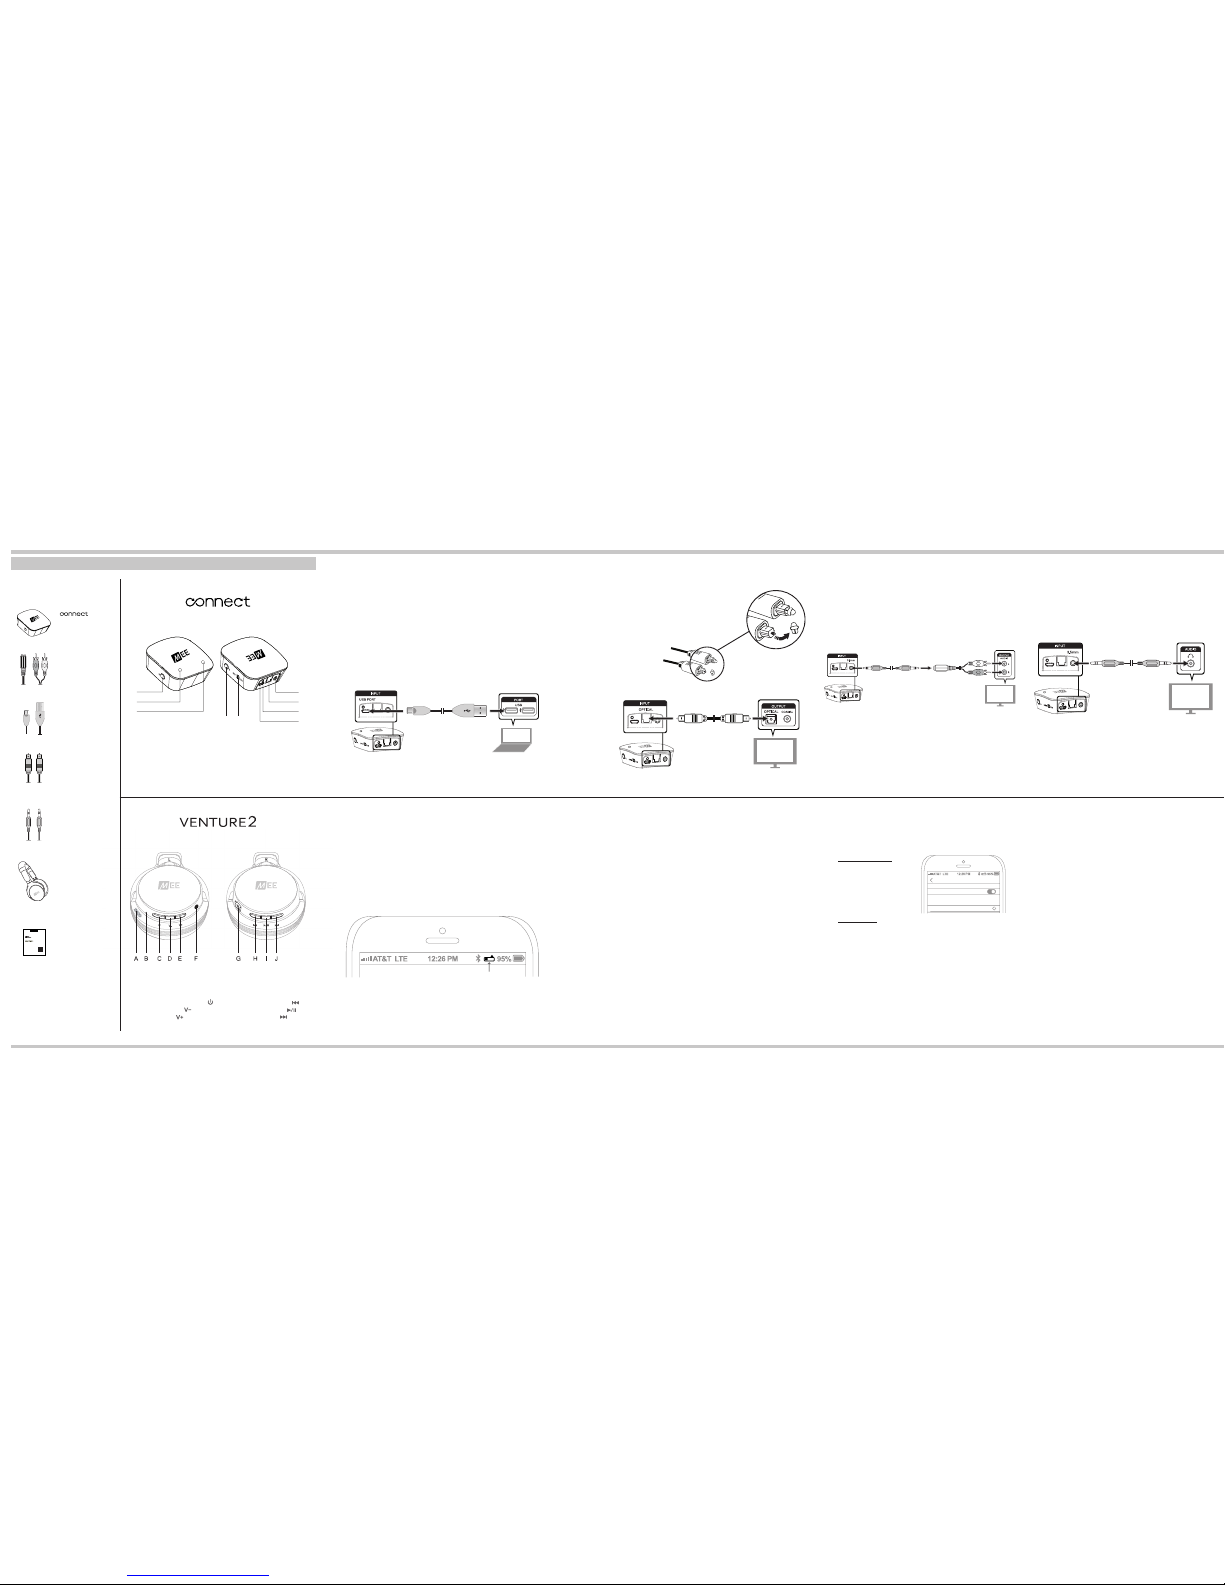
STEP 2: CONNECTING TO TV
The
Connect
features three different connection options for compatibility with
a wide range of devices. Consult the user manual for your TV/audio device to
determine the appropriate audio output.
OPTION 1: DIGITAL OPTICAL AUDIO OUT (TOSLINK)
Newer TVs are usually outfitted with a TOSLINK digital
optical (S/PDIF) audio out connector.
A. Remove the protective caps from the
included fiber optic TOSLINK cable.
B. Plug the cable firmly into the optical audio output on the TV and the optical
input of the
Connect
.
Note: If you have successfully connected the TOSLINK cable and you are still not
receiving any sound, please make sure that your audio output settings on your TV, DVR,
or other similar device are set to “PCM”.
OPTION 2: RCA AUDIO OUT (RED AND WHITE
CONNECTORS)
Older TVs usually have analog audio output with red and
white RCA connectors. To use the RCA output, plug the
included RCA adapter into the matching-color RCA jacks on
the TVs and attach to the 3.5mm stereo audio cable. Plug
the other end of the audio cable into the 3.5mm input of the
Connect
.
Note: Some older TVs do not automatically output sound via
RCA for certain inputs. To enable RCA audio output, locate
the audio output setting on your TV with the options “FIXED”
and “VARIABLE”, sometimes labeled “SET MONITOR OUT”,
and change this setting to “VARIABLE”. If you still don’t hear
any sound, look for a setting that controls the TV’s internal
speakers and set it to “OFF”.
OPTION 3: 3.5MM (1/8”) HEADPHONE JACK
Some TVs and most standalone receivers have a
headphone jack on the front or side. To use the
Connect
with a headphone jack, plug the included 3.5mm stereo
audio cable into the headphone jack and the 3.5mm input of
the
Connect
. A ¼” adapter (not included) may be used with
receivers that have a ¼” jack.
Note: The output volume of the headphone jack can typically
be controlled using the TV or receiver and will affect the
volume of the
Connect
.
ENGLISH
PACKAGE CONTENTS
Stereo Wireless Bluetooth®
Headphones
Right Earcup
G USB port for
charging
H Previous track
I Play / pause
J Next track
Left Earcup
A Microphone
B LED indicator
C Power / multifunction
D Volume down
E Volume up
F 3.5mm audio jack
3.5mm
audio cable
TOSLINK digital
optical S/PDIF
audio cable
2 x Micro-USB
charging cable
3.5mm
to RCA
adapter
Bluetooth
Transmitter
B
PRODUCT OVERVIEW
1
2
3
6
7
8
9
1
2
3
4
5
Pairing button “B”
Indicator light “B”
Indicator light “A”
Pairing button “A”
On/Off switch
6
7
8
9
Analog audio input (3.5mm)
Digital audio input (TOSLINK
optical S/PDIF)
Power/charging indicator light
Micro-USB power/charging
port
4 5
Universal Dual Headphone
Bluetooth® Wireless Audio Transmitter
CHARGING
Connect micro-USB cable to Venture2 charging port and powered-on computer or USB
charger.
Charge time is approximately 2 hours. The red charging indicator light will turn off once
fully charged.
Low battery is indicated by a solid red status indicator light and “battery low” voice
notification once every 3 minutes.
Apple® devices such as the iPhone®, iPad®, and iPod touch® will also display an onscreen headset battery indicator near the top right corner of the screen when the
Venture2 is connected.
Settings
Bluetooth
Bluetooth
MEE audio Matrix3
Connected
i
Now discoverable as “Your iPhone”.
MY DEVICES
Venture2
Stereo Bluetooth
Headphones
User
manual
battery indicator
BLUETOOTH SUPPORT PAGE
Please visit the Connect Support Guide at
www.MEEaudio.com/ConnectSupportGuide
for easy-to-follow video setup guides and
the latest troubleshooting information.
POWERED BY Qualcomm aptX® AND Bluetooth
®
HD WIRELESS SOUND FOR YOUR HDTV
BLUETOOTH WIRELESS HEADPHONE
SYSTEM FOR TV
Model: T1H1
USER MANUAL
English
Page 3

CONTROLS
The headphone controls on the Venture2 are located on the bottom
of each earcup.
* You may need to bring your preferred media player application up on the screen
for media playback to start .
** Not all devices support this functionality. For more information, refer to the user
manual for your device.
SAFETY AND CARE
• Battery performance will be severely decreased when
stored in extreme temperatures: below -10°C/14°F or above
45°C/113°F including direct sunlight.
• The lifetime of the battery will be significantly reduced if your
device is not charged for a long time. It is recommended to
charge your device at least once a month.
• Clean with a soft, slightly damp cloth. Do not use chemical
cleaners.
• There are no user replaceable/reparable parts in this device.
Disassembling it will void your warranty.
• Do not expose the device to liquids. If the device comes
in contact with liquids, quickly wipe away. If submersed in
water, do not turn the device on until completely dried. Note:
liquid submersion voids the warranty.
• Do not use around flammable gasses as fire or explosion
may occur
USE AS WIRED HEADPHONE
The Venture2 can be used as a wired headphone with any 3.5mm
stereo audio cable. This allows use when the battery is depleted
and with devices that do not have Bluetooth (such in-flight
entertainment systems) or aren’t paired.
Note: the built-in microphone of the Venture2 will not work when
the headphones are used in wired mode.
WARNING
Using headphones at high volumes for extended periods of time
will result in permanent hearing damage. It is advised you keep
volume levels moderate to low at all times for your safety. Turn
the volume all the way down after connecting your headphones,
then gradually increase the volume until you reach a comfortable
listening level. Do not use while driving a car, cycling, operating
machinery, or performing other activities that require hearing
surrounding sounds.
TROUBLESHOOTING
Visit the Bluetooth Support Page at
www.MEEaudio.com/Bluetooth for troubleshooting procedures.
WARRANTY
This product is covered by a 1-year manufacturer warranty when
purchased from an authorized retailer.
For more information, contact your local MEE audio dealer or visit
www.MEEaudio.com/Support
STEP 3: SETTING UP BLUETOOTH DEVICES
Before first use the
Connect
must be paired with at least one
Bluetooth headphone or speaker.
The Venture2 headphone comes pre-paired and should connect
automatically once it is charged and powered on. The procedure
below can be used to re-pair the Venture2 if needed, or to pair a
different headphone or speaker with the
Connect
transmitter.
PAIRING WITH BLUETOOTH HEADPHONES OR SPEAKERS
Make sure the headphones are turned off and within 1 meter (3 feet)
of the
Connect
. Put the headphones in pairing mode. The Venture2
can be put in pairing mode by pressing and holding down the power/multifunction button for approximately 6 seconds until the red and
blue lights flash in an alternating manner and the headphone says
“Ready to Pair”. If you are pairing a different Bluetooth headphone or
speaker, consult its user manual for pairing instructions.
Once the headphones are in pairing mode, press pairing button
“A” located on the right side of the
Connect
. A blue light will blink
rapidly on the top of the unit to indicate that the
Connect
is ready to
pair. Once the
Connect
and headphone are both in pairing mode
simultaneously, they will automatically pair. Once paired, the light on
top of the
Connect
will turn solid blue.
OPTIONAL: PAIRING A 2ND HEADPHONE OR SPEAKER
The
Connect
can stream audio to two Bluetooth
headphones simultaneously. A second headphone can
be paired after one headphone is already connected (as
indicated by a solid blue light on top of the unit). To pair the
second headphone, put it in pairing mode and then press
pairing button “B” on the
Connect
. A blue light will flash to
indicate that the
Connect
is in pairing mode and the second
headphone will be paired.
Note: during the pairing process the sound may have a brief
intermittent period.
Once both
headphones are
connected, two
solid blue lights
will be shown.
SUBSEQUENT USE
The
Connect
will remain connected until either the unit
or headphones are turned off. Previously paired Bluetooth
headphones will reconnect automatically once turned back
on. If the
Connect
itself is turned off, it is recommended to
turn it back on first before turning on your headphones. If
your headphones are already on, turn them off and then on
again to reconnect.
Note: it may take up to 60 seconds for audio transmission
to start.
FACTORY RESET / CLEAR MEMORY
The
Connect
can be reset by holding the pairing button “A”
for approximately 5 seconds until the blue indicator light
begins to blink. The unit will enter pairing mode and
previously paired devices will be cleared from memory.
Power / Multifunction Button
[HOLD 3 sec]
[HOLD 5 sec]
- Power on
- Power off
[TAP]
[HOLD 2 sec]
[TAP]
- Answer Incoming Call
- Reject Incoming Call
- End call
(during phone call)
[DOUBLE TAP] - Redial last call**
Volume Down Button
[TAP] - Decrease volume
Volume Up Button
[TAP] - Increase volume
Previous Track Button
[TAP] - Previous track
Play / Pause Button
[TAP]
[HOLD 2 sec]
- Play/pause (during media playback*)
- Activate Siri / voice command / voice dialing**
Next Track Button
[TAP] - Next track
ADJUSTING THE VOLUME
Volume can be individually adjusted on each set of
headphones paired with the
Connect
using the built-in
volume controls on the headphone.
With some TVs and connection options, TV volume may
be further raised or lowered to change the volume of all
headphones paired with the
Connect
. In this case, volume
should be maximized on the TV and then adjusted via
headphones for best audio quality.
STEP 1.
MAXIMIZE TV VOLUME
STEP 2.
ADJUST HEADPHONE VOLUME
3.5mm
Page 4

Have a question?
Email support@MEEaudio.com
MEE audio and its logo are registered trademarks of S2E, Inc. All rights reserved.
The Bluetooth® word mark and logos are registered trademarks owned by Bluetooth SIG, Inc. and any use of such marks by
MEE audio is under license. Other trademarks and trade names are those of their respective owners.
Qualcomm aptX is a product of Qualcomm Technologies International, Ltd. Qualcomm is a trademark of Qualcomm
Incorporated, registered in the United States and other countries, used with permission. aptX is a trademark of Qualcomm
Technologies International, Ltd., registered in the United States and other countries, used with permission.
iPhone®, iPad®, and iPod touch® are registered trademarks of Apple Inc.
Page 5

www.MEEaudio.com
support@MEEaudio.com
 Loading...