

Page 1

Medweb Secure DICOM
Medweb Secure DICOM
Medweb Secure DICOM Medweb Secure DICOM
Proxy Webserver
Proxy Webserver
Proxy WebserverProxy Webserver
Administrator Guide and User Manual
667 Folsom Street
San Francisco, CA 94107
Tel: 415.541.9980
Fax: 415.541.9984
Prepared By:
Medweb
Version 2.0
Page 2

June 2003
l
ADMINISTRATOR GUIDE AND USER MANUAL
1.0 INTRODUCTION……………………………………………………………
1.1 Copyright 7
1.2 Limited Product Warranty 7
1.3 Safety Operating Instructions 8
1.4 Assistance and Problem Reporting 8
1.4.1 User Manual Accessibility 8
2.0 PRODUCT OVERVIEW……………………………………………………
2.1 Introduction 9
2.2 DICOM Introduction 9
3.0 SERVER BASICS AND ORIGINAL SETUP……………………………...
3.1 Requirements 10
3.2 Physical Description 10
3.3 Powering On the Medweb Server 11
3.4 Powering Off the Medweb Server 11
3.5 Rebooting the Medweb Server 11
3.6 Assigning Network Properties to the Server 11
3.7 Changing Disk Drives 12
4.0 LOGGING INTO THE MEDWEB SERVER……………………………...
4.1 Administrator 13
4.2 Logon Using Web Interface 13
4.3 Telnet/SSH Access 13
5.0 USERS, GROUPS AND MAILING LISTS………………………………...
5.1 User Management 15
5.1.1 Access Control Levels (ACL) 15
5.1.1.1 Groups 15
5.1.2 Passwords and Login 16
5.2 User Accounts 17
5.1.2.1 Remote Access Restriction by User 16
5.1.2.2 Remote Access Restriction by Interface 16
5.1.2.3 Remote Access Restriction Based on Originating IP
Address
5.1.2.4 File System Access 16
5.2.1 Maintain User Accounts 17
5.2.1.1 Add a New User 17
5.2.1.2 Set User Defaults 18
5.2.1.3 Deleting a User 19
7
9
10
13
15
16
- 2 Medweb Secure DICOM Proxy Webserver
Administrator Guide and User Manual
Confidentia
Page 3

June 2003
l
5.2.1.4 Check Login Status 19
5.2.1.5 Change a User Password Or Access Level 20
5.3 Logging and Auditing of User Activity 21
5.4 Remote Access Protection and File Protection 21
5.5 Groups 21
5.5.1 Set Group Defaults 21
5.5.2 Add a Group 21
5.5.3 Delete or Modify a Group 22
5.6 Mailing Lists 22
5.6.1 Add a Mailing List 22
5.6.2.Delete or Modify a Mailing List 23
6.0 ADMINISTRATIVE PROCEDURES/SERVICES………………………..
6.1 Network Configuration 25
6.1.1 Modifying Network Settings 25
25
6.1.2 Modem Settings 26
6.1.3 Domain Name Service - DNS 26
6.1.3.1 Add Forward Lookup 27
6.1.3.2 Add Reverse Lookup 27
6.1.3.3 Add Mail Server Lookup 27
6.1.3.4 Add Alias Lookup 28
6.1.3.5 Add Secondary Forward Domain 28
6.1.3.6 Add Secondary Reverse Lookup Domain 28
6.1.4 Dynamic Host Configuration Protocol - DHCP 29
6.1.4.1 Forward DHCP Requests 29
6.1.4.2 Set DHCP Clients 29
6.1.4.3 Add Dynamic Address Assignment 30
6.1.4.4 Add Static Address Assignment 30
6.2 Server Upgrades 31
6.2.1 Upgrading the Server 31
6.2.1.1 Scheduling Upgrades 31
6.2.1.1.1 Diagnostic Messages 32
6.3 Access Rights 32
6.4 Time Settings/Synchronizing 32
6.5 Local Site Information 33
6.6 Services 33
6.6.1 Web Services 33
6.6.2 DICOM Server 34
6.6.3 DICOM Archive 34
6.6.4 Mediscribe HTI 35
6.6.5 Email Settings 36
6.6.6 File Transfer Protocol (FTP) Server 37
- 3 Medweb Secure DICOM Proxy Webserver
Administrator Guide and User Manual
Confidentia
Page 4

June 2003
l
6.6.7 Windows File Sharing (SMB) 37
6.6.8 Apple File Sharing (AppleShare) 37
6.6.9 FrontPage Server Extensions 37
6.6.10 Simple Network Management Protocol (SNMP) Agent 37
6.6.11 Legato File Backup 38
6.7 Server Status 38
6.8 Server Backup Configuration 38
6.8.1 Scheduled Backup Configuration 39
6.8.2 Restoring Backup Data 40
6.9 Resetting the Administrator Password 40
7.0 DICOM………………………………………………………………………..
7.1 Optimized Network Transport and Image Compression 42
7.1.1 Self-Recovering File Transfer Protocol 42
7.1.2 Lossless or Lossy File Compression 42
7.1.3 Satellite Optimized Network Transfer 43
7.1.4 Time Window Delayed Transfer/Timed Forwarding 43
7.1.5 Wavelet Compressed Secure Web Access 43
7.2 Application Entity Titles (AE Titles) 43
7.3 DICOM Devices 44
7.4 Setting DICOM Destinations 44
7.5 Configuring and Using the CD Publisher 46
7.5.1 Introduction to CD Publishing 46
7.5.2 Rimage Software 46
7.5.3 Medweb CD Gateway 47
7.5.4 CD Publisher Settings 47
7.5.5 Starting the Publishing Process (for the Rimage only) 48
7.6 Modifying or Deleting Destinations 48
7.7 DICOM Route Editor: AE Title Forwarding and Element Matching 48
7.7.1 Application Entity Forwarding 48
7.7.2 Element Matching 49
7.8 DICOM Presets 50
7.8.1 Introduction 50
7.8.2 Configuring DICOM Presets 51
8.0 SECURITY SETUP FOR SECURE DICOM ROUTING………………...
8.1 Introduction 52
8.2 Secure Server Operation and Image Routing 52
8.2.1 Using the IPSEC VPN Function 52
8.2.1.1 IPSEC Configuration 53
8.2.2 Secure Tunneling – Routing DICOM Studies 54
8.2.2.1 Application Specific Secure Proxy Tunnels 54
42
52
- 4 Medweb Secure DICOM Proxy Webserver
Administrator Guide and User Manual
Confidentia
Page 5

June 2003
l
8.2.2.2 Secure Tunneling Configuration 54
8.2.2.3 Scheduling Transfer Times 55
8.2.2.4 Network Optimization for Image Transfer 55
8.2.2.4.1 Setting Compression Settings for Image
Transfer
8.2.2.5 Secure Tunnel Step-by-Step 55
8.2.3 Workflow Proxy 56
8.2.3.1 Workflow Proxy Introduction 56
8.2.3.2 Example of Workflow Proxy 56
8.2.3.3 Configuration of First (A) Workflow Proxy (Based on
Example in 8.2.3.2)
8.2.3.4 Configuration of Second (B) Workflow Proxy (Based
on Example in 8.2.3.2)
8.2.4 IP Filters 57
8.2.4.1 IP Filters Introduction 57
8.2.4.2 Resetting IP Filters 57
8.2.5 Secure Operation - SSL 58
8.2.5.1 SSL Introduction 58
8.2.5.2 SSL Security Certificate Generation 59
8.2.5.3 Enable All Ports Configuration 60
9.0 PROCEDURES FOR VIEWING STUDIES……………………….………
9.1 Medweb Image Viewer Plugin 61
9.1.1 Introduction 61
9.1.2 Plugin Installation 61
9.2 View Patients Page 62
9.2.1 Management Toolbar 62
9.2.1.1 New Study 62
9.2.1.1.1 Creating a New Study 62
9.2.1.1.1.1 Acquiring Images from a Kodak
Digital Camera
9.2.1.1.1.2 Acquiring Images from TWAIN
Devices and Scanners
9.2.1.1.1.3 Special Note on Using the Vidar
Scanner TWAIN Drivers
9.2.1.2 The On Call Function 65
9.2.1.2.1 Configuring On Call 65
9.2.1.3 Preferences 66
9.2.1.4 Save Settings 66
9.2.1.5 View Changes 66
9.2.1.6 Statistics 66
9.2.2 Study Search Bar 66
55
56
57
61
63
64
65
- 5 Medweb Secure DICOM Proxy Webserver
Administrator Guide and User Manual
Confidentia
Page 6

June 2003
l
9.3 Study Information and Manipulation 67
9.3.1 Viewing a Study 67
9.3.1.1 Image Management Tools 68
Change Access Permissions 69
Burn Study To CD/Burning Multiple Studies 69
Send To DICOM Storage Device, Printer, Email and Fax 70
Add, Modify or View Web Reports 71
Delete Study 73
Hold/UnHold Study 73
Compression Settings 73
9.4 Plugin Tools/Image Manipulation 73
9.4.1 Supplementary Help Tools 76
9.4.1.1 Plugin Help Screen 76
10.0 THE MEDWEB RIS AND WEB SCHEDULER…...……………………
10.1 RIS Introduction
10.2 RIS Basics 78
10.3 Configuring and Using the RIS 79
10.3.1 HL7 Server
10.3.2 Adding a Scheduler User 79
10.3.3 Adding Machines/Modalities 80
10.3.4 Adding/Editing/Deleting Modalities 81
10.3.5 Scheduling Doctors/Operators on the Modalities 81
10.3.6 Changing the Date 83
10.3.7 Managing Schedules 84
10.3.7.1 Editing Schedules 84
10.3.7.2 Deleting Schedules 84
10.3.8 Creating Patient Orders 84
10.3.9 Managing Existing Orders 87
10.3.9.1 Editing Orders 87
10.3.9.2 Deleting Orders 87
10.3.9.3 Cloning Orders 87
10.3.9.4 Moving Orders 87
10.3.10 Available Time Mode 87
10.3.11 Patient Order Search 88
10.3.12 Viewing All Orders for all Machines 89
10.3.13 Central Radiology 89
10.4 Resolving Schedule Conflicts 90
10.4.1 Order Schedule Conflicts 90
10.4.2 Machine Event Conflicts 91
10.5 System Messages, Errors and Solutions 92
APPENDIX A – DICOM SOP CLASSES……………………………………...
78
78
79
93
- 6 Medweb Secure DICOM Proxy Webserver
Administrator Guide and User Manual
Confidentia
Page 7

June 2003
l
1.0 Introduction
Thank you for purchasing your Medweb Server. Medweb appreciates your business and continual support.
The following user manual has been created to assist in operating and configuring Medweb servers.
1.1 Copyright
Medweb Secure DICOM Proxy Webserver. Copyright 1995-2003 Nexsys Electronics, Inc (d.b.a.
Medweb). All rights reserved.
Operating instructions and manuals are protected by copyright. No part of this document may be
reproduced, stored in retrieval system, or transmitted, in any form or by any means, electronic,
mechanical, photocopying, recording or otherwise, edited or translated, without the prior written or
verbal consent of Nexsys Electronics, (d.b.a. Medweb) Inc.
1.2 Limited Product Warranty
Medweb warrants that this product and all components thereof, will be free of defects in workmanship
and materials for a period of one year from the date of delivery to the original consumer/purchaser (the
“Warranty Period”). This warranty will not apply to repair or replace necessitated by:
• Any damage caused during shipment except by the original consumer/purchaser.
• Any damage caused by natural acts such as fire, flood, wind, earthquake, lightening or similar
disaster.
• Damage from use outside the product usage parameters.
• Damage from upgrade outside the product upgrade parameters, and unauthorized
modifications or incorporation into another product.
• Damage caused by improper use, environment, installation or electrical supply; improper
maintenance; or any other misuse, abuse or mishandling.
• Any modification of files from a telnet or console shell (this includes, but is not limited to
configuration files, software programs and data that are part of the product’s operating
system) that results in improper or impaired function of the product or system failure. This
excluded modification of files by employees of Medweb.
Non-Conforming Products. Upon discovery of any failure of a Medweb product or component thereof,
to conform to the above warranty during the Warranty Period, the consumer/purchaser will promptly
contact Medweb and seek a return merchandise authorization (“RMA”) number. Each requested RMA
number will be issued within three days after the consumer/purchaser requests thereof. The allegedly
defective Medweb product, or component thereof, will be returned to Medweb, securely and properly
packaged, freight and insurance prepaid, with the RMA number prominently displayed. Medweb will
have no obligation to accept any Medweb product, which is returned without an RMA number and will
not accept returns from anyone other than the original consumer/purchaser.
- 7 Medweb Secure DICOM Proxy Webserver
Administrator Guide and User Manual
Confidentia
Page 8

June 2003
l
Medweb will use diligent efforts to either replace or repair, as its option, within (10) days any Medweb
product or component found to be non-complying and will return such Medweb product or component
to the original consumer/purchaser, freight and insurance prepaid. In the event that Medweb, in its sole
discretion, determines that it is unable to replace or repair the Medweb product or component, it will
refund to the original consumer/purchaser the F.O.B. price paid by the consumer/purchaser for such
defective product. The foregoing constitutes the original consumer/purchaser’s sole remedy for
Medweb’s breach of the warranty provided herein.
1.3 Safety and Operating Instructions
It is important that the following safety and operating instructions be observed to ensure safe and
reliable operation your Medweb product.
• Install equipment in a dry, cool place.
• Clean the equipment with a dry cloth only.
• Do not use the components and cables outdoors.
• To prevent overheating, do not expose to direct sunlight.
• Never open the equipment yourself.
1.4 Assistance and Problem Reporting
Points of contact and procedures for obtaining assistance and reporting problems encountered in using
the software and/or hardware, should be reported to Medweb Technical Support at ts@medweb.com
in the case of emergency, please call (1-800-8 Medweb or 415.541.9980). Medweb is responsible for
the deployment and long-term support of the Medweb Server, including equipment installation at
operational sites, as well as installation of product upgrades.
1.4.1 User Manual Accessibility
This user manual is provided for the Administrator of every Medweb Server. It can be found under
Administrator Site/Manuals. You can also contact Medweb or your Reseller for a copy of our User
Manual.
or
- 8 Medweb Secure DICOM Proxy Webserver
Confidentia
Administrator Guide and User Manual
Page 9

June 2003
l
2.0 Product Overview
2.1 Introduction
The Medweb Server is a compact, full-featured Picture Archiving and Communications System,
Teleradiology and/or Telemedicine System for any facility that provides medical imaging services; it is
ideal for multi-chain imaging centers, hospitals with satellite clinics, regional healthcare enterprises
and small, rural sites.
A complete all-in-one hardware and software server solution for acquisition, compression and routing
of DICOM and non-DICOM studies, the Medweb Server integrates with existing PACS and DICOM
modalities to facilitate low-cost, high-performance management solution. Powerful image and web
technology, dynamic email and low maintenance design make it ideally suited for a distributed
environment.
Users only require a PC, browser and the free Medweb Image Viewer Plugin, which is essentially an
image manager that decompresses, opens and displays studies from within a web browser. The Server
may also be administered locally from a PC on the LAN, or remotely from a central site, greatly
reducing administration costs.
2.2 DICOM Introduction
DICOM is a medical imaging standard that allows the transmission of medical images and all of their
relationship data from hundreds of different types of medical devices. It includes the complete suite of
Radiology devices, and now included imaging devices from Dentistry, Ophthalmology, Pathology, and
Orthopedic Surgery etc.
It is designed to provide DICOM work list, DICOM routing, DICOM storage, and DICOM reports for
multiple devices in a department or clinic. The number is based on the hardware configuration;
however, any version of server can easily handle a dozen devices.
The Server provides a rich feature set of DICOM services, these include:
DICOM Worklist (Query, Retrieve, Forwarding)
DICOM Routing
DICOM Storage
DICOM Reports
DICOM Print
DICOM Webserver
DICOM Tunnels (Compressed and Encrypted)
- 9 Medweb Secure DICOM Proxy Webserver
Administrator Guide and User Manual
Confidentia
Page 10
June 2003
l
3.0 Server Basics and Original Setup
3.1 Requirements
1. An Ethernet-based local area network (LAN). 10/100 Base TX network cables are ok.
2. Network Parameters, including the Server’s assigned IP address, subnet mask of the local network,
and a gateway/router address (if necessary).
3. A personal computer attached to the network with Windows 2000, Win XP, UNIX or Macintosh OS
9.1 and higher.
PC Requirements: Pentium 3 or better (750 MHz or greater)
128MB of RAM
Minimum 1024x768 Resolution Monitor at 32 bit color depth
4. A browser on the computer is also necessary. Internet Explorer 5.5 Service Pack 2 or later OR
Netscape Navigator 6.0 or later is desired (if using PC Image Viewing Workstation). The browser must
have Java/JavaScript enabled.
5. The Medweb Image Viewer Plugin (if using PC Image Viewing Workstation).
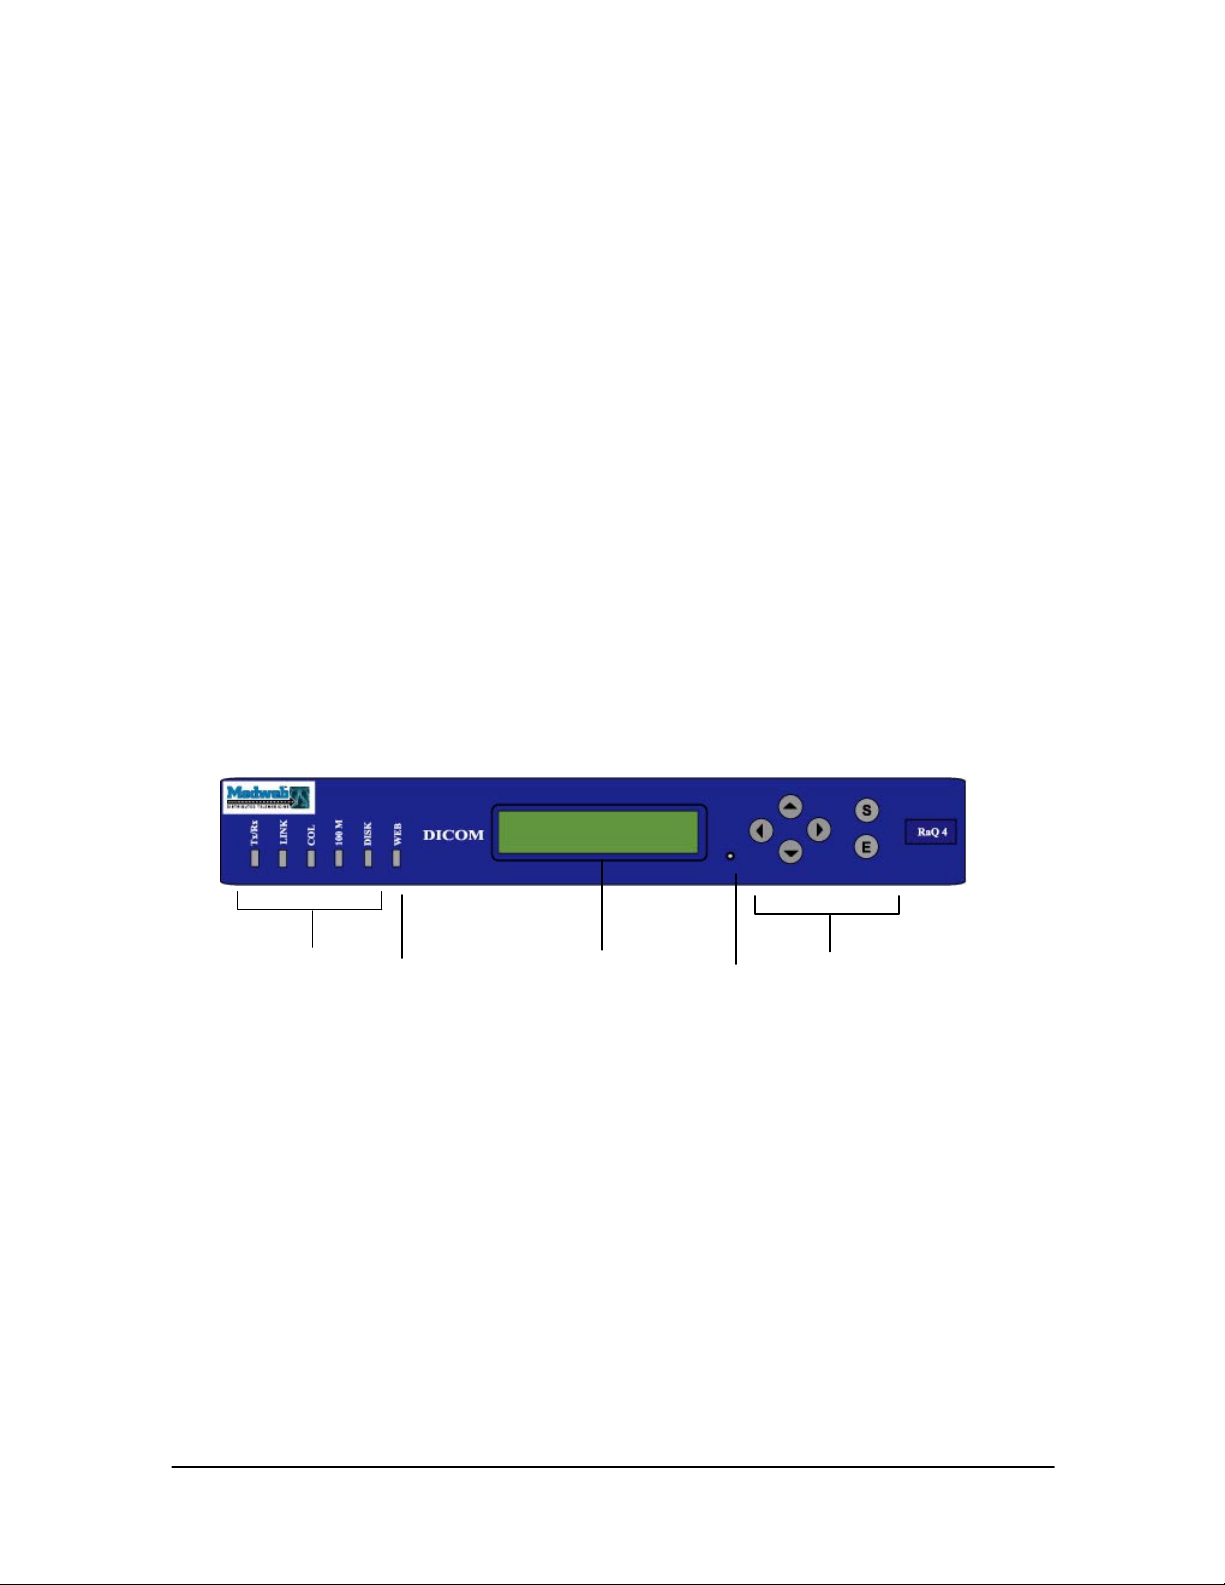
3.2 Physical Description
1. The Status Indicators signal Ethernet and hard drive activity
Tx/Rx (Transmit/Receive) blinks when there is a network traffic on the primary interface.
Link indicates an active network connection on the primary interface.
Col blinks when a collision is detected on the primary interface.
100 M indicates that 100 BaseT Ethernet is being used on the primary interface.
Disk indicates activity on the hard disk drive.
2. The Web indicator blinks to indicate Web activity.
3. The LCD Screen displays messages and values entered.
1
2
3
4
5
4. You can use the recessed Reset Password button if you forget the Server Administrator password.
5. The LCD Arrow buttons allow you to enter the network configuration information, configure a
UPS unit, and reboot the server and power down the Server. Use the Arrow buttons to toggle between
- 10 Medweb Secure DICOM Proxy Webserver
Administrator Guide and User Manual
Confidentia
Page 11

June 2003
l
choices or to enter values. The S (Select) button displays the next option. The E (Enter) button accepts
the information entered or the option displayed.
3.3 Powering On the Medweb Server
Turn on the power by pressing the On/Off switch on the back of the Server. The LCD screen on the
front should light up and a number of status messages should appear on the LCD screen as the Server
completes the boot process. This may take a few minutes.
3.4 Powering Off the Medweb Server
NOTE: Never attempt an improper shutdown
detailed below, can result in damage to your hardware and the possible loss of data.
1. On the LCD screen, hold down the Select button for approximately 3 seconds.
2. The LCD screen should display:
SELECT:
. Turning off the server before completing the procedure
SETUP NETWORK
3. Press the S button until POWER DOWN appears in the LCD screen and press the Enter button.
4. Use the left and right arrows to toggle the cursor between [Y]es and [N]o. Select [Y] to power down
the system by pressing the E button when [Y]es is blinking.
5. The OK to Power Off light on the back panel should blink. The LCD screen will display:
PLEASE SWITCH
POWER OFF NOW
Toggle the On/Off Switch on the back panel to the Off position.
3.5 Rebooting the Medweb Server
Use the same steps as Powering off to toggle the selection to REBOOT on the LCD Screen and press
the E button.
Use the arrow buttons to toggle the cursor between [Y]es and [N]o. Select [Y] to Reboot the system
by pressing the E button when [Y]es is blinking.
The Server will now automatically reboot itself; no further action is needed. This may take a few
minutes.
3.6 Assigning Network Properties to the Server
Make sure you have the following information before proceeding:
• The IP address assigned to the Server (at least one static IP Address)
- 11 Medweb Secure DICOM Proxy Webserver
Administrator Guide and User Manual
Confidentia
Page 12

June 2003
l
• The Subnet mask of your network
• The Gateway/Router address (if necessary)
1. Using the same instructions in “Powering down the Server”, toggle to ENTER IP ADDR using the
S button.
2. Enter the IP address assigned to the Server using the arrow buttons to input the numbers. Press E
once finished.
3. If the IP address is valid, the prompt for ENTER NETMASK appears on the LCD screen. Enter the
subnet mask using the arrow buttons assigned to the server. Press E once finished.
4. If the netmask is valid, the prompt for ENTER GATEWAY appears on the LCD screen. Enter the
IP address of the gateway for your network using the arrow buttons. If your network does not have a
gateway, do not enter any numbers and simple select the default value of 000.000.000.000 and press E.
5. The LCD should display a [S] AVE and [C] ANCEL option. Use the left and right arrows to toggle
between the two choices. Select [S] to save by pressing the E button when [Y]ES is blinking.
6. The LCD will display VERIFYING AND SAVING. The Server will automatically reboot. The
LCD Screen should display the IP address of the Server once finished booting.
To reset the IP address or change any values in the network configuration of the Server, please follow
the directions above.
For more Instructions on Network setup, Visit Section 6.0, Administrative Procedures.
3.7 Changing Disk Drives
In some cases, the server will be equipped with a redundant or backup hard drive. In the event of a
failure of the primary hard drive, you will need to make a switch to the back up drive. The
administrator is sole person permitted to perform this function.
1. Power Down the Server using the instructions provided above.
2. Disconnect all cables and power supply from the Server. Please assure that it is OFF before
disconnecting anything.
3. Unscrew all screws on the side and the back and proceed to lift the top off the Server.
4. The hard drives are located directly behind the LCD Screen on the inside of the Server. Disconnect
the power supply (red, orange and yellow wire) and the ribbon cable from the primary drive.
5. Connect the ribbon cable and the power supply cable into the appropriate port in the backup hard
drive.
6. Snap the top back into place and put in all the screws.
7. Power on the Server using the instructions provided above.
- 12 Medweb Secure DICOM Proxy Webserver
Administrator Guide and User Manual
Confidentia
Page 13

June 2003
l
4.0 Logging In To the Medweb Server
4.1 Administrator
The Administrator obtains their initial password from the installation team. The default login is set to
Username: Admin Password: Admin. The Administrator must, upon initial login, proceed to the
Administrator Site, and change the Administrator Settings. The Administrator may change password or
profile by going to their web site address and:
• Click on Administrators Site
• Click on Administrator Settings
• You must click Save Changes
After changing the password, the Administrator may need to authenticate himself through the web
browser with the new password.
Procedures for adding, deleting, or changing passwords are contained in Section 7, Maintaining User
Accounts Procedures. For the instructions for users to change their passwords, also refer to Section 11,
Maintain User Accounts Procedures.
4.2 Logon Using Web Interface
1. Assure that power has been provided to the server and an Ethernet cable (CAT 5) has been plugged
in to the Primary interface on the back of the server.
2. Network properties must be assigned using the LCD Screen (Section 3.6 Assigning Network
Properties to the Server).
3. Sign on to the Medweb Server by typing the http address of the server into the URL field of the
browser.
Ex: http://xxx.xxx.xxx.xxx
Note: If you use https
on the Medweb server.
4. Click the View Patients button or the Administrator Site button, and the user will be prompted to
fill in the appropriate username and password.
5.Enter a Username and Password assigned into the adjacent textboxes.
The Server Administrator is assigned a username of admin and a password of admin by default.
6.Press OK. Note*: If an invalid username or password is entered an identical screen will reappear for
a second try. The amount of times a user may try is dependent upon Administrator Settings.
(IP Address) or http://www.medweb.com (host and domain name).
at the beginning of the URL, then the browser will automatically access port 443
4.3 Telnet/SSH Access
The Medweb Server permits Telnet Access or SSH into the Server. Secure Shell is a program to log
into another computer over a network, to execute commands in a remote machine, and to move files
from one machine to another. It provides strong authentication and secure communications over
- 13 Medweb Secure DICOM Proxy Webserver
Administrator Guide and User Manual
Confidentia
Page 14

June 2003
l
insecure channels. It is a replacement for rlogin, rsh, rcp, and rdist. SSH protects a network from
attacks such as IP spoofing, IP source routing, and DNS spoofing. An attacker who has managed to
take over a network can only force SSH to disconnect. He/she cannot play back the traffic or hijack the
connection when encryption is enabled. All configuration and operation of the Server is done via the
website interface, so typically there is no need to establish telnet or SSH access to the server. Although
Medweb permits telnet access into the server, it is specifically discouraged and is therefore disabled by
default.
- 14 Medweb Secure DICOM Proxy Webserver
Administrator Guide and User Manual
Confidentia
Page 15

June 2003
l
5.0 Users, Groups and Mailing Lists
5.1 User Management
The Medweb Server Administrator provides users with valid user IDs and initial passwords. The user
role set for the individual username determines the level and scope of access to the server. Only the
Administrator may add, modify or delete users.
The user management page of the administrator web site allows the administrator to create new users,
assign or change passwords, and choose which ACL groups or (access control group) to assign the
users. Please see Section 7.0 Maintaining User Accounts for Information on how to create and manage
user accounts.
If the facility has an LDAP server, then the central LDAP server instead of using the administrator
page can control User access and password management.
5.1.1 Access Control Levels (ACL)
The Medweb server has several access control levels. The server administrator creates a user login
account. The administrator assigns the level of access based on the user’s clinical requirements.
5.1.1.1 Groups
The Medweb server has several access control groups that have varying access to the server
functions and to specific patient data groups. Access control levels include, Radiologist,
Technologist, Referring MD, Transcriptionist, Provider, Demo and Administrator. The
control functions for each group are as follows:
Radiologist
• Allowed to access Server
• Allowed to attach reports to studies
• Allowed to open On Call window
• Allowed to view changes
• Allowed to view access logs and usage
statistics
• Allowed to view/write/attach web
reports
• Allowed to change Read/Unread status
of Study
• Allowed to change Hold/Unhold status
of Study
• Allowed to delete Study
• Allowed to view/change security
permissions
Administrator:
• Allowed to access Server
• User can view all studies assigned only
to him
• Allowed to burn study to CD ROM
• Allowed to open study in Plugin
• Allowed to use Query/Retrieve function
• Allowed to send study as HTML
document by e-mail
• Allowed to send study as PDF document
by e-mail
• Allowed to send study as MWW (plugin
format) by e-mail
• Allowed to send study to remote device
• Allowed to print study on DICOM
printer
• Allowed to write study to USB drive
• Allowed to delete Study
• Allowed to view/change security
permissions
- 15 Medweb Secure DICOM Proxy Webserver
Administrator Guide and User Manual
Confidentia
Page 16

June 2003
l
• Allowed to create new studies
• Allowed to attach reports to studies
• Allowed to open On Call window
Allowed to view changes
• Allowed to view access logs and usage
statistics
• Allowed to view/write/attach web
reports
• Allowed to change Read/Unread status
of Study
• Allowed to change Hold/Unhold status
of Study
Guest:
Allowed to access Server
Allowed to view changes
No Access:
Has no permissions
Provider:
• Allowed to access Server
• Allowed to view/change security permissions
• Allowed to open study in Plugin
• Allowed to send study as HTML document by e-mail
• Allowed to send study as PDF document by e-mail
• Allowed to send study as MWW (plugin format) by e-mail
Transcriptionist:
• Allowed to access Server
• User can view all studies assigned only to him
• Allowed to attach reports to studies
• Allowed to view changes
• Allowed to view/write/attach web reports
• Allowed to send study as HTML document by e-mail
• Allowed to send study as PDF document by e-mail
• Allowed to send study as MWW (plugin format) by e-mail
• Allowed to send study to remote device
• Allowed to print study on DICOM printer
• Allowed to write study to USB drive
Referring M.D.:
• Allowed to burn study to CD ROM
• Allowed to open study in Plugin
• Allowed to use Query/Retrieve function
• Allowed to send study as HTML
document by e-mail
• Allowed to send study as PDF document
by e-mail
• Allowed to send study as MWW (plugin
format) by e-mail
• Allowed to send study to remote device
• Allowed to print study on DICOM
printer
• Allowed to write study to USB drive
- 16 Medweb Secure DICOM Proxy Webserver
Administrator Guide and User Manual
Confidentia
Page 17

June 2003
l
• Allowed to access Server
• User can view all studies assigned only to
him
• Allowed to attach reports to studies
• Allowed to open On Call window
• Allowed to view changes
• Allowed to change Hold/Unhold status of
Study
• Allowed to open study in Plugin
Scheduler (For the RIS Application):
Allowed to access Server
Display RIS page instead of Patient Page
Technologist:
• Allowed to access Server
• Allowed to create new studies
• Allowed to attach reports to studies
• Allowed to view changes
• Allowed to delete Study
• Allowed to view/change security
permissions
• Allowed to burn study to CD ROM
• Allowed to open study in Plugin
• Allowed to use Query/Retrieve function
Administrator
Complete access
• Allowed to send study as HTML
document by e-mail
• Allowed to send study as PDF document
by e-mail
• Allowed to send study as MWW (plugin
format) by e-mail
• Allowed to send study to remote device
• Allowed to print study on DICOM
printer
• Allowed to write study to USB drive
• Allowed to send study as HTML
document by e-mail
• Allowed to send study as PDF document
by e-mail
• Allowed to send study as MWW (plugin
format) by e-mail
• Allowed to send study to remote device
• Allowed to print study on DICOM
printer
• Allowed to write study to USB drive
5.1.2 Passwords and Login
All users of the Medweb server are required to have individual passwords. The password and
login limit user access to designated areas of the server. This includes limiting access to specific
patient files.
5.1.2.1 Remote Access Restriction by User
All login and password entry’s are via encrypted SSL access. No password or login is ever
entered in the clear.
5.1.2.2 Remote Access Restriction by Interface
The admin user has access to the administrator section of the webserver via a separate port
from regular users. As such, access to the admin site is not only limited to a specific user
login, but can also be limited to a particular interface of the Medweb server so that
- 17 Medweb Secure DICOM Proxy Webserver
Confidentia
Administrator Guide and User Manual
Page 18

June 2003
l
administration can be limited only to someone accessing the server from the internal LAN
interface.
5.1.2.3 Remote Access Restriction Based on Originating IP Address
The Medweb server has a packet filter that can limit access to specific TCP port numbers and
specific interfaces, and specific originating IP addresses. Typically only port 443 is open on
the outside for encrypted remote web access.
5.1.2.4 File System Access
Neither admin user nor regular users have direct file system access. All access is through an
application guided web interface with mandatory access controls based on user, group, and
task. File system access is only available to root or admin via SSH. However, this is not
required for regular maintenance of the server. User, date, and time log all activities whether
access is via shell, or via web interface as part of the standard UNIX logging function. SSH
access is not required for operation and can be disabled, thereby disabling direct file system
access.
5.2 User Accounts
This section contains procedures for creating and maintaining user accounts.
5.2.1 Maintain User Accounts
This section provides information on how to maintain Medweb Server user accounts by
performing the following:
• Check login status
• Setting User defaults
• Modify a user password
• Create user accounts
• Delete user accounts
• Modify a User Access Level
The administrator is, by default, the only person able to add or delete a user, change passwords
and access levels. All users of the Medweb server are required to have individual passwords. The
password and login limit user access to designated areas of the server. This includes limiting
access to specific patient files.
5.2.1.1 Add a New User
1. Sign on to the Medweb Server and login as the Administrator. Click on Administrator
Site on the Navigation Menu and then click the User Button.
- 18 Medweb Secure DICOM Proxy Webserver
Administrator Guide and User Manual
Confidentia
Page 19
June 2003
l
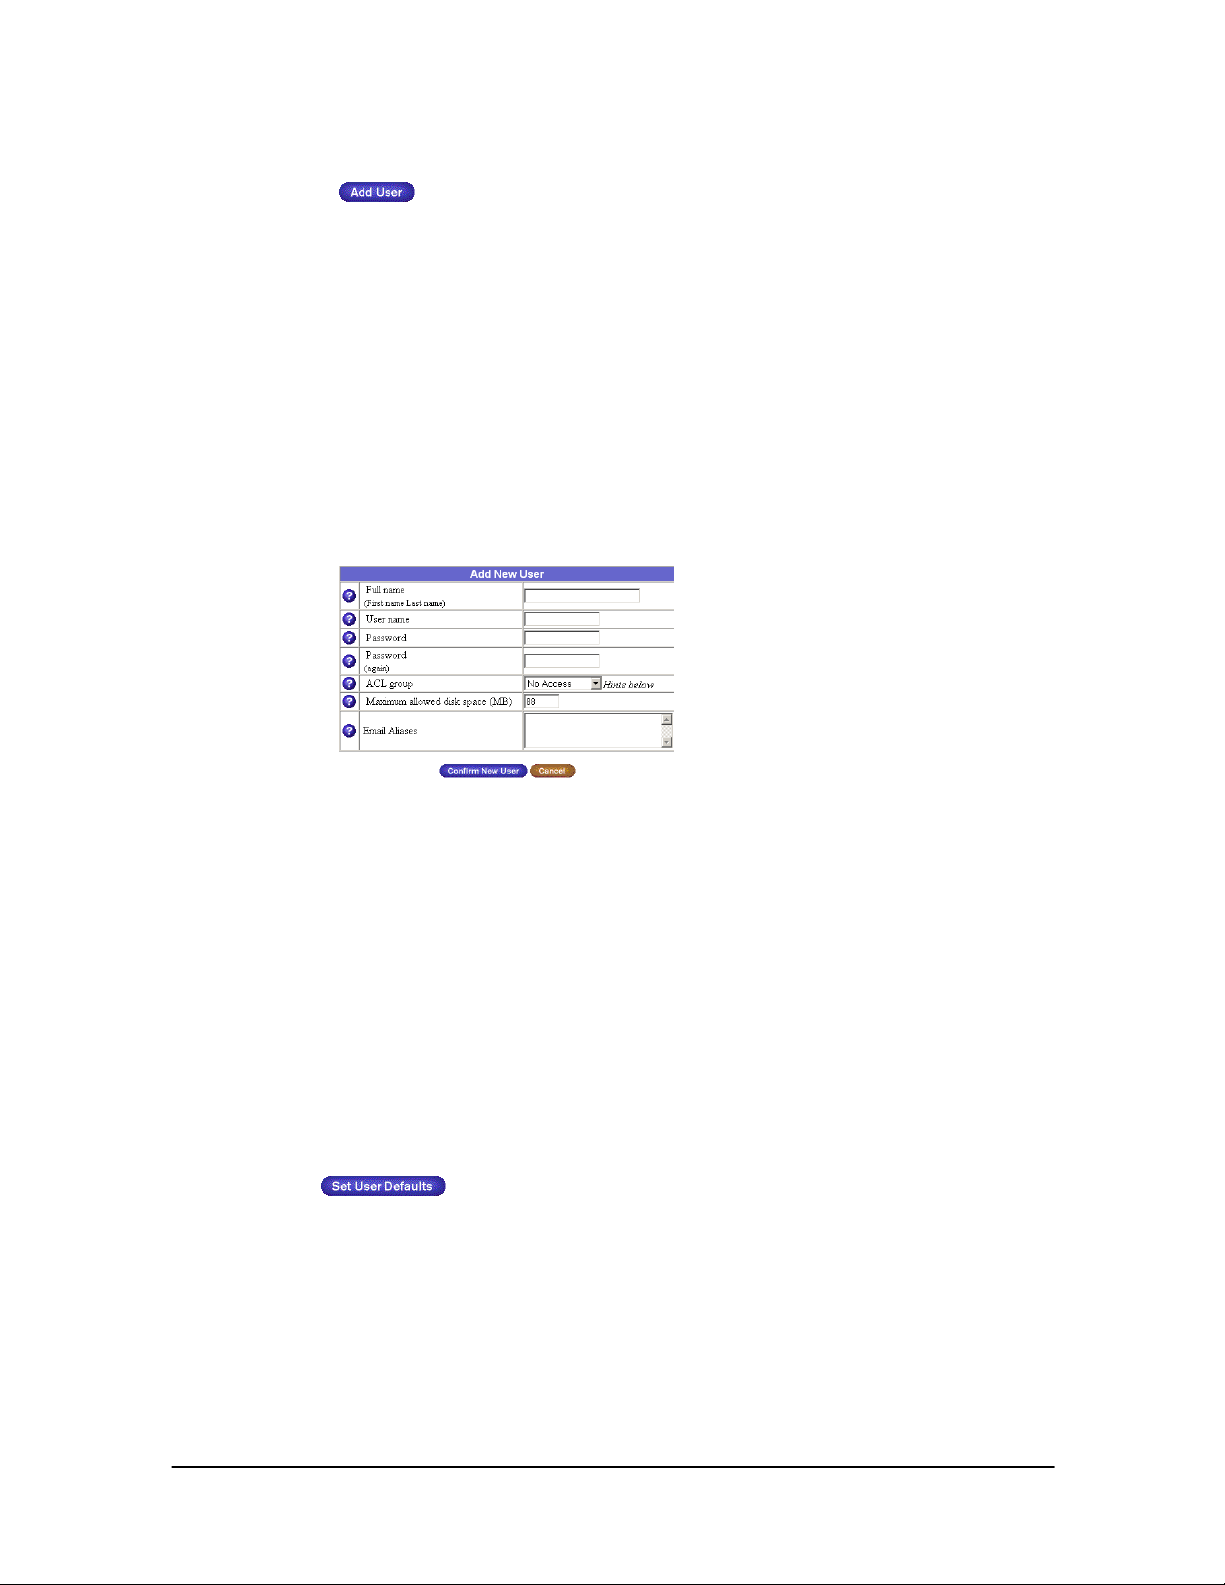
2. Click the Add User button.
3. Fill in the user information and provide a password. The username used by the Server
to identify the user. It also appears in the URL of the web site and the email address of
the user. Only lowercase alphanumeric characters, periods (.), hyphens (-) and
underscores (_) are allowed.
4. The Administrator must to assign a password for the user account being created. Enter
a password containing 3 to 16 characters. A string password is one that is difficult to
guess, not found in any dictionary, and is 5 or more characters with at least one nonalphabetical character. Passwords are case sensitive.
5. Assign the user to a particular ACL group. Medweb has coined 5 groups that possess
certain permissions. These groups are described in Section 6.1.1.1, Administrative and
Security Roles.
6. Click Confirm New User
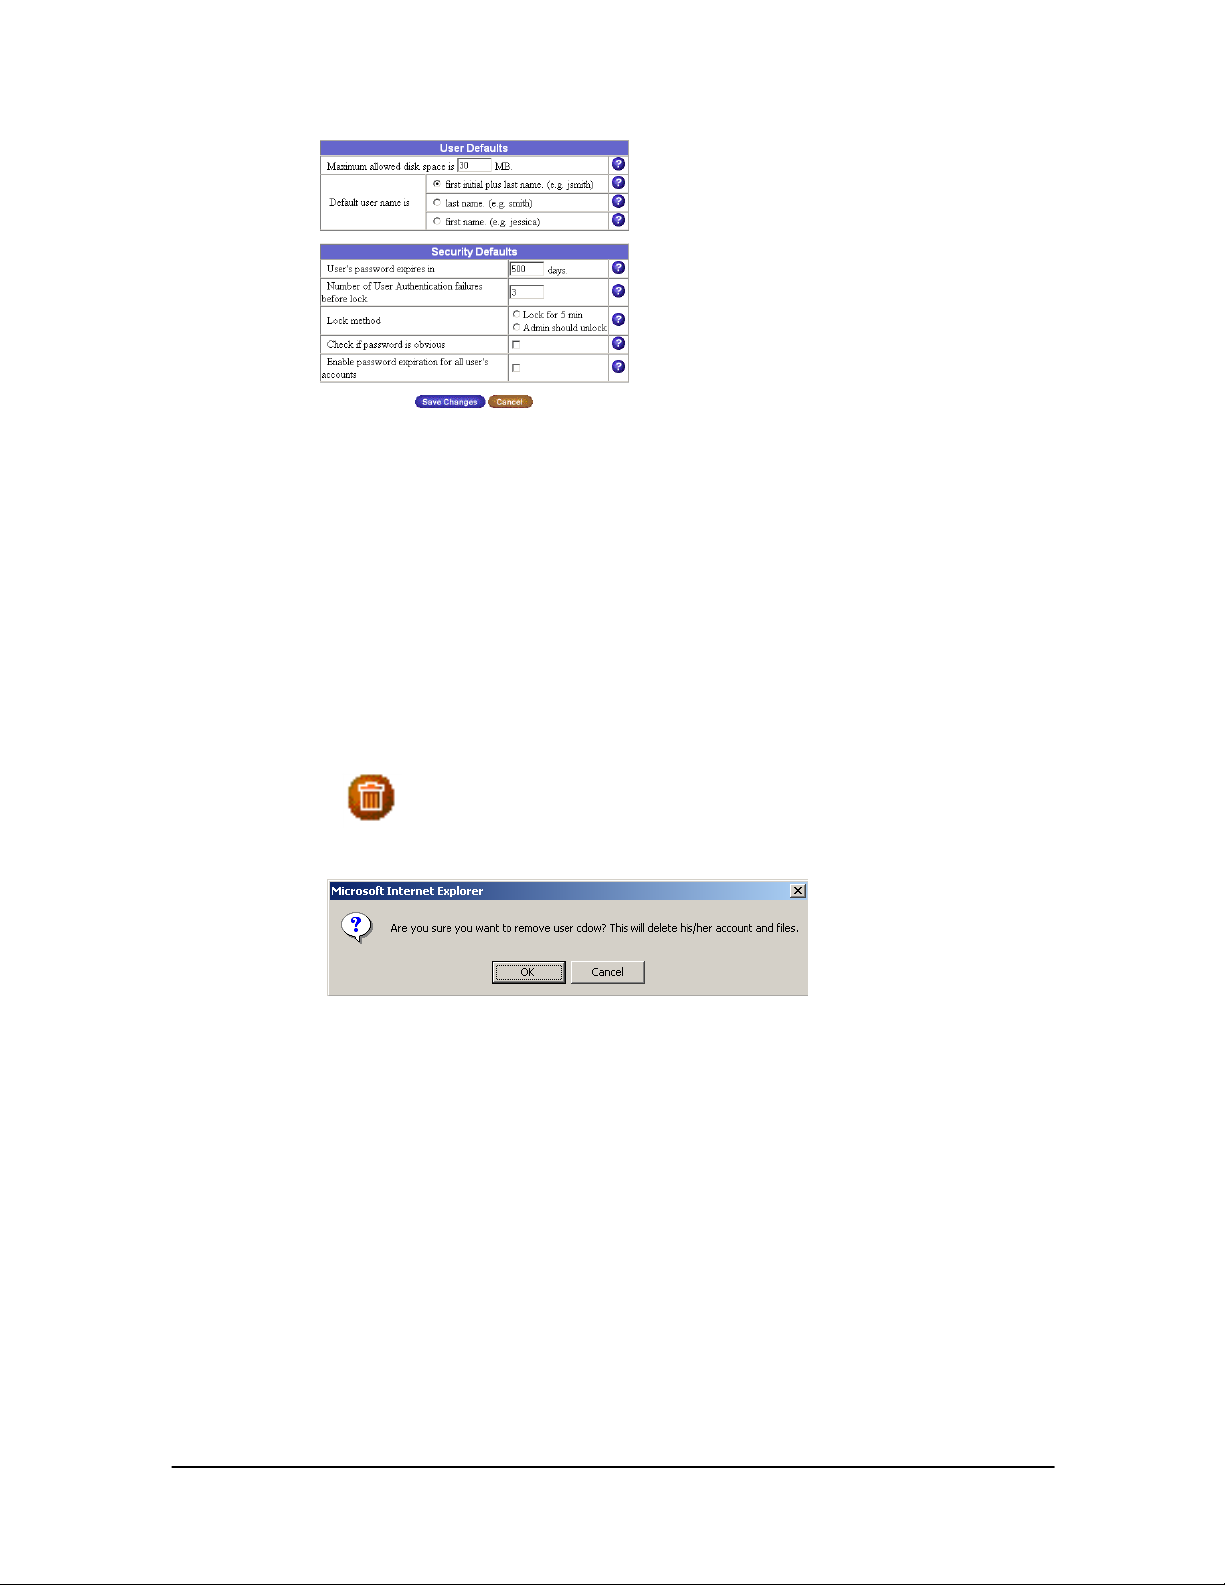
5.2.1.2 Set User Defaults
Only the Administrator may assign User defaults. Follow the steps below to set user
defaults.
1. To configure your user defaults (password rules, expiration etc) click the Set User
Defaults Button at the top of the table.
2. The Administrator may customize the following properties for all user accounts:
• Allowable disk space per user (typically 30MB)
• The username format for all users
• Enabling password expiration and setting time limits
• Password authentication/failure options
- 19 Medweb Secure DICOM Proxy Webserver
Administrator Guide and User Manual
Confidentia
Page 20
June 2003
l
3. Click Save Changes to accept new defaults.
5.2.1.3 Deleting a User
1. Sign on to the Medweb Server and login as the Administrator.
2. Click on the Administrator Site button on the Navigation Menu. The next screen will
present a table of all current users on the Server.
3. Beside each user listed, the administrator has the option to modify the Users’ Profile,
Modify the email Address or Delete the study.
4. Click the trashcan icon to delete a user.
5. The Server will generate a default message.
6. Click OK to confirm the deletion of a particular user.
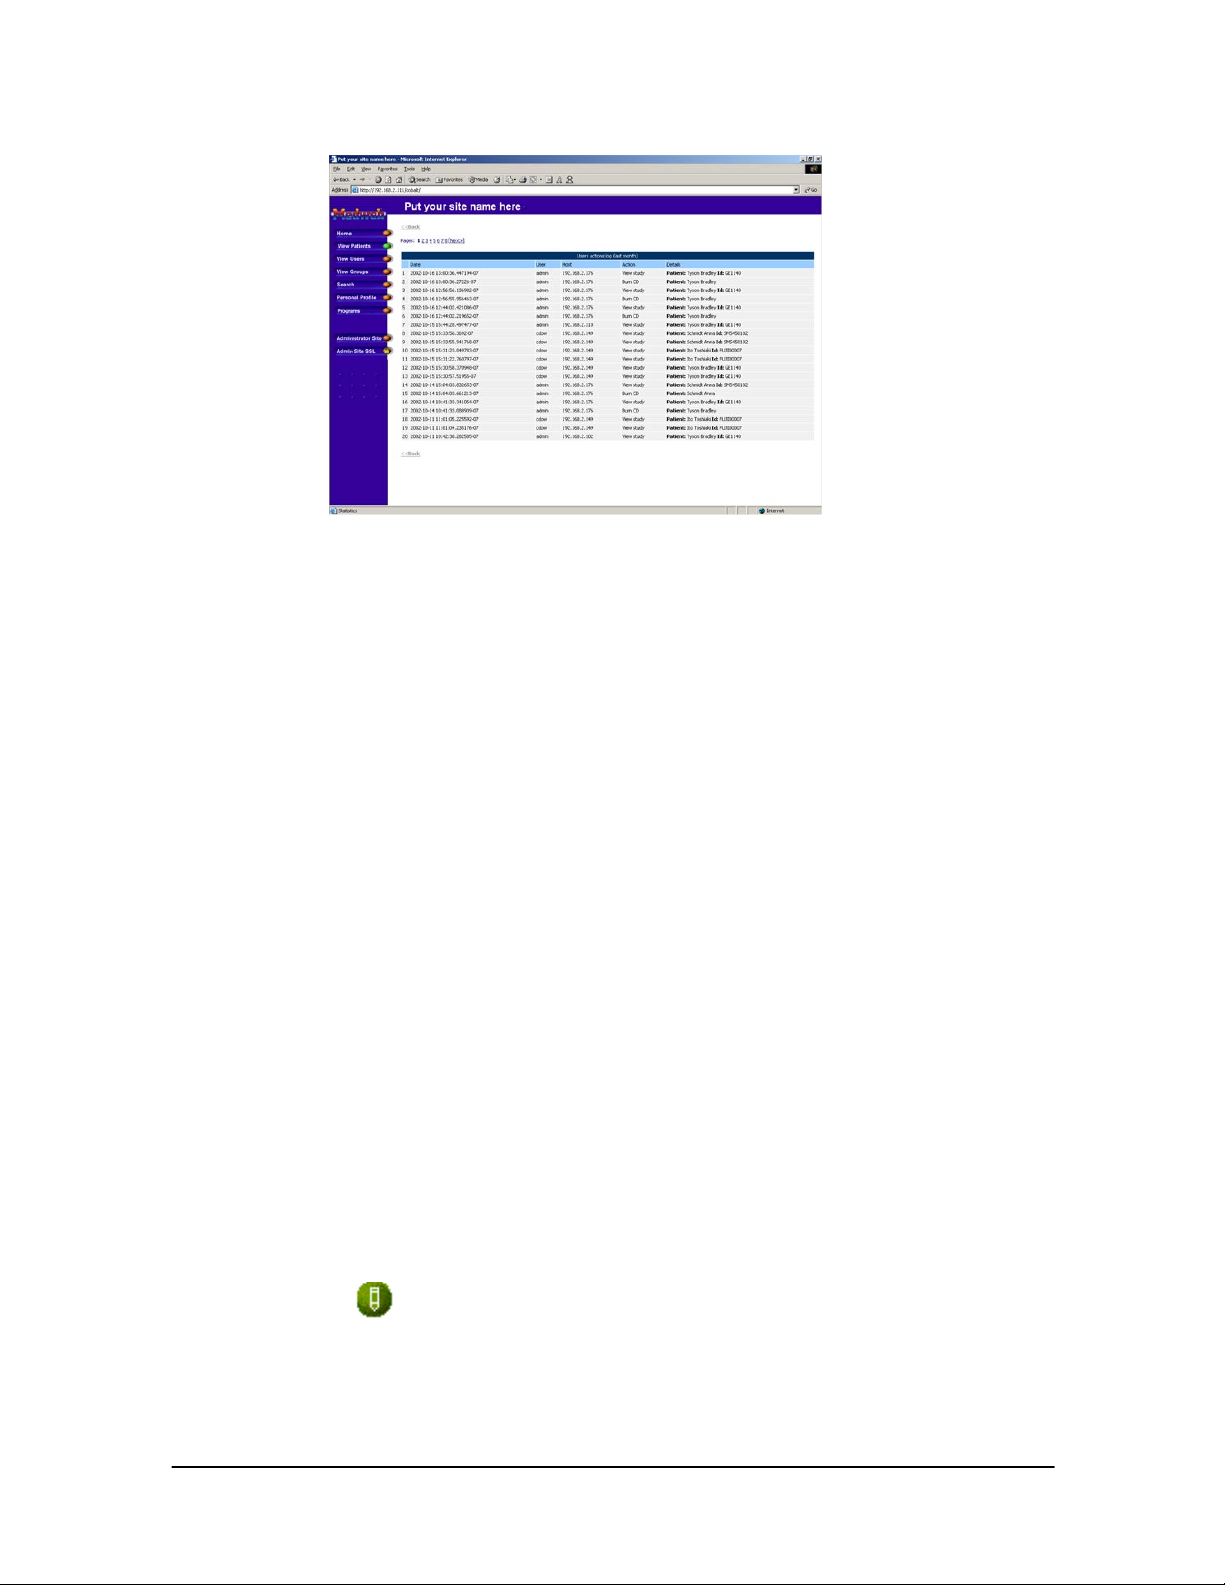
5.2.1.4 Check Login Status
The Administrator as well as a User with a Radiologist Access level will be able to access
the Server Statistics. The Statistics page details the rate at which a user may access
studies, user information, studies being viewed, and study information (name, modality
etc).
1. Sign on to the Medweb Server and login using as the Administrator or as a User with
Radiologist Level Access.
2. Click on View Patients on the Navigation Menu.
3. Click on Statistics in the top right hand corner of the View Patients Page.
- 20 Medweb Secure DICOM Proxy Webserver
Administrator Guide and User Manual
Confidentia
Page 21
June 2003
l
4. Click View Full Web Statistics. Information about users accessing the studies, such as
IP Address of the user’s machine, username, studies viewed, and actions performed are
listed in a table.
These statistics would be updated under the local direction of the Administrator.
5.2.1.5 Change a User Password Or Access Level
Changing a user’s password will ensure that data are kept secure on the system. Please
obtain local direction to determine official password policy.
• Passwords should be changed regularly in accordance with local policy regarding
the maximum number of days allowable between changes.
• If the Administrator changes a password, the old password will be expired so that
the user is forced to change the password the next time the user logs onto the
system.
Only the Server Administrator may change a user password. Follow the directions below
to change the password.
1. Sign on to the Medweb Server and login using as the Administrator.
2. Click on the Administrator Site button on the Navigation Menu. The next screen will
present a table of all current users on the Server.
3. Beside each user listed, the administrator has the option to modify the Users’ Profile,
Modify the email Address or Delete the study.
4. Click the pencil icon to modify the password of a user.
5. Enter the new password into the textboxes.
- 21 Medweb Secure DICOM Proxy Webserver
Administrator Guide and User Manual
Confidentia
Page 22

June 2003
l
6. To change the Access Level, click the ACL Group drop down menu and choose the
appropriate level.
7. Click Confirm Modify.
5.3 Logging and Auditing of User Activity
The Medweb server logs all activity by Date, time, user, and user actions. The administrator can easily
see who has accessed the server, and what machine was used to login to the server from the web
logging screen. The administrator can also see what patient studies the user accessed from the web
interface. All regular user activities are visible from the web-logging screen. The administrator can
search for activities of a specific user as well as activities around a specific patient record.
5.4 Remote Access Protection and File Protection
Remote access is only accomplished through a 128-bit SSL connection. After the encrypted connection
is established, the remote access user is able to enter a login and password in the SSL link established
by the browser.
After entering an incorrect password 3 times in a row, a user account will be disabled and needs to be
restarted by the administrator (this rule can be modified, Section 7.1).
File protection is achieved by limiting each user only to specific application guided functions that
relate to their particular access need. Therefore the user does not have access to view or modify any
file or application that is not “owned” by that user login, or is part of the class of applications that the
particular user is allowed to access. Since ALL ACCESS is through the web interface, the user is
extremely limited in what applications or files they can access. Web-only access is also effective in
restricting direct access to database and OS files. Additional file protection is afforded by leaving
ownership of root files separate from ownership of data files associated with the Medweb applications.
No user may modify these files directly
except root. All modifications are logged.
5.5 Groups
Groups are meant to further categorize users.
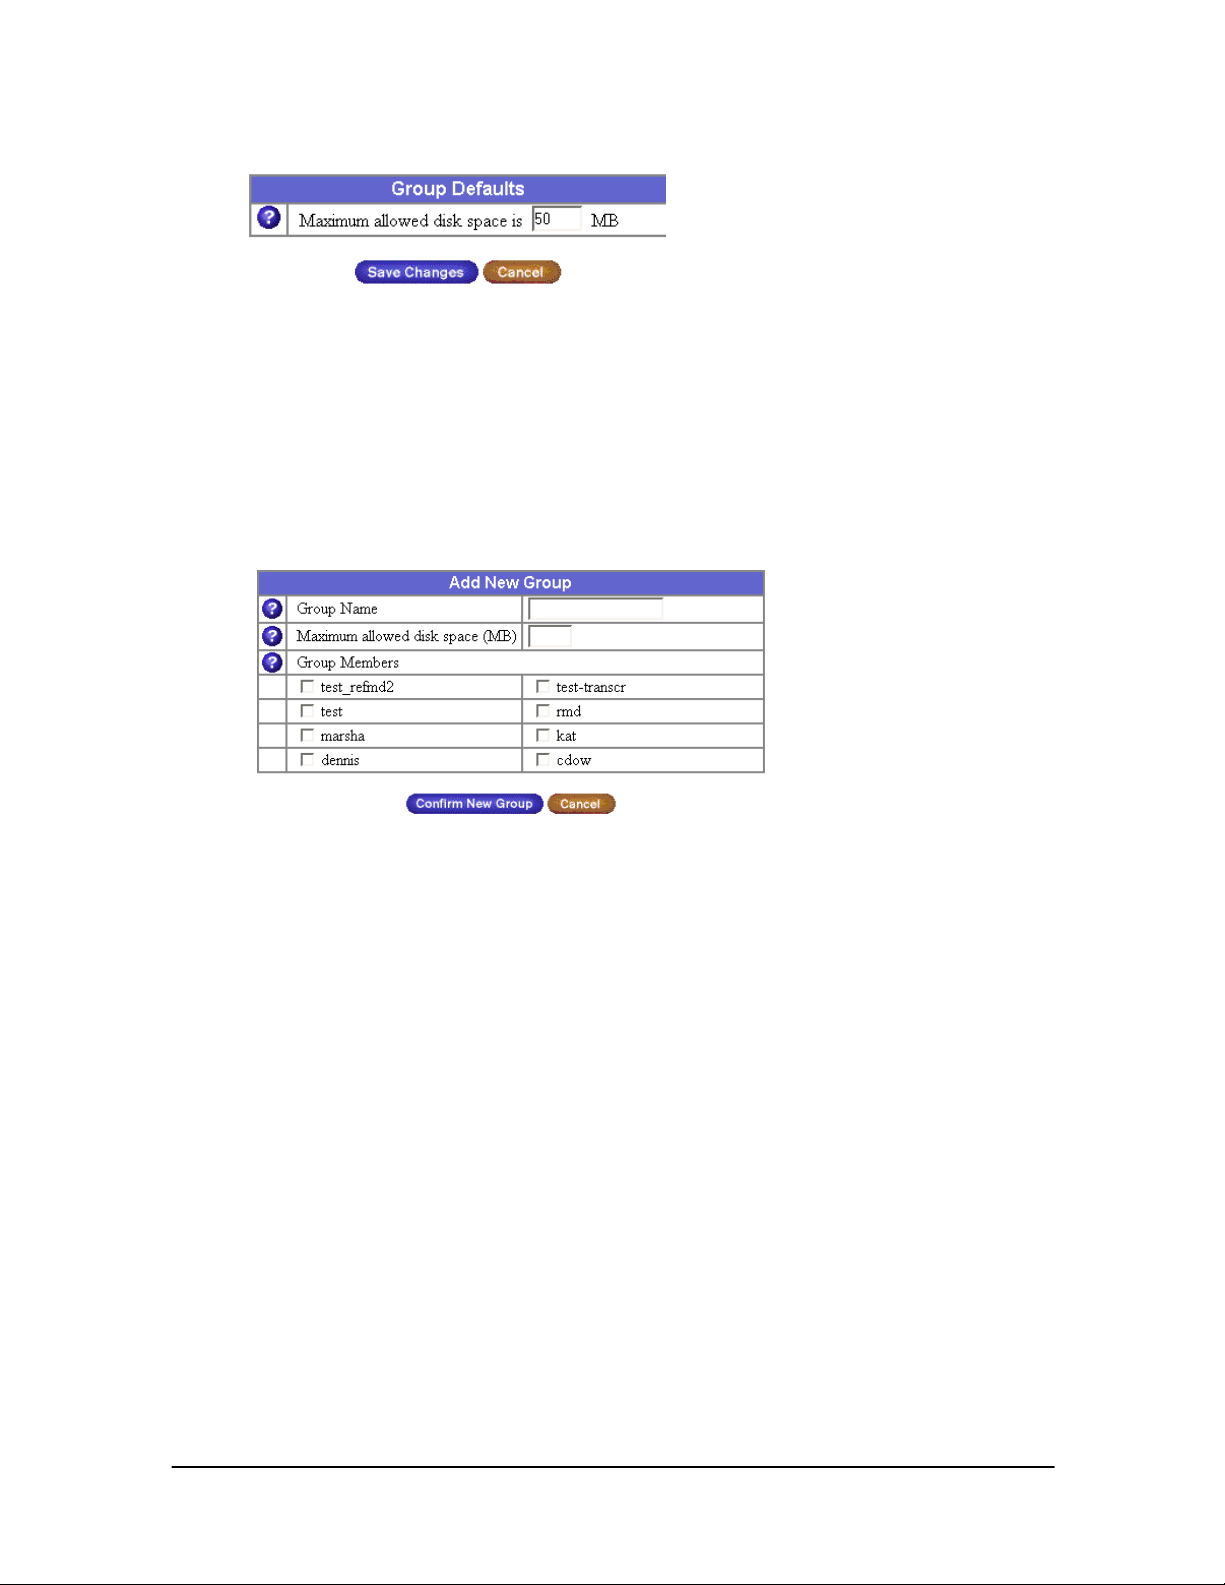
5.5.1 Set Group Defaults
Begin by setting the default parameters for new groups.
- 22 Medweb Secure DICOM Proxy Webserver
Confidentia
Administrator Guide and User Manual
Page 23
June 2003
l
1. Go to Administrators Site – Groups.
2. Click the Set Group Defaults Button.
3. Enter maximum allowed disk space for the group by default.
4.Click Save Changes to save or Cancel to return to the previous page.
5.5.2 Add a Group
1 Go to Administrators Site – Groups.
2. Click the Add Group Button.
3. Enter a distinct group name.
4. Enter the maximum allowed disk space or accept the default.
5. Click the boxes adjacent to select the users to add to the group.
6. Click Confirm New Group or Cancel to return to the previous screen.
5.5.3 Delete or Modify a Group
Once a group is added it appears on the Groups List and may be modified or deleted via the pen or
trashcan icons.
1.
Go to Administrators Site - Groups
2. Click the pen icon to modify the group
3. The same screen as the Add a group appears. Make the changes and click Confirm Modify to save the
changes.
To delete a group, use the Trashcan icon to perform the delete.
5.6 Mailing Lists
Mailing lists are meant to distribute emails to local and remote addresses via one named list.
- 23 Medweb Secure DICOM Proxy Webserver
Confidentia
Administrator Guide and User Manual
Page 24
June 2003
l
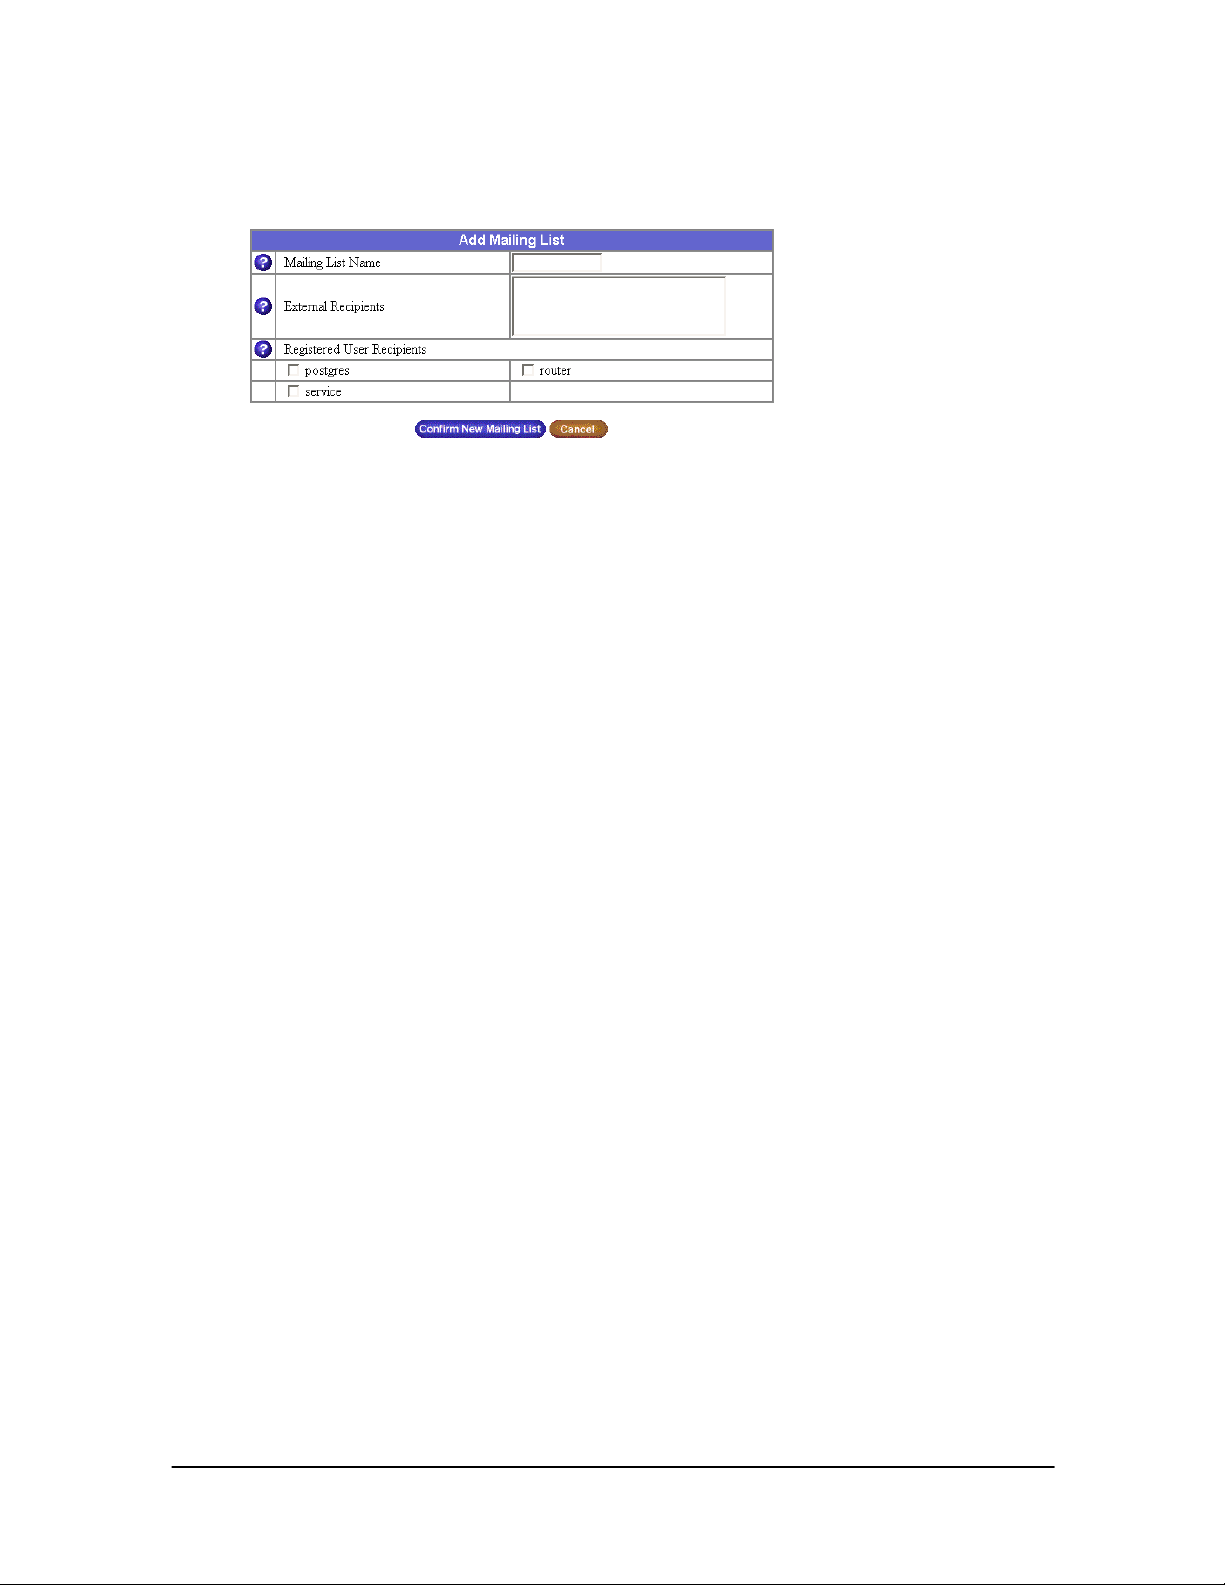
5.6.1 add a Mailing List
Add a mailing list of local and remote users.
1.
Go to Administrators Site – Groups
2.
Enter a distinct name for the mailing list.
3. Enter the full email addresses of any remote recipients to be included in the list.
4. Select the name of any local users to be included in the list.
5. Click Confirm New Mailing List to save or Cancel to go back to previous page.
5.6.2 Delete or Modify a Mailing List
1. Go to Administrators Site - Groups
2. Click the pen icon to modify the group
3. The same screen as the Add a Mailing List appears. Make the changes and click Confirm Modify to save
the changes.
To delete a group, use the Trashcan icon to perform the delete.
Note: Any groups you add will be listed as a mailing list as well and may be modified via the pen
icon, but not deleted. To delete these group-based mailing lists, remove the group entirely. In
either case the mailing list may exist with no users added.
- 24 Medweb Secure DICOM Proxy Webserver
Confidentia
Administrator Guide and User Manual
Page 25
June 2003
l
6.0 Administrative Procedures/Services
6.1 Network Configuration
The server is equipped with a Primary Interface and a Secondary Interface. The primary port is the IP
address of the primary interface, which connects to your Intranet and the secondary interface is used to
connect out to the Internet or to the Medweb network.
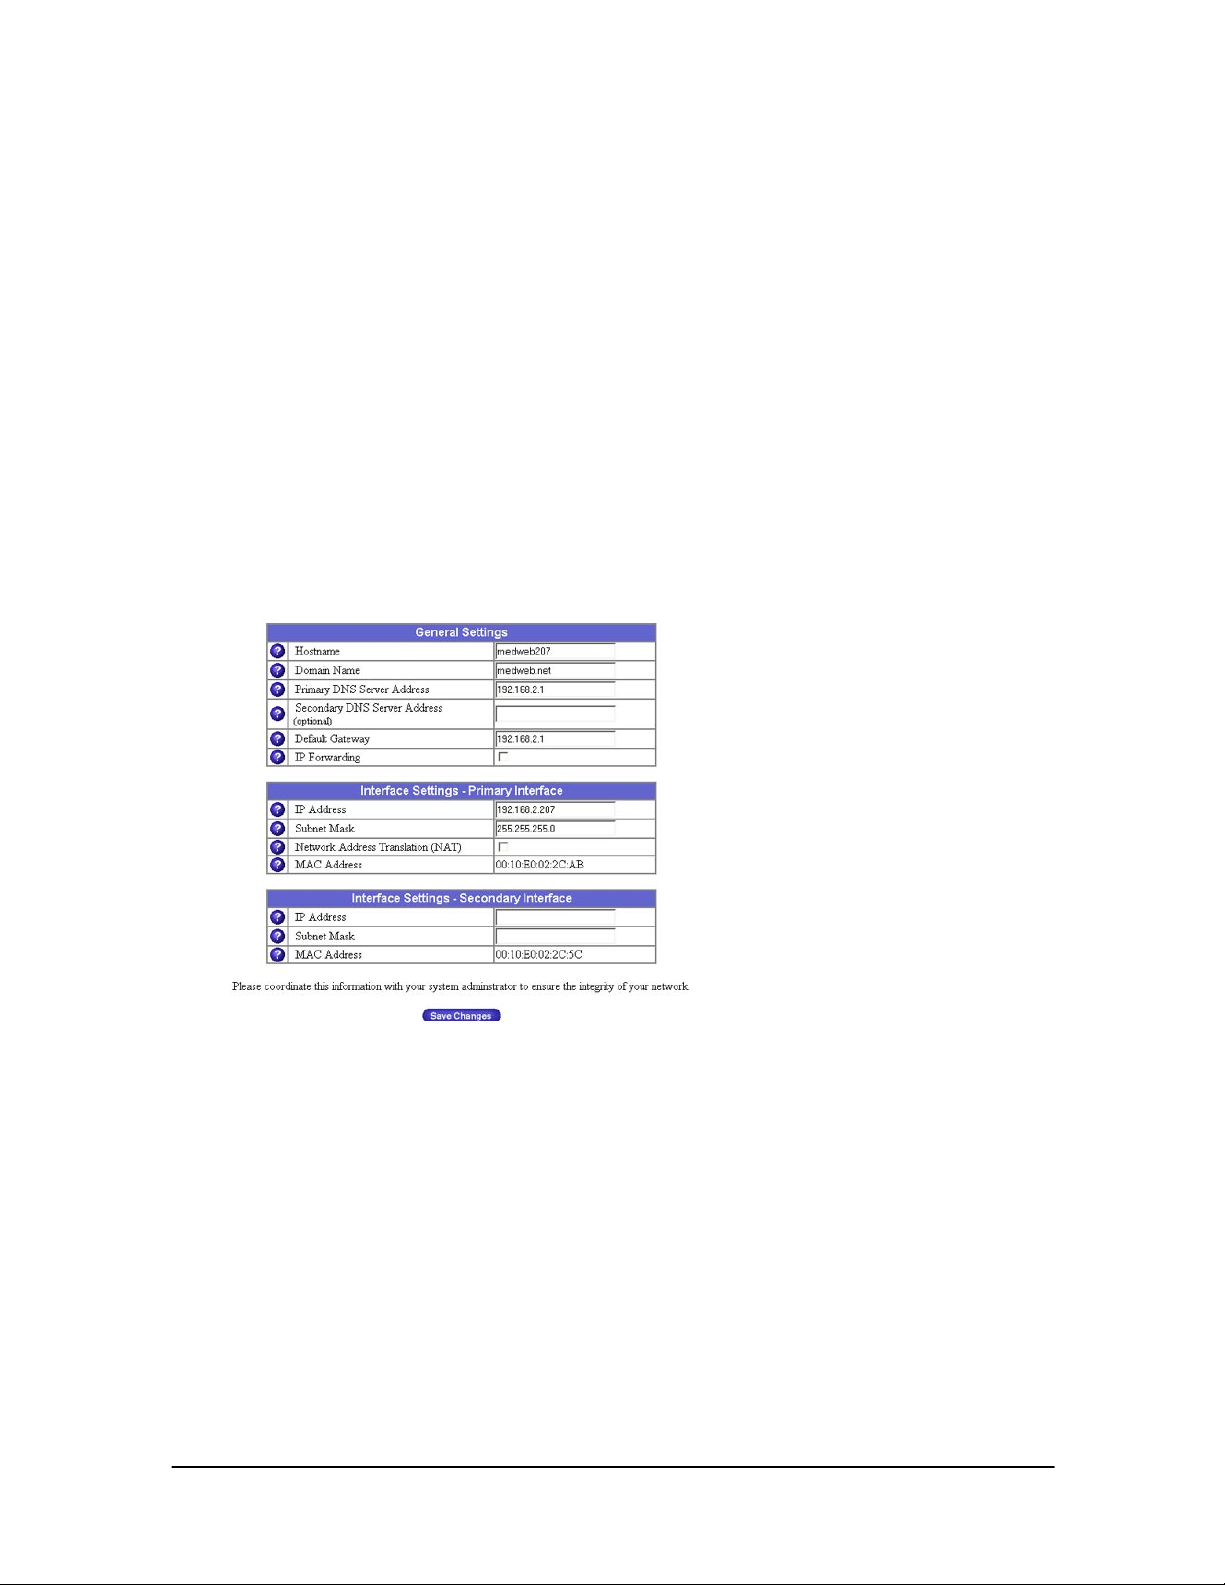
6.1.1 Modifying Network Settings
The web interface should be used to make any changes to existing Ethernet settings.
(A gateway address is required to connect to systems outside the local network. It may be left
empty if you do not wish to access outside networks. If you are using a modem, the word modem
will be in this field.)
1. Sign on to the Medweb Server and login using as the Administrator.
2. Go to Administrator Site - Network
3. Enter the unique name for this server on your network.
4. Enter the domain name for your network.
5. Enter your primary DNS server IP address.
6. Enter an optional secondary DNS server IP address.
7. Enter the default gateway IP address for the network.
8. Select the check box to enable IP forwarding.
9. Enter the unique IP address for the primary interface of this server.
10. Enter the subnet mask for this interface.
11. Select to enable Network Address Translation.
- 25 Medweb Secure DICOM Proxy Webserver
Administrator Guide and User Manual
Confidentia
Page 26
June 2003
l
12. The hardware or MAC address of your interface is listed.
13. Enter the unique IP for the secondary interface (optional).
14. Enter the subnet mask for the secondary interface (optional).
15. The hardware or MAC address of the secondary interface is listed.
16. Click Save Changes to save.
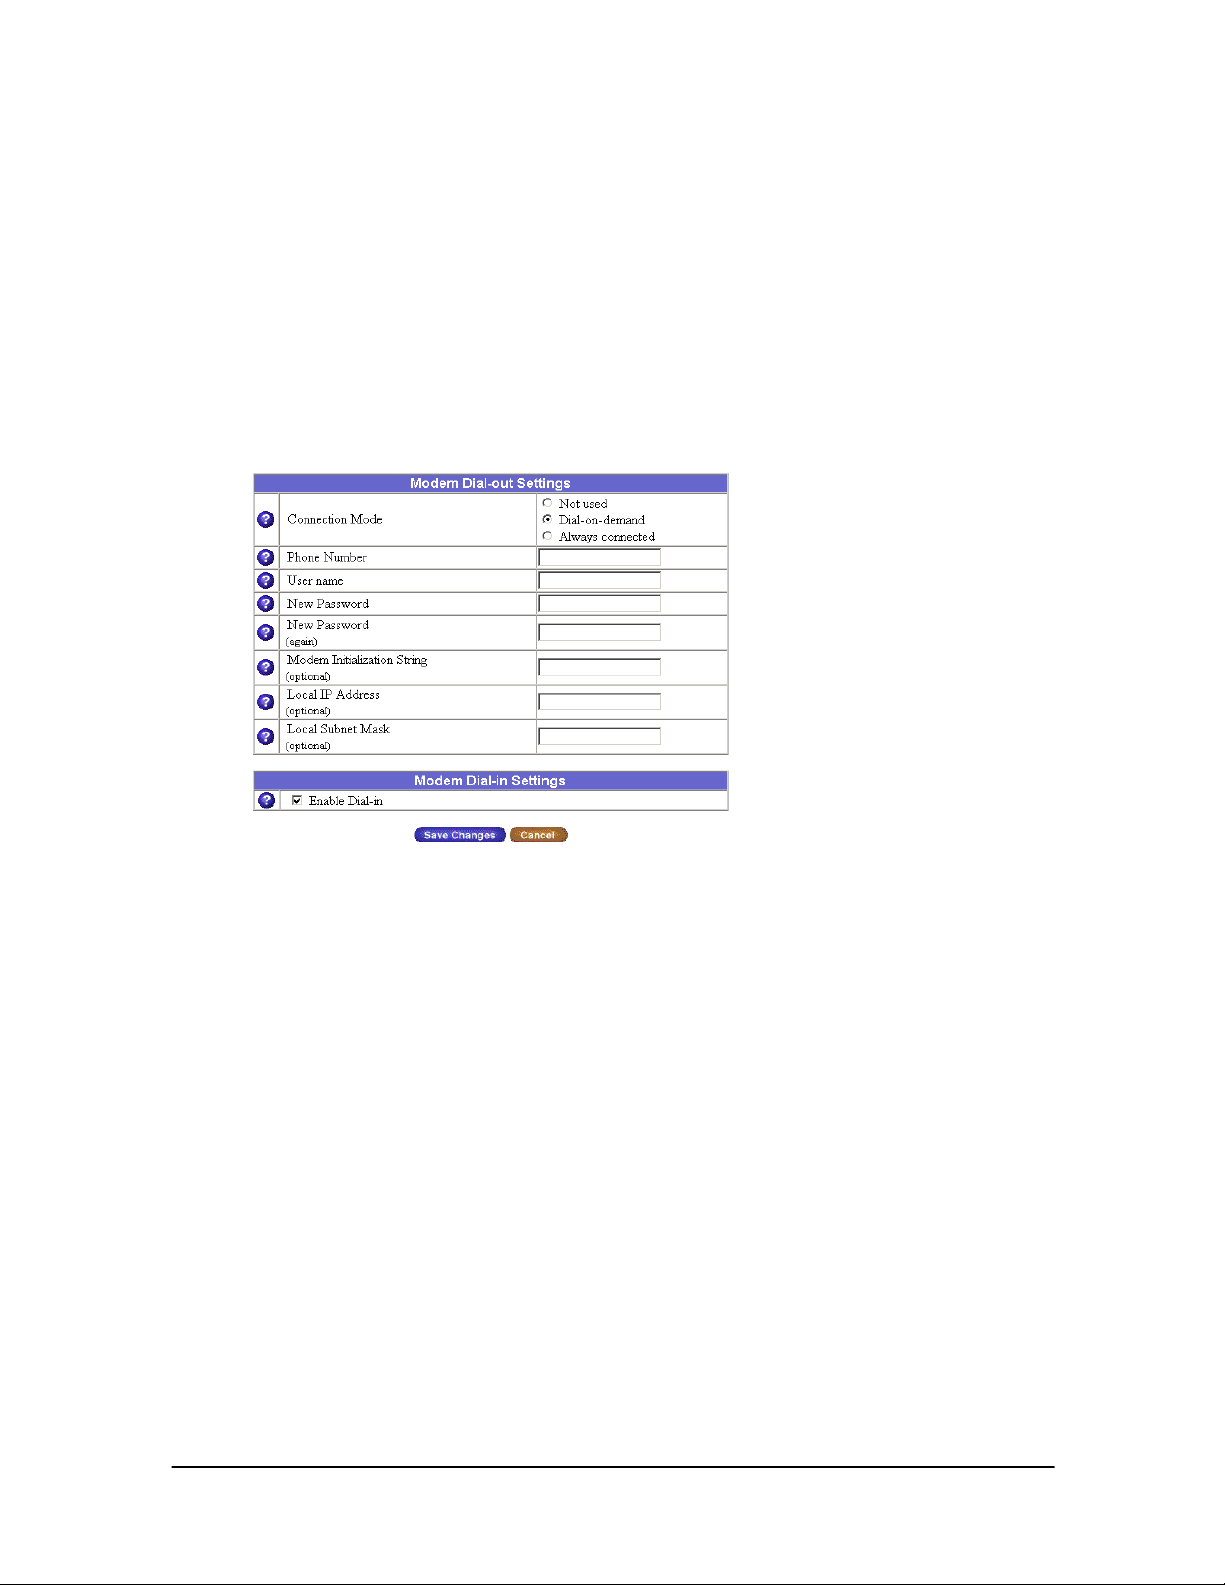
6.1.2 Modem Settings
Manage the phone line dial out settings from your server.
1. Click the Modem Button at the top of the screen (Administrator Site – Network).
2. Select the connection mode; ‘Not used’ if you do not use a modem, ‘Dial-on-demand’ to dial
only when there is data to send, ‘Always connected’ to maintain a modem connection at all times.
3. Enter the phone number to dial.
4. Enter the User name to connect to your ISP.
5. Enter the Password used to connect to your ISP. Repeat.
6. Enter any modem initialization strings for dialup (optional).
7. Enter the Fixed Local IP address, if one is assigned.
8. Enter the network’s subnet mask if assigned a fixed IP.
-----Manage the phone line dial up settings to your server:
9. Select to enable Dial-in to your server by checking the check box.
10.Click Save Changes to save or Cancel to return to the previous screen.
6.1.3 Domain Name Service - DNS
Obtain the IP address of the primary Domain Name Service server (DNS server). The DNS server
converts between IP addresses and the host names of devices on the network. It is required to
receive email.
1. Go to Administrators Site – Control Panel - Domain Name Service (DNS) Server.
- 26 Medweb Secure DICOM Proxy Webserver
Administrator Guide and User Manual
Confidentia
Page 27
June 2003
l
2. Select the check box beside DNS to enable DNS serving.
3. Click Parameters to manage settings for DNS server
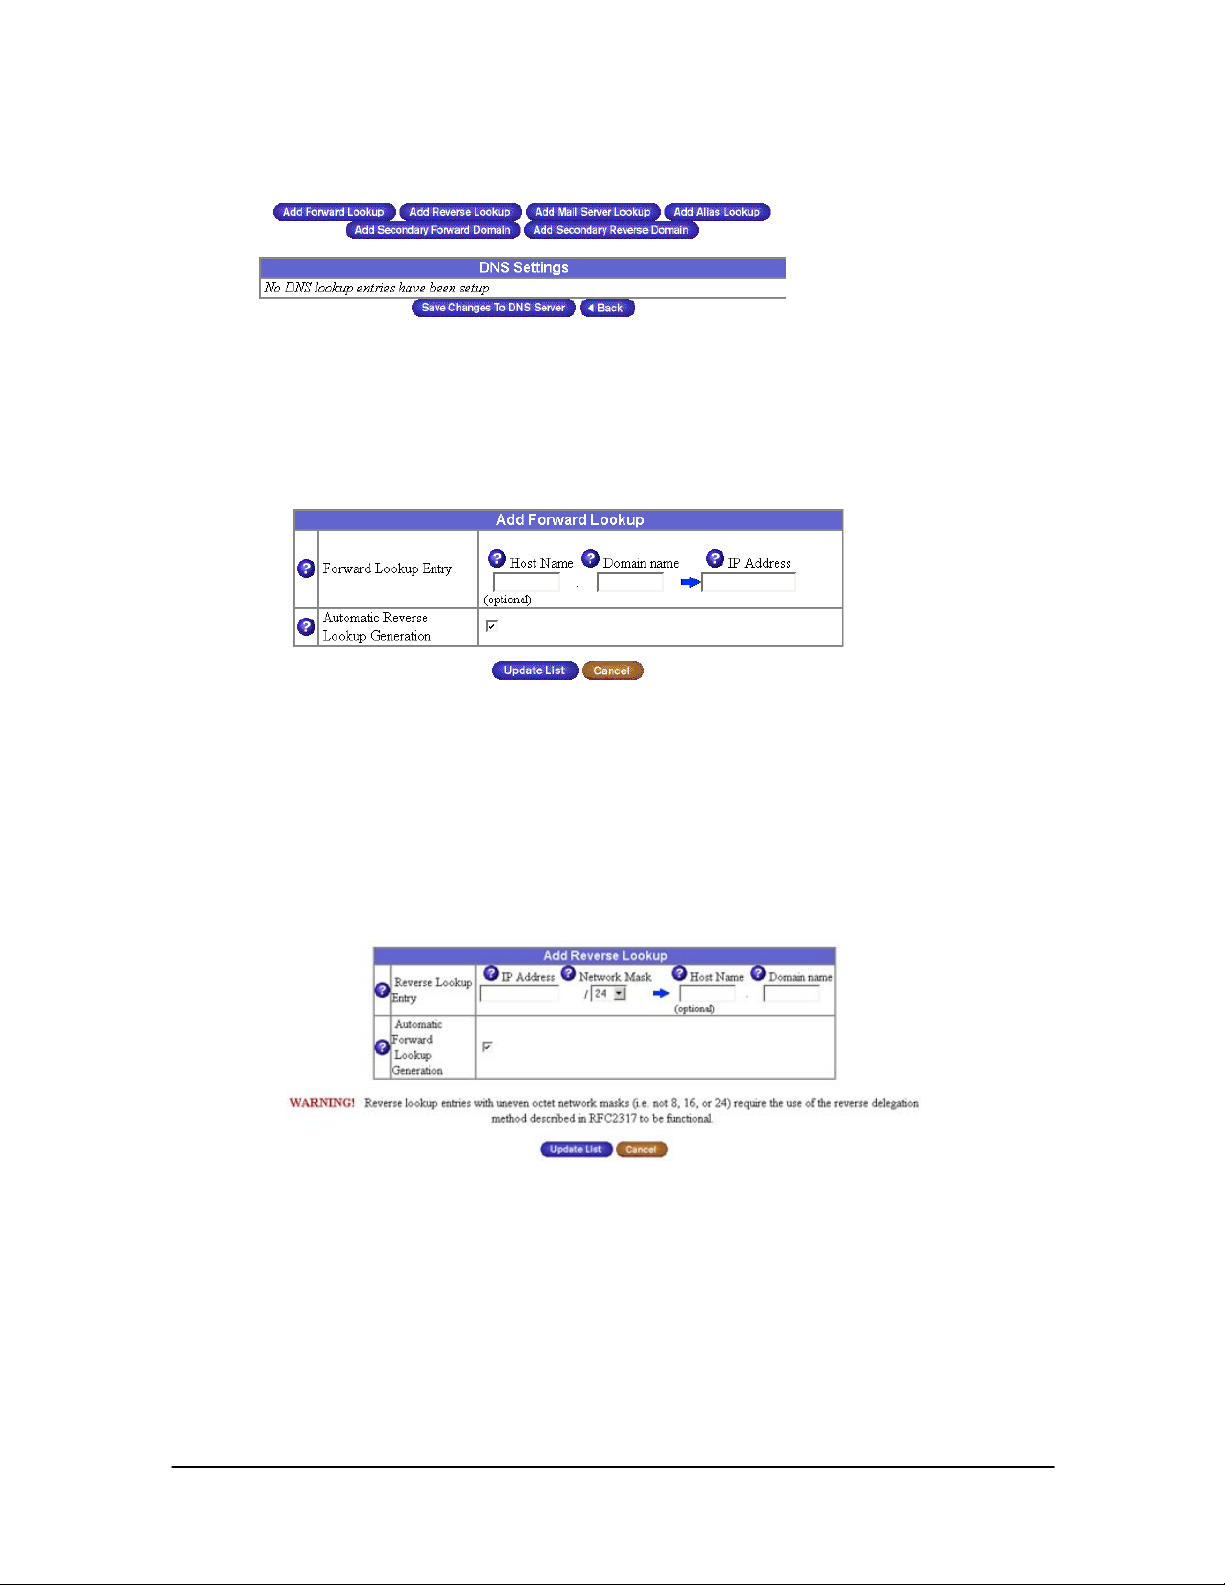
6.1.3.1 Add Forward Lookup
1. Click the Add Forward Lookup Button.
2.Enter the hostname and domain name for resolution to an IP address.
3.Select the check box to enable Automatic Reverse Lookup Generation to automatically
create the Reverse Lookup record (below).
4. Click Update List to save or Cancel to return to the previous screen.
6.1.3.2 Add Reverse Lookup
1. Click the Add Reverse Lookup Button.
2. Enter IP Address, Network Mask number for resolution to a hostname and domain name.
3. Select Automatic Forward Lookup Generation to automatically create the Forward Lookup
record (above).
4. Click Update List to save or Cancel to return to the previous screen.
Note: The DNS Settings table should contain 2 hostname/IP address associations for each
record. Forward lookups will resolve hostname to IP address; Reverse lookups will resolve
IP’s to hostnames
- 27 Medweb Secure DICOM Proxy Webserver
Administrator Guide and User Manual
Confidentia
Page 28
June 2003
l
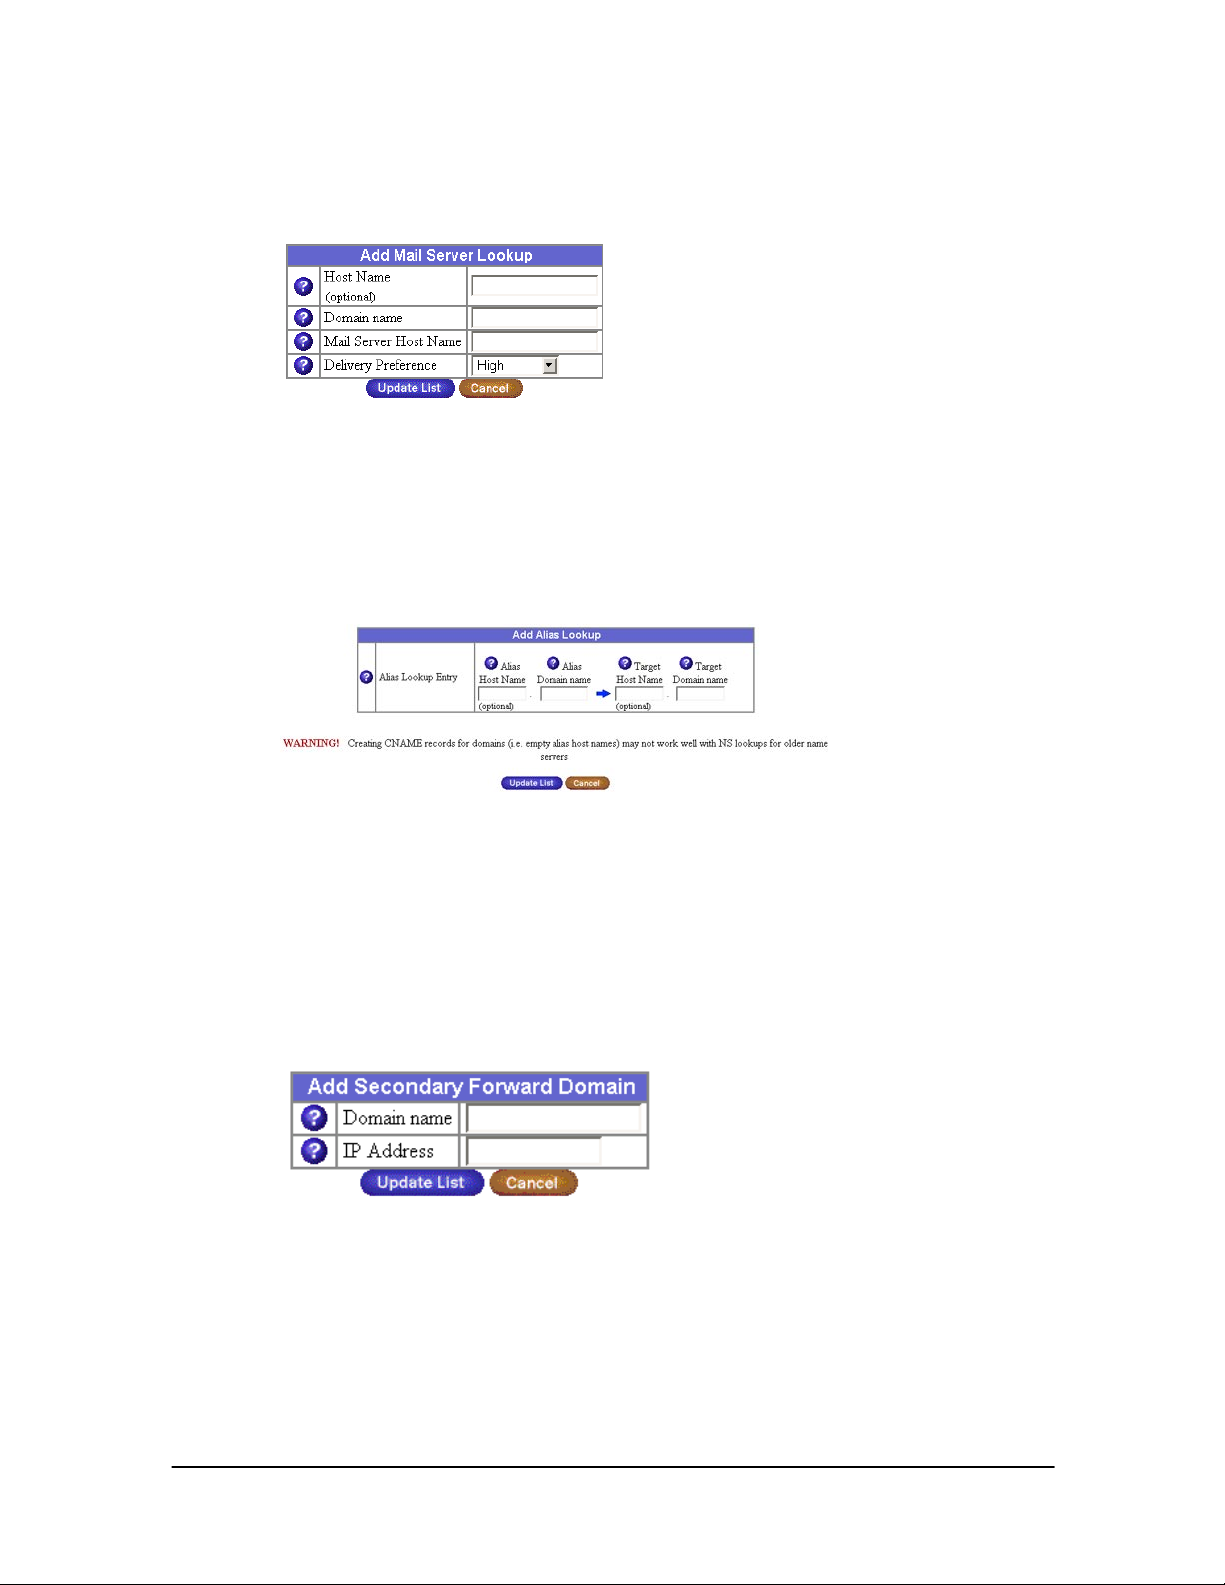
6.1.3.3 Add Mail Server Lookup
1. Click the Add Mail Lookup button.
2. Enter the name of the host.
3. Enter the domain name of the host.
4. Enter the name of the mail server that will handle mail for accounts on this host.
5. Select a delivery preference: Very Low, Low, High or Very High.
6. Click Update List to save or Cancel to return to the previous screen.
6.1.3.4 Add Alias Lookup
1. Click the Add Alias Lookup button.
1. Enter the alias hostname.
2. Enter the alias domain name.
3. Enter the target hostname.
4. Enter the target domain name.
5. Click Update List to save or Cancel to return to the previous screen.
6.1.3.5 Add Secondary Forward Domain
1. Click the Add Secondary Forward Domain button.
2. Enter the domain name you wish to DNS serve with another host.
3. Enter the hostname of the DNS server for that domain.
4. Click Update List to save or Cancel to return to the previous screen.
6.3.6 Add Secondary Reverse Lookup Domain
1. Click the Add Secondary Reverse Domain button.
- 28 Medweb Secure DICOM Proxy Webserver
Administrator Guide and User Manual
Confidentia
Page 29

June 2003
l
2. Enter the network address you wish to DNS serve with another host.
3. Select the number of bits for the network mask.
4. Enter the hostname of the DNS server for that network.
5. Click Update List to save or Cancel to return to the previous screen.
Note: After any changes to DNS, click the Save Changes button to save the information or
Back to cancel
Note: Any additions to DNS settings will be displayed in the DNS Setting table, and can be
modified by selecting the green pencil icon, or deleted with the trash icon.
6.1.4 Dynamic Host Configuration Protocol – DHCP
This feature assigns dynamic IP addresses to devices on a network.
1. Go to Administrators Site – Control Panel – Dynamic Host Configuration Protocol (DHCP)
Server.
2. Select the check box beside DHCP to enable DHCP serving.
3. Click Parameters to manage settings for DHCP server.
6.1.4.1 Forward DHCP Requests
1. Select the check box to enable the forwarding of requests.
2. Enter the IP address of the DHCP server.
3. Click Save Changes.
6.1.4.2 Set DHCP Clients
- 29 Medweb Secure DICOM Proxy Webserver
Administrator Guide and User Manual
Confidentia
Page 30

June 2003
l
1. Click the Settings for DHCP Clients Button to manage the DHCP client parameters.
2. Enter the Domain Name for your DHCP clients.
3. Enter the Primary DNS Server Address for your DHCP clients.
4. Enter the optional Secondary DNS Server Address for your DHCP clients.
5. Enter the Subnet Mask for your DHCP clients.
6. Enter the Default Gateway for your DHCP clients.
6. Enter the Maximum Lease Time in seconds for your DHCP clients.
6.1.4.3 Add Dynamic Address Assignment
1. Click the Add Dynamic Address Assignment button.
2. Add a range of IP addresses to automatically assign via DHCP.
3. Click Confirm Address Assignment to save or Cancel to return to the previous screen.
4. Entries appear in the Dynamic Address Table.
6.1.4.4 Add Static Address Assignment
1. Click the Add Static Address Assignment button.
2. Enter the Static IP address you would like to automatically assign via DHCP.
3. Enter the MAC or hardware address of the machine you would like use the Static IP.
4. Click Confirm Address Assignment to save or Cancel to return to previous screen.
Entries appearing in the Static Address Assignment List can be modified by selecting the
pencil icon, or deleted with the trashcan icon.
- 30 Medweb Secure DICOM Proxy Webserver
Administrator Guide and User Manual
Confidentia
Page 31
June 2003
l
6.2 Server Upgrades
Medweb offers continual updates and upgrades to its server software and plugin software that are
easily accessible via the Internet.
For server-to-server, secure routing, both servers must have the same version of software. The current
version number can be found on the top right hand corner of the View Patients Page.
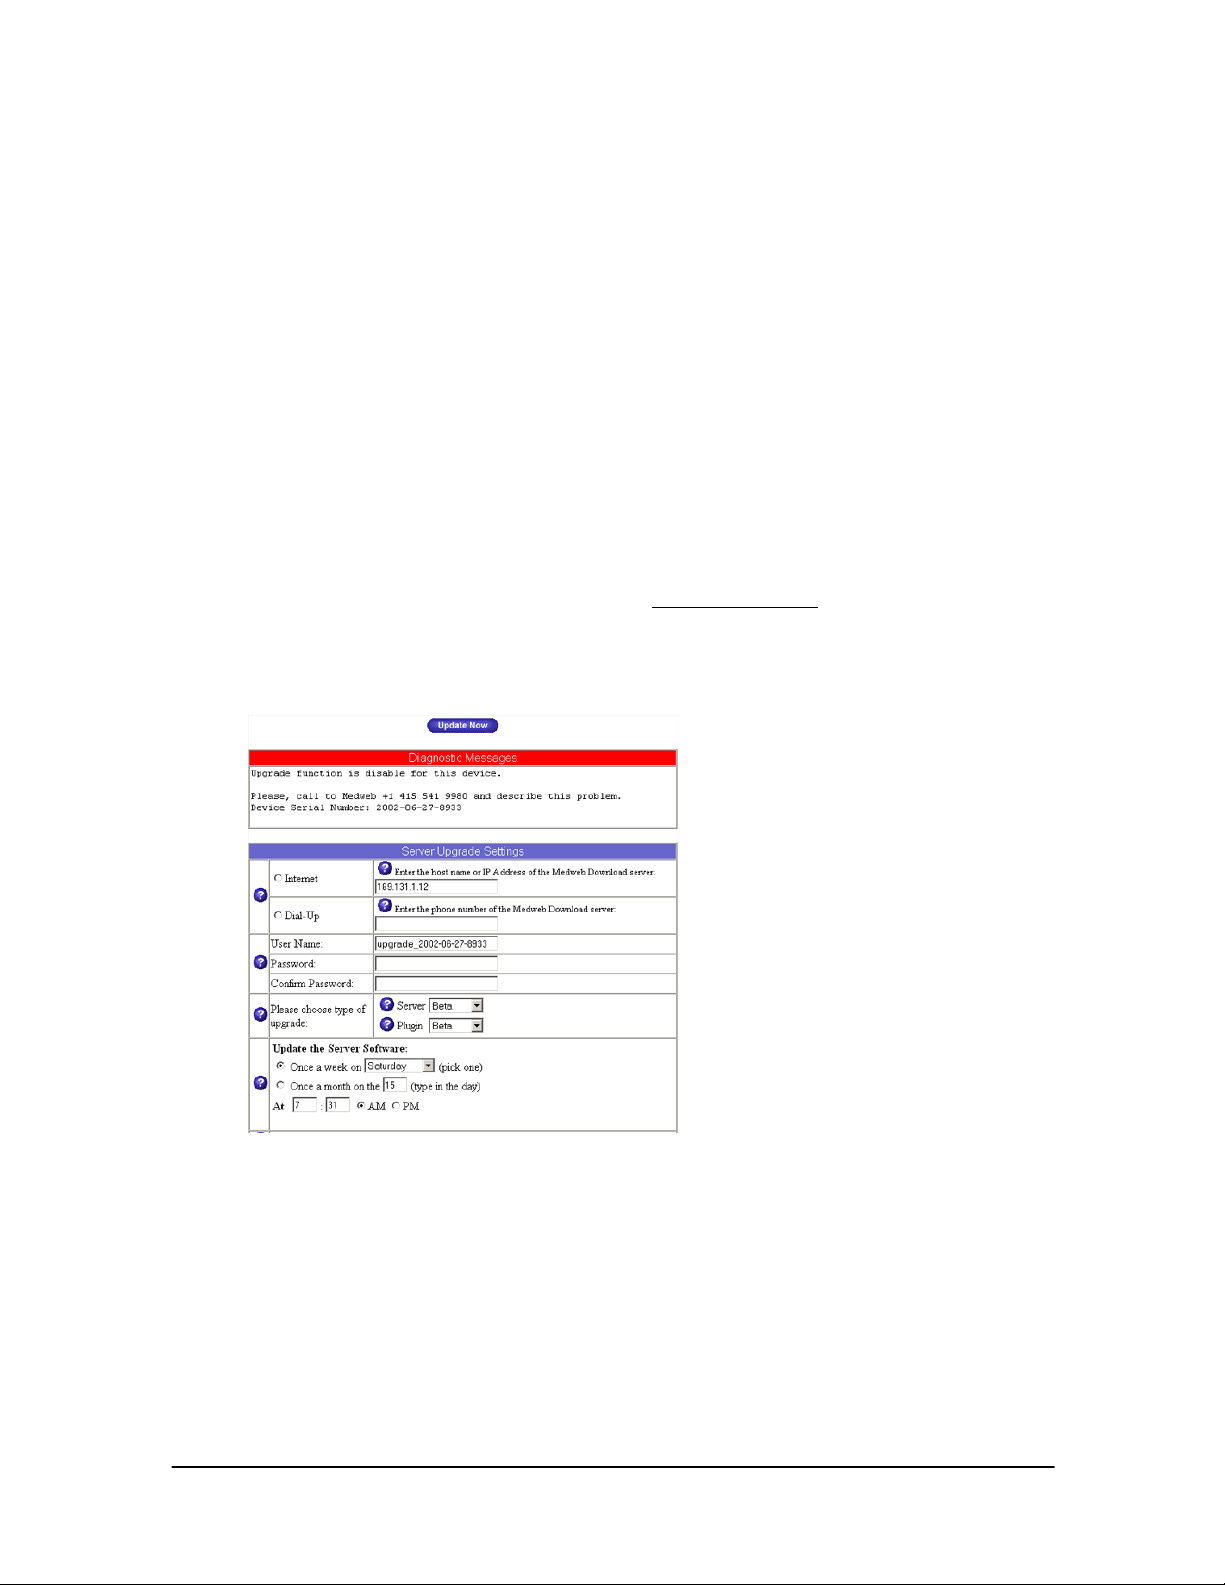
6.2.1 Upgrading the Server
1. Sign on to the Medweb Server and login using as the Administrator.
2. Click on the Administrator Site button on the Navigation Menu. Click the Control Panel button
and then click the Upgrade Server button on the top of the screen.
3. Enter the host name or IP Address of the download server. If external Internet access is not
permitted, make sure that the server is pointing to upgrade.medweb.net
access to a DNS server, the IP Address for the Medweb upgrade server is 169.131.1.12.
. If the server does not have
To upgrade a server that is behind a firewall, the server can access our upgrade server using port #
873 and port #22.
4. Leave the username and password as they appear in the text fields. A password is not needed
for this option.
5. Choose type of upgrade server software and plugin software. The default option is Beta for both
the software and plugin upgrades. These versions contain the latest enhancements.
6. Click the Upgrade Now button to commence the upgrade(s). Watch the log window at the
bottom of the screen for messages. Once the server reboots, the upgrade has been completed.
- 31 Medweb Secure DICOM Proxy Webserver
Administrator Guide and User Manual
Confidentia
Page 32

June 2003
l
6.2.1.1 Scheduling Upgrades
There is an option for regularly scheduled upgrades that may be programmed to run at a specific
time; once a week or once a month. The server can also automatically check for updates and send
a notification to the Administrator when available.
6.2.1.1.1 Diagnostic Messages
Any errors before or during the upgrade will appear in a Message Box at the top of the
screen. See below for an example.
6.3 Access Rights
This section will provide the Administrator with complete control over the access rights of the
Medweb server. Click Save Changes once any modifications are completed.
1. User Add and Remove
This option allows anyone to self-register as a user and to remove his or her own account from the
server. This minimizes the workload of the administrator. This option requires the administrator
to create and remove registered users. This increases the workload of the administrator, but also
controls the number of people who can use the resources of the server. This is the default.
2. Public Site Access (i.e. /cobalt/)
The Public Site contains a powerful search engine, and links to users and groups. Open mode
allows anyone with network access to the server to access and search user and group pages. The
server home page contains user and group information. Choose restricted mode to make
information that is stored on the server accessible only to registered users.
3. Install CGI Scripts
This option allows users to generate CGI-based dynamic web content. Only the administrator can
install CGI scripts on the server. This increases security, but adds workload for the administrator
because only he/she can install CGI scripts.
4. Telnet Access
The telnet server is turned off completely by default. Since telnet access may be insecure, this
option is the safest choice. Telnet access is intended for developers and advanced system
administrators only. Only the root user may telnet to the server. This option provides limited telnet
access. The root user and all registered users can telnet to the server. Use this option to give all
server users telnet access.
6.4 Time Settings/Synchronizing
In order for email to function properly, you must set the time and date on the server. Use the pull-down
menus to enter the values appropriate for your server. The Medweb server will check the accuracy of
its time each night. Enter the host name or IP address of the server that will provide the precise time.
- 32 Medweb Secure DICOM Proxy Webserver
Administrator Guide and User Manual
Confidentia
Page 33

June 2003
l
Currently you may use time.medweb.net to synchronize your servers. This feature is useful when many
Medweb servers are being used to forward images using the timed forwarding feature. Save Changes
after any modifications.
6.5 Local Site Information
This section is used to place any general information that will appear on the public page. Contact
Names, business Hours, phone numbers, e-mails, faxes, pagers and other useful info. Save Changes.
6.6 Services
6.6.1 Web Services
The Web service is always running, making it possible to connect with a browser.
1. Go to Administrators Site – Control Panel
2. Click Parameters to modify Web Server settings.
- 33 Medweb Secure DICOM Proxy Webserver
Administrator Guide and User Manual
Confidentia
Page 34

June 2003
l
3. Redirection: Select the check box to force all web connections to the server to use secure
connection.
4. Security Parameters (Private Key): Paste your secure connection (SSL) Private key here.
5. Security Parameters (Certificate): Paste your secure connection (SSL) certificate here.
6. Click Generate to generate a new Private Key and Certificate based on your Site Information.
7. Click Save Changes to save or Cancel to return to the previous screen.
6.6.2 DICOM Server
The DICOM Server is always running, making it possible to transport DICOM images
(Administrators Site –Control Panel).
6.6.3 DICOM Archive
This screen allows the management of image archive tools. That is, if you have any type of tape
archive attached to your server.
1. Go to Administrators Site – Control Panel
2. Click Parameters to modify settings.
3. Status is reported
4. Click Open Tape Control Panel to manage archive jobs via the Tape Control Panel.
5. Select the check box to enable Tape Archive Service.
6. Enter the path for a tape-changing device attached to the server.
7. Enter the path for a single tape device attached to the server.
8. Select the check box to enable Smart Job Manager, which will sort archive jobs to maximize
tape drive performance. Unchecked will archive jobs in the order they were requested.
9. Select the check box to enable MD5 checksum, which will check the integrity of the archive.
Unchecked will not check integrity, but will decrease archiving time.
10. Select an option to enable auto-storage of a study. Default is ‘none’ for no auto-storage. On
Arrive will archive the study when it is received, On Delete will archive the study before
deleting.
- 34 Medweb Secure DICOM Proxy Webserver
Administrator Guide and User Manual
Confidentia
Page 35

June 2003
l
11. Select an option to enable backup of study databases and configuration files. Default is ‘none’
for no backup of these items. Other options include daily, 2
for backup of these items.
12. Click Save changes to save or Back to return to the previous screen.
6.6.4 Mediscribe HTI
The Medweb server can integrate with HTI’s Mediscribe server to provide transcription services.
Mediscribe is a proprietary medical records software solution designed for medical transcription,
report distribution, and workflow improvements for use by hospitals, clinics, physicians,
transcription services, and managed care organizations.
1. Go to Administrators Site – Control Panel
2. Select the check box to enable support for Mediscribe HTI. Click Parameters to set up the
Mediscribe function.
nd
day, weekly and monthly schedules
3. Select the check box to forward Mediscribe demographic information via ftp.
4. Enter the IP address of the ftp server.
5. Enter the port number for the ftp server.
6. Enter the destination folder on the ftp server.
7. Enter the FTP username and password information.
---Secure Tunnel vs. FTP
8. Select to forward the information via the secure tunnel as opposed to ftp.
9. Enter the IP address of the Medweb server.
10. Enter the Secure tunnel port number; default is 25000.
11. Click Save Changes to save or Back or return to the previous screen.
Be sure to select the check box on the Control Page beside the Mediscribe HTI section. This
will “enable” this service. Click Save Changes at the bottom of this page after any services
have been modified.
6.6.5 Email Settings
1. Go to Administrators Site – Control Panel
- 35 Medweb Secure DICOM Proxy Webserver
Confidentia
Administrator Guide and User Manual
Page 36

June 2003
l
2. Select the check box to enable email serving. Click Parameters to configure the parameters for
the Email Server.
3. Select the frequency for server mail to be delivered from the localhost to remote servers.
4. Select the frequency for the server to check a remote server for mail directed to users on the
localhost.
5. If you have arranged with your ISP to retrieve your entire domain's email from a single
mailbox, specify the appropriate server here.
6. Enter the user name for authentication on the remote server.
7. Enter the password (twice) for authentication on the remote server.
8. Enter the maximum size for an inbound or outbound email.
9. Enter the names of any and all domains, networks or hostnames, which wish to use this server
as a relay for outbound mail. Your own domain is listed by default.
10. Enter the names of any and all domains that wish to receive email on your server.
11. Enter the names of any and all domains from which you wish to block receipt of emails.
12. Click Save Changes or Cancel.
A few notes for the Network Administrator and the Server Administrator about Email:
Use this service for SENDING MAIL ONLY. We do not recommend using the Medweb server
for receiving mail.
Requirements: - A domain name that is valid in the DNS server for the site.
- The service must be activated: checked in control panel, and settings saved.
- An MX record in the DNS server configurations that will validate the sending
address of the email.
Notes: - An email server may reject incoming email due to its size or an invalid return
address.
- 36 Medweb Secure DICOM Proxy Webserver
Administrator Guide and User Manual
Confidentia
Page 37

June 2003
l
6.6.6 File Transfer Protocol (FTP) Server
- The plugin may be sent with a study or the study may be sent on its own if the
plugin is already loaded on the mail-recipient's machine.
- If there are problems opening the MWW study in IE, save the study to the disk
and select to open it in IE.
1. Go to Administrators Site – Control Panel
2.Select the check box to enable FTP on your server. Click Parameters to configure the FTP
server options.
3. Select ‘Off’ or ‘On’ for Anonymous FTP
4. If selecting ‘On’, enter the allowed incoming file-size and the number of simultaneous
anonymous FTP users.
5. Click Save Changes or Cancel.
6.6.7 Windows File Sharing (SMB)
1. Go to Administrators Site – Control Panel
2 Select to enable support for Windows SMB, which allows Windows Users to access your
server’s files on the Windows ‘Network Neighborhood’.
3.Click Parameters to configure SMB parameters
4.Enter the NT workgroup or Domain to connect to
5. Select to enable the server as a central authentication server for a network of Windows 95.
Any machine logging onto a Windows 95 network will be authenticated on the DICOM server by
username and password.
6.Select to be a WINS server on your network or enter the IP address of the WINS server on your
network, if you have one. If not, leave the IP address field empty.
7. Click Save Changes or Cancel.
6.6.8 Apple file Sharing (AppleShare)
1. Go to Administrators Site – Control Panel
2. Select to enable support for AppleShare, which allows MacOS users to access server files on
their desktop.
6.6.9 FrontPage Server Extensions
1. Go to Administrators Site – Control Panel
2. Select the check box to enable support for FrontPage, which allows web pages created by the
Microsoft FrontPage application to be installed on the server.
6.6.10 Simple Network Management Protocol (SNMP) Agent
1. Go to Administrators Site – Control Panel
2. Select the check box to enable SNMP Agent.
- 37 Medweb Secure DICOM Proxy Webserver
Administrator Guide and User Manual
Confidentia
Page 38

June 2003
l
6.6.11 Legato File Backup
1. Go to Administrators Site – Control Panel
2. Select the check box to enable Legato File Backup.
6.7 Server Status
The Server Status page displays the current status of the Medweb server. A red light in the first row
under Web Status indicates if there is a problem.
This page will provide information about:
• The date and time that the last web report was generated
• The time period or scope of the log file.
• The number of unique computers contacting this web server. It gives a rough idea of how
many different people viewed web content on this DICOM server. Note: Multiple computers
behind a firewall or a proxy server will count as only one address.
• The number of requests of .html files. A web page can consist of multiple .html files.
• When people request non-existent files, the DICOM server generates a bad request. This
category also includes malformed requests and other erroneous requests.
• The total of all requests and the total number of bytes served by the web server
• Number of distinct files served by the web server
6.8 Server Backup Configuration
Server backups are performed directly between the PC and the Medweb server.
1. Sign on to the Medweb Server and login using as the Administrator.
- 38 Medweb Secure DICOM Proxy Webserver
Administrator Guide and User Manual
Confidentia
Page 39

June 2003
l
2. Click on the Administrator Site button on the Navigation Menu. Click the Maintenance button and
then click the Backup button on the top of the screen.
3. Several backup methods are available. Select the backup method that is appropriate and click Start
Backup.
• All server configuration, email and user files
• All server configuration
• All users and group files
• Files and email of user
• Files and email of group
Incremental backups can be made of only the files modified in the last few days. Use the pull down
menu to select which recently modified files will be backed up.
6.8.1 Scheduled Backup Configuration
1. Click the Scheduled Backup Button shown in the diagram above.
Frequency - Choose daily, weekly or monthly for how often the backup occurs. Choosing never
will delete the current scheduled backup
3. Several backup methods are available. Select the backup method that is appropriate.
• All server configuration, email and user files
• All server configuration
- 39 Medweb Secure DICOM Proxy Webserver
Administrator Guide and User Manual
Confidentia
Page 40

June 2003
l
4. Method - NFS, Windows File Sharing, and FTP will write the backup file to a NFS resource, a
windows share, or a FTP Server respectively. In all cases be certain that the target of the backup
archives is available and has enough disk space. Failure to do so will result in truncated or
nonexistent backup archives.
5. Location – Enter the location for the chosen backup method. Example FTP:
user@ftp.domain.com. Example Anon FTP: ftp.domain.com/incoming
server:/share, Example SMB: user@\\windowspc\share
6. Password - Enter the password associated with your method. This field is ignored for NFS and
Anonymous FTP methods.
6.8.2 Restoring Backup Data
The server saves backed-up data in .qub files.
• All users and group files
• Files and email of user
• Files and email of group
Example NFS:
Use the Browse button to select the .qub file archived on the local computer that is to be restored
to the server. Note that restore times can vary widely, do not to interrupt a restore as data could be
corrupted.
Select the Selective Restore option to browse the archive contents to restore individual files. Click
Restore a Backup File to complete the restore function. This may take a few minutes.
6.9 Resetting the Administrator Password
In the event of a necessary override, anyone may reset the Administrator password for the Medweb
server.
Follow these steps:
1. Locate the Server and assure that the LCD Screen is facing you.
2. Push and hold the end of a paper clip in the recessed Reset Password button (See Section 3.0,
Server Basics and Original Setup). Hold the button in for approximately 2 seconds.
The LCD Screen on the server should display:
Resetting admin
password…
3.Release the Reset Password button.
4.Open your browser and enter the URL/name of your Site in the address bar.
- 40 Medweb Secure DICOM Proxy Webserver
Administrator Guide and User Manual
Confidentia
Page 41

June 2003
l
5.If a prompt appears asking for a username or password, enter “admin” as the username. DO NOT
enter a password. Click OK.
6.Go to Administrator Site by clicking the Administrator Site Button on the left hand side of the
page.
7.The Administrator Settings table should appear.
8. Enter the user name as admin (if it is not there already), and enter the password twice to confirm.
Click Save Changes button to save the changes. After the password has been reset, enter a new
one as soon as possible to protect the security of the Server.
- 41 Medweb Secure DICOM Proxy Webserver
Administrator Guide and User Manual
Confidentia
Page 42

June 2003
l
7.0 DICOM
One of the Medweb Server’s most useful functions is the ability to securely route a copy of relevant
DICOM studies
Server also lets you specify which DICOM devices support the query function, so that you can select and
retrieve studies from them via the server’s browser interface. When you load the optional VRE (Virtual
Radiology Environment) software on the Server, you can securely route studies and balance the workload
between radiologists or sites located across a wide area network or the Internet.
7.1 Optimized Network Transport and Image Compression
In addition to Wavelet compressed files viewed through the web browser, the Medweb server also
provides 5 Types of Network optimization for file transfers over the DII or the Internet. These Five
components combine to greatly reduce the impact that medical image transfers have on the network.
They also allow transfer to occur over significantly reduced network bandwidth that otherwise would
not support medical imaging traffic. These types of network transport are as follows:
securely across the Internet, Satellite Networks or congested, low bandwidth networks. The
1. Self-Recovering File transfer protocol.
2. Lossless or Lossy File compression
3. Satellite optimized/Congested network optimized transfer
4. Time delayed File transfer
5. Wavelet compressed secure web access
7.1.1 Self-Recovering File Transfer Protocol
The DICOM protocol that is used to transfer medical images across an Ethernet LAN between
medical devices was never designed to work across a wide area network. As a result, if there are
any lost packets in a file transfer, the protocol tosses all sent packets and restarts from the
beginning of the study. This has a significant negative impact on the network.
The Medweb server greatly reduces the network bandwidth requirements of medical file transfer
by accepting DICOM studies locally, then converting them to a self-recovering transfer protocol
that is tolerant of network interruptions and lost packets. In this way, instead of sending multiple
incomplete copies of a study, we send only one copy of the study and then simply send
replacements for the specific packets that were not received. If the transfer is interrupted for
several minutes, the Medweb protocol will pick up from where the transfer left off.
This component reduces network traffic by 3 to 5 fold over regular DICOM. All traffic is also
encrypted. This does not impact positively or negatively.
7.1.2 Lossless or Lossy File Compression
The Medweb Server applies a minimum of 2.8:1 file compression to all studies that are sent
between Medweb servers. Lossless compression on the Medweb server can shrink file sizes up to
10:1. Standard compression ratios are 3:1 for archival quality file transfers. Lossy compression is
also used for extremely low bandwidth communications like 9600-baud satellite modems or POTS
lines (Plain old telephone service). In this instance, Medweb uses state of the art JPEG2000
wavelet compression to shrink file sizes by 20:1 up to 100:1 depending on the imaging device that
- 42 Medweb Secure DICOM Proxy Webserver
Administrator Guide and User Manual
Confidentia
Page 43

June 2003
l
is sending the data to the Medweb server. (Some types of images retain diagnostic quality at much
higher compression levels than others). This lossy compressed file transfer can shrink a plain film
from 30 megabytes uncompressed, to just 1 megabyte or less.
7.1.3 Satellite Optimized Network Transfer
The Medweb server does several things to optimize transport of images over high latency
networks such as that experienced when sending data traffic over satellite links. The server does
this by increasing packet size, and sending parallel data streams to reduce time waiting for
acknowledgment packets and take advantage of idle bandwidth. The typical increase in speed of a
file transfer caused by this component can be over 10X faster than attempting file transfers
without the optimized network software.
7.1.4 Time Window Delayed Transfer/Timed Forwarding
The Medweb server is able to receive medical imaging studies from local DICOM modalities and
cache the studies for sending during periods of Low network utilization. This means that if a
facility has a particularly low bandwidth link, the Medweb server eliminates bottlenecks by
holding the imaging studies until the end of the work day so that imaging file transfers do not
interfere with interactive traffic like HIS (CHCS) sessions that may be going on over the same link
during the day. The Medweb server can be set to send studies only during a particular time
window. Furthermore, if network communications are only enabled during certain periods of
time, the Medweb server will hold imaging traffic and start sending automatically when a remote
network link is initiated. This may be useful for mobile facilities where a satellite network
connection is only initiated for a few hours each day.
7.1.5 Wavelet Compressed Secure Web Access
By wavelet compressing studies that are viewed through a browser interface to the Medweb
server, doctors are able to provide emergency or “stat” “wet reads” for patients in remote
locations without impacting network bandwidth. In fact, this ability to securely access a wavelet
compressed image over the net is simply not available through other techniques, but has a huge
positive impact on patient care and the ability to quickly diagnose and treat life threatening
injuries when they occur at remote locations.
7.2 Application Entity Titles (AE Titles)
It’s a two-step process to set DICOM routes, storage, query, or printing on the intranet or the Internet.
First, you have to define the DICOM devices located on your intranet, and what SOP classes they
support. Then you need to go to the AE Title routing page to set up routes between them.
AE Title stands for "Application Entity Title." It is a standard DICOM field that you will use often
when setting up the Server. Each DICOM device can support multiple applications performing various
functions. For example, you may use one AE Title to access the storage class provider on a device, and
a separate AE Title to access the query services of the same device.
- 43 Medweb Secure DICOM Proxy Webserver
Administrator Guide and User Manual
Confidentia
Page 44

June 2003
l
7.3 DICOM Devices
The Server must be registered as a DICOM device for routing DICOM images. To configure the
server, follow the steps discussed below.
1. Sign on to the Medweb Server and login using as the Administrator.
2. Click on the Administrator Site button on the Navigation Menu. Click the DICOM Settings button.
Server has a series of default settings that the Administrator uses to configure the DICOM devices.
The
These are at the complete discretion of the Administrator and should be discussed prior to setup.
3. The server accepts connections on a predefined port. This port is usually 104. If the network
communicates on a different port, change this field to the appropriate port number.
4. The hostname is the institution and the station name that the Server is associated with. Default
settings for the station name is Medweb Server.
5. The default AE Title for the Medweb server is usually Medweb.
Note: When configuring multiple Medweb servers on the same network, each Medweb server must
have a unique AE Title i.e. New York Medweb, Chicago Medweb.
6. CD printer settings can be configured if you have a CD Publisher attached. See Section 7.5.
7.The MTF Code (Medical Treatment Facility) is used solely by our Military Customers. It is a 4 digit
Number.
7. Click Save Changes.
7.4 Setting DICOM Destinations
The DICOM devices must be registered as DICOM image destinations and must configured with the
- 44 Medweb Secure DICOM Proxy Webserver
Confidentia
Administrator Guide and User Manual
Page 45

June 2003
l
server in order to effectively distribute and route images. Follow the steps discussed below to set up
your DICOM devices.
1. Sign on to the Medweb Server and login using as the Administrator.
2. Click on the Administrator Site button on the Navigation Menu. Click the DICOM Settings button.
3. Choose the New Destination button. The following table will contain any current DICOM image
destinations.
4. Click the Add button to add to new destination.
Please visit Appendix A for a description of all the DICOM SOP classes.
5. Select which of the DICOM SOP classes the particular device supports. For example, a CT scanner may only
support the ability to transfer DICOM storage class studies to another DICOM device that knows how
to accept them. In that case, you would select the second option, "Generic Storage Class SCU" (SCU
stands for Service Class User).
In this case, the CT scanner is storage SCU, while the Server is a storage SCP (Service Class
Provider).
Note: If selecting DICOM Print SOP Class, Select only one choice.
6. The next section contains the AE Title, IP Address and DICOM IP Port. This information should be
supplied by the equipment supplier and configured by the Administrator. To select the AE Title, IP
Address, and Port Number, do the following:
The administrator should supply the destination(s) with IP Addresses. The port number and AE Title
should be provided from the various equipment vendors. The Administrator may make up the
addresses of his/her own choosing, and then select the AE Titles and port numbers. Distribute these to
- 45 Medweb Secure DICOM Proxy Webserver
Confidentia
Administrator Guide and User Manual
Page 46

June 2003
l
the various vendors and request them to enter the same addresses on their machines. The Label is a
description to identify the device in the popup menu that appears on the patient study list selection
screen of the Server.
7. If using a secure port, enter the specific port number and make sure the Secure Tunnel Button is
checked. For more information on Secure Routing, refer to Section 9 Server Configurations for Secure
Image Routing.
8. Secure Tunneling The Admin may select the compression level at which the files are to be
transferred. A drop down list is shown with compression levels from Zero to Nine. Medweb
recommends using compression (6 is the best choose) with slow connections. Using compression on
fast connections may decrease performance. You must check the check box to enable the Secure
Tunneling and Compression level.
9. If only accessing local DICOM devices with the Server, then there is no need to configure the
Server-to-Server Routing functions. Leave these fields blank.
10. Select Scheduling parameters. The Medweb server is able to route and deliver the images
immediately upon request or have them transferred at a specific time. This option is very helpful when
you have multiple destinations routing large numbers of images to the server. For scheduled delivery,
images may be sent to destinations for a particular time interval. The format for this is HH:MM [0023] until [00-59]. Please enter the hours into the text fields provided.
11. Repeat this process for each DICOM device on your local intranet. Begin sending DICOM studies
to the Server once all destinations have been added and configured.
The studies will appear in the patient menu and can be viewed from any browser-equipped PC using
the Medweb Browser plugin.
If you would like the server to forward copies of studies it receives to other DICOM devices, read
ahead to the section on the DICOM route editor. However, if you plan on using Multi-Server networks,
route over the Internet, satellite, or wide area networks, then skip ahead to the section on Server-toServer routing.
7.5 Configuring and Using the CD Publisher
7.5.1 Introduction to CD Publishing
This is a software/hardware option for the Medweb server. It allows authorized users to select
cases from their Web browser to be recorded to a local storage device like a network CD
Publisher. The studies are recorded as DICOM, or as self-playing Medweb files with an integrated
Medweb Viewer Plugin. The ability to integrate a full-featured self-playing Medweb Viewer onto
the CD adds a unique functionality that allows the facility to send patients outside the facility for
consultation with an inexpensive electronic copy instead of printing film.
7.5.2 Rimage Software
Note: Please assure that the PC has a Firewire card installed before proceeding.
1. Install the Rimage Producer Software Suite and proceed through the wizard.
2. When prompted, be sure that Client Applications and Servers – Just Production are selected.
3. Be sure to choose the correct printer attached to your device, either the Everest or the Prism.
- 46 Medweb Secure DICOM Proxy Webserver
Administrator Guide and User Manual
Confidentia
Page 47

June 2003
l
4. Finish Setup.
7.5.3 Medweb CD Gateway
The MedwebCDGateway.exe file will be required to process CD “orders” and is therefore
necessary to download and install on the PC before proceeding. You may obtain this file by
calling Medweb at 415.541.9980/1.800.8MEDWEB and a representative will provide you with
instructions. Download and Install this program. Accept all defaults when installing.
7.5.4 CD Publisher Settings
1. Login to the Administrator Site of the Medweb server using the browser.
2. Select DICOM Settings on the navigation bar on the left of the screen.
3.Select the radio button beside either “Use CD Publisher” or “Use local CD Burner”. A local CD
burner is one that is located inside the PC. The CD Publisher is a separate unit and is usually a
mass storage device and is capable of burning multiple CD’s.
4. Click on the CD Publisher Settings
5. Enter the IP Address assigned to the CD Publisher.
6. The username and password will be demo/demo respectively.
7.Use the standard ftp port 21.
8. Save Changes
Once the CDGateway.exe file has been installed on the PC, and the DICOM settings have been
completed, navigate to the View Patients page using the browser. Located in Image Management
link.
- 47 Medweb Secure DICOM Proxy Webserver
Administrator Guide and User Manual
Confidentia
Page 48

June 2003
l
Toolbar (Section 10.3), a CD icon should appear. This permits the user now to print studies to a
CD, using an attached CD Publisher.
7.5.5 Starting the Publishing Process (for the Rimage only)
1. Start the Production Server software located in the Rimage Directory on the PC.
2. Start the Medweb CD Gateway on the PC.
3. Open the Production Server Gateway so “orders” to be processed can be viewed.
4. Login to the Medweb Server as a regular user and go to the View Patients Page.
5. Click the CD Icon in the Image Management toolbar for any patient listed in the table.
6. Check the PC Production Server to make sure the order is received by the CD Publisher. A
“new order being processed” will be present.
7.6 Modifying or Deleting Destinations
The Administrator may modify or delete any destination by using the Pencil and Trashcan buttons
located beside each destination entry.
1. Sign on to the Medweb Server and login using as the Administrator.
2. Click on the Administrator Site button on the Navigation Menu. Click the DICOM Settings button.
3. Choose the New Destination button. The table will contain any current DICOM image destinations.
4. Click the Pencil or trashcan buttons to perform the delete or the modify function.
Modify and Delete Buttons
7.7 DICOM Route Editor: AE Title Forwarding and Element Matching
The Medweb Server supports two types of forwarding mechanisms for DICOM images. They are AE
Forwarding and Element Matching.
7.7.1 Application Entity Forwarding
AE Forwarding is accomplished by matching an AE against a known set of AE’s. This is done
once the Medweb Server receives a DICOM image. If the remote DICOM entity uses an AE that
does not match the AE of the Server that receives the image, then the receiving server will assume
that the image is to be forwarded to another remote DICOM entity. A copy of the image will
remain on the initial receiving server even though the AE Titles did not match. This method is
- 48 Medweb Secure DICOM Proxy Webserver
Confidentia
Administrator Guide and User Manual
Page 49

June 2003
l
used when you want to use a Server (or two Servers) as intermediaries in the DICOM transmission
process. For instance, a conventional DICOM link would look like this:
Modality ---[DICOM]---> Archive
The link may be modified to this:
Modality ---[DICOM]---> Server ---[DICOM]---> Archive
Configure the modality to use the same AE as the archive, but the IP/port of the Server.
Configure the Server to know about the archive device. Then once the server (with an AE that
matches the archive device’s AE) receives an image, the server will automatically forward to it.
7.7.2 Element Matching
To configure route paths go to Element Matching screen by selecting Administrator
Page>DICOM Settings> AE Title Routing. The following screen appears.
The initial Server performs element matching once a DICOM image is received. Using the
administrative user interface, the Server can be configured to look inside each DICOM image
received and match that image against a pre-stored query. If the image matches the query, then the
image is forwarded to a remote DICOM entity as specified. Use this when you want to use the
Server (or two Servers) as a router. For instance, you may want to have the Server forward all
head studies to a Neuro reading workstation(s), or all images from patients under a certain age to
the pediatric reading workstation(s). Element matching works alongside of AE Routing. Thus, you
can utilize the Server for both AE Routing an image and element matching an image at the same
time. For instance, you may have a DICOM link between a modality and an archive that looks like
this:
Modality ---[DICOM]---> Archive
You can use AE Routing to break this link like this:
Modality ---[DICOM]---> Server ---[DICOM]---> Archive
Then you can use element matching to extend the link like this:
Modality ---[DICOM]---> Server ---[DICOM]---> Archive
--[DICOM]---> Workstation1
--[DICOM]---> Workstation2
--[DICOM]--->Workstation3
- 49 Medweb Secure DICOM Proxy Webserver
Administrator Guide and User Manual
Confidentia
Page 50

June 2003
l
1. To add a route, click the Add button.
2. Select the Destination for the Path, which could be the Local Server attached to DICOM
3. Choose the Attribute that will be the “key” element to route on, such as patient name, study
date, referring physician etc.
4. Enter a Keyword for the attribute.
5. Click Save Changes.
6. Add as many routes as needed for DICOM Routing.
Direct DICOM Forwarding
Direct DICOM forwarding is the baseline forwarding mechanism. This is similar to the
forwarding that was described earlier. Here the server acts as the center of multiple DICOM
transmissions. For instance:
Modality ---[DICOM]---> Server ---[DICOM]---> Archive
Essentially, images arrive via DICOM into the server. The Server routes to one or more remote
AE's using its local AE database and element matching (AE Routing) tables. There are a number
of fields that you can route on when setting up intranet or Server-to-Server element based routing.
These include all those listed in the following image:
7.8 DICOM Presets
7.8.1 Introduction
Despite the fact that the DICOM standard provides a mechanism for forwarding Window/Level
presets, certain DICOM devices fail to forward information concerning Window/Level settings as
part of the DICOM file. When viewed on another DICOM device, the image may appear black at
first. In order to view the image information, you will need to manually adjust the Window and
Level settings. This process can be time consuming, so the Server takes advantage of descriptive
information located in other fields to automatically apply the Window/Level settings to DICOM
studies when they arrive. These settings are controlled in the “presets” submenu of the DICOM
settings screen. This function may also be used to send pre-windowed wavelet compressed studies
to on-call radiologists. For example, when viewing a head CT from a GE spiral scanner, you will
also want to see brain and bone windows of the study. By using the presets function, you can have
the study wavelet compressed as two sets of information, one using bone windows and the second
using brain windows.
- 50 Medweb Secure DICOM Proxy Webserver
Confidentia
Administrator Guide and User Manual
Page 51

June 2003
l
7.8.2 Configuring DICOM Presets
Window/Level presets depend on the sending device populating the descriptive fields in the study with
information about the type of study performed. Certain vendors will populate the descriptive field with an
English description of the scanning protocol used for the study. The Presets function on the Server will look
for certain keywords in that description to decide what Window/Level to apply to the study. The
Administrator may set the presets, or use some of the default parameters that are already programmed into the
Server.
For example, for a brain CT, you can configure the presets window to look for the word “brain” in
the Series Description field. When it finds the word “brain,” it will automatically apply brain and
bone windows before displaying the images in the Web server. You can adjust the window and
level default presets by changing the values in the window and level fields for a particular preset.
These values are based on the same scale as is typically used by GE medical systems. There are
standard conversions that allow you to translate these values into Hounds field units.
- 51 Medweb Secure DICOM Proxy Webserver
Administrator Guide and User Manual
Confidentia
Page 52

June 2003
l
8.0 Security Setup for Secure DICOM Routing
8.1 Introduction
The Medweb server far exceeds HIPAA requirements, as well as having many security functions that
are simply not available from other vendors.
Medweb has two fundamental methods for secure DICOM Image routing. They are:
• IPSEC VPN (Virtual Private Network)
• Application Specific Secure Proxy
The application specific secure proxy is the preferred method of routing DICOM images on
congested networks, the Internet or Satellite links. The following document details the types of
encryption methods that are HIPAA and HCFA compliant that Medweb uses to securely routes
images within a network.
In addition to routing, the Medweb server has a built-in packet filter that may be used to disable
access to all ports and services that are not specifically used by the server. This further enhances
security functions of the server.
8.2 Secure Server Operation and Image Routing
8.2.1 Using the IPSEC VPN Function
IPSEC is Internet Protocol Security. IPSEC uses strong cryptography to provide both
authentication and encryption services. Authentication ensures that packets are from the right
sender and have not been altered in transit. Encryption prevents unauthorized reading of packet
contents.
IPSEC establishes a secure tunnel between two subnets (NET1 and NET2) over an unsecured
communication such as the Internet. Everything passing through the un-trusted Internet is
encrypted by the IPSEC gateway machine and decrypted by the gateway at the other end. The
result is Virtual Private Network or VPN. A VPN lets two networks communicate securely when
the only connection between them is over a third network, which they do not trust. The setup
method is to put a security gateway machine between each of the small sites that only have limited
traffic.
There is never a time when you will transfer from a Medweb server to another non-Medweb server
over the Internet using regular DICOM. It violates HIPAA and HCFA regulations. The way to
route to a remote PACS, or other DICOM device at a remote site is by putting a Medweb at each
end of the Internet link. Medweb makes inexpensive cube servers for communicating networks
and the un-trusted network. The gateway machines encrypt packets entering the un-trusted net and
decrypt packets leaving it, creating a secure tunnel through it.
- 52 Medweb Secure DICOM Proxy Webserver
Administrator Guide and User Manual
Confidentia
Page 53

June 2003
l
Further, Medweb does not permit sending DICOM over a WAN, only over the local Ethernet, and
preferably only on the captive DICOM side of the Medweb Server internal firewall.
8.2.1.1 IPSEC Configuration
NOTE: In order to operate in secure mode, you must assure that you have closed any unsecured
connections.
1. Sign on to the Medweb Server and login using as the Administrator.
2. Click on the Administrator Site button on the Navigation Menu. Click the Control Panel button
and then Click Services.
3. Locate IPSEC Administration from the table of Service Settings and click on Parameters.
The IPSEC Configuration page is divided into 4 Sections. To configure and bind the IPSEC
Interface(s), follow the steps below.
4. Interface bindings
Eth0 and eth1 are network interfaces on the back of your server. Eth3 is a satellite network
interface. Match the network interface to the IP SEC interface.
- 53 Medweb Secure DICOM Proxy Webserver
Administrator Guide and User Manual
Confidentia
Page 54

June 2003
l
Check the check box on the side to enable the matched interfaces.
5. IP secrets
User should enter Encryption and Authorization. The values are to be long strings and may be the
same or different. These parameters should be the same for both ends of tunnel (NET1 and
NET2); therefore communication between both Administrators is necessary.
6. Left network - Right network
Provide the network configuration for both ends. Left is the local end of tunnel and the Right is the
remote end.
7.Click Save changes.
8. Return to the Services Page and Check the box beside IPSEC Administration and click Save
Changes.
This will start the IPSEC tunnel at one end. The remote end (receiving end) must configure the
same settings in order to properly establish a secure connection.
8.2.2 Secure Tunneling – Routing DICOM Studies
8.2.2.1 Application Specific Secure Proxy Tunnels
Secure tunneling uses Secure Shell transport for study routing/forwarding between Medweb
servers. It also can compress data to increase speed on slow networks.
This communication channel will work between Medweb's devices ONLY. Both Servers
must also have the latest version of the Software to ensure compatibility.
8.2.2.2 Secure Tunneling Configuration
1. Sign on to the Medweb Server and login using as the Administrator.
2. Click on the Administrator Site button on the Navigation Menu. Click the Control Panel button
and then Click Services.
3. Locate Medweb Secure Tunnel from the table of Service Settings and click on Parameters.
- 54 Medweb Secure DICOM Proxy Webserver
Administrator Guide and User Manual
Confidentia
Page 55

June 2003
l
4. Secure Tunnel IP Port / Default Value: 25000
This is the service/communication port number. Assign any port number that is not assigned to
another service. The same port must be open on the firewall/router to enable communication.
5. Localhost Public Key
The Public Key of local host Server must be copied and pasted in the remote host’s server. This
allows the remote host to accept studies from the local host.
6. Known Hosts Table
The Public Keys of any remote hosts to should be stored here.
To add a new Remote Host: Click Add and copy the Public Key of the remote host and paste it in
the Box. Click Save Changes.
7. Go back to the Services page and check the check box beside Secure Tunneling.
8. Proceed to DICOM Settings on the Navigation Menu and Select Destinations at the top of the
page (at the source server).
9. Click Add.
10. In the Transport line, specify the same port number to use Secure Tunnel.
11. Select the compression level (1 is the lowest and 9 is the highest).
Note: Use compression on slow networks, using compression on fast network will slowdown
overall performance.
8.2.2.3 Scheduling Transfer Times
The Medweb server is able to route and deliver the images immediately upon request or have them
transferred at a specific time. This is very helpful when you have multiple destinations routing
large numbers of images to the server. For scheduled delivery, images may be sent to destinations
within a particular time interval or transfer window, set by a Medweb Administrator. For
configuration details, refer to Section 8, DICOM Routing.
8.2.2.4 Network Optimization for Image Transfer
In addition to Wavelet compressed files viewed through the web browser, the Medweb server also
provides five types of network optimization for file transfers over the Internet.
8.2.2.5 Secure Tunnel Step-By-Step
• Upgrade both Servers with the latest version of Software.
• Exchange public keys between servers
8.2.2.4.1 Setting Compression Settings for Image Transfer
Please refer to Section 8, DICOM Routing for more information on configuring Compression
Settings for DICOM.
- 55 Medweb Secure DICOM Proxy Webserver
Administrator Guide and User Manual
Confidentia
Page 56

June 2003
l
• Assign a port number
• Save Changes
• Check Secure Tunnel check box on Services Page
• Save Changes
• Go to DICOM SETTINGS /DESTINATIONS
• Add destination and same port number as the source server
• Save Changes
• Commence the transfer from the source server
8.2.3 Workflow Proxy
8.2.3.1Workflow Proxy Introduction
The workflow proxy function is only used for encryption of listed ports. IPSEC encrypts
everything between sites but workflow proxy encrypts only a partial part of traffic and leaves rest
of it unencrypted. Let us suppose that Device A generates data and sends it into device B over port
3320. If we use both device A and B inside a corporate network we don't have think about security
and encryption as much if it was two devices on different sites.
8.2.3.2 Example of Workflow Proxy
Lets say we have two distinct sites, Novgorod (A) and San Francisco (B) and we want to provide
an encrypted tunnel for communication of a particular device at each site. A proxy will need to be
created between the two devices. The proxy will consist two new devices (servers) Proxy on the A
(PA) side and Proxy on the B-side (PB).
PA will listen on port 3320 and will encrypt and forward data from the A device into PB which
will decrypt the data and forward it onto device B. Device A will communicate directly with PA
and will "think" that it is communicating with device B.
8.2.3.3 Configuration of First (A) Workflow Proxy (Based on Example in 8.2.3.2)
1. Sign on to the Medweb Server and login using as the Administrator.
2. Click on the Administrator Site button on the Navigation Menu. Click the Control Panel button
and then Click Services.
3. Locate Workflow Proxy from the table of Service Settings and click on Parameters.
4. Click Add Rule.
5. Listen to Port
- 56 Medweb Secure DICOM Proxy Webserver
Confidentia
Administrator Guide and User Manual
Page 57

June 2003
l
Specify the port to listen to at Local Host. Make sure you have an open connection at this port.
Ex: port 1111
6. Function
Specify the function. Since this is the local host and you are sending the data, you should choose
Encrypt. This will encrypt the stream and forward it to remote host : port.
7. Forward to Host : Port
Specify host : port. This is the target or remote host. This way the encrypted stream goes to the
address at host : port. For example 199.199.199.199:2222
8.2.3.4 Configuration of Second (B) Workflow Proxy (Based on Example in 8.2.3.2)
Specify the port to listen to at localhost. This is should be 2222, because we are forwarding here
from the first Server.
1. Select Function = Decrypt
3. Specify the host : port. This is the target host (B) with server application i.e. a PACS broker.
Remote A: Listens to 3320 for request then encrypt and forward to Hub A:
199.226.64.197:5520
Hub A: Listens to 5520, decrypt and forward to work flow source at 192.168.64.43:3320
8.2.4 IP Filters
8.2.4.1 IP Filters Introduction
IP Filters are like a built in firewall. The Medweb device can store a list of filtering rules and
process every incoming/outgoing data packet and either allow it to go on or drop it. This is very
useful in protecting hosts inside corporate networks.
8.2.4.2 Resetting IP Filters
The wrong configuration of IP Filters can make a device unreachable. To reset IP Filters select
Menu RESET FILTERS from the LCD panel on Server console.
Also, in the Secure Operation tab, if you enable all of the services, you will overwrite any
customized filters. You must then go back to customize your filters once again.
1. Sign on to the Medweb Server and login using as the Administrator.
2. Click on the Administrator Site button on the Navigation Menu. Click the Control Panel button.
16. Click IP Firewall at the top of the screen.
4. Click Add Rule to add customized filters.
- 57 Medweb Secure DICOM Proxy Webserver
Administrator Guide and User Manual
Confidentia
Page 58

June 2003
l
5. Role Number
IP filtering rules are numbered. Rules with smaller numbers are tested first. For example, an IP
packet will not test against rule 2 if rule 1 filters it out.
6. Policy
Policy determines whether packets meeting the criteria of this rule are accepted or denied.
Accepted packets are allowed to pass unfiltered through the server. Denied packets are dropped
from the server.
7. Source IP Address
The IP address and subnet mask of the host or network are where the IP packet is originating. If
the subnet mask is 32, then the IP address specifies a single host.
8. Source Port
Packets originating from this port or range of ports will be filtered.
9. Destination IP Address
The IP address and subnet mask of the host or network are where the IP packet is destined. If the
subnet mask is 32, then the IP address specifies a single host.
10. Destination Port
Packets destined to this port or range of ports will be filtered. For example, port 80 is the HTTP
port, port 21 is the FTP port, and port 23 is the telnet port.
11. Protocol
Select the protocols the rule to which it will be applied. Select all for all protocols. To select just
two protocols (e.g. TCP and UDP), you need to have two separate rules
8.2.5 Secure Operation - SSL
8.2.5.1 SSL Introduction
Secure Sockets Layer (SSL) allows an SSL-enabled server to authenticate itself to an SSL-enabled
client, and allows both machines to establish an encrypted connection. SSL-server authentication
allows a user to confirm the identity of a server. The “sockets” part of the term refers to the
- 58 Medweb Secure DICOM Proxy Webserver
Administrator Guide and User Manual
Confidentia
Page 59

June 2003
l
sockets method of passing data between a client and a server program in a network or between
program layers in the same computer.
SSL-enabled client software can use standard techniques of public-key cryptography to check that
a server’s certificate and public ID are valid and have been issued by a certificate authority. This
process is identical for authentication of the SSL-client.
The Medweb Server allows for secure operation if needed. A force redirection of your public and
Administrator Sites to a secure connection is possible by simply providing your demographic
information and generating a security certificate.
8.2.5.2 SSL Security Certificate Generation
1. Sign on to the Medweb Server and login using as the Administrator.
2. Click on the Administrator Site button on the Navigation Menu. Click the Control Panel button
and then Click Services.
3. Locate Web Server in the table of service settings and click on Parameters.
4. Check the check box to force secure connection.
5. Click Generate.
6. Fill in demographic information and click Generate again.
7. Once redirected back to the Redirect Page, click Save Changes.
Medweb provides the means to enable all ports for services (such as Web, FTP) and Medweb
ports. It overwrites the last IP filter rules and enables the Automatic redirection to Secure HTTP
access for Public and Admin site, as well as other services.
- 59 Medweb Secure DICOM Proxy Webserver
Administrator Guide and User Manual
Confidentia
Page 60

June 2003
l
8.2.5.3 Enable all Ports Configuration
The Secure Operation page of the Medweb Server is the fastest way to enable the services you will
need.
1. Sign on to the Medweb Server and login using as the Administrator.
2. Click on the Administrator Site button on the Navigation Menu. Click the Control Panel button
and then Click Services.
3. Locate Secure Operation at the top of the screen and Click the button.
4. Click Enable all services list below
5. Click Confirm Modify.
6. After clicking Confirm Modify, go to IP filters page and re-customize your IP filter rules.
.
- 60 Medweb Secure DICOM Proxy Webserver
Administrator Guide and User Manual
Confidentia
Page 61

June 2003
l
9.0 Procedures for Viewing Studies
9.1 Medweb Image Viewer Plugin
9.1.1 Introduction
The Medweb Plugin is a unique, patented, clinical imaging viewer that is designed to work in
conjunction with Internet browsers, e-mail programs, or as a stand-alone application. The plugin
has many of the software viewing tools of a high-end DICOM radiology workstation, however it
is less than 1.5 megabytes in size. You can send the plugin via an e-mail message, along with
image studies. The plugin allows a consulting doctor to view and manipulate the images using
only a conventional Windows PC or Macintosh computer. The following section is a description
of the myriad of tools and functions contained in the plugin.
9.1.2 Plugin Installation
To download the plugin for the first time or if you want to upgrade your version, please follow the
directions below.
1. Sign on to the Medweb Server and login using as the Administrator.
2. Click on the View Patients button on the Navigation Menu. Locate the Get Latest Plugin
button at the top of the screen and click it to proceed to the following page.
3. Listed are the latest versions of the Medweb Plugin for Windows, Macintosh and Linux
operating systems as well as downloads for Medweb Smart Monitor and the CD Gateway. Click
the appropriate icon for your operating system.
4.The above screen will appear. Select a location on your hard drive to save the file. The download
should take only a few minutes. Please make sure all instances of the Browser are closed. It is best
to download when all programs are closed.
5.Once the download finishes, select Open from the Window Prompt or go to the location on the
local hard drive where you saved the file and double click it to run the wizard installer.
6. The Medweb Image Viewer Installer will appear.
- 61 Medweb Secure DICOM Proxy Webserver
Administrator Guide and User Manual
Confidentia
Page 62

June 2003
l
7. Click Next to proceed with the installation. Read and accept the terms of the Medweb
Agreement and Select Typical Installation. Continue to choose Next.
8. Click Finish to finalize the installation and a page describing the latest changes to the Medweb
Plugin will open automatically.
9. Reopen your browser and sign into the Medweb Home Page and Select View Patients.
10. You may now view patient images using our Medweb Viewer. Refer to Section 15. 3 Patient
Study Information and Manipulation.
9.2 View Patients Page
The View Patients page provides a convenient method for selecting and viewing patient studies that are
stored on the Server or on DICOM devices located on the same network.
9.2.1 Management Toolbar
Beginning with the management toolbar, this section takes you through the functions of the View
Patients Page. See figure below.
9.2.1.1 New Study
The New Study option opens a blank instance of the Medweb Image Viewer Plugin allowing you
to create a study from scratch by uploading images to the server. Medweb has incorporated Twain
and digital camera interfaces into the plugin to allow the capture of images from devices such as
digital cameras, video scopes and scanners. Please refer to Appendix A for examples of
- 62 Medweb Secure DICOM Proxy Webserver
Administrator Guide and User Manual
Confidentia
Page 63

June 2003
l
compatible TWAIN devices. The New Study features allows you to convert any uploaded images
to DICOM for forwarding to a DICOM archive as well as create a new study and add images to an
existing study.
9.2.1.1.1 Creating a New Study
1. If you are adding images to an existing study you must first select that study and open
it (Refer to Patient Study Management if you have not installed the Plugin).
2. Select the Acquiring Twain Images/Camera Icon from the plugin toolbar.
3. If you are creating a new study then simply click the New Study Button in the
Management toolbar (Pictured above).
4. To create a new study you must enter the patient demographic information before
uploading images. If you are simply adding images to an existing study then the patient
information should appear in the text boxes.
After entering the patient information, use the brief forms to enter additional data for
billing information, medical history, and physical exam data by clicking on the
appropriate tabs. This provides a quick and easy way to create new studies from scratch
without having to connect to DICOM or HL7 driven systems.
Demographic and Images Tab
Billing Information, Medical History,
Physical Exam Tabs
5. Once you have finished entering the demographic data proceed to the Images tab.
9.2.1.1.1.1 Acquiring Images from a Kodak Digital Camera
1. Please make sure the camera is turned on, is in connect mode, and is plugged into the
serial, USB, or set for infrared communication with your PC.
2. To connect the camera simply click the Connect Camera button in the Digital Camera
tab.
- 63 Medweb Secure DICOM Proxy Webserver
Confidentia
Administrator Guide and User Manual
Page 64

June 2003
l
3. Use the pull down menus in the Open Camera Window (below) to configure your
camera settings. Click OK.
4. Click Download Thumbnails to download the images from the camera. The images
appear in the bottom panel of the screen in what is referred to as “thumbnail” size. You
may double click an image to view a larger version.
5. Select the images that you would like to add to the study by dragging and dropping
them into the upper panel (the window above the one you are viewing the thumbnails in).
6. At this point, you can select the Upload button, to transfer the images to the Medweb
server.
Upload button
9.2.1.1.1.2 Acquiring Images from TWAIN Devices and Scanners
1. To connect to the TWAIN device or scanner, simply click the Select Source button in
the Scanner (TWAIN) tab. A screen appears that lists the devices currently connected to
your PC.
2. Highlight the device from which you want to transfer the images and click Select.
3. Click the Acquire button to acquire the image. The control dialog box for the particular
TWAIN device you have selected pops up on the screen. (The TWAIN protocol allows
you to download the TWAIN interface directly from the device or load floppies that
come with the device).
4. Using the interface for your device, select and capture the image. The thumbnail image
appears in the lower panel. Repeat the same steps to acquire more than one image.
5. Once all images have been captured, drag and drop each image from the lower pane
into the upper pane.
6. Click the Upload button (shown below) to upload these images onto the server.
- 64 Medweb Secure DICOM Proxy Webserver
Confidentia
Administrator Guide and User Manual
Page 65

June 2003
l
w
r
9.2.1.2 The On Call Function
Enable the On Call function to allow the automatic download of images that arrive on the server
from imaging modalities onto your patient list.
Upload button for TWAIN devices
NOTE: The plugin displays a progress indicator that shows the images being uploaded to
the server. When it is completed, the progress indicator disappears and the plugin display
window appears with the new images displayed in the study window. If no images appear
in the study window, make sure that the On Call function is Enabled. For instructions,
see below.
To upload images from VIDAR, EKG and Spiro, please follow the same instructions
mentioned in the Acquire Images Section.
9.2.1.1.1.3 Special Note on Using the Vidar Scanner TWAIN Drivers
In order to acquire TWAIN images from a VIDAR scanner, it is important that you
follow a specific order for loading software drivers.
1. Load your PC with a narrow, 50-pin SCSI interface from Adaptec.
2. Load the Adaptec software, which comes with your SCSI interface card.
3. Load the VIDAR TWAIN drivers.
4. Load the Medweb Plugin
5. Start the browser and navigate to your Home site.
Loading drivers in the wrong order, or attempting to use a wide SCSI or ultra-SCSI
interface instead of the 50-pin narrow SCSI, may result in error. The scanner may not
operate or possibly may not even be recognized by the system.
9.2.1.2.1Configuring On Call
Click the On Call button in the Management toolbar to see a small version of the plugin
window display on your desktop. To cancel the auto-download of images, click Cancel on
call
IMPORTANT NOTE
Do not use this windo
to view patient images.
This window is used
ONLY to enable o
disable the On Call
function.
:
- 65 Medweb Secure DICOM Proxy Webserver
Administrator Guide and User Manual
Confidentia
Page 66

June 2003
l
9.2.1.3 Preferences
The preferences menu allows a User to set personal preferences such as your name, email address,
and contact information. Click the Preferences button on the Management toolbar. Click Submit to
save any changes.
9.2.1.4 Save Settings
The Save Compression Settings button allows the user to select per-modality compression settings
when accessing images from inside the same network. Please refer to Compression Settings under
Section 15.3 Study Information and Manipulation for more information.
9.2.1.5 View Changes
The View Changes button displays the recent software updates and version numbers. It outlines
what has been changed and how many fixes were performed. Click the View Changes button on
the Management toolbar to access this information.
9.2.1.6 Statistics
The Statistics page details the rate at which a host may access studies. If you click View Full Web
Statistics, you may also view information about users accessing the studies, such as IP Address of
the user’s machine, username, studies viewed, and actions performed.
9.2.2 Study Search Bar
Use the Search Bar when trying to locate a particular study that no longer resides in the Patient List,
locating studies on another server attached to yours or trying to locate all studies grouped by a
particular physician or other parameter (More search options are described below).
1. Limit: Limit the number of studies to be returned by the search query
2. Status: Select to return only those studies that are either read, unread or both.
3. Find: Use any identifiable word here to narrow down your search. I.e. Smith (last name of patient)
4. Modality: Return only those studies that are of a particular modality.
5. In Last: Use this to set the time frame for your query. I.e. retrieve only those studies dated within
the last four days.
2 3 4 5
8
9
10
11
12
6 7
13
14
- 66 Medweb Secure DICOM Proxy Webserver
Administrator Guide and User Manual
Confidentia
Page 67

June 2003
l
6. Group By: Use this feature to group your results and the way they are displayed in the patient
list.
7. Query: Select a location to query. I.e. search your local server or any attached server to return
requested studies.
8. Advanced: This will launch a more detailed query/search page to search for studies.
9. Current: Clicking this button will return the search parameters to their fields that were used to
display the current results in the patient list.
10. Clear: Clicking this button will set all search fields back to their default values.
11. This field will display the number of images left to send. This option is only available to those
servers who are currently set up for forwarding.
By clicking the [+], a new browser window will appear. A table will display the Server destination
AE Title, the Sending (Routing) AE Title, the number of files, and the total size.
This table lists all studies currently queued for transfer.
Note: In the example above, the server was both the sending and the receiving device.
12. Users: Displays the name of the user current logged in and using the View Patients Page.
13. This box displays the number of images currently left to compress. This occurs when studies are
being sent to the destination server and after being received, they are compressed so that they may
be viewed and stored. This field will be blue if no images are waiting to be compressed/received.
14. Drive Status: This field indicated the amount (in MB) of local drive storage currently available.
9.3 Study Information and Manipulation
9.3.1 Viewing a Study
Refer below for Descriptions.
1 2 3
4
5
6
78 9
10
1. Read/UnRead
Click this check box to mark a study as Read.
2. View a Patient Study
Click this blue ball to launch the patient study in the Medweb Image Viewer Plugin.
- 67 Medweb Secure DICOM Proxy Webserver
Administrator Guide and User Manual
Confidentia
Page 68

June 2003
l
3. Patient Name
This field will populate the name of the patient.
4. Study Origin
This is provides information about the Site, Station and Modality where the study originated.
5. Patient ID
Each patient is assigned a unique ID number within the system.
6. Type
This field describes the type of injury incurred by the patient.
7. Images
This field represents the number of images contained within a study.
8. Study Date
This field contains the date the patient study was entered.
9. Time
This field contains the date the patient study was entered.
10. Image Management Tools
9.3.1.1 Image Management Tools
- 68 Medweb Secure DICOM Proxy Webserver
Administrator Guide and User Manual
Confidentia
Page 69

June 2003
l
Change Access Permissions
This icon allows the Administrator to assign particular users to access patient studies.
Only an Administrator may change ACL permissions for a user and he or she may assign
multiple users to a study. A new window will open by clicking this icon. It will display
all users registered on the server as Referring M.D. or Transcriptionist. These are the
only 2 ACL Groups that only have access to studies assigned to them (as opposed to all
studies in the patient list).
To modify or add users to a particular study, check the check box adjacent to the user
you would like to remove or add.
Click Change to save your changes.
Print Study to a CD – Create Self-Playing Patient CD
Click this icon to publish a study to a CD. A DICOM printer or a CD Publisher must be
attached to the server for this to function (See Section 10, Configuring your CD
Publisher)
- 69 Medweb Secure DICOM Proxy Webserver
Administrator Guide and User Manual
Confidentia
Page 70

June 2003
l
Select to publish a Medweb viewer compatible image format (this option will copy the
Medweb plugin on to the CD as well) and/or raw DICOM files to CD by checking the
check box (es). Click Record CD to begin creating the CD.
Burning Multiple Studies
This feature permits copying multiple studies to a single CD.
Select the CD icon adjacent to the desired patient study. Select to burn Medweb viewer
compatible image format and/or raw DICOM files by checking the check box(es).
Click the Add to List button and the selected study will appear in a table as shown in the
above diagram. To add multiple studies, go back to the Patient List and click the CD icon
of the next study to be added to the CD, click Add to List in the new window and that
study will appear in the table below the previous study. You may continue to add studies
until the Full Size box indicates less than or equal to 650MB (or 700MB depending on
you CD capacity). All studies will appear in the table.
A new window is opened each time a study is selected for burning. The windows maybe
closed (using the X in the right corner) and the studies will remain on the list. If you plan
on burning multiple studies, it is a good idea to close the window after you have added it
to the list, that way you do not have too many windows open after you have added all the
desired studies.
To remove a study, at any time, click the trash can icon beside the undesired study to
remove it from the list.
Send to DICOM storage device, printer or by Email and Fax
Send patient images to a recipient via email or fax, to print the images to a DICOM
printer or to send the study to a local or remote storage device.
This screen will appear:
- 70 Medweb Secure DICOM Proxy Webserver
Administrator Guide and User Manual
Confidentia
Page 71
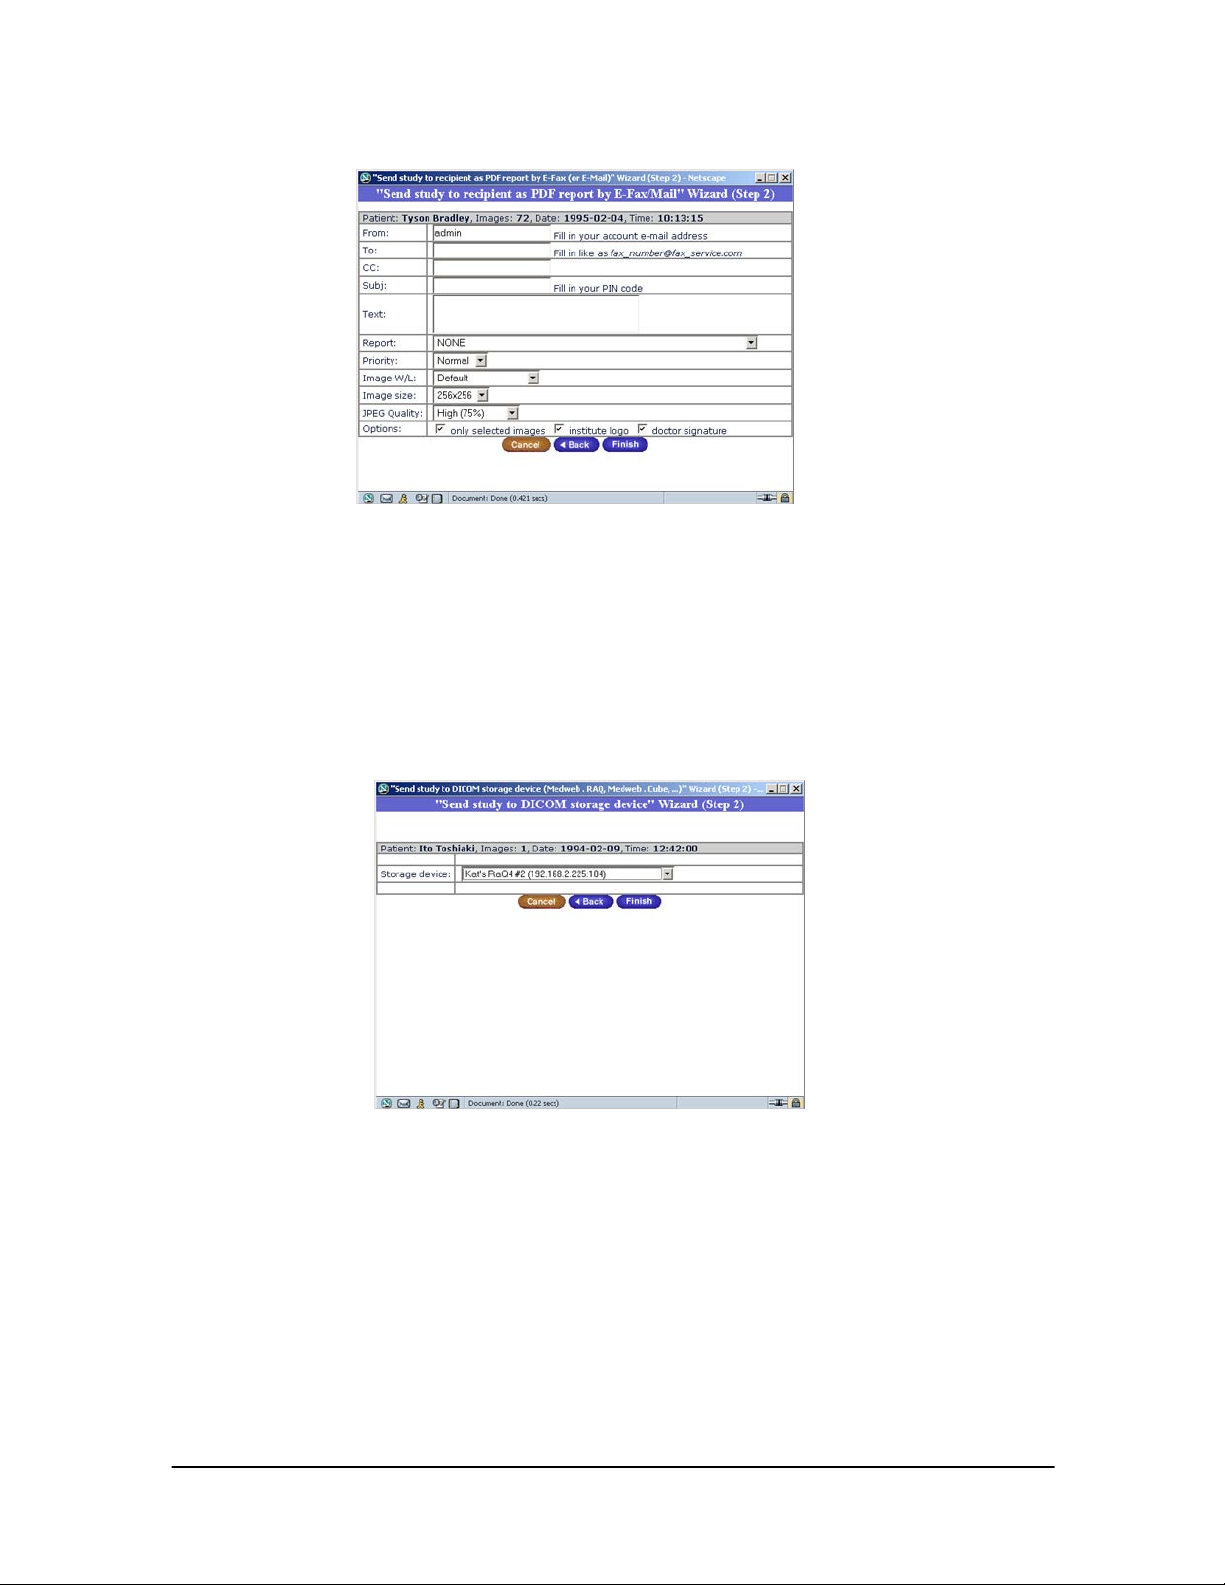
June 2003
l
Fill in the fields with the appropriate personal information.
When sending as HTML and/or PDF, the jpeg size and quality (low, medium and high)
may be modified. When using MWW format, a copy of the Medweb plugin is sent
attached to the email a choice of format in which to send it (Windows, Linux etc) is
available.
2. To send to a DICOM Storage Device, select the button to enable sending the study to
a DICOM storage device, Click Next.
Any devices (Medweb RaQ/Cube) that are currently registered on your server, as
Query/Retrieve DICOM Destinations will appear in the drop down menu. Select the
device (Medweb RaQ/Cube) in the menu and click Finish. The study is now sent to the
receiving Medweb server! (To add a Medweb server as a destination, See Section 8.4
Setting DICOM Destinations.)
- 71 Medweb Secure DICOM Proxy Webserver
Administrator Guide and User Manual
Confidentia
Page 72

June 2003
l
3. To print to a DICOM printer, the printer must also be registered as a DICOM
destination. See above.
Add, Modify or View Web Reports
By clicking this icon, a screen will appear with any current web reports for this study.
Any reports will appear in this table.
To open a report, click the desired item.
To delete a report, click the Trashcan icon beside the report to be deleted.
To edit a report, click the Pencil icon, make the edits necessary, and click Submit.
To add a report, click Add Report and enter the information in the text fields.
- 72 Medweb Secure DICOM Proxy Webserver
Administrator Guide and User Manual
Confidentia
Page 73

June 2003
l
Fill in the appropriate fields and click Submit to create the report. The report will now
appear in the report window.
Adding Word Documents as a Report:
1. Open the study using the Medweb Plugin.
2. Select the image, and Drag (highlight) the desired file Drop it anywhere on the
image.
3. A prompt will appear requiring the user to label the report name. Click Ok.
4. The Word document will now appear ion the list of reports and can be opened
deleted or modified from the Report window.
Delete Study
This will permanently delete a study from the server.
Hold/UnHold Study
Holding a study will prevent it from being deleted from the server. Upholding a study
will permit the server to delete the study when the space is needed.
Compression Settings
The administrator may change the compression level of images. Use
the drop down menu to adjust the compression level for a particular
study. To save per-modality compression settings, click Save settings
at the top of the screen. Any images routed from that modality type
will be compressed at the level specified.
9.4 Plugin Tools/Image Manipulation
This section will describe the manipulation tools in the Medweb plugin. Please see below.
4
5
1
2
3
- 73 Medweb Secure DICOM Proxy Webserver
Confidentia
Administrator Guide and User Manual
Page 74

June 2003
l
1. Plugin Version
The current version of the plugin will be clearly typed in green in all instances of the Medweb
Plugin.
2. Patient Name
The Patient name is indicated in green at the top of the screen.
3. Images
All of the images contained within a study will display in a tiled format upon opening the plugin.
The size of the images will depend on the number of images contained within the study. For
example, the more images in the study, the smaller they display in the window.
4. Menus
Viewing
Use the first drop-down menu, in the top left to adjust the number of images that preview on
the screen. Selecting Fill, which is the default; will populate all images contained with a
study on the plugin screen. True will display an image in the size it was originally captured.
Select the number of images you would like to view at one time by choosing a number
between one and seven.
Zoom
Use the second drop down menu to choose your level of Zoom. The zoom level chosen is
applied to all images currently displayed in the window. You may select a specific image by
clicking on it and then choosing a zoom level. You may then apply that zoom level to all the
images by simply clicking on the image once to proceed to the next image. You may change
the zoom level at any time.
Digital Edge Enhancement
Use the third menu to help sharpen the borders and edges of an image. This tool is useful only
for 12 bit images, such as chest X-rays and abdominal films. The level of enhancement
increases from Sharp 1 being the least amount of enhancement and Sharp 4 being the greatest.
Conversely, Smooth 1 and Smooth 2 will soften or smoothen the image, in effect performing
the reverse function as Sharp. To enhance an image, select the image by double clicking it and
select the desired level of sharpness or smoothness.
Window Level Defaults
Use the fourth menu to restore the original image to the screen or to backtrack one by one
through the changes that were performed.
5. Tools
Window Layout
The user may set the layout of all images contained within a study. The images may be
tiled horizontally, vertically, or 4x4. Cloning the Plugin window will create two separate
windows for viewing the same study. Linking the window will reflect any changes done
- 74 Medweb Secure DICOM Proxy Webserver
Administrator Guide and User Manual
Confidentia
Page 75

June 2003
l
in one window, in the other.
Cine Auto Playback Multi-Frame
This plays back DICOM multi-frame objects, such as ultrasound clips. The PC must have
the adequate RAM and processing speed to display the correct timing. A window allows
the user to select the rate at which the images are played. Reclick the cine button to release
the CINE function.
Cine Stack
Cine modes stacks all of the images in a study one after the other. Use the right mouse
button to advance through the images and the left mouse button to backtrack. Reclick the
image to release the CINE stack function.
Window Level
The Window Level/Invert allows the user to see different parts of the image in detail by
gradually changing the level of black and white in the image. Invoking the Window level
function automatically invokes CINE, so use of the CTRL key is necessary. While holding
down the CTRL key, move your mouse, with the left button pressed, across the image and
the levels will change.
Magnify/Zoom
The magnifying glass creates a zoomed area that can be dragged over any part of an image
to magnify it. Upon clicking the magnifying glass button, select a level of magnification
from the drop down Zoom menu in the left hand corner. You may move the Magnification
box around the image with your mouse. You must however hold down the CTRL key to
move the box. The magnification box will disappear if the CTRL key is not depressed.
DICOM Measurement
DICOM measure uses information sent from the DICOM device to provide measurements
in millimeters (mm). Select the image; hold down the CTRL key and drag the mouse over
the section to be measured (using the left mouse button) and the value will appear in mm.
The measurement device will not work if the CTRL key is not depressed.
Image Mirror
This function will mirror the image as it appears in the window. To return the image to its
original view, click the mirror button a second time.
Rotate
This tool rotates the images in a counterclockwise direction at 90 degree increments.
Measurement Grid
The measurement grid displays a grid of 1cm squares over the image. This is useful when
you zooming images and you want to have a relative measurement tool.
Adding Text Overlay
This tool displays image demographic information such as patient name, hospital, image
size, ID number etc. You may click the button a second time to have the text disappear.
Scout Locator
The scout locator function allows the user to view the perpendicular slices of the entire
DICOM, MR or CT study.
Hounsfield Units
This tool allows you to show or hide Hounsfield units for a CT study. The value is an
averaged value in a circle with a radius of 12 image pixels.
Arrowhead
The arrowhead tool is used to label a particular region of interest on an image. Hold down
the CTRL key to drag the arrow in the direction you would like to annotate, release the
mouse button and a text window will appear. Type the desired text in this window and
- 75 Medweb Secure DICOM Proxy Webserver
Administrator Guide and User Manual
Confidentia
Page 76

June 2003
l
press ok.
Freehand Annotation
The freehand annotation tool allows the user to draw on any image. Hold down the CTRL
key and use the mouse (left button) to draw on the image.
Record Annotation
This records dictation, sound files from Doppler-Ultrasounds as well as heart oscillations.
Clicking this button will launch a recording window. To commence, press Record. To
playback, press Playback. When finished, upload the annotation by clicking the upload
annotation button (below).
Upload Annotations
Once any annotations have been recorded, or any text inserted the user may upload a copy
of the study to the server. Upon clicking the upload button, the user will be prompted to
save the file. The server will label the file with the user’s name, date and the annotations
assigned.
Show/Hide Annotations
This allows the user to show or hide annotations within a study.
Clear Annotations
The user may clear any annotations that have not yet been uploaded to the server. Once on
the server, the user may not delete them.
Save Images locally
The user may save any image, group of images or a complete study to the local hard drive
as a jpeg file.
Once clicked, a window will appear where the user will choose to send one image, a group
of images or the whole study, and the location on the hard drive where the image is to be
stored.
Email Images
The user may also email any image, group of images or a complete study. A window will
open prompting the user to fill in an email address, text and whether or not to send a copy
of a self-installing version of the Medweb Plugin so the recipient may view the image(s).
Print
The print tool will print a selected or group of images with the patient name, date and time
and any other textual information (annotations) the user selects.
Acquire Images
The acquire images tool allows the user to add a new patient study and will open a blank
New Study Window.
Plugin Preferences
The plugin preferences tool allows the user to customize plugin defaults. The DECODER
tab allows the user to set the modality, the number of download steps and the image quality
for each step. Medweb recommends that the second step of progressive downloading be set
to 40% or more. The CACHE tab stores studies in the cache to increase performance. The
user may select the cache location and set size restrictions. In the SECURITY tab, Medweb
suggests checking the “Clean cache before exiting”, which will delete the temporary
storage of information.
9.41 Supplementary Help Tools
9.4.1.1Plugin Help Screen
- 76 Medweb Secure DICOM Proxy Webserver
Administrator Guide and User Manual
Confidentia
Page 77

June 2003
l
The plugin will also display “tool tips” in red at the top of the plugin window. Also, if the
image has reports or annotations previously attached, the user may view them by clicking
on the Reports, Annotations and Demographics buttons at the top of the plugin window
In the top right hand corner of each image, are a triangle and a square highlighted in green.
This is a secondary method to accessing all of the plugin tools by clicking the triangle. The
image may also be marked or unmarked by clicking inside the square. This serves as an
indicator and will “mark” the image for further viewing.
- 77 Medweb Secure DICOM Proxy Webserver
Administrator Guide and User Manual
Confidentia
Page 78

June 2003
l
10.0 The Medweb RIS and Web Scheduler
10.1 RIS Introduction
The Medweb RIS is an HL7 compliant web-based Radiology Information System that is fully
integrated into the Medweb All-in-One Server. This system can receive orders from any standard
HL7-based Hospital Information System (HIS). Once the orders are received, they are listed in the
integrated web scheduler. From the convenient web scheduler, the department or imaging center can
add, delete, or change appointments individually or as a block of appointments. The integrated RIS and
web scheduler provide complete DICOM worklists and workload tracking throughout the department
or imaging center.
Advanced features allow referring physicians to schedule patients from their office with appropriate
restrictions. Blocks of time on various machines can be reserved for specific physicians or groups so
that the imaging center can subcontract time slots to other vendors.
10.2 RIS Basics
The Medweb RIS and integrated web scheduler is a supplementary software component of the
Medweb server. Its primary functions are:
• Management of patient orders
• Scheduling of DICOM modalities/machines
• Displaying orders received from HIS
The Process:
1. Create Order(s)
2. Saves order as HL7 Message
3. Send order to the HL7 Server
4. DICOM Messages are created
5. The order is then stored in a database
6. DICOM Modalities will then query the database for its DICOM worklist
The order is stored in the Database for 7 days after its expiration date (after planned performance day).
The HL7 server supports protocols 2.0 and up. Support of the 3.0 protocol is planned for the near
future.
Medweb RIS and web scheduler has the following main windows (pages):
• Order Scheduler page
All viewing, editing and management of orders is completed here.
•
Machine Scheduler page
This page is a timetable of machine working hours and periods assigned to different doctors.
• Machine List in the Administrator section
- 78 Medweb Secure DICOM Proxy Webserver
Administrator Guide and User Manual
Confidentia
Page 79

June 2003
l
10.3 Configuring and Using the RIS
10.3.1 HL7 Server
To begin using the RIS, make sure the HL7 Engine is running before proceeding. Only the
Administrator of the Medweb server has the authority to perform this function.
Administrator Site - Control Panel – HL7 Click Parameters
1. Check the check box to Enable HL7 Service
2. Enter port number 3300
3. Click Save Changes
4. The Status should change from Not Running to Running
5. Go back to the Public Site.
10.3.2 Adding a Scheduler User
The Server administrator must assign a Scheduler user to manage the RIS (The administrator of
the Medweb server is responsible for Adding Machines, Setting HL7 settings etc).
1. Sign on to the Medweb Server and login as the Administrator. Click on Administrator Site on
the Navigation Menu and then click the User Button.
2. Click the Add User button.
3. Fill in the user information and provide a password. The username used by the
identify the user. It also appears in the URL of the web site and the email address of the user. Only
lowercase alphanumeric characters, periods (.), hyphens (-) and underscores (_) are allowed.
4. The Administrator must to assign a password for the user account being created. Enter a
password containing 3 to 16 characters. A string password is one that is difficult to guess, not
Server to
- 79 Medweb Secure DICOM Proxy Webserver
Administrator Guide and User Manual
Confidentia
Page 80

June 2003
l
found in any dictionary, and is 5 or more characters with at least one non-alphabetical character.
Passwords are case sensitive.
5. Assign the user to the Scheduler ACL group. The Scheduler has the following permissions:
6. Click Confirm New User.
10.3.3 Adding Machines/Modalities
Machines/Modalities need to be added to the RIS in order to receive patient orders (appointments).
Only the Administrator can perform this function.
Administrator Site – Control Panel – MiniRIS Click Parameters
This table below will appear empty if no machines have yet been added.
• Allowed to access the Medweb Server
• Sees only the RIS page (no access to View Patients)
1. Click Add to add a machine/modality.
2. Enter the Machine ID – any set of letters and numbers (no apostrophes, dashes etc) i.e. US1,
CT2.
3. Select the modality type from the drop down list.
4. Enter Location information for the modality.
5. Enter a Phone Number.
6. Select a Minimal Time of Procedure from the drop down menu.
7. Select the Scheduler Time Period from the drop down menu. (This is the length of time per
Appointment) i.e. 60 minutes = 1 Hour slots in the Patient Order Table.
- 80 Medweb Secure DICOM Proxy Webserver
Administrator Guide and User Manual
Confidentia
Page 81

June 2003
l
8. Enter any pertinent or extra information in the Info field (not required).
9. Click Save Changes to add the modality.
10. Repeat this process for multiple modalities.
10.3.4 Adding/Editing/Deleting Modalities
The Server administrator must do all Modality/Machine Management.
1. To administer the machines, enter the Administrators Site and select Control Panel.
2. Navigate to MiniRIS and click Parameters. The current list of modalities will appear in a list.
3. To Edit: Click the Pencil icon next to the study you would like to change. Make the appropriate
edits and click Save Changes.
4. To Delete: Click the Trashcan icon next to the modality to be deleted. This is a permanent
delete.
10.3.5 Scheduling Doctors/Operators on the Modalities
The machines now need to be scheduled. Doctors will “own” all or some time on the modalities
for a specific period of time—whether it is hours within a day, days, weeks or months. This
function allows the institution the option to “rent-out” the machine to external Rads to use for
certain periods of time.
NOTE: You do not need a doctor to be scheduled on a machine in order to book a patient order
but the program will warn you if the patient’s appointment falls in an “unscheduled period”. You
may then proceed to the Schedule of Machines page and schedule a Doctor for that time period.
1. Enter the URL of your Site into the Browser. From the Home Page (Public Site), Click the
Workflow button on the left side.
The Machine Schedule will default to the first Machine in the list of modalities added.
A list of machines appears on the right hand side below the calendar.
3. Select the Machine/Modality to schedule by clicking on the hyperlink for the desired machine.
- 81 Medweb Secure DICOM Proxy Webserver
Administrator Guide and User Manual
Confidentia
Page 82

June 2003
l
4. If the Machine Schedule is completely empty, you will see a column with the time period
(00:00-24:00) and another column with text that says “NOT AVAILABLE PERIOD”.
5. The schedule will also default to Today’s Date. Look at the calendar on the right hand side to
verify the date. The current date will be highlighted with color. Any date can be chosen to
schedule a doctor for a machine.
6. To begin scheduling the machine, Click the hyperlink on the 00:00-24:00
Period button on the right hand side.
7. Procedure Date – This will default to the current date.
8. Procedure Time – Use this to schedule your desired period. If you want to schedule the whole
day, select 00:00-24:00 as the Procedure Time.
9. Doctor- Enter the Doctor’s name or Modality Operator for this period.
10. Doctor Color – Select a color to associate with this doctor.
11. Repeat Mode – Use this check box to schedule a doctor on this machine until a particular
date. If you want the doctor to be scheduled only for the date indicated in the Procedure Date field,
then do not click the Repeat Box.
Example: Dr. X wants to have the Ultrasound (for x number of hours that were chosen above)
every Tuesday and Thursday until August 3, 2003.
or click the New
- 82 Medweb Secure DICOM Proxy Webserver
Administrator Guide and User Manual
Confidentia
Page 83

June 2003
l
A. Last Date - The end date for the schedule (in the above example – August 3 2003)
Use the drop down menu to choose the date.
B. Days of the week – Select the check boxes to choose the days of the week to be scheduled (In
the above example – Tuesday and Thursday).
NOTE: If you want a machine to be available all day round, create one new event. Set the
working hours from 00:00 to 24:00. If you do not want to assign the machine to any doctor, skip
the field.
For a 24/7 event, check all days in repeat mode.
12. Click Save Changes.
The Machine Schedule Table, for the selected date, will now indicate that a Doctor is scheduled
for that machine for a particular period of time. This row in the table will be the color that was
chosen to be specific to that Doctor. See below.
Column 1 displays the time period
Column 2 displays an icon that indicates whether this time period is a single or repeated event.
Column 3 displays information about the doctor scheduled for this time period.
Column 4 displays a trashcan icon so the schedule can be deleted if necessary.
Continue to schedule the machine as necessary. Use different colors to differentiate the doctors
and their periods.
Any unused time periods (unscheduled) will not be seen in the Schedule Table.
10.3.6 Changing the Schedule Date
- 83 Medweb Secure DICOM Proxy Webserver
Confidentia
Administrator Guide and User Manual
Page 84

June 2003
l
You may select different dates, with the calendar to schedule machines as far in advance as
necessary. Use the << and >> to move the month ahead or back. Select the day of the month by
clicking the desired number.
10.3.7 Managing Schedules
10.3.7.1 Editing Schedules
To edit a scheduled period, click the hyperlink on the Doctors name and make any changes
necessary. Click Save Changes.
NOTE: If the scheduled period to be edited is a repeating event, you MUST click the
Repeated Events check box to show the event period in the extended table. If the scheduled
period has repeated events and edits are made and then saved without checking the Repeated
Events check box, the event will then be saved as a single event. The edit will cancel the
repeated event.
10.3.7.2 Deleting Schedules
To delete, click the Trashcan icon next to the time period to be removed.
Deleting a single event is simple: just confirm deleting in the pop-up window
:
If an event is repeating, you can delete either the selected (current) date event, or all events of
the series. If you select the first option, only one event will be deleted from the schedule. The
second option will allow the removal of all similar (same-time and doctor) events from all
days in the event series.
10.3.8 Creating Patient Orders
To begin creating patient orders, the Scheduler must go to the Order Schedule Page.
1. From the Machine Schedule page, click the Order Schedule
click the Schedule Button on the Menu on the left side.
OR
2. Select which modality/machine to schedule patients for using the machine links on the right
side below the calendar.
- 84 Medweb Secure DICOM Proxy Webserver
Administrator Guide and User Manual
link on the lower right side OR
Confidentia
Page 85

June 2003
l
3. If the machine has no schedule assigned (which means no doctor has been assigned to this
machine for ANY period of time for that day) the following message will appear in RED at the top
of the Order Schedule Table: Warning: SCHEDULE NOT ASSIGNED!
You may add patient orders while this message is present but no Doctor will be assigned for the
time. To schedule a Doctor on the machine, go to Section 3.5 Scheduling Doctors/Operators to the
Modalities.
4. Select the desired machine on which to schedule orders using the names on the right side of the
screen. The name of the chosen modality will appear at the top of the table.
5. Click the time period (ex. 09:00-10:00
under the calendar on the right side.
To create the new order, fill in the following fields.
Warning
Message
Machine/
Modality
List
Name of
modality
and current
date
) you wish to schedule or click the New Order button
- 85 Medweb Secure DICOM Proxy Webserver
Confidentia
Administrator Guide and User Manual
Page 86

June 2003
l
6. Procedure Date: The date input format is: month/day/year. By default, the current date is
shown.
7. Procedure Time: Choose the start and finish time of the procedure.
The Procedure time options are limited to the working hours of the machines.
8. Service: Select the Machine/Room to be scheduled.
9. Inject: This check box indicates if the patient has to be injected before the procedure. Injection
requires presents of a doctor besides the technician doing the procedure.
When the box is checked, the order information will be highlighted green in the Central Radiology
monitor.
10. Description Observation: This field contains a short description of the procedure, using terms
and standards of a preferred coding system. Included also can be the quantity of images taken and
other image characteristics. The coding system is defined in the name of coding system filed,
located next to Description observation.
11. Patient Name, Birth Day, Sex and other personal information
These fields contain important personal data of the patient.
12. Patient ID: You can enter the unique patient ID here, if it is used.
If you leave this field empty, the number will be given automatically be the system.
13. Patient Class: Choose the category from the list box.
14. Patient Location: Define the patient’s location at the present time (hospital, room, home, etc.)
15. Attending Doctor: Enter name of the doctor who ordered the study.
16. Entered by: By default, the system puts inserts the login name of the user, who created the
order.
17. Reason for Study: This field may contain more detailed information about the study and the
diagnosis.
18. E-mail: Enter the patient’s e-mail address. The e-mail will be used to send reminders to the
patient.
19. To remind: To remind the patient about the procedure via email, select number of days in
advance the email should be sent. If you select “None” the letter will not be sent.
Format:
Name: Last Name, First Name.
Date of birth: yyyy/mm/dd
Sex: Male/Female
SSN: Social Security number, if provided
The reminding e-mail will be sent to the patient the selected number of days before the procedure.
- 86 Medweb Secure DICOM Proxy Webserver
Administrator Guide and User Manual
Confidentia
Page 87

June 2003
l
The reminder would contain general procedure information and instructions for preparing for the
procedure.
20. Once finished creating or changing the order, press the OK button under the order.
If you do not want to save changes, press Back button to return to the scheduler main window.
10.3.9 Managing Existing Orders
• To send instructions with the reminder, select its name in the list box.
The list will show only instructions relevant to the modality of the procedure.
• To view the contents of pre-entered instruction, press View. The text of instruction will
appear separate window.
• To edit a particular set of instructions, press Edit. You can change the header and the
contents of the instruction in the window. When finished, press the Save button.
• To create a new instruction, press New. Give the instruction a distinct name, enter the
description and press the Save button when finished. The name of the instruction will
immediately appear in the instruction list.
• If you need to delete an instruction, press Del. A window with the instruction text will
appear. Use the Delete button to delete the instruction completely.
10.3.9.1 Editing Orders
To change one or more parameters of an exiting order, click on its description hyperlink in the
order table. Change the needed parameters, and press “Save changes” button. Press “Back” to
return without changes.
10.3.9.2 Deleting Orders
Use the trashcan icon next to the order to delete. This button
allows you instantly delete the order from the system.
10.3.9.3 Cloning Orders
This button opens an independent order editor window with the information copied from the
selected patient order. This feature allows the user to easily create a new order using the base
of existing one.
10.3.9.4 Moving Orders
Use the Up and Down arrows in the last column on the Order Table to move that patient order
to an earlier or later time slot that day. One click moves the order by one time period.
Delete Clone
Move
This function is available when viewing schedule only for one machine.
NOTE: The Order Scheduler will allow you to move the order only within the working hours
of the machine. If the order you are moving gets next to another order, then both (or more)
adjacent orders will move at the same time one time period each. If you want to switch over
the time of two orders, it is better to do it in editing mode.
10.3.10 Available Time Mode
Available time mode is designed for easy viewing and finding time for new orders.
- 87 Medweb Secure DICOM Proxy Webserver
Administrator Guide and User Manual
Confidentia
Page 88

June 2003
l
In this mode the list of orders will look shorter, because all spare hours between existing orders
will be combined in one period. Check the box to enter the available time mode, uncheck to return
to full time mode. Compare the standard view of the order table:
And the same schedule in Available Time mode:
The second table is much shorter, and provides a better view of the order appointments.
NOTE: The Order Scheduler will show only those spare time periods, which are equal or longer
than minimal procedure time, defined for this machine by admin.
10.3.11 Patient Order Search
To search for an order, click to Search button at the right of the Order table.
- 88 Medweb Secure DICOM Proxy Webserver
Administrator Guide and User Manual
Confidentia
Page 89

June 2003
l
You can search orders using the patient’s name, ID or procedure using the whole word, number or
just part of it.
The search results are presented in a list of orders with short description for each.
When multiple matches are found, the list is separated in several pages (see the hyperlink numbers
under the search form.)
By clicking on the order link, the order-editing window will open so that you may modify the
order. You can delete the order from the Search Results using the trashcan icon. In this case the
order will be deleted from the database.
10.3.12 Viewing All Orders for all Machines (Beside the list of machines on the right side)
Click the Adv.
new window will open with all the machines that are available; each with a check box. Select all
or some of machines you would like to view.
The list will only populate the times for the machines that have been assigned/scheduled to a
doctor and therefore cuts out a lot of unused space.
10.3.13 Central Radiology (Below the list of machines on the right side)
Central radiology monitor is a part of the system that graphically represents the schedule of
current appointments based on RIS Order scheduler. The table data includes all machines available
and appointments with patient names. The schedule includes 2 hours of past appointments and 2,
button to view all the machines and all the orders scheduled on the machines. A
- 89 Medweb Secure DICOM Proxy Webserver
Administrator Guide and User Manual
Confidentia
Page 90

June 2003
l
4, or 6 hours of future appointments. Use the drop down menu to select the number of hours of
future appointments to view.
As time passes, old exams slide off the top of the schedule and new exams show at the bottom.
The size of block for certain appointment depends on the type/length of the procedure, and the
number of hours displayed.
If there are few short exams at one period of time, the block will contain the number of orders.
The color of block represents the type of the procedure:
• Grey - for completed exams
• Red - for emergency appointments
• Green - for appointments that require injection of the patient and presence of a doctor.
• Striped – the machine is not available.
10.4 Resolving Schedule Conflicts
10.4.1 Order Schedule Conflicts
If the period of a new order overlaps with the time of an existing order, the Order scheduler will
display both orders. At the same time, a bright red color in the first (“doctor”) column of the order
table will indicate the presence of the error. If you mouse over the red square, a message will
appear stating that: “The order is in an inaccessible time period or overlaps another…”.
- 90 Medweb Secure DICOM Proxy Webserver
Administrator Guide and User Manual
Confidentia
Page 91

June 2003
l
Correct the order time unless the overlapping was done intentionally.
10.4.2 Machine Event Conflicts
Machine event conflicts occur in several cases:
If you must set periods of time that overlap one another, the priority in the scheduler will be given
to the earlier period. In this case the subheading of the list will contain a warning about the error.
Setting one period of time inside another will be displayed in the machine schedule page, but will
not appear in the order scheduler page. An error message will be given instead.
This is an example of a conflict in the machine schedule.
And the results of the conflict in the Order schedule:
- 91 Medweb Secure DICOM Proxy Webserver
Administrator Guide and User Manual
Confidentia
Page 92

June 2003
l
Here you can see a conflict in the machine schedule and order schedule. It is marked with red in
the first column.
10.5 System Messages, Errors and Solutions
1.
No machines defined in the system
If you get the following message on the main page (Order schedule):
This means that no machines have been listed/added in Machine Management
in the administrator section.
You cannot set machine schedule or make any orders without adding any machines/modalities.
Contact administrator to add machines/modalities to the list or refer to Section 3.3 in this manual.
2.
Server is not running
Contact the administrator to start the HL7 server or refer to Section 3.1 in this manual.
If you require further assistance, you may consult the Help link at the top right side
of the Scheduler Windows or submit your question to Medweb at ts@medweb.com
and a technical support representative will contact you.
- 92 Medweb Secure DICOM Proxy Webserver
Administrator Guide and User Manual
Confidentia
Page 93

June 2003
l
Appendix A
DICOM SOP CLASSES
SCP = Service Class Provider
SCU = Service Class User
Generic Storage Service Class/SCP
Can receive and store DICOM images
Example: Medweb RaQ/Cube, other vendor’s servers.
Generic Storage Service Class/SCU
Can send DICOM images to storage
Example: Medweb RaQ/Cube, DICOM Workstations like e-Film, etc.
Generic Gray-Scale Printer/SCP
Can receive and print DICOM images
Example: DICOM printers from Kodak, GE
Generic Gray-Scale Printer/SCP (Bare-support)
Can receive and print DICOM images (Bare-support)
Example: DICOM printers from Kodak, GE
Query/Retrieve - Patient Root/SCP
Query: Can receive and process search queries (patient fields)
Retrieve: Can receive and process "retrieve" requests and send DICOM images from storage to requester
Example: Medweb RaQ/Cube, other servers from Kodak, etc
Query/Retrieve - Study Root/SCP
Query: Can receive and process search queries (study fields)
Retrieve: Can receive and process "retrieve" requests and send DICOM images from storage to the
requester
Example: Medweb RaQ/Cube, other servers from Kodak, etc
Query/Retrieve - Patient/Study Root/SCP
Query: Can receive and process search queries (both patient and study fields)
Retrieve: Can receive and process "retrieve" requests and send DICOM images from storage to requestor
Example: Medweb RaQ/Cube, other servers from Kodak, etc
Query/Retrieve - Patient Root/SCU
Query: Can send search queries (patient fields)
Retrieve: Can send DICOM "retrieve" requests
Example: Medweb RaQ/Cube, DICOM Workstations like e-Film, etc.
Mitra Report Query Class/SCP
Can send Mitra reports (special standard from www.mitra.com company) to requestor
Example: Medweb RaQ/Cube, other servers from Kodak, etc
Mitra Report Query Class/SCU
Can request Mitra reports from SCP
Example: Medweb RaQ/Cube, DICOM Workstations like e-Film, etc.
- 93 Medweb Secure DICOM Proxy Webserver
Administrator Guide and User Manual
Confidentia
 Loading...