


B ureau Veritas

B ureau Veritas
A7+ TouchCare®
Insulin Management System
User Guide
© 2019, Medtrum Technologies Inc. All rights reserved.

0197
B ureau Veritas
Humalog® is a trademark of Eli Lilly and Company.
NovoRapid® is a trademark of Novo Nordisk A/S.
Apidra® is a trademark of Sanofi S.A.
Medtrum Technologies Inc.
7F, Building 8, No. 200, Niudun
Road
Shanghai 201203, China
Tel: +86-21-50274781
Fax: +86-21-50274779
www.medtrum.com
Medtrum B.V.
Nijverheidsweg 17
5683 CJ Best
The Netherlands
Tel: +31 (0) 499745037
This product complies with
Directive 93/42/EEC (MDD) and
Directive 2014/53/EU (RED).
REF SY-018
Version: 1.01
Publication date:
20 August, 2019
UG881116GB
348431

B ureau Veritas
Contents
Contents ........................................................................................ i
1 Introduction ............................................................................... 1
1.1 Before you begin .......................................................................... 1
1.2 Indications ................................................................................... 1
1.3 Contraindications ......................................................................... 2
1.4 User Safety ................................................................................... 2
1.4.1 Warnings and Precautions ............................................................ 2
1.4.2 Consumables ................................................................................. 5
1.4.3 Radio Frequency (RF) Communication .......................................... 6
1.4.4 Emergency Kit ............................................................................... 6
1.4.5 Water ............................................................................................ 7
1.4.6 Storage .......................................................................................... 7
1.4.7 FCC Caution ................................................................................... 8
1.4.8 IC Caution ...................................................................................... 9
1.5 Warranty Information ................................................................... 9
2 Your A7+ TouchCare® System ................................................... 15
2.1 Personal Diabetes Manager (PDM) ...............................................15
2.2 Patch Pump .................................................................................15
2.3 Glucose Sensing System (Optional) ..............................................16
3 How to use the PDM ................................................................. 19
3.1 Basics of the PDM ........................................................................19
3.1.1 Turn on/off the PDM ................................................................... 19
3.1.2 Charge the PDM .......................................................................... 20
3.1.3 Power Mode ................................................................................ 21
3.1.4 Scroll Bar ..................................................................................... 22
3.2 Setting up the PDM .....................................................................22
3.2.1 Select language and country/region ........................................... 22
i

B ureau Veritas
3.2.2 Time and Date ............................................................................. 23
3.2.3 Bolus Calculator ........................................................................... 24
3.3 Home Screen ............................................................................... 25
3.3.1 Status Bar Icons ........................................................................... 26
3.3.1.1 Battery Icon ..................................................................................... 26
3.3.1.2 Time Icon ........................................................................................ 26
3.3.1.3 Audio Icon ....................................................................................... 27
3.3.1.4 Pump RF Signal Icon ........................................................................ 27
3.3.1.5 Alert Icons ....................................................................................... 27
3.3.2 Pump Status ................................................................................ 28
3.3.3 Sensor Status ............................................................................... 29
3.3.4 EasyLoop Icon .............................................................................. 33
3.3.5 Sensor Graph ............................................................................... 34
3.3.6 Alarm Status ................................................................................ 35
3.4 Lock Screen ................................................................................. 36
3.5 Notification Screen ...................................................................... 37
3.6 Shortcut Screen ........................................................................... 37
3.7 Status Screen .............................................................................. 38
3.8 Menus ........................................................................................ 40
3.8.1 Bolus ............................................................................................ 40
3.8.2 Basal ............................................................................................ 40
3.8.3 Suspend ....................................................................................... 40
3.8.4 Patch ............................................................................................ 41
3.8.5 Sensor .......................................................................................... 41
3.8.6 History ......................................................................................... 41
3.8.7 Events .......................................................................................... 41
3.8.8 EasyLoop ...................................................................................... 41
3.8.9 Settings ........................................................................................ 41
3.9 Events ......................................................................................... 41
3.9.1 BG Measurement ........................................................................ 42
ii

B ureau Veritas
3.9.2 Insulin Injection ........................................................................... 43
3.9.3 Carbohydrates Information ......................................................... 43
3.9.4 Physical Exercise Information ..................................................... 44
3.9.5 Health Information ...................................................................... 45
3.9.6 Other Events................................................................................ 45
3.10 History ......................................................................................46
3.10.1 Pump History ............................................................................. 47
3.10.2 Sensor History ........................................................................... 47
3.10.3 PDM Alert History ..................................................................... 47
3.10.4 Event History ............................................................................. 48
3.10.5 BG History ................................................................................. 48
3.10.6 Summary History ....................................................................... 49
3.10.6.1 Summary History: Insulin History .................................................. 50
3.10.6.2 Summary History: Bolus History ................................................... 50
3.10.6.3 Summary History: BG History ........................................................ 50
3.10.6.4 Summary History: Sensor History ................................................. 50
3.10.6.5 Summary History: Low Suspend History ....................................... 50
3.11 Settings .....................................................................................51
3.11.1 CGM System (Optional) ............................................................. 51
3.11.2 Insulin Pump .............................................................................. 51
3.11.3 General Settings ........................................................................ 51
3.11.3.1 Language ....................................................................................... 52
3.11.3.2 Time/Date ..................................................................................... 52
3.11.3.3 Audio Options ............................................................................... 53
3.11.3.4 Display ........................................................................................... 54
3.11.3.5 Confidence Reminder .................................................................... 55
3.11.3.6 User Settings ................................................................................. 55
3.11.3.7 Passcode Lock ............................................................................... 60
3.11.4 Reminders ................................................................................. 62
3.11.4.1 Personal Reminder ........................................................................ 62
iii

B ureau Veritas
3.11.4.2 Bolus Reminder ............................................................................. 64
3.11.4.3 BG Reminder ................................................................................. 64
3.11.4.4 Cal Reminder ................................................................................. 64
3.11.5 Username .................................................................................. 64
3.11.6 Telephone .................................................................................. 65
3.11.7 Diagnostics ................................................................................ 66
3.11.8 About Us .................................................................................... 68
3.12 Troubleshooting ........................................................................ 68
4 How to use Patch Pump ............................................................ 71
4.1 Change the reservoir patch .......................................................... 71
4.1.1 Before Changing the Reservoir Patch .......................................... 71
4.1.1.1 Deactivate the Current Reservoir Patch ......................................... 72
4.1.1.2 Remove the Current Reservoir Patch ............................................. 73
4.1.1.3 Enter Pump Base SN ....................................................................... 74
4.1.2 Activate a New Reservoir Patch .................................................. 77
4.1.3 Connect the Pump Base to a New Reservoir Patch ..................... 78
4.1.4 Fill the New Reservoir Patch ....................................................... 79
4.1.5 Prime the Pump ........................................................................... 82
4.1.6 Select and Prepare the Infusion Site ........................................... 84
4.1.7 Attach the Patch Pump ............................................................... 86
4.1.8 Start Insulin Delivery ................................................................... 87
4.2 Bolus........................................................................................... 89
4.2.1 Normal Bolus ............................................................................... 89
4.2.2 Max Bolus .................................................................................... 94
4.3 Basal ........................................................................................... 94
4.3.1 Your Basal Settings ...................................................................... 95
4.3.2 Edit Your Standard Basal Pattern ................................................ 96
4.3.3 Check the Current Basal Rate ...................................................... 98
4.3.4 Review Your Basal Patterns ......................................................... 99
4.3.5 Delete a time segment of Basal Pattern ................................... 100
iv

B ureau Veritas
4.3.6 Change the time of the Basal Pattern ....................................... 101
4.3.7 Maximum Basal Rate................................................................. 103
4.4 Suspend and Resume ................................................................. 104
4.4.1 Suspend Insulin Delivery ........................................................... 104
4.4.2 Resume Insulin Delivery ............................................................ 107
4.5 Insulin Pump Settings ................................................................ 108
4.5.1 Add/Change the Pump Base SN ................................................ 108
4.5.2 Bolus Setup................................................................................ 109
4.5.3 Basal Setup ................................................................................ 110
4.5.4 Pump Alerts ............................................................................... 111
5 Advanced Pump Features ....................................................... 115
5.1 Bolus Calculator ......................................................................... 115
5.1.1 How the Bolus Calculator Works............................................... 115
5.1.2 How to Set up the Bolus Calculator .......................................... 115
5.1.3 Normal Bolus Using Bolus Calculator ........................................ 121
5.2 Combo/Extended Bolus ............................................................. 124
5.2.1 Combo/Extended Bolus Without Bolus Calculator ................... 125
5.2.2 Combo/Extended Bolus Using Bolus Calculator........................ 128
5.3 Preset Bolus .............................................................................. 131
5.3.1 Preset Bolus Setup .................................................................... 132
5.3.2 Deliver a Preset Bolus ............................................................... 133
5.4 Select a Basal Pattern ................................................................ 134
5.5 Temp Basal ................................................................................ 134
5.5.1 Activate a Temp Basal ............................................................... 134
5.5.2 Cancel a Temp Basal .................................................................. 135
5.6 Preset Temp Basal ..................................................................... 136
5.6.1 Preset Temp Basal Setup ........................................................... 136
5.6.2 Activate a Preset Temp Basal .................................................... 137
5.7 Reminder .................................................................................. 138
5.7.1 Bolus Reminder ......................................................................... 138
v

B ureau Veritas
5.7.2 BG Reminder ............................................................................. 139
5.8 Pump History ............................................................................ 140
5.8.1 Pump History ............................................................................. 140
5.8.1.1 Delivery History ............................................................................. 141
5.8.1.2 Alert History .................................................................................. 145
5.8.2 Pump Summary History ............................................................. 145
5.8.2.1 Summary History: Insulin History ................................................. 145
5.8.2.2 Summary History: Bolus History ................................................... 146
5.9 Troubleshooting Pump issues .................................................... 146
6 How to use CGM system (Optional) ......................................... 151
6.1 Glucose Alerts ........................................................................... 151
6.2 Change Sensor .......................................................................... 151
6.2.1 Disconnect Sensor from Your PDM ........................................... 151
6.2.2 Remove the Current Sensor and Disconnect the Transmitter .. 152
6.2.3 Charge the Transmitter ............................................................. 152
6.2.4 Add the Transmitter SN ............................................................. 153
6.2.5 Insert a New Sensor .................................................................. 157
6.2.5.1 Select an Insertion Site ................................................................. 157
6.2.5.2 Prepare the Insertion Site ............................................................. 158
6.2.5.3 Unpack the Glucose Sensor .......................................................... 158
6.2.5.4 Remove the Protective Liner from the Sensor Support Mount .... 159
6.2.5.5 Locate the Sensor Support Mount ................................................ 159
6.2.5.6 Remove the Safety Lock ................................................................ 159
6.2.5.7 Insert the Sensor ........................................................................... 160
6.2.5.8 Remove the Inserter ..................................................................... 160
6.2.5.9 Check the Sensor Support Mount ................................................. 161
6.2.5.10 Discard the Sensor Inserter Safely .............................................. 161
6.2.6 Attach Your Transmitter ............................................................ 161
6.2.7 Connect Sensor to Your PDM .................................................... 162
6.3 Calibrate Your Sensor ................................................................ 164
vi

B ureau Veritas
6.3.1 Enter Your Meter BG ................................................................. 165
6.3.2 Set Calibration Repeat .............................................................. 167
6.3.3 Calibration Reminder ................................................................ 167
6.4 CGM System settings ................................................................. 168
6.4.1 CGM Feature on/off .................................................................. 168
6.4.2 Set the Transmitter SN .............................................................. 169
6.4.3 Graph Range .............................................................................. 170
6.4.4 Cal Repeat ................................................................................. 170
6.4.5 Alert Silence .............................................................................. 170
6.4.6 Sensor Expired ........................................................................... 171
6.5 Sensor History ........................................................................... 172
6.5.1 Sensor History ........................................................................... 172
6.5.1.1 Data History .................................................................................. 172
6.5.1.2 Calibration History ........................................................................ 174
6.5.1.3 Alert History .................................................................................. 175
6.5.2 Summary History: Sensor History ............................................. 175
6.6 Troubleshooting CGM issues ...................................................... 176
7 How to use (P)LGS (Optional) .................................................. 181
7.1 (P)LGS settings ........................................................................... 181
7.1.1 Glucose Alerts ........................................................................... 181
7.1.1.1 High/Low Limits............................................................................. 182
7.1.1.2 Predictive Alerts ............................................................................ 184
7.1.1.3 Rate Alerts ..................................................................................... 185
7.1.1.4 Repeat ........................................................................................... 188
7.1.2 (Pre) Low Suspend ..................................................................... 189
7.1.2.1 Low Suspend ................................................................................. 189
7.1.2.2 Predictive Low Suspend ................................................................ 192
7.2 Summary History: Low Suspend History ..................................... 194
7.3 Troubleshooting Low Suspend issues ......................................... 195
8 Safety System and Alarms/Alerts ............................................ 197
vii

B ureau Veritas
8.1 Safety System ........................................................................... 197
8.2 Safety Checks ............................................................................ 197
8.3 Alarms ...................................................................................... 197
8.3.1 PDM Alarms ............................................................................... 200
8.3.2 Pump Alarms ............................................................................. 201
8.4 Alerts ........................................................................................ 203
8.4.1 PDM Alerts ................................................................................ 205
8.4.2 Pump Alerts ............................................................................... 205
8.4.3 CGM Alerts ................................................................................ 206
8.5 Reminding messages ................................................................. 211
8.5.1 PDM reminding messages ......................................................... 212
8.5.2 Pump reminding messages ....................................................... 212
8.5.3 CGM reminding messages ......................................................... 213
9 Manufacturer’s Declaration .................................................... 215
9.1 Electromagnetic Emissions ........................................................ 215
9.2 Electromagnetic Immunity ......................................................... 215
10 Appendix I: Symbols and Icons .............................................. 223
10.1 Product Label Symbols ............................................................. 223
10.2 PDM Icons ............................................................................... 224
11 Appendix II: Technical Information ........................................ 227
11.1 PDM Specifications .................................................................. 227
11.2 Patch Pump Specifications ....................................................... 227
11.3 Transmitter Specifications ....................................................... 231
11.4 Glucose Sensor Specifications .................................................. 231
11.5 CGM System Accuracy ............................................................. 231
12 Glossary ................................................................................ 235
viii

B ureau Veritas
1 Introduction
1.1 Before you begin
Check with your healthcare provider (diabetes team) regarding your individual
training needs. Do NOT attempt to use the A7+ TouchCare® System before you
have been properly trained.
As part of your training, your healthcare provider will work with you to establish
diabetes management guidelines and settings that best fit your needs. Your
healthcare provider can provide you with the initial settings of your insulin
Pump and CGM system. After adequate training and practice, you will find it
easy to enter and change the system’s settings.
The A7+ TouchCare® Pump is designed to use U-100 insulin. The following
insulin analogs have been tested and found to be safe for use in with the A7+
TouchCare® Pump: Humalog®, NovoRapid®, and Apidra®. Before you use
different insulin with this Pump, check the insulin label to make sure that it can
be used with your Pump. Use of any insulin with lesser or greater concentration
can result in serious injury or even death. Your Pump is not intended to deliver
any other substance.
The A7+ TouchCare® Continuous Glucose Monitoring (CGM) System
incorporates a Glucose Sensor and a Transmitter. The Glucose Sensor measures
the glucose level of interstitial fluid. The Transmitter wirelessly transmits your
real-time Sensor glucose information to your Personal Diabetes Manager (PDM).
Not all devices or accessories are available in all countries where the A7+
TouchCare® System is approved. To order supplies, contact your local
representatives.
1.2 Indications
The A7+ TouchCare® System is indicated for use in people (ages 2 and older)
with diabetes. The system is intended for single patient use and should be used
under the guidance of a healthcare provider.
1

B ureau Veritas
The Patch Pump is indicated for the continuous subcutaneous delivery of insulin,
at set and variable rates, for the management of diabetes mellitus in persons
requiring insulin.
The CGM System is indicated for continuous monitoring of interstitial fluid
glucose levels, and detecting possible low and high glucose episodes.
Interpretation of the CGM System results should be based on the glucose trends
and several sequential readings.
1.3 Contraindications
The A7+ TouchCare® System is not recommended for people who are unwilling
or unable to:
Maintain contact with their healthcare provider.
Test their blood glucose levels as recommended by their healthcare
provider.
Maintain sufficient diabetes self-care skills.
Recognize and respond to alerts and alarms. (Sufficient vision and/or
hearing are required.)
1.4 User Safety
1.4.1 Warnings and Precautions
General Statements
Make sure that you have read and are familiar with the User Guide before using
the A7+ TouchCare® System . Failure to follow the instructions may result in pain
or injury and may also affect the system’s performance. If you do not
understand something or have questions, ask your healthcare provider, call
customer support, or contact your local Medtrum distributor.
The A7+ TouchCare® System has many different settings and features. It is best
to talk with your healthcare provider to determine which settings and features
are right for you. Some features require great knowledge of insulin pumping and
advanced self-care skills. Do NOT use the A7+ TouchCare® System until you have
specific information for your treatment plan and have had specific training on
each feature from your healthcare provider or local Medtrum distributor.
2

B ureau Veritas
General Precautions
Do NOT put skin care products on the A7+ TouchCare® System, that might result
in damage to the plastic surface of the products. Wipe off the skin care products
such as sunscreen by using a clean cloth. If you find a crack in any part of the
A7+ TouchCare® System, contact customer support.
The A7+ TouchCare® System includes active medical devices. When you dispose
of any device in the A7+ TouchCare® System, follow the local waste disposal
regulations.
We recommend that you have someone around you (family, friends, etc.) who
understands diabetes and the A7+ TouchCare® System, so that in case of an
emergency, they can help you. Make sure that they are familiar with any
information given by your healthcare provider.
General Warnings
No modification of this system is allowed.
Do NOT use the A7+ TouchCare® System if you have delicate skin or if you are
allergic to acrylic adhesives.
Do NOT use anything other than the accessories specified in this User Guide,
which could permanently damage your system and voids its warranty.
Do NOT allow young children to hold the Reservoir Patch, Pump Base,
Transmitter or Sensor without adult supervision. The Reservoir Patch, Pump
Base, Transmitter and Sensor contain small parts and could pose a choking
hazard.
Do NOT operate your A7+ TouchCare® System in the presence of flammable
anesthetics or explosive gases.
Patch Pump Precautions
Contact your healthcare provider about lifestyle changes such as
starting/stopping your exercise program or significant weight loss/gain because
this can affect the way that your body uses insulin.
Patch Pump Warnings
In case the A7+ TouchCare® System is unable to properly deliver insulin you
must be prepared to give yourself an injection of insulin. Knowing how to do
3

B ureau Veritas
this will help to avoid the risk of diabetic ketoacidosis (DKA) or very high blood
glucose (BG).
Do NOT stop using your Pump if you are ill unless instructed to do so by your
healthcare provider. Even when you are ill, your body still needs insulin.
If failure or damage of your Pump Base is found during usage, please contact
customer support or your local Medtrum distributor for replacement.
CGM System Precautions
The Sensor may create special needs regarding your medical conditions or
medications. Please discuss these conditions and medications with your
healthcare provider before using the Sensor.
If failure or damage of your Transmitter is found during usage, please contact
customer support or your local Medtrum distributor for replacement.
CGM System Warnings
Do NOT ignore symptoms of high or low glucose. If you believe your Sensor
glucose readings are inconsistent with how you feel, manually measure your
blood glucose with a blood glucose meter. If the problem continues, discard the
old Sensor and insert a new one.
If you suspect your Sensor is broken during usage, do NOT attempt to remove it
yourself. Contact your healthcare provider for assistance in removing the Sensor.
Personal Diabetes Manager (PDM) Precautions
Your PDM is featured by its color touchscreen. Please operate with dry fingers.
Before you put your PDM in your pocket or purse, remember to press the power
button to put the PDM on sleep mode, so that you can avoid misoperation
resulting from accidental bumps and movements. Press the power button again
to wake the screen.
Check your PDM occasionally to make sure that it emits audible beeps that are
easily detectable and that the vibrate feature is working properly.
If you return your PDM for service, a replacement PDM will be sent. Do NOT use
the replacement PDM until it has been programmed to fit your specific needs.
If you drop your PDM or if it has been hit against something hard, check whether
the display screen and the touch screen are working properly, whether the PDM
can be charged normally. Call customer support or your local Medtrum
4

B ureau Veritas
distributor if you identify or suspect your PDM has been damaged. Your PDM is
designed to be charged by matching charger. Use of anything other than a
charger that does not match could permanently damage your PDM and voids its
warranty.
Operating Temperature Range
Your A7+ TouchCare® System is designed to operate between 5°C (41°F) and
40°C (104°F). Do NOT expose the system to temperatures outside that range.
Do NOT expose the system to direct sunlight for a long period of time.
Cleaning
Do NOT use household cleaners, chemicals, solvents, bleach, scouring pads or
sharp instruments to clean your PDM, Pump Base, or Transmitter. Never put
your PDM, Pump Base or Transmitter in the dishwasher or use very hot water
to clean it.
Do NOT use a hair dryer, microwave oven, or conventional oven to dry your
PDM, Pump Base, or Transmitter. Use a soft towel.
Do NOT clean any part of the system while it is in use.
X-rays, MRIs and CT Scans
The A7+ TouchCare® System may be affected by strong radiation or magnetic
fields. If you are going to have an X-ray, MRI, CT scan or other type of exposure
to radiation, remove your Patch Pump and Glucose Sensing System, and put
them outside the treatment area with your PDM. Change the Reservoir Patch
and Sensor after the test or procedure is completed.
The A7+ TouchCare® System is designed to tolerate common electromagnetic
and electrostatic fields, including airport security systems and mobile phones.
1.4.2 Consumables
Reservoir Patch—The Pump Base (JN-022) is only used with the 200-unit
Medtrum Reservoir Patch (MD-JN-011). Change your Reservoir Patch every
2-3 days or as directed by your healthcare provider.
Glucose Sensor—The Transmitter (MD1026) is used with the Medtrum
Glucose Sensor (MD3026). Change your MD3026 Glucose Sensor every
fourteen days.
5

B ureau Veritas
Warning: For your protection the Pump Base and Transmitter have undergone
extensive testing to confirm appropriate operation when used with
consumables manufactured or distributed by Medtrum. We recommend using
Medtrum Reservoir Patches and Glucose Sensors as we cannot guarantee
appropriate operation if the system is used with consumables offered by thirdparties and therefore we are not responsible for any injury or malfunctioning of
the system that may occur in association with such use.
1.4.3 Radio Frequency (RF) Communication
Note: The A7+ TouchCare® System can generate, use and radiate radio
frequency energy, and may cause harmful interference to radio
communications. There are no guarantees that interference will not occur in a
particular installation. If the A7+ TouchCare® System does cause harmful
interference to radio or television reception, you are encouraged to try to
correct the interference by one of the following measures:
• Move or relocate the A7+ TouchCare® System.
• Increase the distance between the A7+ TouchCare® System and the other
device that is emitting/receiving interference.
Common consumer electronic devices that transmit in the same frequency band
used by the A7+ TouchCare® System may prevent communication between the
PDM and your Patch Pump or Transmitter. This interference, however, does not
cause any incorrect data to be sent and does not cause any harm to your device.
Based on GFSK modulation, the system communicates at frequencies between
2402 and 2480 MHz with power level 0 dBm. RF communication between your
Patch Pump and PDM works up to a distance of 4 meters (13 feet). RF
communication between your Transmitter and PDM works up to a distance of
10 meters (33 feet).
1.4.4 Emergency Kit
Keep an emergency kit with you at all times to make sure you have necessary
supplies. Inform a family member, co-worker, and/or friend where this
emergency kit is kept.
This kit should include but is not limited to:
6

B ureau Veritas
Fast-acting glucose tablets or gel
BG monitoring supplies
Urine ketone testing supplies
Insulin syringe
Rapid-acting U-100 insulin
Extra Medtrum 2.0 mL Reservoir Patches
Power Bank
Instructions from your healthcare provider about how much insulin to
inject if pump delivery is interrupted
Alcohol wipes
Glucagon emergency kit
Emergency contact phone numbers
1.4.5 Water
Both your Patch Pump and Sensor (including the installed Transmitter) are
waterproof to a depth of 2.5 meters (8 feet) for up to 60 minutes (IPX8). After
exposure to water, rinse the devices with clean water and dry them with a towel.
Warning: Do NOT expose your Patch Pump or Sensor (including the installed
Transmitter) to water at depths greater than 2.5 meters (8 feet) or for more
than 60 minutes. Check often to make sure that the devices are securely
attached and in place.
Warning: The PDM is protected against insertion of fingers and will not be
damaged or become unsafe during a specified test in which it is exposed to
vertically dripping water (IP22).
Warning: The Patch Pump may not be able to deliver normally in water. The
Transmitter may not be able to send data normally in water.
Note: Hot water may decrease Sensor life.
1.4.6 Storage
Store the Pump Base and Reservoir Patch at temperatures between -10°C (14°F)
and 55°C (131°F), and at humidity levels between 20% and 90% relative
humidity. Do NOT store the Pump Base and Reservoir Patch in direct sunlight,
extreme temperatures, or in very humid areas.
7

B ureau Veritas
Store the Sensor at temperatures between 2°C (36°F) and 30°C (86°F), and at
humidity levels between 20% and 90% relative humidity for the length of the
Sensor’s shelf life. For temperatures greater than 30°C (86°F), the Sensor will
require cooled storage at temperatures no lower than 2°C (36°F). You may store
the Sensor in the refrigerator if it is within this temperature range. The Sensor
should not be stored in the freezer. Wait for the Sensor to warm to room
temperature before usage to prevent condensation. Storing the Sensor
improperly may cause the Sensor glucose readings to be inaccurate, and you
might miss a low or high blood glucose value.
Store the Transmitter at temperatures between -10°C (14°F) and 55°C (131°F),
and at humidity levels between 20% and 90% relative humidity. Keep the USB
charging cable and the Transmitter separate when in storage.
Store the Personal Diabetes Manager (PDM) at temperatures between -10°C
(14°F) and 55°C (131°F), and at humidity levels between 20% and 90% relative
humidity.
1.4.7 FCC Caution
Labelling requirements.
This device complies with part 15 of the FCC Rules. Operation is subject to the
following two conditions: (1) This device may not cause harmful interference,
and (2) this device must accept any interference received, including interference
that may cause undesired operation.
Information to user.
Any Changes or modifications not expressly approved by the party responsible
for compliance could void the user's authority to operate the equipment.
Note: This equipment has been tested and found to comply with the limits for a
Class B digital device, pursuant to part 15 of the FCC Rules. These limits are
designed to provide reasonable protection against harmful interference in a
residential installation. This equipment generates uses and can radiate radio
frequency energy and, if not installed and used in accordance with the
instructions, may cause harmful interference to radio communications.
However, there is no guarantee that interference will not occur in a particular
installation. If this equipment does cause harmful interference to radio or
8

B ureau Veritas
television reception, which can be determined by turning the equipment off and
on, the user is encouraged to try to correct the interference by one or more of
the following measures:
-Reorient or relocate the receiving antenna.
-Increase the separation between the equipment and receiver.
-Connect the equipment into an outlet on a circuit different from that to which
the receiver is connected.
-Consult the dealer or an experienced radio/TV technician for help.
RF warning for Portable device.
The device has been evaluated to meet general RF exposure requirement. The
device can be used in portable exposure condition without restriction.
1.4.8 IC Caution
This device complies with Industry Canada license-exempt RSS standard(s).
Operation is subject to the following two conditions:
(1) This device may not cause interference, and (2) This device must accept any
interference, including interference that may cause undesired operation of the
device.
1.5 Warranty Information
Personal Diabetes Manager (PDM)
Medtrum Technologies Inc. (“Medtrum”) warrants its PDM against defects in
materials and workmanship for the period of 4 years from the original date of
shipment of the PDM to the original end use purchaser (the “Warranty Period”).
During the Warranty Period, Medtrum will, at its discretion, either repair or
replace (with a new or recertified PDM, at Medtrum’s discretion) any defective
PDM, subject to the conditions and exclusions stated herein. This Warranty
applies only to new devices and, in the event the PDM is repaired or replaced,
the warranty period shall not be extended.
The warranty is valid only if the PDM is used in accordance with Medtrum’s
instructions and will not apply:
• If damage results from changes or modifications made to the PDM by the
user or third persons after the date of manufacture;
• If damage results from service or repairs performed to any part of the PDM
by any person or entity other than Medtrum;
9

B ureau Veritas
• If a charger without matching is used with the PDM
• If damage results from a Force Majeure or other event beyond the control
of Medtrum; or
• If damage results from negligence or improper use, including but not
limited to improper storage or physical abuse such as dropping or otherwise.
This warranty shall be personal to the original end use purchaser. Any sale,
rental or other transfer or use of the PDM covered by this warranty to or by a
user other than the original end use purchaser shall cause this warranty to
immediately terminate. This warranty only applies to the PDM and does not
apply to other products or accessories.
THE REMEDIES PROVIDED FOR IN THIS WARRANTY ARE THE EXCLUSIVE
REMEDIES AVAILABLE FOR ANY WARRANT CLAIMS. NEITHER MEDTRUM NOR
ITS SUPPLIERS OR DISTRIBUTORS SHALL BE LIABLE FOR ANY INCIDENTAL,
CONSEQUENTIAL, OR SPECIAL DAMAGE OF ANY NATURE OR KIND CAUSED BY
OR ARISING OUT OF A DEFECT IN THE PRODUCT. ALL OTHER WARRANTIES,
EXPRESSED OR IMPLIED, ARE EXCLUDED, INCLUDING THE WARRANTIES OF
MERCHANTABILITY AND FITNESS FOR A PARTICULAR PURPOSE.
Pump Base
Medtrum Technologies Inc. (“Medtrum”) warrants its Pump Base against
defects in materials and workmanship for the period of 1 year from the original
date of shipment of the Pump Base to the original end use purchaser (the
“Warranty Period”). During the Warranty Period, Medtrum will, at its discretion,
either repair or replace (with a new or recertified Pump Base, at Medtrum’s
discretion) any defective Pump Base, subject to the conditions and exclusions
stated herein. This Warranty applies only to new devices and, in the event the
Pump Base is repaired or replaced, the warranty period shall not be extended.
The warranty is valid only if the Pump Base is used in accordance with
Medtrum’s instructions and will not apply:
• If damage results from changes or modifications made to the Pump Base
by the user or third persons after the date of manufacture;
• If damage results from service or repairs performed to any part of the
Pump Base by any person or entity other than Medtrum;
• If a non-Medtrum Reservoir Patch is used with the Pump Base;
• If damage results from a Force Majeure or other event beyond the control
of Medtrum; or
10

B ureau Veritas
• If damage results from negligence or improper use, including but not
limited to improper storage or physical abuse such as dropping or otherwise.
This warranty shall be personal to the original end use purchaser. Any sale,
rental or other transfer or use of the Pump Base covered by this warranty to or
by a user other than the original end use purchaser shall cause this warranty to
immediately terminate. This warranty only applies to the Pump Base and does
not apply to other products or accessories.
THE REMEDIES PROVIDED FOR IN THIS WARRANTY ARE THE EXCLUSIVE
REMEDIES AVAILABLE FOR ANY WARRANT CLAIMS. NEITHER MEDTRUM NOR
ITS SUPPLIERS OR DISTRIBUTORS SHALL BE LIABLE FOR ANY INCIDENTAL,
CONSEQUENTIAL, OR SPECIAL DAMAGE OF ANY NATURE OR KIND CAUSED BY
OR ARISING OUT OF A DEFECT IN THE PRODUCT. ALL OTHER WARRANTIES,
EXPRESSED OR IMPLIED, ARE EXCLUDED, INCLUDING THE WARRANTIES OF
MERCHANTABILITY AND FITNESS FOR A PARTICULAR PURPOSE.
Transmitter
Medtrum Technologies Inc. (“Medtrum”) warrants its Transmitter against
defects in materials and workmanship for the period of 1 year from the original
date of shipment of the Transmitter to the original end use purchaser (the
“Warranty Period”). During the Warranty Period, Medtrum will, at its discretion,
either repair or replace (with a new or recertified Transmitter at Medtrum’s
discretion) any defective Transmitter, subject to the conditions and exclusions
stated herein. This Warranty applies only to new devices and, in the event the
Transmitter is repaired or replaced, the warranty period shall not be extended.
The warranty is valid only if the Transmitter is used in accordance with
Medtrum’s instructions and will not apply:
• If damage results from changes or modifications made to the Transmitter
by the user or third persons after the date of manufacture;
• If damage results from service or repairs performed to any part of the
Transmitter by any person or entity other than Medtrum;
• If a non-Medtrum Glucose Sensor is used with the Transmitter;
• If damage results from a Force Majeure or other event beyond the control
of Medtrum; or
• If damage results from negligence or improper use, including but not
limited to improper storage or physical abuse such as dropping or otherwise.
11

B ureau Veritas
This warranty shall be personal to the original end use purchaser. Any sale,
rental or other transfer or use of the Transmitter covered by this warranty to or
by a user other than the original end use purchaser shall cause this warranty to
immediately terminate. This warranty only applies to the Transmitter and does
not apply to other products or accessories.
THE REMEDIES PROVIDED FOR IN THIS WARRANTY ARE THE EXCLUSIVE
REMEDIES AVAILABLE FOR ANY WARRANT CLAIMS. NEITHER MEDTRUM NOR
ITS SUPPLIERS OR DISTRIBUTORS SHALL BE LIABLE FOR ANY INCIDENTAL,
CONSEQUENTIAL, OR SPECIAL DAMAGE OF ANY NATURE OR KIND CAUSED BY
OR ARISING OUT OF A DEFECT IN THE PRODUCT. ALL OTHER WARRANTIES,
EXPRESSED OR IMPLIED, ARE EXCLUDED, INCLUDING THE WARRANTIES OF
MERCHANTABILITY AND FITNESS FOR A PARTICULAR PURPOSE.
12

B ureau Veritas
13

B ureau Veritas
14

B ureau Veritas
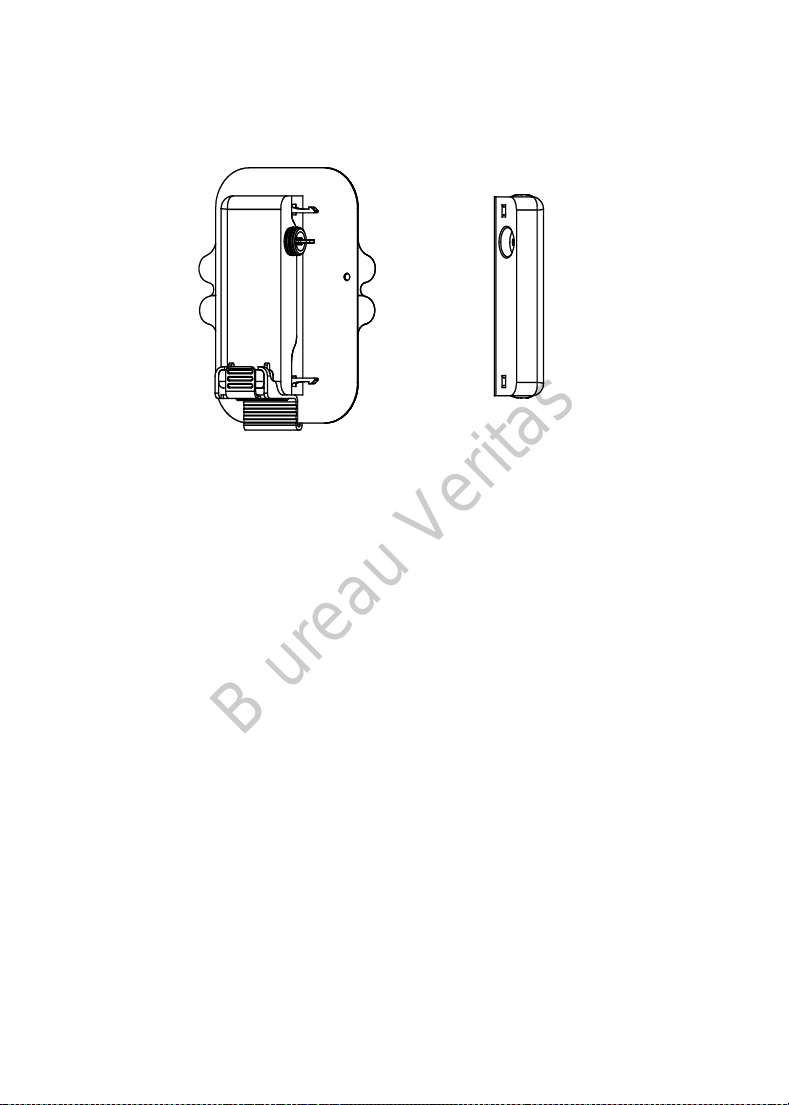
2 Your A7+ TouchCare® System
2.1 Personal Diabetes Manager (PDM)
The Personal Diabetes Manager (PDM) monitors and controls your Patch Pump
and Continuous Glucose Monitoring System via wireless RF communication. It
stores your Pump and Sensor data of the last 90 days. Keep the PDM with you
at all times so that, when needed, you are able to deliver a bolus, change the
basal rate, check your glucose level and so on.
When RF communication is lost or interrupted because of adverse conditions or
overlong distance, you will not be able to use your PDM to control or monitor
your Patch Pump or Continuous Glucose Monitoring System. Yet the Patch
Pump is able to continue delivering basal insulin based on your programmed
settings, perform safety checks and automatically stop delivery in case of
serious conditions. The Transmitter can continue to record Sensor glucose
readings. The PDM is designed to detect and notify you about a disconnection.
As soon as the problem is solved, RF communication will be resumed.
1. Power button
2. Home Key (Software Key)
3. Charging Port
4. Sound Hole
5. Indicator light
✓ Personal Diabetes Manager (PDM) (FM-018)
2.2 Patch Pump
The Patch Pump is a small, portable, self-adhesive device worn directly on your
body to deliver precise, personalized doses of insulin into your body through a
needle. The Patch Pump consists of a reusable Pump Base and a disposable
Reservoir Patch. The reusable Pump Base holds the electronics and stores all
your Pump settings. The disposable 200 Unit Reservoir Patch incorporates a
15
B ureau Veritas
precise dispensing screw, a plunger, an actuator, a needle, a buzzer and a
battery to power your Pump. The delivery system and enclosure of the Reservoir
Patch are applied parts of the Pump.
✓ Reservoir Patch
(MD-JN-011, consumable)
✓ Pump Base (JN-
022)
2.3 Glucose Sensing System (Optional)
The Glucose Sensing System is an optional part of the A7+ TouchCare® System
which consists of a disposable Glucose Sensor and a reusable Transmitter. The
Glucose Sensor is inserted under the skin to measure your glucose level in
interstitial fluid. The Sensor is the applied part of the Glucose Sensing System.
The Transmitter records Sensor data and sends data to a display device via
wireless RF communication. The Transmitter’s USB charging cable or charging
dock is also included in the package.
Transmitter MD1026, compatible sensor MD3026 and compatible charging
cable LQ005 are as follows.
16

B ureau Veritas
✓ Glucose Sensor
(MD3026, Consumable)
✓ USB charging cable
✓ Transmitter
(MD1026, Chargeable)
(LQ005)
17

B ureau Veritas
18
B ureau Veritas
3 How to use the PDM
3.1 Basics of the PDM
We recommend that your PDM is only used by an intended and qualified
operator.
3.1.1 Turn on/off the PDM
1) Turn-on
⚫ When you long-press the power button, a green light will flash, the
screen will light up, the PDM is successfully turned on.
⚫ When you short-press the power button, a yellow light will go on for
about 8 seconds but the PDM is not turned on.
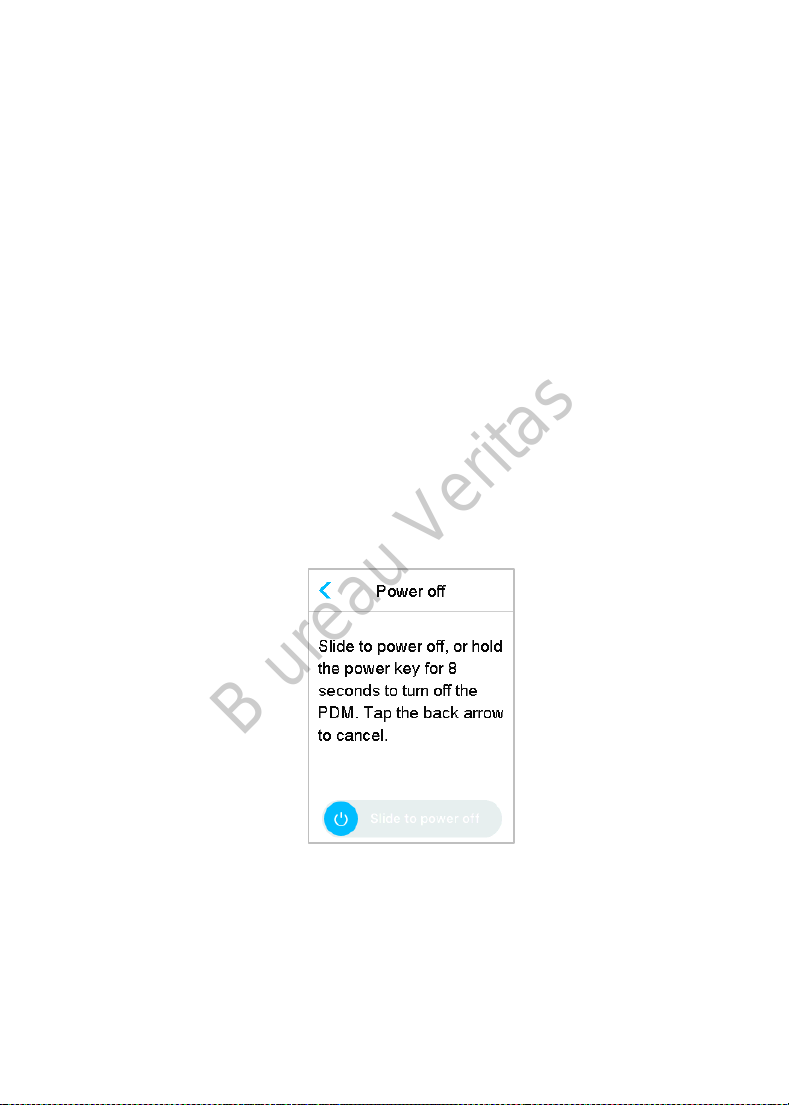
2) Turn-off
⚫ When you long-press the power button for about 2 seconds, the
shutdown screen appears. Then you can slide to power off, a yellow
light will last for about 6 seconds, indicating that the shutdown is
completed.
⚫ Or you long-press the power button for about 6 seconds, a yellow light
will go on for about 2 seconds, indicating that the shutdown is
completed.
19

B ureau Veritas
3.1.2 Charge the PDM
As a safety measure, the PDM will give you “PDM BATTERY LOW” or “CHARGE
PDM NOW” alert when you keep the PDM working at a low power level. If you
receive a “PDM BATTERY LOW” alert, respond to the alert and continue. Though
the PDM will still function normally, the battery life could be decreased.
The PDM requires an AC adapter with an output of DC 5.0V that complies with
IEC 60601-1 and IEC 60950 such as UES06WNCPU-050 100SPA, (input: 100-240V,
50/60Hz, 0.2A; output: 5.0V DC, 1.0A). The adapter is designed as a part of the
ME system.
Note:
⚫ Do not use other types of chargers. Otherwise the PDM may not work
normally.
⚫ You must charge the PDM when the battery is low to keep using the PDM.
If the battery is exhausted, the PDM will shut down automatically.
⚫ No settings will be lost if the PDM power is depleted or PDM error happens.
⚫ The battery must be fully charged the first time you use the PDM, which
usually takes around 2 hours. If the battery is not full after 12 hours of
continuous charging as required, please contact customer service.
⚫ Usually, when the PDM is fully charged, it is available for use of one week
(7 days).
⚫ Blue light flashes when PDM is charging, and the green light is always on
indicates full charge.
⚫ Only person (including patient) with adequate training is permitted to
operate the PDM.
Charging process:
1. Connect PDM to adapter.
2. Plug the adapter into a power socket.
20

B ureau Veritas
3.1.3 Power Mode
The PDM has two power modes:
1. Sleep Mode
The PDM enters the Sleep Mode after screen backlight timeout and the
screen shuts down. You can turn the PDM into Lock Screen of Awake Mode
by short-pressing the Power button.
a. The activated basal, temporary basal and all bolus functions will not be
changed.
b. The screen will be locked after screen backlight timeout.
c. Press Power button, and the screen lights up, the PDM displays the Lock
Screen.
2. Awake Mode
The PDM is in the Awake Mode when the screen backlight stays on.
a. You can turn Sleep Mode to Awake Mode by pressing power button.
b. In the Sleep Mode, all Alerts and Alarms regarding the Pump and CGM will
immediately wake the screen to enter Lock Screen. The Alerts and Alarms
shall be manually cleared after sliding to unlock.
21

B ureau Veritas
An Alarm occurs when the screen
is locked.
An Alarm occurs when the screen
is not locked.
3.1.4 Scroll Bar
If there is excessive text length for the screen, a scroll bar appears on the right
side of the screen. You can view any additional text by scrolling up and down.
3.2 Setting up the PDM
3.2.1 Select language and country/region
1. Select your language, then tap Next.
22

B ureau Veritas
You can change language. See “Language” in Section “Settings” for setup
instructions.
2. Select your country/region, then tap Next.
3.2.2 Time and Date
When starting PDM for the first time, you need to set the time and date. Setting
the correct time and date in your PDM is necessary for accurate basal insulin
delivery and enables you to keep a correct record of your insulin delivery and
Sensor readings. You can select a 12-hour or 24-hour clock format.
1. Select your time, then tap Next.
23

B ureau Veritas
(1) Choose the time.
(2) Tap the blue button to increase and to decrease hour on the
left.
Tap the blue button to increase and to decrease minute on the
right.
(3) When finish, tap Done.
2. Select the Date, then tap Next.
(1) Choose the date.
(2) Adjust the day, month and year separately.
(3) When finish, tap Done.
3.2.3 Bolus Calculator
After you finish the settings for date and time, you can choose whether you shall
use the Bolus Calculator. Tap Setup to enter Bolus Calc Setup. Tap Skip to go
24

B ureau Veritas
directly to Lock Screen. See “Bolus Calculator” in Chapter “Advanced Pump
Feature” for more information.
If you choose Setup, the Bolus Calculator function will be forced to turn on;
If you choose Skip, the Bolus Calculation function will stay turned-off.
3.3 Home Screen
The Home Screen is the starting point to access the programming screens. You
can return to the Home Screen by tapping the Home Key. The first line shows
status bar icons including PDM Battery, Alert/Alarm, Time, Audio/Vibration,
Pump RF Signal. You can find on the main interface icons including Calibration,
IOB (Insulin on Board), EasyLoop Icon, Insulin left and your real-time Insulin
Pump Delivering Status and Sensor Status.
25

B ureau Veritas
Note: At this screen, slide on the screen from right to left, you can open main
menu screen. Slide from left to right to open status screen. Slide PDM from top
to bottom to open alert notification screen. Slide on the screen from bottom to
top to open shortcut screen.
3.3.1 Status Bar Icons
3.3.1.1 Battery Icon
The battery icon shows the remaining battery life.
➢ When the PDM is not charging
There are five icons, indicating different battery conditions. You need to charge
PDM when the battery icon turns red.
At least 80% left
At least 60% left
At least 20% left
At least 10% left
No battery left
➢ When the PDM is charging
There are six icons, indicating different battery conditions.
Less than 10% charged
At least 10% charged
At least 20% charged
At least 60% charged
At least 80% charged
Fully charged
3.3.1.2 Time Icon
You can select the current time displayed in a 12-hour or 24-hour format. The a
or p appears in the 12-hour format. For instructions on setting the time on your
PDM. See “Time and Date” in Section “Settings”.
26

B ureau Veritas
➢ 02:00 p 12-hour format
➢ 14:00 24-hour format
3.3.1.3 Audio Icon
There are eight kinds of audio icons, indicating different Reminder types, you
can set it in the General Settings menu and CGM Settings menu.
Audio
Vibrate
Audio and Vibrate
Audio off /Vibrate off
Alert Silence + Audio Reminder
Alert Silence + Vibrate Reminder
Alert Silence + Audio and Vibrate
Alert Silence + Audio off /Vibrate off
3.3.1.4 Pump RF Signal Icon
A Pump RF icon appears only when there is an active Patch Pump.
Patch Pump is active and RF communication is good
Patch Pump is active but RF communication is lost or interrupted
3.3.1.5 Alert Icons
A yellow triangle with one yellow exclamatory mark (alert), a red triangle with
two red exclamatory mark (medium priority alarm) or a red triangle with three
red exclamatory mark (high priority alarm) appears only when there is an alert
or alarm condition in your insulin management system. See Chapter “Safety
System and Alarms/Alerts” for more information.
Alert icon
Medium priority alarm icon
High priority alarm icon
27

B ureau Veritas
3.3.2 Pump Status
1. EasyLoop Icon
2. Insulin Pump Delivering Status
3. IOB (Insulin on Board)
4. Pump RF Signal
5. Insulin left
You can view the Pump Status on the Home Screen.
Insulin Delivering Status icons in different situations:
Icon
Shape and Color Description
Grey ring
Green ring
Green and dark
green ring
Blue and dark
blue ring
Grey ring indicates that there is no
activated Pump.
Green ring represents the basal
delivery.
Green ring with dark green part
represents Temp Basal, the dark green
part indicates the progress of Temp
Basal delivery.
Blue ring represents the Normal Bolus,
the dark blue part indicates the
progress of delivery.
28

B ureau Veritas
Purple and dark
purple ring
Red ring
The status information is indicated by text below:
Basal(U/H) 1.00: The current basal rate is 1.00U/H.
Temp Basal(U/H) 1.00: Temp Basal is activated and the active temp
basal rate is 1.00U/H.
Temp Basal(U/H) 1.00 85%: Temp Basal is activated and the active
temp basal rate is 1.00U/H (85% of current basal pattern).
Normal(U) 1.00/2.00: Normal Bolus is active and 1.00U of bolus
delivered | total bolus programmed: 2.00U.
Extended(U) 1.00/2.00: Extended Bolus is active and 1.00U of bolus
delivered | total bolus programmed: 2.00U.
C-Normal(U) 1.00/2.00: Normal Bolus of Combo Bolus is active and
1.00U of Normal Bolus delivered | total Normal Bolus programmed: 2.00U.
C-Ext.(U) 1.00/2.00: Extended Bolus of Combo Bolus is active and
1.00U of Extended Bolus delivered | total Extended Bolus programmed:
2.00U.
Suspend time remaining 0:15: Suspend is active and basal will resume
automatically after 15 minutes.
Insulin left: The actual amount of insulin left in the reservoir.
Purple ring represents the extend
Bolus, the deep purple part indicates
the progress of delivery.
Red ring represents the delivery
suspend status.
3.3.3 Sensor Status
You can view the Sensor Status on the Home Screen.
29

B ureau Veritas
1. Trend Arrow
2. The last senor reading or
status
3. Time of the last sensor
reading
4. The scope of glucose limit
5. High Limit of glucose limit
6. Low Limit of glucose limit
7. CGM Curve
8. Last Glucose point
➢ Trend arrow
The trend arrow shows the speed and direction of your Sensor glucose
readings.
Stable
9. The scope of time
10. Calibration
Slowly-rising
Rising
Rapidly-rising
Slowly-falling
Falling
Rapidly-falling
No arrow No information
➢ Calibration Icon
If your Sensor is on a 24-hour calibration routine, the calibration icon grows
fuller as the time for the next calibration.
30

B ureau Veritas
The next calibration is due in 20 to 24 hours.
The next calibration is due in 16 to 20 hours.
The next calibration is due in 12 to 16 hours.
The next calibration is due in 8 to 12 hours.
The next calibration is due in 4 to 8 hours.
The next calibration is due in 0 to 4 hours.
A calibration is needed now.
If your Sensor is on a 12-hour calibration routine, the calibration icon grows
fuller as the time for the next calibration.
The next calibration is due in 10 to 12 hours.
The next calibration is due in 8 to 10 hours.
The next calibration is due in 6 to 8 hours.
The next calibration is due in 4 to 6 hours.
The next calibration is due in 2 to 4 hours.
The next calibration is due in 0 to 2 hours.
A calibration is needed now.
➢ Data recovery status icon
31

B ureau Veritas
If you disconnect the Sensor for a while and reconnect it, it takes some time to
recover the data. The icon indicates that data is being recovered. It
disappears when data-recovery is completed.
➢ Special conditions
Under normal Sensor conditions, the most recent glucose reading is displayed
at the center of the ring on the Home Screen. Under certain conditions, the
Sensor reading will be replaced by a Sensor status in the middle of the ring.
Warm-Up- the Sensor is warming up.
ERR - the Sensor shall be recalibrated after 15 minutes.
BG- the Sensor shall be recalibrated now.
??? - No readings.
LOST - Sensor signal has been lost for more than 10 minutes.
High - Sensor glucose is above 22.2 mmol/L (400mg/dL).
32

B ureau Veritas
Low - Sensor glucose is below 2.2 mmol/L (40mg/dL).
Underlined reading - Calibration overdue. A new meter BG is needed for
calibration.
Note:
1) When the Sensor is warming up, a progress bar is displayed at the bottom of
Home Screen. It takes 120 minutes for each Sensor to warm up.
2) After you enter a meter BG value to calibrate the Sensor, it may take up to 3
minutes for the Sensor to adjust its readings, with the Sensor glucose reading
blinking.
3.3.4 EasyLoop Icon
When you turn on Low Suspend or Predict Low switch in EasyLoop Menu, the
system will be on EasyLoop Icon Mode. The Patch Pump will perform safety
checks and automatically stop delivery when the CGM reading triggers the
suspend function. There are two kinds of EasyLoop Icon. If Low Suspend or
Predict Low happens in different situations, the screen shows different icons.
It will appear when Low Suspend or Predict Low function is available for
now or when Low Suspend or Predict Low is triggered and the insulin delivery
has been suspended.
It will appear when Low Suspend or Predict Low function is unavailable for
now.
33

B ureau Veritas
3.3.5 Sensor Graph
The Y-axis of the Sensor graph is featured by four values: 5, 10, 15, 20 mmol/L
(90, 180, 270, 360 mg/dL). The X-axis of the Sensor graph presents a period of
the last 3 hours.
The Sensor graph can be switched to a landscape screen display. Long tap the
Sensor graph for 1 second and the display will turn horizontal. You can see
trend graph of your glucose information for the past 3-hour, 6-hour, 12-hour,
and 24-hour periods.
⚫ Tap the Sensor graph and move the cursor to spot the glucose values. Use
the left and right arrow button to choose the time. The time interval
between two values is 2 minutes.
⚫ The time point when a new Sensor is applied will be marked with a green
square tag “ ”. Readings during warm-up phase will not be displayed but
marked as “warm-up”.
⚫ Glucose value or special status will always be shown in the area below,
between the left and right arrow button. Special status includes:
calibration error (ERR), no readings (???), warm-up phase (Warm-up),
34

B ureau Veritas
Sensor glucose is above 22.2 mmol/L (400mg/dL). (HIGH) and Sensor
glucose is below 2.2 mmol/L (40mg/dL). (LOW).
⚫ After the warm-up phase, the values before the first calibration are
replaced by “BG”.
⚫ When the Sensor calibration expires, the reading values will be
underlined.
⚫ Calibration will be marked with a red dot “ ”.
⚫ The green square blocks in the graph background represent the Low and
High limits of glucose.
⚫ In the landscape screen display, tap the Home Key to return to the Home
Screen.
⚫ When data is being recovered after sensor-reconnection, you cannot
enter landscape screen by long-pressing the graph.
⚫ When you are only using the insulin pump as stand-alone system, the
sensor graph displays the blood glucose recorded, and BG inputs will be
displayed as red dots “ ”.
3.3.6 Alarm Status
Some Alarm status remains even after the alarm is cleared. The following alarms
will be displayed on the Home Screen in this case:
PATCH BATT DEPLETED, PUMP OUT OF RANGE, EMPTY RESERVOIR, PATCH
EXPIRED, OCCLUSION DETECTED, PATCH ERROR, AUTO OFF, EXCEEDS MAX TDD,
EXCEEDS MAX 1HR, PUMP BASE ERROR, LOW SUSPEND and PRE LOW SUSPEND.
For example:
35

B ureau Veritas
3.4 Lock Screen
The PDM displays the Lock Screen every time you turn it on to view glucose
Information, insulin delivery information, alarm/alert information, date and
time. You also can customize this screen by editing your username and
telephone number. See “Username” and “Telephone” in Section “Settings” for
more information. The PDM displays the Lock Screen after display timeout.
When the screen’s gone dark, short press the Power button to activate the
Lock Screen.
1. Lock Screen without Alarm, Alert and Reminder
See “Pump Status” for more information about delivering status.
2. Lock Screen when Alarm, Alert and Reminder occurs
36

B ureau Veritas
See Chapter “Safety System and Alarms/Alerts” for more information about
Alarm, Alert or Reminder status.
3.5 Notification Screen
Notification Screen only records alert and alarm notifications which are still
effective today. You can slide from top to bottom on Home Screen to call the
Notification Screen.
1) If there is no daily Alert and Alarm notification, the screen displays No Record.
2) If there is Alert and Alarm notification, only the still existing Notifications will
be displayed.
3) The latest notifications will be displayed on top.
3.6 Shortcut Screen
Shortcut Screen grants you quick access to a few settings including Bolus,
Calibration, Audio, Vibration and Brightness. You can slide from bottom to top
from Home Screen to call the Shortcut Screen.
37

B ureau Veritas
1) Calibration Shortcut icon “ ”
2) Bolus Shortcut icon “ ”
⚫ If the Food/Correction Bolus function is turned on, then you’ll enter
Food/Correction Bolus by tapping this icon.
⚫ If not, you’ll enter Manual Bolus by tapping this icon.
3) Audio Option icon
There are two icons of Audio Option, each changing after one tap: Audio off
“ ”, High volume “ ”.
4) Vibration Option icon
There are two icons of Vibration Option, each changing after one tap:
Vibration off “ ”, Vibration on “ ”.
5) Brightness adjustment icon “ ”
There are ten brightness levels, which are increased from left to right.
3.7 Status Screen
The Status Screen lists the system’s current operating status. Slide from left to
right on the Home Screen to open the Status Screen. Slide from right to left or
tap Home key on the Status Screen to go back to the Home Screen.
38

B ureau Veritas
The Status Screen displays the following information.
Delivery/Today Bolus Basal
Other Status Info Device Info
39

B ureau Veritas
3.8 Menus
The Main menu consists of nine sub-menus: Bolus, Basal, Suspend, Patch,
Sensor, History, Events, EasyLoop, Settings. Slide from right to left on the Home
Screen to open Main Menu.
Note: After all insulin delivery is suspended, the Suspend icon on the Main
Menu turns into Resume icon.
3.8.1 Bolus
The Bolus menu contains the settings and functions for bolus deliveries. See
Section “Bolus” in Chapter “How to use Patch Pump” for more bolus
information, and Chapter “Advanced Pump Features” for advanced bolus
settings.
3.8.2 Basal
On Basal menu you can deliver temp basal insulin, select and view different
basal pattern. See Chapter “How to use Patch Pump” and Chapter “Advanced
Pump Features” for more information
3.8.3 Suspend
When no Bolus is being delivered, you can suspend Basal delivery for a set
period of time by tapping Suspend icon.
40

B ureau Veritas
When a Bolus is being delivered, with the Suspend function you can suspend
Bolus or all insulin deliveries (basal and bolus) for a set period of time.
See Section “Suspend and Resume” in Chapter “How to use Patch Pump” for
more information.
3.8.4 Patch
You can change your Reservoir Patch and check Pump Base SN on Patch menu.
See Chapter “How to use Patch Pump” for more information.
3.8.5 Sensor
The Sensor menu contains calibration and connection functions of the Glucose
Sensor. See Chapter “How to use CGM system” for more information.
3.8.6 History
On the History menu you can review Pump History, Sensor History, PDM History,
Event History, BG History and Summary History. See Section “History” in this
chapter for more information.
3.8.7 Events
The Events screen helps you record different events including: blood glucose,
insulin injection, carbohydrates, exercise, health, and other information. See
Section “Events” in this chapter for more information.
3.8.8 EasyLoop
The EasyLoop menu is used to set “Glucose Alerts” and “(Pre) Low Suspend”
functions. See Chapter “How to use (P)LGS” for more information.
3.8.9 Settings
On the Settings menu you can edit personal settings of your system. See Section
“Settings” in this chapter for more information.
3.9 Events
The A7+ TouchCare® System is able to record different events including blood
41

B ureau Veritas
glucose, carbs, insulin injection, health condition, exercise and others. This
information can help you and your healthcare provider make better decisions
about your diabetes management plan.
Go to Events Screen. You can select event type you want to record.
Main Menu➔Events
3.9.1 BG Measurement
1. Select BG Type in the Events screen.
2. Choose the date and time for BG event.
Note: The time refers to blood sampling time.
3. You can choose between BG and Lab Measurements in the Method option.
Note: Lab is referred to as venous blood glucose tested in laboratory.
4. Tap BG to enter BG in the BG row, the default blood glucose is 120 mg/dL (or
6.5 mmol/L). The input range is 40 - 400 mg/dL (or 2.2 - 22.2 mmol/L).
42

B ureau Veritas
5. When finished, tap Save to confirm input. Or press to cancel.
3.9.2 Insulin Injection
1. Select Injection in the Events screen.
2. Choose the date and time for insulin injection.
3. Tap Type option, you can choose the insulin type between “Rapid-acting”,
“Intermediate-acting”, “Long-acting”, “Pre-mixed” and “unselected”.
4. Tap Dose value to select the amount of insulin you use. The input range is
0.1-99 units.
5. When finished, tap Save to confirm input. Or press to cancel.
3.9.3 Carbohydrates Information
1. Select Carbs in the Events screen.
43

B ureau Veritas
2. Choose the date and time for carbohydrate intake.
3. Tap Carbs value to select the carbohydrates you eat or drink. The input range
is 0-200 grams.
4. When finished, tap Save to confirm or press to cancel.
3.9.4 Physical Exercise Information
1. Select Exercise in the Events screen.
2. Choose the date and time for physical exercise.
3. Tap Intensity option to select the intensity of physical exercise. You can
choose the intensity between “Light”, “Medium”, and “Heavy”.
4. Tap Duration value to select the duration of exercise. The input range is 5
minutes ~ 8 hours, the input increment is 5 minutes.
5. When finished, tap Save to confirm input. Or press to cancel.
44

B ureau Veritas
3.9.5 Health Information
1. Select Health in the Events screen.
2. Choose the date and time for health information
3. Tap Health option to select the physical condition. You can choose the
intensity between “Illness”, “Stress”, “High Symptoms”, “Low Symptoms”,
“Menstruation” and “Alcohol”.
4. When finished, tap Save to confirm input. Or press to cancel.
3.9.6 Other Events
This section shows how to enter other markers.
1. Select Others in the Events screen.
2. Choose the date and time for other events
3. Tap Note text to enter other event information.
45

B ureau Veritas
For example, when you want to enter “a”, tap abc and select “a”.
Tap ABC to switch to capital.
4. Tap and choose the letters for text input.
Note: Use no more than 22 characters to describe an event.
5. When finished, tap Save to confirm input. Or press to cancel.
3.10 History
Your PDM stores insulin delivery history, Sensor history, PDM history, Event
history, BG history and Summary history to help you manage diabetes.
Go to the History screen.
Main Menu➔History
46

B ureau Veritas
3.10.1 Pump History
On the Pump History menu you can review Pump History. See Section “Pump
History” in Chapter “Advanced Pump Features” for more information.
3.10.2 Sensor History
On the Sensor History menu you can review Sensor History. See Section
“Sensor History” in Chapter “How to use CGM system” for more information.
3.10.3 PDM Alert History
PDM History stores PDM Alert history.
Main Menu➔History➔PDM History➔PDM Alert History
47

B ureau Veritas
Tap the date to switch between records of different dates. Tap each Alert to view
alert detail information. Tap to return to the previous menu.
See “Alert Icons” for more information about how to address alarms and alerts
and the meanings of different alarm/alert icons.
3.10.4 Event History
Go to the Event History screen.
Main Menu➔History➔Event History
Tap Type option to select event type for viewing records accordingly. Tap the
date or , to switch between records of different dates. Select an event
record to view the details.
3.10.5 BG History
Go to the BG History screen.
Main Menu➔History➔BG History
48

B ureau Veritas
BG History contains BG from Calibration , Event BG and BG input during
Bolus delivery through Bolus Calculator .
Tap the date or , to switch between records of different dates.
3.10.6 Summary History
The Summary History displays a summary of past histories including Insulin
History, Bolus History, BG history, Sensor History and Low Suspend History.
Go to Summary History screen.
Main Menu➔History➔Summary History
On the top right of each summary screen, select 1 day to view the history data
for a single day, or select multiple days (7, 14, 30 days) to view an average result
on the selected days .
49

B ureau Veritas
3.10.6.1 Summary History: Insulin History
See Section “Pump Summary History” in Chapter “Advanced Pump Features”
for more information.
3.10.6.2 Summary History: Bolus History
See Section “Pump Summary History” in Chapter “Advanced Pump Features”
for more information.
3.10.6.3 Summary History: BG History
This screen displays the BG result summary history.
Main Menu➔History➔Summary History➔BG
BG Test: Total number of BG readings entered manually on the selected days.
Average BG: Average BG readings on the selected days.
High BG: Highest BG reading on the selected days.
Low BG: Lowest BG reading on the selected days.
3.10.6.4 Summary History: Sensor History
See Section “Sensor History” in Chapter “How to use CGM system” for more
information.
3.10.6.5 Summary History: Low Suspend History
See Section “Low Suspend History” in Chapter “How to use (P)LGS” for more
information.
50

B ureau Veritas
3.11 Settings
3.11.1 CGM System (Optional)
Tap CGM System on the Settings screen to enter the CGM System screen. You
can set your Sensor in CGM System Screen. You can turn CGM System on or
off, set Transmitter SN, set calibration alert repeat time, set alert silence, set
Sensor expiration alert on or off. See Chapter “How to use CGM system” for
more information.
3.11.2 Insulin Pump
Tap Insulin Pump on the Settings screen to enter the Insulin Pump screen. You
can set your Insulin Pump in Insulin Pump Screen. See Chapter “How to use
Patch Pump” and Chapter “Advanced Pump Features” for more information.
3.11.3 General Settings
The General Settings menu contains: Language, Time/Date, Audio Options,
Display, Confidence Reminder, User Settings.
51

B ureau Veritas
3.11.3.1 Language
You can change your PDM Language.
Main Menu ➔Settings➔General➔Language
3.11.3.2 Time/Date
Setting the correct time and date in your PDM is essential to accurate basal
insulin delivery and keeping an accurate record of your insulin delivery and
other events. You can select a 12-hour or 24-hour clock. Occasionally when you
need to change the date and time settings (for example, to adjust for daylight
saving time or after resetting the PDM), change the old Reservoir Patch and
activate a new patch, disconnect the Sensor and reconnect it.
Note: As a safety feature, you can only change the date and time when there is
no active Reservoir Patch or connected Sensor.
1. Go to the Time/Date Setup screen.
52

B ureau Veritas
Main Menu ➔Settings➔General➔Time/Date
If you turn the switch on, the time is set as 24-hour-format.
2. Date keyboard and Time keyboard
3.11.3.3 Audio Options
Audio/Vibrate
You can choose one of the four audio options for your alerts and alarms: audio,
vibrate, audio and vibrate, or both off. The factory setting is audio and vibrate.
Your choice applies to both your PDM and Patch Pump.
If Audio is selected, both your PDM and Patch Pump will beep when an alert
occurs.
If Vibrate is selected, both your PDM and Patch Pump will vibrate when an alert
occurs.
53

B ureau Veritas
If Audio off/Vibrate off is selected, your PDM and Patch Pump will not beep or
vibrate.
But there are exceptions:
If an alarm is not cleared within 10 minutes, your PDM or/and Patch Pump will
make a siren sound until the alarm is cleared.
When “BELOW 3.1mmol/L (BELOW 56mg/dL)” occurs, your PDM emits three-
pulse vibration every three minutes. If not cleared within 9 minutes, your PDM
will make a siren until the alert is cleared.
See ”Audio Icons” for significance of different audio icons.
See Chapter “Safety System and Alarms/Alerts” for more information.
Go to Audio Options screen.
Main Menu➔Settings➔General➔Audio Options
3.11.3.4 Display
You can set your screen display time between 30 sec, 1 min and 2 min. You can
also set the brightness of the screen.
54

B ureau Veritas
Slide or tap to adjust the brightness, you can choose between 10 brightness
levels. Lower level consumes less power.
3.11.3.5 Confidence Reminder
If this feature is turned on, the PDM will beep and/or vibrate in response to your
instructions, including:
⚫ The beginning and end of a bolus
⚫ The beginning and end of a temp basal
⚫ Basal pattern changed
⚫ Basal edit completed
⚫ Suspend alarm setting takes effect
⚫ Max delivery setting takes effect
⚫ Sensor connected
⚫ Insulin delivery has been suspended
⚫ Basal insulin has been resumed
⚫ Glucose alert set
⚫ Pump alert/alarm set
⚫ Tapping the HOME key
3.11.3.6 User Settings
You can use this feature to save, restore or reset all PDM settings.
55

B ureau Veritas
Note: If there is an active Reservoir Patch, Reset Settings and Restore Settings
will be disabled.
⚫ Save
Take these steps to save your current PDM settings:
1. Select Save in the User Settings screen.
2. If this is the first time saving your PDM settings, this screen appears:
If you have saved PDM settings, this screen appears:
56

B ureau Veritas
Read the instructions on the screen; then tap Next to save your current settings.
3. This screen indicates that your user settings have been saved.
⚫ Restore
Take these steps to restore the most recent PDM settings you have saved to
your PDM.
1. Select Restore in User Settings screen.
2. Read the instructions on the screen, and then tap OK to restore the
settings.
57

B ureau Veritas
3. This screen indicates that your user settings have been restored. Tap OK
to exit the menu and check your system settings.
⚫ Reset
Warning: Do NOT reset your PDM settings unless directed by your healthcare
provider. If you reset your PDM settings, it will be necessary to reprogram all
your personal PDM settings as directed by your healthcare provider.
Take the following steps to reset PDM settings:
1. Select Reset in the User Settings screen. Then select Yes.
58

B ureau Veritas
2. Tap OK. The PDM will be reset to the factory default settings and restart.
⚫ Settings History
On this screen you can review all recent user settings operation records and the
date and time.
1. Select Settings History in User Settings screen.
2. Slide to scroll up/down to view the entire settings history.
59

B ureau Veritas
3.11.3.7 Passcode Lock
The passcode lock function is a safety feature that prevents improper
operation by unintended user.
Main Menu ➔Settings➔General➔Passcode Lock
Tap Set Passcode, enter the old passcode and then set a new one.
60

B ureau Veritas
Enter the 4-digit passcode.
Note: The default passcode is 0000.
Enter the new passcode twice.
61

B ureau Veritas
Turn on Passcode Lock and enter the Passcode to activate Lock, the Passcode
Lock is only for one-time use, you need to enter the passcode each time you
turn on the function.
With the Passcode Lock feature turned on, only the Lock Screen is displayed.
You have to enter the correct passcode after you slide to unlock the PDM. Once
you unlock the PDM, the Passcode Lock is automatically deactivated.
3.11.4 Reminders
Tap Reminders on the Settings to enter the Reminders screen.
3.11.4.1 Personal Reminder
The factory setting for this feature is off. The personal Reminders can be useful
to remind you when to check your blood glucose, eat, bolus, etc.
You can add, delete, or review Reminders when the Personal Reminder option
is turned on. Go to the Personal Reminder screen.
62

B ureau Veritas
Main Menu➔Settings➔Reminders➔Personal Reminder
Tap +Add Reminder to add a reminder, choose the time and tap Done.
Note:
(1) You can set up to 4 Reminders.
(2) The Reminders will be saved automatically.
Slide from right to left on one reminder, tap Delete to delete this segment.
63

B ureau Veritas
3.11.4.2 Bolus Reminder
See Section “Reminder” in Chapter “Advanced Pump Features” for more
information.
3.11.4.3 BG Reminder
See Section “Reminder” in Chapter “Advanced Pump Features” for more
information.
3.11.4.4 Cal Reminder
See Section “Calibration Reminder” in Chapter “How to use CGM system” for
more information.
3.11.5 Username
1. Go to the Username screen.
Main Menu➔Settings➔ Username
2. Tap ------ to enter your username.
64

B ureau Veritas
(1) Use the keyboard to enter the username.
For example, when you want to enter “a”, tap abc key, “a”,”b”,”c” appear on
the top of the keyboard , then select “a”.
(2) When finish, tap Done.
(3) Tap the name in blue to edit Username again.
Note: You can enter as many as 18 letters including spaces. Your username will
be displayed on the Lock Screen.
The PDM displays the username on Lock Screen to help you identify your own
PDM. You can always confirm that the username is correct before using the PDM.
3.11.6 Telephone
1. Go to the Telephone screen.
Main Menu➔Settings➔ Telephone
2. Tap ------ to enter your telephone number or emergency-call number.
65

B ureau Veritas
(1) Use the keyboard to enter the telephone number .
(2) When finish, tap Done.
(3) Tap the number in blue to edit telephone number again.
Note: You can enter as many as 18 letters including spaces.
The PDM displays the Telephone number on Lock Screen, which works in two
optional ways:
1. to help you find your PDM if your PDM is lost.
2. to display your emergency-call number (family members, doctor, healthcare
center).
3.11.7 Diagnostics
The function Diagnostics helps you check if the PDM beeps and vibrates properly.
1. Go to the Diagnostics screen.
Main Menu➔ Settings ➔ Diagnostics
2. Select Diagnostics, then tap Next.
66

B ureau Veritas
3. The PDM will beep three times and vibrate one time while the screen
suggests checking alarms.
4. When checking is completed, tap OK to return to the last menu.
67

B ureau Veritas
Warning: If the PDM fails to beep or vibrate, call customer support. To continue
using the PDM may put your health at risk.
Note: Your PDM uses battery power to beep and vibrate. Checking alarms often
will result in reduced battery life and the “CHARGE PDM NOW” Alarm may
appear sooner than expected.
3.11.8 About Us
Here you can see the Company name, PDM SN, PDM program version, and
code.
3.12 Troubleshooting
This section contains procedures and information to help you understand and
address conditions that might occur with A7+ TouchCare System. It will give a
simple analysis, and some detailed answers, please look for it in the
corresponding sections.
What protocol does the A7+ TouchCare System use to communicate?
The Bluetooth protocol.
Bluetooth Low Energy (BLE) in specific.
Can I take a sauna with a PDM?
No.
The operating temperature range for the PDM is +5°C ~ +40°C.
Charging the PDM
68

B ureau Veritas
We recommend that you charge the PDM when a PDM BATTERY LOW alert
happens.
PDM does not power on after you press the Power button:
1. PDM battery is too low. Charge the PDM.
2. PDM is outside of its operating temperature range. Move the PDM to a
temperature between +5°C ~ +40°C and then try to power it on.
69

B ureau Veritas
70

B ureau Veritas
4 How to use Patch Pump
4.1 Change the reservoir patch
The Reservoir Patch requires replacement and shall not be reused. The
Reservoir Patch should be replaced approximately every 2-3 days or as
directed by your healthcare provider.
Warning: Do NOT attempt to apply or use a Patch Pump before you have been
trained by your healthcare provider. Use of the device with inadequate
training or improper setup could put your health and safety at risk. Your
healthcare provider will help you set up and apply your first Patch Pump if you
are a first-time A7+ Patch Pump user.
Warning: Use an aseptic technique when you are preparing, filling, attaching,
or removing a Reservoir Patch. This means to:
1. wash your hands with soap and water
2. clean the insulin vial with an alcohol wipe
3. clean the infusion site with an alcohol wipe
4. keep sterile items away from any possible germs
Warning: Always check BG one to two hours after changing the Reservoir
Patch. Remember to check the insulin level in your Reservoir Patch two hours
before going to sleep. Change the Reservoir Patch if it doesn’t have enough
insulin to cover your night time insulin needs.
4.1.1 Before Changing the Reservoir Patch
You will need these items before you begin:
- Vial of rapid-acting U-100 insulin
- An unopened Reservoir Patch
- A Pump Base
- Alcohol wipe(s)
- A 2mL disposable sterilized syringe with a capped needle
Warning: Using an insulin type other than rapid-acting U-100 insulin, or using
insulin that is expired or inactive, may lead to hyperglycemia or diabetic
ketoacidosis (DKA). Do NOT use insulin that is cloudy because it may be inactive.
71

B ureau Veritas
Note: The syringe provided by Medtrum matches the fill port on the Reservoir
Patch. Other syringes and needles meeting the following specifications are also
permitted.
Specifications of syringe:
Reservoir volume: 2.0 mL
Needle size: 26G
Needle length: 8 mm (0.31’’)
Make sure that the syringe with fill needle has been properly
sterilized.
Warning: A Reservoir Patch that has not been deactivated properly may
continue to deliver insulin as programmed, putting you at risk of over infusion
and possible hypoglycemia. Do NOT apply a new Reservoir Patch before you
have deactivated and removed the old Reservoir Patch.
4.1.1.1 Deactivate the Current Reservoir Patch
Warning: You must deactivate the current Reservoir Patch before you remove
it from your body and disconnect the Pump Base from the Reservoir Patch.
Main Menu➔ Patch➔ Deactivate Patch.
1. Slide to Deactivate current Reservoir Patch. Tap or Home Key to cancel
this operation.
72

B ureau Veritas
2. Several seconds later, you will see a message showing that the Patch has
been deactivated.
4.1.1.2 Remove the Current Reservoir Patch
1. After the Reservoir Patch is deactivated, press the needle release button
on the side of the Reservoir Patch, and slide it to the direction of the arrow
to retract the needle. Gently lift the edge of the adhesive tape from your
skin and remove the entire Reservoir Patch.
73

B ureau Veritas
Note: To avoid possible skin irritation, remove the Reservoir Patch slowly and
gently. If any adhesive remains on your skin, remove it with soap and water.
Warning: Check the infusion site for signs of infection.
2. Press and hold the two release buttons on both ends of the Pump Base and
pull the Pump Base off the old Reservoir Patch. Discard the old Reservoir
Patch according to your local waste disposal regulations.
Warning: Do NOT discard your Pump Base. It is reusable.
4.1.1.3 Enter Pump Base SN
Before activating a new patch, make sure that the pump Base serial number has
been entered into your PDM.
Main Menu➔Patch ➔Pump Base SN
Note: Don’t forget to update the SN if you change to a new Pump Base.
Note: You can only change the Pump Base SN when there is no active Reservoir
Patch.
You can find Pump Base SN on the product box or on your Pump Base.
74

B ureau Veritas
1. You can either enter SN manually or search for the SN if it is the first time
you enter the SN.
2. You can only enter SN manually if you want to update the SN.
Enter SN manually
Tap --------- or the existing Pump base SN, you will see the following screen.
Then enter the SN to your PDM and tap Done.
75

B ureau Veritas
Note: If it is an 8-digit SN, enter space ” ” at the end.
Search for the SN
You can select Search to search for the SN if it is the first time you enter the SN.
Make sure that your Pump Base is connected to a new Reservoir Patch and move
the PDM closer to your Pump before searching for the SN. See Section “Connect
the Pump Base to a New Reservoir Patch” for more information.
If your PDM finds one Pump, the Pump Base SN appears on the screen.
Check if it matches the SN printed on your Pump Base. If it is correct, tap OK.
76

B ureau Veritas
If your PDM finds multiple Pumps, the SNs won’t be displayed to prevent you
from selecting the wrong SN.
Tap OK to go back to Patch Menu, then select “---------” to enter the SN manually.
If your PDM does not find a Pump, make sure that your Pump Base is connected
to a new Reservoir Patch, move the PDM closer to your Pump, and search again
or enter the SN manually.
4.1.2 Activate a New Reservoir Patch
When there is no old Patch activated or when the old Patch has been removed,
you can go to Patch Menu to activate a new patch. Make sure that the pump
Base serial number has been entered into your PDM correctly.
Main Menu➔Patch➔New Patch
77

B ureau Veritas
4.1.3 Connect the Pump Base to a New Reservoir Patch
1. Tap Next on your PDM and you will see the following message on the
screen.
Warning: Do NOT use a Reservoir Patch if its sterile package has been damaged
or already opened, or if the Reservoir Patch has expired, or if the Reservoir Patch
is damaged in any possible way.
2. Place your thumb and index finger on the Pump Base. Hold the new
Reservoir Patch with your other hand. Insert the hooks and connecter on
the Reservoir Patch all the way into the slots of the Pump Base.
78

B ureau Veritas
3. The Pump performs a series of safety checks immediately after the two
parts are connected. The safety checks take about twenty seconds. The
indicator light flashes in the order of blue, green, yellow, and red, and the
Pump beeps four times.
Warning: If the Pump fails to beep or the indicator light fails to flash, call
customer support. It may put your health at risk if you continue to use the Pump.
Warning: If a single fault condition occurs, the indicator light flashes red, and
the Pump cannot proceed to the next step, call customer service.
4.1.4 Fill the New Reservoir Patch
Warning: If your insulin is stored in the refrigerator, wait until the insulin
reaches room temperature before you fill the reservoir. Using cold insulin could
produce air bubbles in the reservoir. While filling the reservoir, be sure to
remove air bubbles.
Warning: When you are filling the Reservoir Patch, make sure that it is at least
30 cm (12 inches) from any magnetic objects, such as magnets, mobile phones,
and other Reservoir Patches. The Patch Pump will detect the volume of insulin
in the reservoir once it is filled, and if the Patch Pump is in a magnetic field, the
volume detected can be inaccurate.
Take the following steps to fill a new Patch:
1. Clean the top of the insulin vial with an alcohol wipe.
2. Remove the protective cap from the needle. Keep the cap.
79

B ureau Veritas
3. With the help of your healthcare provider, decide on the amount of insulin
(70 U-200 U) you need to insert into the Reservoir Patch.
4. Draw air into the syringe up to the amount of insulin you need.
5. Insert the needle into the insulin vial and push down on the plunger to
pressurize the vial.
6. While still holding the plunger rod, flip the vial over so the vial is on top,
and then slowly pull down on the plunger to fill the syringe with the
number of desired units. Gently tap the side of the syringe to make air
bubbles rise to the top of the syringe. Slowly push up on the plunger just
enough to remove air bubbles from the syringe.
Warning: Avoid using insulin from more than one vial because this may
introduce air into the syringe.
7. With the vial down, hold the syringe. Pull straight up to remove the syringe
needle from the vial, and then insert it perpendicularly into the insulin fill
port on the side of the Reservoir Patch.
Warning: Make sure that you insert the syringe perpendicularly rather than at
an angle into the insulin fill port.
8. Keep the syringe vertical to the Patch Pump, and the needle inside the fill
port, pull back on the plunger until it is fully retracted. This will remove any
residual air from the reservoir. Bubbles will rise toward the plunger.
80

B ureau Veritas
9. Make sure that the needle is still in the fill port and release the plunger.
Pressure will pull the plunger to its neutral position, but it will NOT push
any air back inside the reservoir.
10. Withdraw the needle from the fill port. Turn the syringe upright and pull
on the plunger. Flick the syringe to make sure that any air bubbles rise to
the top. Gently press on the plunger to remove air bubbles until insulin fills
the needle hub and you see a drop of insulin at the tip of the needle.
11. Re-insert the needle in the fill port and slowly fill the reservoir with insulin.
It is normal to feel some back pressure as you slowly press on the plunger.
81

B ureau Veritas
Warning: Do NOT use a Reservoir Patch if you hear a crackling noise or feel
abnormally strong resistance when you press down on the plunger. These
conditions can result in not delivering enough insulin.
Warning: Do NOT inject air into the fill port. Doing so may result in unintended
or interrupted insulin delivery.
Warning: Do NOT fill the Reservoir Patch when you are wearing it. Doing so may
cause serious harm to your life and health.
12. Hold the plunger in position while you remove the needle from the
reservoir. Place the protective cap back on the needle. Safely dispose of
the syringe in a waste container according to local waste disposal
regulations.
Warning: Use your Reservoir Patch right after you fill it. Do NOT store a
Reservoir Patch filled with insulin. Reservoir Patch shall be used soon after being
filled with insulin.
13. After you fill the Reservoir Patch, Press OK to continue.
Note: Call customer support if you have filled the Reservoir Patch with more
than 70 units but the reservoir volume icon is still empty.
Note: After filling the Reservoir Patch with insulin, you should change the
Reservoir Patch within 3 hours. To Reminder that the Reservoir Patch has been
filled and shall be used, the PDM will beep and/or vibrate every 10 minutes. If
you do not apply the Reservoir Patch on your body within 3 hours, you must
deactivate and discard it.
Note: Once a Reservoir Patch (connected with a Pump Base) is activated and
communicates with a PDM, it can only receive commands from that PDM, not
from any other.
4.1.5 Prime the Pump
Once the Reservoir Patch is filled with an appropriate amount of insulin (70 U200 U), tap Next on your PDM and you will see the following message on the
screen.
82

B ureau Veritas
Hold the Patch Pump on a clean flat surface with one hand, and with the other
hand, press the top square part of the button cover all the way until you hear a
click, indicating the needle button is locked in place by the two hooks on the
button cover.
Warning: Do not start priming before the top square part of the button cover is
fully pressed.
After that, tap Next on your PDM to prime the Pump.
83

B ureau Veritas
Warning: Do NOT remove the button cover before priming is completed.
Once completed, the next screen “Attach and Insert” appears, and the Pump
vibrates three times.
Warning: If the Pump fails to vibrate, call customer support. To continue using
the Pump may put your health at risk.
4.1.6 Select and Prepare the Infusion Site
The place on your body where you attach the Pump is important for the success
of your therapy. Discuss the best infusion sites with your healthcare provider.
When choosing the location for the Pump, consider the following:
- You can comfortably reach the Pump.
- You apply the Pump to a flat area of skin with adequate subcutaneous
fat.
84

B ureau Veritas
- The area stays flat during normal daily activities without bending or
creasing.
When choosing the location for the Pump, avoid the following:
- Areas that are constrained by clothing, such as the belt line or waist.
- Curved or rigid areas due to muscle or bone.
- Areas that involve rigorous movement during exercise.
- Areas of skin with scars, tattoos, or irritation.
- 5.0 cm (2 inches) around the navel.
- Areas with excess hair.
Body areas (shaded) suitable for infusion sites:
Front Back Front Back
Adult Youth
If you choose an infusion site on your abdomen, hip, back, or buttocks, apply
the Patch Pump horizontally.
If you choose an infusion site on your upper arm or thigh, apply the Patch Pump
vertically.
Warning: Change the site each time you apply a new Reservoir Patch. Be sure
to rotate the infusion sites so that they are not overused. A new infusion site
should be at least 2.5 cm (1 inch) away from the last site.
Practice using an aseptic technique as described at the beginning of this chapter.
Clean the area with an alcohol wipe where you will attach the Pump. Let the
area dry before applying the Pump.
85

B ureau Veritas
Note: If you have sensitive skin or your skin gets irritated, contact your
healthcare provider.
4.1.7 Attach the Patch Pump
1. Remove the button cover.
2. Peel off the adhesive liner from the bottom of the Reservoir Patch.
Remove the liner and expose the adhesive.
3. Avoid touching the stickiness of the adhesive pad, press the Pump against
the skin at the selected infusion site.
4. Hold your Pump in place for 5-10 seconds. Run your finger around the
entire edge of the adhesive pad to make sure that it is securely attached to
your body.
86

B ureau Veritas
Note: The adhesive of the Reservoir Patch keeps the Patch position secured for
up to 3 days. Several products are available to enhance adhesion if necessary.
Ask your healthcare provider about these products. Avoid getting body lotion,
creams, or oil near the infusion site because it may loosen the adhesive.
Note: The adhesive is designed for one-time use. Once removed, a Reservoir
Patch cannot be reapplied.
4.1.8 Start Insulin Delivery
1. Press the needle button with one quick motion to completely insert the
needle below your skin until the button locks in place.
2. Press Next after you insert the needle, and the following screen appears.
87

B ureau Veritas
Warning: Check the infusion site and needle after insertion to ensure that the
needle has been properly inserted. If the needle is not properly inserted,
hyperglycemia may ensue.
3. Slide to activate basal delivery if the needle is properly inserted. Or tap
Home Key if you find a problem with the needle, then the PDM will instruct
you to discard the Reservoir Patch.
Warning: You should check the area around the Reservoir Patch at regular
intervals for possible redness, irritation, and inflammation. If you find infection,
immediately remove the Reservoir Patch and apply a new one in a different
location.
4. Now your new Reservoir Patch is activated.
Warning: Do NOT disconnect the Pump Base from the Reservoir Patch while the
Patch Pump is connected to your body.
88

B ureau Veritas
Warning: Check the infusion site frequently for improper placement and leaks
that can result in inadequate infusion. You can also check blood glucose level to
ensure normal infusion.
4.2 Bolus
A bolus dose is insulin you deliver to cover meals or snacks, or to correct high
blood glucose. Consult your healthcare provider about how to set your bolus
dose.
Your A7+ TouchCare® System provides three bolus types: Normal Bolus,
Extended Bolus and Combo Bolus. This section gives instructions for a Normal
Bolus. See Chapter “Advanced Pump Features” for more information about
Extended Bolus and Combo Bolus.
Go to the Bolus screen.
Main Menu➔Bolus
Note: When the Bolus Calculator is switched off in the Settings, Bolus Calculator
will not appear in the Bolus menu. See Chapter “Advanced Pump Features” for
more information.
4.2.1 Normal Bolus
1. To deliver a Normal Bolus, go to the Manual Bolus screen.
Main Menu➔Bolus➔Manual Bolus
89
 Loading...