


TH
E
l
a
D
e
n
m
n
0
0
0
m
u
MEDTRUM PRODUCT
Pat
Insu
in Man
chTrum
geme
M
Us
‐SY‐007
r Guide
t Syste
Medtrum Tech
Unit 7F, Buildin
Shanghai 2012
China
Te l:+86‐21‐5
Fax:+86‐21‐5
www.medtru
ologies Inc.
g 8, No.200 Niud
3
274781
274779
.com
n Road

Contents
Contents ............................................................................................................................................................................... 1
Introduction ......................................................................................................................................................................... 4
Before you begin ...........................................................................................................................................................4
Indications ....................................................................................................................................................................4
Contraindications ..........................................................................................................................................................4
Warnings, precautions and important safety information ..............................................................................................5
Warnings .......................................................................................................................................................................... 5
Precautions ...................................................................................................................................................................... 5
X‐rays, MRIs and CT scans ................................................................................................................................................ 8
Consumables .................................................................................................................................................................... 8
About radio frequency (RF) communication ................................................................................................................... 8
Emergency kit .................................................................................................................................................................. 9
Avoid extreme temperature .......................................................................................................................................... 10
Water and your Patch .................................................................................................................................................... 10
Storage ........................................................................................................................................................................... 10
The basics ........................................................................................................................................................................... 11
Introduction to insulin pump therapy .......................................................................................................................... 11
How does the system work? ........................................................................................................................................ 11
Key features ................................................................................................................................................................ 13
No tubing ....................................................................................................................................................................... 13
Automated cannula insertion ........................................................................................................................................ 14
A fully‐integrated design ................................................................................................................................................ 14
Bolus guide..................................................................................................................................................................... 14
Record keeping .............................................................................................................................................................. 14
Event capturing .............................................................................................................................................................. 15
The personal diabetes manager (PDM) ........................................................................................................................ 16
Install battery ................................................................................................................................................................. 16
Buttons ........................................................................................................................................................................... 18
LCD screen ..................................................................................................................................................................... 19
1

HOME screen ................................................................................................................................................................. 19
Screen icons ................................................................................................................................................................... 20
Battery ................................................................................................................................................................... 20
Time ....................................................................................................................................................................... 20
Silence icon ............................................................................................................................................................ 21
Reservoir volume ................................................................................................................................................... 21
Alert and alarm icons ............................................................................................................................................. 21
RF signal icon ......................................................................................................................................................... 21
Scroll bar ........................................................................................................................................................................ 22
Screen backlight ............................................................................................................................................................. 22
Beep/vibrate .................................................................................................................................................................. 22
Menus ............................................................................................................................................................................ 23
MAIN MENU ........................................................................................................................................................... 23
BOLUS MENU ......................................................................................................................................................... 23
SUSPEND ................................................................................................................................................................ 23
BASAL MENU .......................................................................................................................................................... 24
PATCH MENU .......................................................................................................................................................... 24
UTILITIES MENU ..................................................................................................................................................... 24
HISTORY MENU ...................................................................................................................................................... 25
STATUS screen ................................................................................................................................................................ 25
EVENT screen ................................................................................................................................................................. 26
Using the Patch Pump ......................................................................................................................................................... 27
How to change a new Patch? ....................................................................................................................................... 27
Prepare your Patch Pump for use .................................................................................................................................. 29
Deactivate the current Reservoir Patch ................................................................................................................. 30
Connect the Pump Base to a new Patch ................................................................................................................ 33
Fill the new Patch ........................................................................................................................................................... 34
Select and prepare the infusion site .............................................................................................................................. 37
Attach the new Patch ..................................................................................................................................................... 40
Start the insulin delivery with the Patch ........................................................................................................................ 41
Pump safety system and alarms .......................................................................................................................................... 43
Safety system .............................................................................................................................................................. 43
Alerts and Alarms ....................................................................................................................................................... 43
2

Appendix I: Symbols and icons ............................................................................................................................................ 47
Product label symbols ................................................................................................................................................. 47
PDM icons ................................................................................................................................................................... 48
3

Introduction
Before you begin
Check with your health care professional regarding your individual training needs. Do NOT attempt to connect to
your pump before you have been trained on your pump.
As part of your training, your health care professional will work with you to establish diabetes management guidelines
and settings that best fit your needs as your insulin pump settings impact the calculations for insulin delivery. You will
rely on your healthcare professional for a lot of critical information about your pump system, especially during the first
few weeks and months. Your healthcare professional must help you enter the initial settings into the Personal
Diabetes Manager (PDM). Soon you will enter and change your own personal settings with confidence and ease.
The system is designed to use rapid-acting U-100 insulin. The following insulin analogs have been tested and found
to be safe for use in the Reservoir Patch of the pump: Humalog®, NovoLog®, and Apidra®. Before using a different
insulin with this pump, check the insulin drug label and your health care status to make sure it can be used with your
pump. Refer to the insulin labeling and follow your healthcare professional’s directions for how often to replace the
Patch.
Indications
The systems are indicated for the continuous subcutaneous (below the skin) delivery of insulin, at set and variable
rates, for the management of diabetes mellitus in persons requiring insulin.
Contraindications
Insulin pump therapy is NOT recommended for people with diabetes who are either:
y Unable to test their blood glucose levels at least four times per day.
y Unwilling to demonstrate adequate carbohydrate counting skills.
y Unable to maintain good diabetes self-care skills.
4

y Unwilling to see their health care professional regularly.
Successful insulin pump therapy requires sufficient vision or hearing to respond to pump alerts and alarms.
Warnings, precautions and important safety information
Warnings
y Check with your health care provider regarding your individual training needs. Do NOT attempt to connect to
your pump before you have been trained on your pump.
y Incorrect use of your pump, failure to follow the instructions in this User Guide or improper/inadequate self-care
and troubleshooting techniques can lead to death or serious injury. If you do not understand something or have
questions, ask your health care team or call Customer Support or your local Medtrum distributor.
y Your pump is designed to deliver insulin reliably, but because your pump uses only rapid-acting insulin, you will
not have long-acting insulin in your body. To avoid the risk of diabetic ketoacidosis (DKA) or very high BG, you
must be prepared to give yourself an injection of insulin if delivery is interrupted for any reason.
y Your pump is designed and calibrated to deliver U100 insulin. Use of any insulin with lesser or greater
concentration can result in serious injury or death.
y You must take a fingerstick test with your BG meter and use that BG value to make any insulin or treatment
decisions.
y Your pump and pump accessories include small component pie ces that could pose a choking hazard for small
children.
Precautions
y Occasionally check the infusion site for proper placement and leaks. Improperly placed infusion sites or leaks
around the infusion site can result in under infusion.
y Always dispose of used Patches following the regulations in your community. Failure to follow these guidelines
5

may pose health hazards.
y Occasionally check that your PDM personal settings are correct.
y Occasionally check to make sure your PDM emits audible tones that are easily detectable and that the vibrate
feature is working correctly.
y Your PDM uses battery power to notify you of alerts, warnings, and alarms. If you do not confirm the notification,
your PDM will continue to use battery power as the notifications repeat and progress. This will result in reduced
battery life and the Replace Battery Alarm screen appearing sooner than expected.
y Your pump is designed only for Continuous Subcutaneous Insulin Infusion (CSII). It is not intended for use with
any other delivery substance.
y Consult your health care team before using your pump to determine which programming features are
appropriate for you. Some features require a greater knowledge of insulin pumping and advanced self-care skills.
Additionally, some advanced programming features require that testing and fine-tuning of basic settings be
completed in order to achieve the best possible results. Your health care team will give you specific training on
programming and using your pump.
y Use of Extended Bolus, Combo Bolus and Bolus calculator, all require input from your health care team. Do
NOT attempt to use these features until you have specific information for your treatment plan and have had
specific training on each programming feature.
y Only your health care team can determine your Insulin to Carbohydrate (I:C) ratios, Insulin Sensitivity Factors
(ISFs), BG Target ranges and duration of Insulin on Board (IOB).
y Basal rates that are too high or too low can adversely affect BG levels. Work with your health care team to
fine-tune basal rates.
y The way your body uses insulin can be affected by many things. Contact your health care team about lifestyle
changes such as starting/stopping your exercise program or significant weight loss/gain. Your basal rates may
need to be modified.
y Do NOT stop using your pump if you are ill unless instructed to do so by your health care provider. Even when
you are sick, your body still needs insulin.
y Medtrum Corporation recommends that you have someone around you (fa mily, friends, etc.) who understands
diabetes and pump therapy, so in the event of an emergency, they can help you. Be sure they are familiar with
6

any information given to you by your health care team.
y Before Bedtime
- Plan Patch changes at meals or one to two hours before bedtime. If a change is needed at bedtime, then
check BG in one to two hours. Always check BG one to two hours after Patch change.
- Always check that your Patch has enough insulin to last through the night before going to bed.
y If you return your PDM for service and a replacement PDM is sent, Do NOT use the replacement PDM until all
the settings specific to your treatment plan have been programmed.
y If you drop your PDM or it has been hit against something hard, inspect it to be sure it is still working properly.
Check that the display screen is working and clear, and battery cap are properly in place. Call Customer Support
or your local Medtrum distributor if you identify or suspect your PDM has been damaged.
y Your pump is designed to operate in conditions where temperatures are between 5° C (40° F) and 40° C (104°
F). If your pump is exposed to temperatures outside these parameters, extra care should be taken to protect it
from extreme temperatures.
y To avoid risk of explosion, do NOT use your pump in the presence of explosive gases.
y Your PDM is designed to achieve optimum performance and battery life with an AAA battery (1.5V). Use of
anything other than a 1.5V battery could permanently damage your PDM and voids its warranty.
y Do NOT use household cleaners, chemicals, solvents, bleach, scouring pads or sharp instruments to clean your
pump. Small amounts of alcohol can be used to clean the enclosure of your pump. Never put your pump in the
dishwasher or use very hot water to clean it.
y NEVER use a hair dryer, microwave oven or baking oven to dry your pump. Use a soft towel.
y Do NOT try to modify any part of the system. Any problems associated with the system, please contact
Customer Support or your local Medtrum distributor.
y Do NOT use anything other than the manual specified accessories, which could permanently damage your
system and voids its warranty.
y The PDM, the Pump Base and the Wireless USB Stick co
mply with Part 15 of the FCC rules
7

This device complies with Part 15 of the FCC Rules. Its operation is subject to the following two conditions:
(1) These devices may not c
- ause harmful interference.
(2) These devices must accept any
- interference received, including interference that may cause undesired
operation.
X‐rays, MRIs and CT scans
The Patch Pump and PDM may be affected by strong radiation or magnetic fields. If you are going to have X-ray,
MRI, CT scan or other type of exposure to radiation, TAKE OFF YOUR PATCH PUMP AND PDM, and put them
outside the treatment area. Replace with a new Reservoir Patch after the test or procedure is completed.
The Product is designed to tolerate common electromagnetic and electrostatic fields, including airport security
systems and cellular phones.
Consumables
The pumps use disposable Reservoir Patches for insulin delivery.
y Reservoir Patches — The pump is only used with the 200-unit Medtrum Reservoir Patches (MD-JN-002).
Change your Reservoir Patch every two to three days.
Warning: For your protection the pump has undergone extensive testing to confirm appropriate operation when used
with Reservoir Patches manufactured or distributed by Medtrum. We recommend using Medtrum Reservoir Patches
as we cannot guarantee appropriate operation if the pump is used with Reservoir Patches offered by third-parties
and therefore we are not responsible for any injury or malfunctioning of the pump that may occur in association with
such use.
About radio frequency (RF) communication
Your pump has built-in RF capability. RF is a type of wireless communication. Cell phones use RF technology, as do
many other devices. RF is how your pump and PDM communicate and share data.
RF communication between your pump and PDM will work up to a distance of about 2 meters (6.6 feet) and will
transmit through clothing. Direct line of sight is not required for RF communication. As long as you have a good RF
8

signal and are within range, you can use your PDM to control and monitor pump. Exposing your pump to water, and
certain objects in between the two devices may interfere with RF communication.
Common consumer electronic devices that transmit in the same frequency band used by the pump may prevent the
PDM from receiving the pump status information sent by the pump or transmitting control commands to the pump.
Most cellular (mobile) phones, mobile or portable handheld units, when transmitting or receiving, may cause
significant interruption of transmitter-receiver communication. It is likely that other devices operating in similar
frequency ranges will have a similar effect. This interference, however, will not cause any incorrect data to be sent or
received and will not cause any harm to your pump.
When conditions or distance cause RF communication to be lost or interrupted, you will not be able to use your PDM
to control and monitor pump status. This also means that data transfer between the two devices will stop temporarily.
The PDM is designed to sense and notify you about a lost connection. As soon as the problem is resolved, RF
communication will resume.
Emergency kit
Keep an emergency kit with you at all times to make sure you have necessary supplies. Inform a family member,
co-worker, and/or friend where this emergency kit is kept.
This kit should include but is not limited to:
y Quick-acting glucose tablets or gel
y BG monitoring supplies
y Urine ketone testing supplies
y Insulin syringe and fast-acting insulin (with dosage instructions from your healthcare professional)
y Extra Medtrum 2.0mL Reservoir Patch
y Extra AAA alkaline batteries
y Dressing and adhesive
y Glucagon Emergency Kit®
y Emergency contact phone numbers
9

Avoid extreme temperature
The Reservoir Patch’s operating temperature is between +10~+40°C. Under normal circumstances, your body
temperature will keep the Reservoir Patch well within this range.
Warning: Do NOT expose a Reservoir Patch to direct sunlight for long period of time. It is recommended that you
remove your Reservoir Patch prior to using hot tubs, whirlpools, or saunas. These conditions could expose the
Reservoir Patch to extreme temperature and may also affect the insulin inside the Reservoir Patch.
Note: Remember to check your blood glucose levels frequently before and after removing the Reservoir Patch.
Note: Insulin degrades at high temperature and will freeze near 0°C. So please try to avoid Reservoir Patches
exposed in extreme high or low temperature environment.
Water and your Patch
The Patch Pump is waterproof to a depth of 2.5m for 30 minutes (IPX8). After exposure to water, rinse off the Patch
Pump with clean water and gently dry it with a towel.
Warning: Th e Patch Pump may not able to delivery normally in the water. Do NOT expose your Patch Pump to water
at depths greater than 2.5m or for more than 30 minutes. Check often to make sure the Reservoir Patch and soft
cannula are securely attached and in place. If the cannula is not properly inserted, hyperglycemia may result.
Warning: The PDM is not waterproof. Do NOT place it in or near water.
Storage
Store unopened Reservoir Patches in a cool, dry place. Extreme heat or cold can damage Reservoir Patches and
cause them to malfunction.
Warning: Do NOT apply or use a Reservoir Patch if its sterile packaging is opened or damaged, as this may
increase the risk of infection. Reservoir Patches are sterile unless their packaging is opened or damaged.
10

The basics
Introduction to insulin pump therapy
In insulin pump therapy, also known as Continuous Subcutaneous Insulin Infusion (CSII) Therapy, a pump system
delivers precise doses of rapid-acting insulin through a tiny, flexible catheter called a cannula. The insulin goes into
the fatty tissue below subcutaneous tissue. You simply program your diabetes pump system to deliver it in two
different ways:
y Basal Rate: Small amounts of insulin delivered continuously day and night to cover your body’s normal insulin
needs (not including food). The programmed rate is determined by your healthcare professional
y Bolus Dose: Additional insulin you can deliver “on demand” to cover meals or snacks, or to help bring down
high blood glucose. Insulin pumps have bolus calculators that help you calculate your bolus amount based on
settings that are determined by your healthcare professional.
How does the system work?
y The Patch Pump is a small, lightweight, self-adhesive device worn directly on your body to deliver precise,
personalized doses of insulin into your body through a small flexible tube (called a cannula). The Patch Pump is
composed of two parts: the reusable Pump Base (MD-JN-001) and the disposable Reservoir Patch
(MD-JN-002). The reusable Pump Base stores all your pump settings for precise 24-hour basal and bolus
delivery . The Pump Base holds the electronics, memory, and a buzzer just in a smaller package! The disposable
200 unit insulin Reservoir Patch should be replaced every 2 or 3 days. The Reservoir Patch is more
sophisticated than the standard insulin cartridge, because it incorporates the precision dispensing screw,
plunger, driver, cannula, inserter and even a battery to power your Pump Base. The delivery system in the
Reservoir Patch is the broader applied part in the Patch Pump.
11
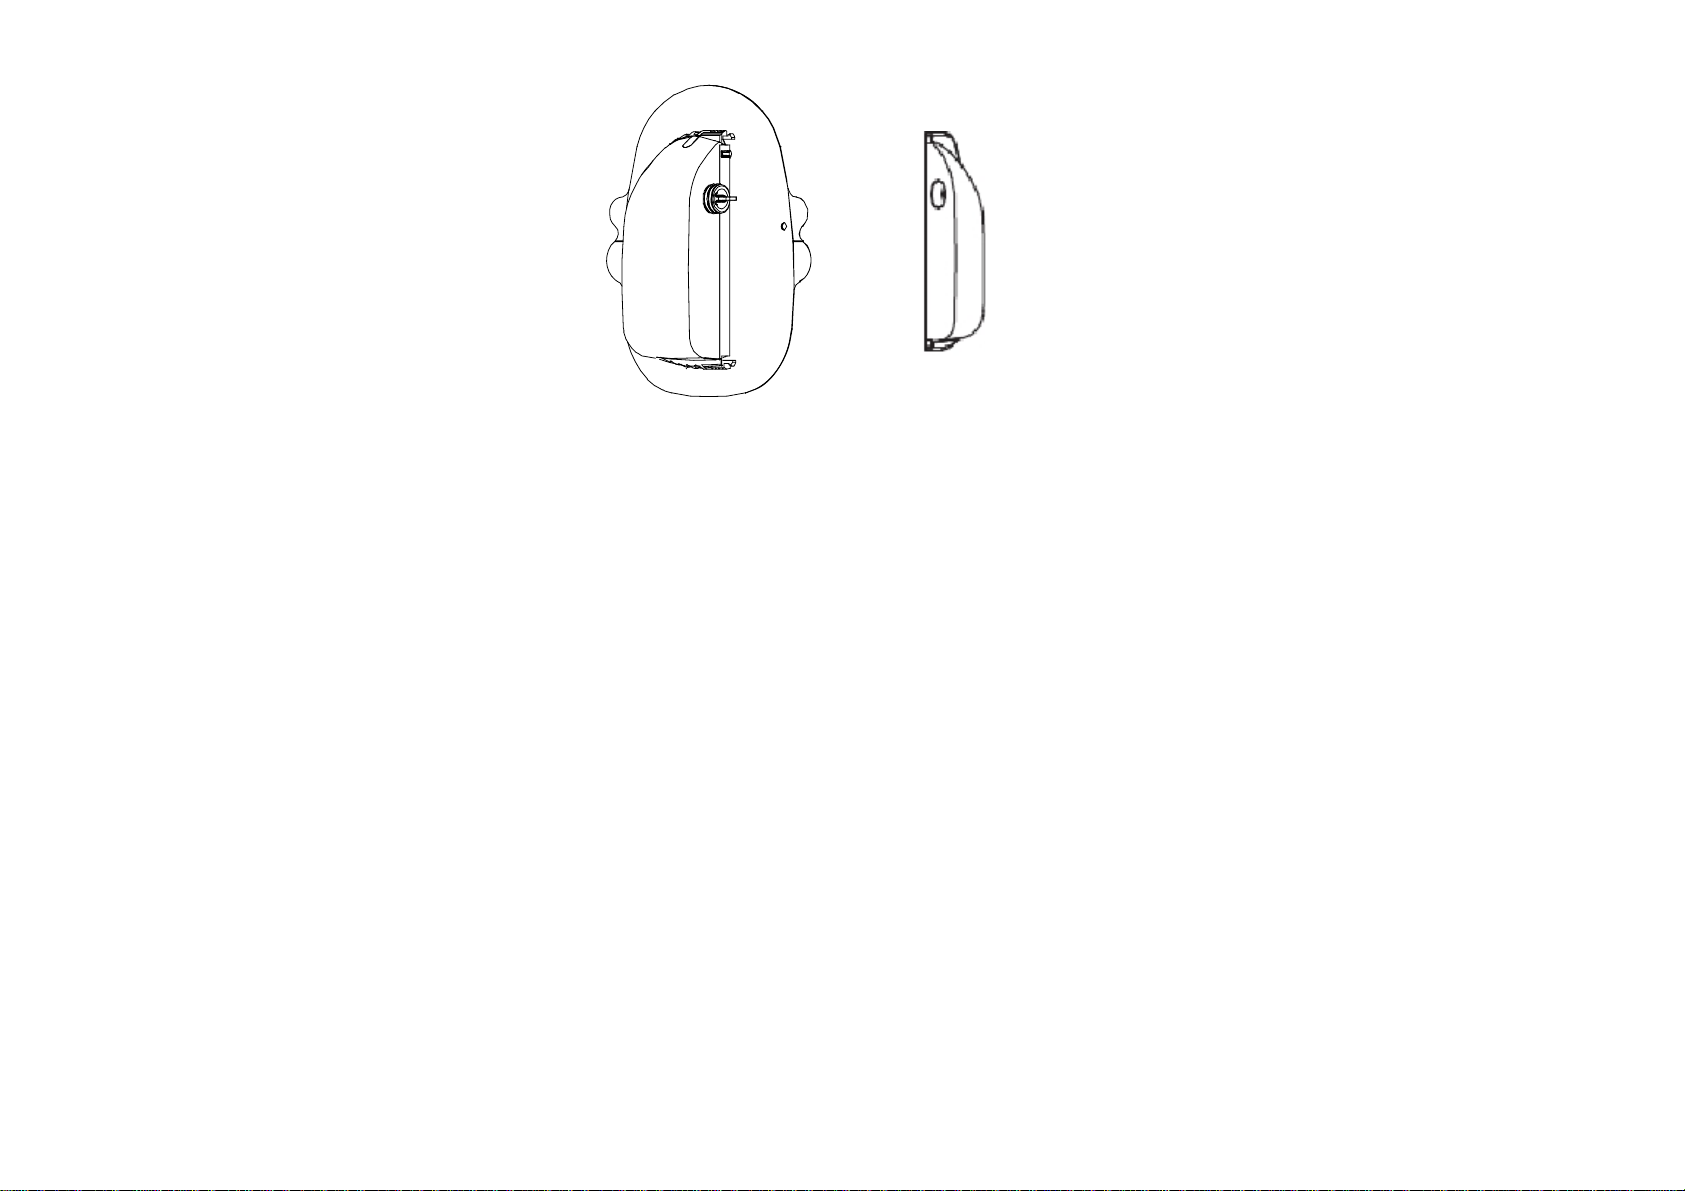
9 Reservoir Patch 9 Pump Base
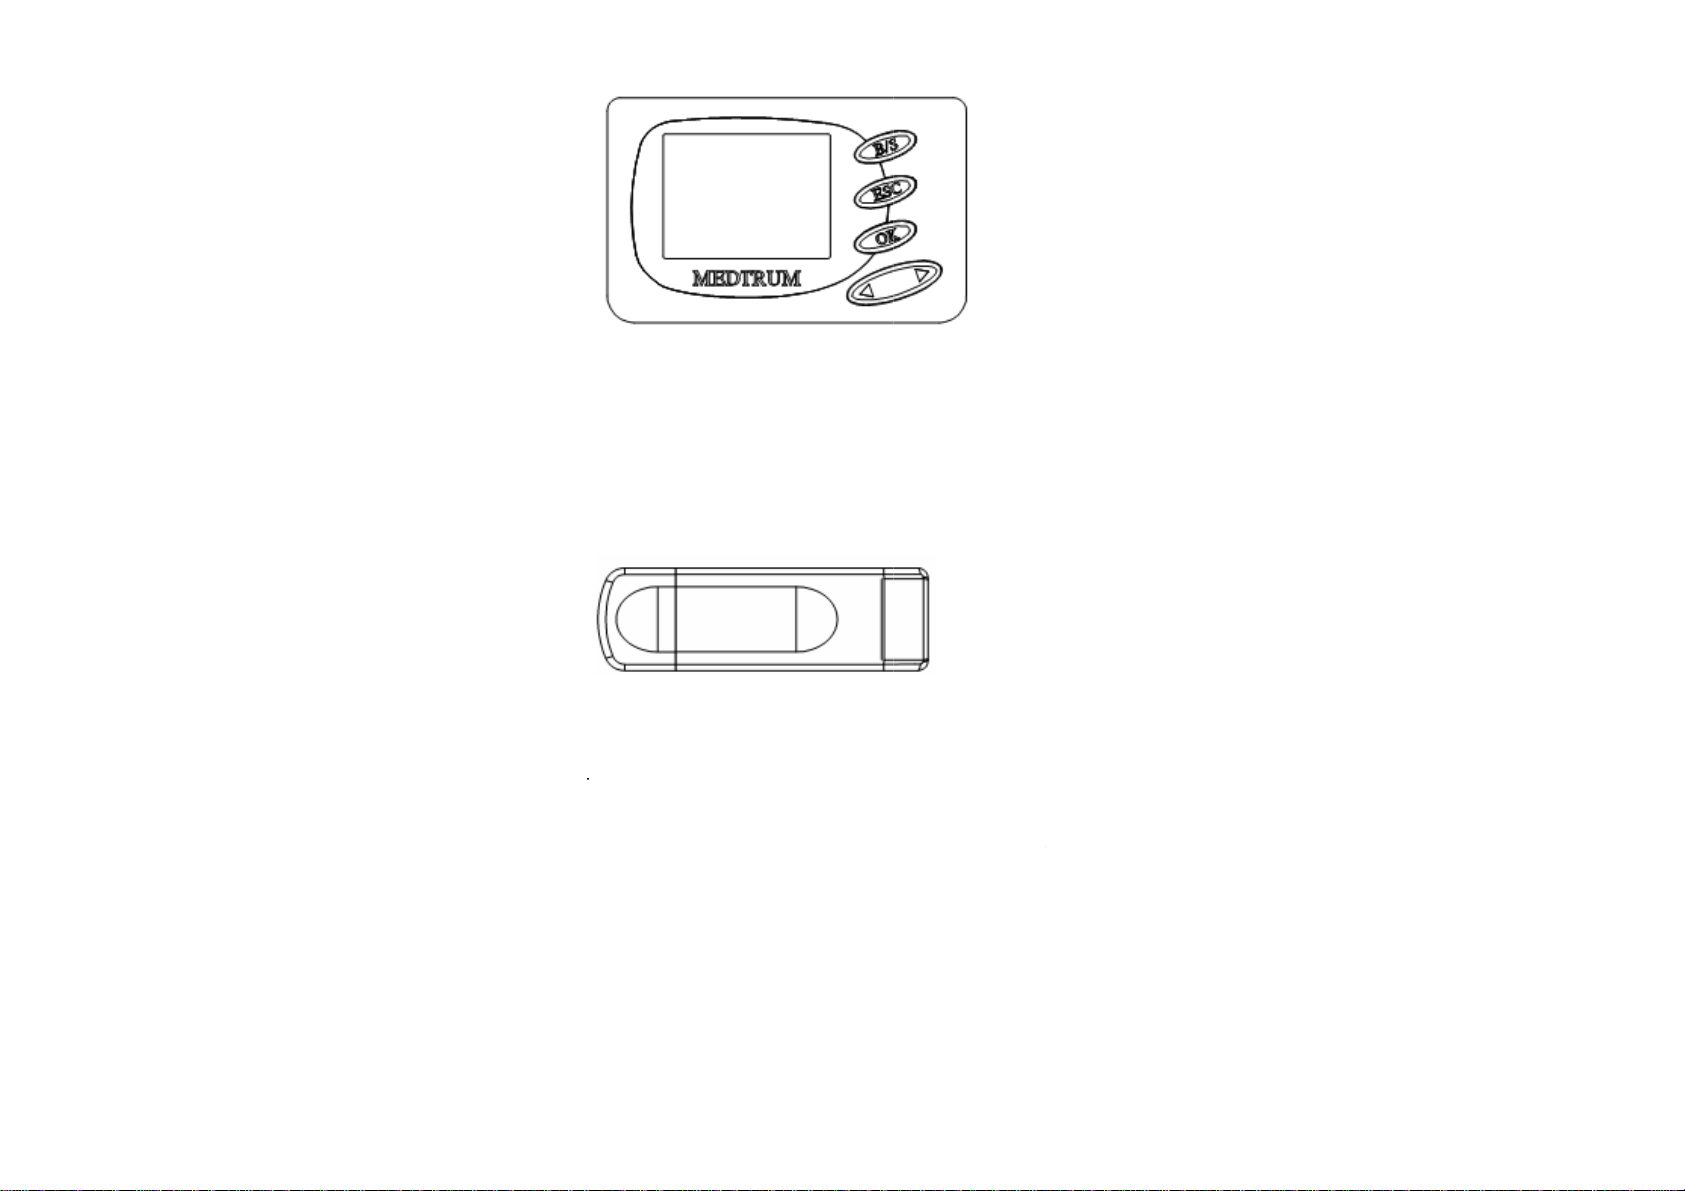
y The Personal Diabetes Manager (PDM) (MD-FM-006P) is the “brains” of the operation. All Patch Pump
operations are programmed and controlled through the palm-sized PDM. The PDM allows you to program the
Patch Pump with your personalized insulin delivery instructions just like any traditional pump. But instead of
being connected to the pump, it wirelessly monitors the Patch Pump’s operation, and wirelessly downloads all
the information to the Patch Pump so it can continue to deliver insulin based on your personalized settings even
if the PDM is not within reach!
Note: When conditions or distance cause RF communication to be lost or interrupted, you will not be able to use your
PDM to control and monitor pump status. This also means that data transfer between the two devices will stop
temporarily. The Patch pump can continue to deliver insulin based on your personalized settings which have been
sent by the PDM before RF communication is lost or interrupted. The patch pump has built-in safety feature: It can
check its own functions and automatically stop delivery when serious conditions happen. To make you aware of a
serious condition, the patch pump will automatically sounds an alarm. The PDM is designed to sense and notify you
about a lost connection. As soon as the problem is resolved, RF communication will resume.
12
9
y
r
e
b
e
U
e
w
o
n
y
t
c
a
-
m
e
s
a
i
m
m
Y
e
n
e
n
P
a
G
k
s
a
u
m
u
c
n
r
n
m
e
s
u
r
m
a
n
Personal Diab
tes manager (P
DM)
The Wireless
y
accessory to th
USB port and
Management S
therapy . You ca
9
Wireless USB
Ke
features
The
PatchTrum Insu
sma
ll and slim size,
No
tubing
SB Stick (MD
Insulin Manage
irelessly downlo
ftware. The Wir
refer to the “Da
Stick
lin Management
hus providing di
FM-007) acco
ent System. It i
ads the system
less USB Stick
ta Management
System (MD-S
creetness. Plus
panied by the
s a radio freque
data from your
ay benefit you
Software User
-007) combines
you’ll enjoy the
Data Manage
cy (RF) device t
DM, and then
nd your health
uide” for more i
ey features of t
afety, convenie
ent Software i
hat plugs into yo
ploads the data
are team in you
formation.
aditional insulin
ce, and freedo
an optional
r computer’s
to your Data
insulin pump
pumps with a
of:
The
e is no tubing
und
r your clothes.
bub
les. In many w
onnecting the P
Tubing of tradit
ys, it can feel l
tch Pump to th
onal pumps ca
ike a leash. Th
PDM. You we
get twisted, p
study has dem
13
r the Patch Pu
lled out by acci
onstrated the b
p comfortably
dent, kinked or
nefits of a tubi
nd discreetly
filled with air
g-free insulin

pump, which can help patients overcome their fear of insertion sets or unsightly tubing and achieve the clinical
benefits of insulin pump therapy.
In addition, you can carry the PDM separately in a backpack, briefcase, or purse.
Automated cannula insertion
With the insulin management system, you don’t have to insert the infusion set manually or carry around a separate
inserter. You simply press a button on the PDM and the Patch Pump automated insertion system safely and
consistently inserts the cannula beneath the skin, virtually pain free.
A fully‐integrated design
The Patch Pump integrates the pumping mechanism, cannula, needle, and insulin reservoir into one wearable u nit.
There is no need to carry separate reservoirs, infusion sets, or inserters, and no assembly required. Just add insulin
and it’s ready to go.
Bolus guide
After you check your blood glucose, enter the carbs for your snack or meal. Based on your individual settings, the
PatchTrum Insulin Management system contains an optional feature called the Bolus Guide. This does the math for
the required bolus amount based on your personal settings. The system displays a suggested bolus dose. You can
accept the suggestion, change it, or cancel it. The Bolus Guide will use your BG reading, carbohydrate intake, and
active insulin when coming up with your bolus amount.
Record keeping
Another convenient part of the PatchTrum insulin management system is record keeping. The data storage system in
the personal diabetes manager (PDM) displays up to 90 days’ worth of information. This includes basal rates, bolus
doses, daily totals, alarms and events. Records wrote in the memory chip of the PDM can be stored up to 10 years.
14

Event capturing
The PatchTrum Insulin Management System contains the options you use to enter information about different
events into the system. Examples of events include: blood glucose, meal, insulin, health, and activity
information. This information can help you and your diabetes management team make better decisions about
your diabetes management plan. These events can be reviewed later with the Medtrum Data Management
Software.
Important Statement:
Take attention that changes or modifications not expressly approved by the the party responsible for compliance
could void the user’s authority operate the equipment
Note: This product has been tested and found to comply with the limits for a Class B digital device,
pursuant to Part 15 of the FCC Rules. These limits are designed to provide reasonable protection against harmful
interference in a residential installation. This product generates, uses, and can radiate radio frequency energy
and, if not installed and used in accordance with the instructions, may cause harmful interference to radio communications.
However, there is no guarantee that interference will not occur in a particular installation. If this product does cause
harmful interference to radio or television reception, which can be determined by turning the equipment off and on, the user is
encouraged to try to correct the interference by one or more of the following measures:
-Reorient or relocate the receiving antenna.
-Increase the separation between the equipment and receiver.
-Connect the equipment into an outlet on a circuit different from that to which the receiver is connected.
-Consult the dealer or an experienced radio/TV technician for help.
15

The personal diabetes manager (PDM)
Install battery
The PDM is designed to only accept a new AAA battery.
Note: Do NOT use any other type of batteries than AAA alkaline batteries to power the PDM. Never use old or used
batteries; the PDM may not work properly.
As a safety measure, if you install a battery that does not have full power, the WEAK BATTERY or FAILED BATT
TEST alarm may sound. If you receive a WEAK BATTERY alarm, respond to the alarm and continue. The pump will
still operate normally, but with a decreased battery life. The PDM uses one AAA alkaline battery.
1. Make sure all the following apply:
y Clear (ESC, OK) any alarms and/or alerts before removing and replacing the battery.
y Make sure the PDM is at the HOME screen when you remove the battery.
y Do NOT remove the battery during a bolus or a Patch change process.
2. Open the battery compartment on the back of the PDM by pushing the compartment latch along with the
direction of arrow and lifting upward.
16

3. Remove the old battery and dispose of it per the disposable requirements of your state or country. Put the new
battery in the PDM. Check the diagram inside the compartment to make sure the battery is inserted correctly.
Note: Do NOT use batteries that have been in cold storage, such as in the refrigerator or in your car during winter in
cold climates.
4. Replace the battery door by pushing the compartment latch along with the direction of arrow.
5. Turn the PDM face-up. The PDM has begun to power on automatically. It will show one or more screens until the
HOME screen appears.
If the HOME screen does not appear, do these steps:
a. Check that the battery is inserted correctly. If the battery has been installed backwards, remove the
battery and install it properly.
b. If your pump still does not turn on or you get a FAILED BATT TEST alarm, remove and replace the
battery with a new one.
c. If the pump is still not on, call your local help line or representative.
6. Check to make sure the time and date are correct. If more than 5 minutes have passed since you removed the
battery, you will be prompted to check the time and date. Refer to the “Set the time and date” in the “How to use
the PDM” chapter for programming instructions.
17

Buttons
Buttons and its names
Names of
Buttons
UP
DOWN
OK
ESC
B/S
Scrolls up the items in a list.
Scrolls down items in a list.
Opens the MAIN MENU.
Opens the HOME screen.
Turn the backlight on when viewing screens other than the HOME screen
(hold down B/S and press DOWN).
Functional description (From the STATUS screen)
18

Names of
Buttons
UP
DOWN
OK
ESC
B/S
Functional description (From the menus and programming screen)
y Increases the value of an item.
y Scrolls up the items in a list.
y Decreases the value of an item.
y Scrolls down the items in a list.
Accepts a selected menu item or activates a selected setting.
y Returns to previous screen.
y Cancels settings if the OK button has not been press yet.
y Press simultaneously with DOWN button to turn on/off backlight.
y Press as a “shift” button in combination with another button to access
certain features.
LCD screen
The screen shows nine lines of text at one time. There are various icons that appear at the top of the screen, like
reservoir volume, reservoir volume, alarm/alert icons, silence icon, time display, RF signal and battery level.
HOME screen
The HOME screen is the starting point to access the programming screens. When no buttons are pressed for about
30 seconds, the PDM returns to this screen. If the LCD is turned on, the first line is the operating icons. The last eight
lines show information of the system status or alert/alarm messages if available.
Press OK button from the HOME screen to open the MAIN MENU.
19

Screen icons
Battery
The battery icon displays the level of battery power remaining. There are four segments in the icon. If you only have
one segment left, make sure you have a new battery available.
At least 60% left
Low battery
Time
The current time of day is displayed across the top of the LCD screen in the format you select 12 – hour or 24 – hour.
The AM or PM is only displayed for the 12 – hour format. For instructions on setting the time on your PDM, see “Set
the time and date” in “How to use the PDM”.
12 – hour format
24 – hour format
20

Silence icon
The Silence icon ( ) is displayed at the top of the LCD screen only when the audio alert/alarm is turned off.
Reservoir volume
The reservoir volume icon displays the current amount of insulin in the Reservoir Patch. The icon is divided into four
segments.
More than 50U insulin left
Low reservoir
Alert and alarm icons
An open Triangle (alert) or a solid Triangle (alarm) are displayed in the upper part of your PDM screen only when
there is an alert or alarm condition on your insulin management system. For alarm and alert information, see “Alarm
condition” and “Alert condition” in “Warnings and troubleshooting”.
Alert icon
Alarm
RF signal icon
A RF icon displays only when there’s an active Patch Pump.
Patch Pump is active and RF communication is good
21

Patch Pump is active but RF communication is lost or interrupted
Scroll bar
If there is more text than the screen can show, a scroll bar appears in the right side of the screen. Press UP/DOWN
button view any additional text.
Screen backlight
When you press DOWN button from the HOME screen, the light on the screen turns on or off.
Under other screen displays, the backlight can be turned on/off by the pressing B/S button and the DOWN button
together.
To conserve your battery, the backlight will turn off automatically while the PDM is vibrating. After the vibration is
finished, the light will turn back on. The backlight cannot be turned on in a Low Battery condition.
Beep/vibrate
The PDM will notify you with vibration or beep when activity occurs. Refer to the “Setting your alert type” section in
the “Utilities” chapter for setup instructions.
22

Menus
MAIN MENU
The MAIN MENU lists all the major menus. The MAIN MENU is the highest level menu. There are submenus,
functions, status and programming screens in the lower menu levels.
Press OK button from the HOME screen to open the MAIN MENU.
The MAIN MENU consists of six submenus: Bolus, Suspend, History, Basal, Reservoir Patch and Utilities.
BOLUS MENU
This menu contains the settings and function for bolus deliveries. The B/S button allows direct access to the
NORMAL BOLUS or to the FOOD BOLUS CALCULATOR feature without having to navigate through the menus.
Refer to chapter “The personal diabetes manager (PDM)” for the normal bolus information or to chapter “Using patch
advanced features” for blousing using the bolus calculator feature.
SUSPEND
Stops all current insulin deliveries (basal and bolus) or resumes insulin delivery programs. Refer to section “Stop
your patch” in chapter “How to use the PDM?” for more information.
23

BASAL MENU
Contains the functions to setup and deliver your basal insulin. Refer to chapter “How to use the PDM?” and chapter
“Using patch advanced features” for more information.
PATCH MENU
Contains the functions to change your Reservoir Patch and set your Pump Base ID. Refer to chapter “How to use the
Reservoir Patch and Pump Base?” for more information.
UTILITIES MENU
Contains the functions to setup basic parameters and basic safety information for your system and self-test. Refer to
chapter “Utilities” for more information.
24

HISTORY MENU
History menu is used to review insulin delivery, alarm histor y and event history. Refer to section “History feature” in
chapter “How to use the PDM” for more information.
STATUS screen
The ST ATUS screen lists the System’s current operating status. Only check your pump status (press ESC) when you
are not programming your PDM. If you press ESC during programming, you will cancel the settings you are trying to
enter.
Press ESC from the HOME screen to open the STATUS screen.
To view more text on STATUS screens, press UP/DOWN to scroll from 01 to 06 and view all of them.
Press ESC from the STATUS screen back to the HOME screen, press OK to the MAIN MENU.
Refer to section “Status feature” in chapter “How to use the PDM?” for more information.
25

EVENT screen
The Event screen allows you to enter information about different events into the system. Examples of events
include: blood glucose, meal, insulin, health, and activity information.
Refer to section “Event journal” in chapter “How to use the PDM?” for more information.
26

Using the Patch Pump
How to change a new Patch?
The Reservoir Patch requires replacement and is not to be reused. The Reservoir Patch should be replaced
approximately every 2-3 days or as directed by your health care team. Refer to the insulin labeling and follow the
direction of your health care team for frequency of replacing the Reservoir Patch. If you like, you can set the PDM to
notify you when it is time to replace the Reservoir Patch.
Warning:
y Inaccurate medication delivery, infection and/or site irritation may result from improper insertion and
maintenance of the infusion site.
y Ensure sterility by checking that the sterile paper and tamper-proof seal are not damaged.
y If using the Reservoir Patch for the first time, do the first set-up in the presence of your healthcare professional.
y If the infusion site becomes inflamed, replace the Patch, and use a new site until the first site has healed.
y Check frequently to make sure the R eservoir Patch and soft cannula are securely attached and firmly in place.
The soft cannula must always be completely inserted to receive the full amount of medication. Replace the
Reservoir Patch if the tape becomes loose, or if the soft cannula becomes fully or partially dislodged from the
skin.
y If in doubt, change the Reservoir Pat ch because the soft cannula may be dislodged, crimped and/or partially
clogged. Should any of these problems arise, make a plan with your healthcare professional for rapidly replacing
insulin. Test your blood glucose level to make sure the problem is corrected.
y Store Reservoir Patches in a cool, dry place. Do NOT leave infusion sets in direct sunlight or inside a vehicle.
y If infusing insulin, and your blood glucose level becomes unexplainably high, or an occlusion alarm occurs,
check for clogs and/or leaks.
y Do NOT use if the package has been opened or damaged. The Reservoir Patch is sterile and non-pyrogenic
unless the package has been opened or damaged.
27

y Do NOT apply or use a Reservoir Patch if it is damaged in any way. A damaged Reservoir Patch may not work
properly. To minimize the possibility of site infection, do NOT apply a Reservoir Patch without first using aseptic
technique.
y Do NOT use a Reservoir Patch if you are sensitive to or have allergies to acrylic adhesives or have fragile or
easily damaged skin.
y Do NOT apply a new Reservoir Patch until you have deactivated and removed the old Reservoir Patch. A
Reservoir Patch that has not been deactivated properly may continue to deliver insulin as programmed, putting
you at risk of over infusion and possible hypoglycemia.
y Your pump is designed to deliver insulin reliably, but because your pump uses only rapid-acting insulin, you will
not have long-acting insulin in your body. To avoid the risk of diabetic ketoacidosis (DKA) or very high BG, you
must be prepared to give yourself an injection of insulin if delivery is interrupted for any reason.
Aseptic Technique:
Aseptic technique helps keep the Reservoir Patch clean during preparation, filling, and application. Following this
technique requires hand-washing and wiping the application site with an alcohol swab. It may involve wiping the
Reservoir Patch with an alcohol swab if the Patch comes into contact with anything else.
Use aseptic technique when you are preparing, filling, and attaching a new Reservoir Patch.
Inserting a needle into your skin creates an opening where germs can enter your body . This could cause an infection
at the infusion site. Always use aseptic technique. The Reservoir Patch and other supplies come to you sterilized. To
keep them that way, follow these precautions:
- Always wash your hands thoroughly before preparing, filling, and attaching the Reservoir Patch.
- The infusion cannula is sterile and protected within the Reservoir Patch. Do NOT touch the underside of the
Reservoir Patch after you remove it from the sterile blister packaging. If you place the Reservoir Patch on a
surface, do NOT let the underside touch that surface. Gently lay the Reservoir Patch on the front side of the
device.
- If the underside of the Reservoir Patch touches something, you must wipe the underside with an alcohol
swab.
- Wipe the infusion site of your skin with an alcohol swab. Let the alcohol dry before you attach the Reservoir
Patch. Do NOT touch this site again before putting the Reservoir Patch on your skin.
28

Prepare your Patch Pump for use
When you are done practicing and ready to use your pump with insulin, you must make sure the time and date are
correct on your pump. You must also program your settings as instructed by your healthcare professional.
You will need these items before you begin:
- Vial of rapid-acting U-100 insulin
Warning: NEVER use insulin that is cloudy, it may be old or inactive. Failure to use rapid-acting U-100 insulin, or
using insulin that is expired or inactive, may lead to hyperglycemia or diabetic ketoacidosis (DKA).
- An unopened Reservoir Patch
- Alcohol prep swab
Warning: If you are a first-time Insulin Management System user, your healthcare professional will guide you
through the steps for initializing and applying your first Reservoir Patch. Do NOT attempt to apply or use a Reservoir
Patch until you have been trained by your healthcare professional. Use of the System with inadequate training or
improper setup could put your health and safety at risk.
- A 2mL disposable sterilized syringe and a fill needle with a protective cap
Warning: Medtrum offers the 2mL disposable sterilized fill syringe with the system, which matches the fill port of the
Reservoir Patch. Other fill syringes which can meet the following specifications are also permitted. Use the fill syringe
carefully and dispose it with needle capped to a puncture-proof container according to local waste disposal
regulations.
Specifications of fill syringe:
y Reservoir volume: 2 mL
y Needle size: 28G
y Needle length: 8.5 mm
y Make sure the syringe with fill needle has been properly sterilized.
29

Deactiv ate the current Reservoir Patch
If there is an active Reservoir Patch, you can deactivate it by Deactivate Patch menu.
1. Enter the MAIN MENU, press UP/DOWN to choose Reservoir Patch and press OK.
2. Select Deactivate Patch and press OK.
3. Select “Yes”, and then press OK.
4. Press OK to deactivate the current Reservoir Patch.
30

5. Several seconds later, you will see the message reminding you that the Patch has been deactivated.
6. The Reservoir Patch has been successfully deactivated. Gently lift the edge of the adhesive tape from your skin
and remove the entire Reservoir Patch.
Tips: Removing the Reservoir Patch slowly will help you to avoid possible skin irritation. Use soap and water to
remove any adhesive that remains on the skin or, if necessary, use an adhesive remover.
Warning: Check the infusion site for signs if infection. See “Avoid infusion site infection” later in this chapter.
7. Pull outwards to remove the Reservoir Patch from the Pump Base, and discard the old Reservoir Patch
according to local waste disposal regulations.
31

Note: The change/new patch process also can deactivate the current Reservoir Patch.
1. Select Change/New Patch and press OK.
If you haven’t set the Pump Base ID, you will see the following message.
If you have set the Pump Base ID, you will see the following message if there is no active Reservoir Patch.
2. If there is an active Reservoir Patch, you will see the following message.
32

3. Press OK to deactivate the current Reservoir Patch.
4. Several seconds later, you will see the following message.
5. Remove the old Reservoir Patch, then press OK to continue.
Connect the Pump Base to a new Patch
1. Connect the Pump Base to a new Reservoir Patch.
33

2. The PDM will beep and/or vibrate, and you will see the following message.
Fill the new Patch
Warning: Using cold insulin can cause air bubbles in the reservoir. If your insulin is stored in the refrigerator, wait till
the insulin reaches room temperature before you fill your reservoir. When filling the reservoir, take care to remove air
bubbles.
1. Swab vial with alcohol.
2. Securely twist the fill needle onto the syringe.
34

3. Pull outward to remove the protective cap from the needle. Save the cap, you will need it later.
Warning: Use with care after removing the needle cap and exposing the fill needle.
4. Determine the amount of insulin you need to insert into the Reservoir Patch. Your healthcare professional will
help you determine the correct amount.
Note: The reservoir requires a minimum of 70 units of insulin to begin operation. The Reservoir Patch can deliver up
to 200 units of insulin.
5. Draw air into the syringe up to the amount of insulin you want.
6. Insert the needle into the insulin vial and push down on the plunger to pressurize the vial.
7. While still holding the plunger rod, flip the vial over so the vial is up, and then slowly pull down on the plunger to
withdraw insulin from the vial into the syringe. Gently tap the side of the syringe to make any air bubbles rise to
the top of the syringe. Slowly push up on the plunger just enough to remove any air bubbles from the syringe.
Slowly pull down on the plunger to fill the syringe to the number of units desired.
35

Warning: Avoid using insulin from more than one vial, which may introduce air into the syringe.
8. With the vial down, hold the syringe. Pull straight up to remove the syringe needle from the vial, and then insert it
straight down into the insulin fill port on the underside of the Reservoir Patch.
Warning: To ensure proper fill, do NOT insert fill syringe at an angle into the fill port.
Warning: Only use specified needle and syringe.
9. Depress the syringe plunger to completely empty the insulin into the Reservoir Patch. The PDM will beep and/or
vibrate, indicating that the System is ready to proceed to the next step.
Warning: NEVER use a Reservoir Patch if you hear a crackling noise or feel resistance when you depress the
plunger. These conditions can result in under delivery of insulin.
10. Remove the needle from the insulin fill port. The port is self-sealing; insulin will not leak after the needle is
removed.
Warning: Do NOT insert the fill syringe into the fill port more than once.
Warning: NEVER inject air into the fill port. Doing so may result in unintended or interrupted insulin delivery.
11. Use your reservoir right after you fill it. Do NOT store it filled.
12. Place the protective cap back on the needle and remove the needle from the syringe.
13. Safely dispose of the capped needle in a sharps container according to local waste disposal regulations.
Warning: The fill syringe is intended for single use only, and only specified fill syringe can be used.
36

14. After you fill the Reservoir Patch, the reservoir volume icon will change from empty to full, and then press OK.
Note: The reservoir volume icon will change to full if you have filled the Reservoir Patch with at least 70 units of
insulin. If you have filled the Reservoir Patch with more than 70 units and the reservoir volume icon is empty, call
Customer Care.
15. The system automatically primes the Reservoir Patch.
Note: After filling the Reservoir Patch with insulin, you should complete the Reservoir Patch change process within 3
hours. As a reminder that the Reservoir Patch has been filled, it will beep and/or vibrate every 10 minutes to indicate
that time is passing. If you do not set up the Reservoir Patch within 3 hours, you must deactivate and discard it.
Note: Once a Reservoir Patch (assembled with Pump Base) is activated and communicates with the PDM, it can
only receive commands from that PDM, not from any other.
Select and prepare the infusion site
Warning: The place on your body where you attach the Reservoir Patch is important for the success of your therapy.
Choose a location that remains flat when you are sitting down, standing up, or lying dow n. Discuss the best location
for you with your doctor or healthcare professional.
Shown here are the best body areas (shaded) for infusion sites. The abdominal area is the most common site
because absorption is very consistent. Other potential sites may be used, that typically have a layer of fatty tissues,
such as the hip, back of upper arm, upper thigh, or lower back.
37

Adult/youth Toddler
For the Reservoir Patch to work best, apply it: crosswise or at a slight angle on your abdomen; hip or upper back; up
and down or at a slight angle on your upper arm or thigh.
You may wish to attach the Reservoir Patch:
- On the abdo men. The abdomen has ample flat surface area, and is accessible and comfortable location.
Insulin absorption is fast, predictable, and less affected by exercise when administrated through the
abdomen. If the Reservoir Patch is worn on the abdomen, keep it horizontal above the belt line.
- On the backside of the arm, but not on the muscle. If the Reservoir Patch is worn on the backside of the arm,
keep it in the up or down direction. Attach the Reservoir Patch in the up or down position as your arm hangs
down.
Warning: Avoid the 5.0 cm (2-inch) area around the navel or a mole or scar, where insulin absorption may be
reduced.
Warning: It is important that you change your Reservoir Patch every two to three days. Change the site each time
you apply a new Reservoir Patch. Be sure to rotate the infusion sites so that they do not become overused. A new
infusion site should be at least 2.5cm away from the last site.
When choosing the location for the Reservoir Patch, consider the following:
- That you can comfortably reach the Reservoir Patch, for easy operation and removal.
- That you apply the Reservoir Patch to a flat area of skin, not on a fold of the skin, muscle, or bone.
- That the site is flat when you are in any of the following positions: sitting down, standing up, or lying down.
When choosing the location for the Reservoir Patch, avoid the following:
38

- The belt line or waistline, or other areas where clothing may rub or constrict.
- Areas with excessive hair. You may shave the area to help the Reservoir Patch attach to your skin.
- Areas that are curved or rigid due to muscle or bone.
- Areas within a 1-inch circle around the belly button or surgical scars.
- Skin that is tender, bruised, red, or hard or has any skin disease or infection.
Clean the area where you will attach the Reservoir Patch with an alcohol swab.
The alcohol swab will remove all lotions and oils. Let the area dry. This helps the adhesive stick properly to the skin.
Practice aseptic technique as described at the beginning of this chapter.
Warning: Clean the insertion area with a disinfectant as directed by your healthcare professional. Be sure the area is
dry before inserting the Reservoir Patch.
You can reduce the risk of infection at the infusion site by following aseptic technique and disinfecting the infusion
site:
- Wash your hands with soap and water.
- Use soap to wash the infusion site.
Note: Antibacterial soap may irritate skin, especially at the infusion site. Ask your healthcare professional how to
treat any skin irritation.
- Dry the site with a clean towel.
- Use an alcohol prep swab to disinfect the infusion site. Start at the center of the site and gently rub outward
in a circular motion.
- Let the site air-dry thoroughly. Do NOT blow on the site to dry it.
Note: If you have sensitive skin or your skin becomes irritated, ask your doctor or healthcare professional about skin
barrier products.
39

Attach the new Patch
1. With one hand hold the Reservoir Patch and pull the needle cap with the other hand. Pull the needle cap in a
quick, straight direction up and away from the Reservoir Patch.
Note: When you remove the needle cap, you will see drops formed at the tip of the needle.
2. Lift the adhesive tab and completely peel off the adhesive liner from the bottom of the Reservoir Patch.
Removing the liner exposes the adhesive.
3. Do NOT touch the adhesive surface. Touching the adhesive surface can reduce the strength of the adhesive.
4. Keep the adhesive pad intact and clean before you place it on the infusion site.
5. Without touching the adhesive pad, press the Reservoir Patch against the skin.
40

6. Hold your Reservoir Patch in place for 5-10 seconds. Run you finger around the entire edge of the adhesive pad
to make sure it is attached to your body.
Note: The Reservoir Pat ch’s adhesive keeps it securely in place for up to 3days. However, if necessary, several
products are available to enhance adhesion. Ask your healthcare professional about these products. Avoid getting
body lotion, creams, or oil near the infusion site, these products may loosen the adhesive.
Warning: The adhesive is designed for one-time use. Once removed, a Reservoir Patch cannot be reapplied.
Start the insulin delivery with the Patch
1. After you securely attach the Reservoir Patch, press OK to automatically insert the cannula below your skin.
Warning: If you are applying a Reservoir Patch in a place that does not have a lot of fatty tissue or is very lean, pinch
the skin around the Reservoir Patch after you press OK, and hold it until the cannula inserts. Occlusions may result
in lean areas if you do not use this technique.
2. Once the soft cannula is inserted, the cannula starts filling with a prime bolus and the PDM indicates that the
Reservoir Patch is active.
3. Press OK to begin basal delivery if the cannula is properly inserted. Or press ESC if you see a problem with the
cannula. The PDM instructs you to deactivate the Reservoir Patch.
41

Warning: Check the infusion site and cannula through the viewing window after insertion to ensure that the cannula
was properly inserted. If the cannula is not properly inserted, hyperglycemia may result. Check frequently to make
sure the Reservoir Patch and soft cannula are securely attached and firmly in place. Replace the Reservoi r Patch if
the tape becomes loose, or if the soft cannula becomes fully or partially dislodged from the skin.
Warning: If infusing insulin, do NOT change the Reservoir Patch just before bedtime unless you can check your
blood glucose 1-3 hours after each Reservoir Patch change.
Warning: You should check the area around the Reservoir Patch at regular intervals for redness, irritation, and
inflammation. If you suspect an infection, immediately remove the Reservoir Patch and apply a new one in a differ
location.
42

Pump safety system and alarms
Safety system
When you turn on the personal diabetes manager (PDM), the system automatically performs a serious of safety
checks. To make you aware of a condition that is outside normal pump activity or potentially serious condition, the
system sounds an alert or an alarm and displays an on-screen message. The message has instruction for taking
care of the alert or alarm condition. Alert or alarm conditions are easy to handle. They are not problems if you attend
to them promptly. Reminders are automatically displayed to remind you of a function that you have set or a condition
that exists. Alerts are triggered for a variety of reasons. They require you to confirm the alert by pressing and/or
taking action to address the alert. Alarms are triggered by several conditions. All require you to address the alarm by
taking appropriate action in order to clear the alarm condition.
Alerts and Alarms
Alarm level Condition Message Cause
Alarm
Alarm
Alarm
Occlusion
Detected
Auto Off
Patch
Expired
! ! OCCLUSION DETECTED
No delivery, change patch now. ESC,OK
to clear
! ! AUTO OFF
No delivery, No patch status received in
last X hours. ESC,OK to clear
! ! PATCH EXPIRED
Insulin delivery stopped, change patch
now. ESC,OK to clear
43
Occlusion detected.
No Patch status received
during the time limit set.
Patch expired and insulin
delivery has been stopped.

Alarm level Condition Message Cause
! ! PATCH ERROR
Alarm
Patch Error
Insulin delivery stopped, change patch
Detect unexpected Patch error.
now. ESC,OK to clear
Alarm
Alarm
Alarm
Alarm
Alarm
Exceeds
Max TDD
Exceeds
Max 1 HR
Delivery
Pump Base
Error
Empty
Reservoir
PDM Error
! ! EXCEEDS MAX TDD
Exceeds max TDD, no delivery . ESC,OK
to clear
! ! EXCEEDS MAX 1 HR DELIVERY
Exceeds max 1 hour MAX, no delivery.
ESC,OK to clear
! ! PUMP BASE ERROR
Remove patch pump, call customer
service. ESC,OK to clear
! ! EMPTY RESERVOIR
No delivery, change patch now. ESC,OK
to clear
! ! PDM ERROR
Remove device now, call customer
support. ESC,OK to clear
Exceeds max TDD.
Exceeds max 1 hr delivery.
Pump Base error.
There is no insulin in the
reservoir. Change Patch now.
PDM error.
! ! REPLACE BATTERY
Alarm
Replace
Battery
Replace the battery. Remove battery to
The battery is dead.
silence the alarm. ESC,OK to clear
! FAILED BATT TEST
Alert
Failed BATT
Test
Insert new battery. Remove battery to
The battery does not have
enough voltage.
silence the alarm. ESC,OK to clear
44

Alarm level Condition Message Cause
Alert
Alert
Alert
Alert
Alert
! STUCK KEY
Stuck Key
Key pressed for more than 3 minutes.
ESC,OK to clear
End of
Suspend
! END OF SUSPEND
Stopped at []. ESC,OK to clear
! LOW RESERVOIR
Low
Reservoir
[] U or less left [] hours remaining,
replace patch soon. ESC,OK to clear
! AUTO OFF ADVISORY
Auto Off
Advisory
Escalates to Auto-Off alarm if not
cleared within 15 minutes. ESC,OK to
clear
Patch
Expiration
Advisory
! PATCH EXPIRATION ADVISORY
Patch expires after [] hours, change
patch soon. ESC,OK to clear
Key pressed for more than 3
minutes.
Pump suspended manually or
automatically.
Low insulin level reached.
Alert indicating that no Patch
status received during the set
time limit.
Patch expires in less than the
set time limit.
! PATCH EXPIRATION IN 1 HOUR
Patch expires in less than 1 hour,
change patch now. ESC,OK to clear
Patch expires in less than 1
hour.
Alert
Patch
Expiration in
1 Hour
! LOW PDM
Alert
Low PDM
The battery is low.
Low PDM. ESC,OK to clear
! RF OUT OF RANGE
Alert
RF Out of
Range
Move devices closer and wait 1 minute.
Pump Base is out of range.
ESC,OK to clear
45

Alarm level Condition Message Cause
Alert
BATT Out
Limit
Battery change too slow. ESC,OK to
clear
! BATT OUT LIMIT
The battery has been out of the
PDM for more than five
minutes.
46

Appendix I: Symbols and icons
Product label symbols
Symbol Meaning Symbol Meaning
Lot number
Date of manufacture
(year - month)
Manufacture
Use by: (year - month)
Caution: See
Instructions for use
Do NOT use if package is
damaged
Sterilized using ethylene
oxide
Follow instructions for use
Prescription drug
Waterproof to 2.5m for 30
minutes
Storage temperature
Device serial number
47

Symbol Meaning Symbol Meaning
PDM icons
Type BF equipment
Do NOT reuse
(Protection from electrical
shock)
Authorized representative
Do NOT re-sterilize
in the European
Community
Icon Meaning Icon Meaning
Insulin left
Alert
Time display
Battery
Alarm
Audio Off
RF signal
48
 Loading...