


Vital Sync™
Mobile Application
Reference Manual

Medtronic, Medtronic with rising man logo, and Medtronic logo are trademarks of Medtronic. Third-party trademarks (“TM*”) belong to their
respective owners. The following list includes trademarks or registered trademarks of a Medtronic entity in the United States and/or in other
countries.
Capnostream™, Nellcor™, Puritan Bennett™, Vital Sync™
U.S. patents: www.medtronic.com/patents

Symbols
Federal law restricts this device to sale by or on the order of a physician
Consult instructions for use
Manufacturer
3

Contents
1 Introduction . . . . . . . . . . . . . . . . . . . . . . . . . . . . . . . . . . . . . . . . . . . . . . . . . . . . . . . . . . . . . . . . . . . . . . . . . . . . . . . . . 7
1.1 Overview . . . . . . . . . . . . . . . . . . . . . . . . . . . . . . . . . . . . . . . . . . . . . . . . . . . . . . . . . . . . . . . . . . . . . . . . . . . . . . . . . . . . . . . . . . . . . . 7
1.2 Applicable Version . . . . . . . . . . . . . . . . . . . . . . . . . . . . . . . . . . . . . . . . . . . . . . . . . . . . . . . . . . . . . . . . . . . . . . . . . . . . . . . . . . . . . 7
1.3 Conventions . . . . . . . . . . . . . . . . . . . . . . . . . . . . . . . . . . . . . . . . . . . . . . . . . . . . . . . . . . . . . . . . . . . . . . . . . . . . . . . . . . . . . . . . . . . 7
1.4 Safety Information . . . . . . . . . . . . . . . . . . . . . . . . . . . . . . . . . . . . . . . . . . . . . . . . . . . . . . . . . . . . . . . . . . . . . . . . . . . . . . . . . . . . . 7
1.5 Obtaining Technical Assistance . . . . . . . . . . . . . . . . . . . . . . . . . . . . . . . . . . . . . . . . . . . . . . . . . . . . . . . . . . . . . . . . . . . . . . . . . 8
1.6 Warranty Information . . . . . . . . . . . . . . . . . . . . . . . . . . . . . . . . . . . . . . . . . . . . . . . . . . . . . . . . . . . . . . . . . . . . . . . . . . . . . . . . . . 9
1.7 Licensing Information . . . . . . . . . . . . . . . . . . . . . . . . . . . . . . . . . . . . . . . . . . . . . . . . . . . . . . . . . . . . . . . . . . . . . . . . . . . . . . . . . . 9
1.8 HIPAA Disclaimer . . . . . . . . . . . . . . . . . . . . . . . . . . . . . . . . . . . . . . . . . . . . . . . . . . . . . . . . . . . . . . . . . . . . . . . . . . . . . . . . . . . . . 10
1.9 Statement Regarding FDA Clearance of Features . . . . . . . . . . . . . . . . . . . . . . . . . . . . . . . . . . . . . . . . . . . . . . . . . . . . . . 10
2 Product Overview . . . . . . . . . . . . . . . . . . . . . . . . . . . . . . . . . . . . . . . . . . . . . . . . . . . . . . . . . . . . . . . . . . . . . . . . . . . 11
2.1 Overview . . . . . . . . . . . . . . . . . . . . . . . . . . . . . . . . . . . . . . . . . . . . . . . . . . . . . . . . . . . . . . . . . . . . . . . . . . . . . . . . . . . . . . . . . . . . . 11
2.2 Intended Use . . . . . . . . . . . . . . . . . . . . . . . . . . . . . . . . . . . . . . . . . . . . . . . . . . . . . . . . . . . . . . . . . . . . . . . . . . . . . . . . . . . . . . . . . 11
2.3 Contraindications . . . . . . . . . . . . . . . . . . . . . . . . . . . . . . . . . . . . . . . . . . . . . . . . . . . . . . . . . . . . . . . . . . . . . . . . . . . . . . . . . . . . . 11
2.4 Application Overview . . . . . . . . . . . . . . . . . . . . . . . . . . . . . . . . . . . . . . . . . . . . . . . . . . . . . . . . . . . . . . . . . . . . . . . . . . . . . . . . . 11
2.5 User Interface Symbols . . . . . . . . . . . . . . . . . . . . . . . . . . . . . . . . . . . . . . . . . . . . . . . . . . . . . . . . . . . . . . . . . . . . . . . . . . . . . . . 12
2.6 Devices Supported . . . . . . . . . . . . . . . . . . . . . . . . . . . . . . . . . . . . . . . . . . . . . . . . . . . . . . . . . . . . . . . . . . . . . . . . . . . . . . . . . . . 14
3 Installation and Access . . . . . . . . . . . . . . . . . . . . . . . . . . . . . . . . . . . . . . . . . . . . . . . . . . . . . . . . . . . . . . . . . . . . . . 15
3.1 Overview . . . . . . . . . . . . . . . . . . . . . . . . . . . . . . . . . . . . . . . . . . . . . . . . . . . . . . . . . . . . . . . . . . . . . . . . . . . . . . . . . . . . . . . . . . . . . 15
3.2 Requirements . . . . . . . . . . . . . . . . . . . . . . . . . . . . . . . . . . . . . . . . . . . . . . . . . . . . . . . . . . . . . . . . . . . . . . . . . . . . . . . . . . . . . . . . . 15
3.3 Installation . . . . . . . . . . . . . . . . . . . . . . . . . . . . . . . . . . . . . . . . . . . . . . . . . . . . . . . . . . . . . . . . . . . . . . . . . . . . . . . . . . . . . . . . . . . . 15
3.4 Initial Setup . . . . . . . . . . . . . . . . . . . . . . . . . . . . . . . . . . . . . . . . . . . . . . . . . . . . . . . . . . . . . . . . . . . . . . . . . . . . . . . . . . . . . . . . . . . 15
3.5 Running the App . . . . . . . . . . . . . . . . . . . . . . . . . . . . . . . . . . . . . . . . . . . . . . . . . . . . . . . . . . . . . . . . . . . . . . . . . . . . . . . . . . . . . 19
4 Operation . . . . . . . . . . . . . . . . . . . . . . . . . . . . . . . . . . . . . . . . . . . . . . . . . . . . . . . . . . . . . . . . . . . . . . . . . . . . . . . . . . 21
4.1 Overview . . . . . . . . . . . . . . . . . . . . . . . . . . . . . . . . . . . . . . . . . . . . . . . . . . . . . . . . . . . . . . . . . . . . . . . . . . . . . . . . . . . . . . . . . . . . . 21
4.2 Alarms and Notications . . . . . . . . . . . . . . . . . . . . . . . . . . . . . . . . . . . . . . . . . . . . . . . . . . . . . . . . . . . . . . . . . . . . . . . . . . . . . . 21
4.3 Navigation and Basic User Interface . . . . . . . . . . . . . . . . . . . . . . . . . . . . . . . . . . . . . . . . . . . . . . . . . . . . . . . . . . . . . . . . . . . 21
4.4 Assigned Patients View . . . . . . . . . . . . . . . . . . . . . . . . . . . . . . . . . . . . . . . . . . . . . . . . . . . . . . . . . . . . . . . . . . . . . . . . . . . . . . . 22
4.5 Device Detail View . . . . . . . . . . . . . . . . . . . . . . . . . . . . . . . . . . . . . . . . . . . . . . . . . . . . . . . . . . . . . . . . . . . . . . . . . . . . . . . . . . . . 24
4.6 Active Alarms View . . . . . . . . . . . . . . . . . . . . . . . . . . . . . . . . . . . . . . . . . . . . . . . . . . . . . . . . . . . . . . . . . . . . . . . . . . . . . . . . . . . 36
4.7 Patient Management View . . . . . . . . . . . . . . . . . . . . . . . . . . . . . . . . . . . . . . . . . . . . . . . . . . . . . . . . . . . . . . . . . . . . . . . . . . . . 37
4.8 Main Menu . . . . . . . . . . . . . . . . . . . . . . . . . . . . . . . . . . . . . . . . . . . . . . . . . . . . . . . . . . . . . . . . . . . . . . . . . . . . . . . . . . . . . . . . . . . 46
4.9 Additional Settings . . . . . . . . . . . . . . . . . . . . . . . . . . . . . . . . . . . . . . . . . . . . . . . . . . . . . . . . . . . . . . . . . . . . . . . . . . . . . . . . . . . 50
5 Alarms and Notications . . . . . . . . . . . . . . . . . . . . . . . . . . . . . . . . . . . . . . . . . . . . . . . . . . . . . . . . . . . . . . . . . . . . 53
5.1 Overview . . . . . . . . . . . . . . . . . . . . . . . . . . . . . . . . . . . . . . . . . . . . . . . . . . . . . . . . . . . . . . . . . . . . . . . . . . . . . . . . . . . . . . . . . . . . . 53
5.2 Summary of Event Indicators . . . . . . . . . . . . . . . . . . . . . . . . . . . . . . . . . . . . . . . . . . . . . . . . . . . . . . . . . . . . . . . . . . . . . . . . . . 53
5.3 Clear Alarm Indicators . . . . . . . . . . . . . . . . . . . . . . . . . . . . . . . . . . . . . . . . . . . . . . . . . . . . . . . . . . . . . . . . . . . . . . . . . . . . . . . . 55
5.4 Pause Bedside Alarms . . . . . . . . . . . . . . . . . . . . . . . . . . . . . . . . . . . . . . . . . . . . . . . . . . . . . . . . . . . . . . . . . . . . . . . . . . . . . . . . . 55
5.5 View Alarm and Notication Information . . . . . . . . . . . . . . . . . . . . . . . . . . . . . . . . . . . . . . . . . . . . . . . . . . . . . . . . . . . . . . 56
5.6 Event Priority . . . . . . . . . . . . . . . . . . . . . . . . . . . . . . . . . . . . . . . . . . . . . . . . . . . . . . . . . . . . . . . . . . . . . . . . . . . . . . . . . . . . . . . . . 62
5.7 Alarm Behavior in the Software . . . . . . . . . . . . . . . . . . . . . . . . . . . . . . . . . . . . . . . . . . . . . . . . . . . . . . . . . . . . . . . . . . . . . . . 62
4

Figures
Figure 1. Login Settings View . . . . . . . . . . . . . . . . . . . . . . . . . . . . . . . . . . . . . . . . . . . . . . . . . . . . . . . . . . . . . . . . . . . . . . . . . . . . 16
Figure 2. Login Fields . . . . . . . . . . . . . . . . . . . . . . . . . . . . . . . . . . . . . . . . . . . . . . . . . . . . . . . . . . . . . . . . . . . . . . . . . . . . . . . . . . . . 17
Figure 3. Login with PIN Fields . . . . . . . . . . . . . . . . . . . . . . . . . . . . . . . . . . . . . . . . . . . . . . . . . . . . . . . . . . . . . . . . . . . . . . . . . . . 18
Figure 4. App Layout and Navigation . . . . . . . . . . . . . . . . . . . . . . . . . . . . . . . . . . . . . . . . . . . . . . . . . . . . . . . . . . . . . . . . . . . . 21
Figure 5. App Layout and Navigation (menus) . . . . . . . . . . . . . . . . . . . . . . . . . . . . . . . . . . . . . . . . . . . . . . . . . . . . . . . . . . . 22
Figure 6. Assigned Patients View . . . . . . . . . . . . . . . . . . . . . . . . . . . . . . . . . . . . . . . . . . . . . . . . . . . . . . . . . . . . . . . . . . . . . . . . . 23
Figure 7. Bed Tile Detail . . . . . . . . . . . . . . . . . . . . . . . . . . . . . . . . . . . . . . . . . . . . . . . . . . . . . . . . . . . . . . . . . . . . . . . . . . . . . . . . . . 24
Figure 8. Device Detail View . . . . . . . . . . . . . . . . . . . . . . . . . . . . . . . . . . . . . . . . . . . . . . . . . . . . . . . . . . . . . . . . . . . . . . . . . . . . . 25
Figure 9. Information Panel (trend page) . . . . . . . . . . . . . . . . . . . . . . . . . . . . . . . . . . . . . . . . . . . . . . . . . . . . . . . . . . . . . . . . . 26
Figure 10. Information Panel (waveform page) . . . . . . . . . . . . . . . . . . . . . . . . . . . . . . . . . . . . . . . . . . . . . . . . . . . . . . . . . . . 27
Figure 11. Information Panel (waveform page; ventilator waveform) . . . . . . . . . . . . . . . . . . . . . . . . . . . . . . . . . . . . . . 27
Figure 12. Information Panel (device page) . . . . . . . . . . . . . . . . . . . . . . . . . . . . . . . . . . . . . . . . . . . . . . . . . . . . . . . . . . . . . . 27
Figure 13. Trend Timeframe Menu . . . . . . . . . . . . . . . . . . . . . . . . . . . . . . . . . . . . . . . . . . . . . . . . . . . . . . . . . . . . . . . . . . . . . . . 28
Figure 14. Trend Information in Landscape Mode . . . . . . . . . . . . . . . . . . . . . . . . . . . . . . . . . . . . . . . . . . . . . . . . . . . . . . . . 29
Figure 15. Available Parameter List (Second Trend button) . . . . . . . . . . . . . . . . . . . . . . . . . . . . . . . . . . . . . . . . . . . . . . . 29
Figure 16. Information Panel (trend page with two trends shown) . . . . . . . . . . . . . . . . . . . . . . . . . . . . . . . . . . . . . . . . 29
Figure 17. Information Panel (trend page with specic data point shown) . . . . . . . . . . . . . . . . . . . . . . . . . . . . . . . . 30
Figure 18. Link New Device View . . . . . . . . . . . . . . . . . . . . . . . . . . . . . . . . . . . . . . . . . . . . . . . . . . . . . . . . . . . . . . . . . . . . . . . . 31
Figure 19. Link Device View (designated area selection) . . . . . . . . . . . . . . . . . . . . . . . . . . . . . . . . . . . . . . . . . . . . . . . . . . 32
Figure 20. Unlink Device View . . . . . . . . . . . . . . . . . . . . . . . . . . . . . . . . . . . . . . . . . . . . . . . . . . . . . . . . . . . . . . . . . . . . . . . . . . . 33
Figure 21. Update Patient View . . . . . . . . . . . . . . . . . . . . . . . . . . . . . . . . . . . . . . . . . . . . . . . . . . . . . . . . . . . . . . . . . . . . . . . . . . 34
Figure 22. Information Panel (threshold settings) . . . . . . . . . . . . . . . . . . . . . . . . . . . . . . . . . . . . . . . . . . . . . . . . . . . . . . . . . 35
Figure 23. Active Alarms View . . . . . . . . . . . . . . . . . . . . . . . . . . . . . . . . . . . . . . . . . . . . . . . . . . . . . . . . . . . . . . . . . . . . . . . . . . . 36
Figure 24. Patient Management View (initial access) . . . . . . . . . . . . . . . . . . . . . . . . . . . . . . . . . . . . . . . . . . . . . . . . . . . . . 37
Figure 25. Admit Patient View (initial access) . . . . . . . . . . . . . . . . . . . . . . . . . . . . . . . . . . . . . . . . . . . . . . . . . . . . . . . . . . . . . 38
Figure 26. Admit Patient View (area selection) . . . . . . . . . . . . . . . . . . . . . . . . . . . . . . . . . . . . . . . . . . . . . . . . . . . . . . . . . . . . 38
Figure 27. Admit Patient View (bed selection) . . . . . . . . . . . . . . . . . . . . . . . . . . . . . . . . . . . . . . . . . . . . . . . . . . . . . . . . . . . . 39
Figure 28. Admit Patient View (patient ID selection) . . . . . . . . . . . . . . . . . . . . . . . . . . . . . . . . . . . . . . . . . . . . . . . . . . . . . . 39
Figure 29. Admit Patient View (patient information) . . . . . . . . . . . . . . . . . . . . . . . . . . . . . . . . . . . . . . . . . . . . . . . . . . . . . . 40
Figure 30. Admit Patient View (device and assignment selection) . . . . . . . . . . . . . . . . . . . . . . . . . . . . . . . . . . . . . . . . 41
Figure 31. Admit Patient View (designated area selection) . . . . . . . . . . . . . . . . . . . . . . . . . . . . . . . . . . . . . . . . . . . . . . . . 42
Figure 32. Patient Management View (area drop-down menu) . . . . . . . . . . . . . . . . . . . . . . . . . . . . . . . . . . . . . . . . . . . 43
Figure 33. Patient Management View (assignment tiles) . . . . . . . . . . . . . . . . . . . . . . . . . . . . . . . . . . . . . . . . . . . . . . . . . . 44
Figure 34. Patient Management View (assignments shown) . . . . . . . . . . . . . . . . . . . . . . . . . . . . . . . . . . . . . . . . . . . . . . 46
Figure 35. Main Menu . . . . . . . . . . . . . . . . . . . . . . . . . . . . . . . . . . . . . . . . . . . . . . . . . . . . . . . . . . . . . . . . . . . . . . . . . . . . . . . . . . . 47
Figure 36. Update PIN View . . . . . . . . . . . . . . . . . . . . . . . . . . . . . . . . . . . . . . . . . . . . . . . . . . . . . . . . . . . . . . . . . . . . . . . . . . . . . . 48
Figure 37. Diagnostics View . . . . . . . . . . . . . . . . . . . . . . . . . . . . . . . . . . . . . . . . . . . . . . . . . . . . . . . . . . . . . . . . . . . . . . . . . . . . . . 49
Figure 38. Mobile Device Notication Settings . . . . . . . . . . . . . . . . . . . . . . . . . . . . . . . . . . . . . . . . . . . . . . . . . . . . . . . . . . . 51
Figure 39. Lock Screen with Push Notications (screen locked) . . . . . . . . . . . . . . . . . . . . . . . . . . . . . . . . . . . . . . . . . . . 57
Figure 40. Lock Screen with Push Notications (screen unlocked) . . . . . . . . . . . . . . . . . . . . . . . . . . . . . . . . . . . . . . . . 58
5

Figure 41. Tile Detail (alarm shown) . . . . . . . . . . . . . . . . . . . . . . . . . . . . . . . . . . . . . . . . . . . . . . . . . . . . . . . . . . . . . . . . . . . . . . 58
Figure 42. Tile Detail (notication shown) . . . . . . . . . . . . . . . . . . . . . . . . . . . . . . . . . . . . . . . . . . . . . . . . . . . . . . . . . . . . . . . . 59
Figure 43. Active Alarms View (all event types shown) . . . . . . . . . . . . . . . . . . . . . . . . . . . . . . . . . . . . . . . . . . . . . . . . . . . 59
Figure 44. Assigned Patients View (events shown) . . . . . . . . . . . . . . . . . . . . . . . . . . . . . . . . . . . . . . . . . . . . . . . . . . . . . . . 60
Figure 45. Device Detail View (active alarm shown) . . . . . . . . . . . . . . . . . . . . . . . . . . . . . . . . . . . . . . . . . . . . . . . . . . . . . . 61
Figure 46. Device Detail View (disconnected device shown) . . . . . . . . . . . . . . . . . . . . . . . . . . . . . . . . . . . . . . . . . . . . . 62
Tables
Table 1. OTS and Open Source Software . . . . . . . . . . . . . . . . . . . . . . . . . . . . . . . . . . . . . . . . . . . . . . . . . . . . . . . . . . . . . . . . . . 9
Table 2. App Navigation Symbols and Denitions . . . . . . . . . . . . . . . . . . . . . . . . . . . . . . . . . . . . . . . . . . . . . . . . . . . . . . . . 12
Table 3. Alarm and Status Symbols and Denitions . . . . . . . . . . . . . . . . . . . . . . . . . . . . . . . . . . . . . . . . . . . . . . . . . . . . . . . 13
Table 4. Visual Alarm and Notication Indicators . . . . . . . . . . . . . . . . . . . . . . . . . . . . . . . . . . . . . . . . . . . . . . . . . . . . . . . . . 53
Table 5. Alarm Colors . . . . . . . . . . . . . . . . . . . . . . . . . . . . . . . . . . . . . . . . . . . . . . . . . . . . . . . . . . . . . . . . . . . . . . . . . . . . . . . . . . . . 55
6

1 Introduction
1.1 Overview
This manual provides instructions for the Vital Sync mobile application.
Note: Before use, carefully review appropriate sections of this manual and the operator’s manual for each
connected device, applicable accessory instructions for use, and all precautionary information and specications.
Note: The app runs on mobile devices using the iOS™* mobile operating system in conjunction with the Vital Sync
virtual patient monitoring platform and informatics manager. To avoid delays in treating patients or in responding
to patient conditions, consult the platform’s reference manual for guidance on basic software functionality. This
includes (but is not limited to) alarm management, patient assignment, and device monitoring.
Note: The v3.0 platform reference manual contains platform functionality descriptions relevant to this release of
the app.
1.2 Applicable Version
This manual applies to version 3.0.1 of the Vital Sync mobile application.
Users can view specic information for their installation of the app in the Main Menu view.
1.3 Conventions
Text and terminology conventions used in this manual include the following:
• Warnings alert users to potential serious outcomes (death, injury, or adverse events) to the patient, user, or
environment.
• Cautions alert users to exercise appropriate care for safe and eective use of the product.
• Notes provide additional guidelines or information.
•
Button names, menu options, and eld names generally appear in
• “Application” and “app” refer to the Vital Sync mobile app, while “platform” refers to the Vital Sync virtual
patient monitoring platform and informatics manager. “Software” refers generally to both the mobile app and
the platform.
• “View” refers to individual app screens. “Screen” refers more generally to the mobile device’s display.
• “Touch” and “tap” refer to the action activating buttons and menus in the app’s user interface. "Swipe" refers
to the motion used to change from one page to another in a view.
• “Clinician” refers to nurses, physicians, respiratory care professionals and other caregivers who use the app.
• “Device” refers to medical devices at the patient’s bedside. “Mobile device” refers to the smartphone used to
access the app.
Note: Names of persons and facilities used as examples in this document are ctitious, and are intended for
illustrative and instructional purposes only. Any similarity to actual names of persons or facilities is coincidental.
boldface
text.
1.4 Safety Information
This section contains generally applicable safety information for this product.
1.4.1 Warnings
•
Warning: The Vital Sync mobile application is not intended to be used as the sole source of patient
monitoring. Improper conguration of application messages or incorrect patient assignment could cause
delays in treatment or clinical intervention, which could result in patient injury.
7

•
Warning: The Vital Sync software is intended to supplement and not to replace any part of the facility’s
monitoring. Do not rely on the Vital Sync software as the sole source of alarms. In order to assure a timely
response to device alarms, a clinician (not necessarily the clinician viewing data in the platform) must be
within visual and/or audible range of the alarming device. In order to provide medical intervention, a clinician
must interact with the device at the bedside.
•
Warning: Adjusting a device’s alarm threshold settings or pausing a device’s audible alarm from within the
app will change settings or pause the alarm tone on the device at the bedside.
•
Warning: The Vital Sync mobile application is intended only as an adjunct in patient assessment. It must be
used in conjunction with clinical signs and symptoms and periodic patient observations.
•
Warning: Always follow the facility’s established patient safety protocols when using the Vital Sync mobile
application.
•
Warning: To avoid delayed response to alarms and potential patient injury, do not disable push notications
for the application.
1.4.2 Cautions
•
Caution: Loss of patient privacy may occur if using the software on unsecured or unencrypted networks.
Always adhere to facility patient privacy practices and procedures to ensure security of patient data on the
facility’s network.
•
Caution:
in the Vital Sync informatics manager. Users should be aware of annunciation delays set up for alarms on any
monitored device.
•
Caution:
rights set up for them in the software. Consult with the Medtronic Solution Delivery Team for account
conguration and setup assistance.
1.4.3 Notes
Note:
they are running the app when it is not in use.
Note:
is the patient indicated in the app. Also, conrm that the device linked to that patient in the app is physically
present with the patient.
To prevent unauthorized access to the application, users should always lock the mobile device on which
After admitting or identifying a patient via the app, conrm that the patient physically present in the bed
Push notications in the app will be delayed for any alarm for which an annunciation delay is set up
Ensure that users who will need to use the app’s remote control functionality have sucient user
1.5 Obtaining Technical Assistance
1.5.1 Technical Services
For technical information and assistance if unable to correct a problem while using the application, contact
Medtronic or a local Medtronic representative.
Medtronic Technical Services
15 Hampshire Street
Manseld, MA 02048 USA
1 800 497 4968, or 1 925 463 4635
HIMSupport@Medtronic.com
When calling Medtronic or a local Medtronic representative, provide the application’s version number, build
number, and date of build, shown in the About row in the Main Menu.
8

1.5.2 Related Documents
Before using the app, review this manual and appropriate sections of the reference manual for the Vital Sync virtual
patient monitoring platform and informatics manager. This information is essential for understanding application
functions and information displays.
Also read all precautionary information and specications for the app and for the platform.
Note: The v3.0 platform reference manual contains platform functionality descriptions relevant to this release of
the app.
1.6 Warranty Information
The information contained in this document is subject to change without notice. Medtronic makes no warranty
of any kind with regard to this material, including, but not limited to, the implied warranties or merchantability and
tness for a particular purpose. Medtronic shall not be liable for errors contained herein or for incidental or
consequential damages in connection with the furnishing, performance, or use of this material.
1.7 Licensing Information
For more details regarding software licenses, refer to the following sections.
1.7.1 Vital Sync and Third Party Software
Licenses obtained from Medtronic for use of Vital Sync software do not include licenses for any third party
software.
Users must obtain their own licenses for the downloading and use of such third party software.
1.7.2 O-the-Shelf and Open Source Software Disclosure
This section identies the o-the-shelf (OTS) and open source software that may be separately called, executed,
linked, aliated, or otherwise utilized by this Vital Sync software product.
Such software is licensed to users subject to the terms and conditions of the separate software license agreement
for such OTS and open source software.
Use of OTS and open source software by users of the Vital Sync mobile application shall be governed entirely by
the terms and conditions of such license.
Table 1. OTS and Open Source Software
Software Title Software Designator Manufacturer
iOS™* 12.0 or later versions Apple™*
Firebase™* Core n/a Google™*
Firebase™* Messaging n/a Google™*
Charts 3.0.5 Open source community
IQKeyboardManagerSwift 6.5.0 Open source community
DropDown 2.3.13 Open source community
CryptoSwift 1.4.0 Open source community
NewPopMenu 2.1.1 Open source community
HandyUIKit 1.9.0 Open source community
KeychainSwift 19.0.0 Open source community
SimpleCheckBox 2.1.0 Open source community
Alamore 5.4.1 Open source community
9

Table 1. OTS and Open Source Software (continued)
Software Title Software Designator Manufacturer
NewRelicAgent 6.10.0 Open source community
RSSelectionMenu 7.1.3 Open source community
1.8 HIPAA Disclaimer
The Vital Sync mobile application is a software application used in conjunction with electronic medical devices
within the customer’s secure health information system. Healthcare providers using the software are expected to
take appropriate security measures to protect the condentiality of all data created, stored or transmitted on their
systems.
Although the Vital Sync mobile application and Vital Sync virtual patient monitoring platform and informatics
manager contain certain features to assist users in the users’ steps to protect their data, Medtronic cannot provide
any assurance that the user’s use of the software will comply with HIPAA regulations or be otherwise in compliance
with the customer’s obligations as a covered entity.
1.9 Statement Regarding FDA Clearance of Features
The remote control feature in the Vital Sync software has not been cleared by the United States Food and Drug
Administration. The feature is being introduced using FDA’s
Monitoring Devices Used to Support Patient Monitoring During the Coronavirus Disease 2019
(COVID-19) Public Health Emergency (Revised)
, updated October 2020.
Enforcement Policy for Non-Invasive Remote
10

2 Product Overview
2.1 Overview
This chapter provides an overall description of the functionality of the Vital Sync mobile application.
2.2 Intended Use
The Vital Sync Mobile App is intended to be used with the Vital Sync Informatics Manager (IM) and Virtual Patient
Monitoring Platform (VPMP).
The Vital Sync Mobile App provides remote viewing of patient data, physiologic data, waveforms, alarm
information, and PUSH alerts routed through the Vital Sync Informatics Manager from supported devices.
The Vital Sync Mobile App provides the user interface to support the Vital Sync IM and VPMP remote control
functionality. (Remote control functionality has not been cleared by the FDA and is being released per FDA’s
Enforcement Policy for Non-Invasive Remote Monitoring Devices Used to Support Patient Monitoring
During the Coronavirus Disease (COVID-19) Public Health Emergency (Revised), updated October 2020.)
The Vital Sync Mobile App is intended to be used by healthcare professionals in a hospital or hospital-type facility.
Warning: The Vital Sync Mobile App and Vital Sync Informatics Manager and Virtual Patient Monitoring Platform
are notication systems and are not replacements for direct patient observation, patient assessment, or clinical
judgment.
2.3 Contraindications
None.
2.4 Application Overview
The app is designed to allow users to access data from medical devices at the patient’s bedside via a mobile device
running the iOS™* mobile operating system.
Users access data and perform other available functions in views within the app, which works in conjunction with
version 3.0 of the Vital Sync virtual patient monitoring platform and informatics manager.
2.4.1 Basic Functions
Within the app, users can see patient data from supported devices, modify their patient assignments, and see and
be notied of device alarms. Users can also link and unlink devices and admit and manually discharge patients in
the platform via the app.
Selected users can change certain settings or pause the audible alarm on supported devices. See Section 4.5.7,
Remote Setting Changes, page 34 and Section 5.4, Pause Bedside Alarms, page 55.
2.4.2 User Roles
Each user is identied in the app by username and password, and enters these to log into the app. Users who are
set up in the Vital Sync virtual patient monitoring platform as clinicians or supervisors are able to log in and use
the app.
Available functionality is the same in the app for all users, regardless of their user role in the platform, except for
device remote control functions, which require additional conguration for specic users. Consult with the
Medtronic Solution Delivery team for assistance.
11

2.5 User Interface Symbols
The software makes use of icons and symbols to denote user functions and to show data from patients and
devices. These are dened in the tables in this section.
Table 2. App Navigation Symbols and Denitions
Icon Description Denition/Location
Active Alarms view Button to access the Active Alarms view.
Appears in the button bar; turns white when tapped to select the
Active Alarms view.
Assigned Patients view Button to access the Assigned Patients view.
Appears in the button bar; turns white when tapped to select the
Assigned Patients view.
Patient Management view Button to access the Patient Management view.
Appears in the button bar; turns white when tapped to select the
Patient Management view.
Main Menu view Button to access the additional function menu.
Appears in the button bar; turns white when tapped to select the
Main Menu view.
Additional function menu Button to access a pop-up menu showing additional functions.
Appears on the right side of the identier panel in the Device
Detail view.
Drop-down menu Button to access a drop-down menu showing options available
for selection.
Appears in the information panel in the Device Detail view, and
in one or more elds in the Patient Management, Admit Patient,
Link New Device, and Unlink views.
Login Settings view Button to access application login settings.
Appears in the upper right corner of the login view.
Page indicator Appears near the bottom of the screen if multiple pages are
available in a view. The white dot indicates which page is currently
selected.
Additional information Button to show more detailed information.
Appears on assignment tiles in the Patient Management view;
changes to downward-pointing when tapped to show assign‐
ment detail.
Exit view Button to exit the current view and return to the previous view.
Appears in the lower left corner of the Device Detail, Diagnostics,
and Privacy views.
Check box
Control to access the Designated Areas eld.
Appears in the Admit Patient and Link New Device views just
before the device assignment elds.
12
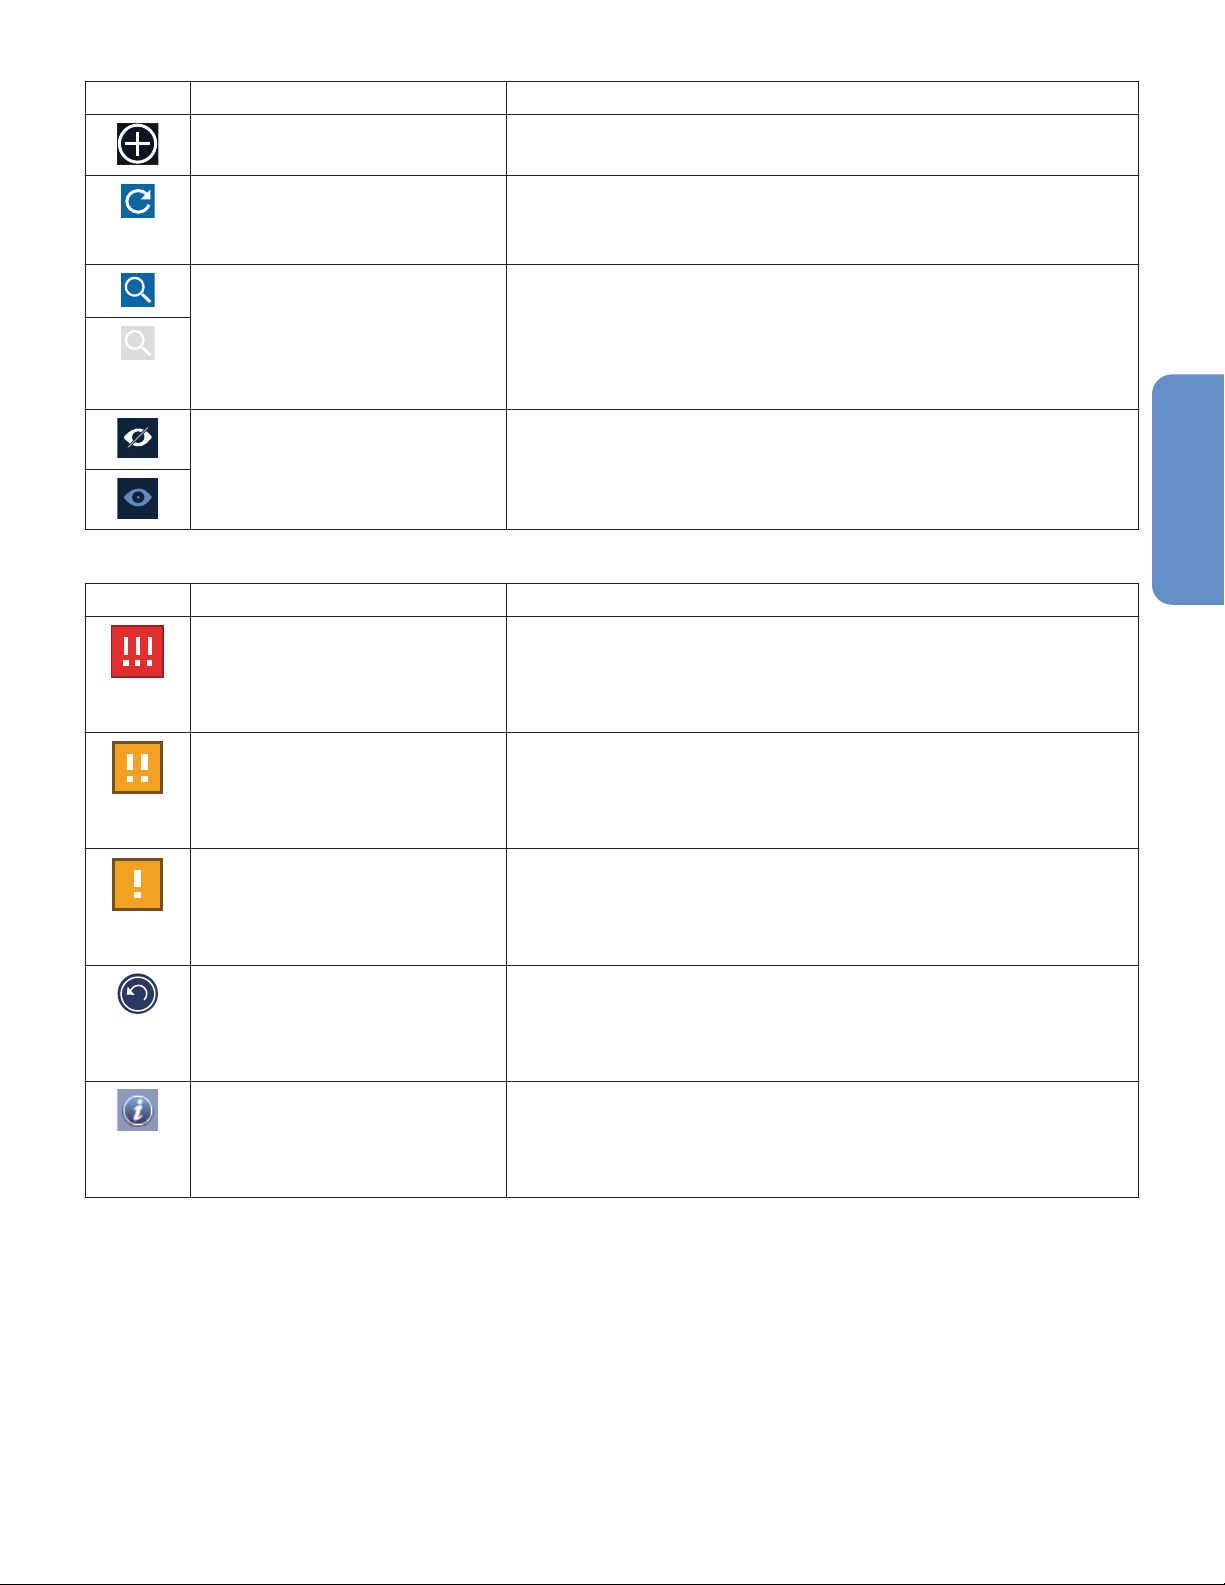
Table 2. App Navigation Symbols and Denitions (continued)
Icon Description Denition/Location
New admission Button to access the Admit Patient view.
Appears in the lower left corner of the Patient Management view.
Refresh Button to refresh the list of available devices.
Appears in the Admit Patient and Update Patient views, next to
the Device Category eld.
Search Button to search for an existing patient ID in the platform, or eld
to search for a designated area for devices.
Appears in the Admit Patient and Update Patient views, next to the
Patient ID eld. Also appears in the Admit Patient and Link New
Devices views at the top of the Designated Areas drop-down list.
View PIN Button to toggle view of data entered in the eld when changing
the PIN.
Appears next to elds in the Update PIN view; changes to “opened
eye” when tapped to unmask eld entry.
Table 3. Alarm and Status Symbols and Denitions
Icon Description Denition/Location
High priority alarm A high priority alarm is active on one of a patient’s devices, or on
the currently viewed device.
Appears on bed tiles in the Assigned Patients view, and at the top
of the screen in the Device Detail view.
Medium priority alarm A medium priority alarm is active on one of a patient’s devices, or
on the currently viewed device
Appears on bed tiles in the Assigned Patients view, and at the top
of the screen in the Device Detail view.
Low priority alarm A low priority alarm is active on one of a patient’s devices, or on
the currently viewed device
Appears on bed tiles in the Assigned Patients view, and at the top
of the screen in the Device Detail view.
Reset alarm A reset alarm is active on one of a patient’s devices, or on the
currently viewed device
Appears on bed tiles in the Assigned Patients view, and at the top
of the screen in the Device Detail view.
Notication A notication is active on one of a patient’s devices, or on the
currently viewed device
Appears on bed tiles in the Assigned Patients view, and at the top
of the screen in the Device Detail view.
13

Table 3. Alarm and Status Symbols and Denitions (continued)
Icon Description Denition/Location
Disconnected capnography
monitor
Disconnected pulse oximeter
Disconnected ventilator
Pause device alarm Button to pause the audible alarm tone on supported bedside
Null value No data is available or no data is reported for a parameter.
Unassigned patient No users have this patient assigned to them as a primary or
The indicated device is currently not communicating with the
platform.
Appears on bed tiles in the Assigned Patients view, and at the top
of the screen and on the device information page in the Device
Detail view.
devices. Appears on the right side of the Device Detail view’s iden‐
tier panel (if available for the alarming device); turns o-white
when tapped to pause the device alarm.
Appears next to parameter names in the Assigned Patients and
Device Detail views.
secondary assignment.
Appears next to names of aected patients in the Patient Man‐
agement view.
2.6 Devices Supported
The current release of the app supports the following devices:
• Puritan Bennett 980 ventilator
• Puritan Bennett 840 ventilator
• Nellcor bedside respiratory patient monitoring system (model number PM1000N)
• Oridion Capnostream 20 capnography monitor
• Oridion Capnostream 35 portable bedside monitor
The current release of the app supports additional remote control functionality for the following device:
• Oridion Capnostream 35 portable bedside monitor
Selected users can remotely adjust certain alarm thresholds and pause the device’s audible alarm tone directly
from the app. See Section 4.5.7, Remote Setting Changes, page 34 and Section 5.4, Pause Bedside Alarms, page 55.
14

3 Installation and Access
3.1 Overview
This chapter describes installing and running the Vital Sync mobile application.
3.2 Requirements
The Vital Sync mobile app requires a device running the iOS™* mobile operating system (version 12.0 or later).
The app also requires an existing installation of the Vital Sync virtual patient monitoring platform and informatics
manager (version 3.0) from which to receive data.
3.3 Installation
3.3.1 Installing the App
To install the application:
1. In the App Store™*, search for “Vital Sync Mobile App”. The listing for the app will appear, with the following
icon shown at upper left in the listing:
2. Tap the download button, then follow prompts on the mobile device for download and installation.
3.3.2 Upgrade Path
Users of version 2.0.0, version 2.1.0, or version 3.0.0 of the app can upgrade directly to version 3.0.1.
3.4 Initial Setup
To set up the app and access it for the rst time:
1. From the mobile device screen, tap the Vital Sync app icon, or, if still in the app’s entry in the App Store™*,
tap the RUN button.
2. Set basic app permissions, as follows:
a.
At the prompt asking for permission for the app to access the mobile device’s camera, tap OK to
approve.
b. At the prompt asking for permission for the app to send push notications to the mobile device, tap
Allow to approve.
Note: Permissions can be adjusted from the mobile device’s settings screen for the app. See
Section 4.9, Additional Settings, page 50.
After setting permissions, the Login Settings view will appear.
15

Figure 1. Login Settings View
3. Set up server URL information for the Vital Sync platform server to be used with the app, as follows:
a. If using a QR code that is encoded with the platform server information, center the code in the
viewnder on the screen until the device’s camera captures it.
Note: Obtain the QR code or platform server URL (provided by the Medtronic Solution Delivery
Team) from appropriate facility personnel.
b. If entering a URL for the platform server, tap the eld below the camera image, enter the URL in the
eld, then tap SAVE to continue.
4. The login elds will appear.
16

Figure 2. Login Fields
5.
USER NAME—Enter the username assigned in the platform.
6.
PASSWORD—Enter the platform login password.
7.
Tap LOGIN to continue. The privacy statement will appear.
8.
After reviewing the privacy statement, tap ACCEPT to continue, or DECLINE to exit the application.
After accepting the privacy statement, the Login with PIN elds will appear.
17

Figure 3. Login with PIN Fields
9.
PIN—If desired, enter a four-digit to six-digit personal identication number (PIN) to use instead of the
normal login password for future logins, then tap SET PIN to save this number.
If not setting a PIN, tap CONTINUE.
Note: If a PIN is not set, these elds will appear on each subsequent login. To stop this, tap the Don’t Ask Me Again
check box to check it.
The Assigned Patients view will appear.
Note: To ensure push notications are received on the mobile device, do the following immediately after signing
into the app for the rst time:
1. Tap the Main Menu button (rightmost on the button bar) to access the Main Menu view.
2. Log out of the app.
3. Return to the mobile device’s home screen.
4. From the home screen, close the app.
5. Open the app again.
6. Close the app again from the mobile device’s home screen.
7. Open the app again, then sign in.
Note: If push notications are not being received, toggle notications and background data refresh o, then back
on in the app settings. See Section 4.9, Additional Settings, page 50.
Refer to subsequent chapters for operation and functionality descriptions.
18

3.5 Running the App
To run the app after initial setup:
1. Tap the Vital Sync app icon on the mobile device screen.
2.
USER NAME—Enter the username assigned in the platform.
3.
If a login PIN is set up, enter it in the PIN eld. If a login PIN is not set up, enter the platform login password
in the PASSWORD eld.
Note: The login password can always be used even after setting up a PIN.
4.
Tap LOGIN.
The Assigned Patients view will appear.
For details on using the app, see Chapter 4.
19

20

4 Operation
4.1 Overview
This chapter describes the operation of the Vital Sync mobile application.
4.2 Alarms and Notications
The Vital Sync mobile application reports alarms and notications (generally referred to as events) from linked
devices in multiple views within the app. Event types and priority are denoted using color, symbols, or both.
For details on events and event indicators, see
4.3 Navigation and Basic User Interface
Figure 4. App Layout and Navigation
Section 4.2, Alarms and Notications, page 21
.
1 Button Bar
2 Page indicator
Users access views within the app via the button bar. Within views, if multiple pages are available, swiping left or
right moves to adjacent pages in the view. Exit from detail views by tapping the leftward-pointing arrow at bottom
left.
21

Figure 5. App Layout and Navigation (menus)
1 Drop-down menu
2 Pop-up menu
Users access certain program functions via menus.
Open menus in the app by tapping buttons with a downward-pointing caret (for a drop-down menu)
or with a vertical stack of dots (for a pop-up menu).
Note: The app is generally best used in portrait mode, except for the second trend view (described in
Section 4.5.5.3, View a Second Trend, page 29), which requires landscape mode to access.
Note: Screen captures in this manual are simulated and representative. Actual screens may vary slightly from
those shown here.
4.4 Assigned Patients View
The Assigned Patients view is the rst view that appears when running the app. To access the view
from elsewhere in the app, tap the Assigned Patients view button (second from left on the button
bar).
22

Figure 6. Assigned Patients View
1 User’s name
2 Assignment type
3 Bed tile (with alarm)
4 Bed tile (with notication)
5 Bed tile (no events active)
Patients appear in the view sorted by assignment type, with primary assignments listed rst.
Note:
Supervisory users can only see a list of their own assigned patients in this view.
4.4.1 Available Tasks
Users can perform the following tasks in or from this view:
• See summary information for all their assigned patients
• Access the Device Detail view for any one of their assigned patients
4.4.2 Bed Tile Information
Bed tiles show patient information and data from linked devices. Tiles are sorted by type of patient assignment
(primary, secondary, or monitoring only).
If alarms or notications are active, the bed tile will show a message and will change color to indicate the priority
of the event.
23

Figure 7. Bed Tile Detail
1 Bed number
2 Patient name
3 Device parameters
4 Event icon
5 Message
Note: The event icon shown and the color of the tile outline and message area depend on the event type (alarm or
notication) and priority (high, medium, low, or informational).
Note: If multiple events are active for a patient, the icon and message for the event with the highest priority will
appear on the tile.
This release of the software allows the following standard parameters to appear on bed tiles:
•
Pulse oximeters
•
Capnography monitors
—Blood oxygen saturation (SpO2) and pulse rate (PR)
—Blood oxygen saturation (SpO2), pulse rate (PR), respiration rate (RR), end tidal
carbon dioxide level (ETCO2), and integrated pulmonary index (IPI) value
•
Ventilators
respiratory rate (f
—Peak inspiratory circuit pressure (P
), and exhaled tidal volume (VTE)
TOT
), positive end expiratory pressure (PEEP), total
PEAK
Not all devices may measure all parameters listed here, and some communication protocols limit the types of data
reported to the Vital Sync software. If not measured or reported, the parameter will not appear on the tile.
4.4.3 Bed Tile Colors
If a device linked with a patient has an active alarm or notication, a colored border will appear around the tile, and
a message area with the same background color will also appear at the bottom of the tile.
•
Yellow
—Indicates at least one low-priority or medium-priority alarm is active on at least one device linked
to the patient in this bed
•
•
—Indicates at least one high-priority alarm is active on at least one device linked to the patient in this bed
Red
—Indicates at least one notication is active on at least one device linked to the patient in this bed
Blue
If a device parameter shown on the tile is causing a device alarm, that parameter will change color as well. If a
device becomes disconnected, an icon indicating its device type (pulse oximeter, capnography monitor, or
ventilator) will appear on the bed tile.
•
Note: If multiple alarms or notications are active, the alarm or notication with the highest priority
determines the color shown on the tile.
•
Note: The same color is used for medium-priority and low-priority alarms. The alarm icon in the message area
denotes the specic alarm priority.
•
Note: The colors indicating alarms and notications on the bed tile also appear in the Device Detail view.
4.5 Device Detail View
To access the Device Detail view, tap or swipe left from the desired bed tile in either the Assigned Patients view
or the Active Alarms view.
24

Figure 8. Device Detail View
1 Settings panel
2 Selected parameter
3 Parameter panel
4 Information panel (trend view shown)
5 Identier panel
If alarms or notications are active on the device, the Device Detail view also shows information about these
events. See Chapter 5 for more details.
To exit the Device Detail view at any time and return to the Assigned Patients view, tap the leftward-pointing arrow
in the lower left corner of the view.
4.5.1 Available Tasks
Users can perform the following tasks in or from this view:
• See all device parameters, including those not shown on the device tile
• See trend information for any device parameter (or pair of parameters)
• See waveforms for certain device parameters
• See device identiers
• Link an available device to the patient
• Unlink the device currently shown in the app from the patient
• Update information for the patient
• Change certain settings on devices that support remote control functionality
• Manually discharge a patient in the Vital Sync platform
25

4.5.2 Parameter Panel
The parameter panel is in the upper half of the Device Detail view. This panel shows all reported parameters for
the device.
When opening the Device Detail view, the parameter initially selected (indicated by a white border around the
parameter) will either be the rst parameter listed, or the parameter with the highest-priority active alarm. More
information for the selected parameter is shown in the information panel.
To select a dierent parameter, simply tap it.
4.5.3 Settings Panel
If the patient is linked with a ventilator, the ventilator settings will appear at the top of the Device Detail view, above
the parameter panel.
Note: For ventilators, the app shows settings and parameters that are appropriate to the selected ventilation type
and mode.
4.5.4 Information Panel
The information panel is in the lower half of the Device Detail view. This panel has pages showing additional
information for selected parameters, as well as device identiers.
4.5.4.1 Trend Page
Trending information for any parameter is available on the trend page. This is the default page shown in the
information panel when opening the Device Detail view.
Figure 9. Information Panel (trend page)
The trend page shows trend information for the currently selected parameter, as well as upper and lower alarm
limits (if set). For more information on trend functions, see Section 4.5.5, Trend Functions, page 28.
4.5.4.2 Waveform Page
Waveforms for certain parameters are available on the waveform page. To view the waveform page, swipe left
from the trend page.
26

Figure 10. Information Panel (waveform page)
Figure 11. Information Panel (waveform page; ventilator waveform)
The waveform will trace from left to right on the page, then refresh itself from left to right.
4.5.4.3 Device Page
Device identiers are available on the device page. To view the device page, swipe left from the trend page (for
parameters without waveforms) or from the waveform page.
Figure 12. Information Panel (device page)
27

The device page shows the serial number and device type for the device from which the parameter currently
selected in the parameter panel is reported.
4.5.5 Trend Functions
Users can change the timeframe for trend data, view trends in landscape mode, and view trends for two
parameters at once. Details follow.
4.5.5.1 Change the Trend Timeframe
Trend information shown in the app is for the past 4 hours by default for ventilator parameters, and for the past
2 hours by default for parameters from other devices.
To select a dierent timeframe for trend data:
1. Tap the drop-down menu at top right in the information panel to open it. Figure 13. Trend Timeframe Menu
2. Tap the desired timeframe to select it. The trend graph will refresh.
4.5.5.2 View Trends in Landscape Mode
If desired, view trend information in landscape mode by turning the mobile device 90 degrees to either the left
or right. The information panel will turn and expand to ll the entire screen.
28

Figure 14. Trend Information in Landscape Mode
4.5.5.3 View a Second Trend
Users can view trend information for two parameters at the same time.
To view two trends at once:
1.
View trend information in landscape mode. This allows access to the Second Trend button (at top right).
2.
Second Trend—Tap to access the list of available parameters. Figure 15. Available Parameter List (Second Trend button)
3. Tap the desired parameter to show along with the currently selected parameter. The trend graph will
refresh, with information for the second parameter shown in yellow. The vertical axis for the second
parameter will also appear, shown at the right of the trend data.
Figure 16. Information Panel (trend page with two trends shown)
29

Note: The second trend will continue to be shown on the information panel even if the mobile device is
turned vertically and the screen reverts to portrait mode.
To remove the second trend from the graph, either repeat the procedure in this section and select None,
or tap a dierent parameter in the parameter panel to select it.
4.5.5.4 View a Specic Data Point
To see more detail about a specic point on the trend graph, tap on the desired point.
Figure 17. Information Panel (trend page with specic data point shown)
4.5.6 Device and Patient Information Functions
Users can link available devices to patients, unlink currently linked devices, and update patient information
directly from the Device Detail view.
4.5.6.1 Link a Device
To link an available device to the current patient:
1. Tap the additional function button in the lower right corner of the screen, on the right side of the identier
panel.
2.
Tap
Link Device
. The Link New Device view will appear.
30

Figure 18. Link New Device View
3.
Show designated area devices—If selecting only from devices associated with a specic area of care, tap
the check box to check it and reveal the Designated Area eld. Otherwise, leave the check box unchecked
and skip to Step 6.
4.
Designated Areas
areas.
—Tap the rightward-pointing arrow to open the drop-down menu showing available
31

Figure 19. Link Device View (designated area selection)
Note: Areas and designated area devices available in the app are set up in the Vital Sync platform.
Note: Selecting Other in the list will show devices not specically set up in the platform as designated area
devices.
5. Tap the desired area to select it. If the desired area is not immediately visible, enter the area name (or the rst
few characters of the name) in the Search eld to lter the list.
Note: The list shows parent areas and child areas for available devices. Take care to select correctly from the
list if desiring devices associated with a specic child area.
Note: Take care to not select a child area and its parent area from the list at the same time, as this may
interfere with changing assignment levels in the app for the patient to whom a designated area device is
linked.
6.
Device Category—Select the desired device type from the drop-down menu.
7.
Device ID—Select the desired device from the drop-down menu.
8.
Tap LINK to link the device, or tap CANCEL to exit the view without linking the device.
If the desired device is not immediately visible in the Device ID eld, click the refresh button next to
the Device Category eld, then click the Device ID drop-down menu again.
4.5.6.2 Unlink a Device
To unlink a device from the current patient:
1. Tap the additional function button in the lower right corner of the screen, on the right side of the identier
panel.
32

2.
Tap Unlink Device. The Unlink Device view will appear. Figure 20. Unlink Device View
3.
Device Category
4.
Device ID
5.
Tap
6.
A dialog box will appear asking for conrmation of unlinking. Tap
7.
If needing to unlink additional devices, repeat the previous four steps. Otherwise, tap
view.
4.5.6.3 Update Patient Information
To update information for the current patient:
1. Tap the additional function button in the lower right corner of the screen, on the right side of the identier
panel.
2.
Tap Update Patient. The Update Patient view will appear.
—Select the desired device from the drop-down menu.
UNLINK
—Select the desired device type from the drop-down menu.
to unlink the device, or tap
CANCEL
to exit the view without unlinking the device.
Yes
to conrm, or tap No to cancel.
CANCEL
to exit the
33

Figure 21. Update Patient View
3.
Patient ID—If desired, enter a dierent patient ID number.
Note: If the number entered is already assigned to another patient, an error message will appear. If this
happens, tap CANCEL, then access the Update Patient view again and enter a dierent ID number.
4.
First Name—If desired, enter a dierent rst name.
5.
Middle Name—If desired, enter a dierent middle name.
6.
Last Name—If desired, enter a dierent last name.
7.
Date of Birth—If desired, enter a dierent date of birth (MM/dd/yyyy format; the app automatically inserts
slashes).
8.
When done updating information, tap UPDATE to save changes, or tap CANCEL to exit the view without
saving changes.
4.5.7 Remote Setting Changes
Selected app users can change certain settings on supported devices directly from the Device Detail view. For a
list of devices that support remote setting changes in this release of the app, see Section 2.6.
Note: Enabling the remote setting change function requires specic user conguration. Consult with the
Medtronic Solution Delivery Team for assistance.
To remotely change a setting on a supported device:
1. In the Device Detail view, select the desired parameter.
2. Swipe left in the information panel until the threshold settings page is visible, showing current settings for
the selected parameter.
34

Figure 22. Information Panel (threshold settings)
3. Tap the setting to be changed, then enter the new value.
4.
When done changing settings, tap Apply.
5.
A dialog box will appear asking for conrmation of the setting change. Tap Yes to conrm, or tap No to
cancel the change.
4.5.8 Manually Discharge a Patient
Users can manually discharge patients directly from the Device Detail view. This removes them from monitoring
in the platform.
To manually discharge a patient:
1. Tap the bed tile for the desired patient to access the Device Detail view.
2. Tap the additional function button in the lower right corner of the screen, on the right side of the identier
panel.
3.
Tap Discharge Patient.
4.
A dialog will appear asking if the patient should be discharged. Tap Yes to conrm, or No to cancel and
return to the Device Detail view.
Note: The discharge functionality removes the patient from monitoring in the platform. This functionality is
distinct from procedures or systems used to physically discharge the patient from the facility.
35

4.6 Active Alarms View
To access the Active Alarms view, tap the Active Alarms view button (leftmost on the button bar).
Note: Before acting on information shown in the app, assess the patient at the bedside to conrm the information
shown.
Figure 23. Active Alarms View
1 Bed tiles with alarms
2 Bed tile with notication
4.6.1 Available Tasks
Users can see their patients with active alarms in this view.
4.6.2 Event Information
The Active Alarms view shows only patients assigned to the user whose devices have active alarms or notications.
The information shown on bed tiles in the view is the same as is shown in the Assigned Patients view. For more
information, see Section 4.4.2.
Note: The event icon shown and the color of the tile outline and message area depend on the event type (alarm or
notication) and priority (high, medium, low, or informational).
Note: If multiple events are active for a patient, the icon and message for the event with the highest priority will
appear on the tile.
To access the Device Detail view for any patient in the Active Alarms view, tap the desired bed tile.
36

4.7 Patient Management View
To access the Patient Management view, tap the Patient Management view button (third from left
on the button bar).
Figure 24. Patient Management View (initial access)
4.7.1 Available Tasks
Users can perform the following tasks in or from this view:
• Admit new patients
• Assign admitted patients to themselves
• Identify and begin in-app monitoring for patients admitted in the platform via ADT functionality or linked to
auto-associated devices
• Change the assignment type for their own assignments
• Remove their own assignments
• See a list of users assigned to any patient
4.7.2 Admit a Patient
To admit a patient into the platform via the app:
1.
In the Patient Management view, tap the New Admission button, located in the lower left corner of the
view. The Admit Patient view will appear.
37

Figure 25. Admit Patient View (initial access)
2.
Area—Select the desired area from the drop-down menu. Figure 26. Admit Patient View (area selection)
3.
Bed Location—Select the desired bed from the drop-down menu.
38

Figure 27. Admit Patient View (bed selection)
4.
Patient ID—Enter the patient ID to be used for this patient.
5.
Tap the search button to the right of the Patient ID eld. If the patient ID is already in use, the app will
show a message indicating the patient is already being monitored. If not, the app will show a message
indicating the ID was not found.
Figure 28.
Admit Patient View (patient ID selection)
6.
Tap NEXT to continue to the patient information page, or tap CANCEL to exit the view without admitting
the new patient.
39

Figure 29. Admit Patient View (patient information)
7.
First Name—Enter the patient’s rst name. This eld is optional.
8.
Last Name—Enter the patient’s last name. This eld is optional.
9.
Date of Birth (MM/dd/yyyy)—Enter the patient’s date of birth in the format shown (the app will
automatically insert slashes). This eld is optional.
10.
Tap NEXT to continue to the device and assignment selection page, or tap BACK to return to the previous
page in the view.
40

Figure 30. Admit Patient View (device and assignment selection)
11.
Show designated area devices—If selecting only from devices associated with a specic area of care, tap
the check box to check it and reveal the Designated Area eld. Otherwise, leave the check box unchecked
and skip to Step 14.
12.
Designated Areas
areas.
—Tap the rightward-pointing arrow to open the drop-down menu showing available
41

Figure 31. Admit Patient View (designated area selection)
Note: Areas and designated area devices available in the app are set up in the Vital Sync platform.
Note: Selecting Other in the list will show devices not specically set up in the platform as designated area
devices.
13. Tap the desired area to select it. If the desired area is not immediately visible, enter the area name (or the rst
few characters of the name) in the Search eld to lter the list.
Note: The list shows parent areas and child areas for available devices. Take care to select correctly from the
list if desiring devices associated with a specic child area.
Note: Take care to not select a child area and its parent area from the list at the same time, as this may
interfere with changing assignment levels in the app for the patient to whom a designated area device is
linked.
14.
Device Category—Select the desired device type from the drop-down menu.
15.
Device ID—Select the desired device from the drop-down menu.
Note: A device must be assigned in order to admit a patient in the platform via the app.
16.
Assignment Level—Tap the button for the desired assignment level for this patient. Selecting Primary,
Secondary, or Monitoring will assign the patient to the current user at that level, while selecting O will
leave the patient unassigned once admitted.
17.
Tap FINISH to admit the patient in the platform, or tap BACK to return to the previous page in the view.
Once the patient is admitted, the app will show the Device Detail view for that patient. All other patient functions
are also available.
42

Note: After admitting or identifying a patient via the app, conrm that the patient physically present in the bed
is the patient indicated in the app. Also, conrm that the device linked to that patient in the app is physically
present with the patient.
4.7.3 Assign Patients
To assign a patient or change an assignment type:
1. Tap the drop-down menu at the top of the Patient Management view to open it. A list of areas of care will
appear.
Figure 32. Patient Management View (area drop-down menu)
Note: Areas of care in the Patient Management view correspond with areas set up in the associated
Vital Sync virtual patient monitoring platform and informatics manager.
2. Tap the desired area in the list. A list of patients in that area, each on their own assignment tile, will appear.
43

Figure 33. Patient Management View (assignment tiles)
1 Assignment tile
2 Patient and bed information
3 Assignment buttons
On each assignment tile, the highlighted button indicates the patient’s current assignment type for this
user.
3.
To assign a patient as a primary assignment, tap the Primary button below that patient’s name.
To assign a patient as a secondary assignment, tap the Secondary button.
To assign a patient as a monitoring only assignment, tap the Monitoring button.
To remove the patient assignment, tap the O button.
4. Repeat the previous step for any other patients who need to be assigned, or whose assignment type needs
to be changed.
Repeat the entire procedure if needing to assign patients in another area.
Note: Removing a patient assignment only unassigns the patient from the user of the app.
Note: The app only allows users to manage their own patient assignments. Supervisory users needing to manage
other users’ assignments can do so in the Vital Sync virtual patient monitoring platform.
4.7.4 Begin Monitoring a Patient
Patients who are present in the platform without a Vital Sync patient ID will not be immediately available for
monitoring in the app. This can occur when a platform user links a patient to one or more devices associated with a
specic bed.
To add a patient ID and begin monitoring the patient in the app:
44

1. In the Patient Management view, select the area of care where the desired patient has been admitted.
2. Find the tile for the bed where the desired patient has been admitted. The tile will not show identifying
information for the patient, but will instead show a Begin Monitoring button.
3.
Tap Begin Monitoring to access the Identify Patient view.
4.
Patient ID—Enter the patient ID to be used for this patient.
5.
Tap the search button to the right of the Patient ID eld. If the patient ID is already in use, the app will
show a message indicating the patient is already being monitored, along with that patient’s identifying
information. If not, the app will show a message indicating the ID was not found, allowing further eld entry.
6.
First Name—Enter the patient’s rst name. This eld is optional.
7.
Last Name—Enter the patient’s last name. This eld is optional.
8.
Date of Birth (MM/dd/yyyy)—Enter the patient’s date of birth in the format shown (the app will
automatically insert slashes). This eld is optional.
9.
Tap NEXT to continue to the assignment selection page, or tap CANCEL to return to the Patient
Management view without identifying the patient.
10.
Assignment Level—Tap the button for the desired assignment level for this patient. Selecting Primary,
Secondary, or Monitoring will assign the patient to the current user at that level, while selecting O will
leave the patient unassigned once admitted.
11.
Tap
view.
FINISH
to begin monitoring the patient in the app, or tap
to return to the previous page in the
BACK
Once the patient is identied, the app will show the Device Detail view for that patient. The patient will now be
accessible for assignment in the Patient Management view, and all other patient functions are also available.
Note:
is the patient indicated in the app. Also, conrm that the device linked to that patient in the app is physically
present with the patient.
4.7.5 View All Assigned Users
A list of users to whom each patient is assigned (along with the type of assignment) is accessible from the Patient
Management view.
To view assigned users for a patient:
After admitting or identifying a patient via the app, conrm that the patient physically present in the bed
1. Find the tile showing the desired patient in the Patient Management view.
2. Tap the patient tile (anywhere except on the assignment buttons). The tile expands to show all assigned
users, in order of assignment type.
45

Figure 34. Patient Management View (assignments shown)
Note: Any patient who does not have any users assigned (or only has monitoring-only users assigned) will be
denoted in the Patient Management screen with a yellow dot on their assignment tile.
4.8 Main Menu
To access the Main Menu, tap the Main Menu button (rightmost on the button bar).
46

Figure 35. Main Menu
4.8.1 Available Tasks
Users can perform the following tasks in or from this view:
• Update their access PIN
• Clear application data
• See and set up diagnostics to aid in troubleshooting
• See version and GTIN information for their installation of the app
• Access the current privacy statement for the app
• Log out of the app
4.8.2 Update the Login PIN
Users can set a new login PIN (to use in place of a password) or update their current PIN.
To update the login PIN:
1.
In the Main Menu, tap Update PIN. The Update PIN view will appear.
47

Figure 36. Update PIN View
2.
Current PIN—Enter the current personal identication number (if any).
3.
New PIN—Enter the new personal identication number to be used. This number can be four, ve, or six
digits long.
4.
Conrm PIN—Enter the new number again.
5.
Tap UPDATE PIN to save the new PIN, or tap CANCEL to return to the Main Menu without saving the new
PIN.
4.8.3 Clear App Data
If needed, users can clear app data (including login information) from the mobile device.
Note: Only use this function if absolutely necessary (for example, if directed by Technical Service), as it will
necessitate redoing initial app setup, as described in Section 3.4, Initial Setup, page 15.
To clear application data:
1.
In the Main Menu, tap Clear App Data.
2. A conrmation dialog will appear. To proceed and clear all app data, including user login information, tap
Yes. To cancel and return to the Main Menu, tap No.
4.8.4 Diagnostics
Certain diagnostic information is available for the app. This information can be used to troubleshoot the app if
problems occur.
To access diagnostic information:
48

1.
In the Main Menu, tap Diagnostics. The Diagnostics view will appear. Figure 37. Diagnostics View
2. The following information appears in the view:
•
Notications Enabled
eld shows No.
•
FCM Token Registered on Vital Sync Server
registered FCM token for the app. If not, this eld shows No.
•
Vital Sync™ URL
currently linked.
3.
Display Log Messages—If desired or directed, tap the switch to turn on log message display in the app.
4. To exit the Diagnostics view and return to the Main Menu, tap the leftward-pointing arrow in the lower left
corner of the view.
Note: Log message display is turned o by default. For user convenience, log messages should only be displayed
if needed to troubleshoot a problem with the app.
4.8.5 Version Information
The version information for the current installation of the app appears in the Main Menu.
This includes the application’s version number, build number, and global trade item number (GTIN); the GTIN
serves as the unique device identier for the app. If problems arise with the app, provide this information to
support personnel to aid in troubleshooting.
Note: The information shown in Figure 35 is representative. Actual version information shown may vary.
—This eld shows
—This eld shows the URL for the Vital Sync platform server to which the app is
if push notications are enabled for the app. If not, this
Yes
—This eld shows
if the platform server has a
Yes
49

4.8.6 Privacy
The privacy policy for the app is accessible from within the app at any time.
In the Main Menu, tap Privacy. The privacy policy will appear on the screen.
To exit and return to the Main Menu, tap the leftward-pointing arrow in the lower left corner of the view.
4.8.7 Application Logout
To log out of the app, tap Log Out in the Main Menu.
4.9 Additional Settings
Additional app settings are available via the iOS™* operating system.
Note: App settings do not generally need to be changed, as defaults should have been accepted during
installation.
To access app settings:
1.
In the mobile device home screen, tap the device’s Settings icon.
2.
Scroll down in the Settings view to nd the list of installed apps, then tap Vital Sync. A list of
application settings will appear.
4.9.1 Notication Settings
Tap
Notications
in the settings list to access notication settings.
50

Figure 38. Mobile Device Notication Settings
Unless overridden during installation, the app’s default setting is to allow notications, with alerts shown in the
mobile device’s lock screen and notication center, and on banners that appear on the screen when the device
is in use. It also defaults to allow notication sounds and badges.
•
Warning: To avoid delayed response to alarms and potential patient injury, do not disable push notications
for the application.
4.9.2 Other App Settings
The app’s other settings are as follows:
•
Camera—Access to the mobile device’s camera is enabled by default. This allows use of a QR code (provided
by the Medtronic Solution Delivery Team) as needed to establish access to a Vital Sync platform server.
•
Siri & Search—All options for Siri™* and device search are active by default.
•
Background App Refresh—This is enabled by default. This allows the app to send push notications to the
mobile device even if the user is logged out or the app is not running.
•
Cellular Data—This is enabled by default. This allows the app to use the cellular data network as well as the
local WiFi network.
Note: Background app refresh will be disabled if the mobile device is in low power mode.
51

52
5 Alarms and Notications
5.1 Overview
This chapter describes alarm information and notications in the Vital Sync mobile application.
5.2 Summary of Event Indicators
5.2.1 Visual Indicators
When a device linked to a patient has an active event (alarm or notication), visual indicators of the event
(including colors and symbols) will appear in multiple locations in the app, as shown in
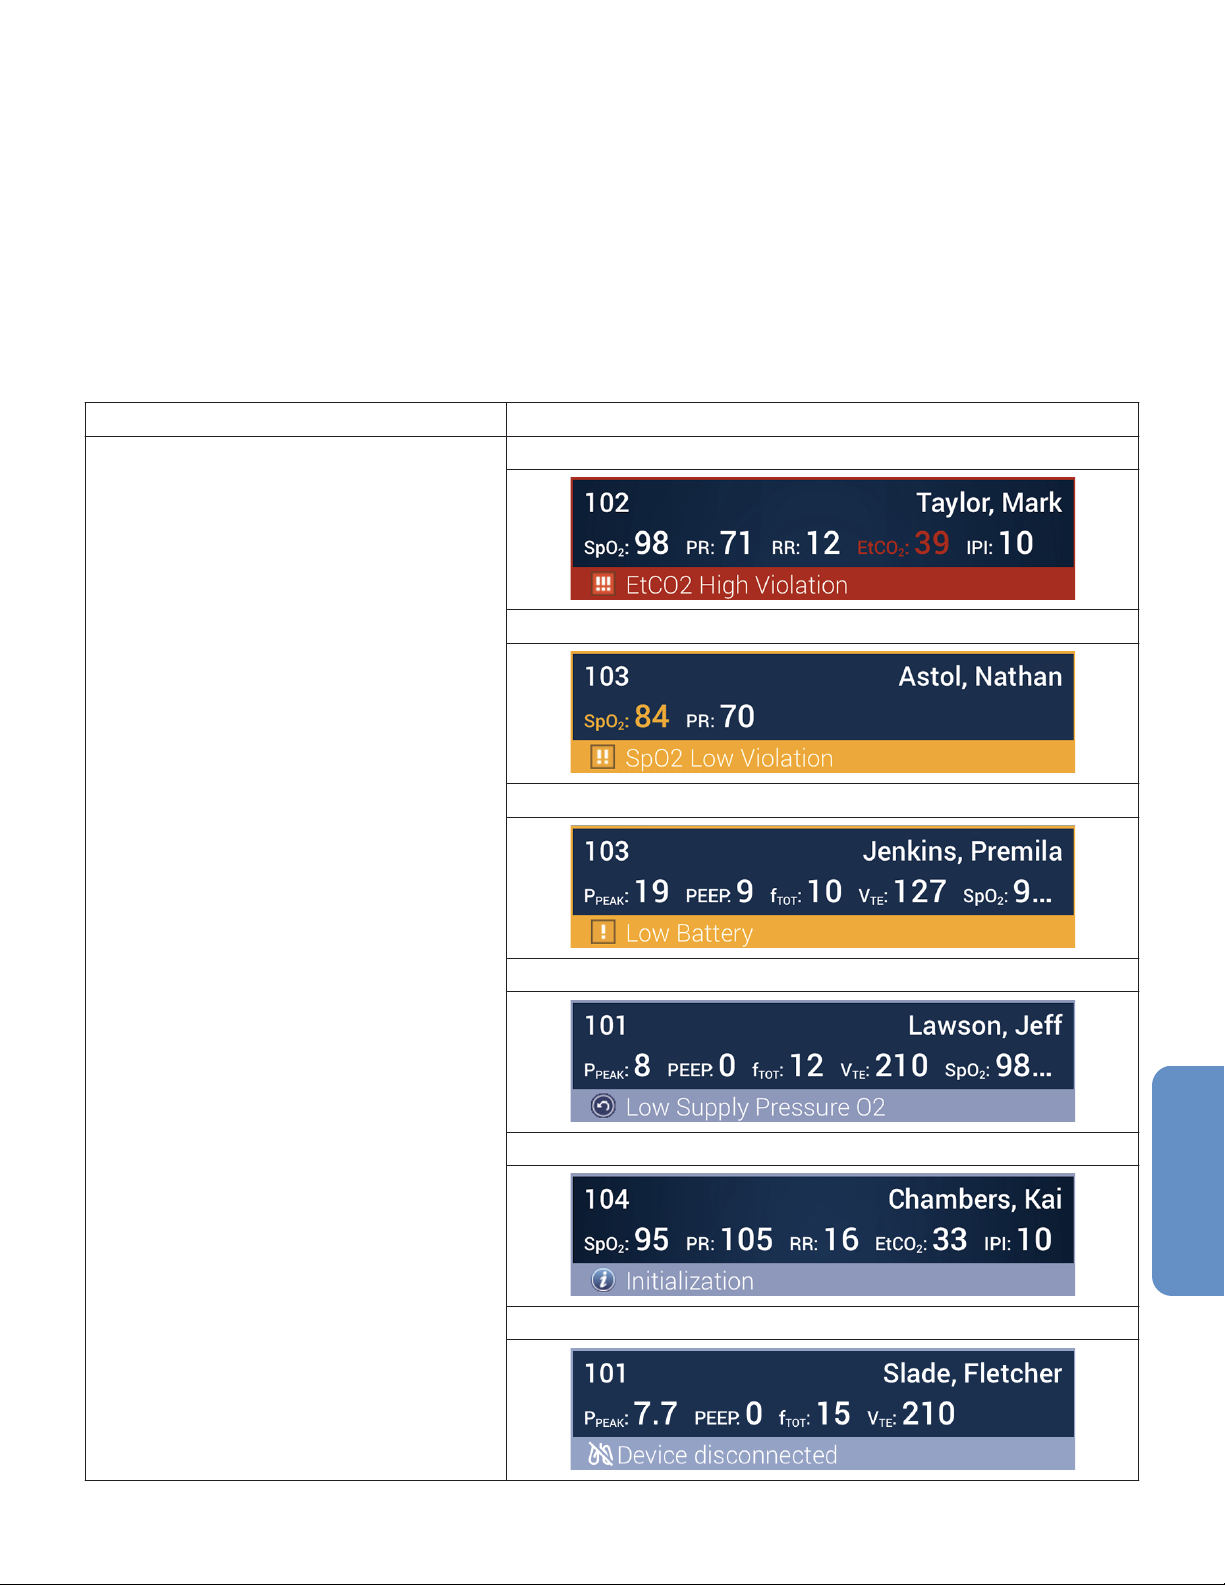
Table 4. Visual Alarm and Notication Indicators
Location Event type and priority
Bed tile (Assigned Patients view or Active
Alarms view)
High priority alarm
Medium priority alarm
Table 4
.
Low priority alarm
Notication (reset alarm)
Notication (standard)
Notication (device disconnect)
53

Table 4. Visual Alarm and Notication Indicators (continued)
Location Event type and priority
Device Detail view (messages) High priority alarm
Medium priority alarm
Low priority alarm
Notication (reset alarm)
Notication (standard)
Notication (device disconnect)
Device Detail view (parameters) High priority alarm condition
Medium or low priority alarm condition
Device Detail view (footer) High priority alarm
High priority alarm (audible alarm paused on device)
Medium or low priority alarm
Notication
Various views Application message
54

Table 4. Visual Alarm and Notication Indicators (continued)
Location Event type and priority
Mobile device lock screen Push notication of device alarm (mobile device locked)
Push notication of device alarm (mobile device unlocked)
Alarm priority is denoted using specic colors, as shown in
Table 5. Alarm Colors
High-priority alarm Medium-priority alarm Low-priority alarm Notication
Red Yellow* Yellow* Light blue
*Use the icon on the tile to distinguish between priorities (two exclamation points indicates a medium-priority
alarm; one exclamation point indicates a low-priority alarm).
5.2.2 Audible Indicators
There are no audible indicators within the app itself for alarms or notications.
If push notications are enabled on the mobile device, the tone associated with calendar alerts will sound
whenever the mobile device receives a push notication. This will occur even if the app is not currently running
or if the user is not currently logged into the app.
5.2.3 Events Shown
The app shows all high priority, medium priority, and low priority alarms from supported devices. The app also
shows standard device notications, reset alarms, and device disconnection notications.
Table 5
.
5.3 Clear Alarm Indicators
The app does not provide any means of clearing an alarm or alarm indicator. If a device linked to a patient is in an
alarm state, attend to the patient according to facility policies and procedures.
Indicators for an alarm or notication will continue to appear in the app until the event is no longer active on the
device.
5.4 Pause Bedside Alarms
From the app, selected users can remotely pause audible alarms on supported devices even when not at the
bedside.
To pause an audible alarm on a device, in the Device Detail view for the alarming device, tap the
audio pause button on the right side of the identier panel.
The bell icon will turn o-white during the audio paused period, which is established on the device
itself. See the device instructions for specic information.
55

Note: Enabling the remote alarm audio pause function requires specic user conguration. Consult with the
Medtronic Solution Delivery Team for assistance.
5.5 View Alarm and Notication Information
•
Warning: The Vital Sync software is intended to supplement and not to replace any part of the facility’s
monitoring. Do not rely on the Vital Sync software as the sole source of alarms. In order to assure a timely
response to device alarms, a clinician (not necessarily the clinician viewing data in the platform) must be
within visual and/or audible range of the alarming device. In order to provide medical intervention, a clinician
must interact with the device at the bedside.
Users are notied of alarms on the mobile device via push notications. Within the Vital Sync mobile app, alarms
and notications (also generally called events) are shown in several locations.
5.5.1 Push Notications
If push notications are active on the mobile device, banners will appear by default at the top of the device screen,
and the audible tone (if any) set on the device for a calendar event will sound.
The software will send push notications of events for any patient assigned to the user as a primary or secondary
assignment. See
Any annunciation delays set in the platform for primary or secondary assignment levels also apply to push
notications. See the platform reference manual for details on annunciation delays.
Section 4.7.3, Assign Patients, page 43
for details on assignment levels.
Note:
assignment.
If the device is locked, the banner appearing on the lock screen will only show the app logo and name and the
number of messages.
The software does not send push notications of events for any patient assigned to a user as a monitoring
56

Figure 39. Lock Screen with Push Notications (screen locked)
If the device is unlocked, the banner appearing on the lock screen will show each message, including the app logo
and name, the alarm message, and the patient identier (partial name and bed number).
57

Figure 40. Lock Screen with Push Notications (screen unlocked)
When a banner with a Vital Sync mobile app message appears on the mobile device screen while the user is using a
dierent app, it will also show the alarm message and patient identier.
If more than one push notication has been sent regarding the same patient, banners for all unread notications
for that patient will be grouped together. To expand the grouping to see all push notications it includes, simply
tap on the grouping. To go directly to the Vital Sync mobile app from any of its push notications, tap on the
banner.
5.5.2 Bed Tiles
If a patient has events active on a linked device, the bed tile in the Assigned Patients view or Active Alarms view
will change color to denote the priority of the event with the highest priority, and will show a message for the
event. If the event is an alarm related to a device parameter shown on the bed tile, that parameter will change color
as well.
Figure 41. Tile Detail (alarm shown)
58

1 Bed number
2 Patient name
3 Alarming parameter
Figure 42. Tile Detail (notication shown)
4 Event icon
5 Message
1 Bed number
2 Patient name
3 Event icon
4 Event message
5 Aected parameter
Note: If a reset alarm is active involving a parameter shown on the bed tile, the aected parameter will change
color to blue.
5.5.3 Active Alarms View
Bed tiles for any of the user’s assigned patients with active and annunciating device alarms or notications will
appear in the Active Alarms view. Each tile in the view has the alarm or notication message for the event with the
highest priority for that patient, with a colored border corresponding to that event’s severity.
Figure 43.
Active Alarms View (all event types shown)
59

1 Bed tile with high-priority alarm
2 Bed tile with medium-priority alarm
3 Bed tile with low-priority alarm
4 Bed tile with notication
Note: If a patient has multiple active events, only the event with the highest priority will be shown on that patient’s
bed tile in this view.
5.5.4 Assigned Patients View
Bed tiles in the Assigned Patients view for any of the user’s assigned patients with an active and annunciating
device event will show the message (and corresponding colored border) for the event.
Information and colors shown are the same as in the Active Alarms view.
Figure 44. Assigned Patients View (events shown)
1 Bed tile with reset alarm
2 Bed tile with standard notication
3 Bed tile with disconnect notication
4 Bed tile with alarm
Note: If a patient has multiple active events, only the event with the highest priority will be shown on that patient’s
bed tile in this view.
5.5.5 Device Detail View
To see detail for any active event, tap on the bed tile to access the Device Detail view.
60

Figure 45. Device Detail View (active alarm shown)
1 Message area (alarm message shown)
2 Aected parameter
3 Identier panel
The message area shows alarm or notication messages, each with an icon and a background color indicating the
event type and priority. If a device parameter is in an alarm condition, it will be highlighted in red or yellow
(depending on priority) and outlined in white. The identier panel at the bottom of the view also changes color
to match the event with the highest priority. If the device supports remote pausing of its audible alarm tone from
the app, a button to pause alarm audio will be present on the identier panel.
If a device is disconnected, the message area and identier panel will change color to light blue, and the message
area will show a disconnection icon specic to the device type. The information panel will automatically show the
device page.
61

Figure 46. Device Detail View (disconnected device shown)
Note: Parameters for other devices linked with the patient that are still communicating with the platform will still
appear in the parameter panel even when viewing device identier information for the disconnected device.
5.5.6 Stale Data
If the app does not receive data for a device parameter for more than 15 seconds, the Assigned Patients, Active
Alarms, and Device Detail views will continue to show the most recent data (and any associated events) reported
from the platform. To indicate that this data is stale (older than 15 seconds), the app will show the time elapsed
since the most recent data was received. The elapsed time appears to the right of the parameter value in the
Device Detail view, and to the right of alarm and notication message text in the Assigned Patients, Active Alarms,
and Device Detail views.
5.6 Event Priority
Built-in priority rules govern how the application shows events, especially in places where only a single event may
be displayed.
Event priority is set in the Vital Sync informatics manager. See the virtual patient monitoring platform and
informatics manager reference manual for more information.
5.7 Alarm Behavior in the Software
Alarms behave similarly in the app to how they behave in the Vital Sync virtual patient monitoring platform. For
a detailed explanation, including an explanation of annunciation delays, see the reference manual for the
platform.
62

•
Caution: Push notications in the app will be delayed for any alarm for which an annunciation delay is set up
in the Vital Sync informatics manager. Users should be aware of annunciation delays set up for alarms on any
monitored device.
63


Covidien llc
*PT00161489*
15 Hampshire Street
Manseld, MA 02048
USA
www.medtronic.com
1 800 962 9888 [T]
© 2022 Medtronic
PT00161489 A
2022-04-06
 Loading...