

Page 1

OCTOPUS® EVOLUTION
Tissue Stabilizer
Stabilisateur tissulaire
Gewebestabilisator
Estabilizador de tejido
Hartspierstabilisator
Stabilizzatore tessutale
Sydänstabilaattori
Vävnadsstabilisator
Σταθεροποιητής ιστού
Vævsstabilisator
Stabilizator pola operacyjnego
Estabilizador de tecido
Doku stabilizatörü
Stabilizátor tkáně
Stabilizátor
Tkanivový stabilizátor
TS2000
Directions for Use ■ Mode d'emploi ■ Gebrauchsanweisung ■
Instrucciones de uso
■
Käyttöohjeet ■ Bruksanvisning ■ Οδηγίες χρήσης ■
l'uso
Brugsanvisning
utilização
Használati útmutató
c Caution: Federal law (USA)
restricts this device to sale by or on
the order of a physician.
■
Kullanım Talimatları ■ Návod k použití ■
■
Gebruiksaanwijzing ■ Istruzioni per
■
Instrukcja użytkowania ■ Instruções de
■
Návod na použitie
c
Page 2

Page 3

Explanation of symbols on package labeling.
Explication des symboles des étiquettes sur l’emballage.
Erklärung der Symbole auf dem Verpackungsetikett
Explicación de los símbolos en el etiquetado del envase.
Verklaring van de symbolen op de verpakkingslabels.
Spiegazione dei simboli sulle etichette della confezione
Pakkauksen merkintöjen selitykset.
Förklaring av symboler på förpackningsetiketten.
Επεξήγηση τω ν συμβόλων στην ετικέτα της συσκευασίας.
Forklaring af symboler på emballagens mærkater.
Objaśnienie symboli zamieszczonych na etykiecie opakowania.
Explicação dos símbolos nas etiquetas da embalagem.
Ambalaj etiketindeki sembollerin açıklamaları.
Vysvětlení symbolů na štítcích obalu.
A csomagoláson látható szimbólumok jelentése
Vysvetlivky k symbolom na označení balenia.
Refer to the device labeling to see which symbols apply to this product.
Se référer aux étiquettes sur le produit pour savoir quels symboles
s’appliquent à ce produit.
Welche Symbole für dieses Produkt zutreffen, entnehmen Sie bitte dem
Etikett auf der Verpackung.
Consulte la etiqueta del dispositivo para comprobar qué símbolos se
utilizan con este producto.
Controleer het verpakkingslabel om te zien welke symbolen op dit
product van toepassing zijn.
Vedere le etichette sulla confezione del dispositivo per sapere quali
simboli si applicano a questo prodotto.
Katso pakkauksen merkinnöistä, mitkä symbolit koskevat tätä tuotetta.
Se etiketten på enheten för de symboler som gäller denna produkt.
Ανατρέξτε στην ετικέτα της συσκευασίας για να δείτε ποια σύμβολα
ισχύουν για το προϊόν αυτό.
Se de symboler der gælder for dette produkt, på mærkaten på enheden.
Aby określić, które z poniższych symboli dotyczą niniejszego produktu,
należy zapoznać się z etykietą urządzenia.
Consultar as etiquetas do dispositivo para ver que símbolos se aplicam
a este produto.
Bu ürünle ile ilgili sembolleri görmek için cihazın etiketine bakın.
Zkontrolujte štítky na obalu, abyste zjistili, které symboly se vztahují na
tento výrobek.
A termékre vonatkozó jeleket lásd az eszköz címkéjén.
Prezrite si označenie prístroja, aby ste zistili, ktoré symboly sa vzťahujú
na tento výrobok.
1
Page 4

Conformité Européenne (European Conformity). This
symbol means that the device fully complies with
European Council Directive 93/42/EEC.
Conformité Européenne. Ce symbole signifie que
l’appareil est entièrement conforme à la Directive
européenne 93/42/CEE.
Conformité Européenne (Europäische Konformität).
Dieses Symbol besagt, dass das Gerät allen Vorschriften
der Direktive 93/42/EWG des Europäischen Rates
entspricht.
Conformité Européenne (Conformidad Europea). Este
símbolo indica que el dispositivo cumple totalmente la
Directiva del Consejo Europeo 93/42/CEE.
Conformité Européenne (Europese Conformiteit).
Dit symbool betekent dat het apparaat volledig voldoet
aan de Europese Richtlijn 93/42/EEG.
Conformité Européenne (Conformità Europea). Questo
simbolo significa che l'apparecchio è conforme alla
Direttiva del Consiglio Europeo 93/42/CEE.
Conformité Européenne (eurooppalainen
vaatimustenmukaisuus). Tämä symboli tarkoittaa, että
laite on kaikilta osin Euroopan unionin neuvoston
direktiivin 93/42/ETY mukainen.
Conformité Européenne (Europeisk standard). Denna
symbol betyder att utrustningen helt följer Rådets direktiv
93/42/EEG.
Conformité Européenne (Eυρωπαϊκή Συμμόρφωση). Το
σύμβολο αυτό σημαίνει ότι η συσκευή συμμορφώνεται
πλήρως με την Οδηγία του Ευρωπαϊκού Συμβουλίου
93/42/ΕΟΚ.
Conformité Européenne (Europæisk Standard). Dette
symbol betyder at enheden fuldt ud overholder det
Europæiske Råds Direktiv 93/42/EØF.
Conformité Européenne (zgodność z normami Unii
Europejskiej). Symbol ten oznacza, że produkt spełnia
wszystkie wymagania Dyrektywy Rady Europejskiej 93/
42/EWG.
Conformité Européenne (Conformidade Europeia). Este
símbolo significa que o dispositivo está em total
conformidade com a Directiva Europeia 93/42/CEE.
Conformité Européenne (Avrupa Normlarına Uygunluk).
Bu sembol, cihazın Avrupa Konseyi Direktifi 93/42/EEC
ile tamamen uyumlu olduğu anlamına gelir.
Conformité Européenne (Evropská shoda). Tento symbol
znamená, že toto zařízení zcela splňuje požadavky
evropského nařízení 93/42/EEC.
Conformité Européenne (European Conformity). Ez a
szimbólum azt jelenti, hogy az eszköz teljes mértékben
megfelel az Európa Tanács 93/42/EGK irányelve
követelményeinek.
Conformité Européenne (European Conformity).
Tento symbol znamená, že prístroj úplne vyhovuje
požiadavkám uvedeným v smernici 93/42/EEC.
Nonpyrogenic / Apyrogène / Nichtpyrogen / Apirógeno /
Niet-pyrogeen / Non pirogeno / Pyrogeenitön / Ickepyrogen / Μη πυρετογόνο / Non-pyrogen / Produkt
niepirogenny / Não pirogénico / Pirojen olmayan /
Apyrogenní / Nem pirogén / Apyrogιnne
Sterilized Using Ethylene Oxide / Stérilisation par oxyde
d'éthylène / Sterilisiert mittels Äthylenoxid / Esterilizado
mediante óxido de etileno / Gesteriliseerd met
ethyleenoxide / Sterilizzato con ossido di etilene /
Steriloitu etyleenioksidilla / Steriliserad med etylenoxid /
Αποστειρωμένο με αιθυλενοξείδιο / Steriliseret med
ætylenoxid / Produkt sterylizowany tlenkiem etylenu /
Esterilizado utilizando óxido de etileno / Etilen Oksit ile
Sterilize Edilmiştir / Sterilizováno ethylen oxidem / Etilénoxiddal sterilizálva / Sterilizované pomocou etylénoxidu
2
Page 5

Do Not Reuse / Ne pas réutiliser / Nicht
wiederverwenden / No reutilizar / Voor éénmalig gebruik /
Non riutilizzare / Kertakäyttöinen / Får inte
återanvändas / Μην επαναχρησιμοποιείτε / Må ikke
genbruges / Nie nadaje się do powtórnego użycia / Não
reutilizar / Yeniden Kullanmayın / Nepoužívejte
opakovaně / Egyszeri használatra / Nepoužívajte
opakovane
Use By / À utiliser jusqu'au / Zu verwenden bis
einschließlich / No utilizar después de / Te gebruiken tot
en met / Non usare dopo il / Käytettävä viimeistään / Får
användas till och med / Χρήση μέχρι και / Kan anvendes
til og med / Termin ważności / Não utilizar depois de /
Son Kullanma Tarihi / Datum použitelnosti / Lejárat /
Dátum najneskoršej spotreby
Lot Number / Numéro de lot / Losnummer / Número de
lote / Partijnummer / Numero di lotto / Eränumero /
Lotnummer / Αριθμός παρτίδας / Partinummer / Numer
partii / Número de lote / Lot Numarası / Číslo šarže /
Sorozatszám / Číslo šarže
For US Audiences Only / Ne s'applique qu'aux ÉtatsUnis / Gilt nur für Leser in den USA / Sólo aplicable en
EE.UU. / Alleen van toepassing voor de V.S. /
Esclusivamente per il mercato statunitense / Koskee vain
Yhdysvaltoja / Gäller endast i USA / Μόνο για πελάτες
εντός των Η.Π.Α. / Gælder kun i USA / Dotyczy tylko
użytkowników z USA / Apenas aplicável aos E.U.A. /
Yal nızca ABD'li Okuyucular İçin / Pouze pro uživatele
z USA / Csak egyesült államokbeli felhasználóknak /
Len pre používateľov v USA
Quantity / Quantité / Anzahl / Cantidad / Aantal /
Quantità / Määrä / Antal / Ποσότητα / Antal / Ilo
Quantidade / Miktar / Množství / Mennyiség / Množstvo
Open Here / Ouvrir ici / Hier öffnen / Abrir aquí / Hier
openen / Aprire qui / Avaa tästä / Öppna här / Ανοίξτε
εδώ / Åbnes her / Otwierać tutaj / Abrir aqui / Buradan
Açın / Zde otevřít / Itt nyílik / Tu otvoriť
Attention, See Instructions for Use / Attention, voir le
mode d'emploi / Achtung, siehe Gebrauchsanweisung /
Atención, consulte las instrucciones de uso / Attentie, zie
gebruiksaanwijzing / Attenzione, vedere le istruzioni per
l'uso / Huomio, katso käyttöohjeet / Obs! Se
bruksanvisningen / Προσοχή, δείτε τις οδηγίες χρήσης /
Obs! Se brugsanvisningen / Uwaga — patrz instrukcja
użytkowania/ Atenção, ver instruções de utilização /
Dikkat, Kullanım Talimatlarına Bakın / Pozor, viz návod
k použití / Figyelem! Tanulmányozza a használati
utasítást. / Pozor, pozrite pokyny pre používanie
Package Contents / Contenu de l'emballage /
Packungsinhalt / Contenido del envase / Inhoud van de
verpakking / Contenuto della confezione / Pakkauksen
sisältö / Förpackningens innehåll / Περιεχόμενα
συσκευασίας / Pakkens indhold / Zawartość opakowania
/ Conteúdo da embalagem / Ambalajın İçindekiler /
Obsah balení / A csomag tartalma / Obsah balenia
Maximum Capacity / Capacité maximale / Maximale
Kapazität / Capacidad máxima / Maximale capaciteit /
Capacità massima / Maksimitilavuus / Maximal
kapacitet / Μέγιστη χωρητικότητα / Maksimal kapacitet /
Maksymalna pojemność / Capacidade máxima /
Maksimum Kapasite / Maximální kapacita / Maximális
kapacitás / Maximálny objem
ść /
3
Page 6

Latex Free / Ne contient pas de latex / Latexfrei / Sin
látex / Latex-vrij / Senza lattice / Ei sisällä lateksia /
Latexfri / Χωρίς λάτεξ / Uden latex / Nie zawiera lateksu /
Não contém látex / Lateks İçermez / Neobsahuje latex/
Latexmentes / Neobsahuje latex
4
Page 7

6
5
7
10
8
9
1
4
3
2
Octopus® Evolution
Figure 1 /
Figure 1 / Abbildung 1 / Figura 1 / Afbeelding 1 / Figura 1 / Kuva 1 /
Figur 1 / Εικόνα 1 / Figur 1 / Rycina 1 / Figura 1 / Şekil 1 / Obrázek 1 /
1.
Tissue stabilizers / Stabilisateurs tissulaires / Gewebestabilisatoren
Estabilizadores de tejido / Weefselstabilisatoren / Stabilizzatori
tessutali / Sydänstabilaattorit / Vävnadsstabilisatorer /
Σταθεροποιητές ιστού / Vævsstabilisatorer / Estabilizadores de
tecido / Stabilizatory pola operacyjnego / Doku stabilizatörleri /
Stabilizátory tkáně / Tapadókorongos talpak / Stabilizátorové
ramienka
2. Articulating arm / Bras articulé / Flex-Arm / Brazo articulado /
Flexibele arm / Braccio articolato / Nivelletty varsi / Ledad arm /
Αρθρωτός βραχίονας / Leddelt arm / Ramię przegubowe / Braço
articulado / Eklemli kol / Ohebné rameno / Csuklós kar /
Polohovateľné rameno
3. Mounting clamp / Clamp de montage / Befestigungsklemme / Pinza
de montaje / Montageklem / Morsetto di bloccaggio /
Lukitusmekanismi / Monteringsklämma / Σφιγκτήρας στερέωσης /
Monteringsklemme / Zacisk mocujący / Grampo de montagem /
Montaj kelepçesi / Upínací svěrka / Rögzítőpofa / Upínacia svorka
4. Turret / Tourelle / Drehachse / Torreta / Draaikop / Torretta /
Taivutusnivel / Vridbart fäste / Πυργίσκος / Drejetårn / Głowica /
Canhão / Taret / Hlavice / Forgófej / Otočný kĺb
5. Tension indicato r / Indicateur de tension / Zugindika tor / Indicador de
tensión / Spanningsindicator / Indicatore di tensione / Kiristymisen
osoitin / Spänningsindikator / Δείκτης διάτασης /
Spændingsindikator / Wskaźnik sztywności / Indicador da tensão /
Gerilim göstergesi / Indikátor napětí / Feszülésjelző / Indikátor
napnutia
6. Knob / Bouton / Feststellschraube / Mando roscado / Knop /
Manopola / Kiristysruuvi / Skruvhandtag / Περιστροφική λαβή /
Drejehåndtag / Pokrętło /
Uťahovacia skrutka
7. Clamp lever / Manette du clamp / Klemmenhebel / Palanca de pinza
/ Klemhendel / Leva del morsetto / Lukitusvarmistin / Låsklämma /
Μοχλός σφιγκτήρα / Klemmens løftestang / Dźwignia zacisku /
Alavanca do grampo / Kelepçe kolu / Upínací páčka / Rögzítőpofa
kallantyúja / Páka svorky
8.
0.32 cm (1/8 in.) ID suction tubing / Tubulure d'aspiration à D.I. de
0,32 cm (1/8 pouce) / Absaugschlauch (Innendurchmesser 0,32 cm
(1/8 in.)
/ Tubo de aspiración de 0,32 cm (1/8”) de diámetro interno /
0,32 cm (1/8 inch) ID zuigslang / Tubo di aspirazione da 0,32 cm
(1/8 in.) di diametro interno / Imuletku, sisähalkaisija 0,32 cm /
0,32 cm (1/8 tuumaa) ID vakuumslang / Εσωτερική διάμετρος
σωλήνωσης αναρρόφησης 0,32 cm (1/8 in.) / sugeslange med
0,32 cm
(1/8 in.)
wewnętrznej 0,32 cm (1/8 cala) / 0,32 cm ID emme borusu /
Tubagem de sucção de 0,32 cm (1/8 pol.) / Sací trubice s vnitřním
průměrem 0,32 cm (1/8 palce) / 0,32 cm (1/8 hüvelyk) belső
átmérőjű szívócső / 0,32 cm (1/8-palcové) podtlakové hadičky
(vnútorný priemer)
1. ábra / Obrázok 1
Botão / Topuz / Knoflík / Állítógomb /
indre diameter / Rurka ssąca o średnicy
/
5
Page 8
9. Tubing clip / Clip de la tubulure / Schlauchklemme / Pinza para el
tubo / Slangklem / Clip del tubo / Letkupuristin / Slangklämma / Κλιπ
σωλήνωσης / Slangeklemme / Klips rurki / Pinça da tubagem / Boru
klipsi / Svorka / Csőzáró / Svorka hadičky
10. Stopcock / Robinet / Absperrhahn / Llave de paso / Driewegkraan /
Rubinetto di arresto / Kolmitiehana / Avstängningskran / Στρόφιγγα /
Stophane / Kranik / Válvula de retenção / Vana / Uzavírací kohout /
Zárócsap / Zatvárací ventil
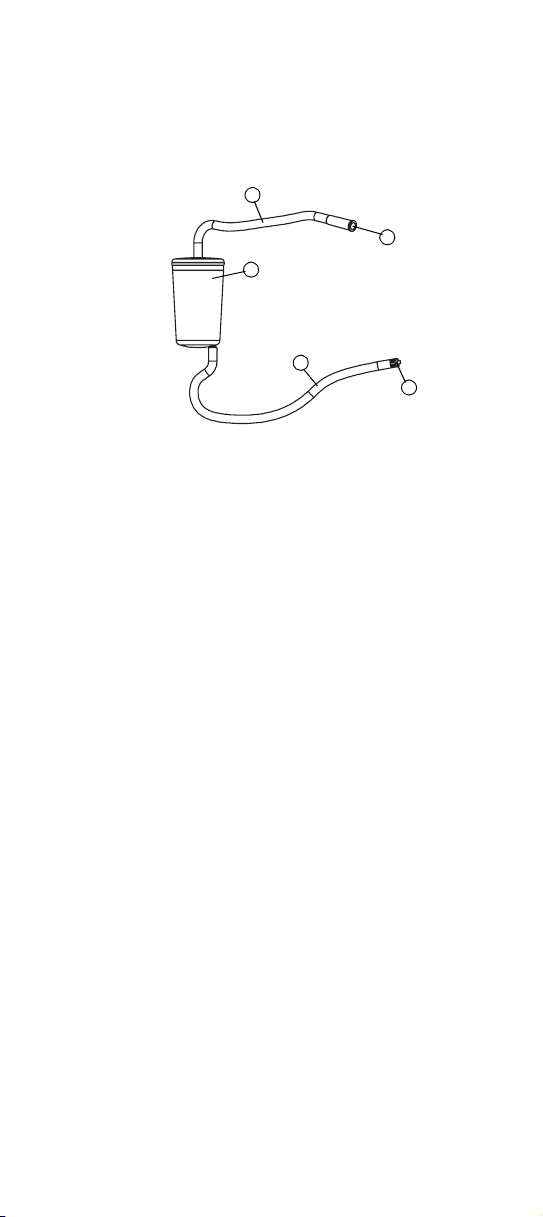
12
14
13
12
11
Figure 2 / Abbildung 2 / Figura 2 / Afbeelding 2 / Figura 2 / Kuva 2 /
Figure 2 /
Figur 2 / Εικόνα 2 / Figur 2 / Rycina 2 / Figura 2 / Şekil 2 / Obrázek 2 /
11. Luer connector / Connecteur luer / Luer-Konnektor / Conector lúer /
Luer-connector / Connettore luer / Luer-liitin / Luer-anslutning /
Σύνδεσμος luer / Luerkonnektor / Łącznik typu luer / Conector Luer /
Luer bağlayıcısı / Spojka typu Luer / Luer-csatlakozó / Spojka typu
Luer
12. 0.64 cm (1/4 in.) ID suction tubing / Tubulure d'aspiration à D.I. de
0,64 cm (1/4 pouce) / Absaugschlauch (Innendurchmesser 0,64 cm
(1/4 in.)) / Tubo de aspiración de 0,64 cm (1/4”) de diámetro interno /
0,64 cm (1/4 inch) ID zuigslang / Tubo di aspirazione da 0,64 cm (1/4
in.) di diametro interno / Imuletku, sisähalkaisija 0,64 cm (1/4
tuumaa) / 0,64 cm (1/4 in.) ID vakuumslang / Σωλήνωση
αναρρόφησης εσωτερικής διαμέτρου 0,64 cm (1/4 in.) / sugeslange
med 0,64 cm(1/4 in.) indre diameter / Rurka ssąca o średnicy
wewnętrznej 0,64 cm (1/4 cala) / Tubagem de sucção de 0,64 cm
(1/4 pol.) / 0,64 cm ID emme borusu / Sací trubice s vnitřním
průměrem 0,64 cm (1/4-palce) / 0,64 cm (1/4 hüvelyk) belső
átmérőjű szívócső / 0,64 cm (1/4-palcové) podtlakové hadi
(vnútorný priemer)
13. Canister with internal filter (150cc maximum capacity) / Récipient à
filtre interne (capacité maximale de 150 cc) / Behälter mit
eingebautem Filter (maximale Kapazität 150 ml) / Depósito con filtro
interno (capacidad máxima 150 mL) / Filterbus met intern filter
(150 cc maximale capaciteit) / Raccoglitore per i liquidi con filtro
interno (capacità massima 150 cc) / Imusäiliö, jossa on sisäinen
suodatin (maksimitilavuus 150 ml) / Behållare med invändigt filter
(maximal kapacitet 150 ml) / Μεταλλικό δοχείο με εσωτερικό φίλτρο
(μέγιστη χωρητικότητα 150 cc) / Beholder med internt filter
(maksimal kapacitet 150 cc) / Zbiornik z filtrem wewnętrznym (maks.
pojemność 150 cm sześc.) / Caixa com filtro interno (capacidade
máxima de 150 ml) / İç filtreli kutu (150cc maksimum kapasite) /
Nádobka s vnitřním filtrem (maximální kapacita 150 ml) / Belső
szűrővel ellátott tartály (maximális kapacitás: 150 köbcentiméter) /
Nádržka s vnútorným filtrom (maximálna kapacita 150 ml)
14. Regulated suction source connection / Connexion à la source
d'aspiration régulée / Anschluss zum Vakuum-Regler / Conexión a la
fuente de aspiración regulada / Gereguleerde zuigeraansluiting /
Connessione per fonte di aspirazione regolabile / Säädellyn
imulähteen liitin / Reglerbar vakuumanslutning / Σύνδεσμος
ρυθμιζόμενης πηγής αναρρόφησης / Reguleret sugekildeforbindelse /
Połączenie z regulowanym źródłem ssania / Ligação de fonte de
sucção regulada / Düzenlenmiş emme kaynağı bağlantısı / Připojení
zdroje regulovaného podtlaku / Csatlakozás a szabályozható
erősségű szíváshoz / Prípojka na zdroj riadeného podtlaku
2. ábra / Obrázok 2
čky
6
Page 9

4.5
4.2
3.3
Figure 3 /
Figure 3 / Abbildung 3 / Figura 3 / Afbeelding 3 / Figura 3 / Kuva 3 /
Figur 3 / Εικόνα 3 / Figur 3 / Rycina 3 / Figura 3 / Şekil 3 / Obrázek 3 /
3. ábra / Obrázok 3
4.1
4.3
Figure 4 / Abbildung 4 / Figura 4 / Afbeelding 4 / Figura 4 / Kuva 4 /
Figur 4 / Εικόνα 4 / Figur 4 / Rycina 4 / Figura 4 / Şekil 4 / Obrázek 4 /
1
a
4. ábra / Obrázok 4
2
1
b
Figure 5 /
Figure 5 / Abbildung 5 / Figura 5 / Afbeelding 5 / Figura 5 / Kuva 5 /
Figure 4 /
Figur 5 / Εικόνα 5 / Figur 5 / Rycina 5 / Figura 5 / Şekil 5 / Obrázek 5 /
1. Vacuum / Aspiration / Vakuum / Vacío / Vacuüm / Aspirazione
(vuoto) / Tyhjiö / Vakuum / Κενό / Vakuum / Ssanie / Vácuo /
Vakum / Podtlak / Vákuum / Podtlakový systém
2. Octopus
®
Octopus® Gewebestabilisator / Estabilizador de tejido Octopus® /
Octopus® hartspierstabilisator / Stabilizzatore tessutale Octopus® /
Octopus
Σταθεροποιητής ιστού Octopus® / Octopus® vævsstabilisator /
Stabilizator pola operacyjnego Octopus® / Estabilizador de tecido
Octopus
Octopus® / Octopus® stabilizátor / Octopus® Tkanivový stabilizátor
Tissue Stabilizer / Stabilisateur tissulaire Octopus® /
®
-sydänstabilaattori / Octopus® vävnadsstabilisator /
®
/ Octopus® Doku Stabilizatörü / Stabilizátor tkáně
5. ábra / Obrázok 5
2
7
Page 10

8
Page 11

Directions for Use
Octopus® Evolution
Model
TS2000
Description
The Octopus
stabilizer that consists of two tissue stabilizers attached to an articulating
arm (arm). The arm fastens to a retractor by use of a mounting clamp. A
stopcock provides on/off control of suction (Figure 1). With the tissue
stabilizers placed on either side of the anastomotic site, suction is applied
to stabilize the tissue. The arm is tightened and loosened by the knob.
Sterile, Nonpyrogenic, Disposable, Single use only.
Note: The mounting clamp has been designed to be compatible with
most adult median sternotomy retractors. Retractor compatibility should
be confirmed prior to beginning the procedure.
Indications
This product is intended to stabilize and minimize the motion of selected
areas of the beating heart during cardiac surgery.
Contraindications
This product is not intended for use except as indicated above. Do not
position the tissue stabilizers over a coronary artery or newly infarcted or
aneurysmal heart tissue.
Warnin gs
Patient and procedure selection is the responsibility of the medical
professional and the outcome is dependent on many variables, including
patient anatomy, pathology, and surgical techniques.
This product is not intended for use as a heart positioner.
Precautions
the order of a physician.
The directions for use are furnished for information purposes only.
The product is designed and intended for single use only: DO NOT
RESTERILIZE OR REUSE.
The initial spacing between the right and left tissue stabilizers is
important for optimal performance. The initial spacing between the tissue
stabilizers will affect stabilization and tension on the tissue and should be
chosen at the surgeon’s discretion.
Canister must be oriented in a vertical position.
Do not fill past the line on canister.
Do not exceed (-)400 mm Hg of suction.
Adverse Effects
None known.
®
Evolution TS2000 is a disposable, retractor-based
Caution: Federal law (USA) restricts this device to sale by or on
FULL
Instructions for Use English 9
Page 12

Directions for Use
1. Inspect the packages and products for damage and expiration date.
1.1 If undamaged and unexpired, open the packages and transfer
the Octopus
2. Suction circuit hook-up:
the sterile field utilizing aseptic technique.
2.1 Attach tubing (not supplied) from the operating room suction
source to the back of the regulator. Turn regulator on and set
vacuum to (-)400 mm Hg.
2.2 Connect the tubing from the Octopus
luer connection of the canister tubing set (Figure 2). Utilizing
aseptic technique, pass the suction source connection end of
the canister tubing set off of the sterile field and connect it to
the vacuum regulator. Utilize the stopcock on the sterile field to
control vacuum (on/off) during the procedure.
Note: Canister must be oriented in a vertical position.
3. Attach device to the retractor.
4. Position tissue stabilizers onto designated anastomotic site. The
5. To remove the tissue stabilizers, support the heart and terminate
6. Turn the knob counterclockwise to loosen the arm, and gently lift
7. When finished, remove the device from the retractor and discard
Note: Do not fill past the line on canister.
3.1 With clamp lever in the unlocked position, slide open the
mounting clamp.
3.2 Place mounting clamp onto the retractor, ensuring clamp
contact is flush with the retractor.
3.3 Move the lever to the locked position to secure the clamp to
the retractor. Check that the clamp is securely fastened to the
retractor (Figure 3).
following steps are recommended:
4.1 Shape the malleable portion of the tissue stabilizers to
conform with the heart (Figure 4).
Caution: Do not exceed a 25 degree bend in any axis.
Exceeding this angle may occlude the lumen. Repeated
bending of the tissue stabilizers may compromise device
performance.
4.2 Rotate turret to desired position (Figure 3).
4.3 If tissue stabilizer spread is desired, utilize the flexibility in the
wire-loop headlink to approximate the tissue stabilizers inward
prior to application on the epicardial surface (Figure 4).
4.4 After the tissue stabilizers are applied to the epicardial
surface, turn suction on by turning the stopcock to the off-to-air
position and release the tissue stabilizers (Figure 5a). Allow
tension in the wire-loop headlink to provide traction lateral to
the anastomotic site.
4.5 Turn the knob clockwise to immobilize the arm. The tension
indicator appears red when the arm reaches maximum
tension.
suction by turning stopcock to the off-to-vacuum position
(Figure 5b).
the tissue stabilizers from the heart.
according to approved hospital procedures.
®
Tissue Stabilizer and canister tubing set onto
®
Tissue Stabilizer to the
FULL
10 English Instructions for Use
Page 13

THE FOLLOWING DISCLAIMER OF WARRANTY APPLIES TO
UNITED STATES CUSTOMERS ONLY:
DISCLAIMER OF WARRANTY
ALTHOUGH THE OCTOPUS
MODEL TS2000, HEREAFTER REFERRED TO AS “PRODUCT” HAS
BEEN MANUFACTURED UNDER CAREFULLY CONTROLLED
CONDITIONS, MEDTRONIC HAS NO CONTROL OVER THE
CONDITIONS UNDER WHICH THIS PRODUCT IS USED.
MEDTRONIC, THEREFORE DISCLAIMS ALL WARRANTIES, BOTH
EXPRESS AND IMPLIED, WITH RESPECT TO THE PRODUCT,
INCLUDING, BUT NOT LIMITED TO, ANY IMPLIED WARRANTY OF
MERCHANTABILITY OR FITNESS FOR A PARTICULAR PURPOSE.
MEDTRONIC SHALL NOT BE LIABLE TO ANY PERSON OR ENTITY
FOR ANY MEDICAL EXPENSES OR ANY DIRECT, INCIDENTAL OR
CONSEQUENTIAL DAMAGES CAUSED BY ANY USE, DEFECT,
FAILURE OR MALFUNCTION OF THE PRODUCT, WHETHER A
CLAIM FOR SUCH DAMAGES IS BASED UPON WARRANTY,
CONTRACT, TORT OR OTHERWISE. NO PERSON HAS ANY
AUTHORITY TO BIND MEDTRONIC TO ANY REPRESENTATION OR
WARRANTY WITH RESPECT TO THE PRODUCT.
The exclusions and limitations set out above are not intended to, and
should not be construed so as to, contravene mandatory provisions of
applicable law. If any part or term of this Disclaimer of Warranty is held to
be illegal, unenforceable or in conflict with applicable law, by a court of
competent jurisdiction, the validity of the remaining portions of this
Disclaimer of Warranty shall not be affected, and all rights and o bligations
shall be construed and enforced as if this Disclaimer of Warranty did not
contain the particular part or term held to be invalid.
THE FOLLOWING DISCLAIMER OF WARRANTY APPLIES TO
CUSTOMERS OUTSIDE THE UNITED STATES:
®
EVOLUTION TISSUE STABILIZER,
DISCLAIMER OF WARRANTY
ALTHOUGH THE OCTOPUS
MODEL TS2000, HEREAFTER REFERRED TO AS “PRODUCT” HAS
BEEN CAREFULLY DESIGNED, MANUFACTURED AND TESTED
PRIOR TO SALE, THE PRODUCT MAY FAIL TO PERFORM ITS
INTENDED FUNCTION SATISFACTORILY FOR A VARIETY OF
REASONS. THE WARNINGS CONTAINED IN THE PRODUCT
LABELING PROVIDE MORE DETAILED INFORMATION AND ARE
CONSIDERED AN INTEGRAL PART OF THIS DISCLAIMER OF
WARRANTY. MEDTRONIC, THEREFORE, DISCLAIMS ALL
WARRANTIES, BOTH EXPRESS AND IMPLIED, WITH RESPECT TO
THE PRODUCT. MEDTRONIC SHALL NOT BE LIABLE FOR ANY
INCIDENTAL OR CONSEQUENTIAL DAMAGES CAUSED BY ANY
USE, DEFECT OR FAILURE OF THE PRODUCT, WHETHER THE
CLAIM IS BASED ON WARRANTY, CONTRACT, TORT OR
OTHERWISE.
The exclusions and limitations set out above are not intended to, and
should not be construed so as to, contravene mandatory provisions of
applicable law. If any part or term of this Disclaimer of Warranty is held
by any court of competent jurisdiction to be illegal, unenforceable or in
conflict with applicable law, the validity of the remaining portion of the
Disclaimer of Warranty shall not be affected, and all rights and o bligations
shall be construed and enforced as if this Disclaimer of Warranty did not
contain the particular part or term held to be invalid.
®
EVOLUTION TISSUE STABILIZER,
Instructions for Use English 11
Page 14

12 English Instructions for Use
Page 15

Mode d'emploi
Octopus® Evolution
Modèle
TS2000
Description
Le stabilisateur jetable Octopus
écarteur est composé de deux stabilisateurs tissulaires fixés à un bras
articulé (le bras). Le bras se fixe à un écarteur à l'aide d'un clamp de
montage. Un robinet permet d'appliquer ou d'arrêter l'aspiration
(Figure 1). Les stabilisateurs tissulaires sont placés de chaque côté du
site de l'anastomose et une aspiration est appliquée afin de stabiliser le
tissu. Le bouton permet de serrer et de relâcher le bras.
Stérile, apyrogène, jetable, réservé à un usage unique.
Remarque : Le clamp de montage est conçu pour être compatible avec
la majorité des écar teurs pour sternotomie médiane chez les adultes.
Vérifier la compatibilité des écarteurs avant l'opération.
Indications
Ce produit est conçu pour stabiliser et minimiser le mouvement des
zones sélectionnées du cœur pendant une chirurgie cardiaque.
Contre-indications
Ce dispositif ne doit être utilisé que pour l'indication décrite ci-dessus. Ne
pas placer les stabilisateurs tissulaires sur une artère coronaire, un tissu
cardiaque récemment touché par un infarctus ou un tissu cardiaque
anévrismal.
Avertissements
La sélection des patients et les procédures chirurgicales engagent la
responsabilité du professionnel médical. Le résultat dépend de
nombreuses variables, dont l'anatomie et la pathologie du patient ainsi
que des techniques chirurgicales employées.
Ce dispositif ne doit pas être utilisé comme positionneur cardiaque.
Précautions
Attention : La réglementation américaine n'autorise la vente de
ce produit que sur prescription médicale.
Le mode d'emploi n'est fourni qu'à titre informatif.
Le produit est conçu et réservé à un usage unique : NE PAS
RESTÉRILISER NI RÉUTILISER.
L'espace initial entre les stabilisateurs tissulaires droit et gauche joue un
rôle important. L'espace initial entre les stabilisateurs tissulaires affecte
la stabilisation et la tension appliquée aux tissus ; c'est le chirurgien qui
détermine cet espace.
Le récipient doit être positionné à la verticale.
Ne pas dépasser la ligne du récipient.
L'aspiration ne doit pas dépasser (-) 400 mm Hg.
Effets secondaires
Aucun effet secondaire connu.
®
Evolution TS2000 à monter sur un
FULL
Mode d'emploi Français 13
Page 16

Mode d'emploi
1. Inspecter les emballages et les produits pour s'assurer que ces
derniers ne sont pas endommagés et que la date de péremption
n'est pas dépassée.
1.1 Si l'emballage et les produits ne sont pas endommagés et si la
date de péremption n'est pas dépassée, ouvrir les emballages
et transférer le stabilisateur tissulaire Octopus
du récipient sur le champ stérile en recourant à une technique
aseptique.
®
et la tubulure
2. Fixation du circuit d'aspiration :
2.1 Fixer la tubulure (non fournie) de la source d'aspiration de la
salle d'opération à l'arrière du régulateur. Allumer le régulateur
et régler l'aspiration à (-) 400 mm Hg.
2.2 Raccorder la tubulure du stabilisateur tissulaire Octopus
connecteur luer de la tubulure du récipient (Figure 2). En
recourant à une technique aseptique, faire passer la
connexion à la source d'aspiration de la tubulure du récipent
hors du champ stérile avant de le raccorder au régulateur
d'aspiration. Pendant l'intervention, utiliser le robinet sur le
champ stérile pour contrôler le démarrage et l'arrêt de
l'aspiration.
Remarque : Le récipient doit être positionné à la verticale.
3. Fixer le dispositif sur l'écarteur.
4. Placer les stabilisateurs tissulaires sur le site de l'anastomose. Les
5. Pour retirer les stabilisateurs tissulaires, maintenir le cœur et
6. Tourner le bouton dans le sens inverse des aiguilles d'une montre
7. Si la procédure est finie, retirer l'appareil de l'écarteur et le jeter
Remarque : Ne pas dépasser la ligne du récipient.
3.1 Déverrouiller la manette du clamp et ouvrir le clamp de
montage.
3.2 Placer le clamp de montage sur l'écarteur, en veillant à ce que
le contact du clamp de montage soit au niveau de l'écarteur.
3.3 Verrouiller la manette pour immobiliser le clamp sur l'écarteur.
Vérifier que le clamp de montage est correctement fixé à
l'écarteur (Figure 3).
étapes suivantes sont recommandées :
4.1 Modeler la partie malléable des stabilisateurs tissulaires en
fonction de la forme du cœur (Figure 4).
Attention : Ne pas plier au-delà de 25°. Une pliure excessive
pourrait boucher l'orifice. Éviter de plier plusieurs fois les
stabilisateurs tissulaires, car cela pourrait compromettre leur
efficacité.
4.2 Faire pivoter la tourelle dans la position souhaitée (Figure 3).
4.3 Si les stabilisateurs tissulaires doivent être écartés, la
flexibilité de l'extrémité de l'arc de cercle permettra de
rapprocher les stabilisateurs avant l'application sur l'épicarde
(Figure 4).
4.4 Lorsque les stabilisateurs tissulaires ont été appliqués sur
l'épicarde, ouvrir l'aspiration (en tournant le robinet sur la
position "off") et relâcher les stabilisateurs tissulaires
(Figure 5a). La tension de l'extrémité de l'arc de cercle doit
exercer une traction latérale sur le site de l'anastomose.
4.5 Tourner le bouton dans le sens des aiguilles d'une montre
pour immobiliser le bras. L'indicateur de tension devient rouge
lorsque le bras atteint sa tension maximum.
interrompre l'aspiration en fermant le robinet.
(Figure 5b).
pour relâcher le bras et soulever doucement les stabilisateurs
tissulaires du cœur.
conformément au protocole hospitalier approuvé.
FULL
®
au
14 Français Mode d'emploi
Page 17

SEULS LES CLIENTS EN DEHORS DES ÉTATS-UNIS PEUVENT
AVOIR RECOURS AU PRÉSENT DÉNI DE GARANTIE :
DÉNI DE GARANTIE
BIEN QUE LE STABILISATEUR TISSULAIRE OCTOPUS
EVOLUTION, MODÈLE TS2000, CI-APRÈS LE "PRODUIT", AIT ÉTÉ
SOIGNEUSEMENT CONÇU, FABRIQUÉ ET TESTÉ PRÉCÉDANT LA
MISE EN VENTE, LE PRODUIT PEUT, POUR DES RAISONS
DIVERSES, CONNAÎTRE DES DÉFAILLANCES. LES MISES EN
GARDE DÉCRITES DANS LA DOCUMENTATION DU PRODUIT
CONTIENNENT DES INFORMATIONS DÉTAILLÉEES ET DOIVENT
ÊTRE CONSIDÉRÉES COMME FAISANT PARTIE INTÉGRANTE DU
PRÉSENT DÉNI DE GARANTIE. EN CONSÉQUENCE, MEDTRONIC
DÉCLINE TOUTE RESPONSABILITÉ, EXPRESSE OU IMPLICITE,
RELATIVE AU PRODUIT. MEDTRONIC NE SERA PAS TENU
RESPONSABLE DE TOUS DOMMAGES FORTUITS OU INDIRECTS
QUI SERAIENT PROVOQUÉS PAR TOUS USAGES,
DÉFECTUOSITÉS OU DÉFAILLANCES DU PRODUIT, ET CE QUE LA
PLAINTE SOIT FONDÉE SUR UNE GARANTIE, UNE
RESPONSABILITÉ CONTRACTUELLE, DÉLICTUEUSE OU
QUASI-DÉLICTUEUSE.
Les exclusions et les limitations de garantie mentionnées ci-dessus ne
sont pas, et ne doivent pas être interprétées comme contraires aux
dispositions obligatoires des lois applicables. Si une partie ou une
diposition du présent Déni de garantie devait être considérée illégale,
non applicable ou contraire à la loi en vigueur par un tribunal compétent,
la validité des autres dispositions du présent Déni de garantie ne sera
pas affectée. Dans ce cas, tous les autres droits et obligations seront
interprétés et appliqués, sans tenir compte de la partie ou la disposition
considérée comme illégale.
®
Mode d'emploi Français 15
Page 18

16 Français Mode d'emploi
Page 19

Gebrauchsanweisung
Octopus® Evolution
Modell
TS2000
Beschreibung
Der Octopus
bestimmten Stabilisator, der zusammen mit einem Thoraxsperrer
verwendet wird und sich aus zwei an einem Flex-Arm (im Folgenden:
„Arm“) angebrachten Gewebestabilisatoren zusammensetzt. Der Arm
wird mittels einer Befestigungsklemme am Thoraxsperrer angebracht.
Die Ein- und Ausschaltung der Ansaugvorrichtung erfolgt über einen
Absperrhahn (siehe Abbildung 1). Der Ansaugvorgang zur Stabilisierung
des Gewebes wird eingeleitet, sobald die Gewebestabilisatoren
beiderseits des Anastomosensitus platziert sind. Der Arm wird mittels
der Feststellschraube festgezogen oder gelockert.
Steriles pyrogenfreies Einwegprodukt zur einmaligen Verwendung.
Note: Die Befestigungsklemme ist zu den meisten Thoraxsperrern für
die mediane Sternotomie beim Erwachsenen kompatibel. Die
Kompatibilität des Thoraxsperrers sollte vor Beginn des Eingriffs geprüft
und bestätigt werden.
Indikationen
Dieses Produkt dient der Stabilisierung und Ruhigstellung bestimmter
Bereiche des schlagenden Herzens bei einer Herzoperation.
Kontraindikationen
Dieses Produkt ist ausschließlich für die oben genannte Verwendung
bestimmt. Die Gewebestabilisatoren nicht über einer Koronararterie,
frischem Infarktgewebe oder Aneurysmagewebe am Herzen
positionieren.
Warnhinweise
Die Auswahl von Patient und Verfahren liegt in der Verantwortung des
Arztes. Das Resultat hängt von verschiedenen Faktoren wie der
Patientenanatomie, der Pathologie und den chirurgischen Techniken ab.
Dieses Produkt ist nicht für die Herzpositionierung bestimmt.
Vorsichtsmaßnahmen
US-Bundesgesetzen nur von Ärzten gekauft oder verschrieben werden.
Diese Gebrauchsanweisung wurde ausschließlich zu
Informationszwecken erstellt.
Dieses Produkt ist nur für den einmaligen Gebrauch bestimmt: NICHT
ERNEUT STERILISIEREN ODER WIEDERVERWENDEN.
Der anfängliche Abstand zwischen dem rechten und linken
Gewebestabilisator ist für ein optimales Verhalten des Systems wichtig.
Der anfängliche Abstand zwischen den Gewebestabilisatoren hat
Auswirkungen auf die Stabilisierung des Gewebes sowie auf seine
Spannung und sollte daher vom Chirurgen sorgfältig eingestellt werden.
Der Behälter muss in eine vertikale Position gebracht werden.
Maximal bis zur -Markierung auf dem Behälter befüllen.
Ein Vakuum von (-) 400 mm Hg nicht überschreiten.
Nebenwirkungen
Keine bekannt.
®
Evolution TS2000 ist ein zur einmaligen Verwendung
Achtung: In den USA darf dieses Gerät aufgrund von
FULL
Gebrauchsanweisung Deutsch 17
Page 20

Gebrauchsanweisung
1. Prüfen Sie die Verpackungen und die Produkte auf Schäden und
kontrollieren Sie das Verfallsdatum.
1.1 Öffnen Sie die Verpackungen des Octopus
Gewebestabilisators, sofern die Verpackung unbeschädigt und
die Verwendungsdauer noch nicht überschritten ist, und
bringen Sie den Gewebestabilisator und das
Behälter-Schlauchset unter aseptischen Bedingungen in das
sterile Feld ein.
®
4.3
2. Anschluss des Ansaugkreislaufs:
2.1 Schließen Sie den (nicht im Lieferumfang enthaltenen)
Schlauch der Vakuumquelle des OP-Saals an der Rückseite
des Reglers an. Schalten Sie den Regler ein und stellen Sie
den Unterdruck auf (-) 400 mm Hg ein.
2.2 Schließen Sie den vom Octopus
kommenden Schlauch an den Luer-Konnektor am Behälter
des Schlauchsets an (siehe Abbildung 2). Reichen Sie den
Anschluss zum Vakuum-Regler unter aseptischen
Bedingungen aus dem sterilen Feld heraus und schließen Sie
ihn an den Vakuumregler an. Verwenden Sie den Absperrhahn
im sterilen Feld, um die Vakuumwirkung während der
Operation zu regeln.
Hinweis: Der Behälter muss in eine vertikale Position gebracht
werden.
Hinweis: Maximal bis zur -Markierung auf dem Behälter
3. Das Gerät am Thoraxsperrer befestigen.
4. Positionieren Sie die Gewebestabilisatoren am vorgesehenen
5. Unterstützen Sie zum Entfernen der Gewebestabilisatoren das
6. Drehen Sie die Feststellschraube gegen den Uhrzeigersinn, um
7. Entfernen Sie das Gerät anschließend vom Thoraxsperrer und
befüllen.
3.1 Schieben Sie die Befestigungsklemme auf, wobei der
Klemmenhebel in der nicht arretierten Stellung steht.
3.2 Positionieren Sie die Befestigungsklemme am Thoraxsperrer;
die Klemmenkontaktfläche muss bündig mit dem
Thoraxsperrer abschließen.
3.3 Bringen Sie den Klemmenhebel in die arretierte Position, um
die Klemme am Thoraxsperrer zu befestigen. Überzeugen Sie
sich davon, dass die Klemme fest am Thoraxsperrer sitzt
(Abbildung 3).
Anastomosensitus. Dazu wird die folgende Vorgehensweise
empfohlen:
4.1 Biegen Sie den formbaren Bereich des Gewebestabilisators
gemäß der Form des zu stabilisierenden Herzbereichs
(Abbildung 4).
Achtung: Die Biegung darf 25 Grad bei keiner Achse
überschreiten. Bei einem höheren Winkel kann das Lumen
okkludieren. Durch wiederholtes Biegen der
Gewebestabilisatoren kann das optimale Verhalten der
Vorrichtung beeinträchtigt werden.
4.2 Drehen Sie den Arm um die Drehachse in die gewünschte
Position (Abbildung 3).
4.3 Falls eine Spreizwirkung des Gewebestabilisators gewünscht
wird, können die Arme des Stabilisators etwas zueinander
gebogen werden, bevor die Befestigung an der
Epikardoberfläche erfolgt (Abbildung 4).
4.4 Aktivieren Sie das Vakuum nach der Befestiung der
Stabilisatorarme am Epikardgewebe, indem Sie den
Absperrhahn in die Stellung EIN drehen (Abbildung 5a). Die
Spannung in der Gabel der Stabilisatorarme stellt hierbei das
Spannen des Gewebes lateral des Anostomosensitus sicher.
4.5 Drehen Sie die Feststellschraube im Uhrzeigersinn, um den
Arm unbeweglich zu machen. Der Zugindikator zeigt an, wenn
die maximale Zugkraft des Armes erreicht ist.
Herz und deaktivieren Sie das Vakuum, indem Sie den
Absperrhahn in die Stellung AUS drehen (der mit OFF beschriftete
Hebel zeigt zur Vakuumquelle, siehe Abbildung 5b).
den Arm zu lockern, und nehmen Sie die Gewebestabilisatoren
behutsam vom Herzen ab.
entsorgen Sie es gemäß den geltenden Krankenhausvorschriften.
®
4.3 Gewebestabilisator
FULL
18 Deutsch Gebrauchsanweisung
Page 21

FOLGENDER HAFTUNGSAUSSCHLUSS GILT NUR FÜR KUNDEN
AUSSERHALB DER USA:
HAFTUNGSAUSSCHLUSS
TROTZ SORGFÄLTIGER KONSTRUKTION, HERSTELLUNG UND
VOR VERKAUF DURCHGEFÜHRTER TESTDURCHLÄUFE IST ES
MÖGLICH, DASS DER GEWEBESTABILISATOR OCTOPUS
EVOLUTION MODELL TS2000 – IM NACHFOLGENDEN ALS
„PRODUKT“ BEZEICHNET – AUS VERSCHIEDENSTEN GRÜNDEN
NICHT ZUFRIEDENSTELLEND FUNKTIONIERT. DIE HINWEISE IN
DER PRODUKTINFORMATION ENTHALTEN WEITERE
DETAILLIERTE INFORMATIONEN UND SOLLTEN ALS TEIL DES
HAFTUNGSAUSSCHLUSSES GESEHEN WERDEN. MEDTRONIC
SCHLIESST JEDE AUSDRÜCKLICHE ODER STILLSCHWEIGENDE
GARANTIE IN BEZUG AUF DAS PRODUKT AUS. MEDTRONIC
HAFTET WEDER FÜR UNMITTELBARE NOCH MITTELBARE
FOLGESCHÄDEN, DIE DURCH DEN GEBRAUCH, DURCH
STÖRUNGEN ODER FEHLFUNKTIONEN DES PRODUKTES
ENTSTEHEN, UNABHÄNGIG DAVON, OB SICH DER ANSPRUCH
AUF SCHADENSERSATZ, AUF EINE GARANTIE, EINEN VERTRAG,
EINE UNERLAUBTE HANDLUNG ODER EINE ANDERE
ANSPRUCHSGRUNDLAGE STÜTZT.
Die hier aufgeführ ten Haftungsausschlüsse und -beschränkungen sollen
nicht gegen zwingende gesetzliche Bestimmungen verstoßen und sind
nicht dahingehend auszulegen. Sollte ein zuständiges Gericht
feststellen, dass dieser Haftungsausschluss ganz oder teilweise
unwirksam, nicht durchsetzbar oder im Widerspruch zu zwingendem
Recht ist, berühr t dies die Gültigkeit der restlichen Klauseln nicht und alle
Rechte und Pflichten aus diesem Haftungsausschluss sind so
auszulegen und durchzusetzen, als sei der für ungültig erklärte Teil oder
die ungültige Vorschrift in dem Haftungsausschluss nicht enthalten.
®
Gebrauchsanweisung Deutsch 19
Page 22

20 Deutsch Gebrauchsanweisung
Page 23

Instrucciones de uso
Octopus® Evolution
Modelo
TS2000
Descripción
El estabilizador de tejido Octopus
desechable de tipo separador que consta de dos estabilizadores de
tejido acoplados a un brazo articulado (brazo). El brazo se fija a un
separador mediante una pinza de montaje. Una llave de paso permite
abrir y cerrar la aspiración (Figura 1). Con los estabilizadores de tejido
colocados a ambos lados del punto anastomótico, se aplica aspiración
para estabilizar el tejido. El brazo se aprieta y afloja con el mando
roscado.
Estériles, apirógenos, desechables y válidos para un solo uso.
Nota: La pinza de montaje se ha diseñado para ser compatible con la
mayoría de los separadores de esternotomía media para adultos. Debe
confirmarse la compatibilidad del separador antes de comenzar el
procedimiento.
Indicaciones
Este producto está diseñado para estabilizar y reducir al mínimo el
movimiento de ciertas áreas del corazón latiente durante la cirugía
cardíaca.
Contraindicaciones
Este producto no está diseñado para una utilización distinta de la
anteriormente indicada. No coloque los estabilizadores de tejido sobre
una arteria coronaria ni sobre tejido cardíaco recién infartado o
aneurismático.
Advertencias
La selección de pacientes y procedimientos es responsabilidad del
profesional médico y el resultado depende de numerosas variables,
como las características anatómicas y la enfermedad del paciente y las
técnicas quirúrgicas.
Este producto no está destinado a su utilización como posicionador de
corazón.
Medidas preventivas
Precaución: Según las leyes federales de los Estados Unidos
este dispositivo puede venderse únicamente por prescripción médica.
Las instrucciones de uso se proporcionan únicamente con fines
informativos.
El producto está diseñado y previsto para un solo uso: NO LO
REESTERILICE NI REUTILICE.
El espacio inicial entre los estabilizadores de tejido izquierdo y derecho
es importante para conseguir un funcionamiento óptimo. El espacio
inicial entre los estabilizadores de tejido afectará a la estabilización y la
tensión sobre el tejido, por lo que debe ser elegido por el cirujano.
El depósito debe estar orientado en posición vertical.
No rebase la línea de llenado del depósito.
No debe superarse una presión de aspiración de (-)400 mm Hg.
Efectos adversos
No se conocen.
®
Evolution TS2000 es un estabilizador
FULL
Instrucciones de uso Español 21
Page 24

Instrucciones de uso
1. Inspeccione los envases y productos en busca de daños y
compruebe su fecha de caducidad.
1.1 Si no están dañados ni han caducado, abra los envases y
transfiera el estabilizador de tejido Octopus
tubos del depósito al campo estéril por medio de una técnica
2. Conexión del circuito de aspiración:
aséptica.
2.1 Conecte el tubo (no suministrado) de la fuente de aspiración
del quirófano a la parte posterior del regulador. Encienda el
regulador y ajuste la presión de vacío en (-)400 mm Hg.
2.2 Conecte el tubo entre el estabilizador de tejido Octopus
conexión lúer del juego de tubos del depósito (Figura 2).
Utilizando una técnica aséptica, saque del campo estéril el
extremo de conexión de la fuente de aspiración del juego de
tubos del depósito y conéctelo al regulador de vacío. Utilice la
llave de paso ubicada en el campo estéril para controlar la
presión de vacío (abierto-cerrado) durante el procedimiento.
Nota: El depósito debe estar orientado en posición vertical.
3. Acople el dispositivo al separador.
4. Coloque los estabilizadores de tejido en el punto anastomótico
5. Para retirar los estabilizadores de tejido, sujete el corazón y finalize
6. Gire el mando roscado hacia la izquierda para aflojar el brazo y
7. Cuando haya finalizado, retire el dispositivo del separador y
Nota: No rebase la línea de llenado del depósito.
3.1 Con la palanca de pinza en la posición de desbloqueo, abra la
pinza de montaje.
3.2 Coloque la pinza de montaje en el separador, asegurándose
de que el contacto de la pinza esté alineado con el separador.
3.3 Coloque la palanca en la posición de bloqueo para asegurar la
pinza al separador. Compruebe que la pinza esté fijada
firmemente al separador (Figura 3).
previsto. Se recomienda realizar los siguientes pasos:
4.1 Dé forma a la parte maleable de los estabilizadores de tejido
para amoldarlos al corazón (Figura 4).
Precaución: No supere un ángulo de 25 grados en ningún
eje. Si lo hace, puede ocluir el lumen. El funcionamiento del
dispositivo puede verse afectado si se doblan repetidamente
los estabilizadores de tejido.
4.2 Gire la torreta hasta la posición deseada (Figura 3).
4.3 Si desea extender el estabilizador de tejido, utilice la
flexibilidad de la varilla de unión para aproximar los
estabilizadores de tejido hacia dentro antes de aplicarlos a la
superficie epicárdica (Figura 4).
4.4 Una vez aplicados los estabilizadores de tejido a la superficie
epicárdica, active la aspiración girando la llave de paso a la
posición de cierre del aire y suelte los estabilizadores de tejido
(Figura 5a). Deje que la tensión de la varilla de unión
proporcione tracción lateral al punto anastomótico.
4.5 Gire el mando roscado hacia la derecha para inmovilizar el
brazo. El indicador de tensión aparece rojo cuando el brazo
alcanza la tensión máxima.
la aspiración girando la llave de paso a la posición de cierre del
vacío (Figura 5b).
eleve con cuidado los estabilizadores de tejido del corazón.
deséchelo conforme a los procedimientos aprobados por el
hospital.
FULL
®
y el juego de
®
y la
22 Español Instrucciones de uso
Page 25

LA SIGUIENTE RENUNCIA DE RESPONSABILIDAD SE APLICA
SÓLO A LOS CLIENTES DE FUERA DE LOS ESTADOS UNIDOS:
RENUNCIA DE RESPONSABILIDAD
AUNQUE EL ESTABILIZADOR DE TEJIDO OCTOPUS
MODELO TS2000,AL QUE NOS REFERIREMOS DE AHORA EN
ADELANTE COMO "PRODUCTO", HA SIDO DISEÑADO,
FABRICADO Y PROBADO CUIDADOSAMENTE ANTES DE
PONERLO A LA VENTA, EL PRODUCTO PUEDE NO CUMPLIR SUS
FUNCIONES SATISFACTORIAMENTE POR VARIAS RAZONES. LAS
ADVERTENCIAS QUE CONTIENE LA DOCUMENTACIÓN DEL
PRODUCTO PROPORCIONAN INFORMACIÓN MÁS DETALLADA Y
SE CONSIDERAN COMO PARTE INTEGRANTE DE ESTA RENUNCIA
DE RESPONSABILIDAD. POR TANTO, MEDTRONIC RENUNCIA A
CUALQUIER RESPONSABILIDAD, TANTO EXPRESA COMO
IMPLÍCITA, CON RESPECTO AL PRODUCTO. MEDTRONIC NO
RESPONDERÁ POR LOS DAÑOS INDIRECTOS O DIRECTOS
CAUSADOS O DERIVADOS DE CUALQUIER USO, DEFECTO, FALLO
O MAL FUNCIONAMIENTO DEL PRODUCTO, AUN CUANDO LA
RECLAMACIÓN SE BASE EN UNA GARANTÍA, CONTRATO,
RESPONSABILIDAD EXTRACONTRACTUAL U OTRAS CAUSAS.
Las exclusiones y limitaciones arriba expresadas no revisten el propósito
de contravenir las disposiciones obligatorias establecidas por la
legislación vigente, ni deben interpretarse de dicha forma. En el
supuesto de que cualquier parte o término de la presente Renuncia de
Responsabilidad sea declarado por cualquier tribunal competente, como
ilegal, inaplicable o contrario a la ley, ello no afectará a la validez del resto
de la Renuncia de Responsabilidad, interpretándose y aplicándose
cuantos derechos y obligaciones se incluyen en ella como si la presente
Renuncia de Responsabilidad no contuviera la parte o condición
considerada no válida.
®
EVOLUTION,
Instrucciones de uso Español 23
Page 26

24 Español Instrucciones de uso
Page 27

Gebruiksaanwijzing
Octopus® Evolution
Model
TS2000
Beschrijving
De Octopus
eenmalig gebruik op een wondspreider, en bestaat uit twee
weefselstabilisatoren op een flexibele arm. De arm wordt vastgemaakt
op een wondspreider met behulp van een montageklem. Via de
driewegkraan kan het vacuüm in- en uitgeschakeld worden
(Afbeelding 1). Door de weefselstabilisatoren aan beide zijden van de
anastomoseplaats te positioneren, wordt een vacuüm gecreëerd
waardoor het hartweefsel wordt gestabiliseerd. De arm kan met de knop
strakker en losser worden gedraaid.
Steriel, niet-pyrogeen wegwerpartikel voor eenmalig gebruik.
Opmerking: De montageklem past op de meeste wondspreiders voor
mediane sternotomie bij volwassenen. Controleer altijd voorafgaand aan
de procedure of de montageklem op de wondspreider past.
Indicaties
Dit product is bedoeld om de beweging van geselecteerde gebieden van
een kloppend hart te stabiliseren.
Contra-indicaties
Dit product is uitsluitend bedoeld voor gebruik zoals hierboven is
aangegeven. Positioneer de weefselstabilisatoren niet op een
kransslagader of op hartweefsel dat recentelijk is getroffen door een
infarct of aneurysma.
Waarschuwingen
De selectie van patiënten en procedures valt onder de
verantwoordelijkheid van de arts en de resultaten zijn afhankelijk van
diverse factoren, zoals de anatomie en pathologie van de patiënt en de
toegepaste operatietechnieken.
Dit product mag niet worden gebruikt als hartspierstabilisator.
Voorzorgsmaatregelen
opdracht van, een arts (wetgeving V.S.).
De gebruiksaanwijzing wordt slechts ter informatie aangeboden.
Het product is uitsluitend ontworpen en bedoeld voor eenmalig gebruik:
NIET HERSTERILISEREN OF OPNIEUW GEBRUIKEN.
De gekozen ruimte tussen de linker- en rechter-weefselstabilisator is van
groot belang voor een optimale werking. De tussenruimte die de chirurg
kiest voor het aanbrengen van de weefselstabilisatoren is van invloed op
de mate van stabilisatie en de druk die op het weefsel wordt uitgeoefend.
De filterbus moet in een verticale stand worden gehouden.
Vul de filterbus niet voorbij de streep .
Zorg dat het vacuüm niet boven (-) 400 mm Hg komt.
Bijwerkingen
Geen bekend.
®
Evolution TS2000 is een hartspierstabilisator voor
Let op: Dit product mag alleen worden verkocht door, of in
FULL
Gebruiksaanwijzing Nederlands 25
Page 28

Gebruiksinstructies
1. Controleer de verpakking en de producten op beschadigingen en
controleer de vervaldatum.
1.1 Als er geen beschadigingen zijn en de vervaldatum niet is
verstreken, opent u de verpakking en brengt u de Octopus
hartspierstabilisator en filterbus-tubingset met een steriele
2. Aansluiten vacuümsysteem:
techniek over naar het steriele veld.
2.1 Sluit de tubing (niet inbegrepen) van het vacuümsysteem in de
operatiekamer aan op de achterzijde van de regelaar. Zet de
regelaar aan, en stel het vacuüm in op (-) 400 mm Hg.
2.2 Sluit de tubing van de Octopus
de luer-connector van de filterbus-tubingset (Afbeelding 2).
Breng de vacuümaansluiting van de filterbus-tubingset met
een steriele techniek buiten het steriele veld en bevestig de
aansluiting op de vacuümregelaar. Gebruik de driewegkraan
in het steriele veld om tijdens de procedure het vacuüm in of
uit te schakelen.
Opmerking: De filterbus moet in een verticale stand worden
gehouden.
®
hartspierstabilisator aan op
Opmerking: Vul de filterbus niet voorbij de streep .
3. Monteer het instrument op de wondspreider.
3.1 Zorg dat de klemhendel ontgrendeld is, en schuif de
montageklem open.
3.2 Plaats de montageklem op de wondspreider, en zorg ervoor
dat de klem goed aansluit op de wondspreider.
3.3 Vergrendel de klemhendel op de wondspreider. Controleer of
4. Positioneer de weefselstabilisatoren op de gewenste
5. De weefselstabilisatoren verwijderen: ondersteun het hart en
6. Draai de knop linksom om de arm los te maken, en haal vervolgens
7. Verwijder na afloop van de procedure, het instrument van de
de klem stevig vast zit op de wondspreider (Afbeelding 3).
anastomoseplaats. De volgende stappen worden aanbevolen:
4.1 Buig de weefselstabilisatoren naar de vorm van het hart voor
een optimale positie (Afbeelding 4).
Let op: Buig de weefselstabilisatoren niet verder dan een
hoek van 25 graden. Anders kan het lumen verstopt raken.
Veelvuldig buigen van de weefselstabilisatoren kan de werking
nadelig beïnvloeden.
4.2 Draai de draaikop in de gewenste positie (Afbeelding 3).
4.3 De weefselstabilisatoren kunnen breder worden ingesteld
dankzij het flexibele tussenstuk. Buig hiertoe de
weefselstabilisatoren naar elkaar toe alvorens deze op het
hart te bevestigen (Afbeelding 4).
4.4 Nadat de weefselstabilisatoren op het hart zijn aangebracht,
zet u de driewegkraan in de vacuümstand en laat u de
weefselstabilisatoren los (Afbeelding 5a). De spanning op het
verbindingsstuk tussen de weefselstabilisatoren zorgt voor
tractie lateraal van de anastomoseplaats.
4.5 Draai de knop rechtsom om de arm te fixeren. De
spanningsindicator wordt rood als de maximumspanning is
bereikt.
schakel het vacuüm uit door de driewegkraan in de atmosfeerstand
te draaien (Afbeelding 5b).
voorzichtig de weefselstabilisatoren van het hart.
wondspreider en verwijder het volgens door het ziekenhuis
voorgeschreven procedures.
®
FULL
26 Nederlands Gebruiksaanwijzing
Page 29

DE HIERNAVOLGENDE UITSLUITING VAN GARANTIE GELDT
ALLEEN VOOR KLANTEN BUITEN DE VERENIGDE STATEN:
UITSLUITING VAN GARANTIE
HOEWEL DE OCTOPUS
MODEL TS2000, HIERNA HET "PRODUCT" GENOEMD, MET VEEL
ZORG IS ONTWORPEN, VERVAARDIGD EN VÓÓR DE VERKOOP
GETEST, KUNNEN ER VERSCHILLENDE REDENEN ZIJN WAAROM
HET PRODUCT NIET VOLGENS DE SPECIFICATIES WERKT. DE
WAARSCHUWINGEN IN DE PRODUCTDOCUMENTATIE BIEDEN
MEER GEDETAILLEERDE INFORMATIE EN VORMEN EEN
INTEGRAAL ONDERDEEL VAN DEZE UITSLUITING VAN
GARANTIE. MEDTRONIC VERLEENT DAAROM GEEN ENKELE
GARANTIE, NOCH EXPLICIET NOCH IMPLICIET, MET BETREKKING
TOT HET PRODUCT. MEDTRONIC IS NIET AANSPRAKELIJK VOOR
ENIGE INCIDENTELE OF GEVOLGSCHADE, VEROORZAAKT DOOR
OM HET EVEN WELK GEBRUIK, DEFECT OF FALEN VAN HET
PRODUCT, ONGEACHT OF DE VORDERING IS GEBASEERD OP
EEN GARANTIE, CONTRACT, ONRECHTMATIGE DAAD OF
ANDERSZINS.
De uitsluitingen en beperkingen die hierboven uiteengezet zijn, zijn niet
bedoeld, en moeten niet geïnterpreteerd worden als een inbreuk op
dwingende bepalingen van de van toepassing zijnde wet. Indien enig
onderdeel of enige bepaling van deze Uitsluiting van garantie door een
daartoe bevoegde rechtbank als onrechtmatig, onuitvoerbaar of in strijd
met de van toepassing zijnde wet beschouwd wordt, zal dit de geldigheid
van het overige deel van deze Uitsluiting van garantie niet aantasten en
zullen alle rechten en plichten worden uitgelegd en ten uitvoer worden
gebracht alsof deze Uitsluiting van garantie het desbetreffende ongeldig
verklaarde gedeelte niet bevatte.
®
EVOLUTION HARTSPIERSTABILISATOR,
Gebruiksaanwijzing Nederlands 27
Page 30

28 Nederlands Gebruiksaanwijzing
Page 31

Istruzioni per l'uso
Octopus® Evolution
Modello
TS2000
Descrizione
L'Octopus
due stabilizzatori tessutali montati su un braccio articolato (braccio). Il
braccio è fissato ad un retrattore mediante un morsetto di bloccaggio. Un
rubinetto di arresto consente di attivare/disattivare l'aspirazione (Figura
1). Con gli stabilizzatori tessutali fissati ai lati del sito dell'anastomosi,
viene eseguita l'aspirazione per stabilizzare il tessuto. Per serrare o
allentare il braccio viene utilizzata l'apposita manopola.
Sterile, non pirogeno, esclusivamente monouso.
Nota: il morsetto di bloccaggio è stato progettato per essere compatibile
con la maggior parte dei retrattori per sternotomia mediana nei soggetti
adulti. Prima di procedere, è necessario verificare la compatibilità del
retrattore.
Indicazioni
Questo prodotto è progettato per stabilizzare e ridurre al minimo il
movimento di aree circoscritte del cuore pulsante durante gli interventi di
chirurgia coronarica.
Controindicazioni
Questo prodotto può essere utilizzato unicamente per gli scopi
sopraindicati. Non posizionare gli stabilizzatori tessutali sopra un'arteria
coronarica o sopra un tessuto cardiaco recentemente infartuato o
aneurismatico.
Avvertenze
La selezione del paziente e della procedura è compito del medico e i
risultati dipendono da molte variabili, tra cui l'anatomia del paziente, la
patologia e le tecniche chirurgiche.
Questo prodotto non è stato progettato per essere utilizzato come
posizionatore cardiaco.
Precauzioni
dispositivo unicamente a personale medico o a seguito di prescrizione
legalmente valida di un medico.
Le istruzioni per l'uso vengono fornite unicamente a scopo informativo.
Questo prodotto è progettato esclusivamente per uso singolo: NON
RISTERILIZZARE NÉ RIUTILIZZARE.
Lo spazio iniziale tra lo stabilizzatore tessutale destro e quello sinistro è
importante per ottenere una prestazione ottimale del prodotto. Lo spazio
iniziale tra gli stabilizzatori tessutali determina la stabilizzazione e la
tensione del tessuto e deve essere scelto a discrezione del chirurgo.
Il raccoglitore per i liquidi deve essere orientato in posizione verticale.
Non superare la linea di riempimento sul raccoglitore per i liquidi.
Non superare (-)400 mm Hg di aspirazione.
Effetti indesiderati
Non si conoscono eventuali effetti indesiderati.
®
Evolution TS2000 è uno stabilizzatore monouso costituito da
Attenzione: la legge federale (USA) autorizza la vendita del
FULL
Istruzioni per l'uso Italiano 29
Page 32

Istruzioni per l'uso
1. Ispezionare le confezioni e i prodotti per verificare la presenza di
eventuali danni e per controllare la data di scadenza.
1.1 Se non si notano danni e la data di scadenza non è stata
superata, aprire le confezioni e trasferire lo stabilizzatore
tessutale Octopus
2. Collegamento del circuito di aspirazione:
3. Montare il dispositivo al retrattore.
4. Collocare gli stabilizzatori tessutali sopra il sito dell'anastomosi
5. Per rimuovere gli stabilizzatori tessutali, sostenere il cuore e
6. Ruotare la manopola in senso antiorario per allentare il braccio e
7. Al termine dell'intervento, rimuovere il dispositivo dal retrattore e
asettiche.
2.1 Collegare il tubo (non in dotazione) dalla fonte di aspirazione
della sala operatoria alla parte posteriore del regolatore.
Accendere il regolatore e impostare il vuoto su (-)400 mm Hg.
2.2 Collegare il tubo dallo stabilizzatore tessutale Octopus
connessione luer del set di tubi con raccoglitore per i liquidi
(Figura 2). Seguendo una tecnica asettica, far passare
l'estremità della connessione della fonte di aspirazione del set
di tubi con raccoglitore per i liquidi al di fuori del campo sterile
e collegarla al regolatore di vuoto. Utilizzare il rubinetto
d'arresto sul campo sterile per controllare l'aspirazione
(attivata/disattivata) durante la procedura.
Nota: il raccoglitore per i liquidi deve essere orientato in
posizione verticale.
Nota: non superare la linea di riempimento sul
raccoglitore per i liquidi.
3.1 Con la leva del morsetto in posizione sbloccata, fare scorrere il
morsetto di bloccaggio fino ad aprirlo.
3.2 Appoggiare il morsetto di bloccaggio sopra il retrattore,
assicurandosi che il contatto del morsetto sia allineato al
retrattore.
3.3 Spostare la leva in posizione bloccata per fissare il morsetto al
retrattore. Verificare che il morsetto sia fissato saldamente al
retrattore (Figura 3).
designato. Si raccomanda di procedere come segue:
4.1 Adattare la parte flessibile degli stabilizzatori tessutali alla
forma del cuore (Figura 4).
Attenzione: non utilizzare angoli maggiori di 25 gradi su
nessun asse. L'uso di angoli eccessivi può determinare
l'occlusione del lume. Se gli stabilizzatori tessutali vengono
piegati ripetutamente, possono venire compromesse le
prestazioni del dispositivo.
4.2 Ruotare la torretta nella posizione desiderata (Figura 3).
4.3 Se è necessario estendere gli stabilizzatori tessutali, utilizzare
la flessibilità della barra di unione ad anelli metallici per
avvicinare gli stabilizzatori verso l'interno prima
dell'applicazione sulla superficie epicardica (Figura 4).
4.4 Una volta applicati gli stabilizzatori tessutali alla superficie
epicardica, attivare l'aspirazione ruotando il rubinetto di
arresto nella posizione OFF di interruzione dell'aria e rilasciare
gli stabilizzatori tessutali (Figura 5a). Consentire alla tensione
nella barra di unione ad anelli metallici di fornire la trazione
laterale al sito per l'anastomosi.
4.5 Ruotare la manopola in senso orario per immobilizzare il
braccio. L'indicatore di tensione diventerà di colore rosso una
volta che i bracci avranno raggiunto la tensione massima.
disattivare l'aspirazione ruotando il rubinetto di arresto nella
posizione OFF di interruzione del vuoto (Figura 5b).
sollevare delicatamente gli stabilizzatori tessutali dal cuore.
gettarlo secondo le procedure approvate dall'ospedale.
®
sul campo sterile avvalendosi di tecniche
®
FULL
alla
30 Italiano Istruzioni per l'uso
Page 33

LA SEGUENTE ESCLUSIONE DALLA GARANZIA È VALIDA SOLO
PER I CLIENTI AL DI FUORI DEGLI STATI UNITI:
ESCLUSIONE DALLA GARANZIA
SEBBENE LO STABILIZZATORE TESSUTALE OCTOPUS
EVOLUTION MODELLO TS2000, INDICATO QUI DI SEGUITO COME
"PRODOTTO", SIA STATO ACCURATAMENTE PROGETTATO,
REALIZZATO E TESTATO PRIMA DI ESSERE COMMERCIALIZZATO,
IL PRODOTTO POTREBBE NON FUNZIONARE IN MODO
SODDISFACENTE PER DIVERSE RAGIONI. LE AVVERTENZE
INDICATE NELLA DOCUMENTAZIONE DEL PRODOTTO
FORNISCONO INFORMAZIONI PIÙ DETTAGLIATE A TALE
RIGUARDO E SONO DA CONSIDERARSI COME PARTE
INTEGRANTE DELLA PRESENTE ESCLUSIONE DALLA GARANZIA.
DI CONSEGUENZA, LA MEDTRONIC NON RILASCIA ALCUNA
GARANZIA, NÉ ESPRESSA NÉ TACITA, IN MERITO AL PRODOTTO.
LA MEDTRONIC NON PUÒ IN ALCUN CASO ESSERE RITENUTA
RESPONSABILE, NÉ IN VIA CONTRATTUALE NÉ IN VIA
EXTRACONTRATTUALE, PER DANNI DIRETTI OD INDIRETTI
CAUSATI DALL'USO, DAI DIFETTI O DALLE MANCANZE DEL
PRODOTTO, INDIPENDENTEMENTE DAL FATTO CHE LA
RICHIESTA DI RISARCIMENTO DI TALI DANNI SIA BASATA SU
GARANZIA, CONTRATTO, FATTO ILLECITO OD ALTRO.
Le esclusioni e le restrizioni di cui sopra non sono intese, né devono
essere interpretate in quanto tali, come contravvenenti a norme ritenute
inderogabili dalla legislazione vigente. Nel caso in cui una parte od un
termine della presente Esclusione dalla garanzia vengano giudicati
illegali, inefficaci od in conflitto con il diritto applicabile da un organo
giudiziario, la validità delle rimanenti parti delle presente Esclusione d alla
garanzia non verrà compromessa e tutti i diritti e gli obblighi verranno
interpretati ed applicati come se la presente Esclusione dalla garanzia
non contenesse la parte od i termini ritenuti non validi.
®
Istruzioni per l'uso Italiano 31
Page 34

32 Italiano Istruzioni per l'uso
Page 35

Käyttöohjeet
Octopus® Evolution
Malli
TS2000
Kuvaus
®
Octopus
käytettävä stabilaattori, johon kuuluu kaksi nivellettyyn varteen
(jäljempänä ”varsi”) kiinnitettyä sydänstabilaattoria. Varsi kiinnitetään
levittimeen lukitusmekanismin avulla. Imulaitteen imu käynnistetään ja
katkaistaan kolmitiehanalla (kuva 1). Sydänkudos stabiloidaan imun
avulla, kun sydänstabilaattorit ovat kiinnitettyinä ompelukohdan
(anastomoosin) viereen. Vartta kiristetään ja löysennetään
kiristysruuvilla.
Steriloitu, pyrogeenitön, kertakäyttöinen.
Huomautus: Lukitusmekanismi on suunniteltu yhteensopivaksi
useimpien aikuispotilailla käytettävien sternotomialevittimien kanssa.
Yhteensopivuus levittimen kanssa tulee varmistaa ennen toimenpiteen
aloittamista.
Käyttöaiheet
Tämä tuote on tarkoitettu stabiloimaan ja minimoimaan sykkivän
sydämen liikettä valituista kohdista sydänleikkauksen aikana.
Vasta-aiheet
Tuotetta ei ole tarkoitettu muuhun kuin yllä kuvattuun käyttöön. Älä aseta
sydänstabilaattoreita sepelvaltimon päälle tai äskettäin
infarktoituneeseen tai aneurysmaattiseen sydänkudokseen.
Varoituksia
Potilas- ja toimenpidevalinnat ovat täysin lääketieteen ammattilaisen
vastuulla, ja lopputulokseen vaikuttavat erilaiset tekijät, kuten potilaan
rakenne, sairaudenkuva ja käytetty leikkaustekniikka.
Tätä tuotetta ei ole tarkoitettu käytettäväksi sydänasettimena.
Varotoimenpiteet
myynti on luvallista vain lääkäreille tai lääkärin suosituksen perusteella.
Käyttöohjeet ovat ainoastaan suuntaa-antavia.
Tämä laite on suunniteltu ja tarkoitettu vain kertakäyttöiseksi: EI SAA
STERILOIDA TAI KÄYTTÄÄ UUDELLEEN.
Vasemman ja oikean sydänstabilaattorin välinen etäisyys on tärkeä
tuotteen optimaalisen toiminnan kannalta. Sydänstabilaattorit sijoittaa
kirurgi, koska stabilaattorien välinen etäisyys vaikuttaa stabiloinnin
tehokkuuteen ja kudokseen kohdistuvaan jännitykseen.
Imusäiliö tulee asettaa pystysuoraan asentoon.
Älä täytä säiliötä yli -rajan (täysi).
Imupaine ei saa olla yli (–)400 mmHg.
Haittavaikutukset
Ei tunneta.
Evolution TS2000 on kertakäyttöinen, levittimen kanssa
Varoitus: Yhdysvaltojen liittovaltiolain mukaisesti tämän laitteen
FULL
Käyttöohjeet Suomi 33
Page 36

Käyttöohjeet
1. Tarkista tuotepakkauksista mahdolliset vauriot ja viimeinen
käyttöpäivä.
1.1 Jos tuotepakkaukset ovat ehjät eikä tuotteen käyttöaika ole
umpeutunut, avaa pakkaukset ja siirrä Octopus
sydänstabilaattori ja säiliön letkusto aseptisesti steriilille
2. Imuletkuston kiinnitys:
3. Kytke laite levittimeen.
4. Aseta sydänstabilaattorit niille tarkoitettuun anastomoosikohtaan.
alueelle.
2.1 Kiinnitä letku (sairaalan oma letku) leikkaussalin seinäimu-
pisteestä regulaattorin taakse. Käynnistä regulaattori ja aseta
tyhjiöpaineeksi (–)400 mmHg.
2.2 Kytke Octopus
Luer-liittimeen (kuva 2). Poista säiliön letkuston imulaitteen
pää aseptisesti steriililtä alueelta ja kytke se tyhjiöregulaattoriin. Käytä kolmitiehanaa steriilillä alueella tyhjiön
säätelyyn (auki/kiinni) toimenpiteen aikana.
Huomautus: Säiliö tulee asettaa pystysuoraan asentoon.
Huomautus: Älä täytä säiliötä yli -rajan (täysi).
3.1 Vedä lukitusmekanismi auki, kun lukitusvarmistinta ei ole
lukittu.
3.2 Aseta lukitusmekanismi levittimen päälle ja varmista, että
mekanismin ja levittimen pinnat ovat kunnolla vastakkain.
3.3 Kiinnitä lukitusmekanismi tiukasti levittimeen kääntämällä
lukitusvarmistin lukittuun asentoon. Tarkista, että
lukitusmekanismi on tiukasti kiinni levittimessä (kuva 3).
®
-sydänstabilaattorin imuletku säiliön letkun
FULL
Seuraavia toimintavaiheita suositellaan:
4.1 Muotoile sydänstabilaattorien taipuva osa sydämen muotoon
sopivaksi (kuva 4).
Varoi tus : Älä ylitä 25 asteen kulmaa missään taivekohdassa.
Jos kulma on tätä suurempi, aukko voi tukkeutua. Toistuva
sydänstabilaattorin taivuttelu saattaa heikentää laitteen
toimintaa.
®
-
4.2 Kierrä taivutusnivel haluttuun asentoon (kuva 3).
4.3 Jos sydänstabilaattorien halutaan erkaantuvan toisistaan,
käytä johdon keskikohdan joustavuutta hyväksesi ja taivuta
sydänstabilaattorit lähekkäin sisäänpäin ennen niiden
asettamista sydämen pintaan (kuva 4).
4.4 Kun sydänstabilaattorit on kiinnitetty sydämen pintaan,
käynnistä imu kiertämällä kolmitiehana sivuaukon (ulkoilman)
suuntaan ja irrota sydänstabilaattorit (kuva 5a). Anna johdon
keskikohdan jännittyä ja kiristää lateraalisesti ompelukohtaa
(anastomoosia).
4.5 Vakauta varsi kiertämällä kiristysruuvia myötäpäivään.
Kiristymisen osoitin näyttää punaista, kun varsi on kiristynyt
5. Kun haluat irrottaa sydänstabilaattorit, tue sydäntä ja katkaise imu
6. Löysää vartta kiertämällä kiristysruuvia vastapäivään ja nosta
7. Irrota lopuksi laite levittimestä ja hävitä se sairaalan noudattamien
ääriasentoon.
kääntämällä kolmitiehana tyhjiöimun suuntaan (kuva 5b).
sydänstabilaattorit varovasti pois sydämestä.
ohjeiden mukaisesti.
34 Suomi Käyttöohjeet
Page 37

SEURAAVA TAKUUTA KOSKEVA VASTUUVAPAUSLAUSEKE
KOSKEE YHDYSVALTOJEN ULKOPUOLISIA ASIAKKAITA:
TAKUUTA KOSKEVA VASTUUVAPAUSLAUSEKE
HUOLIMATTA SIITÄ, ETTÄ OCTOPUS
-SYDÄNSTABILAATTORIN MALLI TS2000, JÄLJEMPÄNÄ ”TUOTE”,
ON SUUNNITELTU, VALMISTETTU JA TESTATTU HUOLELLISESTI
ENNEN MYYNTIÄ, USEISTA ERI SYISTÄ SAATTAA JOHTUA, ETTÄ
TUOTE EI TOIMI TARKOITETULLA TAVALLA. TUOTEPAKKAUKSESSA OLEVAT VAROITUKSET SISÄLTÄVÄT
TARKEMPIA LISÄTIETOJA JA KUULUVAT OLENNAISENA OSANA
TÄHÄN TAKUUTA KOSKEVAAN VASTUUVAPAUSLAUSEKKEESEEN. MEDTRONIC EI SITEN VASTAA MISTÄÄN SUORASTI
TAI EPÄSUORASTI ILMAISTUISTA TAKUISTA, JOTKA LIITTYVÄT
TUOTTEESEEN. MEDTRONIC EI OLE VASTUUSSA MISTÄÄN
SATUNNAISESTA TAI VÄLILLISESTÄ VAHINGOSTA, JOKA ON
AIHEUTUNUT TUOTTEEN KÄYTÖSTÄ, TUOTTEESSA OLEVASTA
VIASTA TAI TUOTTEEN VIRHEELLISESTÄ TOIMINNASTA
RIIPPUMATTA SIITÄ, PERUSTUUKO VAADE TAKUUSEEN,
SOPIMUKSEEN, OIKEUDENLOUKKAUKSEEN TAI MUUHUN
SEIKKAAN.
Yllä mainittuja rajoituksia ei ole tarkoitettu voimassa olevan pakottavan
lainsäädännön vastaisiksi, eikä niitä pidä tällä tavoin tulkita. Mikäli
toimivaltainen tuomioistuin katsoo, että jokin tämän takuuta koskevan
vastuuvapauslausekkeen osa tai ehto on laiton, täytäntöönpanokelvoton
tai ristiriidassa tapaukseen sovellettavan lainsäädännön kanssa, takuuta
koskeva vastuuvapauslauseke säilyy kuitenkin muilta osin voimassa, ja
kaikkia oikeuksia ja velvollisuuksia on tulkittava ja pantava täytäntöön
ikään kuin tämä takuuta koskeva vastuuvapauslauseke ei sisältäisi sitä
erityistä osaa tai ehtoa, joka katsotaan pätemättömäksi.
®
EVOLUTION
Käyttöohjeet Suomi 35
Page 38

36 Suomi Käyttöohjeet
Page 39

Bruksanvisning
Octopus® Evolution
Modell
TS2000
Beskrivning
®
Octopus
bruk som består av två vävnadsstabilisatorer som är fästa vid en ledad
arm (arm). Armen fästs i en hake med hjälp av en monteringsklämma.
Vakuum på/av styrs med en avstängningskran (figur 1). Vävnadsstabilistorerna placeras på endera sidan av anastomosstället och
vävnaden stabiliseras med vakuum. Armen dras åt och lossas med
skruvhandtaget.
Steril, icke-pyrogen, kasseras efter användning, endast avsedd för
engångsbruk.
Observera: Monteringsklämman är utformad så att den är kompatibel
med de flesta hjärthakar för mediansternotomi på vuxna. Hakens
kompatibilitet ska kontrolleras innan ingreppet påbörjas.
Indikationer
Den här produkten är avsedd att stabilisera och minimera rörelsen på
valda områden av det slående hjärtat under hjärtkirurgi.
Kontraindikationer
Produkten är inte avsedd för annat bruk än vad som anges ovan.
Positionera inte vävnadsstabilisatorerna över en koronarartär eller
hjärtvävnad som nyligen drabbats av infarkt eller aneurysmatisk
hjärtvävnad.
Var nin gar
Ansvaret för val av patient och ingrepp vilar på läkaren och resultatet är
beroende av många faktorer som till exempel patientens anatomi och
patologi samt den kirurgiska tekniken.
Denna produkt är inte avsedd för användning som hjärtpositionerare.
Försiktighetsåtgärder
till läkare eller på läkares rekvisition.
Bruksanvisningen är endast avsedd som information.
Produkten är endast avsedd för engångsbruk:
FÅR EJ OMSTERILISERAS ELLER ÅTERANVÄNDAS.
Det första avståndet mellan den högra och vänstra vävnadsstabilisatorn
är viktigt för optimal funktion. Det första avståndet mellan
vävnadsstabilisatorerna påverkar vävnadens stabilisering och sträckning
och ska väljas av kirurgen.
Behållaren måste stå vertikalt.
Fyll inte över strecket på behållaren.
Överskrid ej (-)400 mm Hg.
Biverkningar
Inga kända.
Evolution TS2000 är en hakbaserad stabilisator för engångs-
OBS! Enligt federal lag (i USA) får denna apparat endast säljas
FULL
Bruksanvisning Svenska 37
Page 40

Bruksanvisning
1. Kontrollera att förpackningarna och produkterna inte är skadade
samt att utgångsdatumet inte har passerats.
1.1 Öppna förpackningarna om de är oskadade och ej utgångna.
Flytta över Octopus
behållarslangsetets till det sterila området med aseptisk
2. Koppling av vakuumkrets:
teknik.
2.1 Montera slang (medföljer ej) från operationssalens
vakuumkälla till baksidan av regulatorn. Slå på regulatorn och
ställ in vakuum på (-)400 mm Hg.
2.2 Anslut slangen från Octopus
behållarslangsetets luer-anslutning (se figur 2). Använd
aseptisk teknik och för bort änden på behållarslangsetets
vakuumanslutning från det sterila utrymmet och anslut det till
vakuumregulatorn. Använd avstängningskranen inom det
sterila området för att styra vakuum (på/av) under ingreppet.
Observera: Behållaren måste stå vertikalt.
Observera: Fyll inte över strecket på behållaren.
®
vävnadsstabilisatorn och
®
-vävnadsstabilisator till
FULL
3. Anslut enheten till haken.
3.1 Vrid låsklämman till en olåst position och för upp
monteringsklämman.
3.2 Placera monteringsklämman på spärrhaken och kontrollera att
låsklämmans kontakt befinner sig jäms med haken.
3.3 Flytta klämman till låst position så att låsklämman sitter fast i
haken. Kontrollera att låsklämman sitter säkert fast i haken
4. Positionera vävnadsstabilisatorerna på önskat anastomosställe.
5. Ta bort vävnadsstabilisatorerna genom att stödja hjärtat och
6. Lossa armen genom att vrida skruvhandtaget medurs och lyft
7. När ingreppet är klart tas enheten bort från haken och kasseras i
(figur 3).
Följande steg rekommenderas:
4.1 Forma den böjliga delen av vävnadsstabilisatorn så att den
passar hjärtat (figur 4).
OBS! Överskrid inte 25 graders böjning i någon axel. Om
denna vinkel överskrids, kan lumen ockluderas. Upprepad
böjning av vävnadsstabilisatorerna kan äventyra enhetens
funktion.
4.2 Rotera det vridbara fästet till önskad position (figur 3).
4.3 Om utsträckning av vävnadsstabilisatorn önskas, använd
flexibiliteten i trådslingans huvudlänk till att föra samman
vävnadsstabilisatorn inåt. Detta görs före applikationen på
epikardiet (figur 4).
4.4 Efter att vävnadsstabilisatorn har applicerats på epikardiet ska
vakuumet sättas på genom att vrida avstängningskranen till
off-to-air positionen och släppa vävnadsstabilisator n (figur 5a).
Tillåt spänning i trådslingans huvudkabeln för att göra att den
laterala sidan av anastomosstället blir utsträckt.
4.5 Vrid skruvhandtaget medurs för att fixera armen.
Spänningsindikatorn blir röd när armen når maximal spänning.
avlägsna vakuum genom att vrida avstängningskranen till läget för
avstängt vakuum (figur 5b).
försiktigt upp vävnadsstabilisatorerna från hjärtat.
enlighet med sjukhusets godkända rutiner.
38 Svenska Bruksanvisning
Page 41

NEDANSTÅENDE FRISKRIVNING FRÅN ANSVAR ÄR ENDAST
TILLÄMPLIG PÅ KUNDER UTANFÖR USA:
FRISKRIVNING FRÅN ANSVAR
OAKTAT OCTOPUS
MODELL TS2000, NEDAN PRODUKTEN, FÖRE FÖRSÄLJNING
BLIVIT NOGGRANT KONSTRUERAD, TILLVERKAD OCH
KONTROLLERAD, KAN DET AV OLIKA SKÄL INTRÄFFA ATT
PRODUKTEN ÄR BEHÄFTAD MED FEL ELLER INTE FUNGERAR
TILLFREDSSTÄLLANDE. VARNINGSTEXTER PÅ
PRODUKTETIKETTEN INNEHÅLLER MERA DETALJERADE
UPPLYSNINGAR OCH UTGÖR EN INTEGRERAD DEL AV DENNA
FRISKRIVNING FRÅN ANSVAR. MEDTRONIC FRISKRIVER SIG
DÄRFÖR HELT FRÅN ANSVAR FÖR ALLA FEL I PRODUKTEN. INGA
GARANTIER LÄMNAS, VARE SIG UTTRYCKLIGEN ELLER
UNDERFÖRSTÅTT. MEDTRONIC SKALL DÄRFÖR INTE VARA
SKYLDIGT ATT ERSÄTTA NÅGON SKADA, VARE SIG DIREKT
ELLER INDIREKT, SOM UPPKOMMER I ANLEDNING AV
PRODUKTENS UTFORMNING ELLER DESS ANVÄNDNING,
OAVSETT OM KRAVET GRUNDAR SIG PÅ PÅSTÅENDE OM
GARANTI, AVTALSBROTT, SKADEGÖRANDE HANDLING ELLER
ANNAT.
Ovan angiven friskrivning från ansvar är inte avsedd att stå i strid med
tvingande regler i tillämplig lag, och de skall inte heller tolkas så. Skulle
denna friskrivning från ansvar till någon del av behörig domstol anses
ogiltig, verkningslös eller stridande mot tillämplig lag, skall friskrivning
från ansvar gälla i övrigt, varvid alla rättigheter och skyldigheter skall
bestå, som om avtalet inte innehöll den del av garantin eller friskrivning
från ansvar som underkänts.
®
EVOLUTION VÄVNADSSTABILISATOR,
Bruksanvisning Svenska 39
Page 42

40 Svenska Bruksanvisning
Page 43

Οδηγίες χρήσης
Octopus® Evolution
Μοντέλο
TS2000
Περιγραφή
To Octopus
που βασίζεται σε διαστολέα και αποτελείται από δύο σταθεροποιητές
ιστού που είναι προσαρτημένοι σε έναν αρθρωτό βραχίονα (βραχίονα).
Ο βραχίονας στερεώνεται σε ένα διαστολέα μέσω ενός σφιγκτήρα
στερέωσης. Η αναρρόφηση ρυθμίζεται μέσω μιας στρόφιγγας
ανοίγματος/κλεισίματος (δείτε την Εικόνα 1). Με τους σταθεροποιητές
ιστού τοποθετημένους και στις
εφαρμόζεται η αναρρόφηση για να σταθεροποιηθεί ο ιστός. Ο βραχίονας
σφίγγει και χαλαρώνει από την περιστροφική λαβή.
Αποστειρωμένο, μη πυρετογόνο, αναλώσιμο, μιας χρήσης μόνο.
Σημείωση: Ο σφιγκτήρας στερεώσης έχει σχεδιαστεί ώστε να είναι
συμβατός με τους περισσότερους διαστολείς μέσης στερνοτομής
ενηλίκων. Η συμβατότητα του διαστολέα θα
πριν την έναρξη της διαδικασίας.
Ενδείξεις
Αυτό το προϊόν προορίζεται για σταθεροποίηση και ελαχιστοποίηση της
κίνησης επιλεγμένων περιοχών της παλλόμενης καρδιάς κατά τη
διάρκεια καρδιοχειρουργικής επέμβασης.
Αντενδείξεις
Το προϊόν αυτό δεν προορίζεται για χρήσεις εκτός από τις ανωτέρω
ενδεδειγμένες. Μην τοποθετήσετε τους σταθεροποιητές ιστού πάνω από
στεφανιαία αρτηρία
ή ανεύρυσμα.
Προειδοποιήσεις
Η επιλογή ασθενούς και διαδικασίας είναι ευθύνη του επαγγελματία
ιατρού και η έκβαση εξαρτάται από πολλούς παράγοντες,
συμπεριλαμβανομένων της ανατομίας του ασθενούς, της παθολογίας και
των χειρουργικών τεχνικών.
Το προϊόν αυτό δεν προορίζεται για χρήση ως σταθεροποιητής καρδιάς
Προφυλάξεις
πώληση της συσκευής αυτής μόνο από ιατρό ή κατόπιν εντολής ιατρού.
Οι οδηγίες χρήσης δίδονται μόνο για λόγους ενημέρωσης.
Το προϊόν αυτό είναι σχεδιασμένο και προορίζεται για μία μόνο χρήση:
ΜΗΝ ΕΠΑΝΑΠΟΣΤΕΙΡΩΝΕΤΕ Η ΜΗΝ ΕΠΑΝΑΧΡΗΣΙΜΟΠΟΙΕΙΤΕ.
Για άριστη απόδοση, είναι σημαντική η αρχική
δεξιού και του αριστερού σταθεροποιητή ιστού. Η αρχική απόσταση
μεταξύ των σταθεροποιητών ιστού θα επηρεάσει τη σταθεροποίηση και
την διάταση του ιστού και θα πρέπει να επιλέγεται κατά την κρίση του
χειρουργού.
Το μεταλλικό δοχείο πρέπει να τοποθετείται κατακόρυφα.
Μη γεμίζετε πέρα από την ένδειξη στο μεταλλικό
Μην υπερβαίνετε τα (-) 400 mm Hg αναρρόφησης.
Ανεπιθύμητες ενέργειες
Καμία γνωστή.
®
Evolution TS2000 είναι ένας αναλώσιμος σταθεροποιητής
δύο μεριές του σημείου αναστόμωσης,
πρέπει να επιβεβαιώνεται
ή πάνω από καρδιακό ιστό με πρόσφατο έμφραγμα
Προσοχή: Ο Ομοσπονδιακός Νόμος (Η.Π.Α.) επιτρέπει την
απόσταση μεταξύ του
FULL
δοχείο.
Οδηγίες χρήσης Ελληνικά 41
Page 44

Οδηγίες χρήσης
1. Επιθεωρήστε τις συσκευασίες και τα προϊόντα για βλάβες και
ημερομηνία λήξης.
1.1 Εάν δεν υπάρχει βλάβη και δεν έχει παρέλθει η ημερομηνία
λήξης, ανοίξτε τις συσκευασίες και μεταφέρετε το
σταθεροποιητή ιστού Octopus
μεταλλικού δοχείου στο αποστειρωμένο πεδίο
2. Σύνδεση κυκλώματος αναρρόφησης:
χρησιμοποιώντας άσηπτη τεχνική.
2.1 Συνδέστε τη σωλήνωση (δεν παρέχεται) από την πηγή
αναρρόφησης του χειρουργείου στο πίσω μέρος του ρυθμιστή.
Ενεργοποιήστε το ρυθμιστή και ρυθμίστε το κενό σε (-) 400
mm Hg.
2.2 Συνδέστε τη σωλήνωση του σταθεροποιητή ιστού Octopus
με το σύνδεσμο luer του σετ σωλήνωσης του μεταλλικού
δοχείου (δείτε την Εικόνα 2). Χρησιμοποιώντας άσηπτη
τεχνική, περάστε το άκρο του συνδέσμου της πηγής
αναρρόφησης του σετ σωλήνωσης του μεταλλικού δοχείου
από το άσηπτο πεδίο και συνδέστε το στο ρυθμιστή κενού.
Χρησιμοποιήστε τη στρόφιγγα στο αποστειρωμένο πεδίο, για
να ρυθμίσετε το κενό (
Σημείωση: Το μεταλλικό δοχείο πρέπει να τοποθετηθεί
κατακόρυφα.
Σημείωση: Μη γεμίζετε πέρα από την ένδειξη στο
μεταλλικό δοχείο.
®
και το σετ σωλήνωσης του
ανοικτό/κλειστό) κατά τη διαδικασία.
FULL
®
3. Συνδέστε τη συσκευή στο διαστολέα.
3.1 Με το μοχλό του σφιγκτήρα στη θέση απασφάλισης, σύρετε το
σφιγκτήρα στερέωσης μέχρι να ανοίξει.
3.2 Τοποθ ε τ ή σ τ ε το σφιγκτήρα στερέωσης στο διαστολέα
επιβεβαιώνοντας ότι η επαφή του σφιγκτήρα είναι στο ίδιο
επίπεδο με το διαστολέα.
3.3 Μετακινήστε το μοχλό στη θέση ασφάλισης για να στερεώσετε
το σφιγκτήρα στο διαστολέα. Ελέγξτε ότι ο σφιγκτήρας είναι
4. Τοπο θ ετ ή σ τ ε τους σταθεροποιητές ιστού στο καθορισμένο σημείο
5. Για να αφαιρέσετε τους σταθεροποιητές ιστού, υποστηρίξτε την
6. Γυρίστε την περιστροφική λαβή αριστερόστροφα για να
7. Οταν τελειώσει η διαδικασία, αφαιρέστε τη συσκευή
στερεωμένος με ασφάλεια στο διαστολέα (Εικόνα 3).
αναστόμωσης. Συνιστώνται τα ακόλουθα βήματα:
4.1
Διαμορφώστε το εύκαμπτο τμήμα των σταθεροποιητών ιστού
για να προσαρμοστούν στην καρδιά (Εικόνα 4).
Προσοχή: Μην υπερβείτε την κλίση 25 μοιρών σε κανέναν
άξονα. Η υπέρβαση αυτής της γωνίας μπορεί να προκαλέσει
απόφραξη του αυλού. Το επαναλαμβανόμενο λύγισμα των
σταθεροποιητών ιστού μπορεί να περιορίσει την απόδοση της
συσκευής.
4.2 Περιστρέψτε τον πυργίσκο στην
4.3 Εάν επιθυμείτε ανάπτυξη του σταθεροποιητή ιστού,
χρησιμοποιήστε την ευκαμψία του συνδέσμου κεφαλής της
μεταλλικής αγκύλης για να προσεγγίσετε τους σταθεροποιητές
ιστού προς τα μέσα πριν την εφαρμογή στην επιφάνεια του
επικαρδίου (Εικόνα 4).
4.4 Μετά την εφαρμογή των σταθεροποιητών ιστού στην
επιφάνεια του επικαρδίου, ενεργοποιήστε την αναρρόφηση
περιστρέφοντας τη
και απελευθερώστε τους σταθεροποιητές ιστού (Εικόνα 5α).
Επιτρέψτε τη διάταση του συνδέσμου κεφαλής της μεταλλικής
αγκύλης για να παρέχεται έκταση πλευρικά του σημείου
αναστομώσεως.
4.5 Γυρίστε την περιστροφική λαβή δεξιόστροφα για να
ακινητοποιήσετε το βραχίονα. Ο δείκτης διάτασης εμφανίζεται
κόκκινος όταν ο βραχίονας φτάσει την μέγιστη
καρδιά και τερματίστε την αναρρόφηση γυρνώντας τη στρόφιγγα
στη θέση κλείσιμο (OFF) κενού (Εικόνα 5β).
χαλαρώσετε το βραχίονα και σηκώστε απαλά τους σταθεροποιητές
ιστού από την καρδιά.
διαστολέα και απορρίψτε τη σύμφωνα με τις εγκεκριμένες
διαδικασίες του νοσοκομείου.
στρόφιγγα στη θέση κλείσιμο (OFF) αέρα
επιθυμητή θέση (Εικόνα 3).
διάταση.
από το
42 Ελληνικά Οδηγίες χρήσης
Page 45

Η ΑΚΟΛΟΥΘΗ ΠΑΥΣΗ ΙΣΧΥΟΣ ΤΗΣ ΕΓΓΥΗΣΗΣ ΙΣΧΥΕΙ ΓΙΑ ΠΕΛΑΤΕΣ
ΕΚΤΟΣ ΤΩΝ ΗΝΩΜΕΝΩΝ ΠΟΛΙΤΕΙΩΝ:
ΔΗΛΩΣΗ ΑΠΟΠΟΙΗΣΗΣ ΤΗΣ ΕΓΓΥΗΣΗΣ
ΑΝ ΚΑΙ Ο ΣΤΑΘΕΡΟΠΟΙΗΤΗΣ ΙΣΤΟΥ OCTOPUS
ΜΟΝΤΕΛΟ TS2000, ΕΦΕΞΗΣ ΑΝΑΦΕΡΕΤΑΙ ΩΣ "ΠΡΟΪΟΝ" ΕΧΕΙ
ΠΡΟΣΕΚΤΙΚΑ ΣΧΕΔΙΑΣΘΕΙ, ΚΑΤΑΣΚΕΥΑΣΘΕΙ ΚΑΙ ΔΟΚΙΜΑΣΘΕΙ
ΠΡΙΝ ΤΗΝ ΠΩΛΗΣΗ ΤΟΥ, ΤΟ ΠΡΟΪΟΝ ΜΠΟΡΕΙ ΝΑ ΑΠΟΤΥΧΕΙ ΣΤΗΝ
ΕΚΤΕΛΕΣΗ ΤΗΣ ΠΡΟΤΙΘΕΜΕΝΗΣ ΛΕΙΤΟΥΡΓΙΑΣ ΤΟΥ ΛΟΓΩ ΜΙΑΣ
ΠΟΙΚΙΛΙΑΣ ΑΙΤΙΩΝ. ΟΙ ΠΡΟΕΙΔΟΠΟΙΗΣΕΙΣ ΠΟΥ ΠΕΡΙΕΧΟΝΤΑΙ
ΣΤΗΝ ΕΤΙΚΕΤΑ ΤΟΥ ΠΡΟΪΟΝΤΟΣ ΠΑΡΕΧΟΥΝ ΛΕΠΤΟΜΕΡΕΙΣ
ΠΛΗΡΟΦΟΡΙΕΣ ΚΑΙ ΘΕΩΡΟΥΝΤΑΙ ΑΝΑΠΟΣΠΑΣΤΟ ΤΜΗΜΑ ΑΥΤΗΣ
ΤΗΣ ΠΑΥΣΗΣ ΙΣΧΥΟΣ. Η MEDTRONIC ΠΑΝΤΩΣ
ΕΓΓΥΗΣΕΙΣ ΚΑΙ ΤΙΣ ΡΗΤΕΣ ΚΑΙ ΤΙΣ ΣΥΝΕΠΑΓΟΜΕΝΕΣ ΣΕ ΣΧΕΣΗ
ΜΕ ΤΟ ΠΡΟΪΟΝ. H MEDTRONIC ΔΕΝ ΘΑ ΕIΝΑΙ ΥΠΕYΘΥΝΗ ΓΙΑ
ΟΠΟΙΕΣΔHΠΟΤΕ ΤΥXΑIΕΣ H ΕΠΑΚOΛΟΥΘΕΣ ΒΛΑΒΕΣ
ΠΡΟΚΑΛΟΥΜΕΝΕΣ ΑΠΟ ΚΑΘΕ ΧΡΗΣΗ, ΕΛΑΤΤΩΜΑ Η ΑΠΟΤΥΧΙΑ
ΤΟΥ ΠΡΟΪΟΝΤΟΣ, ΕΦΟΣΟΝ Η ΑΠΑΙΤΗΣΗ ΒΑΣΙΖΕΤΑΙ ΣΕ ΕΓΓΥΗΣΗ,
ΣΥΜΒΟΛΑΙΟ, ΑΔΙΚΟΠΡΑΞΙΑ Η ΟΤΙΔΗΠΟΤΕ ΑΛΛΟ.
Οι ως άνω αποκλίσεις και οι οριοθετήσεις δεν προτίθενται να
εναντιωθούν στις επιτακτικές φροντίδες του εφαρμοζομένου νόμου και
δεν θα πρέπει να ερμηνευθούν σαν τέτοιες. Εάν μέρος ή όρος αυτής της
παύσης ισχύος της εγγύησης θεωρείται από οιοδήποτε
ικανής δικαιοδοσίας παράνομο, ανίσχυρο ή συγκρουόμενο με την
ισχύουσα νομοθεσία, η ισχύς του υπολοίπου τμήματος της παύσης
ισχύος της εγγύησης δεν θα επηρεασθεί και όλα τα δικαιώματα και
υποχρεώσεις θα ερμηνευθούν και θα ισχύσουν σαν να μην περιέχει αυτή
η παύση ισχύος της εγγύησης το ιδιαίτερο τμήμα ή τον
ανίσχυρο.
®
EVOLUTION,
ΑΡΝΕΙΤΑΙ ΟΛΕΣ ΤΙΣ
δικαστήριο
όρο που θεωρείται
Οδηγίες χρήσης Ελληνικά 43
Page 46

44 Ελληνικά Οδηγίες χρήσης
Page 47

Brugsanvisning
Octopus® Evolution
Model
TS2000
Beskrivelse
®
Octopus
engangsbrug, der består af 2 vævsstabilisatorer, som sidder fast på en
leddelt arm (arm). Armen fæstnes til en retraktor ved hjælp af en
monteringsklemme. En stophane sørger for, at suget kan slås til og fra
(Figur 1). Mens vævsstabilisatorerne er placerede på hver side af
anastomosepunktet, anvendes suget til at stabilisere vævet. Armen
spændes til og løsnes med drejehåndtaget.
Steril, non-pyrogen, kan kasseres, kun til engangsbrug.
Bemærk: Monteringsklemmen er udformet, så den er kompatibel med
de fleste mediane sternotomiretraktorer i voksenstørrelse. Retraktorens
kompatibilitet skal bekræftes, før indgrebet påbegyndes.
Indikationer
Dette produkt er beregnet til at stabilisere og minimere bevægelse af
udvalgte områder af det bankende hjerte, mens der udføres hjertekirurgi.
Kontraindikationer
Dette produkt er ikke beregnet til nogen anden brug end den herover
indikerede. Vævsstabilisatorerne må ikke placeres over en
koronararterie eller over områder med nylig vævsinfarkt eller aneurismalt
væv.
Advarsler
Udvælgelse af patienter og indgreb er lægens ansvar, og resultatet
afhænger af mange forskellige forhold, herunder patientens anatomi,
patologi og de kirurgiske teknikker.
Dette produkt er ikke beregnet til at positionere hjertet.
Forholdsregler
til kun at måtte ske af en læge, eller efter en læges ordre.
Brugsanvisningen har kun et informerende formål.
Produktet er kun udformet og beregnet til engangsbrug: DET MÅ IKKE
GENSTERILISERES ELLER GENBRUGES.
Begyndelsesafstanden mellem højre og venstre vævsstabilisator er
vigtig, hvis de skal fungere optimalt. Begyndelsesafstanden mellem
vævsstabilisatorerne har indflydelse på vævets stabilisering og
spænding, og den skal vælges ud fra kirurgens skøn.
Beholderen skal holdes i lodret stilling.
Må ikke fyldes mere end til linjen på beholderen.
Sugekraften må ikke overstige (-) 400 mm Hg.
Komplikationer
Ingen kendte.
Evolution TS2000 er en retraktorbaseret stabilisator til
Forsigtig: Gældende lov (USA) begrænser salget af dette produkt
FULL
Brugsanvisning Dansk 45
Page 48

Brugsvejledning
1. Undersøg emballagerne og produkterne for skader og udløbsdato.
1.1 Hvis alt er ubeskadiget og anvendelsesdatoen ikke er
overskredet, åbnes emballagerne, og Octopus
vævsstabilisatoren og beholderens slangesæt overflyttes til
det sterile område under anvendelse af aseptisk teknik.
®
2. Ophægtning af sugekredsløb:
2.1 Tilslut slangen (som ikke følger med) fra operationsstuens
sugekilde til regulatorens bagside. Drej regulatoren til aktiveret
(on) og indstil vakuum til (-) 400 mm Hg.
2.2 Slangen tilsluttes fra Octopus
luerkonnektoren på beholderens slangesæt (Figur 2). Under
anvendelse af en aseptisk teknik føres sugekildeforbindelsens
ende på beholderens slangesæt ud af det sterile område og
sluttes til vakuumregulatoren. Benyt stophanen i det sterile
område til at styre vakuum (on/off), mens indgrebet foregår.
Bemærk: Beholderen skal holdes i lodret stilling.
Bemærk: Må ikke fyldes mere end til linjen på
beholderen.
®
vævsstabilisatoren til
FULL
3. Fastgør enheden til retraktoren.
3.1 Monteringsklemmen skubbes til åben position mens
klemmens løftestang befinder sig i den ulåste position.
3.2 Sæt monteringsklemmen over på retraktoren idet det sikres at
klemmens kontakt er helt plan med retraktoren.
3.3 Flyt løftestangen til den låste position så klemmen fastgøres til
retraktoren. Kontrollér at klemmen er solidt fastgjort til
4. Placér vævsstabilisatorerne på den udvalgte anastomosepunkt.
5. Når vævsstabilisatorerne skal fjernes, understøttes hjertet, og
6. Drejehåndtaget drejes mod uret for at løsne armen, hvorefter
7. Når indgrebet er afsluttet, fjernes anordningen fra retraktoren,
retraktoren (Figur 3).
Følgende trin anbefales:
4.1 Form den bøjelige del af vævsstabilisatorerne, så de tilpasses
hjertet (Figur 4).
Forsigtig: Bør ikke bøjes mere end 25 grader i en hver given
retning. Overskrides denne vinkel, kan lumen blive okkluderet.
Hvis vævsstabilisatorerne bøjes flere gange, kan
anordningens funktionsevne blive ødelagt.
4.2 Drej drejetårnet til den ønskede position (Figur 3).
4.3 Hvis der ønskes spredning af vævsstabilisatorerne, kan
fleksibiliteten i trådløkkens hovedforbindelse anvendes til at
tilnærme vævsstabilisatorerne indad inden anbringelse på den
epikardiale overflade (Figur 4).
4.4 Når vævsstabilisatorerne er anbragt på den epikardiale
overflade, tændes der for suget ved at dreje stophanen til
positionen OFF-til-luft og frigør vævsstabilisatorerne
(Figur 5a). Tillad spænding i trådløkkens hovedforbindelse så
der bliver træk lateralt for anastomosestedet.
4.5 Drejehåndtaget drejes med uret så armen bliver ubevægelig.
Indikatoren for spænding er rød når armen når den maksimale
spænding.
suget afbrydes ved at dreje stophanen til positionen
OFF-til-vakuum (Figur 5b).
vævsstabilisatorerne løftes meget forsigtigt af hjertet.
hvorefter den kasseres i henhold til godkendte hospitalsprocedurer.
46 Dansk Brugsanvisning
Page 49

FØLGENDE ANSVARSFRASKRIVELSE GÆLDER FOR KUNDER
UDEN FOR USA:
ANSVARSFRASKRIVELSE
SELVOM OCTOPUS
MODEL TS2000, I DET FØLGENDE KALDET "PRODUKTET", ER
OMHYGGELIGT DESIGNET, FREMSTILLET OG AFPRØVET FØR
SALG, KAN DER VÆRE EN RISIKO FOR, AT PRODUKTET IKKE
FUNGERER TILFREDSSTILLENDE EFTER HENSIGTEN.
ADVARSLERNE, SOM FREMGÅR AF PRODUKTETS MÆRKATER,
GIVER MERE DETALJEREDE OPLYSNINGER OG BETRAGTES SOM
EN INTEGRERET DEL AF DENNE ANSVARSFRASKRIVELSE.
MEDTRONIC FRASIGER SIG DERFOR ALLE GARANTIER,
UDTRYKKELIGE SÅVEL SOM STILTIENDE, MED HENSYN TIL
PRODUKTET. MEDTRONIC KAN IKKE HOLDES ANSVARLIG FOR
TILFÆLDIGE SKADER ELLER FØLGESKADER SOM FØLGE AF
BRUG AF PRODUKTET, ELLER DETS DEFEKT ELLER
FEJLFUNKTION, UANSET OM KRAVET BASERES PÅ GARANTI,
KONTRAKT, ERSTATNING UDEN FOR KONTRAKT, ELLER ANDET.
Det er hensigten at ovennævnte undtagelser og begrænsninger ikke skal
være modstrid med ufravigelige bestemmelser i gældende lov, og de må
ikke fortolkes således. Hvis nogen del af eller vilkår i denne
ansvarsfraskrivelse af en kompetent ret anses for ulovlig, uden retskraft
eller i konflikt med den relevante lovgivning, berøres den resterende del
af ansvarsfraskrivelsen ikke, og alle rettigheder og forpligtelser skal
tolkes og håndhæves, som om denne ansvarsfraskrivelse ikke indeholdt
det pågældende afsnit eller vilkår, der anses for ugyldigt.
®
EVOLUTION VÆVSSTABILISATOR,
Brugsanvisning Dansk 47
Page 50

48 Dansk Brugsanvisning
Page 51

Instrukcja użytkowania
Octopus® Evolution
Model
TS2000
Opis
®
Octopus
bazie retraktora, składający się z dwóch stabilizatorów pola
operacyjnego zamocowanych do przegubowego ramienia (ramię).
Ramię jest łączone z retraktorem za pomocą zacisku mocującego.
Kranik umożliwia włączanie i wyłączanie ssania (Rycina 1). Po
umieszczeniu stabilizatorów pola operacyjnego po obu stronach miejsca
zespolenia włączane jest ssanie w celu stabilizacji tkanki. Ramię jest
dokręcane i luzowane za pomocą pokrętła.
Produkt sterylny. Niepirogenny. Po użyciu wyrzucić. Jednorazowego
użytku.
Uwaga: Zacisk mocujący został zapro jektowany w sposób zapewniający
zgodność z większością retraktorów do sternotomii pośrodkowej
udorosłych pacjentów. Zgodność z retraktorem należy zweryfikować
przed rozpoczęciem zabiegu.
Wskazania
Niniejszy produkt jest przeznaczony do stabilizacji i minimalizowania
przemieszczania się wybranych obszarów pracującego serca w trakcie
zabiegu kardiochirurgicznego.
Przeciwwskazania
Niniejszy produkt nie nadaje się do innych zastosowań poza wskazanym
powyżej. Stabilizatorów pola operacyjnego nie należy umieszcza
tętnicą wieńcową ani tkankami po świeżym zawale ani nad tętniakiem
serca.
Ostrzeżenia
Za wybór pacjenta i rodzaju zabiegu odpowiada lekarz, a wynik końcowy
jest zależny od wielu zmiennych, w tym budowy anatomicznej pacjenta,
patologii i zastosowanej techniki chirurgicznej.
Niniejszy produkt nie może być stosowany jako stabilizator koniuszkowy
serca.
Środki ostrożności
niniejszego urządzenia wyłącznie przez lub z przepisu lekarza.
Wskazówki dotyczące użycia zostały przedstawione jedynie w celach
informacyjnych.
Produkt został opracowany i jest przeznaczony wyłącznie do
jednorazowego użytku: NIE STERYLIZOWAĆ PONOWNIE. NIE
NADAJE SIĘ DO POWTÓRNEGO UŻYCIA.
Początkowy odstęp między prawym i lewym stabilizatorem pola
operacyjnego jest istotny dla zapewnienia optymalnych rezultatów.
Początkowy odstęp między stabilizatorami pola operacyjnego będzie
wpływał na stabilizację i napięcie tkanki, dlatego powinien zostać
dobrany według oceny chirurga.
Zbiornik należy ustawić w pozycji pionowej.
Nie napełniać powyżej linii na zbiorniku.
Ciśnienie ssania nie może przekraczać granicy (-)400 mm Hg.
Działania niepożądane
Nie są znane.
Evolution TS2000 to stabilizator jednorazowego użytku na
ć nad
Przestroga: Prawo federalne (USA) zezwala na sprzedaż
FULL
Instrukcja użytkowania Polski 49
Page 52

Instrukcja użytkowania
1. Sprawdzić opakowania i produkty pod kątem uszkodzeń i terminu
ważności.
1.1 Jeśli opakowania nie są uszkodzone i nie minął termin
ważności, otworzyć opakowania i przenieść stabilizator pola
operacyjnego Octopus
2. Podłączenie obwodu ssania:
sterylne pole, stosując technikę aseptyczną.
2.1 Podłączyć rurkę (nie załączona w komplecie) od źródła ssania
na sali operacyjnej do tylnej części obudowy regulatora.
Włączyć regulator i ustawić wartość ssania na (-)400 mm Hg.
2.2 Podłączyć rurkę od stabilizatora pola operacyjnego Octopus
do łącznika typu luer zestawu rurki zbiornika (Rycina 2).
Stosując technikę aseptyczną, przeprowadzić koniec rurki
zbiornika podłączany do źródła ssania poza pole sterylne
ipodłączyć ten koniec do regulowanego źródła ssania. Przy
użyciu kranika na sterylnym polu sterować ssaniem
(włączając i wyłączając) w trakcie zabiegu.
Uwaga: Zbiornik należy ustawić w pozycji pionowej.
3. Przymocować urządzenie do retraktora.
4. Umieścić stabilizatory pola operacyjnego w wyznaczonym miejscu
5. Aby usunąć stabilizatory pola operacyjnego, należy podeprzeć
6. Przekręcić gałkę w kierunku przeciwnym do ruchu wskazówek
7. Po zakończeniu usunąć urządzenie z retraktora i wyrzucić zgodnie
Uwaga: Nie napełniać powyżej linii na zbiorniku.
3.1 Po obróceniu dźwigni zacisku do położenia odblokowanego
zsunąć i otworzyć zacisk mocujący.
3.2 Umieścić zacisk mocujący na retraktorze, upewniając się, że
styk zacisku znajduje się w tej samej płaszczyźnie, co
retraktor.
3.3
Ustawić dźwignię w położeniu zablokowanym, aby
zamocować zacisk do retraktora. Sprawdzić, czy zacisk jest
stabilnie zamocowany do retraktora (Rycina 3).
zespolenia. Zaleca się wykonanie następujących czynności:
4.1 Ukształtować podatną część stabilizatorów pola operacyjnego
w taki sposób, by ich kształt był dopasowany do serca (Rycina
4).
Przestroga: Nie zginać pod kątem większym niż 25 stopni
w żadnej osi. Przekroczenie tego kąta może doprowadzić do
niedrożności światła przewodu. Wielokrotne zginanie
stabilizatorów pola operacyjnego może spowodować
pogorszenie charakterystyki roboczej urządzenia.
4.2 Obrócić głowicę w żądane położenie (Rycina 3).
4.3 Jeś
li wskazane jest rozłożenie stabilizatora pola
operacyjnego, należy przed przyłożeniem do powierzchni
nasierdzia zbliżyć stabilizatory, przemieszczając je w kierunku
wewnętrznym przy wykorzystaniu sprężystego łącznika
(Rycina 4).
4.4 Po przyłożeniu stabilizatorów pola operacyjnego do
powierzchni nasierdzia należy włączyć ssanie, obracając
kranik z pozycji wyłączenia do pozycji włączenia i puścić
stabilizatory pola operacyjnego (Rycina 5a). Nacisk wywierany
przez łącznik sprężysty powinien zapewniać przyleganie
boczne względem miejsca zespolenia.
4.5 Obrócić pokrętło w kierunku zgodnym z ruchem wskazówek
zegara, aby unieruchomić ramię. Gdy sztywność ramienia
osiągnie wartość maksymalną, wskaźnik sztywności przyjmie
kolor czerwony.
serce i wstrzymać ssanie, obracają
ssania.
(Rycina 5b).
zegara, aby poluzować ramię, i ostrożnie unieść stabilizatory pola
operacyjnego z serca.
z zatwierdzonymi procedurami obowiązującymi w szpitalu.
®
oraz zestaw rurki zbiornika na
FULL
c kranik w położenie wyłączenia
®
50 Polski Instrukcja użytkowania
Page 53

PONIŻSZE WYŁĄCZENIE GWARANCJI DOTYCZY KLIENTÓW
SPOZA TERENU STANÓW ZJEDNOCZONYCH:
WYŁĄCZENIE GWARANCJI
NIEZALEŻNIE OD FAKTU, ŻE STABILIZATOR POLA
OPERACYJNEGO OCTOPUS
NAZYWANY DALEJ „PRODUKTEM”, ZOSTAŁ PRZED
WPROWADZENIEM DO SPRZEDAŻY ZAPROJEKTOWANY,
WYTWORZONY I PRZETESTOWANY Z NALEŻYTĄ
STARANNOŚCIĄ, PRODUKT MOŻE NIE SPEŁNIAĆ
W ZADOWALAJĄCY SPOSÓB ZAMIERZONYCH FUNKCJI
Z WIELU POWODÓW. OSTRZEŻENIA PODANE NA ETYKIETACH
PRODUKTU ZAWIERAJĄ BARDZIEJ SZCZEGÓŁOWE
INFORMACJE I STANOWIĄ INTEGRALNĄ CZĘŚĆ NINIEJSZEGO
WYŁĄCZENIA GWARANCJI. FIRMA MEDTRONIC NINIEJSZYM
WYŁĄCZA WSZELKIE GWARANCJE W ODNIESIENIU DO
PRODUKTU, ZARÓWNO WYRAŹNE, JAK I DOROZUMIANE. FIRMA
MEDTRONIC NIE ODPOWIADA ZA JAKIEKOLWIEK UBOCZNE LUB
WTÓRNE SZKODY SPOWODOWANE DOWOLNYM
ZASTOSOWANIEM, WADĄ LUB AWARIĄ PRODUKTU, BEZ
WZGLĘDU NA TO, CZY ROSZCZENIE ZOSTANIE WYSUNIĘTE NA
PODSTAWIE GWARANCJI, UMOWY, ODPOWIEDZIALNOŚCI ZA
SZKODĘ WYRZĄDZONĄ CZYNEM NIEDOZWOLONYM LUB W INNY
SPOSÓB.
Wyżej określone wyłączenia i ograniczenia nie mają na celu naruszenia
obowiązujących uregulowań stosownego prawa i nie należy ich tak
interpretować. Jeśli którakolwiek część lub warunek niniejszego
wyłączenia gwarancji zostanie uznany przez właściwy sąd za sprzeczny
z prawem, niemożliwy do wyegzekwowania lub stojący w konflikcie
zobowiązującym prawem, fakt ten nie wpłynie na ważność pozostałej
części wyłączenia gwarancji, a wszelkie prawa i zobowiązania będą
interpretowane i egzekwowane tak, jakby niniejsze wyłączenie gwarancji
nie zawierało danej części lub warunku uznanego za nieważny.
®
EVOLUTION, MODEL TS2000,
Instrukcja użytkowania Polski 51
Page 54

52 Polski Instrukcja użytkowania
Page 55

Instruções de utilização
Octopus® Evolution
Modelo
TS2000
Descrição
O Octopus
retractor, constituído por dois estabilizadores de tecido ligados a um
braço articulado (braço). O braço é fixado a um retractor por meio de um
grampo de montagem. Uma válvula de retenção permite activar ou
desactivar a sucção (Figura 1). Com os estabilizadores de tecido
colocados um de cada lado do local de anastomose, a sucção é aplicada
para estabilizar o tecido. O botão permite apertar e afrouxar o braço.
Estéril, não pirogénico, descartável, para uma utilização única.
Nota: O grampo de montagem é compatível com a maior parte dos
retractores para esternotomia mediana de adultos. É necessário
confirmar a compatibilidade do retractor antes de se iniciar o
procedimento.
Indicações
Este produto é utilizado para estabilizar e minimizar o movimento de
áreas seleccionadas do coração pulsante durante procedimentos de
cirurgia cardíaca.
Contra-indicações
Este produto só deve ser utilizado conforme indicado acima. Não
posicione os estabilizadores de tecido sobre uma artéria coronária,
sobre tecido que tenha sofrido um enfarte recentemente ou sobre tecido
cardíaco aneurismático.
Avisos
A selecção do doente e do procedimento a adoptar compete ao médico.
O resultado depende de muitas variáveis, incluindo a anatomia do
doente, a patologia e as técnicas cirúrgicas.
Este produto não deve ser utilizado como posicionador do coração.
Precauções
dispositivo está sujeita a prescrição médica.
As instruções de utilização são fornecidas apenas a título de informação.
Este produto foi concebido para uma utilização única. NÃO
REESTERILIZAR NEM REUTILIZAR.
O espaçamento inicial entre os estabilizadores de tecido esquerdo e
direito é importante para um desempenho óptimo. O espaçamento inicial
entre os estabilizadores de tecido afectará a estabilização e a tensão do
tecido, pelo que deve ser seleccionado de acordo com o critério do
médico.
A caixa deverá estar em posição vertical.
Não ultrapasse o nível de enchimento indicado pela linha marcada
na caixa.
A pressão de sucção não deverá exceder os (-)400 mmHg.
Efeitos adversos
Não são conhecidos.
®
Evolution TS2000 é um estabilizador descartável para
Atenção: Nos termos da lei federal dos EUA, a venda deste
FULL
Instruções de utilização Português 53
Page 56

Instruções de utilização
1. Inspeccione as embalagens e os produtos para verificar se existem
danos e confirmar o prazo de validade.
1.1 Se não existirem danos e se o prazo de validade não tiver
expirado, abra as embalagens e transfira o estabilizador de
tecido Octopus
2. Ligação do circuito de sucção:
campo estéril, utilizando uma técnica asséptica.
2.1 Ligue a tubagem (não fornecida) da fonte de sucção da sala
de cirurgia à parte posterior do regulador. Ligue o regulador e
defina a pressão de vácuo para (-)400 mmHg.
2.2 Ligue a tubagem do estabilizador de tecido Octopus
ligação Luer do conjunto da tubagem da caixa (Figura 2).
Utilizando uma técnica asséptica, passe a extremidade da
ligação da fonte de sucção do conjunto da tubagem da caixa
para fora do campo estéril e ligue-a ao regulador de vácuo.
Utilize a válvula de retenção no campo estéril para controlar o
vácuo (ligar-desligar) durante o procedimento.
®
e o conjunto da tubagem da caixa para o
®
à
Nota: A caixa deverá estar em posição vertical.
Nota: Não ultrapasse o nível de enchimento indicado pela
FULL
3. Ligue o dispositivo ao retractor.
4. Posicione os estabilizadores de tecido sobre o local de
5. Para retirar os estabilizadores de tecido, sustente o coração e
6. Rode o botão no sentido contrário ao dos ponteiros do relógio para
7. Quando terminar, retire o dispositivo do retractor e elimine-o de
linha marcada na caixa.
3.1 Com a alavanca do grampo na posição de desbloqueada,
abra o grampo de montagem fazendo-o deslizar.
3.2 Coloque o grampo de montagem sobre o retractor, de modo a
assegurar que o grampo fica nivelado em contacto com o
retractor.
3.3 Coloque a alavanca na posição de bloqueada para fixar o
grampo ao retractor. Verifique se o grampo se encontra fixado
ao retractor de forma segura (Figura 3).
anastomose designado. Recomendam-se os seguintes passos:
4.1 Configure a parte maleável dos estabilizadores de tecido de
modo a adaptá-los ao coração (Figura 4).
Atenção: Não pratique curvaturas que excedam os 25 graus
em qualquer dos eixos. Se ultrapassar este ângulo, poderá
ocludir o lúmen. A dobragem repetida dos estabilizadores de
tecido pode comprometer a eficácia do dispositivo.
4.2 Rode o canhão até à posição desejada (Figura 3).
4.3 Caso pretenda alterar o ângulo de abertura dos
estabilizadores de tecido, aproveite a flexibilidade do anel
metálico de ligação para aproximar os estabilizadores de
tecido na direcção um do outro antes de os aplicar sobre a
superfície epicárdica (Figura 4).
4.4 Depois de os estabilizadores de tecido terem sido aplicados
na superfície epicárdica, ligue a sucção colocando o "OFF" da
válvula de retenção na posição para o ar e liberte os
estabilizadores de tecido (Figura 5a). Permita que o anel
metálico de ligação fique sob tensão para fornecer tracção
lateralmente ao local de anastomose.
4.5 Rode o botão no sentido dos ponteiros do relógio para
imobilizar o braço. O indicador de tensão ficará vermelho
quando o braço atingir a tensão máxima.
termine a sucção colocando o "OFF" da válvula de retenção na
posição para vácuo (Figura 5b).
afrouxar o braço e levante cuidadosamente os estabilizadores de
tecido do coração.
acordo com os procedimentos hospitalares aprovados.
54 Português Instruções de utilização
Page 57

A SEGUINTE RENÚNCIA DE GARANTIA APLICA-SE A CLIENTES
FORA DOS ESTADOS UNIDOS:
RENÚNCIA DE GARANTIA
APESAR DE O ESTABILIZADOR DE TECIDO OCTOPUS
EVOLUTION, MODELO TS2000, A PARTIR DAQUI REFERIDO COMO
“PRODUTO”, TER SIDO CUIDADOSAMENTE DESENHADO,
FABRICADO E TESTADO ANTES DA COMERCIALIZAÇÃO, O
PRODUTO PODE NÃO DESEMPENHAR SATISFATORIAMENTE A
SUA FUNÇÃO DEVIDO A UMA VARIEDADE DE MOTIVOS. OS
AVISOS CONTIDOS NAS ETIQUETAS DOS PRODUTOS FORNECEM
INFORMAÇÕES MAIS DETALHADAS E SÃO CONSIDERADOS
COMO PARTE INTEGRANTE DESTA RENÚNCIA. PORTANTO, A
MEDTRONIC RENUNCIA A TODAS AS GARANTIAS, EXPRESSAS
OU IMPLÍCITAS, RELATIVAS AOS PRODUTOS. A MEDTRONIC NÃO
SERÁ RESPONSÁVEL POR QUAISQUER DANOS ACIDENTAIS OU
CONSEQUENCIAIS CAUSADOS POR QUALQUER UTILIZAÇÃO,
DEFEITO OU FALHA DO PRODUTO, SE A QUEIXA FOR BASEADA
NA GARANTIA, CONTRATO, DANO OU OUTROS.
As exclusões e limitações acima definidas não se destinam a infringir
estipulações obrigatórias da lei aplicável, e não devem ser interpretadas
como tal. Se alguma parte ou termo desta renúncia de garantia for
considerado ilegal, não executável ou em conflito com a lei aplicável por
parte de um tribunal da jurisdição competente, a validade da restante
renúncia de garantia não será afectada, devendo todos os direitos e
obrigações ser interpretados e executados como se esta renúncia de
garantia não contivesse a par te ou termo particular considerado inválido.
®
Instruções de utilização Português 55
Page 58

56 Português Instruções de utilização
Page 59

Kullanım Talimatları
Octopus® Evolution
Model
TS2000
Tan ım
The Octopus
kola bağlı (kol) iki doku stabilizatöründen oluşan bir stabilizatördür. Kol
retraktöre bir montaj kelepçesi kullanılarak bağlanır. Bir vana ile emme
işleminin açma/kapam a kontrolü sağlanır (Şekil 1). Anastomotik bölgenin
iki yanına yerleştirilen doku stabilizatörleri ile emme işlemi dokuyu
stabilize etmek için uygulanır. Kol, topuz yardımıyla sıkılır veya gevşetilir.
Steril, Pirojenik olmayan, Atılabilir, Tek kullanımlık.
Not: Montaj kelepçesi çoğuyetişkin orta sternotomi retraktörüne uyacak
şekilde tasarlanmıştır. Retraktör uyumluluğu prosedür başlamadan önce
doğrulanmalıdır.
Endikasyonlar
Bu ürün kardiyak cerrahisi sırasında atmakta olan kalbin seçilmiş
bölgelerinin hareketini stabilize etmek ve azaltmak amacıyla üretilmiştir.
Kontrendikasyonlar
Bu ürün yukarıdakiler dışı
Doku stabilizatörlerini koroner arteri veya yeni enfarktüs olmuş
veya anevrizmal kalp dokusu üzerinde bulundurmayın.
Uyarılar
Hasta ve prosedür seçimleri tıbbi profesyonellerin sorumluluğualtındadır
ve sonuç, hasta anatomisi, patoloji ve cerrahi teknikler gibi birçok
değişkene bağlıdır.
Bu ürün kalp konumlayıcı olarak kullanım amaçlı değildir.
Önlemler
veya onun siparişiyle sınırlandırır.
Kullanım talimatları sadece bilgi amaçlı konulmuştur.
Bu ürün sadece te k kullanım için üretilmiştir: YENİDEN STERİLİZE ETMEYİN
VEYA YENİDEN KULLANMAYIN.
Sağ ve sol doku stabilizatörleri arasındaki ilk boşluk optimal performans
için önemlidir. Doku stabilizatörleri aras
stabilizasyonu ve tansiyonu etkileyecektir ve cerrahı n kararıyla
seçilmelidir.
Kutu dikey bir konumda yerleştirilmelidir.
Kutudaki yazısını geçecek kadar doldurmayın.
(-)400 mm Hg'lik emme işlemini aşmayın.
Yan Et kil er
Bilinen yok.
®
Evolution TS2000 atılabilir, retraktör bazlı ve eklemli bir
nda bir durum için geliştirilmemiştir.
Dikkat: Federal yasa (ABD) bu cihazın satışını bir hekim tarafından
ındaki ilk boşluk dokudaki
FULL
Kullanım Talimatları Türkçe 57
Page 60

Kullanım Talimatları
1. Ambalajı ve ürünü hasar ve son kullanma talimatları için kontrol edin.
1.1 Hasarsız ve son kullanım tarihi geçmemişse ambalajları açın
ve Octopus
2. Emme devresinin bağlanması:
tekniğiyle steril alana nakledin.
2.1 Çalıştırma odası emme kaynağından çıkan boruyu
(verilmemiştir) regülatörün arkasına takın. Regülatörü
açın ve vakumu (-)400 mm Hg'ye ayarlayın.
2.2 Boruyu Octopus
luer bağlantısına takın (Şekil 2). Aseptik tekniğiyle, kutu boru
setinin emme kaynağı bağlantısını steril alandan çıkarın ve
vakum regülatörüne takı n. Steril bölgedeki vanayı prosedür
sırasında vakum kontrolü (açma/kapama) yapmak için
kullanın.
Not: Kutu dikey bir konumda yerleştirilmelidir.
3. Cihazı retraktöre bağlayın.
4.
5. Doku stabilizatörlerini çıkarmak için kalbe destek verin ve vanayı
6. Kolu gevşetmek için topuzu saat yönünün tersine çevirin ve doku
7. İşlemi bitirdiğinizde, cihazı retraktörden çıkarın ve onaylanan
Not: Kutudaki yazısını geçecek kadar doldurmayı n.
3.1 Kelepçe kolunun kilidi açık haldeyken montaj kelepçesini
açarak kaydırın.
3.2 Montaj kelepçesini retraktörün üzerine koyun ve kelepçe
temasının retraktörle aynı seviyede olduğundan emin olun.
3.3 Kelepçeyi retraktöre sabitlemek için kolu kilitli konuma getirin.
Kelepçenin retraktöre sıkıca bağlandığından emin olun (Şekil 3).
Doku stabilizatörlerini gösterilen anastomotik bölgeye yerleştirin.
Aşağıdaki adımlar tavsiye edilmektedir:
4.1 Kalple uyum sağlamak için doku stabilizatörlerin
biçimlendirilebilir kısımlarına şekil verin (Şekil 4).
Dikkat: Herhangi bir eksende 25 derece sınırını geçmeyin.
Bu sınırın aşılması lumenin tıkanmasına sebep olabilir.
Doku stabilizatörlerinin devamlı olarak bükülmesi cihaz
performansını tehlikeye atabilir.
4.2 Tareti istenen pozisyonda döndürün (Şekil 3).
4.3 Doku stabilizatörünün yayılması isteniyorsa, epikardial
yüzeyde uygulamadan önce doku stabilizatörlerini
yaklaştırmak için kablo loopu anabağlantısındaki esneklikten
yararlanın (Şekil 4).
4.4 Doku stabilizatörleri epikardiyal yüzeye uygulandıktan sonra
vanayı hava-kapalı pozisyonuna getirip emme işlemini
başlat
Anastomotik bölgenin yanına çekebilmek için kablo loopu
ana bağlantısında gerginlik bırakmaya çalışın.
4.5 Kolu hareketsiz bırakmak için topuzu saat yönünde çevirin.
Gerginlik göstergesi, kol maksimum gerginliğe eriştiğinde
kırmızı olarak görünür.
vakum-kapalı pozisyonuna getirerek emmeyi durdurun. (Şekil 5b).
stabilizatörlerini kalpten yavaşça çıkarın.
hastane prosedürlerine göre atın.
®
Doku Stabilizatörünü ve kutu borusunu aseptik
®
Doku Stabilizatöründen kutu boru setindeki
FULL
ın ve doku stabilizatörlerini serbest bırakın. (Şekil 5a).
58 Türkçe Kullanım Talimatları
Page 61

AŞAĞIDAKİ GARANTİ FERAGAT BEYANNAMESİ BİRLEŞİK
DEVLETLER DIŞINDAKİ MÜŞTERİLER İÇİN GEÇERLİDİR:
GARANTİ FERAGAT BEYANNAMESİ
BURADA ADI “ÜRÜN” OLARAK GEÇEN OCTOPUS
DOKU STABİLİZATÖRÜ MODEL TS2000, SATIŞINDAN ÖNCE
DİKKATLE TASARLANMIŞ, ÜRETİLMİŞ VE TEST EDİLMİŞ
OLMASINA RAĞMEN, BU ÜRÜN BAZI NEDENLERDEN DOLAYI
GEREKLİ İŞLEVİ GERÇEKLEŞTİREMEYEBİLİR. ÜRÜN
ETİKETİNDEKİ UYARILAR DAHA AYRINTILI BİLGİLER
İÇERMEKTEDİR VE BU GARANTİ FERAGATNAMESİNİN AYRILMAZ
BİR PARÇASI OLARAK DEĞERLENDİRİLMEKTEDİR. MEDTRONIC,
BU NEDENLE, ÜRÜNLE İLGİLİ AÇIK VEYA ÖRTÜLÜ TÜM
GARANTİLERDEN FERAGAT EDER. MEDTRONIC ÜRÜNÜN
KULLANIMI, KUSUR VEYA BOZUKLUĞU SEBEBİYLE OLUŞAN
HERHANGİ BİR KAZA VEYA DOLAYLI HASARDAN, İDDİA GARANTİ
BELGESİ, SÖZLEŞME VEYA HAKSIZ MUAMELEYE DAYANIYOR
OLSA DA SORUMLU DEĞİLDİR.
Yukarıda belirtilenlerin dışındaki istisnalar ve sınırlamalar, ilgili yasanın
zorunlu hükümlerini ihlal amacı taşımaz ve ihlal olarak yorumlanamaz.
Bu Garanti Feragat Beyannamesinin bir kısmı veya maddesi herhangi
bir yetkili mahkeme tarafından yasadışı , uygulanamaz bulunursa
veya uygulanacak kanunlarla ihtilaf halindeyse, Garanti Feragat
Beyannamesinin geri kalan kısmı bundan etkilenmeyecek, bütün
hak ve yükümlülükler, geçersiz bulunan kısım bu Garanti Feragat
Beyannamesinde bulunmuyormuş gibi sayılarak yorumlanacak ve
uygulanacaktır.
®
EVOLUTION
Kullanım Talimatları Türkçe 59
Page 62

60 Türkçe Kullanım Talimatları
Page 63

Návod k použití
Octopus® Evolution
Typ
TS2000
Popis
Výrobek Octopus
je retraktorový stabilizátor, který se skládá ze dvou stabilizátorů tkáně
připojených k ohebnému ramenu (dále jen rameno). Rameno se
připevňuje k retraktoru pomocí upínací svěrky. Uzavíracím kohoutem se
otevírá a zavírá podtlak (viz obrázek 1). Tkáň se stabilizuje vyvíjením
podtlaku, přičemž stabilizátory jsou umístěny na obou stranách oblasti
anastomózy. Rameno se utahuje a uvolňuje pomocí knoflíku.
Sterilní, apyrogenní, pro jednorázové použití.
Poznámka: Upínací svěrka byla zkonstruována tak, aby byla
kompatibilní s většinou retraktorů pro střední sternotomii u dospělých.
Před zahájením výkonu je nutno zkontrolovat kompatibilitu retraktorů.
Indikace
Tento výrobek je určen ke stabilizaci a minimalizaci pohybů vybraných
oblastí během kardiochirurgických výkonů na bijícím srdci.
Kontraindikace
Tento výrobek není určen k jinému použití, než je uvedeno výše.
Stabilizátory tkáně neumísťujte na koronární artérii, na srdeční tkáň
postiženou čerstvým infarktem ani na oblast s aneurysmatem.
Výstrahy
Za výběr pacienta a postupu je zodpovědný výhradně lékař a výsledek
závisí na mnoha faktor ech, mimo jiné na anatomii pacienta, n a jeho stavu
a na chirurgické technice.
Tento výrobek nemá být použit jako polohovací zařízení.
Zvláštní upozornění
Upozornění: Podle federálních zákonů USA je výdej tohoto
zařízení vázán na lékařský předpis.
Návod k použití je přiložen pouze k informačním účelům.
Výrobek je určen pouze k jednorázovému použití: NESTERILIZUJTE,
NEPOUŽÍVEJTE OPAKOVANĚ.
Počáteční vzdálenost mezi pravým a levým stabilizátorem tkáně je
důležitá pro optimální funkci zařízení. Tato počáteční vzdálenost mezi
stabilizátory ovlivňuje stabilizaci a napětí tkáně a musí se zvolit podle
posouzení chirurga.
Nádobka musí být orientována svisle.
Nenaplňujte nad značku na nádobce.
Nepřekračujte podtlak (-)400 mm Hg.
Nežádoucí účinky
Nejsou známy.
®
Evolution TS2000, určený k jednorázovému použití,
FULL
Návod k použití Česky 61
Page 64

Návod k použití
1. Zkontrolujte výrobek a obal, zda nejsou poškozeny. Zkontrolujte
datum exspirace.
1.1 Je-li výrobek nepoškozený a neuplynula doba použitelnosti,
otevřete obal a aseptickým postupem přeneste stabilizátor
tkáně Octopus
®
a sestavu hadiček nádobky do sterilního pole.
2. Zavěšení sacího okruhu:
2.1 Na zadní stranu regulátoru připojte trubici (není součástí
dodávky) ze zdroje podtlaku na operačním sále. Zapněte
regulátor a nastavte podtlak na hodnotu (-)400 mm Hg.
2.2 Připojte trubici ze stabilizátoru tkáně Octopus
Luer sestavy hadiček nádobky (viz obrázek 2). Aseptickým
postupem přesuňte konec zdroje regulovaného podtlaku
sestavy hadiček nádoby ze sterilního pole a připojte jej
k regulátoru vakua. Během výkonu používejte k vypínání
a zapínání podtlaku uzavírací kohout ve sterilním poli.
Poznámka: Nádobka musí být orientována svisle.
Poznámka: Nenaplňujte nad značku na nádobce.
3. Připevněte zařízení k retraktoru.
3.1 S upínací páčkou v odemčené pozici rozevřete upínací
svěrku.
3.2 Položte upínací svěrku na retraktor a dbejte na to, aby
kontaktní plocha svěrky byla v rovině s retraktorem.
3.3 Otočením páčky do uzamčené polohy zajistěte přichycení
svěrky k retraktoru. Zkontrolujte, zda je svěrka pevně
4. Umístěte stabilizátory tkáně na určené místo anastomózy.
přichycena k retraktoru (obrázek 3).
Doporučuje se následující postup:
4.1 Vytvarujte ohebné části stabilizátorů tak, aby odpovídaly tvaru
srdce (obrázek 4).
Upozornění: Nepřekračujte úhel ohybu 25 stup
ose. Větší ohyb by mohl způsobit okluzi lumen. Opakované
ohýbání stabilizátorů tkáně může ohrozit správnou funkci
výrobku.
FULL
®
na spojku typu
ňů v žádné
4.2 Otočte hlavici do požadované polohy (obrázek 3).
4.3 V případě potřeby roztažení stabilizátorů využijte flexibilitu
hlavního spoje smyčky a před aplikací na epikardiální povrch
přibližte stabilizátory tkáně směrem dovnitř (obrázek 4).
4.4 Po aplikaci stabilizátorů na epikardiální povrch zapněte sání
otočením uzavíracího ventilu do polohy podle obrázku 5a
a stabilizátory uvolněte. Pomocí napětí v hlavním spoji
smyčky zajistěte laterální tah vzhledem k oblasti anastomózy.
4.5 Otočte knoflík po směru hodinových ručiček, a tak znehybněte
rameno. Po dosažení maximálního napětí ramene se na
5. Přiodstraňování stabilizátorů tkáně postupujte takto: podepřete
6. Otoč
7. Nakonec odstraňte zařízení z retraktoru a zlikvidujte je podle
indikátoru objeví červená.
srdce a zavřete podtlak otočením uzavíracího kohoutu do polohy
podle obrázku 5b.
ením knoflíku proti směru hodinových ručiček uvolněte
rameno a pak jemně zvedněte stabilizátory tkáně ze srdce.
platných postupů daného zdravotnického zařízení.
62 Česky Návod k použití
Page 65

NÁSLEDUJÍCÍ ODMÍTNUTÍ ZÁRUK SE VZTAHUJE NA ZÁKAZNÍKY,
KTEŘÍ NEJSOU Z USA:
ODMÍTNUTÍ ZÁRUK
AČKOLI JE STABILIZÁTORU TKÁNĚ OCTOPUS
MODEL TS2000, DÁLE NAZÝVANÉMU „VÝROBEK“, PŘED
PRODEJEM VĚNOVÁNA PEČLIVÁ POZORNOST VE FÁZI JEHO
KONSTRUKCE, VÝROBY I ZKOUŠEK, JE MOŽNÉ, ŽE U VÝROBKU
SELŽE Z NEJRŮZNĚJŠÍCH DŮVODŮ JEHO ZAMÝŠLENÁ FUNKCE.
PODROBNĚJŠÍ INFORMACE POSKYTUJÍ VAROVÁNÍ UVEDENÁ NA
ŠTÍTCÍCH VÝROBKU, KTERÁ JSOU POVAŽOVÁNA ZA NEDÍLNOU
SOUČÁST TOHOTO ODMÍTNUTÍ ZÁRUK. SPOLEČNOST
MEDTRONIC PROTO ODMÍTÁ VŠECHNY ZÁRUKY (VÝSLOVNĚ
UVEDENÉ I IMPLICITNĚ P ŘEDPOKLÁDANÉ) TÝKAJÍCÍ SE TOHOTO
VÝROBKU. SPOLEČNOST MEDTRONIC NEODPOVÍDÁ ZA
JAKÉKOLIV NÁHODNÉ NEBO NÁSLEDNÉ ŠKODY ZPŮSOBENÉ
POUŽITÍM, VADOU NEBO SELHÁNÍM VÝROBKU, NEHLEDĚ
K TOMU, VYPLÝVÁ-LI NÁROK ZE ZÁRUKY, SMLOUVY,
OSOBNOSTNÍCH PRÁV, ČI Z JINÉHO DŮVODU.
Záměrem výše uvedených výjimek a omezení není (ani by tak neměly
být interpretovány) porušování závazných nařízení příslušných právních
předpisů. Pokud bude nějaká část nebo podmínka tohoto odmítnutí
záruk shledána kompetentním soudem jako protiprávní, nevymahatelná
nebo v rozporu s příslušnými právními předpisy, neznamená to, že
pozbude platnost i zbývající část tohoto odmítnutí záruk. Všechny
závazky a práva budou chápány a vymáhány tak, jako by odmítnutí
záruk příslušnou část nebo podmínku pokládanou za neplatnou
neobsahovalo.
®
EVOLUTION,
Návod k použití Česky 63
Page 66

64 Česky Návod k použití
Page 67

Használati utasítás
Octopus® Evolution
Típus
TS2000
Leírás
Az Octopus
mellkasterpeszhez csatlakoztatható stabilizátor két tapadókorongos
talpból áll, melyek egy állítható karhoz vannak rögzítve. A kar a
mellkasterpeszhez rögzítőpofával csatlakozik. A zárócsap a szívás
elindítására, illetve leállítására szolgál (1. ábra). Az anasztomózis
helyének két oldalára helyezett tapadókorongos talpak szívóhatással
rögzítik a szívet. A kar az állítógombbal szorítható meg és lazítható ki.
Az eszköz steril, nem pirogén, eldobható és egyszer használatos.
Megjegyzés: A rögzítőpofa kialakításánál fogva a legtöbb, felnőtteken
végzett median sternotomiánál használt terpesszel használható. Az
eljárás megkezdése előtt ellenőrizze a terpesszel való kompatibilitást.
Javallatok
A termék rendeltetése a dobogó szív egyes területeinek rögzítése és
mozgásának csökkentése a szívsebészeti eljárás során.
Ellenjavallatok
A termék a fentiektől eltérő célra nem használható. Ne helyezze a
tapadókorongos talpakat koszorúérre, illetve friss infarktusos vagy
aneurizmás szívterületre.
Figyelmeztetések
A beteg és a műtéti megoldás kiválasztása a szakképzett orvos
felelőssége, az eredményt több tényező, például a beteg anatómiája, a
patológiai elváltozás és a sebészi technika is befolyásolja.
Az eszköz nem használható szívfeltáróként.
Óvintézkedések
az eszköz csak orvos által vagy orvosi rendelvényre értékesíthető.
A használati útmutató csak tájékoztató jellegű.
A termék egyszeri használatra készült: NE STERILIZÁLJA ÉS NE
HASZNÁLJA ÚJRA.
A bal és jobb oldali tapadókorongos talpak közötti kezdeti távolság a
megfelelő hatás szempontjából fontos. A sebész határozza meg a
tapadókorongos karok közötti kezdeti távolságot, amely befolyásolja a
szív rögzítését és feszülését.
A tartályt függőlegesen kell elhelyezni.
A tartály feltöltésekor ne lépje túl a jelzést.
Ne lépje túl a (-)400 Hgmm-es szíváserősséget.
Szövődmények
Szövődmények nem ismeretesek.
®
Evolution TS2000 egyszer használatos,
Figyelem! Az Egyesült Államokban szövetségi törvény alapján ez
FULL
Használati útmutató Magyar 65
Page 68

Használati utasítás
1. Ellenőrizze a csomagoláson és a terméken a lejárati dátumot, és
vizsgálja meg a csomagolást illetve a terméket, hogy azok nem
sérültek-e.
1.1 Ha sértetlen a csomag, és nem járt le a szavatossági idő,
bontsa fel a csomagot, és aszeptikus körülmények között
helyezze az Octopus
2. A szívórendszer csatlakoztatása:
műtéti területre.
2.1 Vezesse a műtői szívórendszertől a (nem mellékelt)
csővezetéket a vakuumszabályozó hátuljához. Kapcsolja be a
szabályozót és állítsa a szíváserősséget (-) 400 Hgmm
értékre.
2.2 Csatlakoztassa az Octopus
tartály csöveinek Luer-csatlakozójához (lásd: 2. ábra).
Aszeptikus körülmények között a tartály csöveinek
vákuumcsatlakozós végét adja ki a steril területről, és
csatlakoztassa a vákuumszabályozóhoz. Műtét alatt a szívás
be- és kikapcsolását a zárócsappal végezheti a steril
területről.
Megjegyzés: A tartályt függőlegesen kell elhelyezni.
Megjegyzés: A tartály feltöltésekor ne lépje túl a jelzést.
®
stabilizátort és a tartály csöveit a steril
®
stabilizátor csővezetékét a
FULL
3. Rögzítse az eszközt a mellkasterpeszhez.
3.1 A rögzítőpofa karját reteszeletlen állásba helyezve nyissa szét
a rögzítőpofát.
3.2 Helyezze a rögzítőpofát a mellkasterpeszre, ügyelve arra,
hogy azok egy síkban legyenek.
3.3 A kart reteszelt állásba hozva rögzítse a rögzítőpofát a
mellkasterpeszhez. Ellenőrizze, hogy a rögzítőpofa biztosan
4. Helyezze el a tapadókorongos talpakat az anasztomózis kijelölt
5.
6. Az állítógomb óramutató járásával ellentétes irányban történő
7. Ha végzett, távolítsa el az eszközt a mellkasterpeszről, és dobja el
ül-e a mellkasterpeszen (3. ábra).
helyére. Javasoljuk, hogy az alábbi módon járjon el:
4.1 A tapadókorongos talpak hajlítható részét alakítsa úgy, hogy a
szívhez illeszkedjenek (4. ábra).
Figyelem! Az elhajlás mértéke egyik tengely irányában se
haladja meg a 25 fokot. Ennél nagyobb szög esetén
elzáródhat a lumen. A tapadókorongos talpak többszöri
meghajlítása károsan hathat az eszköz működésére.
4.2 Forgassa a kívánt helyzetbe az állítható kar forgófejét
(3. ábra).
4.3 Ha a tapadókorongos talpak szétnyitására van szükség, a
dróthurkos első gyűrű hajlékonyságát kihasználva közelítse a
talpakat befelé, mielőtt az epicardiumra fektetné őket
(4. ábra).
4.4 Miután a talpakat az epicardiumra fektette, kapcsolja be a
szívást a zárócsap kinyitásával, és engedje ki a talpakat
(5/a ábra). Engedje, hogy a dróthurkos első gyűrű feszülése
húzóerőt fejtsen ki az anasztomózis helyétől oldalirányba.
4.5 Az állítógomb óramutató járásával megegyező irányba történő
elforgatásával rögzítse a kart. A feszülésjelző pirosra vált, ha
a kar elérte a maximális feszülést.
A tapadókorongos talpak eltávolításához támassza meg a szívet,
és állítsa le a szívást úgy, hogy a zárócsapot a vákuum irányába
fordítja (5/b ábra).
elforgatásával engedje ki a kart, és óvatosan vegye le a
tapadókorongos talpakat a szívről.
a kórházi előírásoknak megfelelően.
66 Magyar Használati útmutató
Page 69

AZ ALÁBBI FELELŐSSÉGET KIZÁRÓ NYILATKOZAT AZ AMERIKAI
EGYESÜLT ÁLLOMOKON KÍVÜLI VÁSÁRLÓKRA VONATKOZIK:
FELELŐSSÉGKIZÁRÁS
BÁR AZ OCTOPUS
TOVÁBBIAKBAN „TERMÉK”) TERVEZÉSE, GYÁRTÁSA ÉS
ÉRTÉKESÍTÉS ELŐTTI ELLENŐRZÉSE KÖRÜLTEKINTŐ MÓDON
TÖRTÉNT, ELŐFORDULHAT, HOGY A TERMÉK KÜLÖNBÖZŐ
OKOKBÓL ESETLEG NEM LÁTJA EL KIELÉGÍTŐEN A FELADATÁT.
A TERMÉKCÍMKÉN TALÁLHATÓ FIGYELMEZTETÉSEK TOVÁBBI
INFORMÁCIÓT SZOLGÁLTATNAK, ÉS A FELELŐSSÉGET KIZÁRÓ
JELEN NYILATKOZAT SZERVES RÉSZÉT KÉPEZIK. EZÉRT A
MEDTRONIC NEM VÁLLAL SEMMIFÉLE – SEM KÖZVETLEN, SEM
KÖZVETETT GARANCIÁT – A TERMÉKKEL KAPCSOLATOSAN. A
MEDTRONIC NEM FELEL A TERMÉK HASZNÁLATÁBÓL,
HIBÁJÁBÓL VAGY NEM MŰKÖDÉSÉBŐL EREDŐ SEMMILYEN
JÁRULÉKOS VAGY KÖVETKEZMÉNYES KÁRÉRT, LEGYEN A
KÁRIGÉNY ALAPJA SZAVATOSSÁG, SZERZŐDÉS, MAGÁNJOGI
SÉRELEM VAGY EGYÉB.
A fenti kizárások és korlátozások nem kívánnak ellentmondani a
vonatkozó jogrendszer kötelező erejű előírásainak, és nem is
értelmezhetőek ily módon. Ha a jelen felelősségkizárás bármely elemét
vagy rendelkezését illetékes bíróság jogellenesnek, hatálytalannak vagy
a vonatkozó jogszabályokkal ellentétesnek mondja ki, a
felelősségkizárás fennmaradó részét ez nem érinti, és minden jog és
kötelezettség úgy értelmezendő és tartandó be, mintha a jelen
felelősségkizárás nem tartalmazná az érvénytelenített részt vagy pontot.
®
EVOLUTION STABILIZÁTOR (TS2000 TÍPUS, A
Használati utasítás Magyar 67
Page 70

68 Magyar Használati utasítás
Page 71

Návod na použitie
Octopus® Evolution
Model
TS2000
Popis
®
Octopus
upevňuje na rozvierač. Skladá sa z dvoch stabilizátorových ramienok,
ktoré sú pripevnené na polohovacie rameno (rameno). Rameno sa upína
na rozvierač pomocou upínacej svorky. Zapnutie a vypnutie podtlaku
riadi zatvárací ventil (Obr. 1). Po umiestnení stabilizátorových ramienok
na obe strany miesta anastomózy sa aplikuje podtlak na znehybnenie
tkaniva. Rameno sa napína a uvoľňuje pomocou uťahovacej skrutky.
Sterilný, apyrogénny, jednorazový, výhradne na jedno použitie.
Poznámka: Otočný kĺb bol navrhnutý tak, aby bol kompatibilný
sväčšinou rozvieračov na mediánnu sternotómiu pre dospelých.
Kompatibilitu s rozvieračom je potrebné overiť ešte pred začiatkom
operácie.
Indikácie
Tento výrobok je určený na stabilizáciu vybraných oblastí bijúceho srdca
a minimalizáciu ich pohybu počas kardiochirurgického zákroku.
Kontraindikácie
Okrem uvedeného účelu tento výrobok nemá iné využitie. Stabilizátorové
ramienka neumiestňujte nad koronárnu tepnu, tkanivo postihnuté
čerstvým infarktom alebo aneuryzmu.
Upozornenia
Za výber pacientov a voľbu chirurgického postupu je zodpovedný lekár
a výsledok závisí od mnohých faktorov, napríklad anatómie pacienta,
ochorenia a chirurgickej techniky.
Tento výrobok nie je určený na použitie ako polohovač srdca.
Predbežné opatrenia
výlučne na pokyn alebo objednávku lekára.
Pribalený návod na použitie má len informatívny účel.
Tento výrobok je navrhnutý a určený len na jednorazové použitie:
NESTERILIZUJTE A NEPOUŽÍVAJTE HO OPAKOVANE.
Pre optimálny výkon je dôležitá počiatočná vzdialenosť medzi pravým
a ľavým stabilizátorovým ramienkom. Počiatočná vzdialenosť medzi
jednotlivými stabilizátormi ovplyvňuje znehybnenie a napätie tkaniva.
Chirurg by ju mal zvoliť
Nádržka musí byť v zvislej polohe.
Náplň nádržky nesmie presiahnuť značku úplného naplnenia .
Neprekračujte podtlak (-)400 mm Hg.
Nežiaduce účinky
Nie sú známe.
Evolution TS2000 je jednorazový stabilizátor, ktorý sa
Varovanie: Legislatíva USA umožňuje predávať tento prístroj
podľa vlastného uváženia.
(FULL)
Návod na použitie slovenčina 69
Page 72

Návod na použitie
1. Skontrolujte, či obal a výrobok nie sú poškodené, a všimnite si
dátum exspirácie.
1.1 Ak obal nie je poškodený a výrobok nie je exspirovaný, otvorte
obal a asepticky preneste tkanivový stabilizátor Octopus
a hadičkový systém nádržky na sterilné pole.
®
2. Zapojenie podtlakového systému:
2.1 Pripojte potrubie (nie je súčasťou dodávky) zo zdroja podtlaku
operačnej sály na zadnú stranu regulátora. Zapnite regulátor
a nastavte podtlak na (-)400 mm Hg.
2.2 Napojte hadičkový systém tkanivového stabilizátora Octopus
na spojku typu Luer hadičkovej sústavy nádržky (Obr. 2).
Asepticky vyberte odsávacie zakončenie hadičkovej sústavy
nádržky zo sterilného poľa a pripojte ho k ovládaču podtlaku.
Počas výkonu používajte na reguláciu podtlaku (zapnutie
a vypnutie) ventil v sterilnom poli.
Poznámka: Nádržka musí byť v zvislej polohe.
Poznámka: Náplň nádržky nesmie presiahnuť zn ačku úplného
naplnenia .
(FULL)
3. Napojte zariadenie na rozvierač.
3.1 Odistite páčku svorky a otvorte upínaciu svorku.
3.2 Upínaciu svorku položte na rozvierač tak, aby kontakt svorky
bol zarovnaný s rozvieračom.
3.3 Posuňte páčku do zaistenej polohy a zaistite tak svorku
k rozvieraču. Skontrolujte, či je svorka na rozvierači pevne
4. Stabilizátorové ramienka umiestnite na určené miesto anastomózy.
ukotvená (Obr. 3).
Odporúča sa nasledujúci postup:
4.1 Ohybnú časť tkanivového stabilizátora vytvarujte tak, aby
zodpovedala tvaru srdca (Obr. 4).
Varovanie: Pri zakrivení v ľubovoľnom smere neprekračujte
uhol 25°. Väčšie zakrivenie môže spôsobiť uzavretie lúmenu.
Opakované ohýbanie ramienok môže znížiť výkonnosť
zariadenia.
4.2 Otočný kĺb nastavte do požadovanej polohy (Obr. 3).
4.3 Po vytvarovaní tkanivového stabilizátora do požadovanej
polohy využite pružnos
priložením na povrch epikardu priblížte tkanivový
stabilizátor dovnútra (Obr. 4).
4.4 Po priložení tkanivového stabilizátora na povrch epikardu
zapnite otočením ventilu do polohy, ktorá zabraňuje prístupu
vzduchu (označenie „off“ smeruje k prívodu vzduchu),
a uvoľnite tkanivový stabilizátor (Obr. 5a). Pružnosť slučky
spojky hlavice by mala poskytovať bočný ťah smerom
k miestu anastomózy.
4.5 Otočením uťahovacej skrutky v smere hodinových ručičiek
znehybnite rameno. Pri maximálnom napätí ramena sa farba
5. Ak chcete vybrať stabilizátorové ramienka, pridržte srdce a otočením
6. Otáčaním uťahovacej skrutky proti smeru hodinových ručičiek
7. Po ukončení práce vyberte zariadenie z rozvierača a zlikvidujte
indikátora napätia zmení na červenú.
zatváracieho ventilu do polohy, v ktorej označenie „off“ smeruje
k zdroju podtlaku, ukončite pôsobenie podtlaku.(Obr. 5b).
uvoľnite rameno. Jemne nadvihnite stabilizátorové ramienka
a vyberte ich zo srdca.
ho podľa platných nemocničných predpisov.
ť slučky spojky hlavice a pred
®
70 slovenčina Návod na použitie
Page 73

NA ZÁKAZNÍKOV MIMO USA SA VZŤAHUJE NASLEDOVNÉ
ODMIETNUTIE ZÁRUKY:
ODMIETNUTIE ZÁRUKY
TKANIVOVÝ STABILIZÁTOR OCTOPUS
TS2000, (ĎALEJ LEN „PRODUKT“) MÔŽE Z RÔZNYCH PRÍČIN
ZLYHAŤ PRI USPOKOJIVOM VYKONÁVANÍ ČINNOSTÍ, NA KTORÉ
JE URČENÝ, A TO AJ NAPRIEK TOMU, ŽE BOL STAROSTLIVO
NAVRHNUTÝ, VYROBENÝ A TESTOVANÝ PRED UVEDENÍM
DO PREDAJNEJ SIETE. UPOZORNENIA NA ŠTÍTKOCH, KTORÝMI
JE VÝROBOK OZNAČENÝ, POSKYTUJÚ POUŽÍVATEĽOVI
PODROBNEJŠIE INFORMÁCIE A POVAŽUJÚ SA ZA
NEODDELITEĽNÚ SÚČASŤ TOHTO ODMIETNUTIA ZÁRUKY.
SPOLOČNOSŤ MEDTRONIC PRETO ODMIETA VŠETKY ZÁRUKY
NA TENTO VÝROBOK, ČI UŽ VÝSLOVNÉ ALEBO IMPLICITNÉ.
SPOLOČNOSŤ MEDTRONIC NENESIE ZODPOVEDNOSŤ ZA
ŽIADNE NÁHODNÉ ANI NÁSLEDNÉ ŠKODY SPÔSOBENÉ
POUŽÍVANÍM, PORUCHOU ALEBO ZLYHANÍM VÝROBKU, ČI UŽ NA
ZÁKLADE ZÁRUKY, ZMLUVY, PROTIPRÁVNEHO KONANIA ALEBO
INEJ PRÁVNEJ TEÓRIE.
Vyššie uvedené výnimky a obmedzenia by nemali byť v rozpore a ani
by sa nemali považovať za výnimky a obmedzenia, ktoré sú v rozpore
s povinnými nariadeniami relevantných právnych ustanovení.
Ak ľubovoľný súd kompetentnej jurisdikcie vyhlási niektorú časť alebo
podmienku tohto Odmietnutia záruky za nelegálnu, nevynútiteľnú alebo
nezlučiteľnú s relevantnými právnymi ustanoveniami, vyhlásenie súdu
nebude mať vplyv na platnosť zvyšku Odmietnutia záruky a všetky práva
a povinnosti sa musia posudzovať a presadzovať tak, ako keby toto
Odmietnutie záruky neobsahovalo časť alebo podmienku, ktorá bola
vyhlásená za neplatnú.
®
EVOLUTION, MODEL
Návod na použitie slovenčina 71
Page 74

72 slovenčina Návod na použitie
Page 75

Page 76

Europe
Europe/Africa/Middle East
Headquarters
Medtronic International
Trading Sàrl
Route du Molliau 31
Case Postale 84
CH-1131 Tolochenaz
Switzerland
Internet:
www.medtronic.co.uk
Tel. 41-21-802-7000
Fax 41-21-802-7900
Medtronic E.C. Authorized
Representative
Medtronic B.V.
Earl Bakkenstraat 10
6422 PJ Heerlen
The Netherlands
Tel. 31-45-566-8000
Fax 31-45-566-8668
Asia-Pacific
Japan
Medtronic Japan
Comodio Shiodome 5F
2-14-1 Higashi-Shimbashi,
Minato-ku
Tokyo 105-0021
Japan
Tel. 81-3-6430-2001
Fax 81-3-6430-7140
Australia
Medtronic Australasia Pty.
Ltd.
Unit 4/446 Victoria Road
Gladesville NSW 2111
Australia
Tel. 61-2-9879-5999
Fax 61-2-9879-5100
Asia
Medtronic International Ltd.
Suite 1602 16/F, Manulife
Plaza
The Lee Gardens, 33 Hysan
Avenue
Causeway Bay
Hong Kong
Tel. 852-2891-4068
Fax 852-2591-0313
Americas
Latin America
Medtronic Latin America
3750 NW 87th Avenue, Suite
700
Miami, FL 33178
USA
Tel. 305-500-9328
Fax 786-709-4244
Canada
Medtronic of Canada Ltd.
6733 Kitimat Road
Mississauga, Ontario L5N
1W3
Canada
Tel. 905-826-6020
Fax 905-826-6620
Toll-free in Canada:
1-800-268-5346
United States
Manufacturer:
Medtronic, Inc.
710 Medtronic Parkway
Minneapolis, MN 55432-5604
USA
Internet: www.medtronic.com
Tel. 1-763-514-4000
Fax 1-763-391-9100
Toll-free in the USA:
1-800-328-2518
(24-hour consultation service)
*A15452001*
© Medtronic, Inc. 2006, 2007
All Rights Reserved
A15452001 Rev C
 Loading...