

Page 1

User Manual
™
Signia
Stapling System
en
Page 2

Page 3

User Manual
™
Signia
Stapling System
PT00032755
Page 4

Page 5

Table of Contents
1. System Overview.....................................................................................................................................1
2. Instructions for Use ...........................................................................................................................15
3. Cleaning and Sterilization........................................................................................................33
Page 6

Page 7

System Overview
1. System Overview
Description
Signia™ Stapling System
The Signia™ stapler is an intelligent surgical stapler that provides push-button powered
maneuverability and delivery of compatible stapling reloads. The Signia™ stapling
system is the combination of the Signia™ stapler and system accessories.
The Signia™ stapler is composed of the Signia™ power handle, Signia™ power shell, and
Signia™ adapters. The system accessories include a reusable insertion guide, a manual
retraction tool, a single-bay charger, and a four-bay smart charger. The Signia™ stapler is
compatible with Endo GIA™ single-use reloads and Endo GIA™ single-use reloads with
Tri-Staple™ Technology .
Power Handle
The Signia™ power handle is a non-sterile reusable, batterypowered stapling handle that includes microprocessors,
electronics, motors, a OLED display screen, and a rechargeable
lithium-ion battery −all within a sealed handle.
Power Shell
The Signia™ power shell is a single-use, sterile shell that
covers the non-sterile Signia™ power handle to create an
aseptic barrier, control interface, and universal adapter
connector.
Linear Adapters
The Signia™ linear adapters are non-sterile reusable
instruments that attach to the stapling handle to enable
functionality of compatible stapling reloads. Included
are motor mating connectors and electronic sensors. It is
provided non-sterile and must be cleaned and sterilized
prior to each use.
1
Page 8

System Overview
Signia™ Stapler Accessories Descriptions
Stapler Reusable Insertion Guide
The Signia™ reusable insertion guide is used to help
maintain the sterility of the power shell during insertion
of a non-sterile Signia™ power handle. It is provided
non-sterile and must be cleaned and sterilized prior to
each use.
Manual Retraction Tool
The Signia™ manual retraction tool is a reusable,
handheld device that can be used to operate the
adapter controls in the event of a malfunction during
operation. The tool can be used to complete a firing,
retract the knife and open the jaws, and/or articulate a
stapling reload. It is provided non-sterile and must be
cleaned and sterilized before use.
Single-Bay Charger
The Signia™ single-bay charger is designed for use
as an accessory to the Signia™ stapler and is used for
charging the Li-ion batteries within the power handle.
The charger will monitor the state of charge of a
charging battery and report its status using color LEDs.
Four-Bay Smart Charger
The Signia™ four-bay smart charger is designed for
use as an accessory with the Signia™ stapler, which
includes four power handle charging bays and a
touch-screen LCD display screen. Its purpose is to
charge the Li-ion batteries within the power handle.
The touchscreen LCD is used to investigate the Signia™
power handle’s charge status.
Compatibility
The Signia™ stapler is composed of the Signia™ power handle, Signia™ power shell and
Signia™ adapters. Compatible accessories include a manual retraction tool, reusable
insertion guide, a single-bay battery charger and four-bay smart charger. The Signia™
2
Page 9

System Overview
stapler is compatible with Endo GIA™ single-use reloads and Endo GIA™ single-use
reloads with Tri-Staple™ Technology.
Indications for Use
The Signia™ stapler, when used with Endo GIA™ single-use reloads and Endo GIA™ singleuse reloads with Tri-Staple™ Technology, has applications in abdominal, gynecological,
pediatric, and thoracic surgery for resection, transection, and creation of anastomosis. It
may be used for transection and resection of liver substance, hepatic vasculature, and
biliary structures and for transection and resection of the pancreas.
The Signia™ stapler, when used with Endo GIA™ curved tip single use reloads can be
used to blunt dissect or separate target tissue from other certain tissue.
The Signia™ stapler, when used with Endo GIA™ single use Radial Reloads with
Tri-Staple™ Technology, has applications in open or minimally invasive general
abdominal, gynecologic, pediatric and thoracic surgery for resection and transection
of tissue and creation of anastomosis, as well as application deep in the pelvis, i.e.,
low anterior resection. It may be used for transection and resection of liver substance,
hepatic vasculature and biliary structures and for transection and resection of the
pancreas.
The Signia™ stapler, when used with Endo GIA™ single use reinforced reloads with
Tri-Staple™ Technology preloaded with polyglycolic acid staple line reinforcement, has
applications in abdominal, gynecologic, pediatric and thoracic surgery for resection,
transection of tissue and creation of anastomosis. It may be used for transection
and resection of liver substance, hepatic vasculature and biliary structures, and for
transection and resection of the pancreas.
Contraindications
1. Refer to the Instructions for Use provided with the compatible Endo GIA™ single-use
reloads and Endo GIA™ single-use reloads with Tri-Staple™ Technology for specific
indications, contraindications, warnings, and precautions.
2. Tissue thickness should be carefully evaluated before firing any stapler. Refer
to the Instructions for Use provided with the selected Endo GIA™ single-use
reload or Endo GIA™ single-use reload with Tri-Staple™ Technology for the specific
contraindications regarding compressed tissue thickness for the selected reload.
3. Do not use the Signia™ stapler where adequacy of hemostasis cannot be verified
visually after applications.
4. Do not use any linear cutter on major vessels without making provisions for
proximal and distal control.
5. Do not use the instrument on ischemic or necrotic tissue.
3
Page 10

System Overview
6. The Signia™ stapler should not be used on friable or delicate tissue where the
closure of the device might be destructive.
7. When using curved-tip reloads with the Signia™ stapler, do not use on tissue or
structures that cannot fit completely within the reload jaws proximal to the transitional
angle of the curved tip.
8. The Signia™ power shell is provided STERILE and is intended for use in a SINGLE
procedure only. DISCARD AFTER USE. DO NOT RESTERILIZE.
9. Endo GIA™ single-use reloads and Endo GIA™ single-use reloads with Tri-Staple™
Technology are provided STERILE and are intended for use in a SINGLE procedure only.
DISCARD AFTER USE. DO NOT RESTERILIZE.
Precautions and Warnings
System-Specific Precautions and Warnings
Precautions
1. This document is designed to assist in using this product. It is not a reference to
surgical techniques.
2. Do not use the stapler if the packaging or device components appear damaged.
3. Endoscopic procedures should be performed only by physicians having
adequate training and familiarity with endoscopic techniques. Prior to performing
any endoscopic procedures, consult the medical literature relative to techniques,
complications, and hazards.
4. The stapler and associated components are to be used by medical professionals
qualified in the transportation, preparation, cleaning, sterilization, and use of surgical
devices. Covidien™ single-use reloads are intended for use in a sterile operating room
environment in surgical procedures where surgical stapling is indicated.
5.
A thorough understanding of the principles and practices of electrical equipment
is essential to avoid shock and other hazards to the operators and/or the device
accessories. Ensure that electrical isolation and outlet grounding are not compromised.
6. The stapler is a precise instrument. Care should be taken to avoid dropping.
Handling or cleaning the power handle improperly, or sterilizing it, may shorten device
life and/or lead to device failure.
7. The power handle is provided non-sterile. DO NOT STERILIZE.
8. The adapters are provided non-sterile. Clean and sterilize before each use.
9. The reusable insertion guide is supplied non-sterile. Clean and sterilize before each use.
10. The manual retraction tool is provided non-sterile. Clean and sterilize before each use.
11. Do not hold or carry the stapler by the distal end of the adapter or by the stapling
reload.
4
Page 11

System Overview
Warnings
12. The power shell is provided STERILE and is intended for use in a SINGLE procedure
only.
13. The stapler does not directly sense tissue thickness. Select the stapling reload with an
indicated tissue range that is appropriate for the target tissue. Overly thick or thin tissue
may result in unacceptable staple formation.
14. After firing staples and removing the instrument, always inspect the staple line and
the surrounding site for hemostasis and/or leakage. Minor bleeding or leakage may be
controlled by electrocautery or sutures.
15. When dividing major vascular structures, be sure to adhere to the basic surgical
principles of proximal and distal control.
16. Failure to completely fire the stapling reload will result in an incomplete cut and/or
incomplete staple formation, which may result in poor hemostasis and/or leakage.
Component-Specific Warning and Precautions
Refer to component specific Instructions for Use for specific individual component
warning and precautions.
Adverse Reactions
Adverse reactions, adverse events and potential complications may include but are
not limited to:
• seroma/hematoma
• bleeding/hemorrhage/anastomotic leak
• fistula
• infection, which may include intraabdominal abscesses/sepsis
• ischemia
• chronic pain
• allergic reactions
• inflammatory reaction
• visceral adhesions
• nerve entrapment
• tissue erosion
• small bowel perforation
• potential for stricture
• potential for delayed gastric emptying, and the need for future re-operation.
5
Page 12

System Overview
System Indicators
A.
2
1
E.
D.
(1) LED INDICATOR
During use, the stapler uses an LED light, housed within the safety button, to indicate
fully clamped status, readiness to fire, and fire-enabled status.
F.
B.
C.
GREEN LED INDICATOR INDICATES
OFF Stapling reload is not loaded or fully clamped
ON Stapling reload is fully clamped
BLINKING
(2) OLED DISPLAY SCREEN INDICATORS
Graphical display indicators provide additional device status and operative readiness
for use in separate zones within the status border indicator frame.
The green LED / safety button is pressed; device
is entering firing mode
OLED SYSTEM INDICATORS INDICATES
A. System status
B. Power status
C. Reload recognition status
D. Power handle and power shell status
E. Adapter status
F. Reload status
6
Page 13

BATTERY INDICATORS INDICATES
GREEN
Functional, sufficient charge, available for use.
YELLOW
Functional, low battery indicator, available firings,
available for use.
System Overview
RED
Non-Functional, insufficient battery charge, not
available for use.
Low battery status will indicate when there is enough battery charge to complete
firing two linear staple reloads or cartridges. An insufficient battery charge will not
allow you to continue to fire stapling reloads.
Component Status Indicators
Component status indicators will display the device life numerically for the stapler
when setting it up.
When the setup completes, the stapler will indicate it is ready for use with an audible
sequence of tones.
7
Page 14
System Overview
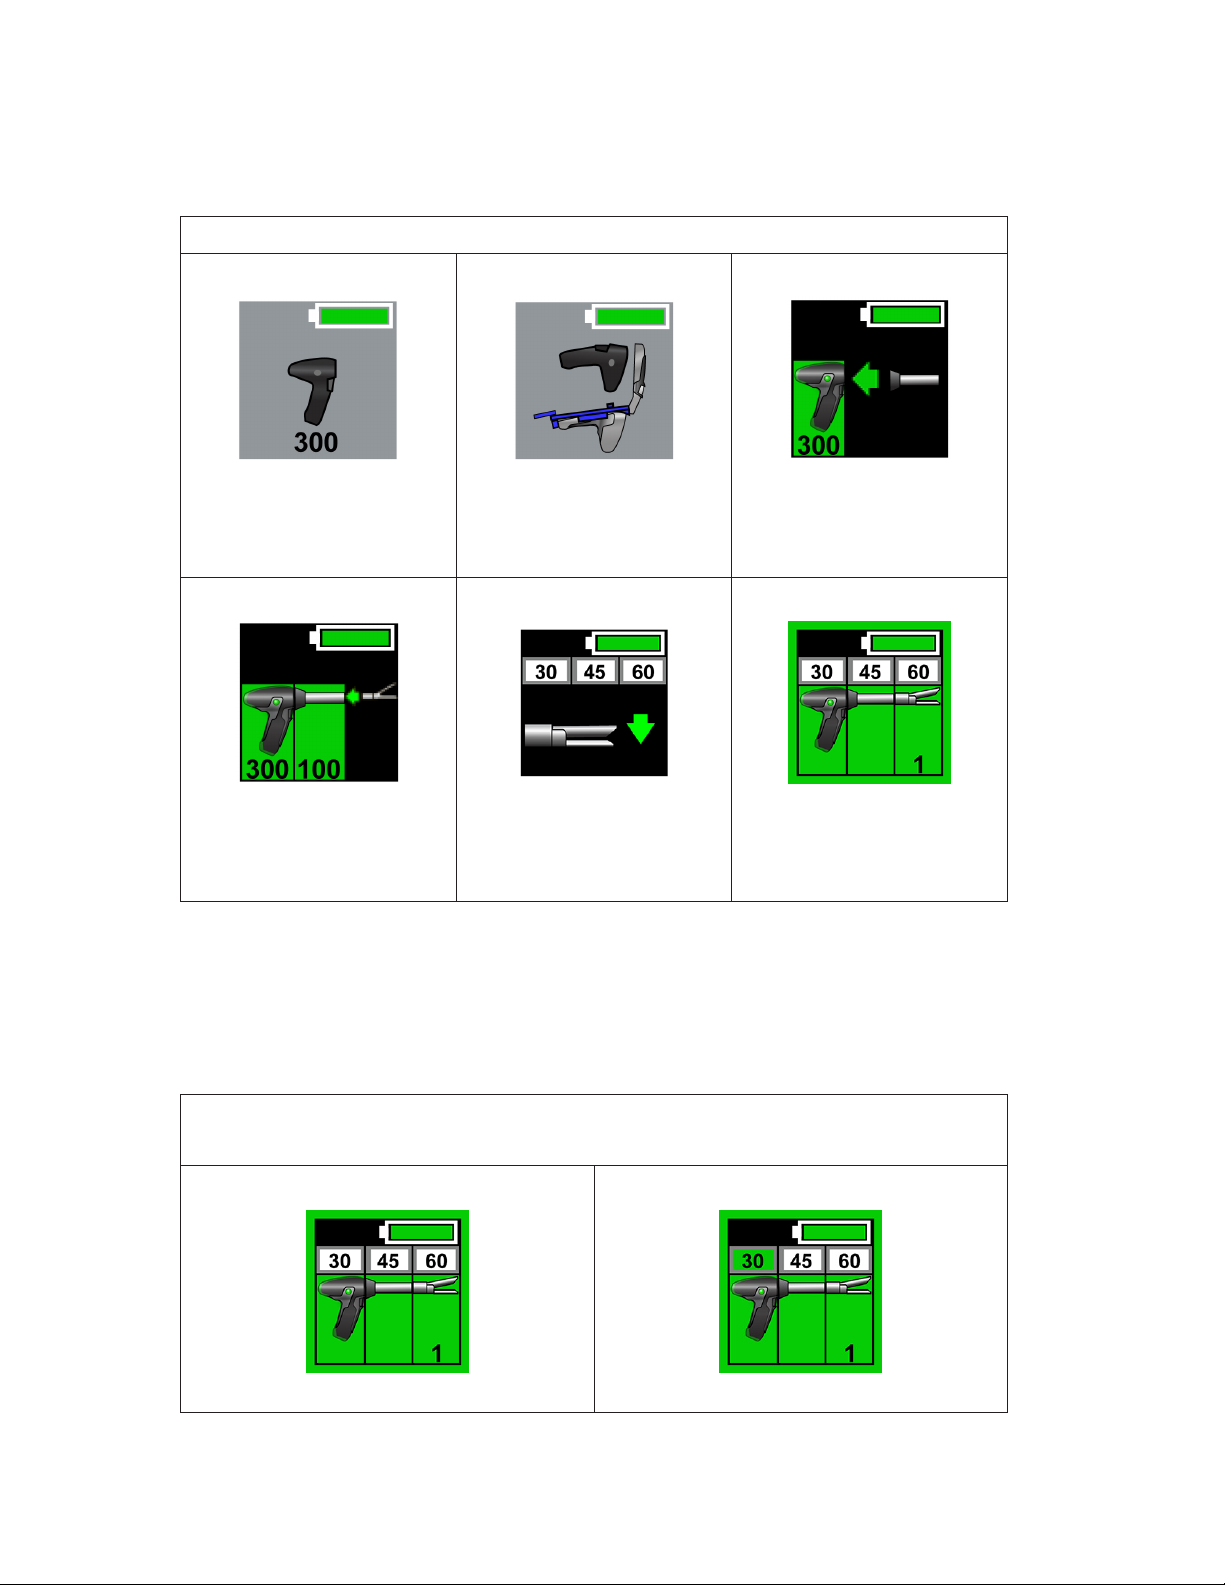
Table 10: Signia™ Stapler Set up Sequence
1
Power handle procedures
remaining
4
Power handle power shell,
adapter status and attach
a stapling reload indicator
2
Insert power handle
into power shell using
insertion guide indicator
5
Perform stapling reload
cycle test before use
indicator
3
Power handle, power
shell status and attach an
adapter indicator
6
Ready for use stapler
system status indicator
Operational Use Indicators
The stapler measures force when clamping and firing staples and will prevent the force
from exceeding predetermined safety limits. As it enters three specially developed,
predetermined force zones, the device will adjust and maintain its firing speed in each
zone to optimize staple formation.
Table 11: Signia™ Stapler Firing Progress and Excessive Force
Display - (e.g., using a 45mm reload)
1
Pre-fire status
Fire travel to 30 mm indicator
2
8
Page 15

System Overview
3
Fire travel to 45 mm indicator
The handle LED light will illuminate green when fully clamped and flash when in fire
mode.
Excessive force indicator, firing stops
4
Firing Process
1. Press DOWN to fire and begin firing the stapler, the reload recognition bar fills green
indicating firing progress.
2. Complete the fire when the knife reaches end of the reload and the reload
recognition bar is completely filled green for the appropriate distance.
3. Press UP to retract the knife, the reload status bar and system status changes to
inactive status indicating the device is no longer fully ready for use.
4. Upon completion of firing, the device with notify the user with an audible
completion tone.
NOTE
The handle LED will flash green during fire mode and stay illuminated when
firing is complete. The LED will turn off when the reload is opened.
In Table 12, Images (1-3) indicate using an Endo GIA™ single-use reload or Endo GIA™
single-use reloads with Tri-Staple™ Technology
9
Page 16

System Overview
Reload travel distance indicators will display when using compatible Endo GIA™
single-use reloads and Endo GIA™ single-use reloads with Tri-Staple™ Technology.
Additional Controls Indicators
Table 12: Signia™ Stapler Firing Progress Indicators -
(e.g., using a 60 mm reload).
1 2 3
The Signia™ stapler’s power rotation controls are preset ON as ambidextrous, but can
be configured for dedicated right- or left-handed use. Configuring rotation buttons
can occur at any time once a Signia™ adapter is attached.
NOTE
The configuration will clear once the power pack is returned to the charger.
Disable/Re-Enable Rotation Button Controls
1. Disable or re-enable rotation controls by pressing and holding both rotation buttons
on one side of the handle for three seconds. The screen will show deactivation or
reactivate countdown and change to its active status (see Table 13).
2. Pressing a single disabled rotation control will display the current disabled and
active status.
10
Page 17

System Overview
Table 13: Signia™ Stapler Special Use Controls –
Disabling and re-enabling the rotation button controls.
1 2
Deactivation Sequence
Current Status
Re-activation Sequence
NOTE
Positive audible tones will notify when settings have been changed.
Manually Changing Firing Speeds
When fully clamped on tissue and in fire mode, the rotation buttons are turned off and
are mapped into speed selection controls. Based on the force measured, the device
will program the appropriate speed selection and faster speeds will not be available.
To adjust to slower speeds, use the following steps:
1. Double click either lower rotation button to enter a slower speed setting. There are
only three speed settings (Standard, Medium and Slow).
11
Page 18

System Overview
NOTE
At any time the device measures higher force than programmed for a speed
setting, the device will override the speed setting and move to a slower speed
to optimize stapling performance.
Trouble Shooting Indicators
If faced with any of the following errors, document the error and replace the
instrument.
Table 14: Signia™ Stapler Error Trouble Shooting Guide
1
2
3
Battery error indicator
4
Power shell error indicator
NOTE
All fault conditions are notified with an audible fault tone
Power handle error
indicator
5
General adapter error
indicator
General error indicator
6
General reload error
indicator
12
Page 19

System Overview
End-of-Life Indicators
If faced with any of the following End-of-Life conditions, document the issue and
replace the component.
Table 15: Signia™ Stapler End-of-Life Guide
1
2
3
End-of-life service
indicator – audible fault
tone notification
Used power shell attached
indicator
4
Used stapling reload attached
End-of-life adapter
indicator
13
Page 20

14
Page 21

Instructions for Use
2. Instructions for Use
These instructions are not intended as a reference to surgical techniques.
SET UP
Three Hours Before First Use
1. Each new power handle unit is shipped in the OFF mode. Turn it on by placing the
base of power handle into a battery charging terminal from back to front until a secure
connection is established. The device will turn on and begin initializing.
2. For its first activation, the power handle should charge for a minimum of three
hours before clinical use.
Charging
NOTE
Refer to individual power charger Instructions for Use for additional information
on set up and use.
PRECAUTION
Ensure that the power handle is sufficiently charged before use.
1. Insert the power handle into the battery charger, placing it into the battery charger
bay facing forward and rock the base of the handle onto the terminal from back to
front until a secure connection is established.
2. The charging cycle will start automatically when the power handle is inserted
correctly into the battery charger.
Charging time will depend on the amount of charge remaining in the power handle.
Full charging of an empty battery takes approximately three hours.
3. To remove the power handle from the battery charger, grasp the power handle and
carefully rock from front to back while removing to release the secure connection.
Assembling The Signia™ Stapler
Before assembling the Signia™ stapler, refer to the power handle display set up
support graphics for user-guided display feedback (Tables 10-15).
15
Page 22

Instructions for Use
PRECAUTION
The power handle is non-sterile and CANNOT BE STERILIZED.
PRECAUTION
The power handle must be inserted into a sterile power shell with a sterilized
reusable insertion guide while maintaining aseptic transfer principles. Use
caution not to contaminate the sterile shell during power handle insertion.
PRECAUTION
Ensure that the power handle is sufficiently charged before use. Refer to the
single-bay and four-bay smart charger sections in this manual or their individual
Instructions for Use.
PRECAUTION
The reusable insertion guide is provided non-sterile. It must be cleaned and
sterilized prior to each use.
Power Handle Insertion Steps
Step 1 and 2
Step 3
Step 4
Reusable Insertion Guide
Extended Remover handle
16
Page 23

Step 5
Instructions for Use
Secure Clips
1. SCRUBBED PERSON: After aseptically removing the sterile power shell from the
packaging, carefully open the shell by holding the back handle of the shell so the
front handle is facing up and away from the back handle.
2. SCRUBBED PERSON: Align and fully seat a clean, sterilized reusable insertion
guide onto the back handle of the open power shell to provide an aseptic transfer
guide when inserting the power handle into the shell.
PRECAUTION
Ensure that the reusable insertion guide is properly seated onto the power shell
and all clips are covered before inserting a power handle device.
3. CIRCULATING PERSON: While maintaining aseptic transfer techniques, insert the
power handle into the insertion guide and power shell.
4. CIRCULATING PERSON: After the power handle is fully seated in the power shell,
carefully remove the reusable insertion guide using the extended remover handle.
Display Screen Status
5. SCRUBBED PERSON: Taking care not to touch the power handle, close the front
portion of the power shell until there is tactile confirmation the base of the shell is
closed and the front clips are secured. Check all three clips to confirm the shell is fully
closed and securely locked.
PRECAUTION
Ensure that both front clips are secured before use.
6. Confirm successful connection of the sterile control shell with the power handle and
the functional status of the stapler on the display screen (see Table 10).
17
Page 24

Instructions for Use
Attaching the Adapter
PRECAUTION
Signia™ adapters are REUSABLE and provided non-sterile. CLEAN and STERILIZE
before use. Consult the Instructions for Use for the selected adapter for
additional information.
PRECAUTION
Do not attach an adapter to the power shell prior to inserting a power handle.
PRECAUTION
Do not attempt to load a stapling reload before the adapter has been attached
to the stapler and calibration has been completed. Doing so may lead to
improper calibration and/or device damage.
NOTE
If a stapling reload is attached to the adapter before the adapter is attached to
the stapler, the adapter will not calibrate for use.
PRECAUTION
If a stapling reload is attached to the adapter in a clamped or fired position
before the adapter is attached to the stapling handle, the stapler will attempt
to retract the knife blade and fully open the jaws. The stapler will not allow the
stapling reload to fire until the reload is removed and the adapter completes its
calibration.
18
Page 25

Instructions for Use
1. Align the proximal end of the adapter with the quick release button facing up and in
the same orientation as the stapling handle.
2. Simultaneously, press the two components together until the adapter is fully seated
into the stapling handle and tactile feedback is registered.
3. Confirm secure attachment by pulling the adapter and power handle in opposite
directions. The stapler will automatically begin to calibrate the adapter and the status
indicator light on the display screen will illuminate as shown in Table 10.
Loading A Stapling Reload
WARNING
Always select a reload with the appropriate staple size for the tissue thickness.
Overly thick or thin tissue may result in unacceptable staple formation.
PRECAUTION
Do not attempt to remove the shipping wedge until the reload is loaded onto
the adapter.
IMPORTANT
When using compatible stapling reloads, refer to the indications,
contraindications, warnings, and precautions described in the associated
Instructions for Use.
When using the linear adapters and Endo GIA™ single-use reloads or Endo GIA™
single-use reloads with Tri-Staple™ Technology:
1. Insert the pin located at the distal end of the adapter into the stapling reload. Ensure
that the LOAD alignment indicator on the reload aligns with the LOAD alignment
indicator on the shaft.
2. Lock the reload in place by pushing it in and twisting clockwise 45 degrees (relative to
the adapter). When loaded properly into the adapter, the reload unload button is seated
in place without any red showing underneath.
19
Page 26

Instructions for Use
3. Remove the shipping wedge from the reload.
4. Perform a reload cycle test to confirm proper loading of the stapling reload:
a. Press and hold the DOWN toggle button until the reload is fully clamped.
b. Press and hold the UP toggle button until the reload is fully open.
The power stapling handle will detect when the stapling reload is loaded, and the
handle display will indicate a reload cycle test is required. Once the test is completed,
the handle will indicate functional status and it is ready for use (see Table 10).
5. Verify that the functional ready status border on the display screen is solid green, as
shown in Table 10.
6. At this point, the instrument is ready for use.
Troubleshooting
Difficulty loading a stapling reload.
PRECAUTION
If there is difficulty loading a stapling reload, do not force it on.
If a stapling reload is difficult to load:
1. Recalibrate the adapter by removing the adapter from the stapler and reattaching it.
The adapter will recalibrate and indicate functional status and it is ready for use.
2. Reattempt to load a stapling reload.
NOTE
To prevent lengthy calibration steps between reload exchanges, center the
reload position and fully open the jaws before removing reloads after each
firing to prevent the need for calibration and to ensure safe and efficient
reload exchanges. The device will also automatically center when removing
the stapling reload. Holding the toggle in the up position for two seconds will
completely open the reload and center articulation.
20
Page 27
Instructions for Use
Difficulty Unloading A Stapling Reload
PRECAUTION
If there is difficulty unloading a stapling reload, do not force it off.
If a stapling reload is difficult to unload:
1. Center the reload and fully open the jaws by manually controlling the toggle or
press and hold the UP control button for two seconds. The articulation will center and
the jaws of the reload will fully open
2. Reattempt to unload the stapling reload by pressing the reload UNLOAD BUTTON
back toward the power handle, twist the reload counterclockwise 45 degrees and
remove the reload from the shaft of the adapter.
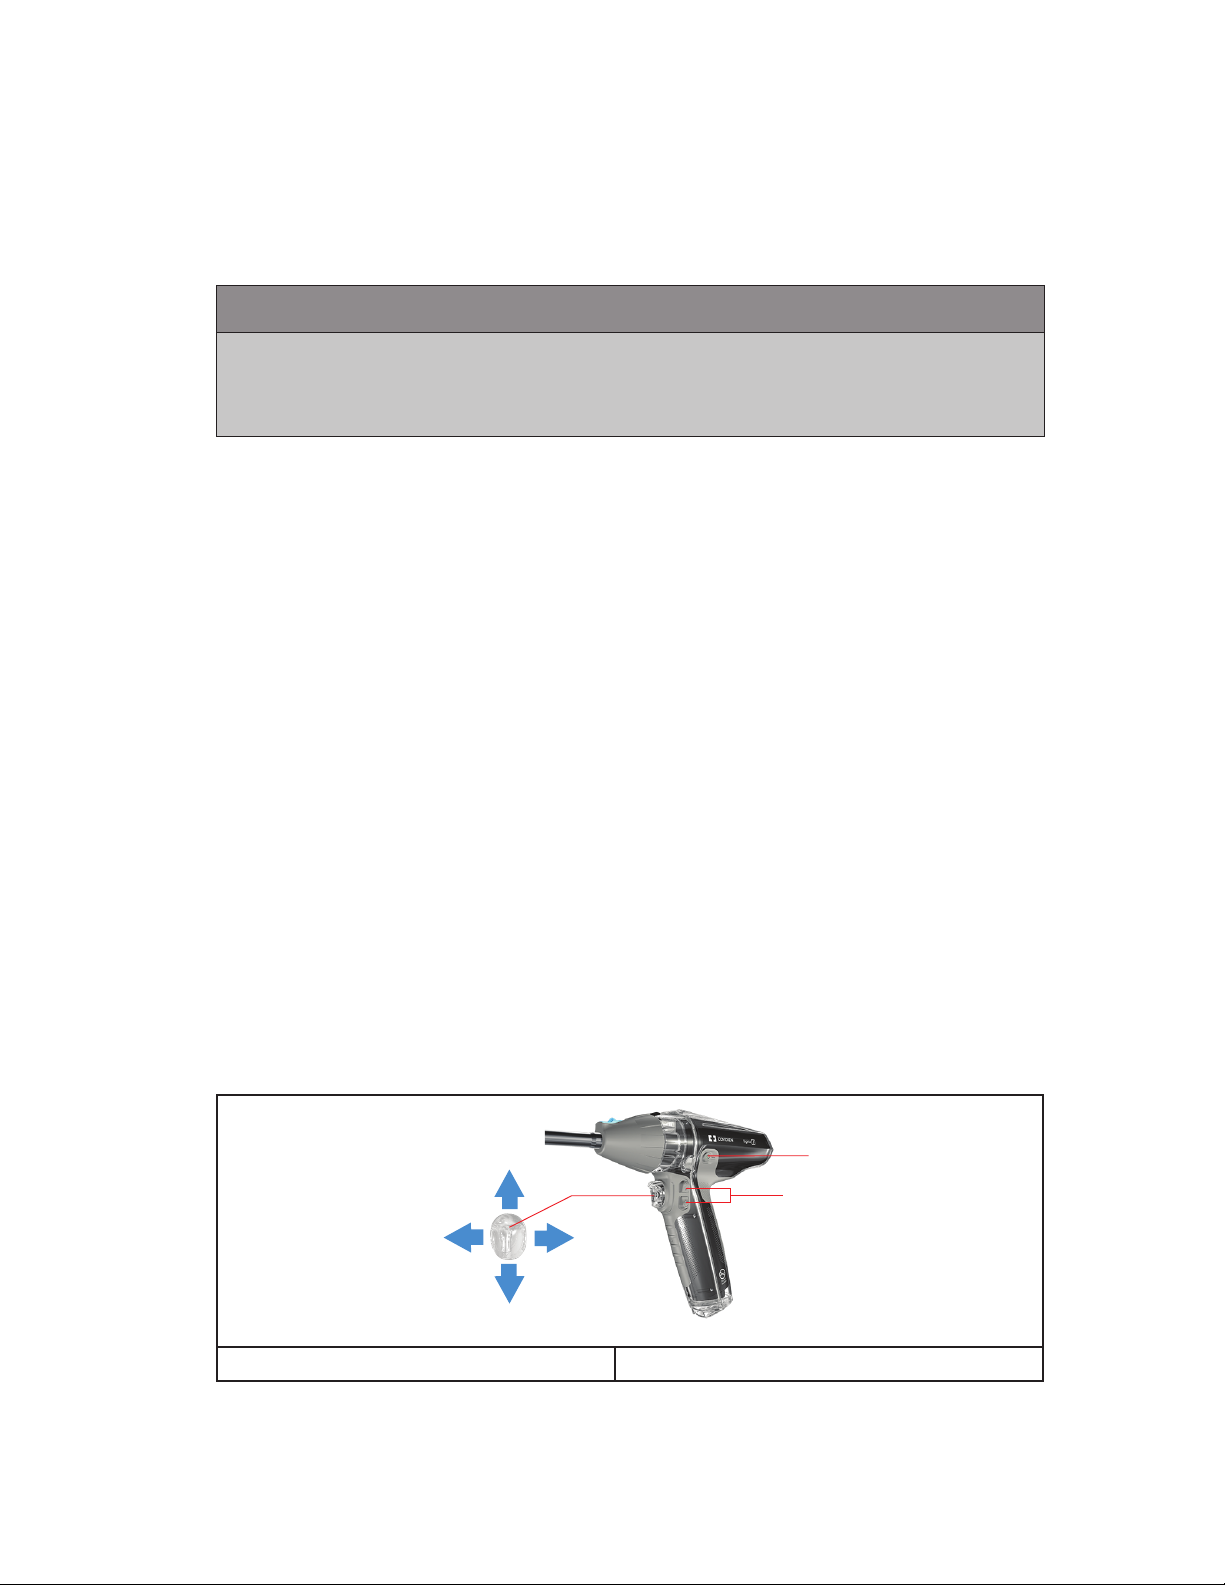
Operating the Stapler
Linear Stapling Control Interface
The OPEN, CLOSE, and ARTICULATION controls are contained in a single toggle with a
four-way activation control switch.
(1) RIGHT articulates the reload to the right when the cartridge is located in the up
position.
(2) LEFT articulates the reload to the left when the cartridge is located in the up
position.
(3) DOWN closes the jaws and will FIRE the staples when in fire mode.
(4) UP opens the jaws and will retract the knife when in fire mode.
4
1 2
3
A.
B.
A. Safety Button B. Rotation Control
21
Page 28

Instructions for Use
The four–way activation TOGGLE provides two ways to activate the left and right
articulation controls:
• (1) Use as a push button to control left – right movement or
• (2) Fit the index finger into the half-hemisphere, and push the center ridge or pull the
side flare.
The SAFETY button can be pressed when the reload is fully closed to enable fire mode.
NOTE
When articulating the device back to center, the device will stop when the
reload is at the center point.
The ROTATION controls are located on either side of the stapler and provide directional
rotation control.
NOTE
When rotating the device, it will stop rotating at the 180 degree point from its
last position.
Precision Handling
Maximize the precision of the powered stapler by:
• Grasping the handle using a comfortable, ergonomic position.
• Using the thumb, rather than the index finger, to actuate the green safety button to
enable firing-mode.
• Using the index finger as the dedicated finger to actuate the four-way control toggle.
22
Page 29

Instructions for Use
Operating Stapling Reloads
PRECAUTION
Do not attempt to insert or remove the instrument from the incision or trocar
sleeve if the instrument is in the articulated position.
PRECAUTION
The anvil must be completely visible (past the trocar sleeve) prior to opening
and/or articulating the reload within the body cavity.
WARNING
The instrument will cut and staple any structure included in the jaws. Use
caution to ensure that only the intended structures to be cut and stapled are
within the instrument jaws.
1. Once the appropriate sized stapling reload has been loaded, close the reload
prior to introducing the instrument into the trocar sleeve or incision by pressing and
holding the DOWN button.
2. Insert the instrument in the patient’s body cavity, press and hold the UP button to
open the jaws of the instrument.
3. Position the jaws of the reload onto the target tissue by using the ARTICULATION
and ROTATION buttons.
NOTE
The device can be manually rotated in addition to the push-button controlled
rotation.
23
Page 30

Instructions for Use
4. Clamp the tissue to be transected within the jaws of the reload. Use the UP and
DOWN toggle buttons to use the instrument as a grasper to manipulate tissue.
WARNING
When positioning the stapler on the application site, ensure that no
obstructions (such as clips) are within the instrument’s jaws. Firing over an
obstruction may result in incomplete cutting action and/or improperly formed
staples.
PRECAUTION
The instrument will not cut tissue beyond the black cut line indicated on the
single-use reload. More than one application of the stapler may be necessary for
tissue exceeding the length of the reload (30 mm, 45 mm, or 60 mm).
PRECAUTION
Placement of tissue proximal to the tissue stops on the reload may result in
stapler malfunction. Any tissue extending beyond the cut line will not be
transected.
5. Press and hold the DOWN button to close the jaws of the reload across the tissue to
be transected. Confirm the reload is fully closed.
When the jaws of the reload are fully closed, an audible tone is indicated and the
green LED light in the safety button is illuminated.
To optimize stapling performance, the Signia™ stapler uses the force measurements
upon clamp and during firing to control the speed of fire.
NOTE
If the stapler must be repositioned when in fire mode, open the jaws by
pressing the UP control button or press the green LED safety button again.
24
Page 31

Instructions for Use
NOTE
The stapler will not fire staples or cut tissue until the green LED fire safety
button is pressed.
6. Press and release the SAFETY button on either side of the stapler. An audible
confirmation will occur and the LED indicator will flash green, indicating that the
device is in fire-enabled mode.
7. Press and hold the DOWN/FIRE toggle button until the lower clamp cover reaches
the distal end of the cartridge slot, and the powered handle stops. The firing-progress
indicator will illuminate on the display to show the distance the reload has been fired
(see Table 12).
8. To retract the knife blade after firing, press and release the UP control toggle.
NOTE
If required, firing can be stopped at any time by releasing the DOWN / FIRE
button. To retract the knife before reaching the end of the reload, press and hold
the UP / OPEN button.
9. To open the jaws after firing, press and hold the UP control toggle until fully opened.
WARNING
The stapler can be stopped and opened by pressing the UP toggle button.
However, failure to completely fire the reload will result in an incomplete cut
and/or incomplete staple formation, which may result in poor hemostasis and/
or leakage.
10. Once the device has completed firing and the jaws open, the status indicator
frame and the reload functional status indicator on the display screen will indicate
completed firing status and is no longer able to be fired (see Tables 12-15). Remove
the instrument from the tissue.
25
Page 32

Instructions for Use
PRECAUTION
After firing and removing the instrument from the tissue, always inspect the
staple line and the surrounding site for hemostasis and/or leakage.
11. After removing the instrument from the tissue, center the articulation by either:
• Using the four-way ARTICULATION toggle control. The articulation will pause when it
has been centered.
• Pressing and holding the UP control toggle for two seconds.
12. Remove the instrument from the body cavity; the reload will spring closed during
removal. Alternatively, press and hold the CLOSE/FIRE toggle button to close the jaws
before removing the instrument from the body cavity.
PRECAUTION
Do not attempt to insert or remove the instrument from the incision or trocar
sleeve if the instrument is in the articulated position.
13. If additional firings are desired on the same patient, attach a new single-use reload.
PRECAUTION
When using the stapler more than once during a single surgical procedure, be
sure to remove the empty stapling reload or cartridge and load a new one. A
safety interlock prevents an empty single-use reload from being fired a second
time. Do not attempt to override the safety interlock.
Center the reload and fully open the jaws before removing the reload to ensure
efficient reload exchanges.
Troubleshooting
Firing Slows Down
The Signia™ stapler measures force when clamping and firing staples and will prevent
the force from exceeding predetermined safety limits. As it enters three specially
26
Page 33

Instructions for Use
developed, predetermined force zones, the device will adjust its firing speed in each
zone to optimize staple formation.
If the stapler slows down during firing before the lower clamp cover reaches the distal
end, it is likely the firing force reached the force zone threshold and moved into the
next force zone level and the device firing speed was slowed to optimize stapling
performance.
Incomplete Firing
If the stapler stops firing before the lower clamp cover reaches the distal end, it is
likely the firing force measured reached the upper design limit of the stapling reload.
Carefully assess the tissue to determine whether to attempt to complete the firing.
PRECAUTION
When dividing major vascular structures, adhere to the basic surgical principles
of proximal and distal control.
If the stapler stops while firing:
1. Release the DOWN/FIRE button, and any other button or toggle that may be
pressed.
2. Inspect the stapling reload for an obstruction, excessively thick tissue, or for
completion of firing.
3. If continued firing is desired, attempt to complete the firing by pressing and holding
the DOWN/FIRE button until completion of firing.
4. If the stapler is unable to complete the firing, press UP on the toggle to RETRACT the
knife of the reload to the fully clamped position. Press and hold UP/OPEN again to fully
open the jaws of the stapling reload.
5. If unsuccessful in removing the stapling reload from the tissue, refer to the
Instructions for Use section to remove the reload. If that fails, follow the instructions
described in the Alternate Opening Procedure or in the Manual Retraction Tool
Procedure.
Alternative Opening Procedures
If the stapler failed to remove the stapling reload from the tissue, the following
procedures may be used to attempt to retract the knife and open the jaws of the
reload.
The alternative opening procedures can be performed using the existing power
stapler or with a new power stapler if a replacement power handle and sterile control
27
Page 34

Instructions for Use
shell is available. Insert a charged power handle into a sterile control shell, following
the instructions in the Assembling The Signia™ Stapler section.
WARNING
Depending upon the potential failure mode, each of the processes described
below may or may not be successful in retracting the knife and opening the
stapling reload. Professional experience should be used to assess patient status
when deciding the best course of action.
PRECAUTION
When dividing major vascular structures, adhere to the basic surgical principles
of proximal and distal control.
I. Powered Opening Approach
PRECAUTION
Care should be taken to support the adapter during disassembly to prevent
tissue damage.
1. Remove the stapling handle from the adapter by pressing the QUICK RELEASE
button on the top of the adapter while simultaneously pulling the stapling handle off
of the adapter.
2. Reattach the stapling handle onto the adapter and connected reload. Upon
connection to the adapter, the device will run through a calibration process and
recognize if a reload is attached. It will then attempt to zero out the controls forcing
the knife to retract and open the stapling reload.
3. Once the stapling reload is disengaged from tissue, remove the power stapling
handle from the patient and inspect the staple line and surrounding tissue for
hemostasis and/or leakage.
If the powered opening approach is unsuccessful, attempt a reboot and follow the
reattachment steps (2-3) as indicated above.
28
Page 35

Instructions for Use
II. Rebooting the power handle
Another way to open the stapling reload is to reboot the power handle.
During a reboot, the device will run through a calibration process and recognize if a
reload is attached. It will then attempt to zero out the controls, forcing the knife to
retract and open the stapling reload. A reboot can be performed while attached to the
adapter and stapling reload or separately.
PRECAUTION
Rebooting the power handle during a firing or incomplete firing will stop the
firing process, retract the knife blade, and open the jaws of the stapling reload.
1. To force a reboot, simultaneously press and hold both SAFETY buttons for ten seconds.
2. Release the SAFETY buttons. The device will reboot.
3. Once the stapling reload is disengaged from tissue, remove the stapler from the
patient and inspect the staple line and surrounding tissue hemostasis and/or leakage.
III. Using the Manual Retraction Tool
If another power stapler is not available, or the powered opening procedure and the
reboot approaches are unsuccessful, use the manual retraction tool procedure.
WARNING
The manual retraction tool is intended to be used as a back-up device for the
stapler should the stapler experience a failure during operation. It can be used
to complete a firing that has already been initiated, or to retract the knife and
open the jaws to remove a reload from tissue. It should NOT be used to initiate a
new firing of a stapling reload.
PRECAUTION
The manual retraction tool can only be used as a backup for the stapling handle.
Should a failure occur in either the stapling reload or adapter, the stapling
reload may not respond to inputs from the manual retraction tool.
29
Page 36

Instructions for Use
WARNING
The manual retraction tool is provided non-sterile. Clean and sterilize before
each use.
1. Remove the power stapling handle from the adapter by pressing the black QUICK
RELEASE button on the adapter while pulling the handle off the adapter.
PRECAUTION
Care should be taken to support the adapter during disassembly to prevent
tissue damage.
2. To control the firing, insert the manual retraction tool into the center hole marked
with a one (1) on the proximal end of the adapter.
3. To continue firing the stapling reload, turn the manual retraction tool
counterclockwise, opposite direction of the arrow.
4. To retract the knife and open the jaws of the stapling reload, turn the manual
retraction tool clockwise, the same direction as the arrow.
PRECAUTION
Retracting the knife and opening a fully fired stapling reload using the manual
retraction tool may take up to ten minutes. The user should consider this when
deciding on the best course of action in the event of a failure of the power
stapling handle.
5. If the reload is articulated, insert the manual retraction tool into the hole marked
with a two (2) on the proximal end of the adapter. If the stapling reload is orientated so
that the lower clamp cover is up and the anvil is down, turning the manual retraction
tool counterclockwise will articulate the reload to the right. Turning it clockwise will
articulate the reload to the left.
6. Once the reload is centered, remove the instrument from the patient. Refer to the
instructions in the Disassembling the Stapler section.
30
Page 37

Instructions for Use
WARNING
When a manual retraction tool is used in a procedure, do not attempt to reuse
the power stapler, power handle, adapter, or the stapling reload. Contact
Covidien customer service for return instructions.
PRECAUTION
After firing and removing the instrument from the patient, always inspect
the staple line and the surrounding site for hemostasis and/or leakage. Minor
bleeding or leakage may be controlled by using electrocautery or sutures.
WARNING
When a device malfunction occurs in a procedure, do not attempt to reuse the
stapler, adapter, or the stapling reload. Contact Covidien customer service to
determine diagnostic service and return options.
Disassembling the Stapler
Unloading A Stapling Reload
1. Once articulation is centered and the jaws are open, pull the blue UNLOAD button
back to release the stapling reload, twist the reload counterclockwise 45 degrees, and
pull the reload from the shaft of the adapter to remove it.
2. Dispose of the single-use reload per local procedures and regulations for biohazard
waste materials. Do not attempt to reuse or resterilize single-use reloads.
Troubleshooting
Difficulty Removing Stapling Reload And Cartridge
If a stapling reload is difficult to remove:
1. Simultaneously press and hold the UP control button for two seconds. The
articulation will center, and the jaws of the reload will fully open.
2. Press the reload UNLOAD BUTTON back toward the power handle, twist the reload
counterclockwise 45 degrees and remove the reload from the shaft of the adapter.
31
Page 38

Instructions for Use
Removing The Adapter
To remove the adapter:
1. Press and hold the adapter QUICK RELEASE button while pulling the adapter off of
the power stapling handle.
2. Refer to the specific adapter Instructions for Use for Cleaning and Sterilizing
instructions.
Removing The Power Shell And Power Handle
WARNING
The power handle cannot be sterilized.
PRECAUTION
The power handle will continue to drain power from the battery as long as it
remains attached to the power shell. Upon completion of use and disinfection,
return the used power handle to the battery charger station.
WARNING
The power shell is single-use only. DISCARD AFTER USE. DO NOT STERILIZE. Resterilized or reprocessed sterile power shells will not function.
1. Open the power shell by first releasing the side secure clips.
2. While holding the back of the power shell, press the bottom release button down
and push under the latch to open the power shell.
3. With clean gloves, securely remove the power handle from the power shell and
place it in a clean environment.
4. Discard the used power shell.
5. Follow the disinfection instructions for the power handle in the Cleaning section.
32
Page 39

Cleaning and Sterilization
3. Cleaning and Sterilization
Cleaning
After Use
Reprocess the instruments as soon as possible following use. If reprocessing cannot be
performed immediately, cover the instruments with a moist towel.
Only use the cleaning methods described for the reusable components as indicated in
the individual Instructions for Use. Discard the single-use power shell after use.
Sterilizing
The adapters, manual retraction tool, and the reusable insertion guide are provided
non-sterile. They may be sterilized by steam autoclave or EtO methods. Only use the
sterilization methods described in the individual Instructions for Use.
WARNING
The power handle is non-sterile and cannot be sterilized. Do not immerse. The
power handle will be damaged if sterilization is attempted.
Recycling And Disposal
NOTE
Contact customer service prior to recycling and disposing of power handle
to confirm contracted recycling and disposal agreements. Contact Covidien
customer service at http://www.covidien.com/sales-support, or by phone:
1-800-722-8772. Recycle the power handle by returning it to the manufacturer.
Discard or recycle the adapter, reusable insertion guide, manual retraction tool, and
other accessories as per local, state, and governmental regulations.
33
Page 40

Page 41

Do not use if
package is opened
or damaged
Consult
instructions
for use
Caution, consult
accompanying
documents
101.3 kPa
54.9 kPa
Transport atmospheric
pressure limitations
© 2016 Covidien.
Covidien llc, 15 Hampshire Street, Mansfield, MA 02048 USA.
Covidien Ireland Limited, IDA Business & Technology Park, Tullamore, Ireland.
www.Covidien.com
+1 800 633 8766
+1 763 514 4000
Covidien, Covidien with logo, and Covidien logo and Positive Results for Life are U.S. and internationally registered trademarks of Covidien AG. Other brands are trademarks of a Covidien company, ™* brands are
trademarks of their respective owner.
2016 / 04 - 3
Transport humidity
limitation
90%
140 °F
60 °C
-20.2 °F
-29 °C
Transport temperature
limitations
Type CF
Applied Part
Protection against fluid
ingress: Drip-proof
0123
 Loading...