


PACEART OPTIMA™ SYSTEM
POS12D Version 1.8
Paceart Optima System Software Installation and Configuration
Instructions
Caution: Federal law (USA) restricts this device to sale by or on
the order of a physician (or a properly licensed practitioner)

Trademarks in this manual
The following list includes trademarks or registered trademarks of Medtronic in the United States and possibly in
other countries. All other trademarks are the property of their respective owners.
Medtronic, Paceart Optima, CareLink, Mainspring, Medtronic CareLink

Contents
Introduction to the Paceart Optima™ System.......................................................................5
Paceart System Installation and Configuration.....................................................................9
Installation and Configuration | Contents | 3
Explanation of symbols.............................................................................................................5
Indications................................................................................................................................6
Precautions...............................................................................................................................6
Contraindications......................................................................................................................7
Authorized users.......................................................................................................................7
Technical Support.....................................................................................................................7
Manuals supplied with your system..........................................................................................7
Accessing the online Help........................................................................................................8
Components of the Paceart Optima System............................................................................9
Paceart System configuration options....................................................................................10
Recommended Windows settings..........................................................................................13
Configuring Internet Information Services (IIS)......................................................................13
Configuring Internet Information Services (IIS) for Windows Server 2008 and
Windows Server 2008 R2.......................................................................................13
Configuring Internet Information Services (IIS) for Windows Server 2012 and
Windows Server 2012 R2.......................................................................................14
Configuring Internet Information Services (IIS) for Windows Server 2016..................15
Configuring Internet Information Services (IIS) for Windows 7....................................16
Configuring Internet Information Services (IIS) for Windows 8.1.................................17
Configuring Internet Information Services (IIS) for Windows 10..................................18
Installing the Paceart Optima System Database Manager.....................................................19
Starting the Paceart System Database Manager........................................................20
Creating a Paceart System Database.........................................................................21
Updating the password for PaceartDataAccessUser...................................................21
Configuring Fax Services and Message Queuing..................................................................22
Installing the Paceart Optima System Application Server, Messaging Service, Data
Transformation Engine, and Online Help...........................................................................23
Installing SSL Certificates......................................................................................................27
Installing an SSL Certificate for Windows 7 and Windows Server 2008......................27
Installing an SSL Certificate for Windows Server 2008 R2..........................................28
Installing an SSL Certificate for Windows Server 2012, Windows Server 2012 R2,
and Windows Server 2016......................................................................................29
Installing an SSL Certificate for Windows 8.1..............................................................30
Installing the MSI Client..........................................................................................................31
Installing Paceart ECG...........................................................................................................32
Installing Paceart Web............................................................................................................33
CardioVoice Installation..........................................................................................................34
Installing the Dialogic D/4PCI and D/4PCIU Boards....................................................35
Installing the driver.......................................................................................................35

4 | Installation and Configuration | Contents
Installing CardioVoice Software...................................................................................35
Disabling the EVO 3.0 message window.....................................................................38
Configuring Dialogic Drivers for Dialogic D/4PCI and D/4PCIU boards.......................39
Simulating a CardioVoice call......................................................................................39
Installing the ClickOnce Server..............................................................................................40
Installing the ClickOnce Client Prerequisites...............................................................41
Installing the Paceart System Client from the ClickOnce Server.................................43
Installing Paceart Optima System Analytics Export...............................................................43
Additional information..................................................................................................43
Installation....................................................................................................................44
Configuration...............................................................................................................45
Installing the Paceart Optima System Client on Citrix Server................................................51
Uninstalling Paceart Optima System Customizations............................................................52
Paceart System Database Manager.......................................................................................52
Starting the Paceart System Database Manager........................................................52
Creating a desktop shortcut to the Paceart System Database Manager.....................53
Creating a Paceart System Database.........................................................................53
Deleting a database.....................................................................................................54
SQL Server Integration Services (SSIS)......................................................................54
Publications.................................................................................................................55
Subscriptions...............................................................................................................58
Bulk copy.....................................................................................................................61
Rename database.......................................................................................................62
Delete strips.................................................................................................................63
Delete patients.............................................................................................................63
SQL Users...................................................................................................................64
Enable or disable auditing............................................................................................66
Audit Data Archiving....................................................................................................66
Set Multi-User..............................................................................................................66
Tools............................................................................................................................66
Command Line Interface..............................................................................................69
Database Replication.............................................................................................................71
When to use replication...............................................................................................71
Replication topologies..................................................................................................71
Replication security......................................................................................................72
SQL server synchronization.........................................................................................76
Synchronization management and replication conflicts...............................................79

Installation and Configuration | Introduction to the Paceart Optima
Introduction to the Paceart Optima™ System
The Paceart Optima System is a clinic management tool that organizes patient, device, and programmer
information. It also provides access to trend analysis, aiding a physician or clinician in their daily workflow
and management of patient and cardiac data. The Paceart System supports cardiac rhythm devices from
most manufacturers.
The Paceart System:
• Stores programmed device parameters
• Summarizes patient data into concise reports
• Keeps a history of patient encounters
• Offers TTM technologies, such as CardioVoice, designed to work with event recorders
• Creates correspondence documents
• Schedules patient follow-up appointments
• Assists with records processing
• Assists in charge and billing management
• Offers integration with a hospital's or clinic's HL7-compatible system
• Provides task management to streamline clinic workflow
• Provides automatic import of data from pacemakers, programmers, and other storage media
™
System | 5
Explanation of symbols
Consult instructions for use
Conformité Européenne (European Conformity).This
symbol means that the device fully complies with
European Directive MDD 93/42/EEC.
For US audiences only
Authorized Representative in the European
Community
Manufacturer
Lot number
Re-order number
Date of Manufacture
Do not dispose of this product in the unsorted
municipal waste stream. Dispose of this product
according to local regulations. See
http://recycling.medtronic.com for instructions on
proper disposal of this product.
6 | Installation and Configuration | Introduction to the Paceart Optima
Temperature Limitation
Humidity Limitation
Software
Indications
The Paceart System is intended for use as a 12-lead electrocardiograph, pacemaker artifact analyzer, and
transtelephonic ECG receiving station. It also acts as a database for cardiac patients with or without
pacemakers or implantable cardioverter defibrillators.
Precautions
™
System
Storage and installation
• Ensure there is no condensed moisture on the Paceart System software USBs.
• Paceart System software USBs must be stored within the following conditions:
Storage Environment
-20°C (-4°F) to +45°C (113°F)Temperature
20% to 90%Relative Humidity
System operation
Before system operation:
• Ensure that the system is not being used with other instruments that may result in misdiagnosis or other
problems.
• Ensure there is no condensed moisture on the Paceart System software USBs.
• The Paceart System software USBs must be operating in an environment within the following conditions:
Operating Environment
0°C (32°F) to +35°C (95°F)Temperature
20% to 90%Relative Humidity
Additional precautions
• Do not modify the original system in any way.This includes adding any software product.
• Ensure that all patient records are updated and permanently stored before turning the PC power off.
• Double-check the data before typing the data into the system.

Installation and Configuration | Introduction to the Paceart Optima
Transmission and transmitter settings
When recording ECGs:
• The transmitter transmission speed must match the transmit speed setting in the Paceart System.
• The transmitter transmit format must match the transmit format setting in the Paceart System.
• Discrepancies between the transmission speed or the transmission format will result in incorrect
measurements that may lead to incorrect ECG interpretations.
• The Date Given field must have a date that is the same or prior to the date the transmission is recorded.
• A patient may only have one active transmitter.
• The Paceart System operator is responsible for setting the speed and format settings.
Contraindications
No known contraindications.
™
System | 7
Authorized users
Medtronic representatives provide the Paceart Optima System orientation and training materials at the time
of the installation. All users should be familiar with the Paceart System documents, including the online Help,
before using the Paceart Optima System. The designated system administrator should also read the Paceart
System documentation for information on using the Paceart Optima System software user interface for function
and control.
An authorized person, preferably a physician, must verify the implantable device and electrode specifications
entered into the database or modified in the database. An authorized person, preferably a physician, must
verify the test results that are automatically entered into the database by the instrument. The data obtained
from this device must be interpreted in conjunction with other clinical data and the results of other independent
tests.
Technical Support
For technical support contact your local Medtronic office. In the US and Canada, Paceart Technical Services
can be contacted via phone or email.
• Phone: 1-800-PACEART
• Email: paceart.support@medtronic.com
• Web: Visit the Paceart Community website at paceartcommunity.medtronic.com.
Manuals supplied with your system
Electronic versions of Paceart Optima System manuals are supplied on the documentation USB supplied
with your software.You can also download or request printed copies of these manuals from
www.medtronic.com/manuals.

8 | Installation and Configuration | Introduction to the Paceart Optima
There are two manuals installed for use with the Paceart Optima System software, the Paceart Optima System
Software Installation and Configuration Instructions and the Paceart Optima System Software User Manual.
The Paceart Optima System Software Installation and Configuration Instructions provide you with the
information you need to install and configure your Paceart Optima System software. This includes optional
configurations and optional software components.The Paceart Optima System Software User Manual provides
you with information on how to use your Paceart Optima System software.
For information on the installation, configuration, and use of the Paceart ECG Module refer to the documentation
supplied with the Paceart ECG Module.
All patient and clinical data displayed in Paceart Optima System software documentation are fictitious and
for demonstration purposes only.
Accessing the online Help
The online Help provides additional information about the features and functionality of the Paceart Optima
System.
There are 5 ways to access the online Help.
™
System
• Clicking Help > Help from the menu bar opens the appropriate help topic for where you are in the
application.
• Clicking the Help button in a dialog box opens the appropriate help topic for the dialog box.
• In any add or edit dialog box, clicking the "?" and selecting an active field opens the field level Help for
that field.
• Pressing the F1 key while a field is selected opens the field level Help for that field.
• Pressing the F1 key while no fields are selected opens the appropriate help topic for where you are in the
application.
If your version of the Paceart System has been customized, you can view your customer build number by
clicking Help > About.

Installation and Configuration | Paceart System Installation and Configuration | 9
Paceart System Installation and Configuration
The intent of this information is to help you as a system administrator prepare for an installation of the Paceart
Optima System at your site. It will answer many of the questions you may have about how the Paceart Optima
System can use your existing network infrastructure.
This manual describes each of the Paceart Optima System components and provides detailed instructions
for installing them. This information will help you decide which Paceart System configuration is the best fit
for your site by providing details on each type of configuration.
Components of the Paceart Optima System
You can install different components of the Paceart Optima System depending on your configuration.
You must have administrative rights on the computer to install Paceart Optima System components. If you
have User Account Control (UAC) turned on, UAC might notify you before changes are made to your computer
that require administrator-level permission. In the User Account Control dialog box, click Yes to confirm
and start the installation.
Ensure that you are installing the components on a supported operating system. For a list of supported
operating systems for each component, see the Technical Requirements for Paceart Optima System document.
The Paceart Database Manager
The Paceart Database Manager is a tool for performing the most common tasks of creating and managing
your Paceart System databases.This tool makes it easy to complete advanced database administration tasks
by using wizards.
Some of the tasks performed by the Paceart Database Manager could also be performed through other
database management software such as Microsoft SQL Server Enterprise Manager.
The Application Server
The Application Server allows you to centralize security and maintenance in one location. Only one database
needs updating if the database structure changes during a Paceart System upgrade.
The Client
The Paceart Optima System client is how most users interact with the Paceart System.The client is the user
interface for the Paceart Optima System.You enter and view information in the Paceart System user interface.
That information is then sent to the Paceart System database via the Application Server.
The client connects to the application server and the Paceart System database. In a standalone configuration,
you can have the client, the application server, and the database all on one workstation. Or in a distributed
system you can have multiple clients running on different workstations that all connect into an application
server and a Paceart System database.
ECG
You can install the optional Paceart System ECG add-on package with the Paceart Optima System client to
add the ability to capture and store ECG data for cardiac events from an external device in the Paceart
System. You can also store and manage a collection of ECG strips within an ECG session. ECG hardware
must be connected to the client workstation to record ECG strips.

10 | Installation and Configuration | Paceart System Installation and Configuration
ClickOnce Server
The ClickOnce server is an optional Paceart System server configuration that enables Paceart System users
to install and run the Paceart Optima System by clicking a link in a Web page instead of running the installation
on individual workstations. ClickOnce ensures that users are always running the latest version of the Paceart
System by automatically downloading any updates from the Application Server each time users run the
Paceart System.
Medtronic Mainspring Data Express
Mainspring Data Express is a comprehensive solution for your cardiac patients, bringing together device and
patient data from the Paceart System, the Medtronic CareLink Network, the CareLink Programmer, the Boston
Scientific LATITUDE
your EHR System, and local network.
For installation and configuration instructions, refer to the Medtronic Mainspring Data Express Connectivity
Guide.
Paceart System Web Access
Paceart System Web Access is an optional add-on package for use with the Paceart System. Adding Paceart
System Web Access to your Paceart System allows you to access Paceart System reports through an
easy-to-use Web interface.
®
Patient Management system, the St. Jude Medical Merlin.net® Patient Care Network,
You can search for a particular report using Paceart System Web Access. The search criteria include patient
name, provider name, type of encounter, and date range of the encounter.
Paceart System Web Access can be configured to work on either an intranet or on the Internet. Depending
on your access requirements, you can restrict Paceart System Web Access availability to your internal intranet,
or you can access your Paceart System reports from any Internet connection in the world.
CardioVoice
The CardioVoice TTM Assistant system is an optional add-on package that enables patients and doctors to
communicate information about cardiac events through an automated voice response system.
Patients call into CardioVoice from their home and are directed through a series of automated prompts.
Patients can transmit an ECG, record messages for their doctor, and listen to messages from their doctor.
Doctors can access CardioVoice from a Paceart System station in the clinic or by dialing into CardioVoice
remotely. When a patient records a new ECG, notification of the event is sent to the doctor by fax, email, or
page. Doctors can record messages for their patients, listen to messages from patients, and view ECGs
recorded by patients.
Analytics Export
The Paceart Optima System with Analytics Export allows you to manage the export of XML data from the
Paceart Optima System. The Paceart Optima System Analytics Export can be configured to send XML data
to an external folder automatically for integration into external systems, such as LUMEDX cardiovascular
information systems.
Paceart System configuration options
The Paceart System can be configured in multiple ways to support the needs of each installation.
When deciding on the configuration most appropriate for your installation, you must take the following items
into consideration:
• Number of clinical ECG-acquisition stations needed

Installation and Configuration | Paceart System Installation and Configuration | 11
• Need for viewing and editing ECG strips
• Number of TTM-acquisition stations needed
• Number of data entry terminals needed
• Availability of a local area network (LAN) and support
• Availability of a wide area network (WAN) and support
• Need for multiple geographic locations
• Number of places and locations for report retrieval
• Need for 24/7 TTM-acquisition
• Need for remote, disconnected data access
Paceart Optima System is scalable and configurable, providing options to best suit your installation.
Standalone Configuration
The Paceart Optima System standalone configuration is the most basic Paceart Optima System configuration
option. It involves a single workstation running the following software with no network connection required:
• Microsoft SQL Server
• The Paceart Optima Database Manager
• The Paceart Optima Application Server
• The Paceart Optima MSI Client
• Medtronic Mainspring Data Express (optional)
Paceart System Hardware, such as the 12-Lead ECG/TTM ECG Module for in-clinic and transtelephonic
ECG acquisition, is added to capture ECG signals.
This configuration most likely does not need a full version of SQL Server; in most cases, an Express edition
of SQL Server suffices. An example of when a full version of SQL Server would be required is when the
database would need to store more than 4 GB of data.
While the standalone configuration is the most straightforward to install, it is not practical if you want to run
the Paceart System on multiple workstations.
Network Configuration
This configuration is the most typical Paceart System scenario in use today. In this scenario, there is one
Paceart System Application Server with a single SQL Server database containing the data from all of the
client workstations. These workstations could be all within the same facility, sending the data across a local
area network (LAN) or in different geographies, sending data on a wide area network (WAN).
Pros of network configuration:
• This configuration has a low degree of complexity.There is only one database to maintain and no replication
is needed.
• Centralized security and maintenance at the Application Server location, including a central repository for
backups.
• Only one database needs updating if the database structure changes during a Paceart System upgrade.
• All patient data is stored in one database and is accessible from any client workstation on the LAN or
WAN.
Cons of network configuration:
• No local copy of data if LAN or WAN fails.
• Higher bandwidth requirements as individual client workstations are saving all data, including large
encounters with multiple episodes, EGMs, and ECG strips, across the LAN or WAN.
• If you are not using ClickOnce, client software upgrades must be upgraded across multiple client
workstations simultaneously.

12 | Installation and Configuration | Paceart System Installation and Configuration
• Queries must contain extra criteria if client workstations only want to see local patients instead of all
patients on the network.
While you can connect multiple instances of the Paceart System client to the same Paceart System Application
Server, you must have a separate database for each instance of an Application Server. The following diagram
shows a typical Paceart System network configuration including which components can be installed on the
application server.The Application Server and SQL Server Database can be hosted on the same workstation.
Multiple Database Configuration
This configuration is for clinic settings that run the Paceart System on multiple databases. For example, your
clinic could have separate databases for arrhythmia and pacemaker patients or adult and pediatric patients.
Your clinic could also want a separate database for testing purposes. If you want to connect to multiple
databases from a Paceart System workstation, install a separate Application Server for each database.
Use the ClickOnce installation method to connect to multiple databases on a single client workstation.You
can be logged in to only one instance of the Application Server and one database at a time from a workstation.
Database Replication
This configuration is for clinic settings that run the Paceart System on a single, distributed database. Using
replication, you can distribute data to remote or mobile users over a local area network, dial-up connection,
or the Internet. Replication also allows you to enhance application performance, physically separate data
based on how it is used, or distribute database processing across multiple servers. For example, your clinic
could have users that want to use replication as a means of backup to an alternate computer.

Installation and Configuration | Paceart System Installation and Configuration | 13
Recommended Windows settings
Use the recommended Windows settings for the best view of the Paceart Optima System user interface.
The Paceart Optima System user interface is best viewed using the Windows Classic theme and the default
text size.You can configure these options in the Personalization section of the Control Panel.
Configuring Internet Information Services (IIS)
Internet Information Services (IIS) is a Web server application and set of feature extension modules created
by Microsoft for use with Microsoft Windows. IIS must be configured before installing the Paceart System.
The version of IIS installed on your workstation varies depending on which Windows operating system your
workstation is running.You must have administrative rights on the computer to configure IIS.There are unique
instructions to configure IIS for each version of Windows.
Configuring Internet Information Services (IIS) for Windows Server 2008 and Windows
Server 2008 R2
Before you install the Paceart System, configure Internet Information Services (IIS).
1. Open Server Manager.
The Server Manager window is displayed.
2. On the Manage menu, click Add roles and features.
The Add Roles and Features Wizard is displayed.
3. Click Next to select the roles to install.
4. Select Role-based or feature based installation and click Next.
5. On the Select Server Roles window, select the Application Server and Web Server (IIS) check boxes.
6. Click Add Features.
7. Click Next.
8. Select the destination server and click Next.
9. On the Select features window, click Next.
10. Click Next
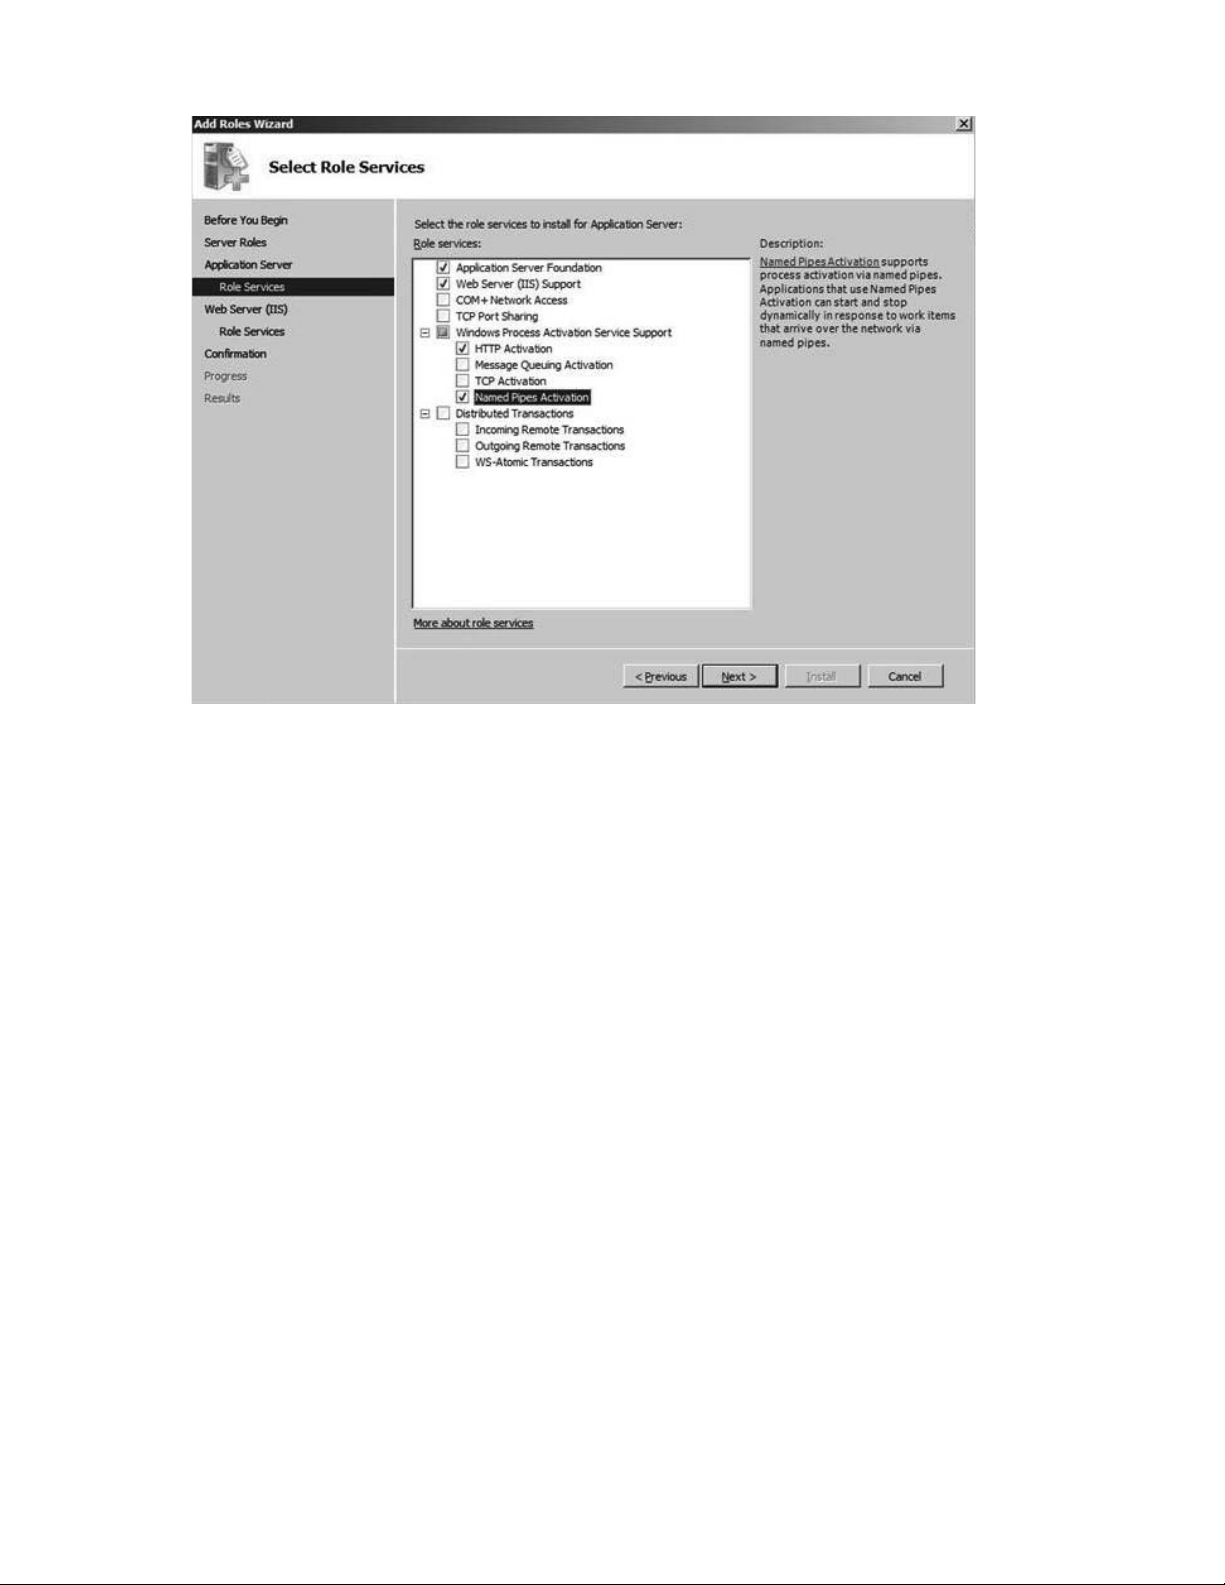
11. On the Select Role Services window for the Application Server, select Web Server (IIS) Support.
12. Under Windows Process Activation Service Support, select HTTP Activation and Named Pipes
Activation.
14 | Installation and Configuration | Paceart System Installation and Configuration
13. Click Add Features.
14. Click Next.
15. Click Next.
16. On the Select Role Services for the Web Server, click Next.
17. On the Confirm Installation Selections window, click Install.
18. Click Close.
Internet Information Services (IIS) is configured on your computer.
Configuring Internet Information Services (IIS) for Windows Server 2012 and Windows
Server 2012 R2
Before you install the Paceart System, configure Internet Information Services (IIS).
1. Open Server Manager.
The Server Manager window is displayed.
2. In the Quick Start box on the dashboard, click Add roles and features.
3. On the Select installation type page, select Role-based or feature-based installation and click Next.
4. On the Select destination server page, choose Select a server from the server pool, then select the
server name from the Server Pool list and click Next.
5. On the Select Server Roles page, select Application Server.
6. Click Next.
7. On the Select features page, select the following options and then click Next.
• Under .NET Framework 3.5 Features, select .NET Framework 3.5 and HTTP Activation.
• Under .NET Framework 4.5 Features, select .NET Framework 4.5 and all options for WCF Services.
• Under Windows Process Activation Service, select all options.
Installation and Configuration | Paceart System Installation and Configuration | 15
8. Click Next.
9. On the Select role services page, select the following role services for the Application Server:
• .NET Framework 4.5
• Web Server (IIS) Support
• Under Windows Process Activation Service Support, select HTTP Activation, Named Pipes
Activation, and TCP Activation.
Note: Accept any additional items that are suggested when you select the server role options.
10. Click Next.
11. On the Confirm installation selections page, click Install.
12. Click Close when the installation completes successfully.
Configuring Internet Information Services (IIS) for Windows Server 2016
Before you install the Paceart System, configure Internet Information Services (IIS).
1. Open Server Manager.
The Server Manager window is displayed.
2. In the Quick Start box on the dashboard, click Add roles and features.
3. On the Select installation type page, select Role-based or feature-based installation and click Next.
4. On the Select destination server page, choose Select a server from the server pool, then select the
server name from the Server Pool list and click Next.
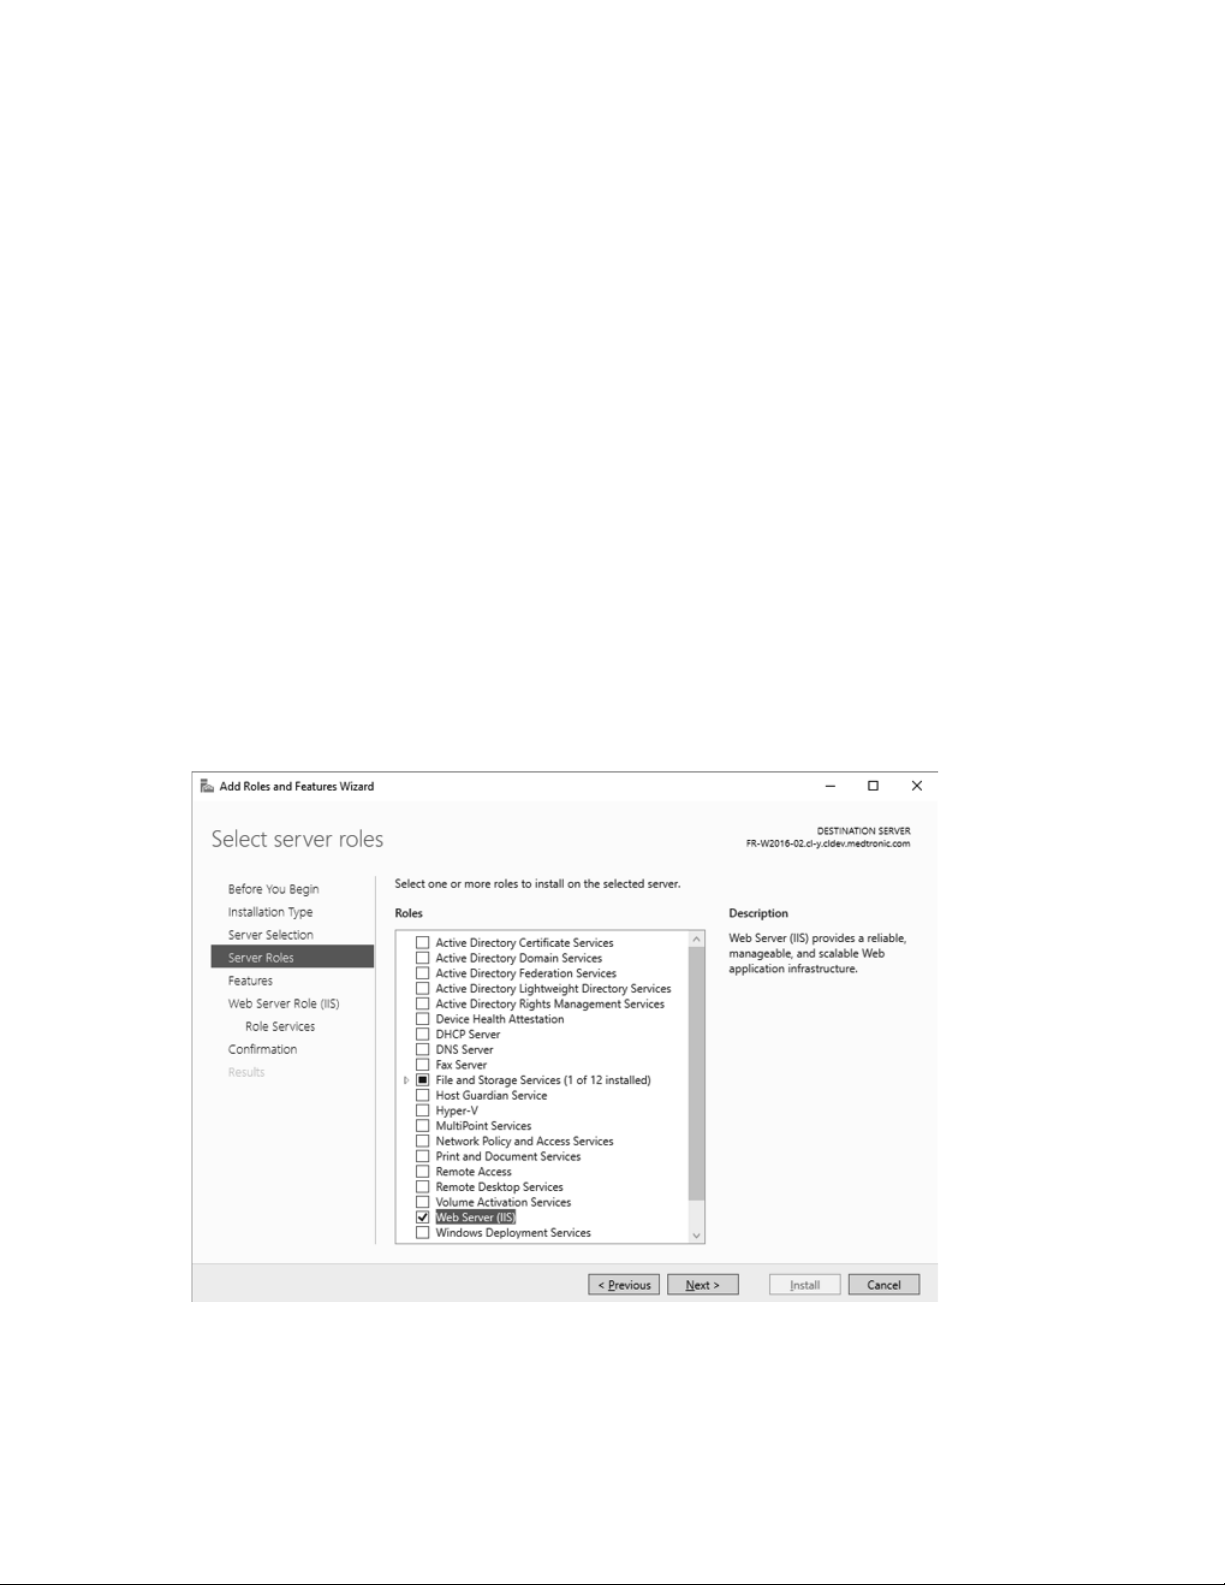
5. On the Select server roles page, select Web Server (IIS).
6. Click Next.
7. On the Select features page, select the following options and then click Next.
Under .NET Framework 4.6 Features, select .NET Framework 4.6 and the following options for WCF
Services.

16 | Installation and Configuration | Paceart System Installation and Configuration
• HTTP Activation
• Named Pipe Activation
8. Click Next.
9. On the Confirm installation selections page, click Install.
10. Click Close when the installation completes successfully.
Configuring Internet Information Services (IIS) for Windows 7
Before you install the Paceart System, configure Internet Information Services (IIS). During this process,
Windows may prompt you for a Windows setup disk.
1. Click Start > Control Panel.
2. Click Programs > Programs and Features.
3. Click Turn Windows features on or off.
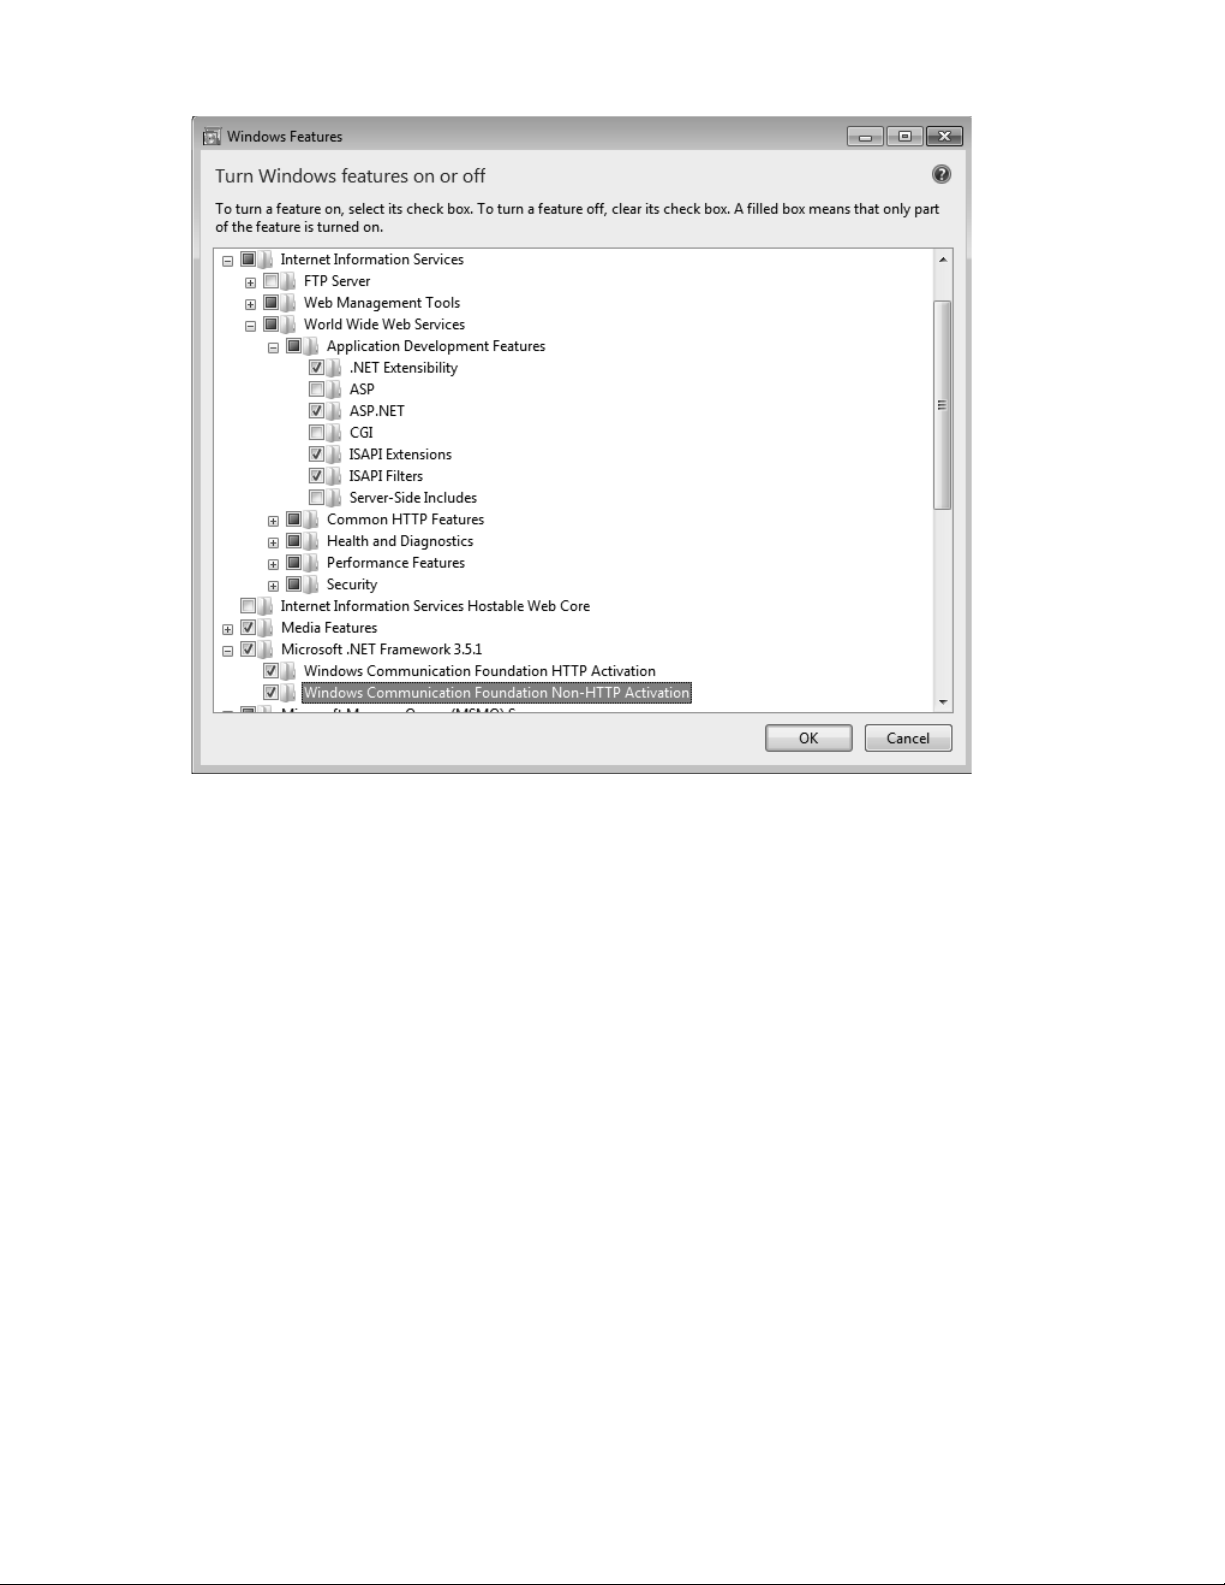
4. On the Windows Features window, click Internet Information Services > World Wide Web Services
> Application Development Features and select the ASP.NET check box.
Installation and Configuration | Paceart System Installation and Configuration | 17
5. Select and expand Microsoft .NET Framework 3.5.1 and then select Windows Communication
Foundation HTTP Activation and Windows Communication Foundation Non-HTTP Activation.
6. Click OK.
Internet Information Services (IIS) is configured on your computer.
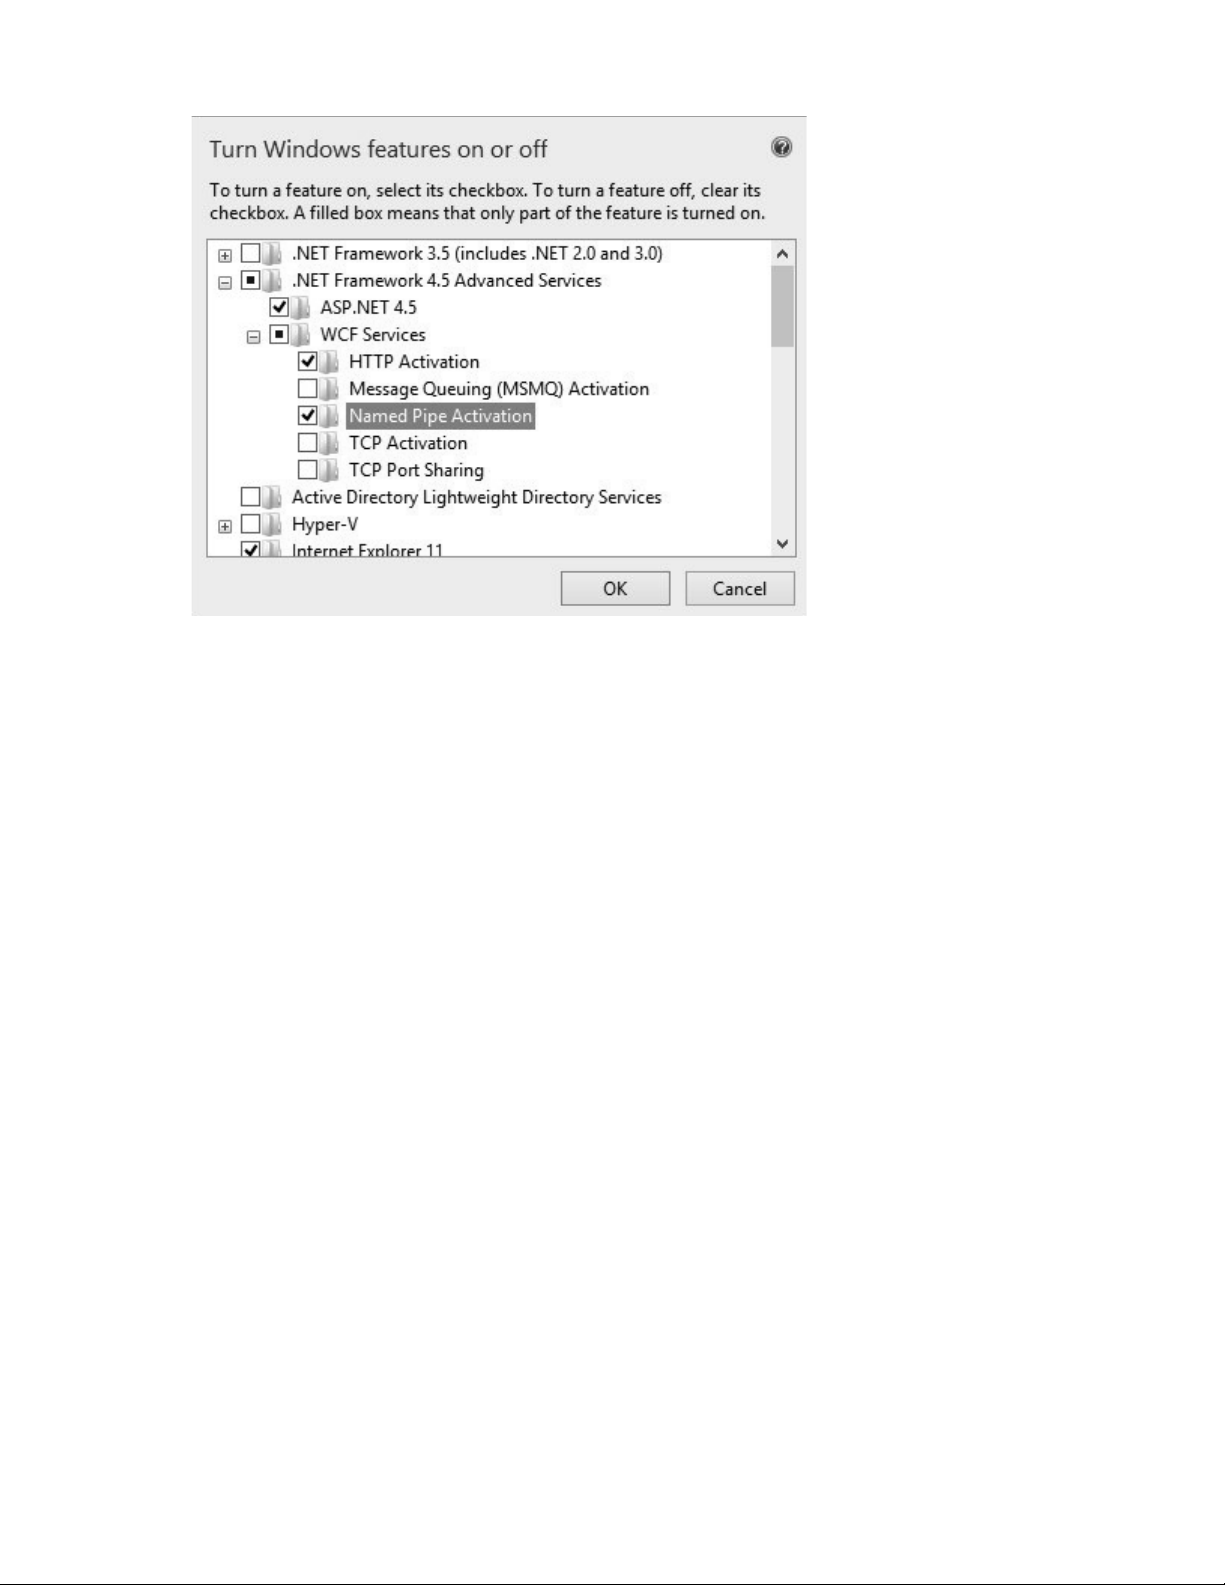
Configuring Internet Information Services (IIS) for Windows 8.1
Before you install the Paceart System, configure Internet Information Services (IIS). During this process,
Windows may prompt you for a Windows setup disk.
1. Select Settings > Control Panel
2. Click Programs > Programs and Features
3. Click Turn Windows features on or off.
4. On the Windows Features window, expand .NET Framework 4.5 Advanced Services > WCF Services
and select HTTP Activation and Named Pipe Activation.
18 | Installation and Configuration | Paceart System Installation and Configuration
5. Expand Internet Information Services > World Wide Web Services > Application Development
Features and then select ASP.NET 3.5.
6. Click OK.
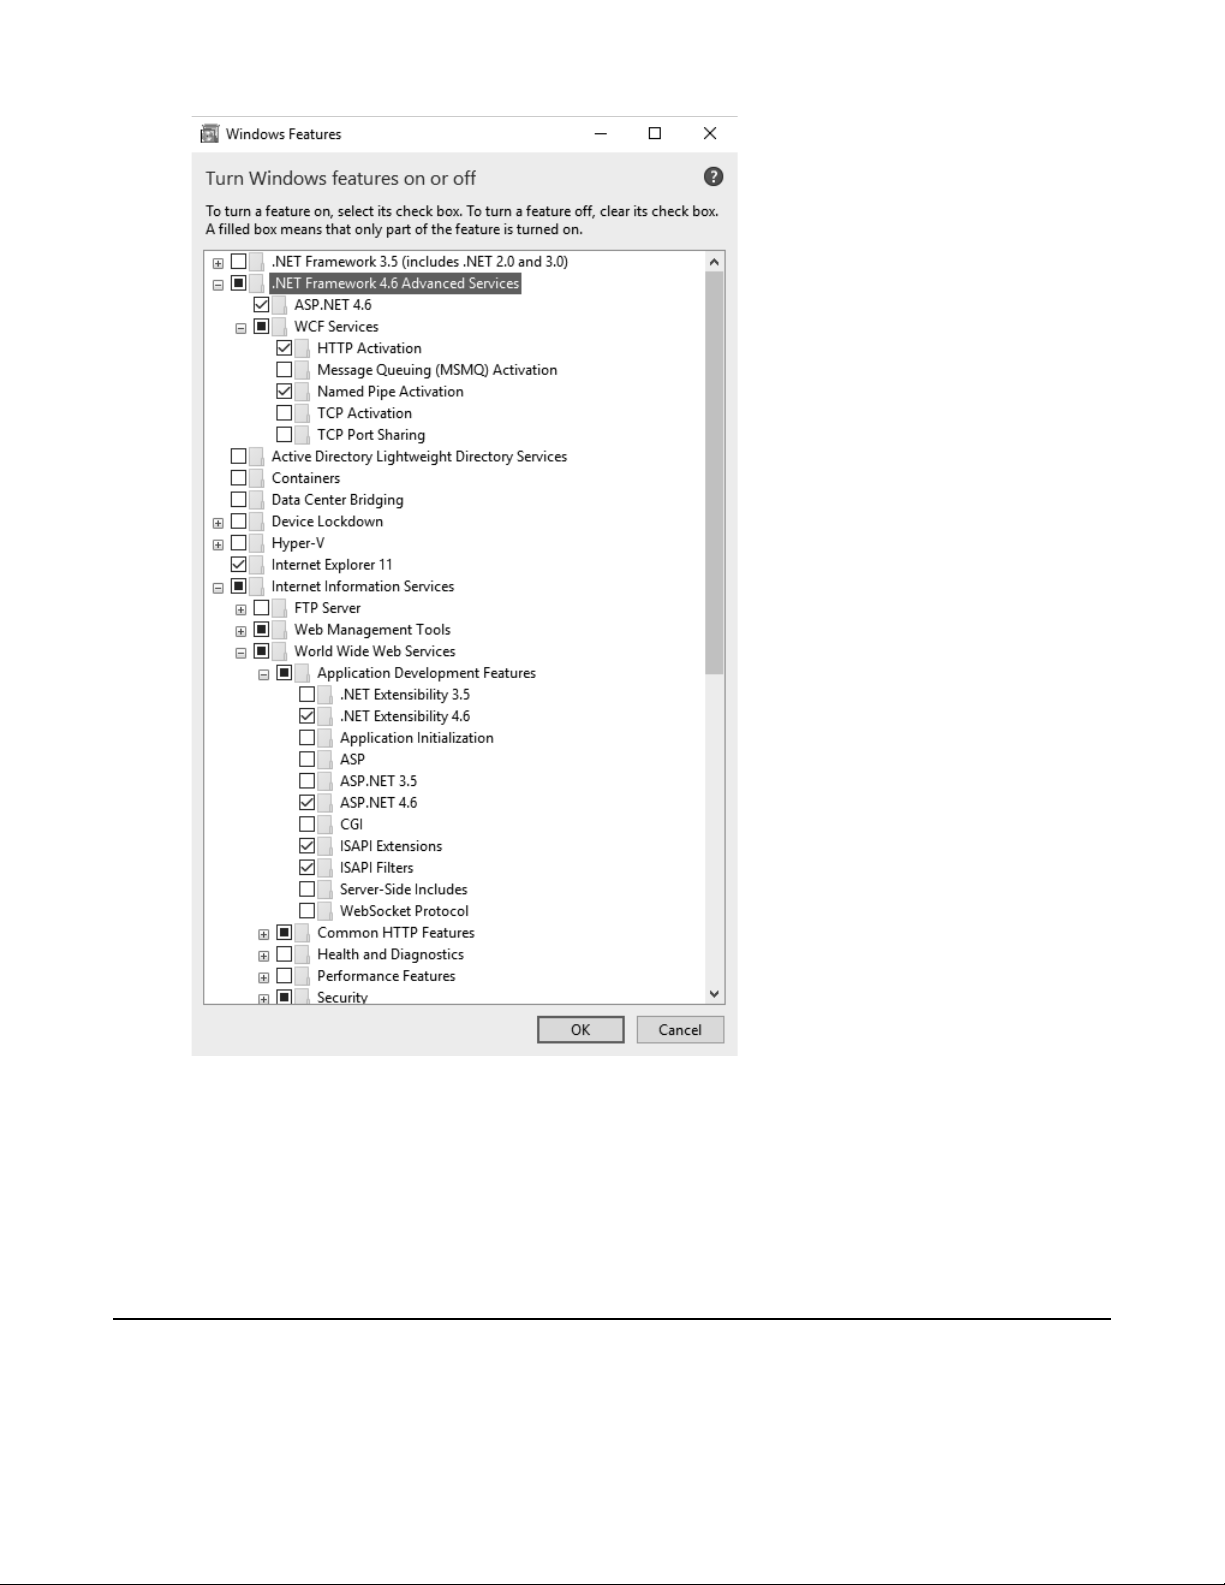
Configuring Internet Information Services (IIS) for Windows 10
Before you install the Paceart System, configure Internet Information Services (IIS). During this process,
Windows may prompt you for a Windows setup disk.
1. Open the Control Panel.
2. Click Programs > Programs and Features.
3. Click Turn Windows features on or off.
4. On the Windows Features window, expand.NET Framework 4.6 Advanced Services > WCF Services
and select HTTP Activation and Named Pipe Activation.
Installation and Configuration | Paceart System Installation and Configuration | 19
5. Expand Internet Information Services and select Web Management Tools.
6. Expand Internet Information Services > World Wide Web Services > Application Development
Features and then select .NET Extensibility 4.6.
7. Click OK.
Installing the Paceart Optima System Database Manager
Install the Paceart Optima System Database Manager to control the creation, maintenance, and use of your
Paceart System databases.
If you have a Paceart Optima System customization installed, uninstall it before installing a new version of
the Paceart Optima System Database Manager software. For more information on uninstalling customizations,
refer to Uninstalling Paceart Optima Customizations.

20 | Installation and Configuration | Paceart System Installation and Configuration
If you plan to use Database Manager for replication and publications, you must have a standard or full version
of SQL Server installed on your system before installing Database Manager. Systems containing subscriptions
to the publishing system can still use express versions of SQL Server, but only with like versions. For example,
a system using SQL Server 2012 with Express Service Pack 1 can only subscribe to a publication hosted on
SQL Server 2012 Standard Edition with Service Pack 1, not SQL Server 2008 Standard Edition.
If the Database Manager installer does not detect a supported version of SQL Server installed on your system,
you will be given the option to install a supported version of SQL Server Express. The version depends on
your operating system. Also, you are given the option to install the SQL Server Management Objects for your
SQL Server version.
1. Insert the Paceart System installation USB drive to start the installation wizard. If your workstation has
the Autorun feature disabled, navigate to the USB and then double-click setup.exe.
2. If there are any prerequisites that must be installed they are displayed in a list. Select and then click Install
for each of the prerequisites.You may need to restart your computer depending on which prerequisites
are installed.
3. On the License Agreement window, read the license terms, then click I accept the terms of the license
agreement if you agree to the terms.
4. Click Next.
5. Click Next.
6. On the Paceart Installer Configuration window, select Database Manager and click Next.
The Paceart Database Manager - InstallShield Wizard window is displayed.
7. Click Next.
8. If you have a supported version of SQL server installed, you will be asked to install the SQL Server
Managements Objects for that version. If you don't have a version supported version of SQL Server
installed, you will be asked to install SQL Server Express. Click Install to install.
9. Click Next.
10. Click Install.
11. Click Finish to exit the Paceart System Database Manager installer.
Paceart Optima System Database Manager is installed on your computer.
Starting the Paceart System Database Manager
Use the sa (System Administrator) login when using the Paceart System Database Manager. Many of the
features require this login.
This icon is used in this topic.
DescriptionIcon
Connect
1. Double-click the Paceart System Database Manager icon on the desktop to display the Connect to SQL
Server login screen.
2. Select the SQL Server instance to which you want to connect.
• Select from the most recently used servers in the drop-down list.
• Click the Browse button to pick from a list of all SQL Servers known to be running on your network or
aliased using the SQL Server Client Network Utility.
3. Select either Windows Authentication or SQL Server Authentication to connect.Your choice depends on
how your SQL Server DB is set up and what access rights you have. There is no difference as far as
Paceart System Database Manager is concerned.
4. If you chose SQL Server Authentication enter your login name and password. The login name defaults to
"sa" but it can be changed to any SQL user.

Installation and Configuration | Paceart System Installation and Configuration | 21
5. Click OK.
You are now connected to the instance of the SQL server that you selected. If you need to login to a different
instance of SQL Server while you are using Paceart System Database Manager click the Connect icon in
the upper left corner of the screen. This will display the Connect to SQL Server login screen again.
Creating a Paceart System Database
Paceart System databases hold patient data. The New Database Wizard takes you through the steps to
create a new Paceart System database.You will name your new database, specify where it is stored, and
set its initial size.You must be a member of the System Administrators server role on the SQL Server to use
this function.
1. Login to the Database Manager.
2. Double-click New Database.
3. Click Next.
4. Enter a name for the database.
It defaults to "Paceart_Database". The next database defaults to "Paceart_Database_#1". The number
will increase by one for each new database.
5. Enter the database location. We recommend that you accept the default value.
6. Click Next.
7. Specify the initial size of the database between 50 MB and 2,000 MB. If you exceed the initial size of the
database it will grow in increments of 50 MB .You can estimate the size of your database according to
the size of your patient population or you can select the initial size of your database.
• If you select the option to estimate the size based on your patient population, enter the number of
Pacemaker patients and the number of arrhythmia patients, and then click Next.
• If you select the option to select the size, slide the bar to the appropriate size.
8. Click Next.
9. Review your choices.
• Click Next if they are accurate.
• Click Back if you need to return to a previous screen to change a value.
It may take several minutes for the wizard to create the database and initialize the database structure.
10. Click Finish.
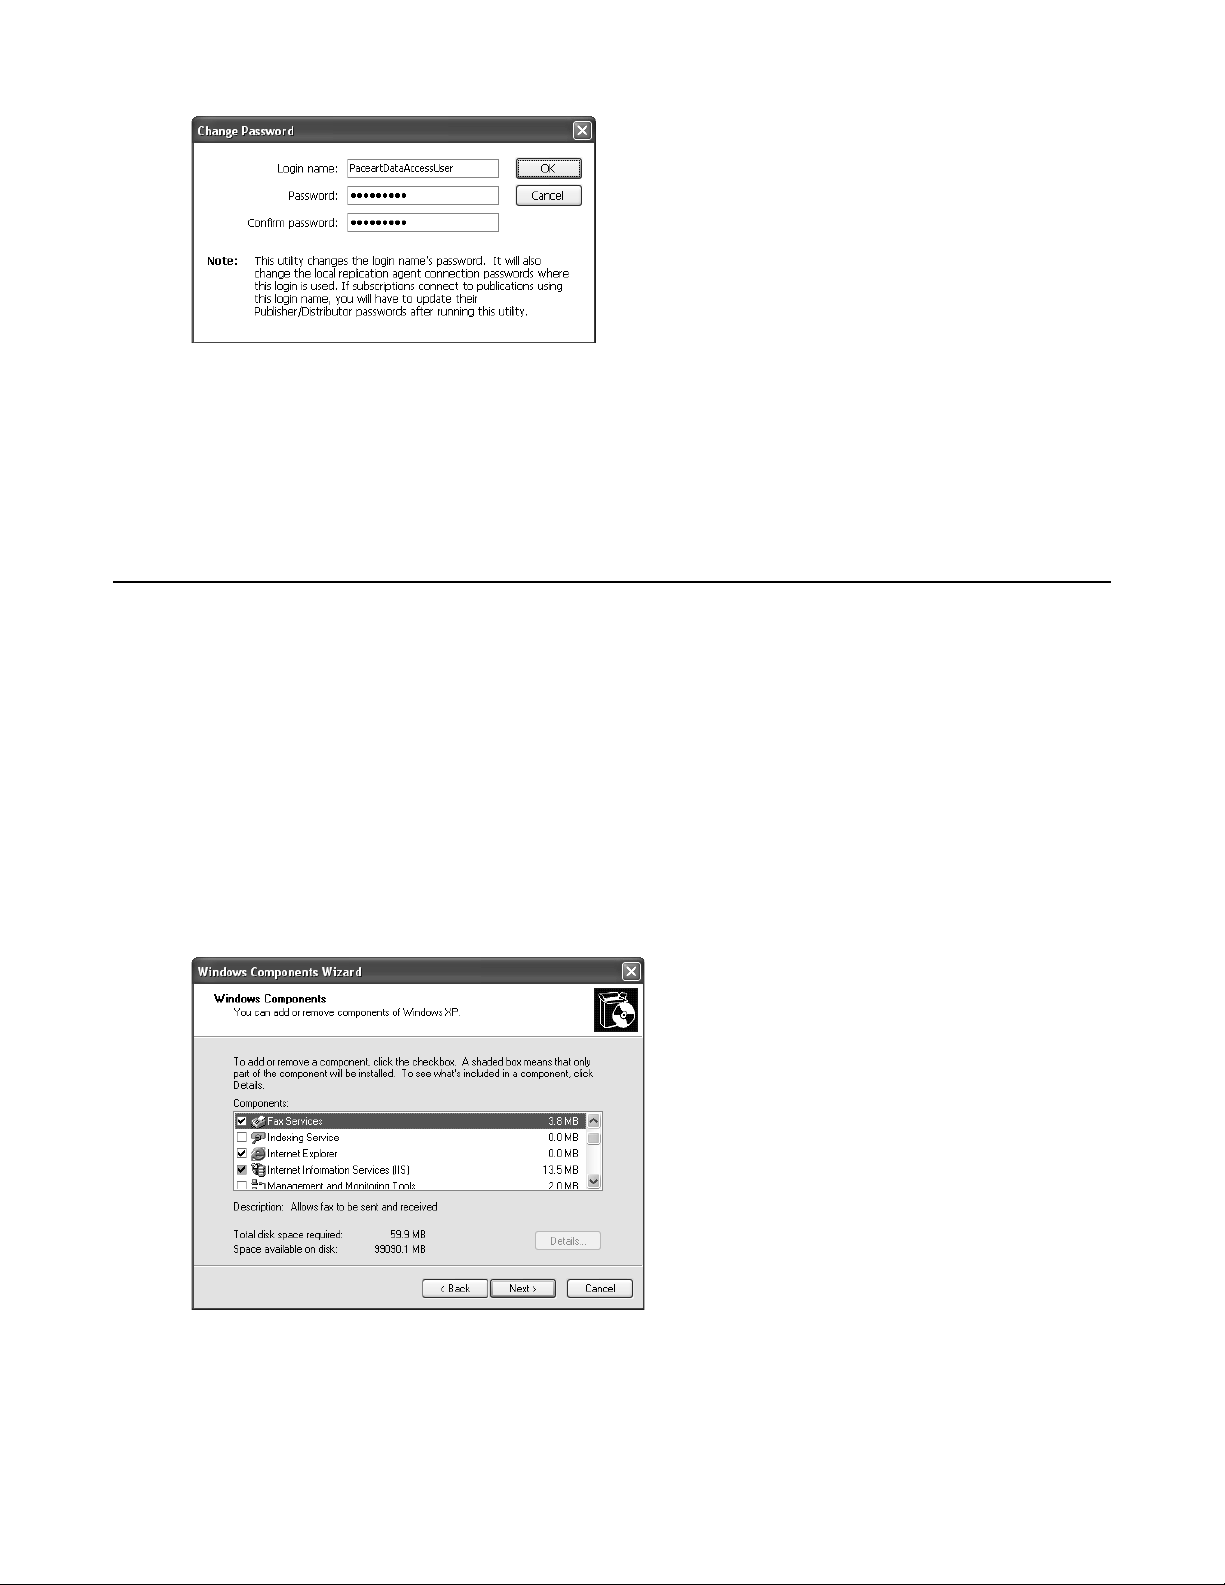
Updating the password for PaceartDataAccessUser
You can update the password for PaceartDataAccessUser in Database Manager.The PaceartDataAccessUser
is automatically created when you create a new Paceart System database and is used to connect to the
Application Server.
1. Log in to Paceart System Database Manager.
2. Click Tools > Change Password.
The Change Password window is displayed.
3. Enter PaceartDataAccessUser in the Login name field.
22 | Installation and Configuration | Paceart System Installation and Configuration
4. Enter a new password in the Password and Confirm Password fields.
5. Click OK.
A message is displayed stating that the password was successfully changed.
6. Click OK.
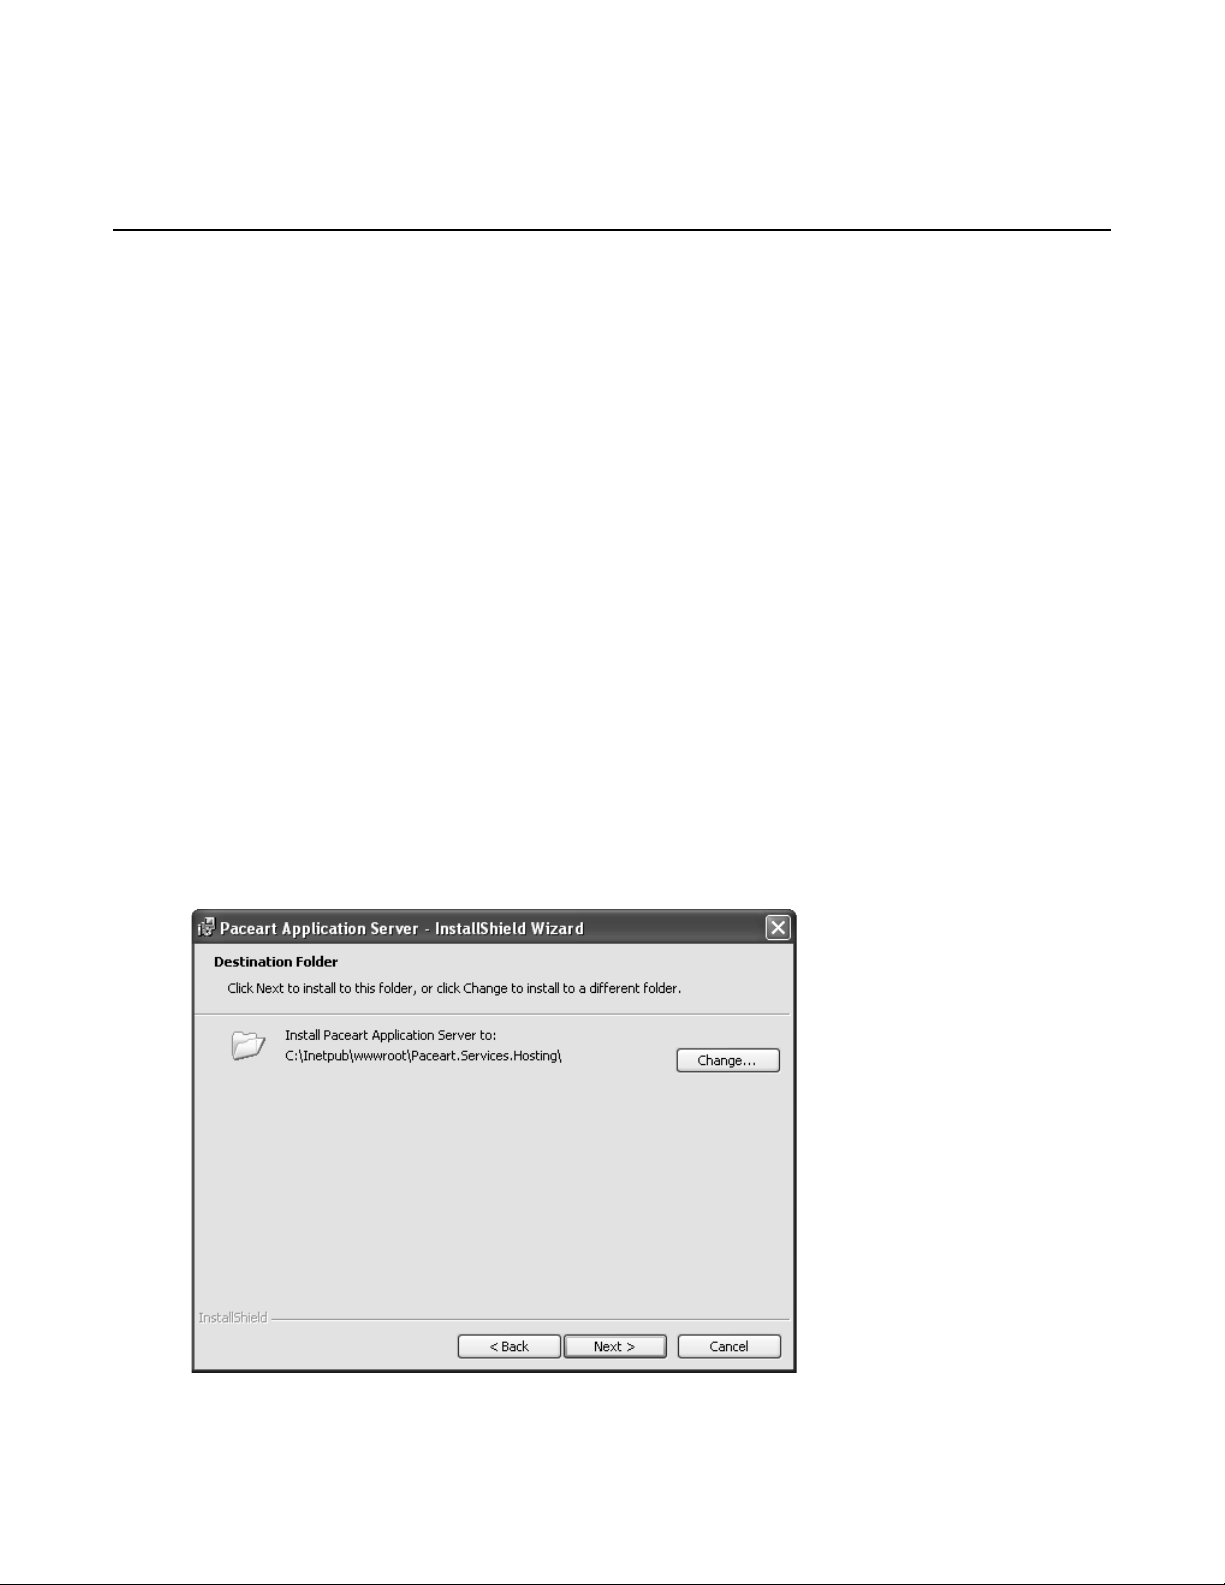
Configuring Fax Services and Message Queuing
Fax Services and Message Queuing need to be configured before installing the Paceart System Messaging
Service. Windows may prompt you for a Windows setup disk during this process.
1. Click Start.
2. Click Control Panel.
3. Double-click Add or Remove Programs.
4. Click Add/Remove Windows Components.
5. On the Windows Component Wizard window, check if the Fax Services and Message Queuing check
boxes are selected.
• If both check boxes are selected, Fax Services and Message Queuing are already configured. Click
Cancel and continue the Paceart System installation.
• If one or both of the check boxes are not selected, select them and click Next.
6. Click Finish.
Fax Services and Message Queuing are configured on your computer.
Installation and Configuration | Paceart System Installation and Configuration | 23
Installing the Paceart Optima System Application Server, Messaging Service,
Data Transformation Engine, and Online Help
Install the Paceart Optima System Application Server to centralize security and maintenance for the Paceart
System in one location. The Messaging Service is used by the Paceart System to send email, fax, and pager
messages. It also allows you to work with the CardioVoice System. The Data Transformation Engine is used
to transform data from various device data formats into Paceart XML format. The Paceart System Online
Help provides context-sensitive help throughout the Paceart System application.
If you have a Paceart Optima System customization installed, uninstall it before installing a new version of
the Paceart Optima System Application Server software. For more information on uninstalling customizations,
refer to Uninstalling Paceart Optima Customizations.
You must have Internet Information Services (IIS) configured before installing the Application Server.
1. Insert the Paceart System installation USB drive to start the installation wizard. If your workstation has
the Autorun feature disabled, navigate to the USB and then double-click setup.exe.
2. If there are any prerequisites that must be installed they are displayed in a list. Select and then click Install
for each of the prerequisites.You may need to restart your computer depending on which prerequisites
are installed.
3. On the License Agreement window, read the license terms, then click I accept the terms of the license
agreement if you agree to the terms.
4. Click Next.
5. Click Next.
6. On the Paceart Installer Configuration window, select Application Server and click Next.
The Application Server progress bar is displayed.
7. When the Application Server progress bar completes, click Next on the Paceart Application Server InstallShield window.
8. Select a destination folder for the Application Server. Click Change to change from the default location.
9. Click Next.
10. Select the database server you are installing to.
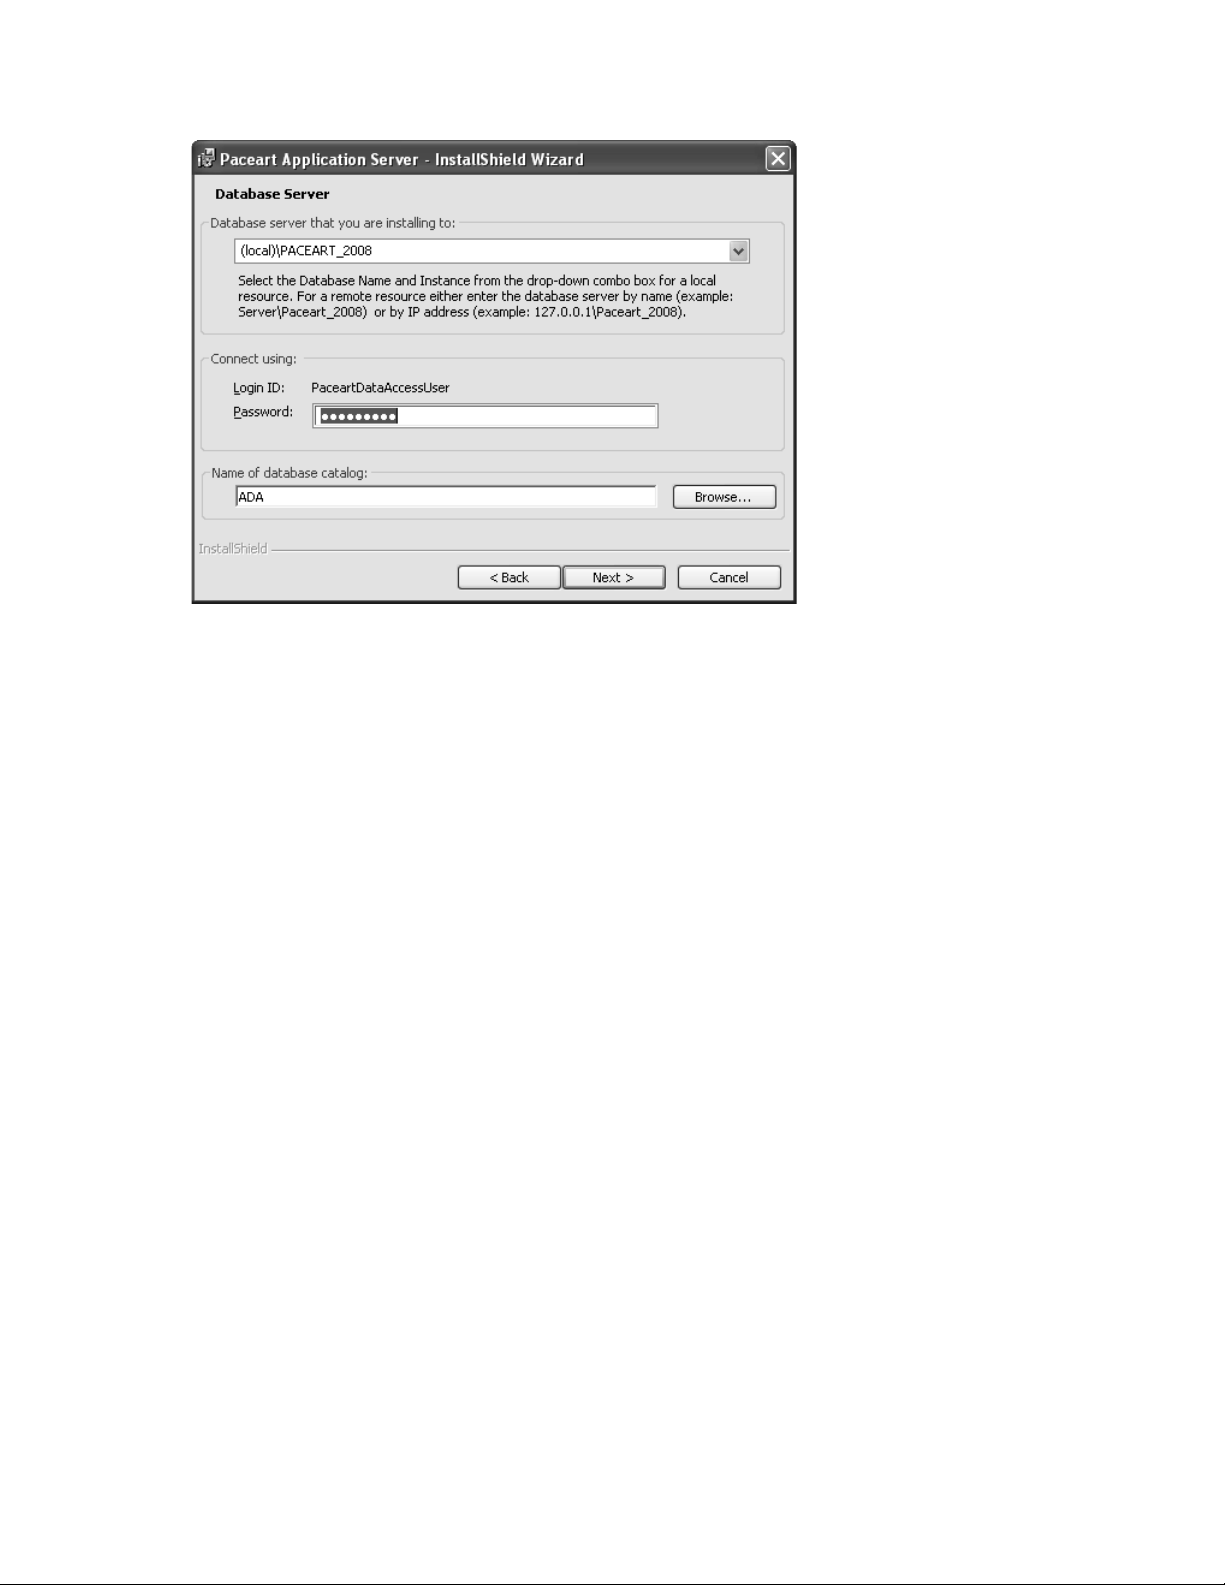
24 | Installation and Configuration | Paceart System Installation and Configuration
• If you are installing to a local database, select the database server from the list.
• If you are installing to a remote database, enter either the database server name or the IP address.
• If you are installing to a Citrix Server database, enter the IP address.
11. Enter the password for PaceartDataAccessUser that you assigned in Database Manager in the Password
field.
12. Click Browse next to the Name of database catalog field.
13. Browse to the desired catalog and click OK.
The selected catalog is displayed in the Name of database catalog field.
14. Click Next.
15. In the Configuration section, select whether to use the machine name or a manual configuration for the
Application Server. A manual configuration can be an IP address or a full machine name including domain.
If you do not use a Domain Name System (DNS), select Manual and enter the IP address.
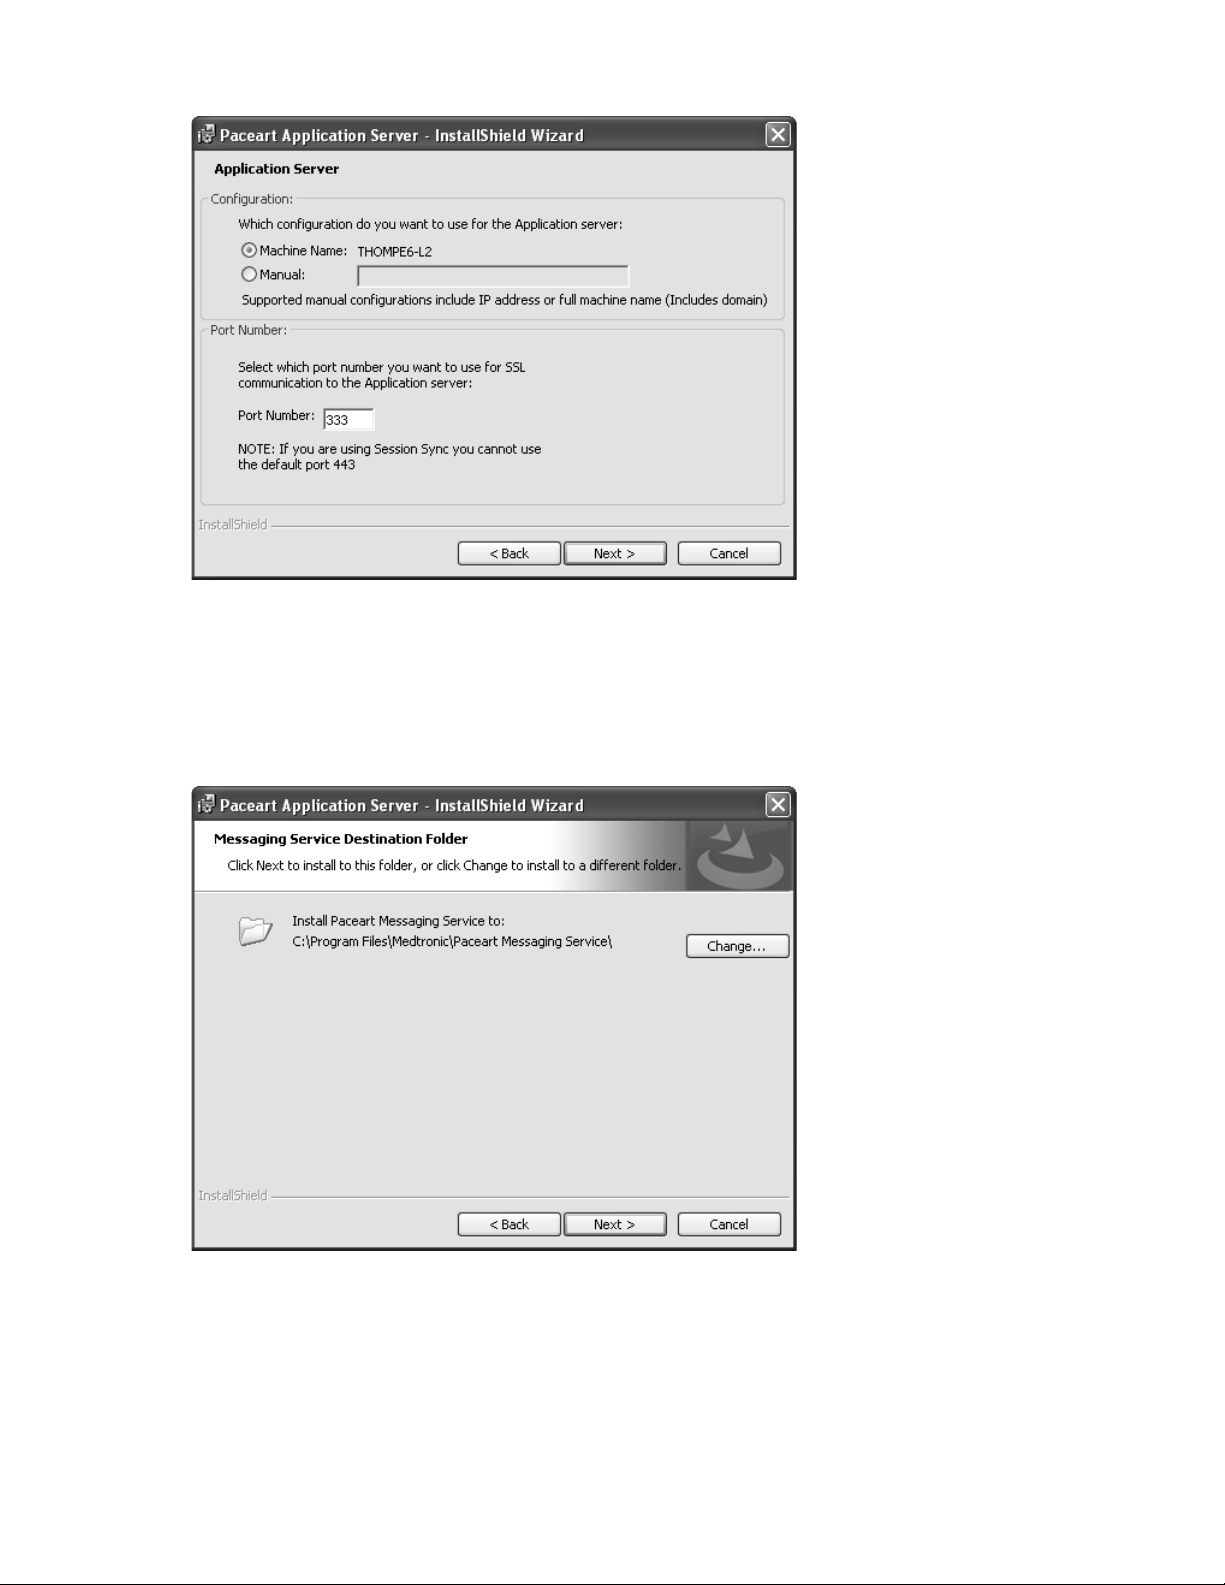
Installation and Configuration | Paceart System Installation and Configuration | 25
16. In the Port Number section, enter a port number.We recommend port number 333 for the Paceart System.
If you are using SessionSync, enter a port number other than 443 because SessionSync uses that port.
17. Click Next.
18. Select a destination folder for the Paceart System Messaging Service. Click Change to change from the
default location.
19. Click Next.
If you do not have all the necessary components installed for the Paceart System Messaging Service, a
warning message is displayed. Click Next to continue the installation.
20. Select a destination folder for the Paceart System Data Transformation Engine. Click Change to change
from the default location.
 Loading...