


PACEART OPTIMA™ SYSTEM
Version 1.5
Paceart Optima System Software Installation and Configuration
Instructions
Caution: Federal law (USA) restricts this device to sale by or on
the order of a physician (or a properly licensed practitioner)

Trademarks in this manual
The following list includes trademarks or registered trademarks of Medtronic in the United States and possibly in
other countries. All other trademarks are the property of their respective owners.
Medtronic, Paceart Optima, CareLink, Mainspring, Medtronic CareLink

Contents
Introduction to the Paceart Optima™ System.......................................................................5
Paceart Installation and Configuration....................................................................................9
Installation and Configuration | Contents | 3
Explanation of symbols.............................................................................................................5
Indications................................................................................................................................6
Precautions...............................................................................................................................6
Contraindications......................................................................................................................7
Paceart authorized users..........................................................................................................7
Technical Support.....................................................................................................................7
Paceart manuals supplied with your system.............................................................................7
Accessing the online Help........................................................................................................8
Components of the Paceart Optima System............................................................................9
Minimum permissions needed for Paceart components.........................................................10
Paceart Configuration Options...............................................................................................12
Recommended Windows settings..........................................................................................15
Configuring Internet Information Services (IIS)......................................................................15
Configuring Internet Information Services (IIS) for Windows Server 2008 and
Windows Server 2008 R2.......................................................................................15
Configuring Internet Information Services (IIS) for Windows Server 2012 and
Windows Server 2012 R2.......................................................................................15
Configuring Internet Information Services (IIS) for Windows 7....................................16
Configuring Internet Information Services (IIS) for Windows 8.1.................................17
Installing the Paceart Optima Database Manager..................................................................17
Starting the Paceart Database Manager.....................................................................18
Creating a Paceart System Database.........................................................................19
Updating the password for PaceartDataAccessUser...................................................19
Configuring Fax Services and Message Queuing..................................................................20
Installing the Paceart Optima Application Server, Messaging Service, and Online Help.......21
Installing SSL Certificates......................................................................................................24
Installing an SSL Certificate for Windows 7 and Windows Server 2008......................24
Installing an SSL Certificate for Windows Server 2008 R2..........................................25
Installing an SSL Certificate for Windows Server 2012 and Windows Server 2012
R2...........................................................................................................................26
Installing an SSL Certificate for Windows 8.1..............................................................27
Installing the MSI Client..........................................................................................................28
Installing Paceart ECG...........................................................................................................29
Installing Paceart Web............................................................................................................30
CardioVoice Installation..........................................................................................................31
Installing the Dialogic D/4PCI and D/4PCIU Boards....................................................31
Installing the driver.......................................................................................................32
Installing CardioVoice Software...................................................................................32
Disabling the EVO 3.0 message window.....................................................................34

4 | Installation and Configuration | Contents
Configuring Dialogic Drivers for Dialogic D/4PCI and D/4PCIU boards.......................36
Simulating a CardioVoice call......................................................................................36
Installing the ClickOnce Server..............................................................................................36
Installing the ClickOnce Client Prerequisites...............................................................38
Installing the Paceart Client from the ClickOnce Server..............................................40
Installing the Paceart Optima Client on Citrix Server.............................................................40
Uninstalling Paceart Optima Customizations.........................................................................41
Paceart Database Manager....................................................................................................41
Starting the Paceart Database Manager.....................................................................41
Creating a desktop shortcut to the Paceart Database Manager..................................42
Creating a Paceart System Database.........................................................................42
Deleting a database.....................................................................................................43
SQL Server Integration Services (SSIS)......................................................................43
Publications.................................................................................................................43
Subscriptions...............................................................................................................47
Bulk copy.....................................................................................................................50
Rename database.......................................................................................................51
Delete strips.................................................................................................................51
Delete patients.............................................................................................................52
SQL Users...................................................................................................................53
Enable or disable auditing............................................................................................54
Audit Data Archiving....................................................................................................55
Set Multi-User..............................................................................................................55
Tools............................................................................................................................55
Command Line Interface..............................................................................................58
Database Replication.............................................................................................................60
When to use replication...............................................................................................60
Replication topologies..................................................................................................60
Replication security......................................................................................................61
SQL server synchronization.........................................................................................64
Synchronization management and replication conflicts...............................................67

Installation and Configuration | Introduction to the Paceart Optima™ System | 5
Introduction to the Paceart Optima™ System
The Paceart Optima System is a clinic management tool that organizes patient, device, and programmer
information and provides access to trend analysis, aiding a physician or clinician in their daily workflow and
management of patient and cardiac data. The Paceart System supports cardiac rhythm devices from most
manufacturers.
The Paceart System:
• Stores programmed device parameters
• Summarizes patient data into concise reports
• Keeps a history of patient encounters
• Offers TTM technologies, such as CardioVoice, designed to work with event recorders
• Creates correspondence documents
• Schedules patient follow-up appointments
• Assists with records processing
• Assists in charge and billing management
• Offers integration with your hospital's or clinic's HL7-compatible system
• Provides task management to streamline your clinic's workflow
• Provides automatic import of data from pacemakers, programmers, and other storage media
Explanation of symbols
Consult instructions for use
Conformité Européenne (European Conformity).This
symbol means that the device fully complies with
European Directive MDD 93/42/EEC.
For US audiences only
Authorized Representative in the European
Community
Manufacturer
Lot number
Re-order number
Date of Manufacture
Do not dispose of this product in the unsorted
municipal waste stream. Dispose of this product
according to local regulations. See
http://recycling.medtronic.com for instructions on
proper disposal of this product.

6 | Installation and Configuration | Introduction to the Paceart Optima™ System
Temperature Limitation
Humidity Limitation
Software
Indications
The Paceart System is intended for use as a 12-lead electrocardiograph, pacemaker artifact analyzer, and
transtelephonic ECG receiving station. It also acts as a database for cardiac patients with or without
pacemakers or implantable cardioverter defibrillators.
Precautions
Storage and installation
• Ensure there is no condensed moisture on the Paceart software USBs.
• Paceart software USBs must be stored within the following conditions:
Storage Environment
-20°C (-4°F) to +45°C (113°F)Temperature
20% to 90%Relative Humidity
System operation
Before system operation:
• Ensure that the system is not being used with other instruments that may result in misdiagnosis or other
problems.
• Ensure there is no condensed moisture on the Paceart software USBs.
• Paceart software USBs must be operating in an environment within the following conditions:
Operating Environment
0°C (32°F) to +35°C (95°F)Temperature
20% to 90%Relative Humidity
Additional precautions
• Do not modify the original system in any way.This includes adding any software product.
• Ensure that all patient records are updated and permanently stored before turning the PC power off.
• Double-check the data before typing the data into the system.

Installation and Configuration | Introduction to the Paceart Optima™ System | 7
Transmission and transmitter settings
When recording ECGs:
• The transmitter transmission speed must match the transmit speed setting in Paceart.
• The transmitter transmit format must match the transmit format setting in Paceart.
• Discrepancies between the transmission speed or the transmission format will result in incorrect
measurements that may lead to incorrect ECG interpretations.
• The Date Given field must have a date that is the same or prior to the date the transmission is recorded.
• A patient may only have one active transmitter.
• The Paceart operator is responsible for setting the speed and format settings.
Contraindications
No known contraindications.
Paceart authorized users
Medtronic representatives provide the Paceart Optima System orientation and training materials at the time
of the installation. All users should be familiar with Paceart documents, including the online Help, before using
the Paceart Optima System. The designated system administrator should also read the Paceart System
documentation for information on using the Paceart Optima System software user interface for function and
control.
An authorized person, preferably a physician, must verify the implantable device and electrode specifications
entered into the database or modified in the database. An authorized person, preferably a physician, must
verify the test results that are automatically entered into the database by the instrument. The data obtained
from this device must be interpreted in conjunction with other clinical data and the results of other independent
tests.
Technical Support
For technical support contact your local Medtronic office. In the US and Canada, call 1-800-PACEART.
Paceart manuals supplied with your system
Electronic versions of Paceart Optima System manuals are supplied on the documentation USB supplied
with your software.You can also download or request printed copies of these manuals from
www.medtronic.com/manuals.
There are two manuals installed for use with the Paceart Optima System software, the Paceart Optima System
Software Installation and Configuration Instructions and the Paceart Optima System Software User Manual.
The Paceart Optima System Software Installation and Configuration Instructions provide you with the
information you need to install and configure your Paceart Optima System software. This includes optional
configurations and optional software components.The Paceart Optima System Software User Manual provides
you with information on how to use your Paceart Optima System software.

8 | Installation and Configuration | Introduction to the Paceart Optima™ System
For information on the installation, configuration, and use of the Paceart ECG Module refer to the documentation
supplied with the Paceart ECG Module.
All patient and clinical data displayed in Paceart Optima System software documentation are fictitious and
for demonstration purposes only.
Accessing the online Help
The online Help provides additional information about the features and functionality of the Paceart Optima
System.
There are three ways to access online Help.
• Clicking Help > Help from the menu bar opens the appropriate help topic for where you are in the
application.
• Clicking the Help button in a dialog box opens the appropriate help topic for the dialog box.
• In any add or edit dialog box, clicking the "?" and selecting an active field opens the field level Help for
that field.
If your version of Paceart has been customized, you can view your customer build number by clicking Help
> About.

Installation and Configuration | Paceart Installation and Configuration | 9
Paceart Installation and Configuration
The intent of this information is to help you as a system administrator prepare for an installation of the Paceart
Optima System at your site. It will answer many of the questions you may have about how the Paceart Optima
System can use your existing network infrastructure.
This manual describes each the Paceart Optima System components and provides detailed instructions for
installing them. This information will help you decide which Paceart configuration is the best fit for your site
by providing details on each type of configuration.
Components of the Paceart Optima System
You can install different components of the Paceart Optima System depending on your configuration.
You must have administrative rights on the computer to install Paceart Optima System components.
The Paceart Database Manager
The Paceart Database Manager is a tool for performing the most common tasks of creating and managing
your Paceart System databases.This tool makes it easy to complete advanced database administration tasks
by using wizards.
Some of the tasks performed by the Paceart Database Manager could also be performed through other
database management software such as Microsoft SQL Server Enterprise Manager.
The Application Server
The Application Server allows you to centralize security and maintenance in one location. Only one database
needs updating if the database structure changes during a Paceart System upgrade.
The Client
The Paceart Optima System client is how most users interact with the Paceart System.The client is the user
interface for the Paceart Optima System.You enter and view information in the Paceart System user interface.
That information is then sent to the Paceart database via the Application Server.
The client connects to the application server and the Paceart database. In a standalone configuration you
can have the client, the application server, and the database all on one workstation. Or in a distributed system
you can have multiple clients running on different workstations that all connect into an application server and
a Paceart database.
ECG
You can install the optional Paceart ECG add-on package with the Paceart Optima client to add the ability
to capture and store ECG data for cardiac events from an external device in Paceart.You can also store and
manage a collection of ECG strips within an ECG session. ECG hardware must be connected to the client
workstation to record ECG strips.
ClickOnce Server
The ClickOnce server is an optional Paceart server configuration that enables Paceart users to install and
run the Paceart Optima System by clicking a link in a Web page instead of running the installation on individual
workstations. ClickOnce ensures that users are always running the latest version of Paceart by automatically
downloading any updates from the Application Server each time users run Paceart.

10 | Installation and Configuration | Paceart Installation and Configuration
Medtronic Mainspring Data Express
Mainspring Data Express is a comprehensive solution for your cardiac patients, bringing together device and
patient data from the Paceart System, the Medtronic CareLink Network, the CareLink Programmer, the Boston
Scientific LATITUDE® Patient Management system, the St. Jude Medical Merlin.net® Patient Care Network,
your EHR System, and local network.
For installation and configuration instructions, refer to the Medtronic Mainspring Data Express Connectivity
Guide.
Paceart Web
Paceart Web Access is an optional add-on package for use with the Paceart System. Adding Paceart Web
Access to your Paceart System allows you to access Paceart reports through an easy-to-use Web interface.
You can search for a particular report using Paceart Web Access.The search criteria include patient name,
provider name, type of encounter, and date range of the encounter.
Paceart Web Access can be configured to work on either an intranet or on the Internet. Depending on your
access requirements, you can restrict Paceart Web Access availability to your internal intranet, or you can
access your Paceart reports from any Internet connection in the world.
CardioVoice
The CardioVoice TTM Assistant system is an optional add-on package that enables patients and doctors to
communicate information about cardiac events through an automated voice response system.
Patients call into CardioVoice from their home and are directed through a series of automated prompts.
Patients can transmit an ECG, record messages for their doctor, and listen to messages from their doctor.
Doctors can access CardioVoice from a Paceart station in the clinic or by dialing into CardioVoice remotely.
When a patient records a new ECG, notification of the event is sent to the doctor by fax, e-mail, or page.
Doctors can record messages for their patients, listen to messages from patients, and view ECGs recorded
by patients.
Minimum permissions needed for Paceart components
Depending on your operating system, you must have certain user account privileges to install and run Paceart
components.
User Groups
There are three groups of users that apply to permissions for Paceart components in each operating system.
• Administrators: Members of the Administrators group have the largest amount of default permissions
and the ability to change their own permissions. Administrators can install and run all Paceart components.
• Power Users: Members of the Power Users group can create user accounts, but can modify and delete
only those accounts they create. Power Users can run all Paceart components but cannot install any of
them.
User Account Control (UAC) settings
UAC notifies you before changes are made to your computer that require administrator-level permission. It
is necessary to turn off UAC before installing most Paceart components.

Installation and Configuration | Paceart Installation and Configuration | 11
User Permissions
The following table shows supported operating systems for each Paceart component, which user groups can
install or run the components, and whether to turn off UAC.We recommend turning off UAC for all installations.
Component
Systems
Supported
Install
prerequisites
Microsoft .NET) Server 2012,
Install SQL
Server
Install Database
Manager
Windows 8.1,
Windows Server(Windows
2008, WindowsInstaller,
Windows Server
2012 R2
Windows 8.1,
Windows Server
2008, Windows
Server 2012,
Windows Server
2012 R2
Windows 8.1,
Windows Server
2008, Windows
Server 2012,
Windows Server
2012 R2
Restricted UserPower UserAdministratorOperating
Turn off UAC
settings?
YesNoNoYesWindows 7,
YesNoNoYesWindows 7,
YesNoNoYesWindows 7,
Install
Application
Server Windows Server
Install MSI Client
Run MSI Client
Install Paceart
ECG
Run Paceart
ECG
Install ClickOnce
Server
Install client from
ClickOnce
Server
Windows 8.1,
2008, Windows
Server 2012,
Windows Server
2012 R2
Windows 8.1
Windows 8.1
Windows 8.1
Windows 8.1
Windows 8.1
Windows 8.1
RecommendedNoNoYesWindows 7,
YesNoNoYesWindows 7,
NoYesYesYesWindows 7,
YesNoNoYesWindows 7,
NoYesYesYesWindows 7,
YesNoNoYesWindows 7,
RecommendedYesYesYesWindows 7,

12 | Installation and Configuration | Paceart Installation and Configuration
Component
Run client from
ClickOnce
Server
Install Paceart
Web
Run Paceart
Web
Install
CardioVoice
Systems
Supported
Windows 8.1
Windows 8.1,
Windows Server
2008, Windows
Server 2012,
Windows Server
2012 R2
Windows 8.1,
Windows Server
2008, Windows
Server 2012,
Windows Server
2012 R2
Windows 8.1
Restricted UserPower UserAdministratorOperating
Turn off UAC
settings?
NoYesYesYesWindows 7,
YesNoNoYesWindows 7,
NoYesYesYesWindows 7,
YesNoNoYesWindows 7,
Run CardioVoice
Windows 8.1
NoNoYesYesWindows 7,
Paceart Configuration Options
The Paceart System can be configured in multiple ways to support the needs of each installation.
When deciding on the configuration most appropriate for your installation, you must take the following items
into consideration:
• Number of clinical ECG-acquisition stations needed
• Need for viewing and editing ECG strips
• Number of TTM-acquisition stations needed
• Number of data entry terminals needed
• Availability of a local area network (LAN) and support
• Availability of a wide area network (WAN) and support
• Need for multiple geographic locations
• Number of places and locations for report retrieval
• Need for 24/7 TTM-acquisition
• Need for remote, disconnected data access
Paceart Optima System is scalable and configurable, providing options to best suit your installation.
Standalone Configuration
The Paceart Optima standalone configuration is the most basic Paceart Optima System configuration option.
It involves a single workstation running the following software with no network connection required:
• Microsoft SQL Server

Installation and Configuration | Paceart Installation and Configuration | 13
• The Paceart Optima Database Manager
• The Paceart Optima Application Server
• The Paceart Optima MSI Client
• Medtronic Mainspring Data Express (optional)
Paceart Hardware, such as the 12-Lead ECG/TTM ECG Module for in-clinic and transtelephonic ECG
acquisition, is added to capture ECG signals.
This configuration most likely does not need a full version of SQL Server; in most cases, an Express edition
of SQL Server suffices. An example of when a full version of SQL Server would be required is when the
database would need to store more than 4 GB of data.
While the standalone configuration is the most straightforward to install, it is not practical if you want to run
Paceart on multiple workstations.
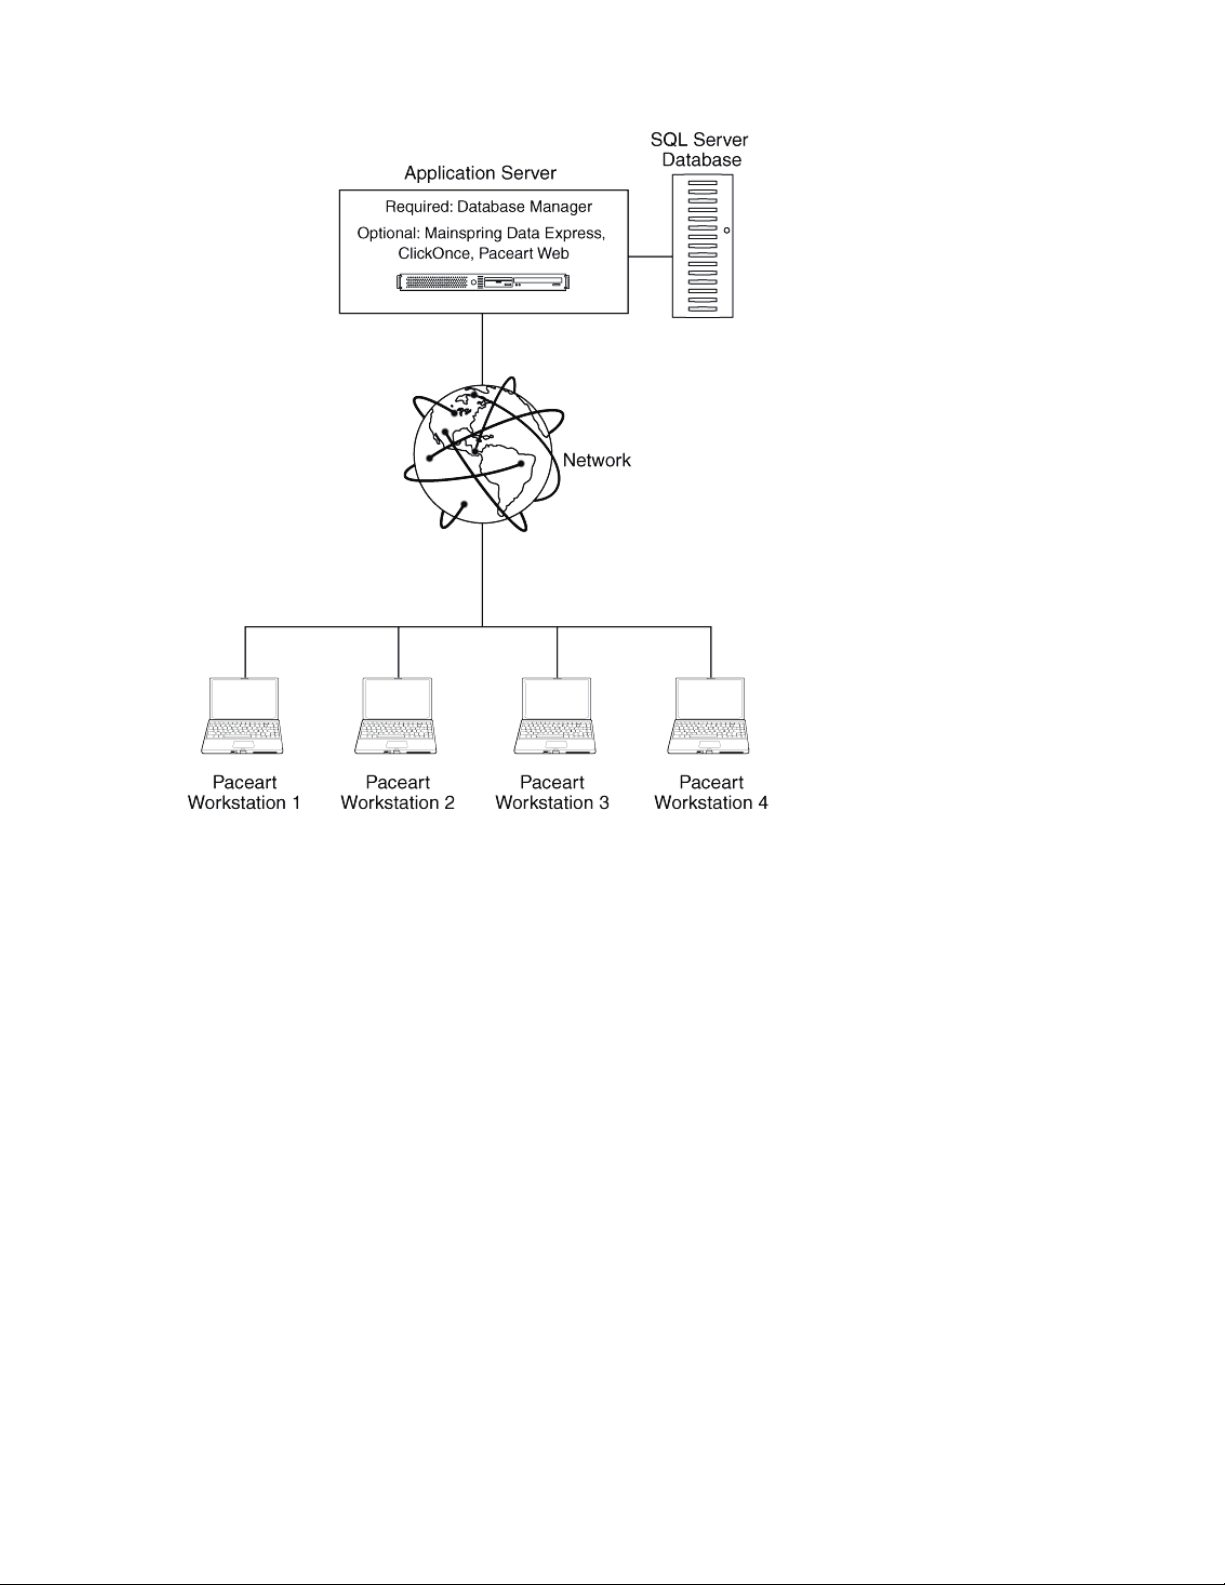
Network Configuration
This configuration is the most typical Paceart System scenario in use today. In this scenario, there is one
Paceart Application Server with a single SQL Server database containing the data from all of the client
workstations. These workstations could be all within the same facility, sending the data across a local area
network (LAN) or in different geographies, sending data on a wide area network (WAN).
Pros of network configuration:
• This configuration has a low degree of complexity.There is only one database to maintain and no replication
is needed.
• Centralized security and maintenance at the Application Server location, including a central repository for
backups.
• Only one database needs updating if the database structure changes during a Paceart System upgrade.
• All patient data is stored in one database and is accessible from any client workstation on the LAN or
WAN.
Cons of network configuration:
• No local copy of data if LAN or WAN fails.
• Higher bandwidth requirements as individual client workstations are saving all data, including large
encounters with multiple episodes, EGMs, and ECG strips, across the LAN or WAN.
• If you are not using ClickOnce, client software upgrades must be upgraded across multiple client
workstations simultaneously.
• Queries must contain extra criteria if client workstations only want to see local patients instead of all
patients on the network.
While you can connect multiple instances of the Paceart client to the same Paceart Application Server, you
must have a separate database for each instance of an Application Server.The following diagram shows a
typical Paceart network configuration including which components can be installed on the application server.
The Application Server and SQL Server Database can be hosted on the same workstation.
14 | Installation and Configuration | Paceart Installation and Configuration
Multiple Database Configuration
This configuration is for clinic settings that run the Paceart System on multiple databases. For example, your
clinic could have separate databases for arrhythmia and pacemaker patients or adult and pediatric patients.
Your clinic could also want a separate database for testing purposes. If you want to connect to multiple
databases from a Paceart workstation, install a separate Application Server for each database.
Use the ClickOnce installation method to connect to multiple databases on a single client workstation.You
can be logged in to only one instance of the Application Server and one database at a time from a workstation.
Database Replication
This configuration is for clinic settings that run the Paceart System on a single, distributed database. Using
replication, you can distribute data to remote or mobile users over a local area network, dial-up connection,
or the Internet. Replication also allows you to enhance application performance, physically separate data
based on how it is used, or distribute database processing across multiple servers. For example, your clinic
could have users that want to use replication as a means of backup to an alternate computer.

Installation and Configuration | Paceart Installation and Configuration | 15
Recommended Windows settings
Use the recommended Windows settings for the best view of the Paceart Optima user interface.
The Paceart Optima user interface is best viewed using the Windows Classic theme and the default text size.
You can configure these options in the Personalization section of the Control Panel.
Configuring Internet Information Services (IIS)
Internet Information Services (IIS) is a Web server application and set of feature extension modules created
by Microsoft for use with Microsoft Windows. IIS must be configured before installing Paceart.
The version of IIS installed on your workstation varies depending on which Windows operating system your
workstation is running.You must have administrative rights on the computer to configure IIS.There are unique
instructions to configure IIS for each version of Windows.
Configuring Internet Information Services (IIS) for Windows Server 2008 and Windows Server 2008 R2
Internet Information Services (IIS) must be configured before installing Paceart.
1. Open Server Manager.
The Server Manager window is displayed.
2. On the Manage menu, click Add roles and features.
The Add Roles and Features Wizard is displayed.
3. Click Next to select the roles to install.
4. Select Role-based or feature based installation and click Next.
5. On the Select Server Roles window select the Application Server and Web Server (IIS) check boxes.
6. Click Add Features.
7. Click Next.
8. Select the destination server and click Next.
9. On the Select features window click Next.
10. Click Next
11. On the Select Role Services window for the Application Server, select the Web Server (IIS) Support.
12. Click Add Features.
13. Click Next.
14. Click Next.
15. On the Select Role Services for the Web Server, click Next.
16. On the Confirm Installation Selections window, click Install.
17. Click Close.
Internet Information Services (IIS) is configured on your computer.
Configuring Internet Information Services (IIS) for Windows Server 2012 and Windows Server 2012 R2
Internet Information Services (IIS) must be configured before installing Paceart.
1. Open Server Manager.
The Server Manager window is displayed.

16 | Installation and Configuration | Paceart Installation and Configuration
2. In the Quick Start box on the dashboard, click Add roles and features.
3. On the Select installation type page, select Role-based or feature-based installation and click Next.
4. On the Select destination server page, choose Select a server from the server pool, then select the
server name from the Server Pool list and click Next.
5. On the Select Server Roles page, select the following options under Application Server:
• .NET Framework 4.5
• Web Server (IIS) Support
• Under Windows Process Activation Service Support, select HTTP Activation and TCP Activation.
Note: Accept any additional items that are suggested when you select the server role options.
6. Click Next.
7. On the Select features page, select the following options:
• Under .NET Framework 3.5 Features, select .NET Framework 3.5 and HTTP Activation.
• Under .NET Framework 4.5 Features, select .NET Framework 4.5 and all options for WCF Services.
• Under Windows Process Activation Service, select all options.
8. Click Next.
9. On the Confirm installation selections page, click Install.
10. Click Close when the installation completes successfully.
Configuring Internet Information Services (IIS) for Windows 7
Internet Information Services (IIS) must be configured before installing Paceart. Windows may prompt you
for a Windows setup disk during this process.
1. Click Start > Control Panel.
2. Click Programs > Programs and Features.
3. Click Turn Windows features on or off.
The Windows Features window is displayed.
4. Click Internet Information Services > World Wide Web Services > Application Development Features
and select the ASP.NET check box.

Installation and Configuration | Paceart Installation and Configuration | 17
5. Select and expand Microsoft .NET Framework 3.5.1 and then select Windows Communication
Foundation HTTP Activation.
6. Click OK.
Internet Information Services (IIS) is configured on your computer.
Configuring Internet Information Services (IIS) for Windows 8.1
Internet Information Services (IIS) must be configured before installing Paceart. Windows may prompt you
for a Windows setup disk during this process.
1. Select Settings > Control Panel
2. Click Programs > Programs and Features
3. Click Turn Windows features on or off.
The Windows Features window is displayed.
4. Select and expand .NET Framework 3.5 and then select Windows Communication Foundation HTTP
Activation.
5. Expand Internet Information Services > World Wide Web Services > Application Development
Features and then select ASP.NET 3.5.
6. Click OK.
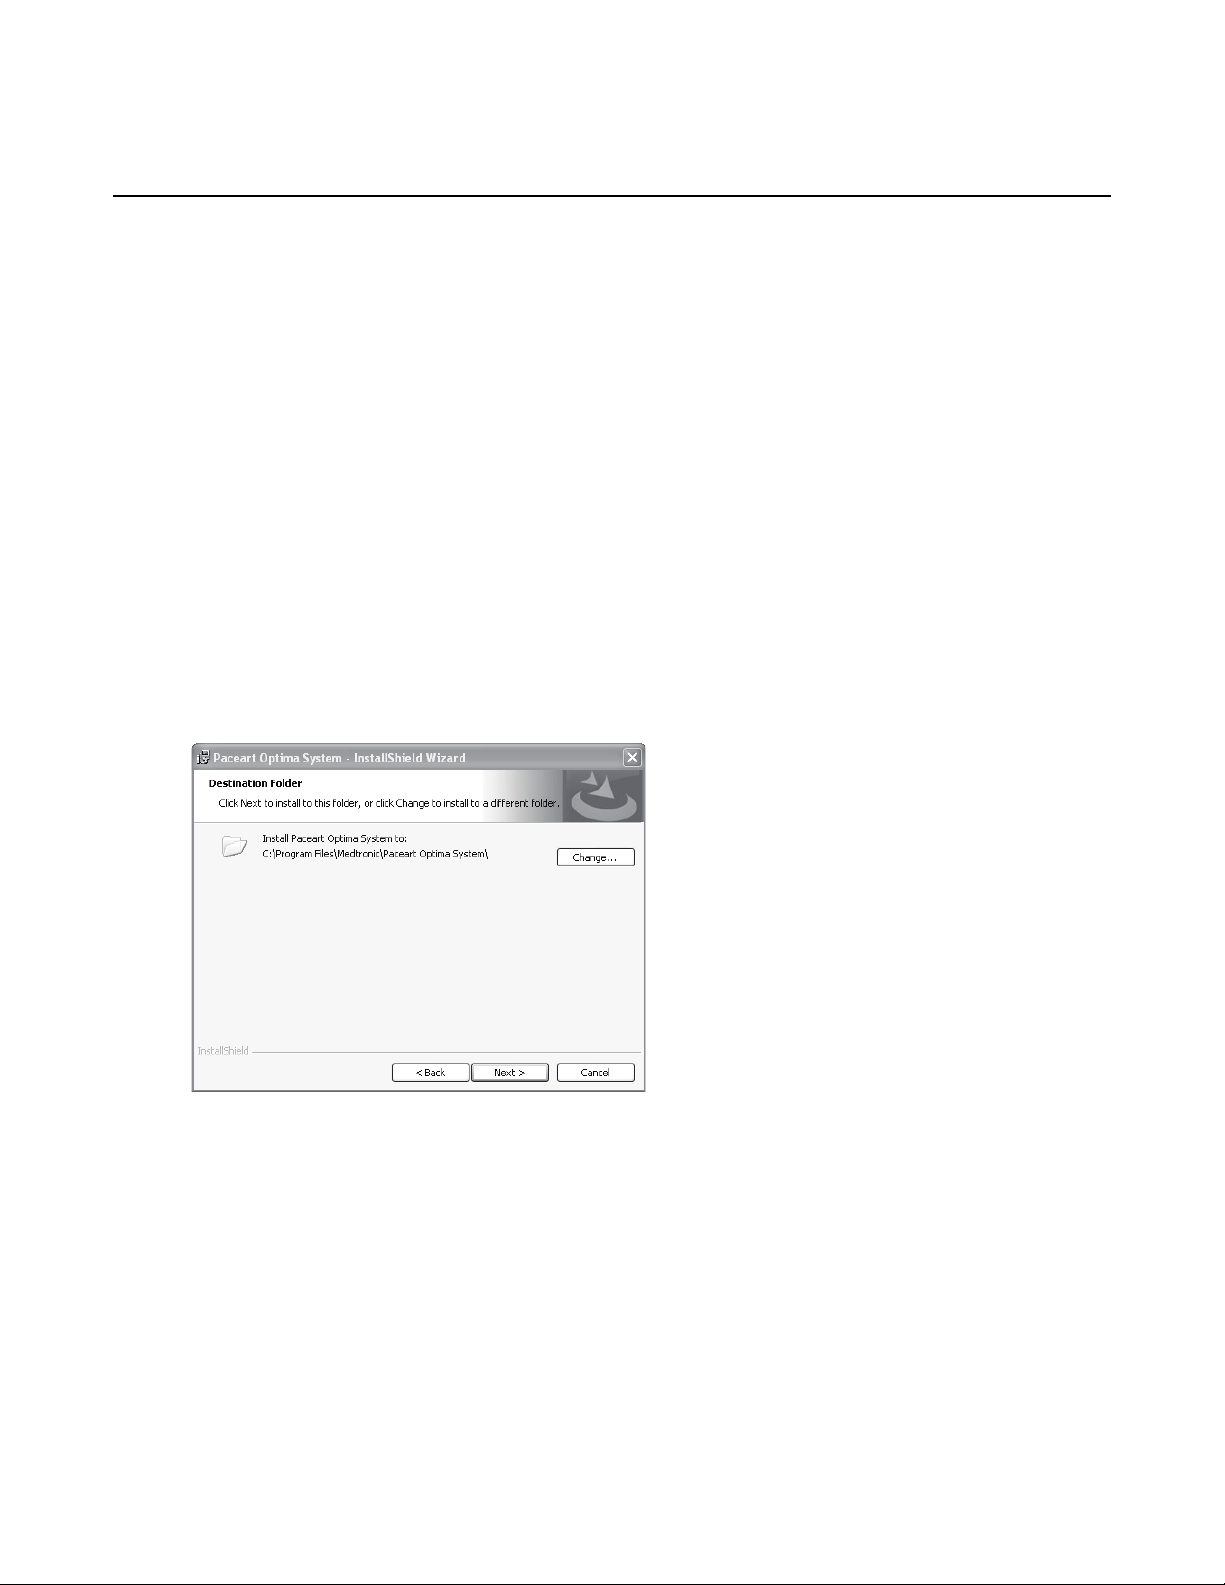
Installing the Paceart Optima Database Manager
Install the Paceart Optima Database Manager to control the creation, maintenance, and use of your Paceart
databases.
If you have a Paceart Optima customization installed, uninstall it before installing a new version of the Paceart
Optima Database Manager software. For more information on uninstalling customizations, refer to Uninstalling
Paceart Optima Customizations.
If you plan to use Database Manager for replication and publications, you must have a standard or full version
of SQL Server installed on your system before installing Database Manager. Systems containing subscriptions

18 | Installation and Configuration | Paceart Installation and Configuration
to the publishing system can still use express versions of SQL Server, but only with like versions. For example,
a system using SQL Server 2012 with Express Service Pack 1 can only subscribe to a publication hosted on
SQL Server 2012 Standard Edition with Service Pack 1, not SQL Server 2008 Standard Edition.
If the Database Manager installer does not detect a supported version of SQL Server installed on your system,
you will be given the option to install a supported version of SQL Server Express.The version depends on
your operating system. Also, you are given the option to install the SQL Server Management Objects for your
SQL Server version.
1. Insert the Paceart installation USB drive to start the installation wizard. If your workstation has the Autorun
feature disabled, navigate to the USB and double-click setup.exe.
2. If there are any prerequisites that must be installed they are displayed in a list. Select and then click Install
for each of the prerequisites.You may need to restart your computer depending on which prerequisites
are installed.
3. On the License Agreement window, read the license terms and click I accept the terms of the license
agreement if you agree to the terms.
4. Click Next.
5. Click Next.
6. On the Paceart Installer Configuration window, select Database Manager and click Next.
The Paceart Database Manager - InstallShield Wizard window is displayed.
7. Click Next.
8. If you have a supported version of SQL server installed, you will be asked to install the SQL Server
Managements Objects for that version. If you don't have a version supported version of SQL Server
installed, you will be asked to install SQL Server Express. Click Install to install.
9. Click Next.
10. Click Install.
11. Click Finish to exit the Paceart Database Manager installer.
Paceart Optima Database Manager is installed on your computer.
Starting the Paceart Database Manager
Use the sa (System Administrator) login when using the Paceart Database Manager. Many of the features
require this login.
This icon is used in this topic.
DescriptionIcon
Connect
1. Double-click the Paceart Database Manager icon on the desktop to display the Connect to SQL Server
login screen.
2. Select the SQL Server instance to which you want to connect.
• Select from the most recently used servers in the drop-down list.
• Click the Browse button to pick from a list of all SQL Servers known to be running on your network or
aliased using the SQL Server Client Network Utility.
3. Select either Windows Authentication or SQL Server Authentication to connect.Your choice depends on
how your SQL Server DB is set up and what access rights you have. There is no difference as far as
Paceart Database Manager is concerned.
4. If you chose SQL Server Authentication enter your login name and password. The login name defaults to
"sa" but it can be changed to any SQL user.
5. Click OK.

Installation and Configuration | Paceart Installation and Configuration | 19
You are now connected to the instance of the SQL server that you selected. If you need to login to a different
instance of SQL Server while you are using Paceart Database Manager click the Connect icon in the upper
left corner of the screen. This will display the Connect to SQL Server login screen again.
Creating a Paceart System Database
Paceart System databases hold patient data. The New Database Wizard takes you through the steps to
create a new Paceart System database.You will name your new database, specify where it is stored, and
set its initial size.You must be a member of the System Administrators server role on the SQL Server to use
this function.
1. Login to the Database Manager.
2. Double-click New Database.
3. Click Next.
4. Enter a name for the database.
It defaults to "Paceart_Database". The next database defaults to "Paceart_Database_#1". The number
will increase by one for each new database.
5. Enter the database location. We recommend that you accept the default value.
6. Click Next.
7. Specify the initial size of the database between 50 MB and 2,000 MB. If you exceed the initial size of the
database it will grow in increments of 50 MB .You can estimate the size of your database according to
the size of your patient population or you can select the initial size of your database.
• If you select the option to estimate the size based on your patient population, enter the number of
Pacemaker patients and the number of arrhythmia patients, and then click Next.
• If you select the option to select the size, slide the bar to the appropriate size.
8. Click Next.
9. Review your choices.
• Click Next if they are accurate.
• Click Back if you need to return to a previous screen to change a value.
It may take several minutes for the wizard to create the database and initialize the database structure.
10. Click Finish.
Updating the password for PaceartDataAccessUser
You can update the password for PaceartDataAccessUser in Database Manager.The PaceartDataAccessUser
is automatically created when you create a new Paceart database and is used to connect to the Application
Server.
1. Log in to Paceart Database Manager.
2. Click Tools > Change Password.
The Change Password window is displayed.
3. Enter PaceartDataAccessUser in the Login name field.

20 | Installation and Configuration | Paceart Installation and Configuration
4. Enter a new password in the Password and Confirm Password fields.
5. Click OK.
A message is displayed stating that the password was successfully changed.
6. Click OK.
Configuring Fax Services and Message Queuing
Fax Services and Message Queuing need to be configured before installing the Paceart Messaging Service.
Windows may prompt you for a Windows setup disk during this process.
1. Click Start.
2. Click Control Panel.
3. Double-click Add or Remove Programs.
4. Click Add/Remove Windows Components.
5. On the Windows Component Wizard window, check if the Fax Services and Message Queuing check
boxes are selected.
• If both check boxes are selected, Fax Services and Message Queuing are already configured. Click
Cancel and continue the Paceart installation.
• If one or both of the check boxes are not selected, select them and click Next.
6. Click Finish.
Fax Services and Message Queuing are configured on your computer.

Installation and Configuration | Paceart Installation and Configuration | 21
Installing the Paceart Optima Application Server, Messaging Service, and Online Help
Install the Paceart Optima Application Server to centralize security and maintenance for Paceart in one
location. The Messaging Service is used by Paceart to send email, fax, and pager messages. It also allows
you to work with the CardioVoice System. Paceart Online Help provides context-sensitive help throughout
the Paceart application.
If you have a Paceart Optima customization installed, uninstall it before installing a new version of the Paceart
Optima Application Server software. For more information on uninstalling customizations, refer to Uninstalling
Paceart Optima Customizations.
You must have Internet Information Services (IIS) configured before installing the Application Server.
1. Insert the Paceart installation USB drive to start the installation wizard. If your workstation has the Autorun
feature disabled, navigate to the USB and double-click setup.exe.
2. If there are any prerequisites that must be installed they are displayed in a list. Select and then click Install
for each of the prerequisites.You may need to restart your computer depending on which prerequisites
are installed.
3. On the License Agreement window, read the license terms and click I accept the terms of the license
agreement if you agree to the terms.
4. Click Next.
5. Click Next.
6. On the Paceart Installer Configuration window, select Application Server and click Next.
The Application Server progress bar is displayed.
7. When the Application Server progress bar completes, click Next on the Paceart Application Server InstallShield window.
8. Select a destination folder for the Application Server. Click Change to change from the default location.
9. Click Next.
10. Select the database server you are installing to.

22 | Installation and Configuration | Paceart Installation and Configuration
• If you are installing to a local database, select the database server from the list.
• If you are installing to a remote database, enter either the database server name or the IP address.
• If you are installing to a Citrix Server database, enter the IP address.
11. Enter the password for PaceartDataAccessUser that you assigned in Database Manager in the Password
field.
12. Click Browse next to the Name of database catalog field.
13. Browse to the desired catalog and click OK.
The selected catalog is displayed in the Name of database catalog field.
14. Click Next.
15. In the Configuration section, select whether to use the machine name or a manual configuration for the
Application Server. A manual configuration can be an IP address or a full machine name including domain.
If you do not use a Domain Name System (DNS), select Manual and enter the IP address.
16. In the Port Number section, enter a port number.We recommend port number 333 for Paceart. If you
are using SessionSync, enter a port number other than 443 because SessionSync uses that port.
17. Click Next.
18. Select a destination folder for the Paceart Messaging Service. Click Change to change from the default
location.

Installation and Configuration | Paceart Installation and Configuration | 23
19. Click Next.
If you do not have all the necessary components installed for Paceart Messaging Service, a warning
message is displayed. Click Next to continue the installation.
20. Select a destination folder for the Paceart Online Help. Click Change to change from the default location.
21. Enter the port number you want to use for Paceart Online Help in the Port Number field. The default port
number is 2782.
22. Click Next.
23. Click Install.
24. Click Finish to exit the Paceart Optima Application Server installer.
The Paceart Optima Application Server, Messaging Service, and Online Help are installed on your computer.

24 | Installation and Configuration | Paceart Installation and Configuration
Installing SSL Certificates
A Secure Socket Layer (SSL) certificate identifies Paceart as a trusted source and ensures transactions
between the Application Server and the Paceart application are secure. An SSL certificate must be installed
before installing the Paceart client.
The approach used to install the SSL certificate on your workstation varies depending on which Windows
operating system your workstation is running.You must have administrative rights on the computer to install
SSL certificates.
Installing an SSL Certificate for Windows 7 and Windows Server 2008
Install an SSL certificate using Internet Information Systems (IIS) before installing the Paceart client.
You must have Internet Information Services (IIS) configured before installing an SSL certificate. Install the
Medtronic Root Certificate, which is automatically installed with the Application Server, before installing an
SSL Certificate.
1. Click Start.
2. Right-click Computer and click Manage.
The Computer Management window is displayed.
3. On the Computer Management (Local) menu, click Services and Applications > Internet Information
Services.
4. In the Connections section, double-click Server Certificates.
5. In the Actions section, click Create Certificate Request.
The Request Certificate window is displayed.
6. Enter the machine name or IP address you selected when installing the Application Server in the Common
name field. Enter any other geographical information as necessary.
7. Click Next.
8. Select 2048 on the Bit length list.
9. Click Next.
10. Change the name of the certification request file to "certreq.mcertreq" in the File name field. If you want
to store the file in a different location, click the [...] button, navigate to that location, and then click Save.
11. Click Finish.
12. Send your certificate request file to Medtronic Certification Support. When you receive a certificate file
back, save the file and rename it "Cert.cer".
13. Click Start.
14. Right-click Computer and click Manage.
The Computer Management window is displayed.
15. On the Computer Management (Local) menu, click Services and Applications > Internet Information
Services.
16. In the Connections section, double-click Server Certificates.
17. In the Actions section, click Complete Certificate Request.
The Complete Certificate Request window is displayed.
18. Click the [...] button to browse to where you saved the Cert.cer file. Select the file and click Open.
19. Enter a name for the certificate in the Friendly name field.
20. Click OK.
21. In the Connections section of the Computer Management window, click Default Web Site.
22. In the Actions section, click Bindings.
The Site Bindings window is displayed.

Installation and Configuration | Paceart Installation and Configuration | 25
23. Click Add.
The Add Site Binding window is displayed.
24. Select https on the Type list.
25. Enter the port you entered when installing the Application Server in the Port field.
26. Select the name you entered for the SSL certificate on the SSL certificate list.
27. Click OK.
Installing an SSL Certificate for Windows Server 2008 R2
Install an SSL certificate using Internet Information Systems (IIS) before installing the Paceart client.
You must have Internet Information Services (IIS) configured before installing an SSL certificate. Install the
Medtronic Root Certificate, which is automatically installed with the Application Server, before installing an
SSL Certificate.
1. Click Start > Administrative Tools > Internet Information Services (IIS) Manager.
The Internet Information Services (IIS) Manager window is displayed.
2. Double-click on the name of the server and then click on Server Certificates.
The Server Certificates pane is displayed.
3. Click Create Certificate Request.
The Request Certificate window is displayed.
4. Enter the machine name or IP address you selected when installing the Application Server in the Common
name field. Enter any other geographical information as necessary.
5. Click Next.
6. Select 2048 from the Bit length list.
7. Click Next.
8. Change the name of the certification request file to "certreq.mcertreq" in the File name field. If you want
to store the file in a different location, click the [...] button, navigate to that location, and then click Save.
9. Click Finish.
10. Send your certificate request file to Medtronic Certification Support. When you receive a certificate file
back, save the file and rename it "Cert.cer".
11. Click Start > Administrative Tools > Internet Information Services (IIS) Manager.
The Internet Information Services (IIS) Manger window is displayed.
12. Double-click on the name of the server and then click on Server Certificates.
The Server Certificates pane is displayed.
13. In the Actions section, click Complete Certificate Request.
The Complete Certificate Request window is displayed.
14. Click the [...] button to browse to where you saved the Cert.cer file. Select the file and click Open.
15. Enter a name for the certificate in the Friendly name field.
16. Click OK to install the certificate on the server.
17. In the Connections section of the Computer Management window, click Default Web Site.
18. In the Actions section, click Bindings.
The Site Bindings window is displayed.
19. Click Add.
The Add Site Binding window is displayed.
20. Select https on the Type list.
21. Enter the port you entered when installing the Application Server in the Port field.
22. Select the name you entered for the SSL certificate on the SSL certificate list.
23. Click OK.

26 | Installation and Configuration | Paceart Installation and Configuration
Your SSL certificate is installed.
Installing an SSL Certificate for Windows Server 2012 and Windows Server 2012 R2
Install an SSL certificate using Internet Information Systems (IIS) before installing the Paceart client.
You must have Internet Information Services (IIS) configured before installing an SSL certificate. Install the
Medtronic Root Certificate, which is automatically installed with the Application Server, before installing an
SSL Certificate.
1. Click Start.
2. On the Start menu, type Computer Management in the Search box.
3. Click Computer Management in the search results.
The Computer Management window opens.
4. Expand Services and Applications.
5. Select Internet Information Services (IIS) Manager.
Options for the IIS Manager are listed in the content area on the right side of the screen.
6. Select the server name under Connections, then double-click Server Certificates.
7. Under Actions on the left side of the screen, click Create Certificate Request.
The Request Certificate window is displayed.
8. Enter the machine name or IP address you selected when installing the Application Server in the Common
name field. Enter any other geographical information as necessary.
9. Click Next.
10. Select 2048 from the Bit length list.
11. Click Next.
12. Change the name of the certification request file to "certreq.mcertreq" in the File name field. If you want
to store the file in a different location, click the [...] button, navigate to that location, and then click Save.
13. Click Finish.
14. Send your certificate request file to Medtronic Certification Support. When you receive a certificate file
back, save the file and rename it "Cert.cer".
15. Click Start > Administrative Tools > Internet Information Services (IIS) Manager.
The Internet Information Services (IIS) Manger window is displayed.
16. Double-click on the name of the server and then click on Server Certificates.
The Server Certificates pane is displayed.
17. In the Actions section, click Complete Certificate Request.
The Complete Certificate Request window is displayed.
18. Click the [...] button to browse to where you saved the Cert.cer file. Select the file and click Open.
19. Enter a name for the certificate in the Friendly name field.
20. Click OK to install the certificate on the server.
21. In the Connections section of the Computer Management window, click Default Web Site.
22. In the Actions section, click Bindings.
The Site Bindings window is displayed.
23. Click Add.
The Add Site Binding window is displayed.
24. Select https on the Type list.
25. Enter the port you entered when installing the Application Server in the Port field.
26. Select the name you entered for the SSL certificate on the SSL certificate list.
27. Click OK.
Your SSL certificate is installed.

Installation and Configuration | Paceart Installation and Configuration | 27
Installing an SSL Certificate for Windows 8.1
Install an SSL certificate using Internet Information Systems (IIS) before installing the Paceart client.
You must have Internet Information Services (IIS) configured before installing an SSL certificate. Install the
Medtronic Root Certificate, which is automatically installed with the Application Server, before installing an
SSL Certificate.
1. Click Start > Search and search for "Administrative Tools".
2. Click Computer Management
3. In the Connections section, double-click Server Certificates.
4. In the Actions section, click Create Certificate Request.
The Request Certificate window is displayed.
5. Enter the machine name or IP address you selected when installing the Application Server in the Common
name field. Enter any other geographical information as necessary.
6. Click Next.
7. Select 2048 on the Bit length list.
8. Click Next.
9. Change the name of the certification request file to "certreq.mcertreq" in the File name field. If you want
to store the file in a different location, click the [...] button, navigate to that location, and then click Save.
10. Click Finish.
11. Send your certificate request file to Medtronic Certification Support. When you receive a certificate file
back, save the file and rename it "Cert.cer".
12. Click Start.
13. Right-click Computer and click Manage.
The Computer Management window is displayed.
14. On the Computer Management (Local) menu, click Services and Applications > Internet Information
Services.
15. In the Connections section, double-click Server Certificates.
16. In the Actions section, click Complete Certificate Request.
The Complete Certificate Request window is displayed.
17. Click the [...] button to browse to where you saved the Cert.cer file. Select the file and click Open.
18. Enter a name for the certificate in the Friendly name field.
19. Click OK.
20. In the Connections section of the Computer Management window, click Default Web Site.
21. In the Actions section, click Bindings.
The Site Bindings window is displayed.
22. Click Add.
The Add Site Binding window is displayed.
23. Select https on the Type list.
24. Enter the port you entered when installing the Application Server in the Port field.
25. Select the name you entered for the SSL certificate on the SSL certificate list.
26. Click OK.
28 | Installation and Configuration | Paceart Installation and Configuration
Installing the MSI Client
You can install the MSI Client to run the Paceart Optima System on an individual workstation.
If you have a Paceart Optima customization installed, uninstall it before installing a new version of the MSI
Client software. For more information on uninstalling customizations, refer to Uninstalling Paceart Optima
Customizations.
1. Insert the Paceart installation USB drive to start the installation wizard. If your workstation has the Autorun
feature disabled, navigate to the USB and double-click setup.exe.
2. If there are any prerequisites that must be installed they are displayed in a list. Select and then click Install
for each of the prerequisites.You may need to restart your computer depending on which prerequisites
are installed.
3. On the License Agreement window, read the license terms and click I accept the terms of the license
agreement if you agree to the terms.
4. Click Next.
5. Click Next.
6. On the Paceart Installer Configuration window, select MSI Client and click Next.
The Paceart Optima system progress bar is displayed.
7. When the Paceart Optima System progress bar completes, click Next on the Paceart Optima System InstallShield Wizard window.
8. Select a destination folder. Click Change to change from the default location.
9. Click Next.
10. In the Application Server Location and Port Number field, enter the machine name or IP address and
port number of the machine that is hosting the Application Server. We recommend port number 333 for
Paceart. The format is [machine name/IP address]:[port number]. For example, if the machine name is
Paceart01 and the port number is 333, enter "Paceart01:333". If you did not specify a port number when
installing the Application Server, enter the machine name only. If you are installing the Paceart Optima
Client on a Citrix Server, enter the IP address.

Installation and Configuration | Paceart Installation and Configuration | 29
11. Enter the same port number you entered when installing the Online Help in the Online Help Port Number
field. The default port number is 2782.
12. Enter an instance name in the Paceart Instance Name field. If you have more than one Paceart System
installed, this name is used to identify which instance of the system you are using.
13. Click Next.
14. Click Install.
15. Click Finish to exit the Paceart Optima System installer.
Installing Paceart ECG
Install Paceart ECG to add the ability to capture and view ECG traces from an external device in Paceart.
The ECG components needed by Paceart Web and CardioVoice are installed with the Application Server
installation. Installing Paceart ECG allows you to capture and store ECG strips.You can view and edit ECG
strips with an MSI client without installing Paceart ECG, but you cannot record ECG strips without installing
Paceart ECG.You must install Paceart ECG to view, edit, or record ECG strips from a ClickOnce client. ECG
hardware must be connected to record ECG strips.
1. Disconnect any Paceart ECG hardware that is connected to a USB port on the installation computer.
2. Insert the Paceart installation USB drive to start the installation wizard. If your workstation has the Autorun
feature disabled, navigate to the USB and double-click setup.exe.
3. If there are any prerequisites that must be installed they are displayed in a list. Select and then click Install
for each of the prerequisites.You may need to restart your computer depending on which prerequisites
are installed.
4. On the License Agreement window, read the license terms and click I accept the terms of the license
agreement if you agree to the terms.
5. Click Next.
6. Click Next.
7. On the Paceart Installer Configuration window, select ECG and click Next.
The Paceart ECG Installer - InstallShield Wizard window is displayed.
8. Click Next.
9. Click Install.
10. A software installation warning may be displayed. If you receive the warning, click Continue Anyway.
11. When the "Please attach your device to this computer any time after the installation has finished" message
dialog box opens, click OK.

30 | Installation and Configuration | Paceart Installation and Configuration
12. Click Finish to exit the Paceart ECG installer.
13. Connect the Paceart ECG hardware's USB module to one of the USB ports on the installation computer.
The light on the USB module indicates whether the installation computer has recognized the hardware.
• The light blinks and then turns on when the USB module is recognized. Paceart ECG has been
successfully installed and is ready for use with your ECG hardware.
• The light blinks, turns off, and then repeats that sequence indefinitely when the USB module is not
recognized.You may need to update the installation computer's BIOS settings to work with the ECG
hardware's USB module. BIOS settings are highly variable based on the computer's hardware and
operating system. For assistance updating BIOS settings, refer to the Paceart System Community
Portal or contact Paceart support.
Installing Paceart Web
Install Paceart Web to access Paceart reports through an easy-to-use Web interface.
You must have Internet Information Services (IIS) configured before installing Paceart Web.
Install Paceart Web on the same machine that you installed the Application Server. If you want to view reports
with ECG information in Paceart Web, install Paceart ECG on the same machine as you installed Paceart
Web and the Application Server.
1. Insert the Paceart installation USB drive to start the installation wizard. If your workstation has the Autorun
feature disabled, navigate to the USB and double-click setup.exe.
2. If there are any prerequisites that must be installed they are displayed in a list. Select and then click Install
for each of the prerequisites.You may need to restart your computer depending on which prerequisites
are installed.
3. On the License Agreement window, read the license terms and click I accept the terms of the license
agreement if you agree to the terms.
4. Click Next.
5. Click Next.
6. On the Paceart Installer Configuration window, select Paceart Web and click Next.
The Paceart Optima Web progress bar is displayed.
7. When the Paceart Optima Web progress bar completes, click Next on the Paceart Optima Web -
InstallShield Wizard window.
8. Select a destination folder. Click Change to change from the default location.

Installation and Configuration | Paceart Installation and Configuration | 31
9. Click Next.
10. On the Paceart Configuration window, enter any configuration and contact information you want for
Paceart Web.
11. In the App Server field, enter the machine name and port number of the machine that is hosting the
Application Server.We recommend port number 333 for Paceart. The format is [machine name]:[port
number]. For example, if the machine name is Paceart01 and the port number is 333, enter "Paceart01:333".
If you did not specify a port when installing the Application Server, enter the machine name only.
12. Click Next.
13. Click Install.
14. Click Finish to exit the Paceart Optima Web installer.
CardioVoice Installation
CardioVoice is a TTM assistant that works with Paceart to provide unattended service and receive patient
ECG transmissions over a phone line.
To install and use the CardioVoice software, you must install and configure a dialogic board and its associated
drivers.
Installing the Dialogic D/4PCI and D/4PCIU Boards
Install a Dialogic Board to the computer that uses CardioVoice.
1. Unplug the electrical supply to the computer.
2. Remove the outside computer cover. Refer to computer owner's manual for instructions on removing the
cover.
3. Identify where existing boards are installed.
4. Insert the Dialogic Board into an open PCI slot and secure it with the included mounting screws. Avoid
over-handling the board because electrostatic shock could damage the board.
5. Replace the computer cover.
6. Reconnect the electrical supply to the computer.
7. Turn on the computer power .
8. After starting up your computer, the Found New Hardware window may appear. Click Cancel.

32 | Installation and Configuration | Paceart Installation and Configuration
Installing the driver
Install the drivers for the dialogic board to work with CardioVoice.
1. Open the installation USB on your computer.
2. Open the Resources\Dialogic Board Driver\SR 6.1 for Windows directory.
3. Double-click on setup.exe.
Installing CardioVoice Software
You can install CardioVoice to automatically fax, page, or email a physician when a patient calls into the
CardioVoice system.
1. Insert the Paceart installation USB drive to start the installation wizard. If your workstation has the Autorun
feature disabled, navigate to the USB and double-click setup.exe.
2. If there are any prerequisites that must be installed they are displayed in a list. Select and then click Install
for each of the prerequisites.You may need to restart your computer depending on which prerequisites
are installed.
3. On the License Agreement window, read the license terms and click I accept the terms of the license
agreement if you agree to the terms.
4. Click Next.
5. Click Next.
6. On the Paceart Installer Configuration window, select CardioVoice and click Next.
7. Determine which action to take.
• If you do not have the Eurovoice Objects toolkit installed and configured, it is displayed as a prerequisite.
Click Install.
• If you have previously installed and configured the Eurovoice Objects toolkit, go to Step 23.
8. Click Next.
9. On the License Agreement window read the license terms and click I accept the terms in the license
agreement if you agree to the terms.
10. Click Next.
11. Enter your name and organization in the User Name and Organization fields.
12. In the Install this application for field, select Anyone who uses this computer (all users).
13. Click Next.

Installation and Configuration | Paceart Installation and Configuration | 33
14. Select a destination folder for the Eurovoice Objects toolkit. Click Change to change from the default
location.
15. Click Next.
16. Click Install.
17. Click Finish.
The Eurovoice Object toolkit is installed and the Paceart CardioVoice - InstallShield Wizard window is
displayed.
18. Open the folder where you installed the Eurovoice Object toolkit.
19. Double-click the evoServerManager.exe file.
The eurovoice objects Server Manager window is displayed.
20. In the Select technology list, click Dialogic.
21. Click Auto Scan to identify the Dialogic Board automatically.
22. Click Exit to close the Server Manager.
34 | Installation and Configuration | Paceart Installation and Configuration
23. Return to the Paceart CardioVoice - InstallShield Wizard window and click Next.
24. Select a destination folder. Click Change to change from the default location.
25. Click Next.
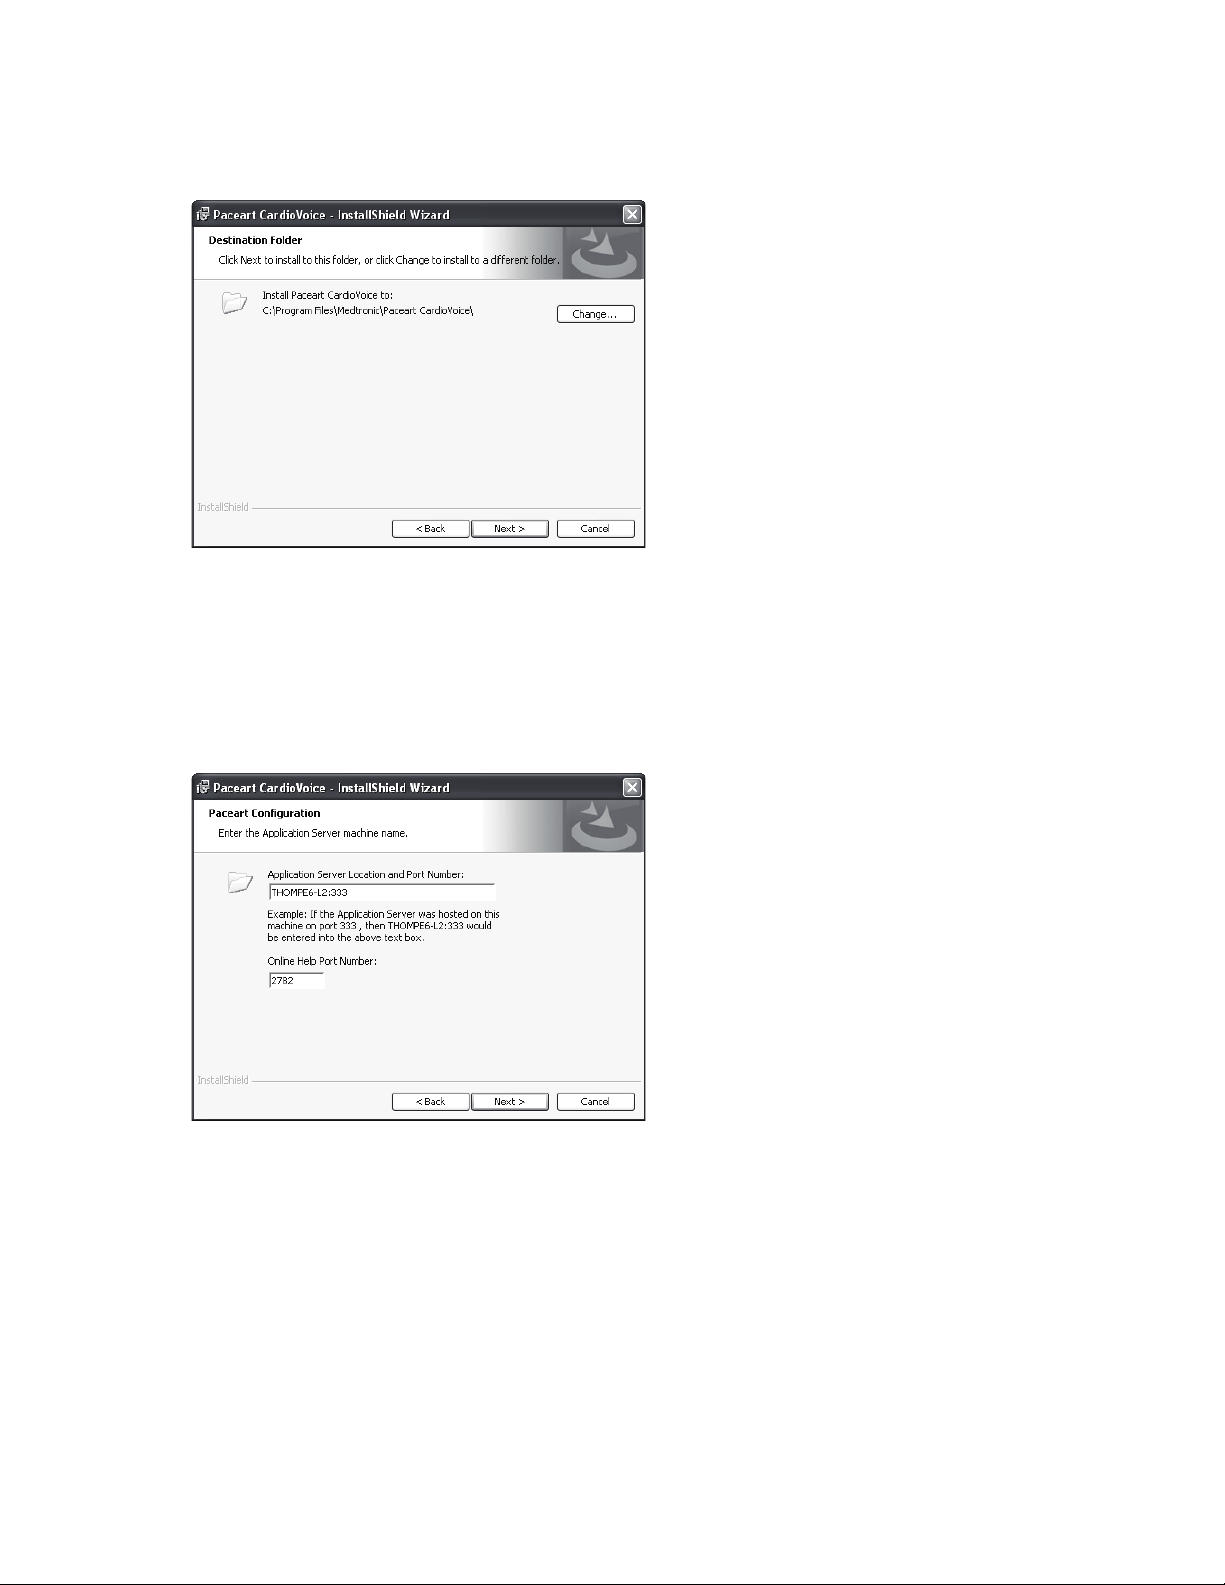
26. In the Application Server Location and Port Number field, enter the machine name and port number
of the machine that hosts the Application Server. For example, if the machine name is Paceart01 and the
Application Server is hosted on port 333, you would enter "Paceart01:333". We recommend port number
333 for Paceart. If you did not enter a port number when installing the Application Server, do not enter a
port number.
27. Enter the same port number you entered when installing the Online Help in the Online Help Port Number
field. The default port number is 2782.
28. Click Next.
29. Click Install.
30. Click Finish to exit the CardioVoice installer.
Disabling the EVO 3.0 message window
You can disable the EVO 3.0 message window that is frequently displayed while running CardioVoice.
1. Click Start.

2. Click Control Panel.
3. Double-click Administrative Tools.
4. Double-click Services.
Installation and Configuration | Paceart Installation and Configuration | 35
The Services window is displayed.
5. Double-click CardioVoice Service.
The CardioVoice Service Properties window is displayed.
6. Click the Log On tab.
7. To disable the EVO 3.0 message window, clear the Allow service to interact with desktop check box.
8. Click Apply.
9. Click OK.

36 | Installation and Configuration | Paceart Installation and Configuration
Configuring Dialogic Drivers for Dialogic D/4PCI and D/4PCIU boards
You can configure your dialogic drivers for use with CardioVoice with the Dialogic Configuration Manager.
1. Click Start > Programs > Dialogic System Software > Dialogic Configuration Manager.
2. Click Connect.
The Dialogic Configuration Manager begins the process of detecting the device.
3. In the Configured Devices window, you should see the device number and TDM Bus. At the top of the
window, click Service, then Startup Mode, and then click Automatic.
4.
Click the button to start the configuration process.
5. When the process is complete, System Status = Running is displayed at the bottom of the window.
6. Close the Dialogic Configuration Manager.
Simulating a CardioVoice call
After you have created a test patient, call into CardioVoice and record a test ECG for that patient.
1. Start the CardioVoice phone line in the CardioVoice Administration application.
2. Dial into CardioVoice by calling the phone number that is connected to the Dialogic board.
3. When prompted, enter your test CardioVoice ID number "1111".
4. When prompted, send an ECG or whistle into the phone to simulate an ECG.
5. Exit the CardioVoice call or hang up.
A new event is displayed in the Call Log section of the main CardioVoice window.
6. Open the test patient in Paceart.
7. Click the Encounters tab and select the new encounter.
8. Click the ECGs tab.
If you are able to open and view the ECG, you have properly installed the CardioVoice software.
Installing the ClickOnce Server
ClickOnce allows you to install the Paceart Optima System client from the Application Server. It is a delivery
mechanism that installs the latest version of the Paceart client from the Application Server onto a workstation.
If you have a Paceart Optima customization installed, uninstall it before installing a new version of the ClickOnce
Server software. For more information on uninstalling customizations, refer to Uninstalling Paceart Optima
Customizations.
Before installing the ClickOnce Server, you must have the following features installed on the Application
Server:
• Paceart Optima Database Manager
• MSXML 4.0
• .NET 3.5 Service Pack 1
• Windows Installer 4.5
• Internet Information Services (IIS) 5.0 or greater
1. Insert the Paceart installation USB drive to start the installation wizard. If your workstation has the Autorun
feature disabled, navigate to the USB and double-click setup.exe.
2. If there are any prerequisites that must be installed they are displayed in a list. Select and then click Install
for each of the prerequisites.You may need to restart your computer depending on which prerequisites
are installed.

Installation and Configuration | Paceart Installation and Configuration | 37
3. On the License Agreement window, read the license terms and click I accept the terms of the license
agreement if you agree to the terms.
4. Click Next.
5. Click Next.
6. On the Paceart Installer Configuration window, select ClickOnce Server and click Next.
7. Click Next.
8. Select a destination folder. Click Change to change from the default location.
9. Click Next.
10. In the Application Server Location and Port Number field, enter the machine name or IP address and
port number of the machine that is hosting the Application Server. We recommend port number 333 for
Paceart. The format is [machine name/IP address]:[port number]. For example, if the machine name is
Paceart01 and the port number is 333, enter "Paceart01:333". If you did not specify a port when installing
the Application Server, enter the machine name only. If you are installing the ClickOnce Server on a Citrix
Server, enter the IP address.

38 | Installation and Configuration | Paceart Installation and Configuration
11. Enter the same port number you entered when installing the Online Help in the Online Help Port field.
The default port number is 2782.
12. In the Which configuration do you want to use for the ClickOnce server field, select Machine Name
or IP Address. If you are installing ClickOnce on a virtual machine or a Citrix Server, select IP Address
and enter the IP address.
13. Enter an instance name in the Instance Name field. If you have more than one ClickOnce server installed,
this name is used to identify which instance of ClickOnce you are using.
14. Click Next.
15. Click Install.
16. Click Finish to exit the Paceart ClickOnce installer.
Installing the ClickOnce Client Prerequisites
You must install and configure prerequisites on each client before you can install the Paceart client from the
ClickOnce Server.
Make sure that the ClickOnce Server was installed on a computer that is on your network and is accessible
from the client computer.
1. Open the Paceart ClickOnce webpage.The page is located at http://<Computer name or IP
address>/Paceart/publish.htm, where <Computer name or IP address> is the computer name or IP address
of the computer where the ClickOnce server was installed (often the application server but could be
different).
2. Install Windows Installer version 3.1.
a) Click Windows Installer 3.1 to install.
b) Click Run.
Windows Installer version 3.1 is installed.
3. Install Microsoft .Net framework version 3.51.
a) Click Microsoft .Net 3.51 to install.
b) Click Run.
Microsoft .Net framework version 3.51 is installed.
4. If you want to record or view ECGs on this client, then click ECG Components to install the necessary
components.
a) Click Run.
The Paceart ECG Installer launches.
b) Click Next.
c) Click Install.
d) Click Finish.
5. Click Medtronic SSL Root Certificate. A root certificate is required in order for the SSL certificate provided
by Medtronic to be considered trusted by your browser.
The File Download - Security Warning window is displayed.
6. Click Open.
The Certificate window is displayed.
7. Click Install Certificate.

Installation and Configuration | Paceart Installation and Configuration | 39
The Certificate Import Wizard window is displayed.
8. Click Next.
9. Select Place all certificates in the following store and click Browse.
The Select Certificate Store window is displayed.
10. Select Trusted Root Certification Authorities and click OK.
11. Click Next.
12. Click Finish.
A message is displayed that the import was successful.
13. Click OK.

40 | Installation and Configuration | Paceart Installation and Configuration
14. Click OK.
Installing the Paceart Client from the ClickOnce Server
You can install the Paceart application from the ClickOnce Server webpage.
Before installing Paceart, make sure you have installed the prerequisites from the ClickOnce webpage.
1. Open the Paceart ClickOnce webpage.The page is located at http://<Machine Name or IP
Address>/Paceart/publish.htm where <Machine Name or IP Address> is the machine name or IP Address
of the machine where the ClickOnce server was installed (often the application server but could be different).
2. Click Launch Paceart Application.
After the installation, a shortcut is placed in your Start menu. You can use that shortcut to launch Paceart
instead of going to the ClickOnce webpage.
Installing the Paceart Optima Client on Citrix Server
You can install the Paceart Optima Client to run the Paceart Optima System on a Citrix Server.
If you have a previous version of Paceart Optima or a Paceart Optima customization installed, uninstall them
before installing the Optima Client. For more information on uninstalling customizations, refer to Uninstalling
Paceart Optima Customizations.
Before installing Paceart components, download the most recent version of the Citrix Client.You do not need
to install the Paceart Optima Database Manager or Application Server on Citrix Server to install the Paceart
Optima Client on a Citrix Server.
Depending on the configuration and group policies of your Citrix Server, you could need special configurations
or group permissions to perform the following tasks:
• Accessing the Citrix Server to view and open the Paceart Optima Client
• Saving to a network drive, PC, floppy disk, or USB
• In-Clinic import from a network drive, PC, floppy disk, USB, or CD
• Exporting
• Printing
• Writing to log files
Contact your Citrix administrator for more information.
The use of Citrix Server is not supported for CardioVoice, Paceart Web, Paceart ECG, and TTM.
1. Open a command prompt on your Citrix Server. At the command prompt, enter Change User /Install.
2. Copy the entire installation folder from the installation USB to the Citrix Server.
3. In the installation folder, open the Paceart installer by double-clicking setup.exe.
4. Install the Paceart Optima Client.
a) If there are any prerequisites that must be installed they are displayed in a list. Select and then click
Install for each of the prerequisites.You may need to restart your computer depending on which
prerequisites are installed.
b) On the License Agreement window, read the license terms and click I accept the terms of the license
agreement if you agree to the terms.
c) Click Next.
d) Click Next.
e) On the Paceart Installer Configuration window, select MSI Client and click Next.

Installation and Configuration | Paceart Installation and Configuration | 41
f) When the Paceart Optima System progress bar completes, click Next on the Paceart Optima System
- InstallShield Wizard window.
5. When all installations are complete, open a command prompt on your Citrix Server. At the command
prompt, enter Change User /Execute.
6. Publish the Paceart application using the process your company normally uses. Contact your Citrix
administrator for more information.
7. To access the Paceart application, log in to your Citrix Client and double-click the Paceart Optima System
logo.
Uninstalling Paceart Optima Customizations
You can uninstall a Paceart customization if you are installing a new version of Paceart software or want to
remove the customization.
1. Click Start.
2. Click Control Panel.
3. Double-click Add or Remove Programs.
4. In the Currently installed programs window, select the customization you want to uninstall.
5. Click Remove.
6. Click Yes to confirm the uninstallation.
The customization is uninstalled.
Paceart Database Manager
The Paceart Database Manager is a tool for performing the most common tasks of creating and managing
your Paceart System databases.This tool makes it easy to complete advanced database administration tasks
through the use of wizards.
Some of the tasks performed by the Paceart Database Manager could also be performed through other
database management software such as Microsoft SQL Server Management Studio.
Starting the Paceart Database Manager
Use the sa (System Administrator) login when using the Paceart Database Manager. Many of the features
require this login.
This icon is used in this topic.
DescriptionIcon
Connect
1. Double-click the Paceart Database Manager icon on the desktop to display the Connect to SQL Server
login screen.
2. Select the SQL Server instance to which you want to connect.
• Select from the most recently used servers in the drop-down list.
• Click the Browse button to pick from a list of all SQL Servers known to be running on your network or
aliased using the SQL Server Client Network Utility.

42 | Installation and Configuration | Paceart Installation and Configuration
3. Select either Windows Authentication or SQL Server Authentication to connect.Your choice depends on
how your SQL Server DB is set up and what access rights you have. There is no difference as far as
Paceart Database Manager is concerned.
4. If you chose SQL Server Authentication enter your login name and password. The login name defaults to
"sa" but it can be changed to any SQL user.
5. Click OK.
You are now connected to the instance of the SQL server that you selected. If you need to login to a different
instance of SQL Server while you are using Paceart Database Manager click the Connect icon in the upper
left corner of the screen. This will display the Connect to SQL Server login screen again.
Creating a desktop shortcut to the Paceart Database Manager
You can create a desktop shortcut to the Paceart Database Manager.
1. Right-click on your computer desktop.
2. Click New > Shortcut.
3. Enter the same path, filename, and switches that you used in the Run window. If you need to navigate to
your location of PaceDatabaseManager.exe, click Browse.
4. Click Next.
5. Enter a name for the shortcut. It is helpful to name your shortcut with a name descriptive of the action you
are performing.
You can set common options using the command line interface in conjunction with a shortcut.
6. Click Finish.
Creating a Paceart System Database
Paceart System databases hold patient data. The New Database Wizard takes you through the steps to
create a new Paceart System database.You will name your new database, specify where it is stored, and
set its initial size.You must be a member of the System Administrators server role on the SQL Server to use
this function.
1. Login to the Database Manager.
2. Double-click New Database.
3. Click Next.
4. Enter a name for the database.
It defaults to "Paceart_Database". The next database defaults to "Paceart_Database_#1". The number
will increase by one for each new database.
5. Enter the database location. We recommend that you accept the default value.
6. Click Next.
7. Specify the initial size of the database between 50 MB and 2,000 MB. If you exceed the initial size of the
database it will grow in increments of 50 MB .You can estimate the size of your database according to
the size of your patient population or you can select the initial size of your database.
• If you select the option to estimate the size based on your patient population, enter the number of
Pacemaker patients and the number of arrhythmia patients, and then click Next.
• If you select the option to select the size, slide the bar to the appropriate size.
8. Click Next.
9. Review your choices.
• Click Next if they are accurate.
• Click Back if you need to return to a previous screen to change a value.

Installation and Configuration | Paceart Installation and Configuration | 43
It may take several minutes for the wizard to create the database and initialize the database structure.
10. Click Finish.
Deleting a database
You can delete a Paceart database from within the Database Manager application. You cannot reverse this
action once the database is deleted.
This icon is used in this topic.
DescriptionIcon
Delete
1. Login to the Database Manager.
2. Select the database that you want to delete by double-clicking on the database icon.
3. Click the Delete icon.
A warning message is displayed.
4. Click Yes to permanently delete the database or No to cancel the delete operation.
SQL Server Integration Services (SSIS)
Database Manager contains a Run SSIS Package Wizard that lets you select and run the Microsoft SQL
Server Integration Services package.
Running SQL Server Integration Services (SSIS)
Select and run the Microsoft SSIS package from within Database Manager.
1. Open Database Manager.
2. Connect to SQL Server.
3. Double-click the Run SSIS icon to start the wizard.
The Run SQL Server Integration Services Wizard window is displayed.
4. Click Next to display the Specify the SSIS package window.
5. Search for and select the file that contains the SSIS package, and then click Next.
6. Select the way that you want to run the SSIS package, and then click Next.
7. If needed, update the connection managers, and then click Next.
8. If necessary, change any SSIS package variables in the list, and then click Next.
9. Click Next to execute the SSIS package.
10. When the execution of the package has finished, click Finish.
Paceart completes the process.
Publications
A publication is a set of data that is configured and created by a member of the System Administrators server
role on the SQL Server, and then is stored on an SQL Server that is set up to be a publisher. When you create
a publication you can configure it to publish all data or a limited amount of filtered data. Once published, this
data is available to other computers through subscriptions. Creating a publication is one of the steps in setting
up replication.You cannot create publications when you are using SQL Server Express Edition.
When you are creating a new publication there are a variety of options you can configure that define the
publication file and filter the data so that you can specify what information it will contain. Filtering data is useful
in reducing the amount of unnecessary information in your publication and reduces the amount of time needed
for synchronization since less data is sent across your network when the client and server synchronize.

44 | Installation and Configuration | Paceart Installation and Configuration
Patient status code and patient code filters
Use this option when you want to create a new publication with data filtered on both the patient status code
(Status field) and the patient code (Code field) within the Paceart System.You can enter a filter condition
for each of the 4 codes.You need to enter separate filter values for each code.
ECG Strip filter
Use this filter to specify whether or not you want to publish ECG strips.You can select All strips to publish
all of the ECG strip data, No strips to not publish ECG strip data, or Front page strips only to publish only
the 6-second strips.
If your client is on a slow network or does not have a large amount of free disk space, you may want to
consider not publishing the ECG strip data unless it is critical that the client see ECG strip data. Not publishing
ECG strip data will cut down on the amount of time needed to synchronize the data between the client and
server.
Large Data Field filters
Use this filter to exclude data items that can make up a significant size of the database.
Auditing filter
Use this filter to specify if you want to include the data stored in the audit log in the publication.
The audit log can become large, and may not need to be published. It can also contain personally identifiable
information in the database and should not be included if your subscribers are restricted in viewing information
in the database such as name, address, and phone number.
Even though you do not include auditing data in your publication, you can still capture your subscriber's audit
data if auditing is enabled on both the publication and subscription databases.Whether or not you choose
to publish your auditing information, audit data from your subscribers will be transferred back to the publisher
if auditing is enabled.
Name the Publication
Use this option to give the publication a unique descriptive name that makes it easy to understand what it
contains. By default, Paceart names the publications sequentially based on the number of publications
currently existing in the database.
Snapshot Location
Use this option to specify the location to store the initial snapshot of the published data. The snapshot data
is used when a new subscription is created in order to give the subscriber an initial set of data from the
publisher.This option is only shown the first time a publication is created on a given SQL Server. All subsequent
publications will use the location that you specify.
The Snapshot Location must be specified in UNC (universal naming convention) format. For example, use
\\ServerName\ReplData, where the D:\Program Files\Microsoft SQL Server\MSSQL\ReplData
directory on the ServerName computer is shared as 'ReplData'.
If your publication has a large amount of data and your subscribers will be connecting over a slow network
connection, you may choose to copy the contents of the snapshot folder to external media and send the
media to your subscribers. When your subscribers initialize their subscription to your publication, they have
the option of pulling the snapshot data over the direct connection on the network, or loading from a snapshot
folder location, for example a CD-ROM drive.

Installation and Configuration | Paceart Installation and Configuration | 45
Distributor Replication Agent Login
Use this option to select the login used for your distribution database to connect to your publication database
on your Publication/Distribution computer. If your operating system is Windows 7 then you must use Windows
authentication.
Select Impersonate the SQL Server Agent Account of the Publisher if you want to use the Windows
Authentication of the current login properties of the SQL Server Agent service on the Publisher server.
Select Use SQL Server Authentication if you want to use a specific SQL Server authenticated login on the
SQL Server containing the distribution database.You will have to specify the login name, password, and
confirm the password for the account you wish to use. This account must exist as a login on the
Publication/Distribution SQL Server.
After you create your publication you must give your subscribers a login and password to use when connecting
to the Publisher/Distributor database.When the subscription is created using the wizard this information must
be provided.You must make sure that this login has access to both the Distribution and Publication databases.
Setting up a new publication
You can use the new publication wizard to create a new Paceart publication. The publication allows other
computers to gain access to patient data stored in the current Paceart database.You can define the patients
that will be published, whether to publish ECG strips or CardioVoice data, and whether to publish auditing
data. Once you have defined your new publication you can give it a unique name and save it.
Login to Database Manager and open the database in which you want to create a new publication.
1. Double-click the Publications icon.
2. Double-click the New Publication icon to open the new publication Welcome window.
3. Click Next.
The Status and Patient Code Filters window is displayed.You can filter on patient status and patient
codes.
4. Enter a patient code or status code to identify the patients that can be published.The code must be in the
patient's record for the patient to be published.You can enter a filter condition for each of the 4 codes.
You need to enter separate filter values for each code.
5. Click Next.
The ECG Strip Filter is displayed.
6. Click the option that describes the ECG strips that you want to publish, and then click Next.
7. Remove the check mark from any of the large data fields that you do not want to publish. Limiting the
number of data fields in the publication may significantly reduce the size of the publication.
8. Click Next.
9. Place a check in the check box if you want to include auditing data, and then click Next.
10. Give a unique and descriptive name to your publication. When there are multiple publications on the same
server that have the same name it gives confusing results in the Synchronization History dialog.
For example, if you are creating a publication for patients with a status of "A" and the publication contains
no ECG strips, a descriptive name could be "Patients with Status=A, No ECGs".
Best practice is to use an underline to represent a space so that there are no spaces in the name. For
example, "Patients_with_Status=A,_No_ECGs".
11. Click Next.
The Create Publication window is displayed showing you the tasks that the wizard will perform to create
your publication.
12. Review the attributes that you selected for your publication.
• If any are incorrect or if you want to add an attribute, click Back to return to a previous window.
• If everything is correct, click Next.

46 | Installation and Configuration | Paceart Installation and Configuration
Paceart starts creating your publication.The amount of time it takes to create your publication is determined
by how large the data set is.
13. Click Finish to complete the wizard.
You will perform the next series of steps only if you have not defined a snapshot location.
14. Select the directory where the initial snapshot of the published data will be stored. The snapshot must be
stored in a Windows shared directory that will be visible from all subscribing computers.
This option is only shown the first time a publication is created on a given SQL Server. All subsequent
publications will use the location that you specify.
15. To share the directory, open Windows Explorer and navigate to the location of your snapshot.
16. Right-click the folder and select Sharing.
17. Click Share this folder.
After you have shared the folder, it will appear when you click the [...] button.
18. Click Next.
The Distributor Replication Agent Login window will display if your SQL Server has not yet been set
up to act as a distributor and publisher participating in replication.
19. Select the login used for your distribution database to connect to your publication database on your
Publication/Distribution computer.
If your operating system is Windows 7 then you must use Windows authentication.
20. Click Next.
21. Review your configuration selections.
22. Click Next.
Depending on the size of your Paceart database and the speed of your database server, publication
creation can take several minutes or hours. If you wish to manually copy the snapshot data to external
media to transfer to remote computers, click the shortcut.
23. Click Finish.
After you create your publication, you must give your subscribers a login and password to use when connecting
to the Publisher/Distributor database.You can do this by either giving your subscribers a specific SQL Server
login, or by changing the login properties of the SQL Server Agent to an account that has access to the
Publication and Distribution databases.When the subscription is created using the Paceart System New
Subscription Wizard this login information must be provided.
Maintaining existing publications
You can display synchronization and conflict information for an existing publication to see if you need to do
any maintenance to the publication.
Select the icon of an existing publication in the Paceart Database Manager to display the following publication
information.
DescriptionPublication Information
ECGs
Shows if the publication has been set to publish all ECG strips, no ECG
strips, or front-page ECG strips only.
Patient Codes
Status
CardioVoice
Shows the filters applied to the patient code field, or All if no filter is applied
to this publication.
Shows the filters applied to the status code field, or All if no filter is applied
to this publication.
Shows whether or not the publication has been configured to publish
CardioVoice recordings.

Installation and Configuration | Paceart Installation and Configuration | 47
DescriptionPublication Information
Attachments
Provider Signatures
Programmer Import Files
Shows whether or not the publication has been configured to publish
attachments.
Shows whether or not the publication has been configured to publish
provider signatures.
Shows whether or not the publication has been configured to publish
programmer import files.
Shows whether or not auditing data is included in the publication.Auditing Data
Subscriptions
You can access the options to create and manage subscriptions through the Subscriptions wizard. You can
specify a server that contains published data, specify which publication to exchange data with, and specify
how to obtain an initial snapshot of the data. This feature is only available when the user logged into the
Paceart Database Manager is a member of the System Administrators server role on the SQL Server.
Subscriptions are set up on database servers to receive replicated data that has been published on a remote
database server. Subscribers can make changes to the data that is propagated back to the publishers using
the replication that is offered in the Paceart Database Manager wizards.
Choose Publishing Server window
Options on this window allow you to specify the server that contains the publication that you wish to subscribe
to.You need to specify the connection properties to connect to the Publication server. This connection
information is not stored permanently in your subscription; it is only used to return a list of publications.
Choose Publication window
Options on this window allow you to select the publication from the Publishing database. The list shows all
of the available and valid publications to which the subscriber can subscribe.You can see all of the publication
attributes in the window on the right side.
Initialize Subscription window
Options on this window allow you to specify whether the subscription needs to be loaded with an initial
snapshot of the published data, and if so, how to initialize the publication data on the subscribing computer.
Before a new subscriber can receive incremental changes from a publisher, the subscriber's database must
contain tables with the same schema and data as the tables in the publication's database.The initial snapshot
contains the complete initial database, including tables and data.
When setting up a new subscription, it is possible to load the initial snapshot into the subscriber's database
manually instead of sending it over a network.This is done if the publication is very large or the network
bandwidth is very small.
Sometimes it is more efficient to copy the initial snapshot to a tape or other storage device, express courier
the external media to the subscriber, and reload the database instead of sending it over a slow network
connection.
These are your choices.
• Initialize the data directly from the publisher:The initial snapshot is sent over the established connection
directly from the snapshot folder on the publisher. This option should be selected if there is a fast network
connection between the subscriber and publisher, or there is only a small amount of patient data being
published.
• Initialize the data from a bulk copy of the initial snapshot: Select this option if the initial snapshot has
already been copied to the subscribing computer and is available locally on the computer. This option

48 | Installation and Configuration | Paceart Installation and Configuration
should be used if there is a slow network connection between the publisher and subscriber and there is
a large amount of patient data being published. In this case, the user will need to specify the location of
the snapshot folder by clicking the [...] button.
• Do not initialize the subscription, the subscriber already has the data: Select this option if the publishing
and subscribing databases are initially the same, or if the initial snapshot of the published data has already
been imported into the subscribing database by other means. This option is for advanced users only. If
the publishing and subscribing databases do not contain the same data or schema the first time
synchronization is run, the databases will not synchronize properly.
Subscriber Login window
Options on this window allow you to specify the permanent connection properties of the subscription to the
subscription database. This connection is used during synchronization. These are your choices.
• Impersonate the SQL Server Agent Account of the Subscriber: This option will use the Windows
Authentication of the current login properties of the SQL Server Agent service on the subscription server.
• Use SQL Server Authentication: Use this option to use a specific SQL server authenticated login on the
SQL server containing the subscription database.You will have to specify the login name, password, and
confirm the password for the account you wish to use.This account must exist as a login on the subscription
SQL server.
Publisher/Distributor Login window
Options on this window allow you to specify the permanent connection properties of the subscription to the
publication and distribution databases.This connection is used during synchronization. These are your
choices.
Impersonate the SQL Server Agent Account of the Publisher/Distributor:This option will use the Windows
Authentication of the current login properties of the SQL Server Agent service on the publication/distribution
server.
Use SQL Server Authentication: Use this option to use a specific SQL server authenticated login on the
SQL server containing the publication and distribution databases.You will have to specify the login name,
password, and confirm the password for the account you wish to use.This account must exist as a login on
the publication/distribution SQL server.
Creating and configuring a new subscription
A subscription lets a computer exchange data with a publication of a database on a remote computer.
You must have a publication configured before you can configure a subscription.You can only have one
subscription created on each database. If you already have a subscription created for the selected database
the New Subscription icon will be disabled.
Login to Database Manager and open the database in which you want to create a new subscription.
1. Double-click the New Subscription icon.
2. Click Next.
3. Select the publishing server that contains the publication. If necessary, click the [...] button for a list of
SQL Servers running on your network.
4. Select how you want to connect to your database.
• If you want to connect using Windows Authentication, select Windows Authentication. This option
is available for all supported operating systems.
• If you want to connect using SQL Server Authentication, select SQL Server Authentication.You must
also specify a Login Name and Password for a valid login on the publication SQL Server.
5. Click Next.
6. Select a publication from one of the databases on the selected server, and then click Next.

Installation and Configuration | Paceart Installation and Configuration | 49
7. Select one of the options on the Initialize Subscription window, and then click Next.
8. Select one of the options on the Subscriber Login window, and then click Next.
9. Select one of the options on the Publisher/Distributor Login window. The Paceart Database Manager
assumes that the publication database and distribution database are contained on the same physical SQL
server. If you have a Remote Distributor you must use Microsoft SQL Server Management Studio.
10. Click Next through to the end of the wizard.
11. Click Finish.
After initial synchronization, you must perform the following steps in order to create unique Paceart System
generated Patient IDs on a subscribing database.The ID will be whatever the prefix entered is, plus an
incremental number starting with 10000000. Failure to do these steps could result in conflicts in Patient
IDs.
a) Open SQL Server Management Studio.
b) Click New Query.
c) Select the subscribing Paceart database.
d) In the query window run the command Exec Paceart.UpdateSystemIDPrefix 'xxx' where
xxx is an up to 3 character prefix that is unique to the subscriber.
Maintain existing subscriptions
The Paceart Database Manager gives you the ability to maintain existing subscriptions. You can use the
Synchronize Subscription window options to synchronize your subscription with the publication. For more
information on synchronization, refer to the SQL Server Synchronization section in the Database Replication
chapter.
You can use the Publisher Login option to update your password for the connection to the
Publisher/Distributor.
From this window you can change the logins that the subscription uses to connect to the distribution and
publication databases.The Paceart Database Manager assumes that the publication database and distribution
database are contained on the same physical SQL Server. If you have a Remote Distributor you must use
Microsoft SQL Server Management Studio.
Select one of the following:
• Impersonate the SQL Server Agent Account of the Subscriber: Select this option to use the Windows
Authentication of the current login properties of the SQL Server Agent service.
• Use SQL Server Authentication: Select this option to use a specific SQL Server authenticated login on
the SQL Server containing the publication and distribution databases.You will have to specify the login
name, password, and confirm the password for the account you wish to use.This account must exist as
a login on the publication/distribution SQL server.
Maintaining existing subscriptions
You can use the Paceart Database Manager to maintain existing subscriptions by synchronizing your
subscription with the publication and updating your password for the connection to the Publisher/Distributor
if your publisher has changed their publisher/distributor password.
If the publisher has changed their publisher/distributor password, the password must be updated before the
synchronization by clicking Publisher Login and updating your password for the connection to the
Publisher/Distributor. You can then perform the synchronization.
1. Click the icon of an existing subscription.
The Synchronize Subscription window is displayed.
2. Synchronize your subscription.

50 | Installation and Configuration | Paceart Installation and Configuration
Bulk copy
The Bulk Copy Wizard gives you the ability to bulk copy data into and out of a Paceart database.You can
only use the import operation for databases not participating in replication either as a publisher or a subscriber.
The wizard exports or imports Microsoft SQL Server data to or from a data file using native format by using
the SQL Server utility called BCP. Since the exported data file is saved in native format it can only be read
by the Bulk Copy Wizard import function or by calling the BCP application directly.
When you bulk copy data out of the database, you can specify filters, including removing personally identifiable
information in the database from the exported data.
In Optima, Database Manager does not enforce single user mode when performing actions on the database.
Performing a bulk copy import
You can bulk copy data into an SQL Server database from a data file that was created using the import option.
You must be logged in as a member of the System Administrators server role on the SQL Server to use this
feature.
You cannot perform an import on a database that has current publications or subscriptions. If you have
publications or subscriptions already configured, cancel the wizard, delete the publications and subscriptions,
and re-run the wizard. After you import the data you will be able to re-establish replication.
Optima does not put the DB in single-user mode but it is recommended that all users be out of the system
when doing an import because it will delete all existing data for the tables being imported.
1. Open the database from which you want to bulk copy data.
2. Double-click Bulk Copy.
The Welcome window is displayed.
3. Click Next.
4. Select Import data to database to bulk copy data into the selected database.
5. Click Next.
6. Select the folder where the data to be imported resides.You can accept the default location or click Browse
to navigate to a folder location.
7. Click Next.
8. Review your settings, and then click Next.The import may take several minutes to complete depending
on the amount of data in your database.
9. Click Finish. The database now contains the data contained in the files that you imported.
10. When you have successfully completed the import or export operation in the Paceart System Bulk Copy
Wizard click Finish to close the wizard.
Performing a bulk copy export
You can bulk copy data out of your Paceart database into a data file. You must be logged in as a member of
the System Administrators server role on the SQL Server to use this feature.
Database Manager cannot put the database in single-user mode but it is recommended that all users log out
of the system.
1. Open the database from which you want to bulk copy data.
2. Double-click Bulk Copy.
The Welcome window is displayed.
3. Click Next.
4. Select Export data from database to bulk copy data out of the selected database.
5. Click Next to display the Patient Status Filter window.

Installation and Configuration | Paceart Installation and Configuration | 51
6. Select one or more of the patient statuses of patients that you want to include in your bulk copy. Leave
this field empty if you do not want to filter the bulk copy data on a patient's status.
7. Click Next to display the Patient Code Filter window.
8. Enter a value for one or more patient codes of patients that you want to include in your bulk copy. Leave
this field empty if you do not want to filter the bulk copy data on a patient's code.
9. Click Next to display the window where you can limit patient identifying data.
10. Select the check box if you want all of the personally identifiable information removed from the output
data.
11. Click Next to display the Data Location window.
12. Specify the folder to which you want the data in the bulk copy operation exported.
13. Click Next to display a list of tasks that the system will perform during the bulk copy export.
14. Click Next.
Database Manager begins the bulk copy export. It may take several minutes to complete the export.
15. When you have successfully completed the export operation in click Finish.
Rename database
You can change the name of your Paceart database using the Rename Database function.You must be a
member of the System Administrators server role on the SQL Server to use this function.
Renaming a database
You can rename a database by running the Rename Database wizard.
Make sure that all publications and subscriptions in the database have been deleted.
You must be the only user logged into the database before you can rename it. If other users are logged into
the database you will be prompted to run the Active Connections tool.
1. Open the database that you want to rename.
2. Double-click the Rename Database icon.
The Welcome screen is displayed.
3. Click Next.
4. Enter the new database name using no spaces.
5. Click Next.
6. Confirm that you want to rename the database by clicking Next.
The Paceart Database Manager will rename the current database and tell you that the process is complete.
7. Click Finish.
Delete strips
Permanently deleting ECG strips from your Paceart database will decrease your database size and free up
disk space.You can use the Delete Strips function of the Paceart Database Manager to perform this task.
You must be a member of the System Administrators server role on the SQL Server to use this function.
Deleting strips
You can delete ECG strips in your current database.The two filter options for selecting the strips are the strip
type and the date the strip was recorded.
You must be the only user logged into the database before you can begin deleting ECG strips. If other users
are logged into the database you will be prompted to run the Active Connections tool.
No applications on any other computer can use the Paceart database while Paceart is deleting strips.
In Optima, Database Manager does not enforce single user mode when performing actions on the database.

52 | Installation and Configuration | Paceart Installation and Configuration
1. In Database Manager, double-click the database from which you want to delete strips.
2. Double-click the Delete Strips icon.
3. Select the strip type on which you want to filter.
4. Enter a date into the date field.
Strips recorded before this date and that also meet the selected strip type criteria will be deleted.
5. Click Next.
The window lists the action that Database Manager is going to perform when you click next.
6. Click Next to delete the strips.
The utility calculates the number of strips that will be deleted, and then deletes the strips from the database.
The amount of time this takes is dependent on the size of your data set.
7. Click Finish to complete the wizard.
Delete patients
The criteria for deleting patients is based on the status code or the patient code.You must be a member of
the System Administrators server role on the SQL Server to use this function.
The Delete Patients wizard takes you through the steps to delete patients in your current database. Use this
wizard to specify the delete criteria; examine, print, and save a list of potential patients to delete; backup the
selected patients before the data is deleted; and delete all of the patients in the given list for the criteria that
is specified
Delete Criteria window
If you enter a status code, all patients in your Paceart Database with the status code you specify will be
deleted. If you make it a practice to give your patients status codes of "D" when they are deceased, or "L" if
they are lost to follow-up, it will be very easy to remove these groups of patients periodically from your
database.
If you enter an patient code, all patients in your Paceart Database with the patient code you specify will be
deleted.
Review Patients for Deletion window
This window displays the patients that match your search criteria and that Paceart will delete from the database.
You can save the data of the selected patients before deleting them from the database.The data is exported
in a format called BCP.
If you need to retrieve the deleted data you can recover it into a new database. Best practice is to back up
the data to a backup folder and also back up the selected folder as part of your system backup procedures.
Deleting patients
This function enables you to delete patients and their associated events from your Paceart database.
Decreasing the number of patients in your database can help you to meet licensing or database size
requirements.
You must be the only user logged into the database before you can rename it. If other users are logged into
the database you will be prompted to run the Active Connections tool.
In Optima, Database Manager does not enforce single user mode when performing actions on the database.
1. Open the database from which you want to delete patients.
2. Double-click Delete Patients, and then click Next.
3. Select the patient status and patient code filters for the patients you want to delete, and then click Next.
The search results display the patients to be deleted.
4. Review the list and decide what you want to do.

Installation and Configuration | Paceart Installation and Configuration | 53
• Click Back if you want to change the search criteria.
• Click Save to save the search results to a comma-separated value (CSV) file.The CSV file can be
opened in a spreadsheet application such as Microsoft Excel.
5. Click Next.
6. Enter the path to the backup folder. The BCP data will be overwritten with each backup.To prevent
overwriting the BCP data you can change your backup folder or move the BCP data out of the selected
backup folder before continuing.
As best practice we recommend that you back up the deleted patient data. If you do not wish to do this,
check the Do not backup data option.
7. Click Next.
8. Review your selections. Click Back if you want to change any selections.
9. Click Next.
10. Click Finish.
SQL Users
You can create new SQL database users and maintain existing SQL users in your current Paceart database
using this wizard.You will be able to select an existing login or create a new SQL server login, specify a user
role, and specify a user name.This functionality can be used to grant users access to the database but does
not give them access to use Paceart.You must be a member of the System Administrators server role on
the SQL Server to use this function.
Creating a new user
All Database Manager users have to be associated with a SQL Server login.When you create a new user
you can select an existing login or create a new login.
There are two types of authentication that you can select from when creating a new user, Windows and SQL
Server.
With Windows authentication the SQL Server login information is taken from the user's Windows domain user
ID and password and validated with Windows authentication. This is sometimes referred to as Windows
Integrated Security.
With SQL Server authentication the SQL Server login information is taken from the account you create directly
in the database. The login is validated by SQL Server and does not use Windows Authentication.This is
sometimes referred to as Standard Security.
1. Open the database in which you want to create a new user.
2. Double-click Users.
3. Double-click New User.
4. Click Next.
5. To associate the new user with a new login, select <New>.
6. Click Next.
7. Select either Windows or SQL Server as the type of authentication you want to use to login to the SQL
Server.
8. Click Next. Depending on the authentication you chose you will see one of these windows.
If you selected Windows follow these steps.
a) Enter a few characters and click Search
to search for the Windows login to associate with your new user.
b) If the login is not listed you can type the name in the Add Name text box.
If you add your own, use either of the following formats:

54 | Installation and Configuration | Paceart Installation and Configuration
• Domain\UserName
• Domain\GroupName
You will not be able to add a Windows authenticated login if the given login is already a member of a
Windows group and the group has already been assigned a login on the SQL Server.
c) Click Next.
If you selected SQL Server follow these steps to create a new SQL Server login to associate with the new
user.
a) Enter a login name.
b) Enter a password.
c) Renter the password to confirm your first entry was correct.
d) Click Next.
9. Assign one or more roles to your new user. The roles that display in the Roles window are the roles
created in your Paceart database.
10. Click Next.
11. Type the new user's name in the text box.
12. Click Next.
The Create User window is displayed.This lists the tasks the wizard will perform to create the new user.
13. Review the user creation tasks, and then click Next.
14. Click Finish.
Maintaining existing users
In addition to creating new users, you can use the Paceart Database Manager to change existing users
passwords and assign or un-assign user roles.You can only change the user's password from this window
if the user is assigned SQL Server authentication. If the user is using Windows Authentication, you must use
one of the tools in Windows to change their Windows domain account information.
1. Double-click the Users icon in the Paceart Database Manager.
You will see icons for each user created on your Paceart database along with the type of login authentication
assigned to each user (NT or SQL).
2. Double-click a user's icon.
The Maintain user Paceart dialog box is displayed.
3. Perform the desired maintenance.
• Change the user's password if the user is assigned SQL Server authentication.
• Assign or un-assign roles for the user.
4. Click OK.
Enable or disable auditing
The Paceart Database Manager auditing feature gives you the ability to audit your database. This will start
logging changes to your Paceart database so that you can run audit reports.Turning on auditing will generate
a lot of data and needs to be monitored and archived periodically to avoid running out of space.This feature
is only available when the user logged into the Paceart Database Manager is a member of the System
Administrators server role on the SQL Server.
One way to quickly determine the state of auditing on your Paceart database is to select your database icon,
and then look at the database properties displayed at the bottom of the window. The Auditing Enabled field
will either display True (auditing is enabled) or False (auditing is not enabled).
Depending on the current state of auditing on your Paceart database, you will either be given the option of
enabling auditing or disabling auditing.

Installation and Configuration | Paceart Installation and Configuration | 55
Enabling and disabling auditing
You can enable or disable database auditing for a Paceart database.
1. Open the database in which you want to enable or disable auditing.
2. Double-click Disable Auditing or Enable Auditing.
The Database Manager will display a message asking you to confirm your selection.
3. Click Yes if you want to perform the action.
Audit Data Archiving
You can use this tool to archive auditing data.You can select the date up to which you want the data archived
and specify the folder to which the data will be archived. During the archiving process Paceart will archive
the auditing data to the location you specified, and then it will delete the auditing data that you archived.
Set Multi-User
You can set the database mode to multi-user by clicking the Set Multi-User icon within the selected database
in Database Manager.This feature is intended to change the database to multi-user mode only. It is available
only when the database uses Single-user or Restricted-user mode.
In Optima, Database Manager does not enforce single user mode when performing actions on the database.
Tools
The Paceart Database Manager supplies you with a variety of tools that you can access from the Tools menu.
• Network configuration: use to configure SQL Server components.
• Change password: use to change the user's password.
• Active connection: manages the active connections to the databases.
Network configuration
The SQL Server Configuration Manager provides basic configuration management for SQL Server services,
server protocols, client protocols and client aliases.
You can perform the following operations using this utility.
Client
• Create network protocol connections to servers.
• Change the default network protocol.
• Display information about the network libraries installed on the client.
• Show and configure DB-Library information.
Server
• Enable and disable network protocols for a SQL Server instance.
• Force protocol encryption.
• Display information about the network libraries installed on the server.

56 | Installation and Configuration | Paceart Installation and Configuration
Using the network configuration tool
The network configuration tool is a Microsoft product. Refer to the Microsoft SQL Server Configuration Manager
online help for information on using this application.
1. To access online help, click Network configuration in the Tools menu to start the Microsoft SQL Server
Configuration Manager.
2. Click the Help button to display the Microsoft SQL Server Configuration Manager online help.
Change password
SQL Server system administrators can change their password or the passwords of other logins by using the
Change Password feature.
This utility will change the following passwords:
• The password of the login specified in the Login Name field.
• The replication agent connection passwords if the login name is used for any of these connections.
Specifically, this means the following password changes occur depending on the type of computer you
are running the Change Password tool on.
Publisher/Distributor: Changes the replication agent connection to the publisher from the distributor.
Subscriber: Changes the replication agent connection to the subscription database and publisher/distributor
database.
If the password for the replication agent connection is modified on the publisher/distributor computer, all
subscriptions to publications on this computer will need to have their publisher/distributor passwords changed.
Changing the login password
You can change the password of the user logged in if you have administrative privileges.
You must be logged in as a member of the System Administrators server role on the SQL Server to use this
feature.
1. Click Tools > Change Password from within the Paceart Database Manager.
2. Enter the name of the login whose password you wish to change in the Login Name field.
3. Enter the new password in the Password text box.
4. Confirm the password by typing it again in the Confirm Password text box.
5. Click OK to set the password.
Active connection
The Active Connection Management tool allows system administrators using the Paceart Database Manager
to see all active connections to either the Microsoft SQL Server or the Paceart Database.
Using the Active Connection Management tool
You can use this tool to view and kill active connections to the server and the Paceart database.The
connections you see depend on where you are in the Database Manager.
• To see all of the connections to the SQL Server select Tools > Active Connections when you are in the
window with the New Database icon.
• To see all of the connections to a Paceart database, open a database in the Paceart System Database
Manager, and then select Tools > Active Connections.

Installation and Configuration | Paceart Installation and Configuration | 57
Server Active Connections Management Window
This topic contains the definitions for the column headings or buttons that are on the Active Connections
to Server window.
The Active Connections window has these columns. If you are unable to see all of the columns displayed
in the window use the scroll-bar at the bottom of the window.
Displayed dataColumn name
System process identifierSPID
Login name associated with the SPIDLogin
Database used by the SPIDDatabase
Computer name of the client connection used by the SPIDComputer
Name of the application or the program that has invoked the SPIDProgram
Current status of the SPIDStatus
Last command run by the SPIDCommand
Cumulative time that the computer has spent processing the SPIDCPU Time
Number of reads and writes the SPID has made to the hard diskDisk I/O
Timestamp of the last activity of the SPIDLast Batch
The Active Connections window has these buttons.
ActionButton name
Re-queries the SQL Server for the active connectionsRefresh
Kill process
Terminates the user process on the highlighted SPID in the table
This feature is only available when the user logged into the Paceart Database
Manager is a member of the System Administrators server role on the SQL
Server.
Use caution when performing a Kill process.You cannot kill system processes,
and you cannot kill your own process.You should not kill critical processes such
as these:
• Awaiting Command
• Checkpoint Sleep
• Lazy Writer
• Lock Monitor
• Select
• Signal Handler
Closes the Active Connections windowClose
Database Active Connections Management
You can manage the active connections to the currently opened database using this tool.
There are many functions that the Paceart System Database Manager performs where it needs to be the
only connection to the Paceart database.
• Rename Database

58 | Installation and Configuration | Paceart Installation and Configuration
• Delete Strips
• Delete Patients
• BCP - Bulk Copy Import and Export
When you encounter one of these situations you are given the ability to see all of the active connections to
the database and if necessary, the ability to kill the connections.
Command Line Interface
The command line interface feature lets you set connection information or start Database Manager at specific
screens.
You can use this feature to create shortcuts that perform very specific tasks. For example, you could set up
a command line to start the program, connect to a particular database as a given user, and click on your
subscription.
Command Line Switches
Refer to this topic for some command line switches that are available to you in the Database Manager.
The following table lists the command line switches available to you when starting the Paceart Database
Manager. Characters between the brackets ([ ])are optional.
-E
-C[ommand]1
Server Name-S[erver]
User ID-U[serID]
Password-P[assword]
Database-D[atabase]
specified database
NotesDescriptionSwitches
The switch must be followed by the
name of the server.Will use the
local server if not specified.
This switch without a parameter is
used to connect to SQL Server with
Windows Authentication.
Used to connect to SQL Server with
SQL Server Authentication.
Used to connect to SQL Server with
SQL Server Authentication.
This is not recommended because
it stores the password in plain text.
It also can be possible for other
users to see command line
switches in a process viewer.
-D must also be specified.Selects a command to run for the
If required by specified -C1.Select sub-command to run-C[ommand]2
-M[ultiple]
The command switches, C1 and C2, allow you to start the program at a particular point in the Paceart Database
Manager by scripting the navigation of the icons.The following table shows the commands you can give for
C1 and C2.
Allow multiple instances of Paceart
Database Manager to run

Installation and Configuration | Paceart Installation and Configuration | 59
-C[ommand]2-C[ommand]1
Publications
Subscriptions
Bulk Copy
Delete Strips
Rename Database
Delete Patients
Users
Enable Auditing
The commands are the names of the icon labels in the Paceart Database Manager.
Open the New Publication wizard in database
Paceart_Database on the local server
New Publication
Any publication name you have set up on the
database
New Subscription
Any subscription name you have set up on the
database
New User
Any user name you have set up on the database
ExampleAction
DatabaseManager.exe -D Paceart_Database -C1
Publications -C2 New Publication…
Open the Run SSIS window on database
Paceart_Database on server CORPDB. Connect
using user id jdoe and password mysqlpassword
Manager while one instance is currently running
DatabaseManager.exe -S CORPDB -D
Paceart_Database -U jdoe -P mysqlpassword -C1
Run SSIS
DatabaseManager.exe -MOpen a second instance of the Paceart Database
Running the Paceart Database Manager from Command Line
The command line interface feature lets you set connection information or start Database Manager at specific
screens.This task shows you the basic steps that you can use to create shortcuts for specific Database
Manager tasks.
1. Click Start > Run.
2. In the Run window do one of the following.
• Enter "C:\Program Files\Medtronic\Paceart Database Manager\DatabaseManager.exe" <your switches
here>, replacing "<your switches here>" with the switches needed to perform your operation. Make
sure that your switches are entered outside the path and filename quotation marks.
• Click Browse to navigate to your PaceDBM.exe location if you installed the Database Manager in a
location other than the default location.
3. Click OK to run the Database Manager.

60 | Installation and Configuration | Paceart Installation and Configuration
Database Replication
Your Paceart System has the ability to utilize a feature of Microsoft SQL Server called Database Replication.
Replication is a set of technologies for copying and distributing data and database objects from one database
to another and then synchronizing between databases for consistency.
Using replication, you can distribute data to remote or mobile users over a local area network, dial-up
connection, or the Internet. Replication also allows you to enhance application performance, physically
separate data based on how it is used, or distribute database processing across multiple servers.
Express versions of SQL, such as SQL Server 2005 Express and SQL Server 2008 Express, can only perform
replication with like versions.This means that a subscriber using SQL Server 2005 Express is limited to
subscribing to a publication hosted on a system using the full version of SQL Server 2005, and a subscriber
using SQL Server 2008 Express is limited to subscribing to a publication hosted on a system using the full
version of SQL Server 2008.
When to use replication
Replication can be used in a variety of situations. Scenarios where replication may be used with your Paceart
System include the following:
• Sites with notebook computers that are periodically logged off the network and run remotely.
• A multiple-site user with a slow connection between sites.
• A site where the user would like to use replication as a means of backup to an alternate computer.
• A site with an unreliable network where the user would like workstations to be able to run locally on demand.
Replication topologies
There are three possible topologies that can be set up and maintained by the Paceart Database Manager:
Central Publisher, Publishing Subscriber, and Central Subscriber. Paceart technical support staff should be
consulted in selecting the topology that will best suit the needs of your site.
Other more complex topologies exist but they must be set up using Microsoft SQL Server Management Studio.
You can use Microsoft SQL Server Management Studio Express or Microsoft SQL Server Management Studio
which is only available to clients who purchase full licenses of SQL Server. If you decide that a more complex
topology is required at your site, consult the Paceart technical staff to determine if the manual setup of the
replication topology could be integrated with the built-in utilities for replication found in the Paceart Database
Manager.
Central subscriber
The Central Subscriber replication topology is used by customers who want to maintain multiple Paceart
System databases.
An example of this is monitoring services that wish to keep client databases separate. In this scenario, each
individual client site would publish its data. At the site that will serve as the central repository for all of the
data, a separate database will be created for each client, and then subscriptions will be created in each
database to the corresponding client publication. By making the central computer the Subscriber, it gives that
computer more control over when synchronization will take place with the various client sites
Publishing subscriber
The Publishing Subscriber replication topology is used by customers with multiple sites that are connected
by a slow (or expensive) network link.
In this scenario, one computer is designated as the main Publisher and Distributor, Publisher A. At the remote
site, a second computer, Publisher B, is configured to subscribe to Publisher A. Publisher B is configured to
publish its data that it receives from Publisher A, and will act as a Publishing Subscriber. All computers at

Installation and Configuration | Paceart Installation and Configuration | 61
the remote location can now subscribe to the local copy of the publication stored on Publisher B.This Publishing
Subscriber acts as a gateway to Publisher A, and eliminates the need for individual connections from each
Subscriber.
Central publisher
The Central Publisher replication topology is the most common. In this scenario, one computer is designated
as the Publisher, and one or more computers are acting as Subscribers.
The Subscribers can either be computers on a local area network, or computers at a remote site.This scenario
would be used at sites that have notebook computers that must be disconnected from the network to work
remotely, or sites that have multiple locations connected by a slow (or expensive) network link.
Replication security
Using a login other than "sa" requires the use of Microsoft SQL Server Management Studio.
SQL Server Agent service
The SQL Server Agent is a Windows service that executes jobs for your SQL Server, including replication
jobs. This service is only available on full versions of SQL; it is not available on express versions of SQL. If
you will be performing replication, it is important that you specify an account that the service should use to
log in to your system, and not rely on the Local System account.
1. From your desktop, click Start > Settings > Control Panel.
2. Double-click Administrative Tools.
3. Double-click Services.
4. Double-click SQL Server Agent.
5. Click the Log On tab.
6. Select the This account option.
7. Enter the user name in This account.
8. Enter a password, and then re-enter the same password in the Confirm Password box.
9. Click OK.
Publisher/distributor security
The Paceart Database Manager configures your Publisher/Distributor security the first time you create a
publication on your SQL Server if the SQL Server has not already had its replication enabled through programs
outside of the Paceart System.
The Paceart System New Publication Wizard sets up the Distributor Replication Agent Login. This is the
connection that the distribution database uses to connect to the publication database.You can choose to
use the Windows authenticated login of your SQL Server Agent service running on your Publisher, or specify
an SQL Server login and password.
Subscriber security
Subscriptions under Microsoft SQL Server replication require three logins when performing a synchronization.
Each login is to a different database.
• The first login is to the Subscription database.
• The second login is to the Distribution database.
• The third login is to the Publication database.
Since the Paceart System assumes local distributors (i.e., the Distribution and Publication databases reside
on the same physical SQL Server), the login information for the Distribution and Publication databases is
identical.

62 | Installation and Configuration | Paceart Installation and Configuration
When you run the New Subscription Wizard in Database Manager you are asked to specify the login
information for the Subscription Database on the Subscriber Login screen.You are also asked to specify
the login information for the Distribution and Publication databases on the Publisher/Distributor Login
screen.
For these logins, you can choose either Windows Authentication by impersonating the SQL Server Agent
account, or SQL Server Authentication by specifying a login that resides on the SQL Server.
If you choose to impersonate the SQL Server Agent account, you will be using the login information specified
in the SQL Server Agent service on the Subscription computer when connecting the Subscription database,
or the Publication/Distribution computer when connecting to the Publication and Distribution databases.
Setting up replication
There are various tasks you need to perform to set up replication for use with your Paceart System. Medtronic
Paceart requires that all Paceart System deployments using replication must have a full version of SQL Server
on the publishing computer. SQL Server Express cannot be used as publishers in a replicated environment.
Setting up replication for use with your Paceart System involves performing the following tasks:
• Establishing a connection
• Configuring publishing and distribution
• Creating publications
• Creating subscriptions
• Applying the initial snapshot of data to the Subscriber
If you wish to perform advanced replication setups, you can make use of SQL Server tools (Management
Studio for SQL Server 2005 and 2008).
Establishing the connection
The first step in setting up replication is to make sure that you have a connection between your publishing
and subscribing computers.You can verify that you have established this connection when you can see the
other computer on your network.
The connection can be in the form of a permanent network connection such as an established LAN or WAN.
If your Paceart System configuration does not have a permanent LAN or WAN, replication can still be achieved
by using Windows Dial-Up Networking.This type of connection should be used as a last resort if other
permanent, faster connections do not exist in your Paceart System environment.
You must make sure both computers have the appropriate network protocols installed in their Windows
Networking Components. Also, you must make sure that the instances of SQL Server that are running on
both computers can communicate with each other. Although most SQL Servers will be able to connect to
each other using the default settings, special installations that use uncommon network protocols or ports may
need to be configured using the Client Network Configuration or Server Network Configuration tools in
the Paceart Database Manager.
Setting up a Windows Network is beyond the scope of this guide. Please consult your Microsoft Windows
Networking documentation or consultant if you have questions on creating and configuring a Windows Network.
Replication using the Paceart Database Manager
The replication wizards in the Paceart Database Manager make it easy to set up replication. If you set up
replication using the wizards in the Paceart Database Manager your replication will be set up as merge
replication with a local distributor and pull subscriptions.
The Paceart Database Manager creates replication with the following features:
• Merge Replication - Used when subscribers are disconnected for periods of time from the publishing
database. Data is updated at the subscriber and conflicts are handled at the row level.

Installation and Configuration | Paceart Installation and Configuration | 63
• Local Distributor - The distributor and publisher are located on the same physical server. In the Paceart
Database Manager, when you create a publication on a computer, that computer also becomes a distributor.
The opposite of a local distributor is a remote distributor.
• Pull Subscriptions - The subscriptions are created on the subscriber computer. The subscriber chooses
when the data will be synchronized, either by scheduling synchronization or performing it on demand.The
opposite of pull subscriptions are push subscriptions.
• Snapshots Stored In Native SQL Server Format - All publications created in the Paceart Database
Manager have snapshots stored in native SQL Server format. This requires that all subscribers must be
servers running SQL Server.
• Anonymous Subscriptions - Detailed information about the subscriptions and subscribers are not stored
on the publisher/distributor. In the Paceart Database Manager, all subscriptions are set to anonymous.
• Synchronization Enabled with Windows Synchronization Manager - All subscriptions created in the
Paceart Database Manager will automatically be set up in Windows Synchronization Manager.
• Subscription Security - All subscriptions created in the Paceart Database Manager are set to login to
the publisher/distributor using SQL Server Security and either the specified SQL Server authenticated
login, or by impersonating the SQL Server Agent service on the publisher/distributor.
Configuring publishing, distribution, and publications with Paceart Database Manager
In the Paceart Database Manager, publishing and distribution is configured at the same time you create your
first publication.The New Publication Wizard will set up a local distributor in addition to creating a publication.
To configure publishing and distribution, and to create a publication on your Paceart System Database, click
the New Publications icon in the Paceart Database Manager while connected to your publishing database.
This starts the New Publication Wizard.
Creating subscriptions and applying the initial snapshot with Paceart Database Manager
In the Paceart Database Manager, you can create subscriptions to publications on your subscriber database.
When creating the subscription, you will also have the opportunity to apply the initial snapshot.
To do this, double-click the New Subscription icon in the Paceart Database Manager while connected to
your subscriber database to start. This starts the New Subscription Wizard.
Replication using SQL Server Management Studio
As an advanced alternative to using the Paceart Database Manager, you can use Microsoft SQL Server
Management Studio to set up your replication.
To set up your initial publications and subscriptions, we recommend that you use the Publication and
Subscription wizards in the Database Manager.These wizards perform actions that the replication wizards
in SQL Server Management Studio do not provide, including setting the table relationships on the subscriber
as NOT FOR REPLICATION and do not publish DRI (Declarative Referential Integrity).
Paceart wizards also preserve the security permissions on the subscriber database when it is initialized with
the schema from the publisher. Once the initial publications and subscriptions have been set up, changes to
the default settings can be made with SQL Server Management Studio.
Management Studio gives you advanced functionality when designing your replication topology. Here are a
few of the available advanced features.
• You can choose different replication methods including merge, transactional, and snapshot replication.
• You can set up a remote distributor where the distributor and publisher are two different computers.
• You can set up your subscriptions to be either push subscriptions or pull subscriptions.
Even the most advanced SQL Server users will find it convenient to use the Paceart Database Manager for
performing specific Paceart functions such as creating a Paceart System database, publication, or subscription.
After these are created using the Paceart Database Manager, advanced users can switch to the Microsoft
SQL Server Management Studio for advanced management of their Paceart databases.

64 | Installation and Configuration | Paceart Installation and Configuration
For more detailed information on using replication in Microsoft SQL Server SQL Management Studio, consult
your SQL Server Books Online.This online help ships with your SQL Server.
SQL server synchronization
Synchronization is the act of moving data from the publisher to the subscriber, and from the subscriber to the
publisher, after the initial snapshot has been applied.
Once you have replication set up on your Paceart database you have to perform synchronization.
Under Merge replication, which is the default replication method in the Paceart Database Manager,
synchronization means that data updates made on multiple subscriber computers are merged, any conflicts
are detected and resolved, and data converges to the same values in both the publisher and subscriber
databases.
Using Pull subscriptions, the default subscription method in the Paceart Database Manager, synchronization
can either be scheduled to occur at certain times or on-demand.
The following sections discuss the three different tools that can be used for synchronization:
• Paceart Database Manager
• Microsoft SQL Server Management Studio
• Windows Synchronization Manager
Certain tools have more advanced features than others. Some of the tools will only work in certain
environments, so check to see that the tool you choose will work in your specific Paceart environment.
Synchronization using the Paceart Database Manager
You can use the Paceart Database Manager to perform on-demand synchronization. At the same time you
can also update your subscription with a new password.
1. Double-click the Subscriptions icon.
2. Double-click the individual subscription icon that you want to synchronize.
3. To initiate synchronization, click Synchronize.
4. You can update your subscription with a new password by clicking Publisher Login.
Paceart displays the Change Publisher/Distributor Login dialog box.
5. Enter the new password in the Password and the Confirm Password fields, and then click OK.
Synchronization with SQL Server Management Studio
You can use SQL Server Management Studio to synchronize your subscriptions. For more detailed information
on using synchronization in Microsoft SQL Server Management Studio, consult your SQL Server Books
Online. This online help ships with your SQL Server.
1. In SQL Server Management studio, connect to the subscriber and expand the server node.
2. Expand the Replication folder.
3. Expand the local Subscriptions folder.
4. Right-click the subscription you want to synchronize.
5. Select View Synchronization Status.
6. In the View Synchronization Status dialog box click Start.
7. When complete, click Close to the synchronization completed message.
Synchronization with Windows Synchronization Manager
The majority of Paceart installations use Windows Synchronization Manager to manage their database
synchronization. Once your subscriptions appear in Windows Synchronization Manager, you can synchronize

Installation and Configuration | Paceart Installation and Configuration | 65
your subscriptions manually via on-demand synchronization, automatically at login or logoff from the network,
or automatically via scheduled synchronization.
If Windows Synchronization Manager cannot be found, search your Windows directory to find and run the
mobsync.exe program. If Windows Synchronization Manager does not appear in your start menu and you
do not have the Mobsync utility, upgrade your version of Internet Explorer to version 5.0 or greater.
Windows Synchronization Manager is installed with Microsoft Windows XP and anywhere Microsoft Internet
Explorer 5.0 or higher is installed.
1. Open Windows Synchronization Manager. One way you can do this is by finding and double-clicking
mobsync.exe.
2. Select the check boxes next to the items that you want to synchronize.
3. Click Synchronize.
Getting subscriptions to appear in Windows Synchronization Manager
Subscriptions created using SQL Server Management Studio do not automatically appear in Windows
Synchronization Manager.You can make them appear by following this process. Subscriptions created using
the Database Manager will automatically appear in Windows Synchronization Manager.
This process is based on SQL Server Management Studio 2008.Your steps may vary slightly.
1. Open SQL Server Management Studio.
2. Navigate to your subscription by selecting Replication > Local Subscriptions.
3. Right-click the subscription that you want to appear in Windows Synchronization Manager and select
Properties.
4. In the Synchronization section click the Use Windows Synchronization Manager option.
This option determines whether this subscription can be synchronized using Windows Synchronization
Manager.
5. Set the option toEnable.
6. Click OK.
Performing on-demand synchronization
On-demand synchronization is a one-time synchronization with the master publication database that is initiated
by the user.
1. Open Windows Synchronization Manager. One way you can do this is by finding and double-clicking
mobsync.exe.
2. Select the check boxes next to the items that you want to synchronize.
3. Click Synchronize.
Configuring synchronization on log on/log off
You can configure your subscriptions to automatically synchronize when you log on to your network, log off
the network, or both.
1. Open the Windows Synchronization Manager.
2. Click Setup.
3. Select the network connection to which this automatic synchronization on log on and/or log off should
apply from the list. For example, if you want to set up automatic synchronization when you connect to your
local area network, select LAN Connection.
4. Select the check boxes next to the subscriptions you want to set up for automatic synchronization on log
on and/or log off.

66 | Installation and Configuration | Paceart Installation and Configuration
5. Select the appropriate check boxes to set up automatic synchronization when you log on to your computer,
log off of your computer, or both. You can also select the option to have the Synchronization Manager
ask you before performing synchronization.
6. Click OK.
7. Click Close.
Configuring scheduled synchronization
Windows Synchronization Manager has an easy-to-use Scheduled Synchronization Wizard that allows
you to set up your synchronization on a schedule.This option is often used if you have replication set up on
your network and you wish to synchronize your databases unattended at a specific time, for example, every
evening at 11 PM.
1. Open Windows Synchronization Manager.
2. Click Setup.
3. Select the Scheduled tab.
4. Click Add.This will start the Scheduled Synchronization Wizard.
5. Click Next.
6. On this page, you must select three items:
• The network connection that the synchronization will use to transfer the data between the publisher
and subscriber.
• The items to synchronize. Select the subscription or subscriptions from the list that you wish to include
in your scheduled synchronization.
• Choose whether or not you want to automatically connect your computer to the network connection if
it is not connected when the synchronization is scheduled to start.
7. Click Next.
8. Select the start time, frequency, and start date of your scheduled synchronization.
9. Click Next.
10. Give your scheduled synchronization a descriptive name and click the Next button.
11. Click Finish.
Your scheduled synchronization will appear in the Current Synchronization Tasks window.
Current Synchronization Tasks window
You can add or delete a scheduled synchronization, or edit scheduled synchronization options, from the
Current Synchronization Tasks window.
Perform the desired task by clicking the appropriate button.
What the button doesButton
Add a scheduled synchronization.Add
Delete the selected scheduled synchronization.Remove
Edit
The first time you run a scheduled synchronization, you may see a dialog box allowing you to choose whether
you want the scheduled synchronization to run unattended from then on. If you want it to run unattended,
select the Do not show me this again check box.
Edit the options for the selected scheduled
synchronization. This also gives you access to the
advanced scheduled synchronization options not
available in the Scheduled Synchronization Wizard.

Installation and Configuration | Paceart Installation and Configuration | 67
From the next window, you can specify the subscriber login, the publisher login, and the distributor login. This
information usually will be pre-filled with information that was specified when you created the subscription.
Make any necessary changes to this information and click OK.
Synchronization management and replication conflicts
Once you have set up replication and synchronization, you will want to periodically administer the
synchronization, verify that your synchronization is succeeding, and resolve any synchronization conflicts.
To open the Publication Information window, double-click a publication in Database Manager to display the
Publication Information window containing the selected publication's synchronization history.
The topmost node in the tree is the publication name.
The child nodes to the publication represent each subscription to the publication.The subscription names
are based on the subscribing server name in the format \\ServerName\DatabaseName.
The child nodes of each subscription represent each time the subscription was synchronized with the publisher.
These names are based on the date and time the synchronization began and the outcome of the
synchronization.
The child nodes of the synchronization represent the individual steps that occurred in the synchronization
process.There names are based on the time they occurred and a text description of the action that occurred.
Click the Refresh History button to update the synchronization history and display it in the Synchronization
History window.
Click the Resolve button to display the Microsoft Replication 'Conflict Viewer. This viewer helps you view
and resolve conflicts that may have occurred during replication synchronization.
Microsoft Replication Conflict Viewer
This viewer helps you view and resolve conflicts that may have occurred during replication synchronization.
Conflicts occur when the same data is modified at two separate servers, for example, at a publisher and
subscriber, or at two different subscribers.
Click the Resolve button on the Publication Information window to open the Microsoft Replication Conflict
Viewer.
The following types of conflicts can occur:
• Update and insert conflicts: This conflict happens when the same data is changed at two locations. One
change wins, the other one loses. For these conflicts, you have the option to keep the existing data (the
data that won) or overwrite the existing data with the data that conflicted with it (the losing data). If you
keep the existing data, it remains in the replica that won and the Microsoft Replication Conflict Viewer
adds it to the replica whose update or insert operation initially lost. If you overwrite the existing data with
the conflicting data, the replicas are changed to include the data that was originally lost.
• Delete conflicts: This conflict occurs when the same row is deleted at one location and changed at the
other.
Conflicts are automatically resolved using the conflict resolver selected when the publication or subscription
article was created. As conflicts are resolved during synchronization, the data from the losing row is written
to a conflict table in the database.The Replication Conflict Viewer allows you to review these conflict records
and, potentially, modify your data.
By default, when the Microsoft Replication Conflict viewer opens, it will be synchronized to the Publisher
server, the publication database, and the publication currently being viewed. If there are any data conflicts,
each table with conflicts will be listed, along with a count of the conflicts that occurred.To view these conflicts,
click View.This will open up a window showing more information about the conflict.
When you resolve a conflict using Replication Conflict Viewer, you can choose to accept the original
resolution or submit an update to the data based on the winning or losing row. In each instance, the logged

68 | Installation and Configuration | Paceart Installation and Configuration
conflict row is deleted from the conflict table.Thereafter, you should periodically review conflicts to help reduce
the size of the conflict tracking tables.
Replication Conflict Viewer options
The following options are available in the Replication Conflict Viewer dialog box for merge publications.
What the option doesOption
Reason for conflict
Show only columns with conflicts
Show all columns
Show
Show or edit for resolution
Keep winning change
Resolve with this data
Postpone resolution
View the reason for the conflict, including where data
modifications occurred.
Select to display only those columns where data
modifications conflict.
Select to show all columns regardless of whether
there is a conflict.
Select Conflict Winner or Conflict Loser to view the
data modifications made by the winner or loser that
caused the conflict.
Select Conflict winner or Conflict Loser to view or edit
the data modifications made by the winner or loser
that caused the conflict.
Select to keep the winning change.The losing change
will be disregarded and the winning change will be
propagated to the other servers in the replication
topology.
Select to resolve the conflict with the data listed.This
data will be accepted and propagated to the other
servers in the replication topology.
Postpones any resolution to the conflict and closes
the Replication Conflict Viewer for this table.
Logs the details of the conflict in system tables.Log the details of the conflict for later reference


Manufacturer
*M959684A001*
Medtronic, Inc.
710 Medtronic Parkway
Minneapolis, MN 55432
USA
www.medtronic.com
+1 763 514 4000
Authorized Representative in the European
Community
Medtronic B. V.
Earl Bakkenstraat 10
6422 PJ Heerlen
The Netherlands
+31 45 566 8000
Europe/Africa/Middle East
Medtronic International Trading Sàrl
Route du Molliau 31
Case Postale 84
CH-1131 Tolochenaz
Switzerland
+41 21 802 7000
Australia
Medtronic Australasia Pty. Ltd.
97 Waterloo Road
North Ryde, NSW 2113
Australia
Canada
Medtronic of Canada Ltd.
99 Hereford Street
Brampton, Ontario L6Y 0R3
+905 460 3800
Technical Manuals
www.medtronic.com/manuals
©
Medtronic, Inc. 2015
M959684A001 Rev A
2015-01-09
 Loading...