


PACEART OPTIMA
Version 1.4
™
SYSTEM
Paceart Optima System Software User Manual
Caution: Federal Law (USA) restricts this device to sale by or on
the order of a physician (or properly licensed practitioner).


Contents
Trademarks........................................................................................................................................11
Chapter 1: Introduction to the Paceart Optima™System..............13
Paceart Optima System | Contents | 3
Explanation of symbols...........................................................................................................13
Indications...............................................................................................................................14
Precautions.............................................................................................................................14
Contraindications....................................................................................................................15
Paceart authorized users........................................................................................................15
Technical Support...................................................................................................................15
Paceart manuals supplied with your system............................................................................15
Accessing the online Help.......................................................................................................16
Navigating through Paceart without a mouse..........................................................................16
Chapter 2: Paceart Optima System Administration.......................17
Using the Activity Log..............................................................................................................19
Activity Log Services....................................................................................................19
Searching for information in the Activity Log.................................................................30
Deleting Activity Log Entries.........................................................................................32
Editing Activity Log Retention.......................................................................................32
Using the Audit Log.................................................................................................................33
Searching for information in the Audit Log....................................................................33
Batch Deleting Patients...........................................................................................................34
Configuring Billing Payment Methods.....................................................................................35
Adding or editing a payment method............................................................................35
Deleting a payment method.........................................................................................36
Configuring CardioVoice Settings...........................................................................................37
Editing CardioVoice Settings........................................................................................38
Configuring Connectivity.........................................................................................................40
Editing Verify Patient Match Configuration Settings......................................................41
Editing Demographics Only Match Configuration Settings...........................................42
Activating CareLink Scheduling Integration..................................................................43
Deleting Appointment Requests...................................................................................44
Activating CareLink Remote Encounter Acquisition.....................................................44
Deleting Encounter Import Requests............................................................................45
Editing HL7 Encounter Export......................................................................................45
Deleting XML Export Requests....................................................................................47
Configuring Demographics.....................................................................................................48
Setting the default country for a location of care...........................................................49
Adding or editing a Location of Care............................................................................50

4 | Paceart Optima System | Contents
Viewing a list of patients related to a Location of Care.................................................52
Adding or Editing a Patient ID Type..............................................................................53
Deleting a Patient ID Type............................................................................................54
Editing a Patient Code Type.........................................................................................54
Deleting a Patient Code Type.......................................................................................55
Encounter Export XML............................................................................................................55
Editing XML Encounter Export.....................................................................................56
Configuring the Paceart Home Tab.........................................................................................57
Editing Visible Tasks.....................................................................................................58
Adding or Editing Links on the Home Tab.....................................................................59
Deleting Links from the Home Tab................................................................................60
Changing the Order of Links on the Home Tab.............................................................60
Paceart License Keys..............................................................................................................61
Applying a license key..................................................................................................62
Configuring Server and Client Logging...................................................................................62
Editing Server and Client Logging................................................................................65
Configuring the Messaging Service........................................................................................66
Editing fax settings.......................................................................................................66
Editing email settings...................................................................................................67
Editing pager settings...................................................................................................68
Clearing pending messages.........................................................................................69
Configuring Report Groups.....................................................................................................69
Adding or Editing a report group...................................................................................70
Deleting a report group.................................................................................................72
Configuring the Schedule........................................................................................................72
Schedule configuration for a location of care................................................................73
Configuring resources for a location of care.................................................................78
Configuring the closed hours for a location of care.......................................................80
Configuring Security Options..................................................................................................83
Users and User Roles..................................................................................................84
External System Accounts...........................................................................................96
Security Policies.........................................................................................................101
Configuring Task Management.............................................................................................102
Configuring Workgroups.............................................................................................103
Configuring Encounter Tasks.....................................................................................105
Configuring System Tasks..........................................................................................107
Configuring User Preferences...............................................................................................109
Report Options tab.....................................................................................................110
Opening Paceart tab..................................................................................................112
ECG Recording Tab...................................................................................................113
Configuring Waveform Settings.............................................................................................114
Editing waveform settings...........................................................................................115
Chapter 3: Searching in Paceart....................................................117

Paceart Optima System | Contents | 5
Sorting search results by columns........................................................................................117
Patients search tab................................................................................................................117
Searching for a patient...............................................................................................118
Devices search tab................................................................................................................119
Searching for a device................................................................................................120
Encounters search tab..........................................................................................................121
Searching for an encounter........................................................................................122
Downloading remote encounters................................................................................123
Appointments search tab......................................................................................................124
Searching for an appointment....................................................................................125
Downloading a remote appointment status update....................................................126
Advanced search..................................................................................................................127
Paceart pre-defined advanced search queries...........................................................128
User-created advanced search queries.....................................................................128
Creating an advanced search query...........................................................................130
Performing an advanced search.................................................................................132
Editing a saved advanced search query.....................................................................132
Copying an advanced search query...........................................................................132
Deleting an advanced search query...........................................................................133
Pre-defined searches.................................................................................................133
Using operators and conditions in advanced searches..............................................139
Exporting search results to a spreadsheet............................................................................141
Using an exported spreadsheet to create letters and mailings..............................................141
Chapter 4: Paceart Encyclopedias.................................................143
Searching for information in the encyclopedia.......................................................................144
Deleting an entry from an encyclopedia................................................................................144
Exporting search results to a spreadsheet............................................................................144
Using Device Encyclopedia...................................................................................................145
Searching for information in the encyclopedia............................................................146
Adding or editing a device in the encyclopedia...........................................................146
Device Alerts and Watches........................................................................................164
Aliases.......................................................................................................................169
Device Capabilities.....................................................................................................170
Changing references of a device to a different device................................................172
Using the Diagnosis Encyclopedia........................................................................................173
Adding or editing a diagnosis in the encyclopedia......................................................174
Changing references of a patient's diagnosis to a different diagnosis........................176
Using the Medications Encyclopedia....................................................................................177
Adding or editing a medication in the encyclopedia...................................................178
Changing references of a medication to a different medication..................................179
Using the Insurance Encyclopedia........................................................................................180
Adding or editing insurance companies in the encyclopedia......................................181
Changing references of an insurance company to a different insurance company.....183

6 | Paceart Optima System | Contents
Using the Providers Encyclopedia.........................................................................................184
Adding or editing a provider in the encyclopedia........................................................185
Changing references of a provider to a different provider...........................................188
Using the Charge Codes Encyclopedia.................................................................................189
Adding or editing a charge code in the encyclopedia.................................................190
Changing references of a charge code to a different charge code.............................192
Using the Procedures Encyclopedia.....................................................................................193
Adding or editing a procedure code in the encyclopedia............................................194
Changing references of a procedure to a different procedure....................................195
Using the Pager Services Encyclopedia...............................................................................196
Adding or editing a pager service in the encyclopedia...............................................196
Changing references of a pager service to a different pager service..........................198
Chapter 5: Paceart Patient Records...............................................201
Opening a patient record.......................................................................................................201
Closing a patient record........................................................................................................201
Switching between patient records.......................................................................................201
Adding a patient to the Paceart database.............................................................................203
Adding a new patient to the Paceart database...........................................................203
Deleting a patient record.......................................................................................................206
Patient Record......................................................................................................................206
Patient Information tab...............................................................................................207
Device Details tab......................................................................................................225
Encounters tab...........................................................................................................230
Working with reports.............................................................................................................321
Adding a subtitle to a report........................................................................................321
Previewing a report.....................................................................................................322
Printing a report..........................................................................................................322
Printing a report for a specific patient.........................................................................322
Printing a report for multiple patients..........................................................................323
Report Graphing in Paceart Optima......................................................................................323
Chapter 6: Reports list....................................................................325
Appointment Search Results report......................................................................................327
Billing report..........................................................................................................................327
Brady Programming History report........................................................................................328
Comprehensive Encounter Summary report.........................................................................329
Device Search Results report................................................................................................333
Doctor Letter.........................................................................................................................334
Doctor Letter (Brady).............................................................................................................335
Doctor Letter (Tachy).............................................................................................................336
Encounter Arrhythmia (150 x 20 mm) report ........................................................................337
Encounter Arrhythmia (150 x 40 mm) report ........................................................................340

Paceart Optima System | Contents | 7
Encounter Arrhythmia (175 x 10 mm) report.........................................................................345
Encounter Arrhythmia Event Recorder report........................................................................347
Encounter Arrhythmia Implantable Monitor report.................................................................351
Encounter Brady (2 Strips) report..........................................................................................352
Encounter Brady (3 Strips) report..........................................................................................355
Encounter Brady (Biventricular) report..................................................................................357
Encounter Brady (No strips) report........................................................................................360
Encounter ECG 12 Lead (3 x 4) report .................................................................................361
Encounter ECG 12 Lead (6 x 2) report .................................................................................362
Encounter ECG 6 Lead report...............................................................................................363
Encounter Episode Details report.........................................................................................364
Encounter Episode List.........................................................................................................366
Encounter Miscellaneous Chart report..................................................................................367
Encounter Miscellaneous Letter to Patient............................................................................368
Encounter Miscellaneous Letter to Provider..........................................................................370
Encounter Phone Note report...............................................................................................371
Encounter Search Results report..........................................................................................372
Encounter Tachy (Biventricular) report..................................................................................374
Encounter Tachy (Detailed) report ........................................................................................376
Encounter Tachy (Simplified, 2 strips) report.........................................................................379
Encounter Tachy (Simplified, no strips) report ......................................................................382
Encounter TTM (2 Strips) report............................................................................................384
Encounter TTM (3 Strips) report............................................................................................387
Missed Appointment Letter...................................................................................................390
Missed Appointment List report............................................................................................391
Missed Appointment Postcard..............................................................................................392
Patient Activity report............................................................................................................393
Patient Device History report.................................................................................................394
Patient Labels.......................................................................................................................395
Patient Listing (Device Information) report............................................................................396
Patient Listing (Landscape) report........................................................................................397
Patient Listing (Last and Next Encounter Dates) report.........................................................399
Patient Listing (Last Encounter Date) report .........................................................................399
Patient Listing (Portrait) report ..............................................................................................400
Patient Medication Summary report......................................................................................401
Patient Schedule Letter.........................................................................................................402
Patient Search Results report................................................................................................403
Patient Summary report........................................................................................................404
Patient Summary (Encounter) report ....................................................................................405
Patients Tested report...........................................................................................................407
Provider Labels.....................................................................................................................408
Reminder Letter....................................................................................................................408
Reminder Postcard...............................................................................................................409
Remote Monitoring Prescription Letter..................................................................................410
Schedule (Device Information) report....................................................................................413

8 | Paceart Optima System | Contents
Schedule report ....................................................................................................................413
Chapter 7: Tasks tab........................................................................415
Searching for tasks...............................................................................................................416
Searching for tasks.....................................................................................................416
Working with tasks................................................................................................................419
Workgroups................................................................................................................419
User tasks..................................................................................................................419
Encounter tasks.........................................................................................................422
System tasks..............................................................................................................424
Routing a task............................................................................................................425
Accepting a task.........................................................................................................425
Deleting a task............................................................................................................426
Adding task comments...............................................................................................426
Chapter 8: Home tab........................................................................427
Displaying today's appointments for a resource....................................................................427
Opening an appointment or patient record from a selected appointment..............................427
Opening a task......................................................................................................................428
Adding a user task................................................................................................................428
Field and button definitions for the Adding or Editing a Task dialog box.....................428
Selecting an assignee................................................................................................429
Chapter 9: Scheduling.....................................................................431
Patient scheduling preferences.............................................................................................432
Setting a patient's scheduling preferences.................................................................432
Field definitions for Edit Preferences dialog box.........................................................432
Scheduling appointments.....................................................................................................433
Adding an appointment from a patient's record..........................................................433
Adding or editing an appointment from the schedule tab...........................................433
Adding an appointment from an encounter................................................................435
Editing an appointment..............................................................................................435
Searching for an appointment....................................................................................436
Canceling an appointment.........................................................................................439
Reinstating a canceled appointment..........................................................................440
Deleting an appointment............................................................................................440
Associating an encounter with an appointment..........................................................440
Disassociating an encounter with an appointment.....................................................441
Remote Appointment Status.................................................................................................441
Downloading a remote appointment status update....................................................441
Chapter 10: CardioVoice TTM Assistant........................................443

Paceart Optima System | Contents | 9
CardioVoice Configuration....................................................................................................443
CardioVoice Application........................................................................................................444
Opening CardioVoice.................................................................................................444
CardioVoice Configuration Options............................................................................444
Configuring CardioVoice Options in Paceart.........................................................................452
Editing CardioVoice Settings......................................................................................452
Provider CardioVoice IDs...........................................................................................453
Patient CardioVoice IDs..............................................................................................454
Chapter 11: Paceart Web Access...................................................457
Paceart Web Access security................................................................................................458
Installing the custom error handling file......................................................................458
Monitoring services and limiting access to patient data.............................................458
Account administration..........................................................................................................459
Adding or editing a Paceart user account...................................................................459
Linking Users to Providers..........................................................................................460
Setting a user password.............................................................................................461
Logging in to Paceart Web Access........................................................................................461
Searching patient encounters...............................................................................................461
Chapter 12: Paceart Optima System Security and Privacy.........463
Paceart Optima Security Configuration Overview.................................................................463
Password Complexity Enforcement............................................................................464
Integration with Microsoft Active Directory Services...................................................464
External system accounts and roles...........................................................................467
Data Filtering in Paceart Optima.................................................................................467
SSL Certificates.........................................................................................................467
Database security for Application Server services.....................................................468
ClickOnce digital signing certificate............................................................................468
Local security policies................................................................................................468
Audit control...............................................................................................................469
HL7 Integration.....................................................................................................................469
BCP data export....................................................................................................................469
Data authentication...............................................................................................................470
HIPAA Overview....................................................................................................................470
Product use and technical features............................................................................470
Potential security exposures.......................................................................................471
Paceart Optima System security features...................................................................471
Important notes..........................................................................................................474

10 | Paceart Optima System | Contents

Trademarks
The following list includes trademarks or registered trademarks of Medtronic in the United States and possibly
in other countries. All other trademarks are the property of their respective owners.
Mainspring, Medtronic, Medtronic CareLink, Paceart Optima, Paceart

Chapter
1
Introduction to the Paceart Optima™System
The Paceart Optima System is a clinic management tool that organizes patient, device, and programmer
information and provides access to trend analysis, aiding a physician or clinician in their daily workflow and
management of patient and cardiac data. The Paceart System supports cardiac rhythm devices from most
manufacturers.
The Paceart System:
• Stores programmed device parameters
• Summarizes patient data into concise reports
• Keeps a history of patient encounters
• Offers TTM technologies, such as CardioVoice, designed to work with event recorders
• Creates correspondence documents
• Schedules patient follow-up appointments
• Assists with records processing
• Assists in charge and billing management
• Offers integration with your hospital's or clinic's HL7-compatible system
• Provides task management to streamline your clinic's workflow
• Provides automatic import of data from pacemakers, programmers, and other storage media
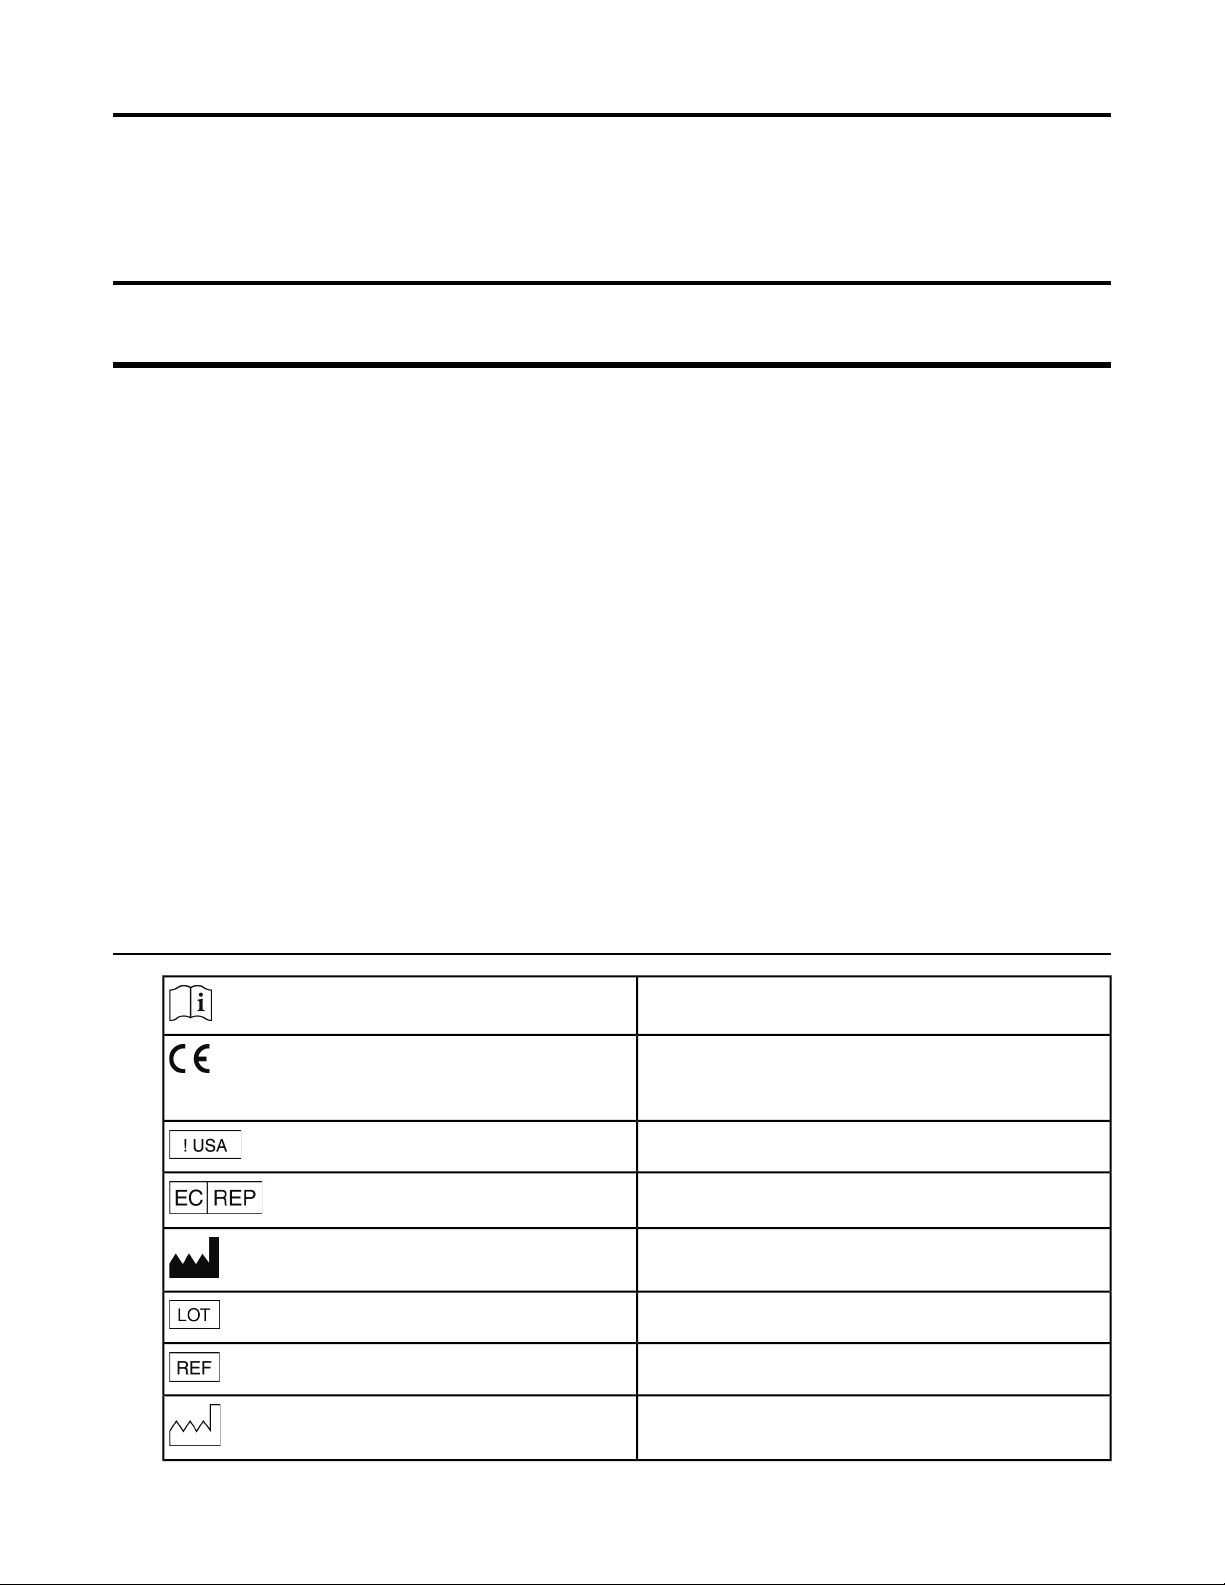
Explanation of symbols
Consult instructions for use
Conformité Européenne (European Conformity). This
symbol means that the device fully complies with
European Directive MDD 93/42/EEC.
For US audiences only
Authorized Representative in the European Community
Manufacturer
Lot number
Re-order number
Date of Manufacture
14 | Paceart Optima System | Introduction to the Paceart Optima™System
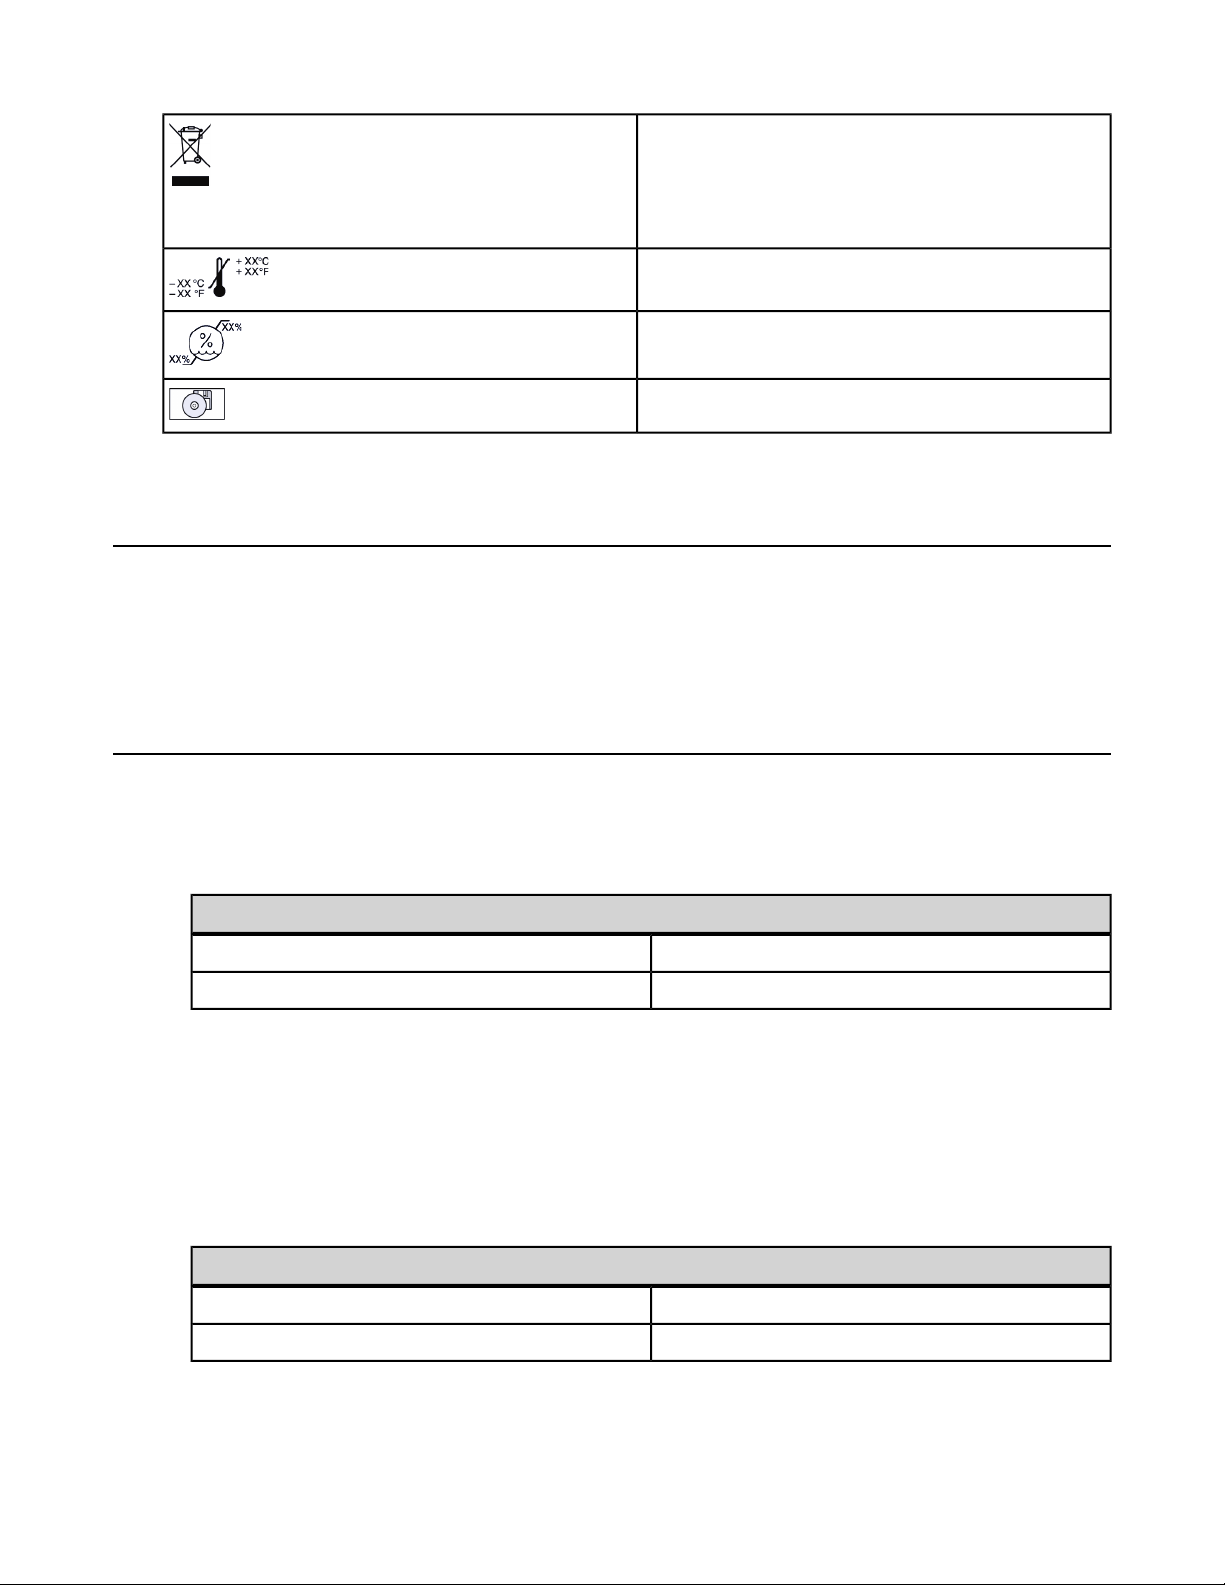
Do not dispose of this product in the unsorted
municipal waste stream. Dispose of this product
according to local regulations. See
http://recycling.medtronic.com for instructions on
proper disposal of this product.
Temperature Limitation
Humidity Limitation
Software
Indications
The Paceart System is intended for use as a 12-lead electrocardiograph, pacemaker artifact analyzer, and
transtelephonic ECG receiving station. It also acts as a database for cardiac patients with or without pacemakers
or implantable cardioverter defibrillators.
Precautions
Storage and installation
• Ensure there is no condensed moisture on the Paceart software USBs.
• Paceart software USBs must be stored within the following conditions:
Storage Environment
-20°C (-4°F) to +45°C (113°F)Temperature
20% to 90%Relative Humidity
System operation
Before system operation:
• Ensure that the system is not being used with other instruments that may result in misdiagnosis or other
problems.
• Ensure there is no condensed moisture on the Paceart software USBs.
• Paceart software USBs must be operating in an environment within the following conditions:
Operating Environment
0°C (32°F) to +35°C (95°F)Temperature
20% to 90%Relative Humidity

Paceart Optima System | Introduction to the Paceart Optima™System | 15
Additional precautions
• Do not modify the original system in any way. This includes adding any software product.
• Ensure that all patient records are updated and permanently stored before turning the PC power off.
• Double-check the data before typing the data into the system.
Transmission and transmitter settings
When recording ECGs:
• The transmitter transmission speed must match the transmit speed setting in Paceart.
• The transmitter transmit format must match the transmit format setting in Paceart.
• Discrepancies between the transmission speed or the transmission format will result in incorrect
measurements that may lead to incorrect ECG interpretations.
• The Date Given field must have a date that is the same or prior to the date the transmission is recorded.
• A patient may only have one active transmitter.
• The Paceart operator is responsible for setting the speed and format settings.
Contraindications
No known contraindications.
Paceart authorized users
Medtronic representatives provide the Paceart Optima System orientation and training materials at the time of
the installation. All users should be familiar with Paceart documents, including the online Help, before using
the Paceart Optima System. The designated system administrator should also read the Paceart System
documentation for information on using the Paceart Optima System software user interface for function and
control.
An authorized person, preferably a physician, must verify the implantable device and electrode specifications
entered into the database or modified in the database. An authorized person, preferably a physician, must
verify the test results that are automatically entered into the database by the instrument. The data obtained
from this device must be interpreted in conjunction with other clinical data and the results of other independent
tests.
Technical Support
For technical support contact your local Medtronic office. In the US and Canada, call 1-800-PACEART.
Paceart manuals supplied with your system
Electronic versions of Paceart Optima System manuals are supplied on the documentation USB supplied with
your software.
There are two manuals installed for use with the Paceart Optima System software, the Paceart Optima System
Software Installation and Configuration Instructions and the Paceart Optima System Software User Manual.

16 | Paceart Optima System | Introduction to the Paceart Optima™System
The Paceart Optima System Software Installation and Configuration Instructions provide you with the information
you need to install and configure your Paceart Optima System software. This includes optional configurations
and optional software components. The Paceart Optima System Software User Manual provides you with
information on how to use your Paceart Optima System software.
For informationon the installation, configuration, and use of the Paceart ECG Module refer to the documentation
supplied with the Paceart ECG Module.
All patient and clinical data displayed in Paceart Optima System software documentation are fictitious and for
demonstration purposes only.
Accessing the online Help
The online Help provides additional information about the features and functionality of the Paceart Optima
System.
There are three ways to access online Help.
• Clicking Help > Help from the menu bar opens the appropriate help topic for where you are in the application.
• Clicking the Help button in a dialog box opens the appropriate help topic for the dialog box.
• In any add or edit dialog box, clicking the "?" and selecting an active field opens the field level Help for that
field.
If your version of Paceart has been customized, you can view your customer build number by clicking Help >
About.
Navigating through Paceart without a mouse
On some windows in Paceart you can navigate by using the keyboard instead a mouse. These keyboard
commands are composed of the ALT key followed by one or more keyboard symbols.
1. From within a Paceart window, press the ALT key.
If the window supports ALT key functionality the File menu item is selected and buttons, tabs, or file menu
items are underlined.
2. Press the letter on the keyboard that corresponds to the action you want to take.
3. You can press the TAB key, SHIFT+TAB, and the ARROW keys to access additional options in a list.
4. Press ENTER to select the option.

Chapter
2
Paceart Optima System Administration
The Administration section of the Paceart Optima System allows you, or your system administrator, the ability
to configure system settings that are used throughout the application. To view and edit settings in Administration
you must have Clinic Administration user permissions.
To access the Administration section click Administration from the menu bar. The Administration section
of the application is divided up into subsections by system feature.
Activity Log
You can search and view the Activity Log, which provides a record of requests, the status of work items, when
the requests were completed, and by whom they were completed.
Audit
You can search and view the audit log, which provides a record of changes, the date the change was made,
and by whom. The system automatically updates the log as users change the system. You can also export the
results from Audit Log searches.
Batch Delete
You can delete multiple unused patients from the Paceart database using the Batch Delete function. Unused
patients are patients who do not have devices, encounters, or appointments associated with them.
Billing
Paceart assists clinics in charging and billing management by providing clinicians with the ability to document,
print, and export billing information related to patient encounters. You can add and edit billing payment types
that can be recorded in patient encounters.
CardioVoice
The CardioVoice System enables patients and providers to communicate information about cardiac events
through an automated voice response system. You can configure CardioVoice to automatically fax, page, or
email a physician when a patient calls into the CardioVoice system.
Connectivity
You can configure how Paceart interacts with information from external systems.
Demographics
You can add new or edit existing locations of care, patient ID types, and patient code types using the options
on the Demographics window. These changes automatically show up in the selection lists when you add
demographic information to a patient record.

18 | Paceart Optima System | Paceart Optima System Administration
Encounter Export XML
You can configure how to export XML encounters in Paceart XML format from your Paceart system.
Home
You can customize what users see on the Home tab when using your Paceart system.
License Key
You can apply a license key in Paceart to enable new components that you have purchased.
Logging
Paceart Optima System logs client and server activity in separate log files. You can configure where the log
files are stored and how the files are formatted.
Messaging Service
You can use the messaging service to send faxes, emails, and pages from the Application Server. The messaging
service can send reports via fax and email in addition to working with the CardioVoice System.
Report Groups
This feature allows you define report groups that contain two or more standard reports or letters that can be
printed from a specified type of encounter.
Schedule
You can configure how Paceart handles scheduling for each location of care. You can set default preferences
for automatic scheduling, define the working hours, and define resources for a location of care.
Security
You can add, edit, and delete information associated with Paceart System users, External System users,
Paceart System roles, External System roles, and system-level security policies.
Task Management
You can set up workgroups to assist in clinic task management flow. A workgroup is a collection of one or more
authorized users and can be assigned one or more workflow tasks or user tasks. A workgroup does not
necessarily correspond to an authorized system role. Task management is an optional feature.
User Preferences
You can define user preferences, such as default report formats and ECG settings, for your user account. User
preferences will be applied anywhere you log in.
Waveform
You can edit ECG data settings. The ECG recorder in Paceart gives you the ability to obtain, measure, modify,
and view ECG data.

Paceart Optima System | Paceart Optima System Administration | 19
Using the Activity Log
The Activity Log provides a searchable record of requests, the status of work items, when the requests were
completed, and by whom they were completed.
Paceart automatically records all activity relating to connectivity events in the Activity Log. The values are
stored in the database and you can view or update items in the Activity Log. The system automatically updates
the Activity Log as users update work items. The default retention for the Activity Log is 30 days. The size of
the log must be monitored since it can become large. Activity Log items that have a status of "Pending" are
still retained even after the maximum length of retention has been exceeded.
Using the Search Criteria section you can filter the search results.
You can export your Activity Log search results to a spreadsheet by clicking Export.
Activity Log Services
You can search the Activity Log by the service that initiated the Activity Log requests. Each service uses different
types of requests.
Authentication
The Authentication service logs communication attempts from external systems. Paceart checks the credentials
from the external system and logs the result in the Activity Log.

20 | Paceart Optima System | Paceart Optima System Administration
Patient Management
The Patient Management service logs all patient information changes from the HL7 protocol. Any additions,
deletions, and updates to patient records from HL7-based systems are logged under this service in the Activity
Log.
Encounter Management
The Encounter Management service logs activity for encounters imported from Remote Data Interface (RDI)
and Local Data Interface (LDI). Data transmitted from local and remote sources for adding and processing
encounters is logged under this service in the Activity Log, including SessionSync and LATITUDE. If a system
accesses the Paceart Domain Interface (PDI) without a valid Patient ID type, Paceart creates a work item in
the Activity Log.
Appointment Management
The Appointment Management service logs all appointment information changes in Paceart. Any additions,
deletions, and updates to appointments are logged under this service in the Activity Log. HL7 appointments
are logged under this service in the Activity Log.
Outbound Appointment
The Outbound Appointment service logs how appointments are handled between Paceart and CareLink. The
results of queuing, updating, and synchronizing appointments are logged under this service in the Activity Log.
Outbound XML Export
The Outbound XML Export service logs all XML export messages from Paceart to an external file system or
the HL7 protocol in the Activity Log.
Outbound Encounter
The Outbound Encounter service logs encounter activity any time a CareLink download is initiated automatically
or by a clinician. The results of Paceart pulling encounter information from CareLink are logged under this
service in the Activity Log.
Activity Log Results
This is a list of Activity Log request results and their definitions. The list also shows if a work item is created for
each result and what action is needed to resolve work items.
Authentication service
Work Item
Action
NoneNoThe user could not be authenticated.Authentication
Check
Credentials
Failure
Result definitionResultRequest
Work
Item?
Check
Credentials
Credentials
Credentials
Authorization
Failure
NoneNoThe user is not authorized to complete the
request.
NoneNoThe credentials were successfully checked.Valid CredentialsCheck
NoneNoThe credentials were invalid.Invalid CredentialsCheck

Patient Management service
Paceart Optima System | Paceart Optima System Administration | 21
Add Patient
Add Patient
Add Patient
Add Patient
Update Patient
Update Patient
Failure
Authorization
Failure
Paceart System
Failure
Patient Matching
Error
Failure
Authorization
Failure
Result definitionResultRequest
request.
request.
matching criteria.
request.
Work
Item?
YesThe request had invalid data.Invalid DataAdd Patient
YesThe request did not meet the patient
Work Item
Action
NoneNoThe user could not be authenticated.Authentication
NoneNoThe user is not authorized to complete the
Edit and
resubmit
request
NoneNoPaceart failed and could not complete the
NoneNoThe patient was successfully added.Patient AddedAdd Patient
Edit and
resubmit
request
NoneNoThe user could not be authenticated.Authentication
NoneNoThe user is not authorized to complete the
Update Patient
Update Patient
Delete Patient
Delete Patient
Delete Patient
Paceart System
Failure
Patient Matching
Error
Failure
Authorization
Failure
Paceart System
Failure
request.
matching criteria.
request.
request.
YesThe request had invalid data.Invalid DataUpdate Patient
YesThe request did not meet the patient
YesThe request had invalid data.Invalid DataDelete Patient
YesThe patient was not found in the database.Patient Not FoundDelete Patient
Edit and
resubmit
request
NoneNoPaceart failed and could not complete the
NoneNoThe patient was successfully updated.Patient UpdatedUpdate Patient
Edit and
resubmit
request
NoneNoThe user could not be authenticated.Authentication
NoneNoThe user is not authorized to complete the
Edit and
resubmit
request
Edit and
resubmit
request
NoneNoPaceart failed and could not complete the
NoneNoThe patient was successfully deleted.Patient DeletedDelete Patient

22 | Paceart Optima System | Paceart Optima System Administration
Delete Patient
Delete Patient
Add/Update
Patient
Add/Update
Patient
Patient
Add/Update
Patient
Patient
Patient
Patient Matching
Error
Allowed
Failure
Authorization
Failure
Paceart System
Failure
Result definitionResultRequest
matching criteria.
request.
request.
Work
Item?
YesThe request did not meet the patient
YesDeleting the patient was not allowed.Delete Patient Not
YesThe request had invalid data.Invalid DataAdd/Update
Work Item
Action
Edit and
resubmit
request
Edit and
resubmit
request
NoneNoThe user could not be authenticated.Authentication
NoneNoThe user is not authorized to complete the
Edit and
resubmit
request
NoneNoPaceart failed and could not complete the
NoneNoThe patient was successfully added.Patient AddedAdd/Update
NoneNoThe patient was successfully updated.Patient UpdatedAdd/Update
Add/Update
Patient
Change Patient
ID
Change Patient
ID
ID
Change Patient
ID
Change Patient
ID
Change Patient
ID
Encounter Management service
Patient Matching
Error
Failure
Authorization
Failure
Paceart System
Failure
Changed
Patient Matching
Error
matching criteria.
request.
request.
matching criteria.
Result definitionResultRequest
YesThe request did not meet the patient
YesThe request had invalid data.Invalid DataChange Patient
YesThe request did not meet the patient
Work
Item?
Edit and
resubmit
request
NoneNoThe user could not be authenticated.Authentication
NoneNoThe user is not authorized to complete the
Edit and
resubmit
request
NoneNoPaceart failed and could not complete the
NoneNoThe Patient ID was successfully changed.Patient ID
Edit and
resubmit
request
Work Item
Action
Add
Encounter
NoneNoThe user could not be authenticated.Authentication
Failure

Paceart Optima System | Paceart Optima System Administration | 23
Add
Encounter
Add
Encounter
Encounter
Encounter
Processing
Processing
Processing
Encounter
Processing
Authorization
Failure
Queued For
Processing
Encounter
Processing Error
Use
Result definitionResultRequest
request.
processing.
encounter.
Work
Item?
YesThere was an error processing the
YesThe patient record was already in use.Patient Record In
Work Item
Action
NoneNoThe user is not authorized to complete the
NoneNoThe encounter was successfully queued for
NoneNoThe request was invalid.Invalid RequestAdd
Edit and
resubmit request
NoneNoThe encounter was successfully added.Encounter AddedEncounter
NoneNoThe request was invalid.Invalid RequestEncounter
Add the
encounter to the
existing patient
device and
resubmit the
encounter
request.
Encounter
Processing
Encounter
Processing
Encounter
Processing
Appointment Management service
Multiple Matching
Patient Devices
Patient Device Not
Found
License Restriction
Error
devices for the patient.
encounter.
complete the request.
YesThe encounter had multiple matching
YesThe patient's device was not found in the
Add the
encounter to the
existing patient
device. Allow
updates to the
serial number or
model aliasing to
avoid future
work items.
Add the
encounter to the
existing patient
device. Allow
updates to the
serial number or
model aliasing to
avoid future
work items.
NoneNoThe license did not allow the user to
Appointment
Result definitionResultRequest
Work
Item?
Work Item
Action
NoneNoThe appointment was successfully added.Appointment AddedAdd

24 | Paceart Optima System | Paceart Optima System Administration
Add
Appointment
Add
Appointment
Add
Appointment
Appointment
Appointment
Add
Appointment
Add
Appointment
Failure
Authorization
Failure
Add Appointment
Not Allowed
Patient Matching
Error
Appointment
Matching Error
Result definitionResultRequest
request.
appointment.
matching criteria.
matching criteria.
Work
Item?
YesThe user is not allowed to add the
YesThe request had invalid data.Invalid DataAdd
YesThe request did not meet the patient
YesThe request did not meet the appointment
Work Item
Action
NoneNoThe user could not be authenticated.Authentication
NoneNoThe user is not authorized to complete the
Edit and
resubmit
request
Edit and
resubmit
request
NoneNoThe request was invalid.Invalid RequestAdd
Edit and
resubmit
request
Edit and
resubmit
request
Add
Appointment
Update
Appointment
Update
Appointment
Update
Appointment
Update
Appointment
Appointment
Appointment
Update
Appointment
Update
Appointment
License Restriction
Error
Appointment
Updated
Failure
Authorization
Failure
Update
Appointment Not
Allowed
Patient Matching
Error
Appointment
Matching Error
complete the request.
updated.
request.
appointment.
matching criteria.
matching criteria.
NoneNoThe license did not allow the user to
NoneNoThe appointment was successfully
NoneNoThe user could not be authenticated.Authentication
NoneNoThe user is not authorized to complete the
YesThe user is not allowed to update the
YesThe request had invalid data.Invalid DataUpdate
YesThe request did not meet the patient
YesThe request did not meet the appointment
Edit and
resubmit
request
Edit and
resubmit
request
NoneNoThe request was invalid.Invalid RequestUpdate
Edit and
resubmit
request
Edit and
resubmit
request
Update
Appointment
License Restriction
Error
NoneNoThe license did not allow the user to
complete the request.

Paceart Optima System | Paceart Optima System Administration | 25
Appointment
Add/Update
Appointment
Add/Update
Appointment
Add/Update
Appointment
Add/Update
Appointment
Add/Update
Appointment
Appointment
Appointment
Appointment
Updated
Failure
Authorization
Failure
Add Appointment
Not Allowed
Update
Appointment Not
Allowed
Result definitionResultRequest
updated.
request.
appointment.
appointment.
Work
Item?
YesThe user is not allowed to add the
YesThe user is not allowed to update the
YesThe request had invalid data.Invalid DataAdd/Update
Work Item
Action
NoneNoThe appointment was successfully added.Appointment AddedAdd/Update
NoneNoThe appointment was successfully
NoneNoThe user could not be authenticated.Authentication
NoneNoThe user is not authorized to complete the
Edit and
resubmit
request
Edit and
resubmit
request
Edit and
resubmit
request
NoneNoThe request was invalid.Invalid RequestAdd/Update
Add/Update
Appointment
Add/Update
Appointment
Add/Update
Appointment
Cancel
Appointment
Cancel
Appointment
Cancel
Appointment
Cancel
Appointment
Appointment
Patient Matching
Error
Appointment
Matching Error
License Restriction
Error
Appointment
Cancelled
Failure
Authorization
Failure
Cancel
Appointment Not
Allowed
matching criteria.
matching criteria.
complete the request.
cancelled.
request.
appointment.
YesThe request did not meet the patient
YesThe request did not meet the appointment
YesThe user is not allowed to cancel the
YesThe request had invalid data.Invalid DataCancel
Edit and
resubmit
request
Edit and
resubmit
request
NoneNoThe license did not allow the user to
NoneNoThe appointment was successfully
NoneNoThe user could not be authenticated.Authentication
NoneNoThe user is not authorized to complete the
Edit and
resubmit
request
Edit and
resubmit
request
Appointment
NoneNoThe request was invalid.Invalid RequestCancel

26 | Paceart Optima System | Paceart Optima System Administration
Cancel
Appointment
Cancel
Appointment
Delete
Appointment
Delete
Appointment
Delete
Appointment
Delete
Appointment
Appointment
Patient Matching
Error
Appointment
Matching Error
Appointment
Deleted
Failure
Authorization
Failure
Delete Appointment
Not Allowed
Result definitionResultRequest
matching criteria.
matching criteria.
deleted.
request.
appointment.
Work
Item?
YesThe request did not meet the patient
YesThe request did not meet the appointment
YesThe user is not allowed to delete the
YesThe request had invalid data.Invalid DataDelete
Work Item
Action
Edit and
resubmit
request
Edit and
resubmit
request
NoneNoThe appointment was successfully
NoneNoThe user could not be authenticated.Authentication
NoneNoThe user is not authorized to complete the
Edit and
resubmit
request
Edit and
resubmit
request
Appointment
Delete
Appointment
Delete
Appointment
Outbound Appointment service
Queue
Appointment
Get Appointment
Request
Request
Request
Patient Matching
Error
Appointment
Matching Error
Queued For
Processing
Failure
Authorization FailureGet Appointment
matching criteria.
matching criteria.
Result definitionResultRequest
processing.
the request.
YesThe request did not meet the patient
YesThe request did not meet the appointment
Work
Item?
NoneNoThe request was invalid.Invalid RequestDelete
Edit and
resubmit
request
Edit and
resubmit
request
Work Item
Action
NoneNoThe appointment was queued for
NoneNoThe user could not be authenticated.Authentication
NoneNoThe user is not authorized to complete
NoneNoThe appointment request was available.Request AvailableGet Appointment
Request
Update
Appointment
Request
NoneNoThe request was invalid.Invalid RequestGet Appointment
NoneNoThe appointment was cancelled.Appointment
Cancelled

Paceart Optima System | Paceart Optima System Administration | 27
Update
Appointment
Request
Update
Appointment
Request
Update
Appointment
Request
Update
Appointment
Request
Update
Appointment
Request
Update
Appointment
Request
Found
Appointment Created
and Updated
No Appointment
Found When
Creating
Appointment
Appointment Deleted
and Updated
Delete Attempted Appointment Still
Exists
Appointment
Updated
Result definitionResultRequest
created and updated.
creating the appointment.
deleted and updated.
deleted but still exists.
updated.
Work
Item?
Work Item
Action
NoneNoNo appointment was found.No Appointment
NoneNoThe appointment was successfully
NoneNoThere was no appointment found when
NoneNoThe appointment was successfully
NoneNoThe appointment was attempted to be
NoneNoThe appointment was successfully
Update
Appointment
Request
Update
Appointment
Request
Appointment
Request
Update
Appointment
Request
Update
Appointment
Request
Update
Appointment
Request
Update
Appointment
Request
No Appointment
Found When
Updating
Appointment
Failure
Authorization FailureUpdate
Clinic Appointment
Synchronization
Complete
Clinic Appointment
Synchronization
Started
Patient Appointment
Synchronization
Complete
Patient Appointment
Synchronization
Started
NoneNoThere was no appointment found when
updating the appointment.
NoneNoThe user could not be authenticated.Authentication
NoneNoThe user is not authorized to complete
the request.
NoneNoThe clinic appointment synchronization
was successful.
NoneNoThe clinic appointment synchronization
was started.
NoneNoThe patient appointment
synchronization was successful.
NoneNoThe patient appointment
synchronization was started.
Appointment
Request
NoneNoThe request was invalid.Invalid RequestUpdate

28 | Paceart Optima System | Paceart Optima System Administration
Synchronize
Appointments Paceart to
Remote
Synchronize
Appointments Paceart to
Remote
Synchronize
Appointments Paceart to
Remote
Synchronize
Appointments Paceart to
Remote
Synchronize
Appointments Paceart to
Remote
Building Paceart
Patient Appointment
List
Patient Matching
Error
Sending Appointment
Created Request
Sending Appointment
Updated Request
Paceart Appointment
Found By External ID
Result definitionResultRequest
appointment list.
matching criteria.
appointment was sent to CareLink.
appointment was sent to CareLink.
external ID.
Work
Item?
Work Item
Action
NoneNoPaceart is building the patient
NoneNoThe request did not meet the patient
NoneNoThe request for creating the
NoneNoThe request for updating the
NoneNoThe appointment was found by the
Synchronize
Appointments Paceart to
Remote
Synchronize
Appointments Remote to
Paceart
Synchronize
Appointments Remote to
Paceart
Synchronize
Appointments Remote to
Paceart
Synchronize
Appointments Remote to
Paceart
Outbound XML Export service
Appointment Found
By Start Date
Creating Paceart
Appointment
Sending Appointment
Deleted Request
Paceart Appointment
Found By External ID
License Restriction
Error
NoneNoThe appointment was found by the start
date.
NoneNoCareLink is creating the Paceart
appointment.
NoneNoThe request for deleting the
appointment was sent to Paceart.
NoneNoThe appointment was found by the
external ID.
NoneNoThe license did not allow the user to
complete the request.
Queue XML
Export
Queued For
Processing
Result definitionResultRequest
queued for processing.
Work
Item?
Work Item
Action
NoneNoThe export request was successfully

Paceart Optima System | Paceart Optima System Administration | 29
Get XML Export
Request
Get XML Export
Request
Request
Request
Request
Update XML
Export Request
Update XML
Export Request
Export Request
Export Request
Failure
Authorization
Failure
Invalid XMLGet XML Export
Failure
Authorization
Failure
Request UpdatedUpdate XML
Result definitionResultRequest
request.
generated.
request.
updated.
Work
Item?
Work Item
Action
NoneNoThe user could not be authenticated.Authentication
NoneNoThe user is not authorized to complete the
NoneNoThe export request was available.Request AvailableGet XML Export
NoneNoThe request was invalid.Invalid RequestGet XML Export
NoneNoThe requested XML version could not be
NoneNoThe user could not be authenticated.Authentication
NoneNoThe user is not authorized to complete the
NoneNoThe request was invalid.Invalid RequestUpdate XML
NoneNoThe export request was successfully
Outbound Encounter
Get Encounter
Request
Get Encounter
Request
Request
Request
Update
Encounter
Request
Update
Encounter
Request
Update
Encounter
Request
Failure
Authorization
Failure
Failure
Authorization
Failure
Clinic Encounter
Download
Complete
Result definitionResultRequest
request.
request.
successfully downloaded.
Work
Item?
Work Item
Action
NoneNoThe user could not be authenticated.Authentication
NoneNoThe user is not authorized to complete the
NoneNoThe encounter request was available.Request AvailableGet Encounter
NoneNoThe request was invalid.Invalid RequestGet Encounter
NoneNoThe user could not be authenticated.Authentication
NoneNoThe user is not authorized to complete the
NoneNoThe clinic encounter has been
Update
Encounter
Request
Clinic Encounter
Download Started
NoneNoThe clinic encounter download has
started.

30 | Paceart Optima System | Paceart Optima System Administration
Update
Encounter
Request
Update
Encounter
Request
Encounter
Request
Encounter
Request
Encounter
Request
Processing
Encounter
Request
Processing
Patient Encounter
Download
Complete
Patient Encounter
Download Started
Request UpdatedUpdate
Encounter Already
Exists In Paceart
Data Requested
From Remote
System
Result definitionResultRequest
successfully downloaded.
started.
updated.
in Paceart.
requested from the remote system.
Work
Item?
Work Item
Action
NoneNoThe patient encounter has been
NoneNoThe patient encounter download has
NoneNoThe request was invalid.Invalid RequestUpdate
NoneNoThe encounter request was successfully
NoneNoThe requested encounter already exists
NoneNoThe encounter data was successfully
Searching for information in the Activity Log
You can enter search criteria to limit the Activity Log event results. To return all results, leave the search criteria
text boxes blank.
1. Click Administration > Activity Log.
2. Enter search criteria in one or more of the following fields:
• Service:
Select a service from the drop-down list to limit your results to a particular service.
• Request:
Select a request from the drop-down list to limit your results to a particular request of a service. The
requests available depend on the service you selected.
• Result:
Select a result from the drop-down list to limit your results to a particular result of a request. The results
available depend on the service and request you selected.
• Work Item Status:
Select a work item status from the drop-down list to limit your results to a particular status. Activity Log
items that have a status of Pending are still retained even after the maximum length of retention has
been exceeded.
• Start Date/Time:
If you enter a date and time, Activity Log entries occurring on or after the date and time will be returned
in the results.
• End Date/Time:
If you enter a date and time, Activity Log entries occurring on or before the date and time will be returned
in the results.

Paceart Optima System | Paceart Optima System Administration | 31
• User / Account:
Select a user from the drop-down list to limit your results to a particular user.
• Device Serial Number:
Enter a patient's device serial number.
• Patient ID:
Enter a patient's ID number.
3. Click Search to search the activity log for entries matching your search criteria. Unused patients have no
devices, no encounters, and no appointments.
4. You can accomplish the following tasks with the Activity Log search results:
• To clear the search results, click Clear.
• To open an Activity Log entry, select the entry from the search results and click Open. You can also
double-click an entry in the search results to open it.
• To delete an Activity Log entry, select the entry from the search results and click Delete.
• To mark an activity as complete, select the entry from the search results and click Complete.
• To export the search results to a spreadsheet, click Export.

32 | Paceart Optima System | Paceart Optima System Administration
Deleting Activity Log Entries
You can delete entries from the Activity Log.
1. Click Administration > Activity Log.
2. Select a single or multiple activity log entries. To select multiple entries SHIFT+click or CTRL+click.
3. Click Delete.
The Activity Log entries are deleted.
Editing Activity Log Retention
You can edit how long Paceart retains data in the activity log. Activity Log items that have a status of Pending
are still retained even after the maximum length of retention has been exceeded.
1. Click Administration > Connectivity > Activity Log.
2. Click Edit.
3. Enter the number of days to retain activity log data in Activity Log Retention.
4. Click Save.
Field and button definitions for the Edit Activity Log Retention dialog box
This is a list of fields and buttons and their definitions.
Field and button definitionsDialog box fields and buttons
Activity Log Retention
Save
Cancel
Help
The number of days data will be retained in the Activity
Log.
Saves all changes.
Cancels and closes the dialog.
Accesses the Help system.

Paceart Optima System | Paceart Optima System Administration | 33
Using the Audit Log
You can search and view the Audit Log, which provides a record of changes, the date the change was made,
and by whom.
You can narrow the list of changes in the Audit Log based on patient, user, date and time, and other criteria.
You can also narrow the list by the type of operation such as an insertion or deletion.
Paceart automatically tracks database and end-user activity and updates the Audit Log. The system automatically
updates the Audit Log as users update a record. The size of the log must be monitored since it can become
large. Permission to view the Audit Log is granted through your user role.
You can export detailed information for each of the entries in your results table to an Excel spreadsheet by
clicking Export.
Searching for information in the Audit Log
You can enter search criteria to limit the Audit Log event results that are returned to you. Since the Audit Log
can be very large, enter as much search criteria as possible to reduce the number of results.
1. Click Administration > Audit.
2. Enter search criteria in one or more of the following fields.
• Patient Name:
Select a patient name to show Audit Log entries for one patient.
• Table Name:

34 | Paceart Optima System | Paceart Optima System Administration
Select a table name from the drop-down list to limit your results to a particular database table.
• Column Name:
Select a column name based on the table you selected from the drop-down list to limit your results to a
particular database column.
• Modified By:
Select a login name from the drop-down list to limit your results to modifications made by a particular
user.
• Computer Name:
Select a computer name from the drop-down list to limit your results to modifications made from a
particular computer.
• Start Date/Time:
If you enter a date and time, Audit Log entries occurring on or after this timestamp are returned in the
results.
• End Date/Time:
If you enter a date and time, Audit Log entries occurring on or before this timestamp are returned in the
results.
• Insert
Check this box to include insert database events. Insert events are created when a new entry is added
to the database.
• Update
Check this box to include update database events. Update events are createdwhen an existing database
entry is modified.
• Data Disclosure
Check this box to include events that disclosed patient data to any external system.
• Delete
Check this box to include delete database events. Delete events are created when an entry is deleted
from the database.
3. Click Search to search the Audit Log for entries matching your search criteria.
4. Select an entry in the search results to view the details of the Audit Log entry in the Details section.
5. You can accomplish the following tasks with the Audit Log search results:
• To clear the search results, click Clear.
• To export the search results to a spreadsheet, click Export.
Batch Deleting Patients
You can delete multiple unused patients from the Paceart database. Unused patients are patients who do not
have devices, encounters, or appointments associated with them.
1. Click Administration > Batch Delete.
2. Click Search to find all unused patients in Paceart.
All unused patients are displayed in the Results section.
3. Select the unused patients you want to delete in the search results or click Select All to select all unused
patients.

Paceart Optima System | Paceart Optima System Administration | 35
4. Click Delete.
5. Click Yes to confirm the deletion of the selected patients from the Paceart database.
Configuring Billing Payment Methods
Paceart assists clinics in charging and billing management by providing clinicians with the ability to document,
print, and export billing information related to patient encounters. You can add and edit billing payment types
that can be recorded in patient encounters.
Setting up payment methods is a clinic administration function. Use the Encyclopedia to add and edit billing
codes such as charge codes and CPT codes.
The Payment Information Method window allowsyou to add and edit payment method codes and descriptions,
for example VISA.
For billing encounters, Paceart allows you to:
• Export billing information to other systems via XML and HL7
• Generate a Billing Report for a specific patient encounter
Adding or editing a payment method
You can add or edit payment methods to Paceart for patient encounters using the Administration:Billing
window.
1. Click Administration > Billing.

36 | Paceart Optima System | Paceart Optima System Administration
2. Determine which action to take.
• To add a payment method, click Add.
• To edit a payment method, click Edit.
3. Enter the payment method code in the Code field. This field is required.
4. Enter a description of the payment method in the Description field. This field is required.
5. If the payment method is available for billing, select the Available checkbox.
6. Click Save.
The entry is displayed on the Payment Method Information section.
Field and button definitions for the Add or Edit Payment Method dialog boxes
This is a list of fields and buttons and their definitions.
Field and button definitionsDialog box fields and buttons
*Code:
*Description:
Available
Save
Cancel
Help
The payment method code. Required field.
The name of the payment method, for example, VISA.
Required field.
Indicates if the payment method is available to apply
to bills.
Saves all changes.
Cancels and closes the dialog.
Accesses the Help system.
Deleting a payment method
You can delete payment methods from Paceart for patient encounters using the Administration: Billing
window.
1. Click Administration > Billing.
2. Select the payment method you want to delete.
3. Click Delete.
4. Determine which action to take.

Paceart Optima System | Paceart Optima System Administration | 37
• If the payment method is not already used in billing, click Yes on the confirmation message dialog box.
• If the payment method is already used in billing, click Yes to make it unavailable for future billing.
If the paymentmethod is not already used in billing, the entry is removed from the Payment Method Information
section. If the payment method is already used in billing, it is no longer available to assign to billing.
Configuring CardioVoice Settings
The CardioVoice TTM Assistant system allows patients and doctors to communicate information about cardiac
events through an automated voice response system.
The CardioVoice TTM Assistant can be configured to automatically fax, page, or e-mail a physician when a
patient calls into the CardioVoice system. These external notifications alert physicians that new data is waiting
in their Paceart System, and in the case of faxing and emailing, send the data directly to the physician.
You can configure ECG recording settings for ECGs recorded using CardioVoice.

38 | Paceart Optima System | Paceart Optima System Administration
Editing CardioVoice Settings
Paceart can be configured to automatically fax, email, or page a physician when a patient calls into CardioVoice.
Before you can use the CardioVoice auto fax, auto email, or auto pager notifications you must have the
messaging service installed on the application server and configured in Administration: Messaging Service.
1. Click Administration > CardioVoice.
2. Click Edit.
3. In the Report Information section, select which report is sent when a physician is sent a report through
CardioVoice.
4. Select how you want CardioVoice to notify the provider. Select the Active check box for fax, email, and
pager notification.
5. For each of the notification methods, choose which provider you would like to send the notification to.
• Select Following or Referring to use the following or referring provider listed in the patient record. If a
patient has more than one following or referring provider, Paceart selects one provider in the following
order if they are specified for the patient:
• Following
• Referring 1
• Referring 2
• Referring 3
• Select Specific Provider to choose a provider from the Encyclopedia.
6. In the CardioVoice ID Information section, choose the default CardioVoice ID information.
• Select Use the last 7 digits of the primary phone number to assign a CardioVoice ID to a patient
automatically.
• Select Do not default patients' CardioVoice IDs.

Paceart Optima System | Paceart Optima System Administration | 39
7. Click Save.
The updated CardioVoice information is displayed in the Administration: CardioVoice window.
Field and button definitions for the Edit CardioVoice Settings dialog box
This is a list of fields and buttons and their definitions.
Field and button definitionsDialog box fields and buttons
Report
Auto Fax Notification Information Active
Following or Referring
Specific Provider
Specific Provider field
Auto Email Notification Information Active
Auto Pager Notification Information Active
Use the last 7 digits of the primary phone number radio
button
Allows you to specify which report will be sent when
a physician requests a report through CardioVoice.
When checked indicates that the auto fax notification
is active.
When selected indicates that the following or referring
provider listed in the patient record will be notified.
When selected indicates that the provider in the field
below will be notified.
Click the [...] button to specify a provider.
When checked indicates that the auto email notification
is active.
When checked indicates that the auto pager
notification is active.
When selected the Patient's CardioVoice ID will be
assigned automatically and be the last seven digits of
the patient's primary phone number.
Do not default patients' CardioVoice IDs
Save
Cancel
Help
When selected CardioVoice IDs are not automatically
assigned.
Saves all changes.
Cancels and closes the dialog.
Accesses the Help system.
Field and button definitions for the Edit CardioVoice ECG Settings dialog box
This is a list of fields and buttons and their definitions.
Field and button definitionsDialog box fields and buttons
Gain
The selected Gain setting in mm/mV. Gain is used to
increase or decrease the amplitude of an ECG signal.

40 | Paceart Optima System | Paceart Optima System Administration
Field and button definitionsDialog box fields and buttons
Filter
Speed
Invert Polarity:
Save
Cancel
Help
The selected Filter setting in Hz. Filtering is used to
eliminate "noise" on the ECG display.
The selected Speed setting in mm/sec. The strip speed
indicates the horizontal scale of the ECG strip.
Indicates if the polarity should be inverted.
Saves all changes.
Cancels and closes the dialog.
Accesses the Help system.
Configuring Connectivity
You can configure how Paceart interacts with information from external systems using the Administration:
Connectivity window.
Patient Matching Configuration tab
When you import patient information into Paceart from an external system, patient matching is based on the
Patient ID. If you want an additional level of patient matching, you can specify which patient demographics
must match in addition to the Patient ID in the Verify Patient Match Configuration section. A patient must
match at least one of the selected demographics for a successful patient match.
If the system cannot match patient information using the Patient ID, you can choose to match patients based
on demographic information. You can specify which demographics in the Demographics Only Match
Configuration section. A patient must match all of the selected demographics for a successful patient match.
Scheduling Integration tab
You can set CareLink scheduling integration as active or inactive. You can also view and delete appointment
requests. In order to activate CareLink scheduling to integrate with Paceart scheduling, additional setup is
required. For more information, refer to the Mainspring Data Express Connectivity Guide.
Remote Encounter Acquisition tab
You can set CareLink remote encounter acquisition as active or inactive, or set up remote encounters for nightly
acquisitions. You can also view and delete encounter import requests. In order for CareLink to integrate with
Paceart to acquire remote encounters, additional setup is required. For more information, refer to the Mainspring
Data Express Connectivity Guide.
Encounter Export tab
You can configure how to export encounters with optional PDF reports and attachments, set encounter export
as active or inactive, and view or delete XML export requests. In order to export HL7 encounters with Paceart,
additional setup is required. For more information, refer to the Mainspring Data Express Connectivity Guide.

Paceart Optima System | Paceart Optima System Administration | 41
Activity Log tab
You can edit how long records are retained in the Activity Log.
Editing Verify Patient Match Configuration Settings
You can select patient demographics for additional patient matching criteria in addition to the Patient ID. A
patient must match at least one of the selected demographics for a successful patient match.
1. Click Administration > Connectivity > Patient Matching Configuration.
2. In the Verify Patient Match Configuration section, click Edit.

42 | Paceart Optima System | Paceart Optima System Administration
3. Select the demographics you want for patient matching in addition to the Patient ID.
4. Click Save.
Field and button definitions for the Verify Patient Configuration Settings dialog box
This is a list of fields and buttons and their definitions.
Field and button definitionsDialog box fields and buttons
Last Name:
First Name:
Middle Name:
Date of Birth:
Gender:
Zip/Postal Code:
Save
Cancel
Help
The patient's last name.
The patient's first given name (e.g. primary forename
or primary personal name).
The patient's middle name.
The patient's date of birth.
The patient's gender. The value must be one of the
following values: Male, Female, Other.
The zip or postal code associated with the patient's
street address.
Saves all changes.
Cancels and closes the dialog.
Accesses the Help system.
Editing Demographics Only Match Configuration Settings
You can select patient demographics for patient matching criteria if a patient match cannot be made using the
patient ID. A patient must match all of the selected demographics for a successful patient match.
1. Click Administration > Connectivity > Patient Matching Configuration.

Paceart Optima System | Paceart Optima System Administration | 43
2. In the Demographics Only Match Configuration section, click Edit.
3. Select the demographics you want for patient matching.
4. Click Save.
Field and button definitions for the Matching Patient Configuration Settings dialog box
This is a list of fields and buttons and their definitions.
Field and button definitionsDialog box fields and buttons
Last Name:
First Name:
Middle Name:
Date of Birth:
Gender:
Zip/Postal Code:
Save
Cancel
Help
The patient's last name.
The patient's first given name (e.g. primary forename
or primary personal name).
The patient's middle name.
The patient's date of birth.
The patient's gender. The value must be one of the
following values: Male, Female, Other.
The zip or postal code associated with the patient's
street address.
Saves all changes.
Cancels and closes the dialog.
Accesses the Help system.
Activating CareLink Scheduling Integration
You can activate CareLink scheduling to integrate with Paceart scheduling.
In order to activate CareLink scheduling to integrate with Paceart scheduling, additional setup is required. For
more information, refer to the Mainspring Data Express Connectivity Guide.
1. Click Administration > Connectivity > Scheduling Integration.
2. Click Edit.
3. Select the Active checkbox to activate CareLink scheduling integration.
4. Click Save.

44 | Paceart Optima System | Paceart Optima System Administration
Field and button definitions for the CareLink Scheduling Integration dialog box
This is a list of fields and buttons and their definitions.
Field and button definitionsDialog box fields and buttons
Active
Save
Cancel
Help
Indicates if CareLink Scheduling Integration is active.
Saves all changes.
Cancels and closes the dialog.
Accesses the Help system.
Deleting Appointment Requests
You can delete appointment requests from Paceart scheduling integration with external systems.
When deleting Appointment Request records, ensure that the request status has a value of Completed. If the
request status has a value of Processing, an external system may still be working with the request. If the
request status continues to display Processing for an extended time, there may be an error and the request
cannot be processed. Contact Paceart support to assist in the investigation of the logs and troubleshooting
Connectivity services.
1. Click Administration > Connectivity > Scheduling Integration.
2. To get the latest list of appointment requests, click Refresh.
3. Select the appointment requests that you want to delete in the Appointment Requests section. You can
select multiple requests by holding the CTRL key and you can select a range of requests by holding the
SHIFT key.
4. Click Delete.
5. Click Yes to confirm the deletion.
Activating CareLink Remote Encounter Acquisition
You can activate CareLink to integrate with Paceart to acquire remote encounters and choose when the
encounters are acquired.
In order for CareLink to integrate with Paceart to acquire remote encounters, additional setup is required. For
more information, refer to the Mainspring Data Express Connectivity Guide.
1. Click Administration > Connectivity > Remote Encounter Acquisition.
2. Click Edit.
3. Select the Active checkbox to activate CareLink remote encounter acquisition.
4. Select the Nightly Active checkbox if you want to run the remote encounter acquisition nightly.
5. Click Save.

Paceart Optima System | Paceart Optima System Administration | 45
Field and button definitions for the CareLink Remote Encounter Acquisition dialog box
This is a list of fields and buttons and their definitions.
Field and button definitionsDialog box fields and buttons
Active
Nightly Active
Save
Cancel
Help
Indicates if CareLink Remote Encounter Acquisition
is active.
Indicates if CareLink Remote Encounter Acquisition
is performing nightly acquisitions.
Saves all changes.
Cancels and closes the dialog.
Accesses the Help system.
Deleting Encounter Import Requests
You can delete encounter import requests from Paceart remote encounter acquisitions.
When deleting Encounter Import Request records, ensure that the request status has a value of Completed.
If the request status has a value of Processing, an external system may still be working with the request. If
the request status continues to display Processingfor an extendedtime, there maybe an error and the request
cannot be processed. Contact Paceart support to assist in the investigation of the logs and troubleshooting
Connectivity services.
1. Click Administration > Connectivity > Remote Encounter Acquisition.
2. To get the latest list of encounter import requests, click Refresh.
3. Select the import requests that you want to delete in the Encounter Import Requests section. You can
select multiple requests by holding the CTRL key and you can select a range of requests by holding the
SHIFT key.
4. Click Delete.
5. Click Yes to confirm the deletion.
Editing HL7 Encounter Export
You can configure how to export HL7 encounters and choose whether to include PDF reports and attachments
with the encounters.
HL7 Integration must be enabled by your license key to configure HL7 encounter export.
In order to export HL7 encounters with Paceart, additional setup is required. For more information, refer to the
Mainspring Data Express Connectivity Guide.
1. Click Administration > Connectivity > Encounter Export.
2. Click Edit.

46 | Paceart Optima System | Paceart Optima System Administration
3. To enable HL7 Encounter Export, select the Enabled checkbox.
4. To set HL7 encounter export as the default method for exporting encounters, select the Default checkbox.
5. To include a PDF report with exported encounters, select Yes next to the Include PDF Report field. You
can then choose which reports are included with each type of encounter in the drop-down lists next to each
type of encounter.
6. To include attachments with exported encounters, select Yes next to the Include Attachments field.
7. If you chose to include PDF reports or attachments with exported encounters, choose how you want to
handle the files in the File Handling field.
• To embed PDF reports or attachments with the encounters, select Embed.
• To link to PDF reports or attachments, select Link.
8. If you chose to link PDF reports or attachments with exported encounters, enter the export path in the Path
field. The export path is the physical file system or network path on the server.
9. If you chose to link PDF reports or attachments with exported encounters, enter the export location in the
Location field. The location is the URL or network path that is placed in the XML file and HL7 message for
attachments and linked Paceart reports.
10. Click Save.
Field and button definitions for the Edit Encounter Export - HL7 dialog box
This is a list of fields and buttons and their definitions.
Field and button definitionsDialog box fields and buttons
Enabled:
Default:
Include PDF Report:
When checked indicates that HL7 Encounter Export
is enabled.
When checked indicates that this is the default method
for exporting encounters.
Select whether to include a PDF report with the
encounter export.

Paceart Optima System | Paceart Optima System Administration | 47
Field and button definitionsDialog box fields and buttons
Implant:
In-clinic:
Remote:
TTM:
Programming:
Phone Note:
Miscellaneous:
Include Attachments:
Allows you to specify which PDF report is included for
implant encounters with the encounter export.
Allows you to specify which PDF report is included for
in-clinic encounters with the encounter export.
Allows you to specify which PDF report is included for
remote encounters with the encounter export.
Allows you to specify which PDF report is included for
TTM encounters with the encounter export.
Allows you to specify which PDF report is included for
programming encounters with the encounter export.
Allows you to specify which PDF report is included for
phone note encounters with the encounter export.
Allows you to specify which PDF report is included for
miscellaneous encounters with the encounter export.
Select whether to include attachments with the
encounter export.
File Handling:
Path:
Location:
Save
Cancel
Help
Deleting XML Export Requests
You can delete encounter XML export requests from Paceart.
Select whether to embed or link to PDF reports or
attachments for the encounter export.
The file path for PDF reports or attachments for the
encounter export. The export path is the physical file
system path on the server.
The location of PDF reports or attachments for the
encounter export. The location is the URL that is
placed in the XML file and HL7 message for
attachments and linked Paceart reports.
Saves all changes.
Cancels and closes the dialog.
Accesses the Help system.
When deleting Export Request records, ensure that the request status has a value of Completed. If the request
status has a value of Processing, an external system may still be working with the request. If the request status
continues to display Processing for an extended time, there may be an error and the request cannot be

48 | Paceart Optima System | Paceart Optima System Administration
processed. Contact Paceart support to assist in the investigation of the logs and troubleshooting Connectivity
services.
1. Click Administration > Connectivity > Encounter Export.
2. To get the latest list of XML export requests, click Refresh.
3. Select the export requests you want to delete in the XML Export Requests section. You can select multiple
requests by holding the CTRL key and you can select a range of requests by holding the SHIFT key.
4. Click Delete.
5. Click Yes to confirm the deletion.
Configuring Demographics
You can add new or edit existing locations of care, patient ID types, and patient code types using the
Demographics window. These changes automatically show up in the selection lists when you add demographic
information to a patient record.
Location of Care Tab
Locations of care are usually hospitals and clinics that are associated with a patient or provider. Clinic scheduling
is based on the location of care.
Location of care allows multiple clinical locations to share the Paceart database while isolating certain types
of information. All patients are assigned a location of care and clinic scheduling is based on location.
Having a primary arrhythmia or device-related clinic location of care assigned to each patient allows you to
search for patients, generate reports, and export data based on patients in a particular clinic location. The
locations of care can be organized in a hierarchy with up to three levels with the highest level of the organization
on top. Each location is associated to the level directly above it.
Location of care can also be used to describe the location for an appointment or the location for an encounter.
You can also use this window to:
• Set the default country for a location of care
• View details about the location such as the address and contact person on the Details tab.
• See a list of patients who receive medical care at this location on the Related Patients tab.
Patient ID Type Tab
The patient ID type allows you to define multiple categories for tracking different patient IDs used by a clinic.
The ID type and value combination uniquely identifies a single patient in Paceart. Patient ID values must be
unique or blank for each Patient ID Type.
With the addition of patient ID types, patient IDs are a combination of a patient ID type and a patient ID value.
This feature allows a clinic to have multiple unique IDs for a single patient. Paceart validates that patient ID
values are unique for each patient ID type. The primary ID type is used whenever a single patient ID is displayed,
such as the Patient Information tab and on reports.
You can have a maximum of twenty ID types. The ID type at the top of the list is automatically designated as
the primary type. You can have only one primary ID type but you can change the primary type at any time by
moving a different ID type to the top of the list.
Each ID type must have a unique name. Two ID types are automatically added when Paceart is installed,
Default and Paceart.
Default is initially designated as the primary patient ID type and it corresponds to the current patient ID in
Paceart. Both the ID name and primary designation can be changed.

Paceart Optima System | Paceart Optima System Administration | 49
Paceart contains a number that is either automatically assigned by the system when the patient is added to
the database or is imported from the Patient # field from previous versions of Paceart. This ID type cannot be
renamed or deleted.
Patient Code Type Tab
Code types are used for various purposes within a clinic. For example, you can enter a code into a patient's
record to associate that patient with a particular clinic or specific clinical trial. Within a clinic, a code type can
be assigned an alphanumeric code identifier of up to 6 characters.
Paceart has four code types initially designated as Code 1, Code 2, Code 3, and Code 4. You can change the
code description from this tab.
Setting the default country for a location of care
You can set the default country for adding new locations of care in Paceart.
1. Click Administration > Demographics > Location of Care.
2. Click the [...] button next to the Default Country field.
The Default Country window is displayed.

50 | Paceart Optima System | Paceart Optima System Administration
3. In the Default Country list, click the default country of your choice.
4. Click Select.
The selected country is the default country for all new locations of care.
Field and button definitions for the Default Country dialog box
This is a list of fields and buttons and their definitions.
Field and button definitionsDialog box fields and buttons
Default Country:
Select
Cancel
Help
The default country for the location of care.
Shows the selected item in the main window.
Cancels and closes the dialog.
Accesses the Help system.
Adding or editing a Location of Care
You can add or edit a location of care in Paceart. Locations of care enable multiple clinical locations to share
the Paceart database while isolating certain types of information.
Each patient is assigned a location of care which is the basis of their clinic scheduling. A location of care can
also be used as search criteria. To create a hierarchy, add the highest-level location first.
1. Click Administration > Demographics > Location of Care.
2. Determine which action to take.
• To add a location of care, click Add.
• To edit a location of care, click Edit.

Paceart Optima System | Paceart Optima System Administration | 51
3. Select a Parent Location of Care from the drop-down list. The default parent location supplied by Medtronic
is called Default Location.
4. Enter a name for the location of care.
5. Enter other relevant information for the location of care such as address, phone number, fax number, contact
name, and contact email address.
6. Determine which action to take.
• To add a clinic image, click Browse next to the Clinic image field and navigate to the image. The image
cannot be more than 750 pixels wide or 240 pixels high. Paceart allows the following image formats:
.bmp, .jpg, .gif, and .png. Reports can be configured to use this image in the report heading.
• To remove an existing clinic image, click Remove next to the image.
7. Click Save.
You must restart Paceart before you can use the new location of care.
Field and button definitions for the Add or Edit Location of Care dialog boxes
This is a list of fields and buttons and their definitions.
Field and button definitionsDialog box fields and buttons
*Parent Location of Care:
Defines the parent clinic for the new location of care.
The parent location of care describes the highest level
of clinic within your organization, for example main
office versus satellite clinics. Required field.
*Name:
The name for the location of care. Required field.

52 | Paceart Optima System | Paceart Optima System Administration
Field and button definitionsDialog box fields and buttons
Abbreviation:
Address:
Address:
Default: (checkbox)
City:
State/Province:
Zip/Postal Code:
Country:
Phone:
Contact Name:
Contact Email:
The abbreviation for the location of care.
The first line of the location of care address.
The second line of the location of care address.
Indicates the default clinic when adding a new patient.
The city for the location of care.
The state or province for the location of care.
The zip or postal code for the location of care.
The country for the location of care.
The phone number for the location of care.
The name of the contact person for the location care.
The contact person's email address for the location of
care.
Clinic image:
Browse...
Remove
Comments:
Save
Cancel
Help
The clinic image for this location of care. The image
should be no more than 750 pixels wide and 240 pixels
high.
Opens a browse dialog and allows you to select a clinic
image for this location of care.
Removes the clinic image for this location of care.
Miscellaneous comments.
Saves all changes.
Cancels and closes the dialog.
Accesses the Help system.
Viewing a list of patients related to a Location of Care
You can view all the patients receiving care at a specific medical care location (such as a hospital or clinic) in
the Paceart database.
You can also view patients related to a location of care on the Search tab in Paceart.
1. Click Administration > Demographics > Location of Care.

Paceart Optima System | Paceart Optima System Administration | 53
2. Select a location in the Location of Care section.
3. Click the Related Patients tab in the Location of Care Information section.
The patients associated to that location of care are displayed in the Results list.
Adding or Editing a Patient ID Type
You can set up information about patient ID and code types. The combination of a patient ID and type uniquely
identifies a patient in the Paceart System.
1. Click Administration > Demographics > Patient ID Type.
2. Determine which action to take.
• To add a patient ID type, click Add.
• To edit a patient ID type, click Edit.
3. Enter the name of the patient ID type in the Description field.
4. If necessary, click the arrows to change the display order of patient ID types. The first patient ID type listed
in the Display Order field is the primary patient ID type. The primary patient ID will be the ID that is shown
on select reports and shown on the Patient Information tab.
5. Click Save.
Field and button definitions for the Add or Edit Patient ID Type dialog boxes
This is a list of fields and buttons and their definitions.
Field and button definitionsDialog box fields and buttons
*Description:
Display Order
Move Up
Move Down
The name for the patient ID type. Required field.
The order that the patient ID types are displayed in the
list. You can change the order using the up and down
arrow buttons. The first patient ID type listed is the
primary patient ID type.
Moves the selected item up in the list box.
Moves the selected item down in the list box.
Save
Cancel
Saves all changes.
Cancels and closes the dialog.

54 | Paceart Optima System | Paceart Optima System Administration
Field and button definitionsDialog box fields and buttons
Help
Accesses the Help system.
Deleting a Patient ID Type
You can delete patient ID types from Paceart. The combination of a patient ID and type uniquely identifies a
patient in the Paceart System.
You cannot delete the Paceart ID type.
1. Click Administration > Demographics > Patient ID Type.
2. Select the patient ID type you want to delete in the Patient ID Type Information section.
3. Click Delete.
4. Click Yes to confirm the deletion.
Editing a Patient Code Type
You can set up information about patient ID and code types.
1. Click Administration > Demographics > Patient Code Type.
2. Select the code type you want to edit in the Patient Code Type Information section and click Edit.
3. Edit the Description field and click Save.
The code description is changed in all Paceart patient records.
Field and button definitions for the Edit Patient Code Type dialog box
This is a list of fields and buttons and their definitions.
Field and button definitionsDialog box fields and buttons
*Description:
Purge
Save
Cancel
Help
The name for the patient code. Required field.
Removes the patient code from all related patients in
the Paceart database.
Saves all changes.
Cancels and closes the dialog.
Accesses the Help system.

Paceart Optima System | Paceart Optima System Administration | 55
Deleting a Patient Code Type
You can remove patient code types from all related patients in the Paceart database.
1. Click Administration > Demographics > Patient Code Type.
2. Select the patient code type you want to delete in the Patient Code Type Information section.
3. Click Edit.
4. On the Edit Patient Code Type window, click Purge.
5. Click Yes to confirm the deletion.
The code description is removed from the Paceart database and all related patients that used the code.
Field and button definitions for the Edit Patient Code Type dialog box
This is a list of fields and buttons and their definitions.
Field and button definitionsDialog box fields and buttons
*Description:
Purge
Save
Cancel
Help
The name for the patient code. Required field.
Removes the patient code from all related patients in
the Paceart database.
Saves all changes.
Cancels and closes the dialog.
Accesses the Help system.
Encounter Export XML
Paceart Encounter Export XML is an optional add-on component to the Paceart System. It allows you to export
data files in Paceart XML format from your Paceart System.
You can use exported XML data files in your integration projects to connect your Paceart System with other
computer systems, including Hospital Information Systems (HIS) and Electronic Medical Record (EMR) systems.
Encounter Export XML exports all data related to an encounter in an XML document. The XML conforms to
the Paceart XML Schema Definition (XSD). In addition, you can optionally choose to include a Paceart report
in PDF file format and include attachments.

56 | Paceart Optima System | Paceart Optima System Administration
Editing XML Encounter Export
You can configure how to export XML encounters and choose whether to include PDF reports and attachments
with the encounters.
XML Export must be enabled by your license key to configure XML encounter export.
1. Click Administration > Encounter Export XML.
2. Click Edit.
3. To enable XML Encounter Export, select the Enabled checkbox.
4. To set XML encounter export as the default method for exporting encounters, select the Default checkbox.
5. Choose which version of the Paceart XML schema to use for exporting the encounters in the XML Version
drop-down list. The highest number indicates the latest XML version.
6. Enter the export path for exported encounters in the Path field. The export path is the physical file system
path on the server.
7. To include a PDF report with exported encounters, select Yes next to the Include PDF Report field.
8. To include attachments with exported encounters, select Yes next to the Include Attachments field.
9. If you chose to include PDF reports or attachments with exported encounters, choose how you want to
handle the files in the File Handling field.
• To embed reports and attachments with the encounters, select Embed.
• To link to reports and attachments, select Link.

Paceart Optima System | Paceart Optima System Administration | 57
10. If you chose to link reports and attachments with exported encounters, enter the export location in the
Location field. The location is the URL that is placed in the XML file for linked Paceart reports and
attachments.
11. Click Save.
Field and button definitions for the Edit Encounter Export - XML dialog box
This is a list of fields and buttons and their definitions.
Field and button definitionsDialog box fields and buttons
Enabled:
Default:
XML Version:
Include PDF Report:
Include Attachments:
File Handling:
Path:
When checked indicates that XML Encounter Export
is enabled.
When checked indicates that this is the default method
for exporting encounters.
Allows you to choose which version of the Paceart
XML schema to use for exporting encounters.
Select whether to include a PDF report with the
encounter export.
Select whether to include attachments with the
encounter export.
Select whether to embed or link to attachments for the
encounter export.
The file path for PDF reports and attachments to the
encounter export. The export path is the physical file
system path on the server.
Location:
Save
Cancel
Help
The location of attachments to the encounter export.
The location is the URL that is placed in the XML file
for attachments and linked Paceart reports.
Saves all changes.
Cancels and closes the dialog.
Accesses the Help system.
Configuring the Paceart Home Tab
You can customize what users see on the Home tab when using your Paceart system.
Use the Administration: Home window to choose the links and the type of tasks that are displayed for your
clinic on the Home tab.

58 | Paceart Optima System | Paceart Optima System Administration
Editing Visible Tasks
You can select which type of tasks are displayed for your clinic on the Home tab of Paceart.
1. Click Administration > Home.
2. In the Tasks section, click Edit.
3. In the Edit Visible Tasks dialog box, select the types of tasks you want to see on the Home tab.
4. Click Save.
The count of each type of task you selected for your clinic are displayed on the Home tab.

Paceart Optima System | Paceart Optima System Administration | 59
Field and button definitions for the Edit Visible Tasks dialog box
This is a list of fields and buttons and their definitions.
Field and button definitionsDialog box fields and buttons
All Tasks
Encounter Tasks
In-clinic
TTM
Remote
System Tasks
User Tasks
When checked indicates that the count of all
Encounter, System, and User tasks are visible on the
Home tab.
When checked indicates that the count of Encounter
tasks are visible on the Home tab.
When checked indicates that the count of In-clinic
tasks are visible on the Home tab.
When checked indicates that the count of TTM tasks
are visible on the Home tab.
When checked indicates that the count of Remote
tasks are visible on the Home tab.
When checked indicates that the count of System tasks
are visible on the Home tab.
When checked indicates that the count of User tasks
are visible on the Home tab.
Save
Cancel
Help
Saves all changes.
Cancels and closes the dialog.
Accesses the Help system.
Adding or Editing Links on the Home Tab
You can update the links that are displayed for your clinic on the Home tab in Paceart.
1. Click Administration > Home.
2. Determine which action to take.
• To add a link, click Add.
• To edit an existing link, select the link in the Links section and click Edit.

60 | Paceart Optima System | Paceart Optima System Administration
3. Enter the name for the link in the Name to be Displayed field.
4. Enter the link's URL in the Link Destination (URL) field.
5. Click Save.
The link is displayed in the Links section.
Field and button definitions for the Add or Edit Link dialog boxes
This is a list of fields and buttons and their definitions.
Field and button definitionsDialog box fields and buttons
*Name to be Displayed:
*Link Destination (URL):
Save
Cancel
Help
The name of the link as you want it to appear on the
Home tab. For example, Medtronic CareLink Network.
Required field.
The URL or web address of the link. For example,
http://medtroniccarelink.net. Required field.
Saves all changes.
Cancels and closes the dialog.
Accesses the Help system.
Deleting Links from the Home Tab
You can remove links that are displayed for your clinic on the Home tab in Paceart.
1. Click Administration > Home.
2. Select the link you want to delete in the Links section.
3. Click Delete.
4. Click Yes to confirm the deletion.
The link is removed from the Links section and from your Home tab.
Changing the Order of Links on the Home Tab
You can arrange how links are displayed on the Home tab in Paceart.
1. Click Administration > Home.
2. In the Links section, click Change Display Order.

Paceart Optima System | Paceart Optima System Administration | 61
3. On the Change Display Order dialog box, click the arrows to arrange the links.
4. Click Save.
The link order is displayed in the Links section and on your Home tab.
Field and button definitions for the Change Display Order dialog box
This is a list of fields and buttons and their definitions.
Field and button definitionsDialog box fields and buttons
Move Up
Move Down
Save
Cancel
Help
Moves the selected item up in the list box.
Moves the selected item down in the list box.
Saves all changes.
Cancels and closes the dialog.
Accesses the Help system.
Paceart License Keys
Paceart Optima System uses license keys to activate certain components.
If you purchase additional Paceart Optima System components, you must enter a new license key to enable
the new functionality.
You can view details about your current license key including the date the key was applied, the number of
concurrent users, and which license options are enabled on the Administration: License Key window.

62 | Paceart Optima System | Paceart Optima System Administration
Applying a license key
You can apply a license key in Paceart to enable new components that you have purchased.
1. Click Administration > License Key.
2. Enter the license key provided to you by Medtronic in the License Key field.
3. Click Apply.
If the license key is valid, the details of your license key will display in the Details section. If the license key
is not valid, you will receive an error message.
4. Confirm that the license information in the Details section is correct.
Configuring Server and Client Logging
Paceart Optima System logs client and server activity in separate log files. You can configure where the log
files are stored and how the files are formatted.
The Administration: Logging window allows you to set up how client and server activity is logged in Paceart.
Paceart logs the following server and client events:
• Exceptions not handled by the system
• Data updates without user intervention
• Starting the Paceart application
• Exiting the Paceart application
• Security events such as login attempts and password changes

Paceart Optima System | Paceart Optima System Administration | 63
You can set the location of the files, the maximum number of files to preserve, and the maximum size of the
files. You can also format where and how each activity is logged.
Location of log file
You can specify where to store each type of log file on your computer.
Log line layout
You can enter the following parameters to format the log line layout:
• %date: The time and date of the logged event according to the operating system on which the system is
running and the date pattern entered for that type of logging.
• %level: The level of the logged event. This parameter tells you if Paceart successfully completed the event
or if there was an error.
• %logger: The Paceart service attempting to complete the task.
• %message: The message returned from the Paceart service.
• %newline: Enters a carriage return at the end of the log line so each logged event is on a different line.
• %timestamp: The number of milliseconds elapsed since the start of the application until the creation of the
logging event.
• %type: The type name of the caller issuing the logging request.
For example, the default log line layout for client logging is %date [%-5level][%logger] %message %newline.
Successfully exiting the Paceart application would yield the following log file entry: 2011-01-12 04:10:09,766
[INFO ][Paceart.Program]Application_ApplicationExit. INFO is the level of the event, Paceart.Program is the
service used, and Application_ApplicationExit is the message returned from the service.

64 | Paceart Optima System | Paceart Optima System Administration
Format modifiers
You can add optionalformat modifiers to the log line layout with certain characters. One optional format modifier
is the left justification flag, which is the minus (-) character followed by the optional minimum field width modifier.
This modifier is a decimal constant that represents the minimum number of characters to output. If the data
item requires fewer characters, it is padded on either the left or the right until the minimum width is reached.
The default is to pad on the left (right justify) but you can specify right padding with the left justification flag. If
the data item is larger than the minimum field width, the field is expanded to accommodate the data. The value
is never truncated.
This behavior can be changed using the maximum field width modifier, which is designated by a period followed
by a decimal constant. If the data item is longer than the maximum field, then the extra characters are removed
from the beginning of the data item. For example, if the maximum field width is eight and the data item is ten
characters long, then the first two characters of the data item are dropped.
The following table describes format modifier examples for the log line layout.
Format modifier
Date pattern
The default value for the date pattern for log files is yyyy-MM-dd hh:mm:ss,fff. For example, if a logged event
occurs on December 15, 2010 at 4:45 PM, the default date pattern would show 2010-12-15 04:45:12,345 in
the log file. If you want the log files to display dates and times in a different way, you can enter a different date
pattern. For example, dd MMM yyyy HH:mm:ss,fff.
Left
justify?
Minimum
width
width
None20No%20logger
None20Yes%-20logger
30NoneN/A%.30logger
3020No%20.30logger
3020Yes%-20.30logger
CommentMaximum
If the logger name is less than 20 characters
long, left pad with spaces.
Right pad with spaces if the logger name is less
than 20 characters long.
If the logger name is longer than 30 characters,
truncate from the beginning.
Left pad with spaces if the logger name is
shorter than 20 characters. However, if logger
name is longer than 30 characters, then truncate
from the beginning.
Right pad with spaces if the logger name is
shorter than 20 characters. However, if logger
name is longer than 30 characters, then truncate
from the beginning.
If no date pattern is specified, Paceart uses the regional settings of operating system on which the system is
running.
Maximum number of files to preserve
Once the maximum log file size is reached, the system creates another log file. Paceart preserves the most
recent number of log files specified in this field.
Maximum log file size
You can specify the size of log files in megabytes. Once the maximum file size is reached, the system creates
another log file.

Editing Server and Client Logging
You can edit Paceart client and server log file settings.
1. Click Administration > Logging.
2. Determine which action to take.
• To edit server logging, click Edit in the Server Logging section.
• To edit client logging, click Edit in the Client Logging section.
3. Edit the logging settings as necessary.
4. Click Save.
Paceart Optima System | Paceart Optima System Administration | 65
The logging settings are displayed in the Server Logging or Client Logging section.
Field and button definitions for the Edit Server or Client Logging Settings dialog boxes
This is a list of fields and buttons and their definitions.
Field and button definitionsDialog box fields and buttons
*Location of log file:
*Log line layout:
Date pattern:
*Maximum number of files to preserve:
*Maximum log file size:
Save
The location of where the log file is stored. Required
field.
The layout of each entry in the log file. Required field.
The date pattern of each entry in the log file.
The maximum number of log files to preserve.
Required field.
The maximum log file size in megabytes. Required
field.
Saves all changes.
Cancel
Help
Cancels and closes the dialog.
Accesses the Help system.

66 | Paceart Optima System | Paceart Optima System Administration
Configuring the Messaging Service
You can use the messaging service to send faxes, emails, and pages from the Application Server. The messaging
service can send reports via fax and email in addition to working with the CardioVoice System.
The messaging service requires additional setup and configuration. For more information, refer to the Paceart
Optima System Software Installation and Configuration Instructions.
Fax Settings tab
This tab allows you to set default settings for faxes sent by the messaging service.
Email Settings tab
This tab allows you to set default settings for emails sent by the messaging service.
Pager Settings tab
This tab allows you to set default settings for pager messages sent by the messaging service.
Editing fax settings
You can edit the default settings of fax messages sent by the messaging service.
1. Click Administration > Messaging Service > Fax Settings.
2. Click Edit.

Paceart Optima System | Paceart Optima System Administration | 67
3. Edit the fax message settings as necessary.
4. Click Save.
The fax settings are displayed in the Fax Settings Information section.
Field and button definitions for the Edit Fax Settings dialog box
This is a list of fields and buttons and their definitions.
Field and button definitionsDialog box fields and buttons
Sender Name:
Sender Address:
Sender Title:
Subject:
Sender Company:
Sender Department:
Sender Office Location:
HIPAA Disclaimer Text:
Sender Office Phone:
Sender Fax Number:
The fax sender's name.
The fax sender's address.
The fax sender's title. For example, Dr.
The subject of the fax.
The fax sender's company.
The fax sender's department.
The fax sender's office location.
The Health Insurance Portability and Accountability
Act (HIPAA) disclaimer text that appears on all faxes.
The fax sender's office phone number.
The fax sender's fax number.
Sender Home Phone:
Cover Page:
Cover Text:
Save
Cancel
Help
The fax sender's home phone number.
The cover page file you want to use for faxing.
The cover page text.
Saves all changes.
Cancels and closes the dialog.
Accesses the Help system.
Editing email settings
You can edit the default settings of email messages sent by the messaging service.
1. Click Administration > Messaging Service > Email Settings.
2. Click Edit.
3. Edit the email settings as necessary.

68 | Paceart Optima System | Paceart Optima System Administration
4. Click Save.
The email settings are displayed in the Email Settings Information section.
Field and button definitions for the Edit Email Settings dialog box
This is a list of fields and buttons and their definitions.
Field and button definitionsDialog box fields and buttons
Sender Email Address:
Email Default Body:
Server Host Name:
Server Port Number:
TLS Certificate:
Email User Login:
Email User Password:
Email User Domain:
Save
Cancel
The email sender's address.
The default email body text.
The email server host name.
The email server port number.
The Transport Layer Security (TLS) certificate. Also
referred to as an SSL (Secure Sockets Layer)
certificate.
The email user login you will use to send emails.
The email user password you will use to send emails.
The email user domain you will use to send emails.
Saves all changes.
Cancels and closes the dialog.
Help
Accesses the Help system.
Editing pager settings
You can edit the default settings of pager messages sent by the messaging service.
1. Click Administration > Messaging Service > Pager Settings.
2. Click Edit.
3. Edit the pager message settings as necessary.
4. Click Save.
The pager settings are displayed in the Pager Settings Information section.
Field and button definitions for the Edit Pager Settings dialog box
This is a list of fields and buttons and their definitions.
Field and button definitionsDialog box fields and buttons
Modem Port Number:
The modem's port number.

Paceart Optima System | Paceart Optima System Administration | 69
Field and button definitionsDialog box fields and buttons
Modem Initialization String:
Modem Baud Rate:
Numeric Delay in Seconds:
Maximum Number of Retries:
Save
Cancel
Help
Clearing pending messages
You can clear any pending messages from the messaging service.
1. Click Administration > Messaging Service.
2. Determine which action to take.
• To clear pending fax messages, click the Fax Settings tab.
• To clear pending email messages, click the Email Settings tab.
• To clear pending pager messages, click the Pager Settings tab.
The modem's initialization string.
The modem's baud rate.
The numeric paging delay in seconds.
The maximum number of paging retries.
Saves all changes.
Cancels and closes the dialog.
Accesses the Help system.
3. Click Clear Pending Messages.
All pending messages of that type have been cleared from the messaging service.
Configuring Report Groups
The Administration: Report Groups window allows you to group reports by the encounter type and device
type. You can define report groups that contain one or more standard reports or letters.
Report Groups tab
Report groups are useful for generating multiple encounter reports under certain circumstances. For example,
you can group together the Doctor Letter, Patient Summary, and Billing reports so you can send them to a
provider whenever a patient has an in-clinic encounter. You can select the report group from a Print dialog
box when available.
Report groups can be used in most of the same ways that single reports are used, such as printing, faxing,
and emailing.

70 | Paceart Optima System | Paceart Optima System Administration
Adding or Editing a report group
You can add or edit report groups for generating multiple encounter reports under certain circumstances.
1. Click Administration > Report Groups.
2. Determine which action to take.
• To add a report group, click Add.
• To edit an existing report group, select the report group in the Report Groups section and click Edit.

Paceart Optima System | Paceart Optima System Administration | 71
3. In the Name field, enter a name for the report group.
4. In the Encounter Type list, click the type of encounter for the report group.
5. In the Description field, enter a description for the report group.
6. Determine which action to take.
• To add reports to the report group, click Add. In the Add Report dialog box, select the report and click
Save.
• To edit a report in the report group, select the report in the Reports section and click Edit. In the Edit
Report dialog box, select the report and click Save.
• To delete a report from the report group, select the report in the Reports section and click Delete.
7. Click Save.
The report group is displayed in the Report Groups list.
Field and button definitions for the Add or Edit Report Group dialog boxes
This is a list of fields and buttons and their definitions.
Field and button definitionsDialog box fields and buttons
*Name:
Encounter Type
Description:
Add
Edit
The name of the report group.
The encounter type, for example, in-clinic or remote.
The description of the report group.
Adds information.
Allows you to edit existing information.
Delete
Save
Removes the item from the list.
Saves all changes.

72 | Paceart Optima System | Paceart Optima System Administration
Field and button definitionsDialog box fields and buttons
Cancel
Help
Cancels and closes the dialog.
Accesses the Help system.
Field and button definitions for the Add or Edit Report dialog boxes
This is a list of fields and buttons and their definitions.
Field and button definitionsDialog box fields and buttons
*Report:
*Provider:
Save
Save and add another
Cancel
Select a report for the report group. Required field.
Select a provider for the report. Required field.
Saves all changes.
Saves the report information that is displayed and
redisplays the window with unpopulated fields so you
can add another report.
Cancels and closes the dialog.
Help
Accesses the Help system.
Deleting a report group
You can delete existing Paceart report groups.
1. Click Administration > Report Groups.
2. Select the report group you want to delete.
3. Click Delete.
4. Click Yes to confirm the deletion.
The report group is removed from the Report Groups section.
Configuring the Schedule
You can configure how Paceart handles scheduling for each location of care including default appointment
settings, hours appointments can be scheduled, and available resources.
Schedule Configuration tab
This tab allows you to set default preferences for each type of appointment, update the open hours, and view
the calendar for a location of care.
Resource Configuration tab
This tab allows you to manage and enable resources available to a location of care.

Paceart Optima System | Paceart Optima System Administration | 73
Closed Hours tab
This tab allows you to specify when a location of care is closed.
Schedule configuration for a location of care
The Schedule Configuration tab on the Administration: Schedule window in Paceart allows you to configure
how appointment types and open hours are handled on the schedule for a location of care.
You can define the preferences for a location of care for each type of appointment including the duration and
frequency, when an appointment is considered missed, and whether to allow overbooking for that type of
appointment on the schedule.
You can also choose open hours for a location of care. When the schedule for a location of care is displayed
on the Schedule tab, white areas represent the open hours you designated on the Schedule Configuration
tab.
Editing the location of care schedule defaults
Scheduling defaults can be configured for each location of care.
Scheduling defaults allow you to configure the appointment duration, appointment interval, the time period
after which an appointment will be missed, and overbooking preferences by appointment type. Appointment
duration and frequency entered in a patient record overrides the location of care default settings.
1. Click Administration > Schedule.
2. In the Location of Care list, click a location of care.
3. Click the Schedule Configuration tab.

74 | Paceart Optima System | Paceart Optima System Administration
4. In the Appointment Type Preferences section, select an appointment type and click Edit.
5. Edit the appointment settings.
6. Click Save.
Field and button definitions for the Edit Appointment Type Preferences dialog box
This is a list of fields and buttons and their definitions.
Appointment Type:
Appointment Duration:
Appointment Interval:
Missed After:
Overbooking:
Save
Field and button definitionsDialog box fields and buttons
The type of appointment such as in-clinic, remote, or
TTM.
Default duration of the selected type of appointment
for this location of care measured in minutes.
Interval (in days, weeks, or months) that the
appointment type can be scheduled at the selected
location of care.
Number of days that must pass before the appointment
type is considered missed by the location of care.
Measured in days.
Selects whether overbooking of the appointment type
is allowed or prevented for the selected location of
care. Overbooking is always allowed for remote
appointments.
Saves all changes.
Cancel
Help
Cancels and closes the dialog.
Accesses the Help system.

Paceart Optima System | Paceart Optima System Administration | 75
Adding or editing weekly open hours for a location of care
You can set the weekly open hours for a location of care. These hours will be the default open hours for each
week in the calendar unless there are additional open or closed hours added to the schedule.
If Paceart receives a scheduling message from an external source for a time during hours that are not set to
open for a location of care, the appointment is not scheduled.
1. Click Administration > Schedule.
2. In the Location of Care list, click a location of care.
3. Click the Schedule Configuration tab.
4. Click the Open Hours tab.
5. Determine which action to take.
• To add weekly open hours, click Add in the Weekly Open Hours section.
• To edit existing weekly open hours, select the hours in the Weekly Open Hours section and click Edit.
6. Enter the days and times the location of care is open.
7. Click Save.
The weekly open hours entry is displayed in the Weekly Open Hours section.
Field and button definitions for the Add or Edit Weekly Open Hours dialog boxes
This is a list of fields and buttons and their definitions.
Field and button definitionsDialog box fields and buttons
Title:
Day of Week:
Start Time (time):
End Time (time):
Duration:
Descriptive name for the schedule open or closed
hours.
Day on which the start and end times apply. Required
field.
The time when the open or closed hours begin.
The time when the open or closed hours end.
The system automatically calculates duration when
the start time and end time are specified. If you change
the start or end times, the system automatically adjusts
the duration.
Save
Saves all changes.
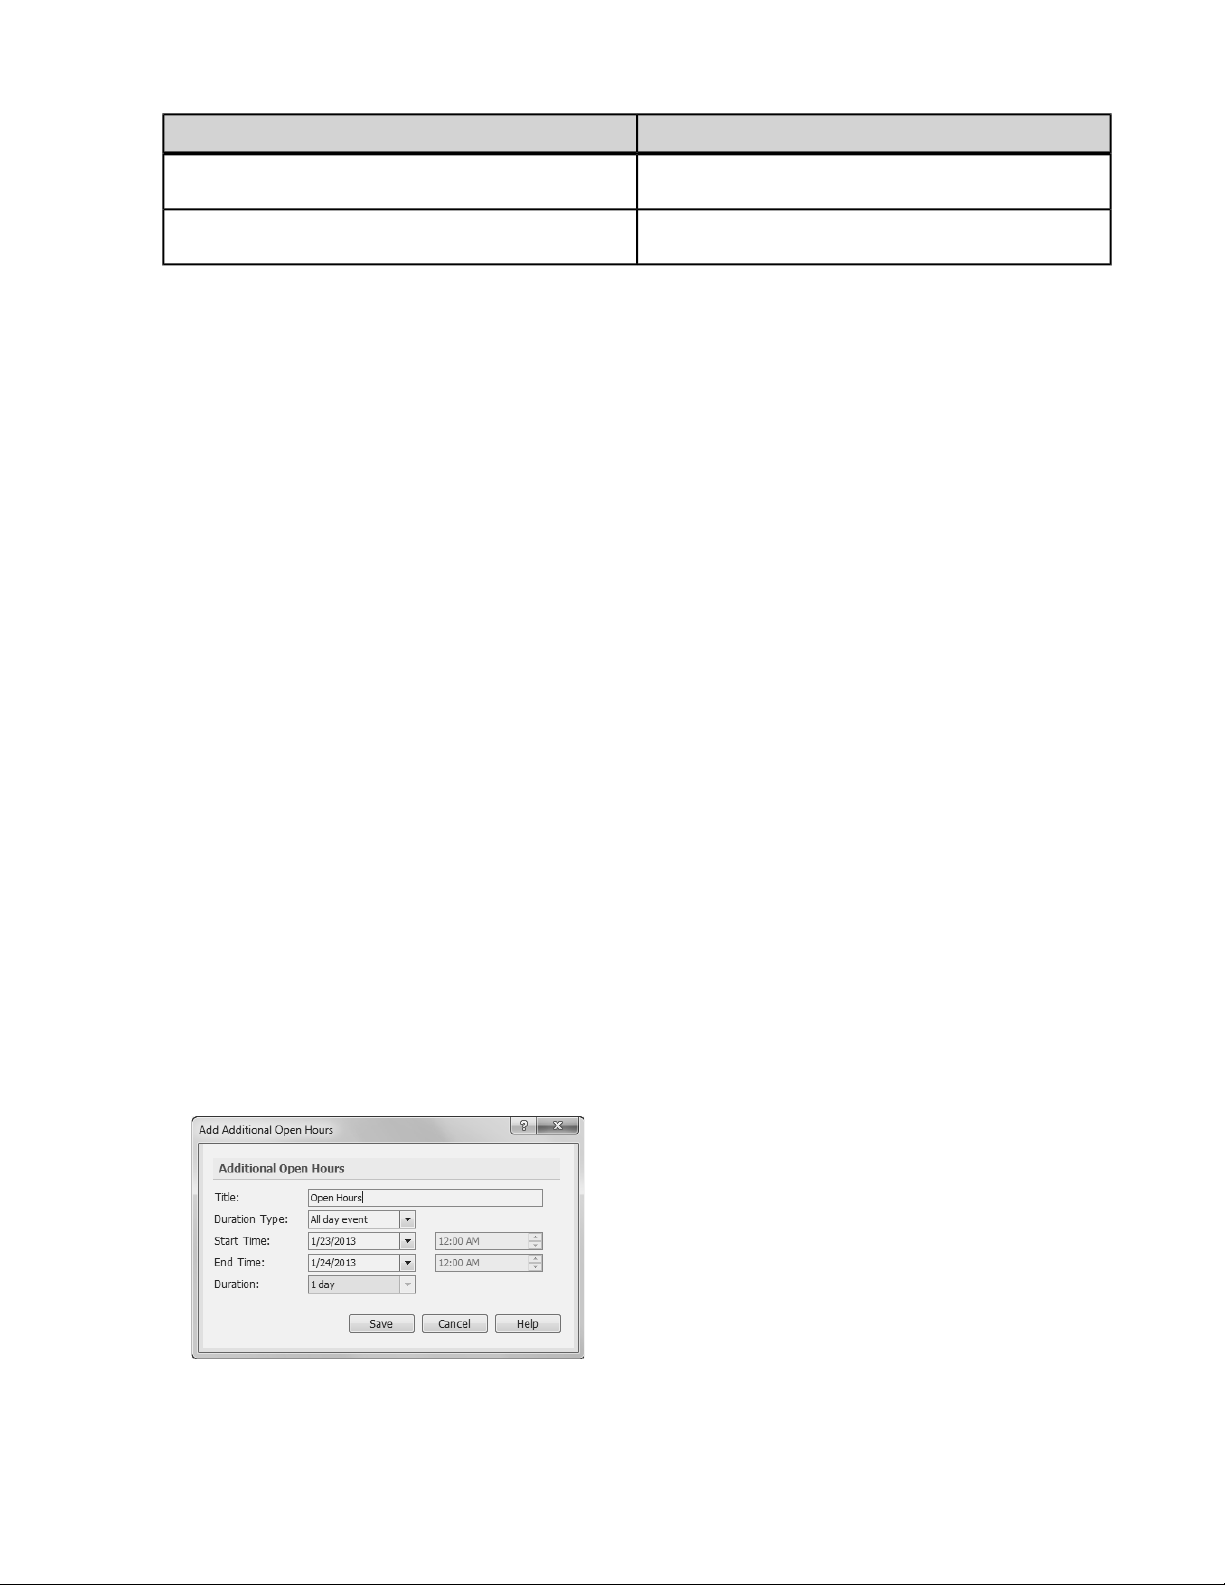
76 | Paceart Optima System | Paceart Optima System Administration
Field and button definitionsDialog box fields and buttons
Cancel
Help
Cancels and closes the dialog.
Accesses the Help system.
Deleting weekly open hours for a location of care
You can delete weekly open hours for a location of care. These hours will be removed as the default open
hours for each week in the calendar.
1. Click Administration > Schedule.
2. In the Location of Care list, click a location of care.
3. Click the Schedule Configuration tab.
4. Click the Open Hours tab.
5. Select an entry in the Weekly Open Hours section.
6. Click Delete.
7. Click Yes to confirm the deletion.
The weekly open hours entry is deleted from the Weekly Open Hours section.
Adding or editing exception hours for a location of care
You can set the exception hours for a location of care.
Exception hours are hours the location of care is open in addition to the usual weekly open hours. For example,
your clinic might be open Monday through Friday and only every third Saturday of the month. The Monday
through Friday schedule would be entered in the weekly open hours while the Saturday schedule would be
entered as exception hours.
1. Click Administration > Schedule.
2. In the Location of Care list, click a location of care.
3. Click the Schedule Configuration tab.
4. Click the Open Hours tab.
5. In the Year field, enter or select the year you want to add or edit open hours for.
6. Determine which action to take.
• To add exception hours, click Add in the Additional Open Hours section.
• To edit existing exception hours, select the hours in the Additional Open Hours section and click Edit.
7. Enter the days and times the location of care is open.
8. Click Save.

Paceart Optima System | Paceart Optima System Administration | 77
The new exception hour entry is displayed in the Additional Open Hours section.
Field and button definitions for the Add or Edit Additional Open Hours dialog boxes
This is a list of fields and buttons and their definitions.
Field and button definitionsDialog box fields and buttons
Title:
Duration Type:
Start Time (date):
Start Time (time):
End Time (date):
End Time (time):
Duration:
Save
Descriptive name for the schedule open or closed
hours.
"All day event" allows you to select dates, but not
times. "During the day" allows you to select dates and
times.
The date when the open or closed hours begin.
The time when the open or closed hours begin.
The date when the open or closed hours end.
The time when the open or closed hours end.
The system automatically calculates duration when
the start time and end time are specified. If you change
the start or end times, the system automatically adjusts
the duration.
Saves all changes.
Cancel
Help
Cancels and closes the dialog.
Accesses the Help system.
Deleting exception hours for a location of care
You can delete existing exception hours for a location of care.
Exception hours are hours the location of care is open in addition to the usual weekly open hours. For example,
your clinic might be open Monday through Friday and only every third Saturday of the month. The Monday
through Friday schedule would be entered in the weekly open hours while the Saturday schedule would be
entered as exception hours.
1. Click Administration > Schedule.
2. In the Location of Care list, click a location of care.
3. Click the Schedule Configuration tab.
4. Click the Open Hours tab.
5. In the Additional Open Hours section, select the exception hours you want to delete for the specified year.
6. Click Delete.
7. Click Yes to confirm the deletion.
The exception hour entry is deleted from the Additional Open Hours section.

78 | Paceart Optima System | Paceart Optima System Administration
Viewing the calendar for a location of care
You can view the calendar for a location of care to see its open and closed hours.
1. Click Administration > Schedule.
2. In the Location of Care list, click a location of care.
3. Click the Schedule Configuration tab.
4. Click the Calendar tab.
The calendar for the location or care is displayed. The calendar reflects the open and closed hours for the
location of care.
5. To hide the monthly calendar and get a larger view of the weekly calendar, click the Hide Calendar icon.
Configuring resources for a location of care
The Resource Configuration tab on the Administration: Schedule window in Paceart allows youto configure
how resources are used on the schedule for a location of care.
A resource is anything that constrains the schedule at a location of care. For example resources could be
nurses, programmers, or follow-up rooms. It is recommended to use only one type of resource for each location
of care.
You can set the types of appointments supported by a resource and whether a resource is enabled for
scheduling. You can also view the calendar for a resource on the Resource Configuration tab.
Adding or editing a resource for a location of care
You can and or edit a resource for a location of care.
1. Click Administration > Schedule.
2. In the Location of Care list, click a location of care.
3. Click the Resource Configuration tab.
4. Determine which action to take.
• To add a resource, click Add in the Resources section.
• To edit an existing resource, select the resource in the Resources section and click Edit.
5. Enter a name for the resource. The name of the resource must be unique across all locations of care.

Paceart Optima System | Paceart Optima System Administration | 79
6. Select the appointment types the resource supports.
7. Enter any additional information in the Description field.
8. If the resource is available for scheduling, select the Resource enabled box.
9. Click Save.
The resource is listed in the Resources section, along with the supported appointment types, status, and
description for the resource.
You must log out of Paceart and log back in before you can search using new resources.
Field and button definitions for the Add or Edit Resource dialog boxes
This is a list of fields and buttons and their definitions.
Field and button definitionsDialog box fields and buttons
*Name:
Appointment Type(s) supported check boxes
Description:
Resource enabled:
Save
Cancel
Help
Name of resource. The name must be unique for each
location of care. Required field.
When checked,an appointment type that the selected
resource supports.
Description of resource.
When checked, the resource is enabled.
Saves all changes.
Cancels and closes the dialog.
Accesses the Help system.
Deleting a resource from a location of care
You can delete a resource from a location of care.
1. Click Administration > Schedule.
2. In the Location of Care list, click a location of care.
3. Click the Resource Configuration tab.
4. In the Resources section, select the resource you want to delete.
5. Click Delete.
6. Click Yes to confirm the deletion.
The resource is deleted from the Resources section.
Viewing the resource calendar
You can view the calendar for a resource to see its availability.
1. Click Administration > Schedule.
2. In the Location of Care list, click a location of care.
3. Click the Resource Configuration tab.
4. In the Resources section, select a resource.

80 | Paceart Optima System | Paceart Optima System Administration
The calendar for the resource is displayed in the Resource Calendar section. The calendar reflects both the
availability of the resource and the location of care schedule.
Hiding the calendar
You can collapse the monthly calendar to allow for a larger view of the weekly calendar.
1. Click Administration > Schedule.
2. In the Location of Care list, click a location of care.
3. Click the Resource Configuration tab.
4. In the Resource Calendar section, click the Hide Calendar icon.
The monthly calendar is collapsed to give you a larger view of the weekly calendar.
Configuring the closed hours for a location of care
The Closed Hours tab on the Administration: Schedule window in Paceart allows you to configure the closed
hours for a location of care.
Additional closed hours are hours the location of care is closed or a resource is unavailable in addition to the
usual weekly closed hours. For example, your clinic might be closed at 5:00 PM Monday through Friday but it
is closed early for a holiday. The Monday through Friday schedule would be entered in the weekly closed hours
while the holiday schedule would be entered as additional closed hours.
Adding or editing weekly closed hours
You can set the weekly closed hours for a location of care or resource. These hours will be the default closed
hours for each week in the calendar unless there are additional open or closed hours added to the schedule.
If you have weekly open hours that overlap with weekly closed hours, the overlapping hours are considered
closed for the location of care.
1. Click Administration > Schedule.
2. In the Location of Care list, click a location of care.
3. Click the Closed Hours tab.
4. Determine which action to take.
• To add weekly closed hours, click Add in the Weekly Closed Hours section.
• To edit existing weekly closed hours, select the hours in the Weekly Closed Hours section and click
Edit.
5. Enter a title, day of the week, and times for the closed hours. If you want to have closed hours for an entire
day, enter 12:00 AM for the Start time and End time.

Paceart Optima System | Paceart Optima System Administration | 81
6. If the closed hours are applicable for all resources, select the All resources option. If the closed hours are
only applicable for one resource, select the Single resource option. Then select the resource from the
drop-down box.
7. Click Save.
The closed weekly hours entry is displayed in the Weekly Closed Hours section.
Field and button definitions for the Add or Edit Weekly Closed Hours dialog boxes
This is a list of fields and buttons and their definitions.
Field and button definitionsDialog box fields and buttons
Title:
Day of Week:
Start Time (time):
End Time (time):
Duration:
All resources
Single resource
Save
Descriptive name for the schedule open or closed
hours.
Day on which the start and end times apply. Required
field.
The time when the open or closed hours begin.
The time when the open or closed hours end.
The system automatically calculates duration when
the start time and end time are specified. If you change
the start or end times, the system automatically adjusts
the duration.
Applies the closed hours to all available resources.
Applies the closed hours to the single resource
selected from the drop-down list.
Saves all changes.
Cancel
Help
Cancels and closes the dialog.
Accesses the Help system.
Deleting weekly closed hours
You can delete weekly open hours for a location of care. These hours will be removed as the default closed
hours for each week in the calendar.
1. Click Administration > Schedule.
2. In the Location of Care list, click a location of care.
3. Click the Closed Hours tab.
4. In the Weekly Closed Hours section, select the entry you want to delete.
5. Click Delete.
6. Click Yes to confirm the deletion.
The entry is deleted from the Weekly Closed Hours section.

82 | Paceart Optima System | Paceart Optima System Administration
Adding or editing additional closed hours
You can set additional closed hours for your clinic or resources.
Additional closed hours are hours the location of care is closed in addition to the usual weekly closed hours.
For example, your clinic might be closed at 5:00 PM Monday through Friday but it will be closed early for a
holiday. The Monday through Friday schedule would be entered in the weekly closed hours while the holiday
schedule would be entered as additional closed hours.
1. Click Administration > Schedule.
2. In the Location of Care list, click a location of care.
3. Click the Closed Hours tab.
4. In the Year field, enter or select the year you want to add or edit closed hours for.
5. Determine which action to take.
• To add additional closed hours, click Add in the Additional Closed Hours section.
• To edit existing additional closed hours, select the hours in the Additional Closed Hours section and
click Edit.
6. Enter a title, duration type, and times for the closed hours.
7. If the closed hours are applicable for all resources, select the All resources option. If the closed hours are
only applicable for one resource, select the Single resource option. Then select the resource from the
drop-down box.
8. Click Save.
The entry is displayed in the Additional Closed Hours section.
Field and button definitions for the Add or Edit Additional Closed Hours dialog boxes
This is a list of fields and buttons and their definitions.
Field and button definitionsDialog box fields and buttons
Title:
Duration Type:
Start Time (date):
Descriptive name for the schedule open or closed
hours.
"All day event" allows you to select dates, but not
times. "During the day" allows you to select dates and
times.
The date when the open or closed hours begin.

Paceart Optima System | Paceart Optima System Administration | 83
Field and button definitionsDialog box fields and buttons
Start Time (time):
End Time (date):
End Time (time):
Duration:
All resources
Single resource
Save
Cancel
Help
The time when the open or closed hours begin.
The date when the open or closed hours end.
The time when the open or closed hours end.
The system automatically calculates duration when
the start time and end time are specified. If you change
the start or end times, the system automatically adjusts
the duration.
Applies the closed hours to all available resources.
Applies the closed hours to the single resource
selected from the drop-down list.
Saves all changes.
Cancels and closes the dialog.
Accesses the Help system.
Deleting additional closed hours
You can delete additional closed hours from a location of care or resource.
Additional closed hours are hours the location of care is closed in addition to the usual weekly closed hours.
For example, your clinic might be closed at 5:00 PM Monday through Friday but it will be closed early for a
holiday. The Monday through Friday schedule would be entered in the weekly closed hours while the holiday
schedule would be entered as additional closed hours.
1. Click Administration > Schedule.
2. In the Location of Care list, click a location of care.
3. Click the Closed Hours tab.
4. In the Additional Closed Hours section, select the closed hours you want to delete for the specified year.
5. Click Delete.
6. Click Yes to confirm the deletion.
The entry is deleted from the Additional Closed Hours section.
Configuring Security Options
The tabs on the Administration: Security window allow you to add, edit, and disable information associated
with Paceart System and External System users, Paceart System and External System roles, and system-level
security policies.
The user and role options define who has access to the system and whether they can display, add, edit or
delete certain types of information. The security policies govern passwords and other system level settings.

84 | Paceart Optima System | Paceart Optima System Administration
Security tabs
DescriptionTab
Users
User Roles
External System Accounts
External System Roles
Security Policies
Add, edit, disable, and view Paceart System user accounts as well as set
passwords.
Define system roles and the security permissions associated with a role
such as viewing and adding and editing.
Add, edit, and view user accounts used for external systems integration to
access Paceart.
Define external system roles and security permissions such as viewing and
adding and editing for users of external systems such as CareLink.
Displays the name, value, and description of Paceart System security
policies such as login attempts and password length. To edit the value of a
selected security policy, click Edit.
Users and User Roles
You can create users and define user roles for Paceart System users. Once a role is defined, it can be assigned
to a user.
When an internal user account record is set up, the user's system access is enabled and a role and an initial
password are assigned.

Paceart Optima System | Paceart Optima System Administration | 85
Roles are also associated with tasks and workgroups to help manage workflow.
If necessary, you can reset a user's password or disable a user's account.
Users tab
Use the Users tab to add a username, password, and role to create a user record for Paceart users.
To set a password for a selected user, click Set Password.
User Roles tab
A name, description, and the associated system permissions define a role. Once a role is defined, users can
be assigned to the role. A user can be assigned to only one role.
Adding or editing a Paceart user account
You can set up a user account to provide a person access to the Paceart System. Account information includes
user name, role, and password.
1. Click Administration > Security > Users.
2. Determine which action to take.
• To add a user account, click Add.
• To edit an existing user account, select the user in the Users section and click Edit.
3. Enter user and account information for the user as necessary. If you are editing an existing user, the user
name and password information are not editable. The user name appears on printed reports and logs. The
set password function can be used to reset the password for an existing user.
4. Click Save.
The user is saved and displayed in the Users section.
Field and button definitions for the Add or Edit User dialog boxes
This is a list of fields and buttons and their definitions.
Field and button definitionsDialog box fields and buttons
*First Name:
The user's first given name (primary forename or
primary personal name). Required field.

86 | Paceart Optima System | Paceart Optima System Administration
Field and button definitionsDialog box fields and buttons
*Last Name:
Credentials:
Email:
Description:
*User Name:
*Role:
Link to Provider:
*Password:
The user's surname (family name). Required field.
The evidence that provides the basis for confidence,
belief, or credibility in the healthcare provider's ability
to perform professional duties. Generally, a degree or
status level as conferred by an institution of higher
learning.
The user's email address.
Additional information that can help identify a user's
account.
The user's user name. Required field.
The user's role from the drop-down list. Required field.
Links a user to a provider from the Encyclopedia. This
can be used to identify when a Paceart user is also
one of the providers listed in the encyclopedia.
The user's password. Required field.
*Confirm Password:
Account is disabled:
Account is locked out: (Edit mode only)
Save
Cancel
Help
Re-entry of the user's password. This makes sure that
the password was typed as intended. Required field.
Indicates if the user account is deactivated. To activate
the user account, clear the check box. The user will
not be able to access the system until activated.
The Paceart System automatically check marks this
box when a user exceeds the number of allowed login
attempts. Only an administrator can clear this check
box.
Saves all changes.
Cancels and closes the dialog.
Accesses the Help system.
Enabling or disabling a user account
You can enable or disable a user account to provide or prevent a person access to the Paceart System.
1. Click Administration > Security.
2. Determine which action to take.
• To enable or disable a Paceart user role, click the Users tab.

Paceart Optima System | Paceart Optima System Administration | 87
• To enable or disable an external system role, click the External System Accounts tab.
3. In the Users or External System Accounts section, select the user that you want to enable or disable.
4. Click Edit.
5. Determine which action to take.
• To enable the user account, clear the Account is disabled: check box.
• To disable the user account, select the Account is disabled: check box.
6. Click Save.
Field and button definitions for the Add or Edit User dialog boxes
This is a list of fields and buttons and their definitions.
Field and button definitionsDialog box fields and buttons
*First Name:
*Last Name:
Credentials:
Email:
The user's first given name (primary forename or
primary personal name). Required field.
The user's surname (family name). Required field.
The evidence that provides the basis for confidence,
belief, or credibility in the healthcare provider's ability
to perform professional duties. Generally, a degree or
status level as conferred by an institution of higher
learning.
The user's email address.
Description:
*User Name:
*Role:
Additional information that can help identify a user's
account.
The user's user name. Required field.
The user's role from the drop-down list. Required field.

88 | Paceart Optima System | Paceart Optima System Administration
Field and button definitionsDialog box fields and buttons
Link to Provider:
*Password:
*Confirm Password:
Account is disabled:
Account is locked out: (Edit mode only)
Save
Cancel
Links a user to a provider from the Encyclopedia. This
can be used to identify when a Paceart user is also
one of the providers listed in the encyclopedia.
The user's password. Required field.
Re-entry of the user's password. This makes sure that
the password was typed as intended. Required field.
Indicates if the user account is deactivated. To activate
the user account, clear the check box. The user will
not be able to access the system until activated.
The Paceart System automatically check marks this
box when a user exceeds the number of allowed login
attempts. Only an administrator can clear this check
box.
Saves all changes.
Cancels and closes the dialog.
Help
Accesses the Help system.
Removing a lockout from a user account
If a user surpasses the maximum failed password attempts, a lockout prevents the user from accessing the
Paceart System. Once a lockout is removed, the user can access the system again.
1. Click Administration > Security > Users.
2. In the Users section, select the user that is locked out of the Paceart System.
3. Click Edit.

Paceart Optima System | Paceart Optima System Administration | 89
4. Clear the Account is locked out check box.
5. Click Save.
The account is available to use.
Linking Users to Providers
You can link a User to a Provider from the Encyclopedia when adding or editing a Paceart user account. Linking
to a Provider can be used to identify when a Paceart user is also one of the providers listed in the Encyclopedia
tab.
1. Click Administration > Security.
2. Determine which action to take.
• To link a Paceart user to a provider, click the Users tab.
• To link an external system role to a provider, click the External System Accounts tab.
3. Click Add or Edit.
4. From the Add User or Edit User window, click the [...] in the Account Information window to specify a
provider.
The Select Provider window is displayed.
5. Select a provider and click Select.
6. Click Save.
The provider is linked to the user.
Field and button definitions for the Select Provider dialog box
This is a list of fields and buttons and their definitions.
Field and button definitionsDialog box fields and buttons
Search String:
Search
Name:
Address:
Text box for entering whole or partial keywords.
Invokes the search.
Full name of the provider.
The provider's street address.

90 | Paceart Optima System | Paceart Optima System Administration
Field and button definitionsDialog box fields and buttons
Country:
Comments:
Phone:
Provider ID:
Specialty:
Provider Code:
Save
Cancel
Help
The country of the provider's street address.
Miscellaneous comments.
The provider's phone number.
The provider's ID number.
The provider's medical specialty, for example,
cardiology.
The provider code.
Saves all changes.
Cancels and closes the dialog.
Accesses the Help system.
Setting a user password
You can set passwords for both Paceart users and external system accounts. A user's password is initially set
up when the user account is added, but it can be re-set. Passwords for external system accounts don't expire.
1. Click Administration > Security.
2. Determine which action to take.
• To set a Paceart user password, click the Users tab.
• To set an external system account password, click the External System Accounts tab.
3. In the Users or External System Accounts section, select the user whose password you want to set.
4. Click Set Password.
5. Enter the new password in the New Password field. This is a required field.
6. Re-enter the new password in the Confirm New Password field. This is a required field.
7. Click Save.
The new password is saved.

Paceart Optima System | Paceart Optima System Administration | 91
Field and button definitions for the Set Password dialog box
This is a list of fields and buttons and their definitions.
Field and button definitionsDialog box fields and buttons
*New Password
*Confirm New Password
Save
Cancel
Help
The new password. Required field.
Re-entry of the new password. This makes sure that
the new password was typed as intended. Required
field.
Saves all changes.
Cancels and closes the dialog.
Accesses the Help system.
Adding or editing a role
You can add or edit a role in Paceart. A role is a set of system level permissions that can be assigned to users
of the Paceart System.
1. Click Administration > Security > User Roles.
2. Determine which action to take.
• To add a role, click Add.
• To edit an existing role, select the role in the User Roles section and click Edit.
3. Enter the role information and identify the permissions for the role as necessary. If you select a permission
that requires other permissions, Paceart automatically selects the required permissions when you select
the first permission.
4. Click Save.

92 | Paceart Optima System | Paceart Optima System Administration
The role is saved and displayed in the User Roles section.
Field and button definitions for the Add or Edit Role dialog boxes
This is a list of fields and buttons and their definitions.
Field and button definitionsDialog box fields and buttons
*Role Name:
Description:
Default:
View
Add/Edit
Delete
View Data
Add/Edit/Delete Data
The name of the new role. Required field.
The description for the role.
Indicates if this is the default role.
Indicates if users in this role can view patient
demographic information. Users with this permission
can also perform encounter searches and view
encounter history.
Indicates if users in this role can add and edit patient
demographic information.
Indicates if users in this role can delete patients.
Indicates if users in this role can view patient encounter
information.
Indicates if users in this role can add and delete patient
encounters or edit existing encounter information.
Sign Encounter/Lock Encounter
View Appointments
Add/Edit/Delete Appointments
Scheduling Administration
Access Advanced Search
View/Edit/Delete (any) User's Tasks
View Audit Log
Indicates if users in this role can sign or lock patient
encounters.
Indicates if users in this role can view the appointments
schedule.
Indicates if users in this role can add, edit, and delete
appointments on the schedule.
Indicates if users in this role can view and modify
scheduling preferences and resources.
Indicates if users in this role can use the Advanced
Search feature.
Indicates if users in this role can view, edit, and delete
any user tasks in the workflow management feature.
If users do not have this permission, they can only view
and modify tasks and workgroups assigned to them.
Indicates if users in this role can view the audit log.

Paceart Optima System | Paceart Optima System Administration | 93
Field and button definitionsDialog box fields and buttons
Add/Edit/Delete Patient Identification
Add/Edit/Delete Report Groups
Add/Edit/Delete Security
Add/Edit/Delete Task Management
View/Edit CardioVoice settings
View/Edit Messaging Service settings
Add/Edit/Delete Entries
Indicates if users in this role can add, edit, and delete
all information for locations of care, patient ID types,
and patient codes.
Indicates if users in this role can add, edit, and delete
report groups.
Indicates if users in this role can add, edit, and delete
security information including users, roles, and security
policies.
Indicates if users in this role can add, edit, and delete
task management information, including workgroups.
Indicates if users in this role can view and edit
CardioVoice settings.
Indicates if users in this role can view and edit
Messaging Service settings.
Indicates if users in this role can add, edit, and delete
encyclopedia entries.
Allow Access
View All Patients' Encounters
Edit Connectivity configuration
View Activity Log
Add/Edit/Delete Activity Log
Edit Logging
Save
Cancel
Indicates if users in this role can log in to the Paceart
Web application.
Indicates if users in this role can view all patient
encounters. If a user does not have this permission,
the user can only view encounters of patients related
to a provider.
Indicates if users in this role can edit the configuration
for patient matching.
Indicates if users in this role can view the activity log.
Indicates if users in this role can add, edit, and delete
Activity Log entries.
Indicates if users in this role can edit settings for client
and server logging files.
Saves all changes.
Cancels and closes the dialog.
Help
Accesses the Help system.

94 | Paceart Optima System | Paceart Optima System Administration
Role Permissions
A user role can access specific data when granted each security permission in Paceart.
If you select a permission that requires other permissions, Paceart automatically selects the required permissions
when you select the first permission.
Patient Demographics
View: Allows the user to view all patient demographic information. This permission also allows the user to
perform encounter searches and view encounter history, although they cannot open an encounter without also
having the View Data permission.
Add/Edit: Allows the user to add new patients to the system and modify all patient demographic information.
A user with this permission must also have the View permission.
Delete: Allows the user to delete a patient from the system. A user with this permission must also have the
View permission.
Patient Encounters
View Data: Allows the user to view all patient encounter information. A user with this permission must also
have the View permission.
Add/Edit/Delete Data: Allows the user to add new encounters, modify existing patient encounter information,
and delete existing encounters from the system. A user with this permission must also have the View, Add/Edit,
and View Data permissions.
Lock Encounter: Allows the user to sign or lock encounters depending on how you have set up encounter
task completion. It also allows you to modify all patient encounter information. A user with this permission must
also have the View, Add/Edit, View Data, and Add/Edit/Delete Data permissions.
Scheduling
View Appointments: Allows the user to view all appointment information. A user with this permission must
also have the View permission.
Add/Edit/Delete Appointments: Allows the user to add new appointments, modify all appointment information,
and delete existing appointments from the system. A user with this permission must also have the View,
Add/Edit, and View Appointments permissions.
Scheduling Administration: Allows the user to view and modify scheduling preferences and resources. A
user with this permission must also have the Add/Edit/Delete Patient Identification permission.
Search
Access Advanced Search: Allows the user to access the Advanced Search feature in Paceart. A user with
this permission must also have the View and View Data permissions.
Workflow
View/Edit/Delete (any) User's Tasks: Allows the user to view and modify tasks and workgroups for all users.
If the user does not have this permission, they can only view and modify tasks and workgroups assigned to
them. A user with this permission must also have the View permission.
Clinic Administration
View Audit Log: Allows the user to view and search the Audit Log. A user with this permission must also have
the View, View Data, and View Appointments permissions.

Paceart Optima System | Paceart Optima System Administration | 95
Add/Edit/Delete Patient Information: Allows the user to add, edit, and delete all information for locations of
care, patient ID types, and patient codes.
Add/Edit/Delete Report Groups: Allows the user to add, edit, and delete all report options and report groups.
Add/Edit/Delete Security: Allows the user to add, edit, and delete all security and licensing information. This
permission also allows the user to view the Audit Log.
Add/Edit/Delete Task Management: Allows the user to add, edit, and delete tasks and workgroups.
View/Edit CardioVoice settings: Allows the user to view and modify CardioVoice settings.
View/Edit Messaging Service settings: Allows the user to view and modify Messaging service settings.
Encyclopedias
Add/Edit/Delete Entries: Allows the user to add, edit, and delete all Encyclopedia entries.
Paceart Web
Allow Access: Allows the user to log in to the Paceart Web application. A user with this permission must also
have the View and View Data permissions
View All Patients' Encounters: Allows the user to view all patient encounters in Paceart Web. If a user does
not have this permission and has the Allow Access permission, the user can only view encounters of patients
related to a provider. A user with this permission must also have the View, View Data, and Allow Access
permissions.
Connectivity Configuration
Edit Connectivity Configuration: Allows the user to edit the configuration for patient matching.
Activity Log
View Activity Log: Allows the user to view and search the Activity Log.
Add/Edit/Delete Activity Log: Allows the user to add, edit, and delete Activity Log entries. A user with this
permission must also have the View Activity Log permission.
Logging
Edit Logging: Allows the user to edit settings for client and server logging files.
Deleting a role
You can delete existing roles for both Paceart users and externalsystem accounts. A role is a set of permissions
that can be assigned to users of the Paceart System. You cannot delete a role if any users are assigned to it.
1. Click Administration > Security.
2. Determine which action to take.
• To delete a Paceart user role, click the User Roles tab.
• To delete an external system role, click the External System Roles tab.
3. In the User Roles or External System Roles section, select the role that you want to delete.
4. Click Delete.
5. Click Yes to confirm the deletion.
The role is removed from the User Roles or External System Roles section.

96 | Paceart Optima System | Paceart Optima System Administration
External System Accounts
You can create account records and define user roles used by external systems. External users that use other
systems such as CareLink may need to do scheduling or other tasks in Paceart. Once a role is defined, it can
be assigned to a user.
When an external user account record is set up, the user's system access is enabled and a role and an initial
password are assigned. If necessary, you can reset a password for a user or disable a user account.
Roles are associated with tasks and workgroups to help manage workflow. An external user, for example, a
user of the CareLink system, might be assigned a role that allows them to schedule appointments in Paceart.
External System Accounts tab
Use the External System Accounts tab to add a user name, password, and role to create a user record for
accounts used by external systems such as CareLink.
To set a password for a selected external user, click Set Password. Passwords for external system accounts
don't expire.
External System Roles tab
Use the External System Roles tab to define roles for accounts used by external systems such as CareLink.
You can create a new, external role based on the information for a selected existing role by clicking Save As.
Adding or editing a Paceart External System Accounts user
You can add or edit an External System Account. Creating separate External System Account users allows
you to connect to external systems, such as the Medtronic CareLink Network, with different permissions than
a typical Paceart user would have.
1. Click Administration > Security > External System Accounts.
2. Determine which action to take.
• To add an external user account, click Add.
• To edit an existing external user account, select the user in the External System Accounts section
and click Edit.

Paceart Optima System | Paceart Optima System Administration | 97
3. Enter user and account information for the user as necessary. If you are editing an existing user, the user
name and password information are not editable. The user name appears on printed reports and logs. The
set password function can be used to reset the password for an existing user.
4. Click Save.
The user is saved and displayed in alphabetical order in the External System Accounts section.
Field and button definitions for the Add or Edit User dialog boxes
This is a list of fields and buttons and their definitions.
Field and button definitionsDialog box fields and buttons
*First Name:
*Last Name:
Credentials:
Email:
Description:
*User Name:
*Role:
Link to Provider:
The user's first given name (primary forename or
primary personal name). Required field.
The user's surname (family name). Required field.
The evidence that provides the basis for confidence,
belief, or credibility in the healthcare provider's ability
to perform professional duties. Generally, a degree or
status level as conferred by an institution of higher
learning.
The user's email address.
Additional information that can help identify a user's
account.
The user's user name. Required field.
The user's role from the drop-down list. Required field.
Links a user to a provider from the Encyclopedia. This
can be used to identify when a Paceart user is also
one of the providers listed in the encyclopedia.
*Password:
*Confirm Password:
Account is disabled:
Account is locked out: (Edit mode only)
Save
The user's password. Required field.
Re-entry of the user's password. This makes sure that
the password was typed as intended. Required field.
Indicates if the user account is deactivated. To activate
the user account, clear the check box. The user will
not be able to access the system until activated.
The Paceart System automatically check marks this
box when a user exceeds the number of allowed login
attempts. Only an administrator can clear this check
box.
Saves all changes.

98 | Paceart Optima System | Paceart Optima System Administration
Field and button definitionsDialog box fields and buttons
Cancel
Help
Cancels and closes the dialog.
Accesses the Help system.
Setting a user password
You can set passwords for both Paceart users and external system accounts. A user's password is initially set
up when the user account is added, but it can be re-set. Passwords for external system accounts don't expire.
1. Click Administration > Security.
2. Determine which action to take.
• To set a Paceart user password, click the Users tab.
• To set an external system account password, click the External System Accounts tab.
3. In the Users or External System Accounts section, select the user whose password you want to set.
4. Click Set Password.
5. Enter the new password in the New Password field. This is a required field.
6. Re-enter the new password in the Confirm New Password field. This is a required field.
7. Click Save.
The new password is saved.
Field and button definitions for the Set Password dialog box
This is a list of fields and buttons and their definitions.
Field and button definitionsDialog box fields and buttons
*New Password
*Confirm New Password
Save
Cancel
Help
The new password. Required field.
Re-entry of the new password. This makes sure that
the new password was typed as intended. Required
field.
Saves all changes.
Cancels and closes the dialog.
Accesses the Help system.

Paceart Optima System | Paceart Optima System Administration | 99
Adding or editing a Paceart External System role
You can add or edit an External System role. An External System role is a set of permissions that can be
assigned to a user who will be connecting to an External System, such as the Medtronic CareLink Network.
1. Click Administration > Security > External System Roles.
2. Determine which action to take.
• To add an external role, click Add.
• To edit an existing external role, select the role in the External System Roles section and click Edit.
3. Enter the role information and identify the permissions for the role as necessary.
4. Click Save.
The role is saved and displayed in alphabetical order in the External System Roles section.
Field and button definitions for the Add or Edit Role dialog boxes
This is a list of fields and buttons and their definitions.
Field and button definitionsDialog box fields and buttons
*Role Name:
Description:
Default:
View
The name of the new role. Required field.
The description for the role.
Indicates if this is the default role.
Indicates if users in this role can view patient
demographic information. Users with this permission
can also perform encounter searches and view
encounter history.

100 | Paceart Optima System | Paceart Optima System Administration
Field and button definitionsDialog box fields and buttons
Add/Edit
Delete
View Data
Add/Edit/Delete Data
Sign Encounter/Lock Encounter
View Appointments
Add/Edit/Delete Appointments
Allow Access
Indicates if users in this role can add and edit patient
demographic information.
Indicates if users in this role can delete patients.
Indicates if users in this role can view patient encounter
information.
Indicates if users in this role can add and delete patient
encounters or edit existing encounter information.
Indicates if users in this role can sign or lock patient
encounters.
Indicates if users in this role can view the appointments
schedule.
Indicates if users in this role can add, edit, and delete
appointments on the schedule.
Indicates if users in this role can log in to the Paceart
Web application.
View All Patients' Encounters
Save
Cancel
Help
Indicates if users in this role can view all patient
encounters. If a user does not have this permission,
the user can only view encounters of patients related
to a provider.
Saves all changes.
Cancels and closes the dialog.
Accesses the Help system.
Deleting a role
You can delete existing roles for both Paceart users and externalsystem accounts. A role is a set of permissions
that can be assigned to users of the Paceart System. You cannot delete a role if any users are assigned to it.
1. Click Administration > Security.
2. Determine which action to take.
• To delete a Paceart user role, click the User Roles tab.
• To delete an external system role, click the External System Roles tab.
3. In the User Roles or External System Roles section, select the role that you want to delete.
4. Click Delete.
5. Click Yes to confirm the deletion.
 Loading...