

Page 1

Medtronic Navigated, Nonsterile,
M708348B622E Rev. B
Single-Use Instruments for use with
StealthStation™ and IPC™
POWEREASE™ Systems
2018-03-06
IMPORTANT INFORMATION ON THE MEDTRONIC NAVIGATED NONSTERILE,
SINGLE USE INSTRUMENTS
DESCRIPTION
Medtronic navigated non-sterile, single-use instruments are spine preparation instruments made of high grade stainless steel.
These instruments are specifically designed for use in procedures where the use of stereotactic surgery may be appropriate.
Placing Medtronic single-use sterile spheres on each of the NavLock™ Tracker passive stems allows a Medtronic computerassisted surgery system such as the StealthStation™ Image Guidance System to track the instruments in the surgical field.
Medtronic navigated non-sterile, single-use instruments are compatible with various Medtronic spinal implant systems. These
instruments are also compatible with Medtronic’s IPC™ POWEREASE™ System when connected to the POWEREASE™
Driver.
These instruments should never be reused under any circumstances.
INTENDED USE
Medtronic navigated non-sterile, single-use instruments are intended to be used during the preparation and placement of
Medtronic screws during spinal surgery to assist the surgeon in precisely locating anatomical structures in either open, or
minimally invasive, procedures. Medtronic navigated non-sterile, single use instruments are specifically designed for use with
the StealthStation™ System, which is indicated for any medical condition in which the use of stereotactic surgery may be
appropriate, and where reference to a rigid anatomical structure, such as a skull, a long bone, or vertebra, can be identified
relative to a CT or MR-based model, fluoroscopy images, or digitized landmarks of the anatomy. Medtronic navigated nonsterile, single-use instruments are also compatible with the IPC™ POWEREASE™ System.
DO NOT IMPLANT THE INSTRUMENTS
If there is any doubt or uncertainty concerning the proper use of these instruments, contact Medtronic. Any available surgical
techniques will be provided at no charge.
Medtronic does not and cannot warrant the use of this instrument nor any of the component parts upon which repairs have been
made or attempted, except as performed by Medtronic or an authorized Medtronic repair representative. Implied warranties of
merchantability and fitness for a particular purpose or use are specifically excluded.
WARNINGS
▪ These instruments should never be reused or reprocessed under any circumstances. Reuse or reprocessing may
compromise the structural integrity of these instruments and create a risk of contamination, which could result in patient
injury, illness, or death.
▪ Breakage, slippage, misuse, or mishandling of instruments, such as on sharp edges, may cause injury to the patient or
operative personnel.
▪ Improper maintenance, handling, or poor cleaning procedures can render the instrument unsuitable for its intended purpose
or even dangerous to the patient or surgical staff.
▪ The surgeon should use extreme caution when working in close proximity to vital organs, nerves, or vessels. In addition,
excessive force should not be used when positioning the instruments, since it could cause injury to the patient.
▪ During navigation, it is important to frequently confirm navigational accuracy by touching the tip of the instrument on known
anatomical points, including accuracy checkpoints, and comparing the position of the instrument tip in the image with its
physical location.
PRECAUTIONS
▪ Excessive force applied by instruments to implants can dislodge devices, particularly hooks.
Page 2

▪ Never expose instruments to temperatures in excess of 135°C (275°F). This level of heating may modify the physical
characteristics. If uncertain if the instruments were exposed to temperatures in excess of 135°C (275°F), carefully inspect
the instruments to ensure they still function as intended.
▪ Extreme care should be taken to ensure this instrument is in good working order. During the procedure, successful
utilization of this instrument is extremely important. Instruments should not be bent or damaged in any way. Misuse of
instruments resulting in corrosion, “freezing-up,” scratching, loosening, bending, or fracture of any or all sections of an
instrument may inhibit or prevent proper function.
▪ Do not use this instrument for any action for which it was not intended.
▪ To avoid injury or navigation inaccuracy, the instrument should be carefully examined for functionality or damage prior to
use. A damaged instrument should not be used. Additional back-up instruments should be available.
▪ Preoperative and operating procedures, including knowledge of surgical techniques, are important considerations in the
successful utilization of the system by the surgeon. The proper selection and the compliance of the patient will greatly affect
the results.
▪ Proper patient selection and operative care are critical to the success of the surgery and avoidance of injury during surgery.
Read and follow all other product information supplied by the manufacturer of the implants or the instruments.
▪ Special precautions are needed during pediatric use. Care should be taken when using instruments in pediatric patients
since these patients can be more susceptible to the stresses involved in their use.
▪ Some surgeries require the use of instruments that incorporate a measuring function. Ensure instruments with a measuring
function are not worn and any surface engravings are clearly visible.
POTENTIAL ADVERSE EFFECTS
▪ Nerve damage, paralysis, pain, or damage to soft tissue, visceral organs, or joints.
▪ Infection if instruments are not properly cleaned and sterilized.
▪ Pain, discomfort, or abnormal sensations resulting from the presence of the instrument.
▪ Nerve damage due to surgical trauma.
▪ Dural leak in cases of excessive load application.
▪ Impingement or damage of close vessels, nerves, and organs by slippage or misplacement of the instrument.
▪ Damage due to spontaneous release of clamping devices or spring mechanisms of certain instruments.
▪ Cutting of skin or gloves of operating staff.
▪ Bony fracture in cases of deformed spine or weak bone.
▪ Tissue damage to the patient, physical injury to operating staff, and/or increased operating time that may result from the
disassembly of multi-component instruments occurring during surgery.
▪ The methods of use of instruments are determined by the user's experience and training in surgical procedures. A
successful result is not always achieved in every surgical case. This fact is especially true in spinal surgery where other
patient conditions may compromise the results.
Physician note: although the physician is the learned intermediary between the company and the patient, the important medical
information given in this document should be conveyed to the patient.
For US Audiences Only
Caution: Federal law (USA) restricts these devices to sale by or on the order of a physician.
PACKAGING
Packages for instruments should be intact upon receipt. All devices should be checked for completeness and all instruments
should be checked for signs of damage prior to use. Damaged packages or products should not be used and should be
returned to Medtronic.
Only sterile instruments should be used in surgery. Always immediately discard all instruments used in surgery.
EXAMINATION
Instruments must always be examined by the user prior to surgery.
Examination should be thorough and must include a visual and functional inspection of the working surfaces, pivots, racks,
spring or torsional operation and the presence of any cracks, bending, deformation, or distortion, and that all components are
complete.
Visual Inspection
Make certain of the following:
▪ Laser etchings, engravings, and other markings are legible.
▪ No cracks are present in instrument handles or any part of the instrument.
▪ Discoloration, corrosion, stains, or rust do not exist.
▪ There is no handle/shaft separation, and the handle-to-shaft connection is secure.
▪ No cuts or gouges in silicone are present.
▪ There is no damage (cuts, tears, etc.) to insulation.
▪ There is no damage to the working ends or tips. The working ends should be free of cracks, sharp edged gouges, and other
damage. When applicable, the working ends should be sharp.
▪ There is no damage to threads.
Page 3

▪ All parts are present and free of damage and deterioration. Examples of parts that may be missing, loose, or damaged
include set screws, springs, curved springs, pins, and prongs.
▪ Mating ends are free of damage (nicks, gouges, bends, etc.) that would interfere with the mating function.
▪ Cannulated instruments with a guide wire or other insertion tool are visually checked.
Functional Inspection
Make certain of the following:
▪ The parts intended to move do so freely without sticking, binding, or grinding.
▪ Springs return the handle of the instrument to its original position.
▪ Retention tabs hold appropriate mating parts and are not damaged.
▪ The instrument will function as intended with the appropriate mating parts.
▪ Ball detents hold mating parts and are free from damage.
▪ Sharp edges are sharp to the touch and are not dull, have no nicks, or any other damage.
▪ Tips meet when appropriate.
▪ Ratcheting mechanisms are functional. This includes handles, latches, and other mechanisms. All teeth should be present
and functional.
DIRECTIONS FOR USE
The instruments are precision devices, which may incorporate a measuring function and have uses as described on the label.
Those instruments which incorporate a depth measuring function have an accuracy level equivalent to ±0.1mm.
Use with the IPC™ POWEREASE™ System
See the IPC™ POWEREASE™ System package insert (M726750B246) for instructions on how to set up and operate the IPC™
POWEREASE™ System.
Using the POWEREASE™ Adapter is optional. See the POWEREASE™ Adapter package insert (9734925) for instructions on
using the adapter with the POWEREASE™ Driver.
1. Place single-use sterile spheres on each of the four NavLock™ Tracker stems. Push each sphere onto the stem until it
“clicks” into place. Make sure the sphere is firmly seated on the stem.
2. Place the instrument into the NavLock™ Tracker.
A. Insert the proximal end of the instrument shaft until it is fully seated in the NavLock™ Tracker.
B. Verify the tool is secured in the NavLock™ Tracker by making sure it cannot be pulled out of the device.
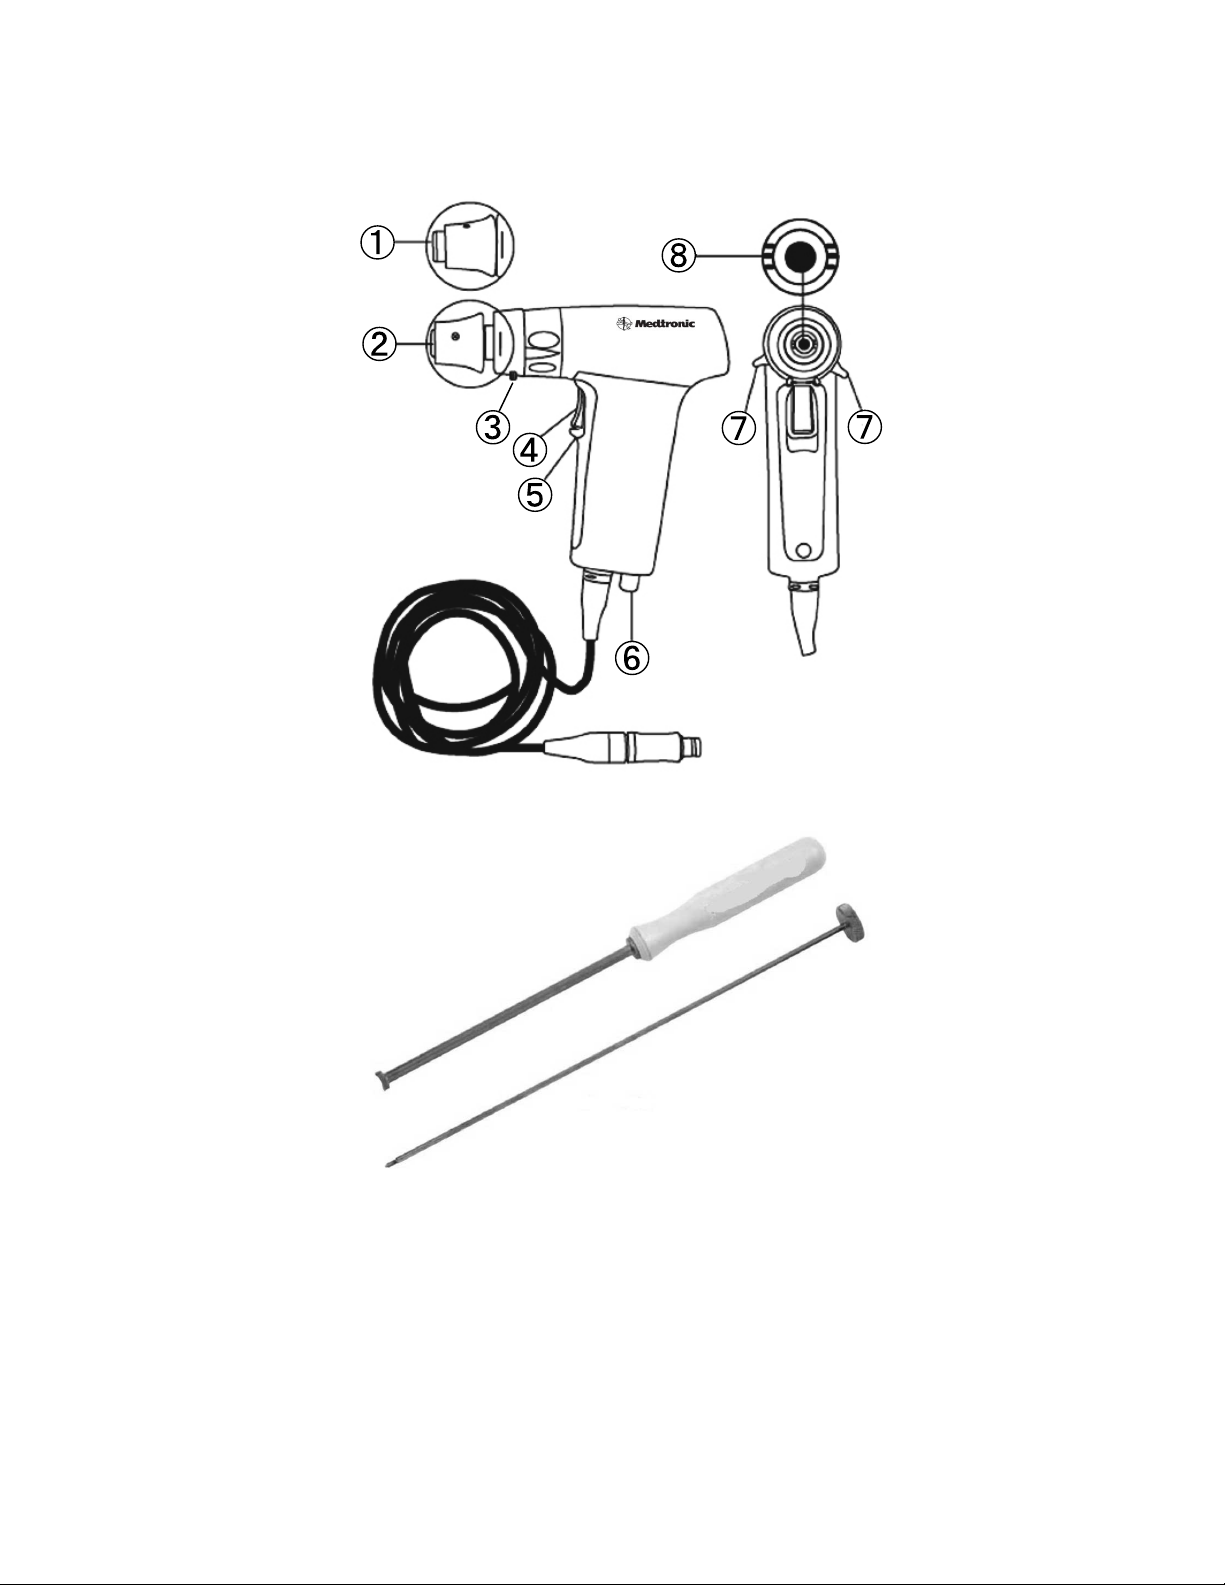
3. Attach the NavLock™ Tracker assembly to the POWEREASE™ Driver (Figure 1).
A. On the POWEREASE™ Driver, pull back and hold the quick disconnect to unlock the collet.
Note: the quick disconnect must be held in the unlocked position ① when inserting or removing tools.
B. Insert the proximal end of the NavLock™ Tracker assembly into the collet.
C. Align the flat sides of the instrument shaft with the marks on the collet ⑧ and insert into the collet until fully seated
(Figure 2).
D. Release the quick disconnect to place the assembly in the locked position ②.
E. Verify the NavLock™ Tracker assembly is secured in the POWEREASE™ Driver by ensuring it cannot be pulled out of
the device.
F. Refer to the Synergy™ Spine & Trauma Pocket Guide for additional navigation instructions.
Table 1: POWEREASE™ Driver
①
Quick Disconnect Unlocked
②
Quick Disconnect Locked
③
Mechanized Working Collar Locking Pins (2)
④
Variable Speed Trigger
4. Verify the assembly.
A. For Synergy™ Spine Version 1.7, select the current NavLock™ Tracker color and corresponding instrument from the
instrument list (tool card) in the procedure software. For Synergy™ Spine & Trauma software version 2.0 and later,
select the appropriate NavLock™ tool card.
B. Ensure the instrument has green status (i.e. it is being tracked by the StealthStation™ system) on the screen.
C. Face the NavLock™ Tracker array toward the camera.
D. Place the instrument tip straight into the reference frame divot.
E. Press the footswitch or wait for the system to verify.
5. In the procedure software, select the appropriate instrument that corresponds to the instrument being used in the
procedure.
A. While in the Navigate task, click the Select Tip button.
B. Select the instrument type and size from the list in the Select Tip flyout.
6. Refer to the Synergy™ Spine & Trauma Pocket Guide for additional navigation instructions.
⑤
Finger Sensor Trigger
⑥
NIM-ECLIPSE Cable Connector
⑦
Mode Select Switch
⑧
Flat Side Indicators
Page 4

When using the POWEREASE™ Driver with navigation, avoid any bending of the instrument by applying direct force only along
the instrument assembly axis (Figure 3).
Instructions for Manual Use
1. Place single-use sterile spheres on each of the four NavLock™ Tracker stems. Push each sphere onto the stem until it
“clicks” into place. Ensure the sphere is firmly seated on the stem.
2. Place the instrument into the NavLock™ Tracker.
A. Insert the proximal end of the instrument shaft until it is fully seated in the NavLock™ Tracker.
B. Verify the instrument is secured in the NavLock™ Tracker by ensuring it cannot be pulled out of the device.
3. Secure the handle to the NavLock™ Tracker assembly. Note: use only the Medtronic Ratcheting Egg Handle (9734410),
Medtronic Straight Handle (9733734), Quick Connect Ratcheting Handle (G900000), or Medtronic Ratcheting Handle
(G170059).
A. Retract the collar on the handle and snap the proximal end of the instrument shaft into the handle.
B. Verify the handle is secured to the instrument by ensuring it cannot be pulled out of the device.
4. Continue with steps 4 through 6 in the section entitled “Use with the IPC™ POWEREASE™ System.”
Sterilization Instructions
Medtronic non-sterile, single-use instruments are considered critical devices and must be sterilized prior to initial use.
1. Double wrap instruments and/or dedicated transportation/sterilization cassettes containing instruments with non-woven/
moisture resistant surgical sterilization wrap.
2. Inspect the packaging to ensure no rips, punctures, or seal failures are present in or on the packaging prior to loading into
the sterilizer.
3. Load the instruments into the sterilizer by following the sterilizer manufacturer’s recommended loading procedures and load
configurations.
4. Follow the sterilizer manufacturer’s recommended procedures to program the sterilizer with any one of the sets of
sterilization cycle parameters found in Tables 2 and 3.
Table 2: Sterilization cycle parameters for the US and its territories
Method Cycle Temperature Exposure time
Minimum dry time
1
Steam Gravity displacement 250°F (121°C) 30 Minutes 30 Minutes
Steam Gravity displacement 270°F (132°C) 15 Minutes 30 Minutes
Steam Gravity displacement 275°F (135°C) 10 Minutes 30 Minutes
Steam Dynamic-air-removal 270°F (132°C) 4 Minutes 30 Minutes
Steam Dynamic-air-removal 275°F (135°C) 3 Minutes 16 Minutes
For medical facilities located outside the US and its territories: some non-US health care authorities recommend sterilization
according to these parameters to minimize the potential risk of transmission of Creutzfeldt-Jakob disease, especially of surgical
instruments that could come into contact with the central nervous system.
Table 3: Sterilization cycle parameters for medical facilities outside the US and its territories
Method Cycle Temperature Exposure time
Minimum dry time
1
Steam Gravity displacement 273°F (134°C) 20 Minutes 30 Minutes
Steam Dynamic-air-removal 273°F (134°C) 4 Minutes 30 Minutes
Steam Dynamic-air-removal 273°F (134°C) 20 Minutes 30 Minutes
1
The minimum dry times were validated using sterilizers having vacuum drying capabilities. Drying cycles using ambient
atmospheric pressure may require longer dry times. Refer to the sterilizer manufacturer’s recommendations.
Note: chamber size and chamber load differences may exist between industrial and health care facility sterilizer models. The
sterilization parameters listed in Tables 2 and 3 can be achieved in both health care facility and larger, industrial sterilizer
models. Because of the many variables involved in sterilization, each medical facility should calibrate and verify the sterilization
process (e.g. temperatures, times) used for their equipment.
Caution: ethylene oxide (EO), gas plasma, gamma irradiation, chemical vapor, or dry heat sterilization methods are NOT
recommended for sterilization of these instruments. Steam/moist heat is the recommended method of sterilization.
The sterilization cycles listed in Table 3 are not considered by the Food and Drug Administration (FDA) to be standard
sterilization cycles. It is the user’s responsibility to use only sterilizers and accessories (such as sterilization wraps, sterilization
pouches, chemical indicators, biological indicators, and sterilization cassettes) cleared by the FDA for the selected sterilization
cycle specifications (time and temperature).
FURTHER INFORMATION
Recommended directions for use of this system (surgical operative techniques) are available at no charge upon request. If
further information is needed or required, contact Medtronic.
Page 5
PRODUCT COMPLAINTS
Disassembled
To report product problems, contact Medtronic.
©2017 Medtronic Sofamor Danek USA, Inc. All rights reserved.
Figure 1: POWEREASE™ Driver
Figure 2: Instrument Seating in POWEREASE™ Driver
Page 6

Figure 3: POWEREASE™ Assembly
Medtronic Sofamor Danek USA, Inc.
1800 Pyramid Place
Memphis, TN 38132
Telephone: 800 933 2635 (USA)
901 396 3133 (Outside USA)
Fax: 901 396 0356
EXPLANATION OF SYMBOLS
Authorized representative in the European Community
CAUTION: Federal law (USA) restricts these devices to
sale by or on the order of a physician.
Do Not Re-use
Batch code
Manufacturer
Catalogue number
For US audiences only
The device complies with European Directive MDD
93/42/EEC
Medtronic B.V.
Earl Bakkenstraat 10
6422 PJ Heerlen
The Netherlands
Tel: + 31 45 566 80 00
Non-sterile
Use-by date
Consult instructions for use at this website.
 Loading...