


Reveal LINQ™ Mobile Manager Online Help
Instructions for Use
Caution: Federal law (USA) restricts this device to sale by or on the order of a physician.

Medtronic, Medtronic with rising man logo, and Medtronic logo are trademarks of Medtronic. Third-party trademarks (“TM*”) belong to their respective owners. The
following list includes trademarks or registered trademarks of a Medtronic entity in the United States and/or in other countries.
Cardiac Compass™, CareLink™, CARELINK™, LINQ II™, Marker Channel™, Medtronic CareLink™, MyCareLink Heart™, MyCareLink Relay™, MyCareLink™,
Quick Look™, Reveal LINQ™, Reveal™

1 Configuration
1.1 About Reveal LINQ Mobile Manager
Device description
The Reveal LINQ Mobile Manager application (called the “app” from now on) is installed on a tablet with Internet access and is the
software of the Reveal LINQ Mobile Manager system. The app communicates with the Medtronic 24967 Patient Connector (called the
“patient connector” from now on) to enable, connect, and send stored Reveal LINQ and LINQ II Insertable Cardiac Monitors (called
the “device” from now on) data to the Medtronic CareLink Network. The Reveal LINQ Mobile Manager system also facilitates patient
enrollment and device registration in the Medtronic CareLink Network. The app should be used by healthcare professionals only in
a clinical or hospital environment.
Intended use
The Reveal LINQ Mobile Manager app is intended for programming and interrogating the Reveal LINQ and LINQ II Insertable Cardiac
Monitors.
Contraindications
There are no known contraindications.
Electronic instructions for use/manuals
To view, download, print, or order manuals for this product, go to www.medtronic.com/manuals, or contact a Medtronic representative.
Software requirements
Manuals can be viewed using a current version of any major internet browser. For best results, use Adobe Acrobat® Reader with the
browser.
Paper manuals
Paper manuals are available to customers free of charge. They should arrive in 3 - 7 days. To order, go to
www.medtronic.com/manuals, or contact a Medtronic representative.
Model number
MSW002
> About > About Reveal LINQ™ Mobile Manager to determine the model number for your app. All model numbers may not
Tap
be available in your geography.
Symbols
For US audiences only
Patient Information icon
Contextual Help icon
Add/Edit Alias icon
Add icon
CareLink connectivity - disconnected icon
CareLink connectivity - connected icon
CareLink Sync off icon
Patient connector not connected icon
3

Patient connector connected icon
Patient connector low battery icon
Patient connector charging icon
Information icon
Non-programmable interlock icon
Lock icon
Warning icon
1.2 IT network, tablet, and data information
Required IT network characteristics and configuration
The use of this system requires your network to have internet access for the following purposes:
• To install and update the app from the app store.
• To log in to the app.
• To have the app in a connected status in order to have all app features and parameters available.
• To complete patient enrollment and device registration.
• To set up the home monitor.
• To communicate with the CareLink Network.
• To add physicians to the Physician List.
• To add follow-up clinics to the Follow-Up Clinic List.
• To conduct episode assessments.
• To read symptom journal entries from the MyCareLink Heart™ mobile app.
The use of this system also requires that Bluetooth® wireless technology is enabled on your tablet. The system cannot communicate
with the device if the tablet is unable to establish a Bluetooth connection with the patient connector.
Failure to provide IT network access will lead to limited app functionality, including the following results:
• Installation of and updates to the app cannot be completed if the tablet is unable to access the app store.
• Comprehensive review of the device data and facilitation of patient enrollment and device registration activities in the CareLink
Network cannot be completed if the app is unable to access the internet from the clinic’s IT network.
• You cannot log in and will be unable to use the app.
Follow your organization’s processes and policies to configure your network.
1
Supported tablets and technical specifications
For the list of supported tablets, and their specifications including network connectivity specifications, go to the following website:
www.medtronic.com/24967
Precautions when connecting to your IT network
Connecting the app to a secure IT network that includes other equipment could result in unforeseen risks to patients, operators, or third
parties. Changes to your IT network could also introduce additional risks. Analyze, evaluate and control any risks identified.
Intended information flows
The device data and system logs are sent for processing through the system components in the following sequential order:
1. Device
2. Patient connector
1
The Bluetooth® word mark is a registered trademark of Bluetooth SIG, Inc. and any use of this mark by Medtronic is under license.
4

3. App installed on the tablet
4. Internet
5. CareLink Network
In response, a confirmation receipt is sent from the CareLink Network via the Internet to the app.
All information in transit is protected for security.
1.3 Security
Data in the app is protected by application level encryption. The app does not provide data protection for data exported from it to
another destination. Data exported from the app should be handled in accordance with your clinic’s security policy for data handling
and storage.
To help protect patient health information and to prevent unauthorized programming of the device, security measures for your tablet
must include the following items:
• Implement a passcode or PIN to use the app.
• Only use the app and the patient connector on a managed, trusted, and secured network.
• The app must be used by healthcare professionals only in a hospital or clinical environment. Monitor all patient interactions with
the tablet.
To protect the clinician app, Medtronic recommends that you implement the following security measures:
• Use the clinician app only on a managed, trusted network. Verify that your Wi-Fi networks comply, at minimum, with wireless
standard 802.11b, 802.11g, or 802.11n, and use WPA2 or stronger encryption.
• Secure your network with industry best practices, which can include antivirus software, firewalls, and wireless security policies,
according to the policies of your IT department.
• When installing or updating the clinician app, if your tablet displays a message indicating that a security certificate is invalid, the
installation or update process is unable to continue. For assistance, contact your local Medtronic representative.
The app closes automatically when the app detects a failure to maintain security.
If you suspect that a cybersecurity event has occurred, contact your IT security or biomedical department for information on how to
confirm and respond to the suspected incident.
2 Setting up the app
2.1 Pairing the patient connector
During the procedure, you may be asked to enter the security code and verify the serial number of the patient connector. This
information is found on the back of the patient connector. You can also refer to the instructions for use provided with the patient
connector for help in locating this information.
1. Ensure that Bluetooth wireless technology is enabled on your tablet. For most tablets, tap Settings > Bluetooth to enable it.
2. Open the app.
3. On the Reveal LINQ MOBILE MANAGER screen, tap CONTINUE.
4. Press the button on the patient connector you are using to turn it on.
The Bluetooth light on the patient connector first flashes when the Bluetooth connection is discoverable, and then turns solid
when the Bluetooth connection is established.
5. You may be prompted by the tablet to grant permission for the app to turn on Bluetooth wireless technology. Follow the tablet’s
prompts to allow the app to turn on the tablet’s Bluetooth.
6. When prompted, select the patient connector you are using from the list.
7. When prompted, enter the security key code and tap CONTINUE.
8. If you are prompted by the tablet to accept a Bluetooth pairing request, confirm that the serial number in the request matches
the serial number on the back of the patient connector.
• Decline the request if the serial number does not match the serial number on the back of the patient connector.
• Accept the request to pair the patient connector with the app.
2.2 Setting up the app
2.2.1 Overview
During the setup of the app on the tablet, you must log in to the app by entering a Username and Password and creating a unique
Tablet Name. Logging in to the app is used to authorize the use of the app on the tablet and to manage access of the app on the tablet.
5

Logging into the app must be completed during the initial setup of the app. If you do not enter a Username, Password during setup
of the app, you will not be able to continue beyond the ENTER USERNAME AND PASSWORD screen.
There are two steps to complete to log in to the app:
1. Enter a unique Username and Password on the ENTER USERNAME AND PASSWORD screen.
2. Create a unique Tablet Name and select your Hospital or Clinic on the CREATE TABLET NAME screen.
Enter your clinic’s Reveal LINQ Mobile Manager or CareLink Network credentials for the Username and Password to log into the app.
Contact your Medtronic representative if you have questions about or have forgotten your clinic’s CareLink Network credentials.
The Tablet Name is unique to the tablet where the app is installed. If your clinic has the app installed on more than one tablet, you will
need to create a unique Tablet Name for each tablet. The Tablet Name and Hospital or Clinic selections are entered once for each
tablet where the app is installed. The selections can only be changed by deleting and reinstalling the app.
You may also be asked to enter your Username and Password into the app in the following scenarios:
• Occasionally when the app is launched
• After 30 days of disconnected use
• After 6 months of connected use
2.2.2 Entering a username and password
From the ENTER USERNAME AND PASSWORD screen, enter your Reveal LINQ™ Mobile Manager or CareLink Network
Username and Password.
1. Enter your clinic’s Username.
2. Enter your clinic’s Password.
• Tap SHOW PASSWORD to display your clinic’s password.
• Tap HIDE PASSWORD to obscure your clinic’s password.
3. Tap CONTINUE.
2.2.3 Tablet identifying information
During setup of the app, you must log in to the tablet on the CREATE TABLET NAME screen by entering a unique Tablet Name and
by selecting your Hospital or Clinic. Tablet identifying information is used to manage access to the app on the tablet.
• You must enter a primary tablet name and primary location to continue to log into the app.
• The tablet identifying information is set up once. After the Tablet Name and Hospital or Clinic settings are set on a tablet, they
can only be changed by uninstalling and reinstalling the app on that tablet.
• The clinics listed in the Hospital or Clinic drop menu are associated with your Account Number.
• The Tablet Name must be unique. You cannot use the same tablet name for multiple tablets in your clinic.
2.2.4 Entering the tablet name and location information
1. Enter a unique tablet name in the Tablet Name field.
2. Select a hospital or clinic name from the Hospital or Clinic drop menu.
3. Tap SAVE to save your login information.
2.3 Password issues
2.3.1 Forgot password
If you have forgotten your password, you can reset it at the CareLink Network website.
The app locks after three failed password attempts. If the app locks, you must wait 10 min for the app to unlock before entering your
password again.
Contact your Medtronic representative if you have questions about or have forgotten your clinic’s CareLink Network credentials.
2.3.2 Resetting a forgotten password
1. Tap Forgot Password?
2. Follow the instructions at the CareLink Network website to reset your password.
2.3.3 Password expired
You can reset an expired password at the CareLink Network website.
If your password has expired, a notification message and link to reset your password displays on the ENTER USERNAME AND
PASSWORD screen.
6

2.3.4 Resetting an expired password
1. Tap Reset Password.
2. Follow the instructions at the CareLink Network website to reset your password.
2.4 Physician List
2.4.1 Physician List overview
On the SET UP PHYSICIAN LIST screen, you can add a physicians to the Physician List, or you can skip this step. Adding physicians
to the Physician List allows you to more easily assign physicians to patients on the INSERT DEVICE > MONITORING INFORMATION
screen during an INSERT DEVICE or CHECK PATIENT session.
Any physicians added to the Physician List are available locally on the tablet running the app. If you have installed the app on more
than one tablet, you will need to add physicians to the Physician List for each additional tablet.
2.4.2 Adding physicians to the Physician List
1. Enter a physician’s first name in the First Name field.
2. Enter a physician’s last name in the Last Name field.
3. Enter one or more options for the physician’s location information:
• Enter a city name in the City field.
• Select a state from the State drop menu.
• Enter a zip code in the Postal Code field.
4. Select one of the following options:
• Tap SEARCH to search for the physician.
• Tap CLEAR FIELDS to clear all of the search fields.
Tapping SEARCH displays the physician information in the Search Results field.
5. Select a physician or physicians from the Search Results field and tap ADD TO LIST.
A message appears when a physician or physicians have been successfully added to the Physician List.
2.4.3 Manually adding a physician to the Physician List
If the search for the physician did not return a result, you can manually add a physician to the Physician List.
When a search for a physician did not return a result, the Search Results screen displays a message that no results were found for
the physician.
Physicians that are manually added are only available in the Physician List for 30 calendar days.
1. In the Search Results field, select I want to manually add this physician to the list.
2. Tap ADD TO LIST.
The MANUALLY ADD TO LIST screen displays.
3. Enter the required information for the physician in the required fields:
• First Name
• Last Name
• City
• State
4. Enter additional optional physician information, if desired.
5. Select one of the following options:
• Tap ADD MANUALLY to manually add the physician to the Physician List.
• Tap CANCEL to exit the MANUALLY ADD TO LIST screen.
2.4.4 Removing a physician from the Physician List
You can remove a physician from the Physician List.
1. Tap PHYSICIAN LIST to view all physicians in your Physician List.
2. Tap next to the physician’s name you want to remove from the Physician List.
• Tap REMOVE to remove the physician from the Physician List.
• Tap CANCEL to exit the REMOVE PHYSICIAN screen.
7

2.4.5 Completing the Physician List set up
Tap one of the following buttons to save or skip adding physicians to your Physician List:
Button Result
SAVE AND
CONTINUE
The physicians are saved to your Physician List.
The physicians you added to your Physician List are now available as options on the INSERT DEVICE > MONI-
TORING INFORMATION screen
The Physician List can also be accessed from the following locations during a CHECK PATIENT session:
• On the Device & Patient Settings > Monitoring screen from the Implanting Physician drop menu.
a
• From the > Settings > Physician List, when CareLink™ Sync is turned ON.
SKIP THIS
No physicians are added or saved to your Physician List.
STEP
a
For Reveal LINQ devices only.
2.5 Follow-up clinics
2.5.1 Follow-Up Clinic List
On the SET UP FOLLOW-UP CLINIC LIST screen, you can add a follow-up clinic, or you can skip this step. Adding follow-up clinics
allows you to more easily enroll patients in the CareLink Network during a device insertion.
Adding follow-up clinics to your Follow-Up Clinic List allows you to assign a patient to a follow-up clinic on the INSERT DEVICE >
MONITORING INFORMATION screen.
Any follow-up clinics added to the Follow-Up Clinic List are available locally on the tablet running the app. If you have installed the app
on more than one tablet, you will need to add follow-up clinics to the Follow-Up Clinic List for each additional tablet.
Contact your CareLink Network administrator or your Medtronic representative for questions about the CareLink™ Network User ID or
Clinic Account Number.
2.5.2 Adding follow-up clinics to the Follow-Up Clinic List
1. Select CareLink™ Network User ID or Clinic Account Number from the Search By drop-down list.
2. Enter a CareLink Network User ID or Clinic Account Number in the Search Entry field for the clinic where the patient will be
enrolled.
Contact your CareLink Network administrator or your Medtronic representative for questions about the CareLink Network User
ID or Clinic Account Number.
3. Tap SEARCH.
The follow-up clinics are displayed in the Search Results field.
4. Select a clinic or clinics you want to add to your Follow-Up Clinic List.
5. Tap the Add icon.
Your selected follow-up clinics are displayed in the Follow-Up Clinic List field.
6. To add additional follow-up clinics, enter a CareLink Network User ID or Clinic Account Number and repeat the search.
2.5.3 Renaming a follow-up clinic
You can rename a follow-up clinic with an alias.
1. Tap the Add/Edit Alias icon.
2. Enter a unique alias for the follow-up clinic you want to rename in the ALIAS field next to the follow-up clinic name. A follow-up
clinic alias must be a unique name.
• If you have entered the same alias for two or more follow-up clinics on the ADD/EDIT ALIAS screen, the ALIAS field is
highlighted in red.
• The EXISTING CLINIC screen displays if a duplicate alias is entered for an existing follow-up clinic in your Follow-Up Clinic
List.
3. Tap one of the following options:
• Tap OK to rename the follow-up clinic.
• Tap CANCEL to exit the ADD/EDIT ALIAS screen.
2.5.4 Removing a follow-up clinic from the Follow-Up Clinic List
Tap next to the follow-up clinic you want to remove from the Follow-Up Clinic List.
8

• Tap REMOVE to remove the follow-up clinic from the Follow-Up Clinic List.
• Tap CANCEL to exit the REMOVE FOLLOW-UP CLINIC FROM LIST screen.
2.5.5 Completing the Follow-Up Clinic List setup
Tap one of the following buttons to add a follow-up clinic to the Follow-Up Clinic List, or to skip this step:
Button Result
SAVE AND CON-
TINUE
SKIP THIS STEP No clinics are added or saved to your Follow-Up Clinic List.
The follow-up clinics are saved to your Follow-Up Clinic List.
The clinics you added to your Follow-Up Clinic List are now available as options on the INSERT DEVICE >
MONITORING INFORMATION screen and during a CHECK DEVICE session on the > Settings > Follow-Up Clinic List.
2.6 Initial setup results
The Reveal LINQ MOBILE MANAGER screen is displayed. The app and patient connector are ready to use.
3 Patient connector
3.1 Adding a patient connector
The app will guide you through the following steps when you tap INSERT DEVICE or CHECK PATIENT from the Reveal LINQ
MOBILE MANAGER screen.
During the procedure, you may be asked to enter the security code or serial number of the patient connector. This information is found
on the back of the patient connector. You can also refer to the instructions for use provided with the patient connector for help in locating
this information.
1. Ensure that Bluetooth wireless technology is enabled on your tablet. For most tablets, tap Settings > Bluetooth to enable it.
2. Press the button on the patient connector to turn it on.
The Bluetooth light on the patient connector first flashes when the Bluetooth connection is discoverable, and then turns solid
when the Bluetooth connection is established.
3. When prompted, select the patient connector you are using from the list or tap CANCEL.
If you tap CANCEL, select one of the following options:
• Tap SEARCH to search for a different patient connector, and return to Step 2.
• Tap CANCEL to return to the home page.
4. If prompted, enter the security key code and tap CONTINUE.
5. If you are prompted by the tablet to accept a Bluetooth pairing request, confirm that the serial number in the request matches
the serial number on the back of the patient connector.
• Decline the request if the serial number does not match the serial number on the back of the patient connector.
• Accept the request to pair the patient connector with the app.
The patient connector is paired and ready to use.
3.2 Charging
Medtronic recommends that you charge the patient connector and your tablet fully before conducting device’s INSERT DEVICE or
CHECK PATIENT session.
For information on charging the patient connector, refer to the instructions for use provided with the patient connector.
4 Set up patient
4.1 Setting up patients
You can set up patients in the app up to 7 days before the patient’s device insertion. The information can be used to set up the device
during the insertion procedure. CareLink™ Sync must be turned ON to set up patient in the app.
Patients set up in the app are available for association with a device for 7 days.
1. From the Reveal LINQ Mobile Manager screen, tap SET UP PATIENT.
The SET UP PATIENT > PATIENT DEMOGRAPHICS screen displays.
2. Enter the required patient demographics:
9

Table 1. Required patient demographics parameters
Parameter Editable values
First Name Enter the patient’s first name as you would like it to appear in the
patient’s record.
Last Name Enter the patient’s last name as you would like it to appear in the
patient’s record.
Date of Birth Select the patient’s date of birth from the picker. This setting is
used to calculate the nominal Tachy Detection Interval setting.
Gender Select the patient’s gender from the drop menu.
Phone Number Enter the patient’s phone number.
3. Enter any optional patient demographics:
Table 2. Optional patient demographics information
Parameter Editable values
Address Enter the patient’s address.
City Enter the city where the patient lives.
State/Region Enter the state or region where the patient lives.
Postal Code Enter the patient’s postal code.
Country Enter the patient’s country of residence.
Patient ID Enter the patient’s ID number from the patient ID card.
4. Tap one of the following options:
• Tap CANCEL to return to the Reveal LINQ Mobile Manager screen. No patient information is saved if you tap CANCEL.
• Tap INSERT NOW to save the patient data and continue with the device insertion. Use this option to continue inserting the
device after entering the patient demographics for the patient.
• Tap SAVE FOR LATER to save the patient data and allow you to enter another patient’s information.
5 Insert device
5.1 Preinsertion
5.1.1 Overview
Before you begin, see the device’s instructions for use for the insertion procedure instructions.
Caution: Before inserting the device, verify that the patient connector and tablet are fully charged. The patient connector and tablet
may run out of power during the insertion procedure if they are not fully charged. You will not be able to program or interrogate the
patient’s device until the patient connector and the tablet have power.
• Do not open the device’s sterile package until the preinsertion steps are completed.
• Do not turn on data collection in the Reveal LINQ device before the insertion procedure is completed, or the device may detect
the absence of cardiac signal ECG as episodes. Episodes cannot be cleared from the device using the app once they are
detected.
• Complete the insertion procedure within 15 min of the INSERT DEVICE programming steps. If the device insertion procedure is
not completed within 15 min of the INSERT DEVICE programming steps, you will need to reinterrogate the device. There can be
a few minutes delay in re-discovering the device when re-interrogating the device if the device is not inserted within 15 minutes
of the INSERT DEVICE programming steps.
5.1.2 Select a patient
1. Set aside device’s sterile packaging, which contains a scannable code for pairing the app with the device.
2. From the Reveal LINQ™ MOBILE MANAGER screen, tap INSERT DEVICE.
3. Select a patient from the SELECT A PATIENT list, then tap CONTINUE.
To enter a new patient that is not on the SELECT A PATIENT list, tap NEW PATIENT.
5.1.3 Associating a device to a patient
You can associate the device to a patient on the INSERT DEVICE > ASSOCIATE INSERTABLE DEVICES screen by entering the
device serial number. Associating a device to a patient allows the app to link the specific device with the patient and then to assign
equipment to the patient.
Enter the device serial number using one of the following options:
10

Option: Steps:
Scanning the device code. 1. Tap SCAN CODE.
Enable the use of the camera on the tablet if it is not enabled. For most tablets, select Settings > Reveal LINQ
Mobile Manager, and enable the camera setting.
2. Scan the code on the sterile device label with the camera on
the tablet.
The INSERT DEVICE > ASSOCIATE EQUIPMENT
screen displays.
Manually entering the device serial number 1. Tap ENTER MANUALLY.
The INSERT DEVICE > ASSOCIATE EQUIPMENT
screen displays.
2. Enter the serial number of the device from the sterile device
label in the Enter Serial Number field.
3. If you’re inserting a LINQ II ICM, select one of the following
options. If you’re inserting a Reveal LINQ ICM, skip this
step.
• Enter the device’s 16-digit code in the 16-digit Code
field, then close the keyboard.
• Tap LOST PACKAGING.
Note: There can be a small waiting period to auto-
identify the device when the LOST PACKAGING
option is selected.
The INSERT DEVICE > ASSOCIATE EQUIPMENT screen dis-
plays.
Sterile tray label unavailable If the device’s sterile tray label is not available, complete the fol-
lowing steps.
1. Tap LOST PACKAGING.
The INSERT DEVICE > ASSOCIATE EQUIPMENT
screen displays.
2. Enter the device’s serial number in the Enter Serial Num-
ber field, then close the keyboard.
The INSERT DEVICE > ASSOCIATE EQUIPMENT
screen displays.
Note: There can be a small waiting period to auto-identify the
device when the LOST PACKAGING option is selected.
5.1.4 Associating equipment to a patient
Users may only associate a monitor with a patient when CareLink™ Sync is ON.
On the INSERT DEVICE > ASSOCIATE EQUIPMENT screen, select one of the following monitoring options:
Monitoring option:
MyCareLink Heart™ Mobile App (Download and set up the
app after insertion)
MyCareLink Relay™ 24960
a
a
Select this option if the patient will be assigned the
MyCareLink Heart™ mobile app for remote monitoring.
Select this option if the patient will be assigned a physical home
communicator for remote monitoring.
If the patient will be assigned a physical home communicator,
enter the serial number using one of the following options:
Scanning the barcode:
1. Tap SCAN BARCODE.
Enable the use of the camera on the tablet with the app if it
is not enabled. For most tablets, select Settings >
Reveal LINQ Mobile Manager, and enable the camera setting.
2. Scan the monitor’s barcode, found on the outer package,
with the camera on the tablet.
Manually entering the serial number:
11

Monitoring option:
Enter the serial number of the monitor in the Enter Serial Number field.
MyCareLink™ Monitor
b
Select this option if the patient will be assigned a physical home
communicator.
If the patient will be assigned a physical home communicator,
enter the serial number using one of the following options:
Scanning the barcode:
1. Tap SCAN BARCODE.
Enable the use of the camera on the tablet with the app if it
is not enabled. For most tablets, select Settings >
Reveal LINQ Mobile Manager, and enable the camera setting.
2. Scan the monitor’s barcode, found on the outer package,
with the camera on the tablet.
Manually entering the serial number:
Enter the serial number of the monitor in the Enter Serial Num-
ber field.
No equipment selection at this time Select this option if the patient will not be remotely monitored at
this time.
a
This option is available for the LINQ II ICM only.
b
This option is available for the Reveal LINQ ICM only.
Tap CONTINUE after selecting a monitoring option for the patient.
5.1.5 Patient demographics
On the INSERT DEVICE > PATIENT DEMOGRAPHICS screen, confirm or update, if necessary, the patient demographics
information.
1. Confirm the required patient demographics information for selected patient.
Table 3. Required Patient Demographics parameters
Parameter Editable values
First Name Confirm or update the patient’s first name
as you would like it to appear in the
patient’s record.
Last Name Confirm or update the patient’s last name
as you would like it to appear in the
patient’s record.
Date of Birth Confirm or update the patient’s date of
birth. This setting is used to calculate the
nominal Tachy Detection Interval setting.
Gender Confirm or update the patient’s gender.
Phone Number
a
This option is unavailable for LINQ II devices when CareLink Sync is turned OFF.
a
Confirm the patient’s phone number.
2. Confirm any optional patient demographics information for the selected patient.
Table 4. Optional Patient Demographics information
Parameter Editable values
Address
a
Confirm the patient’s address if it was previously entered. You can
also enter the patient’s address if it was not previously entered.
a
City
Confirm the city where the patient lives. You can also enter the city
where the patient lives if it was not previously entered.
State/Region
a
Confirm the state or region where the patient lives. You can also
enter the state or region where the patient lives if it was not previously entered.
Postal Code
a
Confirm the patient’s postal code. You can also enter the patient’s
postal code if it was not previously entered.
12

Table 4. Optional Patient Demographics information (continued)
Parameter Editable values
Country
a
Confirm the patient’s country of residence. You can also enter the
patient’s country of residence if it was not previously entered.
Patient ID
a
Confirm the patient’s ID number from the patient ID card. You can
also enter the patient’s ID number if it was not previously entered.
a
This option is unavailable for LINQ II devices when CareLink Sync is turned OFF.
3. Tap CONTINUE.
5.1.6 Monitoring information
On the INSERT DEVICE > MONITORING INFORMATION screen, select a Reason for Monitoring for the patient and any additional
follow-up clinic, physician, or patient selections.
Table 5. Monitoring Information parameters
Parameter Programmable values Shipped value Reset value
Reason for Monitoring Syncope - -
Cryptogenic Stroke
Suspected AF
AF Ablation
AF Management
Palpitations
Ventricular Tachycardia
Seizures
Other
Follow-Up Clinic
e
Available options set on the APP
- -
SETUP > SET UP FOLLOW-UP
CLINIC LIST screen.
Implanting Physician
de
Available options set on the APP
- -
SETUP > SET UP PHYSICIAN LIST
screen.
Follow-Up Physician
a
Available options set on the APP
- -
SETUP > SET UP PHYSICIAN LIST
screen.
Patient Local Date and Time Month, Date, Year
Hour, Minute, AM, PM
Patient Comments
ac
No selectable values. Enter any
This field defaults to the
tablet’s date and time.
- -
Jan 01, 1994
desired patient comments information in the field.
Patient History
b
No selectable values. Enter any
- desired patient history information in
the field.
13

Table 5. Monitoring Information parameters (continued)
Parameter Programmable values Shipped value Reset value
Sleeping Hours Near Home Monitorb (Daily Wireless Transmission
Time)
12:00 AM - 5:00 AM 12:00 AM - 5:00 AM 12:00 AM - 5:00 AM
1:00 AM - 6:00 AM
2:00 AM - 7:00 AM
3:00 AM - 8:00 AM
4:00 AM - 9:00 AM
5:00 AM - 10:00 AM
6:00 AM - 11:00 AM
7:00 AM - 12:00 PM
8:00 AM - 1:00 PM
9:00 AM - 2:00 PM
10:00 AM - 3:00 PM
11:00 AM - 4:00 PM
12:00 PM - 5:00 PM
1:00 PM - 6:00 PM
2:00 PM - 7:00 PM
3:00 PM - 8:00 PM
4:00 PM - 9:00 PM
5:00 PM - 10:00 PM
6:00 PM - 11:00 PM
7:00 PM - 12:00 AM
8:00 PM - 1:00 AM
9:00 PM - 2:00 AM
10:00 PM - 3:00 AM
11:00 PM - 4:00 AM
a
This option is available only when CareLink™ Sync is ON.
b
This option is available for the Reveal LINQ ICM only.
c
This option is available for the LINQ II ICM only.
d
For Reveal LINQ, when CareLink™ Sync is OFF, you can manually enter this information.
e
For LINQ II, when CareLink™ Sync is OFF, this option is not available.
5.2 Insertion
Insert the device.
Refer to the device’s instructions for use for insertion procedure instructions.
5.3 Interrogating the device
1. Ensure that Bluetooth wireless technology is enabled on your tablet. For most tablets, tap Settings > Bluetooth to enable it.
2. From the INSERT DEVICE screen, tap the box next to The device has been inserted.
3. Tap ACTIVATE DEVICE.
4. Place a sterile sleeve over the patient connector if the patient connector is being used in the sterile field.
5. Press the button on the patient connector you are using to turn it on.
The Bluetooth light on the patient connector first flashes when the Bluetooth connection is discoverable, and then turns solid
when the Bluetooth connection is established.
6. If prompted, select the patient connector you are using from the list.
If you are using a new patient connector, you will have to pair the app and the patient connector. See Section 3.1.
7. The patient connector pairs with the app.
8. Position the patient connector over the patient’s device.
The telemetry indicator light on the patient connector turns on when you have established telemetry with the device.
The patient connector interrogates the device. Device programming and activation occur at the end of this interrogation process.
When interrogation is complete, the app displays a DEVICE ACTIVATED message.
14

5.4 Post-insertion data, settings, and reports
After the Insert Device steps are completed and the device is inserted in the patient, you can review the pre-insertion parameters,
set additional device parameters, select Episodes and Trends, and generate Session Reports.
After reviewing the device information, tap END SESSION to end your current INSERT DEVICE session. The Session Summary
screen displays. For information about the Session Summary screen, see Section 7.6.
5.5 Check the patient-enrollment and device-registration status
If CareLink™ Sync is turned ON when you start an INSERT DEVICE session, patient enrollment and device registration are sent to
Medtronic servers when you end the session. If a patient’s device registration or patient enrollment is unsuccessful after you end the
session, the app displays the Patient implant data was not sent message. When the app is open or running in the background, the
app continuously tries to resend the patient enrollment and device registration for up to 7 days.
To check the patient-enrollment and device-registration statuses, from the Reveal LINQ MOBILE MANAGER screen, tap View next
to the Patient implant data was not sent message.
The IMPLANT SESSION SUMMARY screen shows the following statuses for patient enrollment:
•
Patient enrollment successful
• Patient enrollment unsuccessful
Note: For troubleshooting information, see Section 10.4.
• Patient enrollment declined
The IMPLANT SESSION SUMMARY screen shows the following statuses for device registration:
• Device registration successful
• Device registration unsuccessful
Note: For troubleshooting information, see Section 10.4.
The app automatically removes the patient’s implant session summary from the IMPLANT SESSION SUMMARY screen when the
following conditions occur:
• When all statuses for a patient change from unsuccessful to successful
• When patient enrollment or device registration is unsuccessful after 7 days
6 Check patient
6.1 Check Patient session
After device insertion, it is important to schedule regular patient sessions to read collected data and, if necessary, to adjust sensing
and episode detection parameters. Medtronic recommends that you schedule the first patient session 3 months after device insertion.
The frequency of subsequent sessions depends on the patient’s condition and the number of arrhythmia episodes that occur.
If the patient is not being remotely monitored, it is important that subsequent appointments occur before the device memory is full.
Ensuring that appointments occur before the device’s memory is full will prevent older episode information from being overwritten by
newer episode information.
If the patient is being remotely monitored, data transmissions are made regularly to CareLink through the MyCareLink Heart™ mobile
app or the MyCareLink Relay™ 24960 Home Communicator.
6.2 Conducting a Check Patient session
1. Ensure that Bluetooth wireless technology is enabled on your tablet. For most tablets, tap Settings > Bluetooth to enable it.
2. From the Reveal LINQ™ MOBILE MANAGER screen, tap CHECK PATIENT.
3. Press the button on the patient connector you are using to turn it on.
The Bluetooth light on the patient connector first flashes when the Bluetooth connection is discoverable, and then turns solid
when the Bluetooth connection is established.
4. The patient connector pairs with the app.
When prompted, select the patient connector you are using from the list.
If you are using a new patient connector, you will have to pair the app and the patient connector. See Section 3.1.
5. Select a patient from the SELECT A PATIENT list.
If communication with the patient’s LINQ II device is unavailable, a lock icon is shown next to the patient and you cannot select
the patient from the list. A device can place a lock on itself for up to 24 hours if it detects excessive Bluetooth connections. By
temporarily locking itself, the device can prevent the battery from being depleted from excessive connections. Try to reconnect
the patient’s LINQ II device later.
15

6. Tap CHECK DEVICE.
7. Place a sterile sleeve over the patient connector, if necessary.
8. Position the patient connector over the patient’s device.
The telemetry indicator light on the patient connector turns on when you have established telemetry with the device.
9. Review the data displayed in the Quick Look tab.
The Quick Look tab provides a summary of the data from the current collection period. This is the data collected since the last
in-clinic session.
6.3 Check patient data, settings, and reports
During a Check Patient session, you can review the device’s data, with episodes and trends, change device and patient settings, and
view and save device reports.
After reviewing the device information, tap END SESSION to end your current CHECK PATIENT session.
7 Parameter field descriptions
7.1 Quick Look screen
The Quick Look screen displays after the device has been interrogated. You can view the AMPLITUDE indicator for R-Wave
amplitude of the device, battery status, key parameter settings, dynamic ECG data from the device, episode counters, and information
for Key Observations and counter parameters.
The Quick Look screen displays summary information about the device and patient.
Table 6. Summary information fields
Field Description
Reason for Monitoring
Implant Date This date is automatically filled in based on the date the insertion procedure occurred.
LINQ Battery The battery status for the device is displayed in one of the following values.
Key Observations
This field describes the clinical reason the patient is being monitored. This information determines the current
settings of the device based on the programmed value. This information is populated from the information that
was entered in the MONITORING INFORMATION screen during an INSERT DEVICE session or during a
CHECK PATIENT session on the Device & Patient Settings > Monitoring tab.
• Good: The battery has not yet reached Recommended Replacement Time or End of Service.
• RRT: The battery has reached the Recommended Replacement Time (RRT). The date displayed indicates
when the battery reached RRT.
• EOS: The battery has reached End of Service (EOS). The date displayed indicates when the battery reached
EOS.
The Key Observations section displays relevant information for device observations.
The counters section displays information in episodes and events and the totals recorded since the patient’s last in-clinic session.
Table 7. Counters Listings
Field CURRENT LIFETIME PARAMETERS
Symptom Lists the total number of epiTachy
Pause
sodes or events since the
patient’s last in-clinic session.
Brady
Lists the total number of episodes or events recorded for
the device.
Lists the range of duration, frequency, or threshold that is
used to determine if an event or
episode is counted.
AT
AF
Time in AT/AF
PVCs (% beats)
a
Displayed for LINQ II ICMs only.
a
7.2 Episodes
Tap the Episodes tab to view and assess the patient’s episodes. The Episodes tab displays a list of patient episodes. You can also
view the detailed ECG for each available episode.
The AVAILABLE EPISODES list each available episode and information about that episode. Tap on an episode to see additional
information for that episode. You can use the Assess Episode drop menu to mark the appropriateness of each episode as
16

Appropriate, Inappropriate, or Indeterminate. Assess Episode is disabled if the patient is not enrolled in your CareLink clinic or if there
is no connection to the CareLink Network.
The information from an episode or episodes selected is displayed on the Reports tab and is included in the session report.
Episodes tab features
Use the selections on the Episodes tab to select, organize, and assess the episodes available in the AVAILABLE EPISODES list.
Table 8. AVAILABLE EPISODES list column titles
Column Information displayed
Report Used to select an episode or episodes for inclusion in the Session
Report.
ID Displays the episode ID number.
Next to the ID number, there may be an assessment icon indicating the episode has been marked Appropriate, Inappropriate,
or Indeterminate.
Type Displays the type of episode.
Date Displays the date the episode was detected.
Time HH:MM Displays the time the episode was detected.
Duration HH:MM:SS Displays the duration of the episode.
Max Rate Displays the maximum rate in bpm for all episode types except
Brady episodes. Brady episodes display the minimum rate
in bpm.
Med Rate Displays the median rate in bpm.
Table 9. AVAILABLE EPISODES list options
Feature Options Result
Report Tap the check box next to an episode or
episodes.
Tap the check box next to ALL.
Type Use the radio button to select the episode
Type from the drop menu:
Selected episodes from the AVAILABLE
EPISODES list are included in the Session
Report.
Only the selected episode type is displayed in the AVAILABLE EPISODES list.
• All Types
• AF
• AT
• Brady
• Pause
• Symptom
• Tachy
Assess Episode
a
Select a category from the Assess Epi-
sode drop menu:
• Appropriate
• Inappropriate
• Indeterminate
Use the categories in the Assess Episode
drop menu to apply an adjudication status
to an episode.
If an episode has an adjudication status
assigned in the CareLink Network, the status is displayed with the episode.
• Unassessed
INTERROGATE Tap INTERROGATE to view episodes that
were recorded during the patient’s previ-
New episodes, if available, are displayed in
the AVAILABLE EPISODES list.
ous in-clinic INSERT DEVICE or CHECK
PATIENT session, and any new episodes
recorded since last session.
a
This option is available only when CareLink™ Sync is ON.
Tap on the episode row to view more details of the episodes ECG.
17

Table 10. Selected episode ECGs
Feature Option
Symptom Details
a
Lists any symptoms and symptom details that a patient has
marked using the MyCareLink Heart™ mobile app.
Zoom Amplitude Use the - or + icons to adjust the episode’s ECG y-axis scale.
Interval plot Select the view of the rate in ms or bpm. The selected rate pref-
erence is saved and used throughout the app and in the Session
Report.
Episode plot The episode plot displays the full span of time when the ECG was
recorded, including time before and after the event.
Tap and hold the box, and then slide it to a specific time period of
the episode. You can also tap on a specific span of time to move
the box. The ECG displayed will correspond to the time selected.
Plot line The plot line, displayed horizontally on the episode plot, shows
the detection rate for the episode.
Episode ECG The episode ECG displays the full episode ECG strip.
Swipe left or swipe right on the ECG strip to view different seg-
ments of the ECG strip.
a
For LINQ II devices only.
Table 11. Marker Channel annotations
Marker Explanation
Ventricular sense
Pause detection (marks the first event in a detected pause episode)
Brady sense
Brady detection (marks the first event in a detected brady episode)
VT (Tachy) sense
VT (Tachy) detection (marks the first event in a detected VT episode)
(below the baseline)
FVT (Tachy) sense
FVT (Tachy) detection (marks the first event in a detected FVT episode)
(below the baseline)
AT detection (marks the end of at least 2 min of atrial arrhythmia)
(above the baseline)
AF detection (marks the end of at least 2 min of atrial arrhythmia)
(above the baseline)
Δ Patient-activated symptom (only marked in a stored ECG recording)
Ignored event
a
a
An event that ends a noise interval.
Pause rejection (marks a pause that is determined to not be a pause episode)
FVT (Tachy) rejection (marks an event that would have been detected as FVT but was
rejected due to noise)
18

7.3 Trends
0
2
4
6
8
10
>12
7.3.1 Overview
Tap the Trends tab to view Cardiac Compass trends or Rate Histograms recorded by the patient’s device.
7.3.2 Cardiac Compass
The Cardiac Compass tab displays clinical trends during a CHECK PATIENT session. Reveal LINQ device clinical trends are
displayed for a 14 month (425 days) duration, and LINQ II device clinical trends are displayed for a 9 month (270 days) duration. The
PVC trend is available for LINQ II devices only.
AT/AF total time per day – This trend may help you to assess the need to initiate or adjust the patient’s rate or rhythm control
therapies. It may also reveal the presence of asymptomatic episodes of AT/AF.
The device records a daily total for the time (burden) the patient spent in atrial arrhythmia. This trend may be reported in hours or
minutes per day depending on the maximum (total) atrial arrhythmia duration per day.
Figure 1. AT/AF total time per day
1 Total time per day
Ventricular rate during AT/AF – You may use this trend to perform the following assessments:
• Correlate patient symptoms to rapid ventricular responses to AT/AF.
• Prescribe or titrate antiarrhythmic and rate control drugs.
• Assess the efficacy of an AV node ablation or modification procedure.
The graph plots daily median ventricular rates during episodes of atrial arrhythmia. The vertical lines show the daily difference
between the median rate and the maximum sensed ventricular rate. Multiple points on one day represent multiple episodes with
different median rates.
Figure 2. Ventricular rate during AT/AF
1 Beats per minute
2 Max
3 Average
Average ventricular rate – The day and night heart rates provide information that may have the following clinical uses:
• Objective data to correlate with patient symptoms
• Indications of autonomic dysfunction or symptoms of heart failure
• Information regarding diurnal variations
For this trend, “day” is defined as the 12-hour period between 8:00 AM and 8:00 PM and “night” as the 4-hour period between midnight
and 4:00 AM (as indicated by the Reveal LINQ clock).
19

Figure 3. Average ventricular rate
40
80
100
120
>
30
20
10
0
>
200
160
120
80
40
1 Beats per minute
2 Day
3 Night
PVC – This trend displays the percent of beats that are detected as PVCs per day.
Figure 4. PVC
1 Percentage of beats
Patient activity – The patient activity trend may help you to obtain the following types of information:
• A way to monitor a patient’s exercise regimen
• An early indicator of progressive diseases like heart failure, which cause fatigue and a consequent reduction in patient activity
The device uses data derived from the built-in accelerometer to determine weekly patient activity.
Figure 5. Patient activity
1 Hours per day
Heart rate variability – Reduced variability in the patient’s heart rate may help you to identify heart failure decompensation. The
device measures each ventricular interval and calculates the median ventricular interval every 5 min. It then calculates and plots a
variability value (in ms) for each day.
Note: The heart rate variability calculation does not include events that occur during automatically detected arrhythmia episodes
(AT/AF or Tachy).
Figure 6. Heart rate variability
1 Milliseconds
2 Date
7.3.3 Rate Histograms
Ventricular rate during AT/AF histogram (time in or out of AT/AF) – The Time out of AT/AF and Time in AT/AF histograms show
ventricular events that occurred during automatically detected AT/AF episodes. The histograms show 20 rate ranges that are each
10 bpm wide. Rates slower than 40 bpm are included in the <40 bpm range; rates faster than 220 bpm are included in the >220 bpm
20

range. The information includes the AT/AF burden expressed in both the percentage of time and the total time that the patient spent
in or out of AT/AF.
Figure 7. Time out of AT/AF
1 Percentage of time out of AT/AF
2 Total time
3 Rate (bpm)
Figure 8. Time in AT/AF
1 Percentage of time in AT/AF
2 Total time
3 Rate (bpm)
7.4 Device and Patient Settings
7.4.1 Overview
You can edit the parameters for the device during an INSERT DEVICE or CHECK PATIENT session. When you change a parameter
value, the new value is shown as pending. You can change several parameter values together. To undo your pending changes and
revert to the last programmed values, tap UNDO. The values remain pending until you tap SAVE.
From the Quick Look screen, tap Device & Patient Settings, and then select one of the following tabs:
• Monitoring
• Detection
• Sensitivity
• Equipment
• Demographics
21

7.4.2 Monitoring - Reveal LINQ ICM
Tap the Monitoring tab to confirm or update the Monitoring parameters for the Reveal LINQ ICM.
Table 12. Monitoring parameters
Parameter Programmable values Shipped value Reset value
Reason for Monitoring Syncope - -
Cryptogenic Stroke
Suspected AF
AF Ablation
AF Management
Palpitations
Ventricular Tachycardia
Seizures
Other
Patient Local Date and Time Month, Day, Year
Hour, Minute, AM, PM
This field defaults to the
tablet’s date and time.
Jan 01, 1994
Wireless Data Priority Tachy, Brady, Pause; Pause, Tachy, Brady Pause, Tachy, Brady
Tachy, Pause, Brady;
Brady, Tachy, Pause;
Brady, Pause, Tachy;
Pause, Tachy, Brady;
Pause, Brady, Tachy
Implanting Physician Available options set on the APP
- -
SET UP > SET UP PHYSICIAN LIST
screen.
You can add a physician to the
PHYSICIAN LIST in a session by
tapping > Settings > Physician
List.
22

Table 12. Monitoring parameters (continued)
Parameter Programmable values Shipped value Reset value
Sleeping Hours Near Home Monitor
(Daily Wireless Transmission Time)
12:00 AM - 5:00 AM 12:00 AM - 5:00 AM 12:00 AM - 5:00 AM
1:00 AM - 6:00 AM
2:00 AM - 7:00 AM
3:00 AM - 8:00 AM
4:00 AM - 9:00 AM
5:00 AM - 10:00 AM
6:00 AM - 11:00 AM
7:00 AM - 12:00 PM
8:00 AM - 1:00 PM
9:00 AM - 2:00 PM
10:00 AM - 3:00 PM
11:00 AM - 4:00 PM
12:00 PM - 5:00 PM
1:00 PM - 6:00 PM
2:00 PM - 7:00 PM
3:00 PM - 8:00 PM
4:00 PM - 9:00 PM
5:00 PM - 10:00 PM
6:00 PM - 11:00 PM
7:00 PM - 12:00 AM
8:00 PM - 1:00 AM
9:00 PM - 2:00 AM
10:00 PM - 3:00 AM
11:00 PM - 4:00 AM
Patient History No selectable values. Confirm or
- enter any desired patient history
information in the field.
7.4.3 Monitoring - LINQ II ICM
Tap the Monitoring tab to confirm or update the Monitoring parameters for the LINQ II ICM.
Table 13. Monitoring parameters
Parameter Programmable values Shipped value Reset value
Reason for Monitoring Syncope - -
Cryptogenic Stroke
Suspected AF
AF Ablation
AF Management
Palpitations
Ventricular Tachycardia
Seizures
Other
Patient Local Date and Time Month, Day, Year
Hour, Minute, AM, PM
MyCareLink Heart™ Mobile App
Optimization
ON
OFF
a
This field defaults to the
Jan 01, 1994
tablet’s date and time.
OFF OFF
Note: Tap ADVANCED SETTINGS
to access this parameter setting.
a
When the MyCareLink Heart™ Mobile App Optimization is turned ON, the LINQ II ICM battery longevity is reduced.
23

7.4.4 Detection - Reveal LINQ ICM
Tap the Detection tab to edit the Detection parameters.
Table 14. Detection parameters
Parameter Programmable values Shipped value Reset value
Tachy
Detection ON; OFF OFF ON
Interval (Rate) 270 ms (222 bpm) 340 ms (176 bpm) 340 ms (176 bpm)
280 ms (214 bpm)
290 ms (207 bpm)
300 ms (200 bpm)
310 ms (194 bpm)
320 ms (188 bpm)
330 ms (182 bpm)
340 ms (176 bpm)
350 ms (171 bpm)
360 ms (167 bpm)
370 ms (162 bpm)
380 ms (158 bpm)
390 ms (154 bpm)
400 ms (150 bpm)
410 ms (146 bpm)
420 ms (143 bpm)
430 ms (140 bpm)
440 ms (136 bpm)
450 ms (133 bpm)
460 ms (130 bpm)
470 ms (128 bpm)
480 ms (125 bpm)
490 ms (122 bpm)
500 ms (120 bpm)
510 ms (118 bpm)
520 ms (115 bpm)
Duration 5; 12; 16; 24; 32; 48 beats 16 beats 16 beats
Brady
Detection ON; OFF OFF ON
Interval (Rate) 2000 ms (30 bpm) 2000 ms (30 bpm) 2000 ms (30 bpm)
1500 ms (40 bpm)
1200 ms (50 bpm)
1000 ms (60 bpm)
Duration 4; 8; 12 beats 4 beats 4 beats
Pause
Detection On; Off Off On
Duration 1.5; 3; 4.5 s 3 s 3 s
AT/AF…
AT/AF Detection Off; AT and AF; AF Only Off AF Only
Symptom
Detection Four 7.5 min Episodes;
Three 10 min Episodes;
Two 15 min Episodes
Four 7.5 min Episodes Four 7.5 min Episodes
Tap ADVANCED SETTINGS to edit the parameters on the ADVANCED DETECTION SETTINGS screen.
24

Table 15. ADVANCED SETTINGS parameters
Parameter Programmable values Shipped value Reset value
AF: Detection Sensitivity Least Sensitive; Less Sensi-
tive; Balanced Sensitivity; More
Sensitive
AT/AF: Ectopy Rejection Off; Nominal; Aggressive Off Off
AT/AF: Recording Threshold All Episodes;
Episodes ≥6 min;
Episodes ≥10 min;
Episodes ≥20 min;
Episodes ≥30 min;
Episodes ≥60 min;
Only Longest Episode
Detect Very Regular AT
Rhythms
7.4.5 Detection - LINQ II ICM
Tap the Detection tab to edit the Detection parameters.
Table 16. Detection parameters
Parameter Programmable values Shipped value Reset value
Tachy
Detection ON; OFF OFF ON
Interval (Rate) 270 ms (222 bpm) 340 ms (176 bpm) 340 ms (176 bpm)
Duration 5; 12; 16; 24; 32; 48 beats 16 beats 16 beats
Brady
Detection ON; OFF OFF ON
Off; On - All Rates; On - Rates ≥
67 bpm; On - Rates ≥ 100 bpm
280 ms (214 bpm)
290 ms (207 bpm)
300 ms (200 bpm)
310 ms (194 bpm)
320 ms (188 bpm)
330 ms (182 bpm)
340 ms (176 bpm)
350 ms (171 bpm)
360 ms (167 bpm)
370 ms (162 bpm)
380 ms (158 bpm)
390 ms (154 bpm)
400 ms (150 bpm)
410 ms (146 bpm)
420 ms (143 bpm)
430 ms (140 bpm)
440 ms (136 bpm)
450 ms (133 bpm)
460 ms (130 bpm)
470 ms (128 bpm)
480 ms (125 bpm)
490 ms (122 bpm)
500 ms (120 bpm)
510 ms (118 bpm)
520 ms (115 bpm)
Less Sensitive Less Sensitive
Episodes ≥10 min Episodes ≥10 min
Off ---
25

Table 16. Detection parameters (continued)
Parameter Programmable values Shipped value Reset value
Interval (Rate) 2000 ms (30 bpm) 2000 ms (30 bpm) 2000 ms (30 bpm)
1500 ms (40 bpm)
1200 ms (50 bpm)
1000 ms (60 bpm)
860 ms (70 bpm)
750 ms (80 bpm)
Duration 4; 5; 6; 7; 8; 9; 10; 11; 12
beats
Pause
Detection On; Off Off On
Duration 1.5; 2; 3; 4; 5 s 3 s 3 s
PVCs
Detection Off; On Off Off
AT/AF…
AT/AF Detection Off; AT and AF; AF Only Off AF Only
Symptom
Duration Off; Two 15 min Epi-
sodes; Three 10 min Episodes
Tap ADVANCED SETTINGS to edit the parameters on the ADVANCED DETECTION SETTINGS screen.
4 beats 4 beats
Two 15 min Episodes Two 15 min Episodes
Table 17. ADVANCED SETTINGS parameters
Parameter Programmable values Shipped value Reset value
AF: Detection Sensitivity Least Sensitive; Less Sensi-
tive; Balanced Sensitivity; More
Sensitive
AT/AF: Ectopy Rejection Off; Nominal; Aggressive Aggressive Aggressive
AT/AF: Recording Threshold All Episodes;
Episodes ≥6 min;
Episodes ≥10 min;
Episodes ≥20 min;
Episodes ≥30 min;
Episodes ≥60 min;
Brady: Nighttime ECGs Stored None; 1 ECG; Up to 3 ECGs 1 ECG 1 ECG
Tachy: Require Rapid Onset On; Off On On
7.4.6 Sensitivity
Tap the Sensitivity tab to edit the sensing parameters.
Table 18. Sensitivity Parameters
Parameter Programmable Values Shipped Value Reset Value
Sensitivity 0.025 mV (25 µV) 0.035 mV (35 µV) 0.035 mV (35 µV)
0.035 mV (35 µV)
0.05 mV (50 µV)
0.075 mV (75 µV)
0.1 mV (100 µV)
0.125 mV (125 µV)
0.15 mV (150 µV)
0.175 mV (175 µV)
0.2 mV (200 µV)
Less Sensitive Less Sensitive
Episodes ≥10 min Episodes ≥10 min
26

Table 18. Sensitivity Parameters (continued)
Parameter Programmable Values Shipped Value Reset Value
Blank after Sense 130; 150; 170; 200; 250; 300;
400 ms
T-Wave Blanking Interval
(LINQ II ICM)
Sensing Threshold
Decay Delay
(Reveal LINQ ICM)
7.4.7 Equipment
Tap the Equipment tab to edit the Equipment options for the patient.
The Equipment tab is only available when the tablet is connected to the internet and CareLink™ Sync is turned ON.
You can change the patient’s Equipment settings if the patient has not been fully enrolled in the CareLink Network. If the patient has
been fully enrolled in the CareLink Network, changes to the patient’s Equipment settings need to be completed through the CareLink
Network.
Table 19. Equipment options per device
Device Equipment options
Reveal LINQ MyCareLink™ Monitor
LINQ II MyCareLink Heart™ Mobile App
130; 150; 200; 300; 400; 500 ms 150 ms 150 ms
150 ms 150 ms
No equipment selection at this time
Note: This option is not available if the patient is pre-enrolled in
the CareLink Network and an Equipment option was previously
selected for the patient.
Note: The app must be downloaded and set up on the patient’s
smart phone or tablet after device insertion.
MyCareLink Relay™ 24960
No equipment selection at this time
Note: This option is not available if the patient is pre-enrolled in
the CareLink Network and an Equipment option was previously
selected for the patient.
7.4.8 Demographics - Reveal LINQ ICM
Tap the Demographics tab to view the patient’s personal information.
Confirm or edit the required patient Demographics parameters.
Table 20. Required Demographics Parameters
Parameter Editable Values
First Name Confirm or edit the patient’s first name as you would like it to
appear in the patient’s record.
Last Name Confirm or edit the patient’s last name as you would like it to
appear in the patient’s record.
Date of Birth Confirm or edit the patient’s date of birth from the picker. This
setting is used to calculate the nominal Tachy Detection Interval
setting.
Gender Confirm or edit the patient’s gender from the drop menu.
Phone Number Confirm or edit the patient’s phone number.
Confirm or edit the optional patient Demographics parameters.
Table 21. Optional Patient Demographics Information
Parameter Editable Values
Address Confirm or edit the patient’s address.
City Confirm or edit the city where the patient lives.
State/Region Confirm or edit the state or region where the patient lives.
27

Table 21. Optional Patient Demographics Information (continued)
Parameter Editable Values
Postal Code Confirm or edit the patient’s postal code.
Country Confirm or edit the patient’s country of residence.
Patient ID Confirm or edit the patient’s ID number from the patient ID card
7.4.9 Demographics - LINQ II ICM
Tap the Demographics tab to view the patient’s personal information.
Confirm or edit the required patient Demographics parameters.
Table 22. Required Demographics Parameters
Parameter Editable Values
First Name Confirm or edit the patient’s first name as you would like it to
appear in the patient’s record.
Last Name Confirm or edit the patient’s last name as you would like it to
appear in the patient’s record.
Date of Birth Confirm or edit the patient’s date of birth from the picker. This
setting is used to calculate the nominal Tachy Detection Interval
setting.
Gender Confirm or edit the patient’s gender from the drop menu.
7.5 Reports
You can generate a Session Report on the Reports tab.
After an INSERT DEVICE or CHECK PATIENT session, the app saves the session data to the tablet. The session data can be
generated into a Session Report.
After it has been generated, the Session Report is available in the app for 7 days. After 7 days, the Session Report is deleted from
the app.
To view a report, complete the following steps:
1. Select the episodes you want to include in the report from the Episodes > AVAILABLE EPISODES list.
2. Determine if you want to include the following options in the report:
Option Outcome
Include trends (Cardiac Compass and Histograms) This option is automatically selected for inclusion in the Ses-
sion Report. Tap the check box to deselect this option and
remove it from the Session Report.
Include full episode list This option is automatically selected for inclusion in the Ses-
sion Report. When this option is selected, all available Epi-
sodes from the Episodes are included in the Session Report.
The Session Report includes ECGs for each episode selected on the Episodes tab.
Tap the check box to deselect this option. When Include full
episode list is deselected, only selected Episodes from the
Episodes tab are included in the Session Report.
3. Tap VIEW AND SAVE REPORT.
Session report - Reveal LINQ device
The Session Report provides you a comprehensive view of the device data.
ECGs for each episode are available in the Session Report.
Table 23. Session Report - Reveal LINQ device
Session Report information Parameters
Patient Information Name
Patient ID
Device type and device serial number
Date of Birth
Implanted Date
28

Table 23. Session Report - Reveal LINQ device (continued)
Session Report information Parameters
Reason for Monitoring
Quick Look Symptom
Tachy
Pause
Brady
AT
AF
Time in AT/AF
Battery Status
Key Observations
Additional Parameter Settings Sensitivity
Blank After Sense
Sensing Threshold Decay Delay
AF: Detection Sensitivity
AT/AF: Ectopy Rejection
Current ECG Amplitude
Heart Rate
Episode List
a
ID#
Type
Date
Time HH:MM
Duration HH:MM:SS
Max Rate
Med Rate
Trends - Cardiac Compass AT/AF
V. (ventricular) rate during AT/AF
Average V. (ventricular) rate
Patient Activity
Heart Rate Variability
Trends - Histograms Total Time AT/AF
Time in AT/AF
Episode ECG The episodes selected on the Episodes tab, including the ECG
and the Rate Plot for the selected episodes.
a
All episodes are listed in the Session Report when Include full episode list is selected.
Session Report - LINQ II device
The session report provides you a comprehensive view of the device data.
ECGs for each episode are available in the Session Report.
Table 24. Session report - LINQ II device
Session report information Parameters
Patient Information Name
Device type and device serial number
Date of Birth
Implanted Date
Reason for Monitoring
Quick Look Symptom
Tachy
Pause
Brady
AT
AF
Time in AT/AF
PVCs (% beats)
Battery Status
Key Observations
Additional Parameter Settings Sensitivity
29

Table 24. Session report - LINQ II device (continued)
Session report information Parameters
Blank After Sense
T-Wave Blanking Interval
AF: Detection Sensitivity
AT/AF: Ectopy Rejection
Brady: Nighttime ECGs Stored
Current ECG Amplitude
Heart Rate
Episode List
a
ID#
Type
Date
Time HH:MM
Duration HH:MM:SS
Max Rate
Med Rate
Symptom Details (logged by the patient in the
MyCareLink Heart™ Mobile App)
Trends - Cardiac Compass AT/AF
V. (ventricular) rate during AT/AF
Average V. (ventricular) rate
PVC
Patient Activity
Heart Rate Variability
Trends - Histograms Total Time AT/AF
Time in AT/AF
Episodes The episodes selected on the Episodes tab, including the ECG
and the Rate Plot for the selected episodes.
a
All episodes are listed in the Session Report when Include full episode list is selected.
7.6 End Session
The END SESSION > SESSION SUMMARY screen displays a summary of patient information when you end your current INSERT
DEVICE session.
If the SESSION SUMMARY screen displays
, indicating that the patient enrollment or device registration was unsuccessful, see
Section 10.4 for troubleshooting information.
8 Menu options
8.1 Pending Uploads
Data transmissions from an INSERT DEVICE or CHECK PATIENT session remain pending for 7 days or until they are sent
successfully to the Medtronic CareLink Network. Data transmissions remain pending when CareLink™ Sync is turned OFF. The app
will attempt to send any pending data transmissions when CareLink™ Sync is turned ON. Unsent data transmissions will be deleted
after 7 days.
Tap > Pending Uploads to view any pending data transmissions to the Medtronic CareLink Network.
If there are pending data transmissions, the number of pending data transmissions are displayed next to the Pending Uploads option.
The PENDING UPLOADS screen displays the following information for a pending data transmission:
• Date: The date the data from the INSERT DEVICE or CHECK PATIENT session was collected.
• Patient Name: The patient’s name associated with the data.
• Days Left to Retry: The number of days remaining for the data to be transmitted to the CareLink Network.
The app will automatically transmit the data to the Medtronic CareLink Network when a Wi-Fi or cellular network connection is
established. After 7 days of no connectivity to a Wi-Fi or cellular network, the data will be deleted.
8.2 Unenrolled Patients
The Unenrolled Patients screen displays a list of patients that have not been accepted by his or her assigned clinic from the
Follow-Up Clinic List 7 days after the insertion occurred. The Unenrolled Patients screen will not display patients whose data has
not been sent to the CareLink Network because the app is not connected to the Internet.
30

To view the list of unenrolled patients, tap > Unenrolled Patients. Contact the patient’s follow-up clinic and request that the clinic
accept the patient from their New Patients list in the CareLink Network.
• If there are new unenrolled patients, an exclamation point and the number of unenrolled patients is displayed next to the >
Unenrolled Patients setting.
• If the app is not connected to the Medtronic CareLink Network, no unenrolled patients will be displayed on the Unenrolled
Patients screen.
• The Unenrolled Patients menu option will not be visible when the CareLink™ Sync option is turned OFF.
8.3 Settings
8.3.1 Overview
Use the Settings option to turn ON or turn OFF the CareLink™ Sync setting. When CareLink™ Sync is turned ON, you can add
physicians to the Physician List, or add clinics to the Follow-Up Clinic List, and access other features of the app.
8.3.2 CareLink™ Sync
CareLink™ Sync connects the app to the Medtronic CareLink Network. Connection to the network is enabled when the tablet is
connected to the Internet and CareLink™ Sync is turned ON.
CareLink™ Sync is set to ON when the app is downloaded and set up. It remains ON unless you toggle the CareLink™ Sync switch
to OFF.
When the tablet is connected to the Internet and CareLink™ Sync is turned ON, the following features are available in the app:
• PHYSICIAN LIST setup
• Creation of your Follow-Up Clinic List
• Setting up and adding patients to the SELECT A PATIENT list
• Patient pre-enrollment in the Medtronic CareLink Network
• Device registration
• Access to the Unenrolled Patients list
• Access to the Pending Uploads list
• Associate equipment to patients during pre-enrollment in the Medtronic CareLink Network
• Episode assessment
• Viewing Symptom records
When CareLink™ Sync is turned OFF, the app is not connected to the Medtronic CareLink Network. Device registration and patient
pre-enrollment must be completed manually.
When CareLink™ Sync is turned OFF, you will be unable to access the following app features:
• PHYSICIAN LIST setup
• Creation of your Follow-Up Clinic List
• Setting up and adding patients to the SELECT A PATIENT list
• Patient pre-enrollment in the Medtronic CareLink Network
• Device registration
• Access to the Unenrolled Patients list
• Access to the Pending Uploads list
• Associate equipment to patients during pre-enrollment in the Medtronic CareLink Network
• Episode assessment
• Viewing Symptom records
Turning on or turning off CareLink™ Sync
1. Tap > Settings > CareLink™ Sync.
2. Select one of the following options:
• Toggle the CareLink™ Sync switch ON to turn on CareLink™ Sync.
• Toggle the CareLink™ Sync switch OFF to turn off CareLink™ Sync.
31

8.3.3 Physician List
8.3.3.1 Adding physicians to the Physician List
You can add physicians to the Physician List when you are on the home screen or during an INSERT DEVICE or CHECK PATIENT
session.
Tap > Settings > Physician List
The SET UP PHYSICIAN LIST screen is displayed.
8.3.3.2 Edit physician list
1. Enter a physician’s first name in the First Name field.
2. Enter a physician’s last name in the Last Name field.
3. Enter one or more options for the physician’s location information:
• Enter a city name in the City field.
• Select a state from the State drop menu.
• Enter a zip code in the Postal Code field.
4. Select one of the following options:
• Tap SEARCH to search for the physician.
• Tap CLEAR FIELDS to clear all of the search fields.
Tapping SEARCH displays the physician information in the Search Results field.
5. Select a physician or physicians from the Search Results field and tap ADD TO LIST.
A message appears when a physician or physicians have been successfully added to the Physician List.
8.3.3.3 Manually adding a physician to the Physician List
If the search for the physician did not return a result, you can manually add a physician to the Physician List.
When a search for a physician did not return a result, the Search Results screen displays a message that no results were found for
the physician.
Physicians that are manually added are only available in the Physician List for 30 calendar days.
1. In the Search Results field, select I want to manually add this physician to the list.
2. Tap ADD TO LIST.
The MANUALLY ADD TO LIST screen displays.
3. Enter the required information for the physician in the required fields:
• First Name
• Last Name
• City
• State
4. Enter additional optional physician information, if desired.
5. Select one of the following options:
• Tap ADD MANUALLY to manually add the physician to the Physician List.
• Tap CANCEL to exit the MANUALLY ADD TO LIST screen.
8.3.3.4 Removing a physician from the Physician List
You can remove a physician from the Physician List.
1. Tap PHYSICIAN LIST to view all physicians in your Physician List.
2. Tap next to the physician’s name you want to remove from the Physician List.
• Tap REMOVE to remove the physician from the Physician List.
• Tap CANCEL to exit the REMOVE PHYSICIAN screen.
8.3.3.5 Completing the Physician List set up
Tap one of the following buttons to save physicians to your Physician List, or to cancel this step:
• Tap SAVE to save the physicians to your Physician List.
The physicians you added to your Physician List are now available as options on the INSERT DEVICE > MONITORING
INFORMATION screen
32

The Physician List can also be accessed from the following locations during a CHECK PATIENT session:
– On the Device & Patient Settings > Monitoring screen from the Implanting Physician drop menu. (For Reveal LINQ
devices only.)
– From the > Settings > Physician List, when CareLink™ Sync is turned ON.
• Tap CANCEL. No physicians are added or saved to your Physician List.
8.3.4 Follow-Up Clinic List
8.3.4.1 Adding follow-up clinics
You can add follow-up clinics to the Follow-Up Clinic List when you are on the home screen or during an INSERT DEVICE or CHECK
PATIENT session.
Tap > Settings > Follow-Up Clinic List
The SET UP FOLLOW-UP CLINIC LIST screen is displayed.
1. Select CareLink™ Network User ID or Clinic Account Number from the Search By drop-down list.
2. Enter a CareLink Network User ID or Clinic Account Number in the Search Entry field for the clinic where the patient will be
enrolled.
Contact your CareLink Network administrator or your Medtronic representative for questions about the CareLink Network User
ID or Clinic Account Number.
3. Tap SEARCH.
The follow-up clinics are displayed in the Search Results field.
4. Select a clinic or clinics you want to add to your Follow-Up Clinic List.
5. Tap the Add icon.
Your selected follow-up clinics are displayed in the Follow-Up Clinic List field.
6. To add additional follow-up clinics, enter a CareLink Network User ID or Clinic Account Number and repeat the search.
8.3.4.2 Renaming a follow-up clinic
You can rename a follow-up clinic with an alias.
1. Tap the Add/Edit Alias icon.
2. Enter a unique alias for the follow-up clinic you want to rename in the ALIAS field next to the follow-up clinic name. A follow-up
clinic alias must be a unique name.
• If you have entered the same alias for two or more follow-up clinics on the ADD/EDIT ALIAS screen, the ALIAS field is
highlighted in red.
• The EXISTING CLINIC screen displays if a duplicate alias is entered for an existing follow-up clinic in your Follow-Up Clinic
List.
3. Tap one of the following options:
• Tap OK to rename the follow-up clinic.
• Tap CANCEL to exit the ADD/EDIT ALIAS screen.
8.3.4.3 Removing a follow-up clinic from the Follow-Up Clinic List
Tap next to the follow-up clinic you want to remove from the Follow-Up Clinic List.
• Tap REMOVE to remove the follow-up clinic from the Follow-Up Clinic List.
• Tap CANCEL to exit the REMOVE FOLLOW-UP CLINIC FROM LIST screen.
8.3.4.4 Completing Follow-Up Clinic List setup
Tap one of the following buttons to add a follow-up clinic to the Follow-Up Clinic List, or to cancel this step:
• Tap SAVE to save the follow-up clinics to your Follow-Up Clinic List.
The clinics you added to your Follow-Up Clinic List are now available as options on the INSERT DEVICE > MONITORING
INFORMATION screen and during a CHECK DEVICE session on the > Settings > Follow-Up Clinic List screen.
• Tap CANCEL. No clinics are added or saved to your Follow-Up Clinic List.
8.4 Patient Education
Patient Education is used to access a Medtronic webpage that has patient-focused information about the cardiac monitor system.
> Patient Education. The PATIENT EDUCATION window displays with a notice that tapping CONTINUE will open a website
Tap
with patient-focused learning activities. The patient can watch an instructional video, view a setup exercise, and read answers to
33

frequently asked questions. To prevent the patient from accessing information in other areas of the app, it is important that you click
CONTINUE and that the webpage has opened before the tablet is handed to the patient.
Caution: If you hand the tablet to the patient before tapping CONTINUE, then another patient’s information in the app could be
exposed. For example, > Load Saved Session could be used to access information about a patient’s saved session.
Patient Education is not available from the app menu when a CHECK PATIENT session is active.
8.5 About
Use the About selection to view information about the app or the patient connector.
About Reveal LINQ™ Mobile Manager
Tap > About > About Reveal LINQ™ Mobile Manager to view the following information about the app:
• Reveal LINQ™ Mobile Manager app model number
• App version number
• UDI (Unique Device Identifier)
• App Install ID
• Copyright information
• Contact Medtronic support
• Legal information
• Account number
• Tablet name
About Patient Conntector
Tap > About > About Patient Conntector to view the following information about the patient connector:
• Model number
• Name
• Firmware version number
8.6 View Reports
View reports from INSERT DEVICE or CHECK PATIENT sessions that occurred within the last 7 days. The VIEW REPORTS option
is only available when you are not in an INSERT DEVICE, CHECK PATIENT, or SET UP PATIENT session.
1. From the Reveal LINQ MOBILE MANAGER screen, tap > View Reports.
2. Tap the report you want to open, then tap OPEN.
8.7 Save Session
You can save the INSERT DEVICE or CHECK PATIENT session data to your tablet.
You can load a patient’s saved session to review the device data outside of an INSERT DEVICE or CHECK PATIENT session. Saved
device data can also be retrieved after the 7-day period for storing the patient’s Session Report has expired and the Session Report
has been deleted.
> Save Session to save interrogated device data to your tablet.
Tap
8.8 Load Saved Session
You can load session data from a previous INSERT DEVICE or CHECK PATIENT session. The Load Saved Session option is only
available when you are not in an INSERT DEVICE, CHECK PATIENT, or SET UP PATIENT session.
To load session data from a previous session, complete the following steps:
1. Tap > Load Saved Session.
The LOAD SAVED SESSION screen displays.
2. Select the desired session data from the list.
3. Select one of the following options:
• Tap LOAD SESSION to view the selected session data.
• Tap CANCEL to return to the Reveal LINQ™ MOBILE MANAGER screen.
34

4. To close the saved session, select one of the following options:
• Tap > End Session.
• Tap END SESSION in the bottom-right corner of the window.
8.9 Patient-data privacy
You can remove protected health information (PHI) from the app to manage the privacy of patient data.
The > Patient Data Privacy option is only available when you are outside of a SET UP PATIENT, INSERT DEVICE, or CHECK
PATIENT session.
For more information about managing patient-data privacy and removing patient data from the app, see Section 9.1.
9 Manage patient-data privacy
9.1 About patient-data privacy management
Protected health information (PHI) is stored on the app in reports, saved sessions, pending uploads, and implant-session summaries.
PHI that is accessible from the app, but that is not stored on the app, includes set-up patients and unenrolled patients. You can access
these sources of PHI from the REPORT LIST, LOAD SAVED SESSION, IMPLANT SESSION SUMMARY, INSERT DEVICE, or
UNENROLLED PATIENTS screens.
PHI is automatically removed from the app 7 days after it was added to the app. During the 7-day period, you can manually remove
PHI from the app to manage patient-data privacy.
9.2 Remove protected health information from the app
Remove protected health information (PHI) from the app to manage patient-data privacy. Use the DELETE PROTECTED HEALTH
INFORMATION button to remove reports, saved sessions, pending uploads, and implant-session summaries from the app.
Note: The DELETE PROTECTED HEALTH INFORMATION button does not remove set-up patients and unenrolled patients from the
app. Unenrolled patients and set-up patients are automatically removed from the app after 7 days. To manually remove set-up patients
from the app, see Section 9.6.
1. From the Reveal LINQ MOBILE MANAGER screen, tap > Patient Data Privacy.
2. Tap DELETE PROTECTED HEALTH INFORMATION.
3. From the CONFIRM TO DELETE window, tap DELETE PROTECTED HEALTH INFORMATION.
9.3 Remove a report from the app
Remove a report from the app to manage patient-data privacy.
1. From the Reveal LINQ MOBILE MANAGER screen, tap > View Reports.
2. Tap next to the report that you want to remove.
3. Tap REMOVE.
9.4 Remove a saved session from the app
Remove a saved session from the app to manage patient-data privacy.
1. From the Reveal LINQ MOBILE MANAGER screen, tap
2. Tap next to the saved session that you want to remove.
3. Tap REMOVE.
> Load Saved Session.
9.5 Remove a pending upload from the app
Remove a pending upload from the app to manage patient-data privacy.
1. From the Reveal LINQ MOBILE MANAGER screen, tap > Pending Uploads.
2. Tap next to the pending upload that you want to remove.
3. Tap REMOVE.
9.6 Remove a set-up patient from the app
Remove a set-up patient from the app to manage patient-data privacy.
1. From the Reveal LINQ MOBILE MANAGER screen, tap INSERT DEVICE.
2. From the SELECT A PATIENT screen, tap
3. Tap REMOVE.
next to the patient that you want to remove.
35

9.7 Remove a patient’s implant-session summary from the app
Remove a patient’s implant-session summary from the app to manage patient-data privacy.
1. From the Reveal LINQ MOBILE MANAGER screen, tap VIEW next to the Patient implant data was not sent message.
2. Tap next to the implant-session summary that you want to remove.
3. Tap REMOVE.
10 Troubleshooting
10.1 Issue and system messages
Table 25. Issue messages
Issue code Message title Message description Action
0056 - - The app has failed an integrity check.
Contact your Medtronic representative and tap CLOSE.
0060 - - The app has failed a compatibility
check. Contact your Medtronic representative and tap CLOSE to close the
app.
2108 LOGIN UNSUCCESS-
FUL
2108 The CareLink™ Net-
work is currently
unavailable
2316 - - Tap CLOSE to close the app.
3230 - - The Bluetooth pairing failed. The app
3269 BLUETOOTH INTER-
RUPTED
This tablet requires login through the
CareLink™ Network to continue.
Please login again.
- The connection with the CareLink Net-
Check the following:
• Patient connector is on
• Tablet Bluetooth is on
• Patient connector is near the tablet
Tap CLOSE to close the message.
Try one or more of the following items
to try to resolve the issue:
• Check that the tablet’s Wi-Fi or
cellular connection is enabled and
that the tablet is connected to your
network.
• Find an area with the stronger
connection to the internet.
• Try to login the tablet in the
CareLink Network at a later time.
work cannot be established.
Try one or more of the following items
to try to resolve the issue:
• Try to add the follow-up clinic or
physician at a later time.
• Manually add the physician to the
PHYSICIAN LIST, if applicable.
The app has a system error. Contact
your Medtronic representative.
is unable to connect to the requested
patient connector at the beginning of a
session.
Tap CLOSE to close the window.
Try one or more of the following items
to resolve the issue:
• Try to pair the app and the patient
connector again.
• Try to pair the app with a different
patient connector if you are
unable to pair the app with the current patient connector.
Select one of the following options to
close the window:
• Tap CLOSE to close the window.
The app displays the screen you
36

Table 25. Issue messages (continued)
Issue code Message title Message description Action
Ending session will cause any pending
parameter changes to be lost.
3269 CONNECTION LOST The Patient Connector connection cannot be
recovered. End Session and start a new session to reconnect.
You may close this window and continue
reviewing the current data.
Ending session will cause any pending
parameter changes to be lost.
3276 CONNECTION LOST The Patient Connector connection cannot be
recovered. End Session and start a new session to reconnect.
You may close this window and continue
reviewing the current data.
Ending the session will cause any pending
parameter changes to be lost.
3517 DEVICE NOT ACTIVA-
TED
The connection to the insertable device has
been lost.
The patient will not be monitored until device
activation is complete.
To complete activation:
were working on when the message was displayed.
• Tap END SESSION to close the
window, end your current session
and return to the Reveal LINQ
MOBILE MANAGER screen. Any
pending parameter changes will
be lost if you tap END SESSION.
Try one or more of the following items
to resolve the issue:
• Verify that the patient connector is
turned on.
• Verify in the tablet’s Settings that
Bluetooth wireless technology is
enabled. For most tablets, tap
Settings > Bluetooth.
• Move the patient connector closer
to the tablet. The patient connector needs to be close to the tablet
to establish a Bluetooth connection with the tablet.
Select one of the following options to
close the window:
• Tap CLOSE to close the window
and return to the previous window.
• Tap END SESSION to close the
window and end your current session. Any pending parameter
changes will be lost if you tap END
SESSION.
To reconnect the patient connector to
the device, perform one or more of the
following steps:
• Verify that the patient connector is
turned on.
• Reposition the patient connector
to attempt to reestablish the connection with the device.
• Connect to the device with a different patient connector.
Select one of the following options to
close the window:
• Tap CLOSE to return to your previous screen.
• Tap END SESSION to close the
window and end your current session. Any pending parameter
changes will be lost if you tap END
SESSION.
• Pair the app with a different patient
connector and restart your workflow.
To complete activation, complete the
following steps:
37

Table 25. Issue messages (continued)
Issue code Message title Message description Action
• Press the button on the patient connector
to turn it on
• Place the patient connector over the
insertable device
• Select RESUME
• Press the button on the patient
connector to turn it on
• Place the patient connector over
the insertable device
• Select RESUME
To cancel activation, which will result
in the patient not being monitored, tap
CANCEL ACTIVATION, then tap
YES, CANCEL on the confirmation
screen.
3517 OPERATION UNSUC-
CESSFUL
The connection to the insertable device has
been lost.
Press the button on the patient connector to
turn it on, place it over the inserted device,
and then select RETRY.
Try one or more of the following
options to try to resolve the issue:
• Tap CANCEL to close the message.
• Reposition the patient connector
over the patient’s device and tap
RETRY.
If the current patient connector is
unable to establish a connection with
the device, try to connect to the device
with a different patient connector.
3517 OPERATION UNSUC-
CESSFUL
The connection to the insertable device has
been lost.
Press the button on the patient connector to
turn it on, place it over the inserted device,
and then select RETRY.
Try one or more of the following
options to try to resolve the issue:
• Reposition the patient connector
over the patient’s device and tap
RETRY.
• Tap END SESSION to close the
window and end your current session.
If the current patient connector is
unable to establish a connection with
the device, try to connect to the device
with a different patient connector.
3517 SESSION EXPIRED The session with the insertable device has
expired. END SESSION and start a new session to reconnect. Pending parameter
changes have been lost.
The current device session has
expired. Tap END SESSION to close
the window and end your current session. Any pending parameter changes
have been lost and need to be re-programmed.
4514 INSERTABLE DEVICE
ERROR
Warning: Insertable Device Electrical Reset.
Contact a Medtronic representative.
Settings in the insertable device may have
changed. Please review all programmed settings.
To continue operation:
1. Select CLEAR to reset the indicator.
Try one or more of the following
options to try to resolve the issue:
• Tap CLEAR to clear previously
interrogated data in the app
• Tap END SESSION.
• Contact your Medtronic representative.
2. Save interrogated data.
4514 INSERTABLE DEVICE
ERROR
Warning: Insertable Device Electrical Reset.
Contact a Medtronic representative.
Settings in the insertable device may have
changed. Please review all programmed settings.
To continue operation:
1. Select CLEAR to reset the indicator.
2. Save interrogated data.
Try one or more of the following
options to try to resolve the issue:
• Tap CLEAR to clear previously
interrogated data in the app
• Tap CLOSE to close the message.
• Contact your Medtronic representative.
38

Table 25. Issue messages (continued)
Issue code Message title Message description Action
4514 INSERTABLE DEVICE
ERROR
Warning: Insertable Device Electrical Reset.
Contact a Medtronic representative.
To continue operation:
1. Select CLEAR to reset the indicator.
2. Save interrogated data.
Try one or more of the following
options to try to resolve the issue:
• Tap CLEAR to clear previously
interrogated data in the app
• Tap CLOSE to close the message.
• Contact your Medtronic representative.
4514 UNKNOWN INSERTA-
BLE DEVICE
4522 INSERTABLE DEVICE
ERROR
An insertable device with a different serial
number, model number or software version
has been detected under the patient connector.
Warning: Insertable Device Electrical Reset
Contact a Medtronic representative.
To continue operation:
1. Select CLEAR to reset the indicator.
2. Reprogram desired parameter values.
Note: All data in programmer will be cleared.
• Tap END SESSION.
• Repeat the interrogation.
• Contact your Medtronic representative.
Try one or more of the following
options to try to resolve the issue:
• Tap CLEAR to clear previously
interrogated data in the app.
• Tap END SESSION to close the
session and return to the Reveal
LINQ MOBILE MANAGER
screen. Repeat your workflow.
• Contact your Medtronic representative.
4522 INSERTABLE DEVICE
ERROR
Warning: Insertable Device Electrical Reset
Contact a Medtronic representative.
To continue operation:
1. Select CLEAR to reset the indicator.
2. Reprogram desired parameter values.
Note: All data in programmer will be cleared.
Try one or more of the following
options to try to resolve the issue:
• Tap CLEAR to clear previously
interrogated data in the app.
• Tap CLOSE to close the session
and return to the Reveal LINQ
MOBILE MANAGER screen.
Repeat your workflow.
• Contact your Medtronic representative.
4522 INSERTABLE DEVICE
ERROR
Warning: Insertable Device Electrical Reset
Contact a Medtronic representative.
To continue operation:
Select CLEAR to reset the indicator.
Note: All data has been cleared but key
parameter values are unchanged.
Try one or more of the following
options to try to resolve the issue:
• Tap CLEAR to clear previously
interrogated data in the app.
• Tap END SESSION to close the
session and return to the Reveal
LINQ MOBILE MANAGER
screen. Repeat your workflow.
• Contact your Medtronic representative.
4522 INSERTABLE DEVICE
ERROR
Warning: Insertable Device Electrical Reset
Contact a Medtronic representative.
To continue operation:
Select CLEAR to reset the indicator.
Note: All data has been cleared but key
parameter values are unchanged.
Try one or more of the following
options to try to resolve the issue:
• Tap CLEAR to clear previously
interrogated data in the app.
• Tap CLOSE to close the session
and return to the Reveal LINQ
MOBILE MANAGER screen.
Repeat your workflow.
• Contact your Medtronic representative.
5506 CHECK INTERNET
CONNECTION
Internet connection is required to login. You
must connect to the internet every 30 days to
remain logged in.
Tap CLOSE to close the message.
To enable all features of the app,
ensure that Wi-Fi or cellular data serv-
39

Table 25. Issue messages (continued)
Issue code Message title Message description Action
Please check your internet settings and
RETRY.
5506 CHECK INTERNET
CONNECTION
5506 CHECK INTERNET
CONNECTION
5506 Internet not connected - The connection with the CareLink Net-
8218 - - A firmware update failed. Tap OK to
8423 INSUFFICIENT STOR-
AGE SPACE
8423 NOT ENOUGH FREE
SPACE
Internet connection is required to login. You
must connect to the internet every 30 days to
remain logged in.
Please check your internet settings and
RETRY.
Certain features of this software require a
connection to the internet.
The insertable device data could not be
saved to the tablet.
Ensure that your tablet has sufficient storage
space and try saving again.
There is insufficient data memory to run this
app. To increase the available memory,
delete any unnecessary files, videos, images
or applications.
ice is enabled and that the tablet is
connected to your network.
Enable the Wi-Fi or cellular setting on
your tablet, and connect to your network.
The app must be connected to the
internet every 30 days to remain logged in to the CareLink Network.
Try one or more of the following
options to fix the issue:
• Tap RETRY to try to reconnect to
your Wi-Fi or cellular network.
• Enable the Wi-Fi or cellular setting
on your tablet, and connect to your
network.
Tap CLOSE to close the message.
Tap CLOSE to close the message.
To enable all features of the app,
ensure that Wi-Fi or cellular data service is enabled and that the tablet is
connected to your network.
• Tap RETRY to try to reconnect to
your Wi-Fi or cellular network.
• Enable the Wi-Fi or cellular setting
on your tablet, and connect to your
network.
work cannot be established due to an
internet connection issue.
Try one or more of the following items
to try to resolve the issue:
• Check that the tablet’s Wi-Fi or
cellular connection is enabled and
that the tablet is connected to your
network.
• Try to add the follow-up clinic or
physician at a later time.
• Manually add the follow-up clinic
to the Follow-Up Clinic List, if
applicable.
• Manually add the physician to the
PHYSICIAN LIST, if applicable.
close the message.
Tap OK to close the message.
Ensure that your tablet has sufficient
storage space and try saving again.
Retry your work flow again.
Tap OK to close the message.
Verify that there is a minimum 30 MB of
internal storage available to run the
app.
40

Table 25. Issue messages (continued)
Issue code Message title Message description Action
The required minimum free space to run this
app is: 30 MB on internal storage.
8434 INVALID PARAME-
TERS
The insertable device data could not be
saved to the tablet. Some parameters have
invalid values.
Reprogram device settings and try saving
again.
1. Tap OK to close the message.
2. Reprogram the device parameters.
3. Tap > Save Session to retry
saving the device data to the
tablet.
Table 26. System messages
Message title Message description Action
A newer version of the application is available.
Application update available An optional app update is available.
• Tap UPDATE to install the update now.
• Tap CANCEL to install the update later.
Application update available You must update the application to continue. A required app update is available. You must
install the app update to continue using the
app.
• Tap UPDATE to install the update and
continue.
• Tap CANCEL to close the app and install
the update later. You will not be able to
continue using the app until the app
update is installed.
Are you sure you want to
cancel device activation?
The patient will not be monitored until device activation is complete.
Tap RESUME to return to the ACTIVATE
DEVICE screen.
Tap YES, CANCEL to cancel device activation and return to the INSERT DEVICE
screen.
Note: The device will not be activated and all
detection parameters will remain disabled.
CANNOT CONNECT TO
INSERTABLE DEVICE
The insertable device could be out of range of the
Patient Connector.
To continue, try re-positioning the Patient Connector
closer to the insertable device.
Tap OK to close the message.
Try one or more of the following options to try
to resolve the issue:
• Position the patient connector closer to
the device and try to re-pair the patient
connector with the device.
• Use a different patient connector and pair
it with the device.
CARELINK™ SYNC IS
TURNED OFF
Data cannot be sent or received from the CareLink™
Network.
Patient pre-enrollment and device registration MUST
be completed manually through the Medtronic websites.
Tap OK to close the message.
Turn ON CareLink Sync.
To turn ON CareLink Sync, complete the fol-
lowing steps:
• Tap > Settings > CareLink Sync.
• Slide to toggle switch to ON.
CHECK INTERNET CONNECTION
The CareLink™ Network connection failed.
You can complete your workflow disconnected, but
data will not be sent to or received from the CareLink™
Network.
To resolve the CareLink Network connection
issue, try one or more of the following items:
• Check your tablet connectivity to verify
that your tablet is connected to the internet through your Wi-Fi or cellular network.
• Find an area with the stronger connection
to the internet.
• Tap RETRY.
• Tap CONTINUE DISCONNECTED to
continue your workflow without a connection to the CareLink Network.
41

Table 26. System messages (continued)
Message title Message description Action
CHECK INTERNET CONNECTION
The CareLink™ Network connection failed.
You can complete your workflow disconnected, but
data will not be sent to or received from the CareLink™
Network.
To resolve the CareLink Network connection
issue, try one or more of the following items:
• Check your tablet connectivity to verify
that your tablet is connected to the internet through your Wi-Fi or cellular network.
• Find an area with the stronger connection
to the internet.
• Tap RETRY.
Tap CONTINUE DISCONNECTED to continue your workflow without a connection to
the CareLink Network.
CHECK INTERNET CONNECTION
You are not connected to the CareLink™ Network.
Data cannot be sent or received.
Check your internet connection and select RETRY.
To continue without saving, select CANCEL.
To resolve the CareLink Network connection
issue, try one or more of the following items:
• Check your tablet connectivity to verify
that your tablet is connected to the internet through your Wi-Fi or cellular network.
• Find an area with the stronger connection
to the internet.
• Tap RETRY.
Tap CANCEL to continue your workflow without saving the device data.
CLEAR ELECTRICAL
RESET
Clearing this Electrical Reset indication will also clear
any previously interrogated data in the programmer.
Select CONTINUE to complete the clear.
Tap CONTINUE to clear the previously interrogated device data.
Tap CANCEL to return to the previous screen.
CONFIRM END SESSION Are you sure you want to end this session? • Tap YES to end your current session.
• Tap CANCEL to close the message and
remain in your current session.
CONNECTED TO THE
CARELINK™ NETWORK
DATA WILL BE CLEARED Changing Symptom Episode Duration will clear all
You are connected to the CareLink™ Network, all features are available.
Symptom episodes from the insertable device.
Select CONTINUE to proceed with the change.
Tap OK to close the message.
• Tap CONTINUE to clear the symptom
episode data on the app and the device.
• Tap CANCEL to return to the previous
screen.
DEVICE NOT SETUP The insertable device has not been setup. The inser-
tion workflow needs to be completed before the
device can be used.
• Tap CONTINUE INSERTION to navigate
to the INSERT DEVICE steps in order to
complete the device setup.
• Tap CANCEL to end your current session
and to return to the SELECT A PATIENT
screen.
Note: If you tap CANCEL and want to continue the session with the current device, you
will need to complete the INSERT DEVICE
steps to complete the device setup before you
can continue with additional work flow steps.
FILE CANNOT BE READ Verify that file is correct and try again. Tap OK to close the message.
Verify that the file you are reading is the correct file you wish to view.
INCOMPATIBLE DEVICE The device you are attempting to associate is not
compatible with the Reveal LINQ™ Mobile Manager
application.
This application is intended for use with a Reveal
LINQ™ or LINQ™ II device.
To continue, scan the bar code or manually enter the
serial number of a compatible device.
INCOMPATIBLE EQUIPMENT
The equipment you are attempting to associate is not
compatible with the insertable device.
Tap OK to close the message.
• Verify that you have a compatible implantable device.
• Scan the barcode or manually enter the
serial number of the compatible implantable device.
Tap OK to close the message.
42

Table 26. System messages (continued)
Message title Message description Action
To continue, scan the barcode or manually enter the
serial number of compatible equipment.
• Verify that you have compatible equipment.
• Scan the barcode or manually enter the
serial number of the compatible implantable device.
INVALID CHARACTERS
ENTERED
NO CAMERA ACCESS The app is not able to access the camera. The camera
Invalid characters have been entered.
Please re-enter the text.
can be used to scan barcodes of the insertable device
and associated equipment instead of manually entering the serial codes.
Tap OK to close the message.
Correct the characters in the field.
Tap OK to close the message.
Enable camera access with the app. For most
tablets select the Settings, locate the app, and
enable Camera access.
To continue, check the Settings of your tablet to enable camera access to the Reveal LINQ™ Mobile Manager app.
OPERATION UNSUCCESSFUL
The connection to the insertable device has been lost.
Press the button on the patient connector to turn it on,
place it over the inserted device, and then select
RETRY.
• Place the patient connector close to the
device and tap RETRY.
• Tap CLOSE to close the window, end the
current session, and return to the Reveal
LINQ MOBILE MANAGER screen.
PATIENT NOT ENROLLED
IN THIS CLINIC
Some features are not available including:
• Episode Assessment
• Symptom Details
Tap OK to close the message.
Check the patient’s clinic enrollment status on
the CareLink Network.
• Equipment Information
Please visit the CareLink™ Network and check the
patient’s enrollment status.
PATIENT PRE-ENROLLED
IN CARELINK™
The selected patient has been pre-enrolled in the
CareLink™ Network but has not yet been accepted by
this clinic or is pre-enrolled in a different clinic.
Tap OK to close the message.
Check the patient’s clinic enrollment status on
the CareLink Network.
Some features are not available including:
• Episode Assessment
• Symptom Details
Please visit the CareLink™ Network and check the
patient’s enrollment status.
TABLET PASSCODE
REQUIRED
You must set a passcode on this tablet to continue.
To set a passcode on this tablet:
1. Tap CLOSE to close the message.
2. Turn on and set a passcode or Touch ID.
1. Close this dialog.
2. Open the Settings on this tablet.
3. Turn on and set passcode or Touch ID.
4. Relaunch this app and allow permission
3. Restart the app.
4. Allow permission requests.
requests.
TEMPORARILY DISCONNECTED
You have chosen to work disconnected, certain features require internet connection.
To access connected features:
1. End Session.
2. Check internet connection.
3. Begin another session.
Tap OK to close the message.
Try one or more of the following options to try
to resolve the issue:
• Tap END SESSION to end the current
INSERT DEVICE or CHECK PATIENT
session.
• Check your tablet connectivity to verify
that your tablet is connected to the internet through your Wi-Fi or cellular network.
UNABLE TO CONTINUE An insertable device with a different serial number,
model number or software version has been detected
under the patient connector.
A different device has been detected by the
patient connector.
Verify that you have a compatible implantable
device.
Tap END SESSION to close the current session.
Open the tablet’s Settings and tap Set-
tings > Passcode or Touch ID.
43

Table 26. System messages (continued)
Message title Message description Action
VALUES NOT PROGRAMMED
WARNING: EXPIRED
EQUIPMENT
This screen has values which have not been programmed.
The equipment you are attempting to associate is
expired beyond its shelf life.
• Tap BACK to return to the previous screen
and program the parameter values.
• Tap CONTINUE to continue with your current session. Your current session will
continue, but the pending parameter
changes will be lost.
Tap OK to close the message.
• Verify that you have a compatible implantable device within the expiration date.
• Scan the barcode or manually enter the
serial number of the compatible implantable device.
10.2 Charging
Table 27. Patient Connector Messages
Issue code Message title Message description Action
3248 CONNECT CHARGER - Tap OK to close the message.
The patient connector battery charge is
getting low. Charge the patient connector battery before it becomes too low to
use or switch to a different patient connector and follow the prompts on the
app.
3248 - - Tap END SESSION to close the window.
The patient connector battery charge is
low and has less than 25 minutes of estimated service.
Connect the patient connector to the
Medtronic-supplied charger or switch to
a different patient connector and follow
the prompts on the app.
10.3 Updates
Medtronic will periodically push updates to the app on the tablet and software on the patient connector.
If an app update is available, you will be prompted to update the app when you launch the app unless you have enabled automatic
updates on your tablet. Medtronic recommends accepting all app updates when they are available if automatic updates are not
enabled on your tablet.
Standard app updates
If the app displays a message that a newer version of the app is available, select one of the following options:
• Accept the update to update the app to the latest version.
• Decline the update to keep the app at the same version.
If you decline the app update, you will not have the most current version of the app. You will continue to receive the notification to update
the app until you accept the update.
Required app updates
If the app displays a message that the app must be updated, select one of the following options:
• Accept the update to update the app to the latest version.
• Decline the update to keep the app at the same version.
If you decline the update, the app will close. You cannot use the app until you accept the app update.
Patient connector software updates
When an update to the patient connector software is available, the update begins automatically after the patient connector pairs with
the app.
44

The patient connector software update process occurs automatically. You do not need to take any action for the process to start or
complete.
When the software update initiates, ensure that the patient connector has sufficient power. Plug in the patient connector if the software
update initiates and the amber indicator light is lit.
When the patient connector software is updating, a software update screen displays and a progress bar shows the status of the
software update. When the progress bar fills completely, the patient connector software is updated and the software update screen
closes.
If you close the app or navigate away from the patient connector software update screen during the software update, the software
update continues until the patient connector software update completes. You cannot cancel the patient connector software update.
10.4 Troubleshooting unsuccessful patient enrollment and device registration
Successful patient enrollment and device registration requires an Internet connection and communication with Medtronic servers. If
patient enrollment or device registration is unsuccessful, take one of the following actions:
• Ensure that Wi-Fi or cellular data is enabled and that the tablet is connected to your network.
• Keep the app open. When the app is open or running in the background, the app continuously tries to resend the patient enrollment
and device registration for up to 7 days. When the Medtronic server is not available, it typically becomes available within 24 hours.
• Manually complete patient enrollment or device registration.
– If patient enrollment is unsuccessful, contact the patient’s follow-up clinic and request to have the patient manually enrolled in
the Medtronic CareLink network.
– If device registration is unsuccessful, contact your Medtronic representative to manually register the patient’s device.
Note: After you manually complete patient enrollment or device registration, the app does not update the patient-enrollment or
the device-registration status from to on the IMPLANT SESSION SUMMARY window. To remove the patient’s
implant-session summary from the app, see Section 9.7.
11 Contextual Help Content
11.1 Amplitude gauge
The amplitude gauge displays the sensed signal of the device and indicates if the device has a strong or weak sensed signal.
The amplitude gauge displays a strong sensed signal with the following indicators:
• The sensed signal is >= 0.20 mV.
• The sensed signal value is displayed in green.
The amplitude gauge displays a weak sensed signal with the following indicators:
• The sensed signal is < 0.20 mV.
• The sensed signal value is displayed in red.
11.2 Reason for Monitoring - Reveal LINQ ICM
Reason for Monitoring is used to recommend certain nominal settings.
You can edit parameters from the Device & Patient Settings screen.
When you select a Reason for Monitoring, parameter values for AF Detection Sensitivity, Ectopy Rejection, AT/AF Recording
Threshold, and Wireless Data Priority are automatically set to default settings. You can change these default settings after you
select a Reason for Monitoring.
When you change a parameter value, the new value is shown as pending. You can change several parameter values together. The
values remain pending until you tap SAVE. Pending changes will be lost if the session is ended or the app is closed before tapping
SAVE.
To undo your pending changes and revert to the last programmed values, tap UNDO.
Ectopy Rejec-
c
tion
c
Reason for Monitoring
a,b
AF Detection Sensitivity
Syncope Least Sensitive Aggressive Only Longest Episode Pause, Tachy, Brady
Cryptogenic Stroke Balanced Sensitivity Aggressive All Episodes Tachy, Pause, Brady
Suspected AF Less Sensitive Nominal Episodes ≥6 min Tachy, Pause, Brady
AF Ablation Balanced Sensitivity Nominal All Episodes Tachy, Pause, Brady
AF Management Balanced Sensitivity Nominal All Episodes Tachy, Pause, Brady
Palpitations Less Sensitive Nominal Episodes ≥6 min Tachy, Pause, Brady
AT/AF Recording
Threshold
c
Wireless Data Priority
c
45

Reason for Monitoring
a,b
AF Detection Sensitivity
Ectopy Rejec-
c
tion
c
AT/AF Recording
Threshold
c
Wireless Data Priority
c
Ventricular Tachycardia Least Sensitive Aggressive Episodes ≥10 min Tachy, Pause, Brady
Seizures Least Sensitive Aggressive Episodes ≥10 min Pause, Tachy, Brady
Other Less Sensitive Aggressive Episodes ≥10 min Pause, Tachy, Brady
a
For all Reasons for Monitoring, Tachy Detection Interval is programmed automatically to the closest value less than or equal to 230 bpm minus the
patient’s age, as calculated from the information entered in the patient’s Date of Birth.
b
For all Reasons for Monitoring, AT/AF Detection is set to AF Only.
c
AF Detection Sensitivity, Ectopy Rejection, AT/AF Recording Threshold, and Wireless Data Priority parameters are set to pending automatically
according to the selected Reason for Monitoring.
11.3 Reason for Monitoring - LINQ II ICM
Reason for Monitoring is used to recommend certain nominal settings.
You can edit Reason for Monitoring parameters from the Quick Look > Device & Patient Settings screen.
When you select a Reason for Monitoring, parameter values are automatically set to default settings. These default settings are
described in the LINQ II LNQ22 Insertable Cardiac Monitor Clinician Manual. You can change these default settings after you select a
Reason for Monitoring.
When you change a parameter value, the new value is shown as pending. You can change several parameter values together. The
values remain pending until you tap SAVE.
To undo your pending changes and revert to the last programmed values, tap UNDO.
11.4 Date of Birth
Date of Birth is used to calculate the nominal Tachy Detection Interval setting.
11.5 Patient Local Date and Time
• Changes to the Patient Local Date and Time will be applied to new data only. Timestamps of previously stored data will not be
modified.
• Changing the Patient Local Date and Time may cause temporary errors in CareLink Network reporting.
• Any episodes awaiting wireless transmission to the CareLink Network when the Patient Local Date and Time is changed will not
be sent unless a manual transmission is requested.
11.6 Blank After Sense
Blank After Sense can minimize R-wave oversensing.
Blank After Sense temporarily suspends sensing after R-wave detection for the duration of the programmed value. (Nominal
setting=150 ms)
The following figure shows T-waves that are inappropriately sensed as R-waves by the device due to a low Blank after Sense setting.
Figure 9. T-Wave sensed as R-Wave
The following figure shows the elimination of T-wave sensing after programming Blank after Sense to a higher setting.
46
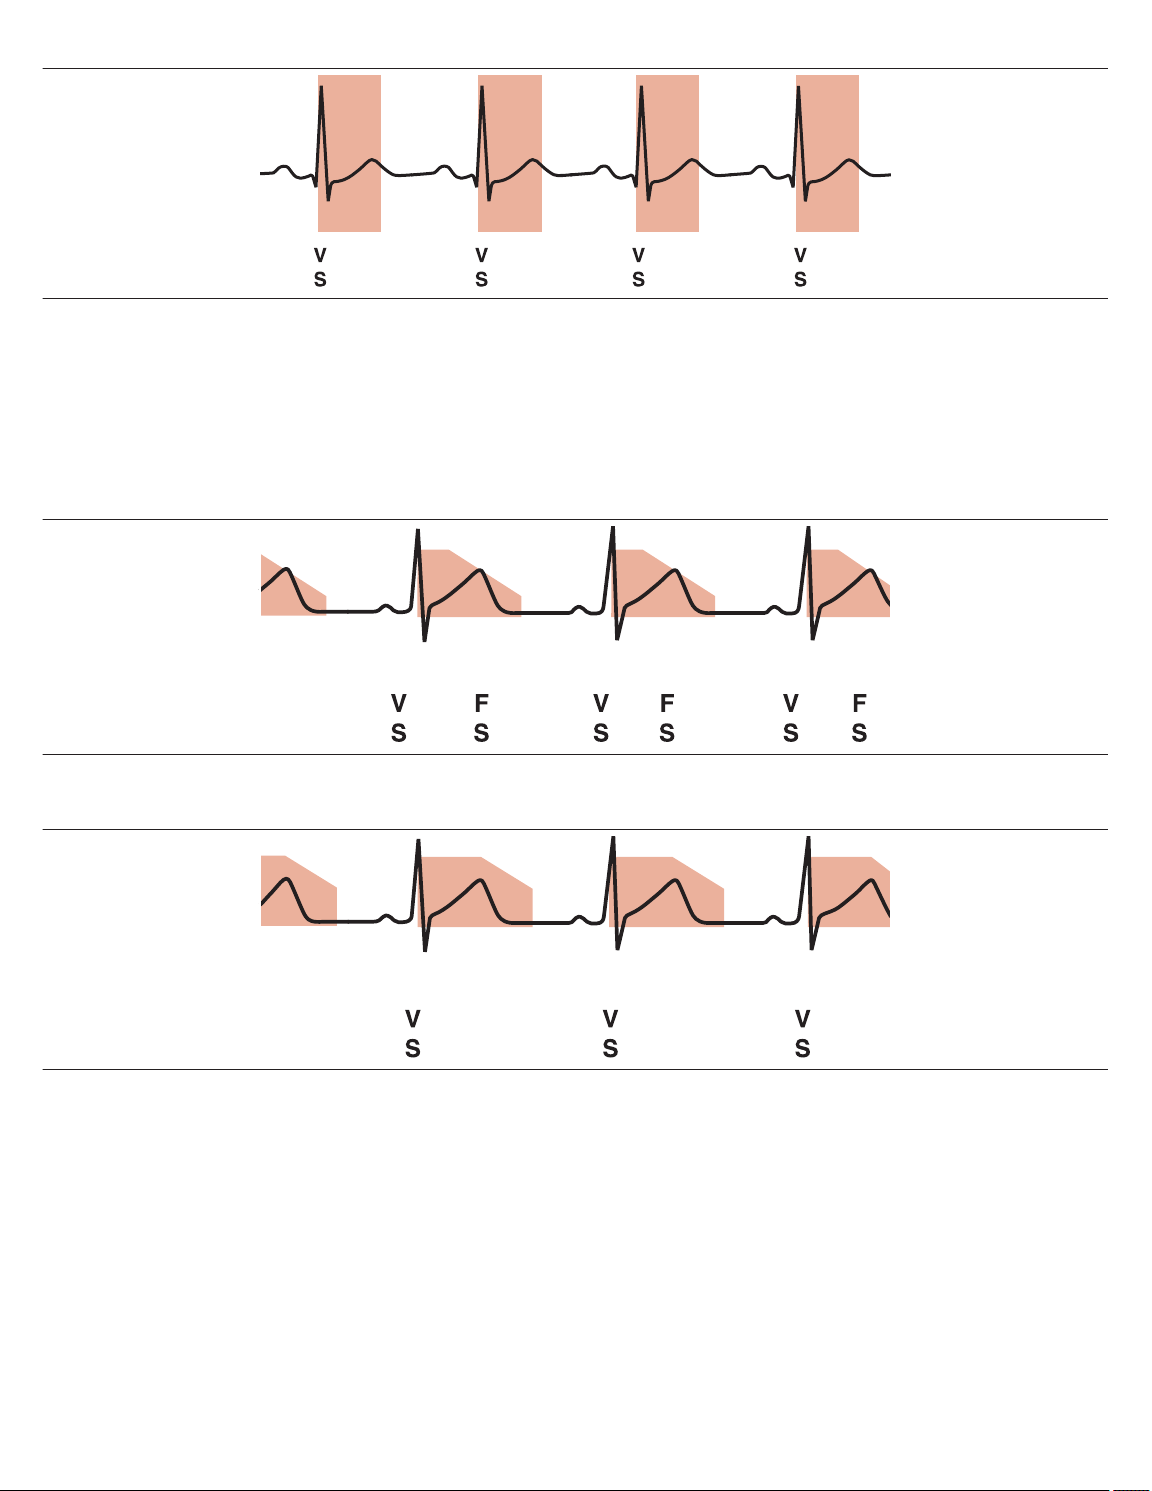
Figure 10. ECG sensed correctly
11.7 Sensing Threshold Decay Delay - Reveal LINQ ICM
Sensing Threshold Decay Delay can minimize R-wave oversensing.
Normally, after a sensed-R-wave, sensitivity is temporarily reduced. Sensing Threshold Decay Delay delays the return of sensitivity
to the programmed value after a sensed R-wave. (Nominal setting = 150 ms)
The following figure shows T-waves that are inappropriately sensed as R-waves by the Reveal LINQ device due to a low Sensing
Threshold Decay Delay setting.
Figure 11. T-Wave sensed as R-Wave
The following figure shows the elimination of T-wave sensing after programming Sensing Threshold Decay Delay to a higher setting.
Figure 12. ECG sensed correctly
11.8 T-Wave Blanking Interval - LINQ II ICM
T-Wave Blanking Interval can minimize R-wave oversensing.
Normally, after a sensed-R-wave, sensitivity is temporarily reduced. T-Wave Blanking Interval delays the return of sensitivity to the
programmed value after a sensed R-wave. (Nominal setting = 150 ms)
The following figure shows T-waves that are inappropriately sensed as R-waves by the device due to a low T-Wave Blanking Interval
setting.
47

Figure 13. T-Wave sensed as R-Wave
The following figure shows the elimination of T-wave sensing after programming T-Wave Blanking Interval to a higher setting.
Figure 14. ECG sensed correctly
11.9 Sensitivity
Set Sensitivity to determine the amplitude threshold for R-wave detection. The nominal Sensitivity setting is 0.035 mV (35 µV).
• Select a lower Sensitivity setting to make the device more sensitive. A lower Sensitivity setting makes the device more sensitive
by detecting smaller amplitude signals.
• Select a higher Sensitivity setting to make the device less sensitive. A higher Sensitivity setting makes the device less sensitive
by detecting larger amplitude signals.
The following figure shows R-waves that are not sensed by the device due to a high Sensitivity setting.
Figure 15. ECG undersensing example
The following figure shows optimal sensing of R-waves by the device after programming Sensitivity to a lower setting.
Figure 16. ECG sensed correctly
11.10 Sleeping Hours Near Home Monitor (Daily Wireless Transmission Time) - Reveal LINQ ICM
Sleeping Hours Near Home Monitor (Daily Wireless Transmission Time) determines the start time for daily wireless
transmissions. Select a time when the patient is expected to be near their home monitor for at least the next 5 hours (for example,
48

during sleep). Note that the patient must avoid interacting with their home monitor during this time interval in order to avoid disrupting
their daily wireless transmissions. For example, the patient must refrain from pushing any buttons on the home monitor.
This option is available for Reveal LINQ ICM only.
11.11 Wireless Data Priority - Reveal LINQ ICM
Wireless Data Priority determines the selection of episodes for wireless transmission to the CareLink Network. The nominal setting
for Wireless Data Priority is determined by Reason for Monitoring. However, the nominal setting can be overridden by selecting
a different value. This setting is unrelated to Episode Priority, which affects episode storage on the device.
11.12 Brady: Nighttime ECGs Stored - LINQ II ICM
Brady: Nighttime ECGs Stored is used to set user preferences for the number of Brady ECGs stored between midnight and 6:00
AM.
If you select None to be stored, Brady episodes will still be detected and the brady episode counter will be incremented on the Quick
Look tab. But no corresponding episode logs or episode records will be stored during this time period.
If you select 1 ECG to be stored, the ECG of the first detected Brady episode during this time period will be stored.
If you select Up to 3 ECGs to be stored, the device will function normally: the ECGs for the first three episodes will be stored. If a longer
episode is detected, then it will overwrite the last stored episode.
11.13 Trends: Cardiac Compass
The vertical dotted lines in the Cardiac Compass mark the current date and the date of the previous session.
The Cardiac Compass displays 425 days of data for the Reveal LINQ ICM and 270 days of data for the LINQ II ICM. Any data from
before that time period will no longer be displayed.
A key to the left side of the timeline at the top of the screen explains that the P icon represents a Programming Change, the I icon
represents an Interrogation, an underlined letter means that the action was taken remotely, and the S icon represents a Symptom.
11.14 Trends: Rate Histograms
These histograms show data from the last session to the current date. Each histogram shows the total number of days in AT/AF and
out of AT/AF since the last session.
11.15 MyCareLink Heart™ Mobile App Optimization
When MyCareLink Heart™ Mobile App Optimization is enabled, patients will experience increased connectivity between the patient
app and the device. However, this parameter will affect the device’s battery longevity. Refer to the LINQ II LNQ22 Insertable Cardiac
Monitor Clinician Manual for LINQ II ICM battery-longevity projections.
11.16 Implanting Physician
Select the Implanting Physician from the drop menu.
The Implanting Physician information is entered on the SET UP PHYSICIAN LIST screen during the setup of the app. If this step
was skipped during the setup of the app, then no Implanting Physician names are available in the Implanting Physician drop menu.
The Implanting Physician drop menu is not displayed when CareLink™ Sync is turned OFF.
Manually added physicians are periodically removed from the Physician List. If the implanting physician is not available in the
Implanting Physician drop menu and CareLink™ Sync is turned ON, tap
information.
If the tablet is not connected to the internet, check the tablet’s Wi-Fi or internet connection.
> Settings > Physician List to add physician
11.17 Follow-Up Physician
Select the Follow-Up Physician from the drop menu.
The follow-up physician information is entered on the Set Up Physician List screen during the setup of the app. If this step was
skipped during the setup of the app, then no follow-up physician names are available in the Follow-Up Physician drop menu. The
Follow-Up Physician drop menu is not displayed when CareLink™ Sync is turned OFF.
Manually added physicians are periodically removed from the Physician List. If the follow-up physician is not available in the
Follow-Up Physician drop menu and CareLink™ Sync is turned ON, tap > Settings > Physician List to add physician
information.
If the tablet is not connected to the internet, check the tablet’s Wi-Fi or internet connection.
49

11.18 Follow-Up Clinic List
Select the Follow-Up Clinic from the drop menu.
The Follow-Up Clinic information is entered on the Follow-Up Clinic List during the set up of the app. If this step was skipped during
set up of the app, no clinics are available in the Follow-Up Clinic drop menu.
50


Medtronic, Inc.
*M016238C001*
710 Medtronic Parkway
Minneapolis, MN 55432
USA
www.medtronic.com
+1 763 514 4000
Medtronic USA, Inc.
Toll-free in the USA (24-hour technical consultation for physicians and
medical professionals)
Bradycardia: +1 800 505 4636
Tachycardia: +1 800 723 4636
Technical manuals
www.medtronic.com/manuals
© 2021 Medtronic
M016238C001 A
2021-03-31
 Loading...