


Reveal LINQ Mobile Manager Online Help
Instructions for Use
Caution: Federal law (USA) restricts this device to sale by or on the order of a physician.

The following list includes trademarks or registered trademarks of Medtronic in the United States and possibly in other countries. All other trademarks are the property
of their respective owners.
CARELINK, CareLink, Integrity, Medtronic, Quick Look, Reveal LINQ
1 Configuration
1.1 About Reveal LINQ Mobile Manager
Device Description
The Reveal LINQ™ Mobile Manager application (called the “app” from now on) is installed on a tablet with Internet access and is the
software of the Reveal LINQ™ Mobile Manager system. The app communicates with the Medtronic 24965 Patient Connector or the
Medtronic 24967 Patient Connector1 (called the “patient connector” from now on) to program, interrogate, and transmit stored
Reveal LINQ™ Insertable Cardiac Monitor (ICM) data to Medtronic’s proprietary CareLink™ Network for generating reports and to
facilitate patient enrollment in the CareLink™ Network. The app should be used by healthcare professionals only in a clinical or
hospital environment.
Intended Use
The Reveal LINQ™ Mobile Manager app is intended for programming and interrogating the Reveal LINQ™ Insertable Cardiac
Monitor.
Contraindications
There are no known contraindications.
Electronic instructions for use/manuals
To view, download, print, or order manuals for this product, go to www.medtronic.com/manuals, or contact a Medtronic representative.
Software requirements
Manuals can be viewed using a current version of any major internet browser. For best results, use Adobe Acrobat® Reader with the
browser.
Paper manuals
Paper manuals are available to customers free of charge. They should arrive in 3 - 7 days. To order, go to
www.medtronic.com/manuals, or contact a Medtronic representative.
Applicable Model Numbers
MSW001
MSW002
Tap Menu > ABOUT to determine the model number for your app. All model numbers may not be available in your geography.
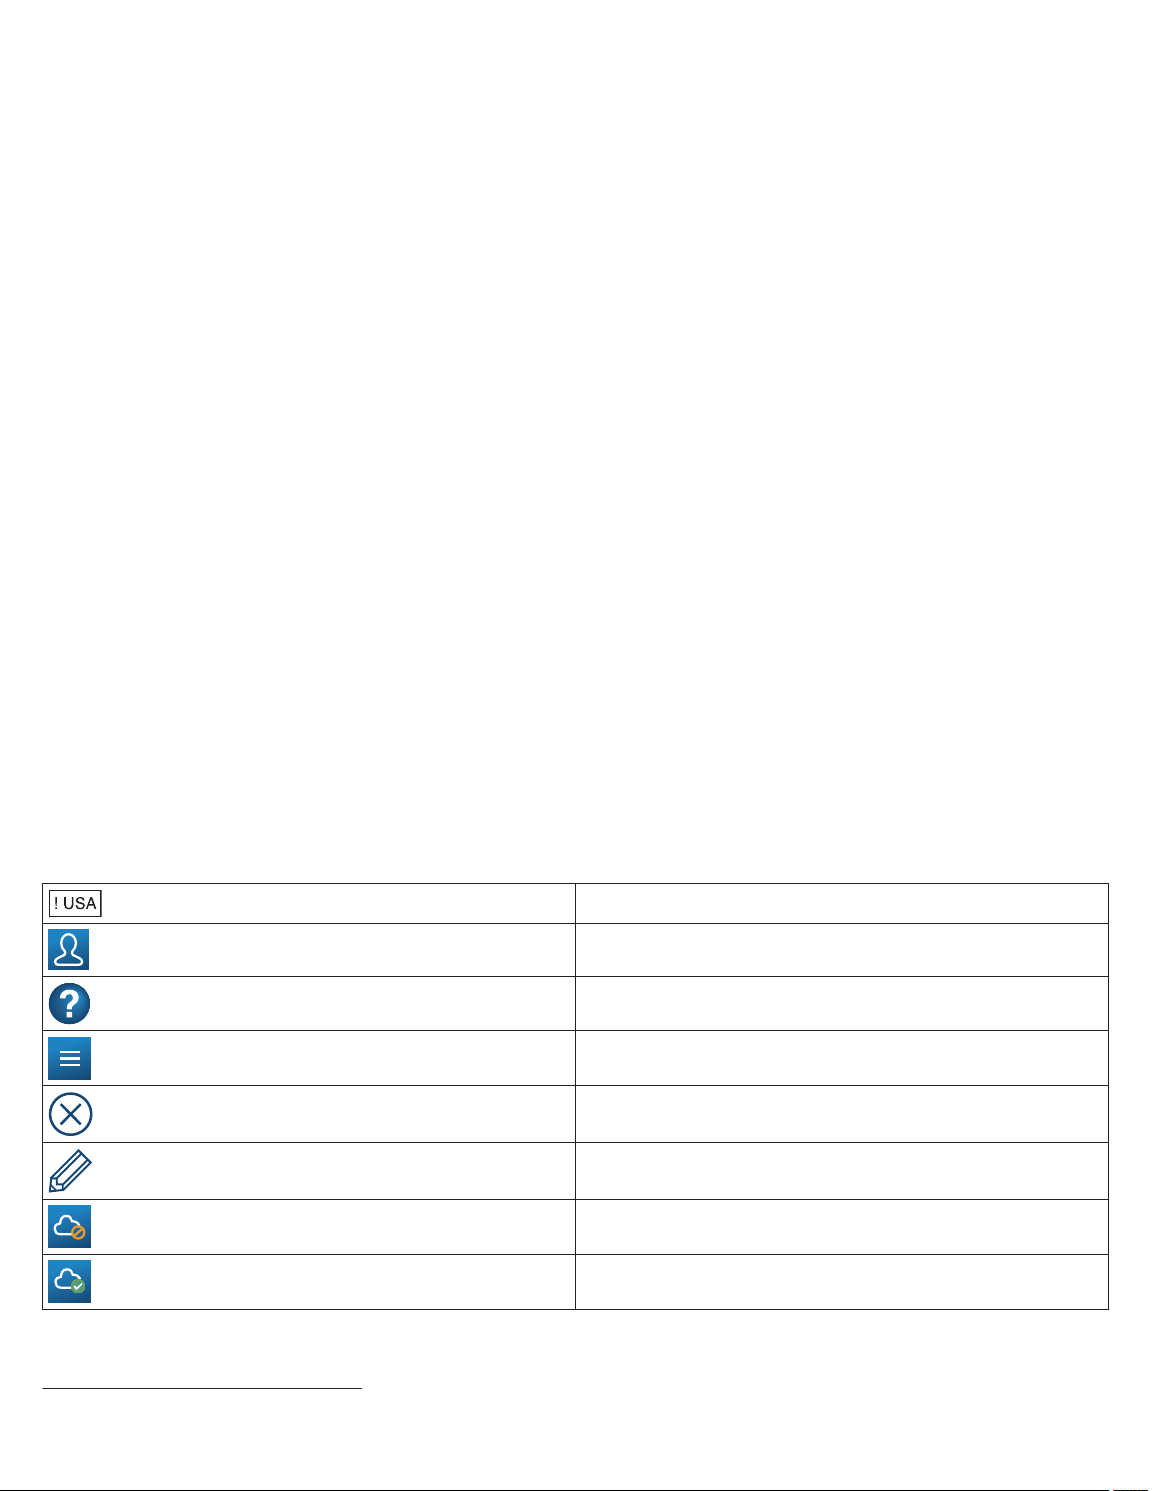
Symbols
For US audiences only
Patient Information icon
Contextual Help icon
Menu icon
Remove button
Add/Edit Alias icon
Unauthenticated icon
Authenticated icon
1
All model numbers may not be available in your geography.
3

1.2 IT Network, Tablet, and Data Information
Required IT network characteristics and configuration
The use of this system requires your network to have Internet access for the following purposes:
• Install and update the app from the app store.
• Complete authentication with the CareLink Network.
• Communicate with the CareLink™ Network for patient enrollment and device registration.
• Generate full reports.
• Search for physicians and CareLink clinics.
The use of this system also requires that Bluetooth® is enabled on your tablet.
Failure to provide IT network access results in the following effects:
• Installation and updates to the app cannot be completed if the tablet is unable to access the app store.
• To app must be authenticated to use.
• Comprehensive review of the Reveal LINQ™ ICM data and facilitation of patient enrollment in the CareLink™ Network cannot be
completed if the app is unable to access the CareLink™ Network.
• The system cannot communicate with the implantable device if the tablet is unable to establish a Bluetooth connection with the
patient connector.
Follow your organization’s processes and policies to configure your network.
Supported tablets and technical specifications
For the list of supported tablets, and their specifications including network connectivity specifications, go to the following website:
www.medtronic.com/24965
2
Precautions when connecting to your IT network
Connecting the app to a secure IT network that includes other equipment could result in unforeseen risks to patients, operators, or third
parties. Changes to your IT network could also introduce additional risks. Analyze, evaluate and control any risks identified.
Intended information flows
Reveal LINQ™ ICM data and system logs are sent for processing through the system components in the following sequential order:
1. Reveal LINQ™ ICM
2. Patient Connector
3. App installed on the tablet
4. Internet
5. CareLink™ Network
In response, a confirmation receipt is sent from the CareLink™ Network via the Internet to the app.
PDF report requests are sent from the app via the Internet to the CareLink™ Network. In response, the CareLink™ Network sends the
PDF report via the Internet to the app.
The CareLink™ Clinic search criteria are sent from the app via the Internet to the CareLink™ Network. In response, the corresponding
CareLink™ Clinic’s details are sent by the CareLink™ Network via the Internet to the app.
All information in transit is protected for security.
1.3 Security
Data in the app is protected by application level encryption. The app does not provide data protection for data exported from it to
another destination. Data exported from the app should be handled in accordance with your clinic’s security policy for data handling
and storage.
To help protect patient health information and to prevent unauthorized programming of the Reveal LINQ™ ICM, security measures for
your tablet should include the following items:
• Implement a passcode and PIN to protect the tablet.
• Ensure that the tablet is installed with the latest operating system version that is compatible with the app. For the latest operating
system version information, see Section 1.2, “IT Network, Tablet, and Data Information”, page 4.
• Enable Background App Refresh on the tablet so that the tablet can receive the latest available app version without a delay.
2
The Bluetooth® word mark is a registered trademark of Bluetooth SIG, Inc. and any use of this mark by Medtronic is under license.
4

• Only use the app and the patient connector on a managed, trusted, and secured network.
• The app should be used by healthcare professionals only in a hospital or clinical environment. Monitor all user interactions with
the tablet.
2 Setting Up the App
2.1 Pairing the Patient Connector
During the procedure, you may be asked to enter the security code and verify the serial number of the patient connector. This
information is found on the back of the patient connector. You can also refer to the instructions for use provided with the patient
connector for help in locating this information.
1. Ensure that Bluetooth® is enabled on your tablet. For most tablets, tap Settings > Bluetooth to enable it.
2. Ensure that your tablet is connected to the Internet.
3. Open the app.
4. On the Reveal LINQ MOBILE MANAGER screen, tap CONTINUE.
5. Press the button on the patient connector you are using to turn it on.
The Bluetooth light on the patient connector first flashes when Bluetooth is discoverable, and then turns solid when the Bluetooth
connection is established.
6. When prompted by the app, enter the patient connector model number you are using and tap CONTINUE.
7. When prompted, select the patient connector you are using from the list.
8. When prompted, enter the security key code and tap CONTINUE.
9. If you are prompted by the tablet to accept a Bluetooth Pairing Request, confirm that the serial number in the request matches
the serial number on the back of the patient connector.
• Decline the request if the serial number does not match the serial number on the back of the patient connector.
• Accept the request to pair the patient connector with the app.
2.2 Authentication
2.2.1 Authentication
The AUTHENTICATION screen appears during first time setup of the app. On this screen, you can authenticate your clinic’s use of
the app on the tablet with your Reveal LINQ™ Mobile Manager or CareLink™ Network credentials.
2.2.2 Authenticating the App on the Tablet
1. Enter your USER NAME.
2. Enter your PASSWORD.
3. Tap NEXT to authenticate.
2.2.3 Verifying Authentication of the App with the Tablet
You can verify if the app is authenticated for use on the tablet from the options in the app Menu and from the top navigation bar.
1. Tap the Menu icon.
2. Verify if the Menu displays AUTHENTICATED. The app is authenticated for use on the tablet. The Authenticated icon appears
in both the menu and top navigation bar.
3. Tap AUTHENTICATED. A confirmation message appears. Tap CLOSE to return to the previous screen in your workflow.
2.2.4 Resetting a Forgotten Password
Use the Forgot Password? link on the AUTHENTICATION screen to reset your password on the CareLink™ Network website if you
have forgotten it.
The app locks after three failed password attempts. If the app locks, you must wait 10 min for the app to unlock before entering your
password again.
1. Tap Forgot Password?
2. Follow the instructions on the CareLink™ Network website to reset your password.
2.2.5 Resetting an Expired Password
You can reset an expired password on the CareLink™ Network website.
If your password has expired, a notification message and link to reset your password displays on the AUTHENTICATION screen.
5

1. Tap Reset Password.
2. Follow the instructions on the CareLink™ Network website to reset your password.
2.3 Entering Tablet Registration Information
2.3.1 Tablet Registration
To complete authentication, you must authenticate the tablet on the TABLET REGISTRATION screen by entering a unique TABLET
NAME and selecting your HOSPITAL OR CLINIC. Tablet registration information is used to manage access to the app and the tablet.
• The tablet registration information is set up once. The TABLET NAME and HOSPITAL OR CLINIC settings cannot be changed
after they are set.
• The clinics listed in the HOSPITAL OR CLINIC drop menu are associated with your clinic’s Account Number.
• The TABLET NAME must be unique. You cannot use the same tablet name for multiple tablets in your clinic.
2.3.2 Setting Up Tablet Registration
1. Enter a unique tablet name in the TABLET NAME field.
2. Select a hospital or clinic name from the HOSPITAL OR CLINIC drop menu.
3. Tap AUTHENTICATE to save the tablet registration information.
2.4 Edit Physicians List
2.4.1 Setting Up the Physicians List
On the EDIT PHYSICIANS LIST screen, you can add a physicians to the PHYSICIANS LIST, or you can skip this step. Adding
physicians to the PHYSICIANS LIST allows you to more easily assign physcians to patients on the PERSONALIZE REVEAL LINQ >
MONITORING INFORMATION screen during a Reveal LINQ™ ICM insertion, or on the PARAMETERS > MONITORING screen
during a CHECK REVEAL LINQ session.
Any physicians added to the PHYSICIANS LIST are available locally on the tablet running the app. If you have installed the app on
more than one tablet, you will need to add physicians to the PHYSICIANS LIST for each additional tablet.
2.4.2 Edit Physicians List
1. Enter a physcian’s first name in the FIRST NAME field.
2. Enter a physcian’s last name in the LAST NAME field.
3. Enter one or more options for the physician’s location information:
• Enter a city name in the CITY field.
• Select a state from the STATE drop menu.
• Enter a zip code in the ZIP CODE field.
4. Select one of the following options:
• Tap SEARCH to search for the physician.
• Tap CLEAR FIELDS to clear all of the search fields.
Tapping SEARCH displays the physician information in the SEARCH RESULTS field.
5. Select a physician or physicians from the SEARCH RESULTS field and tap ADD TO LIST.
A message displays when a physician or physicians have been successfully added to the PHYSICIANS LIST.
2.4.3 Manually Adding a Physician to the Physicians List
If the search for the physician did not return a result, you can manually add a physician to the PHYSICIANS LIST.
When a search for a physician did not return a result, the SEARCH RESULTS screen displays a message that no results were found
for the physician.
1. In the SEARCH RESULTS field, select I want to manually add the physician to the list.
2. Tap ADD TO LIST.
The MANUALLY ADD TO LIST screen displays.
3. Enter additional optional physician information, if desired.
4. Select one of the following options:
• Tap ADD MANUALLY to manually add the physician to the PHYSICIANS LIST.
• Tap CANCEL to exit the MANUALLY ADD TO LIST screen.
6

2.4.4 Removing a Physician from the Physicians List
You can remove a physician from the PHYSICIANS LIST.
1. Tap PHYSICIANS LIST to view all physicians in your PHYSICIANS LIST.
2. Tap the Remove icon next to the physician’s name you want to remove from the PHYSICIANS LIST.
• Tap REMOVE to remove the physician from the PHYSICIANS LIST.
• Tap CANCEL to exit the REMOVE PHYSICIAN screen.
2.4.5 Completing the Physicians List Setup
Tap one of the following buttons to save or skip adding physicians to your PHYSICIANS LIST:
Button Result
SAVE AND
CONTINUE
SKIP THIS
STEP
The physicians are saved to your PHYSICIANS LIST.
The physicians you added to your PHYSICIANS LIST are now available as options on the PERSONALIZE
REVEAL LINQ screen, in the IMPLANTING PHYSICIAN or FOLLOW-UP PHYSICIAN drop menus, and in the
PARAMETERS > MONITORING screen from the IMPLANTING PHYSICIAN or FOLLOW-UP PHYSICIAN drop
menus.
No physicians are added or saved to your PHYSICIANS LIST.
2.5 CareLink Clinics
2.5.1 Setting Up CareLink Clinics
On the EDIT CARELINK CLINICS LIST screen, you can add a CareLink™ Clinic, or you can skip this step. Adding a CareLink™ Clinic
allows you to more easily enroll patients in the CareLink™ Network during a Reveal LINQ™ ICM insertion, or during a CHECK
REVEAL LINQ session.
Adding CareLink™ Clinics to your CARELINK CLINICS LIST allows you to assign a patient to a CareLink™ Clinic on the
PERSONALIZE REVEAL LINQ screen, or on the PARAMETERS > MONITORING screen, from the CARELINK CLINIC drop menu.
Any CareLink™ Clinics added to the CARELINK CLINICS LIST are available locally on the tablet running the app. If you have installed
the app on more than one tablet, you will need to add CareLink™ Clinics to the CARELINK CLINICS LIST for each additional tablet.
Contact your CareLink™ Network administrator or your Medtronic representative for questions about the CareLink User ID or Account
Number.
2.5.2 Edit CareLink Clinics
1. Select CareLink User ID or Account Number from the SEARCH BY drop-down list.
2. Enter a CareLink User ID or Account Number in the SEARCH ENTRY field for the clinic where the patient will be enrolled.
Contact your CareLink™ Network administrator or your Medtronic representative for questions about the CareLink User ID or
Account Number.
3. Tap SEARCH.
The CareLink™ Network clinics are displayed in the SEARCH RESULTS field.
4. Select a clinic or clinics you want to add to your CARELINK CLINICS LIST.
5. Tap ADD.
Your selected CareLink™ Clinics are displayed in the CARELINK CLINICS LIST field.
6. To add additional CareLink™ Network clinics, enter a CareLink User ID or Account Number and repeat the search.
2.5.3 Renaming a CareLink Clinic
You can rename a CareLink™ Clinic with an alias.
1. Tap the Add/Edit Alias icon.
2. Enter an alias for the CareLink™ Clinic you want to rename in the ALIAS field next to the CareLink™ Clinic.
• Tap SET to rename the CareLink™ Clinic.
Note: A CareLink™ Clinic alias must be a unique name. The EXISTING CLINIC WITH ALIAS screen displays if a duplicate
alias is entered for a CareLink™ Clinic.
• Tap CANCEL to exit the ADD/EDIT ALIAS screen.
2.5.4 Removing a CareLink Clinic from the CareLink Clinics List
Tap the Remove icon next to the CareLink™ Clinic you want to remove from the CARELINK CLINICS LIST.
7

• Tap REMOVE to remove the CareLink™ Clinic from the CARELINK CLINICS LIST.
• Tap CANCEL to exit the REMOVE CARELINK CLINIC FROM LIST screen.
2.5.5 Completing Edit CareLink Clinics List Setup
Tap one of the following buttons to add a CareLink™ Clinic to you CARELINK CLINICS LIST, or to skip this step:
Button Result
SAVE AND CON-
TINUE
SKIP THIS STEP No clinics are added or saved to your CARELINK CLINICS LIST.
The CareLink™ Clinics are saved to your CARELINK CLINICS LIST.
The clinics you added to your CARELINK CLINICS LIST are now available as options on the PERSONALIZE
REVEAL LINQ screen, or on the PARAMETERS > MONITORING screen, from the CARELINK CLINIC drop
menu.
2.6 Initial Setup Results
The Reveal LINQ MOBILE MANAGER screen is displayed. The app and patient connector are ready to use.
3 Patient Connector
3.1 Adding a Patient Connector
The app will guide you through the following steps when you select INSERT REVEAL LINQ or CHECK REVEAL LINQ from the
Reveal LINQ MOBILE MANAGER screen.
During the procedure, you may be asked to enter the model number, security code, or serial number of the patient connector. This
information is found on the back of the patient connector. You can also refer to the instructions for use provided with the patient
connector for help in locating this information.
1. Ensure that Bluetooth® is enabled on your tablet. For most tablets, tap Settings > Bluetooth to enable it.
2. Press the button on the patient connector to turn it on.
The Bluetooth light on the patient connector first flashes when Bluetooth is discoverable, and then turns solid when the Bluetooth
connection is established.
3. Select the available option:
• Tap SELECT NEW PATIENT CONNECTOR.
• Tap Cancel from the pop-up dialog.
4. When prompted by the app, enter the patient connector model number you are using and tap CONTINUE.
5. When prompted, select the patient connector you are using from the list.
6. If prompted, enter the security key code and tap CONTINUE.
7. If you are prompted by the tablet to accept a Bluetooth Pairing Request, confirm that the serial number in the request matches
the serial number on the back of the patient connector.
• Decline the request if the serial number does not match the serial number on the back of the patient connector.
• Accept the request to pair the patient connector with the app.
The patient connector is paired and ready to use.
3.2 Charging
Medtronic recommends that you charge the patient connector and your tablet fully before conducting Reveal LINQ™ ICM insertions
or checks.
For information on charging the patient connector, refer to the instructions for use provided with the patient connector.
4 Insertion
4.1 Reveal LINQ ICM Insertion
4.1.1 Inserting a Reveal LINQ ICM
Before you begin, see the Reveal LINQ™ ICM instructions for use for the insertion procedure instructions.
Caution: Before inserting the Reveal LINQ™ ICM, verify that the patient connector and tablet are fully charged. The patient connector
and tablet may run out of power during the insertion procedure if they are not fully charged. You will not be able to program or
interrogate the patient’s Reveal LINQ™ ICM until the patient connector and the tablet have power.
8

4.1.2 Preinsertion
• Do not open the Reveal LINQ™ ICM sterile package until the pre-insertion steps are completed.
• Do not turn on data collection in the Reveal LINQ™ ICM before the insertion procedure is completed, or the Reveal LINQ™ ICM
may detect the absence of cardiac signal ECG as episodes. Episodes cannot be cleared from the Reveal LINQ™ ICM using the
app once they are detected.
• Ensure your internet connection is active if you intend to use the app for patient enrollment and device registration.
1. Ensure that Bluetooth® is enabled on your tablet. For most tablets, tap Settings > Bluetooth to enable it.
2. From the Reveal LINQ MOBILE MANAGER screen, tap INSERT REVEAL LINQ.
3. Press the button on the patient connector you are using to turn it on.
The Bluetooth light on the patient connector first flashes when Bluetooth is discoverable, and then turns solid when the Bluetooth
connection is established.
4. The patient connector pairs with the app.
If prompted, select the patient connector you are using from the list.
If you are using a new patient connector, you will have to pair the app and the patient connector. See Section 3.1.
5. Position the patient connector over the Reveal LINQ™ ICM sterile package.
The telemetry indicator light on the patient connector turns on when you have established telemetry with the Reveal LINQ™ ICM.
The patient connector interrogates the Reveal LINQ™ ICM.
If the Reveal LINQ™ ICM has been pre-programmed prior to insertion, a verification message confirms that it has been
personalized for the patient.
The PERSONALIZE REVEAL LINQ screen displays. The app displays the Reveal LINQ™ ICM serial number and the model
number on the PERSONALIZE REVEAL LINQ screen.
6. Enter the patient information on the PERSONALIZE REVEAL LINQ > STEP 1 OF 2: PATIENT DEMOGRAPHICS screen.
Patient information is included in reports and used for CareLink™ Network patient enrollment.
Field Description
FIRST NAME Enter the patient’s first name as you would like it to appear in the patient’s record.
LAST NAME Enter the patient’s last name as you would like it to appear in the patient’s record.
DATE OF BIRTH Select the patient’s date of birth from the picker. This setting is used to calculate the nominal Tachy
Detection Interval setting.
GENDER Select the patient’s gender from the drop menu.
PATIENT TELEPHONE Enter the patient’s telephone number in the field.
7. Enter any additional optional patient demographics information.
Field Description
ADDRESS Enter the patient’s address.
CITY Enter the city where the patient lives.
STATE Enter the state where the patient lives.
POSTAL CODE Enter the patient’s postal code.
COUNTRY Enter the country where the patient lives.
PATIENT ID Enter the patient’s ID number from the patient ID card.
8. Enter additional patient information in the PERSONALIZE REVEAL LINQ > STEP 2 OF 2: MONITORING INFORMATION
screen.
Field Description
REASON FOR
MONITORING
Select the clinical reason the patient is being monitored. This information determines the initial parameter settings of the Reveal LINQ™ ICM. Select a choice from the menu:
• Syncope
• Cryptogenic Stroke
• Suspected AF
• AF Ablation
• AF Management
• Palpitations
• Ventricular Tachycardia
• Seizures
• Other
9

Field Description
Additional parameters are automatically programmed according to the selected Reason for Monitoring.
Refer to the Reason for Monitoring table in Section 4.4.2.
PATIENT’S LOCAL
DATE/TIME
CARELINK CLINIC Select an option for assigning a patient to a CareLink™ Clinic:
SLEEPING HOURS
NEAR HOME MONITOR
IMPLANTING
PHYSICIAN
FOLLOW-UP
PHYSICIAN
PATIENT MONITOR DISTRIBUTION
HISTORY Enter any desired patient history.
9. Select one of the following options:
• Tap SAVE AND CONTINUE to save the information entered in the PERSONALIZE REVEAL LINQ screen to the
Reveal LINQ™ ICM.
• Tap BACK to return to the PERSONALIZE REVEAL LINQ > STEP 1 OF 2: PATIENT DEMOGRAPHICS screen.
10. Confirm that the patient information entered on the PERSONALIZE REVEAL LINQ screens is correct.
11. Tap SAVE AND CONTINUE.
12. After the patient information is programmed to the Reveal LINQ™ ICM, move the patient connector away from the Reveal LINQ™
ICM sterile package.
The PATIENT’S LOCAL DATE/TIME sets the internal calendar and clock of the Reveal LINQ™ ICM. Set
the time to the patient’s local time to ensure successful daily wireless transmissions.
• Select the patient’s CareLink™ Clinic from the list and tap SET.
• Tap DECLINE CARELINK ENROLLMENT if you do not wish to enroll the patient in CareLink™.
• Tap CLOSE if there are no available CareLink™ Clinics in the list.
See Section 4.3.1 for instructions to add a CareLink™ Clinic.
Select the range of time that the patient is expected to be asleep and in range of the home monitor. The
patient’s daily wireless transmissions occur during this time. The SLEEPING HOURS NEAR HOME
MONITOR defaults to midnight in the patient’s local time zone.
Caution: The patient must avoid interacting with their home monitor during this time interval otherwise
disruptions to the patient’s daily wireless transmissions may occur.
Select the implanting physician’s name from the IMPLANTING PHYSICIAN drop menu.
Select the follow-up physician’s name from the FOLLOW-UP PHYSICIAN drop menu.
Select one of the following options:
• YES: Distributed at Implant.
• NO: Not Distributed at Implant.
4.1.3 Insertion
Insert the Reveal LINQ™ ICM.
Refer to the instructions for use for the Reveal LINQ™ ICM for insertion procedure instructions.
4.1.4 Post-Insertion
Complete these steps after the Reveal LINQ™ ICM is inserted in the patient.
Caution: Do not place the tablet directly over the implanted cardiac device. Keep the tablet at least 6 in (15 cm) away from the
implanted cardiac device.
1. Tap CONTINUE when the insertion is complete.
2. Place a sterile sleeve over the patient connector.
3. Hold the patient connector over the inserted Reveal LINQ™ ICM.
4. Select the I have inserted the Reveal LINQ device. check box.
5. Tap ENABLE REVEAL LINQ to turn on the Reveal LINQ™ ICM and begin collecting data. Data collection cannot be disabled
once the Reveal LINQ™ ICM is turned on.
When data collection is turned on, Tachy, Brady, Pause, AT/AF, and Symptom detection are also turned on.
6. On the INSERTION SUMMARY screen, verify that the data is correct.
Field Description
REASON FOR MONITORING
INSERTION DATE This date is automatically filled in based on the date the implant procedure occurred.
The clinical reason the patient is being monitored. This information determines the initial settings of the
Reveal LINQ™ ICM based on the programmed value. This information is populated from the information that was entered in the PERSONALIZE REVEAL LINQ screen.
10

Field Description
SLEEPING HOURS
NEAR HOME MONITOR (DAILY WIRELESS TRANSMISSION TIME)
PATIENT’S LOCAL
DATE/TIME
LINQ BATTERY The Reveal LINQ™ ICM battery status is displayed in one of the following values.
HISTORY This information is populated from the OPTIONAL FIELDS tab of the PERSONALIZE REVEAL LINQ
7. Tap EDIT PARAMETERS to change the parameter settings.
8. Tap VIEW REPORT to view the Quick Look Report.
9. Tap END SESSION to end the session and return to the Reveal LINQ MOBILE MANAGER screen.
The data is sent to the CareLink™ Network when the tablet is connected to the Internet.
Verify that this range is set to a time when the patient is expected to be near their home monitor for an
extended period of time, for example while the patient is asleep. Program this setting after consulting
with the patient on their sleep pattern.
Verify that the PATIENT’S LOCAL DATE/TIME is set to the patient’s local time to ensure successful daily
wireless transmissions.
• Good: The battery has not yet reached Recommended Replacement Time or End of Service.
• RRT: The battery has reached the Recommended Replacement Time (RRT). The date displayed
indicates when the battery reached RRT.
• EOS: The battery has reached End of Service (EOS). The date displayed indicates when the
battery reached EOS.
screen.
4.2 Editing the Physicians List
4.2.1 Adding Physicians to the Physicians List
You can add physicians to the PHYSICIANS LIST during an INSERT REVEAL LINQ or CHECK REVEAL LINQ session.
Tap Menu > SETTINGS > PHYSICIANS LIST
The EDIT PHYSICIANS LIST screen is displayed.
4.2.2 Edit Physicians List
1. Enter a physcian’s first name in the FIRST NAME field.
2. Enter a physcian’s last name in the LAST NAME field.
3. Enter one or more options for the physician’s location information:
• Enter a city name in the CITY field.
• Select a state from the STATE drop menu.
• Enter a zip code in the ZIP CODE field.
4. Select one of the following options:
• Tap SEARCH to search for the physician.
• Tap CLEAR FIELDS to clear all of the search fields.
Tapping SEARCH displays the physician information in the SEARCH RESULTS field.
5. Select a physician or physicians from the SEARCH RESULTS field and tap ADD TO LIST.
A message displays when a physician or physicians have been successfully added to the PHYSICIANS LIST.
4.2.3 Manually Adding a Physician to the Physicians List
If the search for the physician did not return a result, you can manually add a physician to the PHYSICIANS LIST.
When a search for a physician did not return a result, the SEARCH RESULTS screen displays a message that no results were found
for the physician.
1. In the SEARCH RESULTS field, select I want to manually add the physician to the list.
2. Tap ADD TO LIST.
The MANUALLY ADD TO LIST screen displays.
3. Enter additional optional physician information, if desired.
4. Select one of the following options:
• Tap ADD MANUALLY to manually add the physician to the PHYSICIANS LIST.
• Tap CANCEL to exit the MANUALLY ADD TO LIST screen.
11
 Loading...