

Page 1

Imagine a world...
MiniMed® Veo
A Step-by-Step Guide
Believe in better control
™
Paradigm™ System
™
Page 2

Imagine a world...
Where you can exercise whenever you want and
not have to carb load or worry about hypos.
R
Where you can eat what you want, when you want,
without planning.
R
Where you can have one needle every 3 days
as opposed to 12 needles.
*
R
Where you can worry less about hypos overnight, and know
that your pump will look after you when you need it most.
Imagine the possibilities with the MiniMed® Veo™ system.
A system designed to give you BETTER CONTROL.
Come and join our world and be part of the possibility...
Believe in better control
2
™
Page 3

INTRODUCING THE MINIMED® VEO™ SYSTEM
Contents
Introducing the MiniMed® Veo™ System 6
• MiniMed® Veo™ System Overview 8
• Menu & Menu Options 10
• Operation Mode and Key Alarms 12
Infusion Set and Reservoir 14
• MiniMed® Reservoirs and Infusion Sets 16
• Inserting the Infusion Set and Filling the Reservoir 18
• Fill the Infusion Set Tubing 20
• Insertion of the Medtronic Quick-set™ Infusion Set 21
• Insertion of the Medtronic Silhouette™ Infusion Set 23
Basal and Bolus 25
• Setting the Basal Rate 27
• Medtronic Bolus Wizard™ Calculator 29
• Setting the Missed Bolus Reminder 32
• Temporary Basal Rate 34
• Express Bolus 35
Continuous Glucose Monitoring (CGM) 36
• Insertion of Sensor 38
• Starting a Sensor 41
• Key CGM Alarms 42
• Trend Graphs 43
• Alerts and Glucose Limits 45
• Predictive and Rate of Change Alerts 47
• Low Glucose Suspend (LGS) 49
Optional Extras 51
• Bayer Contour® Link Meter 51
• Medtronic CareLink® Therapy Management Software 52
• Personalise Your Pump 53
For further information on a specic topic,
please refer to the highlighted chapters in the
MiniMed® Veo™ User Guide.
3
Page 4

44
A step-by-step guide to using the Paradigm® Veo™
Page 5

Your HCPs' Contact Details
Staying in touch with your
Healthcare Professionals (HCPs)
Your Endocrinologist:
Phone number:
Email:
Your Diabetes Educator:
Your Diabetes Centre:
Address:
Phone number:
Email:
Medtronic Diabetes 24-hour Toll Free: 1800 777 808
Please note: In contacting the Diabetes Toll Free, your personal and health information
may be disclosed to an operator located outside Australia.
www.medtronic-diabetes.com.au
www.medtronic-diabetes.co.uk
5
Page 6
INTRODUCING THE MINIMED® VEO™ INSULIN PUMP
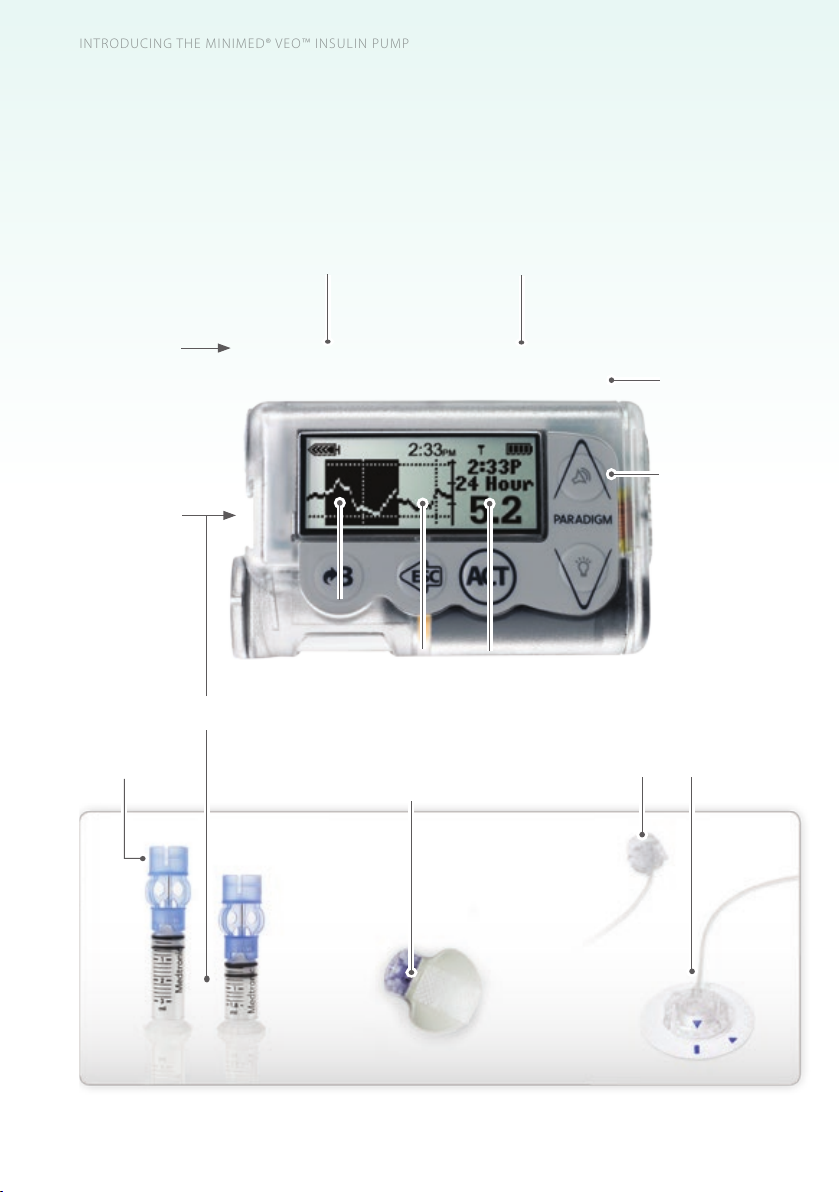
Introducing the MiniMed® Veo™
Insulin Pump
The key elements in managing your diabetes with
insulin pump therapy
BATTERY
COMPA RTMENT
RESERVOIR
COMPARTMENT
TRANSFER GUARD
RESERVOIR VOLUME
EXPRESS BOLUS
RESERVOIR
ESCAPE
to prior screen
& SENSOR
BATTERY STATUS
ACT
conrm information
or menu selection
TUBING CONNECTOR INFUSION SETMINILINK™ TRANSMITTER
EASY BOLUS/
SCROLL UP
BACKLIGHT/
SCROLL DOWN
66
Refer to Chapter 3 in the MiniMed® Veo™ User Guide
A step-by-step guide to using the Paradigm® Veo™
Page 7

Getting Started
Thank you for choosing Medtronic Diabetes as a partner in managing your
diabetes. Whether you are just starting pump therapy or upgrading from a
previous model, this step-by-step guide is designed to help you understand
the basic operation of the MiniMed® Veo™ System. It is intended to be
used in conjunction with the guidance of a Healthcare Professional.
Please consult your Healthcare Professional before making any therapy
adjustments. For full product details, please refer to the MiniMed® Veo™
User Guide and Instructions for Use for each system component.
Getting Started
Understanding the basics
For this section, you will need the:
• MiniMed® Veo™ insulin pump
• MiniMed® Veo™ User Guide
www.medtronic-diabetes.co.uk/gettingstarted
The MiniMed® Veo™ insulin pump shown in purple.
7
Page 8

GETTING STARTED
e MiniMed® Veo™ Insulin Pump
A patient-friendly insulin pump
With the MiniMed® Veo™ pump:
•
You only need to press a few buttons to make
appropriate selections and adjustments.
•
Simple on-screen instructions help with the
infusion set and reservoir changes.
•
An easily accessible backlight illuminates the
pump’s screen in the dark.
•
Large, clear text makes all on-screen information
easy to read.
•
Inserting the infusion set is straightforward and
virtually painless.
In this section, we’ll explain technical terms, give
you practical assistance, and make sure you feel as
comfortable as possible using the MiniMed® Veo™
pump from day one.
* Information contained herein does not replace the
recommendations of your Healthcare Professional
(HCP). Please refer to the User Manual and your
healthcare team for more information. When using an
insulin pump, check your blood glucose a minimum of
4 times per day.
The MiniMed® Veo™ pump
is discrete and can be easily
attached to your waistband.
8
Refer to Chapter 3 in the MiniMed® Veo™ User Guide
Page 9
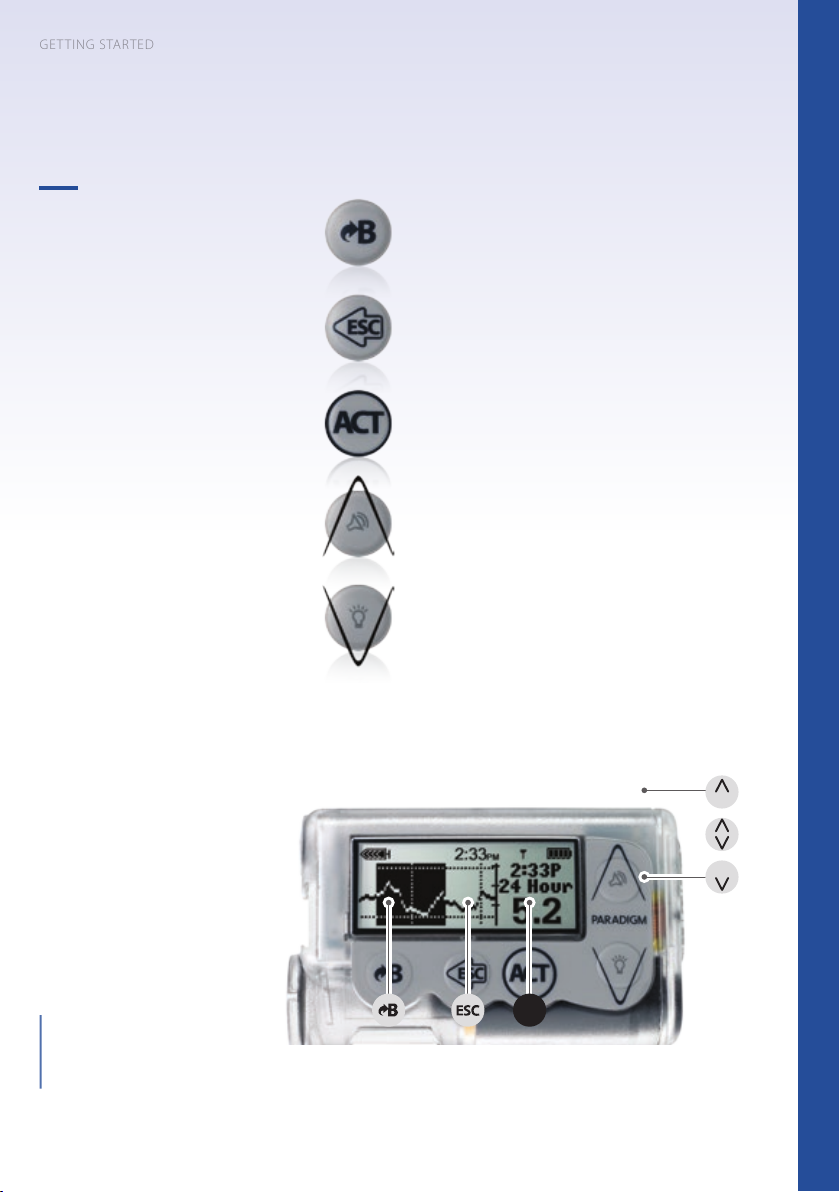
Breakdown of the Buttons
GETTING STARTED
Getting Started
Simple buttons for
simple use
The buttons on the MiniMed® Veo™
insulin pump are designed to make it
simple and eective to manage your
MiniMed® Veo™ pump.
EXPRESS BOLUS to set a Bolus
RETURN to prior screen
ACT to conrm information or menu selection
SCROLL UP
SCROLL DOWN
NOTE: The MiniMed® Veo™ insulin
pump buttons will be referred to
throughout the brochure using the icons
shown to the right.
ACT
Refer to Chapter 3 in the MiniMed® Veo™ User Guide
9
Page 10
GETTING STARTED
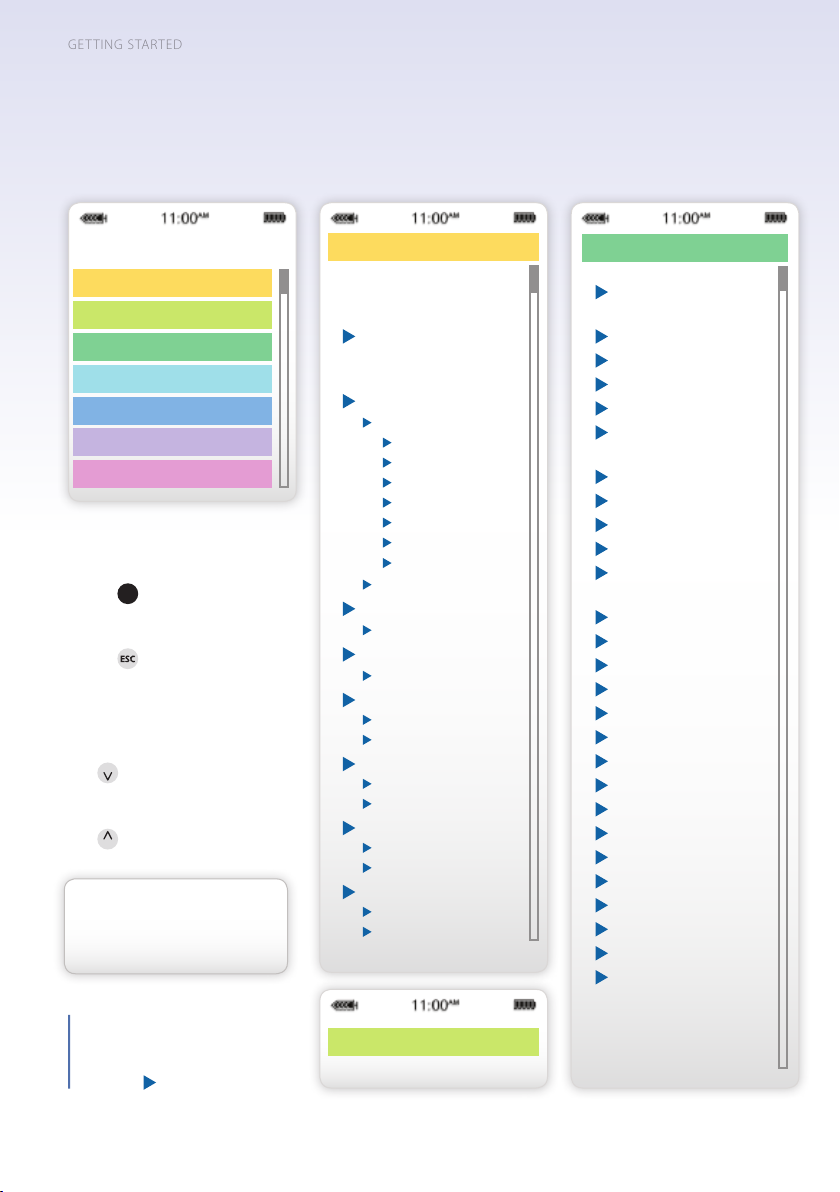
Menus and Menu Options
MAIN MENU
BOLUS
SUSPEND
SENSOR
CAPTURE EVENT
BASAL
RESERVOIR + SET
UTILITIES
Navigation
ACT
Press the
to get to the sub-menus.
Press the
screen to return to the MAIN MENU.
Scroll bar (appears on the right of the
screen when more screen text is available).
Press
screen text.
Press
1. Displays only when the Bolus Wizard™ feature is o.
2. Displays only when the Bolus Wizard™ feature is on.
button from the MAIN MENU
button from a submenu
to scroll down to view additional
to scroll back up.
When using Low Suspend Features,
the Graph Timeout Feature should
not be set to "NONE".
Note: All screens are samples
only. Actual screens depend on
the current active functions. Blue
Arrows (
) indicate submenus.
Bolus MENU
1
Set Bolus
Use Bolus Wizard
Manual Bolus
2
2
Set Bolus
Bolus History
Bolus Setup
Bolus Wizard Setup
Edit Settings
Wizard
Carb Units
Carb Ratios
BG Units
Sensitivity
BG Target
Active Ins Time
Review Settings
Max Bolus
Max Bolus Setup
Scroll Step
Scroll Step Setup
Dual/Square Bolus
Off
On
Easy Bolus
Off
On/Set
BG Reminder
Off
On
Missed Bolus Reminder
Off
On/Set
SUSPEND
Press ACT to Stop Pump
3. Displays only when the sensor is communicating with the pump.
4. Displays if Sensor is on.
SENSOR MENU
3
Calibrate
Enter BG
Alert Silence
4
O
Hi Alerts
Lo Alerts
Hi and Lo Alerts
All Sensor Alerts
Link to Sensor
4
New Sensor
Reconnect Old Sensor
Find Lost Sensor
Turn O Sensor
Transmtr ID
Edit Settings
Sensor
Glucose Alerts
Glucose Limits
Lo Repeat
Hi Repeat
5
5
Predict Alert
Rate Alerts
Low Suspend
Cal Repeat
Cal Reminder
Auto Calibrate
BG Units
Transmtr ID
Weak Signal
Graph Timeout
Sensor Demo
Calibration Hist
Sensor Alert History
Review Settings
Turn O Sensor
5. Displays if Glucose Alerts feature is on.
4
4
4
4
Page 11
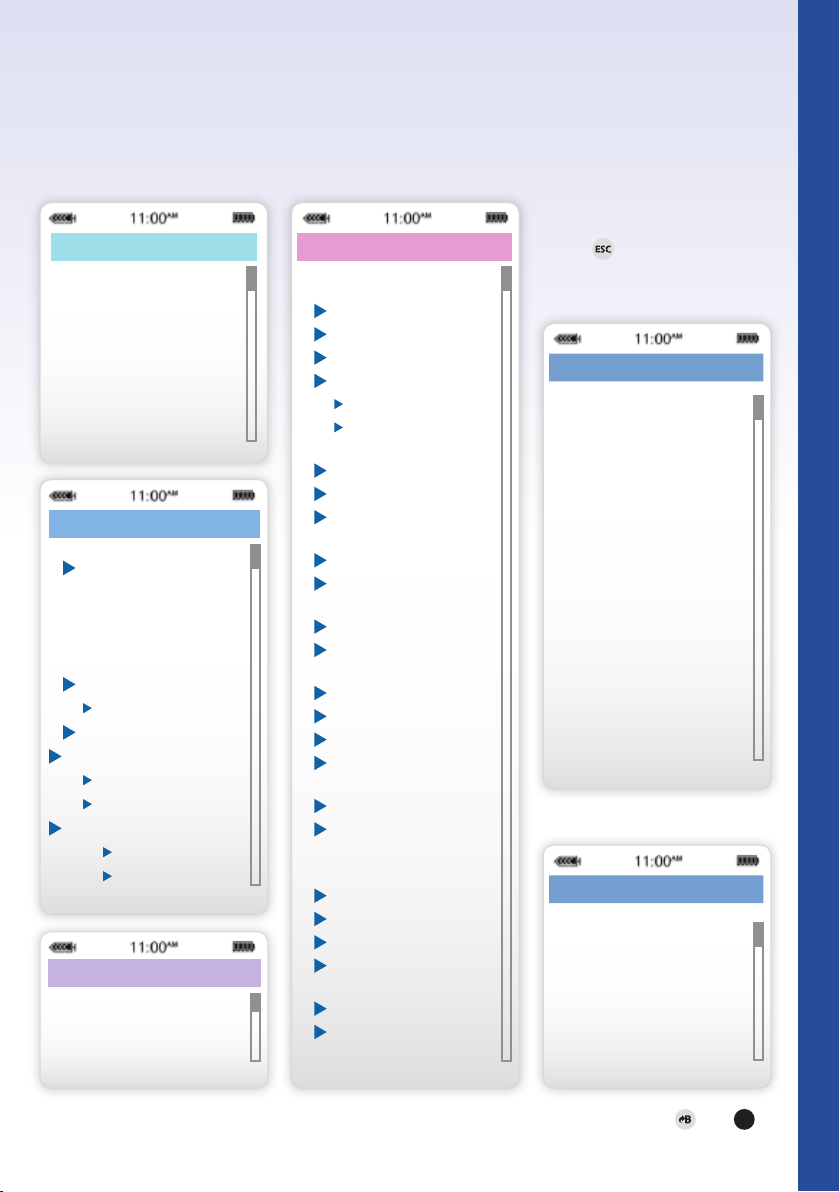
CAPTURE EVENT
Enter BG
Insulin marker
Meal marker
Exercise marker
Other
Getting Started
History
BG Units
Carb Units
Basal MENU
Set/Edit Temp Basal
Set Duration
Cancel Temp Basal
Select Patterns
7
8
Basal Review
Basal Setup
Set/Edit Basal
Set Basal Rate 1
Max Basal Rate
Patterns
Off
On
Temp Basal Type
Insulin Rate
Percent of Basal
RESERVOIR + SET
Reservoir Setup
Fill Tubing
9
Fill Cannula
History
Getting Started
Status Screens
6
UTILITIES MENU
Lock Keypad
Alarm
Alarm History
Alert Type
Auto-Off
Low Resv Warning
Insulin Units
Time
Daily Totals
Daily Average
Calculate AUC
History
Time/Date
12 Hour Setup
24 Hour Setup
Alarm Clock
Off
On / Set
Device Options
PC Connect
Meters
Remotes
Other Devices
Block
Off
On
Selftest
10
User Settings
Save Settings
Restore Settings11
Clear Settings
History
Capture Option
Off
On
Language
Press the button to go to the PUMP
AND SENSOR STATUS screens.
PUMP STATUS SCREEN
STATUS U100
Last Alarm:
24APR 11:30 LoBat
Active ins: 1.050U
Last Bolus N 3.800U
9:07 24 MAR
Basal 1: 0.15U/H
Reservoir Started:
23APR, 12:44
Units left: 144.0U
Time left: > 24 hours
BG Reminder in 2:04h
Meter: On
Battery: Normal
Auto O - 12HR
Fri 25 APR 2008
S/N# 123456
Paradigm 554
VER X.XX X.X
SENSOR STATUS SCREEN
SENSOR STATUS
Next Cal: 08:30
Sensor Age: 2d 3h
Sensor Isig: 25.97
Transmtr Batt: Good
Transmtr Ver: 1.1
Transmtr ID: 2111111
Pump S\N#: 123456
6. Displays if Capture Option is turned on in Utilities Menu.
7. Displays only after setting Temp Basal.
8. Displays only when the Patterns feature is on.
9. Displays only after a rewind.
10. Displays only when you hold
11. Displays only after the patient settings have been saved.
and press
ACT
.
Page 12
GETTING STARTED
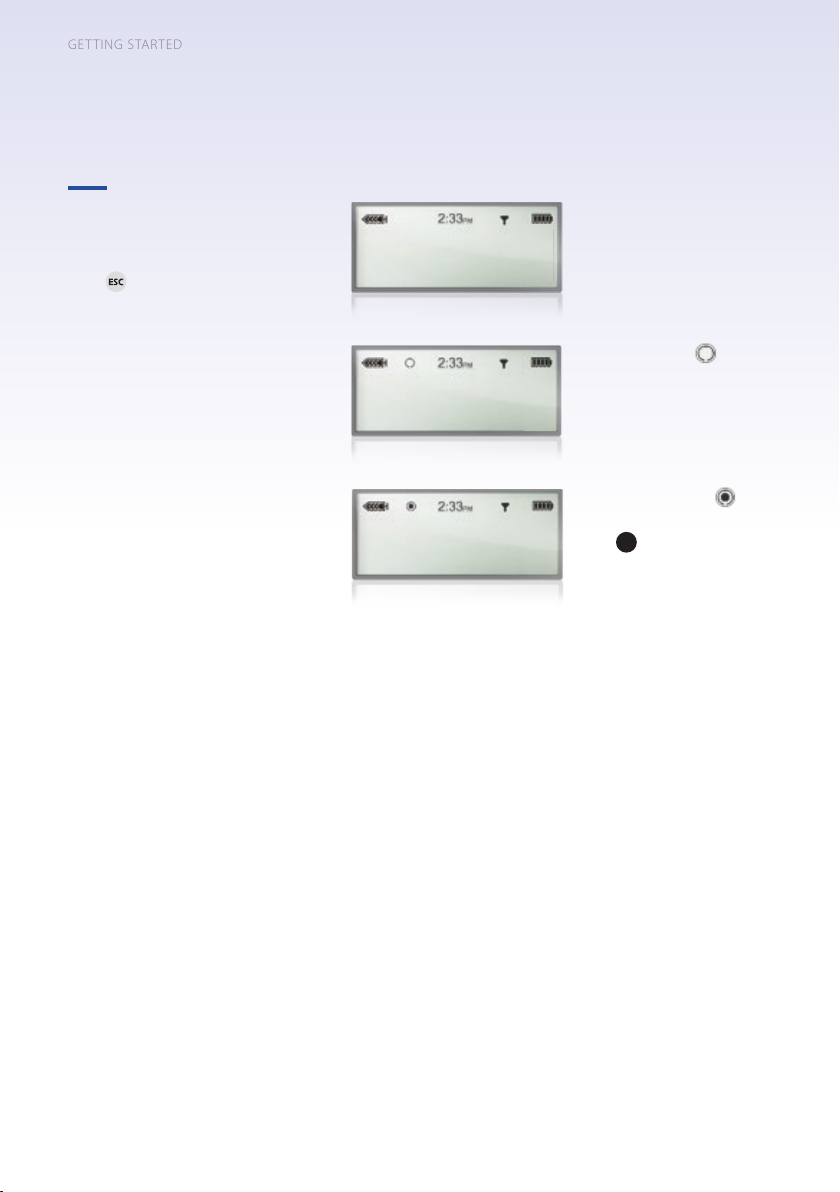
Operational Modes
The 3 Operational
Modes
Press
so you can review the reason for
the empty circle.
to view the status screen
Normal Mode
The pump operates normally.
Special Mode
Indicates special circumstances:
low battery, low reservoir, temporary
basal, etc.
Attention Mode
Administration of insulin is s†opped.
ACT
to view alarm type to take
Press
action.
12
Refer to Chapters 10 and 13 in the MiniMed® Veo™ User Guide
Page 13
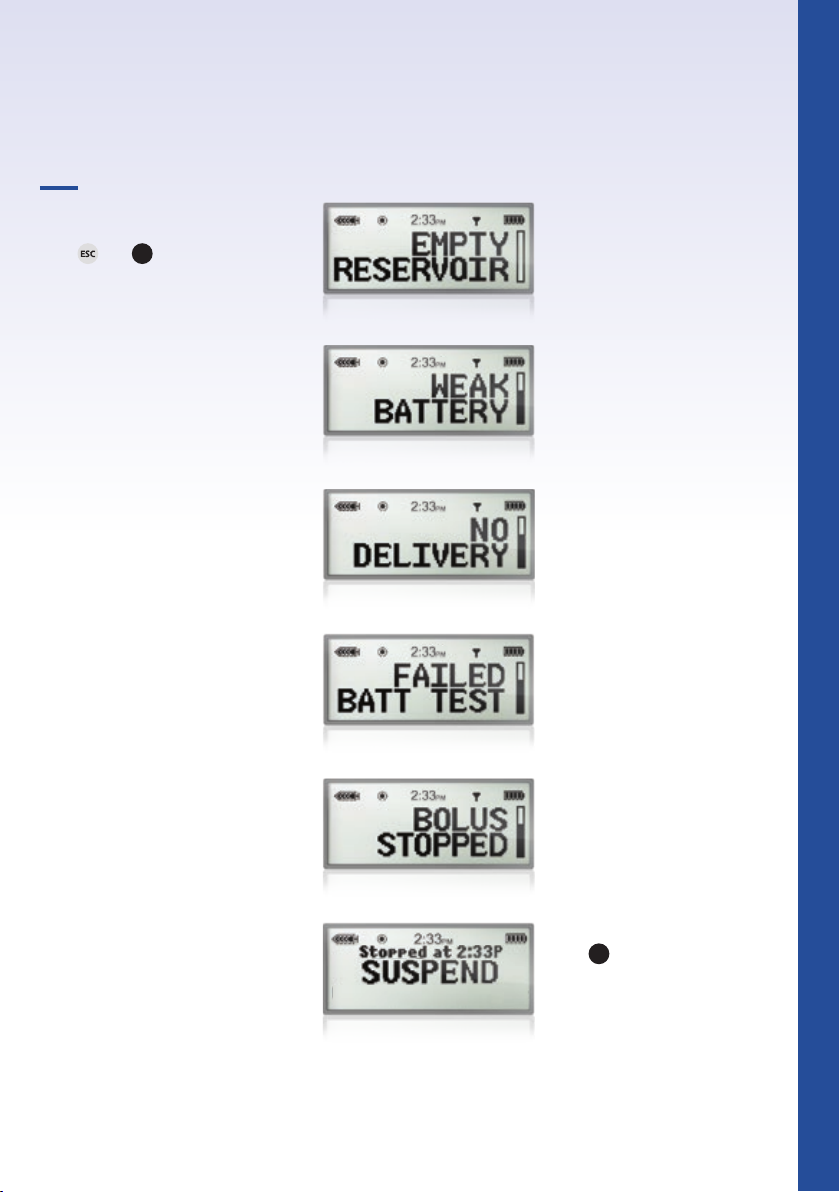
Key Alarms
Getting Started
THE SCREEN INDICATES THE
REASON FOR THE ALARM
ACT
and
Press
to clear the alarm.
Empty Reservoir
CHANGE THE RESERVOIR immediately.
Weak Battery
REPLACE THE AAA BATTERY immediately.
No Delivery
BLOCKAGE DETECTED: insulin delivery
stopped. Check blood glucose and
ketone levels.
Failed Batt Test
CHECK SETTINGS
BATTERY VOLTAGE INADEQUATE
Install a new battery.
Bolus Stopped
CHECK Bolus HISTORY
Reprogram Bolus with the amount of
insulin not delivered.
Suspend
ACT
Press
to stop pump.
Suspend stops all insulin delivery,
including the current Basal, any Bolus
or Fill Cannula deliveries that are in
progress.
Refer to Chapters 10 and 13 in the MiniMed® Veo™ User Guide
13
Page 14

Infusion Set and Reservoir
GETTING CONNECTED
A Unique Connection
Medtronic has developed a range of infusion sets and
reservoirs designed for your MiniMed® Veo™ insulin
pump. They have one key element in common:
•
The MiniMed® patented connector –
A unique interface between your MiniMed®
infusion set and reservoir. The patented and
leak-proof connector builds on our experience
of traditional Luer lock systems, with additional
benets for you.
Note: Successful pumping relies on proper infusion
set management. Changing your infusion set every
2 to 3 days may help ensure the eectiveness of your
therapy.
Use it right and use it in good health.
Change your infusion set every 2 to 3 days.
click! - Two parts, one interface, a secure t.
INFUSION SET
14
RESERVOIRMINIMED® SILHOUETTE™
TUBING
CONNECTOR
Refer to Chapter 5 in the MiniMed® Veo™ User Guide
MINIMED® QUICKSET™
INFUSION SET
TRANSFER GUARD
Page 15

Getting Connected
Infusion Set & Reservoir
Understanding Infusion Set
and Reservoir
For this section, you will need:
•
Reservoir
•
Infusion Set
•
Serter (optional)
•
Insulin
•
MiniMed® Veo™ insulin pump
The MiniMed® Veo™ insulin pump shown in pink.
15
Page 16
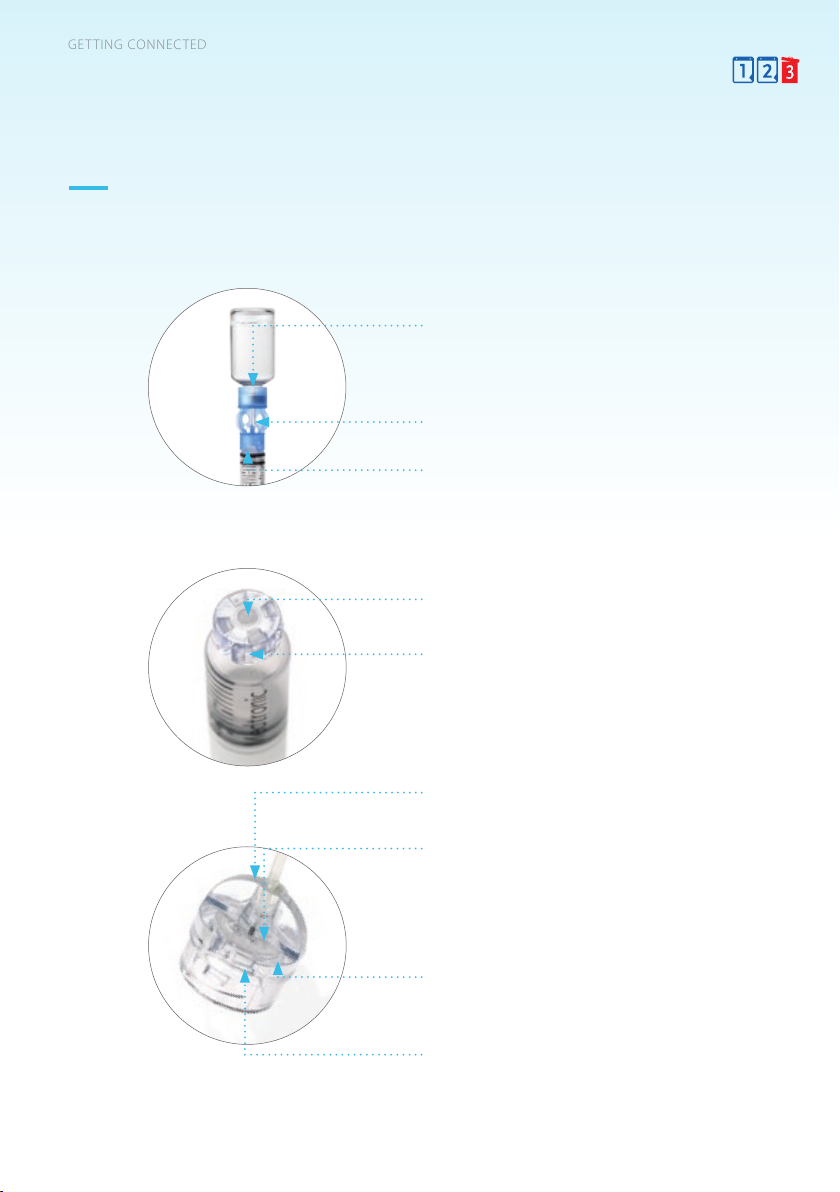
GETTING CONNECTED
Medtronic MiniMed® Reservoirs
Simplicity and Security
TRANSFER GUARD SNAPS ONTO INSULIN VIAL
OR PEN CARTRIDGE for secure and stable reservoir
lling.
NEEDLE INCORPORATED INTO TRANSFER GUARD
to help prevent injury.
PREASSEMBLED AND READY TO USE for fast,
ecient reservoir lling.
SILICONE MEMBRANE seals the reservoir when the
Transfer Guard is removed to help prevent leakage.
ROUNDED SHAPE helps eliminate air bubbles to
promote consistent insulin delivery.
16
ERGONOMIC DESIGN makes it easy to grab the
connector for secure handling.
VENTS are built into the connector, so they are
replaced every time you change your infusion set.
CONNECTER FITS SECURELY on both the reservoir
and the MiniMed® Veo™ pump, providing a leakproof connection - click!
AIRTIGHT SEAL for reliable insulin delivery when
connected to reservoir.
Refer to Chapter 5 in the MiniMed® Veo™ User Guide
Page 17

GETTING CONNECTED
Medtronic MiniMed® Infusion Sets
Choice and Flexibility
MiniMed® Quick-set™
infusion set
•
Soft cannula set
•
90 degree insertion angle
•
MiniMed® Quick-serter™ insertion device
for consistent insertion depth
•
At-site tubing disconnection
•
Cannula length: 6 or 9mm
MiniMed® Silhouette™
infusion set
•
Soft cannula set
•
20-45 degrees variable insertion angle
•
MiniMed® Sil-serterTM insertion device for
controlled insertion depth
•
At-site tubing disconnection
•
Cannula lengths: 13 or 17mm
MiniMed® Sure-T®
infusion set
•
Steel needle set
•
90 degree insertion angle
•
Tubing disconnection 10 cm from
infusion site
•
Additional adhesive for increased security
•
Cannula lengths: 6, 8 or 10mm
Is the Quick-set™ right
for you?
Due to its versatile design and
straight 90 degree insertion
angle, you may like the
Quick-set if you are of average to
heavier build.
Infusion Set & Reservoir
Is the Silhouette™ set
right for you?
Due to its low prole and
adjustable insertion depths, the
Silhouette set is a good choice
for babies, during pregnancy
or if you are an active lean adult
or child.
Is the Sure-T® set right
for you?
Due to its very thin, steel needle
and dual adhesives, the Sure-T®
set is ideal for children of normal
to heavier build. This set may also
appeal to you if you are pregnant,
simply prefer the steel needle set
or are allergic to Teon® cannulas.
MiniMed® Mio®
infusion set
•
All-in-one infusion set and insertion device
•
90 degree angle
•
Soft cannula
•
At-site tubing disconnection
•
Rigid box can be carried and stored
anywhere
•
Cannula lengths: 6 or 9 mm
•
Available in three colours: blue, pink
and clear
Refer to Chapter 5 in the MiniMed® Veo™ User Guide
Is the Mio® set right
for you?
Due to its 90 degree angle and
soft cannula, this set is suitable
for both children and adults of
average to heavier build.
17
Page 18

GETTING CONNECTED
Inserting the Infusion Set
Insert the Infusion Set
•
Wash hands thoroughly before any handling
•
Prepare materials: insulin, reservoir, infusion
set and pump
Prior to lling the reservoir, it is recommended
that the insulin be at room temperature.
Refer to instructions for use for the cannula:
MiniMed® Quick-set™ or Silhouette™
infusion sets.
Remember to rotate and cleanse insertion
sites. Recommended possible sites:
•
abdomen
•
upper buttock
•
outer thigh
•
arm
1
25
34
Additional Tips
•
It is recommended to stand while inserting
•
Insert the new infusion set before removing
the old one; this will ensure you do not
re-insert at the same location.
•
Choose a site free of lumps, bumps, bruises,
scars and tattoos.
•
Clean the inside of the insertion device
(if you use one) with alcohol each month
to ensure proper function.
•
Avoid inserting the infusion set within 5cm
of the belly button.
18
Refer to Chapter 5 in the MiniMed® Veo™ User Guide
WARNING
•
All 'sharps' – introducer needle, transfer guard,
old tubing, etc., should be disposed of in a sharps
container.
•
Never change infusion set immediately before
going to bed.
•
Check your blood glucose 2 hours after the infusion
set change.
•
It is recommended to change the infusion set prior
to a meal.
Page 19

Filling the Reservoir
1
1.8
ml
1
1.8
ml
1
1.8
ml
1
1.8
ml
1
1.8
ml
1
1.8
ml
GETTING CONNECTED
1
1.8
ml
Step 1
CLEAN the insulin vial stopper
with an alcohol wipe.
Step 2
INSERT the needle of the
Transfer Guard into the vial.
Step 3
PRESSURISE the vial by pushing
the plunger down completely.
If using a penll cartridge, pull
the plunger back to ll the
reservoir.
Step 5
REMOVE any air bubbles from
the reservoir by gently tapping.
Step 6
REMOVE the Transfer Guard
from the reservoir (1/4 turn)
and connect the reservoir to the
infusion set. Always avoid getting
insulin, or any liquid, on the inside
of the tubing connector. This can
temporarily block the vents that
allow the pump to properly prime.
The recommended reservoir ll
procedure can be found at
www.medtronic-diabetes.com.au/
mylearning.
Step 7
To PURGE air bubbles that have
risen to the top of the reservoir,
push up on the plunger until
you see insulin in the tubing.
Infusion Set & Reservoir
Step 4
INVERT the reservoir and
allow the reservoir to ll.
Gently pull the plunger, if
necessary.
Step 8
UNSCREW the reservoir plunger.
Refer to Chapter 5 in the MiniMed® Veo™ User Guide
19
Page 20

GETTING CONNECTED
Fill the Infusion Set Tubing
Step 1
ACT
Step 2
ACT
Step 3
ACT
Step 4
ACT
Step 5
Insert the reservoir
(with set connected)
into the pump
compartment and lock
it (1/4 turn).
ACT
Step 7
ACT
Step 8
Fill until drops are
seen at the end of the
infusion set tubing.
ACT
, then
.
Step 9
ACT
Step 10
Insert set (see
instructions for inserting
infusion sets).
ACT
Step 11
Using the arrows,
ADJUST the volume
needed to ll the
ACT
cannula.*
* Note: if using the Sure-T® infusion set, lling the cannula is not
required . Press
20
Step 6
ACT
to skip " Fill Cannula" (Step 10).
Refer to Chapter 5 in the MiniMed® Veo™ User Guide
Step 12
ACT
Page 21

Insertion of the MiniMed®
GETTING CONNECTED
™
Quick-set
Please refer to PAGE 16 of this manual
BEFORE YOU START
Infusion Set
Step 1
INSERT the Quick-set™ into the
insertion device (Quick-serter™).
Step 2
REMOVE the protective lms
from the adhesive.
Step 3
LOAD the Quick-serter by
pulling back on the plunger.
Step 4
REMOVE the needle protector
(blue cone) by unscrewing it.
Infusion Set & Reservoir
(continued on next page)
Refer to Chapter 5 in the MiniMed® Veo™ User Guide
21
Page 22

90°
(Insertion of the MiniMed® Quick-set™ Infusion Set, continued)
Step 5
POSITION the Quick-serter at
the desired site.
Step 6
SQUEEZE the two white triggers
to begin insertion.
Step 7
PRESS the plunger with your
index nger to release the
introducer needle.
Step 8
REMOVE the Quick-serter
while supporting the tubing
with your other hand.
Step 9
Carefully WITHDRAW the
introducer needle.
Step 10
Fold the needle before placing
it in a sharps container.
Recommended Cannula Fill:
0.3U for 6mm
0.5U for 9mm
22
Refer to Chapter 5 in the MiniMed® Veo™ User Guide
Page 23

Insertion of the
GETTING CONNECTED
®
MiniMed
Please refer to PAGE 16 of this manual
BEFORE YOU START
Silhouette™ Infusion Set
Step 1
OPEN the mouth of the
Sil-serter™ insertion device.
PLACE the Silhouette™ set
in the Sil-Serter device and
releasethe mouth.
Step 3
REMOVE the needle protector.
REMOVE rst half of the
protective lm from the
adhesive.
Step 4
LOAD the Sil-serter device.Step 2
Infusion Set & Reservoir
(continued on next page)
Refer to Chapter 5 in the MiniMed® Veo™ User Guide
23
Page 24

30°
(Insertion of the MiniMed® Silhouette™ Infusion Set, continued)
Step 5
PLACE the feet of the
Sil-serter device on the
insertion site and position at an
approximately 30 degree angle.
Step 6
INSERT the Silhouette set by
pressing the white button.
Step 7
OPEN the Sil-serter mouth
again and SLIDE it backwards.
Step 8
WITHDRAW the introducer
needle by squeezing on the
sides before pulling.
Step 9
REMOVE the other half of
protective lm from the part
before the adhesive.
ADHERE the back part of the
adhesive to the skin.
Step 10
CONNECT the tubing and the
Silhouette set.
Recommended Cannula Fill:
0.7U for 13mm and 17mm.
24
Refer to Chapter 5 in the MiniMed® Veo™ User Guide
Page 25

Basal and Bolus
GETTING FREEDOM
Understanding Basal and Bolus.
The MiniMed® Veo™ insulin pump allows
you to set multiple basal rates. The basal
insulin is delivered throughout the day
and night to cover your insulin needs
between meals and at night. When you
exercise, you can reduce the basal rate
so that your blood glucose (BG) does not
drop too low. When you are sick or have
an infection, you can increase the basal
rate. This will keep your BG from going
up too high.
The MiniMed® Veo™ pump allows
you to give a bolus, or dose of insulin
on demand when you eat. You can
also increase or decrease your meal
bolus based on the foods you choose
to eat. A bolus may also be used to
lower an elevated BG. This is called a
correctionbolus.
Your healthcare professional will help
calculate these rates for you.
5U
0.60U/h
00:00
07:00
Basal rates
The insulin needed to maintain blood
glucose at a proper level between
meals and during the night.
Basal rate
7U
4U
1.00U/h
0.60U/h
20:00
Bolus
The insulin needed to compensate for
meals and/or to correct blood glucose.
Bolus
00:00
Basal & Bolus
Basal & Bolus
Refer to Chapters 4, 6, and 7 in the MiniMed® Veo™ User Guide
23
25
Page 26

Getting Freedom
Understanding Basal and Bolus
For this section, you will need:
•
Starting hourly basal rate
•
Sensitivity factor
•
Insulin to carb ratio (or exchange)
•
Blood glucose targets
•
Active insulin time
26
The MiniMed® Veo™ pump shown in blue,
with 'Bubbles' SKIN.
Page 27

getting freedom
Setting the Basal Rate
To set the basal rate for dierent
times and activities of the day.
Step 1
Select Basal SETUP from the Basal Menu
ACT
and press
.
Step 2
Select SET/EDIT Basal from the “Basal
ACT
SETUP” menu and press
.
Step 3
Set Basal RATE 1 using and
ACT
.
press
Note: U/H is units of insulin per hour.
Step 4
To set Basal RATE 2, enter the start time
and the second rate. If starting with one
ACT
basal rate, simply press
to get back
to the Basal Rate Review menu.
Step 5
Remember to check the 24 hour total.
Basal & Bolus
Refer to Chapters 4, 6, and 7 in the MiniMed® Veo™ User Guide
27
Page 28

Basal Review
getting freedom
To check your basal rates and
times:
Step 1
To check your BASAL RATES & TIMES
choose
Basal menu and press
“Basal REVIEW” from the
ACT
.
Step 2
Use to scroll up and down and view
your set BASAL RATES & TIMES.
28
Refer to Chapters 4, 6, and 7 in the MiniMed® Veo™ User Guide
Page 29

Medtronic Bolus Wizard™ Calculator
getting freedom
The Medtronic Bolus Wizard™ calculator
performs the calculations needed to manage
your insulin dosing and reduce the potential for
hypoglycaemia, by calculating the:
•
Correction Boluses when glucose is out of
target range.
•
Meal Boluses, if you are able to calculate your
carbohydrates.
Before using the Bolus Wizard™ calculator, you
must determine the following settings with your
diabetes care team:
•
Insulin-carbohydrate ratio (Carb Ratio). The
amount of carbohydrate covered by 1 unit of
insulin.
Note: You may have dierent ratios for dierent
meals (breakfast, lunch and dinner) or dierent
timesof the day. This ratio may not apply during
physical exercise.
•
Insulin sensitivity factor (Ins Sensitivity).
This corresponds to the decrease in your blood
glucose when 1 unit of insulin is bolused.
Note: Your sensitivity to insulin may vary
throughout the day. This factor may not apply
during physical exercise.
•
Blood glucose targets (BG Target).
The high and low blood glucose values that are
used when calculating a Correction Bolus.
•
Active insulin duration (Active Ins Time).
How long the insulin will have a glucose
lowering eect in your body once it has been
bolused.
Basal & Bolus
Warning
•
If you do not know your personal settings, do not
use this function prior to discussing it with your
diabetes care team.
Refer to Chapter 6 in the MiniMed® Veo™ User Guide
29
Page 30

Programming the Bolus
getting freedom
Wizard
™
Calculator
The following is a step-by-step
guide to the Bolus Wizard™
calculator. Follow the instructions
using the screens as a guide.
Step 1
From the MAIN menu choose “Bolus”
ACT
and press
Step 2
From the Bolus menu choose “Bolus
SETUP” and press
Step 3
From the Bolus SETUP menu choose
“Bolus WIZARD SETUP” and press
Step 4
From the Bolus WIZARD SETUP menu
choose “EDIT SETTINGS” and press
Step 5
From the Bolus WIZARD ON/OFF menu
choose “ON” and press
Afterwards, please enter other information
for all requested data:
Carb Units , Carb ratio, BG unit, Sensitivity,
BG target and Active Insulin Time.
.
ACT
.
ACT
.
ACT
.
ACT
.
Reviewing settings
30
Always check the programming
performed before using the Wizard.
Use the “REVIEW SETTINGS” line in the
menu entitled “WIZARD SETUP.”
Refer to Chapter 6 in the MiniMed® Veo™ User Guide
Page 31

Using the Bolus Wizard™ Calculator
getting freedom
With the Bolus Wizard™ calculator,
you can:
•
Perform a Correction Bolus:
enter only blood glucose.
•
Perform a Meal Bolus:
enter only the amount of
carbohydrates.
•
Combine both
(meal + correction Bolus):
enter both blood glucose and carb
amounts.
Example: blood glucose of 7.1
mmol/L and carbohydrates = 40g
Step 1
ACT
Press
3 times to access the Bolus
Wizard™ calculator.
Step 2
Use
to enter BLOOD GLUCOSE
ACT
mmol/L and press
.
Step 3
Use to enter MEAL CARBOHYDRATES
ACT
and press
.
Step 4
Use to scroll through your ESTIMATE
ACT
DETAILS
.
If you decide to adjust the bolus, use the
arrows to adjust, then press
ACT
to
administer the bolus.
Basal & Bolus
* The Bolus Wizard™ calculator will
subtract previously bolused insulin
that is still working in your body to
help prevent hypoglycaemia.
Refer to Chapter 6 in the MiniMed® Veo™ User Guide
31
Page 32

Setting the Missed Bolus Reminder
getting freedom
Missed Bolus Reminder feature:
When turned on: is used as a reminder to eat or
deliver a Bolus within a given period of time. If
you do not deliver a bolus within the Missed Bolus
Reminder time period, the MISSED BOLUS alert will
ACT
,
be displayed. Press
Add, delete and review Bolus Reminders:
You have to turn on the Missed Bolus
Reminder option to add, delete and review the
programmedreminders.
to clear this alert.
Bolus Setup
Bolus MENU
Missed Bolus Reminder
Off
On/Set
Note: The pump is set at the
factory with the Missed Bolus
Reminder feature turned O.
Go to menu
1. Go to the MISSED Bolus REMINDER
screen.
Main > Bolus > Bolus Setup > Missed
Bolus Reminder
2. Select On/Set, then press
ACT
.
Add a Reminder
You can set up to four Missed Bolus
Reminders.
If you enter the same Start Time and
End Time, you will get one Missed
Bolus Reminder in a 24 hour period.
If you add a Missed Bolus Reminder
with a start time earlier than the
current pump time, you will not get
this Missed Bolus Reminder until the
next day.
32
Refer to Chapters 4, 6, and 7 in the MiniMed® Veo™ User Guide
Step 1
Select Add Reminder on the MISSED
Bolus REMINDER screen, then press
Step 2
The Start Time ashes. Times can be
entered in 30 minute increments. Set
ACT
the Start Time, then press
.
ACT
.
Page 33

getting freedom
Step 3
After this time is set, the End Time
ashes. Set the End Time, then press
ACT
.
Delete a Reminder
Review a Reminder
You can set up to four Missed Bolus
Reminders.
Step 1
Select Delete Reminder on the MISSED
BOLUS REMINDER screen and press
ACT
Step 2
In the DELETE REMINDER screen,
highlight the bolus reminder that you
ACT
want to delete and press
.
Step 1
Select Review Reminders on the MISSED
BOLUS REMINDER screen and press
ACT
Step 2
Review your Missed Bolus Reminders.
Exit the menus when you are done.
.
Basal & Bolus
.
Refer to Chapters 4, 6, and 7 in the MiniMed® Veo™ User Guide
33
Page 34

Temporary Basal Rate
getting freedom
Setting a Temporary
Basal Rate
To adjust the basal rate as needed
for dierent everyday activities:
unexpected physical activity, sports,
illness, etc. Only the time duration
and then the temporary rate need
to be adjusted. This will take eect
immediately!
You can also set your Temp Basal
Rate as a percentage of your current
basal rate.
Example: adjusting a temporary
rate of 0.05 U/h for 2 hours.
Step 1
Select Basal SETUP from the Basal menu
ACT
and press
.
Step 2
Set the DURATION using .
Step 3
ACT
Press
.
Step 4
Set TEMP Basal U/H using and
ACT
. Alternatively, you can also
press
set Temp Basal as percentage of the
Basal rate.
Step 5
On the HOME SCREEN, an empty
circle appears to indicate that this
TEMPORARY BASAL RATE is in progress.
Canceling a
Temporary Basal Rate
34
Refer to Chapters 4, 6, and 7 in the MiniMed® Veo™ User Guide
Select CANCEL TEMP BASAL from the
ACT
Basal Menu and press
.
Page 35

Express Bolus
getting freedom
Setting the
Express Bolus
Cancelling a Bolus
(Temporary stop)
Step 1
Click on Bolus and press
times.
Step 2
Use arrows to adjust bolus rate,
ACT
then press
Step 3
The pump delivers a bolus immediately.
Step 1
WARNING: The BOLUS and BASAL
ow have been stopped. The pump
is not administering any insulin while
suspended.
.
ACT
three
Basal & Bolus
Step 2
RESUME will restart basal rate only
All remaining bolus is cancelled
following suspend.
Refer to Chapters 4, 6, and 7 in the MiniMed® Veo™ User Guide
35
Page 36

GETTING CONTROL
Continuous Glucose Monitoring (CGM)
Continuous Glucose Monitoring provides better
insights of low and high glucose levels and gives
you more control of your diabetes with:
•
Continuous Glucose Readings provide
continuous visibility of your current glucose level
24 hours a day.
•
Trend Graphs covering 3, 6, 12 and 24 hours
give you a clearer picture of your glucose levels
over time, allowing you to identify personal
patterns.
•
Alerts - dierent types of alerts to provide
you with early warning, making it possible to
minimise oncoming low and high glucose levels.
Greater Understanding with CGM
Seeing the full picture of your glucose patterns
enables you to make therapy adjustments with
condence. When used with the Medtronic
MiniLink™ transmitter and glucose sensor, the
MiniMed® Veo™ insulin pump monitors glucose
24 hours a day, with readings updated every ve
minutes (up to 288 readings per day) for up to six
days. You can see how the glucose is trending at
all times.
Note: If you have any questions or concerns, please
consult your healthcare professional before making
any therapy changes.
36
Refer to Chapters 8 and 9 in the MiniMed® Veo™ User Guide
Page 37

GETTING CONTROL
Getting Control
Understanding the benets
of Continuous Glucose
Monitoring
For this section, you will need:
•
Medtronic MiniLink™ transmitter
•
Medtronic Enlite™ glucose sensor
•
Medtronic Enlite™ insertion device
•
Medtronic Enlite™ overtape
•
MiniMed® Veo™ insulin pump
www.medtronic-diabetes.co.uk/cgm
CGM
The MiniMed® Veo™ insulin pump,
shown in black.
Medtronic MiniLink™
transmitter & sensor.
37
Page 38

GETTING CONTROL
Insertion of Sensor
Wash your hands thoroughly before starting.
You will need the following:
•
A Medtronic Enlite™ glucose sensor at room
temperature
•
The Medtronic Enlite™ serter device
•
Medtronic Enlite™ overtape
Select a site for insertion and choose a site free of
lumps, bumps, bruises, tattoos, etc. Remember to
alternate sites.
Clean the insertion site with alcohol wipes.
Insert the sensor at 90 degrees using the
Enlite serter (on taut skin).
WARNING
•
Ensure that the sensor is fully inserted into the skin;
make sure it is not dislodged while removing the
Enlite serter or the introducer needle (ref steps 7-9
on page 37).
•
Once inserted, wait 5-15 minutes for the sensor to be
wetted with interstitial uid.
38
Refer to Chapters 8 and 9 in the MiniMed® Veo™ User Guide
Page 39

GETTING CONTROL
Inserting the Sensor
wait 5
seconds
Step 1
REMOVE the pedestal from packaging.
Place pedestal on at surface, e.g. table.
Step 2
PUSH the Enlite serter down onto the
pedestal until the base of the inserter sits
at on the table.
Step 4
PLACE the base of the Enlite serter at
against your insertion site.
Step 5
PRESS the green button in, and then
release it. Keep holding the serter in place.
Step 7
PRESS and hold in the green button.
Step 8
While holding the button in, slowly lift
the serter away from the skin.
CGM
Step 3
To detach the Enlite serter from the pedestal,
place two ngers over the pedestal arms
and slowly pull the serter straight up.
Step 6
WAIT 5 SECONDS to allow the adhesive
time to stick to the skin.
Refer to Chapters 8 and 9 in the MiniMed® Veo™ User Guide
Step 9
Gently hold the base of the sensor against
the skin using one hand. Hold the needle
housing at the top with two ngers, and
slowly pull straight up, away from the sensor.
(continued on next page)
39
Page 40

(Inserting the Sensor, continued)
Step 10
Straighten the sensor adhesive tape so
that itlies at against the skin.
Step 11
While holding the sensor in place, gently
lift the adhesive tab. Carefully remove the
bottom piece of white paper from under
the adhesive pad. Press the adhesive
against the skin.
Dispose of the needle housing in a
sharps bin after single use.
•
Do not clean or resterilise the
needle.
•
Do not extract the needle from
the needle housing.
3
Step 12
OPTIONAL Before connecting the
MiniLink™ transmitter, apply overtape.
Do not cover the adhesive tab(1) or
sensor connectors(2) with overtape(3).
Step 13
Wait at least 5 minutes before
connecting the MiniLink™ transmitter to
the sensor.
NOTE! Overtape is now shown in
steps14 – 17.
Step 15
Wait for the green light on the transmitter
to ash green briey.
Step 16
While holding the sensor with one nger,
peel o the paper backing from the
adhesive tab with the other hand.
40
Step 14
While holding the sensor in place, slide
the transmitter onto the sensor with the
other hand by lining up the connection
ends and gently pressing them until they
"click" into place.
Refer to Chapters 8 and 9 in the MiniMed® Veo™ User Guide
Step 17
Fold the adhesive tab over the transmitter.
Smooth adhesive onto transmitter.
Page 41

GETTING CONTROL
Starting a Sensor
1. Sensor Start
Once the sensor is inserted under the skin:
•
WAIT 5-15 minutes; this is the time required for
the sensor to be wetted with interstitial uid.
•
REMOVE the MiniLink™ transmitter from its
charger: it will ash green. Wait 1 minute.
•
CONNECT the MiniLink™ transmitter to the
sensor; the MiniLink™ will ash green again = ok.
•
PRESS ACT > Main Menu > Sensor > Link to
Sensor > New Sensor.
•
PRESS ACT > SENSOR READY 2 HRS (initialising)
(Note: you will not be able to view any sensor
readings until after 2 hours.)
WARNING
•
ALWAYS USE the same blood glucose meter.
•
ALWAYS CALIBRATE when your blood glucose
isstable.
•
DO NOT CALIBRATE if your blood glucose is changing
rapidly, i.e. soon after a meal, and/or if there is an
alert present or trend arrows are present.
•
REMEMBER TO CALIBRATE the sensor before going
to bed so that you do not have to get up during
the night.
•
If you have any questions or concerns, please
consult your healthcare professional before making
therapy adjustments.
2. Sensor Initialisation
2 hours later the METER BG NOW alarm should
ACT
sound; CLEAR the alarm:
•
TAKE a blood glucose meter test and ENTER the
value into the pump.
•
ACT > Main Menu > Sensor > Enter BG > Use
to enter blood glucose, and then press
•
Your CGM is displayed in about 15 minutes on the
graph screen.
, then
.
ACT
.
3. Sensor Calibration
A SECOND BLOOD GLUCOSE calibration will
beneeded in the following 6 hours. Blood
glucoseCALIBRATION will then be required
every12 hours.
The glucose sensor reads the glucose content in
the interstitial uid under your skin. Calibration
is a process to assist in determining the correct
interstitial glucose values. The MiniMed® Veo™
System will need a minimum of 2 and maximum
of4 BG measurements per day for calibration.
CGM
Refer to Chapters 8 and 9 in the MiniMed® Veo™ User Guide
41
Page 42

GETTING CONTROL
Key CGM Alarms
Alarms
The pump sounds a signal to alert
you. A message is displayed on the
screen, followed by a second screen
showing the action to take.
ACT
then
Press
to clear the alarm.
Enter blood glucose for
sensor calibration
> Main Menu > Sensor > Enter BG
> Enter BG > Use
glucose and validate with
to enter blood
ACT
.
No communication to
pump from sensor
Connect pump and sensor
> Sensor > Link to Sensor > Find
lost sensor.
Capillary blood glucose
and sensor level are
incompatible
Wait 30 minutes before checking
blood glucose again. Enter the
new blood glucose value.
Appears after 2 cal errors
Check transmitter.
Replace sensor.
42
Refer to Chapters 8 and 9 in the MiniMed® Veo™ User Guide
Page 43

GETTING CONTROL
Trend Graphs
This section allows you to review
trends of your glucose levels.
•
3, 6, 12 and 24 hour graphs.
3 hour graph
From the home screen, press
onceto access the 3 hour graph. To
seevariations in your glucose levels
minutes press
over5
navigate the graph itself.
To access 6, 12 and 24 hour graphs,
once in the 3 hour graph, use the
button when the cursor is at the
far-right of the screen.
only to
6 hour graph
To see variations in your glucose levels
over 10 minutes press
to move the cursor in the graph itself.
button only
12 hour graph
To see variations in your glucose levels
over 10 minutes press
to move the cursor in the graph itself.
button only
USEFUL TIPS
•
Glucose level: indicates the level of
your glucose in the interstitial uid.
•
This does not correspond exactly to
the value obtained at the same time
on your meter. There is usually a
lag-time between the two values.
•
Before any corrective action is taken,
verify your blood glucose with a
ngerstick reading.
24 hour graph
To see variations in your glucose levels
over 20 minutes press
to move the cursor in the graph itself.
Refer to Chapters 8 and 9 in the MiniMed® Veo™ User Guide
button only
CGM
43
Page 44

GETTING CONTROL
Understand the Trend Graphs
All graphs show High and
Low Glucose Limits lines, a
continuous Sensor Glucose (SG)
measurement line, a data
section and the cursor
(ashing vertical line).
Sensor glucose
(SG) line.
High Glucose
Limit Line at
10.6mmol/L
(for example).
Low Glucose
Limit Line at
3.2mmol/L
(for example).
When you open any graph, the cursor ashes on the right edge of the graph. There
are three marks on the cursor at 5, 10 and 15 mmol/L. The data section shows the
most recent SG measurement or the reason why no measurement shows, and the
time in the data section matches the time at the top of the screen.
When you move the cursor left to select an earlier SG measurement, the data
section of the graph turns black, the word "History" appears here, and the time in
the data section changes to show the time when the SG measurement was taken
or the reason why no SG measurement shows for that time.
Each time you
bolus, a marker
willappear on
your graph.
Indicates that your
glucose has risen above
17.2mmol/L.
Cursor (ashing line) indicates selected time,
and the SG measurement (or alert) for that
time. There are three marks on the cursor
at 5, 10 and 15mmol/L.
Data section shows
the selected time,
the type of graphs
(or “History” if you
have scrolled to the
left on the graphs),
and the SG
measurement
(or alert).
44
Refer to Chapters 8 and 9 in the MiniMed® Veo™ User Guide
Page 45

GETTING CONTROL
Alerts
Allows you to set your
customisablealerts.
Glucose alerts will sound if your
glucose level reaches or goes
beyond the target you set.
To turn the alert feature on:
Make sure that the EDIT SETTINGS
screen is open.
Turning glucose alerts on:
Step 1
From the MAIN menu choose
ACT
“SENSOR” and press
.
Step 2
From the SENSOR menu choose
”EDIT SETTINGS” and press
ACT
Step 3
From the EDIT SETTINGS menu
choose
and press
“GLUCOSE ALERTS: OFF”
ACT
.
Step 4
From the GLUCOSE ALERTS menu
choose
“ON” and press
ACT
.
.
USEFUL TIPS
•
There are many alerts in your MiniMed®
Veo™ insulin pump. In conjunction with
your health care team, you may wish
to add one alert at a time, to see which
ones and with what setting, are most
suited to you.
Refer to Chapters 8 and 9 in the MiniMed® Veo™ User Guide
CGM
45
Page 46

GETTING CONTROL
Glucose Limits
Allows you to set the high and low
Glucose Limits.
Step 1
From the SENSOR menu choose
ACT
“EDIT SETTINGS” and press
.
Step 2
From the EDIT SETTINGS menu choose
“GLUCOSE LIMITS” and press
ACT
.
Step 3
To select your LOW GLUCOSE LIMIT
to set a value between
use
ACT
2.2 and 22mmol/L and press
.
Step 4
Next select your HIGH GLUCOSE LIMIT
to set a higher value between
using
ACT
2.2 and 22mmol/L and press
.
Step 5
The rst pair of GLUCOSE LIMITS is now
set. If you do not need a second pair of
ACT
Glucose Limits press
.
SECOND PAIR OF LIMITS?
•
To set up the second Glucose Limit
pair, repeat steps as above.
46
Refer to Chapters 8 and 9 in the MiniMed® Veo™ User Guide
Page 47

GETTING CONTROL
Predictive Alerts
The Predictive Alerts calculate
when you may reach your Low or
High Glucose Limits, then send you
an alert before you reach those limits.
A Predictive Alert tells you that if your
sensor glucose measurements keep
falling or rising at the current rate,
you may reach your Glucose Limit in
the number of minutes you select.
This is known as the Time Sensitivity.
To set up the Predictive Alerts:
To set up the time sensitivity:
Step 1
Select PREDICT ALERT in the "EDIT
ACT
SETTINGS" screen, then press
.
Step 2
Select ON, then press
ACT
.
Step 1
Select the Low Time Sensitivity, then
ACT
.
press
Step 2
Select the High Time Sensitivity, then
ACT
.
press
Refer to Chapters 8 and 9 in the MiniMed® Veo™ User Guide
CGM
47
Page 48

GETTING CONTROL
Rate of Change Alerts
The Rate of Change Alerts alert
when your sensor glucose changes
at, or faster than, the pre-determined
per-minute rate.
Fall Rate: sensor glucose values
falling at or faster than your
pre-dened rate.
Rise Rate: sensor glucose values
rising at or faster than your
pre-dened rate.
To set up the Rate of Change alerts:
Step 1
Select RATE ALERTS in the "EDIT
SETTINGS" screen then press
Step 2
Select the Fall Rate Limit, then
press
Step 3
Step 4
Select the Rise Rate Limit, then
press
ACT
ACT
ACT
.
.
.
48
Step 5
Refer to Chapters 8 and 9 in the MiniMed® Veo™ User Guide
Page 49

GETTING CONTROL
Low Glucose Suspend
Purpose
•
The Low Glucose Suspend (LGS) is a
feature designed to help reduce the risk
of severe hypoglycaemia. If the feature is
turned on, it automatically alarms and halts
insulin infusion when glucose levels reach a
pre-determined threshold.
•
Without patient intervention, after a 2 hour
suspension, the pump resumes basal insulin
delivery.
•
If sensor detects that glucose remains low
4 hours after resuming insulin delivery, the
pump will re-suspend insulin delivery.
•
May be useful for people with hypoglycaemic
unawareness or nocturnal hypoglycaemia.
•
This feature will not prevent hypoglycaemia.
Please note:
•
Do not change the Sensor Graph timeout
setting to “NONE.”
•
If you are using the Low Glucose Suspend
feature and have changed the Sensor Graph
timeout setting to “NONE,” please follow the
steps below to reset it now.
•
Go to the Main Menu
•
Select the Sensor Menu
•
Select Edit Settings, Press ACT
•
Select Graph Time Out, Press ACT
•
Select 2, 4 or 6 minutes (do not select “NONE”),
Press ACT
Settings
•
On/O
•
You need to turn on the LGS feature.
(The default setting for LGS is o.)
•
Range: 2.2 – 6.1 mmol/L.
•
Should you clear the alert and your glucose
levels stay below the threshold set for the LGS,
within 10 minutes the LGS function will alarm
and suspend the pump again.
•
All other sensor functions remain operational
during insulin suspension.
CGM
Refer to Chapters 8 and 9 in the MiniMed® Veo™ User Guide
49
Page 50

GETTING CONTROL
e MiniMed® Veo™ insulin pump and
CGM functionalities aim at helping
people reduce glucose variability
Low Glucose Suspend in focus *
Insulin infusion
stopped
7.8
Target
zone
Glucose (mmol/L)
3.4
Time of day
6:00 am
7:00 am
LOW GLUCOSE SUSPEND TRIGGERED
Person DOES NOT RESPOND to alarm
Pump suspends and alarms
“I have diabetes, call for emergency assistance"
Pump suspends insulin delivery
for 2 hours
Insulin infusion
resumed
21
8:00 am
9:00 am
Blood glucose value with LGS
Blood glucose value without LGS
1
Insulin infusion stopped (LGS in action)
2
Insulin infusion resumed
* illustrative purposes only.
Person RESPONDS to alarm
Person can choose to suspend or
resume basal
If suspend, pump suspends insulin
delivery for 2 hours
If BG still low 4 hours after resuming
Note: You can override Low Glucose Suspend at any time.
50
After 2 hours pump resumes basal
basal, insulin delivery re-suspends
Refer to Chapters 8 and 9 in the MiniMed® Veo™ User Guide
After 2 hours pump resumes basal
If BG still low 4 hours after resuming
basal, insulin delivery re-suspends
Page 51

OPTIONAL EXTRAS
Connecting the Meter to
the MiniMed
®
Veo
™
Using the Bolus Wizard™ with the
Bayer CONTOUR® LINK meter:
•
If you use the CONTOUR® LINK
meter, the results of your capillary
blood glucose are automatically
sent to your MiniMed® pump via
wireless transmission.
Step 1
From the UTILITIES menu choose
ACT
“METER OPTIONS” and press
Step 2
From the METER OPTION menu choose
“ON” and press
Step 3
From the METER ID menu choose
“ADD ID” and press
Step 4
Enter the SERIES NUMBER* of your
Bayer Contour® Link meter reader
using
digit to conrm
ACT
ACT
and press ACT after each
ACT
.
.
.
.
* The serial number is on the back of
your Bayer CONTOUR® LINK Meter.
Refer to Chapter 6 in the MiniMed® Veo™ User Guide
When using the Bayer CONTOUR®
LINK with the Bolus Wizard™ the Blood
Glucose reading will be used by the
Bolus Wizard™ for 15 minutes after a
test, so you donít need to manually
enter this value.
For more information, refer to your
meter instruction manual.
51
Optional Extras
Page 52

OPTIONAL EXTRAS
CareLink® erapy
Management Software: for you and
your Healthcare Professional
Bringing it all together
CareLink® therapy management software gives you an overall picture of how your glucose levels are
behaving. The software combines data from the glucose sensor, glucose transmitter, glucose meters and
MiniMed® Veo™ insulin pump to create a truly integrated diabetes management system. CareLink® Personal
and CareLink® Pro software enhance the way you manage your diabetes, byorganising glucose information
into easy-to-read charts, graphs and tables.
How to Upload Data into CareLink® Personal Therapy Management Software:
1. Sign up: Go to carelink.medtronicdiabetes.com, click the "sign up now" button and register to use
the system.
2. Sign in: Access the system using your newly created username and password.
3. Upload: Click the "upload" tab and follow the onscreen instructions along with the Medtronic
CareLink® USB to transfer data from the pump to the computer.
For you –
CareLink® Personal
• Allows you to upload information from
your diabetes management devices
to a free and secure online database
(http://carelink.medtronicdiabetes.com).
• Helps you to understand the eects of
insulin,carbohydrates, and exercise on
yourglucose levels.
• Helps maximise your therapy by assisting you
inidentifying glucose patterns and problems.
MiniLink™
transmitter and Continuous
Glucose Sensor – Wireless,
integrated communication
52
For your Healthcare Professional –
CareLink® Pro
• Allows your Healthcare Professional (HCP) to access
the information you have previously uploaded
using Medtronic CareLink® Personal software.
• Produces detailed reports that help your HCP
tospot trends.
• Helps your HCP to develop an advanced
understanding of your diabetes and optimise
your therapy.
MiniMed® Veo™
insulin pump
Refer to "carelink.medtronicdiabetes.com" and Chapter 11 in the MiniMed® Veo™ User Guide
CareLink®
therapy management
software – Reports for better
understanding and control
Page 53

OPTIONAL EXTRAS
Personalise Your Pump
Pumps with SKINS.
Make It Yours
Personalise your MiniMed® Veo™ insulin pump with a skin of your choice.
Visit www.medtronic.skinit.com for further information.
Mini Med® Veo™ SKINS
Pink Butterfly
Mini Med® Veo™ SKINS
Van Gogh - e St arry Night
Mini Med® Veo™ SKINS
Lenny the Lion
Mini Med® Veo™ SKINS
i Heart peng uin
Mini Med® Veo™ SKINS
Surfing
Mini Med® Veo™ SKINS
Psychedel ic Circles
53
Optional Extras
Page 54

Notes
54
Page 55

Safety Information
Insulin Pump Therapy and Medtronic
MiniMed® Insulin Infusion Pumps
Patients should always discuss the benefits and
potential risks with a clinician. Please review the
product’s technical manual prior to use for detailed
instructions and disclosure. Indications for use
The insulin pump is indicated for the continuous
delivery of insulin, at set and variable rates, for the
management of diabetes mellitus in persons requiring
insulin. Contraindications Insulin pump therapy is
not recommended for people who are unwilling or
unable to perform a minimum of four blood glucose
tests per day and to maintain contact with their
healthcare professional. While features exist to help
facilitate pump usage, Medtronic Diabetes does not
recommend the use of this product by individuals
whose impaired vision or hearing does not allow full
recognition of the pump signals and alarms.
Medtronic Diabetes Continuous
Glucose Monitoring
Indications for use The CGM System is intended
to continuously record interstitial glucose levels in
persons with diabetes mellitus. This information is
intended to supplement, not replace, blood glucose
information obtained using standard home glucosemonitoring devices. A confirmatory fingerstick is
required prior to treatment. This information collected
by CGM may be downloaded and displayed on a
computer and reviewed by you and your healthcare
professional. This information may allow identification
of patterns of glucose-level excursions above or below
the desired range, facilitating therapy adjustments that
may minimise these excursions. Contraindications
Successful operation of CGM requires adequate vision
and hearing. Use of CGM is not recommended for
patients whose impaired vision or hearing does not
allow full recognition of the monitor signals and
alarms, or who do not have a caregiver who can
perform this function for them.
References
* Based on total number of pump consumables sold
nationally, NDSS sales date 2011.
55
Page 56

Believe in better control
™
Connect with Medtronic Diabetes
Web: www.medtronic-diabetes.com.au
Email: australia.diabetes@medtronic.com
Facebook: www.facebook.com/MedtronicDiabetesAUS
Address: Medtronic Australasia Pty Ltd, 97 Waterloo Road,
North Ryde NSW 2113 Australia
Mail: Medtronic Diabetes, PO Box 945, North Ryde, NSW 1670
Telephone: 02 9857 9000
Facsimilie: 02 9857 9237
24-hour Toll Free: 1800 777 808
Paradigm, Veo, Bolus Wizard, MiniLink and Believe in better control are trademarks
and Medtronic CareLink is a registered trademark of Medtronic MiniMed, Inc.
Always seek advice from your medical practitioner to determine your suitability
©2013 Medtronic Australasia Pty Ltd. All rights reserved. 74 5-0 92013
for insulin pump therapy. Use as directed.
MiniMed® Veo™ Paradigm™ System
 Loading...