

Page 1

MINIMED® 640G SYSTEM
Getting Started
WITH THE MiniMed® 640G INSULIN PUMP
^
Page 2

let’s get
started!
Page 3

Table of Contents
Section 1: Getting Started ���������������������������������������������������������������������������������������������������������������������������������������������������������������� 3
Getting Started with the MiniMed® 640G Insulin Pump ��������������������������������������������������������������������������� 3
1.1 Pump Mechanics and the Delivery of Insulin
1�1�1 Infusion Set ������������������������������������������������������������������������������������������������������������������������������������������������������������������������� 4
1�1�2 Reservoir ������������������������������������������������������������������������������������������������������������������������������������������������������������������������������ 4
1�1�3 Pump ������������������������������������������������������������������������������������������������������������������������������������������������������������������������������������� 4
1.2 Pump Basics ����������������������������������������������������������������������������������������������������������������������������������������������������������������������5
1�2�1 The Front of Your Pump ������������������������������������������������������������������������������������������������������������������������������������������������ 5
1�2�2 The Bottom of Your Pump ������������������������������������������������������������������������������������������������������������������������������������������� 5
1�2�3 The Back of Your Pump ������������������������������������������������������������������������������������������������������������������������������������������������� 5
1�2�4 Attaching the Skins �������������������������������������������������������������������������������������������������������������������������������������������������������� 6
1�2�5 Inserting the Battery ����������������������������������������������������������������������������������������������������������������������������������������������������� 6
1.3 Startup Wizard ����������������������������������������������������������������������������������������������������������������������������������������������������������������� 7
1.4 Home Screen
1�4�1 Unlocking the Pump ������������������������������������������������������������������������������������������������������������������������������������������������������ 9
1�4�2 Status Bar ����������������������������������������������������������������������������������������������������������������������������������������������������������������������������� 9
1�4�3 Status Screens �����������������������������������������������������������������������������������������������������������������������������������������������������������������10
1.5 Menu ����������������������������������������������������������������������������������������������������������������������������������������������������������������������������������� 11
1�5�1 Scroll Bar ����������������������������������������������������������������������������������������������������������������������������������������������������������������������������11
1�5�2 Basic Menu Map �������������������������������������������������������������������������������������������������������������������������������������������������������������12
1�5�3 Navigation�������������������������������������������������������������������������������������������������������������������������������������������������������������������������13
1�5�4 Menu Options �����������������������������������������������������������������������������������������������������������������������������������������������������������������14
1.6 Alerts ����������������������������������������������������������������������������������������������������������������������������������������������������������������������������������� 15
1.7 Alarms
1.8 Menu Options - A Closer Look
1�8�1 Audio Options �����������������������������������������������������������������������������������������������������������������������������������������������������������������17
1�8�2 Display Options ��������������������������������������������������������������������������������������������������������������������������������������������������������������17
1.9 Basal Patterns ����������������������������������������������������������������������������������������������������������������������������������������������������������������18
1�9�1 Basal Pattern Setup – One Basal Rate �������������������������������������������������������������������������������������������������������������������18
1�9�2 Basal Pattern Setup – Changing a Basal Rate ���������������������������������������������������������������������������������������������������20
1�9�3 Basal Pattern Setup – Multiple Basal Rates ��������������������������������������������������������������������������������������������������������21
1�9�4 Basal Pattern Setup – Removing Basal Rates ���������������������������������������������������������������������������������������������������24
1�9�5 Select Basal Pattern�������������������������������������������������������������������������������������������������������������������������������������������������������24
1.10 Bolus Wizard™ Calculator ���������������������������������������������������������������������������������������������������������������������������������25
1�10�1 Using the Bolus Wizard™ Calculator �������������������������������������������������������������������������������������������������������������������25
1�10�2 Checking Last Bolus ��������������������������������������������������������������������������������������������������������������������������������������������������30
1.11 Suspend Delivery ���������������������������������������������������������������������������������������������������������������������������������������������������� 31
1.12 Charging the
�������������������������������������������������������������������������������������������������������������������������������������������������������������������� 8
��������������������������������������������������������������������������������������������������������������������������������������������������������������������������������16
�������������������������������������������������������������������������������������������������������������������������� 17
Contour® next LINK 2.4 Meter �����������������������������������������������������������������������������������������33
�������������������������������������������������������������������������������������������4
Section 2: Medtronic CareLink® Personal Software ���������������������������������������������������������������������������������������� 34
2.1 Introduction to Medtronic CareLink® Personal Software ��������������������������������������������������������������34
Section 3: Connecting the MiniMed® 640G Insulin Pump &
the Contour® next LINK 2.4 Meter ������������������������������������������������������������������������������������������������������������ 35
Section 4: Getting Started Using the
4.1 Giving a Remote Bolus ������������������������������������������������������������������������������������������������������������������������������������������� 36
Contour® next LINK 2.4 Meter ��������������������������������������������36
Section 5: Changing the Reservoir and Infusion Set ��������������������������������������������������������������������������������������37
5.1 Reservoir & Tubing ���������������������������������������������������������������������������������������������������������������������������������������������������� 37
1
Page 4

Table of Contents
Section 6: Additional Features �������������������������������������������������������������������������������������������������������������������������������������������������40
6.1 History �������������������������������������������������������������������������������������������������������������������������������������������������������������������������������� 40
6�1�1 Summary ���������������������������������������������������������������������������������������������������������������������������������������������������������������������������40
6�1�2 Daily History ���������������������������������������������������������������������������������������������������������������������������������������������������������������������40
6�1�3 Alarm History ������������������������������������������������������������������������������������������������������������������������������������������������������������������� 40
6.2 Manual Bolus ����������������������������������������������������������������������������������������������������������������������������������������������������������������� 41
6.3 Insulin Settings
6�3�1 Max Basal ���������������������������������������������������������������������������������������������������������������������������������������������������������������������������42
6�3�2 Adding New or Copying Basal Patterns ��������������������������������������������������������������������������������������������������������������43
6�3�3 Temp Basal ������������������������������������������������������������������������������������������������������������������������������������������������������������������������44
6.4 Preset Insulin Settings ��������������������������������������������������������������������������������������������������������������������������������������������46
6�4�1 Preset Temp Setup �������������������������������������������������������������������������������������������������������������������������������������������������������46
6�4�2 Preset Bolus ���������������������������������������������������������������������������������������������������������������������������������������������������������������������47
6.5 Max Bolus �������������������������������������������������������������������������������������������������������������������������������������������������������������������������49
6.6 Advanced Bolus
6�6�1 Square Wave ��������������������������������������������������������������������������������������������������������������������������������������������������������������������50
6�6�2 Dual Wave ������������������������������������������������������������������������������������������������������������������������������������������������������������������������52
6�6�3 Bolus Increment ������������������������������������������������������������������������������������������������������������������������������������������������������������54
6.7 Easy Bolus ����������������������������������������������������������������������������������������������������������������������������������������������������������������������� 55
6.8 Auto Suspend
6.9 Bolus Speed
6.10 Event Markers
6.11 Reminders
6�11�1 Personal Reminder �����������������������������������������������������������������������������������������������������������������������������������������������������60
6�11�2 Bolus BG Check Reminder ��������������������������������������������������������������������������������������������������������������������������������������60
6�11�3 Missed Meal Bolus Reminder ��������������������������������������������������������������������������������������������������������������������������������61
6�11�4 Low Reservoir Reminder ������������������������������������������������������������������������������������������������������������������������������������������62
6�11�5 Set Change Reminder �����������������������������������������������������������������������������������������������������������������������������������������������63
6�11�6 Turning Reminders Off ���������������������������������������������������������������������������������������������������������������������������������������������63
6.12 Utilities ���������������������������������������������������������������������������������������������������������������������������������������������������������������������������� 64
6�12�1 Airplane Mode ������������������������������������������������������������������������������������������������������������������������������������������������������������64
6�12�2 Time & Date ������������������������������������������������������������������������������������������������������������������������������������������������������������������64
6�12�3 Block ���������������������������������������������������������������������������������������������������������������������������������������������������������������������������������64
6�12�4 Remote Bolus ���������������������������������������������������������������������������������������������������������������������������������������������������������������64
6�12�5 Self Test ���������������������������������������������������������������������������������������������������������������������������������������������������������������������������64
6�12�6 Carb Unit ������������������������������������������������������������������������������������������������������������������������������������������������������������������������65
6�12�7 Manage Settings ��������������������������������������������������������������������������������������������������������������������������������������������������������65
6�12�8 Sensor Demo ���������������������������������������������������������������������������������������������������������������������������������������������������������������65
6�12�9 Language �����������������������������������������������������������������������������������������������������������������������������������������������������������������������65
������������������������������������������������������������������������������������������������������������������������������������������������������������ 41
����������������������������������������������������������������������������������������������������������������������������������������������������������� 50
���������������������������������������������������������������������������������������������������������������������������������������������������������������57
������������������������������������������������������������������������������������������������������������������������������������������������������������������58
������������������������������������������������������������������������������������������������������������������������������������������������������������59
���������������������������������������������������������������������������������������������������������������������������������������������������������������������60
Section 7: Training Handouts ���������������������������������������������������������������������������������������������������������������������������������������������������� 66
7.1 Basal Quick-Reference Guide for the MiniMed® 640G Insulin Pump ������������������������������������67
7.2 Bolus Wizard™ Quick-Reference Guide for the MiniMed® 640G Insulin Pump
7.3 Changing the MiniMed® Sure-T® Infusion Set with the MiniMed® 640G Insulin Pump
7.4 Changing the MiniMed® mio® Infusion Set with the MiniMed® 640G Insulin Pump
2
���������������69
�����71
����������� 77
Page 5
Introduction I Welcome
Getting Started with the MiniMed® 640G Insulin Pump
Welcome! We are glad that you have chosen insulin pump therapy and are
excited for you to begin using your insulin pump�
Whether you’ve chosen pump therapy because of its convenience, the
flexibility it provides, or to help improve your glucose control, your pump will
be a valuable tool in helping to manage your diabetes�
This guide provides step-by-step instructions on the basic operation and
programming of your pump�
Using your pump to complete each practice exercise will help you become
comfortable with the basics and prepare you for your in-person training� The
information is presented in an order that will build your skills and knowledge�
During your in-person training, your trainer will build on this information and
help ensure you are confident to begin pump therapy�
Here are some quick tips to keep in mind as you work through this information:
• Be sure you are not attached to your insulin pump while you practice�
• It’s okay if you make a mistake� If you press the wrong button, use
the to go back to the previous screen and try again�
• If you do not touch a button for 15 seconds, the pump screen will
turn dark� Press any button and the pump screen will return�
• Avoid the Reservoir & Tubing menu option as you practice� You will
review these steps during your in-person training�
We hope you enjoy learning about your new insulin pump�
Did You Know?
A complete
explanation of the
technical and
operational aspects
of your pump can
be found in the
MiniMed® 640G
System User Guide.
Did You Know?
An interactive
online version
of this training
is available at
www�medtronic-
diabetes�com�au
IMPORTANT Do NOT attach the insulin pump to your body or
attempt to use insulin in your pump as you use this guide to
practice and learn�
Attaching and using must only be done when you receive formal
training with your healthcare professional or a certified product trainer�
3
Page 6
Section 1 I Getting Started
1.1 Pump Mechanics and the Delivery of Insulin
Before we begin, let’s make sure you know how insulin is delivered
when using an insulin pump� The parts that make up the pump’s
delivery system are the infusion set, the reservoir, and the pump�
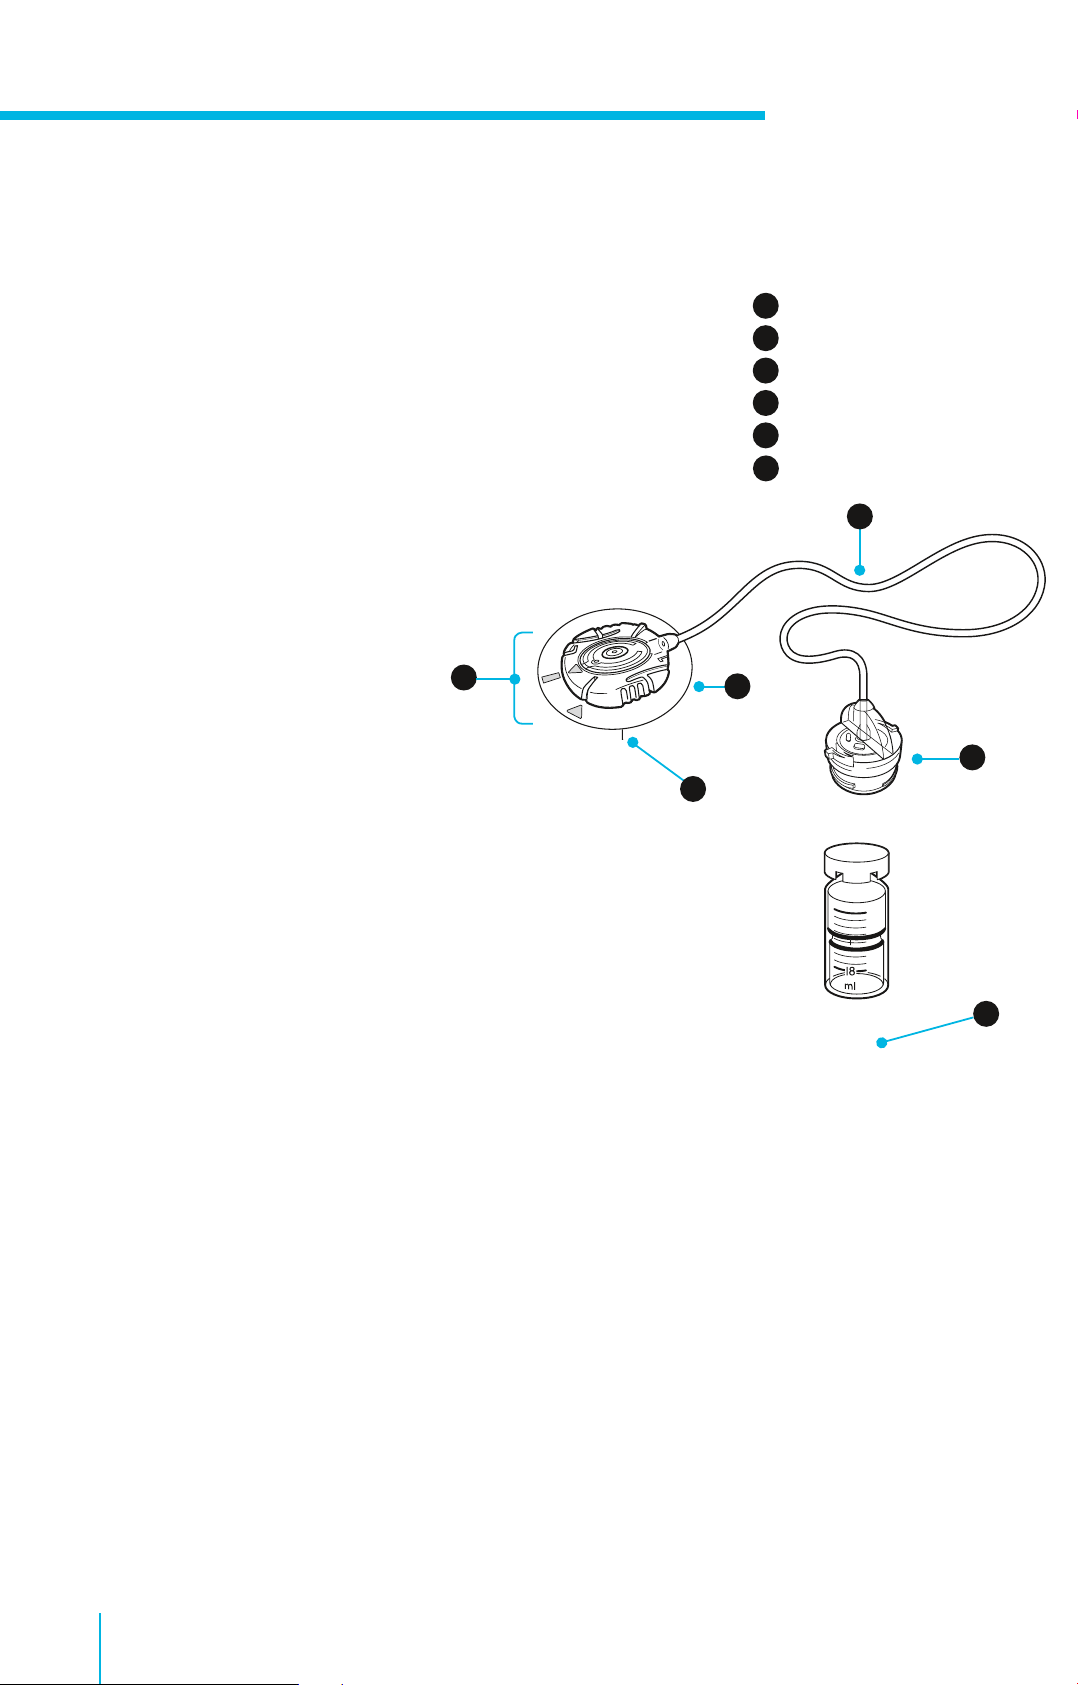
1.1.1 Infusion Set
The infusion set consists of tubing (1) that carries insulin from the
pump to you� On one end of the tubing is the reservoir connector
(2) that attaches to the reservoir which holds the insulin� On the
other end is the insertion site section (3) that attaches to you�
The insertion site section has a small
insertion needle that places a tiny
flexible tube called a cannula (4) into
your body**� Once the infusion set is
inserted, you remove the needle,
leaving just the cannula behind�
A small piece of adhesive (5) holds
the infusion set in place�
3
1.1.2 Reservoir
The reservoir is similar to a syringe and holds 2- to 3-days
supply of insulin� The reservoir fits into the pump’s reservoir
compartment (6)� You will be replacing both the infusion
set and the reservoir every 2 to 3 days.
Infusion Set
1
Tubing
2
Reservoir Connector
3
Insertion Site Section
4
Cannula
5
Adhesive
6
Reservoir Compartment
5
4
*
1
2
u u
Reservoir
1.1.3 Pump
Inside the pump, at the bottom of the reservoir compartment, is a piston� The
piston acts like the plunger rod on a syringe, pushing up on the bottom of the
reservoir, moving insulin into the tubing, through the cannula, and into your body�
The piston is controlled by a mini computer inside the pump that’s able
to deliver insulin in very small doses, sometimes as small as 0�025 units�
It must be rewound each time a newly filled reservoir is placed into the
reservoir compartment�
*Medtronic Quick-set™ infusion set shown in illustration.
**Some infusion sets do not use a cannula but have a small needle that remains inserted in the body.
6
Pump
4
Page 7

Section 1 I Getting Started
1.2 Pump Basics
Before inserting the battery or pressing any buttons, let’s take a closer look at your pump�
1.2.1 The Front of Your Pump
Up, Down, Left, and Right
• Press to scroll up or down through a menu or list
• Press to move to desired area on the screen
• Press to change the value in an area
Back
• Press to return to a previous screen
• Press and hold to return to the starting screen,
called the Home screen
Select
• Press to select or confirm a value or
menu option that is highlighted
• Press when directions say ‘select’
Notication Light
Back
Up
Left
Menu
Right
Select
Menu
• Press to get to the Menu
Notication Light
• Flashes when an Alert or an Alarm is occurring
1.2.2 The Bottom of Your Pump
US Medtronic Diabetes
Helpline Telephone Number
For product assistance within
Australia please use the local
number to call the 24-hour
helpline: 1800 777 808
Down
1.2.3 The Back of Your Pump
Pump Serial and
Model Number
You may need to
provide these numbers
if you call for assistance�
5
Page 8

Section 1 I Getting Started
1.2.4 Attaching the Skins
You have received skins to attach to the back of the pump and the
front of the belt clip� You can find these with the accessories� In
addition to personalising the look of your pump, skins provide
additional protection against surface scratches� Apply the skins
using the instructions provided with them�
1.2.5 Inserting the Battery
Your insulin pump is powered by a AA battery� A lithium, alkaline, or rechargeable AA battery can be
used� The battery you place into your pump should always be new or fully charged�
To insert the battery and get started, you will need:
• the battery cap found with the pump
• the belt clip found with the accessories
• the AA battery found with the accessories
u
Step 1� Place the battery
into the battery compartment
with the negative (flat) end
going in first�
Note: Do not undertighten or try to
overtighten the battery cap� It should be
aligned horizontally with the pump case
as shown here�
Step 2� Place the battery cap onto the pump�
Use the edge of the belt clip to turn the cap to
the right (clockwise) and tighten until the slot is
horizontal to the pump� See image below�
u u
6
Page 9
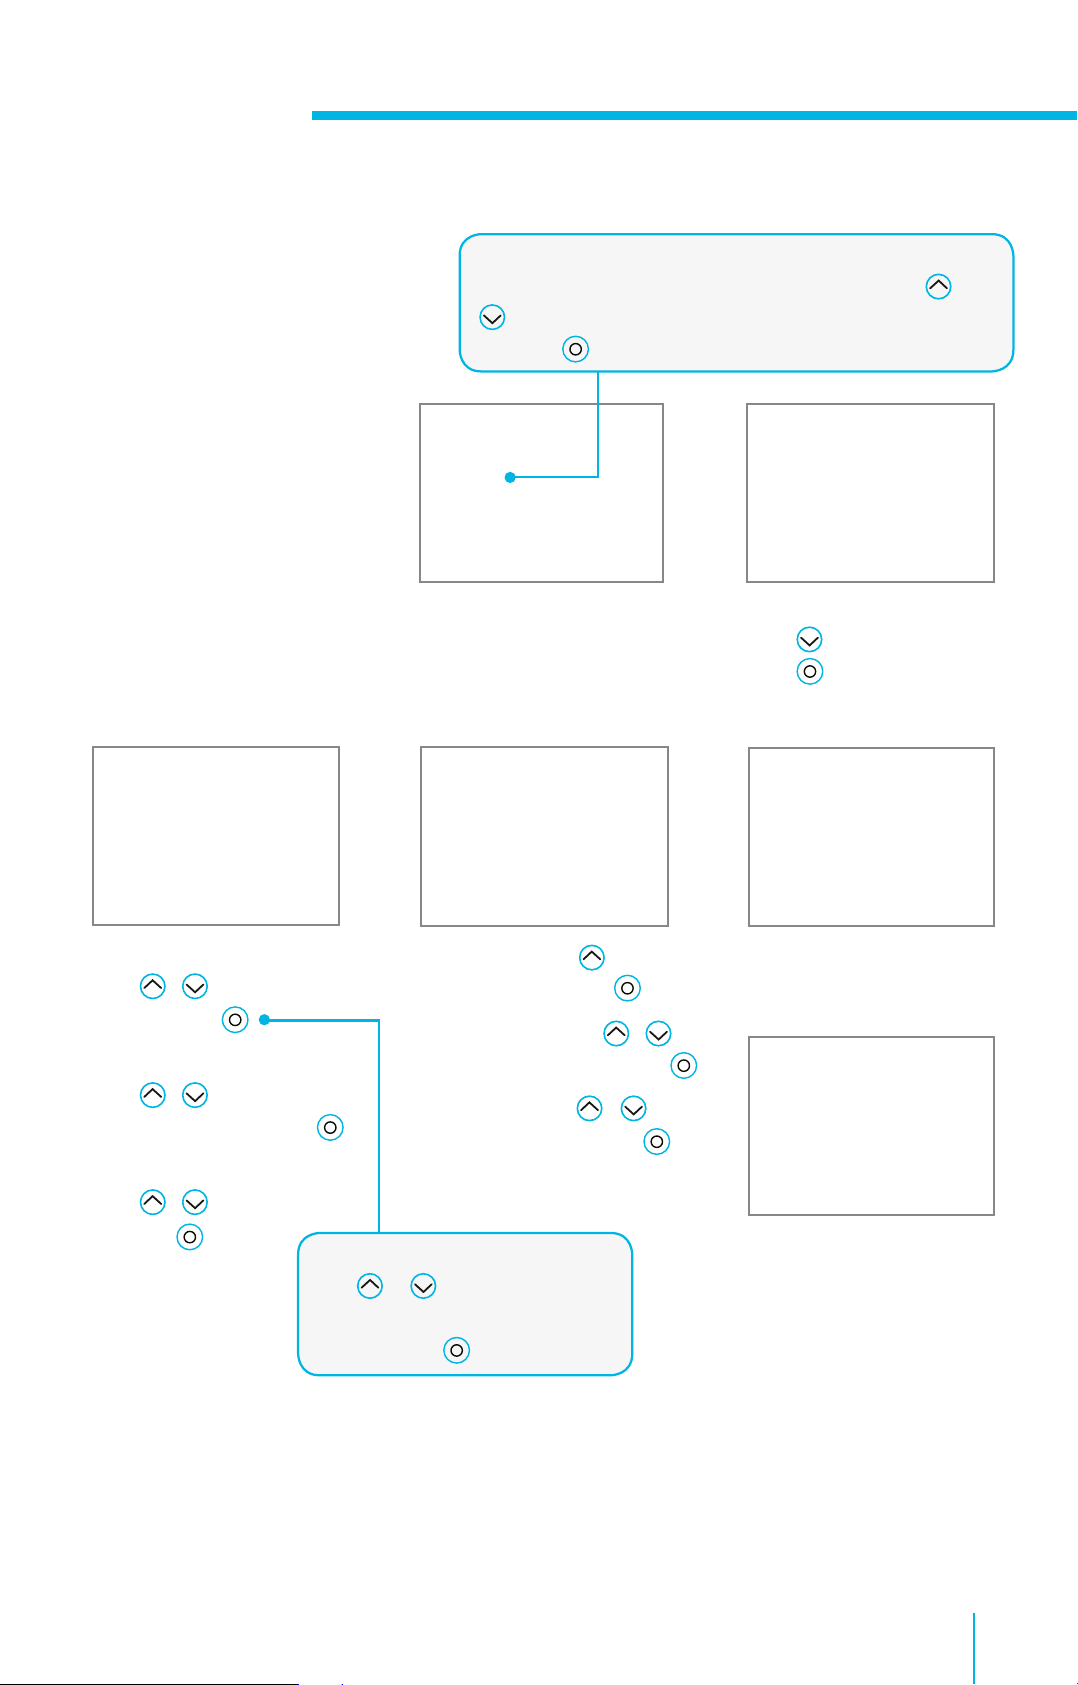
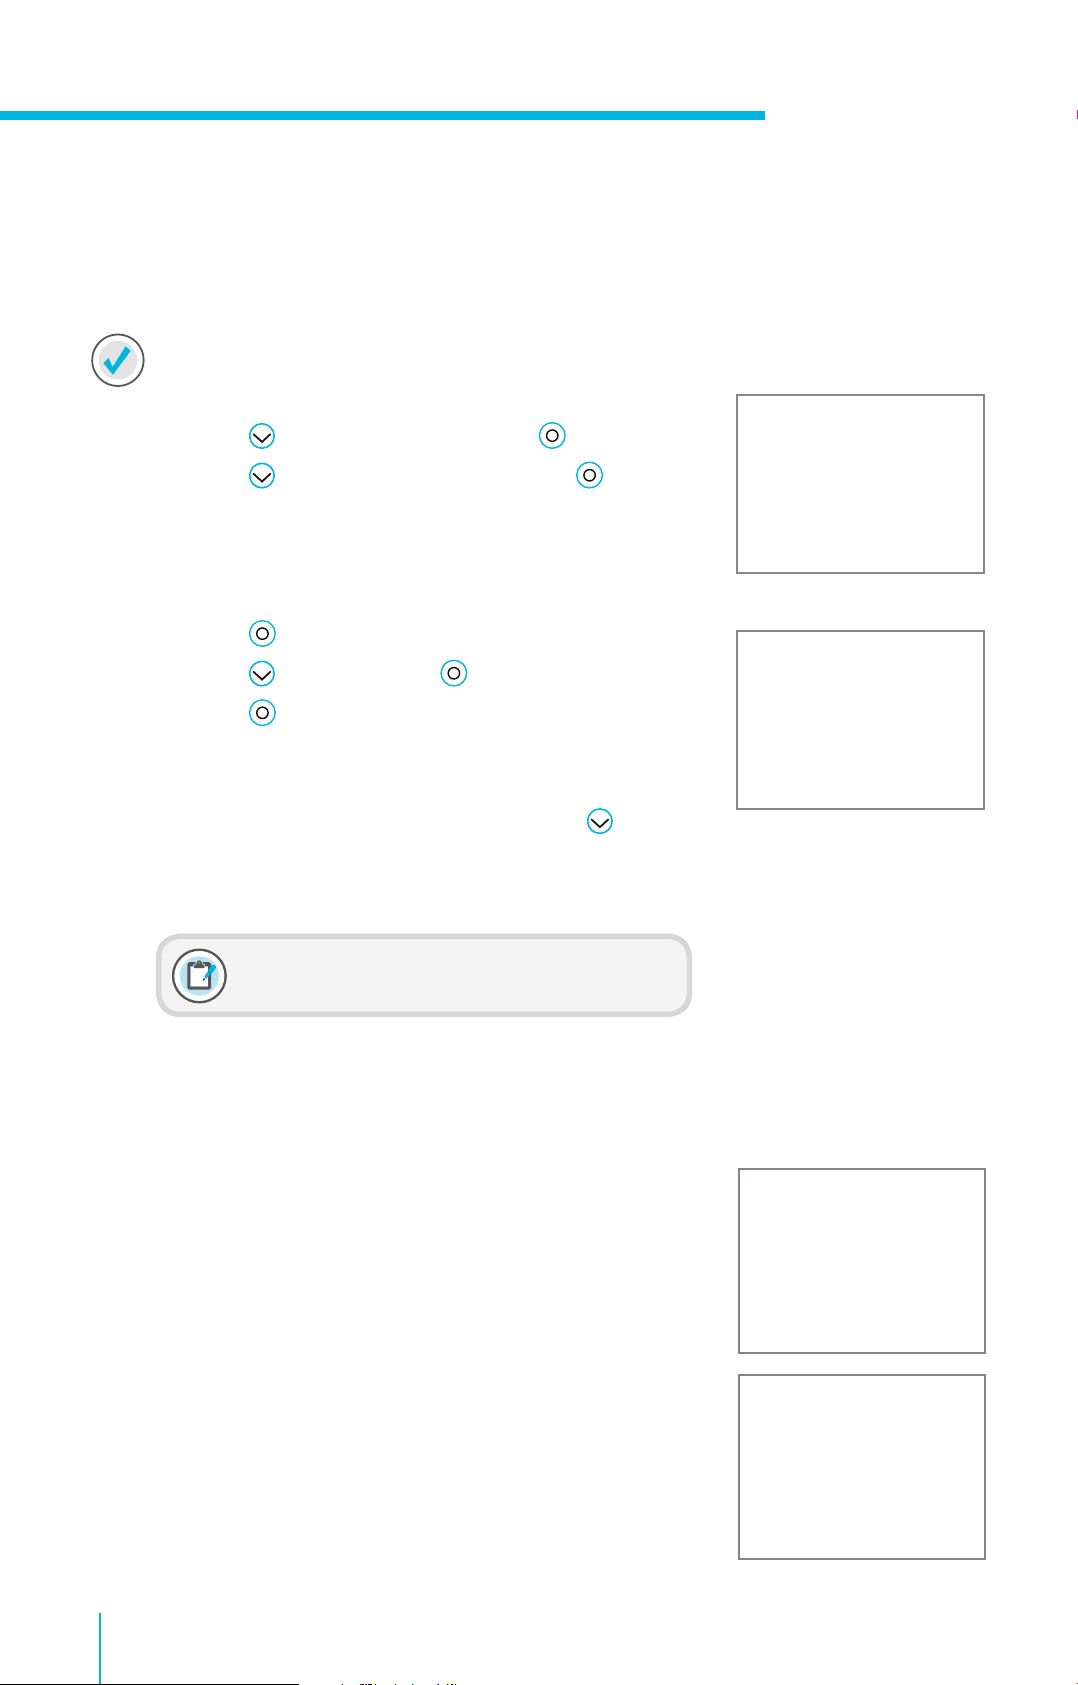
1.3 Startup Wizard
Section 1 I Getting Started
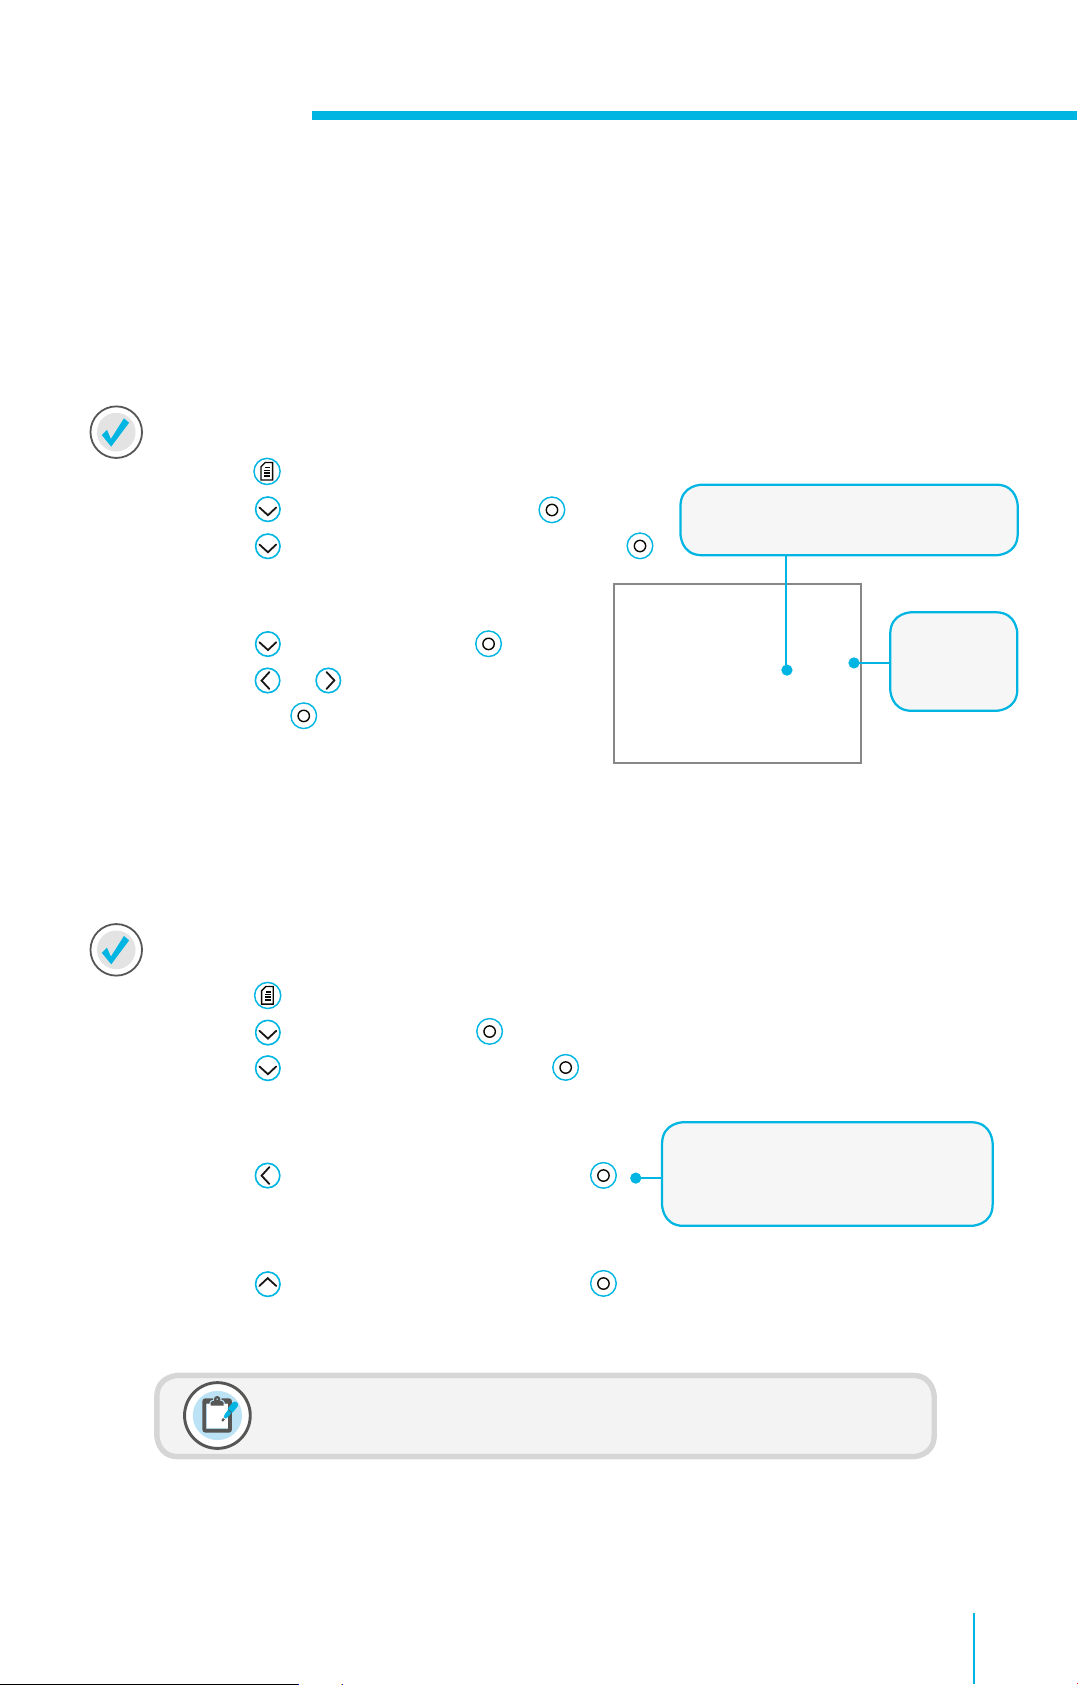
Always look for the item on the screen that is highlighted
in yellow� This is the item that can be selected� Use
buttons to highlight the item you want to choose and
press the
button to select it�
and
The pump will power on and
Startup wizard will begin�
The hour will be flashing�
Press / to the correct
hour and press �
The minutes will be flashing�
Press / to the
correct minutes and press �
The AM/PM will be flashing�
Press / if needed
and press �
Select Next.
To scroll faster, press and hold
the or
Once you reach the correct value
or item, press
u
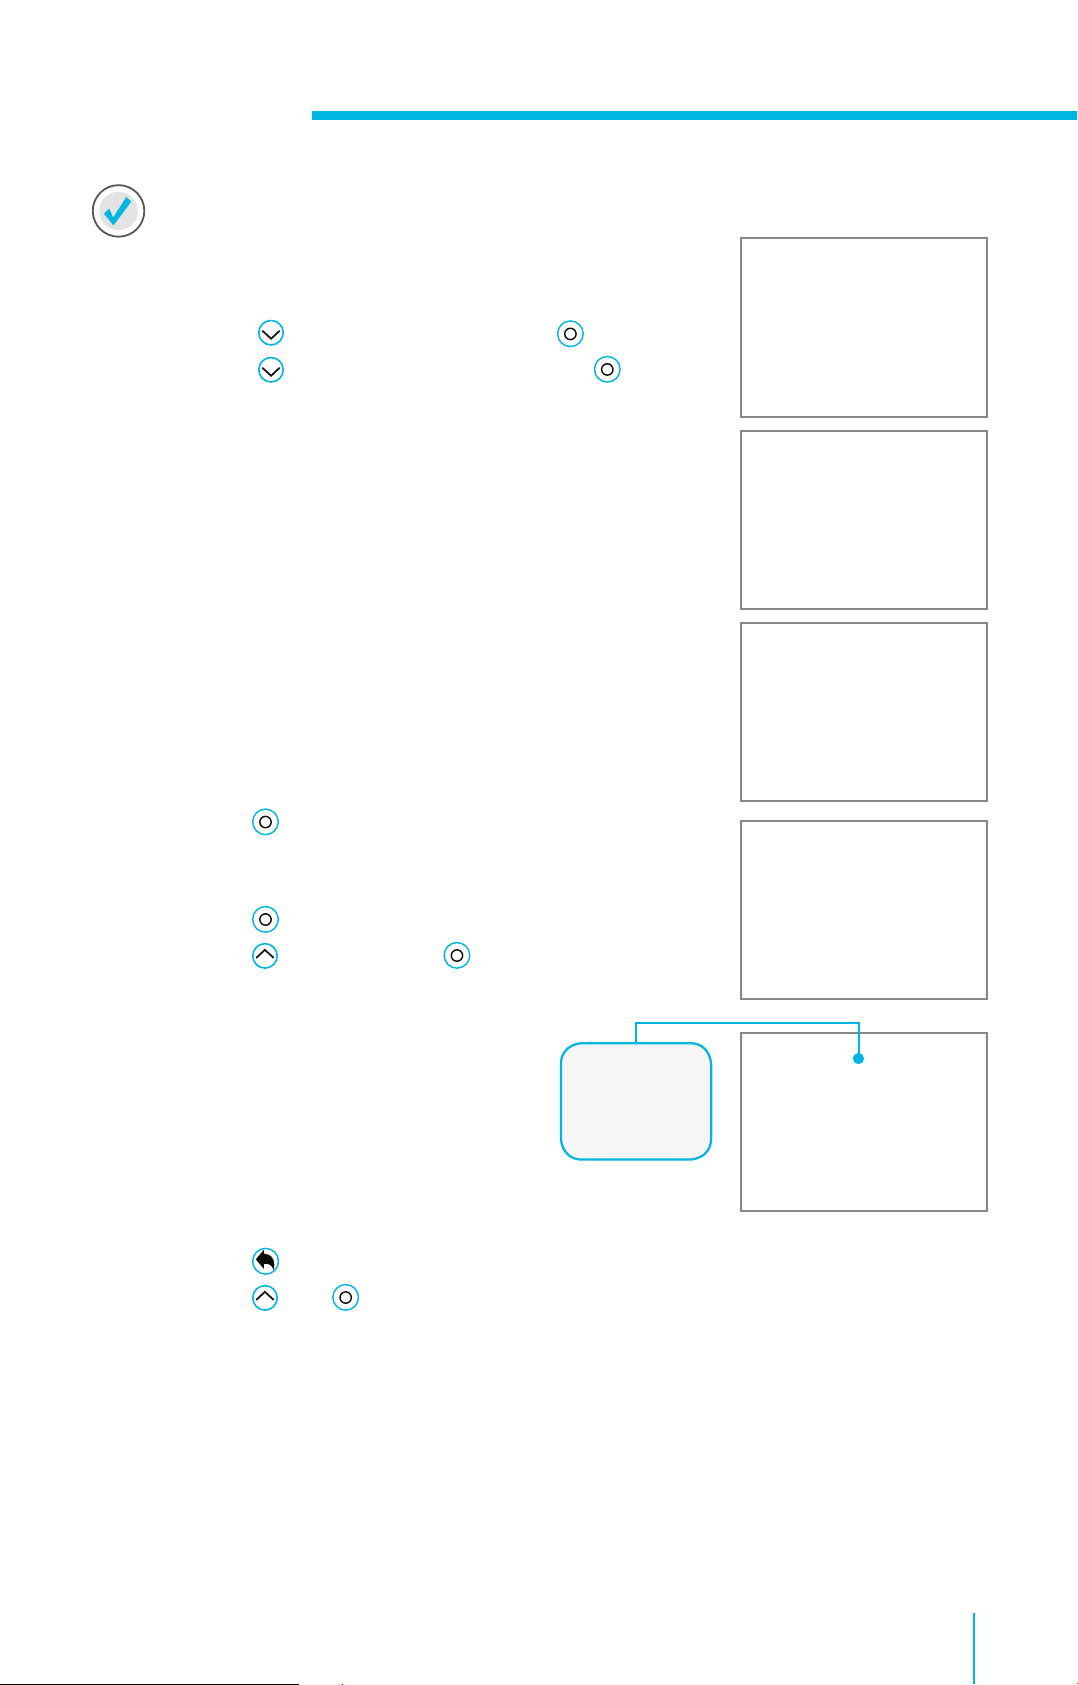
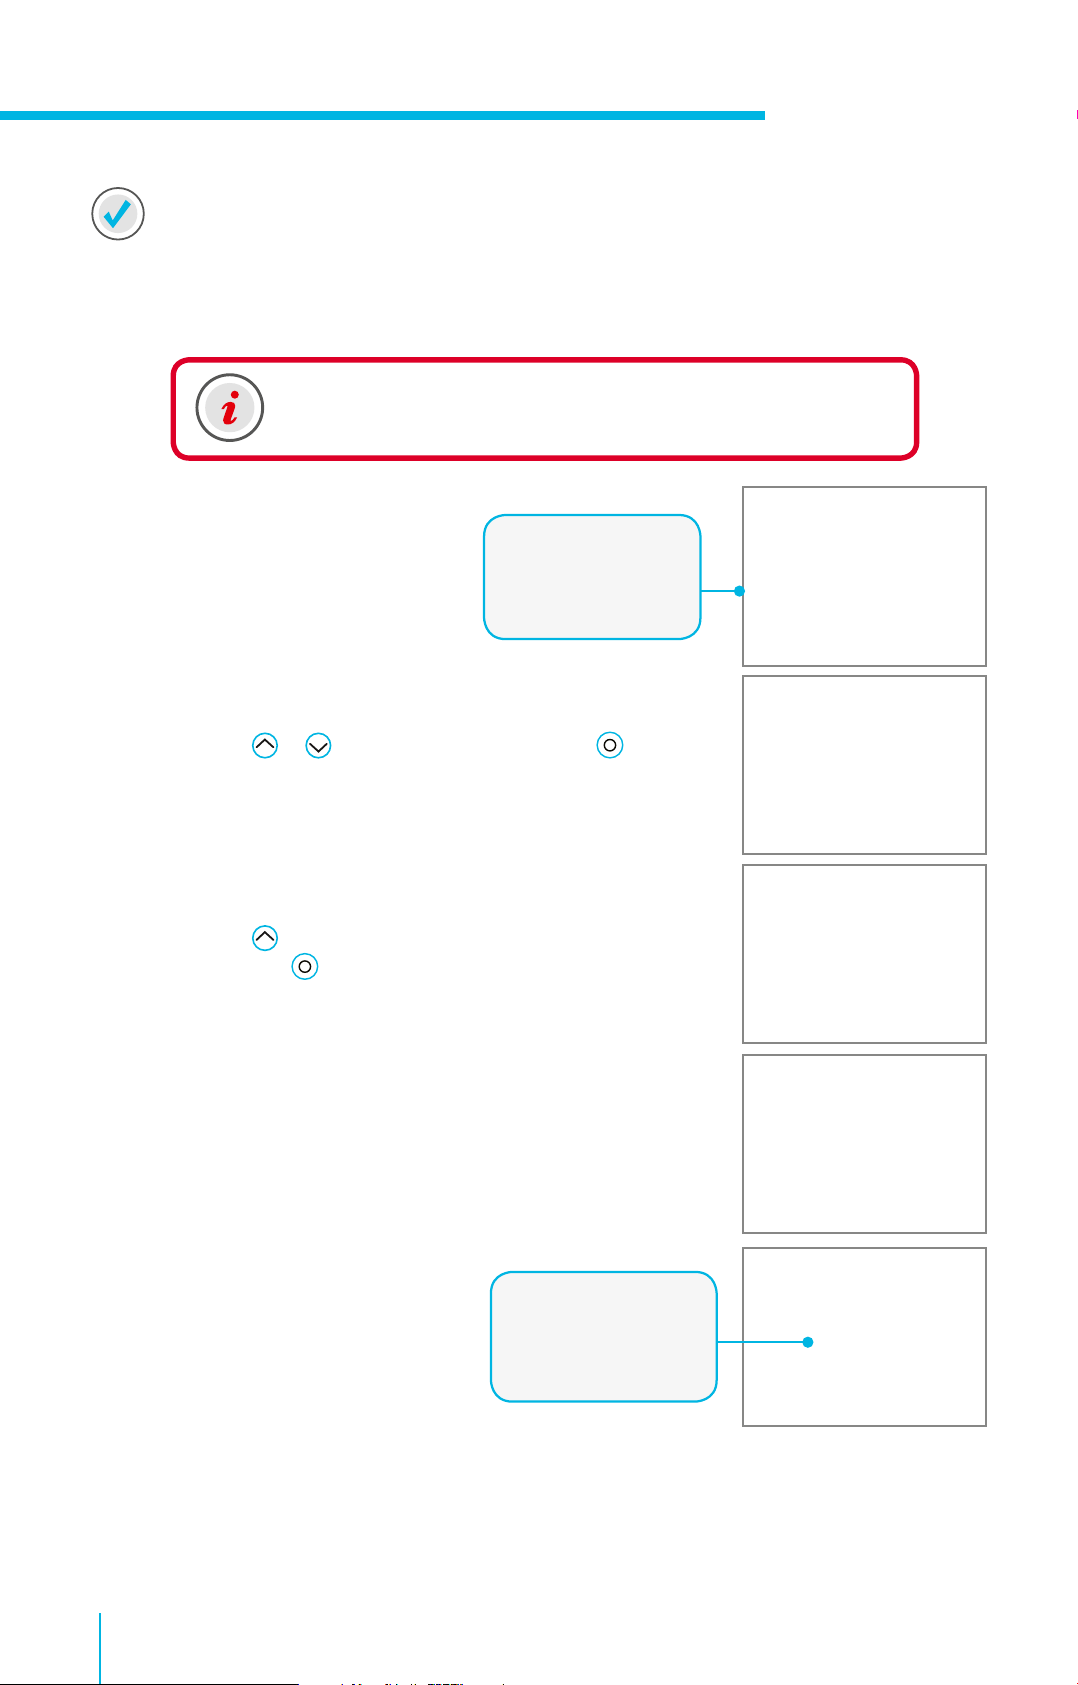
u
Select English�
Select Year� Press to the
correct year and press �
Select Month� Press / to
the correct month and press �
Select Day� Press / to
the correct day and press �
Select Next.
button�
to select�
u
u
Select 12 Hour (AM/PM) or
press to 24 Hour and
press
12 hour.
Wait a moment�
Select OK�
� This example uses
u
7
Page 10

Section 1 I Getting Started
1.4 Home Screen
You are now on the Home screen� The Home screen will be your starting place to access all features in
the pump�
When you haven’t pressed any buttons for a while, the pump screen will look dark� The pump is still on�
It is just saving battery power� You can simply press any button to make the screen reappear�
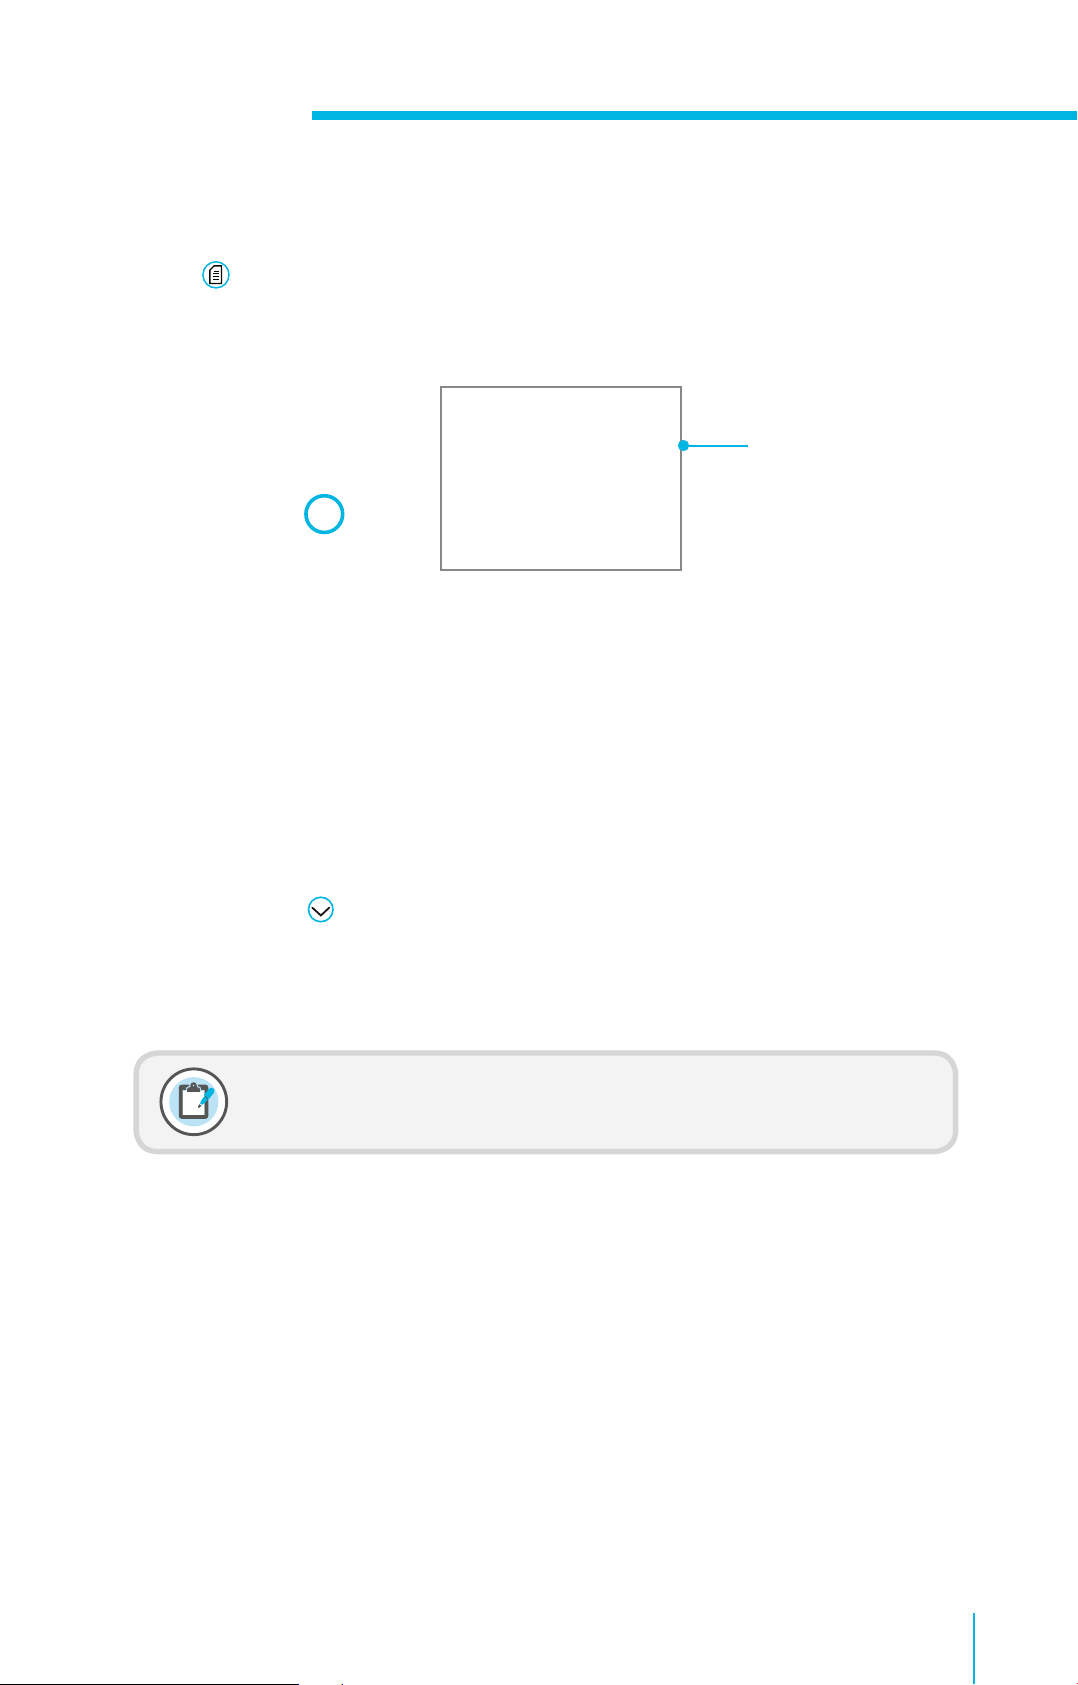
The following information is displayed on the Home screen�
Status bar: provides a
quick look at the pump’s
status
Bolus: gives you
access to the bolus
delivery screen and
other bolus insulin
options
Basal: gives you
access to basal
insulin options
Keeping the screen on longer....
Margaret noticed when she wasn’t pressing buttons on her
pump, the screen would turn dark� This happens to save
battery life� She soon learned she could simply press any
button to turn the screen back on�
Current time
BG reading: displays a
BG taken in the last 12
minutes
Active insulin: displays
any insulin still active
from a previous bolus
Helpful Hint: If the pump is going into Power Save mode
too quickly, the setting can be changed� You will learn how
to do this on page 17�
8
Page 11
Section 1 I Getting Started
1.4.1 Unlocking the Pump
After the Backlight has been off for a few minutes, the pump goes into
Sleep mode and the pump is locked� When you begin using your pump
again, you will see a screen like the one shown here when you leave the
Home screen� You will need to press the arrow key that is highlighted
to unlock the pump� This confirms you are reading the screen and the
button presses are not accidental�
If the wrong arrow key is pressed, you will see the screen here�
Select OK
to return to the Home screen and try again�
You can press and hold if you wish to put the pump into Sleep mode and keep it locked when you
are not using it� Doing this can also help save battery life�
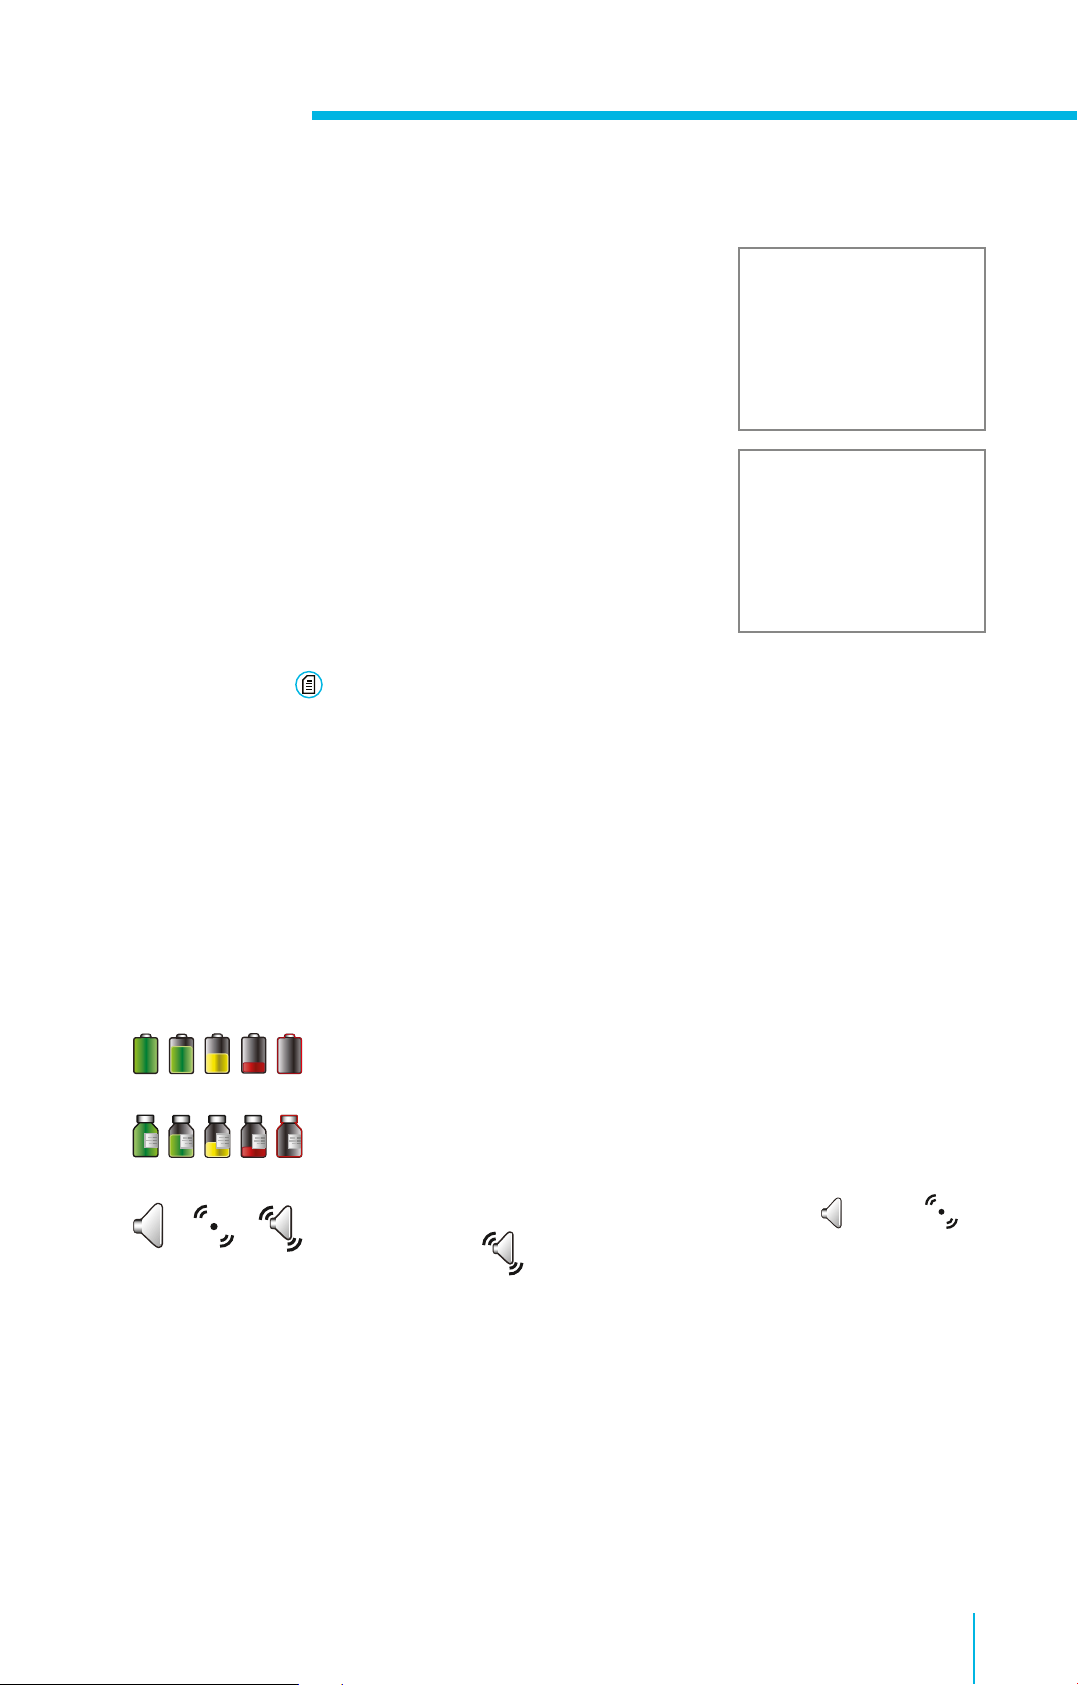
1.4.2 Status Bar
The Status Bar displays the following icons so you can quickly view important information� When using your
pump, you will see 3 of these icons�
Battery icon: Shows the level of charge your battery has� As the battery charge
Reservoir icon: Shows the approximate amount of insulin left in your reservoir�
Audio icon: Shows the audio mode you are using: audio , vibrate or
audio and vibrate �
decreases, the icon will become less full and change to yellow and then red�
As insulin is used, the icon will become less full and change to yellow and
then red�
9
Page 12
Section 1 I Getting Started
1.4.3 Status Screens
There will be times when you need additional status information� For example, the Status Bar icon shows
you if the insulin in your reservoir is getting low, but you may need to know exactly how many units are
left� This additional status information can be found in the status screens�
1) Press to highlight the Status Bar and press �
2) If prompted, press the arrow key that appears to
unlock the pump�
3) Press to view Notifications or press to
highlight the status screen you wish to view and press �
Here you can see the status information that can be found when you select each menu item:
Notications - shows the name and times of alarms, alerts, messages, and reminders that you have
received over the past 24 hours�
Quick Status - provides a current summary of pump information including the last bolus you
delivered, the last BG entered, and your current basal rate�
Pump - provides detailed information about your pump, including the date you last changed the
reservoir, and the number of units left in it�
Settings Review - displays the settings you have programmed into your pump�
Remember: You can go back to the previous
screen by pressing
�
10
Page 13
1.5 Menu
Pressing the button will take you to the Menu.
u
Section 1 I Getting Started
Scroll Bar
There are 9 items listed on the Menu� Each menu item contains the features and functions that
pertain to that menu item� You will find the items meant to be most quickly accessible closest to the
top of the Menu�
1.5.1 Scroll Bar
When a screen or menu has more than five lines of information, a scroll bar appears on the right
side of the screen� Press
On the following page, you will find a map of the basic menu� This shows you the options that you
will find under each of the Menu items�
Note: You will not be using all of these options right away� We will focus on
the ones that you will need to get started�
to scroll down and view the additional items�
11
Page 14

Section 1 I Getting Started
1.5.2 Basic Menu Map
Press
u
Suspend Delivery
Audio Options
History
Reservoir & Tubing
Insulin Settings
Sensor Settings
Event Markers
Reminders
Utilities
Home Screen
Suspend Delivery
Audio Options
Audio
Audio & Vibrate
Vibrate
Volume
History
Summary
Daily History
Alarm History
Reservoir & Tubing
New Reservoir
Fill Cannula
12
Page 15

1.5.3 Navigation
Press from any screen to open the Menu.
Section 1 I Getting Started
Press
Press on the desired menu item to open�
The scroll bar appears on menus to indicate when additional text is available�
Press
Press to scroll back up�
Press to go to previous screen� Hold to return to the Home screen�
and to scroll through the menu items�
to scroll down to view additional items�
Sensor Settings
Sensor
Reminders
Personal
Bolus BG Check
Missed Meal Bolus
Low Reservoir
Set Change
Insulin Settings
Bolus Wizard Setup
Basal Pattern Setup
Preset Temp Setup
Preset Bolus Setup
Dual/Square Setup
Bolus Increment
Max Basal/Bolus
Easy Bolus
Auto Suspend
Bolus Speed
Event Markers
BG
Injections
Food
Exercise
Other
Utilities
Airplane Mode
Display Options
Time/Date
Remote Bolus
Block
Self Test
Carb Unit
Manage Settings
Sensor Demo
Device Options
Keypad Lock
Language
13
Page 16

Section 1 I Getting Started
1.5.4 Menu Options
Here you see a brief summary of the information found within each menu item�
• Suspend Delivery: Lets you stop insulin delivery� This is commonly used when
disconnecting to swim or bathe�
• Audio Options: Lets you choose audio, vibrate or both to inform you of alerts and
notifications� You can also change the volume here�
• History: Shows information about recent insulin delivery, actions you performed on your
pump, and alerts and alarms received� You can look back to previous days when necessary�
• Reservoir & Tubing: Contains steps to changing the reservoir and infusion set�
• Insulin Settings: Contains all features and settings that affect or change your pump’s
delivery of insulin� These settings help you to individualise the pump to meet your insulin needs�
• Sensor Settings: Contains all options related to sensor use� These are set when using
continuous glucose monitoring�
• Event Markers: Lets you use your pump instead of a written log to record events such as
taking an injection or exercising�
• Reminders: Lets you set the pump to remind you to do important routine activities such as
checking BG and changing your infusion set�
• Utilities: Contains various other features and settings related to pump use�
The Menu....
When Lisa first started on her pump, she didn’t know if she
could ever learn how to use all the features the pump had
available� But, she just focused on the basics first, and then
she started learning the additional features that she found
helped her the most�
Helpful hint: Take some time to get comfortable with basics
first� Then learning the additional features will be much
easier and more fun to do�
14
Page 17
Section 1 I Getting Started
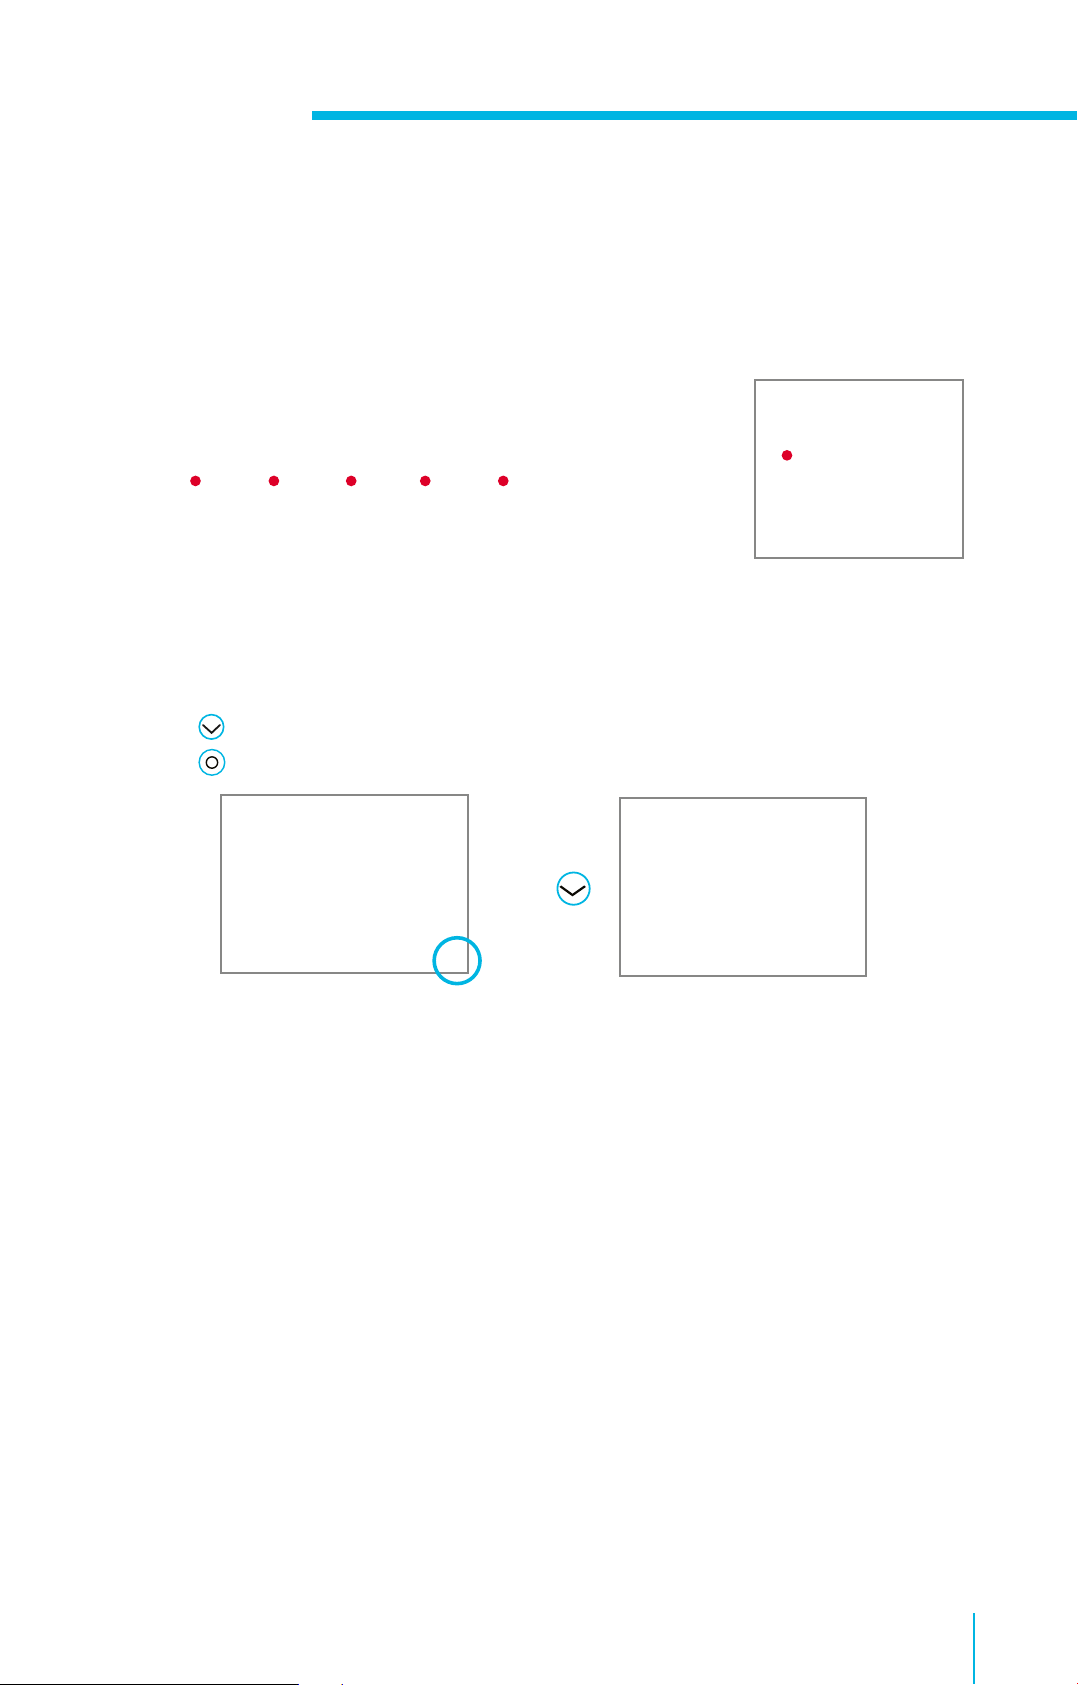
1.6 Alerts
An alert makes you aware of a situation that may need your attention� When an alert occurs, you should
check to see what your pump is telling you� Examples of alerts include Low reservoir or Low battery.
When an alert occurs:
Notication Light:
The red light on the pump will blink once followed by a pause,
blink again followed by a pause� This sequence continues until
the alert is cleared� The flashing pattern is shown here:
Audio:
Depending on your Audio Option settings, the pump emits a
repeated alert tone, a continuous two-pulse vibration, or both�
Display:
The pump will display a notification with a yellow icon and instructions on what to do�
To address and clear the alert:
1) Read the text on the screen to understand the alert and the steps that should be taken�
2) Press �
3) Press on the desired option�
Press
If you do not respond to an alert, the audio / vibration pattern repeats every five minutes until the
alert is cleared�
15
Page 18
Section 1 I Getting Started
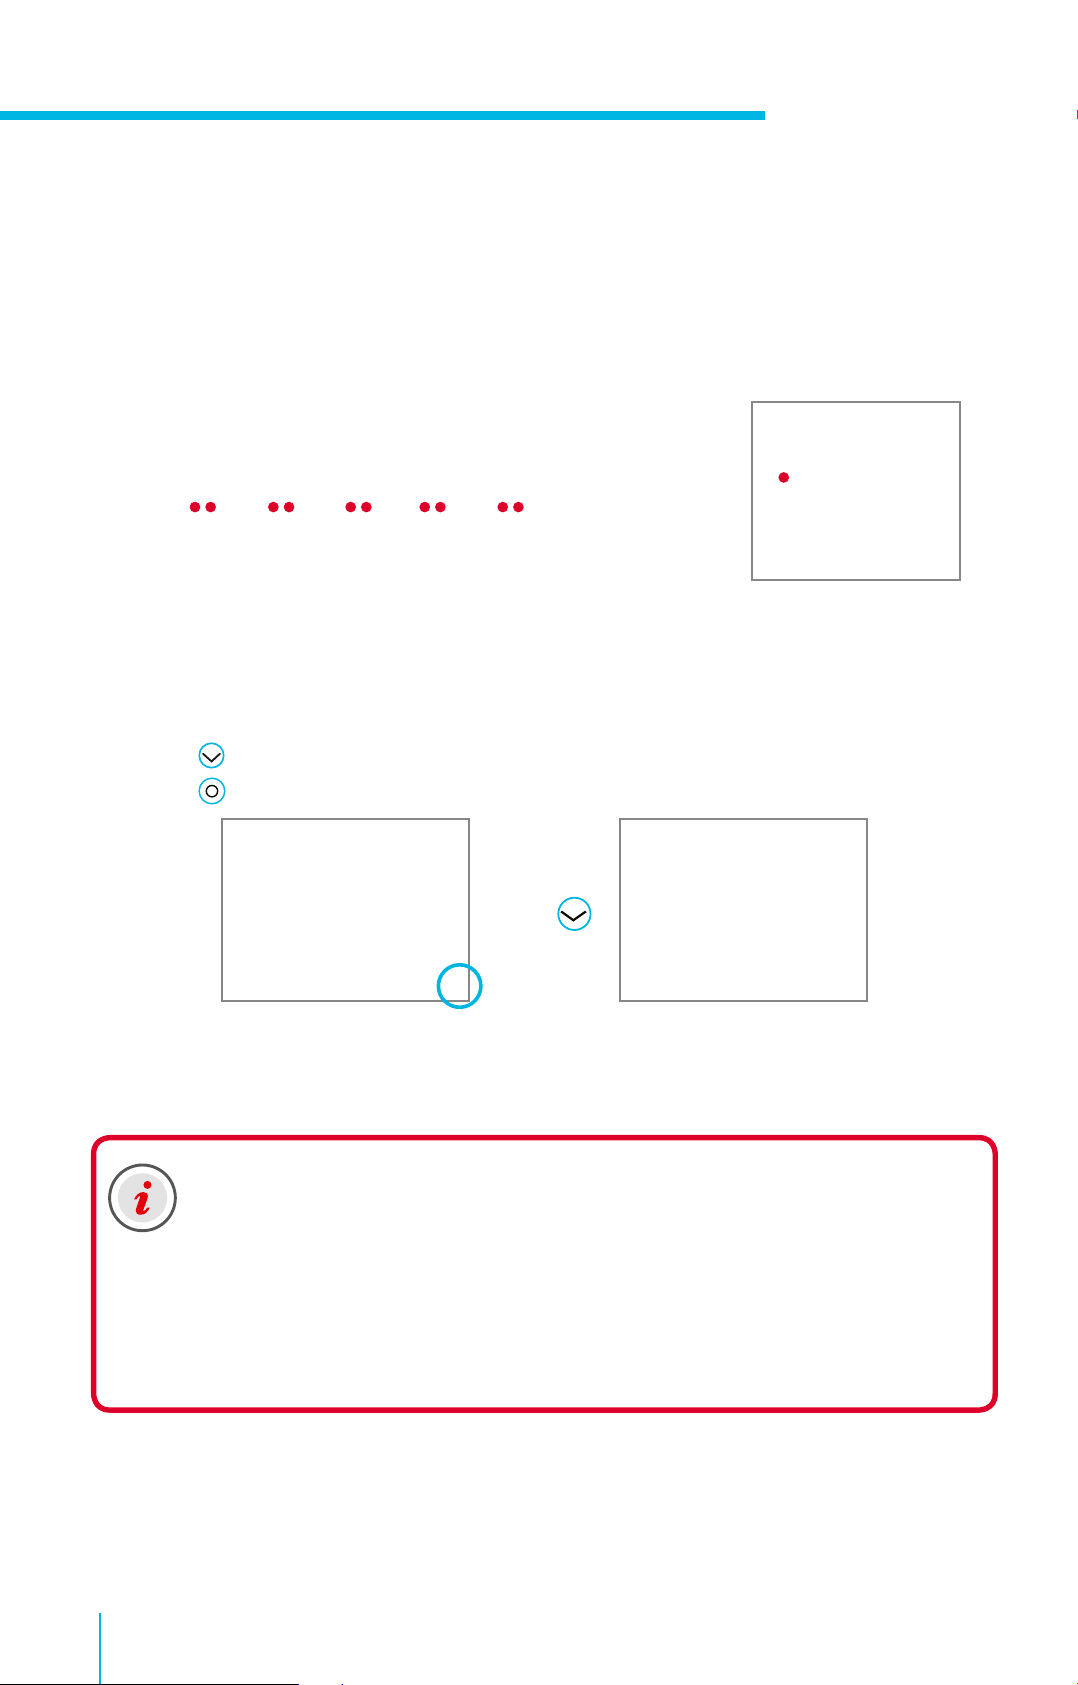
1.7 Alarms
When an alarm occurs, something has been detected that is preventing insulin from being delivered�
You are not getting insulin� It is important that you address an alarm right away. Examples of
alarms are Insulin ow blocked and Replace battery now.
When an alarm occurs:
Notication Light:
The red light on the pump will blink twice, followed by a pause,
blink twice again followed by a pause� This sequence continues
until the alert is cleared� The flashing pattern is shown here:
Audio:
Depending on your Audio Option settings, the pump emits a
repeated alert tone, a continuous three-pulse vibration, or both�
Display:
The pump will display a notification with a red icon and instructions on what to do�
To address and clear the alarm:
1) Read the text on the screen to understand the alarm and the steps that should be taken�
2) Press
3) Press
�
on the desired option�
Press
If you do not respond to an alarm, the audio / vibration pattern repeats every minute for 10 minutes�
After 10 minutes, the alarm begins to siren.
IMPORTANT: It is important that you are able to address an Insulin ow blocked alarm�
This alarm means that insulin is not able to get through the tubing or cannula� If this alarm
occurs, check to see if your infusion set has become dislodged or if your tubing is kinked�
• If you don’t detect an issue and are unable to change your reservoir and infusion set
right away, you might choose to select Resume Basal. If an Insulin flow blocked alarm
occurs again, follow the steps on the screen� Select Rewind and change your reservoir
and infusion set�
• If you detect an issue or if your reservoir has run out of insulin, follow the steps on the
screen� Select Rewind to change your reservoir and infusion set�
16
Page 19
Section 1 I Getting Started
1.8 Menu Options - A Closer Look
You are now ready to set a couple of the basic features within the Menu�
1.8.1 Audio Options
You will use Audio Options to set pump to beep (Audio), beep and vibrate (Audio & Vibrate), or just vibrate
(Vibrate)� If you set Audio or Audio and Vibrate, you can also increase or decrease the Volume�
Let’s Practice:
1) Press to open the Menu�
2) Press to Audio Options and press �
3) Press to the option that you prefer and press �
If you choose Audio or Audio & Vibrate, you are
able to adjust the volume.
4) Press to Volume and press �
5) Press or to desired volume
and press �
The icon shown here will display on
the Status Bar on the Home screen�
The Option
you select
turns On�
6) Select Save.
1.8.2 Display Options
Display Options allows you choose the brightness of your pump screen� This is also where you go to
change the amount of time your pump stays on before it goes into Power Save mode�
Let’s Practice:
1) Press to open the Menu�
2) Press to Utilities and press �
3) Press to Display Options and press �
If you want to adjust the screen brightness:
4) Select Brightness�
5) Press to the setting you prefer and press �
To adjust the backlight:
6) Select Backlight�
7) Press to the setting you prefer and press �
8) Select Save.
The Auto setting automatically
adjusts the screen brightness to
match your current environment�
Note: How you adjust these settings can affect battery life� For instance,
increasing the Backlight time will decrease the life of your battery�
17
Page 20

Section 1 I Getting Started
1.9 Basal Patterns
Remember, your body needs insulin so glucose can be moved into your cells providing energy for your
body� Insulin is needed 24 hours a day, even between meals and during the night� This is called basal
insulin� The pump supplies basal insulin by delivering small amounts throughout each hour, every hour of
the day and night� This allows for insulin to be increased and decreased to adjust for your body’s needs�
U/hr
00:00
Basal insulin amounts must be programmed into your pump� This is done by setting a basal pattern�
A basal pattern consists of one or more basal rates being delivered over the course of 24 hours�
24 Hours
24:00
Before her pump....
Lynn always had to remember to take her injection of long-acting
insulin at bedtime� Taking it at the same time every night like her
doctor asked her to was difficult� She is at university and some
nights she would go to bed early, others she would be at the
library until late studying� Now with her pump, she doesn’t have
to worry about taking an injection� She is getting her basal insulin
automatically 24 hours a day�
1.9.1 Basal Pattern Setup – One Basal Rate
Your healthcare professional will calculate the hourly basal rate or rates are best for you to use when you
start on your pump� You may simply start with a basal pattern that has only one basal rate� The pump
will deliver that exact basal amount evenly over each hour, 24 hours a day�
For example, if your starting basal rate is 1�0 unit, your pump would deliver one unit of insulin throughout
each hour� This means you would receive a total of 24 units of basal insulin every 24 hours�
To set your Basal Patterns, you will need to go to the Insulin Settings menu option and then to Basal
Pattern Setup� There are two ways to access Insulin Settings:
1) From the Home screen, select Basal and press to Insulin Settings
OR
2) Press and press to Insulin Settings
18
Page 21
Section 1 I Getting Started
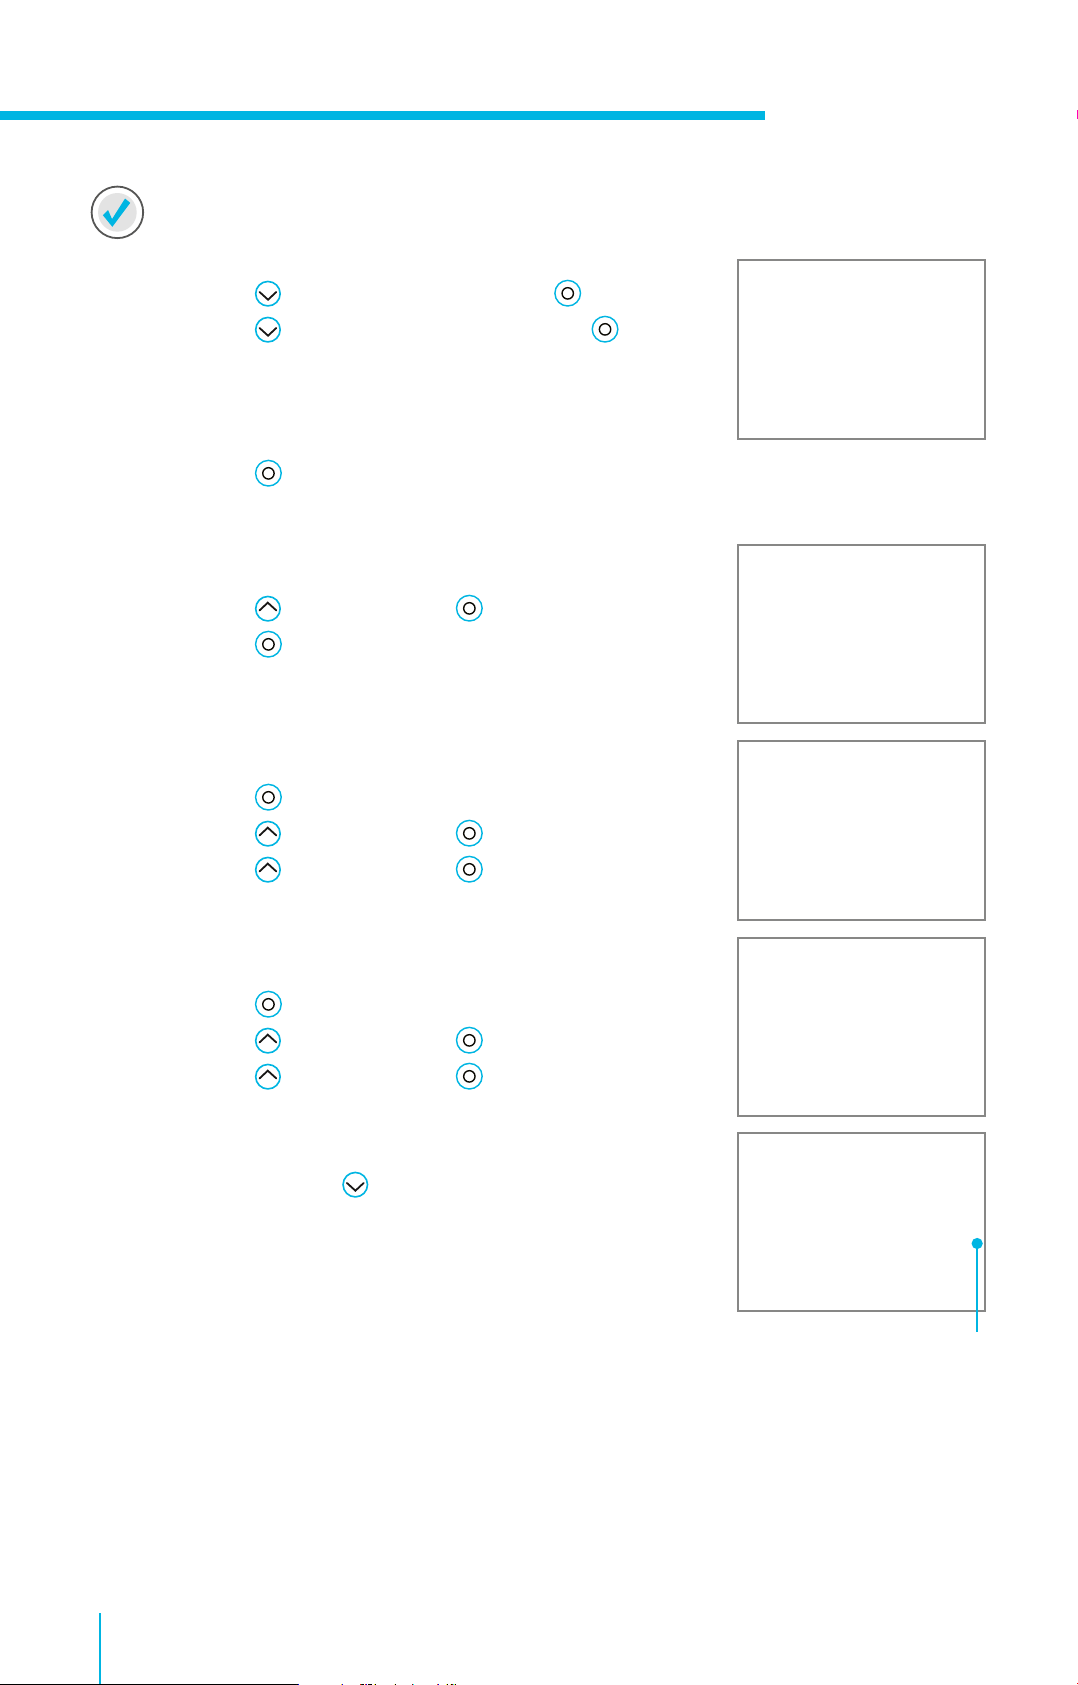
Let’s Practice: Setting a Basal Pattern with one Basal Rate
Let’s set a Basal pattern with a basal rate of 0�75 U/hr from 00:00 - 24:00
1) From the Home screen, select Basal.
2) Press to Insulin Settings and press �
3) Press to Basal Pattern Setup and press �
4) Select Basal 1.
5) Currently, the pump is delivering 0�000 U/hr� Select Options.
6) Select Edit.
7) Press
flashing� Since you are setting only one basal rate for all
24 hours, the End time does not need to be changed�
8) Press
9) Press
10) Select Done.
11) Verify that Basal 1
is entered correctly�
If NO changes need to be made:
12) Select Save.
If changes need to be made:
12) Press �
13) Press press � Repeat Steps 8-11�
14) Select Save.
on the time segment� The End time will be
�
to 0�750 and press �
This basal
pattern
delivers 18 U
over 24 hours�
19
Page 22

Section 1 I Getting Started
This basal rate amount entered, 0�750 U/hr in this example, will automatically be delivered throughout
each hour continuously from one day to the next�
1.000
00:00 – 24:00
0.500
U/hr
00:00 06:00
0.75 U/hr
12:00 18:00
24 Hours
24:00
1.9.2 Basal Pattern Setup – Changing a Basal Rate
If your glucose levels are running too high or too low, this basal amount may need to be changed�
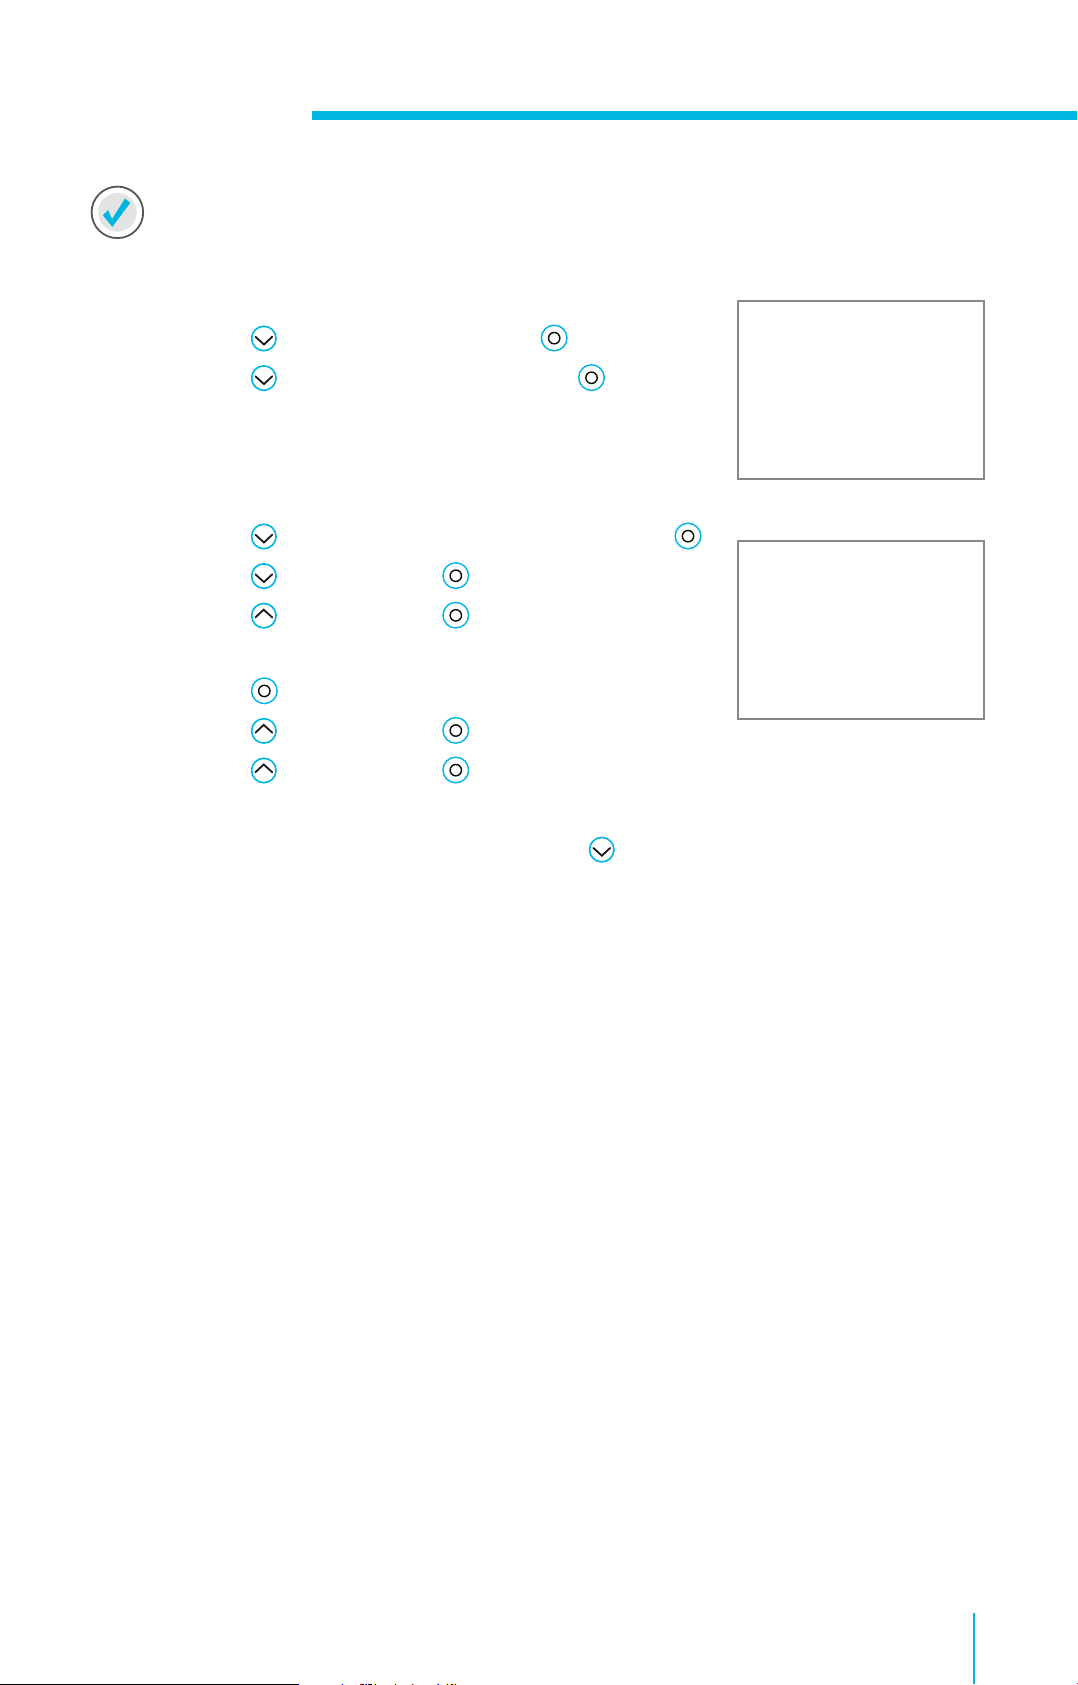
Let’s Practice: Changing a Basal Rate
Change Basal 1 basal rate from 0�750 to �0�900 U/hr�
1) From the Home screen, select Basal.
2) Press to Insulin Settings and press �
3) Press to Basal Pattern Setup and press �
4) Select Basal 1.
5) Select Options.
6) Select Edit.
7) Press on the time segment�
8) Select End time�
9) Press to change 0�750 to 0�900�
10) Select Done.
11) Verify that Basal 1 is entered correctly�
12) Select Save.
20
Page 23

Section 1 I Getting Started
1.9.3 Basal Pattern Setup – Multiple Basal Rates
After you start using your insulin pump, your glucose readings will help you and your healthcare
professional determine if your basal pattern needs to be changed� Not only might you need to increase
or decrease your current rate, you may also need to add basal rates to give you different amounts of
basal insulin during certain parts of the day or night�
Having more than one basal rate....
When Jessica was taking insulin injections, her BG readings
were always high in the morning� If she increased her
nighttime insulin, then she would have low BGs later in the
day� Now that she has her pump, it is set to deliver more
insulin in the early morning so her BGs aren’t high when
she wakes up, and less insulin later in the day when she
doesn’t need as much�
Helpful hint: Most people need more than one basal rate
to get the best control with their pump� Work with your
healthcare professional to get your basal rates adjusted
correctly when you start on pump therapy�
For example, your healthcare professional has reviewed your BG readings and has determined that this
basal rate works well part of the day, but that you need a lower basal rate, 0�650 U/hr, between the hours
of 08:00 and 18:00�
Your basal pattern would look like this:
1.000
0.500
U/hr
00:00 06:00
00:00 – 08:00
0.900 U/hr 0.900 U/hr
08:00 – 18:00
0.650 U/hr
12:00 18:00
24 Hours
18:00 – 00:00
24:00
Now, let’s make the changes to your basal pattern�
21
Page 24
Section 1 I Getting Started
Let’s Practice: Setting Multiple Basal Rates
1) From the Home screen, select Basal�
2) Press
3) Press
4) Select Basal 1.
5) Select Options.
6) Select Edit.
7) Press on the time segment�
The 0�900 basal rate will now need to end at 08:00 since this is the time
that your basal rate needs to decrease�
8) Press
9) Press
You can see you are automatically asked to enter the end time of the
second basal rate� This basal rate will need to end at 18:00 and will
need to be changed to 0�065�
10) Press
11) Press
12) Press
to Insulin Settings and press �
to Basal Pattern Setup and press �
to 08:00 and press �
again as this basal rate will stay the same�
to change End time�
to 18:00 and press �
to 0�650 and press �
You can now enter the next end time� You will need to enter 24:00 to
complete the full 24 hours�
13) Press
14) Press
15) Press
16) Select Done�
17) Verify that Basal 1 is entered
correctly� Press
18) Select Save�
to change End time�
to 24:00 and press
to 0�900 and press
�
�
to view all basal rates�
scroll bar
22
Page 25
Section 1 I Getting Started
Let’s Practice: Changing Multiple Basal Rates
Now change the 08:00 to 18:00 basal rate to 08:00 to 17:30 and change to 0�700 U/hr�
1) From the Home screen, select Basal�
2) Press to Insulin Settings and press �
3) Press to Basal Pattern Setup and press �
4) Select Basal 1.
5) Select Options.
6) Select Edit.
7) Press to the 08:00 to 18:00 time segment and press �
8) Press to 17:30 and press �
9) Press to 0�700 and press � Notice the start
time of the 3rd time segment changed to 17:30�
u
10) Press
11) Press to 24:00 and press �
12) Press to 0�900 and press �
13) Select Done�
14) Verify that Basal 1 is entered correctly� Press to view all basal rates�
15) Select Save.
to change End time�
23
Page 26
Section 1 I Getting Started
1.9.4 Basal Pattern Setup – Removing Basal Rates
There may be times when you have basal rates entered that need to be removed� This is done by simply
changing the end time of the last basal rate that you need to 24:00�
Let’s Practice: Removing Basal Rates
1) From the Home screen, select Basal�
2) Press to Insulin Settings and press �
3) Press to Basal Pattern Setup and press �
4) Select Basal 1.
5) Select Options.
6) Select Edit.
7) Press on the time segment�
u
8) Press to 24:00 and press �
9) Press � Notice that all other basal rates have
been removed�
10) Select Done�
11) Verify that Basal 1 is entered correctly� Press
to view all basal rates�
12) Select Save.
Note: Creating a new basal pattern will not result in it
automatically becoming the active pattern�
1.9.5 Select Basal Pattern
Once multiple basal patterns are set, you can then select the basal pattern you wish to be active�
1) From Home Screen, select Basal.
2) Select Basal Patterns.
3) Select the Basal Pattern you wish to be active�
4) Select Begin.
24
Page 27

Section 1 I Getting Started
1.10 Bolus Wizard™ Calculator
Calculating how much bolus insulin to give can be challenging� When using the Bolus Wizard™, all you
will need to do is enter your current BG reading along with the amount of carbs you are about to eat�
Once you do this, the Bolus Wizard™ uses the individual settings provided by your health care
professional to estimate your bolus amount� Because these settings are specific to you, you can rely on it
to calculate the precise amount of bolus insulin you need for your food and BG� This can help you better
control your glucose levels (refer to page 69 for details on setting up the Bolus Wizard™)�
1.10.1 Using the Bolus Wizard™ Calculator
Here you can see the Bolus Wizard™ calculation screen and a short description of the steps below:
If you have tested your glucose using your compatible Bayer®
meter, the BG and correction dose will already be showing�
uu
You will first test and enter
your current BG�
You will learn more about using the Bolus Wizard™ at your in-person training� There, your trainer will help
you program your individual settings and have you practice giving boluses using this feature�
Using the Bolus Wizard™....
Larry is so excited that his insulin pump has made his
glucose management easier� Before his pump he had to try
to calculate on his own how much insulin he needed� Now,
his meter sends his BG to his pump, he enters his carbs, and
the pump delivers the bolus�
Helpful hint: After you begin pump therapy, testing your
BG two hours after meals will help you determine if your
Bolus Wizard™ settings are correct� If your BG is too high or
too low, your healthcare professional can help you adjust
your set tings to help you achieve better glucose control�
You will then enter grams of
carbohydrates to be eaten�
The pump displays
estimated amount of insulin
to be delivered�
25
Page 28
Section 1 I Getting Started
Let’s Practice: Food and Correction Bolus
Now you are ready to practice giving a bolus� This example shows giving a bolus for a BG and carbs�
In this example we will use a BG value of 6�9 mmol/L and 35 grams of carb (refer to page 69 for details
on setting up the Bolus Wizard™)�
IMPORTANT: Make sure you are NOT connected to the pump
while you are giving practice boluses�
1) From the Home screen,
select Bolus.
2) Select Bolus Wizard.
3) If using the compatable Bayer® meter, BG will be on screen�
If not, select BG.
4) Press
Active Ins. adjust. is the active insulin from previous
boluses that is being adjusted (subtracted) from the
correction dose.
5) Select Carbs.
6) Press to enter the amount of carbs you are eating
and press �
7) Select Next.
or to enter current BG, and press �
Bolus Wizard now
appears� You can also
give a Manual Bolus
from here�
8) Select Deliver Bolus.
26
The BG value entered
appears on the home
screen and will remain
here for 12 minutes�
Page 29

Section 1 I Getting Started
There may be times you enter either a BG value or carbs� For example, you would enter:
• only grams of carb if you finished your meal, but are eating additional carbs�
• only a BG value if you tested 2 hours after your meal to see if you needed a bolus�
Let’s Practice: Food bolus with no BG
1) From the Home screen, select Bolus.
2) Select Bolus Wizard.
3) Press
to Carbs and press �
4) Press
and press
5) Select Next.
6) Select Deliver Bolus.
to enter the amount of carbs you are eating
�
Note: You will receive messages when you enter a BG below 3�9 mmol/L
or above 13�9 mmol/L� These prompt you to take appropriate steps
to treat as instructed by your healthcare professional� You will see an
example in the next practice exercise�
27
Page 30

Section 1 I Getting Started
Let’s Practice: Correction Bolus With No Food
This example shows giving a bolus for a BG value of 14�7 mmol/L�
1) From the Home screen, select Bolus.
2) Select Bolus Wizard.
3) If using the compatable Bayer meter, BG will be on screen�
If not, select BG.
4) Press or to enter current BG, and press �
5) Press
6) The High BG message will appear� Read text and press
7) Continue reading text and take appropriate action to
prevent DKA�
8) Select OK.
For more information on addressing Alerts, see page 15.
9) Select Deliver Bolus.
to Next and press �
�
28
Note: You can learn how to give the other types
of boluses in the Additional Features
section�
Page 31

Section 1 I Getting Started
Stopping a Bolus....
Karen gives a bolus for lunch, but before she can begin eating, the
phone rings� It’s her cousin calling long distance so Karen knows
this phone call will take a while� She decides to wait to eat until
after the call� She stops the delivery of the bolus so that she does
not receive the insulin that is no longer needed right now�
Helpful hint: Always check the Bolus Stopped screen to see how
much of the bolus was delivered before it was stopped, so you
know how much insulin you received�
Let’s Practice: Stopping a Bolus
Give a manual bolus of 1�5 units and stop the bolus once it has started to deliver�
1) With Bolus highlighted, press �
2) Press to 1�5 U and press �
3) Select Deliver Bolus.
4) Select Stop Bolus.
5) Press and select Yes to stop bolus delivery�
6) Review Bolus Stopped screen to see how much of the bolus was delivered�
7) Select Done.
29
Page 32

Section 1 I Getting Started
1.10.2 Checking Last Bolus
There may be times when you need to see the time or amount of the last bolus that was given� For
example, you may not remember if you took a bolus at lunch and want to check to make sure� You can
see the last bolus delivered in the Quick Status screen�
Let’s Practice: Checking Last Bolus
1) From the Home screen, press
Bar and press �
2) Press to Quick Status and press �
The (N) behind the Last bolus amount means the bolus was delivered
as a normal bolus. There are additional ways to give a bolus which you
will learn about later in this guide.
to the Status
Checking Bolus History
You may also want to review the last several boluses that were delivered� For example, a parent might
want to view the boluses their child gave throughout the day� You can see the last several boluses
delivered in Daily History�
Let’s Practice: Checking Bolus History
You can see the last several boluses you delivered in Daily History�
1) Press �
2) Press to History and press �
3) Press to Daily History and press �
4) Press on the day you would like to review�
Did You Know? You can use the and arrows to move from day to day�
You can also see further details by pressing on any item listed�
30
Page 33

Section 1 I Getting Started
1.11 Suspend Delivery
Remember your pump is delivering basal insulin throughout every hour of the day� Although you should
never stop this insulin delivery for more than an hour or so, there will be times when you will want to
manually suspend, or stop delivery, and disconnect from your pump�
This is done using the Suspend Delivery feature� Using Suspend Delivery stops all insulin delivery�
The most common reasons to manually suspend delivery might include bathing and water activities�
Infusion sets are designed so you can easily disconnect from your pump and leave it in a safe place�
Let’s Practice: Placing the Pump in Manual Suspend
1) Press �
2) Select Suspend Delivery.
3) Press
A confirmation screen appears�
Notice that the Home screen has changed�
and select Yes to suspend insulin delivery�
31
Page 34

Section 1 I Getting Started
Let’s Practice: Resume Basal Insulin Delivery
1) Select Resume.
2) Press and select Yes to resume insulin delivery�
A confirmation screen appears�
The original Home screen returns�
Remember: When delivery is resumed, basal insulin will begin
to deliver again� The pump will not deliver any of the basal
insulin you missed while the pump was suspended.
If you manually suspend delivery while a bolus is delivering,
the bolus delivery will stop� When you resume delivery,
the remainder of the bolus will not be delivered.
32
Page 35

Section 1 I Getting Started
1.12 Charging the Contour® next LINK 2.4 Meter
This Contour® next LINK 2.4 meter from Bayer is the only blood glucose (BG) meter able to communicate
wirelessly with your MiniMed® 640G insulin pump� This can make your diabetes management easier by
automatically sending your BG meter readings over to the pump� This is especially helpful when using
the Bolus Wizard™ and the Event Marker options�
Review the parts of your meter here:
Menu and Power Button USB Connector
Test Strip Port*
and Port Light
10:24 l 11.10
5.2
mmol
L
Before Meal
Display Screen
Bolus
Reminder
Notes
Protective USB Cap
Selection/Scrolling Buttons
Contour® next LINK 2.4 Meter
Your meter has a permanent rechargeable battery� It is important that the meter be charged prior to
your in-person training. To charge your meter:
1) Remove the cap with
2) Plug the USB connector into a computer�
The computer must be ON and not in
sleep, hibernate or power save mode.
3) The meter will briefly display Do Not Test-charging and the test strip port light will flash�
You cannot do a blood glucose test while the battery is charging�
on it to reveal the USB connector�
4) When charging is complete, the test strip port light will turn off� You can then unplug your meter�
You will connect your pump and meter at your in-person training� Steps to do this can be found in the
Training Handouts section on page 66� For more information on using your meter, see the User Guide
found in the meter box�
* The Contour® next LINK 2.4 meter only works with Contour® next glucose testing strips�
33
Page 36

Section 2 I Medtronic CareLink® Personal Software
2.1 Introduction to Medtronic CareLink® Personal Software
Medtronic CareLink® Personal software is a web-based program that is provided free of charge� This
software allows you to upload the data from your pump and glucose meter to a secure website and
organise it into easy-to-read reports and charts� These reports provide an overview of how insulin, food
intake and exercise affect you glucose control�
Reviewing the data on these reports, allows you and your healthcare professional to identify glucose
patterns and trends so you can determine if any pump settings need to be adjusted�
You will need to set up your Medtronic CareLink® Personal account so you can upload your pump
and meter every 2 to 3 days after you start using your pump� With your permission, your healthcare
professional can then access your information and have you adjust your pump settings as needed�
Using Medtronic CareLink® software....
Julia uploads her pump and meter information to Medtronic
CareLink® Personal before each visit with her doctor� She has
given him access to her reports so he can review them, saving
a great deal of time during her office visit� Her doctor has the
information he needs to make adjustments to her pump settings�
Follow these steps to set up your Medtronic CareLink® Personal account prior to your in-person training:
1� Go to http://carelink.minimed.eu
2� Click the Sign Up Now button�
3� Choose your country and language�
4� Read and Accept the Terms of Use and Privacy Statement�
5� Create a Username and Password and enter all required information�
6� Click the Submit button�
When uploading information from your pump to Medtronic CareLink® Personal, you will use the Bayer®
meter as the communication device from the pump to your computer�
USB connector used for Medtronic CareLink® upload
10:24 l 11.10
5.2
Before Meal
mmol
L
Bolus
Reminder
Notes
Contour® next LINK 2.4 Meter
You will learn more about using Medtronic CareLink® software at your in-person training�
34
Page 37

Section 3 I
Connecting the MiniMed® 640G Insulin Pump &
Contour® next LINK 2�4 Meter
the
1� Hold Menu the button
until meter turns on�
2� Scroll to your language
and press OK
� Press OK
to confirm�
3� Press OK when asked
Connect to a
LANGUAGE
English
Deutsch
Español
CONNECT TO PUMP
Connect to a
MiniMed® Pump?
MiniMed® Pump?
4� Press OK�
5� Press Auto Connect�
CONNECT TO PUMP
Select "Connect
Device" on your Pump.
CONNECT TO PUMP
Manual Connect
Auto Connect
Put the meter down and pick up your pump.
6� Press
�
7� Select Utilites�
8� Select Device Options�
9� Select Connect Device�
10� Select Auto Connect
on your pump�
Skip
Go Back
15� Check to see that the
Device SN (serial
number) on the pump
screen matches the
OK
OK
Device SN on the meter�
16� If they match, select
Confirm on the pump�
CONNECT TO PUMP
Use Pump to confirm Device
SN:
BGJ133333F
17� Check to see that the
OK
SN on the back of the
pump matches the SN
now on the meter
screen�
18� Select Next on the
meter�
19� Select Always�*
20� Then select OK�
21� Select Date Format�
22� Select OK�
If time and date are not
correct, you must change
PUMP CONNECTED
MiniMed® Pump
connected:
AA1234567B
SEND OPTIONS
Automatically send
results to the Pump?
DATE FORMAT
Select
DATE/TIME
Date / Time is set
by Pump.
10:30 | 13.10.11
Month/Day/Year
Day.Month.Year
Next
Delete
Always
Ask me
Never
OK
them on the pump.
11� Press �
12� Select Continue�
Place the meter and pump next to each other.
13� Select Search on your
pump�
14� Select Search on your
meter�
CONNECT TO PUMP
Select “Search” on
Your Pump and meter.
Search
Cancel
23� Press Accept to select
AutoLog is Off.
AutoLog allows you to mark
AUTOLOG
AutoLog is Off.
Accept
Turn On
a test result as Before Meal,
After Meal, or Fasting.*
24� Accept or Change High
and Low Alerts�*
25� Accept or Change the
Target Range�* Press
Accept again to confirm�
26� Setup is now complete
and you are ready to
HIGH AND LOW ALERTS
mmol/L
High: 13.9
mmol/L
Low: 3.9
TARGET
3.9 - 10.0
Setup is complete.
Insert strip to start a
test.
Accept
Change
Accept
Change
use meter�
*For more detail on this feature see your meter guide.
The search may take up to 2 minutes.
35
Page 38

Getting Started
Section 4 I
Using the Con to ur® ne x t LINK 2�4 Meter
4.1 Giving a Remote Bolus
Once your pump and meter are connected, you have the option of delivering a manual bolus through
the meter without accessing the pump�
1) Press
2) Selec t Utilities.
3) Selec t Remote Bolus.
4) Selec t On.
You can now follow these steps to deliver a bolus:
1) If you have just tested, press Bolus on the meter while the
test result is displayed
OR
10:30 | 13.10
9.3
Sent, Before...
mmol
L
Reminder
Notes
Bolus
From the menu, press Bolus.
2) Press Manual Bolus.
If you have a Preset Bolus set in your pump, it can be also be
delivered from the meter.*
3) Use the button to set the bolus amount�
In this example, a 0.250 U bolus has been set.
4) Press Yes to send the bolus to your pump�
5) A confirmation screen appears on the meter�
MENU
Bolus
Logbook
Trends
BOLUS
Manual Bolus
Preset Bolus
MANUAL BOLUS
SET BOLUS AMOUNT
0.250 U
MANUAL BOLUS
Deliver Bolus?
0.250 U
Manual Bolus was sent.
0.250 U
OK
OK
Yes
No
OK
6) The bolus delivery appears on the pump as it is delivering�
* For more detail on this feature see your meter guide.
Visit www.medtronic-diabetes.com.au for more support using CareLink®.
36
Page 39

Section 5 I Changing the Reservoir and Infusion Set
5.1 Reservoir & Tubing
The MiniMed® 640G uses the same infusion sets and reservoirs as previous Medtronic Paradigm™ insulin
pumps� If you were using a Medtronic pump, much of this process will be the same� However, please
follow these steps
If you have not used a Medtronic pump or would like more detail, please use the Quick Reference Guide
to changing your infusion set or see pages 71-82
X
Changing Reservoir and Infusion Set
as there are a few very important changes�
if using the Sure-T® or mio® infusion sets�
IMPORTANT: Remember to always remove current reservoir and
infusion set before rewinding the pump�
1) Press �
2) Select Reservoir & Tubing.
3) Select New Reservoir.
4) Remove the used infusion set from your body�
5) Remove the empty reservoir from the pump�
6) Select Rewind.
You will see this screen while the pump is rewinding� The pump will beep
and/or vibrate when rewind is complete�
37
Page 40

Section 5 I Changing the Reservoir and Infusion Set
Complete these steps just like you have done in the past�
1) Fill the reservoir with insulin�
2) Connect the infusion set tubing to the reservoir�
3) Press Next�
4) Place the newly filled reservoir into the pump and lock�
5) Select Next�
IMPORTANT: Pay close attention to these next steps�
First, you will Load Reservoir. This moves the piston to the bottom of the
reservoir:
6) Select Load and keep holding
checkmark
7) Select Next.
Then you will Fill Tubing.
8) Select Fill and keep holding
end of the tubing�
appears�
This moves insulin through the end of the tubing�
until the
until you see drops at the
38
Page 41

Section 5 I Changing the Reservoir and Infusion Set
9) Press and select Next.
To finish, insert infusion set and fill the cannula:
10) Prepare and insert the infusion set into the body�
Remember: Always rotate your site when you change
your infusion set�
11) You will now fill the cannula�
12) Select Fill.
If you use a steel needle set (for example, the Medtronic Sure-T®
infusion set), select Done. Otherwise, proceed to step 11.
13) Select Fill Amount.
14) Press
If you don’t know how many units to use, see the User Guide in
the infusion set box.
15) Select Fill Now.
The Home screen will show the cannula fill� If for any reason you need to
stop filling, for example, you realised you used the wrong amount, select
Stop Fill.
Your infusion set change is now complete.
to correct units and press
�
The pump will remember
the Fill amount you enter�
39
Page 42

Section 6 I Additional Features
Additional Features
You have now learned the features that are necessary to use your pump� There are, however,
additional features that you may already use on your current pump and others that are new that you
might find helpful�
This section will discuss the additional menu options and features that are available on your new
insulin pump�
6.1 History
The History option allows you review information from previous days� This section will look more
closely at what items can be found here�
To access History:
1) Press �
2) Press to History and press �
When you select the Menu item, you will see the following items� By selecting each item,
you will see the following information:
6.1.1 Summary
• Shows the Total Daily Dose of insulin delivered
• Provides a summary of the total Basal insulin delivered, total Boluses given, total carbs,
descriptions of boluses given and BGs recorded
• You can look at one day or an average of 7, 14, or 30 days
6.1.2 Daily History
• List of actions you performed or event entries that you made, for example, BG readings,
bolus deliveries, temp basals, etc�
• You can scroll left and right to move to previous or next day
6.1.3 Alarm History
• Lists Alarms and Alerts that occurred during each day
• You can scroll left and right to move to previous or next day
40
Page 43

Section 6 I Additional Features
6.2 Manual Bolus
When giving a manual bolus, you simply enter the amount of bolus
insulin that you think you need for the carbohyrates you are eating,
or to lower your BG if it is high�
1) From the Home screen, select Bolus�
2) Press to 1�0 u and press �
3) Select Deliver Bolus.
4) Confirmation that Bolus has started will appear�
The Home screen will show the amount as it is being delivered�
Notice that Stop Bolus also now appears�
Once the bolus has finished
delivering, the pump will return
to the normal Home screen�
Notice that you can
view your Active
Insulin amount from
the Home screen�
6.3 Insulin Settings
Insulin Settings menu contains features and settings that affect or change your pump’s delivery of
insulin� We previously went to Insulin Settings to access Bolus Wizard Setup and Basal Pattern
Setup (Refer to page 67-69 for details)� We will now look at the additional items found in this menu�
IMPORTANT: You should practice using the following features BEFORE you start using
insulin in your new pump� If you are already using the pump, DO NOT deliver any
boluses or change insulin delivery until necessary to do so� ALWAYS disconnect your
pump while you practice using these new features�
41
Page 44

Section 6 I Additional Features
6.3.1 Max Basal
Before you continue, you may need to change your Max Basal amount� Max Basal is the maximum
amount of basal insulin that can be delivered in one hour� Check your current pump settings� If your
Max Basal is an amount other than 2�0 u/hr, follow these steps to change:
1) Press �
2) Select Insulin Settings�
3) Select Max Basal/Bolus�
4) Select Max Basal�
IMPORTANT:
Changes to your Max Basal or Max Bolus should only be made in consultation
with your healthcare professional�
42
Page 45

Section 6 I Additional Features
6.3.2 Adding New or Copying Basal Patterns
You may be using additional basal patterns� These are basal patterns set to account for days that
require different basal amounts� For example, a pattern might be used for weekends because a person
is less active than they are during the week� When setting an additional pattern, you can simply enter
the basal rates into a new pattern, or you can copy and then make edits to a basal pattern that is
already set� To enter another basal pattern, follow these steps:
1) From the Home screen, select Basal.
2) Press to Insulin Settings and press �
3) Press to Basal Pattern Setup and press �
Choose one of these two options:
Add a New Basal Pattern
4) Press and select Add New
5) Select a name
6) Enter times and basal rates for the additional pattern�
OR
Copy and Edit an Existing Basal Pattern
4) Select Basal 1 or another currently programmed Basal Pattern�
5) Select Options.
6) Press to Copy. This copies the basal pattern that you have programmed and allows
you to make the necessary changes�
7) Select name for this Basal Pattern�
8) Press to Edit.
9) Continue by making the necessary changes to the programmed basal rates� To change
active basal pattern, see Basal Patterns on page 18�
Additional Options from Basal on Home Screen
You have selected Basal on the Home screen to access Insulin Settings and setup your basal
patterns� Let’s take a look at the other options found here�
43
Page 46

Section 6 I Additional Features
6.3.3 Temp Basal
This feature lets you immediately increase or decrease your basal insulin for the period of time (duration)
that you set� It is often used for exercise and sick days� A Temp Basal can be set in either:
• Percent: delivers a percent of the current basal rate
• Rate: delivers the amount that you enter
A temp basal can be set to deliver more or less than your current basal rate� It can be set in any 30 minute
increment for up to 24 hours�
Let’s Practice: Setting a Temp Basal
This example will show setting a Temp Basal to deliver 60% of the current basal rate for the next 2 hours�
1) From the Home screen, select Basal�
2) Select Temp Basal�
3) Press to set duration and press �
4) Select Next�
5) Select Percent.
6) Press or to enter the percent of current basal rate
desired�
NOTE: If you choose to use Rate, press to Type and press .
You can then enter the U/hr you want delivered.
7) Select Begin.
The Home screen now reads Basal (T) to indicate that you have a
Temp Basal active�
Select Basal (T) to review the details of the active Temp Basal�
When the Temp Basal delivery is complete, the basal will automatically return to the regularly
programmed basal rate�
44
Page 47

Using a Temp Basal...
Patricia loves to work in her garden� She often finds,
however, that her glucose levels run lower when she
does� Now she uses a temp basal rate to decrease the
amount of insulin she gets while she is working� This
helps keep her glucose levels from dropping too low�
Let’s Practice: Canceling a Temp Basal
Section 6 I Additional Features
If you need to return to your regularly programmed basal rate before your Temp Basal is completed,
you can cancel it�
1) From the Home screen, select Basal (T)�
2) You can see the details about the Temp Basal�
Select Cancel Temp Basal�
If you decide not to cancel, just press .
You can see that the Home screen has now returned to Basal�
45
Page 48

Section 6 I Additional Features
6.4 Preset Insulin Settings
Using a Preset Temp Basal...
Janya uses the same Temp Basal every time she takes her favorite
exercise class� Now instead of programming the Temp Basal
before every class, she can simply start the Preset Temp that she
has programmed�
6.4.1 Preset Temp Setup
Like a Temp Basal, a Preset Temp Basal is used to increase or decrease your current basal insulin
amount� When the same Temp Basal is required on a frequent basis, you can set a Preset Temp Basal
for that amount and duration� The Preset Temp Basal can then simply be started when the basal rate
change is needed�
X
Setting a Preset Temp Basal
1) Press �
2) Select Insulin Settings.
3) Select Preset Temp Setup.
4) Select Add New.
5) Press to the desired name and press �
In this example, we will use High Activity.
6) Press and select Percent to set percent of
current basal rate you wish to receive�
Select Type to change to Rate if you prefer to set the
number of units to be delivered.
7) Select Duration and press to the length of time
you wish the Temp Basal to be active�
8) Select Save.
46
Page 49

X
Starting a Preset Temp Basal
When you are ready to use your Preset Temp Basal:
Section 6 I Additional Features
1) From the Home screen, select Basal�
2) Select Preset Temp.
3) Select the Preset Temp you wish to start�
4) Select Begin.
The Home screen will again show Basal (T)�
Preset Temp now
appears on the
Basal screen�
6.4.2 Preset Bolus
A Preset Bolus can be set and used for bolus amounts that you give repeatedly� For example:
• you might use for your meal boluses if you give set insulin doses�
• you might set this for commonly eaten items that you know the carb content and how much
insulin you need�
Using Preset Bolus...
Ana uses the Bolus Wizard to give her boluses� But she knows that
every morning, it calculates 1�7 u for her latte� She set up a Preset
Bolus for 1�7 u and finds it easier to give her bolus this way�
47
Page 50

Section 6 I Additional Features
X
Setting a Preset Bolus
1) Press �
2) Select Insulin Settings.
3) Select Preset Bolus.
4) Select Add New.
5) Press to the desired name and press �
In this example, we will use Snack.
6) Select Bolus.
7) Press to enter the desired units and press �
8) Select Type if you want to set as Square or Dual Wave�
A Preset Bolus can also be set to deliver as a Square or Dual
Wave bolus.
X
Giving a Preset Bolus
When you are ready to use your Preset Bolus:
1) From the Home screen, select Bolus�
2) Select Preset Bolus.
3) Select the Preset Bolus you
wish to start�
4) Select Deliver Bolus.
Preset Bolus now
appears on the
Bolus screen�
48
Page 51

Section 6 I Additional Features
6.5 Max Bolus
Before you continue, you may need to change your Max Bolus amount� Max Bolus is the maximum
amount that can be given by any one bolus� Check your current pump settings� If your Max Bolus is
an amount other than 10�0 U, follow these steps to change:
1) Press �
2) Select Insulin Settings�
3) Select Max Basal/Bolus�
4) Select Max Bolus�
5) A screen will appear to ensure you are entering a value
that has been determined by you and your healthcare
professional� If this change has been recommended by
your healthcare professional, press and select Continue�
6) Select Max Bolus�
7) Press or to enter number of units and press �
8) Select Save�
IMPORTANT:
Changes to your Max Basal or Max Bolus should only be made in consultation
with your healthcare professional�
49
Page 52

Section 6 I Additional Features
6.6 Advanced Bolus
The practice boluses that were given earlier were delivered as
Normal boluses; that is, as a single immediate dose of insulin�
This is the type of bolus you would typically use to cover
normal food intake and to correct a high BG�
The pump also lets you deliver bolus insulin as a Dual Wave or
Square Wave bolus� These can help better match the effects
food has on your glucose levels�
X
Turning Dual and Square Wave Bolus On
To use either of these bolus options, it must first be turned on�
1) Press �
2) Select Insulin Settings.
3) Select Dual/Square Wave.
4) Select Dual Wave to turn On if desired�
5) Select Square Wave to turn On if desired�
6) Select Save.
6.6.1 Square Wave
A Square Wave bolus delivers a bolus over an extended period
of time� This can be helpful:
• to match delayed food digestion due to
gastroparesis�
• for meals very low in carbohydrate but high in fat�
• when snacking on small amounts of carb
over period of time, for example, at a reception�
When setting a Square Wave bolus, you will need to determine the duration that you want the bolus to
deliver (30 minutes to 8 hours in 30 minute increments)� This will vary depending on you individually, as
well as the situation for which the Square Wave bolus is being used� Frequent glucose testing should be
done until you and your healthcare professional have determined the best use for you�
You will be unable to deliver a Square bolus if the Bolus Wizard has estimated a bolus for a high BG, since that
insulin is needed right away.
50
Page 53

Section 6 I Additional Features
Using a Square Wave Bolus...
Sarah eats at her desk at work and it takes her a while to finish
because she often gets distracted� She delivers her lunch bolus as a
Square Wave over 45 minutes to help make sure her insulin doesn’t
start to work before her carbs are digested�
X
Giving a Square Wave Bolus
This example will show a Square Wave bolus using the Bolus Wizard with a BG value of 5�7 mmol/L
and 41 grams of carb�
1) From the Home screen, select Bolus�
2) Select Bolus Wizard.
3) Enter BG and Carbs�
4) Select Next.
5) Press and to Square and press �
6) Select Duration.
7) Press to desired time and press �
8) Select Deliver Bolus.
51
Page 54

Section 6 I Additional Features
Bolus (S) will appear on
the Home screen until
bolus delivery is complete�
Select Bolus (S) and:
• review bolus status, then press
• select Stop Bolus to stop delivery�
• select Bolus Menu to deliver a normal bolus while the
square is delivering�
to return to Home screen�
6.6.2 Dual Wave
A Dual Wave bolus combines the Normal and the Square Wave bolus� It delivers part of the bolus as a
Normal Bolus (Now) and part as a Square (over time)�
A Dual Wave bolus can be helpful for meals high in both carbs and fat� Fat delays the digestion of carbs,
meaning glucose doesn’t enter bloodstream right away� Giving some insulin as a normal bolus covers any
immediate glucose rise� Giving the rest over time as a square helps to match the delayed glucose rise�
When setting a Dual Wave bolus, you will need to determine:
• the percentage / amount of insulin you want
delivered immediately and how much over time�
• the duration of time over which you want the square
portion delivered�
This will vary depending on you individually, as well as the
types of foods that are in the meal for which the Dual Wave
bolus is being used� Frequent glucose testing should be done
until you and your healthcare professional have determined
the best use for you�
52
Page 55

Section 6 I Additional Features
Giving a Dual Wave Bolus
X
This example will show a Dual Wave bolus using the Bolus Wizard with a BG value of 7�3 mmol/L
(131 mg/dL) and 63 grams of carb�
1) From the Home screen, select Bolus�
2) Select Bolus Wizard.
3) Enter BG and Carbs� Notice in this example, the total bolus
for BG is 0�6U and 4�2U for carbs�
4) Select Next.
5) Press
6) Select and press or to change the amount of the
bolus that is delivered Now and the amount delivered as
Square if needed�
7) Select Duration.
8) Press to desired time and press �
9) Select Deliver Bolus.
to Dual and press �
Square is not an option since a
correction bolus was estimated so
some insulin is needed now�
Bolus for carbs
is divided 50%
Now/50% Square�
Bolus for BG is
added to Now�
Bolus (Dual) will appear on
the Home screen while the
Now portion is delivering�
Bolus (D) will appear on the
Home screen until the
Square delivery is complete�
53
Page 56
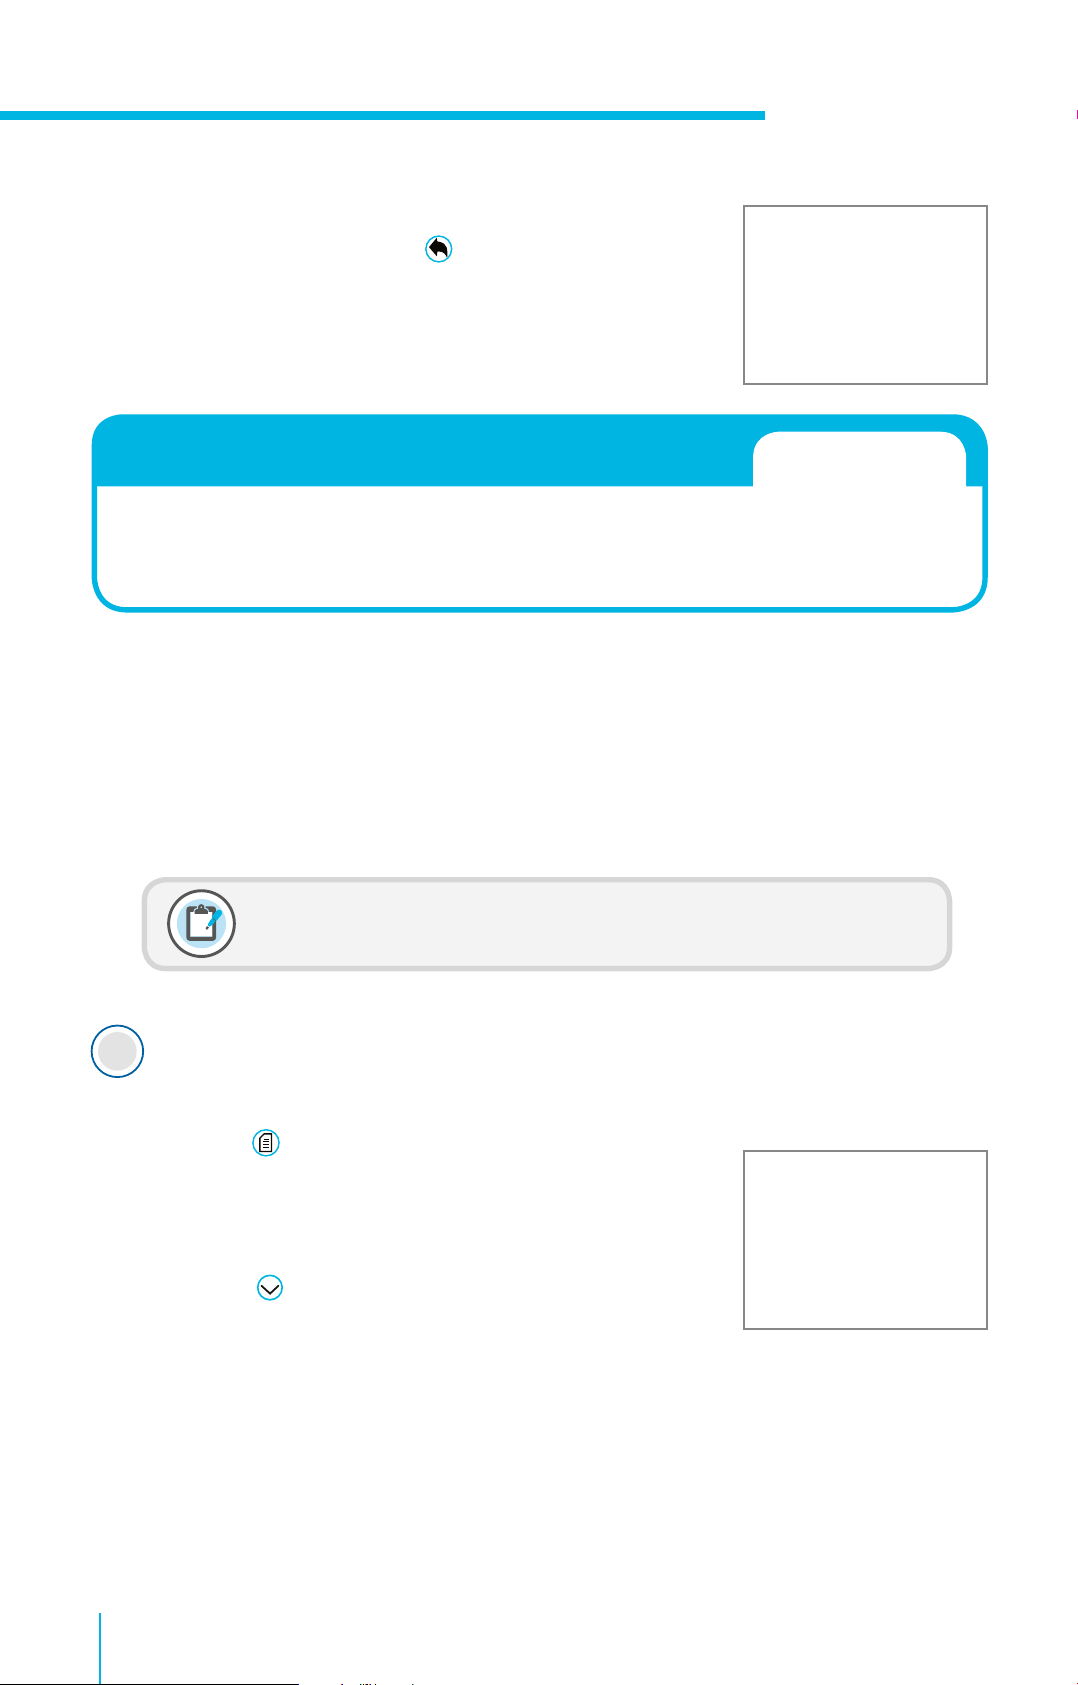
Section 6 I Additional Features
Select Bolus (D) and:
• review bolus status, then press
• select Stop Bolus to stop delivery�
• select Bolus Menu to deliver normal bolus while the
square is delivering�
to return to Home screen�
Using a Dual Wave Bolus...
When William ate pizza, his glucose level would be good for a while,
but then 3 or 4 hours later it would be high� Now he uses a Dual Wave
bolus to help reduce these post-meal highs�
6.6.3 Bolus Increment
The Bolus Increment determines the number of decimal places a bolus will be set or calculated� You will
notice the bolus increment:
• in the amount that a bolus is increased or decreased with each button press when setting
a Manual or Preset Bolus (this does not apply to Easy Bolus)�
• on the Bolus Wizard details screen in the number of decimal points used to calculate the bolus�
Note: Changing this setting may be most helpful if you give small boluses�
X
Setting the Bolus Increment
If you need to use a Bolus Increment other than 0�1 U, follow these steps to change:
1) Press �
2) Select Insulin Settings.
3) Select Bolus Increment.
4) Select Increment.
5) Press to change Increment.
Increment can be set to 0.1 U, 0.05 U, or 0.025 U
6) Select Save.
54
Page 57

6.7 Easy Bolus
Section 6 I Additional Features
The Easy Bolus allows you to give a bolus using the button on your pump� You determine the bolus
amount by the number of times you press
This feature may be beneficial if you:
• are giving manual boluses for meals�
• want to be discreet when bolusing�
• want to confirm a bolus amount using beep or vibrate�
Before using the Easy Bolus, you must turn the feature On and select the increment� The increment is the
amount that each press of the button represents� It will be important that you remember what this
increment is - it will determine how much bolus you are giving� For example, if the increment is set at
0�5u, and you need a 3�0 unit bolus, you will need to press 6 times to get to 3�0 units�
�
Using the Easy Bolus...
Marten prefers to use the Easy Bolus when he is in a meeting and
having a snack� This allows him to be more discreet�
X
Setting up the Easy Bolus
1) Press �
2) Select Insulin Settings.
3) Select Easy Bolus.
4) Select Easy Bolus to turn On.
5) Press to Step Size and press �
6) Press to change increment to desired units�
This example shows the Step Size at 1.0 U. Each press of the
button will represent 1.0 U
7) Select Save.
55
Page 58

Section 6 I Additional Features
X
Giving an Easy Bolus
1) With the pump in Sleep mode, hold for about 1 second�
Your pump sounds a tone or vibrates and the Easy Bolus
screen appears.
Note: If the pump does not sound a tone or vibrate, you may not be in Sleep
mode� Hold the menu key for about 2 seconds and then hold again�
2) Press the number of times needed to set your bolus
based on the increment that you chose�
Your pump sounds a tone or vibrates for each button press.
In this example using an increment of 1.0 U,
pressed 3 times.
was
3) When your desired bolus amount is set, press and hold
for about 1 second to confirm the amount�
The pump repeats a tone or vibrate for each increment.
Count to ensure the amount is correct.
4) Is the amount correct?
Yes: hold for about 1 second to deliver the bolus�
No: press to cancel and return to Step 1 to start again�
IMPORTANT: Pressing during any part of this process, cancels the Easy
Bolus� You will hear three tones signifying a bolus has not been given�
56
Page 59

Section 6 I Additional Features
6.8 Auto Suspend
Auto Suspend is a safety feature that sounds an alarm and stops all insulin delivery if you do not
press any buttons for the number of hours that you set� It is meant for situations when you are not
responding to hypoglycaemia�
Auto Suspend is most useful if you live or travel alone� It is important to use if you have difficulty
responding appropriately to lows, have hypoglycaemia unawareness, if you are susceptible to lows due
to alcohol intake, or have a history or fear of lows at night�
Auto Suspend should be set based on your schedule� Let’s say you typically go to bed about 23:00�
At about 22:00 each evening you do a BG check and check your pump (buttons would be pressed)�
You usually get up at 07:00 and eat breakfast around 08:00 What happens if:
• Auto Suspend is set for 8 hours: Alarm would go off at 06:00 if no buttons had been pressed�
Since you don’t get up until 07:00, this could be a nuisance�
• Auto Suspend is set for 12 hours: Alarm would go off at 10:00 if no buttons had been
pressed� You should have been up by now and given a bolus� If in a dangerous situation,
receiving this alarm and stopping insulin could be very helpful�
• Auto Suspend is set for 18 hours: Alarm would go off at 16:00 if no buttons have been
pressed� You should have been up and given bolus several hours ago� If in a dangerous
situation, you may want to be alarmed and have delivery stopped sooner�
Choose the number of hours that seems right for you�
X
Setting Auto Suspend
1) Press �
2) Select Insulin Settings.
3) Select Auto Suspend.
4) Select Alarm to turn On.
5) Press to Time and press �
6) Use or to change number of hours�
This example shows Auto Suspend set at 12 hours.
7) Select Save.
Using Auto Suspend...
Thomas is a runner and finds the days he runs, he is more prone
to hypoglycaemia at night� He often sets a temp basal, but
when using Auto Suspend, he sleeps even more confidently
because he knows his pump will stop delivering insulin and
alarm if he isn’t waking up when he should�
57
Page 60

Section 6 I Additional Features
6.9 Bolus Speed
The Bolus Speed determines how long it takes to deliver a Normal bolus� The Standard rate delivers at
1�5 units per minute, the Quick rate delivers 15 units per minute�
This setting is really a personal preference� You might consider changing to the quick rate if you regularly
take larger boluses�
X
Setting the Bolus Speed
1) Press �
2) Select Insulin Settings.
3) Select Bolus Speed.
4) Select speed that you want to be active�
5) Press to Save and press �
Notice the active
bolus speed is
checked�
Setting Bolus Speed...
Antonio often gives boluses of 20 or 25 units� He has his Bolus Speed
set on Quick so it doesn’t take as long for his bolus to be delivered�
58
Page 61

Section 6 I Additional Features
6.10 Event Markers
Event Markers let you record when certain events related to your diabetes control occur�
You can use Event Markers to record:
• BG: a BG value when not using the Bolus Wizard™
• Injection: the amount of insulin taken by injection
• Carbs: the amount of carbs eaten when not using the Bolus Wizard™
• Exercise: the length of time you exercised so you can better see the effect it had on your
glucose readings
• Other: for example a hypoglycaemic event or other diabetes medications taken
X
Marking an Event
1) Press �
2) Select Event Markers.
3) Select the desired event�
4) Select the additional information requested�
5) Press to the correct amount and press �
6) Select Save.
Using Event Markers...
Kylie exercises regularly� She likes to be able to see how it affects her
glucose levels� She enters an exercise event marker when she begins
exercise� These markers then appear on her Medtronic CareLink®
reports helping her and her healthcare professional better understand
if she needs to make different insulin adjustments during this time�
59
Page 62

Section 6 I Additional Features
6.11 Reminders
Reminders can be set to alert you of important information or to do
routine activities� There are several reminders that can be set as shown
in the Reminders menu seen here�
6.11.1 Personal Reminder
Similar to an alarm clock, you can set the pump to beep or vibrate (depending on your Audio Settings)
at any time that you choose� It could be set to remind you to do a BG Check, to take Medication, or any
other reason you desire�
X
Setting a Personal Reminder
1) Press �
2) Select Reminders.
3) Select Personal.
4) Select Add New.
5) Select the desired name�
6) Select Time.
7) Use and arrows to desired time and press �
8) Select Save.
6.11. 2 Bolus BG Check Reminder
Turning Bolus BG Check on, gives you the option to set a reminder when you give a bolus� This can be
helpful to remember to test, for example, 2 hours after your meal, or 1 hour after a correction bolus�
X
Turning Bolus BG Check On
1) Press �
2) Select Reminders.
3) Select Bolus BG Check.
4) Select Reminder to turn On.
5) Press and select Save.
60
Page 63

Section 6 I Additional Features
Now you are able to set a reminder each time you deliver a bolus� The BG Check screen will display on
your pump after the bolus is delivered, asking you when you want to be reminded�
Setting a Bolus BG Check Reminder
X
1) Press to desired time and press �
2) Select OK.
If you don’t want to receive a reminder after the bolus,
1) Press (on the dashes)�
2) Select OK.
Using Bolus BG Check...
When Andrea first started using her pump, she set a Bolus BG Check
reminder for 2 hours after each meal bolus� She and her healthcare
professional then made adjustments to her Carb Ratio and now she
feels confident she is getting the correct amount of insulin for the
food she eats�
6.11. 3 Missed Meal Bolus Reminder
The Missed Meal Bolus reminder will alert you if you do not give a bolus during your normal meal/snack
times� For example, you typically eat lunch at noon, but you are often busy at work and forget to bolus�
You could set this reminder for 11:00 – 13:00� If you give a bolus between this time, no alert will sound�
However, if you don’t give a bolus during this time, you would be notified� If you did eat and forgot to
bolus, you could then test your BG and give a correction bolus if necessary�
Setting a Missed Meal Bolus Reminder
X
1) Press �
2) Select Reminders.
3) Select Missed Meal Bolus.
4) Select Add New.
5) Select Start Time.
6) Enter time and press �
7) Select End Time.
8) Enter time and press �
9) Select Save.
61
Page 64

Section 6 I Additional Features
6.11.4 Low Reservoir Reminder
The Low Reservoir reminder notifies you when the number of units left in your reservoir reaches the
amount you set here� The default setting for this reminder is 20 units, meaning you will get a Low
reservoir alert when you have 20 units remaining in your reservoir, and again when half of that amount
(10 units) is left� You can set the number of units according to your individual needs�
Using Low Reservoir Reminder...
Gorge’s meal boluses are usually between 15 and 20 units� He
increased his Low Reservoir reminder amount to 40 units� If he
receives his reminder after he leaves for work, he knows he still has
enough insulin for his lunch, a snack, and his basal needs�
Setting a Low Reservoir Reminder
X
1) Press �
2) Select Reminders.
3) Select Low reservoir.
4) Press to Units and press �
5) Press or to desired units and press �
6) Select Save.
Note: Low Reservoir Warning can be set in either Units or Time� We
generally recommend choosing Units� Time left is only based on basal
insulin per hour� If a bolus is given, the amount of time left can decrease
more quickly than anticipated�
62
Page 65

Section 6 I Additional Features
6.11. 5 Set Change Reminder
The Set Change reminder will remind you when your infusion set is due to be changed� You can set it for
either 2 or 3 days� When turned on, you will receive a message when either 48 hours (2 days) or 72 hours
(3 days) have passed since your last change�
Setting a Set Change Reminder
X
1) Press �
2) Select Reminders.
3) Select Set Change.
4) Select Reminders to turn On.
5) Press to Time and press �
6) Change days if desired and press �
7) Select Save.
6.11. 6 Turning Reminders O
Any reminder that is set can be changed, turned off, or deleted at any time� This is done by simply going
back into the reminder and selecting the desired option�
63
Page 66

Section 6 I Additional Features
6.12 Utilities
The remaining features that have not yet been discussed and are found in the Utilities menu�
To access the Utilites menu:
1) Press �
2) Select Utilities.
3) Select the desired menu item�
See below for a brief description of each�
6.12.1 Airplane Mode
Airplane Mode temporarily stops wireless communication between your pump and connected devices�
This can be used during airline travel when you are instructed to turn off wireless devices� You will learn
more about this feature when using continuous glucose monitoring�
6.12.2 Time & Date
You may need to change the Time and Date on your pump, for example,
when you are traveling to different time zones or for daylight savings
time changes� It is very important that the time and date are always
correct so that basal rates deliver properly and Medtronic CareLink®
uploads are correct�
6.12.3 Block
The Block feature allows caregivers, such as parents of a young child, to restrict access to critical pump
settings and functions� When Block is on, the child is unable to do things like give a bolus or change a
basal rate� Features that cannot be accessed will be in grey and are unselectable� Anytime a bolus needs
to be given or a temp basal started, for example, Block will need to be turned off� It can then be turned
back on�
Note: You can choose to use the Remote Bolus
feature when the Block feature is on�
6.12.4 Remote Bolus
Remote Bolus must be on if you want to give boluses remotely from your Contour® next LINK 2.4 meter�
See page 36
for more information on giving a remote bolus�
6.12.5 Self Test
The Self Test checks to see that the display, notification light, vibration and tone are all working properly�
This test is in addition to the routine tests that the pump runs� If an error message is displayed at the
end of the test or you observe the pump not behaving as indicated, contact the 24-hour helpline
on 1800 777 808 (tollfree within Australia on landlines) or your local representative�
64
Page 67

Section 6 I Additional Features
6.12.6 Carb Unit
Carb Unit lets you change from using Grams to using Exchanges when
entering food into the Bolus Wizard™ and using Event Markers�
Notice that the active selection is marked with a checkmark�
6.12.7 Manage Settings
Manage Settings lets you save, restore, clear active insulin, or clear all
settings� When you select Manage Settings, you will see the screen
shown here� Hold the
• Save Settings: do this any time new settings are entered or
settings are changed�
• Restore Settings: use this to restore the settings you have
saved; can be used if the pump is asking you to re-enter your settings�
and
buttons together to access�
• Clear Active Insulin: you can only use this option once� It needs to be done before first
using the pump with insulin to clear active insulin from practice boluses that were given�
• Clear All Settings: never clear unless directed to do so by your healthcare professional.
• Settings History: lists the times you have saved, restored or cleared your settings�
6.12.8 Sensor Demo
Sensor Demo shows you samples of alerts and graphs that you would
hear and see if using continuous glucose monitoring�
6.12.9 Language
Allows you to select the language of your choice�
65
Page 68

Section 7 I Training Handouts
Training Supplementary Materials
This section contains handouts that you can refer to during or after training� The Quick
Reference Guides can be used when performing the most common tasks with your pump�
These tasks are related to:
• Basal Rates and Patterns
• Bolus Wizard™ calculator
• Changing the Quick-set™ Infusion Set
• Changing the mio® Infusion Set
• Connecting Your Pump and Meter
Feel free to tear these Quick Reference Guides out and keep them in a place where they are
easily accessible�
66
Page 69

Se c t ion 7�1 I
Basal Quick-Reference Guide for the MiniMed® 640G Insulin Pump
Change a Basal Rate
1� From Home Screen,
select Basal�
2� Select Insulin Settings�
3� Select Basal
Pattern Setup
4� Select the basal pattern
you wish to edit�
5� Select Options�
6� Select Edit�
7� Press on the time
segment�
8� Press on End time�
9� Press or to change
U/h and press �
10� Select Done�
�
Add a Basal Rate to a Basal Pattern
1� From Home Screen,
select Basal�
2� Select Insulin Settings�
3� Select Basal
Pattern Setup
4� Select the Basal pattern
you are adding a rate to�
5� Select Options�
6� Select Edit�
7� Press on the time
segment�
8� Enter the new End time
(this is the same as the
start time of the basal
rate you are adding)
and press
9� Press if U/hr is not
changing� (Press or
to change value if
necessary and press )�
�
�
11� Review rates and
select Save
Review Basal Patterns
1� From Home screen,
select Basal�
2� Select Basal Patterns�
3� Select the basal pattern
you wish to review�
4� Review basal rates�
NOTE: If you see a scroll bar on
the right, press
basal rates in the Basal Pattern.
�
to see all
10� Press on the new
time segment�
11� Press to enter the new
End time and press
12� Press to enter the
basal rate and press
13� Continue adding end
times and basal rates
if necessary�
14� Select Done�
15� Review basal rates�
16� Select Save�
�
�
5� Select OK.
NOTE: The basal rates shown are for illustration purposes only – your basal settings will be different.
67
Page 70

Se c t ion 7�1 I
Basal Quick-Reference Guide
for the MiniMed® 640G Insulin Pump
Temporary (Temp) Basal Rate
This feature lets you immediately increase or
decrease your basal insulin for the period of time
(duration) that you set� It is often used for exercise
and sick days� A Temp Basal can be set in either
Percent (delivers a percent of the current basal rate)
or by Rate (delivers the amount that you enter)�
Set Temp Basal Rate
1� From Home Screen,
select Basal�
2� Select Temp Basal�
3� Press to set duration
and press
�
4� Select Next�
5� Select Percent�
Multiple Basal Patterns
Setting multiple Basal Patterns helps you more
easily accommodate routine schedule changes
that cause different basal needs (for example,
weekday vs� weekend; day vs� night shift)�
Set an Additional Basal Pattern
1� From Home Screen,
select Basal�
2� Select Insulin Settings�
3� Select Basal Pattern
Setup
�
4� Select Add New�
5� Select the name you
would like to use�
6� Enter the basal rates
needed for this pattern�
7� Select Save�
6� Press or to enter
the percent of current
basal rate desired�
NOTE: If you choose to use Rate,
select Type, and you can then
enter the U/hr desired.
7� Select Begin�
NOTE: The Home screen reads Basal (T) since you have a Temp
Basal active. Select Basal (T) to review the details of the active
Temp Basal. When the Temp Basal. When the Temp Basal is
complete, the basal will automatically return to the regularly
programmed basal rate.
Cancel Temp Basal Rate
If you ever set a Temp Basal and decide you do not
need it, it can be cancelled�
1� From Home Screen,
select Basal (T)�
NOTE: The Basal pattern that
your pump is currently using
has a check mark next to it.
Select Basal Pattern
Once multiple basal patterns are set, you can then
select the basal pattern you wish to be active�
1� From Home Screen,
select Basal�
2� Select Basal Patterns�
3� Select the Basal Pattern
you wish to be active�
2� Select Cancel
Temp Basal�
NOTE: Basal rate has now
returned to the currently
programmed rate.
68
4� Select Begin�
NOTE: The basal rates shown are for illustration purposes only – your basal settings will be different.
Page 71

Bolus Wizard™ Quick-Reference Guide
Se c t ion 7�2 I
Turning Bolus Wizard™ On and Setup
This feature should be set up in consultation with your healthcare professional�
for the MiniMed® 640G Insulin Pump
1� Press �
2� Select Insulin Settings�
3� Select Bolus Wizard
Setup
�
4� Select Bolus Wizard�
5� Press to continue
reading text�
6� Select Next�
7� Review the description
of Carb Ratio and
select Next
8� Press on the time
segment�
9� If you have only one
Carb Ratio, press �
�
16� Select Next�
17� Review the description
of BG Target and
select Next
18� Press on the time
segment�
19� If you have only one BG
Target range, press �
20� Press or to enter the
Lo target and press �
21� Press or to enter the
Hi target and press �
22� Select Next�
�
10� Use or to enter
Carb Ratio and
press �
11� Select Next�
12� Review the description
of Sensitivity Factor and
select Next
13� Press on the time
segment�
14� If you have only one
Sensitivity Factor,
press
15� Use or to enter
Sensitivity Factor and
press �
�
�
23� Review the description
of Active Insulin Time
and select Next
24� Select Duration�
25� Use or to enter
Active Insulin Time and
press
26� Select Save�
The Bolus Wizard™ setup
is now complete.
�
�
NOTE: The boluses shown are for illustration purposes only – your settings and bolus results will be different.
69
Page 72

Se c t ion 7�2 I
Bolus Wizard™ Quick-Reference Guide
for the MiniMed® 640G Insulin Pump
Deliver Food and Correction Bolus
1� Test BG� Select Bolus�
Select Bolus Wizard�
2� If using linked meter, BG
is on screen� If not,
select BG. Use or
to enter BG and press �
3� Select Carbs�
4� Use to enter grams
of carb and press
5� Select Next�
6� Select Deliver Bolus�
NOTE: Active Ins. adjust. is the
active insulin from previous
boluses that is adjusted
(subtracted) from the correction
dose. In this example, there was
no active insulin to subtract.
�
Review Bolus History
1� Press �
2� Select History�
3� Select Daily History�
4� Select the day you want
to view�
5� You will see bolus
deliveries listed in
the history�
Edit Bolus Wizard™ Settings
1� From Home screen,
press Bolus�
2� Select Insulin Settings�
3� Select Bolus Wizard
Setup
�
Deliver Correction Bolus – no food
1� Test BG� Select Bolus�
Select Bolus Wizard�
2� If using linked meter, BG
is on screen� If not,
select BG. Use or
to enter BG and press �
3� Press to Next�
4� Select Deliver Bolus�
NOTE: In this example, there
was active insulin to adjust –
it was subtracted from the
correction dose.
Deliver Food Bolus – no correction
1� Select Bolus� Select
Bolus Wizard�
2� Press to Carbs and
press
enter grams of carb
and press
� Press to
�
4� Select the setting to be
changed�
5� Select Edit�
6� Press on the time
segment� Press or
to change the times
and/or values�
7� Select Save�
Review Bolus Wizard™ Settings
1� From Home screen,
press and select the
Status Bar
2� Select Settings Review�
3� Press to scroll
through the list
of settings�
�
3� Select Next�
4� Select Deliver Bolus�
NOTE: Active Insulin is never
adjusted (subtracted) from a
food bolus.
70
NOTE: The boluses shown are for illustration purposes only – your settings and bolus results will be different.
Page 73

Se c t ion 7�3 I
Before you begin, please note that it is not recommended
that you change your infusion set just prior to bedtime�
Changing your set during the day may reduce the risk of
unexplained highs and no delivery alarms while sleeping�
Please refer to the MiniMed® Sure-T® Infusion Set User
Guide for more details�
To change your MiniMed® Sure-T® infusion set, you will
need to organise the following supplies:
Changing the MiniMed® Sure-T® Infusion Set with the MiniMed® 640G Insulin Pump
Insulin cartridge/vial
(at room temp
for 1 hour)
START HERE:
1�
Wash your hands�
Press �
4�
Reservoir
(with blue
Transfer Guard)
MiniMed® Sure-T®
infusion set
2� 3�
u
Select Reservoir & Tubing.
u
u
Alcohol swabs/
skin antiseptics
Select New Reservoir.
Sharps bin
Remove the infusion set you have been using by loosening the adhesive
and pulling away from body�
5� 6�
u
Remove the used
reservoir from
the pump�
Select Rewind.
u
Continued on next page
u
71
Page 74
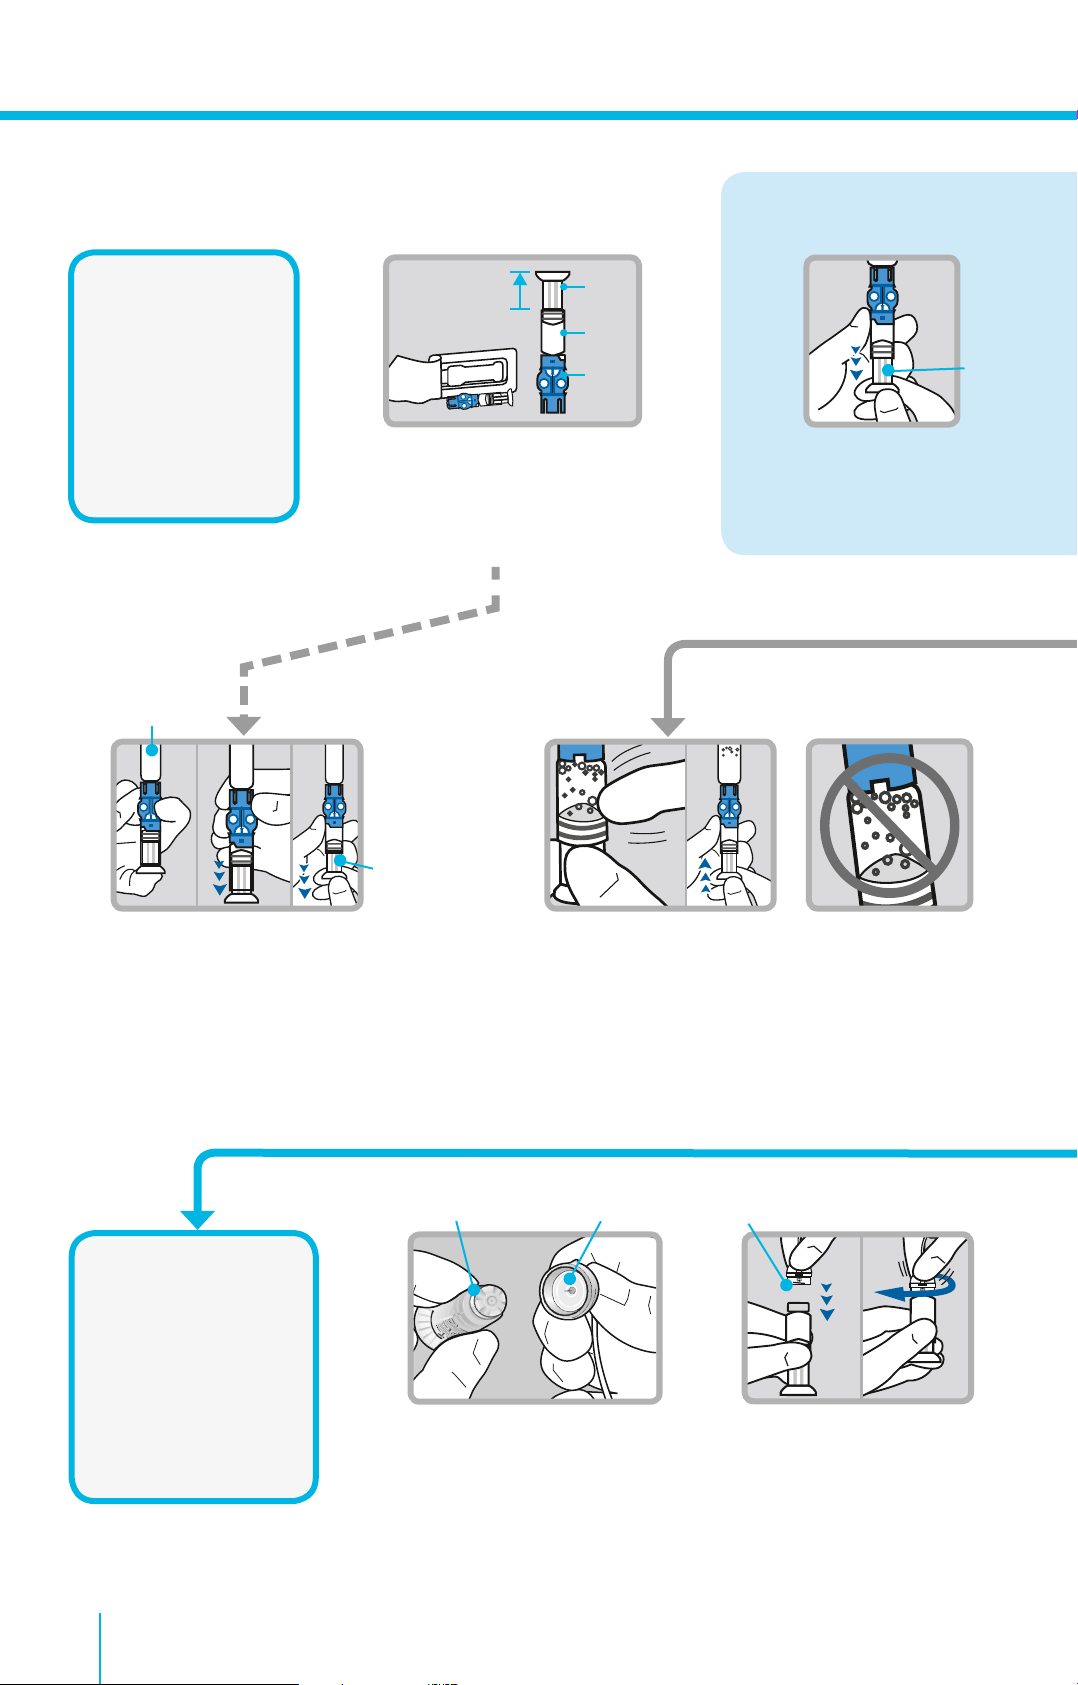
Se c t ion 7�3 I
plunger
rod
reservoir
transfer
guard
Changing the MiniMed® Sure-T® Infusion Set
with the MiniMed® 640G Insulin Pump
If using insulin vial only. If using insulin cartridge, skip to Step 6.
FILL RESERVOIR &
CONNECT TO
THE INFUSION SET
TUBING
Follow the next steps
to fill reservoir with
insulin and connect
to the infusion set
tubing�
Insulin cartridge
6�
1�
Remove from package� Make
sure insulin vial is at room
temperature to reduce the risk
of air bubbles� (If using insulin
cartridge proceed to step 6�)
7�
u
2�
u u
Plunger
Pull plunger down
to the amount that
you plan to fill with
insulin�
u
72
Plunger
If using a cartridge of insulin.
Hold the reservoir upright� Push plunger into
the reservoir to expel any air� Turn plunger
slightly anti-clockwise to loosen it� Firmly press
insulin cartridge onto blue transfer guard�
Hold the reservoir and cartridge at eye level
and using a pencil, push down on the rubber
stopper of the cartridge to fill the reservoir�
Top of Reservoir
CONNECT
RESERVOIR TO
INFUSION SET
You will place the
reservoir connector
onto the end of the
infusion set to the
filled reservoir�
1�
Open infusion set packaging and
connect the infusion set to the
newly filled reservoir� Make sure
both the top of the reservoir and
the connector are dry before
connecting them� Liquid can
temporarily block the vents on the
tubing connector�
Tap the reservoir to move air bubbles to top of
reservoir� Push plunger up to move air into vial�
Tubing Connector
Connector
2�
Gently push connector
onto reservoir� Turn clockwise until locked� You will
hear a click�
u
Page 75

Transfer guard
Plunger
Insulin vial
3�
Insulin
vial
8�
4�
u u
Wipe vial with alcohol�
Place vial on table�
Firmly press the blue
transfer guard onto vial�
Transfer
Push and hold plunger
down�
9�
u
guard
5�
Plunger
With your thumb still on the
plunger, flip over so vial is on top�
Release thumb and pull plunger
down to fill with insulin�
Reservoir
If needed, pull
plunger back down
to amount of insulin
needed for 2-3 days�
3�
If you see air bubbles, tap
reservoir to move them to
top� Push plunger just a bit
to move them into tubing�
To avoid getting insulin
on the top of the reservoir,
turn vial over so it is upright�
Hold transfer guard and turn
reservoir counter-clockwise and
remove from transfer guard�
4�
u
Twist plunger counter-clockwise to loosen and remove�
Plunger
IMPORTANT: If insulin
or any liquid gets inside
the tubing connector,
it can temporarily block
the vents that allow the
pump to properly fill the
infusion set� This may
result in the delivery of
too little or too much
insulin, which could
cause hypoglycaemia or
hyperglycaemia�
Continued on next page
u
73
Page 76

Se c t ion 7�3 I
THE BACKLIGHT
MAY HAVE
TURNED OFF
Press any button to
turn the screen
back on�
Changing the MiniMed® Sure-T® Infusion Set
with the MiniMed® 640G Insulin Pump
uu
Select Next.Select Load Reservoir and
unlock pump if necessary�
2� 3�
u
Turn clockwise until you
feel reservoir lock into place�
4�
After you see drops,
press and select Next.
Select Next
INSERT
INFUSION SET
Next, follow
the steps to
insert the
infusion set into
your body�
LOAD RESERVOIR
AND FILL TUBING
Follow these
steps to load the
reservoir and fill
the tubing�
1�
Choose an insertion site from the
shaded areas shown here� Wipe
with alcohol or antiseptic�
u
u
74
Insert infusion set using a
90 degree angle� Smooth
down adhesive to secure
set in place�
6�5�
u
Remove backing from adhesive at the tubing connection
site� Place in a convenient location near insertion site�
Ensure tubing between the two sites is not tight�
Page 77
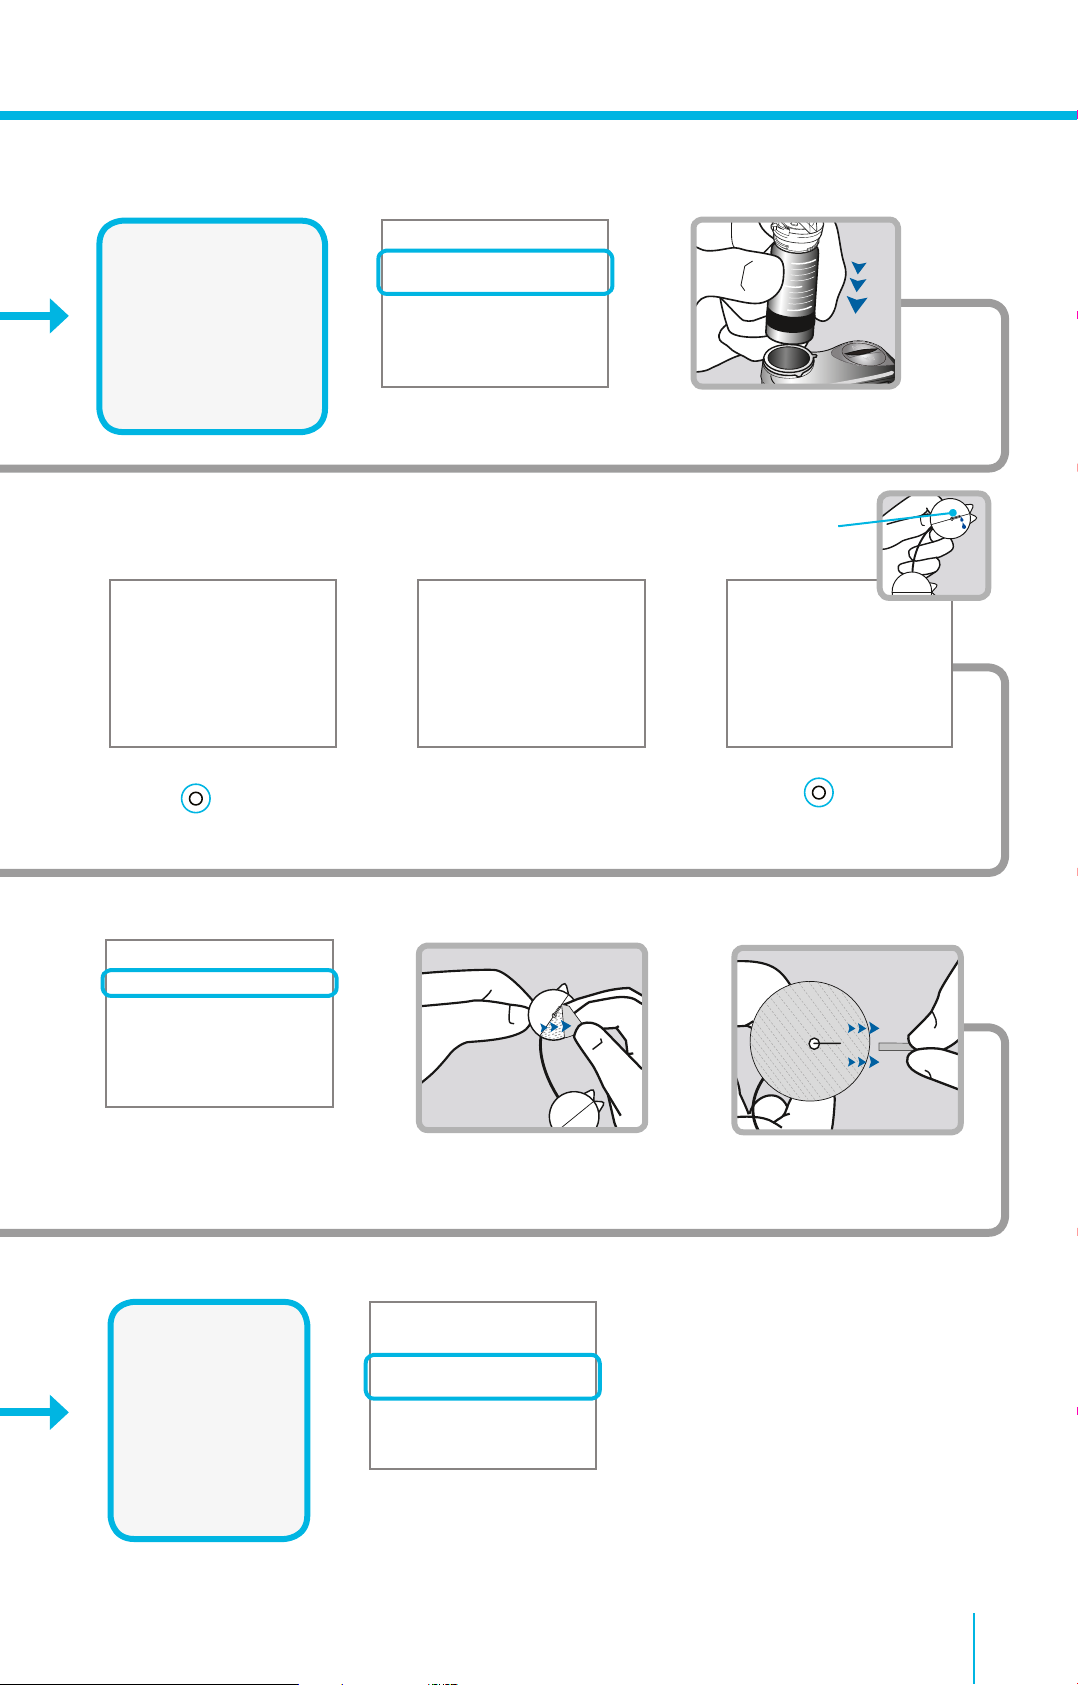
PLACE RESERVOIR
INTO PUMP
Now place the
filled reservoir
into the reservoir
compartment of
the pump�
1�
u
Place reservoir into pump�
Drops at end of tubing
1�
Select Load and keep
holding
2�
u
When you see this screen,
�
select Next.
3�2�
u
Remove backing from
the adhesive surrounding
the needle�
3�
u
Select Fill and keep
holding until you
see drops at the end of
tubing, then let go�
4�
u
Remove needle guard�
FILL CANNULA
When using a
Sure-T Infusion
Set you are not
required to fill the
canula� Please
select “Done”�
Your
infusion set
change is now
complete!
Select Done.
75
Page 78

Notes
76
Page 79

Se c t ion 7�4 I
Before you begin, please note that it is not recommended
that you change your infusion set just prior to bedtime�
Changing your set during the day may reduce the risk of
unexplained highs and no delivery alarms while sleeping�
Please refer to the MiniMed® mio® Infusion Set User Guide
for more details�
To change your MiniMed® mio® infusion set, you will need
to organise the following supplies:
Changing the MiniMed® mio® Infusion Set with the MiniMed® 640G Insulin Pump
Insulin cartridge/vial
(at room temp
for 1 hour)
START HERE:
1�
Wash your hands�
Press �
4�
Reservoir
(with blue
Transfer Guard)
MiniMed® mio®
infusion set
2� 3�
u
Select Reservoir & Tubing.
u
u
Alcohol swabs/
skin antiseptics
Select New Reservoir.
Sharps bin
Remove the infusion set you have been using by loosening the adhesive
and pulling away from body�
5� 6�
u
Remove the used
reservoir from
the pump�
Select Rewind.
u
Continued on next page
u
77
Page 80

Se c t ion 7�4 I
plunger
rod
reservoir
transfer
guard
Changing the MiniMed® mio® Infusion Set
with the MiniMed® 640G Insulin Pump
If using insulin vial only. If using insulin cartridge, skip to Step 6.
FILL RESERVOIR &
CONNECT TO
THE INFUSION SET
TUBING
Follow the next steps
to fill reservoir with
insulin and connect
to the infusion set
tubing�
Insulin cartridge
6�
1�
Remove from package� Make
sure insulin vial is at room
temperature to reduce the risk
of air bubbles� (If using insulin
cartridge proceed to step 6�)
7�
u
2�
u u
Plunger
Pull plunger down
to the amount that
you plan to fill with
insulin�
u
Plunger
If using a cartridge of insulin.
Hold the reservoir upright� Push plunger into
the reservoir to expel any air� Turn plunger
slightly anti-clockwise to loosen it� Firmly press
insulin cartridge onto blue transfer guard�
Hold the reservoir and cartridge at eye level
and using a pencil, push down on the rubber
stopper of the cartridge to fill the reservoir�
1�
CONNECT
RESERVOIR TO
INFUSION SET
You will place
the reservoir
connector
onto the end
of the infusion
set to the filled
reservoir�
Remove the infusion
set from packaging
by pulling down the
red plastic tab�
Tap the reservoir to move air bubbles to top of
reservoir� Push plunger up to move air into vial�
2�
u
Then peel sterile
paper from bottom�
3�
u
With one hand press
the three raised
markings on the sides
of the lid�
uu
78
Page 81

Transfer guard
Plunger
Insulin vial
3�
Insulin
vial
8�
u u
Wipe vial with alcohol�
Place vial on table�
Firmly press the blue
transfer guard onto vial�
Transfer
If needed, pull
plunger back down
to amount of insulin
needed for 2-3 days�
4�
Push and hold plunger
down�
9�
u
guard
To avoid getting insulin
on the top of the reservoir,
turn vial over so it is upright�
Hold transfer guard and turn
reservoir counter-clockwise and
remove from transfer guard�
5�
Plunger
With your thumb still on the
plunger, flip over so vial is on top�
Release thumb and pull plunger
down to fill with insulin�
Reservoir
IMPORTANT: If insulin
or any liquid gets inside
the tubing connector,
it can temporarily block
the vents that allow the
pump to properly fill the
infusion set� This may
result in the delivery of
too little or too much
insulin, which could
cause hypoglycaemia or
hyperglycaemia�
4�
Free tubing from
slot� Gently
unwind tubing in
counter clockwise
direction�
Connector
5�
u
Gently push connector
onto reservoir� Turn
clockwise until locked�
You will hear a click�
6�
u
If you see air bubbles,
tap reservoir to move
them to top� Push
plunger just a bit to
move them into tubing�
7�
u
Twist plunger
counter-clockwise
to loosen and
remove�
Continued on next page
Continued on next page
u
u
Plunger
79
Page 82

Se c t ion 7�4 I
THE BACKLIGHT
MAY HAVE
TURNED OFF
Press any button to
turn the screen
back on�
Changing the MiniMed® mio® Infusion Set
with the MiniMed® 640G Insulin Pump
uu
Select Next.Select Load Reservoir and
unlock pump if necessary�
2� 3�
u
Turn clockwise until you
feel reservoir lock into place�
4�
After you see drops,
press and select Next.
Select Next
INSERT
INFUSION SET
Next, follow the
steps to insert the
infusion set into
your body�
LOAD RESERVOIR
AND FILL TUBING
Follow these
steps to load the
reservoir and fill
the tubing�
u
80
4�
Carefully hold needle
guard by tip� To remove it,
gently turn needle guard
& pull away to expose needle�
5�
u
Place tubing in slot on
side of serter�
u
CAUTION:
Be careful not to pull
the tubing tightly
when placing it in
the slot�
u
Page 83

PLACE RESERVOIR
INTO PUMP
Now place the
filled reservoir
into the reservoir
compartment of
the pump�
1�
u
Place reservoir into pump�
Drops at end of tubing
1�
Select Load and keep
holding �
2�
u
When you see this screen,
select Next.
u
1� 2� 3�
u
Gently peel paper to
expose adhesive�
u
Turn over and hold by the
lined ridges on the sides�
3�
Select Fill and keep
holding until you
see drops at the end of
tubing, then let go�
With other hand pull up
on center of serter until it
clicks and locks into place�
6�
Choose an insertion site from the
shaded areas shown here� Wipe with
alcohol or other antiseptic�
7�
u
Place against prepared site on body�
Press the round indentations on each
side of serter to insert needle�
Continued on next page
u
81
Page 84

Se c t ion 7�4 I
Changing the MiniMed® mio® Infusion Set
with the MiniMed® 640G Insulin Pump
8� 9�
u u
Push down on center of
serter to press adhesive
against skin�
FILL CANNULA
You will now fill
the cannula, the
little tube under
your skin, with
insulin�
1�
Select Fill.
10�
To remove serter, hold the center
handle and gently pull it straight
out away from body� Press
adhesive securely against skin�
2�
u
Select Fill amount and enter:
- 0�300 if using 6 mm cannula
- 0�500 if using 9 mm cannula
Then press �
Place lid back onto serter
to safely discard needle�
Note: Your pump will remember the Fill
amount that you used last� Always verify that
the Fill amount is correct�
• If it is correct, press to Fill Now and press �
• If it is incorrect, press � Change to correct amount
and� Press � Fill Now.
4�
The Home screen
displays the insulin as
it fills the cannula�
Total
should rarely happen if you have
verified the Fill amount on the
previous screen�
Note: Select Stop Filling
if you need to stop, for
example, if you notice the
amount is incorrect� This
3�
Select Fill Now.
Your
infusion set
change is now
complete!
82
Page 85

Notes
83
Page 86

Notes
84
Page 87

Getting Started I Basal Patterns
85
Page 88

MINIMED® 640G SYSTEM
^
Medtronic Diabetes 24-hour toll free helpline
(Australian landlines): 1800 777 808
www.medtronic-diabetes.com.au
Medtronic Australasia Pty Ltd
97 Waterloo Road, North Ryde NSW 2113 Australia
Please note: In contacting the Diabetes Toll Free, your personal and health information
may be disclosed to an operator located outside Australia� ^Components sold
separately� Automated insulin delivery is made possible through combining Medtronic
insulin pump and continuous glucose monitoring technology�
Medtronic, MiniMed, Medtronic CareLink, mio and Sure-T are registered trademarks and
Bolus Wizard and Quick-set are trademarks of Medtronic MiniMed, Inc� Bayer and
CONTOUR are registered trademarks of Bayer Healthcare, LLC�
©2014 Medtronic Australasia Pty Ltd� All rights reserved� 1472-092014
 Loading...