

Page 1

Getting Started
with Continuous Glucose Monitoring
for the MiniMed® 530G with Enlite®
CGM Foundations
Page 2
WARNING: The Threshold Suspend feature will cause the pump to temporarily suspend insulin delivery for two hours when the sensor glucose reaches
a set threshold. Under some conditions of use the pump can suspend again
resulting in very limited insuln delivery. Prolonged suspension can increase
the risk of serious hyperglycemia, ketosis, and ketoacidosis. Before using the
Threshold Suspend feature, it is important to read the Threshold Suspend
information in this Getting Started Guide and the MiniMed 530G` System
User Guide and discuss proper use of the Threshold Suspend feature with
your healthcare provider.
Record safety information from your healthcare provider:
Page 3

Table Of Contents
Getting Started with Continuous Glucose Monitoring
for the MiniMed® 530G with Enlite®
Continuous Glucose Monitoring System Components ...........................2
Sensor Glucose and Blood Glucose ............................................. 3
Trends .......................................................................... 4
Personalize Alerts ............................................................... 5
Sensor Insertion ............................................................... 17
Sensor and Transmitter Connection ............................................ 22
Sensor Initialization ............................................................ 24
Calibration. . . . . . . . . . . . . . . . . . . . . . . . . . . . . . . . . . . . . . . . . . . . . . . . . . . . . . . . . . . . . . . . . . . . . 25
CareLink® ...................................................................... 28
Appendix and Quick Reference Guides ......................................... 30
Please refer to the MiniMed 530G System
User Guide for more information.
1
Page 4
Continuous Glucose Monitoring System Components
Section 1: Continuous Glucose Monitoring
System Components
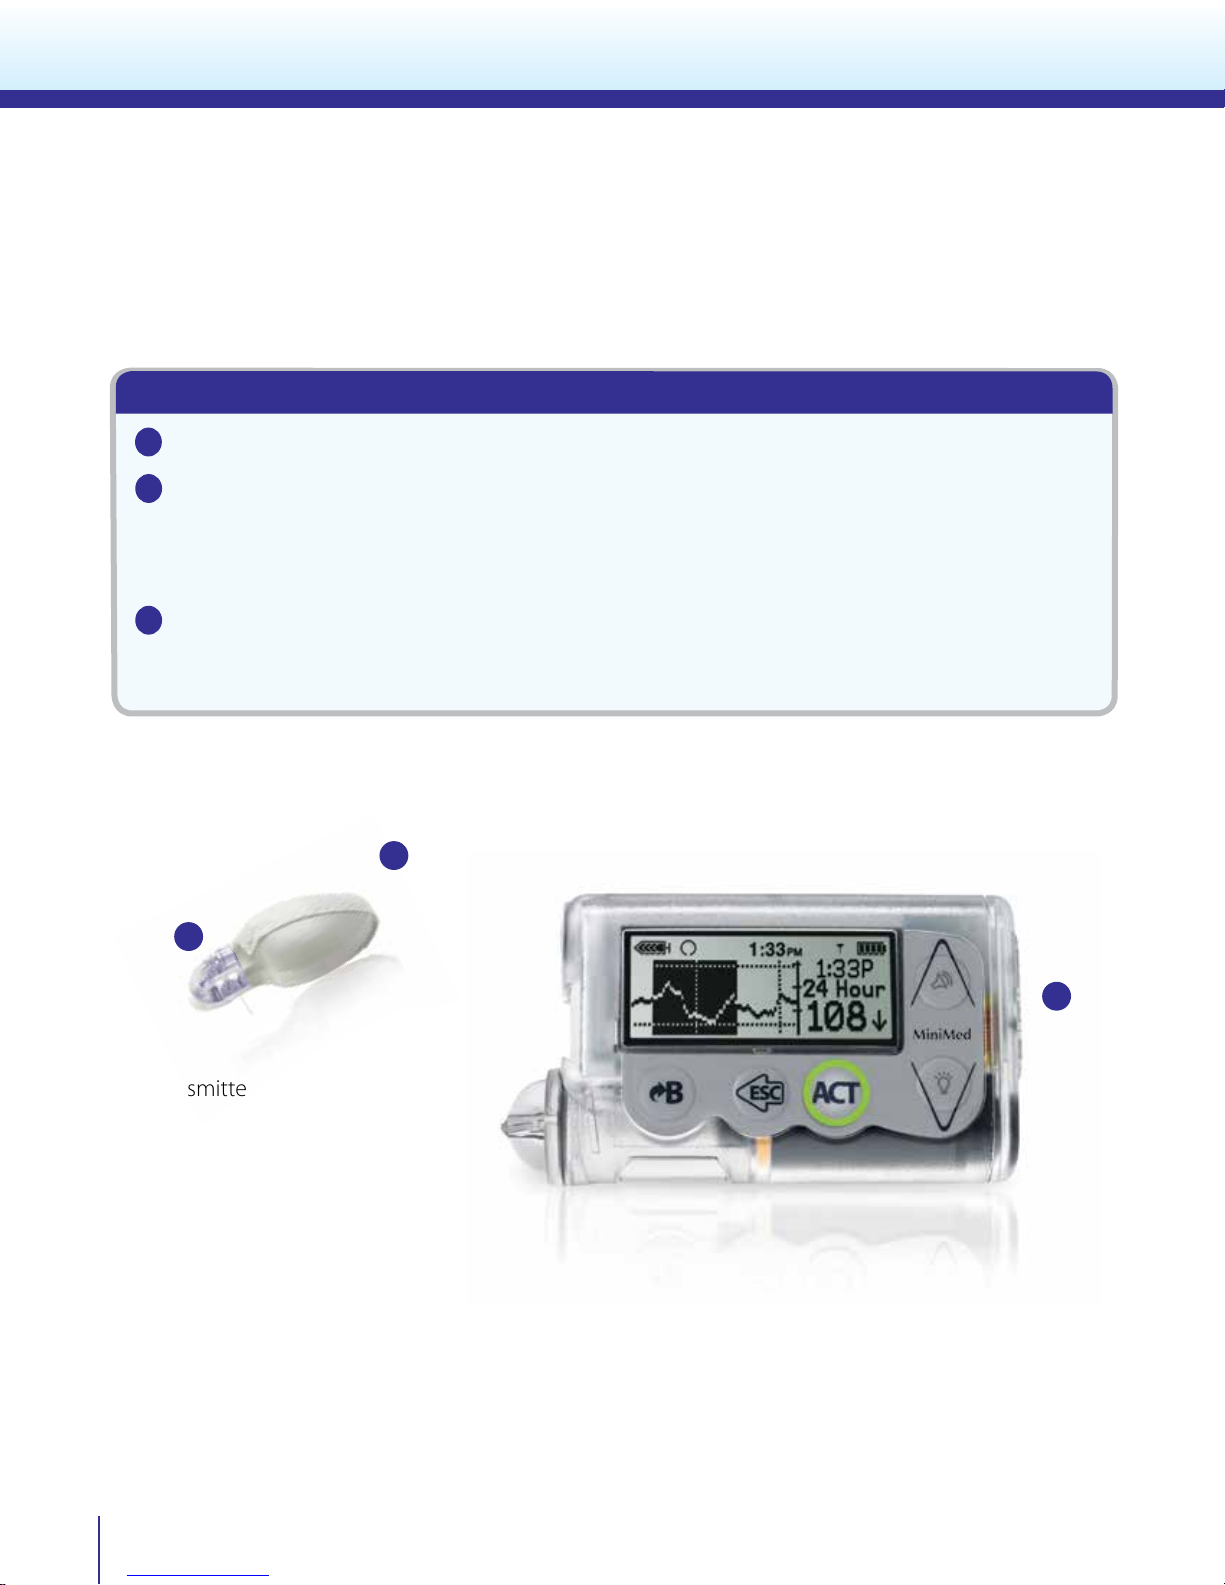
Your MiniMed 530G with Enlite includes 3 key items:
1
Glucose Sensor The Enlite® sensor measures glucose levels in the body.
2
Transmitter The MiniLink® transmitter connects to the glucose sensor and
sends glucose readings to your insulin pump/CGM monitor.
It is recharged and stored in the MiniLink charger when not
in use.
3
Insulin Pump/CGM monitor The MiniMed® 530G insulin pump displays glucose readings.
Other items include: Enlite
2
1
The transmitter must be within 6
feet of the insulin pump in order
to communicate sensor readings.
For more information, please see
“Insulin pump and RF accessories”
or “RF interference from other
devices” sections in the MiniMed
530G System User Guide.
®
serter and Enlite® sensor overtape
3
The Enlite sensor is approved for ages 16 years and older, those who are not pregnant, and those who are
not on dialysis.
Refer to the MiniMed 530G System User Guide for more information.
2
Page 5
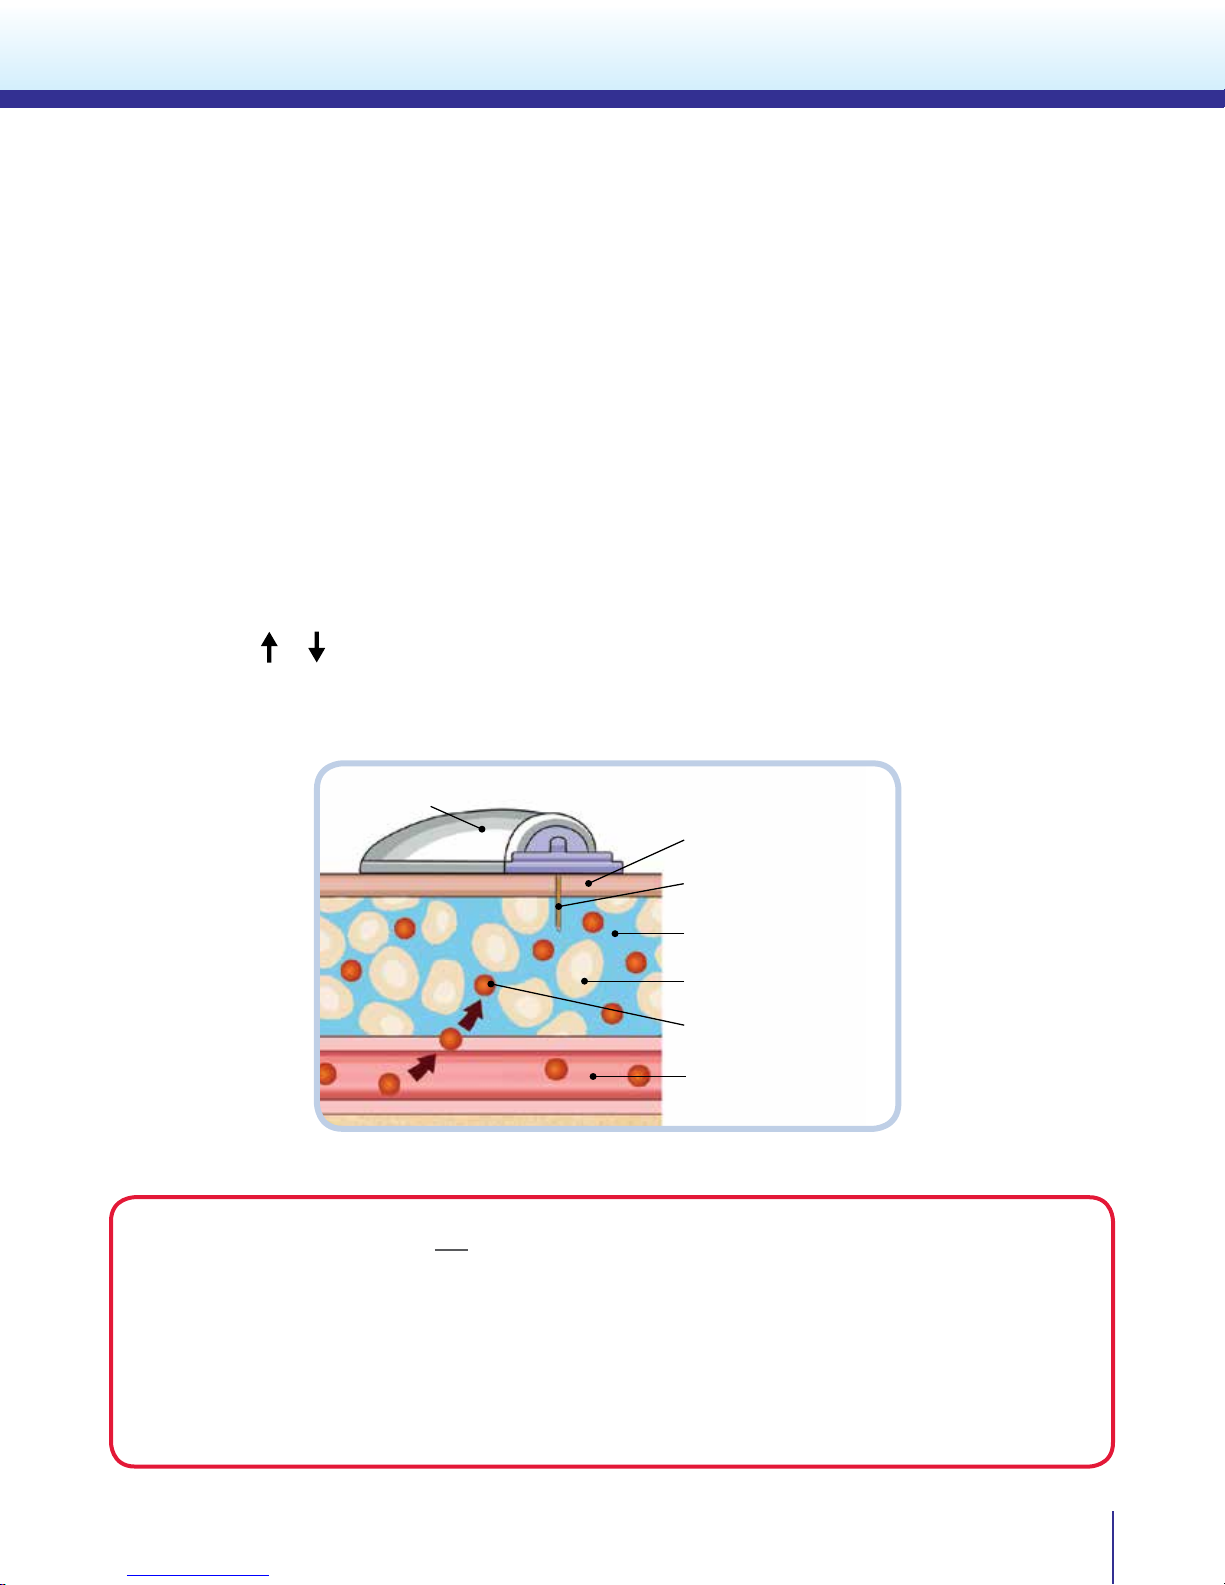
Skin
Glucose Sensor
Interstitial Fluid
Cell
Glucose
Blood Vessel
Transmitter
Sensor Glucose and Blood Glucose
Section 2: Sensor Glucose and Blood Glucose
Your BG meter measures glucose levels in your blood while your glucose sensor measures glucose in
the uid surrounding the cells of your tissue. This uid is called interstitial uid.
Most of the time, glucose travels to your blood rst and then to your interstitial uid. Because of how
glucose moves, your BG meter readings and your sensor glucose readings will rarely match exactly
but should be close. This dierence is normal and should be expected.
However, when glucose levels are rising or falling quickly, you should expect to see a larger difference
between your BG meter readings and the sensor glucose readings. Examples of times when this larger
dierence may occur include:
• When or arrows appear on your pump screen
• After meals or after taking a bolus of insulin
IMPORTANT Sensor glucose is not the same as blood glucose. Your sensor glucose reading will
rarely match your BG meter reading.
Sensor glucose values should not be used to make diabetes treatment decisions. Always conrm
your blood glucose with a BG meter rst.
If you “feel” that your glucose is high or low, but your sensor glucose does not match your
symptoms, always test your blood glucose using your BG meter.
3
Page 6
210
11:50A
Trends
Section 3: Trends
When using CGM focus on what matters, the trends - the direction and the speed of the sensor glucose
readings and graphs. Pay less attention to each individual glucose number.
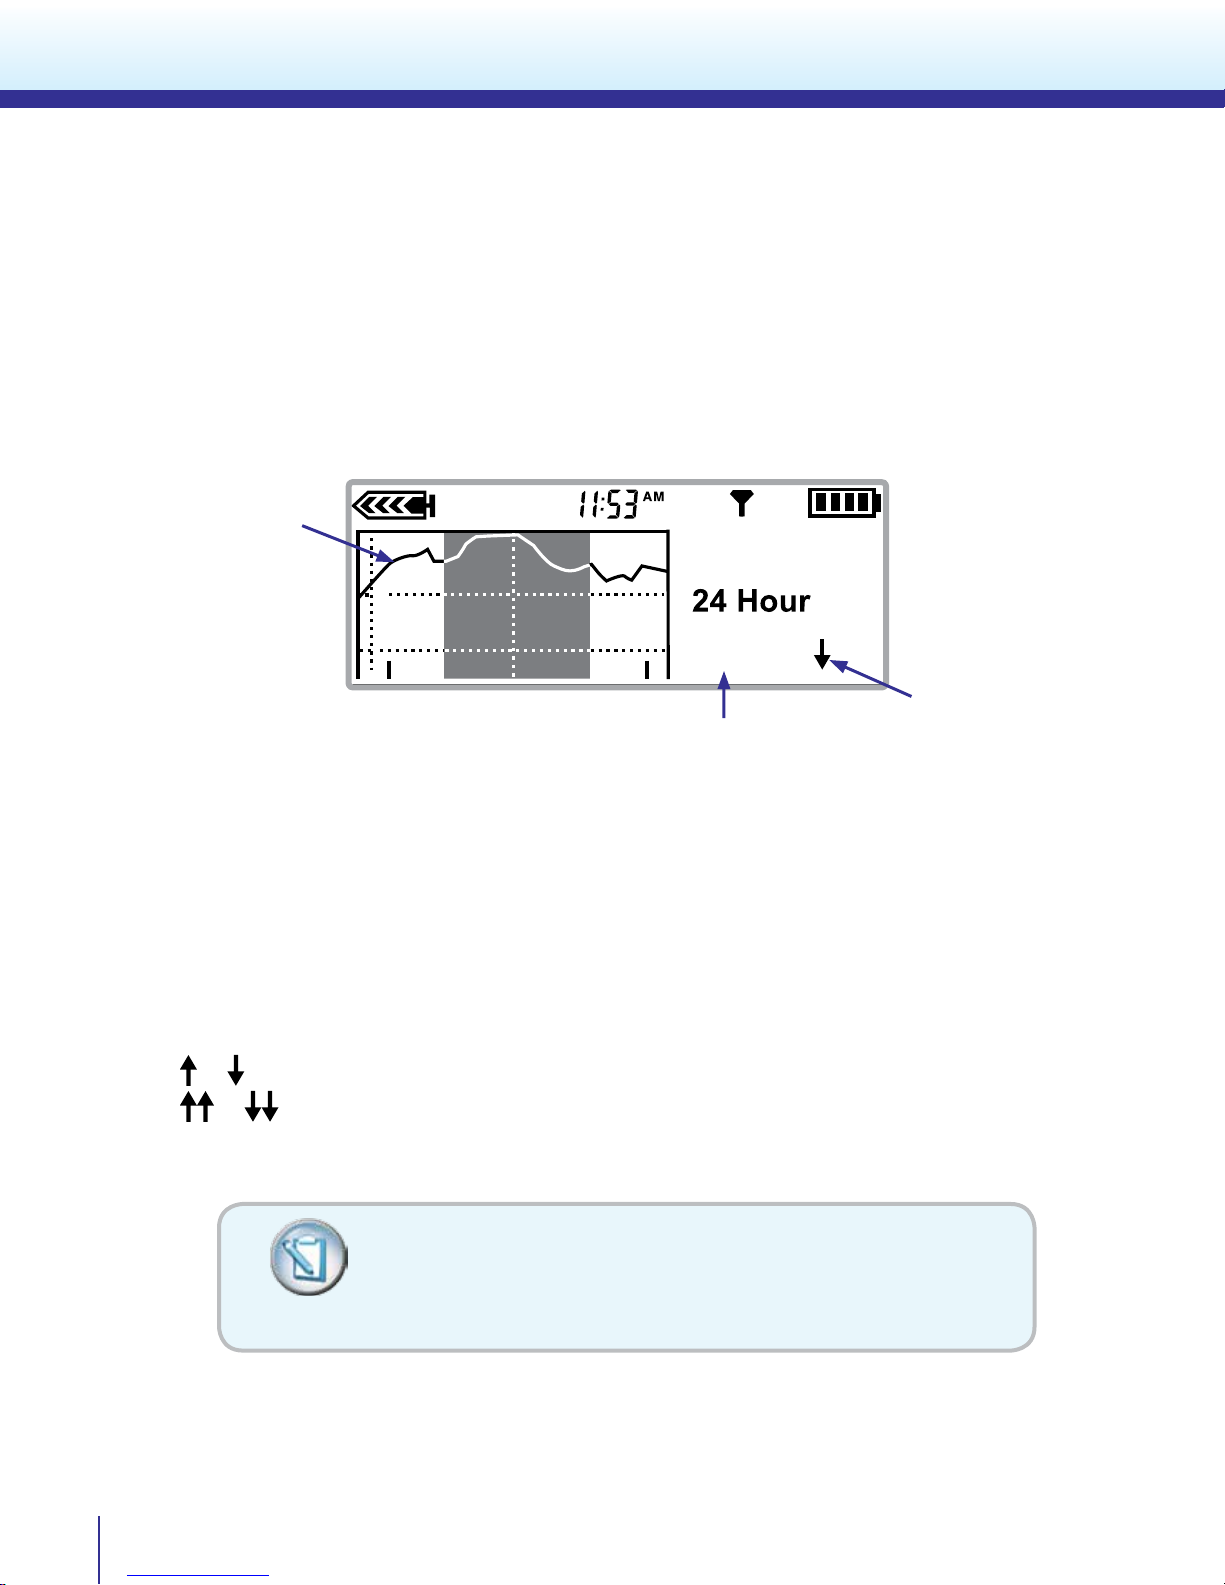
Example of a Sensor Glucose Trend Graph
Sensor Glucose Graph
Trend Arrow
Sensor Glucose
Reading
Your insulin pump screen will display 3-hour, 6-hour, 12-hour, and 24-hour glucose trend graphs. The
most current part of the graph appears on the far right side of the graph display.
There are times you may see one or two arrows next to your sensor glucose reading. Arrows indicate that
your sensor glucose has been changing rapidly:
or means your glucose has risen or fallen by 2 or more mg/dL per minute
or means your glucose has risen or fallen by 1-2 mg/dL per minute
When might you see your glucose trending up or down?
You may notice that after eating, giving a bolus, or when
exercising your glucose may begin to rise or fall.
4
Page 7

Personalize Alarm and Alerts
250
70
High Predictive
High Glucose Limit
Fall Rate
Low Predictive
Threshold Suspend
Sensor
Glucose
Personalize Alerts
CGM Alert Setting
Low Repeat
High Repeat
Rise Rate
Low Glucose
Limit
Section 4: Personalize Alarm and Alerts
Your CGM settings will be most benecial to you if they are personalized for your needs. Personalizing
alerts means that all or some settings will be programmed during your CGM training but can be changed
to better meet your needs as you learn more about the information your CGM provides. Your healthcare
provider will work with you and your trainer to determine your initial settings and help with adjustments.
There are ve main categories of alarm and alerts that you can personalize:
• High and Low Glucose Alerts
• Predictive Alerts
• Rate of Change Alerts
• Threshold Suspend Alarm
• Calibration Alerts
Low and High Glucose Alerts
Low and high glucose alerts notify you when your sensor glucose readings have reached or moved
below or above your programmed glucose limits. You can set up to eight customizable Low and High
Glucose Limits for dierent periods of the day or night. You may set either the low or high limit or both.
The Low Glucose Limit can be set from 40 to 390 mg/dL. The High Glucose Limit can be set from 50 to
400 mg/dL.
In order to temporarily silence or “snooze” repeated glucose alerts, the High and Low Repeat are set for
the amount of time when you are reminded that your sensor glucose is still above or below your selected
glucose limits. The Low Repeat can be set from 5 minutes to 1 hour. The High Repeat can be set from 5
minutes to 3 hours. High and Low Repeat will also apply to other CGM settings (Rate of Change and Predictive Alerts and Threshold Suspend alarm which are discussed next).
While sleeping...
Michael wants his CGM to alert him if his sensor glucose falls too low
so his doctor instructed him to set his Low Glucose Limit to 80 mg/
dL and leave his High Glucose Limit o to prevent too many alerts.
During the day when he’s awake his Low Glucose Limit is set to 70
mg/dL as he is able to sense when his glucose is low. Michael and his
doctor agree that these settings work best for him.
Low Glucose Limit and Threshold Suspend may be programmed at the same or dierent settings.
Please refer to MiniMed 530G System User Guide for more information.
5
Page 8
Personalize Alarm and Alerts
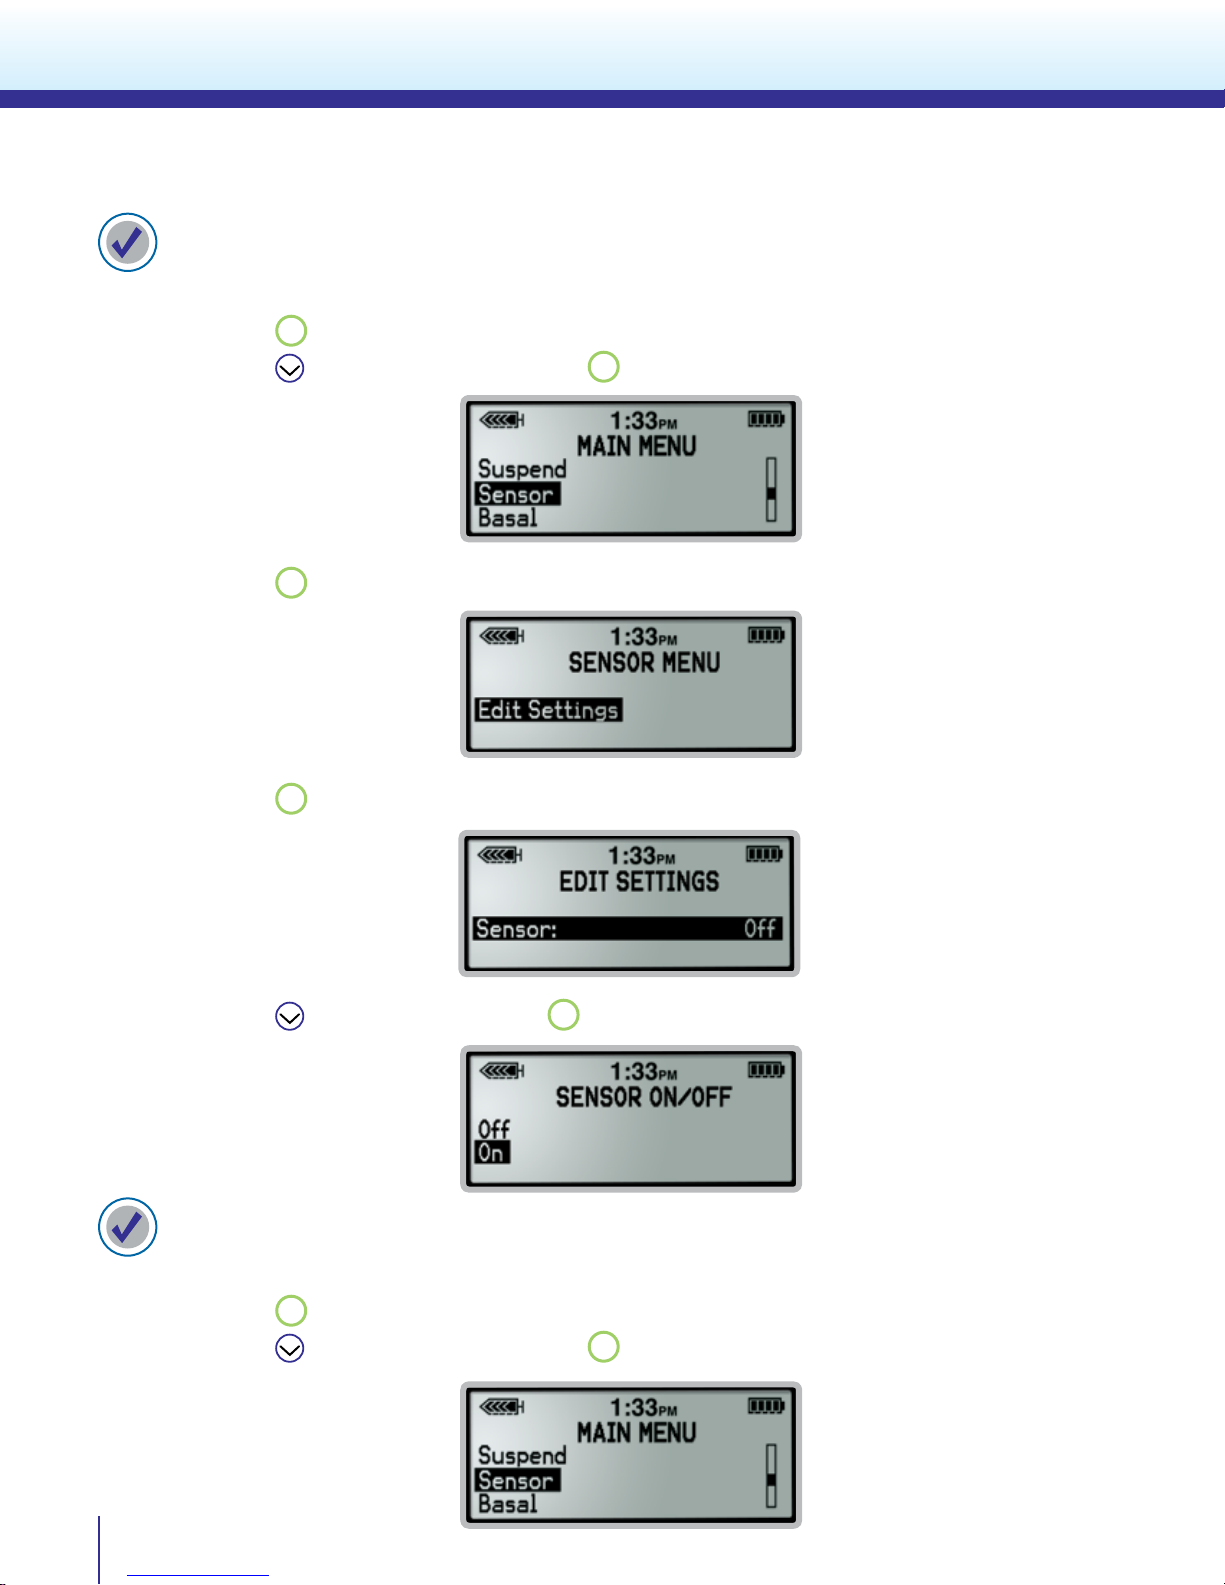
To turn the SENSOR feature on:
1) From the Home Screen:
Press
2) Press
ACT
to open the Main Menu.
to scroll to Sensor and press
ACT
.
3) Press
ACT
to Edit Settings.
4) Press
ACT
to select Sensor.
5) Press to scroll to On and press
ACT
.
To turn on Glucose Alerts:
1) From the Home Screen:
ACT
Press
2) Press to scroll to Sensor and press
6
to open the Main Menu.
ACT
.
Page 9
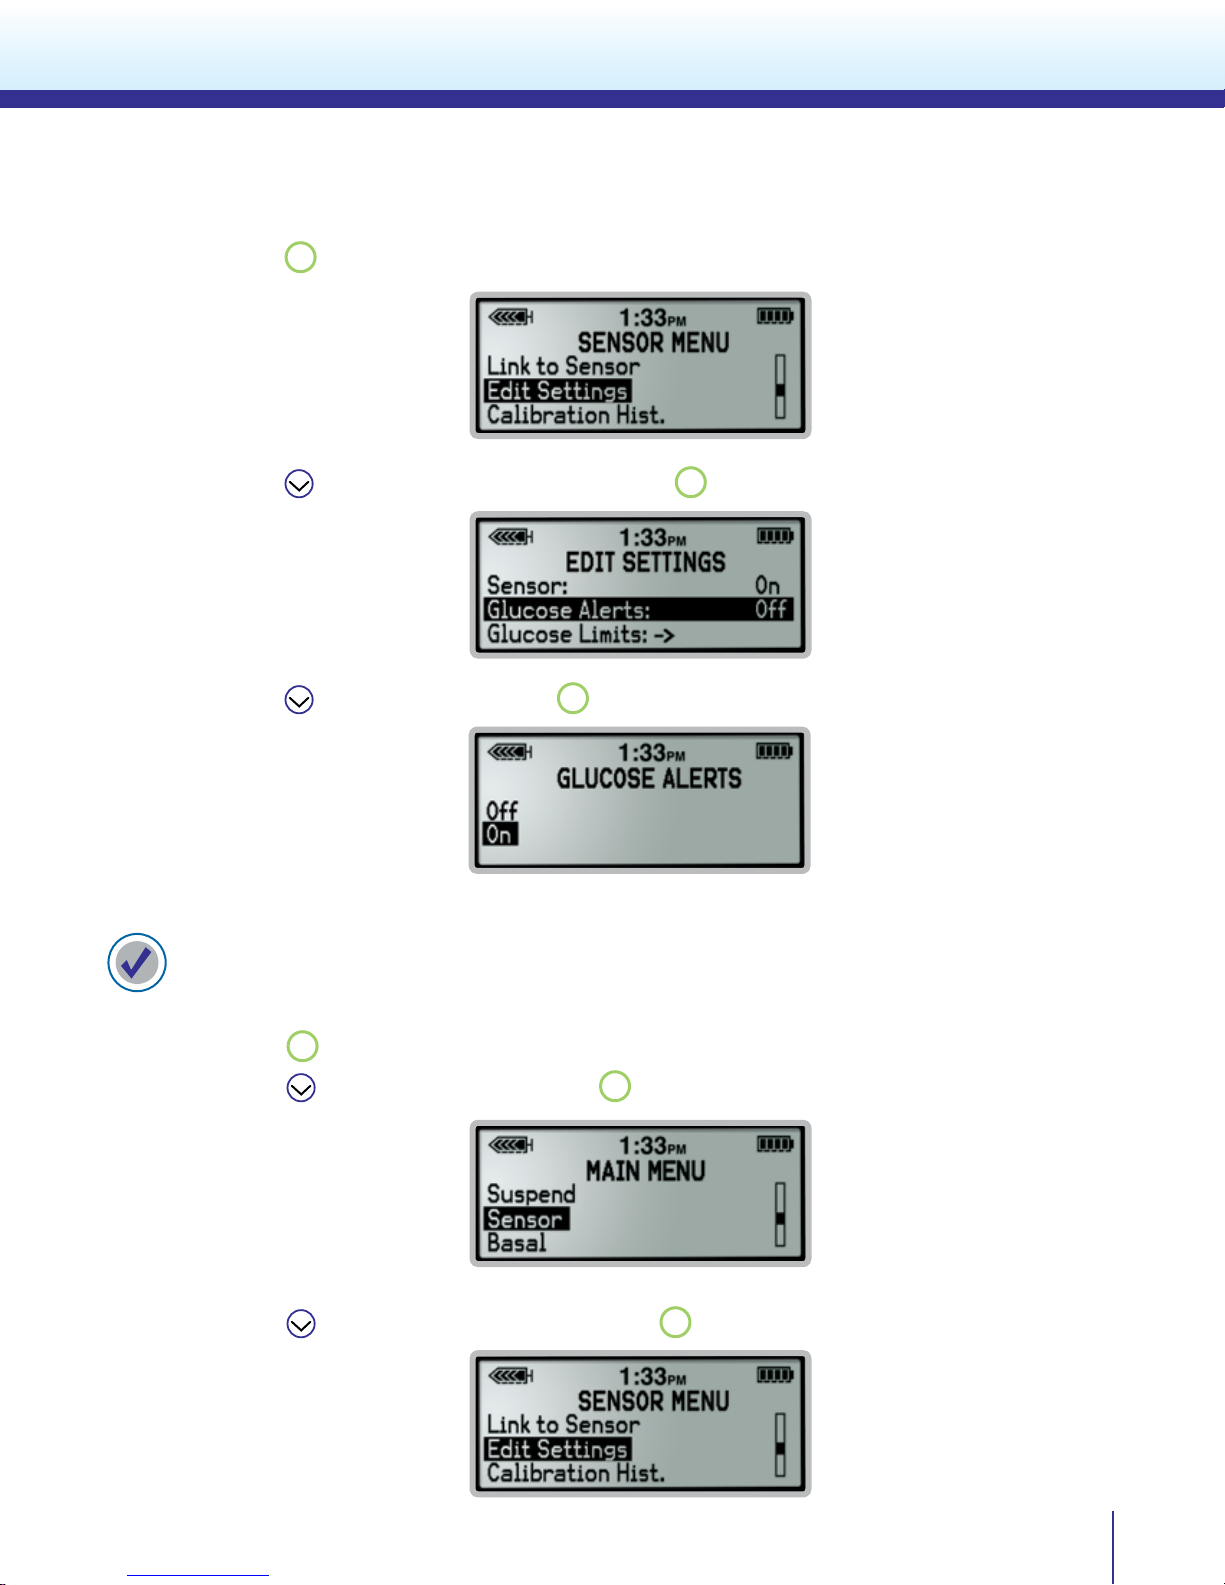
Personalize Alarm and Alerts
3) Press
ACT
to Edit Settings.
4) Press
to scroll to Glucose Alerts and press
5) Press to scroll to On and press
ACT
ACT
.
.
To set Low and High Glucose Limits:
1) From the Home Screen:
ACT
Press
2) Press
3. Press
to open the Main Menu.
to scroll to Sensor and press
to scroll to Edit Settings and press
ACT
.
ACT
.
7
Page 10
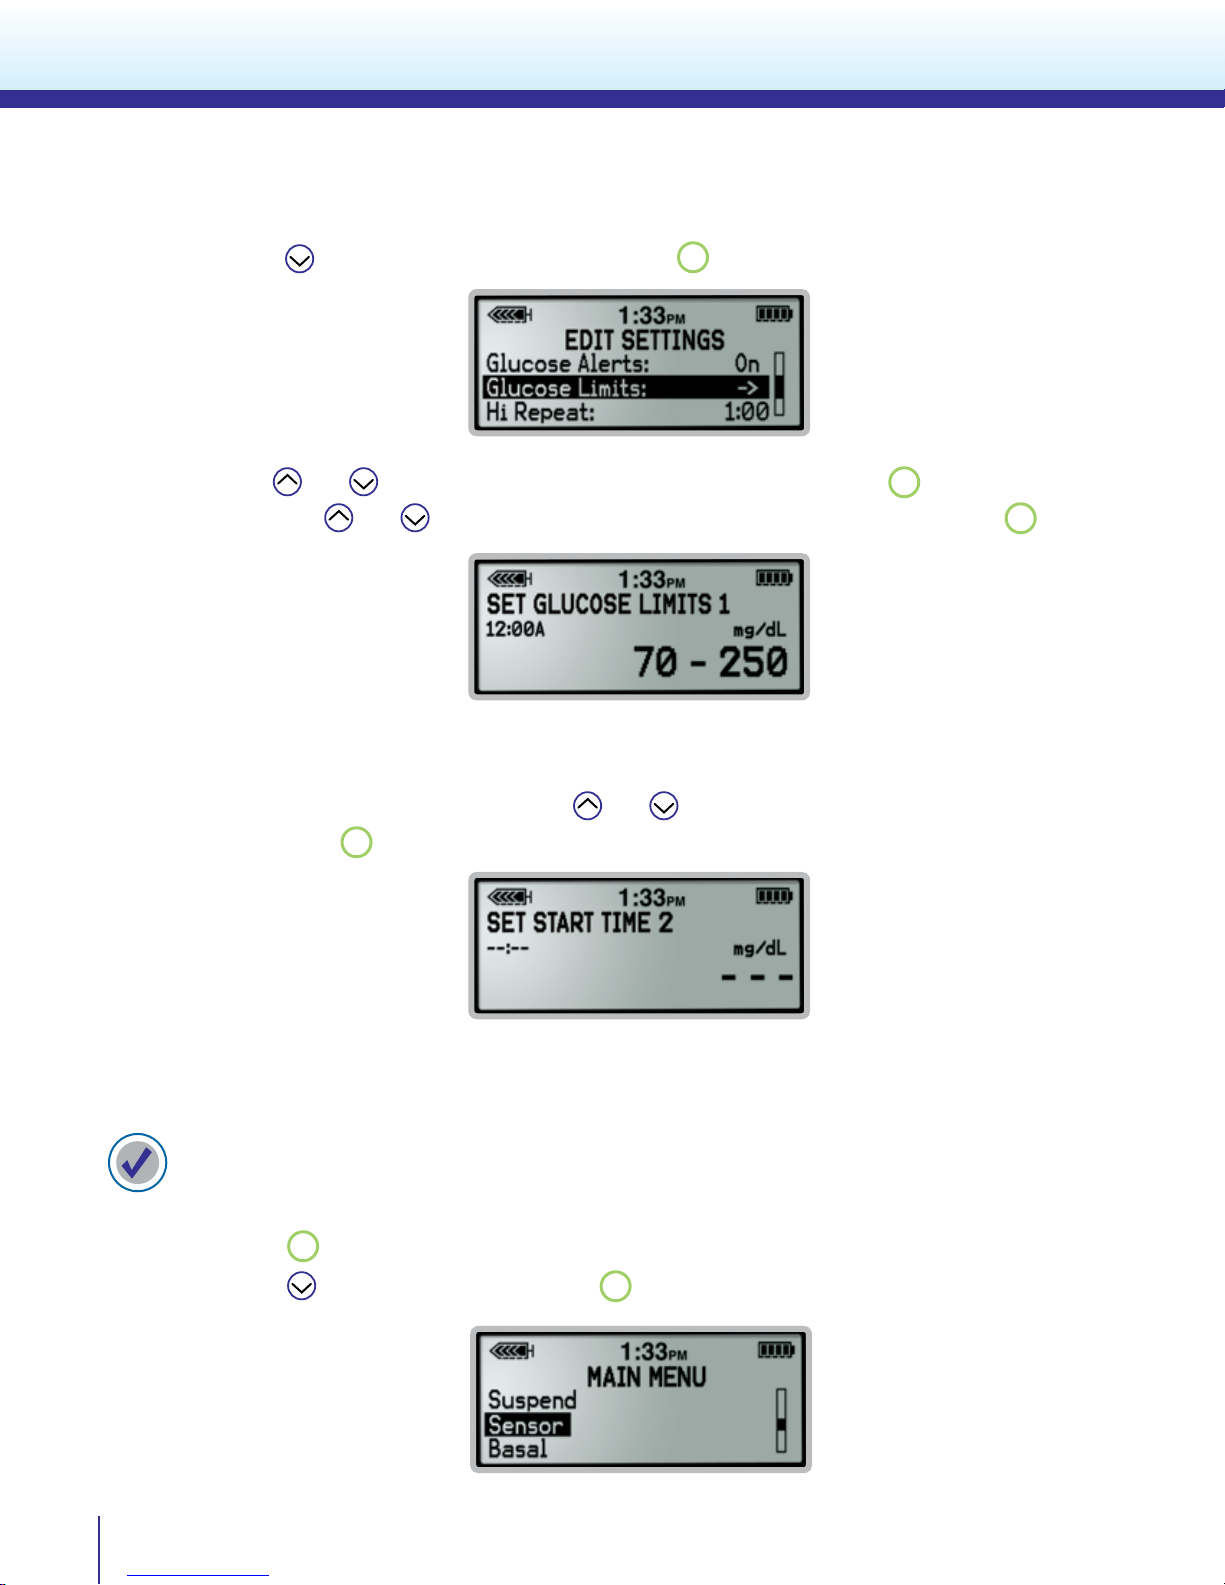
Personalize Alarm and Alerts
4) Press to scroll to Glucose Limits and press
ACT
.
5) Use and buttons to change the Low Glucose limit and press
Then use and buttons again to change the High Glucose limit and press
ACT
.
ACT
.
6) SET START TIME 2 appears with dashes ashing in the upper left part of the screen.
The ashing dashes indicate that the Start Time for the 2nd Low and High Glucose Limits
need to be programmed here. Use and buttons to select the start time and AM/PM.
Then press
ACT
.
7) Then repeat step 5 to set the Low and High Glucose Limit.
To set High and Low Repeat:
1) From the Home Screen:
ACT
Press
2) Press
8
to open the Main Menu.
to scroll to Sensor and press
ACT
.
Page 11
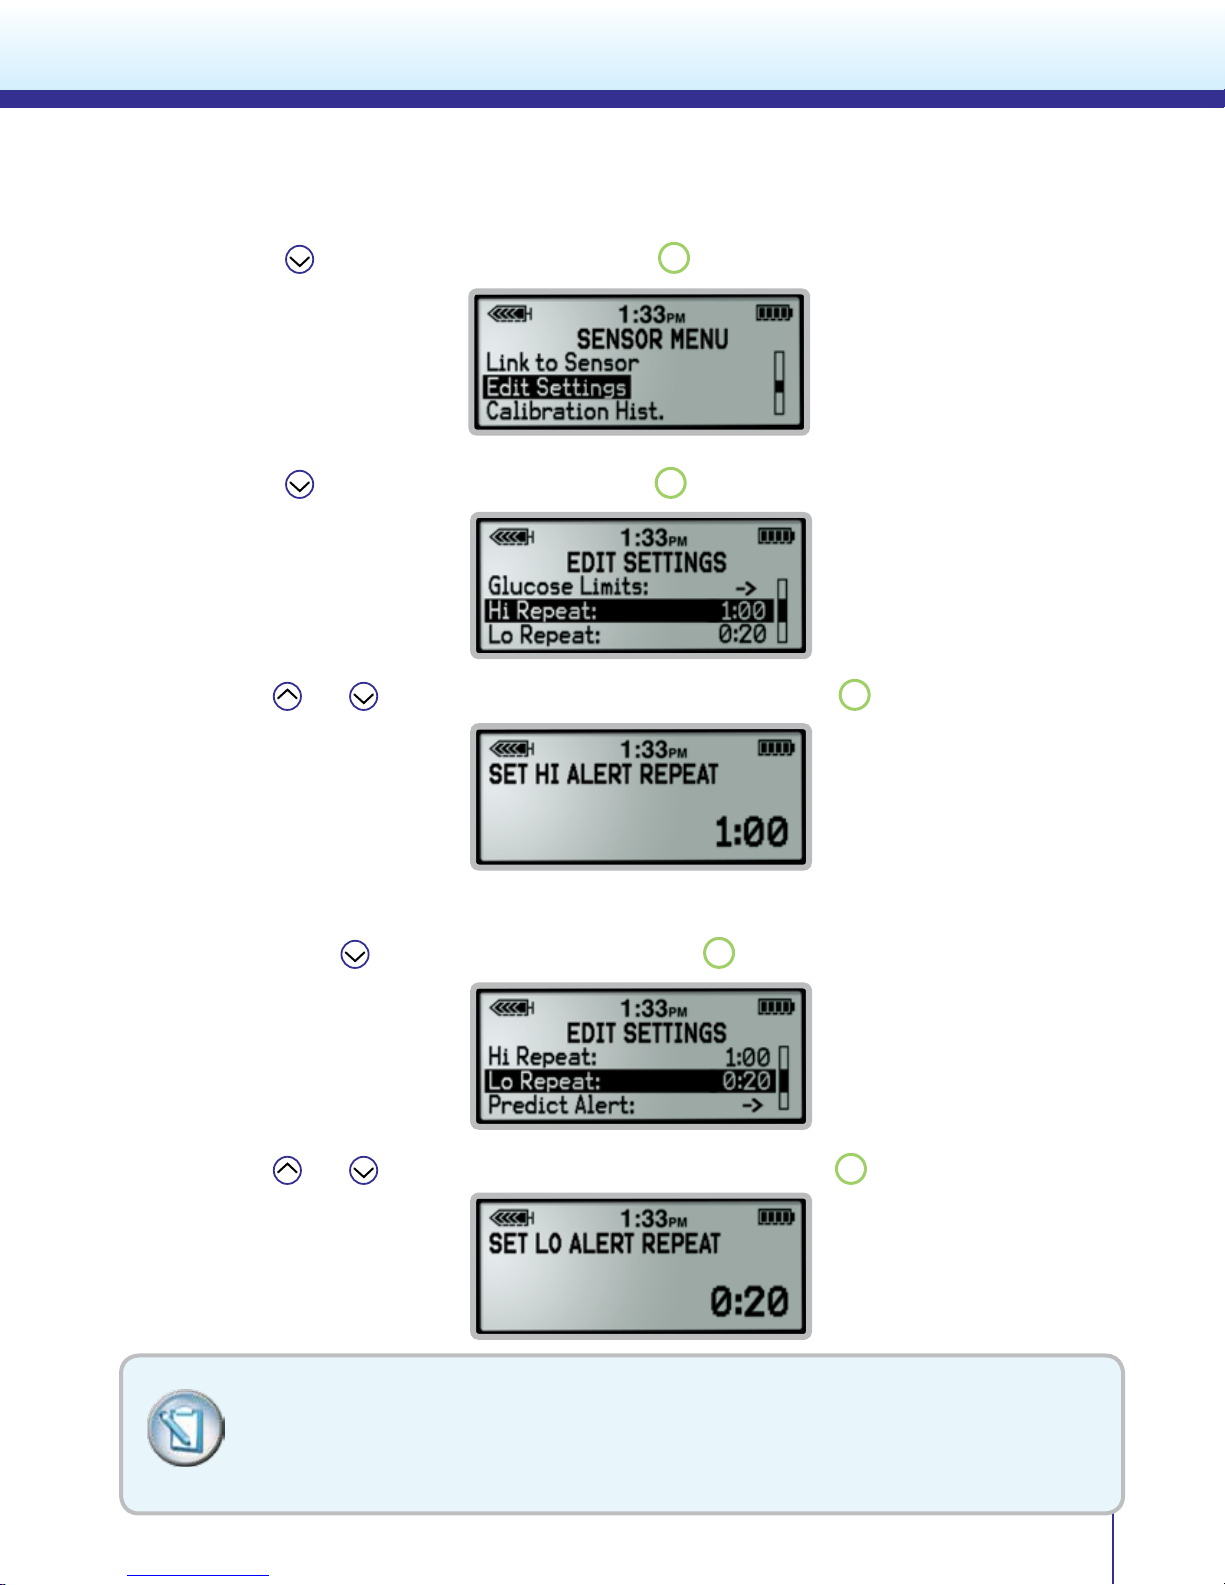
Personalize Alarm and Alerts
3) Press to scroll to Edit Settings and press
4) Press to scroll to High Repeat and press
5) Use
and buttons to set the High Repeat time and press
ACT
ACT
.
.
ACT
.
6) Repeat steps 1 to 3 if the screen has timed out and returned to the Home Screen.
Then press to scroll to Low Repeat and press
ACT
.
7) Use
and
buttons to set the Low Repeat time and press
ACT
.
REMEMBER: Your Low and High Glucose Limits are not the same as your glucose target
ranges. Initially, your healthcare provider may determine that it is best to set only the Low
Glucose Limit in order to prevent frequent inconvenient alerts. You can still view your
glucose readings on your pump even if your limits are not set.
9
Page 12
Personalize Alarm and Alerts
Predictive Alerts
Predictive Alerts can warn you up to a half hour before you reach your chosen High or Low Glucose Limit.
With Predictive Alerts you can be made aware of potential highs and lows even before they occur. You
may set a Predictive Low, Predictive High, both or neither. The Predictive Alerts can be set from 5 to 30
minutes.
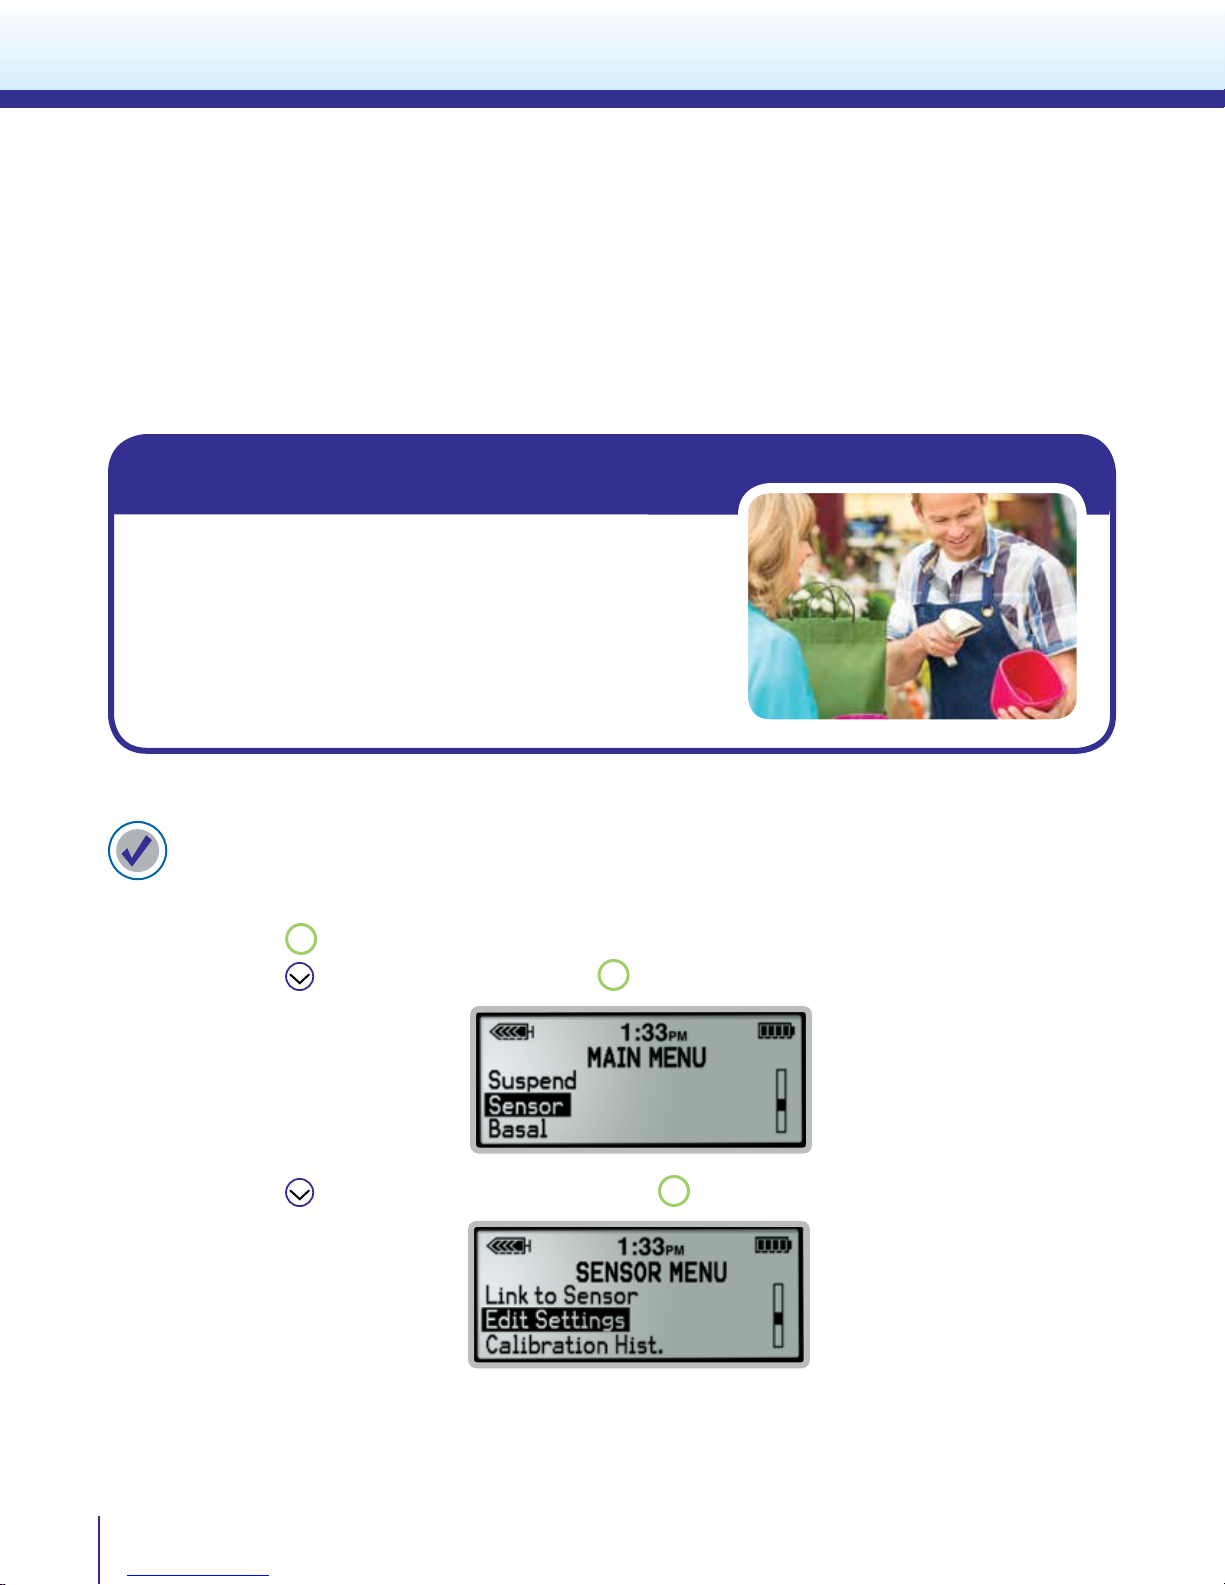
While at work...
John is very busy and with customers all day. Sometimes
he receives Low Sensor Glucose alerts while working. His
doctor has decided that setting the Predictive Low Alert to 30
minutes can notify him 30 minutes before his sensor glucose
value has reached his programmed Low Glucose Limit of 70
mg/dL.
To set Predictive Alerts:
1) From the Home Screen:
Press
2) Press to scroll to Sensor and press
3) Press to scroll to Edit Settings and press
ACT
to open the Main Menu.
ACT
.
ACT
.
10
Page 13
Personalize Alarm and Alerts
4) Press to scroll to Predictive Alert and press
5) Press
6) Use
to scroll to On and press
and buttons to set the Low Predictive time and press
ACT
.
ACT
.
ACT
.
7) Repeat step 6 to set the High Predictive time.
Rate of Change Alerts
Rate of Change Alerts tell you when your glucose is changing rapidly. These alerts are useful for
understanding how quickly your glucose levels are aected by meals, insulin, and physical activity (such
as forgetting to bolus or giving yourself more insulin than you needed) and to recognize potentially
dangerous sensor glucose changes before they become a problem. You can set a Fall Rate, Rise Rate, both
or neither. The Rate of Change Alerts can be set from 1.1 to 5.0 mg/dL/minute.
NOTE: Your healthcare provider may determine that using the Rate of Change Alerts are
more helpful when notifying you of extreme changes in your sensor glucose. Otherwise,
setting the rate too low may cause you to receive too many alerts when you may not need
them such as after every time you eat causing your sensor glucose values to rise quickly.
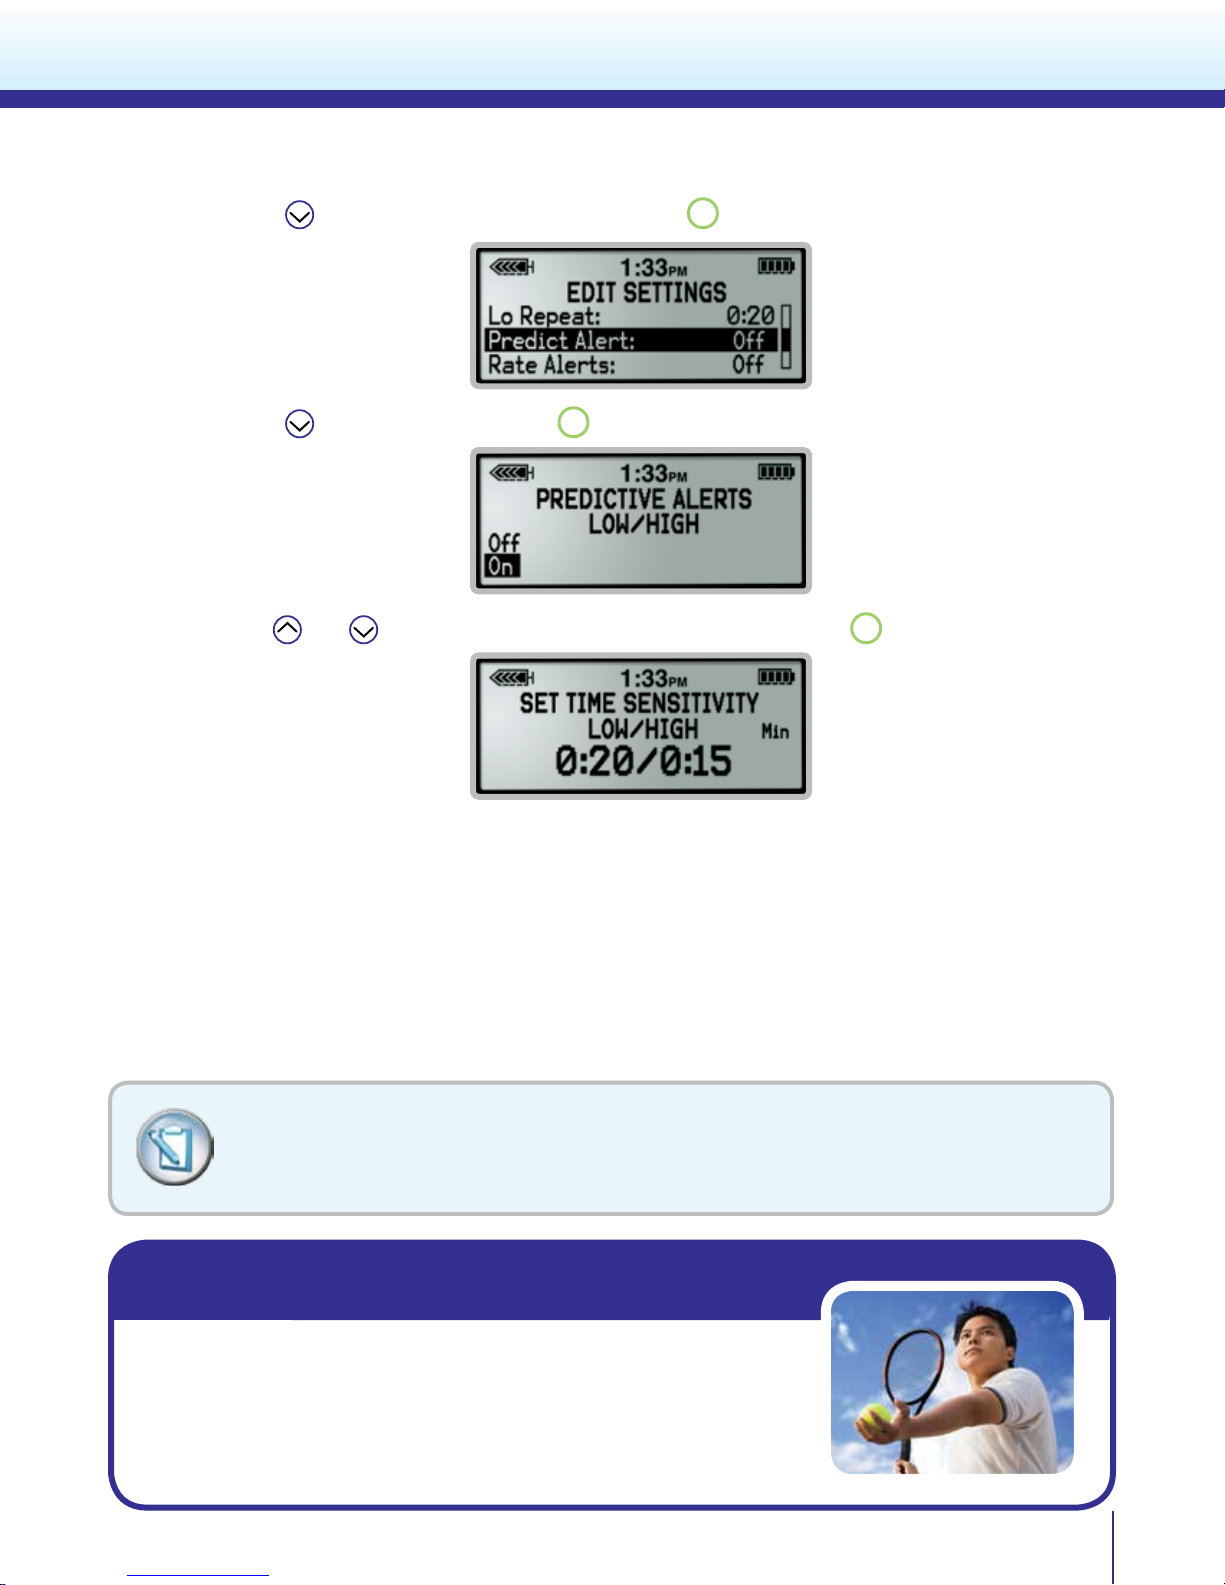
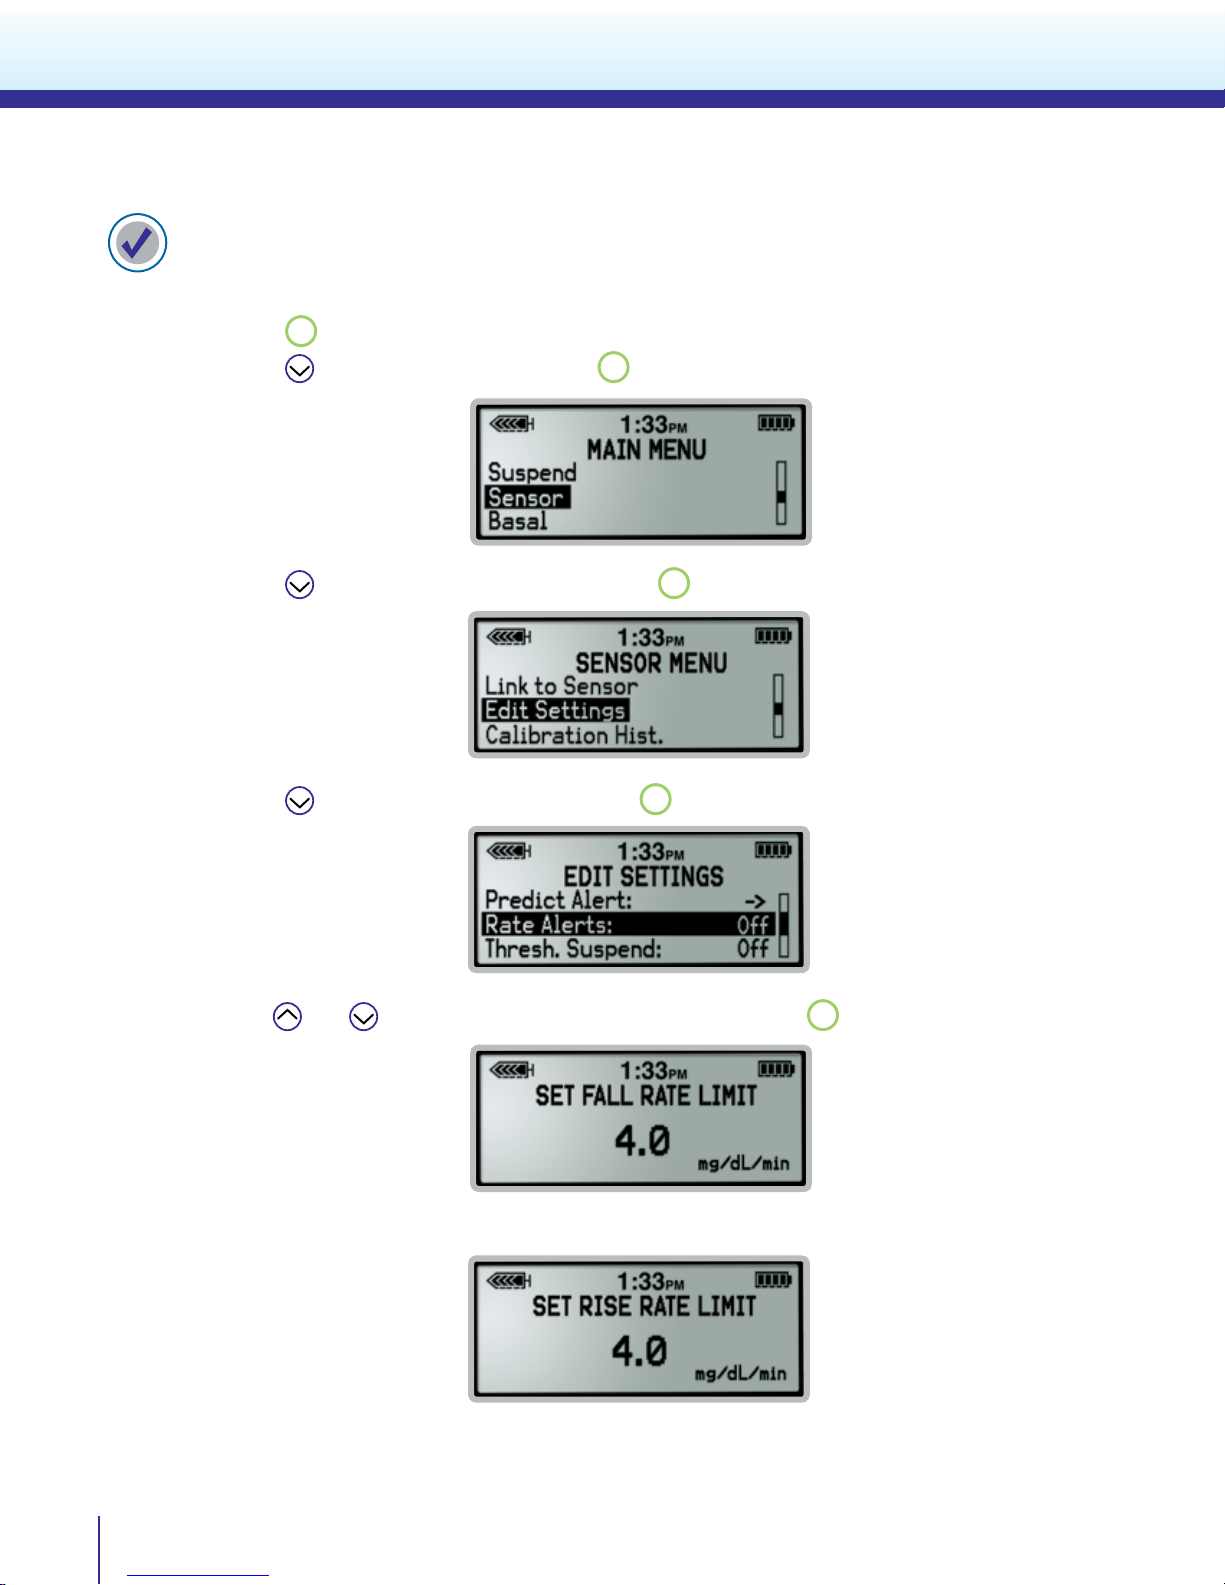
While exercising…
Mark sometimes experiences low glucose when he is playing tennis.
His doctor has determined that using the Rate of Change Alert may
be helpful. His doctor has instructed him to set his Fall Rate to 4 mg/
dL/minute. Now when his pump noties him that his sensor glucose is
falling rapidly and is also trending towards his Low Glucose Limit of 70
mg/dL Mark is prepared to take action sooner.
11
Page 14
Personalize Alarm and Alerts
To set Rate of Change Alerts:
1) From the Home Screen:
Press
2) Press to scroll to Sensor and press
ACT
to open the Main Menu.
ACT
.
3) Press to scroll to Edit Settings and press
4) Press to scroll to Rate Alerts and press
5) Use
and buttons to set the Fall Rate Limit and press
ACT
ACT
.
.
ACT
.
6) Repeat step 5 to set the Rise Rate Limit.
12
Page 15

Personalize Alarm and Alerts
Threshold Suspend
The Threshold Suspend feature stops the pump’s insulin delivery if your sensor reading has reached or
fallen below your programmed suspend threshold. Threshold Suspend can be set from 60 to 90 mg/dL.
WARNING: Threshold Suspend is not intended to be used to prevent or treat low glucose. Always conrm
your blood glucose using your BG meter. Treat a conrmed low blood glucose with carbohydrates and
according to your healthcare provider’s instructions. If you are unable to respond to the Threshold Suspend
alarm, insulin delivery will remain suspended for 2 hours unless you restart basal insulin delivery earlier.
Once the Threshold Suspend alarm is triggered, all insulin delivery will stop immediately and the pump will
siren. The pump will continue to siren until the alarm is cleared by pressing
ESC
, followed by
After clearing the alarm you will have the option to continue to suspend or restart basal insulin delivery.
If you do not clear the alarm:
- insulin delivery will remain suspended for 2 hours
- then basal insulin will restart automatically for 4 hours regardless of the sensor glucose value
- NOTE: Your standard basal rate or basal pattern will restart. Any programmed temporary basal will
be cancelled.
ACT
.
NOTE: Any bolus that was delivering at the time of Threshold Suspend will not restart.
If you clear the alarm within 2 hours:
- you will have the option to continue to Suspend or Restart Basal insulin delivery
- if you choose to continue to suspend, the pump will remain suspended for 2 hours before
restarting basal insulin
- once basal insulin is restarted, the pump will use the Low Repeat time that is set as the time
frame to suspend again if the sensor glucose is still at or below the Suspend Threshold
- Any bolus that is delivering at the time of Threshold Suspend will not restart
- NOTE: If a temporary basal is delivering at the time of Threshold Suspend, then it will restart.
While sleeping…
Beth has set the Threshold Suspend feature to siren at a sensor
glucose value of 60 mg/dL or below. If the siren awakens her she can
check her glucose with her BG meter. If her BG is conrmed to be
low, Beth will follow the recommendations of her healthcare provider
to treat low blood glucose. Beth knows that if she is ever unable to
respond to the Threshold Suspend siren, the pump will automatically
suspend insulin delivery for 2 hours.
WARNING: Threshold Suspend uses the sensor glucose value, not the blood glucose value, to
automatically suspend all insulin delivery. Be aware that your pump may automatically suspend when your
sensor glucose is at or below the Suspend Threshold but while your blood glucose is above that threshold.
This could result in hyperglycemia. Likewise, your pump may not suspend even when your blood glucose
is at or below the Suspend Threshold. This could result in hypoglycemia. Always conrm your blood
glucose using your BG meter and treat as directed by your healthcare provider.
13
Page 16

Personalize Alarm and Alerts
IMPORTANT When the Threshold Suspend alarm is triggered it will siren automatically
even if you have set your pump’s alert type to beep or vibrate. Your healthcare provider
may instruct you to only turn on the Threshold Suspend feature at night before you go to
bed and then turn it o in the day to avoid receiving the alarms during the day if you don’t
need them.
To set Threshold Suspend:
1) From the Home Screen:
Press
2) Press to scroll to Sensor and press
ACT
to open the Main Menu.
ACT
.
3) Press
to scroll to Edit Settings and press
ACT
.
4) Press to scroll to Threshold Suspend and press
5) Press to scroll to On and press
ACT
.
ACT
.
6) Use
Please refer to the MiniMed 530G System User Guide for more information on Threshold Suspend.
and buttons to set the Suspend Threshold and press
14
ACT
.
Page 17

Personalize Alarm and Alerts
Calibration Alerts
Calibration alerts remind you when a sensor calibration (“Meter BG Now” alert) is due. There are two
types of calibration alerts. The Cal Repeat is the amount of time after a missed calibration when you are
reminded that a calibration is needed. You can set your Cal Repeat from 5 minutes to 1 hour. The other
is the Cal Reminder which is the amount of time until your next calibration is required. The Calibration
Reminder is optional and can be set from 5 minutes to 6 hours.
To reduce inconvenient alerts…
Lynn has set her Cal Reminder to o. She used to have her Cal Reminder set
to alert her one hour before her next calibration was due. However, Lynn
has learned that with frequent calibrating throughout the day as part of her
daily routine, she no longer needs the reminder and extra alert.
To set Calibration Repeat:
1) From the Home Screen:
Press
2) Press to scroll to Sensor and press
3) Press
4) Press
ACT
to open the Main Menu.
to scroll to Edit Settings and press
to scroll to Cal Repeat and press
ACT
.
ACT
.
ACT
.
5) Use
and buttons to set the Calibration Repeat time and press
ACT
.
15
Page 18

Personalize Alarm and Alerts
To set Calibration Reminder:
1) From the Home Screen:
ACT
Press
2) Press to scroll to Sensor and press
to open the Main Menu.
ACT
.
3) Press to scroll to Edit Settings and press
4) Press to scroll to Cal Reminder and press
ACT
ACT
.
.
16
5) Press to scroll to On and press
6) Use
and buttons to set the Calibration Reminder time and press
TIP: There are other alerts that can be customized...
The Alert Silence feature allows you to prevent beep or vibrate alerts for specific settings. You
can silence high, low, both, or all sensor alerts. “ALERT SILENCE” will appear on your pump
screen when an alert is triggered. Check your Sensor Alert History to see the specific alert.
REMEMBER: Your healthcare provider may instruct you on:
• Waiting to turn on CGM alerts • Turning on only certain alerts
These alerts are meant to be adjusted as your knowledge of how to use CGM improves.
ACT
.
ACT
.
Page 19

Section 5: Sensor Insertion
A
B
C
D
A
Before you insert your sensor, gather all of your supplies:
Enlite® System Components
Sensor Insertion
Enlite Serter
Enlite Sensor & Pedestal
A – Sensor
B – Pedestal
C – Adhesive pad
D – Needle housing
Sensor Overtape
A – Pre-cut Hole
MiniLink Transmitter
*For more details on the Enlite System Components, consult the User Guides.
Enlite serter is required in order to insert the sensor properly and safely
Enlite sensor is individually packaged and comes attached to a plastic pedestal which is necessary for
proper loading into the serter
Sensor overtape is required to keep the sensor securely in place
MiniLink transmitter is connected after the sensor is inserted and covered with the overtape
Selecting Your Site
Your sensor should be inserted in the abdomen.**
The sensor insertion site should be at least:
• 2 inches away from your navel
• 1 inch away from your insulin pump
infusion site
• 1 inch away from any other insulin needle
injection site (syringe, pen)
** Clinical trials for glucose sensors were performed on sensors inserted in the shaded area shown
Abdomen
17
Page 20

Sensor Insertion
For best glucose sensor performance, avoid sites:
•
Where clothing may rub or constrict (for example, your beltline)
• Where your body naturally bends a great deal which may cause the sensor to pull out
• That are scarred or have hardened tissue or stretch marks
Preparing Your Site
• Wash your hands
• Clean the selected site with an alcohol swab and allow the alcohol to dry. Do not use
IV prep or the sensor may not work properly.
Inserting Your Sensor
• Where there is a great deal of motion or friction
u
u
18
1. Open the
sensor package
2. Remove the
sensor with attached
pedestal by holding
the pedestal. Place
the sensor and pedestal on a clean, at
surface (such as a
table)
3. Hold the serter so the green button
is lined up with the arms of the pedestal. To load the serter, carefully push the
serter down on the sensor and pedestal
until the base of the serter sits at on
the table. Be careful not to force the
serter too hard onto the sensor and
pedestal or it may not load properly.
4. To detach the pedestal from the sensor, place two ngers on the pedestal
arms and slowly pull the serter straight up. This step will also remove the paper
backing from the sensor. The sensor will remain inside the serter after detaching the pedestal.
Do not detach the pedestal from the sensor in mid-air as this may damage
the sensor.
Page 21

u
Sensor Insertion
5. Place the base
of the serter at
against your selected insertion site.
The arrow on each
side of the serter
indicate the location of the sensor
and needle.
7. With one hand,
hold the sensor
against your body.
With the other hand,
hold the needle
housing at the tip.
6a. To insert the
sensor, press the
green button in
and then release
it. Then keep the
serter at against
your body.
u
8. Slowly pull the needle
housing straight out,
away from the sensor.
Warning: If bleeding
occurs at your sensor
site (under/around/or on
top of the sensor), apply
steady pressure using
sterile gauze or a clean
cloth placed on top of
the sensor for up to three
minutes. If bleeding does
not stop, then remove
the sensor and apply
steady pressure until the
bleeding stops.
6b. While
continuing to
hold the serter
against your
body, wait 5 seconds in order to
allow time for the
pressure-sensitive
adhesive to stick
to your skin.
u
9. Carefully, remove
the white paper that
is located underneath
the curved adhesive
pad. Press the
adhesive against
the skin for several
seconds to help
ensure that it sticks
to your skin.
6c. In order to
remove the serter,
a SECOND BUTTON
PUSH is required.
Press and hold in
the green button.
Do not push the
serter too hard
against the skin
or doing so may
make it dicult to
press and hold in
the green button.
Inserting the sensor
2 button presses:
serter after sensor
6d. While
continuing to hold
in the green button, slowly pull the
serter away from
your body.
REMEMBER:
requires
1. To insert the
sensor
2. To remove the
insertion
10. Flip the
adhesive tab
so that it lies
at, but do not
remove the
paper backing
yet.
19
Page 22

Sensor Insertion
Taping Your Sensor
Before you connect the MiniLink transmitter to your Enlite sensor it is very important that you
properly secure the sensor against your skin using the sensor overtape.
u
1. Remove the large
paper backing from
the overtape. Do
not remove the two
smaller paper tabs
on the sides of the
overtape.
u
4. Remove the two paper
tabs from the sides of the
overtape and press the
adhesive against the skin.
2. Important:
Attach the overtape
to both the rounded
part of the sensor
and the skin in front
of the sensor.
5. This image is an
example of the overtape applied correctly.
u
3. Stretch the remaining
part of the overtape around
the sensor connector so
that the tape sticks to the
curved adhesive pad and
does not block the sensor
connector. Press the
overtape to your skin
for several seconds to
help ensure that it sticks
securely.
IMPORTANT
All Enlite tapes
and adhesives
stick best when you apply
pressure for several seconds
after putting them on your
skin. Doing so helps the Enlite
sensor stay securely placed
and fully inserted.
20
Page 23

Sensor Insertion
Properly applying the overtape is key to ensuring your success with the Enlite sensor.
Due to the sensor’s small size and flexible nature, the overtape helps to secure it from
body motion or physical activity that can cause it to be pulled out.
Checking Proper Tape Application
It is important to check your sensor site periodically to make sure the sensor is still secure and has not
been pulled out. If the sensor has been pulled out, do not try to push it back into place as this will
damage the sensor.
Ways to Check Proper Tape Application
Correct Not Correct
Overtape is covering both
the sensor and the skin
Overtape is missing Overtape is covering the
sensor but not the skin
21
Page 24

Sensor and Transmitter Connection
MEDTRONIC MINIMED
MiniLink Transmitter
REF MMT-7703XX
SN GT2XXXXXXM
FCC D: OH27703
IC: 3458-7703
1234
IPX8
Connecting Your Transmitter
Before connecting your MiniLink® transmitter
Transmitter ID Number
to your sensor, your transmitter ID must be
entered into your pump in order to enable
communication. Look on the back of your
transmitter to locate the ID number.
To program the Transmitter ID into your pump:
1) From the Home Screen:
Press
2) Press to scroll to Sensor and press
3) Press to scroll to Edit Settings and press
ACT
to open the Main Menu.
ACT
.
ACT
.
4) Press to scroll to Transmitter ID and press
5) Use
6) Repeat step 5 to enter each digit.
22
and buttons to enter each digit and press
ACT
.
ACT
.
Page 25

To connect your transmitter to your sensor:
Sensor and Transmitter Connection
1. With one hand,
hold the sensor in
place. With the other
hand, connect the
transmitter to the
sensor.
5. Press the adhesive
onto the transmitter.
u
2. You will hear a
faint “click” indicating
that the two components are connected.
Check for a green
light to ash on the
transmitter.
u
3. Remove the
paper on the
adhesive tab.
IMPORTANT If you do not see a green light ashing on
the transmitter after it is connected to the sensor, then
disconnect the transmitter and place it back on the charger
to ensure that it is fully charged. Then reconnect the
transmitter to the sensor.
u
4. Fold the adhesive
tab over and onto the
transmitter. Important:
Be careful not to pull
the adhesive tab too
tightly or it may cause
the transmitter to
bend or pull from the
sensor connection.
Optional: If you notice that the Enlite overtape is peeling,
then you may want to add a second adhesive on top of
the provided sensor overtape. This second adhesive can be
used to cover the entire area including the transmitter.
When your transmitter is connected to your sensor they
form a water-tight seal to a depth of 8 feet (2.4 meters)
for up to 30 minutes. You can shower and swim without
removing them.
23
Page 26

Initializing the Sensor
1) From the Home Screen:
ACT
Press
to open the Main Menu.
2) Press to scroll to Sensor and press
ACT
.
3) Press to scroll to Link to Sensor and press
4) Press
ACT
to select New Sensor.
ACT
.
5) You will see a message that your sensor will be ready in 2 hours.
You will now see next to the time. Your sensor is now initializing and you will be alerted in about 2
hours to enter your rst BG calibration before sensor glucose readings can be viewed.
A Quick Reference page is available in the back of this book to help guide you during your
sensor insertions.
24
REMEMBER:
1. Insert the sensor
2. Tape the sensor in place
3. Connect the transmitter
Page 27

Calibration
Section 6: Calibration
Your continuous glucose monitoring system requires BG meter readings in order to generate sensor
glucose readings. These BG meter readings are entered into the pump and are for sensor calibrations.
Calibration is essential for optimal CGM performance. CGM does not eliminate the need for BG meter
readings.
To calibrate, you must use a fingerstick blood sample to test your BG on your meter and then enter that
value into your pump. The pump will accept BG meter readings between 40 mg/dL to 400 mg/dL.
After inserting a new sensor, a calibration is needed:
• Approximately 2 hours after you connect the transmitter to your sensor and initialize your sensor.
Your pump will notify you with a “METER BG NOW” alert when it is ready for its rst calibration.
• Again within 6 hours (rst day of inserting sensor only)
• Again every 12 hours
The minimum number of calibrations required is once every 12 hours (after the rst day). The sensor’s
accuracy can be improved with 3 - 4 calibrations per day. *Although not optimal, calibrations can be
done at anytime providing you with the exibility to calibrate at times that are convenient for you
and to avoid needing to calibrate when it is less convenient such as during the night.
*Note: Calibrating with
or
displayed on the CGM screen may decrease sensor accuracy until the
next calibration.
Calibrations are necessary in order to continue to receive sensor
glucose readings, alerts, and Threshold Suspend alarms. Not
calibrating properly can aect CGM performance.
Approximately two hours after inserting a new sensor, a “METER BG NOW” alert will notify you that the
pump is ready for your rst calibration. Clear the alert by pressing
ESC
, followed by
ACT
and follow these
steps:
There are two ways to calibrate:
Using your Bolus Wizard
1) Press
2) Use
button
and buttons to enter BG meter value and press
3) You will receive a message “BG to update sensor?” Press the to select Yes and press
ACT
.
ACT
.
25
Page 28

Calibration
**If you are using a linked meter, then your BG meter value will automatically appear on the
pump screen. Then follow step 3 above.
Or
Using your Sensor Menu
1) From the Home Screen:
Press
2) Press to scroll to the Sensor menu and press
ACT
to open the Main Menu.
ACT
.
3) Press
ACT
to select Calibrate. (You will only see the option to Calibrate if your sensor and
transmitter are connected and your sensor is ready for its rst calibration).
Calibrating through your Sensor Menu can only occur if
your pump’s insulin delivery is not suspended.
After your rst calibration, it will take about 10-15 minutes for sensor glucose readings to appear on your
pump screen. To nd when your next calibration is due press
ESC
three times from the Home Screen to
view the Sensor Status screen.
Calibrate before bed…
Pam knows she will not have to wake up in the middle of the night
from a “METER BG NOW” alert if she tests her BG before bed and
enters that value into her pump to calibrate her sensor.
IMPORTANT If you notice a large dierence between your BG meter reading and
sensor glucose readings, do another BG ngerstick test after washing your hands. Then
check the sensor site to ensure the sensor is still inserted in your skin. If there is still a
large dierence in glucose readings, then another calibration may be needed to
bring the readings closer together again. Wait 15 minutes before entering another BG
reading for a calibration.
26
Page 29

Calibration
210
11:50A
Reading the CGM Display
Your pump displays 3-hour, 6-hour, 12-hour, and 24-hour glucose trend graphs. To view dierent trend
graphs press .
Press
other graphs.
The CGM will provide sensor glucose readings between 40 mg/dL and 400 mg/dL. If the sensor glucose
reading falls below 40 mg/dL, then the screen will display “Below 40”. If the sensor reading rises above
400 mg/dL, then the screen will display “Above 400”.
Glucose sensor graph
Each time you bolus
a marker will appear on
your graph
Press
recent sensor glucose reading. In order to view the different trend graphs, the most recent sensor
glucose reading must be displayed first.
ESC
once from the Home screen to display the most recently viewed graph. Press to display the
Connection icon
Time of most recent
sensor glucose
reading
24-hour trend graph
The darkened area is the 12 hours
from 6:00pm to 6:00am
to view individual sensor glucose readings on the graph. Press to return to the most
Sensor glucose
reading
What the Sensor Connection Icons Mean
Insulin pump indicates that the MiniLink® transmitter and insulin
pump/CGM monitor are communicating properly.
Pump/CGM monitor has not received a signal for more than 5–7 minutes. This
is okay. The MiniLink transmitter stores up to 40 minutes of data and will send
these readings to the insulin pump once a signal is re-established.
27
Page 30

CareLink® Personal Software
Section 7: CareLink® Personal Software
CareLink Personal software is a free, web-based program that allows you to upload information from your
insulin pump, CGM, and blood glucose meter, making it easier to understand your glucose patterns and
trends.
CareLink Personal is an important part of your success with CGM as it will assist you and your healthcare provider in tracking your glucose levels to see how they are aected by your insulin delivery, meals,
and exercise routines. It provides you with a secure place to store your information and uncover glucose
patterns that meter and logbooks alone cannot reveal. It also allows you and your healthcare provider
to make more informed therapy decisions such as identifying which pump settings to change for better
glucose control.
CareLink organizes your sensor and meter glucose readings, insulin usage, and carbohydrate intake into
detailed reports with charts, tables, and graphs.
Tips for Using CareLink Personal
• Regularly upload your insulin pump using CareLink Personal (at least once/month)
• Review your data and look for patterns and trends
• Discuss therapy adjustments with your healthcare provider
Let’s get started by looking at one of the CareLink Personal Reports: Sensor Daily Overlay
Sensor readings for one day – each day is shown with a dierent color.
1
Target glucose range – the green shaded area represents the target glucose range set in the
2
preferences section of CareLink® Personal and shows whether you are within your target for glucose
control.
Hypoglycemic threshold – the red line represents the low glucose indicator set in the preferences
3
section. The default setting is 60 mg/dL.
Specic information regarding each day’s sensor readings and calibrations.
4
Excursion Summary – shows the number and type of excursions outside the target glucose range.
5
Duration Distribution – shows the amount of time spent above, in, or below your target glucose
6
range on a pie chart.
28
Page 31

CareLink® Personal
1
2
3
4
5
6
Do you see a pattern of low or high glucose values? Focus on resolving lows rst.
• Look at the overnight period rst,
• Then, look at the time periods before meals (let’s assume this patient eats at 7 AM,
12 noon, and 6 PM)
• Finally, look at the time periods after meals (2-3 hours after each meal)
Getting started with CareLink® Personal
To register and setup your free CareLink account visit: www.medtronicdiabetes.com/carelink
29
Page 32

Appendix
Section 7: Appendix
Charging and Storing the MiniLink® transmitter
Charge the transmitter before each use. When the transmitter is
charging, a green light will ash on the charger. This green light
on the charger will turn o when the transmitter is completely
charged. A completely depleted transmitter battery will need
up to 8 hours to recharge. The transmitter can be used for a
maximum of 6 full days in between charges.
When you remove the transmitter from the charger, a green
light should ash on the transmitter. This indicates that it has
enough battery power and is ready to be connected to the sensor.
If you do not see the green ashing light on the transmitter place
it back on the charger until it is fully charged.
Store the transmitter, charger, and test plug in a clean, dry location
at room temperature. Although not required, you may store the
transmitter on the charger. If the transmitter is not in use, you
must charge it at least once every 60 days.
If you see red lights on the charger that ash once every 2 seconds, then the AAA
battery in the charger needs replacement. However, if you see a mix of quick and long
ashes of red lights, then the transmitter battery is depleted and should be fully charged.
Note: Refer to your MiniLink® transmitter User Guide for more information.
30
Page 33

Going for X-rays, MRI, or CT Scan
If you are going to have an X-ray, MRI, CT scan, or other type of diagnostic imaging involving radiation exposure, remove your insulin
pump, transmitter, and glucose sensor and place them outside of
the testing area.
Appendix
Going through Airport Security
Your monitor should not go through the x-ray machine that is used
for carry-on or checked luggage. The full body scanner is also a
form of x-ray. If you choose to go through the full body scanner,
you will need to remove your sensor and transmitter prior to the
scan. To avoid removing your devices, you should request an
alternative screening process that does not use x-ray. Your CGM
system (monitor, sensor, and transmitter) can withstand exposure
to metal detectors and wands used at airport security checkpoints.
Traveling by Air
Your transmitter, sensor, and insulin pump are safe for use on U.S.
commercial airlines and can be worn during ight. However, if airport security requests that you turn o your CGM device, then you
must comply. It is advisable to check with the Transportation Safety
Administration (TSA) for updates. International passengers should
consult with their individual air carriers for international regulations.
To turn o your CGM, simply:
1) Go to: Home Screen > Main Menu > Sensor >
X
X
Turn O Sensor
2) Keep the glucose sensor in place on your body, but
disconnect the transmitter from the sensor and store
it on the charger.
To turn on your CGM after the ight:
1) Reconnect your transmitter to your sensor
2) Go to: Home Screen > Main Menu > Sensor > Edit
Settings > Sensor: On
3) Go to: Home Screen > Main Menu > Sensor > Link to
Sensor > Reconnect Old Sensor
In two hours you will be prompted by a “METER BG NOW” alert that
a calibration is needed.
NOTE: It is important that
you test your blood glucose
(BG) more frequently while
you are traveling. The routine hassle of travel, including stress, changes in time
zones, schedules and activity levels, meal times and
types of food, can all aect
your diabetes control. Be
extra attentive to monitoring your BG frequently, and
be prepared to respond if
needed.
31
Page 34

Notes
Page 35

Quick Reference Guide for CGM Alarm and Alerts
Alerts and Alarms
This table shows the possible alerts and alarms you may receive. To silence an alert, press
ESC
, followed by
WARNING: The Threshold Suspend feature cannot be used to prevent or treat hypoglycemia. Patients
should always respond to the Threshold Suspend alarm when possible and perform a self-monitor blood
glucose (ngerstick glucose test with a BG meter). Patients should follow the advice of their healthcare
providers in treating hypoglycemia and hyperglycemia.
Alert/Alarm What It Means How to Respond
Weak Signal There has been no communication Move the pump closer to the
between the pump and transmitter transmitter/sensor site. To adjust the timing
for the amount of time selected in of this setting go to Home Screen > Main
the Weak Signal setting of the Sensor Menu > Sensor > Edit Settings > Weak
menu. Communication needs to Signal
be re-established or “Lost Sensor”
alert will follow.
Lost Sensor Communication between pump Check that the sensor is still inserted in the
and transmitter has stopped skin. Check that the transmitter and sensor
and sensor glucose readings will not are still connected. To restart communication
be displayed. go to Home Screen > Main Menu > Sensor >
Link to Sensor > Find Lost Sensor.
Meter BG Now A calibration is needed in order to Test your BG with your meter and enter that
receive sensor glucose readings BG value into your pump to calibrate. To
adjust how often you want this alert to repeat
after clearing it, go to Home Screen > Main
Menu > Sensor > Edit Settings > Cal Repeat
ACT
.
Meter BG By A calibration is needed by the time Test your BG with your meter and enter that
that is shown on the alert screen BG value into your pump to calibrate by the
time that is indicated on the alert screen. To
adjust this setting go to Home Screen >
Main Menu > Sensor > Edit Settings > Cal
Reminder
Cal Error BG meter value that was entered Wait at least 15 minutes. Wash hands and do
as a calibration is too different another BG test with your meter and enter
compared with the sensor glucose that value into the pump as a calibration
readings
High SG Sensor glucose reading is equal to Do not treat your glucose based on SG.
or higher than your programmed Confirm it using your BG meter. Treat based
high glucose limit value on instructions from your healthcare
provider. To adjust this setting go to Home
Screen > Main Menu > Sensor > Edit
Settings > Glucose Limits
Low SG Sensor glucose reading is equal to Do not treat your glucose based on SG.
or lower than your programmed Confirm it using your BG meter. Treat based
low glucose limit value on instructions from your healthcare
provider. To adjust this setting go to Home
Screen > Main Menu > Sensor > Edit
Settings > Glucose Limit
33
Page 36

Quick Reference Guide for CGM Alarm and Alerts
Alert/Alarm What It Means How to Respond
High Predicted Sensor glucose reading is expected Do not treat your glucose based on SG.
to reach your programmed high Confirm it using your BG meter and continue
glucose limit in the length of time to monitor. Treat based on instructions from
you selected for the high your healthcare provider. To adjust this
predicted alert setting go to Home Screen > Main Menu >
Sensor > Edit Settings > Predict Alert
Low Predicted Sensor glucose reading is expected Do not treat your glucose based on SG.
to reach your programmed low Confirm it using your BG meter and continue
glucose limit in the length of time to monitor. Treat based on instructions from
you selected for your low your healthcare provider. To adjust this
predicted alert setting go to Home Screen > Main Menu >
Sensor > Edit Settings > Predict Alert
Rise Rate Sensor glucose reading is Do not treat your glucose based on SG.
increasing at a rate that is equal to Confirm it using your BG meter and continue
or faster than your programmed to monitor. Treat based on instructions from
rate alert setting your healthcare provider. To adjust this
setting go to Home Screen > Main Menu >
Sensor > Edit Settings > Rate alerts
Fall Rate Sensor glucose reading is Do not treat your glucose based on SG.
decreasing at a rate that is equal Confirm it using your BG meter and continue
to or faster than your to monitor. Treat based on instructions from
programmed rate alert setting your healthcare provider. To adjust this
setting go to Home Screen > Main Menu >
Sensor > Edit Settings > Rate alerts
Threshold Your programmed Suspend Test your BG and treat based on instructions
Suspend Threshold has been reached and from your healthcare provider. Select to
insulin delivery has stopped continue to Suspend or Restart Basal
insulin delivery. To adjust this setting
go to Home Screen > Main Menu > Sensor >
Edit Settings > Threshold Suspend
Sensor End Sensor has reached its maximum Remove the sensor and follow the
usage of 6 full days instructions for inserting and starting a new
sensor
Sensor Error Sensor electrical signals are not Clear the alert and ignore it if it occurs
within the expected range during the two-hour sensor initialization. If
the alert occurs repeatedly, then replace the
sensor.
Change Sensor The system has detected that the If alert occurs after two “CAL ERROR”
sensor may not be working messages in a row, replace the sensor.
properly. For more information, If alert happens without two “CAL ERROR”
please see ”Alarms and alerts” screens, use the transmitter’s tester to make
chapter, in the section “Alerts” sure the transmitter is working properly. If
of the MiniMed 530G User Guide. alert occurs during initialization, call
Medtronic for assistance.
34
Page 37

Quick Reference Guide for Using the Enlite® Sensor
Part 1. Inserting a new Sensor
1. Hold sensor by pedestal
and place on table.
2. To load serter, push serter all
the way down onto sensor
and pedestal until serter sits
on table.
Be careful not to force serter
too hard onto sensor/pedestal
or it may not load properly.
3. To remove pedestal, place
two ngers on pedestal arms
and pull serter straight up.
5. With one hand, hold sensor
against your body. With other
hand, hold needle housing at
the tip.
Pull needle housing straight out.
Warning: If bleeding occurs at
sensor site (under/around/or
on top of sensor), apply steady
pressure using sterile gauze or
clean cloth placed on top of sensor for up to
three minutes. If bleeding does not stop, then
remove sensor and apply steady pressure until
bleeding stops.
Remove white paper
underneath curved adhesive
pad. Press entire adhesive to
skin for several seconds.
Flip adhesive tab so it lies at,
but do not remove paper
backing yet.
4. To insert sensor, press
green button in and release it.
Hold serter against body and
wait 5 seconds to allow
time for pressure-sensitive
adhesive to stick to skin.
Press and hold in green button.
While continuing to hold in
green button, slowly lift serter
away from your body.
Part 2. Taping the Sensor
1. Remove large paper backing
from overtape. Do not remove
two smaller paper tabs on
sides of overtape.
2. Important: Attach overtape to
both rounded part of sensor
and skin in front of sensor.
3. Apply rest of overtape, but
do not block sensor connector
with overtape. Press overtape
to your skin for several
seconds.
35
Page 38

Quick Reference Guide for Using the Enlite® Sensor
Taping the Sensor cont.
4. Remove two paper tabs
from sides of overtape.
Press overtape against
skin.
These images are
examples of overtape
applied correctly.
Overtape covers both
sensor and skin
Part 3. Connecting the Transmitter
1. With one hand, hold
sensor in place. With
other hand, connect
transmitter to sensor.
2. You will hear a faint “click”
when the two components
are connected. Check for
green light to ash on
transmitter.
Part 4. Initializing the Sensor
1. From Home
Screen, press
ACT
to
open Main Menu.
2. Scroll to Sensor
and press
ACT
.
3. Scroll to Link to
Sensor and press
ACT
4. Press
to select
ACT
.
New Sensor
5. You will see a message
that your sensor will be
ready in 2 hours.
Part 5. Calibrating
Two hours after sensor has started, “METER BG NOW”
alert will notify you for rst calibration. There are two
ways to calibrate:
1. Press
button
2. Enter BG meter value
3. You will receive
message “BG to update
sensor?” Select “yes”
and press
ACT
.
3. Remove paper on adhesive
tab.
4. Fold adhesive tab over
transmitter. Important:
Be careful not to pull
adhesive tab too tightly.
5. Press adhesive onto
transmitter.
36
**If you are using linked meter, your BG meter value will
automatically appear on pump screen. Then follow step
3 above.
1. From Home Screen,
press
Main Menu.
ACT
to open
2. Scroll to the Sensor
menu and press
3. Press
ACT
to select
ACT
.
Calibrate (You will
only see option to
Calibrate if sensor
and transmitter are
connected and sensor
is ready for rst calibration).
Note: Calibrating through Sensor Menu can only
occur if pump’s insulin delivery is not suspended.
950M11672-011 20130903 ©2013 Medtronic MiniMed, Inc. All rights reserved.
Page 39

Quick Reference Guide for Threshold Suspend
Threshold Suspend
Stops all insulin delivery when your sensor glucose reading has reached or fallen below your
programmed Suspend Threshold (can be set between 60 – 90 mg/dL).
Important Tips:
• Threshold Suspend is not intended to be used to treat or
prevent low blood glucose. Conrm your blood glucose using
your BG meter. Then treat your conrmed low blood glucose using
the “15-15 Rule” or as directed by your healthcare provider:
- Take 15 grams of fast-acting carbohydrates (4 oz. orange
juice, 3-4 glucose tabs) and wait 15 minutes. Then retest your
blood glucose. If your blood glucose has not improved, then
take another 15 grams of carbohydrates, wait 15 minutes,
and retest.
• Do not miss Calibrations. Threshold Suspend requires that CGM is
working. Calibrate before going to bed.
• Avoid “Lost Sensor” alert. Check that your sensor has not pulled
out of your skin. Check that your transmitter and sensor are properly
connected and communicating with your pump.
• Check the battery. Change the pump battery when you receive a
“Low Battery” alert to avoid depleting the battery quickly during
Threshold Suspend.
• Avoid nuisance alarms with the two-step response to the
Threshold Suspend siren:
- First, clear the alarm (press
ESC
, followed by
ACT
)
- Then, select continue to “Suspend” or “Restart Basal” delivery
37
Page 40

Quick Reference Guide for Threshold Suspend
Two-step response to Threshold Suspend alarm:
When Threshold Suspend sirens all insulin delivery stops immediately.
Step 1. Press
ESC
, followed by
Step 2. Select to continue “Suspend” or “Restart Basal” delivery.
ACT
to clear the alarm.
NOTE: If you have not
cleared the alarm in 2
minutes, then another
screen will appear: “I
have diabetes, call for
emergency assistance,
to clear ESC then ACT”
If you select to continue “Suspend”, then suspend will last two hours.*
If you select “Restart Basal”, then pump will only suspend again after the set Low Repeat
time has passed and sensor glucose is still at or below the Suspend Threshold.
* Note: If you decide to resume basal insulin delivery after you have selected “Suspend”, press
show the THRESHOLD SUSPEND options screen again, and select “Restart Basal”.
38
ACT
to
950M10620-011 20130903 ©2013 Medtronic MiniMed, Inc. All rights reserved.
Page 41

Notes
Page 42

Notes
40
Page 43

Page 44

www.medtronicdiabetes.com
Medtronic Diabetes
18000 Devonshire Street
Northridge, CA 91325
1.800.646.4633
MiniMed and CareLink are registered trademarks and mio is a trademark of Medtronic MiniMed, Inc.
9501486-011 20130903 ©2013 Medtronic MiniMed, Inc. All rights reserved.
 Loading...