

Page 1

User ’s Guide
Page 2

Introduction to the
model 508 insulin pump
- - - - - - - - - - - - - - - - - - -
1
Let’s Get Started! - - - - - - - - - - - - - - - - - - - - - - - - - - - -
2
In Preparation for Your Pump Start - - - - - - - - - - - - - - -
2
Becoming Familiar With Your Pump - - - - - - - - - - - - - - - -
5
Buttons - - - - - - - - - - - - - - - - - - - - - - - - - - - - - - - - -
6
Liquid Crystal Display (LCD) - - - - - - - - - - - - - - - - - - - -
6
Turn Your Pump Over - - - - - - - - - - - - - - - - - - - - - - - -
7
Main Programming Screens - - - - - - - - - - - - - - - - - - - - -
8
Setup I - - - - - - - - - - - - - - - - - - - - - - - - - - - - - - - - - -
8
Setup II - - - - - - - - - - - - - - - - - - - - - - - - - - - - - - - - - -
9
508 Quick Start Guide - - - - - - - - - - - - - - - - - - - - -
11
Verifying & Setting the Time and Date: - - - - - - - - - - - -
12
Setting Your Basal Rate - - - - - - - - - - - - - - - - - - - - - - -
14
Reviewing Your Profiles - - - - - - - - - - - - - - - - - - - - - - -
16
The Reservoir and Infusion Set - - - - - - - - - - - - - - - - -
17
Changing the Reservoir and Infusion Set - - - - - - - - - - -
18
Reservoir Placement - - - - - - - - - - - - - - - - - - - - - - - -
18
To Remove the Reservoir Converter - - - - - - - - - - - - - -
20
To Reinstall the Reservoir Converter - - - - - - - - - - - - -
21
Sof-set and Reservoir Change - - - - - - - - - - - - - - - - - -
22
Silhouette and Reservoir Change - - - - - - - - - - - - - - - -
24
Installing the Reservoir and Infusion Set - - - - - - - - - -
26
Removing the Reservoir and Infusion Set - - - - - - - - - -
28
Table of Contents
This device is protected under one or more of the following U.S.
Patents:
[US]4,562,751 [US]5,050,764 [US]5,376,070
[US]4,678,408 [US]5,080,653 [US]5,399,823
[US]4,685,903 [US]5,097,122
Other U.S. and/or foreign patents may be pending.
D9195742-011 9/01
M
edtroni
c
M
iniMe
d
Northridge, CA 91325
USA
800-826-2099 • 818-576-5555 (24-hour Help Line)
800-843-6687 (To order supplies)
www.minimed.com
0678
0459
Page 3

Priming the Pump - - - - - - - - - - - - - - - - - - - - - - - - - - -
29
Bolus - - - - - - - - - - - - - - - - - - - - - - - - - - - - - - - - - - - -
31
Setting A Normal Bolus - - - - - - - - - - - - - - - - - - - - - -
31
Stopping and Restarting Your Pump - - - - - - - - - - - - - -
32
To Stop or Put Your Pump in ‘Suspend’ - - - - - - - - - - - -
32
To Restart Your Pump - - - - - - - - - - - - - - - - - - - - - - -
33
Prime History and Use - - - - - - - - - - - - - - - - - - - - - - - -
34
Reservoir Volume and Low Volume Alert
- - - - - - - - - -
35
Initial Pump Settings - - - - - - - - - - - - - - - - - - - - - - - - -
37
Basal Rates: why and how - - - - - - - - - - - - - - - -
41
Q & A - - - - - - - - - - - - - - - - - - - - - - - - - - - - - - - - - - - -
41
Setting the Maximum Basal Rate - - - - - - - - - - - - - - - - -
44
Setting Your Basal Rate - - - - - - - - - - - - - - - - - - - - - - -
45
Personal Delivery Patterns - - - - - - - - - - - - - - - - - - - - -
47
To Turn Personal Delivery Patterns ON - - - - - - - - - - - -
47
To Set Personal Delivery Patterns - - - - - - - - - - - - - - -
47
Setting a Temporary Basal Rate - - - - - - - - - - - - - - - - -
49
Verifying Delivery - - - - - - - - - - - - - - - - - - - - - - - - -
50
Stopping or Resetting a Temporary Basal Rate - - - - - -
51
Verifying the Change - - - - - - - - - - - - - - - - - - - - - - - -
52
Insulin Boluses: why and how - - - - - - - - - - - - -
53
Q & A
- - - - - - - - - - - - - - - - - - - - - - - - - - - - - - - - - - - -
53
Setting the Maximum Bolus Limit - - - - - - - - - - - - - - - -
55
Reviewing Bolus History
- - - - - - - - - - - - - - - - - - - - - - -
56
Variable Bolus
- - - - - - - - - - - - - - - - - - - - - - - - - - - - -
57
Setting A Normal Bolus - - - - - - - - - - - - - - - - - - - - - - -
58
Square Wave Bolus Option
- - - - - - - - - - - - - - - - - - - - -
59
Dual Wave Bolus Option
- - - - - - - - - - - - - - - - - - - - - - -
60
Audio Bolus - - - - - - - - - - - - - - - - - - - - - - - - - - - - - - -
62
To Turn Audio Bolus Feature On - - - - - - - - - - - - - - - -
62
To Set an Audio Bolus - - - - - - - - - - - - - - - - - - - - - - -
63
Daily Totals and History - - - - - - - - - - - - - - - - - - - - - - -
64
Clocks and Alarms - - - - - - - - - - - - - - - - - - - - - - - -
65
Changing the Time Display - - - - - - - - - - - - - - - - - - - - -
65
Setting the Beep Volume - - - - - - - - - - - - - - - - - - - - - -
66
Reviewing Your Alarms - - - - - - - - - - - - - - - - - - - - - - - -
67
Setting the Automatic Off - - - - - - - - - - - - - - - - - - - - -
68
Alarm Type - - - - - - - - - - - - - - - - - - - - - - - - - - - - - - - -
69
Other Useful Features - - - - - - - - - - - - - - - - - - - - -
71
Using The Remote Programmer - - - - - - - - - - - - - - - - -
71
Using the Remote Programmer to Deliver a Bolus - - - -
74
Using the Remote Programmer
to Suspend/Restart the Pump - - - - - - - - - - - - - - - - - -
75
Child Block Activation - - - - - - - - - - - - - - - - - - - - - - - -
76
Setting Your Insulin Concentration
- - - - - - - - - - - - - - -
77
Pump Function Evaluation Options - - - - - - -
79
Self Test - - - - - - - - - - - - - - - - - - - - - - - - - - - - - - - - - -
79
Lead Screw Rotation Test
- - - - - - - - - - - - - - - - - - - - - -
81
Pump Care and Maintenance - - - - - - - - - - - - - -
83
Batteries - - - - - - - - - - - - - - - - - - - - - - - - - - - - - - - - - -
83
Low Battery & Vibration - - - - - - - - - - - - - - - - - - - -
83
To Remove the Battery Carrier - - - - - - - - - - - - - - - - -
84
To Install New Batteries - - - - - - - - - - - - - - - - - - - - - -
85
Installation of the Spring Belt Clip
- - - - - - - - - - - - - - -
86
Pump Care
- - - - - - - - - - - - - - - - - - - - - - - - - - - - - - - -
87
If Your Pump is Dropped - - - - - - - - - - - - - - - - - - - - -
87
If Your Pump Becomes Submerged in Water - - - - - - - -
88
Exposure to Extreme Temperatures - - - - - - - - - - - - - -
89
Cleaning Your Pump - - - - - - - - - - - - - - - - - - - - - - - -
90
Page 4

X-Rays, MRI’S and CT Scans - - - - - - - - - - - - - - - - - - - -
90
Remote Programmer Care and Maintenance - - - - - - - -
91
Installation of the Battery - - - - - - - - - - - - - - - - - - - -
91
If Your Remote Programmer is Dropped - - - - - - - - - - -
91
If Your Remote Programmer
Becomes Submerged in Water - - - - - - - - - - - - - - - - -
92
Exposure to Extreme Temperatures - - - - - - - - - - - - - -
92
Cleaning Your Remote Programmer - - - - - - - - - - - - - -
92
FCC Notice for the Remote Programmer - - - - - - - - - - -
93
Pump User Safety Information - - - - - - - - - - - - -
95
Caution - - - - - - - - - - - - - - - - - - - - - - - - - - - - - - - - - - -
95
Indications - - - - - - - - - - - - - - - - - - - - - - - - - - - - - - - -
95
Contraindications - - - - - - - - - - - - - - - - - - - - - - - - - - -
95
Warnings - - - - - - - - - - - - - - - - - - - - - - - - - - - - - - - - - -
96
Precautions - - - - - - - - - - - - - - - - - - - - - - - - - - - - - - - -
97
General - - - - - - - - - - - - - - - - - - - - - - - - - - - - - - - -
97
Infusion Sets and Sites - - - - - - - - - - - - - - - - - - - - - -
99
Hypoglycemia - - - - - - - - - - - - - - - - - - - - - - - - - - -
100
Hyperglycemia and Diabetic Ketoacidosis (DKA) - - - -
101
Adverse Reactions - - - - - - - - - - - - - - - - - - - - - - - - - -
102
Hyperglycemia and Diabetic Ketoacidosis (DKA) - - - -
102
Hypoglycemia - - - - - - - - - - - - - - - - - - - - - - - - - - -
103
Site Infection/Abscesses - - - - - - - - - - - - - - - - - - - -
103
Troubleshooting:
Alarms and Screen Messages
- - - - - - - - - - - - -
105
Error Messages
- - - - - - - - - - - - - - - - - - - - - - - - - - - -
105
Error Restart Procedure - - - - - - - - - - - - - - - - - - - - -
105
Alarm Messages
- - - - - - - - - - - - - - - - - - - - - - - - - - - -
106
Alarm Restart Procedure - - - - - - - - - - - - - - - - - - - -
106
Troubleshooting & Diabetes
Management Issues
- - - - - - - - - - - - - - - - - - - - - - -
109
Blood Glucose Monitoring - - - - - - - - - - - - - - - - - - - - -
109
Low Blood Glucose - Hypoglycemia - - - - - - - - - - - - -
111
Problems & Solutions - - - - - - - - - - - - - - - - - - - - - -
111
Prevention and Treatment Tips - - - - - - - - - - - - - - - -
112
Hyperglycemia and Diabetic Ketoacidosis – DKA - - -
113
High Blood Glucose Problems & Solutions - - - - - - - -
113
Sick Day Management - - - - - - - - - - - - - - - - - - - - - - -
116
Infusion Sets and Infusion Sites - - - - - - - - - - - - - - - -
118
Skin Site Selection - - - - - - - - - - - - - - - - - - - - - - - -
118
Problems & Solutions - - - - - - - - - - - - - - - - - - - - - -
119
Daily Living, Lifestyle Activities - - - - - - - - - - - - - - - - -
120
Temporary Removal Guidelines - - - - - - - - - - - - - - - -
121
Physical Activity
- - - - - - - - - - - - - - - - - - - - - - - - - - - -
122
Pump Overview - - - - - - - - - - - - - - - - - - - - - - - - - - -
125
Pump Specifications - - - - - - - - - - - - - - - - - - - - - - - - -
125
Memory - - - - - - - - - - - - - - - - - - - - - - - - - - - - - - - - - -
127
Safety Features - - - - - - - - - - - - - - - - - - - - - - - - - - - -
128
Factory Settings - - - - - - - - - - - - - - - - - - - - - - - - - - -
130
Icon Table
- - - - - - - - - - - - - - - - - - - - - - - - - - - - - - - -
131
Glossary - - - - - - - - - - - - - - - - - - - - - - - - - - - - - - - - -
133
Index - - - - - - - - - - - - - - - - - - - - - - - - - - - - - - - - - - - - -
139
Check Point Answers - - - - - - - - - - - - - - - - - - - - - -
145
Page 5

1
Introduction to the model
508 insulin pump
Whether you are beginning pump therapy for the first time, or
upgrading from a previous model, we are pleased that you have chosen Medtronic MiniMed as your partner to help you gain better control of your diabetes. We believe that the combination of state-of-theart technology with simple, menu-driven programming will provide
many benefits.
There are three main sections to this user’s guide:
•A‘Quick Start’ guide is available beginning on page 11. It
has been designed to get you up and pumping!
•Following the ‘Quick Start’ guide, you will find more
detailed information on specific programming features and
more advanced options.
•Adetailed troubleshooting guide and glossary are also
included.
Throughout, you will find
NEED TO KNOW
facts, and Checkpoints
included in the margins and at the end of many sections. These are
cues for you to check your understanding.
answers can be found in the Checkpoint answers section.
This user’s guide is designed to help you learn to use your pump,
however, working with your health car e pr ofessional will speed your
familiarity with the pump and pump therapy.
Welcome
Page 6

Please bring the following items with you to your pump start:
•One (1) Medtronic MiniMed pump, remote programmer and
all the supplies that came in your pump box
•Two or three (2-3) extra Medtronic MiniMed reservoir
syringes and infusion sets (Sof-set®, Silhouette™, etc.)
•Three or Four (3-4) tape patches (IV3000*, Polyskin, etc.)
•Insulin
•Any questions that you have from your "homework"
Coming prepared will help make your pump start a comfortable
learning experience. Do not hesitate to call your Medtronic
MiniMed representative or your health care professional if you have
any questions during your preparation for your pump start.
Let’s Get Star ted!
IN PREPARATION FOR YOUR PUMP START
The Medtronic MiniMed 508 has been designed to be very simple to
learn and most pump wearers find the time spent learning how to
operate their pump enjoyable! However, valuable time will be lost to
both you and your health care team if you have not become familiar
with your pump prior to your pump start.
Pump Start "Homework"
Along with your pump, remote programmer (where applicable) and
supplies, you have received:
•This user’s guide with ‘Quick Start’ guide
•Programming and Alarm Cards
With your pump in hand, watch the video and review the user’s
guide and ‘Quick Start’ guide. After doing this you should come to
the pump start comfortable with the following basic functions:
•Using the SEL button to move through the pump screens
•Using the ACT button to choose a pump feature
•Changing the Time and Date on the pump
•Delivering a Bolus
•Stopping the pump by placing the pump in Suspend and
then restarting the pump
•Setting three (3) Basal Rates and changing them
•Setting a Temporary Basal Rate and then canceling it
•Filling a Medtronic MiniMed reservoir syringe, attaching an
infusion set to the syringe and priming the tubing (use tap
water or a bottle of saline - no need to waste insulin!)
•Inserting the syringe into your pump and delivering a Prime
to take up "slack" in the system
3
Welcome
Welcome
2
NEED TO KNOW
ALWAYS TREAT YOUR DIABETES FIRST!!!
As you start pump therapy REMEMBER:
Your pump uses only fast acting, R egular insulin. This means you do not
have longer-acting insulin in your body. Without insulin your blood
glucose will rise and you could experience diabetic ketoacidosis
(DKA), which could result in hospitalization.
If your insulin delivery is interr upted for any reason, you must be prepared to replace the missed insulin injection immediately.
The quickest way to do so is to
TAKE AN INJECTION OF REGULAR
INSULIN.
* IV3000 is a trademark of Smith & Nephew
Page 7
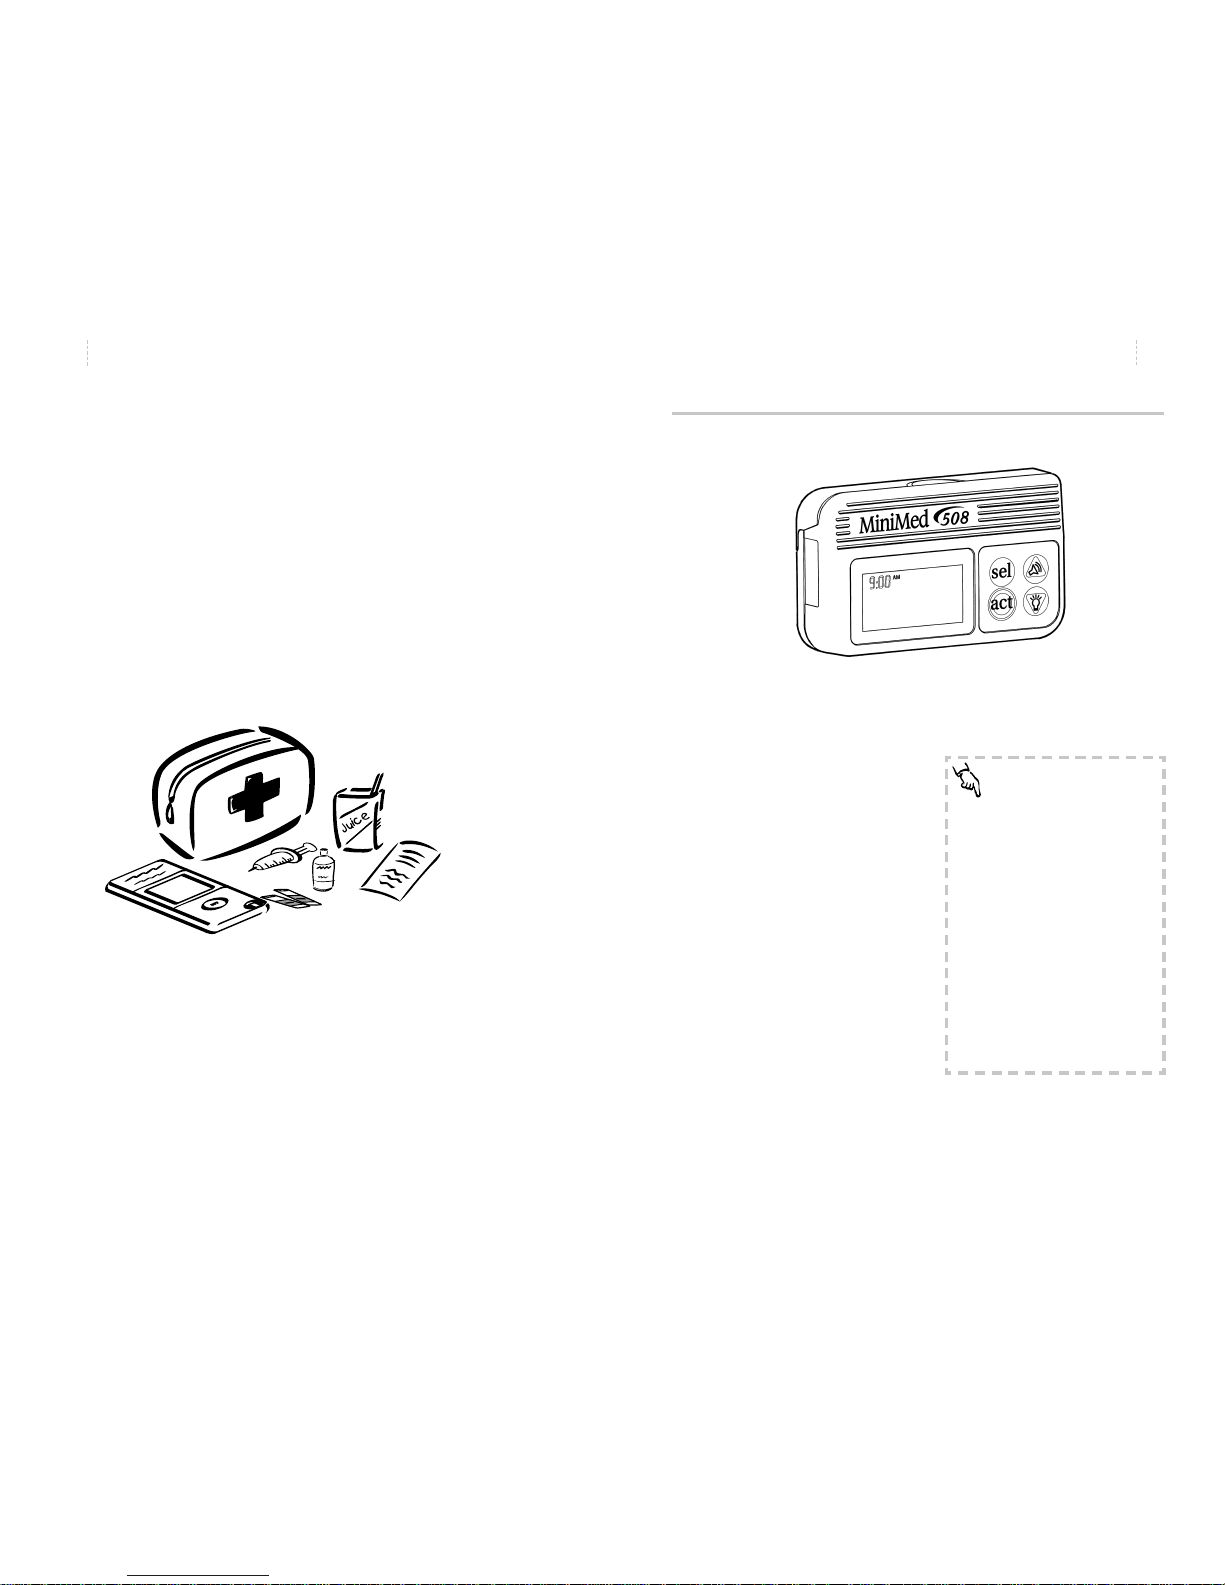
Becoming Familiar With Your Pump
Take a look at your pump.
The pump is small, lightweight and has a large, backlit liquid crystal
display (LCD).
The pump is also smart - storing
approximately 90 days worth of
data in memory. With the ComStation, you will be able to connect
your pump to a computer to ‘download’ this stored information.
Keep an emergency kit with you at all times.
This kit should include:
•Fast-acting glucose tablets
•Blood glucose monitoring supplies, urine ketone monitoring
supplies
• Regular insulin & insulin syringe with directions from your
health care professional regarding how much insulin to take
•An extra infusion set and Medtronic MiniMed reservoir
•Dressing and adhesive
•Extra batteries (MMT-104)
•508 programming and alarm cards
Let another family member or friend know where this is kept.
Please refer to the Pump User Safety Information section on page 95
for more information on pump therapy including troubleshooting
and diabetes management issues.
5
Welcome
Welcome
4
NEED TO KNOW
‘Press’ means to push and release
the button being used.
Blinking words or numbers, seen in
an ‘outline fashion’, indicate information that can be changed.
BLINKING
Information that cannot be
changed is printed on the screen
in whole, black characters.
NORMAL
Page 8
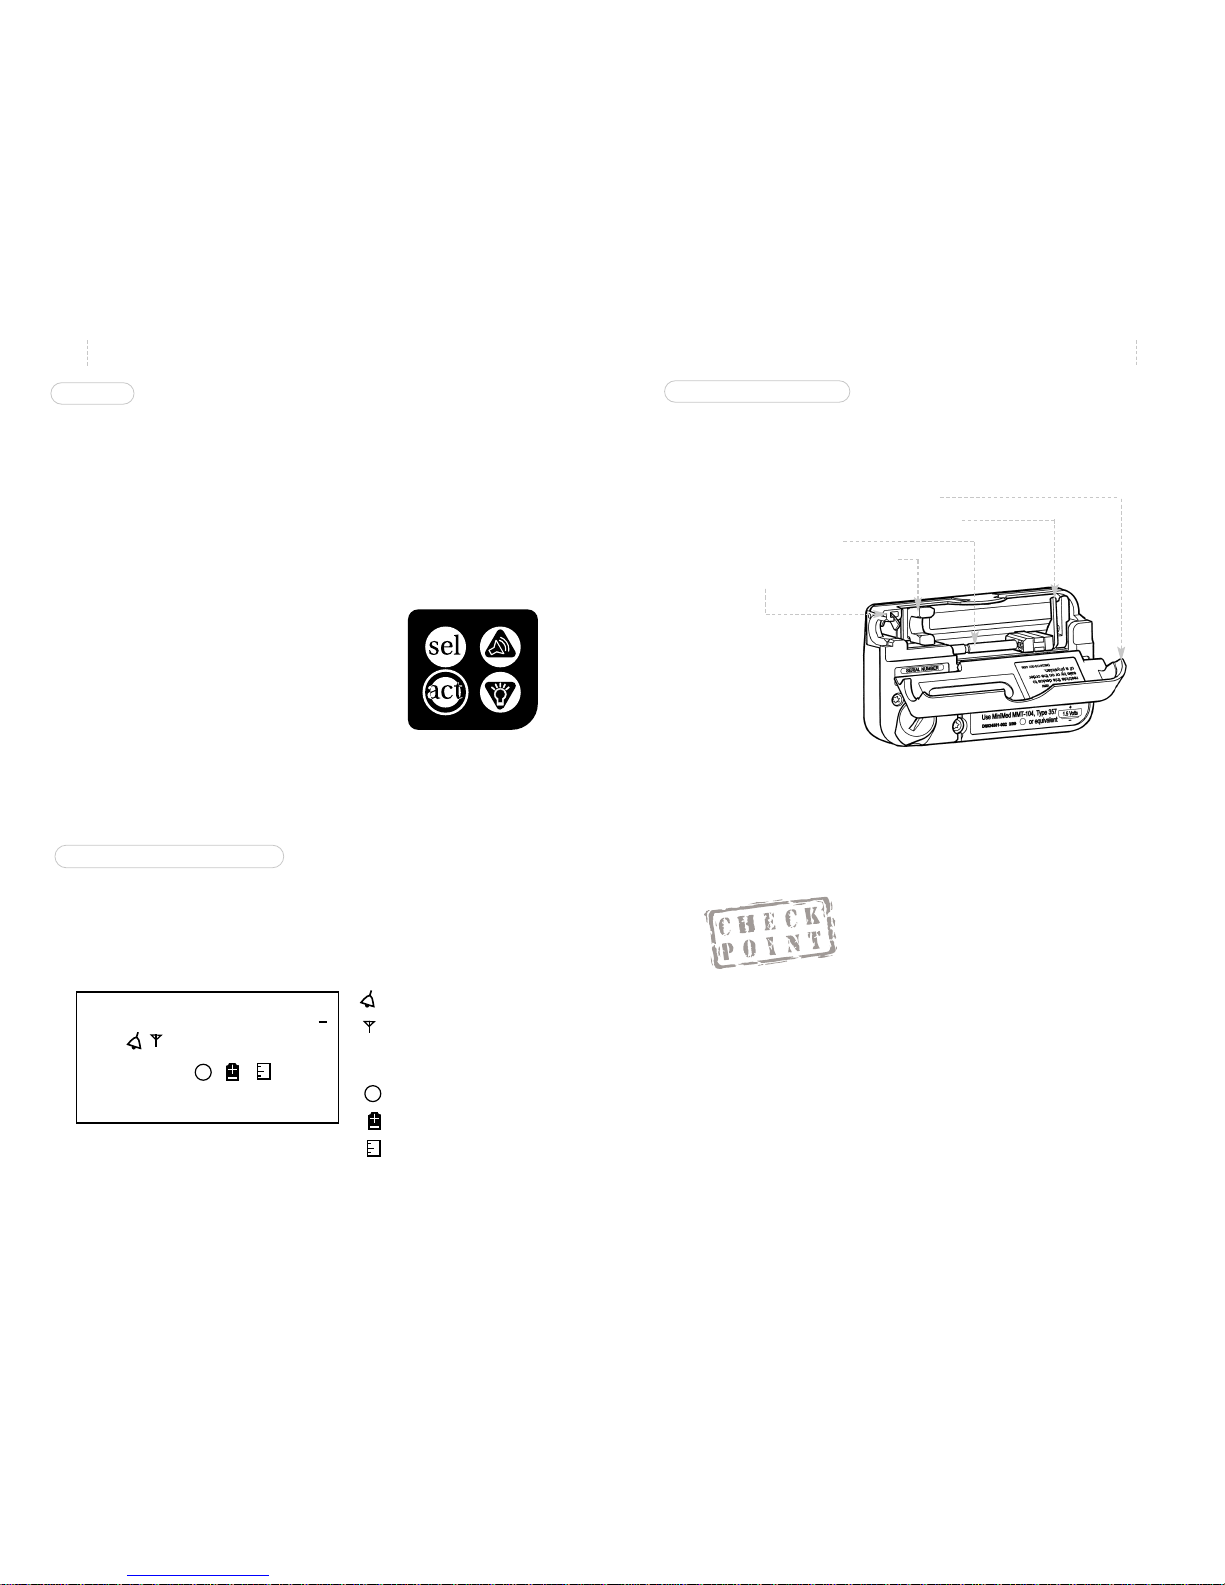
TURN YOUR PUMP OVER
•Look at the reservoir compartment window. This window
lets you see how much insulin remains in the syringe.
•Apply pressure to the top of the case and pull open the
reservoir compartment door.
•Find the mechanical driver arms
and lead screw,
reservoir converter and
the Luer neck lever.
Y ou will put insulin into a special syringe called a r eservoir. The Luer
neck lever holds the reservoir in position. The driver arms will be fit
over the squared-off end of the reservoir plunger. The driver arms are
connected to the driver block which moves insulin through the reservoir and tubing and into your body.
Welcome
7
Welcome
BUTTONS
Four buttons let you program all of the pump’s features and options.
1. The SEL (Select) button will scroll through the screens. You
will have about seven seconds to view each screen. If you
wish to view the screen for longer periods, continue to hold
the SEL button after each press.
2. The ACT (Activate) button will activate programming
changes you wish to make. You will
always hear a single beep after you
have successfully activated a change.
3. The UP and DOWN arrows will
change the number to the value of
your choice. UP scrolls the number
higher and DOWN scrolls the number lower.
• The UP arrow lets you set an audio bolus.
• The DOWN arrow lets you turn the backlight on or off.
LIQUID CRYSTAL DISPLAY (LCD)
The pump has a unique LCD which combines both text and icons to
notify you of all operations, alerts and alarms. Take a moment to
become familiar with all the parts of the LCD. The LCD also has a
backlight to help you see the pump in low light conditions.
6
1. What button must be pressed to activate a change?
______
Find:
a. The battery compartment located on the lower left side of the
pump case.
b. The toll-free Medtronic MiniMed Clinical Services Help Line
number.
______________________
8.8.Z
AM
PM
PROG
SETUP
TEMP
BASAL
BOLUS
TOTAL
PROF:
HIST:
U
H
........
88:88
S
A
B
#1
S
A
B
Alarm Type
RF Device
Personal Delivery Patterns
Future Applications
Low Battery Indicator
Reservoir Volume
Page 9

Welcome
Welcome
9
8
MAIN PROGRAMMING SCREENS
SETUP I
AM
PM
03:02
8.6.0
AM
PM
BOLUS
HIST:
U
11 .N .LAST
12:00
+.5.+
PPRROOGG
SSUUSSPPEENNDD
++.+
TEMP
BASAL
U
H
........
++:++
8.0.0
AM
PM
PROG
BASAL
PROF:
U
H
11 NOW
88:88
2.
AM
PM
PROG
BEEP8VO L
++:Hr
8.2.0
AM
PM
PPRROOGG
SSEELLFFTTEESSTT
++:Hr
06.0
TOTAL
U
TTOODDAAYY.
HIST:
---- ..PRIME
SETUP8I
SETUP8II
8.8.Z
AM
PM
SET.TIME
83:06
SETUP
EXIT8888
1.0.0
AM
PM
BOLUS
HIST:
U
MAXIMUM8
12:00
O.FF
AM
PM
BOLUS
HIST:
U
AUDIO8M
12:00
32.0
AM
PM
PROG
BASAL
PROF:
U
H
MAXIMUM8
88:88
O.FFn
AM
PM
PROG
BASAL
PROF:
U
H
PATTERNS
88:88
O.FFn
AM
PM
PROG
BASAL
PROF:
U
H
BLOCK8
88:88
HIST:
---- .ALARM9
Off
RF.DEV.
TYPE..
8.0.0
AM
PM
PROG
DISPLAY
12:Hr
1.0.0
AM
PM
PROG
INSULIN
12:HU
SETUP II
SETUP
EXIT8888
1. Time of Day
2. Bolus 3. Suspend
4. Basal Rate
5. Temporary Basal Rate 6. Daily Totals
7. Prime & Low
Reservoir Volume
8. Set Up I
1. Set Time and Date
2. Automatic Off
3. Beep Volume
4. Self Test 5. Set Up II
6. Set Up I Exit
1. Variable Bolus
2. Maximum Bolus
3. Maximum Basal Rate
4. Alarm Review
5. Radio Frequency Device
6. Audio Bolus
7. Basal Patterns
8. Alarm Type
9. Child block
10. Time Display
11. Insulin Concentration
13. Set Up II Exit
SETUP8I
12. Set up I
SETUP8II
9. Set Up II
8.0.0
AM
PM
PROG
AUT0--0FF
++:Hr
0FF
AM
PM
BOLUS
HIST:
U
VARIABLE
12:00
Page 10

11
Quick Start
10
508 Quick Start Guide
The following guidelines are basic instructions to get you started
using your pump. Please refer to the detailed instructions in this
user’s guide regarding additional options including various bolus
and basal rates.
Welcome
Page 11

7. The time and date that you just set will be displayed.
13
Quick Start
12
Quick Start
WHY IS THE TIME AND DATE NECESSARY?
✗ The time shown on your clock is used to time the insulin
delivery of your basal rate(s) and to monitor other pump
operations.
✗ The date is used to sort the long term data stored in the
pump’s memory.
✗ This stored information can be downloaded to a computer
for you or your health care professional to use in assisting
you in your glucose control goals.
NEED TO KNOW
The 508 does not have an On/Off
button. As soon as you install batteries, the pump will be On and the
current time will be shown on the
window display.
8.8.Z
AM
PM
04DEC99
84:07
Verifying & Setting the Time and Date
Why:
Sets the time and date for your specific area.
Where:
SET UP I on the SET TIME screen.
How:
1. From the TIME OF DAY screen, press SEL to SET UP I then
press ACT. You will see the SET
TIME screen. Press ACT, “PROG
HOURS” will appear.
2. Use the arrows to select the hour,
then press ACT. The screen will
say “PROG MINUTES”.
3. Use the arrows to select the min-
utes and press ACT. The screen
will say “PROG YEAR”.
4. Use the arrows to select the year
and press ACT. The screen will
say “PROG MONTH”.
5. Use the arrows to select the
month and press ACT. The
screen will say “PROG DAY”.
6. Use the arrows to select the day
and press ACT.
8.8.Z
AM
PM
SET.TIME
83:06
8.8.Z
AM
PM
HOURS
833:06
8.8.Z
AM
PM
MINUTES
84:0066
PROG
PROG
0.99
AM
PM
YEAR
84:07
PROG
0.12
AM
PM
MONTH
84:07
PROG
0.04
AM
PM
DAY
84:07
PROG
Page 12

15
Quick Start
14
Quick Start
1. Which of the four buttons moves you to the BASAL screen?
___________
2. Which of the four buttons sets the program you are select-
ing? ___________
3. Which of the four buttons selects the number value?
___________
NEED TO KNOW
It is recommended that you set
these features with the assistance
of your health care professional.
#2
Setting Your Basal Rate
Why:
Provides a continuous amount of insulin 24 hours a day.
Where:
Main Menu on the BASAL RATE screen.
How:
1. From the TIME OF DAY screen, press
SEL until you see the BASAL RATE
screen, then press ACT. The first basal
rate always starts at midnight - this
time cannot be changed.
2. Use the arrows to select your basal
rate. Press ACT.
3. To add another basal rate, use the
arrows to select your start time. The
start time for the second basal rate is
the end time for the first basal rate.
Press ACT .
4. Use the arrows to select a basal rate.
Press ACT .
5. Follow this process to set additional
rates as necessary.
6. When all rates have been set, press
ACT. The total amount of insulin
delivered as a basal rate for the day
will appear on the screen.
8.0.0
AM
PM
PROG
BASAL
PROF:
U
H
11 NOW
88:88
8.00.4
AM
PM
PROG
BASAL
PROF:
U
H
1
12:00
8.+.+
AM
PM
PROG
BASAL
PROF:
U
H
2
6:00
8.0.8
AM
PM
PROG
BASAL
PROF:
U
H
2
6:00
1.16.8
BASAL
TOTAL
U
24.HOURS
Page 13

17
Quick Start
The Reservoir and Infusion Set
The Medtronic MiniMed system includes the Medtronic MiniMed
pump, reservoir syringe and infusion set. The Medtronic MiniMed
pump is intended for use with the Medtronic MiniMed reservoir
syringe, Model 103. Medtronic MiniMed also provides a variety of
infusion sets to appeal to different types of people. Medtronic
MiniMed also provides a variety of
infusion sets to appeal to different
types of people. The sets to be used
with the Medtronic MiniMed pump
and the Medtronic MiniMed model 103
reservoir include the following:
•Polyfin®Bent Needle Infusion
sets
•Sof-set®Infusion sets
•Silhouette®Infusion sets
•Quick-set™Infusion sets
All infusions sets are available with a disconnect feature. Please refer
to the Instructions for Use found with the reservoir and infusion set
you have chosen for detailed information.
NEED TO KNOW
Remember the reservoir syringe is
specifically designed for use with
the Medtronic MiniMed pump.
Do not use other syringes as they
may not provide you with accurate insulin delivery.
16
Quick Start
Reviewing Your Profiles
Why:
Confirms that basal rates are entered correctly.
Where:
Main Menu on the BASAL RATE screen.
How:
1. From the TIME OF DAY screen, press
SEL until you see the BASAL RATE
screen. You will see the current basal
rate on the screen in units per hour.
2. Use the arrows to review the other basal rates you have set.
Example:
Profile 2:
What time does it begin?
What is the rate?
After you have reviewed all of your programmed basal rates, the
total amount of insulin to be delivered as basal rate during the 24
hour day will be shown.
After a few seconds, the pump will then return to the TIME OF DAY
screen.
8.0.4
AM
PM
PROG
BASAL
PROF:
U
H
11 NOW
88:88
8.0.8
AM
PM
PROG
BASAL
PROF:
U
H
2
06:00
16.8
BASAL
TOTAL
U
24 HOURS8
Page 14
19
Quick Start
18
Quick Start
Changing the Reservoir and Infusion Set
Why:
It is important that you change the infusion set at least every 2-3
days. Rotating the site will help to avoid any problems with your skin,
or with your infusion site. Also, the insulin will absorb best when you
change the set regularly. For complete information, refer to the
Instructions for Use that come with your reservoir and infusion set.
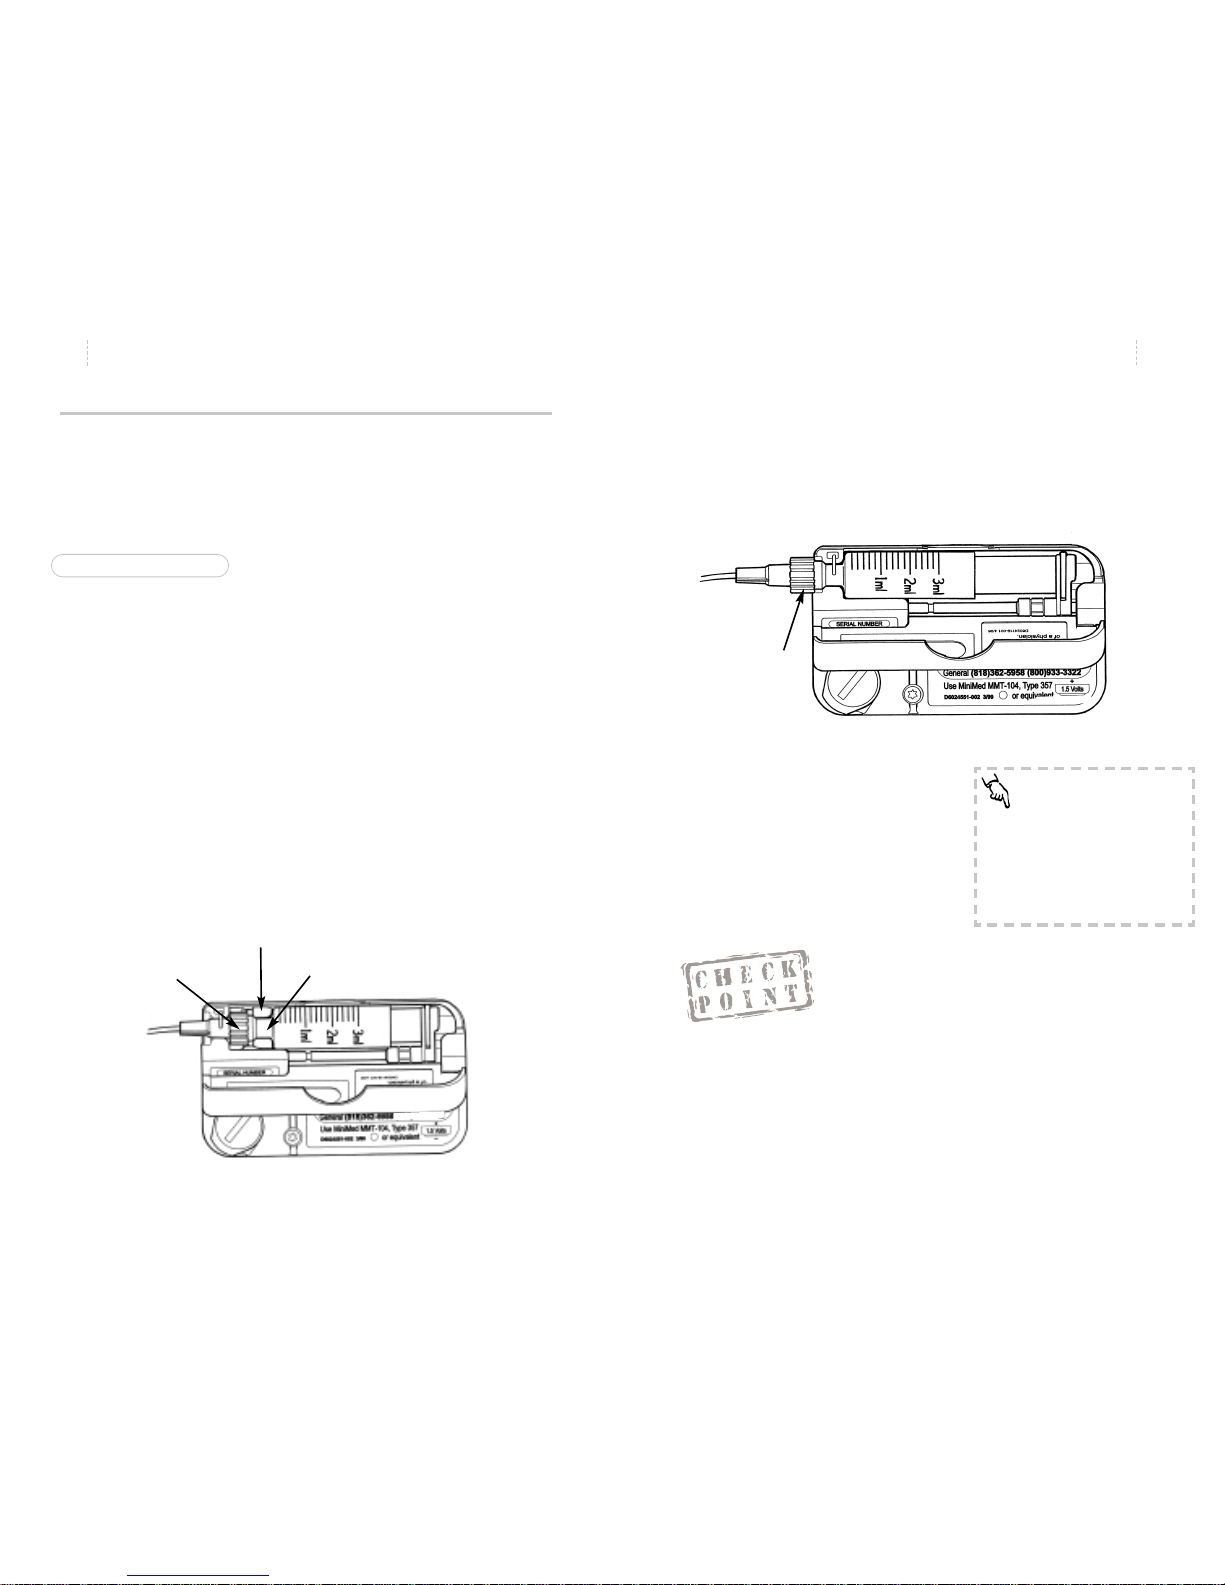
RESERVOIR PLACEMENT
There are two methods of installing the reservoir in your pump.
These are the Short Reservoir method and the Full or Long Reservoir
method. Please discuss with your health care professional which is
right for you.
The Short Reservoir Method:
•Allows the Luer connection to be almost completely hidden
inside the pump.
•The maximum reservoir volume is 150 units (U-100).
•Uses the reservoir converter to hold the reservoir neck in
place inside the pump. (Reservoir converter must be used or
inaccurate insulin delivery may result.)
NOTE: All pumps are shipped from Medtronic MiniMed in the Short
Reservoir Method.
The Full Reservoir Method:
•Allows the Luer connection to be outside the reservoir
compartment.
•Maximum reservoir volume is 300 units (U-100).
•Does not use the reservoir converter.
Reservoir Converter
1. Which reservoir method is installed at Medtronic MiniMed?
2. Which reservoir method is used when the required reservoir
volume is 300 units (U-100)?_______________
3. What special task needs to be performed to use the Full
Reservoir Method?_____________________
NEED TO KNOW
IMPORTANT
Always change the infusion set
and the reservoir at the same time
to insure adequate priming and
accurate insulin delivery.
#3
Luer
Lock
Reservoir
Neck
Luer
Lock
Page 15
21
Quick Start
20
Quick Start
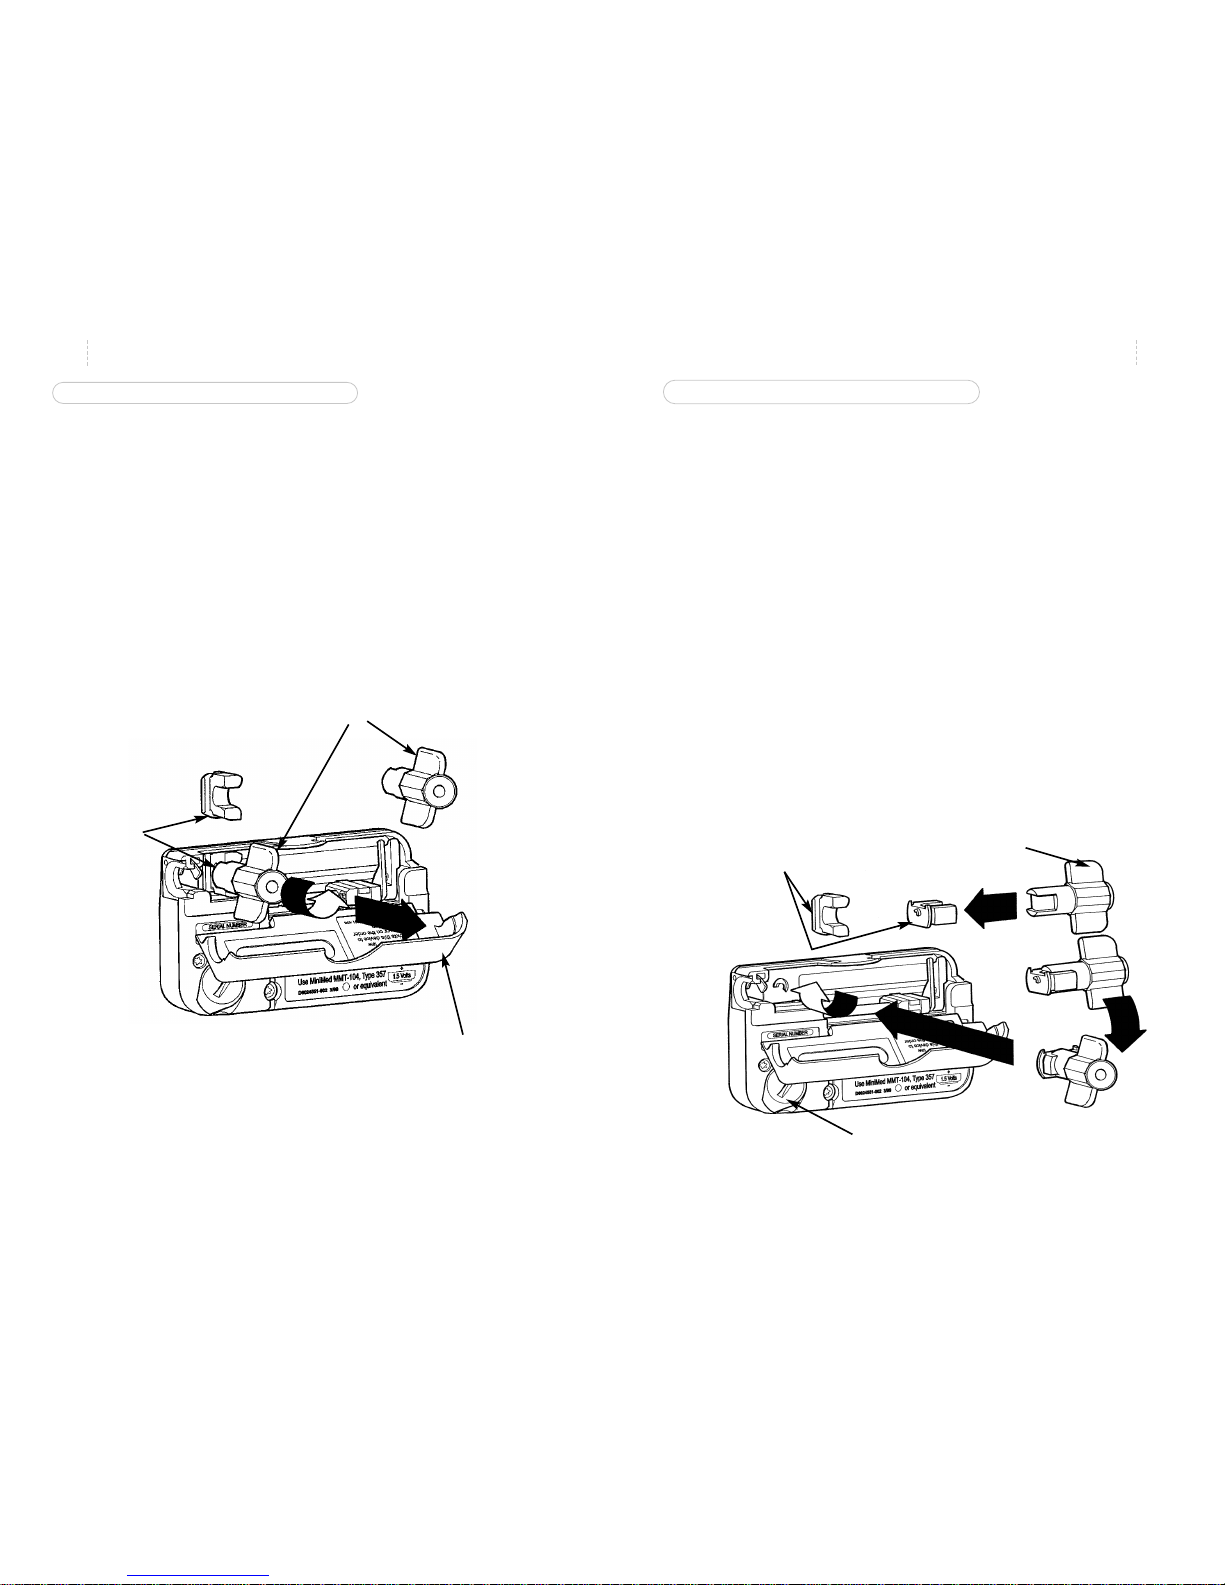
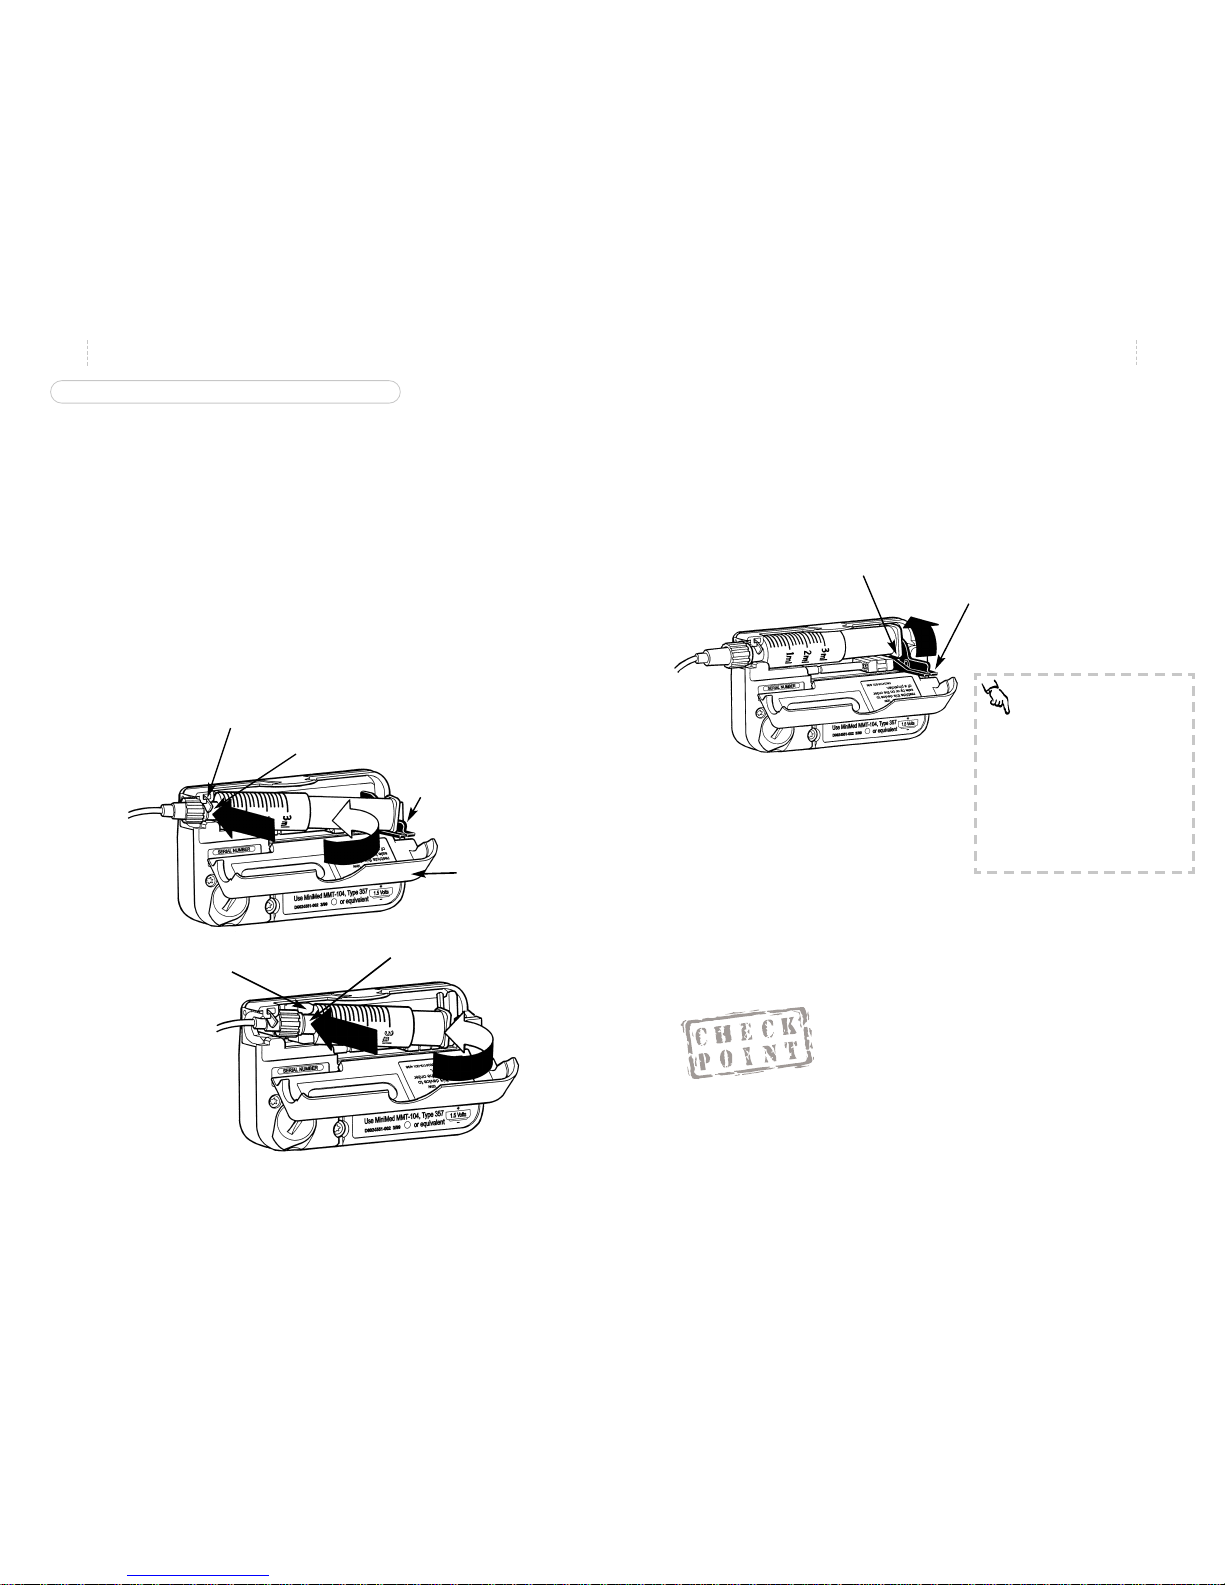
TO REINSTALL THE RESERVOIR CONVERTER
(Used in the Short Reservoir Method)
If the reservoir converter is not in place, reinstall the converter by following these steps:
1. Open the reservoir compartment by gently pulling open the
reservoir compartment door.
2. Insert the reservoir converter tool in the reservoir converter.
3. Insert the converter horizontally between the marked slots
in reservoir compartment.
4. Check that the flat edge is facing toward the battery com-
partment.
5. Turn the reservoir converter tool clockwise until the convert-
er is securely in place.
TO REMOVE THE RESERVOIR CONVERTER
(The converter is not used with the Full Reservoir Method.)
1. Open the reservoir compartment by gently pulling open the
reservoir compartment door.
2. Place the reservoir converter tool over the reservoir converter.
3. Turn the tool counter-clockwise until the converter is dis-
lodged.
4. Save it in a safe place for possible future use.
Reservoir
Converter
Reservoir
Converter
Tool
Flat Edge of
Reservoir
Converter
Reservoir
Converter
Tool
Reservoir
Compartment
Door
Battery
Compartment
Page 16

13. Load the Sof-set into Sof-serter with tubing between the
prongs.
14. Push the Sof-set down until it clicks into place.
15. Program pump to deliver a 5.0 unit prime bolus to “take up
the slack.” Set the reservoir volume amount.
16. Watch to see insulin exit the introducer needle.
17. Clean the site with alcohol or IV Prep.
18. While holding the Sof-set wings, remove the white tab and
needle guard.
19. Position the Sof-serter on the site and press the ACT button.
20. While holding the Sof-set wings, gently remove the
Sof-serter and slide it off the blue needle hub.
21. Place Sof-set tape over the blue needle hub.
22. Holding the wings, give the blue hub ¼ turn and remove.
Discard using proper needle disposal products.
23. Program 0.5 unit prime bolus to fill cannula.
24. Check your blood glucose level 3 hours later.
23
Quick Start
22
Quick Start
SOF-SET AND RESERVOIR CHANGE
1. Wash your hands.
2. Gather a new reservoir, Sof-set, alcohol swab or site prep
(e.g. IV Prep), Sof-serter, and insulin vial.
3. Discard old set and reservoir: pull off set at site first, then
remove reservoir.
4. Cycle the syringe. Fill new reservoir with 2-3 days worth of
insulin plus 25 extra priming units.
5. Remove the filling needle from the reservoir after purging
air bubbles.
6. Open the Sof-set package and attach the reservoir to infusion
set. Make sure the connection is tight!
7. Manually prime the infusion set by pressing slowly on the
plunger until you see a drop of insulin come out of the Sofset introducer needle.
8. Clear away air bubbles from tubing.
9. Open reservoir compartment door, pull driver arms up
(towards you) and slide driver block to the far right of the
case.
10. Place reservoir in pump with numbers facing upwards.
11. Lower the driver arms so that one arm is on each side of the
reservoir plunger.
12. Close the reservoir compartment door.
Page 17

13. Program pump to deliver a 5.0 unit prime bolus to “take up
the slack.” Set the reservoir volume amount.
14. Watch to see insulin exit the introducer needle.
15. Clean site with alcohol or IV Prep.
16. Remove the front half of the back paper from the white
adhesive tape. Remove the plastic protective cap from the
needle.
17. While using the index finger to hold back the forward flap
of the white adhesive, insert the Silhouette at a 30° angle.
(Talk with your health care professional about any changes
to your individual angle of insertion.)
18. Carefully smooth out the front half of the backing paper
onto the skin.
19. Remove the introducer needle. Put one finger just in front of
the see-through window to keep Silhouette in place and
with your other hand, press gently the side clips with two
fingers while simultaneously withdrawing the introducer
needle.
20. Remove the back side of the backing paper and smooth out
the white adhesive tape to make sure good skin contact is
achieved.
21. Connect site side of infusion set to the tubing side of the
infusion set. Program 1.0 unit prime to fill the cannula.
22. Check your blood glucose level 3 hours later.
25
Quick Start
24
Quick Start
SILHOUETTE AND RESERVOIR CHANGE
1. Wash your hands.
2. Gather new reservoir, Silhouette, alcohol swab, and insulin
vial.
3. Discard old set and reservoir: pull off set at site first, then
remove reservoir.
4. Cycle the syringe. Fill new reservoir with 2-3 days worth of
insulin plus 25 extra priming units.
5. Remove filling needle from the reservoir after purging air
bubbles.
6. Open Silhouette package. The Silhouette has two pieces:
"site" (with adhesive and needle) and the tubing. Attach
reservoir to infusion set. Make sure connection is tight!
7. Manually prime the infusion set by pressing slowly on the
plunger until you see a drop of insulin come out of the
Silhouette introducer needle.
8. Clear away air bubbles from tubing.
9. Open reservoir compartment door, pull driver arms up
(towards you) and slide driver block to the far right of the
case.
10. Place reservoir in pump with numbers facing upwards.
11. Lower the driver arms so that one arm is on each side of the
reservoir plunger.
12. Close the reservoir compartment door.
Page 18
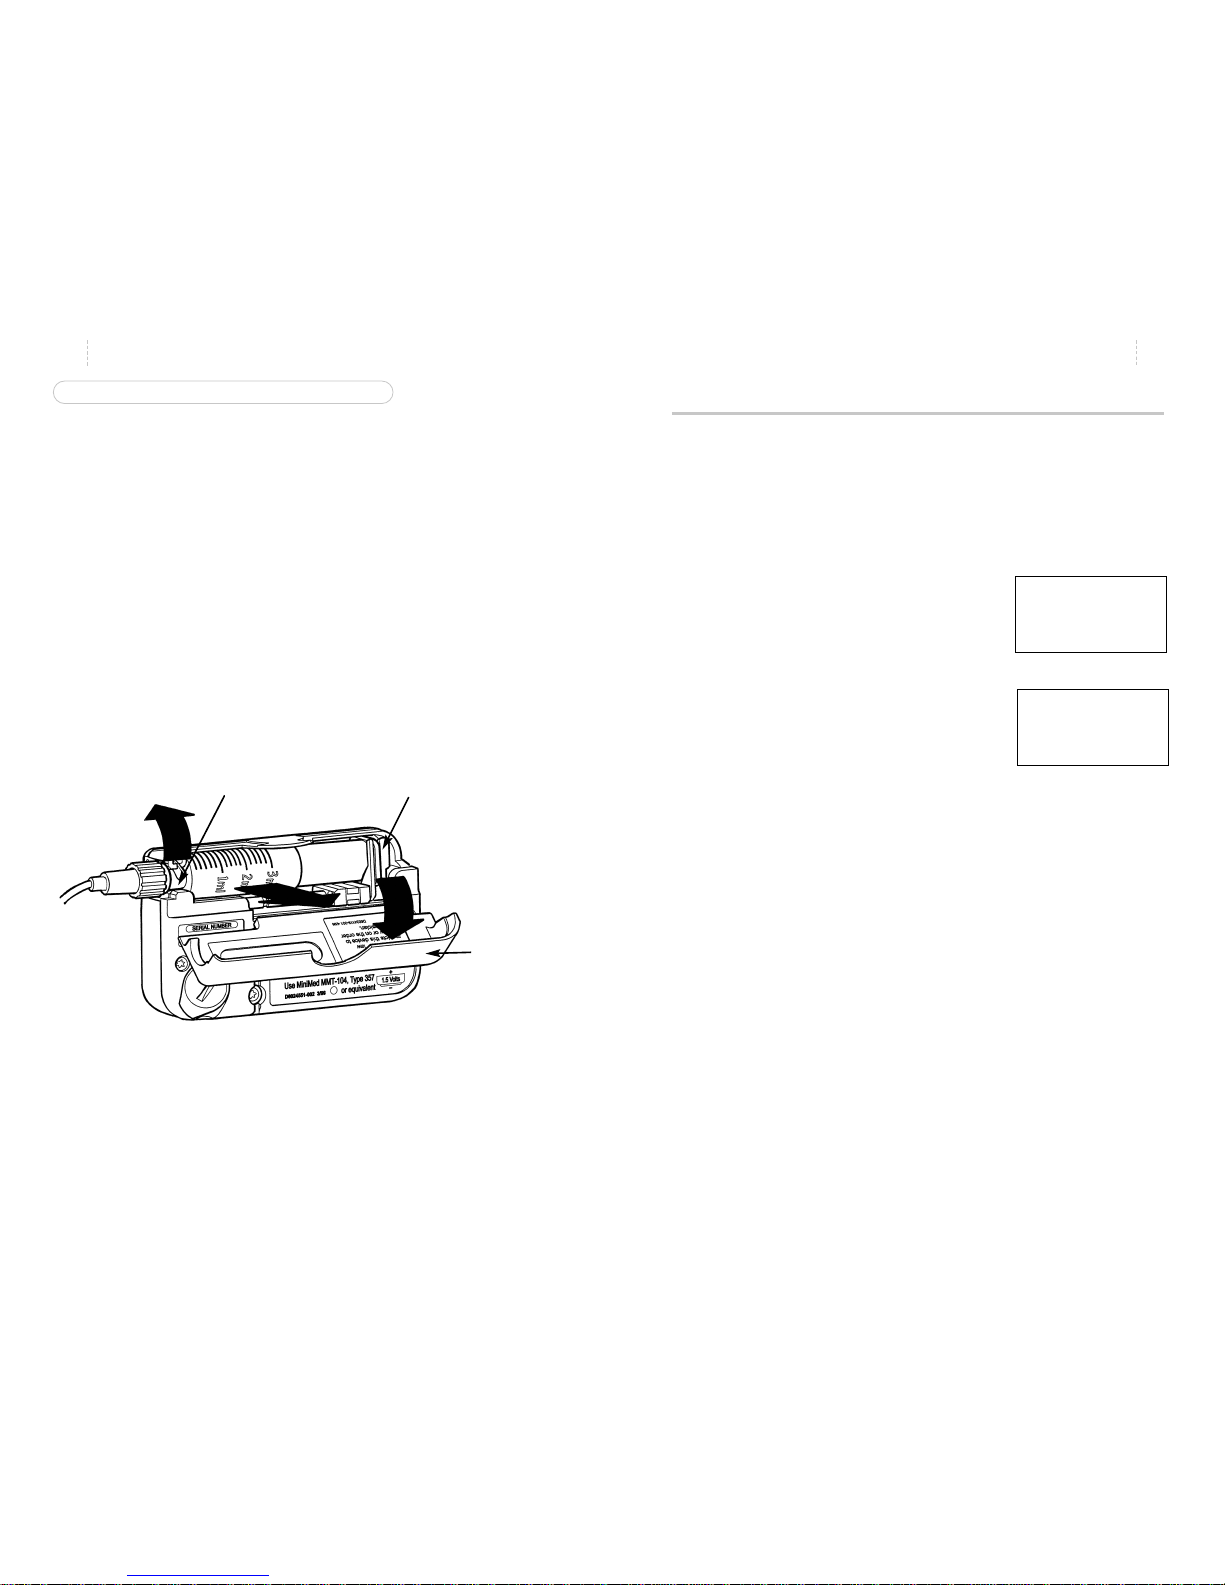
4. Push down firmly on the reservoir Luer neck so that it fits
snugly in place. Do not press on the reservoir plunger or
barrel.
5. Slide the two driver arms toward the reservoir so they rest
on either side of the squared-end of the reservoir plunger.
Push both arms so that the end of the plunger is firmly
between them.
6. Close the reservoir compart-
ment door.
Is the door closed properly? If you can’t close the door, the reservoir
may be inserted incorrectly. Improper insertion of the reservoir may
result in inaccurate delivery of insulin. Check to be sure the Luer
neck lever is down and the reservoir is inserted correctly – then try
again.
27
Quick Start
INSTALLING THE RESERVOIR AND INFUSION SET
Follow the directions on page 18. After this is complete, follow these
steps to correctly insert the reservoir and infusion set into your
pump.
1. Open the reservoir compartment door.
2. Lift up on the two driver arms and slide them to the end of
the lead screw (away from the luer neck lever). Lift up the
silver-colored Luer neck lever.
3. Align the reservoir neck with the reservoir converter (for the
short reservoir method ) or with the silver-colored Luer neck
lever (for the full reservoir method), and insert it into the
pump.
26
Quick Start
Why should the reservoir’s milliliter markings face outward?
_______________________________________________
Luer Neck
Lever
Driver
Arms
Reservoir Neck
Reservoir
Neck
Reservoir Converter
Driver
Arms
Squared-off End
of Plunger
NEED TO KNOW
Before inserting the reser voir into
the pump, rotate the reservoir so
the milliliter markings on the reservoir face outward. This allows you
to look through the pump’s reservoir compartment window to see
how much insulin is left in the
reservoir.
#4
Reservoir
Compartment
Door
Page 19
29
Quick Start
28
Quick Start
REMOVING THE RESERVOIR AND INFUSION SET
To remove the used infusion set and reservoir, follow these steps:
1. Using clean (aseptic) technique, remove the infusion set
from your body following the directions on the infusion set.
2. Open the reservoir compartment by gently pulling open the
reservoir compartment door.
3. Pull the driver arms forward and slide them to the end of
the lead screw. Lift up the silver-colored Luer neck lever and
gently pull out the used reservoir.
Dispose of your used reservoir and infusion set. Prepare a new set
and follow the procedures for priming and insertion.
Priming the Pump
Why:
Makes certain that insulin delivery is continuous by removing
any air in the tubing or “slack” in the pump mechanics.
Where:
Main Menu on the PRIME screen.
How:
1. From the TIME OF DAY screen, press
SEL until you see the PRIME screen.
The screen will display “PRIME” and
“HIST”.
2. Press ACT to see “PROG PRIME” and
the value dashes.
3. Use the arrows to program a 5.0 unit
prime.
4. Press ACT. The screen will display “RES VOL”. Use the
arrows to program reservoir volume.
5. Press ACT .
Insulin droplets will form at the infusion set needle tip indicat-
ing the reservoir and tubing are properly inserted.
You are now ready to insert the infusion set. Please follow the directions on page 22 or in the Instructions For Use.
8..5.0
AM
PM
PROG
BASAL
PROF:
U
H
PRIME
88:88
HIST:
---- ..PRIME
Luer
Neck
Lever
Driver Arms
Reservoir
Compartment
Door
Page 20

31
Quick Start
30
Quick Start
After inserting a new reservoir and infusion set, what must you do to
make sure delivery is uninterrupted? _________________________
Bolus
SETTING A NORMAL BOLUS
Why:
Provides an immediate amount of insulin to cover current
needs.
Where:
Main Menu on the BOLUS screen.
How:
1. From the TIME OF DAY screen, press
SEL until you see the BOLUS screen.
2. Press ACT. The dashes for units will
blink, letting you know you can
change this number.
3. Use the arrows to select the bolus
amount you want. Press ACT.
8.0.6
AM
PM
BOLUS
HIST:
U
11 .N .LAST
12:00
++.+
AM
PM
BOLUS
HIST:
U
.NORMAL
12:00
PROG
8.0.6
PM
BOLUS
U
DELIVERY
83:45
TIP
Some pump users have told us that it is easy to use the following
steps to Prime the set:
1. From the PRIME screen press ACT, then press the DOWN
arrow - this will automatically set a prime for the maximum
bolus amount.
2. Watch for insulin to appear at the end of the infusion set.
When it appears, stop the prime by placing the pump into
Suspend.
3. Insert the infusion set and restart the pump.
#5
Page 21

TO RESTART YOUR PUMP
Why:
Restarts pump basal delivery.
Where:
Main Menu on the SUSPEND screen.
How:
Press SEL and then ACT. Your pump
will beep once and return to the TIME
OF DAY screen. The current time will be
displayed and your pump will resume
your basal insulin delivery.
33
Quick Start
32
Quick Start
Stopping and Restarting Your Pump
TO STOP OR PUT YOUR PUMP IN ‘SUSPEND’
Why:
Stops all delivery (basal and bolus) by the pump.
Where:
Main Menu on the SUSPEND screen.
How:
1. From the TIME OF DAY screen, press SEL until you see the
SUSPEND screen. The screen will blink.
2. Press ACT. This will stop your pump. The pump will beep
three times and you will see “STOPPED” and the time it
stopped.
Why would you stop your pump?
•You may want to stop your pump when you are
changing your infusion set.
•You may want to stop a bolus, go swimming or
play contact sports. For the best results discuss
these times with your health care professional.
+.5.+
PM
STOPPED
83:54
NEED TO KNOW
Your pump will beep three times
every fifteen minutes to remind
you it has stopped insulin delivery. The screen will also show
"-S- STOPPED” when suspended.
NEED TO KNOW
If you stopped your pump while it
was in the middle of delivering any
bolus – it will NOT be resumed.
You may need to program a new
one.
If your pump is in Suspend, what should you think about?
___________________________
#6
Page 22

Reservoir Volume and
Low Volume Alert
Why:
Provides a ‘sound’ or ‘vibration’ when the insulin level in the
reservoir reaches 20 Units and again at 10 Units.
Where:
Main Menu on the PRIME screen.
How:
1. To get to the PRIME screen, follow the steps on page 34. Use
the arrows to record the amount of insulin in the reservoir.
2. Press ACT. The Low Volume Alert is now activated and the
Prime feature will begin. The screen will show “PRIME”
along with the amount being delivered.
3. Every time you install a new reservoir, you should reset the
reservoir volume.
35
Quick Start
Prime History and Use
Why:
Provides a method of delivery:
•To fill the Sof-set cannula after removing the introducer
needle
•To deliver a small bolus just prior to reconnecting the QR
®
•To conduct the 7.2 unit bolus test while disconnected from
your pump
•To take up slack between the reservoir plunger and the driv-
er arms after putting in a new reservoir.
Where:
Main Menu on the PRIME screen.
How:
1. From the TIME OF DAY screen, press
SEL until you see the PRIME screen.
The screen will display “PRIME” and
“HIST”.
2. Use the arrows to review the past
nine Prime uses, beginning with the
most recent.
3. To set a Prime, press ACT. The words
“PROG PRIME” will appear with
blinking dashes. Use the arrows to
set the Prime amount.
4. Press ACT . “RES VOL” (r eservoir
volume) will appear with either
dashes (if it is a new reservoir) or the
amount of insulin remaining in your
reservoir.
34
Quick Start
NEED TO KNOW
Prime is used only when the insulin is
not being delivered into your body.
The Prime amounts are not counted into
your daily total amount of insulin.
Do not use the Prime feature to fill a new
infusion set – follow the Instructions For
Use.
HIST:
---- ..PRIME
8.2.0
AM
PM
HIST:
U
11P.03NOV
85:20
++.+
PROG
U
PRIME
+++
PROG
RES VOL
U
Page 23

Low Volume Alert Activation:
• The alert will first occur when 20 units of insulin are left in
the reservoir.
• Alert sounds at the time triggered, at 30 and 60 seconds
later.
• “LO VOLUME” appears on the screen for 60 seconds.
• Low Volume icon remains on the screen until the reservoir is
replaced and a new value is set.
•Sequence repeats again
when the reservoir volume reaches 10 Units.
36
Quick Start
NEED TO KNOW
• This is an OPTIONAL feature. You
may bypass it by pressing ACT
when the dashes to enter volume
appear. Doing so means the feature is not set and you will not
receive an alert when the insulin
volume is low.
• Each time you set a Prime, the
current reservoir amount will
appear.
• T o clear the LOWVOL alert, Press
SEL – then replace the reservoir
and enter the new amount of
insulin in the reservoir.
• Press ACT from the TIMEOF DAY
screen to see how much insulin
remains according to the amount
you set.
• You can change the reservoir
volume amount when you change
the reservoir, do a reconnect
prime or self-test.
Initial Pump Settings
This is the information you will need on the day that you begin using
your pump with insulin.
• If your pump start is going to take place in your health care professional’s office, you will be given the settings that day.
• If your pump start is going to take place in another location, make
sure to get in touch with your health care professional to determine
your basal rate and bolus amounts. This may require making an
appointment to review your blood glucose logs in order to make an
accurate determination.
37
Quick Start
Basal Rate Information
Most people require only one basal rate in the beginning.
Basal Rate #1 Time: _____ Units per Hour: _____
Additional Rates:
Basal Rate #2 Time _____ Units per Hour: _____
Basal Rate #3 Time _____ Units per Hour: _____
Basal Rate #4 Time _____ Units per Hour: _____
Meal Boluses
Carbohydrate Ratio: 1.0 unit of insulin for _____ grams of
carbohydrates.
Correction Bolus
1.0 unit of insulin will lower blood glucose by approximately _____ mg/dl.
Blood Glucose Targets
Before Meals between _____ and _____ mg/dl.
2 Hours after Meals between _____ and _____ mg/dl.
Bedtime between _____ and _____ mg/dl.
2-3 A.M. between _____ and _____ mg/dl.
LO
VOLUME
10:55
Page 24

Treatment of Hyperglycemia
Correction Bolus Guidelines
My insulin sensitivity factor is _____ mg/dL
Formula for determining insulin sensitivity factor:
1500 = _____mg/dL
Total Daily Dose of Insulin Amount that 1.0
unit of insulin will
decrease BG
(See your health care professional about this formula.)
HIGH
blood sugars
LOW
blood sugars
Please tear out and fold the following cards and carry them with you at all
times.
38
Quick Start
Page 25

41
Basal Rates
Basal Rates:
why and how
Q & A
Why is a basal rate needed?
✗ Basal insulin is the amount that the body needs to maintain
target glucose values under fasting conditions.
✗ The basal rate accounts for approximately 50 percent of the
body’s total daily insulin requirements. If it could, your pan-
creas would provide this basal rate. Your pump mimics your
pancreas by delivering insulin continuously over the 24
hours in the day.
✗ You can set your insulin pump to provide one or more dif-
ferent rates, called”profiles”. Some people only use one rate
while others find they need more. It depends upon your
lifestyle and insulin requirements.
Why program a maximum basal rate?
✗ A maximum basal rate is a safety feature to help you from
programming a basal rate that is too high for your require-
ments.
✗ You should discuss this with your health care professional to
decide on the maximum amount of basal insulin that can be
delivered over an hour. This is usually based upon your
blood glucose values and body’s requirement for insulin.
The Rule of 15
If blood glucose is 70 mg/dl or below
- Treat with 15 grams of carbohydrate
- Check BG in 15 minutes.
If not above 70 mg/dl, repeat treatment and check
BG in 15 minutes
These have 15 grams of carbohydrate:
- Glucose tablets - three 5 grams tablets
or four 4 gram tablets
- 4 oz. of juice
- 1/2 can regular soda pop
- 6 lifesavers
- 2 tablespoons table sugar or honey
- Tube of glucose gel
Carry carbohydrate with you at all times for treating
hypoglycemia.
High Blood Glucose Treatment
If you have nausea or vomiting, check blood
glucose and urine ketones immediately!!!
If this blood glucose is above 250 mg/dL and
ketones are moderate or large:
Take insulin injection by syringe and contact physician(follow insulin sensitivity factor on back of card
for amount of insulin).
Change insulin infusion set.
Drink liquid with no calories every 30 minutes.
Check BG every 2 hours and continue to take insulin
until BG reaches target.
Check urine for ketones. Call physician if your BG
and urine ketones remain elevated or you are unable
to drink.
If this blood glucose is above 250 mg/dLand
ketones are small, trace or negative:
Take insulin correction bolus (follow guidelines on
back of card).
Check BG every two hours and give correction insulin
bolus if BG is above target.
Page 26

Why should I review my profiles?
✗ Comparing your profiles to your blood glucose records
helps you and your health care professional identify your
optimal basal rate(s).
About personal delivery patterns:
✗ Personal Delivery Patterns allow you to establish multiple
sets of basal rates in order to match different lifestyle needs.
• Do sleep patterns change?
• Do weekday and weekend schedules change?
✗ For best results discuss this option with your health care
professional.
✗ Each pattern must have at least one basal rate set or it will
not be accepted as a pattern.
✗ Keep a paper copy of the pattern(s) and basal rate(s) you
have programmed.
Are your basal rates set correctly?
✗ Review with your health care professional how to verify that
your basal rates are set correctly.
43
Basal Rates
42
Basal Rates
Are the profiles set each day?
✗ Once set, these individual basal rates or profiles form your
complete basal rate and the pump repeats them every 24
hours. There is no need to reprogram them.
✗ You have the option of programming a new basal rate every
30 minutes. However, most people find that only a few are
needed.
Why start and stop times?
✗ The start time of one basal rate is the stop time of the previ-
ous one – giving you continuous basal insulin over 24 hours.
✗ You cannot set a start time for a basal rate that overlaps the
next profile. The new profile will cancel any basal rates that
follow.
✗ It may be helpful for you to record your basal rates on paper
until you are familiar with the process or have the computer
capacity to download this information.
✗ For best results, discuss setting or changing your basal rate
with your health care professional.
When would a temporary basal rate be useful?
✗ Temporary basal rates offer an easy way to meet temporary
situations that may affect your blood glucose levels.
✗ The stress of illnesses can elevate your blood sugar. Setting a
temporary basal rate to meet this rise in glucose can help in
your recovery.
✗ Setting a lower temporary basal rate during times of exer-
cise may help prevent post-exercise hypoglycemia.
Page 27

45
Basal Rates
Setting the Maximum Basal Rate
Why:
Sets the maximum basal rate
(units/hour) that your pump will
deliver per hour. This maximum
rate will apply to each and every
profile that you set including a temporary basal rate.
Where:
SET UP II on the MAXI-
MUM BASAL RATE screen.
How:
1. From the TIME OF DAY screen, press
SEL until you see SET UP II, then
press ACT .
2. Press SEL until you see the MAXI-
MUM BASAL RATE screen.
3. Press ACT. The screen will display
“BASAL MAXIMUM” and the number of units will blink showing the
current maximum basal rate.
4. Use the arrows to select the
maximum basal rate. Press
ACT. The screen will display
the next SET UP II screen. Your
pump will return to the TIME
OF DAY screen if no buttons
are pressed within 15 seconds.
44
Basal Rates
NEED TO KNOW
A maximum basal rate of up to
35.0 units per hour can be set.
Discuss with your health care professional what your limit should be.
You CANNOT set a maximum basal
rate that is less than any of the currently programmed basal rates –
this includes profiles and temporary basal rates.
NEED TO KNOW
Your pump is delivered from the
factory with a maximum basal setting of two (2.0) units per hour.
Discuss with your health care professional if you need to personalize this amount.
32.0
AM
PM
PROG
BASAL
PROF:
U
H
MAXIMUM8
88:88
32.0
AM
PM
PROG
BASAL
PROF:
U
H
MAXIMUM8
88:88
Setting Your Basal Rate
Why:
Provides continuous insulin delivery 24 hours a day.
Where:
Main Menu on the BASAL RATE screen.
How:
It is important that you follow these steps to set your basal rates to
avoid any programming or delivery errors. Work with your health care professional to set the basal rates best for you.
1a. If your pump does not have any basal rates set, talk with your
health care professional about the rates for you to use as you begin
pump therapy.
1b. If you currently have basal rates set in your pump:
• From the Basal Rate screen, use the arrow buttons to make a list
of your current basal rates. Be careful to record the start time
and rate of each basal rate.
• After you have made a list of your current basal rates, clear all
of your basal rates.To do this:
• Press ACT on the main BASAL RATE screen. Use the
arrows to reset Basal Rate 1 to 0.0 u/h. Press ACT.
• Use the arrows to reset the start time for Basal Rate 2
to dashes (--:--). Press ACT to complete.
NEED TO KNOW
You cannot change the start time
of Profile 1 - only the rate. Profile
1 always starts at 12:00 A .M.
Page 28

Personal Delivery Patterns
TO TURN PERSONAL DELIVERY PATTERNS ON
Why:
Provides an option to set up to three different basal rate patterns– Standard, Pattern A and Pattern B – each containing up to 48
different basal rate profiles.
Where:
SET UP II on the BASAL PATTERNS screen.
How:
1. From the TIME OF DAY screen press
SEL until you see SET UP II, then
press ACT. Press SEL until you see
the BASAL PATTERNS screen, then
press ACT .
2. The screen will show “PROG
BASAL”, “OFF” and “PATTERNS”.
Press ACT and use the arrows to turn
patterns ON. Press ACT. The pump
will move to the next SET UP II
screen, ALARM TYPE.
TO SET PERSONAL DELIVERY PATTERNS
1. From the TIME OF DAY screen, press
SEL until you see the BASAL RATE
screen, then press ACT.
2. The screen will show the word
“STANDARD”.
47
Basal Rates
You are ready to begin setting basal rates.
2. From the TIME OF DAY screen, press SEL until you see the
BASAL RATE screen, then press ACT.
The first basal rate always starts at
midnight - this time cannot be
changed. You will see the "0.0" flashing - this means it can be changed.
3.
Use the arrows to select the basal rate.
As you press the arrow buttons you will
see the basal rate increase or decrease.
Press ACT when you have the desired
rate selected.
4. To add another basal rate, use the
arrows to select the start time for
Basal Rate 2. The start time for Basal
Rate 2 is the end time for Basal Rate 1.
Press ACT .
5.
Use the arrows to set a basal rate.
Press ACT .
6. Follow steps 4 and 5 to set additional
rates as necessary
When all rates have been set, press ACT. The total amount of insulin
delivered as a basal rate for the day will appear on the screen.
46
Basal Rates
8.0.8
AM
PM
PROG
BASAL
PROF:
U
H
2
6:00
1.9.4
BASAL
TOTAL
U
24.HOURS
8.+.+
AM
PM
PROG
BASAL
PROF:
U
H
2
66::0000
O.FFn
AM
PM
PROG
BASAL
PROF:
U
H
PATTERNS
88:88
O.nFn
AM
PM
PROG
BASAL
PROF:
U
H
PATTERNS
88:88
8.0.0
AM
PM
PROG
BASAL
PROF:
U
H
11 NOW
88:88
8.0.0
AM
PM
PROG
BASAL
PROF:
U
H
SSTTAANNDDAARRDD
88:88
8.0.0
AM
PM
PROG
BASAL
PROF:
U
H
11 NOW
88:88
8.00.4
AM
PM
PROG
BASAL
PROF:
U
H
1
12:00
Page 29

49
Basal Rates
48
Basal Rates
Setting a Temporary Basal Rate
Why:
Provides a temporary change to programmed basal rate profiles in order to meet a temporary increase or decrease in your insulin
requirements.
Where:
Main Menu on the TEMPORARY BASAL screen.
How:
1. From the TIME OF DAY screen,
press SEL until you see the TEMPORARY BASAL RATE screen.
2. Press ACT. The dashes for duration
in the upper left of the screen will
blink, indicating that it can be
changed.
3. Use the arrows to set the desired
duration .You may set a duration in
30 minute increments: 30 minutes,
one hour, one hour 30 minutes, etc.
4. Press ACT. The dashes for amount
in the upper right of the screen will
blink, indicating that it can be
changed.
5. Use the arrows to set the desired
temporary basal rate (units/hour).
6. Press ACT. The pump will beep
once and return to the TIME OF
DAY screen.
3. Use arrows to select the basal rate profile pattern you want,
either Standard, Pattern Aor Pattern B. Press ACT.
4. Follow the same steps as described to set your basal rate
profiles to set a personal pattern.
5. To confirm your personal patterns, press ACT and wait 15
seconds for the pump to return to TIME OF DAY screen.
If you have selected a basal pattern other than standard, the
letter “A” or “B” will appear in the TIME OF DAY screen.
8.0.0
AM
PM
PROG
BASAL
PROF:
U
H
PP aa tt tt ee rr nn AA
88:88
8.0.0
AM
PM
PROG
BASAL
PROF:
U
H
PP aa tt tt ee rr nn BB
88:88
PM
83:56
A
++.+
TEMP
BASAL
U
H
........
++:++
++.+
TEMP
BASAL
U
H
DURATION
++++:++++
++.+
TEMP
BASAL
U
H
DURATION
+00::3300
++.+
TEMP
BASAL
U
H
DURATION
0:30
+2.0
TEMP
BASAL
U
H
DURATION
0:30
PROG
PROG
PROG
PROG
NEED TO KNOW
Your pump is delivered to you
with the Personal Pattern option
“OFF”.
The personal pattern that is currently working will appear on the
Basal Profile screen.
When you have completed setting
the profiles in one pattern, the
screen will display the 24 hour
total basal amount you have set
before going on to the next
screen.
Page 30

51
Basal Rates
VERIFYING DELIVERY
You can verify that a temporary basal rate is delivering by checking
the following screens:
1. The TIME OF DAY screen displays
“TEMP BASAL” verifying it is active.
Also your pump will beep three times
on every hour.
2. The BASAL RATE screen shows that the current profile is
“OFF”.
3. The TEMPORARY BASAL RATE
screen tells you the current temporary rate that is set and tells you the
time remaining on the temporary
rate.
50
Basal Rates
Stopping or Resetting
a Temporary Basal Rate
Why:
Stops or resets a temporary basal rate.
Where:
Main Menu on the TEMPORARY BASAL RATE screen.
How:
1. From the TIME OF DAY screen, press
SEL until you see the TEMPORARY
BASAL RATE screen. The current
temporary basal rate is displayed.
2. Press ACT. The time remaining on
the temporary basal rate will round
down to the nearest half hour and
will blink.
3. Use the arrow keys to select the
duration you want or to dashes to
completely reset the duration.
4. Press ACT. Your pump will beep
once and return to the TIME OF DAY
screen.
AM
PM
TEMP
BASAL
4:05
+2.0
TEMP
BASAL
U
H
DURATION
00:3300
PROG
+2.0
TEMP
BASAL
U
H
DURATION
++++:++++
PROG
NEED TO KNOW
If you have set a ‘profile’ to deliver a specific basal rate at the same time you set
the temporary basal rate, the profile will
be inactive. The screen will read: “BASAL
PROF: ‘X’ IS OFF”.
The temporary basal rate will not repeat.
If you want to repeat it, you will have to
go through the process on the next day.
8.0.8
AM
PM
PROG
BASAL
PROF:
U
H
110IS0OFF
88:88
A
+2.0
TEMP
BASAL
U
H
DURATION
0:21
PROG
+2.0
TEMP
BASAL
U
H
DURATION
0:30
PROG
Page 31

53
Boluses
Insulin Boluses:
why and how
The following bolus options will be discussed: Audio bolus, Variable
bolus including Normal, Square Wave, Dual Wave and Normal on a
Square Wave.
Q & A
What do the letters mean on the bolus screen?
✗ The Medtronic MiniMed 508 sets different types of boluses:
✗ ‘N’ stands for Normal bolus
✗ ‘S’ stands for Square Wave
✗ ‘D’ stands for Dual Wave indicating a Normal bolus fol-
lowed by a Square Wave.
Setting the Bolus Maximum:
✗ Discuss with your health care professional what the maxi-
mum bolus amount should be for you. This feature can be
set anywhere from 0.0 to 25.0 units.
Why choose a Square Wave bolus?
✗ The Square Wave bolus option can be a very useful tool to
use when you have a long meal, are doing extended snacking or if you have gastroparesis. By extending the bolus
delivery over a period of time, (30 minutes to eight hours),
the insulin is more likely to be available to match your individual needs.
VERIFYING THE CHANGE
You can verify that a temporary basal rate has been stopped by
checking the following screens:
1. The TIME OF DAY screen will return to normal.
2. The BASAL RATE screen will show an active profile.
52
Basal Rates
NEED TO KNOW
When the temporary basal rate is
completed your pump will return
to the basal rate profile that is currently programmed.
1. What is the ‘start’ time of your first profile? _____________
2. Describe why you would want to set a second profile.
________________________________________________
#7
81.8
AM
PM
PROG
BASAL
PROF:
U
H
11 NOW
88:88
Page 32

Setting the Maximum Bolus Limit
Why:
Sets a safety limit for the amount of insulin that can be deliv-
ered in a single bolus.
Where:
SET UP II menu on the MAXIMUM BOLUS screen.
How:
1. From the TIME OF DAY screen press
SEL until you see the SET UP II
screen, then press ACT. Press SEL
until you see the MAXIMUM BOLUS
screen.
2. Press ACT. The current maximum
bolus value will blink.
3. Use the arrows to select the maxi-
mum amount and press ACT. The
screen will display the next SET UP II
screen, MAXIMUM BASAL RATE.
55
Boluses
What can I do if I want to eat more than the Square Wave I have programmed?
✗ The 508 will let you program a Normal bolus if you have a
Square Wave programmed, and need to give some additional insulin. The Normal bolus will "interrupt" the Square
Wave that is being delivered, and then the Square Wave will
resume after it is finished.
What is the advantage of the Dual Wave?
✗ This bolus option is useful for meals that contain both rapid-
ly and slowly absorbed carbohydrates. (Example: buffets or
combinations of starch, fruit and medium fat protein). This
option meets both immediate and extended insulin needs.
54
Boluses
NEED TO KNOW
What is the Maximum Bolus
Range?
The factory setting is 10.0 Units but
it can be set for any value from 0.0
to 25.0 Units.
1.0.0
AM
PM
BOLUS
HIST:
U
MAXIMUM8
12:00
1.0.0
AM
PM
BOLUS
HIST:
U
MAXIMUM8
12:00
Page 33

Variable Bolus
Why:
Allows you to program bolus options.
Where:
SET UP II on the VARIABLE BOLUS screen.
How:
1. From the TIME OF DAY screen, press SEL until you see SET
UP II.
2. Press ACT. You will see the
VARIABLE BOLUS screen.
3. Press ACT. “OFF” or “ON” will
blink.
4. Use arrows to move between OFF
and ON. Set your option and press
ACT. The screen will display the
next SET UP II option, MAXIMUM
BOLUS.
57
Boluses
Reviewing Bolus History
Why:
Provides a record of the last 24 delivered boluses fr om the most
recent (history 1) to the most distant (history 24).
Where:
Main Menu on the BOLUS screen.
How:
1. From the TIME OF DAY screen press SEL until you see the
BOLUS screen.
2. Use the arrows to review your bolus history.
56
Boluses
NEED TO KNOW
The Bolus screen has two parts:
• History lets you review bolus history.
• Programming lets you program a
bolus.
After reviewing your bolus history,
if you DO NOT press ACT, the
pump will automatically return to
the TIME OF DAY screen.
NEED TO KNOW
The factory setting is “OFF” so in
order to set the Square Wave or
Dual Wave bolus this option must
be turned “ON”.
8.6.0
AM
PM
BOLUS
HIST:
U
11 .N .LAST
12:00
O.ff
AM
PM
BOLUS
HIST:
U
VARIABLE
12:00
O.ff.f
AM
PM
BOLUS
HIST:
U
VARIABLE
12:00
8.00.n
AM
PM
BOLUS
HIST:
U
VARIABLE
12:00
Page 34

Square Wave Bolus Option
Why:
Delivers a bolus evenly over a period of time, from 30 minutes
to 8 hours.
Where:
Main Menu on the BOLUS screen.
How:
1. From the TIME OF DAY screen, press
SEL until you see the BOLUS screen.
2. Press ACT. Use the arrows to choose
“SQUARE”, then press ACT.
3. Dashes for the bolus amount will
blink. Use the arrows to select the
desired amount.
4. Press ACT. Dashes will now blink to
set duration. Use the arrows to set the
desired bolus duration.
5. Press ACT to begin delivery.
59
Boluses
Setting A Normal Bolus
Why:
Delivers an immediate bolus to cover current needs.
Where:
Main Menu on the BOLUS screen.
How:
1. From the TIME OF DAY screen press
SEL until you see the BOLUS screen.
2. Press ACT. Use the arrows to choose
“NORMAL” then press ACT.
3. The dashes for the bolus amount will
blink. Use the arrows to select the
desired bolus amount. Press ACT.
58
Boluses
NEED TO KNOW
Setting a Normal bolus is also
explained in the ‘Quick Start’
guide.
When setting a Normal bolus, you
can set the bolus in 0.1 unit increments using U-100 insulin.
NEED TO KNOW
The Square Wave bolus may be useful
for a prolonged, multi-course meal, if
you have been doing extended
snacking or you have ‘gastroparesis’.
Note: Variable bolus must be “ON”.
You are also able to set a Normal
bolus while a Square Wave is being
delivered. Simply follow the programming steps for setting a Normal bolus.
When a Square Wave is delivering, you
will not be able to make any changes
in SET UP.
8.6.0
AM
PM
BOLUS
HIST:
U
11 .N .LAST
12:00
++.+
AM
PM
BOLUS
HIST:
U
.NORMAL
12:00
PROG
++.++
AM
PM
BOLUS
HIST:
U
.NNOORRMMAALL
12:00
PROG
8.0.6
PM
BOLUS
U
DELIVERY
83:45
8.6.0
AM
PM
BOLUS
HIST:
U
11 .N .LAST
12:00
8.0.2
AM
PM
BOLUS
HIST:
U
11 .N .LAST
4:20
++.++
AM
PM
BOLUS
HIST:
U
SSQQUUAARREE
12:00
PROG
+0.4
AM
PM
BOLUS
HIST:
U
SQUARE
12:00
PROG
+3.0
AM
PM
BOLUS
HIST:
U
DURATION
00:3300
PROG
Page 35

6. Press ACT. The pump will begin to deliver the Normal
bolus. The Square Wave bolus will follow the Normal bolus.
61
Boluses
60
Boluses
Dual Wave Bolus Option
Why:
Delivers an immediate Normal bolus which will be followed by
an extended Square Wave bolus.
Where:
Main Menu on the BOLUS screen.
How:
1. From the TIME OF DAY screen press
SEL until you see the BOLUS screen.
2. Press ACT. Use the arrows to choose
“DUAL” and then press ACT.
3. You will see the word “NOW” and
the dashes for the bolus amount will
blink. Use the arrows to select the
amount to be delivered now as the
Normal bolus.
4. Press ACT. The screen will now dis-
play the word “SQUARE” and the
dashes for the amount will blink. Use
the arrows to select the amount to be
delivered as a Square Wave bolus.
5. Press ACT. Use the arrows to select
the desired bolus duration.
NEED TO KNOW
This bolus option is useful for
meals that contain both rapidly
and slowly absorbed carbohydrates (e.g. buffets or combinations of starch, fruit and medium
fat protein).
Note
: Variable Bolus must be
“ON”.
How will you know the dual wave is delivering?
•During the entire bolus delivery the main screen will show
the word “BOLUS” and the amount that has been delivered.
•At the end of the delivery your pump will beep once and
the screen will display the amount of bolus delivered for
five seconds.
8.6.0
AM
PM
BOLUS
HIST:
U
11 .N .LAST
12:00
++.++
AM
PM
BOLUS
HIST:
U
DDUUAALL00
12:00
PROG
+0.2
AM
PM
BOLUS
HIST:
U
NOW0
12:00
PROG
+0.4
AM
PM
BOLUS
HIST:
U
SQUARE
12:00
PROG
+3.4
AM
PM
BOLUS
HIST:
U
DURATION
00:3300
PROG
+0.6
AM
PM
BOLUS
HIST:
U
DELIVERY
04:25
PROG
8.0.2
AM
PM
BOLUS
HIST:
U
11 .N .LAST
04:20
Page 36

63
Boluses
Audio Bolus
TO TURN AUDIO BOLUS FEATURE ON
Why:
Allows you to set a bolus with an audible sound. With each
button press, you will hear a beep which equals your choice of either
0.5 or 1.0 Units (U-100 insulin).
•Half unit (0.5) increases will have one short beep
•Whole unit (1.0) increases will have two short beeps
Each beep is a different note in a musical chord making it easy for
you to count the beeps.
Where:
SET UP II on the AUDIO BOLUS
screen.
How:
1. From TIME OF DAY screen press SEL
until you see SET UP II. Press ACT.
Press SEL until you see the AUDIO
BOLUS screen, then press ACT.
2. Use the arrows to select “ON”. Press
ACT.
3. Use the arrows to select the bolus
increment amount, either 0.5 or 1.0
units. Press ACT.
62
Boluses
TO SET AN AUDIO BOLUS
1. From the TIME OF DAY screen, press
the UP arrow. Each time you press
the button you will hear a beep or feel
a vibration. Carefully count the
beeps/vibrations until you have
selected the bolus amount you want.
2. Press ACT. Listen and count the
beeps as they are played back to you.
If the beeps match the bolus amount
you want, press ACT to deliver the
bolus.
OFFn
AM
PM
BOLUS
HIST:
U
AUDIO8M
12:00
OnFn
AM
PM
BOLUS
HIST:
U
AUDIO8M
12:00
PROG
01.0
AM
PM
BOLUS
HIST:
U
STEP8M
12:00
PROG
01.0
AM
PM
BOLUS
HIST:
U
STEP8M
12:00
PROG
NEED TO KNOW
WHY HAVE AN AUDIO BOLUS?
It may be useful for setting a bolus
through clothing; when you are
unable to see the pump; or for the
visually impaired.
When programming an Audio
bolus, scrolling is disabled, thus
preventing you from going so fast
you may lose count of the beeps.
The factory setting is “OFF”.
AM
PM
04:55
8.0.6
PM
BOLUS
U
DELIVERY
83:45
Page 37

Clocks and Alarms
The following section covers: Changing the Time Display Format,
Setting the Beep Volume, How to Review Alarms, Alarm Type and
Setting the Automatic Off. Setting the Time and Day is discussed in
the Quick Start guide. Please refer to page 13 if you have questions.
Changing the Time Display
Why:
Allows changing the time display from 12 hour (AM/PM) to 24
hour (international) format, according to your personal preference.
Where:
SET UP II on the TIME DISPLAY screen.
How:
1. From the TIME OF DAY screen,
press SEL until you see SET UP II,
then press ACT.
2. Press SEL until you see the TIME
DISPLAY screen, then press ACT.
The time format will blink. Use the
arrows to choose either “12:Hr” or
“24:Hr”.
3. Press ACT. Your pump will
return to the TIME OF DAY
screen if no other buttons
are pressed within 15 seconds.
65
Alarms
NEED TO KNOW
If you choose the 12 hour display,
the TIME OF DAY screen will show
AM or PM.
8.0.0
AM
PM
PROG
DISPLAY
12:Hr
8.0.0
AM
PM
PROG
DISPLAY
2244:Hr
64
Boluses
Daily Totals and History
Why:
Allows you to recall the daily total amount that you have
received in each of the past seven days.
Where:
Main Menu on the DAILY TOTALS screen.
How:
1. From the TIME OF DAY screen,
press SEL until you see the DAILY
TOTALS screen. You will see the
amount of insulin delivered for that
day and the word “TODAY” will
blink.
2. Use the arrows to review the daily
totals for the last seven days.
3. When you have completed your
review the pump will return to the
TIME OF DAY screen.
NEED TO KNOW
The daily total includes all bolus and all basal amounts that have been
delivered for that day since midnight.
The daily total does not include any insulin used with the Prime feature.
A 90 day review is kept by the pump’s computer but is only available
by downloading.
If you change or re-set the day of the week for any reason, the daily
total will be erased for that day.
06.0
TOTAL
U
TTOODDAAYY.
06.2
TOTAL
U
01NOV99
Page 38

Reviewing Your Alarms
Why:
Allows the user to review the last 12 alarms and/or errors that
have occurred.
Where:
SET UP II on the ALARM REVIEW screen.
How:
1. From the TIME OF DAY screen,
press SEL until you see SET UP II,
then press ACT. Press SEL until you
see the ALARM REVIEW screen.
2. The screen will display the words
“HIST” and “ALARM”. Use the
arrows to review the alarms, from
the most recent (1) to the oldest (12)
alarm. You will see both time and
date.
3. The pump will return to the TIME OF DAY screen if no
additional buttons are pressed within 15 seconds.
67
Alarms
Setting the Beep Volume
Why:
Allows the user to set the volume for the pump’s beeps.
Where:
SET UP I on the BEEP VOLUME screen.
How:
1. From the TIME OF DAY screen,
press SEL until you see SET UP I,
then press ACT. Press SEL until
you see the BEEP VOLUME screen,
then press ACT.
2. Use the arrows to select the beep
volume level of your choice: 1, 2 or
3. Press ACT. The pump will
return to the TIME OF DAY screen
if no additional buttons are pressed
in 15 seconds.
66
Alarms
NEED TO KNOW
There are three beep volume levels:
1 = Low,
2 = Medium
3 = High.
Your pump arrives with the beep
volume set at 2 (Medium).
Beep volumes do not affect the
alarms, which will always sound at
the highest level.
NEED TO KNOW
WHY REVIEW ALARMS?
This feature will assist you in the
event you may have to contact
Medtronic MiniMed’s 24-hour
Clinical Services Help Line at
1-800-826-2099.The
Medtronic MiniMed representative may ask you for any
alarms you have received.
HIST:
---- .ALARM9
E02
M
PM
HIST:
220000050CT
11:00
2
M
M
ROG
BEEP8VO L
++:Hr
2
AM
PM
PROG
BEEP8VO L
++:Hr
3
AM
PM
PROG
BEEP8VO L
++:Hr
Page 39

Setting the Automatic Off
Why:
Provides an optional safety feature. When ‘ON’ the pump’s
computer "watches" all button presses. If the computer notices that
no buttons have been pressed within the time you set, ALL delivery
will be stopped and the pump will alarm to alert you.
Where:
SET UP I on the AUTOMATIC OFF screen.
How:
1. From the TIME OF DAY screen,
press SEL until you see SET UP I
then press ACT. Press SEL until
you see the AUTOMATIC OFF
screen.
2. Press ACT. Use the arrows to select
the number of hours for the pump
to monitor lack of activity before
activating an alarm. You may
choose from 1 hour to 16 hours.
3. Press ACT. The pump will return
to the TIME OF DAY screen if no
additional buttons are pressed in
15 seconds.
68
Alarms
NEED TO KNOW
The pump is shipped with this feature OFF.
Discuss this option with your
health care professional for the
setting best for you.
8.0.0
AM
PM
PROG
AUT0--0FF
++:Hr
8.0.0
AM
PM
PROG
AUT0--0FF
++++:Hr
8.0.0
AM
PM
PROG
AUT0--0FF
44:Hr
Alarm Type
Why:
Allows user to select either an audible or vibration alarms and
alerts.
Where:
SET UP II on ALARM TYPE screen.
How:
1. From the TIME OF DAY screen, press SEL until you see SET
UP II, then press ACT.
2. Press SEL until you see the ALARM
TYPE screen, then press ACT. The
alarm type will blink. Use the
arrows to choose either “AUDIO”
or “VIBRATE”.
3. Press ACT. Your pump will return
to the TIME OF DAY screen if no
other buttons are pressed within 15
seconds.
69
Alarms
TTYYPPEE..
AAUUDDIIOO..
PROG
NEED TO KNOW
Using the vibrate option uses more battery power than using the audible option. It is recommended that you use MMT 104 batteries as they
will provide you with optimum battery life. To maximize battery life, use
the vibration option sparingly.
For safety purposes, when you receive a "LOW BATTERY" alert, your
pump will automatically revert to audible tones.
If you are using the Child Block option, vibrate mode will be disabled.
Any alarms or aler ts will be in audio mode.
VVIIBBRRAATTEE
PROG
Page 40

70
Alarms
71
Other Features
Other Useful Features
Using The Remote Programmer
The Model 500 Remote Programmer is an accessory item for your
model 508 insulin pump that allows you to program a bolus or suspend and restart your pump without pressing any of the pump’s buttons! The Remote Programmer contains a transmitter that sends signals to a receiver in your 508 pump. This is designed to add more
freedom and flexibility to your daily activities! Of course, you can
still program your pump by using the four main pump buttons.
NEED TO KNOW
The Remote Programmer is a very
simple and easy to use device.
Three buttons control all the programming:
• ‘STOP’: Suspends or restarts
your pump
• ‘BOL’: Allows you to set an
Audio bolus
• ‘ACT’: activates your programming choices
Page 41

5. You have the ability to add the
ID numbers for up to three
remote programmers.
6. If you wish to add, delete or
review remote programmer ID
numbers, press ACT on the
desired option at step four above.
The pump screen will return to the TIME OF DAY screen.
Why:
It allows the user, by way of ‘radio frequency waves’, to suspend, restart and program an Audio bolus without using the buttons
on the 508 pump. This “links” the remote programmer to the pump.
Where:
SET UP II on the RADIO FRE-
QUENCY DEVICE screen.
How:
To use the Remote Programmer,
you must turn this feature ON in your
508 pump.
1. From the TIME OF DAY screen,
press SEL until you see SET UP II,
then press ACT. Press SEL until
you see the RADIO FREQUENCY
DEVICE screen then press ACT.
2. Use the arrows until the word ON
appears and press ACT.
3. The screen will display “Id” and
the word “ADD”. Press ACT.
4. Use the arrows to record the first
six digits shown on the Remote
Programmer’s serial number as the
ID number. (This is on the back of
the Remote). Press ACT to enter
each number and to move to the
next digit. (To enter a 0, press ACT,
this will take you to the next digit).
Press ACT after the last number is
entered. Your pump and remote
programmer are now linked.
NEED TO KNOW
The remote programmer runs on a
single A23 battery. The programmer will go into ‘sleep mode’
when it is not being used to help
preserve battery life.
NEED TO KNOW
About the LED light on the
remote programmer.
When the remote is in "sleep
mode", green LED light will be off.
After you have awakened your
remote by pressing and holding
the ACT button, the LED light will
glow and flash very fast.
When the battery is low, the LED
will blink in a series of 3 quick flashes until the battery is replaced.
When this happens, replace the
battery in the Remote Programmer
as soon as possible.
Off.
RF.DEV.
Onf.
RF.DEV.
1.d.1
PROG
PROG
AADDDD.
1.d.1
PROG
------ --------
72
Other Features
73
Other Features
NEED TO KNOW
You have to link your remote
to your pump. The pump will
only work with YOUR individual remote and only after it
has been linked!
1.d.1
PROG
156218
NEED TO KNOW
You can have a maximum of three
remote programmers active. You
may link them to the pump following the same steps.
PM
12:34
Page 42

74
Other Features
USING THE REMOTE PROGRAMMER TO DELIVER A BOLUS
Why:
Allows you to deliver an audio bolus using the remote
programmer.
Where:
The BOL button on remote programmer.
How:
1. Press and hold ACT on the remote programmer for at least
five seconds to ‘wake up’ the pump. When the pump is
awake, it will beep or vibrate. You will now be able to program an Audio bolus.
2. Slowly, press the BOL button as many times as you want to
select the bolus amount. Each press will result in a beep or
a vibration. For example, with Audio bolus feature ‘ON’ and
the increment set at 1.0 units a five unit bolus would be five
presses of the BOL button.
3. Press ACT. The pump will playback the amount you just
selected. Press ACT to deliver.
NEED TO KNOW
The remote programmer will work
between a range of 12 to 18 inches.
The Audio bolus feature must be
“ON” to set a bolus using the remote
programmer.
Your pump ‘looks’ for a signal from
the remote programmer every 2 or 3
seconds. This is why you need to
press and hold the ACT button on
the remote programmer before you
can program.
USING THE REMOTE PROGRAMMER TO SUSPEND/RESTART THE PUMP
1. Press and hold ACT on the remote programmer for at least
five seconds to ‘wake up’ the pump. When the pump is
awake, it will beep or vibrate.
2. To Suspend: Press STOP then press ACT. You will hear three
audible beeps or vibrations confirming that the pump is in
suspend.
3. To Restart: Press and hold ACT on the remote programmer
for five seconds. This will “wake-up” the pump. Press STOP
and then press ACT. The pump will beep and or vibrate
once and then resume normal operations.
75
Other Features
NEED TO KNOW
If you make a mistake you can let
the pump time out. (just do not
press any buttons), and in about
15 seconds the pump will reset
and return to the TIME OF DAY
screen.
T o start programming, you need to
“wakeup” the pump by pressing
and holding ACT for 5 seconds.
Page 43

Setting Your Insulin Concentration
Why:
Allows the user to change insulin concentration prescribed by
his/her physician to achieve glucose control.
Where:
Set Up II on the INSULIN CONCENTRATION screen.
How:
1. From the TIME OF DAY screen press SEL until you see SET
UP II, then press ACT.
2. Press SEL until you see the INSULIN
CONCENTRATION screen, then
press ACT .
3. Use the arrows to set the concentra-
tion of your choice.
4. Press ACT. The screen will now dis-
play “E02 SET PUMP” and the pump
will clear all previous settings and
return to the factory settings.
To clear the E02 alarm, press SEL, then ACT.
If you have chosen a concentration other than
U-100, it will appear on the TIME OF DAY
screen. Re-program your pump settings.
77
Other Features
Child Block Activation
Why:
Restricts access to the pump’s features except by the Remote
Programmer, Suspend ON/OFF and Self Test.
Where:
SET UP II on the CHILD BLOCK screen.
How:
1. From the TIME OF DAY screen,
press SEL until you see SET UP II
then press ACT. Press SEL until you
see the CHILD BLOCK screen, then
press ACT .
2. Use the arrows to select “ON”. Press
ACT. If no additional buttons are
pressed, the screen will return to the
TIME OF DAY screen in 15 seconds.
76
Other Features
1.0.0
AM
PM
PROG
INSULIN
12:HU
1.5.0
AM
PM
PROG
INSULIN
12:HU
E02
AM
PM
SET8PUMP
15:15
U50
AM
PM
PROG
SET8PUMP
15:15
NEED TO KNOW
You will not be able to change any
of the programmed basal rates, or
Personal Pattern information when
Child Block is ON.
You will be able to program a
Normal bolus and stop and restar t
the pump with the remote programmer. You will only be able to
Suspend and run a Self Test when
Child Block is ON.
For safety, when Child Block is ON,
the pump will disable Vibrate
mode and all alarms and aler ts will
be in Audio mode.
O.FFn
AM
PM
PROG
BASAL
PROF:
U
H
BLOCK8
88:88
O.n
AM
PM
PROG
BASAL
PROF:
BLOCK8
88:88
Page 44

Pump Function
Evaluation Options
This section will discuss the following operations: Self Test, Lead
Screw Rotation Test (Occlusion Alarm Test)
Self Test
Why:
Allows you to perform safety checks on all pump software at
any given time.
Where:
SET UP I on the SELF TEST screen.
How:
1. From the TIME OF DAY screen, press SEL until you see SET
UP I, then press ACT.
2. Press SEL until you see the SELF TEST
screen then press ACT.
3. The following sequences will occur:
a. The pump will beep once and
the Full Segment Display will
appear for ten seconds. Verify
that all segments are present.
b. The screen will count down from ‘9’ to ‘3’ and the
screen will blink and the word “SELF TEST” will be
displayed.
79
Pump Functions
8.2.0
PPRROOGG
SSEELLFFTTEESSTT
++:Hr
8.8.Z
AM
PM
PROG
SETUP
TEMP
BASAL
BOLUS
TOTAL
PROF:
HIST:
U
H
........
88:88
S
A
B
78
Other Features
NEED TO KNOW
Your pump is shipped with the
insulin concentration set for U – 100.
The rate of your insulin delivery is
based on your insulin concentration:
U - 100 . . .0.1 U per stroke
U - 50 . . . .0.05 U per stroke
U - 40 . . . .0.04 U per stroke
If you change the insulin concentration from the pre-set type to another type, an alarm will sound to
remind you to re-program your profiles and maximum values for basal
and bolus rates.
This safety step is necessary to
ensure accurate delivery of insulin
after you change the insulin concentration.
Page 45

81
Pump Functions
c. At the countdown of ‘3’, the bottom of the screen will
show “VIBRATE” on the screen with a test of the
vibrator.
d. At the countdown of ‘2’ the bottom of the screen will
show “TONETEST” and you will hear an alarm beep
sequence (European siren).
e. “TEST OK” indicates a successful Self Test after which
the TIME OF DAY screen will show.
80
Pump Functions
Lead Screw Rotation Test
Why:
Provides a method for you to ver-
ify that the lead screw turns properly.
How:
1. Disconnect from the pump by
either of the following:
a. If you are using an infusion set with a Quick Release
feature, disconnect by using the QR. Leave the fluid
filled reservoir in the pump.
b. If you are not using an infusion set with a Quick
Release feature, remove the infusion set from your
body. Leave the reservoir in the pump.
2. Find the ‘landmark’ on the lead screw. This is the groove
(white/yellow mark) which is placed on the end of the lead
screw closest to the serial number.
3. Using the Prime feature, program a 7.2 unit bolus of U-100
insulin (3.6 of U-50, 2.88 of U-40). The lead screw will make
one complete turn. The groove will return to its initial
location.
If no insulin flow is seen during test:
1. Check that no air is in the infusion set. If air is seen, prime
the set until insulin appears at the end.
2. Check that no obstruction is present in the infusion set tub-
ing or needle. If there is an obstruction, prepare and insert a
new infusion set.
1. Do you need to disconnect from your pump to run a Self
Test?____
8.0
AM
PM
PPRROOGG
TEST0OK
++:Hr
NEED TO KNOW
Run a Self Test if your pump experiences a hard bump or if an error
code occurs you don’t understand.
If any part of the Self Test is not
accurate, if you do not hear sound
during the tone test or if you do
not feel a vibration during the
vibrate test or if an Error Code
appears, immediately call the 24hour Clinical Services Help Line at
1-800-826-2099.
NEED TO KNOW
If you have questions regarding
the lead screw test, call the 24hour Clinical Services Help Line at
1-800-826-2099.
#8
Page 46

Pump Care and
Maintenance
This section will cover Installation of Batteries, General Pump Care
and Cleaning Your Pump.
Batteries
Certain features on the 508 pump use a lot of battery power.
• Remote Programmer
• Backlight
• Vibration alarms
• Downloading with the Com-Station.
If you use these features a lot, your batteries will need to be replaced more frequently.
LOW BATTERY & VIBRATION
When your pump receives a low battery alert, your pump will revert back
to “audio mode” and vibration will be
disabled.
83
Pump Care
NEED TO KNOW
Your Medtronic MiniMed pump
uses three 1.5 volt silver oxide batteries.
For best results use Medtronic
MiniMed Model 104 batteries.
These batteries are available
only
through Medtronic MiniMed. You
may also use EverReady model
357 or equivalent batteries; however results may vary.
It is important that you
DO NOT
use
alkaline, lithium or zinc-air
batteries in your Medtronic MiniMed
Insulin Pump.
3. Make sure the driver block and driver arms are snug around
the syringe:
a. Disengage the two driver arms of the driver block by
pulling both driver arms upwards toward you.
b. Slide the driver block away from the reservoir plunger
along the lead screw.
c. Return the driver block snugly against the reservoir
plunger.
d. Re-engage the two driver arms of the driver block by
pushing both arms inward to secure the back of the
plunger between them.
4. Repeat the Lead Screw
Rotation Test.
82
Pump Functions
NEED TO KNOW
Correct turning of the lead screw
confirms that you will receive the
correct amount of insulin.
Disconnection from your pump
MUST be performed in one of
these two options so you do not
deliver a 7.2 unit insulin bolus during the test.
Check:
a. The yellow mark has
moved.
b. The yellow mark has
returned to its original
position after 7.2 units
have been delivered.
What is the purpose of Lead Screw Rotation Test?
_____________________________________________________
#9
Page 47

TO INSTALL NEW BATTERIES
1. Insert three new batteries into the
battery carrier. The middle battery
must be inserted last. All three
batteries should be facing in the
same direction. Follow the diagram on the battery carrier.
2. Replace the battery carrier into the
pump, pushing it down and turning it clockwise.
3. The TIME OF DAY screen should appear as soon as the bat-
teries are inserted. If this does not happen:
a. Check to see if the batteries are inserted properly.
b. If yes, and it still does not turn on, try three new bat-
teries.
c. If the pump is still not on,
call the 24-hour Clinical
services Help Line for
assistance at 1-800-826-
2099.
85
Pump Care
NEED TO KNOW
Low Battery Indication Icon
– will
appear on the TIME OF DAY
screen when the pump’s battery
power is low (approximately 10%
of battery life is remaining) and will
be visible until the batteries are
changed.
84
Pump Care
TO REMOVE THE BATTERY CARRIER
1. Place the pump face down on a secure, flat surface.
2. Insert a coin in the slot on the cover of the battery carrier
and rotate it counter-clockwise to the ‘open’ position. The
slot will be parallel to the edge of the case.
3. Gently lift up the battery carrier and remove it from the case.
4. Remove all three of the old bat-
teries from the battery carrier by
using a key or other blunt object
to push the middle battery out
first.
NEED TO KNOW
If you remove the batteries from
your pump, all settings and history will be saved for approximately 2 hours. After two hours, you
will receive either an E-03 or an
E-01 message depending on
how long the batteries were
removed. Clear the message,
check all settings and reprogram
as needed. See page 107 for
additional details.
Your pump turns on as soon as
the batteries are inserted.
It will perform a two – three second ‘safety check’ and return to
the TIME OF DAY screen.
For Best Results:
• Do not let the batteries touch
each other prior to placing in the
battery carrier.
• Do not mix old and new batteries.
• Never put batteries in upside
down.
Page 48

87
Pump Care
Installation of the Spring Belt Clip
Installation
Slide the clip into the pump using the triangular ridge on the bottom.
This ridge slides into the corresponding groove on the back of the
pump. Push the clip until it stops and clicks into place.
Removal
Using your thumb, push up on the grooved edge of the Belt Clip, and
gently slide the clip out of the groove.
86
Pump Care
Pump Care
IF YOUR PUMP IS DROPPED
1. Check that the driver arms and infusion set connections are
not damaged and are still correctly in place.
2. Check for leaks, cracks or damage to the keyboard and reser-
voir syringe.
3. Review your PROFILES and ALL the SET UP options to
ensure they are still properly programmed.
4. Perform a Self Test. (See page 79)
NEED TO KNOW
Read your warranty statement
included with your pump for information on what is covered during
your warranty period.
Take care to protect your pump
from being dropped.
Page 49

IF YOUR PUMP BECOMES SUBMERGED IN WATER
1. Pat the outside of the case until dry.
2. Open the reservoir compartment and check the compart-
ment and reservoir for water. If wet, dry it completely within ten minutes of exposure to water. Exposure to liquids,
including water or insulin, can corrode the mechanism.
3. Dry the reservoir completely – do not place a wet reservoir
in your pump.
4. Do not use HOT AIR to dry your pump, as this may damage
internal electronics.
5. Check the battery compartment and the batteries - if wet, let
them dry completely before resuming use of the pump.
6. Check the battery carrier. If you need a new one, call the
Clinical Services Help Line at 1-800-826-2099.
88
Pump Care
NEED TO KNOW
Your pump is watertight but
should not be deliberately submerged in liquids.
We recommend using an infusion
set with a Quick Release feature to
disconnect before showering,
bathing, etc.
You can also use a Shower Pak™
or a SportGuard™.
89
Pump Care
EXPOSURE TO EXTREME TEMPERATURES
1. Avoid exposure of your Medtronic MiniMed pump to tem-
peratures above 104 °F (40°C) or below 33°F (0.5°C). Insulin
solutions freeze near 32° F and degrade at high temperatures. If you are outside in cold weather, wear your pump
close to your body and cover it with warm clothing. If you
are in warm weather, take measures to keep your pump and
insulin cool.
2. If you live in a cold, dry
climate, protect your pump
from Electrostatic
Discharge (ESD) which can
cause your pump to alarm.
Using the leather case can
help protect your pump
from ESD. If this happens,
contact the Clinical Services
Help Line for assistance
1-800-826-2099.
3. Do not steam sterilize or autoclave your Medtronic MiniMed
pump.
NEED TO KNOW
A leather case can provide greater
protection for your pump.
If you have to remove and store
your pump, it is recommended that
you store it with the batteries in
place. Keep a record of your current basal rates and reset the rates
to zero to preserve battery life.
Page 50

CLEANING YOUR PUMP
1. Use a damp (not wet) cloth
and mild soap to clean the
outside of your Medtronic
MiniMed pump.
2. Never use organic solvents,
such as lighter fluid, nail polish remover or paint thinner
to clean your pump.
3. Keep the reservoir compartment free from moisture.
4. Each time you change your batteries, clean the lead screw
with a stiff brush.
Your Medtronic MiniMed pump mechanism has been treated with
special dry lubricants designed to last the life of the pump. DO NOT
use any lubricants on this mechanism
X-RAYS, MRI’S AND CT SCANS
If you are going to have an X-ray, CT scan, MRI or any other type of
radiation therapy, TAKE YOUR PUMP AND REMOTE PROGRAMMER OFF.
90
Pump Care
NEED TO KNOW
A brush for cleaning the lead
screw is located in Medtronic
MiniMed’s Battery Pack (Model #
104, Disposable Power Kit). To
order call the Medtronic MiniMed
Sales Order and Information
Department 1-800-843-6687.
NEED TO KNOW
The Medtronic MiniMed pump is
designed to withstand common
electrostatic and electromagnetic
interference, including airport security
systems.
91
Pump Care
Remote Programmer Care and
Maintenance
INSTALLATION OF THE BATTERY
1. Place the Remote Programmer face
down on a secure, flat surface.
2. Using a standard Phillips screwdriver,
unscrew the rear panel. Remove the
used battery and discard properly.
3. Insert a new A23 battery according to the diagram on the
Remote Programmer case. When inserting the new battery,
do not touch any of the exposed electronics.
4. Replace rear panel and screw to connect Remote
Programmer case.
Your Remote Programmer should be able to talk with the pump as
soon as the battery is inserted. If this does not happen:
a. Check to see if the battery is inserted properly.
b. If the battery is inserted properly and it still does not
turn on, try a new battery.
If the Remote Programmer still does not turn on, call the Clinical
Services Help Line for assistance at 1-800-826-2099.
IF YOUR REMOTE PROGRAMMER IS DROPPED
1. Check that the Remote Programmer panels (front and rear)
are still attached.
2. Press and hold the ACT button to check communication
with the pump.
Page 51

92
Pump Care
IF YOUR REMOTE PROGRAMMER BECOMES SUBMERGED IN WATER
1. Pat the outside of the case until dry.
2. Following the battery installation procedure above, unscrew
the rear panel and dry out the two sections.
3. Do not use HOT AIR to dry your Remote Programmer as
this may damage internal electronics.
4. If you need assistance, call the Clinical Services Help Line at
1-800-826-2099.
EXPOSURE TO EXTREME TEMPERATURES
1. Avoid exposure of your Medtronic MiniMed Remote
Programmer to temperatures above 104 °F (40°C) or below
33°F (0.5°C).
2. Do not steam sterilize or autoclave your Remote
Programmer.
CLEANING YOUR REMOTE PROGRAMMER
1. Use a damp (not wet) cloth and mild soap to clean the out-
side of your Remote Programmer.
2. Never use organic solvents, such as lighter fluid, nail polish
remover or paint thinner to clean your Remote Programmer.
Each time you change your battery, clean the compartment
to remove any debris or lint that may have accumulated in
this area.
FCC Notice for the
Remote Programmer
This device complies with Part 15 of the FCC Rules. Operation is subject to the following two conditions: (1) This device may not cause
harmful interference and (2) This device must accept any interference
received, including interference that may cause undesirable operation.
This device has been tested and found to comply with the limits for
a Class B digital device, pursuant to Part 15 of the FCC Rules. These
limits are designed to provide reasonable protection against harmful
interference in a residential installation. This device generates, uses,
and can radiate radio frequency energy and, if installed and used in
accordance with the instruction, may cause harmful interference to
radio communications. However, there is no guarantee that interference will not occur in a particular installation. If this device does
cause harmful interference to radio or television reception, the user is
encouraged to try to correct the interference by one or more of the following measures:
•Reorient or relocate the Remote Programmer
•Increase the separation between the Remote Programmer
and the device that is receiving/emitting interference
•Consult Medtronic MiniMed’s 24-hour Clinical Services
Help Line at 1-800-826-2099 if you have any questions.
Caution: Any changes or modifications to the devices not expressly
approved by Medtronic MiniMed could void your ability to operate
the equipment.
93
Pump Care
Page 52

95
User Safety
Pump User Safety
Information
Caution
Federal (USA) law restricts this device to sale by or on the order of a
physician.
Indications
The Medtronic MiniMed Model 508 Insulin Pump is indicated for the
continuous delivery of insulin at set and variable rates for the management of diabetes mellitus in persons requiring insulin.
Contraindications
Pump therapy is not recommended for people who are unwilling or
unable to perform at least four to six blood glucose tests per day and
to maintain contact with their health care professional.
94
Pump Care
Page 53

97
User Safety
96
User Safety
Precautions
GENERAL
Monitor your blood sugar levels at least FOUR to SIX times per day
and ALWAYS:
•before you go to bed
•when you get up in the morning
•whenever you feel nauseous
•before driving a car
Act quickly to respond to abnormal blood sugars! Notify your health
care professional of any serious hypoglycemia or hyperglycemia, or
of an increased frequency in low or high blood sugars.
Develop a protocol with your health care professional in the event
that a problem occurs and you are unable to reach him/her for
advice. (There is also a troubleshooting section in this manual for
your reference.)
Periodically check your 3:00 A.M. blood sugar levels. Discuss any
abnormal readings with your health care professional.
Always carry an "emergency kit" of conventional insulin supplies in
case you develop a problem with your pump and your insulin delivery is stopped. This kit should include:
•Fast-acting glucose tablets
•Blood glucose monitoring supplies, urine ketone monitoring
supplies
• Regular insulin & insulin syringe with directions from your
health care professional regarding how much insulin to take
•An extra infusion set and Medtronic MiniMed reservoir
•Dressing and adhesive
•Extra batteries (MMT-104)
•508 programming and alarm cards
Warnings
The following conditions may occur while using an insulin pump.
Hypoglycemia
The intensive management of diabetes has been associated with an
increase in the incidence of hypoglycemia (low blood glucose).
Diabetic Ketoacidosis (DKA)
Insulin pump therapy uses only Regular (short-acting) insulin, therefore, any interruption in the delivery of insulin may result in the
rapid onset of diabetic ketoacidosis.
Skin Infections
Infection at the infusion site is a risk of pump therapy.
Please refer to the Troubleshooting sections for more information.
Page 54

99
User Safety
98
User Safety
INFUSION SETS AND SITES
To help prevent problems with infusion sets or sites, routinely follow
these precautions:
1. Always check for leaks after changing your reservoir and
infusion set. Wrap a tissue around the Luer connection
between the reservoir and infusion set and check for leaks.
2. Never use insulin that appears cloudy, as this may indicate
the insulin is inactive. Do not expose your insulin to extreme
changes in temperature.
3. Change your infusion site regularly every 2-3 days, accord-
ing to your health care professional’s suggestions and
according to the Instructions for Use which accompany the
infusion sets.
4. Practice aseptic technique when inserting infusion sets.
5. Check the infusion site often for redness, irritation and
inflammation. Many health care professionals recommend
that pump wearers check the site at the following times:
• before getting up in the morning
• before going to bed in the evening
• whenever blood sugar levels are elevated
6. Use an infusion set or dressing that provides anti-microbial
protection against infection.
7. Rotate the infusion site each time you change the infusion
set to ensure proper absorption of insulin. The new site
should be at least one inch from the previously used site.
Check the amount of insulin remaining in your reservoir at least once
a day.
Your Medtronic MiniMed pump is watertight, but should not be
deliberately submerged in liquids. If the reservoir area does become
wet, dry it completely within ten minutes. Wet reservoirs should not
be placed in the pump. Continued exposure of the reservoir area to
liquids, including water or insulin, can corrode the mechanism.
Do not use any lubricants on the Medtronic MiniMed pump mechanism. It has been treated with a special dry lubricant designed to last
the life of the pump.
Use only 3.0 ml reservoirs labeled "for use with Medtronic MiniMed
pumps." Other manufacturers’ syringes can deliver the wrong
amount of insulin.
If a display or function appears incomplete or differs from the
descriptions contained in this manual, initiate a Self Test and contact
the Medtronic MiniMed Clinical Services Help Line at 800-826-2099.
Successful operation of the Medtronic MiniMed pump requires both
visual and auditory acuity. While features exist to help facilitate
pump usage, Medtronic MiniMed does not recommend the use of
this product by individuals whose impaired vision or hearing does
not allow full recognition of the pump signals and alarms.
Page 55

101
User Safety
100
User Safety
7. Test before you drive. Blood glucose should be above 100
mg/dl.
8. Set Automatic Off feature of your pump (see page 68)
HYPERGLYCEMIA AND DIABETIC KETOACIDOSIS (DKA)
To help prevent serious hyperglycemia (high blood glucose) and the
possibility of diabetic ketoacidosis (DKA), follow these precautions:
1. Monitor your blood glucose at least four to six times a day
and always before you go to bed, when you get up in the
morning and whenever you feel nauseous.
2. If your blood glucose is above 250 mg/dl twice in a row,
give regular insulin by injection (shot). Check blood glucose
again in 1-2 hours.
3. Take insulin by injection (shot) at the first sign of nausea
if blood glucose is above 250 mg/dl. Check blood glucose
again in 1-2 hours.
4. Check urine ketones if blood glucose is above 250 mg/dl or
you feel nauseous. If positive, call your doctor immediately.
5. Change your infusion set if blood glucose is elevated above
250 mg/dl at two consecutive readings, AFTER you have
taken an injection (shot).
6. Note: Remember, nausea and vomiting are often the first
signs of DKA. The key to avoiding DKA is to be prepared
and act quickly! Do not assume your blood glucose is high
because you are under stress, have the flu or miscalculated
your last meal bolus.
8. Avoid using an infusion site that will be irritated by clothing
and accessories, or by rigorous movement and stretching
due to exercise.
9. If using the Short Reservoir method, the reservoir converter
must be in place or inaccurate insulin delivery may result.
HYPOGLYCEMIA
T o help pr event hypoglycemic (low blood glucose) episodes, routinely follow these precautionary steps:
1. Know the symptoms of hypoglycemia and never ignore
these symptoms, no matter how mild they may be.
2. Always carry a fast-acting sugar replacement (such as candy,
juice or glucose tabs) in the event of a hypoglycemic
episode.
3. Have a current glucagon kit in your possession. Periodically
review the proper procedure for administering glucagon
with family members and significant others. Periodically
check the expiration date of the kit.
4. Monitor your blood glucose frequently, at least four to six
times a day, including periodic 3:00A.M. values. Discuss an
appropriate protocol with your health care professional for
adjustment of your insulin.
5. Never go to bed if your blood glucose is below your bedtime
target level. Bedtime target levels are often set higher than
other blood glucose levels.
6. Do not skip a bedtime snack prescribed by your health care
professional. Use extra caution whenever you program a
bedtime bolus.
Page 56

HYPOGLYCEMIA
Hypoglycemia can be more subtle for pump users than with patients
on conventional therapy and may occur even when the pump is
working properly. Check blood glucose levels at least four to six
times per day with periodic checks at 3:00A.M. Notify your health
care professional if you are experiencing repeated or severe low
blood glucose reactions. Besides reviewing your insulin, food and
exercise, you and your physician should also discuss your target
blood glucose goals. Never go to bed with a blood glucose value
below your target level. Also, blood glucose tests should be performed before driving a car because hypoglycemia may go unnoticed
while concentrating on traffic. Set Automatic Off feature of your
pump (see page 68).
SITE INFECTION/ABSCESSES
Infections at the insertion site may occur, but can be minimized by
good site preparation and the frequent changing of infusion sets. The
set should always be changed immediately if the site becomes sore,
red, or swollen. Follow the advice of your health care professional
and product Instructions for Use regarding proper insertion techniques.
103
User Safety
102
User Safety
Adverse Reactions
HYPERGLYCEMIA AND DIABETIC KETOACIDOSIS (DKA)
Pump wearers use only Regular short-acting insulin. As a result you
will not have a reserve of long-acting insulin. You must be aware that
interruption of insulin delivery due to infusion set clogs, leaks, loss
of insulin potency or pump malfunction can result in a rapid rise of
blood glucose levels within two to four hours and the development
of DKA within four to ten hours. In addition, the sudden onset of
stress caused by infection or an emotional event can result in a rapid
rise of blood glucose levels and the development of DKA.
Although the pump has multiple safety alarms, it cannot alarm if the
set is leaking or the insulin has lost its potency.
Therefore, it is essential that you make frequent (at least four to six
times per day) blood glucose determinations. If blood glucose levels
are high (over 250 mg/dl), you must be prepared to give an injection
of regular insulin and troubleshoot the pump and infusion set to
insure that it is delivering the necessary amount of insulin. You
should also check for urine ketones whenever blood glucose values
are elevated, above 250 mg/dl. Establish a protocol with your health
care professional for rapidly identifying and treating hyperglycemia
to prevent the onset of diabetic ketoacidosis and possible hospitalization.
Page 57

105
Troubleshooting: Alarms
104
User Safety
Troubleshooting:
Alarms and
Screen Messages
Your Medtronic MiniMed pump has a sophisticated network of safety checks and systems which continually monitor the computer software, operations and programs.
If the safety network detects anything unusual, your pump has
alarms and signals to alert you to problems for immediate attention.
Error Messages
When you see an “E-XX” message, note the message and then restart
your pump. If you receive the same error message, call the Clinical
Services Help Line at 800-826-2099.
ERROR RESTART PROCEDURE
1. Press SEL, then ACT to
clear the error message. A
few alarms will result in the
message “PROG PUMP
E-01” appearing on the display.
2. Press SEL and then ACT to
clear the E-01 message.
3. Reprogram ALL of your settings.
NEED TO KNOW
Safety check messages are divided
into two groups: ERRORS (EXX)
and ALARMS (AXX).
XX represents a number that corresponds to the safety check message seen on the screen.
Page 58

107
Troubleshooting: Alarms
Alarm Messages
When you see an ‘AXX’ message, look up the number on this troubleshooting list to determine the problem and how to remedy it. Press
SEL and then ACT to restart your pump.
ALARM RESTART PROCEDURE
Press SEL then ACT. Your pump should r estart. All of your prior programming will be intact – you do not have to reprogram your settings.
106
Troubleshooting: Alarms
Pump has been
programmed to
stop delivery.
To restart the
pump, press
SEL, then ACT.
3 beeps/vibrations
every 15 minutes.
Alarm Message Cause
What to do
Low battery.
(Pump is still
delivering. 10%
battery life
remains.)
Replace with
MMT-104 batteries as soon as
possible always
before going to
bed, and prior
to downloading.
3 beeps when the alarm
is triggered.
6 beeps every minute.*
6 beeps/vibrations every
minute.*
Depleted battery.
Replace batteries now. Pump
has stopped
insulin delivery.
No delivery
due to excess
pressure caused
by an occlusion
or empty reservoir.
Press SEL, then
ACT to stop the
alarm. Check
reservoir, infusion set and
blood glucose.
Replace as necessary.
•Displayed as A-05 in Alarm Review Feature.
•Displayed as A-04 in Alarm Review Feature.
+5+
AM
STOPPED
11:44
LO
PM
BATTERY
10:25
NO
PM
DELIVERY
12:38
OFF
PM
NO POWER
9:38
•Vibration is disabled when pump has a Low Battery message.
3 beeps/vibrations every hour.
6 beeps/vibrations every minute.*
Temporary
basal rate is
active.
No action necessary unless you
want to stop the
temporary rate.
No buttons
were pressed
during the
automatic-off
time period.
To restart
the pump,
press SEL,
then ACT.
Check time
duration for
automatic off.
Over-delivery
protection
“Watchdog.”†
Press SEL,
then ACT.
•Displayed as A-06 in Alarm Review Feature.
+0+
AM
ALARM
11:43
AM
RATE
TEMP
BASAL
9:41
A-51
PM
12:38
6 beeps/vibrations every minute.*
Alarm Message Cause
What to do
Pump time and
date has been
reset.
Press SEL,
then ACT.
Reprogram ALL
settings including time, profiles
and set-up
options.
Change in
insulin concentration has
cleared profiles
& maximum
settings.
Press SEL,
then ACT.
Reprogram
profiles & maximum settings.
E-01
AM
SET PUMP
12:00
E-02
PM
SET PUMP
7:58
6 beeps/vibrations every minute.*
Batteries have
been removed
for longer than
two hours.
Press SEL,
then ACT.
Re-set time and
date. Verify all
other settings
remain.
E-03
AM
SET TIME
12:00
6 beeps/vibrations every minute.*
6 beeps/vibrations every minute.*
Time safety
check.
Press SEL,
then ACT.
Re-set time and
date. Verify all
other settings
remain.
E-20
AM
SET TIME
12:00
6 beeps/vibrations every minute.*
Page 59

109
Diabetes Management
108
Troubleshooting: Alarms
Troubleshooting
& Diabetes
Management Issues
These are general suggestions. Consult with your health care professional for detailed guidelines.
Blood Glucose Monitoring
Why:
Regular monitoring of
blood glucose provides the user
an ‘external’ view of ‘internal’
responses to insulin basal rates,
boluses, ingested food, physical
activity, stress or anything else
than can impact the blood glucose.
SUGGESTED FREQUENCY OF BLOOD GLUCOSE MONITORING
General:
1. Four to six times daily – before each meal and at bedtime.
2. Periodically at 3:00A.M. When pre-breakfast readings are
outside of target range – do a 3:00A.M test.
3. Consult with your health care professional regarding
changes to remedy these out of range values.
NEED TO KNOW
Teach another person in your family or close personal circle how to
check your blood glucose in case
of an emergency and what to do if
immediate action is necessary.
Alarm Message
Safety check
message.**
Press SEL, then ACT.
An E-01 alarm will
occur. (To clear, see
above instructions.) If
same error message
reoccurs, call
Medtronic MiniMed
Help Line.
Cause
What to do
e-
PM
ERROR
3:51
xx
6 beeps/vibrations every minute.*
Delivery safety
check.
(Adjusting the
lead screw may
cause this
alarm.)
Press SEL, then ACT.
Call Medtronic
MiniMed Help Line
if same alarm reoccurs without explanation.
Safety check
message.**
Press SEL, then ACT.
If same alarm reoccurs, call Medtronic
MiniMed Help Line.
A-35
AM
ALARM
11:53
A-
AM
ALARM
5:53
6 beeps/vibrations every minute.*
xx
6 beeps/vibrations every minute.*
NEED TO KNOW
All alarms will gradually become
higher in pitch until turned off.
If using vibrate mode, all alarms
and alerts will start as vibrations.
For alarms, if there is no response
after 3 minutes, they will become
beeps, and then sirens.
Performing a ‘Self Test’ at the time
of an alarm or error may be beneficial. Page 79.
NEED TO KNOW
Questions or concerns regarding
the alarms or screen messages that
you cannot clear using the trouble
shooting guidelines call the 24hour Clinical Services Help Line at
1-800-826-2099.
* For your safety, if alarms are not cleared with-
in 10 minutes, your pump will siren every
minute. To clear this alarm, wait until the sir en
has finished sounding, then press SEL and
ACT.
** In the safety check messages, E-XX and A-XX,
the numbers represented by "XX" will vary to
indicate the specific safety check message.
† This alarm occurs if you deliver more than 2½
times your maximum bolus rate plus 1 maximum basal rate in one hour.
Page 60

Low Blood Glucose - Hypoglycemia
May be experienced as: sudden sweating, trembling, hunger, weakness,
pounding heart/rapid pulse, tingling of
hands, lips or tongue, blurred vision,
headache, dizziness, sweating,
impaired speech or confusion.
Others may notice that they may not
have any symptoms.
PROBLEMS & SOLUTIONS
Decreased food intake
•Adjust insulin bolus.
Increased physical activity
•Adjust insulin by decreasing basal or bolus dose before
activity. Monitor blood glucose 1 – 2 hours after stopping
activity.
Programming Error:
•Review pump programs: basal rates, profiles, concentration
and total insulin delivered. Reprogram and adjust insulin as
needed.
Improper disconnection of infusion set from reservoir:
•Adjust insulin as needed. Review proper method for disconnection to prevent excess insulin infusion.
Alcohol consumption:
•Check with your health care professional regarding the
hypoglycemic effect of alcohol consumption. Check your
blood glucose more frequently when consuming alcohol.
Always eat food with any alcohol consumed. Check your
blood glucose before going to bed and during the night.
111
Diabetes Management
110
Diabetes Management
NEED TO KNOW
Treat signs and symptoms of low
blood glucose IMMEDIATELY. Keep
a fast-acting source of glucose
available - glucose tablets, juice or
non-diet soda, hard candies.
Follow this action with blood glucose monitoring, a carb/protein
snack or meal if it is that time, and
re-test your blood sugars 15 minutes after the first treatment.
During Sick Days:
It is recommended that you check your blood sugar every two to four
hours, 24 hours a day. The blood glucose results can alert you to
DKA. Urine ketones should also be checked. See Sick Day Guidelines
on page 116.
Exercise:
1. ½ hour before start of activity.
2. Midway point of activity more than 1 hour.
3. Within ½ hour after activity.
New physical activity (change in exercise routine):
1. Before activity.
2. Midway if new activity is
longer than usual.
3. Within ½ hour after activity.
Stress - family, work, school, social,
etc.
1. Review your pre-meal and
pre-bedtime values to see if
additional monitoring is necessary during the period of
time.
2. Discuss these findings with
your health care professional
to develop an intervention
plan.
NEED TO KNOW
Keep daily records of BG results,
associated activities like exercise,
parties, stress, illnesses, etc. and
use this information to make insulin
profile adjustments.
Watch for drops or elevations that
follow basal profiles and insulin
boluses.
Discuss your physical activity routine or new activity with your
health care professional. Changes
usually need to be made to basal
profiles.
Changes in activity frequently
occur with the changing of seasons – develop a plan for your
basal rate profiles to meet that
challenge.
Look at your blood glucose values
for monthly patterns of ups or
downs.
Page 61

113
Diabetes Management
Bedtime BG less than target:
•Eat your snack plus a protein. Do a 3:00A.M. test.
Unexplained:
•Correct hypoglycemia. Check pump programs and your
infusion set.
PREVENTION AND TREATMENT TIPS
1. Keep fast acting glucose tablets everywhere: car, office,
purse, briefcase, bedside, kitchen, frequently used rooms at
home, exercise bag, etc.
2. Have a regular blood glucose monitoring schedule and keep
records.
3. Keep in contact with your health care professional/diabetes
educator for fine tuning of your diabetes management.
112
Diabetes Management
Hyperglycemia and
Diabetic Ketoacidosis – DKA
May be experienced as: high blood glucose (over 250 mg/dl) and/or
positive urine ketone test, nausea and vomiting, abdominal pain, frequent urination, dehydration, blurred vision, breathing difficulties
and fruity smelling breath.
HIGH BLOOD GLUCOSE PROBLEMS & SOLUTIONS
Forgot/delayed meal bolus
•Adjust your insulin according
to your health professional’s
instructions. Review carbohydrate counting with a health
care professional.
Illness, stress, menses
•Adjust your insulin according to a pre-set plan.
Programming error
•Review basal rate and profiles, insulin concentration and
total delivered. Make necessary changes.
NEED TO KNOW
Nausea and vomiting may be
the first signs you have of DKA.
Develop a plan for immediate
treatment of possible DKA with
your health care professional.
Teach a family member or close
friend about the plan.
NEED TO KNOW
Treat signs and symptoms of
hyperglycemia and DKA immediately.
• T ak e an injection of regular insulin
with a syringe.
• If urine ketones are present, call
your physician.
• Change your syringe, insulin and
infusion set.
• Begin drinking eight ounces of
water every 30 minutes until blood
glucose target is near.
NEED TO KNOW
TROUBLESHOOT
this episode of low
blood glucose – think about why it
happened and how to prevent it.
Teach family members and close
friends the signs/symptoms and treatment.
Keep a current glucagon kit with you.
Teach a family member or close
friend how and when to use it.
GOOD NEWS: Pump therapy has
been shown to reduce hypoglycemic episodes due to the more
predictable delivery of insulin.
Bode BW, et al. Diabetes Care
1996;19:324-327.
Page 62

Unexplained
•Take insulin by injection (shot) if your blood glucose is
above 250 mg/dl twice in a row. Check blood glucose again
in 1-2 hours. Check ketones. If positive, call your health care
professional. If negative, change your infusion set and verify
that pump is functioning.
115
Diabetes Management
114
Diabetes Management
NEED TO KNOW
If you need to seek emergency
health care, DO NOT drive yourself! Call for emergency help or
have a family member or friend
drive you there.
Change your infusion set as recommended.
Empty reservoir
•Replace the reservoir; adjust insulin as necessary.
Leaks in infusion set or reservoir
•Change the reservoir and move the infusion sets, as cracks
may be difficult to see.
Obstructed set or poor site absorption
•Change the infusion set and site at least 1 inch from the previous site.
Infusion set left in too long
•Change immediately and go to a consistent change schedule
according to instructions.
PVC infusion set
•Change to Polyolefin infusion set.
Inactivated insulin due to temperature extremes
•Protect the pump and infusion set from extremes in temperature. Change the infusion set, reservoir and insulin at the
first sign of abnormal sugars.
Air bubbles or obstruction in infusion set or reservoir
•Change the infusion set and site. Fill the reservoir with room
temperature insulin.
Inactive insulin
•Check the insulin for cloudiness and for expiration date. If in
doubt, use a new vial.
Dawn phenomenon
•Check 3:00 A.M. blood glucose; notify health care professional if elevation of blood glucose occurs between 3:00 A.M.
and pre-breakfast BG value. Adjust basal insulin according
to their recommendations.
Page 63

117
Diabetes Management
116
Diabetes Management
NEED TO KNOW
With the help of your health care
professional, put together a sick
day kit containing:
• Telephone numbers of physician
and diabetes educator
• Liquids such as bouillon and
chicken broth
• Several cans or bottles of both
sugared and non-sugared fluids
like ginger ale, apple juice, soda,
diet soda, water and gelatin
• Anti-fever medication
• Thermometer
• Ketone testing strips in a closed
bottle
• Anti-diarrheal medication
• Sugar free cough medicine and
cough drops
• Glucagon kit
• Suppositories to stop vomiting
(if your physician provides the
prescription)
Discuss with your health care professional use of the temporary
basal rate option to program basal
insulin delivery during sick days.
Sick Day Management
May be experienced as: flu, diarrhea, bronchitis, ‘common cold’ or
other illnesses.
•Discuss extra insulin intake with your health care professional to use during ‘sick days’.
•Always take insulin. NEVER omit insulin, even if you are
unable to eat.
•Do not take off your pump unless you are taking adequate
amounts of insulin by injection.
•Begin to monitor your blood glucose and urine ketone testing as soon as your symptoms begin and continue to test
every two hours, 24 hours a day until symptoms are gone
and blood glucose returns to target. Keep accurate records
and report these to your health care professional.
•Take extra insulin whenever BG results are 250 mg/dl or
more and ketones are moderate or large. To take extra
insulin safely, take small doses and check blood glucose two
hours later. Extra insulin may be taken as often as every two
to three hours. The amount of insulin for sick days depends
on:
Blood glucose level
Presence of urine ketones
If you are able to eat and drink.
•See page 101 for additional guidelines.
•Call health care professional immediately if you are vomiting or if blood glucose is still elevated after injection (shot).
Page 64

PROBLEMS & SOLUTIONS
Site area used longer than 72 hours, possibly red or irritated.
•Change infusion set and site immediately. Put skin treatment
plan into effect. The new site should be at least one inch
from red area.
•Use aseptic technique to prevent infection and discomfort.
Infusion site irritation
•Change site. Do not use infusion sites which may be irritated
by clothing, belts, etc.
Allergic reaction to metal needles
•Ask your health care professional about non-needle sets,
such as the Sof-set or Silhouette infusion sets.
Poor site absorption
•Change the set and site. The new site should be at least 1
inch from previous site. Avoid areas with scar tissue or
stretch marks.
Blood in tubing (site may have been bumped or irritated)
•Change the site and infusion set.
119
Diabetes Management
118
Diabetes Management
Infusion Sets and Infusion Sites
SKIN SITE SELECTION
•The preferred area is the abdomen as insulin absorption is
faster, more predictable and not as affected by exercise as
other body areas.
•Other sites include outer thighs and hips; the arms can be
used but tubing and needle placement may be awkward and
the site needs to be checked more frequently.
•Avoid areas around the belt or waistline, at bikini/underwear lines, within a one-inch circle around the belly button
and any other area where clothing might rub or constrict.
•Each new site should be at least one inch from the last site
placement.
NEED TO KNOW
Your health care professional is a
resource for:
• Information on NEW infusion sets
• Site selection preparation and
choices
• Methods for securing the infusion
set and pump and types of tape.
Develop a plan to treat any skin irritation with your health care professional.
Page 65

Temporary Removal Guidelines
Time Off the Pump (one to four hours):
•Monitor blood glucose every two to four hours.
•Take an injection of Regular insulin equal to basal amount
missed.
•Take an injection of Regular insulin to cover carbohydrates
consumed.
•Take an injection of Regular insulin based upon blood glu-
cose value.
•Decrease insulin dose, usually 10 to 50%, if exercising.
Discuss this with your health care professional.
Time Off the Pump (Overnight):
•Monitor blood glucose every four hours.
•Take an injection of Regular insulin equal to amount of basal
missed every four hours
during the sleep period.
•Take an injection of Regular
insulin based upon blood
glucose value.
121
Diabetes Management
Daily Living, Lifestyle Activities
The following are tips for wearing and protecting your pump:
•Use a belt clip to attach your pump to a belt or waistband.
•Keep your pump in a jacket, pant or skirt pocket.
•Sew a button hole behind a shirt pocket and place your
pump in pocket.
Use a pump case or baby sock as a protective covering. Pump cases
can be color coordinated to match clothing.
120
Diabetes Management
NEED TO KNOW
For best results discuss pump disconnection with your health care
professional.
Plans need to be made for insulin
and carbohydrate coverage during the time away from your pump.
NEED TO KNOW
Make a list of all your activities from
morning rising to bedtime and discuss each with your diabetes educator for pump management.
Page 66

•When calculating the bolus for the first meal time after exer-
cising, only bolus for the carbohydrate grams to be consumed. DO NOT bolus for an elevated blood glucose at this
time.
•High intensity activity lasting two hours or less: disconnect
from pump or put pump into Suspend.
✗ Eat 15 grams of carbohydrate for every 30 minutes of
planned intense activity.
✗ Reconnect to pump after activity.
✗ Use the ‘temporary basal rate’ option to decrease basal
rate by 50% for one hour.
✗ Monitor your blood glucose two to four hours post
activity and more frequently over the next 24 to 36
hours.
123
Diabetes Management
122
Diabetes Management
NEED TO KNOW
High intensity physical activity with
a lot of body movement may be
better performed with your pump
off. Discuss this option with your
health care professional.
Physical Activity
General Guidelines (review these with your health care professional):
•Mild activity of less than 30 minutes can usually be compensated by an extra 15 grams of carbohydrate.
•Decreasing the basal rate or using a Temporary Basal Rate
can compensate for planned
activity before breakfast or
four-six hours past the last
meal bolus.
•Moderate activity of 30-60
minutes duration one to
three hours after a meal can
be compensated by a
decrease in the pre-meal
bolus.
•Moderate-to-high activity,
lasting longer than one
hour, usually requires
adjustment in basal rate,
pre-meal bolus or both. The basal rate may also need to be
lowered for the next 24 to 36 hours following high intensity
activity.
•Carbohydrate coverage for different levels of activity are
dependent upon the person’s weight and level of physical
fitness and training. Consult with your health care professional for specific advice.
NEED TO KNOW
Blood glucose monitoring is an
essential component of any physical activity – plan it into your routine.
Physical activity increases insulin
sensitivity, uses up glucose and
other energy fuels.
Review your physical activities with
your health care professional to
determine how to program your
basal rates and adjust your food
intake for the best results.
Page 67

125
Pump Overview
124
Diabetes Management
Pump Overview
Pump Specifications
Normal Bolus Delivers 0.1 – 25 units in increments of
0.1 units.
Audio Bolus Abolus can be programmed using audi-
ble tones in either 0.5 or 1.0 unit increments.
Square Wave Bolus A bolus can be programmed to be deliv-
ered uniformly over a specified duration
from 30 minutes up to eight hours.
Dual Wave Bolus Acombination bolus can be programmed
to deliver a Normal bolus followed by a
Square Wave bolus.
Bolus on Square Wave A Normal bolus can be programmed
after a Square Wave bolus has been set
and is in progress.
Prime Allows a specific amount of insulin to be
set to prime the infusion set. These
amounts are not counted in the total
daily record but can be recorded separately.
Basal Rates and Up to 48 daily basal rates may be proProfiles grammed. Adifferent basal profile can be
programmed every 30 minutes. Rates can
be set from 0.0 to 35.0 units per hour in
0.1 unit increments. Multiple basal rates
are called profiles.
Personal Delivery The pump user may program three
Patterns different basal rate patterns: Standard, A
and B, each with the option of setting up
to 48 basal rates.
Page 68

Memory
Pump Accessible Memory (These histories can be viewed on the
pump)
Bolus History The pump stores the last 24 boluses in
reverse chronological order.
Daily Totals The pump stores the last 7 days of
combined daily totals, (bolus deliveries +
basal rates) in reverse chronological
order.
Alarms The pump stores the last 12 alarms or
error messages received, including type,
date and time in reverse chronological
order.
Primes The pump stores the last 9 Primes in
reverse chronological order.
Stored Memory (This data is retrieved through downloading with additional equipment)
Bolus History The pump stores the last 450 bolus with a
time and date stamp.
Daily Totals The pump stores approximately 90 days
of combined daily totals (bolus deliveries
+ basal rates).
Alarms The pump stores the last 50 alarms with
time and date stamp.
Primes The pumps stores the last 50 Primes with
time and date stamp.
127
Pump Overview
Temporary Basal Rate Allows the user to temporarily increase
or decrease the current basal rate for a
duration of 30 minutes to 24 hours.
Remote Programmer The Remote Programmer uses ‘radio fre-
quency’ to allow the user to program a
Normal bolus or suspend/restart their
pump.
Back Light Pressing the Down arrow will activate
the back light on the LCD display.
126
Pump Overview
Page 69

Feature Performance
Weight The pump weighs 3.5 ounces (less than
100 grams).
Delivery Accuracy +/- 2%
Water-tight Conform to IEC60601-1 sub-clause 44.6
and IEC60529 IPX7 standard.
Delivery Increment With U-100 each motor stroke delivers
0.1 units, U-50 delivers 0.05 units and U-
40 delivers 0.04 units.
129
Pump Overview
128
Pump Overview
Safety Features
Feature Performance
Solenoid Motor Motor has a unique, patented design
which delivers in precise 0.1 unit increments and is incapable of over-delivery.
Program Safety Checks Over 50 independent safety systems are
continuously monitoring all pump operations.
Alarms & Error Over 50 safety alarms and error mes-
sages.
Messages Messages alert the user by an audible
tone or a vibration. All alarms and errors
have a visible message or icon on the
TIME OF DAY screen.
Time Display User has the choice of AM/PM or inter-
national time format. Time is always displayed on the TIME OF DAY screen.
Date Display User sets the date in month, day , year for-
mat.
Insulin Concentration User can select either U-100, U-50 or U-40
insulin.
Child Block Activation of the ‘Child Block’ restricts
access to all features except the Suspend,
Self Test and programming with the
Remote Programmer.
Reservoir An impact-resistant, highly insulin com-
patible polypropylene syringe holds up
to 300 units of U-100 insulin. Unit markings ensure accuracy. A clear pump window allows user to see the remaining
amount of insulin.
Power Supply Powered by standard 1.5 V
& Batteries silver oxide batteries. For best results use
MMT-104 available through Medtronic
MiniMed. If MMT-104s are not available,
use EverReady or silver oxide model 357
batteries. Batteries are available at photo
shops and drug stores .
Pump Size 1.9 x 3.4 x 0.8 inches (4.8 x 8.6 x 2.0 cm).
Page 70

131
Pump Overview
Factory Settings
The following features were set at the factory but can be re-programmed:
Feature Setting
Current Basal Rate - - - - - - - - - -0.0 u/h (units per hour)
Automatic OFF - - - - - - - - - - - -OFF
Beep Volume Level - - - - - - - - -Two (medium)
Variable Bolus Mode - - - - - - - -OFF
Maximum Bolus - - - - - - - - - - -10.0 units
Maximum Basal Rate - - - - - - - -2.0 u/h
RF Device - - - - - - - - - - - - - - - -OFF
Audio Bolus - - - - - - - - - - - - - -OFF
Personal Delivery Patterns - - - -OFF
Alarm Type - - - - - - - - - - - - - - -Audible
Child Block - - - - - - - - - - - - - - -OFF
Time display - - - - - - - - - - - - - -12 hour (A.M./P.M.)
Insulin Concentration - - - - - - -U-100
Reservoir - - - - - - - - - - - - - - - -Short Reservoir Method – 150 units
capacity
130
Pump Overview
Do Not Reuse This Device
Please Read the Instructions for Use:
Sterilized By Ethylene Oxide:
Manufacture Date:
(year - month)
Lot Number:
Expiration Date (Use By Date):
(year - month)
Reference/Record Number:
example:
(reorder number)
REF MMT-115
Device Serial Number:
S N
Storage Temperature Range:
Fragile Product:
Protect Against Moisture:
Type CF:(Protection from Electrical Shock)
Water Resistant: IPX7
Radio Frequency Alert
+55C
C
!
LOT
STERILE EO
1999-06
1999-06
-20C
+55C
Icon Table
Page 71

133
Glossary
132
Pump Overview
Glossary
Activate Key:
The ACT button is located on the keypad of the insulin pump and on
the Remote Programmer and allows the user to activate or change
values.
AADE:
American Association of Diabetes Educators is composed of health
care professionals with special knowledge in diabetes education and
management. AADE maintains a free telephone line for those who
would like to contact a diabetes educator in their geographic area call
(1–800–TEAM UP-4)
ADA:
American Diabetes Association is composed of health professionals
and people living with diabetes, as well as researchers, and other
interested parties. They endeavor to develop educational programs
and materials for professionals and the public, raise research funds to
cure diabetes, increase awareness about the signs and symptoms of
diabetes and provide general information to all peoples regarding
diabetes. Their toll free number is 1-800-232-3472.
ADtA:
American Dietetic Association is an international organization of
food and nutrition professionals. They maintain a consumer nutrition hot line staffed by registered dietitians at 1-800-366-1655.
Basal Rate:
The amount of insulin required by the individual’s body to regulate
the production and availability of fats, carbohydrates and proteins
under fasting conditions. The user’s physician calculates this rate. A
basal rate is also called a profile. Multiple basal rates can be programmed depending upon the user’s needs.
Page 72

135
Glossary
134
Glossary
Dual Wave Bolus:
This provides for a Normal bolus and a Square Wave bolus to be programmed at the same time to cover the calories of a specific meal
over two different time periods. The Normal bolus is infused first,
followed by the Square Wave bolus which will be delivered over a
longer period of time.
Hyperglycemia:
Elevated blood glucose over 240mg/dl as seen by monitoring blood
glucose levels with any or all of the following symptoms: nausea,
vomiting, blurred vision, headache, gastric distress, frequent urination of large amounts and lethargy. Insulin pump users need to take
immediate treatment action (see page 113).
Hypoglycemia:
Low blood glucose less than 80 mg/dl as seen by monitoring blood
glucose levels, with or without any or all of the following suddenly
appearing symptoms: excessive hunger, shaking or tremors, perspiration, ‘dancing’ vision, headache, slurred speech, sudden mood
swings or personality change. Insulin pump users need to take
immediate treatment action (see page 111).
Icons:
Visual symbols that signify an action. (See page 131 for a list of the
icons and their function.)
JDF:
Juvenile Diabetes Foundation – an organization dedicated to
fundraising for juvenile diabetes research. Their toll free number is
1-800-223-1138.
Lead Screw Rotation Test:
Method whereby the insulin pump user can visually check that the
pump is delivering insulin.
Bolus:
A specific amount of insulin released into the body to cover the estimated amount of carbohydrates in a given meal.
Bolus on Square Wave:
Provides increased flexibility for the user by allowing a Normal bolus
during a programmed Square Wave bolus. This program provides
the user the option to take more insulin to cover an unexpected addition to their meal.
Child Block:
Prevents accidental changing of set values in the SET UP I and SET
UP II menu options. This is a ‘lock-out’ function and must be programmed into the pump.
CSII:
Continuous subcutaneous insulin infusion.
Default:
A specific setting that has been programmed into the pump’s computer at the factory. The user cannot change this value.
Diabetes Educator:
A health care professional who has experience and training in assisting those with diabetes to understand how to manage this disease. A
Certified Diabetes Educator (C.D.E.) is a diabetes educator who
passed a national exam on diabetes education and management.
DKA:
Diabetic Ketoacidosis occurs when the blood glucose level becomes
elevated, the insulin levels are low and the body uses fat for energy.
This process produces ketone bodies which upset the body’s acidbase balance leading to a potentially life threatening situation.
Page 73

137
Glossary
136
Glossary
Scroll:
This is the process of pushing the button on the keypad to move the
insulin pump screens to another option or of pressing the arrows to
reach a specific number value.
Select Key:
SEL is identified on the button of the keypad on the insulin pump. It
is used to select an option but NOT to change a value.
Self Test:
This a factory initiated program built into the pump to perform a
safety check of all functions. The user has the option of initiating the
Self Test at any time.
Square Wave Bolus:
A specific amount of insulin to be delivered over a longer period of
time.
Suspend:
This function will stop ALL (both basal and bolus) delivery programmed into the pump. The user must restart the pump in order for
delivery to resume.
Temporary Basal Rate:
This is a specific amount of insulin programmed to cover a short term
need different than a programmed basal rate, (e.g., for exercise periods or for sick days).
Watch Dog Alarm:
An independent circuit within the insulin pump that monitors operations of the primary microprocessor. Deviations from normal operations will result in a continuous tone (see troubleshooting alarms on
page 105.)
Low Volume Alert:
Audible sound to warn the user that the amount of insulin in the
reservoir is low.
Low Battery Indicator:
Icon shown on LCD which indicates the amount of power remaining
in the batteries is low.
LCD:
Liquid Crystal Display – this is the visual screen on the front of the
insulin pump where functions and messages are displayed.
Normal Bolus:
This is a specific amount of insulin that can be programmed into the
insulin pump’s computer and infused immediately.
Prime:
This is insulin used for priming the infusion set, taking up slack in
the pump drive system, etc., that is not intended to be delivered to
the body.
Profile:
This is a basal rate with a start and stop time. A user may program
several different profiles, each with a differ ent basal rate, during a 24hour period of time to achieve better glucose control.
Reservoir:
A specially designed syringe for use with the Medtronic MiniMed
insulin pump. Any other type should not be used as inaccurate delivery may occur.
Remote Programmer:
A Remote Programmer which uses radio frequency which to “talk”
with your pump. Lets you deliver a Normal bolus and suspend and
restart the insulin pump without pressing the buttons on the pump.
Page 74

139
Index
138
Index
Accuracy,
pump delivery, 128,129
Alarm,
reviewing, 67,127,128
type, 69,130
vibration, 69
Automatic Off,
setting, 68,130
Audio Bolus,
feature, 62-63
on/off, 62
Backlight, 6
Basal Rate,
description, 41-43, 125, 130, 133
maximum, 41,44,130
multiple, 43, 125, 133
patterns, 43, 47-48, 76, 125, 130
profiles, 16, 41-42, 43, 45-46, 47-48, 51, 125, 136,
reviewing, 16
resetting, 51
screen, 8-9
setting, 14-15, 44, 45-46, 49
temporary, 42, 49-50, 51-52, 126, 137
Batteries,
battery carrier, 84
changing, 84-85
low battery alert, 69, 83,85, 106, 136
type, 69, 73, 83, 128
Beep Volume, 66, 130
Block Feature, 69, 76, 128, 120, 134
setting, 76
Page 75

141
Index
140
Index
Lead Screw Test, 81, 135
Low Volume Alert, 35-36, 136
setting reservoir volume, 35
Main Programming Screens, 8
Maximum Basal Rate, 41,44,130
Maximum Bolus, 53, 55, 130
Multiple Basal Rate, 43, 125, 133
MRI, 90
Normal Bolus, 31, 543, 54, 58, 134, 125
Performance Options, 128-129
Personal Delivery Pattern,
feature, 43, 47-48, 76, 125, 130
setting, 47-48
Polyfin, 17
Precautions,
general, 97
hypoglycemia, 39-40, 100, 111, 135
hyperglycemia, 30-40, 101, 113, 135
infusion sets & sites, 118-119
Prime Feature, 29-30, 34, 125, 127, 136
low volume indicator, 35-36
Prime History,
review, 34
Priming, 29
Profiles,
description, 41-42, 125, 136
reviewing, 16, 43
resetting, 51
setting, 45-46, 47-48
Programming,
screens, 8-9
time-out, 75
Pump,
buttons, 6
batteries, 69, 83-85 128
care, 83, 87-90
cleaning, 90
components, 6-7
Blood Glucose Monitoring, 109
Bolus,
audio, 62-63, 125, 130
delivery, 53, 58, 61
dual wave, 60-61, 53, 54, 125, 135
history, 56, 127
maximum, 53, 55, 130
normal, 31, 543, 54, 58, 134, 125
remote programmer, 74
screen, 8-9
setting, 31, 55-62
square wave, 53, 54, 59, 60-61, 125, 134, 135, 137
stopping, 51
variable, 57-130
CT Scan, 90
Cleaning, 90
Daily Totals,
reviewing, 64, 127
Date,
setting/changing, 12
Diabetic Ketoacidosis (DKA), 96, 134
Dual Wave Bolus, 60-61, 53, 54, 125, 135
Emergency Kit,
content, 4, 97
Factory Settings, 130
Glucagon, 100, 112, 117
Hyperglycemia, 39-40, 97, 101, 102, 113, 135
Hypoglycemia, 39-40, 42, 96, 97, 100, 103, 111, 112, 135
Icon Table, 131
Infusion Set,
installing, 22-25, 26, 118
removing, 28
priming, 22, 24, 29-30
Infusion Site,
irritation, 99, 118, 119
Insulin concentration,
Setting, 77-78, 128, 130
Page 76

Specifications,
pump, 125
Spring Belt Clip, 86
Square Wave Bolus, 53, 54, 59, 60-61, 125, 134, 135, 137
Suspend, 137
restarting pump, 32
remote programmer, 75
Temporary Basal Rate, 42, 49-50, 51-52, 126, 137
screen, 8, 49
setting, 49-50
stopping, 51-52
Time
12-hour format, 65, 128-130
24-hour format, 65, 128
setting/changing, 12-13, 65
Troubleshooting,
alarms & error messages, 105, 108
blood glucose monitoring, 109
high blood sugars, 39-40, 97, 101, 102, 113, 135
low blood sugars, 39-40, 42, 96, 97, 100, 103, 111, 112, 135
infusion sites & sets, 118
physical activity, 120, 122
sick day management, 116
temporary removal guidelines, 121
U-100 Insulin, 19, 77, 78, 81, 128, 130
U-40 Insulin, 78, 81, 128
U-50 Insulin, 77, 78, 81, 128
Variable Bolus, 57-130
X-Rays, 90
143
Index
142
Index
factory settings, 130
memory, 127
overview, 5-9, 125-131
performance options, 128-129
restarting, 32-33
safety features, 128
screens, 8-9
specifications, 125
starting, 32-33
stopping, 32-33, 121
user safety, 95-103
user options, 79-81
Quick Release, 34
Quick Start, 11-37
Remote Programmer,
audio bolus, 74
batteries, 73, 91,
care & maintenance, 91-92, 126, 136
cleaning, 92
regulatory notification, 93
suspend, 75
RF Device Feature, 72-130
Reservoir,
air bubbles, 22-24
converter, 20-21, 18
filling, 22, 24
installation, 18-23, 26-27, 136
priming, 29-30
Safety Features, 128-129
Self Test, 79-80, 137
Set Up Options,
screens, 8-9
Set Up I, 8
Set Up II, 9
Silhouette, 24
Sof-set, 17, 22
Sof-serter, 23
Page 77

145
Check Point Answers
144
Glossary
#1 1. ACT.
b. 1-800-826-2099.
#2 1. SEL.
2. ACT.
3. Arrows.
#3 1. The Short Reservoir method.
2. The Full Reservoir method.
3. Remove the reservoir convertor.
#4 1. This allows you to see how much insulin is left in the
reservoir.
#5 1. Program a Prime.
#6 1. How you will make up for any missed insulin.
#7 1. 12:00 A.M. midnight.
2. To match insulin requirements to blood glucose needs.
#8 1. No, you do not need to disconnect.
#9 1. The Lead Screw Rotation test checks to make sure that the
motor and drive mechanisms are working correctly.
Answers
Check Point Answers
 Loading...