

Page 1

Medtronic
MiniMed 2007D
Implantable
Insulin Pump
System
Patient Manual
Page 2
© 2003, Medtronic MiniMed. All rights reserved.
Medtronic MiniMed™ is a trademark of Medtronic MiniMed
Dual W a ve™ is a trademark of Medtronic MiniMed
Square W ave™ is a trademark of Medtronic MiniMed
Steri-strip® is a registered mark from 3M
A v e n tis® is a registered mark from Aventis Pharmaceutical
Genapol® is a registered mark from Aventis Pharmaceutical
Luer Lok® is a registered mark from BD and Co.
This device is protected under one or more of the following U.S. Patents:
4,731,051 5,217,442 5,527,307 6,427,088
4,776,842 5,257,971 5,559,828 6,537,268
5,167,633 5,460,618 5,797,733 6,562,001
5,176,644 5,466,218 5,915,929 6,564,105
5,197,322 5,514,103 6,283,943 6,571,128
U.S., international, and foreign patent applications are pending.
6025070-011 7/0 4
0976
REF MMT-3160
Page 3

Table of contents
CHAPTER 1 The Medtronic MiniMed 2007D Implantable
Insulin Pump System . . . . . . . . . . . . . . . . . . . . 1
Introduction . . . . . . . . . . . . . . . . . . . . . . . . . . . . . . . . . . . . . . . . . . . . . . . . . . . 1
Medtronic MiniMed help line . . . . . . . . . . . . . . . . . . . . . . . . . . . . . . . . . . . . . 1
Description of the system . . . . . . . . . . . . . . . . . . . . . . . . . . . . . . . . . . . . . . . . 2
Medication reservoir . . . . . . . . . . . . . . . . . . . . . . . . . . . . . . . . . . . . . . 3
Pumping mechanism . . . . . . . . . . . . . . . . . . . . . . . . . . . . . . . . . . . . . . 3
i
Antenna . . . . . . . . . . . . . . . . . . . . . . . . . . . . . . . . . . . . . . . . . . . . . . . . 3
Microelectronics . . . . . . . . . . . . . . . . . . . . . . . . . . . . . . . . . . . . . . . . . 3
Battery . . . . . . . . . . . . . . . . . . . . . . . . . . . . . . . . . . . . . . . . . . . . . . . . . 4
Tone transducer . . . . . . . . . . . . . . . . . . . . . . . . . . . . . . . . . . . . . . . . . . 4
Side Port Catheter . . . . . . . . . . . . . . . . . . . . . . . . . . . . . . . . . . . . . . . . . . . 4
Personal Pump Communicator (PPC) . . . . . . . . . . . . . . . . . . . . . . . . . . . . 5
Special insulin . . . . . . . . . . . . . . . . . . . . . . . . . . . . . . . . . . . . . . . . . . . . . . 6
CHAPTER 2 Safety features . . . . . . . . . . . . . . . . . . . . . . . . . 7
Pump safety features . . . . . . . . . . . . . . . . . . . . . . . . . . . . . . . . . . . . . . . . . . . . 7
Safe telemetry . . . . . . . . . . . . . . . . . . . . . . . . . . . . . . . . . . . . . . . . . . . . . . 7
Alarms . . . . . . . . . . . . . . . . . . . . . . . . . . . . . . . . . . . . . . . . . . . . . . . . . . . . 7
Negative pressure reservoir . . . . . . . . . . . . . . . . . . . . . . . . . . . . . . . . . . . . 7
PPC safety features . . . . . . . . . . . . . . . . . . . . . . . . . . . . . . . . . . . . . . . . . . . . . 8
Programming sequence . . . . . . . . . . . . . . . . . . . . . . . . . . . . . . . . . . . . . . . 8
Maximum dosage limits . . . . . . . . . . . . . . . . . . . . . . . . . . . . . . . . . . . . . . . 8
Page 4

ii
Table of contents
Alarms and messages . . . . . . . . . . . . . . . . . . . . . . . . . . . . . . . . . . . . . . . . . 8
CHAPTER 3 Implanting the Medtronic MiniMed
2007D Pump System . . . . . . . . . . . . . . . . . . . . . 9
Hospitalization . . . . . . . . . . . . . . . . . . . . . . . . . . . . . . . . . . . . . . . . . . . . . . . . . 9
Pre-operative procedures . . . . . . . . . . . . . . . . . . . . . . . . . . . . . . . . . . . . . . 9
Implantation procedures . . . . . . . . . . . . . . . . . . . . . . . . . . . . . . . . . . . . . 10
Post-operative procedures . . . . . . . . . . . . . . . . . . . . . . . . . . . . . . . . . . . . 10
Follow-up . . . . . . . . . . . . . . . . . . . . . . . . . . . . . . . . . . . . . . . . . . . . . . 11
Pump refills . . . . . . . . . . . . . . . . . . . . . . . . . . . . . . . . . . . . . . . . . . . . . . . . . . 11
Insulin used with the Implantable Pump . . . . . . . . . . . . . . . . . . . . . . . . . 11
Pump refill procedure . . . . . . . . . . . . . . . . . . . . . . . . . . . . . . . . . . . . . . . 11
CHAPTER 4 Programming your Pump . . . . . . . . . . . . . . . . 13
Introduction . . . . . . . . . . . . . . . . . . . . . . . . . . . . . . . . . . . . . . . . . . . . . . . . . . 13
PPC screen icons . . . . . . . . . . . . . . . . . . . . . . . . . . . . . . . . . . . . . . . . . . . . . . 14
PPC buttons . . . . . . . . . . . . . . . . . . . . . . . . . . . . . . . . . . . . . . . . . . . . . . . . . . 15
Communicating PPC . . . . . . . . . . . . . . . . . . . . . . . . . . . . . . . . . . . . . . . . . . . 15
Main programming screen . . . . . . . . . . . . . . . . . . . . . . . . . . . . . . . . . . . . . . . 16
Programming a bolus . . . . . . . . . . . . . . . . . . . . . . . . . . . . . . . . . . . . . . . . 16
Set an immediate bolus (Variable Bolus option is “off”) . . . . . . . . . . . . . 17
Set an immediate bolus (Variable Bolus option is “on”) . . . . . . . . . . . . . 18
Set a Square Wave bolus . . . . . . . . . . . . . . . . . . . . . . . . . . . . . . . . . . . . . 19
Set a Dual Wave bolus . . . . . . . . . . . . . . . . . . . . . . . . . . . . . . . . . . . . . . . 21
Review the bolus history . . . . . . . . . . . . . . . . . . . . . . . . . . . . . . . . . . . . . 22
Suspend mode . . . . . . . . . . . . . . . . . . . . . . . . . . . . . . . . . . . . . . . . . . . . . 23
Program basal rates . . . . . . . . . . . . . . . . . . . . . . . . . . . . . . . . . . . . . . . . . 23
Set one basal rate . . . . . . . . . . . . . . . . . . . . . . . . . . . . . . . . . . . . . . . . 23
Set multiple basal rates . . . . . . . . . . . . . . . . . . . . . . . . . . . . . . . . . . . 25
Set a temporary basal rate . . . . . . . . . . . . . . . . . . . . . . . . . . . . . . . . . 26
Page 5

Table of contents
Stop a temporary basal rate . . . . . . . . . . . . . . . . . . . . . . . . . . . . . . . . 27
Personal events . . . . . . . . . . . . . . . . . . . . . . . . . . . . . . . . . . . . . . . . . . . . 27
Preset events . . . . . . . . . . . . . . . . . . . . . . . . . . . . . . . . . . . . . . . . . . . 27
Additional events . . . . . . . . . . . . . . . . . . . . . . . . . . . . . . . . . . . . . . . . 27
History . . . . . . . . . . . . . . . . . . . . . . . . . . . . . . . . . . . . . . . . . . . . . . . . . . . . . . 28
Pump setup . . . . . . . . . . . . . . . . . . . . . . . . . . . . . . . . . . . . . . . . . . . . . . . . . . . 30
Time and date . . . . . . . . . . . . . . . . . . . . . . . . . . . . . . . . . . . . . . . . . . . . . . 30
Auto off . . . . . . . . . . . . . . . . . . . . . . . . . . . . . . . . . . . . . . . . . . . . . . . . . . . . . 31
Alarms . . . . . . . . . . . . . . . . . . . . . . . . . . . . . . . . . . . . . . . . . . . . . . . . . . . 31
Self test . . . . . . . . . . . . . . . . . . . . . . . . . . . . . . . . . . . . . . . . . . . . . . . . . . 32
Basal delivery patterns . . . . . . . . . . . . . . . . . . . . . . . . . . . . . . . . . . . . . . . 33
Initialize PPC to pump . . . . . . . . . . . . . . . . . . . . . . . . . . . . . . . . . . . . . . . 34
Pump Setup II . . . . . . . . . . . . . . . . . . . . . . . . . . . . . . . . . . . . . . . . . . . . . 34
iii
Exit Setup Menu . . . . . . . . . . . . . . . . . . . . . . . . . . . . . . . . . . . . . . . . . . . 34
Pump Setup II . . . . . . . . . . . . . . . . . . . . . . . . . . . . . . . . . . . . . . . . . . . . . . . . 35
Turn on the audio bolus feature . . . . . . . . . . . . . . . . . . . . . . . . . . . . . . . . 35
Use audio bolus in the Main Menu . . . . . . . . . . . . . . . . . . . . . . . . . . 36
Turn on the Variable Bolus feature . . . . . . . . . . . . . . . . . . . . . . . . . . . . . 36
Set a maximum bolus . . . . . . . . . . . . . . . . . . . . . . . . . . . . . . . . . . . . . . . . 37
Set a maximum basal rate . . . . . . . . . . . . . . . . . . . . . . . . . . . . . . . . . . . . 38
Set time format . . . . . . . . . . . . . . . . . . . . . . . . . . . . . . . . . . . . . . . . . . . . . 38
Personal event . . . . . . . . . . . . . . . . . . . . . . . . . . . . . . . . . . . . . . . . . . . . . 39
Pump setup . . . . . . . . . . . . . . . . . . . . . . . . . . . . . . . . . . . . . . . . . . . . . 39
Exit Setup Menu . . . . . . . . . . . . . . . . . . . . . . . . . . . . . . . . . . . . . . . . 39
CHAPTER 5 Alarms and messages . . . . . . . . . . . . . . . . . . 41
The pump alarms . . . . . . . . . . . . . . . . . . . . . . . . . . . . . . . . . . . . . . . . . . . . . . 41
The PPC alarms . . . . . . . . . . . . . . . . . . . . . . . . . . . . . . . . . . . . . . . . . . . . . . . 42
Alarm type 1 . . . . . . . . . . . . . . . . . . . . . . . . . . . . . . . . . . . . . . . . . . . . . . 42
Alarm type 2 . . . . . . . . . . . . . . . . . . . . . . . . . . . . . . . . . . . . . . . . . . . . . . 42
Page 6

iv
Table of contents
Pump alarms . . . . . . . . . . . . . . . . . . . . . . . . . . . . . . . . . . . . . . . . . . . . . . . . . 43
Alarm feedback . . . . . . . . . . . . . . . . . . . . . . . . . . . . . . . . . . . . . . . . . . . . 43
Pump low battery . . . . . . . . . . . . . . . . . . . . . . . . . . . . . . . . . . . . . . . . . . . 43
Depleted pump battery . . . . . . . . . . . . . . . . . . . . . . . . . . . . . . . . . . . . . . . 43
System error . . . . . . . . . . . . . . . . . . . . . . . . . . . . . . . . . . . . . . . . . . . . . . . 44
Pump self test fail . . . . . . . . . . . . . . . . . . . . . . . . . . . . . . . . . . . . . . . . . . 44
PPC alarms . . . . . . . . . . . . . . . . . . . . . . . . . . . . . . . . . . . . . . . . . . . . . . . . . . . 45
PPC low battery . . . . . . . . . . . . . . . . . . . . . . . . . . . . . . . . . . . . . . . . . . . . 45
Low reservoir . . . . . . . . . . . . . . . . . . . . . . . . . . . . . . . . . . . . . . . . . . . . . . 45
Empty reservoir . . . . . . . . . . . . . . . . . . . . . . . . . . . . . . . . . . . . . . . . . . . . 46
Communication error . . . . . . . . . . . . . . . . . . . . . . . . . . . . . . . . . . . . . . . . 46
Battery replacement . . . . . . . . . . . . . . . . . . . . . . . . . . . . . . . . . . . . . . . . . 47
Pump suspended . . . . . . . . . . . . . . . . . . . . . . . . . . . . . . . . . . . . . . . . . . . 47
Auto off . . . . . . . . . . . . . . . . . . . . . . . . . . . . . . . . . . . . . . . . . . . . . . . . . . 48
Hourly maximum exceeded . . . . . . . . . . . . . . . . . . . . . . . . . . . . . . . . . . . 48
Personal Pump Communicator messages . . . . . . . . . . . . . . . . . . . . . . . . . . . 49
CHAPTER 6 Warnings and precautions . . . . . . . . . . . . . . . 51
Warnings . . . . . . . . . . . . . . . . . . . . . . . . . . . . . . . . . . . . . . . . . . . . . . . . . . . . 51
Electrotherapy . . . . . . . . . . . . . . . . . . . . . . . . . . . . . . . . . . . . . . . . . . . . . 51
Diagnostic ultrasound . . . . . . . . . . . . . . . . . . . . . . . . . . . . . . . . . . . . . . . 51
Ultrasound therapy . . . . . . . . . . . . . . . . . . . . . . . . . . . . . . . . . . . . . . . . . . 51
Diagnostic radiation . . . . . . . . . . . . . . . . . . . . . . . . . . . . . . . . . . . . . . . . . 51
Therapeutic radiation . . . . . . . . . . . . . . . . . . . . . . . . . . . . . . . . . . . . . . . . 52
Magnetic resonance imaging . . . . . . . . . . . . . . . . . . . . . . . . . . . . . . . . . . 52
Pump and catheter under-delivery . . . . . . . . . . . . . . . . . . . . . . . . . . . . . . 52
Pump electronic or alarm malfunction . . . . . . . . . . . . . . . . . . . . . . . . . . . 52
Reservoir level warnings . . . . . . . . . . . . . . . . . . . . . . . . . . . . . . . . . . . . . 53
Environmental conditions . . . . . . . . . . . . . . . . . . . . . . . . . . . . . . . . . . . . 53
Precautions . . . . . . . . . . . . . . . . . . . . . . . . . . . . . . . . . . . . . . . . . . . . . . . . . . . 54
Page 7

Table of contents
Blood glucose monitoring . . . . . . . . . . . . . . . . . . . . . . . . . . . . . . . . . . . . 54
Conventional insulin supplies . . . . . . . . . . . . . . . . . . . . . . . . . . . . . . . . . 54
Physician’s instructions . . . . . . . . . . . . . . . . . . . . . . . . . . . . . . . . . . . . . . 54
PPC . . . . . . . . . . . . . . . . . . . . . . . . . . . . . . . . . . . . . . . . . . . . . . . . . . . . . 54
Maximum dosages . . . . . . . . . . . . . . . . . . . . . . . . . . . . . . . . . . . . . . . . . . 55
Battery change . . . . . . . . . . . . . . . . . . . . . . . . . . . . . . . . . . . . . . . . . . . . . 55
Proper PPC positioning . . . . . . . . . . . . . . . . . . . . . . . . . . . . . . . . . . . . . . 55
Physical activities to avoid . . . . . . . . . . . . . . . . . . . . . . . . . . . . . . . . . . . 55
Emergency plan . . . . . . . . . . . . . . . . . . . . . . . . . . . . . . . . . . . . . . . . . . . . . . . 55
Adverse reactions . . . . . . . . . . . . . . . . . . . . . . . . . . . . . . . . . . . . . . . . . . . . . . 56
Hyperglycemia . . . . . . . . . . . . . . . . . . . . . . . . . . . . . . . . . . . . . . . . . . . . . 56
Hypoglycemia . . . . . . . . . . . . . . . . . . . . . . . . . . . . . . . . . . . . . . . . . . . . . 57
Pump pocket infection . . . . . . . . . . . . . . . . . . . . . . . . . . . . . . . . . . . . . . . 57
v
Pump pocket seroma . . . . . . . . . . . . . . . . . . . . . . . . . . . . . . . . . . . . . . . . 57
CHAPTER 7 Important Self-Care . . . . . . . . . . . . . . . . . . . . . 59
Blood glucose monitoring . . . . . . . . . . . . . . . . . . . . . . . . . . . . . . . . . . . . . . . 59
Meal plan . . . . . . . . . . . . . . . . . . . . . . . . . . . . . . . . . . . . . . . . . . . . . . . . . . . . 60
Daily activities . . . . . . . . . . . . . . . . . . . . . . . . . . . . . . . . . . . . . . . . . . . . . . . . 60
Exercise . . . . . . . . . . . . . . . . . . . . . . . . . . . . . . . . . . . . . . . . . . . . . . . . . . . . . 60
Travel . . . . . . . . . . . . . . . . . . . . . . . . . . . . . . . . . . . . . . . . . . . . . . . . . . . . . . . 60
Medtronic MiniMed information card . . . . . . . . . . . . . . . . . . . . . . . . . . . . . . 61
CHAPTER 8 PPC Care and Maintenance . . . . . . . . . . . . . . 63
Installing/replacing the main battery . . . . . . . . . . . . . . . . . . . . . . . . . . . . . . . 63
CHAPTER 9 Technical specifications . . . . . . . . . . . . . . . . . 67
Implantable Insulin Pump (MMT-2007D) . . . . . . . . . . . . . . . . . . . . . . . 67
Personal Pump Communicator (MMT-3160) . . . . . . . . . . . . . . . . . . . . . 68
Side Port Catheter . . . . . . . . . . . . . . . . . . . . . . . . . . . . . . . . . . . . . . . . . . 69
FCC compliance . . . . . . . . . . . . . . . . . . . . . . . . . . . . . . . . . . . . . . . . . . . 69
Page 8

vi
Table of contents
Page 9

Table of contents
List of figures
Figure 1: The Implantable Insulin Pump ................................................................2
Figure 2: Interior of the Implantable Insulin Pump ................................................3
Figure 3: Side Port Catheter ....................................................................................4
Figure 4: Personal Pump Communicator (PPC) .....................................................5
vii
Page 10

viii
Table of contents
Page 11

CHAPTER 1 The Medtronic MiniMed
2007D Implantable Insulin
Pump System
Introduction
This manual is a reference guide for both you and your support network of
family and friends. It is important that other people in your support network
know how to use the Medtronic MiniMed 2007D Implantable Insulin Pump
System, so they can be of assistance if the need arises.
Throughout the manual you will see note comments which provide important
information about the Medtronic MiniMed 2007D System. If you have a
question not covered in the manual, please talk with your doctor. Your doctor
knows the most about your medical condition and can give you the best
answers to your questions about your diabetes treatment.
1
NOTE: Before you can use the Medtronic MiniMed 2007D
System, you will be trained. This training will teach
you about implantable insulin pump therapy, and how
to operate the Medtronic MiniMed 2007D System. This
manual can be used to help, but not replace, your
training.
Medtronic MiniMed help line
Medtronic MiniMed provides a 24-hour help line for assistance. Clinical
Services personnel are trained to answer questions you may have about the
Medtronic MiniMed 2007D System.
When calling from: Primary number Alternate number
Outside the United States 1-818-576-5040 1-818-362-5958
Within the United States 1-800-826-2099 1-818-362-5958
Page 12
2
Table of contents
Description of the system
The Medtronic MiniMed 2007D Implantable Insulin Pump System (see Figure 1)
is an "open-loop" system, which means you must test your blood glucose in
accordance with the method and frequency recommended by your physician.
Based on the results of your blood glucose testing, you can program the Pump
with desired rates of delivery by using the Personal Pump Communicator (PPC).
The system consists of four components:
• Implantable Insulin Pump
• Side Port Catheter
• Personal Pump Communicator (PPC)
• Special Insulin
Implantable Insulin Pump
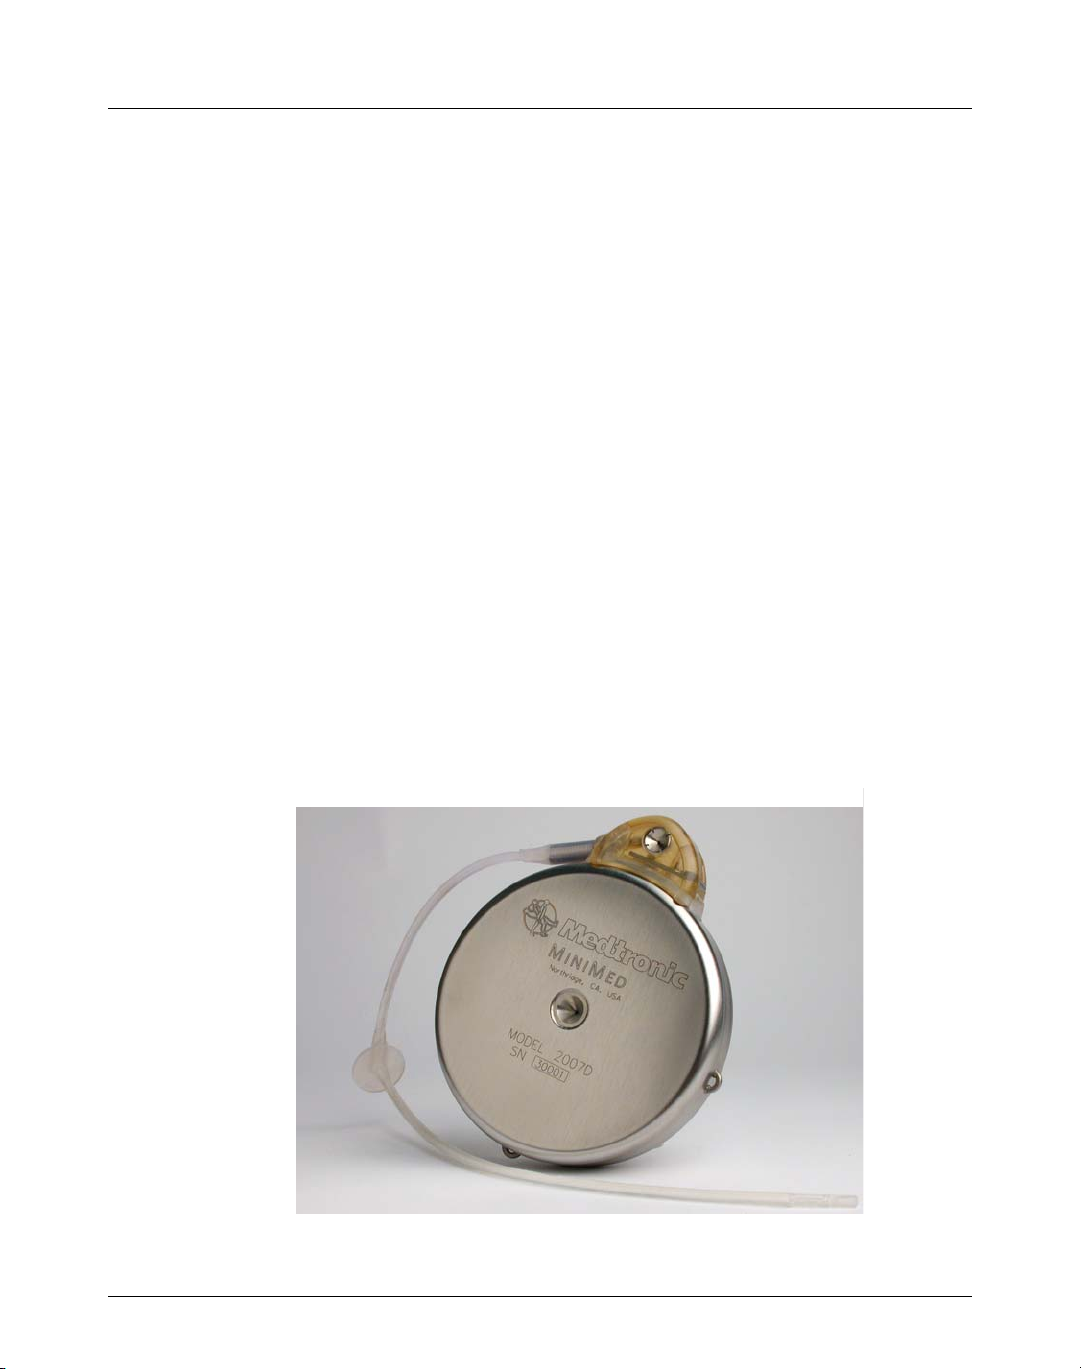
The Implantable Insulin Pump (Pump) is a round disc, 8.1 cm (3.2 inches) in
diameter and 2.0 cm (0.8 inches) thick. The Pump weighs 131 grams (4.6 ounces)
when empty. The outside case of the Pump is made of titanium. Titanium is a
biocompatible metal used in many types of implantable medical devices. The
Pump contains an insulin fill port, located at the center of the disc. The fill port is
used for rinsing and filling the Pump with insulin, and for diagnostic procedures.
Figure 1: The Implantable Insulin Pump
Page 13

Table of contents
The Pump has six major components: the medication reservoir, the pumping
mechanism, the antenna, the microelectronics, the battery, and the tone
transducer. Figure 2 shows the interior of the Pump.
3
Figure 2: Interior of the Implantable Insulin Pump
Medication reservoir
The medication reservoir holds the insulin and is refilled with a special
syringe through the Pump fill port.
Pumping mechanism
The pumping mechanism takes insulin from the medication reservoir and
delivers it through a catheter into your body. The pumping mechanism
delivers the same amount of insulin every time it pumps. The amount of
insulin delivered in each “stroke” of the pump mechanism is called the stroke
volume.
Antenna
The Pump antenna receives the radio signals from the PPC and delivers the
PPC’s programmed message to the microelectronics of the Pump.
Microelectronics
The microelectronics are designed to control the pumping mechanism so that
you receive the amount of insulin you have programmed the Pump to deliver.
You tell the microelectronics what to do by using your PPC. The
Page 14

4
Table of contents
microelectronics also store pump specifications and programming history
information in its memory.
Battery
The battery supplies power to the pumping mechanism and microelectronics. It is
a lithium carbon mono-fluoride battery specially designed for the Implantable
Insulin Pump.
Tone transducer
The tone transducer is a Pump safety feature. It emits audible beeps to c onfirm
your Pump is operating properly. It also alerts you when your Pump needs
attention.
Side Port Catheter
The Side Port Catheter (catheter) is a soft plastic tube, made of polyethylenelined silicone rubber. The Catheter delivers insulin from the Pump into your
peritoneal cavity. Intraperitoneal insulin is rapidly absorbed by your body and is
used to regulate your blood sugar. Your doctor can use the Catheter’s radioopaque stripe to help locate it on an X-ray.
The Catheter has a subcutaneous part and an intraperitoneal part as shown in
Figure 3.
Subcutaneous Part
Intraperitoneal Part
Figure 3: Side Port Catheter
Page 15
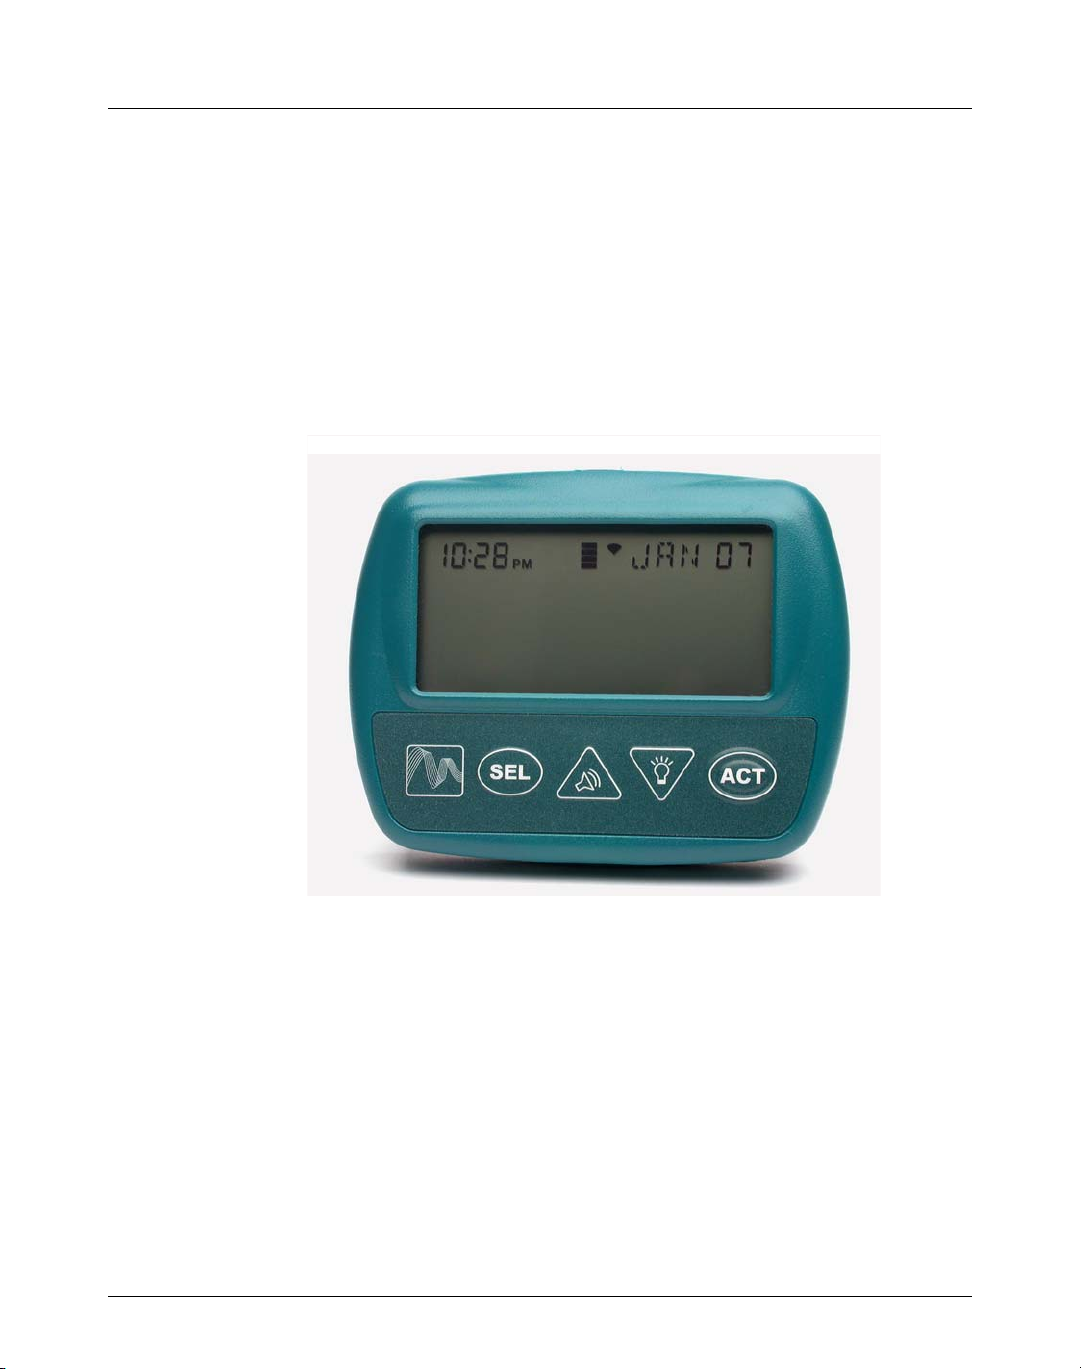
Personal Pump Communicator (PPC)
The Personal Pump Communicator (PPC) is a hand-held device which allows
you to send commands to your Pump and receive Pump information using
(RF telemetry) radio waves. The PPC is 8.9 cm (3.5 inches) long, 7.0 cm (2.8
inches) wide and 2.0 (0.8 inches) thick and weighs 115 grams (4.06 ounces).
The PPC uses one AA (1.5) volt alkaline battery as the main power source.
The PPC has an easy-to-read screen. Programming information is entered
using a four button keyboard. The four buttons and their functions are
described in Chapter 4. See Figure 4.
Table of contents
5
Figure 4: Personal Pump Communicator (PPC)
To send a command to the Pump, place the PPC near the Pump. With your
PPC you can:
• Deliver an immediate, square wave or dual wave insulin bolus to
compensate for meals. Boluses can be programmed by reading the
screen or listening to beeps (audio bolus)
• Deliver one or many basal rates in a daily pattern
• Preprogram three different daily basal patterns
• Deliver a temporary basal rate
Page 16

6
Table of contents
• Suspend the Pump
• Record Personal Events
• Program an Automatic Off
Your PPC also stores important information in its memory (120 days of data).
This information includes:
• Current time and date
• Time, date and amount of the last meal bolus
• Current basal rate
• Daily insulin totals (basal and bolus)
• Clinical history
• Insulin amount remaining in the Pump
• Maximum bolus allowed
• Maximum basal rate allowed
• Insulin concentration used
NOTE: The PPC issued to you by your doctor can only be used
Special insulin
The Medtronic MiniMed 2007D Implantable Insulin Pump System uses a sp ecial
insulin, purified and concentrated exclusively for implantable pump use. The
insulin is HOE 21 PH U-400, manufactured by Aventis. Only Aventis HOE 21
PH U-400 may be used in the Medtronic MiniMed 2007D Implantable Insulin
Pump System.
with your Implantable Insulin Pump. Do not attempt to
use any other PPC to program your Pump, unless
specifically instructed to do so by your doctor.
Page 17

CHAPTER 2 Safety features
Pump safety features
Safe telemetry
Your Pump will respond only to telemetry commands from your PPC. Your
Pump will not change when exposed to electromagnetic fields, such as microwave ovens, garage door openers, airport security systems, television or video
remote controls.
Alarms
7
The most important safety feature of your Pump is its self-checking circuitry.
If your Pump is not working properly, it will signal you with an alarm message on the PPC screen and then automatically turn itself off. This feature
ensures that your Pump will always deliver insulin in a controlled, predictable
manner.
Negative pressure reservoir
The Pump reservoir has a negative pressure (vacuum) which will draw in fluids. In the event of a Pump malfunction, this vacuum assures your insulin will
stay in the reservoir. There are multiple safety features to assure that your
body fluids won’t enter the Pump. Only the pumping mechanism can overcome this negative pressure and deliver insulin to your body.
Page 18

8
Table of contents
PPC safety features
Programming sequence
In order to send a command to your Pump, your PPC must be properly positioned nearby and a series of programming steps must be followed.
Maximum dosage limits
Your doctor will program maximum dose limits into your PPC. The programmed maximum basal rate and bolus amount will protect you from an
insulin overdose, in the event of a programming mistake.
Alarms and messages
Your PPC prompts you with many easy-to-read messages on the screen. Also,
the PPC emits beeps to notify you of certain conditions, such as battery status,
programming errors, and a low or empty pump reservoir. These messages and
alarms are discussed further in Chapter 5, entitled, “Alarms and Messages.”
Page 19

CHAPTER 3 Implanting the Medtronic
MiniMed 2007D Pump
System
Hospitalization
You will be admitted to the hospital to have your Medtronic MiniMed 2007D
Implantable Insulin Pump surgically implanted and stabilized. Your Pump
System will also be programmed and tested prior to your leaving the hospital.
Your hospitalization will consist of three types of procedures:
• Pre-Operative Procedures
• Implantation Procedures
9
• Post-Operative Procedures
Pre-operative procedures
You will have blood drawn, be given diagnostic procedures, and possibly
other tests before your scheduled surgery date. You should ask your doctor
what tests will be required before your Pump is implanted. You may also meet
with an Anesthesiologist or Surgeon prior to the surgery.
The Pump will be implanted in your abdominal area. Your doctor will discuss
the exact location of implantation with you. The choice of a Pump site may
depend upon the catheter location and the size and shape of your body or
whether or not you have had any previous abdominal surgery, such as an
appendectomy.
The Pump may be implanted using either local or general anesthesia. This
decision will be made by you, your doctor , the Su r geon, and the Anesthesiologist. If local anesthesia is chosen, you will be awake during the implantation
but the pump site will be numbed. Under general anesthesia, you will be kept
asleep during the procedure by the anesthesiologist.
Page 20

10
Table of contents
Implantation procedures
The Surgeon will make an incision through your skin and create a “pocket” in
which to place the Pump. The Pump is then inserted under the fatty tissue just
beneath your skin. The Surgeon will then secure the Pump in your tissue to
prevent movement. A very small opening will be made in your abdominal
muscle wall through which the Surgeon will thread the Side Port Catheter into
your peritoneal cavity. After the Catheter is positioned and the Pump is
secured, the Surgeon will use sutures to close the incision in your skin. Bandages are used to protect the incision until it heals. Some Surgeons may want
you to wear a binder over the implant site for a short time to minimize postoperative swelling.
Post-operative procedures
The length of your hospital stay will be determined by your doctor. Your stay
will depend upon how quickly you recover, and how quickly you learn to use
the Medtronic MiniMed 2007D Implantable Insulin Pump System.
Before your admission to the hospital, your doctor or a nurse will teach you
how to use your PPC to program the Pump. Before leaving the hospital, you
must become proficient in understanding and using your PPC to program the
Pump. You should:
• Fully understand how to use your PPC.
• Demonstrate appropriate responses to warning messages and alarms
from your PPC.
• Be able to identify signs and symptoms your doctor wants you to report.
• Have completed a Patient Emergency Information Card, which indicates
you have an implantable pump and provides emergen cy ph on e n umbers.
• Ask your doctor to complete and return your Device Registration Card
to Medtronic MiniMed. This card contains the Pump and Catheter serial
numbers, which are needed for device tracking by
Medtronic MiniMed.
• Schedule an appointment with your doctor for your first follow-up visit.
• Read Chapter 5, “Alarms and Messages,” and ask your doctor to explain
anything you don’t understand.
Page 21

Follow-up
Before you leave the hospital, your doctor will schedule an appointment for
your first follow-up office visit. Your healthcare team will also keep in close
contact with you during the first few weeks following implantation. Frequent
adjustments in your insulin delivery are often required for several weeks following implantation.
NOTE: ALWAYS keep your PPC with you. During office visits,
Your post-implant recovery will be similar to recovery from other surgical
procedures. You will need to obtain adequate rest, eat a nutritious diet, and
avoid individuals who are suffering from infections or viruses. Recovery
times vary among individuals, but most people recover fully in a few weeks.
Your physician will ask you to call if you are not feeling well, particularly if
you have an elevated temperature or if you notice any redness or drainage
around your incision site.
Table of contents
a member of the healthcare team will check the status
of your Pump. Only YOUR PPC can be used to check
YOUR Pump.
11
Pump refills
Insulin used with the Implantable Pump
Aventis, located in Frankfurt, Germany, is the manufacturer of the insulin
used in your Implantable Insulin Pump. This insulin, HOE 21 PH U-400, is
specifically designed for implanted pumps. No other insulin should be put in
your Pump.
Pump refill procedure
It is important that the time between your Pump refills should not exceed 90
days. Refilling your Pump is a sterile procedure. Your doctor or a nurse will
first disinfect your skin directly over the Pump. All equipment that will touch
your skin during the refill procedure is sterile to minimize the risk of infection.
Your doctor or a nurse may now numb the disinfected skin area with a local
anesthetic. A short needle will then be inserted through your skin to locate the
fill port of the Pump. Then a longer needle will be inserted into the Pump fill
Page 22

12
Table of contents
port through the inside of the shorter needle. The doctor or nurse will then
empty unused insulin from the Pump and refill it with new Aventis, HOE 21
PH U-400 insulin.
Page 23

CHAPTER 4 Programming your Pump
Introduction
You will program your Implantable Insulin Pump with your PPC. The PPC
transmits information by (RF telemetry) radio waves to your Pump. With your
PPC you can:
• Deliver an immediate, square wave or dual wave insulin bolus to
compensate for meals. Boluses can be programmed by reading the
screen or listening to beeps (audio bolus)
13
• Deliver one or many basal rates in a daily pattern
• Preprogram three different daily basal rate patterns
• Deliver a temporary basal rate
• Suspend the Pump
• Program an Automatic Off
• Adjust the tone frequency of the PPC and the audible alarms of the
Pump.
NOTE: Your PPC has been designed for easy use (See Chapter
4 for a list of the PPC commands). You must follow a
specific sequence of steps and hold the PPC near the
Pump to deliver a command. Therefore, you cannot
unintentionally program your Pump.
Your PPC has been specifically pre-programmed for use with your Pump. Do
not use another PPC to program your Pump. You must keep yo ur PPC with
you at all times because it is the only way to program your Pump.
Remember, you must measure your blood sugar at least four times each day,
according to the method recommended by your doctor. You must then use the
Page 24

14
Table of contents
results of your blood sugar tests to determine the appropriate dose of insulin
to be delivered by your Pump.
PPC screen icons
Your PPC has an easy-to-read dot matrix liquid crystal display (LCD). The
main PPC screen displays the time (12hr. or 24hr. format), month, day, and a
variety of icons. The type and purpose of these icons are as follows:
Icon Description
The bell icon is displayed when the PPC receives a RF telemetry message
from the Pump. The icon may indicate the Pump or PPC has detected a
failure, or the Pump is in a “SUSPEND” mode or “STOPPED.”
The reservoir icon is composed of 4 segments that indicate how full the
Pump reservoir is, based on the history of the Pump delivery.
The PPC shows a “spinning” icon while insulin delivery is in progress.
When the Pump delivers a bolus amount, the pattern will show three
delivery segments. When the Pump delivers a basal rate, the pattern will
show one delivery segment. When the Pump is not delivering, all four
segments will be displayed.
Page 25

PPC buttons
PPC programming information is entered using four buttons:
Buttons Description
SEL Means SELECT. The SEL button allows you to step through and view
ACT Means ACTIVATE. The ACT button activates programming changes you
UP
ARROW
Table of contents
each of the option screens.
wish to make. As a safety check, you must press ACT to complete any
programming changes. You will always hear a single beep after you have
successfully activated a change.
Allows you to make changes to the screen settings by scrolling to higher
values. You must then press the ACT button for a change to be activated.
This button has a Sound Icon. When the “AUDIO BOLUS” feature is
turned on, the button allows you to program an Audio Bolus.
15
Allows you to make changes to the screen settings by scrolling to lower
DOWN
ARROW
values. You must then press the ACT button for a change to be activated.
This button has a Light Icon which turns on the backlight. With the
display illuminated, you can program your Pump in dark areas. The
backlight remains on for 4 seconds after each press.
Communicating PPC
1. When commands are programmed the PPC
will talk to the Pump. When this occurs the
following screen will be displayed.
2. The word COMMUNICATING will blink to
indicate a communication is taking place.
PPC
COMMUNICATING
Page 26

16
Table of contents
Main programming screen
The Main programming screen is used to program features you will use every
day, such as a Meal Bolus or Basal Rate, or putting your Pump in the Suspend
mode.
Programming a bolus
Using the PPC, you can program the Pump to deliver a bolus of insulin whenever you need it. The Pump System has several special features which allow
you to customize the programming and delivery of a bolus:
• Immediate Bolus (programmed by reading the PPC screen or listening to
beeps, using the Audio Bolus)
• Square Wave Bolus
• Dual Wave Bolus
NOTE: To program a Square Wave or Dual Wave Bolus, you
must turn on the Variable Bolus programming option
(program “ON” in the “SETUP II” menu). Otherwise,
only an Immediate Bolus can be given. The Variable
Bolus option is programmed by your doctor.
Page 27

Table of contents
Set an immediate bolus (Variable Bolus option is “off”)
17
1. From the Time/Date screen, press SEL until
the “BOLUS” screen is displayed. The Time
and Date will be flashing, and the last bolus is
displayed.
2. Press ACT and “SET BOLUS” appears, and
the dashes or previous bolus under “IMM”
start flashing.
3. Use the and buttons to enter an
immediate bolus
amount.
4. Press ACT and the screen shows “CONFIRM
IMM.” If the number you entered for the
immediate bolus
is correct, press ACT to
confirm it. This value will now be
programmed into the Pump. If the number
was not correct, wait for the screen to return
to Time/Date and then repeat this procedure
to enter the correct value.
5. Place the PPC near the Pump to complete the
programming. The PPC will beep once and
display 0.0 units.
08:23 Jan 02
BOLUS
IMM EXT
10 U
PROG
SET BOLUS
IMM
_ _ U
CONFIRM
IMM
2.6U
PPC
COMMUNICATING
_ _ U
_ _
6. If the Alarm Feedback feature is “ON,” the
Pump will beep during each of the first five
strokes. The PPC will beep when the bolus
08:23 JAN 04
BOLUS 0.0U
delivery is complete. Three segments of the
insulin delivery icon will be displayed and
will spin slowly during the bolus delivery. By
pressing SEL you can see the amount of insulin being delivered.
Page 28

18
Table of contents
Set an immediate bolus (Variable Bolus option is “on”)
1. From the Time/Date screen press SEL until
the “BOLUS” screen is displayed. The last
bolus value programmed and the Time and
Date will be flashing.
2. Press ACT and “SET BOLUS TYPE”
appears. Use the and buttons to choose
“NORMAL.”
3. Press ACT and “IMM” appears with the
dashes underneath flashing.
4. Use the and buttons to enter an
immediate bolus
amount
5. Press ACT and the screen shows “CONFIRM
IMM.”
6. If the number was not correct, wait for the
screen to return to Time/Date and then repeat
this procedure to enter the correct value.
08:23 Jan 04
BOLUS
IMM EXT
_ _U
SET
BOLUS TYPE
NORMAL
SET BOLUS
IMM
_ _U
CONFIRM
IMM
2.6U
_ _U
_ _
7. If the number you entered for the immediate
bolus is correct, press ACT to confirm it.
Place the PPC near the Pump to complete the
PPC
COMMUNICATING
programming.
8. The PPC will beep once and display the
amount of insulin delivered. If the Alarm
Feedback feature is “ON,” the Pump will
08:23 JAN 04
BOLUS 0.0U
beep during each of the first five strokes.
9. The PPC will beep when the bolus delivery is
complete. Three segments of the insulin
delivery icon will be displayed and spinning slowly during the bolus
delivery. By pressing SEL you can see the amount of insulin being
delivered.
Page 29

Set a Square Wave bolus
A Square Wave Bolus is delivered evenly over a time period you set, from 30
minutes to 4 hours. A Square Wave Bolus is useful during long meals, high fat
meals, or if you have gastroparesis. During a Square Wave Bolus, your Basal
Rate insulin continues to be delivered.
To access Squa re Wave Bolus you must first turn the Variable Bolus feature
"ON" in the SET UP II menu.
Table of contents
19
1. From the Time/Date screen press SEL until
the “BOLUS” screen is displayed. The last
bolus value programmed and the Time and
Date will be flashing.
2. Press ACT and “SET BOLUS TYPE”
appears.
3. Use the and buttons to choose
“SQUARE”.
4. Press ACT and the dashes underneath “EXT”
will appear flashing.
5. Use the and buttons to enter an extended
bolus amount.
08:23 Jan 04
BOLUS
IMM EXT
10U
PROG
SET
BOLUS TYPE
SQUARE
SET BOLUS
IMM EXT
_ _U _ _U
SET BOLUS
IMM EXT
_ _U
_ _U
_ _
4.0U
6. Press ACT and dashes will appear under the
bolus amount you just entered.
SET BOLUS
IMM EXT
_ _U
4.0U
--
Page 30

20
Table of contents
7. Use the and buttons to enter a time
duration that you would like the Square Wave
Bolus to last.
8. Press ACT and the screen shows
“CONFIRM EXT” asking you to confirm
the extended bolus
9. If the numbers you entered are correct, press
and time duration.
ACT to confirm them. These values will
now be programmed into the Pump. If either
number is not correct, wait for the screen to
return to Time/Date and then repeat this
procedure to enter the correct values.
10. Place the PPC near the Pump to complete
the programming.
11. The PPC will beep once and display the
amount of insulin being delivered. If the
Alarm Feedback feature is “ON,” the Pump
will beep during each of the first five strokes.
SET BOLUS
IMM EXT
_ _U
CONFIRM
IMM EXT
_ _U
02:00
PPC
COMMUNICATING
4.0U
02:00
4.0U
08:23 JAN 04
BOLUS 0.0U
12. The PPC will beep when the bolus delivery is
complete. Three segments of the insulin
delivery icon will be displayed and will spin
slowly during the bolus delivery. By pressing
SEL you can see the amount of insulin being
delivered.
Page 31

Set a Dual Wave bolus
Variable Bolus Option Must be “ON.”
The Dual Wave Bolus allows you to deliver an Immediate Bolus immediately
followed by a Square Wave Bolus.
Table of contents
21
1. From the Time/Date screen press SEL until
the “BOLUS” screen is displayed. The last
bolus value programmed will be shown and
the Time and Date will be flashing.
2. Press ACT and “SET BOLUS TYPE”
appears.
3. Use the and buttons to choose “DUAL”.
4. Press ACT and “IMM” appears with the
dashes underneath flashing.
5. Use the and buttons enter an immediate
bolus amount.
6. Press ACT and the dashes underneath “EXT”
will appear flashing.
7. Use the and buttons enter an extended
bolus amount.
08:23 Jan 04
BOLUS
IMM EXT
_ _U
PROG
SET
BOLUS TYPE
DUAL
SET BOLUS
IMM
2.0U
SET BOLUS
IMM EXT
2.0U 2.0U
_ _U
_ _
8. Press ACT and dashes will appear under the
extended bolus
amount you just entered.
9. Use the and buttons to enter a time
duration that you would like the extended
bolus to last.
SET BOLUS
IMM EXT
2.0U 2.0U
SET BOLUS
IMM EXT
2.0U 2.0U
02:00
Page 32

22
Table of contents
10. Press ACT and the screen shows
“CONFIRM” asking you to confirm the
immediate bolus
, extended bolus, and time
duration.
11. If the numbers you entered are correct, press
ACT to confirm them. These values will
now be programmed into the Pump. If any
number is not correct, wait for the screen to
return to Time/Date and then repeat this
procedure to enter the correct values.
CONFIRM
IMM EXT
2.0U 2.0U
02:00
PPC
COMMUNICATING
12. Place the PPC near the Pump to complete the
programming. The PPC will beep once and
display the amount of insulin being delivered.
13. If the Alarm Feedback feature is “ON,” the
Pump will beep during each of the first five
strokes.
14. The PPC will beep when the bolus delivery is complete. Three segments
of the insulin delivery icon will be displayed and spinning slowly during
the bolus delivery. By pressing SEL you can see the amount of insulin
being delivered.
Review the bolus history
You can review the bolus type, bolus amount, time and day of your last 512
insulin boluses.
1. From the Time/Date screen press SEL until
the “BOLUS” screen is displayed. The last
bolus value programmed and the time and
date will be flashing.
2. Press the button once to display the
previous bolus and the time and date it was
delivered. Each additional press will
display the next previous bolus delivery.
08:23 JAN 04
BOLUS 0.0U
08:23 Jan 04
BOLUS
IMM EXT
_ _U_ _U
PROG
_ _
Page 33

Suspend mode
Suspend Mode allows you to cancel bolus programming. In suspend mode the
pump will still deliver a basal rate of approximately 0.2u/hr.
1. From the Time/Date screen press SEL until
the “SUSPEND PUMP” screen is shown.
2. Press ACT .
3. Place the PPC near the Pump to complete the
programming. When communication is
finished the Pump will beep 3 times.
Table of contents
SUSPEND PUMP
PPC
COMMUNICATING
23
4. All four segments of the insulin delivery icon
will be displayed.
5. To restart the Pump, press SEL and ACT.
Program basal rates
Your Basal Rate provides you with approximately 50 percent of your daily
insulin needs. A Basal Rate is normally delivered all the time, throughout the
day and night. Your PPC allows you to tailor your Basal Rates to meet your
changing insulin needs throughout the day. If you want to, the PPC can
deliver a different Basal Rate every 30 minutes throughout the day. For some
people, one Basal Rate will work fine. Other people find that multiple Basal
Rates will help them respond better to their insulin needs. You should discuss
with your doctor the number and amount of Basal Rates that are best for you.
Set one basal rate
1. From the Time/Date screen press SEL until
the “BASAL RATE” screen is displayed.
Basal Delivery Pattern “A” and the current
Basal Rate appear. The word “NOW” also
appears and is flashing.
08:13 OCT 02
PUMP SUSPENDED
BASAL RATE : A NOW
00:00 0.2U/H
Page 34

24
Table of contents
2. Press ACT and “1” appears to the right of
“A” indicating that you will now program the
first Basal Rate “1” in Basal Delivery Pattern
“A.” The Basal Rate is flashing.
3. Use the and buttons to enter a new Basal
Rate.
4. Press ACT and the screen displays “SET
RATE,” indicating you will now program a
start time for Basal Rate “2” The time is
flashing.
5. Use the and buttons to change time to dashes.
6. To enter one Basal Rate, press ACT 2 times.
NOTE: In 24 hr. display mode, “00:00” indicates a start time
of MIDNIGHT. In 12hr. display mode, the screen will
read “12:00am.”
SET RATE
BASAL RATE: A 1
00:00 0.2U/H
SET RATE
BASAL RATE: A 2
00:30 _ _U/H
7. Place the PPC near the Pump to complete the
programming. The screen will display PPC
communicating.
8. The screen will calculate and briefly display
the total daily Basal insulin from the Basal
Rates you have programmed.
PPC
COMMUNICATING
24 HOUR TOTAL
4.8U
Page 35

Set multiple basal rates
1. From the Time/Date screen press SEL until
the “BASAL RATE” screen is displayed.
Basal Delivery Pattern “A” and the current
Basal Rate appear. The word “NOW” also
appears and is flashing.
2. Press ACT and “1” appears to the right of
“A” indicating you will now program Basal
Rate “1” in Basal Delivery Pattern “A.” The
Basal Rate is flashing.
3. Use the and buttons to enter a new Basal
Rate.
4. Press ACT and the screen displays “SET
RATE”, indicating you will now program a
start time for Basal Rate “2” The time is
flashing.
Table of contents
BASAL RATE: A NOW
00:00 0.2U/H
SET RATE
BASAL RATE: A 1
00:00 0.2U/H
SET RATE
BASAL RATE : A 2
04:30 _ _U/H
25
5. Use the and buttons to enter a new start
time.
NOTE: In 24 hr. display mode, “00:00” indicates a start time
of MIDNIGHT. In 12hr. display mode, the screen will
read “12:00am.”
6. Press ACT and “SET RATE” and “2”
appears, indicating you will now program
Basal Rate “2” in Basal Delivery Pattern “A.”
The Basal Rate is flashing.
7. Use the and buttons to enter a Basal
Rate and start time for Basal Rate #2.
8. Continue this procedure until all desired Basal
Rates and start times are programmed. Then
press and ACT.
9. Place the PPC near the Pump to complete the
programming.
SET RATE
BASAL RATE: A 2
05:00 _ _U/H
PPC
COMMUNICATING
Page 36

26
Table of contents
10. The screen will calculate and briefly display
the total daily Basal insulin from the Basal
Rates you have programmed.
NOTE: To set multiple basal profiles in the other patterns (A,
B, C), select the pattern in Setup II menu and follow
the above procedure.
Set a temporary basal rate
A T emporary Basal Rate is often used when a brief change in basal delivery is
required, for example during exercise.
1. From the Time/Date screen press SEL until
the “TEMP BASAL” screen is displayed.
24 HOUR TOTAL
4.8U
TEMP BASAL
_ _ _ _U/H
2. Press ACT and “SET DURATION” appears
with the Temporary Basal Rate duration
flashing.
SET DURATION
TEMP BASAL
00:30 _ _U/H
3. Use the and buttons to enter a
Temporary Basal Rate duration.
4. Press ACT and “SET AMOUNT” appears
with the T e mporary Basal Rate flashing.
SET AMOUNT
TEMP BASAL
00:30 1.5U/H
5. Use the and buttons to enter the
Temporary Basal Rate, then press ACT
again.
PPC
COMMUNICATING
6. Place the PPC near the Pump to complete the
programming.
NOTE: When your Pump is delivering a Temporary Basal
Rate, pressing SEL will display “TEMP BASAL.” This
will remind you that the Temporary Basal Rate feature
is currently active.
Page 37

Stop a temporary basal rate
1. From for the Time/Date screen press SEL
until the “TEMP BASAL” screen is
displayed.
2. Press ACT and “SET DURATION” will
appear with the time flashing.
3. Press the button until the time is set to
dashes, then press ACT .
4. Place the PPC near the Pump to complete the
programming.
5. When the communication is finished, “SET
AMOUNT” will appear with the dashes
flashing. Allow the PPC to return to the Time/
Date screen or press ACT. The Temporary
Basal Rate is now canceled.
Table of contents
SET DURATION
TEMP BASAL
PPC
COMMUNICATING
SET AMOUNT
TEMP BASAL
_ _ _ _U/H
27
1.5U/H00:30
Personal events
This feature appears in the Main menu if it has been activated to "ON" in the
Pump Setup II menu. The Personal Event menu allows you to enter important
“events” during the day.
Preset events
You can enter the following preset codes for these popular events:
• 1 = meal
• 2 = snack
•3 = sick
• 4 = exercise
Additional events
Codes A, B and C can be used to record other events. Be sure to document the
events listed for A, B, and C.
NOTE: Events that happened in the past or present can be
entered.
Page 38

28
Table of contents
1. From the Time/Date screen, press SEL until
the “SET PERSONAL EVENTS” screen is
displayed.
2. Press ACT and the screen will change to
“SET EVENT” with “MEAL” flashing.
3. Use the and buttons to select the event
you want to enter: MEAL, SNACK, SICK,
EXERCISE, A, B, C.
4. Press ACT and the time will appear flashing.
EVENT
_ _
SET
EVENT
MEAL
5. Use the and buttons to enter the time
6. Press ACT to enter the event in the PPC
History
The History menu allows you to look at important Pump data, such as the
amount of insulin remaining in the Pump reservoir or total insulin delivery
since the last refill. The History menu contains the following options: Med
Remaining, Insulin Total Basal Bolus, Clinical Hist PPC, Clinical History
Pump, Est Pump Battery. To read Pump Data perform the following steps.
From the Time/Date screen, press SEL until the
“HISTORY” screen is displayed.
1. Press ACT and the screen will change to
that the event occurred.
memory.
“READ PUMP DATA” with the entire s creen
flashing.
08:32Am
SET TIME
EVENT
MEAL
HISTORY
READ PUMP DATA
• • • • • • • • • • • • • • • •
• • • • • • • • • • • 10057
Page 39

2. Press ACT, place the PPC near the Pump.
History data will be transferred to the PPC.
3. The screen will automatically change to “MED
REMAINING.” The amount of insulin in the
Pump reservoir is reported in units.
Table of contents
PPC
COMMUNICATING
MED REMAINING
7263U
29
4. Press SEL and the screen will change to
“INSULIN TOTAL.” The amount of Basal
Rate and Bolus insulin delivered is reported for
the day indicated.
5. Press the button to review insulin delivery
rates for other days.
6. Press SEL and the “CLINICAL HISTORY
PPC” screen is shown. Ask your doctor what
the numbers mean.
7. Press the button to review other days.
8. Press SEL to find the “CLINICAL HISTORY
PUMP” screen. Ask your doctor what the
numbers mean. Press the button to review
other days.
9. Press SEL and the screen will change to the
“EST PUMP BATT” display. This screen
indicates the energy left in the Pump battery.
Ask your Physician what the numbers mean.
Jan 02
INSULIN TOTAL
BASAL BOLUS
9U 22U
6:26 Jan 02
CLINICAL HISTORY
PPC
11
6:26 Jan 02
CLINICAL HISTORY
PUMP
14
Jan 02
EST PUMP BATTERY
NO LD LD
2.9U 2.7U
10. Press SEL and the screen will read
“EXIT HISTORY.” Press ACT to return to the
Time/Date scre en.
EXIT HISTORY
Page 40

30
Table of contents
Pump setup
This screen permits access to other Pump “SETUP” features. These features
are normally programmed for you by your doctor or nurse. To reach the
“SETUP PUMP” menu, press SEL until the “SETUP PUMP” screen is displayed, then ACT to access the SETUP screens.
Time and date
The time and date settings must be correct. The PPC uses the time and date to
calculate your total daily insulin and display Pump history.
1. From the Time/Date display, press SEL until
the “SETUP PUMP” screen is displayed.
2. Press ACT two times. The hour digits will
08:32 Jan 02
SET 2004
TIME-DATE
begin flashing. Use the and buttons to
select the current hour.
3. Press ACT again, and the minute digits will begin flashing. Use the and
buttons to select the current minute.
4. Repeat this programming process again to select the current year, month
and day.
5. At the conclusion of programming press ACT,
and then place the PPC near the Pump. When
the communication process is complete, the
PPC will automatically move to the next
PPC
COMMUNICATING
screen, “AUTO OFF.”
Page 41

Auto off
“AUTO OFF” sets an alarm on your PPC to remind you if you have not programmed your Pump recently. The “AUTO OFF” alarm can be set betw een 1
and 16 hours. To turn off the "AUTO OFF" program set the time to dashes.
1. From the “SETUP PUMP” screen, press ACT
2. The screen will display “AUTO OFF” with
3. Use the and buttons to select the number
4. Press ACT. In this example, a time duration of
then SEL.
flashing dashes. Press ACT.
of hours before an Auto Off alarm occurs.
10 hours was selected. The PPC will alarm if
you did not program your Pump during the
past 10 hours.
Table of contents
AUTO OFF
_ _ HRS
SET
AUTO OFF
10 HRS
31
Alarms
5. Place the PPC near the Pump. The PPC will
beep once when the communication is
completed.
PPC
COMMUNICATING
There are three PPC Alarm options, two audible tones (Low/High) and a
vibrate mode.“ALARMS” will alert you if either the PPC or Pump recognizes
a problem. The vibrate only alarm provides all programming feedback from
PPC with beeps.
1. Press ACT on the ALARMS menu to enter
the “ALARMS” menu.
ALARMS
Page 42

32
Self test
Table of contents
2. Press the and buttons to select the type
of alarm you want, then press ACT.
SET
PPC
ALARM TYPE
LOW/HIGH/VIBRATE
3. The screen will now display “SET
ALARM FEEDBACK.” This setting should
always be “ON”. Press ACT.
SET
ALARM
FEEDBACK
ON/OFF
4. Place the PPC near the Pump. When the
communication is completed, the PPC will
change to “SELF TEST” and then timeout to
PPC
COMMUNICATING
the Time / Day screen.
Your doctor may ask you to run a diagnostic test of your Pump System.
“SELF TEST” will send messages between your PPC and Pump to check
their operation.
NOTE: Notify your doctor if any of these Self Test events do
not occur.
If the PPC displays a Medtronic MiniMed logo and
software number, the PPC has re-started but has a low
battery. Replace the battery immediately.
1. From the “SETUP PUMP” screen, press SEL
until the “SELF TEST” screen is displayed.
SELF TEST
2. Press ACT .
3. Place the PPC near the Pump and complete
the communication process.
4. Verify the following events occur:
PPC
COMMUNICATING
The Pump will beep four times.
The PPC backlight will turn on.
Page 43

The PPC will sound a long changing tone.
The PPC will vibrate.
The PPC will beep once.
The PPC screen displays all possible icons and numbers.
5. If your PPC and Pump “pass” the Self Test,
the display will change to “PPC PASSED/
PUMP PASSED.” After several seconds, the
screen will change back to the Time/Date
screen.
Basal delivery patterns
The PPC allows you to program three different basal delivery patterns (A, B,
C). Pattern A is preset at the factory. Patterns B and C can be programmed
from the “SETUP PUMP” menus. Each basal rate pattern can accept up to 48
different basal rates, one for each half-hour of the day. These are programmed
from the "Basal Rate" screen in the Main Programming menu.
Table of contents
PPC PUMP
PASSED PASSED
33
Basal patterns can be used to follow your normal daily routines. For example,
separate patterns could be programmed for a typical work day, weekend day,
and travel day.
1. From the “SETUP PUMP” screen, press SEL
until the “DELIVERY PATTERN A” screen
is displayed. Press ACT.
2. Press SEL again until the “DELIVERY
PATTERN” screen appears. Press ACT and
the screen will change to “SET DELIVERY
DELIVERY A
PATTERN
SET
DELIVERY A,B,C
PATTERN
PATTERN”.
3. Press the and buttons to select
pattern A, B or C.
4. Press ACT. Place the PPC near the Pump
PPC
COMMUNICATING
and allow the communication to
complete.
Page 44

34
Table of contents
NOTE: The PPC will automatically return to the Time/Date
Initialize PPC to pump
This screen initializes your PPC to your Pump. Your doctor will normally perform this programming for you. Contact your doctor if you need to have your
PPC replaced.
Pump Setup II
“SETUP II” is another programming menu. “SETUP II” features are used less
often than the features in “SETUP.” “SETUP II” features are explained in the
next section.
screen. Press SEL until the “BASAL RATE” screen is
displayed. The pattern you have selected will appear
on this screen.
Exit Setup Menu
From the “SETUP” screen, press SEL until the “EXIT SETUP MENU”
screen is displayed. Press ACT. The PPC will return to the Time/Date screen.
Page 45

Pump Setup II
The “SETUP II” screen allows you to program additional features into your
PPC. Your doctor will normally program “SETUP II” features for you.
1. From the “SETUP” screen, press SEL until the “SETUP II” screen is
displayed.
Turn on the audio bolus feature
The “AUDIO BOLUS” feature allows you to deliver a bolus without looking
at the PPC screen. There are two step sizes you can se lect, 0.4U and 0.8U.
With each press of the button, the PPC will beep one time (0.4U setting) or
two times (0.8U setting) depending on the delivery amount selected per key
press.
1. From the “SETUP II” screen, press ACT. The
“AUDIO BOLUS” screen appears.
2. Press ACT, and the screen changes to “SET
AUDIO BOLUS” with “ON” flashing.
Table of contents
AUDIO BOLUS
0.4U
ON
35
3. Use the and buttons to choose “ON” to
turn on the Audio Bolus feature. Choose
“OFF” to turn the Audio Bolus off. Press
ACT again.
SET
AUDIO BOLUS
ON
0.4U
NOTE: If “OFF” is chosen, pressing the and buttons will
have no effect.
4. If “ON” was chosen, the “SET STEP AUDIO
BOLUS” screen appears, with a bolus amount
of 0.4U flashing.
5. Use the and buttons to choose a step size
of either 0.4U or 0.8U.
6. Press ACT and program the Pump. “AUDIO BOLUS” will now appear
on the PPC Main Menu.
SET STEP
AUDIO BOLUS
ON
0.4U
Page 46

36
Table of contents
Use audio bolus in the Main Menu
NOTE: When an immediate bolus is being delivered, the
button will be disabled.
From the Time/Date screen press button. Each time the button is pressed
the PPC will beep one or two times, depending upon the step size set (0.4U or
0.8U).
1. Count the number of beeps to determine how
much insulin you want to program. The bolus
amount delivered is determined by the step
size and the number of times the button is
pressed. For example: If the step size is
programmed to 0.4U and the button is
pressed three times, the total bolus delivered will be 1.2U (3 x 0.4U).
2. Press ACT, and the beeps repeat to confirm
the bolus amount you have entered.
3. Press ACT twice, and the PPC will program
the Pump. The PPC will beep once when the
communication is completed.
Turn on the Variable Bolus feature
SET BOLUS
IMM
12U
PPC
COMMUNICATING
If “OFF” is chosen, the Variable Bolus feature will not be available.
1. From the “SETUP II” menu, press SEL until
the “VARIABLE BOLUS” screen is
displayed.
2. Press ACT and the screen changes to “SET
VARIABLE BOLUS.” The word “ON” is
flashing.
3. Use the and buttons to select “ON” or
VARIABLE ON/OFF
BOLUS
SET
VARIABLE ON
BOLUS
“OFF.”
Page 47

4. Place the PPC near the Pump and complete
the communication.
5. If “ON” was chosen, the Variable Bolus
option will appear in the Main Menu / Bolus
screen.
Set a maximum bolus
Your doctor will decide if you should use this feature. Setting a maximum
bolus amount will minimize the chance of you over-delivering insulin in case
you make a programming mistake.
1. From the “SETUP II” menu, press SEL until
the “MAX BOLUS” screen is displayed.
Table of contents
PPC
COMMUNICATING
MAX BOLUS
_ _ U
37
2. Press ACT and the screen will change to
“SET MAX BOLUS,” with the dashes
flashing.
3. Use the and buttons to enter a
maximum bolus amount (0.0U to 25.0U),
then press ACT.
4. Place the PPC near the Pump and complete
the communication. The PPC screen will
automatically change to the “MAX BASAL
RATE” screen and then times out to the
Time/Date screen if no further action is
taken.
SET
MAX BOLUS
_ _U
PPC
COMMUNICATING
Page 48

38
Table of contents
Set a maximum basal rate
Your doctor will decide if you should use this feature. Setting a maximum
basal rate will protect you from over-delivering insulin in case you make a
programming mistake.
1. After setting a maximum bolus, the “MAX BASAL” screen appears with
the maximum basal rate flashing.
2. Use the and buttons to enter a maximum
basal rate (0.2U/h to 35.0U/h), then press
ACT.
3. Place the PPC near the pump and complete
the communication. The PPC screen will
automatically change to the “TIME
FORMAT” screen.
Set time format
1. From the “SETUP II” screen, press SEL until
the “SET TIME FORMAT” screen is
displayed.
2. Use the and buttons to select either a 12
hour (12:00am) or 24 hour (00.00) time
format, then press ACT.
3. Place the PPC near the pump and complete
the communication. The PPC screen will
change to the “PERSONAL EVENTS”
screen.
SET
MAX BASAL RATE
0.2U/H
PPC
COMMUNICATING
SET
TIME FORMAT
12/24 HOUR
PPC
COMMUNICATING
Page 49

Personal event
To activate this feature located in the Main Menu it must be "ON."
1. From the "SET UP II" screen, press SEL
until the "PERSONAL EVENTS" screen is
displayed.
2. Press ACT and the "SET PERSONAL
EVENTS" screen is displayed and "OFF" is
blinking.
3. Use the ▲ and ▼ buttons to select "ON" or
"OFF." Press ACT.
4. Place the PPC near the Pump and complete
the communications. The PPC screen will
change to "PUMP SET UP."
Table of contents
PERSONAL OFF
EVENTS
SET
PERSONAL
EVENTS
PPC
COMMUNICATING
OFF
39
Pump setup
This screen allows you to return to the Setup mode by pressing ACT. If you
press SEL the screen will change to “EXIT SET UP MENU.”
Exit Setup Menu
This screen allows you to return to the Main Menu, Time/Date screen by
pressing ACT.
Page 50

40
Table of contents
Page 51

CHAPTER 5 Alarms and messages
The Medtronic MiniMed 2007D Implantable Insulin Pump System is
equipped with various alarms and messages that ensure the correct function of
the system.
The pump alarms
The Implantable Insulin Pump has an alarm system which beeps when an
error condition occurs. The beeps are audible through the skin and alert you
that the Pump needs attention. The Pump alarm consists of 4 beeps each
minute for 10 minutes then, 4 double tones each minute for 10 minutes and
will then repeat pattern. Upon hearing the alarm, you need to communicate
with your PPC to determine the alarm condition and call your Physician. Use
the Read Pump Data option to communicate to the Pump. The alarm can be
cleared by pressing SEL and ACT.
41
Page 52

42
Table of contents
The PPC alarms
The PPC has three types of alarms, audible or vibrate alarms and visual
alarms. This chapter will describe, for each alarm condition, which screen
message appears.
Some alarms can be cleared by pressing SEL then ACT. The difference
between these alarms will be explained later in this chapter.
Two audible or vibrate alarm types are used:
Alarm type 1
If the PPC is set to “vibrate”, the vibrator will be turned on for 3 seconds
every minute until the condition is cleared.
If the PPC is set to “audible”, the PPC will beep 6 times every minute for 30
minutes. If the alarm is not cleared in 30 minutes, the PPC will beep 6 alternating tones. The PPC will continue to do so every minute until the condition
is cleared.
Alarm type 2
If the PPC is set to “vibrate”, the vibrator will be turned on for 3 seconds
every minute while the condition exists.
If the PPC is set to “audible”, the PPC will emit 6 beeps, 3 times for every 30
minutes while the condition exists.
Page 53

Pump alarms
Alarm feedback
The Alarm Feedback function allows you to verify the Pump and the Pump
beeper are operating normally. When Alarm Feedba ck is p rogramm ed “YES,”
the Pump will beep on each of the first five Pump strokes:
• Following a change in the delivery regimen, for example when
completing a meal Bolus and then changing to a Basal Rate.
• After the Alarm Feedback function is programmed “YES.” Alarm
Feedback will stay on until programmed back to “NO.”
Pump low battery
The Implantable Insulin Pump battery is designed to last approximately seven
years during conditions of normal use (see Chapter 9, Technical Specifications). Battery life may vary somewhat depending upon your insulin delivery
requirements. When battery energy becomes low, a voltage sensor in the
Pump will trigger the Pump Low Battery Alarm. A Pump Low Battery Alarm
indicates there are approximately eight weeks of battery energy remaining.
Table of contents
43
PPC display Type of alarm Pump alarm
PUMP LOW BATTERY 1 In 24 hours if no PPC
You can clear this condition and your Pump will continue to operate normally .
However, you should notify your doctor as soon as possible. Your doctor will
then schedule a Pump replacement, and may switch you back to conventional
insulin therapy.
Depleted pump battery
When there is no longer sufficient battery energy to power the Pump, the
Pump Low Battery Alarm will cease. This means that insulin delivery has
stopped. You must switch to another type of insulin therapy.
communication
Page 54

44
Table of contents
System error
The Implantable Insulin Pump has a sophisticated self-monitoring system that
continuously checks for circuit faults. If the Pump detects a circuit error, it
will beep and then automatically shut itself off. When this occurs, you
must switch to your alternative insulin therapy established between you
and your doctor. Notify your doctor immediately of the System Error.
PPC display Type of alarm Pump alarm
PUMP STOPPED
1 or 2 or 3 or 4 or 5 or 6
Pump self test fail
If during a “SELF TEST,” the Pump finds a malfunction. The Pump will stop
delivering insulin. Clear the message by pressing SEL then ACT. You must
switch to your alternative insulin therapy established between you and
your doctor. Notify your doctor immediately of the Self Test Error.
1 In 5 minutes if no PPC
PPC display Type of alarm
PUMP
SELF TEST FAIL
1
communication
Page 55

PPC alarms
The PPC offers a choice of two alarms, audible and vibrate. In addition, a
screen message appears indicating the type of alarm condition that occurred.
PPC low battery
If the PPC main battery (AA 1.5 volt alkaline) energy is low, the following
alarm display will appear:
Table of contents
PPC display Type of alarm
45
You can clear this message by pressing SEL and then ACT, and then continue
programming. There should be sufficient energy in the battery for at least 24
hours. For instructions on changing the battery, refer to Chapter 8, PPC Care
and Maintenance.
NOTE: If while programming the Pump the PPC screen goes
Low reservoir
When the Pump calculates that less than 800 units (2 ml) of insulin remains in
its reservoir, the following display will appear:
PPC display Type of alarm Pump alarm
RESERVOIR
PPC
LOW BATTERY
1
blank, the PPC beeps six times and then the "CHECK
PUMP STATUS" message appears, the PPC (AA 1.5
volt alkaline) battery needs to be replaced. For
instructions, see "Installing/Replacing the Main
Battery" in Chapter 8.
LOW
1 In 24 hours if no PPC communication
You can clear this message by pressing SEL and ACT, and then continue pro-
gramming. You should notify your doctor of the Low Reservoir message, and
schedule a Pump refill appointment as soon as possible.
Page 56

46
Table of contents
Empty reservoir
When the Pump calculates that less than 400 units (1 ml) of insulin remain in
its reservoir, the following display will appear:
PPC display T ype of alarm Pump alarm
EMPTY
RESERVOIR
You can clear this message by pressing SEL and ACT, and then continue pro-
gramming. The PPC Medication Remaining function reads calculated values
only, and there may still be some insulin left in the Pump reservoir. You
should report this alarm to your doctor as soon as possible, and schedule an
appointment for a Pump refill. It is important not to allow the pump to deplete
its insulin supply as this may result in a catheter blockage.
Communication error
If programming is interrupted after partial transmission of a command, the
PPC will display the following message on the display screen:
PPC display Type of alarm
COMM ERROR RE-ATTEMPT 1
You should reposition the PPC near the pump, press SEL and ACT. The PPC
will attempt to resume communication with the Pump.
1 In 24 hours if no PPC
communication
Page 57

Battery replacement
If the PPC main battery (AA 1.5V alkaline) has been replaced or the PPC recognizes the “PUMP STATUS” needs to be checked, the following message is
displayed:
PPC display Type of alarm
CHECK PUMP STATUS 1
Place the PPC near the pump, then press SEL and ACT. Allow the communication to complete.
NOTE: If while programming the Pump, the PPC goes blank,
the PPC beeps six times and then the "CHECK PUMP
STATUS" message appears, the PPC (AA 1.5V
alkaline) battery needs to be replaced. For
instructions, see "Installing/Replacing the Main
Battery" in Chapter 8.
Table of contents
47
Pump suspended
If the Pump operation has been suspended, the following message is displayed:
During “SUSPEND PUMP,” the Pump will deliver a basal rate of
0.2 U/h. To restart insulin delivery programming, press SEL and ACT. Then
place the PPC near the Pump and allow the communication to complete.
PPC display Type of alarm
PUMP
SUSPENDED
2
Page 58

48
Auto off
Table of contents
If the “AUTO OFF” time interval elapses, the following message is displayed:
PPC display Type of alarm
AUTO OFF PUMP
PUMP SUSPENDED
The Pump will initiate the internal alarm sequence of four beeps every minute
for 5 minutes, then double-beep 4 times every minute for 10 minutes, then
repeating the pattern. The alarm is cleared by pressing SEL and ACT, place
the PPC near the Pump. The PPC will communicate with the Pump to reset
the "Auto Off" duration.
Hourly maximum exceeded
If you attempt to deliver more than 2.5 times the pre-programmed bolus maximum in one hour, the following message will be displayed:
PPC display Type of alarm
HOURLY MAX
EXCEEDED
Press SEL and ACT, place the PPC near the Pump and allow the communica-
tion to complete. You may exceed this limit by programming another bolus
within 10 minutes.
1
1
Page 59

Table of contents
Personal Pump Communicator messages
Display screen message Message meaning or action required
49
AUTO OFF PUMP
PUMP SUSPENDED
BOLUS 0.0 u A bolus has been programmed and is being delivered.
CHECK PUMP
STATUS
EMPTY RESERVOIR The PPC has recognized the Pump has 400 units (1 ml) or less
HOURLY MAX
EXCEEDED
LOW RESERVOIR The PPC has recognized the Pump has 800 units (2 ml) or less
PPC LOW BATTERY The PPC can be programmed. Replace the PPC AA 1.5 volt
PUMP LOW
BATTERY
PUMP RESET The Pump was reprogrammed to the preset factory values.
PUMP SELF TEST FAIL A Pump malfunction was detected during a Self Test. Notify your
PUMP STOPPED
1 or 2 or 3 or 4 or 5 or 6
PUMP SUSPENDED The Pump is in suspend mode
Auto Off time interval has elapsed. Pump operation is suspended.
The PPC battery has been replaced. The PPC needs to check the
Pump status.
insulin remaining in its reservoir . Schedule a Pu mp refill as soon as
possible. Allowing the reservoir to completely empty may damage
the Pump.
You attempt to deliver more than 2.5 times the bolus maximum in
one hour. To clear the message, press SEL and ACT. You may
exceed this limit by programming another bolus within 10 minutes.
insulin remaining in its reservoir . Schedule a Pu mp refill as soon as
possible. Allowing the reservoir to completely empty may damage
the Pump.
alkaline battery.
The Pump battery energy is low but still functioning. Schedule a
replacement as soon as possible.
physician immediately.
When the Pump recognizes a system malfunction, it automatically
stops and insulin delivery ceases. Notify your physician
immediately.
TELEMETRY COMM
ERROR 3
The PPC and Pump are not communicating. Repositio n the PPC
over the Pump, then press SEL and ACT . If the error message
persists, notify your physician immediately.
Page 60

50
Table of contents
Page 61

CHAPTER 6 Warnings and precautions
Warnings
Electrotherapy
The Medtronic MiniMed 2007D Implantable Insulin Pump System has been
tested with electrosurgical cutting tools, electrocoagulation, and cardiac
defibrillation medical equipment. Typical use of this type of device has not
affected the Pump. However, after such procedures you should test the Pump
function (e.g., program “SELF TEST”) to determine that the Pump and PPC
are operating properly. If the system is not performing correctly, contact your
doctor.
51
Diagnostic ultrasound
The Medtronic MiniMed 2007D Implantable Insulin Pump System has been
tested with diagnostic ultrasound procedures. These procedures have no effect
on the Pump. However, after such procedures you should test the Pump function (e.g., program a “SELF TEST”) to determine that the Pump and PPC are
operating properly. If the system is not performing correctly, contact your
doctor.
Ultrasound therapy
The Medtronic MiniMed 2007D Implantable Insulin Pump System shou ld not
be exposed to therapeutic ultrasound procedures, such as lithotripsy . Exposure
to ultrasound therapy may damage the Pump System.
Diagnostic radiation
The Medtronic MiniMed 2007D Implantable Insulin Pump System has been
tested with Computerized Tomography and X-ray. These procedures have no
effect on the Pump. However, after such procedures you should test the Pump
function (e.g., program a “SELF TEST”) to determine that the Pump and PPC
Page 62

52
Table of contents
are operating properly. If the system is not performing correctly, contact your
doctor.
Therapeutic radiation
The Medtronic MiniMed 2007D Implantable Insulin Pump System has been
tested with therapeutic radiation. These procedures have no effect on the
Pump. However, it is recommended not to focus therapeutic levels of radiation directly over the pump. After such procedures, you should test the Pump
function (e.g., program a “SELF TEST”) to determine that the Pump and PPC
are operating properly. If the system is not performing correctly, contact your
doctor.
Magnetic resonance imaging
You cannot undergo Magnetic Resonance Imaging procedures with the
Medtronic MiniMed 2007D Implantable Pump System.
Pump and catheter under-delivery
Under-delivery or “backflow” may occur when insulin deposits collect in the
pumping mechanism inside your Pump. These deposits affect the vacuum seal
in the pumping mechanism, and can prevent some of the insulin from being
delivered. If the pumping mechanism is unable to seal tightly, the pump will
under-deliver its insulin.
If your Pump is under-delivering insulin, you may feel symptoms of hyper glycemia. If this occurs, you should contact your doctor immediately. Your doctor will instruct you on how to manage your blood glucose levels until the
Pump can be corrected.
Another under-delivery condition can also be caused by body fluids or body
tissue collecting at the tip of the Catheter. To correct a Catheter obstruction,
your doctor may need to flush your Catheter with a sterile solution.
Pump electronic or alarm malfunction
If the Pump’s electronic or alarm systems malfunction, Self Test circuitry will
detect the malfunction and may stop the Pump. Notify your doctor immediately if this occurs. If your doctor cannot correct the malfunction, your Pump
may need to be replaced and you will need to take alternative insulin therapy.
Page 63

Reservoir level warnings
Have your Pump refilled before the reservoir is empty. Alarms in the PPC will
alert you to low and depleted reservoir levels. For more information on alarms
and messages, see Chapter 5. If the low reservoir alarm sounds and you do not
have a refill appointment scheduled within two weeks, call your doctor immediately to schedule a refill.
Environmental conditions
NOTE: If you are in doubt about whether a condition or
situation will affect your Pump, contact your doctor
for advice.
The Implantable Insulin Pump, like all microelectronic devices, should not be
exposed to extreme electrical or magnetic fields or temperature extremes
which may adversely affect the Pump and its insulin. Do not allow your
Implantable Insulin Pump to be exposed to the following environmental conditions:
Table of contents
53
• Physical damage to the Pump and the Pump pocket
• Altitudes greater than 2500 meters or 8,000 feet (skiing, hiking, skydiving)
• Depths greater than 4 meters or 15 feet (scuba diving, etc.)
• Elevated temperatures (hot tubs, saunas)
Avoid any sharp blows or pressure on the Pump. A direct blow may damage
the Pump or injure the Pump pocket. Extreme pressure on the Pump may
cause the sutures and the tissue pocket to be damaged resulting in Pump
migration and a possible dislodging of the Catheter. If you suspect that your
Pump or Pump pocket have been damaged, you should contact your doctor
immediately. You may need to wear a pressure bandage or reduce your level
of physical activity until the Pump pocket heals completely.
You may not reside at or travel to an elevation in excess of 8,000 feet, or dive
below 15 feet. High altitudes and depths will change the Pump’s insulin flow.
This warning does not apply to commercial airline travel. Airline cabins are
adequately pressurized at any altitude for Pump use. It is still possible to ski,
dive or sky-dive with the proper precautions. Consult your doctor.
Exposure to elevated temperatures in excess of 104 degrees Fahrenheit (i.e.
hot tubs, saunas) for longer than one hour can effect the potency of the insulin
Page 64

54
Table of contents
and the function of your Pump System (see “Pump and Catheter Under-delivery” on the previous pages). If you have any questions about an activity you
are planning, you should contact your doctor for advice.
This device may experience communication interruptions when operated at or
near some airport facilities. This will not affect the operation of the pump,
and it will continue delivery of insulin per previously programmed levels.
Precautions
Blood glucose monitoring
You must check your blood sugar at least four times daily, using a technique
recommended by your doctor. Notify your doctor of any increased frequency
of serious low or high excursions in your blood sugar. High blood sugar values may indicate under-delivery of insulin. If you experience symptoms of
high blood sugar, check the programmed insulin delivery settings in your PPC
and contact your doctor immediately.
Conventional insulin supplies
Carry conventional insulin supplies with you at all times, including insulin
and a means to inject it, in case your PPC is damaged, lost or inopera tive.
Periodically review with your doctor your recommended insulin delivery procedure you should utilize in the event your Medtronic
MiniMed 2007D Implantable Pump System becomes inoperative.
Physician’s instructions
Follow your doctor’s instructions about your insulin delivery. The range of
insulin delivery with your PPC is a basal rate between 0.2 and 35 units per
hour (U/H), and a maximum meal bolus of 25 units (U). Your doctor may narrow this range by programming maximum limits for your Basal Rate and
Bolus. The alarm “Hourly Maximum Exceeded” will be displayed if you try
to program more than 2.5 times the maximum bolus in one hour.
PPC
The PPC is an electronic device and can be damaged if dropped. Do not get
the PPC wet or take it into very hot or humid environments, such as steam
baths or saunas. If the PPC is damaged, check the displays for proper operation by performing a “SELF TEST”. If the “SELF TEST” finds a problem,
Page 65

you will need to replace your PPC. For more information on the “SELF
TEST” procedure, see Chapter 6, Warnings and Precautions.
Maximum dosages
Your doctor may program specific limits for your Basal Rate and Meal Bolus.
These maximum limits provide a regimen specific to your needs.
Battery change
Carry a fresh AA 1.5-volt alkaline battery with you at all times. The estimated
PPC main battery life is approximately 6 weeks, although this can be influenced by how often you program your Pump. If the Low Battery message
appears, change the battery as soon as possible, preferably immediately.
Proper PPC positioning
Keep the PPC near to the Pump during a programming sequence. Separation
of the PPC and Pump may result in a partial transmission of a command. If
this occurs, the PPC will alarm and display “COMM ERROR REATTEMPT” on the screen.
Table of contents
55
Physical activities to avoid
Physical activities which are not permitted are those involving very HIGH or
LOW altitudes and pressure changes. Such activities include skiing, (above
8,000 feet), sky diving, and scuba diving. When you must participate in such
activities, discuss them with your physician who will provide treatment
requirements, such as the temporary use of another method of insulin delivery ,
and will refill your Pump with buffer.
Emergency plan
Be fully informed and thoroughly understand what to do in an emergency.
Carry your emergency card with you at all times. Additionally, it is important
for individuals close to you, such as family, friends, and co-workers, to know
what to do if you are unable to treat yourself due to illness or injury.
The following instructions should be used by your family or friends to set the
Pump to the lowest basal rate while your doctor is consulted:
1. Press SEL until the PPC displays “SUSPEND PUMP”.
2. Press ACT , the PPC will indicate “PPC COMMUNICATING”.
Page 66

56
Table of contents
3. Position the PPC near the Pump.
4. When programming is complete, the PPC will beep and the display will
automatically return to the Time/Day screen. The message “PUMP
SUSPENDED” will be displayed. The Pump will deliver a basal rate of
approximately 0.2 U/h.
In addition to the procedure above, review with family members the proper
procedure for administering glucagon.
It is important to closely monitor blood sugar levels on refill days. During a
refill procedure, a very small amount of insulin may be deposited subcutaneously possibly resulting in hypoglycemia.
Adverse reactions
In clinical studies, adverse reactions associated with the Medtronic
MiniMed 2007 Implantable Insulin Pump System included hypoglycemia,
diabetic ketoacidosis, hyperglycemia, skin erosion, infection, abnormal healing, elevated anti-insulin antibodies, intestinal obstruction, post-operative discomfort and pain. Malfunctions in the order of frequency and seriousness
include insulin aggregation resulting in Pump under-delivery, Catheter occlusion or tissue overgrowth, early Pump battery depletion and electronic Pump
failure. Adverse events associated with the use of Aventis HOE 21 PH U-400
insulin are described in the package insert accompanying the insulin medication.
Hyperglycemia
Your Implantable Insulin Pump uses a special regular insulin, so your body
will not have any reserve of long-acting insulin. Interruption of insulin delivery (due to Pump malfunction or clogging of the Catheter) or the sudden onset
of stress (emotional upset, infection, etc.) may result in a rapid rise of blood
sugar levels, and possibly the development of diabetic ketoacidosis (DKA).
Check your blood sugar levels, and your urine for ketones , if you suspect a
high glucose level. Supplemental insulin delivered by conventional means
may be required. Establish a protocol with your doctor for rapidly iden tifying
and treating hyperglycemia to avoid the onset of DKA.
Page 67

Hypoglycemia
The best method for identifying hypoglycemia is testing your blood sugar levels. Establish a protocol with your doctor for identifying and treating symptoms of hypoglycemia to avoid an insulin reaction.
Pump pocket infection
Pump pocket infection, although rare, occurs around the Pump implantation
site. If you notice pain, redness, or swelling in the area of your Pump, contact
your doctor immediately. Pump pocket infections may require the removal of
your Pump.
Pump pocket seroma
A Pump pocket seroma is generally characterized by swelling around the area
of implantation. It may occur after surgery or if a blow is received to the
Pump site. If you notice swelling around your Pump, contact your doctor
immediately.
Table of contents
57
Page 68

58
Table of contents
Page 69

CHAPTER 7 Important Self-Care
Having a Medtronic MiniMed 2007D Implantable Insulin Pump System is
only one aspect of an overall management program to treat your diabetes.
There are many other requirements for achievi ng near normal blood glucose
levels.
This manual presents general information regarding blood glucose monitoring, meal planning, exercise and other issues concerning your implantable
Pump. You will be instructed more specifically on these self-care issues by
your doctor, nurse, and dietitian. Be sure to discuss all questions with them as
they are your best source of information.
59
A support person such as a family member or friend should also read this
manual and pay particular attention to the section entitled, “Emergency Plan”
in Chapter 6. Your support person should also be able to program the PPC to
stop insulin delivery as described in Chapter 6.
Blood glucose monitoring
NOTE: Remember much of the success of implantable pump
therapy depends on accurate and frequent blood
glucose monitoring.
Your Pump System does not monitor your blood glucose levels. You must
continue to self-monitor your blood glucose at least four times daily, and then
use this glucose information to program your Pump System. Blood glucose
monitoring is the only way to determine if you are receiving the correct
amount of insulin. You should test your blood glucose according to the
method recommended by your doctor.
If you begin to have a problem with glycemic control, it is very important to
record your blood glucose measurements. A careful record may help determine if the problem is related to your Pump or another cause.
Page 70

60
Table of contents
Meal plan
You will always receive some basal insulin from your Implantable Insulin
Pump. When you program a meal bolus, this will be in addition to your basal
rate.
As with any insulin therapy, it is recommended that you ke ep some form of
fast-acting sugar with you at all times to treat hypoglycemia. If you have any
questions concerning your meal plan and insulin therapy, discuss them with
your healthcare team as they are your best source of information.
Daily activities
There are no restrictions on your normal work, school, social, or sexual activities unless you have a medical condition which does not allow such activities.
Because your Pump is implanted, you may bathe and shower without any
interruption in insulin therapy. However, your PPC is not waterproof and
should be protected from getting damp or wet.
Exercise
You may participate in most physical activities with your Medtronic
MiniMed 2007D Implantable Pump Insulin System. Rough contact sports are
not recommended as Pump pocket injury may occur. Exercise may reduce
your insulin requirements, therefore, you must check your blood glucose frequently during periods of exercise. In addition, it may be necessary to reduce
your basal rate during the exercise.
Travel
You may travel with your Medtronic MiniMed 2007D Implantable Insulin
Pump System. All extended trips should be discussed with your doctor. It is
safe to travel in a pressurized aircraft, which includes all commercial airlines.
Security systems at airports will not affect your Pump, but you may be asked
to show your Patient Emergency Information Card which explains the Pump
and PPC. Remember to always carry conventional insulin supplies with you
when you travel (insulin and syringes or an external Pump) in case of a medical emergency.
Page 71

Table of contents
Medtronic MiniMed information card
Your doctor will give you a Patient Emergency Information Card when you
receive your Pump System. It provides information about your Pump, as well
as important phone numbers in case of a medical emergency. Carry Your
Information Card With You At All Times. It is also recommended that you
wear a bracelet or necklace indicating that you have an implantable insulin
Pump.
61
Page 72

62
Table of contents
Page 73

CHAPTER 8 PPC Care and Maintenance
Installing/replacing the main battery
PPC Battery life is estimated to be approximately 4 weeks. Only AA 1.5 volt
alkaline battery is recommended for use with the PPC. To replace the PPC
Main Battery:
1. Locate the battery door on the back of the PPC.
2. Slide the locking bar to the left.
3. Push the middle part of the PPC box (under the battery door) and lift by
gently pulling up the battery door to unlatch.
63
4. Remove the old battery, noting the polarit y. The PPC screen will be blank.
5. Position the new battery so the + and - markings on the battery match the
polarity diagram in the battery compartment.
6. Close the battery door .
7. Slide the locking bar to the right.
8. The PPC screen reappears after 30 seconds.
9. The PPC will beep six times and display
“PPC/PUMP.”
PPC 8 102 100
PUMP 3 100 348
10. After a few seconds, the screen will change to
“CHECK PUMP STATUS.”
11. Press SEL and ACT, then place the PPC over
08:26 JAN O2
CHECK
PUMP STATUS
the Pump.
Page 74

64
Table of contents
12. Allow the communication to complete.
NOTE: When the PPC displays “PPC LOW BATTERY,” you
can clear the message and continue programming.
There should be sufficient energy in the battery to
communicate with the Pump. If while programming the
PPC goes blank, the PPC beeps six times and then the
"CHECK PUMP STATUS" message appears, the PPC
(AA 1.5v alkaline) battery needs to be replaced. For
instructions, see "Installing/Replacing the Main
Battery" in this Chapter.
Physical protection
• Protect the PPC from direct contact with water and moisture. Never take
the PPC into a sauna or steam bath. If the PPC comes in contact with
moisture where the battery compartment is wet, remove the battery and
dry compartment thoroughly. Replace the battery and perform a “SELF
TEST.”
PPC
COMMUNICATING
• Protect the PPC from temperatures greater than 40°C (104°F). Do not
leave the PPC in direct sunlight.
• Protect the PPC from cold temperatures less than below freezing 0°C
(32°F).
• Do not drop the PPC. Protect the PPC from sharp blows. Either could
damage the electrical components of the PPC and affect its ability to
program your implantable Pump.
Page 75

Table of contents
Cleaning the outer surface of your PPC
• If necessary, use a slightly damp cloth and mild soap to clean the outside
of the PPC. Do not use a wet cloth or dip the PPC in any liquid. Moisture
may harm the PPC’s electrical components.
• Never use organic solvents or harsh detergents to clean the PPC.
• Always completely dry the PPC after cleaning.
• Never spray any cleaning solutions directly onto the PPC, especially the
keyboard panel.
65
Page 76

66
Table of contents
Page 77

CHAPTER 9 Technical specifications
Implantable Insulin Pump (MMT-2007D)
Component Performance Specification
Diameter 8.1 cm (3.2 inches)
Thickness 2.0 cm (0.8 inches)
Reservoir Volume 13 ml to 15 ml
Weight - Empty 131 gm (4.6 ounces)
67
Insulin - Concentration Aventis HOE 21 PH U-400
Stroke Volume 0.42 to 0.58 µl per stroke
0.17 to 0.23 units per stroke
Basal Rate 0.2 to 35.0 units per hour (U/h)
Basal Patterns 3 Patterns of up to 48 basal rates each
Meal Bolus 0.2 to 25.0 units
Bolus Duration Immediate, Square Wave (30 minutes to 4 hours), or both together. Audio Bolus
Te mporary Basal Rate 0.2 to 35.0 units per hour
30 minute increment duration
30 minutes up to 24 hours duration
Diagnostic Rate 10 to 150 U/h
Power Supply Lithium - Carbon Monofluoride Battery
Audio Alarms Low Battery
System Error
Safety Features Negative Pressure Reservoir with Passive Filling
Pump Shutdown and Alarm with System Error (unique code sequences)
Materials Titanium Housing, Polyethylene-lined Silicone Rubber Catheter
Page 78

68
Table of contents
Personal Pump Communicator (MMT-3160)
Component Performance Specification
Height 2.0 cm (0.8 inches)
Length 8.9cm (3.5 inches)
Width 7.0 cm (2.8 inches)
Weight 115 gm (4.0 ounces)
Main Power Source 1.5 Volt Alkaline Battery Type AA
Main Battery Life Approximately 4 weeks, depending upon usage
Operating Temperature 0ºC to 40ºC (32ºF to 104ºF)
Storage Temperature -0ºC to 30ºC (32ºF to 86ºF)
Messages Auto Off Pump Suspended
Check Pump Status
Communication Error
Empty Reservoir
Hourly Maximum Exceeded
Low Reservoir
PPC Not initialized
PPC Low Battery
Pump Self Test Fail
Pump Reset
Pump Stopped
Pump Version Error
Telemetry Communications Error
Page 79

Side Port Catheter
MMT- 4027
Length
Proximal:
Distal:
MMT- 4024
Length
Proximal:
Distal:
Material Polyethylene-lined Silicone Rubber
Sideport Polysulfone, Silicone Septum
Operation is subject to the following two conditions: (1) This device may not
cause harmful interference, and (2) this device must accept any interference
received, including interference that may cause undesired operation.
11.8 ± 1.3 cm (4.7 ± 0.5 inches)
17.8 ± 0.7 cm (7.0 ± 0.3 inches)
11.8 ± 1.3 cm (4.7 ± 0.5 inches)
10.2 ± 0.4 cm (4.0 ± 0.2 inches
Table of contents
69
Any changes or modifications to the system not expressly approved by
Medtronic MiniMed could void the user’s authority to operate the system.
FCC compliance
This device complies with Part 15 of the FCC Rules. Operation is subject to
the following two conditions:
(1) this device may not cause harmful interference, and
(2) this device must accept any interference received, including interference
that may cause undesired operation.
Page 80

70
Table of contents
 Loading...