

Page 1
1
Page 2

2
Page 3
3
Reprocessing of Reusable Medical Devices
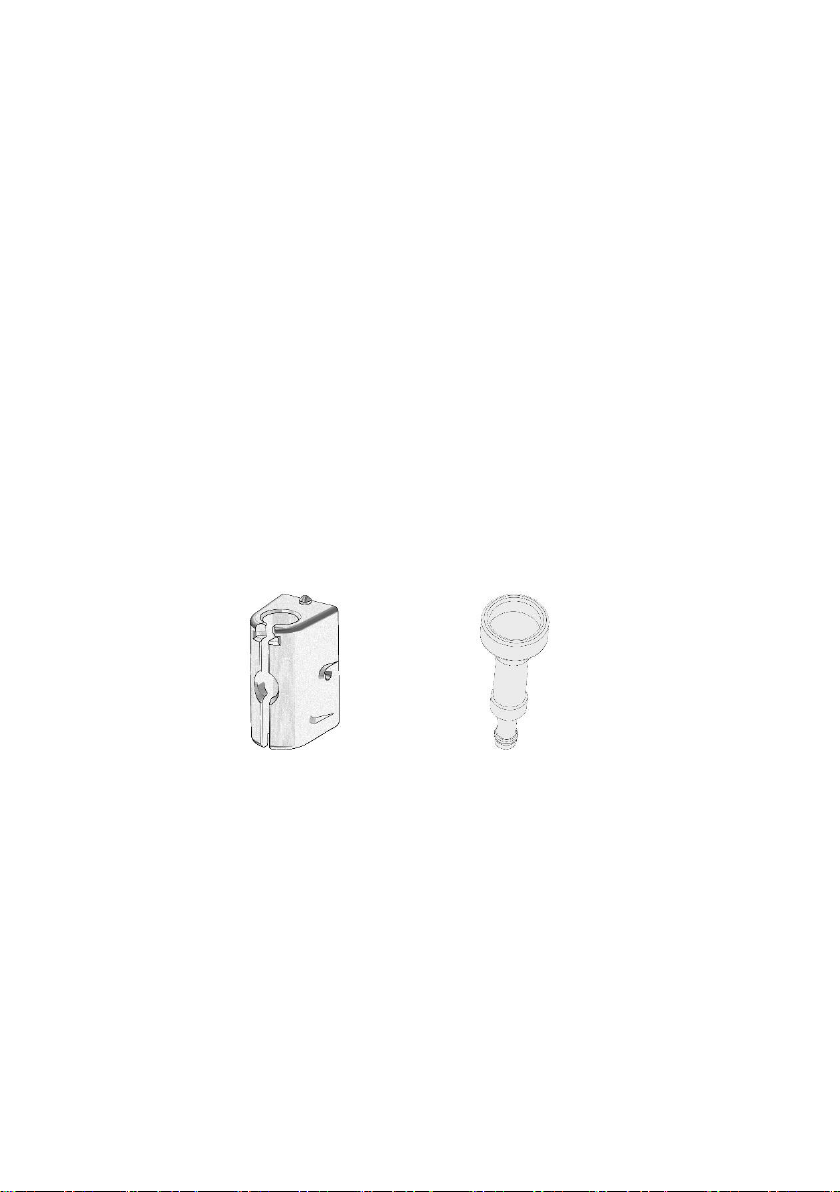
4.75 Arm Guide
4.75 Arm Guide Screw
5.5/6.0 Arm Guide
5.5/6.0 Arm Guide Screw
Important safety and health information
Arm Guide
Snapshot Tracker Screw
MKC0525-01, Rev. A
Page 4

4
Safety Warning and Compliance Labels
The Mazor Robotics tools are fitted with safety warning and compliance labels, located on or inside the package. The individual symbols
are defined in the table below.
Symbol
Definition
Catalog Number
Batch Code
Caution (see Instructions for Use)
Non-sterile
Manufacturer's name and address
Date of Manufacture (YYYY-MM-DD)
Caution: Federal law restricts this device to sale by or on the order of a physician
Warnings indicate precautions which, if not followed, may result in personal injury or even death.
Page 5

5
Introduction
Manufacturer:
Mazor Robotics
Method:
Mazor Devices are delivered with instructions for processing prior to first use and in between each
subsequent use (for reusable devices only). The Devices are cleaned, and sterilized by moist heat or are
cleaned, thermally disinfected, and sterilized by moist heat.
Devices:
MAS2655 4.75 Arm Guide
MAS2654 4.75 Arm Guide Screw
MAS2658 5.5/6.0 Arm Guide
MAS2656 5.5/6.0 Arm Guide Screw
WARNING!
All supplied Devices are non-sterile. Prior to first use, remove all packaging material and perform the
reprocessing procedures according to the instructions provided in this document.
Fundamental Points
• Cleaning and sterilization information provided is in accordance with ANSI/AAMI ST81 and ISO 17664.
• While these instructions have been validated by the manufacturer as being capable of preparing the Device for re-use, it
remains the responsibility of the processor to ensure that the reprocessing (as actually performed, using equipment,
materials, and personnel in the reprocessing facility) achieves the desired result. This normally requires validation and
routine monitoring of the process.
• Use only steam sterilization methods for reprocessing. Other sterilization methods have not been validated and might
significantly reduce the performance of the Device or result in inadequate sterilization.
• Unless stated otherwise, use only freshly prepared solutions made with critical/de-ionized water
• Damage incurred by improper processing will not be covered by the warranty.
Reprocessing Limitations
• For all practical purposes, there is no limit to the number of times Devices can be reprocessed.
• Proper processing has a minimal effect on the Device. Mazor Reusable Devices "end of life" is determined by excessive
wear and damage from normal use.
See Maintaining, Inspecting, and Testing Procedures, including the Visual and Functional inspection subsections, to determine if a Device
has reached its "end of life".
Cleaning Procedures
CAUTION!
• Verify that the following substances are not ingredients (or do not exceed their permitted pH-values) of
the cleaning detergents:
• Organic solvents (that is acetone, ether, alcohol, benzine), mineral, and oxidizing acids
• Oxidizing agents (minimum permitted pH-value of 5.5)
• Strong lye (maximum permitted pH value is 11.0)
• Halogens (that is, chlorine, iodine, bromine)
• Aromatic, halogenated hydrocarbons
• Solutions containing chlorine (e.g. bleach) or aldehydes (e.g. glutaraldehydes)
• Formalin, mercury, chlorides, bromides, iodides, saline or Ringer’s solutions
• Do not use metallic brushes, scrub pads, or other abrasive cleaning aids which can permanently
damage the Device. Soft bristled brushes and soft pipe cleaners are recommended.
• Use the Sterilization Cases for sterilization only; not for cleaning or disinfection.
Point of Use
Important:
Transport contaminated Devices separately to avoid contamination of personnel and surroundings.
1. Remove all visible soil from instruments using non-shedding wipes.
2. Instruments should be thoroughly cleaned within 30 minutes of use to minimize the potential for drying.
3. If the instruments cannot be reprocessed immediately, keep the devices moist during transport.
4. Place instruments in a tray of softened tap water, if available, or cover with damp towels.
Containment and Transportation
Immediately transport the covered instrument tray to a work area dedicated for further reprocessing.
Important:
All Devices should be thoroughly cleaned as soon as is reasonably possible, following use, to prevent any
blood and/or debris from drying and adhering to the Device surfaces.
Page 6

6
Precleaning
1. Remove any screws, if applicable and reprocess separately.
2. Remove any occlusions prior to cleaning.
Cleaning Methods
Proceed to clean the Devices with ONE of the following cleaning methods:
• Automated Cleaning (preferred) – can be performed with either an Enzymatic/Neutral pH cleaner or an Alkaline Cleaner.
• Manual Cleaning – performed when there is no automatic cleaning system available; with Enzymatic/Neutral pH cleaner only.
Automated Cleaning
1. Rinse, flush, and scrub the Devices under running (cold) tap water at a temperature of <43°C (<110°F) for 30 seconds to 1
minute.
• Use appropriately-sized, soft-bristle brushes to scrub all surfaces, hinges, pivot point gaps, cavities, grooves, holes,
threads, raised and recessed pins and screws.
• Use a single-use syringe (minimum volume 10-50 ml, depending on the instrument size) or a jet-pistol for rinsing and
flushing any lumens, cavities, holes and grooves.
2. Using tap water, prepare an enzymatic cleaning solution (refer to Table 1) or an alkaline cleaning solution (refer to Table 2),
according to the manufacturer’s instructions, dilution reco mmendations, and temperatures in an appropriately-sized
ultrasonic bath.
3. Completely submerge the Devices in the enzymatic or alkaline cleaner, and ultrasonicate at 40–50 kHz for a minimum of
15 minutes. Multiple ultrasonication cycles totaling a minimum of 15 minutes of ultrasonication time may be used.
Important:
Verify that:
• The Devices are completely immersed and that there are no air pockets to obstruct the flow of the cleaning
agents into the lumens and cavities.
• The Devices do not contact one another.
4. Transfer the Devices to the automated washer-disinfector and program the washer-disinfector with the cycle parameters
listed in Table 1: Enzymatic Cleaner (7.0 – 8.0 pH) or Table 2: Alkaline Cleaner (8.0 – 11.0 pH).
a. Verify that Devices that are cannulated and/or have blind holes are positioned in the washer-disinfector such as to
allow proper drainage, and to prevent wash water pooling.
b. If necessary, for further instructions, refer to the relevant Thermal Disinfection section.
5. After unloading, visually inspect the Devices, including lumens and cavities, to ensure that all visible debris has been
removed.
6. If debris is still present, repeat the Cleaning process. Do not proceed with reprocessing of a soiled Device.
Table 1: Enzymatic Cleaner (7.0 – 8.0 pH)
Cycle
Temperature Set Points
Minimum Time (minutes)
Concentration
Pre-wash
<43°C (<110°F) Cold tap
2:00
N/A
Pulsed enzymatic wash
Wash
Hot tap
10:00
0.2 – 0.8 mL/liter
Rinse
Hot tap
≥00:15
N/A
Detergent wash (Neutral pH)
65°C (149°F)
5:00
0.2 – 0.8 mL/liter
Rinse
71°C (160°F)
15:00
N/A
Thermal rinse (critical water)
93°C (200°F)
5:00
N/A
Dry
98.8°C (210°F)
≥30:00
N/A
Note: Cycle validated using Prolystica Enzymatic Presoak and Cleaner (1-4 mL/liter) for ultrasonication
and Prolystica Ultra Concentrate Enzymatic Cleaner and Prolystica Neutral Detergent for washer use.
Table 2: Alkaline Cleaner (8.0 – 11.0 pH)
Cycle
Temperature Set Points
Minimum Time (minutes)
Concentration
Pre-wash
<110°F (<43°C) Cold tap
2:00
N/A
Pulsed alkaline wash
Wash
Hot tap
10:00
0.2 – 0.8 mL/liter
Rinse
Hot tap
≥00:15
N/A
Alkaline detergent wash
60°C (140°F)
5:00
2 – 6 mL/liter
Rinse
71°C (160°F)
15:00
N/A
Thermal rinse (critical water)
93°C (200°F)
5:00
N/A
Dry
98.8°C (210°F)
≥30:00
N/A
Note 1: Cycle validated using neodisher MediClean Forte (5-10 mL/liter: ultrasonication; 2-6 mL/liter: washer-disinfector). A
neutralizing step is not required for neodisher MediClean Forte. However, other alkaline cleaning agents may require this step.
Refer to manufacturer’s instructions to determine if neutralization is required.
Note 2: Due to the many variables involved with washer-disinfectors, each health care facility should properly install, calibrate, and
verify the process (e.g. temperatures, times) used for their equipment. Washer-disinfector manufacturer recommendations should
always be followed. When cleaning multiple Devices in one cleaning cycle, ensure the manufacturer’s maximum load is not
exceeded. Cleaning validation was conducted using a full chamber load.
Page 7

7
Manual Cleaning
Important:
Manually clean instruments only when an automated washer-disinfector is not available.
1. Rinse, flush, and scrub the Devices under running (cold) tap water at a temperature of <43°C (<110°F) for a minimum of 3
minutes.
• Use appropriately-sized, soft-bristle brushes to scrub all surfaces, hinges, pivot point gaps, cavities, grooves, holes,
threads, raised and recessed pins and screws.
• Use a single-use syringe (minimum volume 10-50 ml, depending on the instrument size) or a jet-pistol for rinsing and
flushing any lumens, cavities, holes and grooves.
2. After all visible soil is removed, using tap water, prepare an enzymatic cleaning soluti on according to the manufac turer’s
instructions, dilution recommendations, and temperatures.
3. Place instruments in the enzymatic cleaner, submerge completely, and soak for 45 - 60 minutes. Ensure all surfaces,
lumens, and components of the device are in contact with the cleaning solution.
4. Remove instruments from the enzymatic cleaning solution and flush under running (cold) tap water. Flush any lumens or
cavities in the water stream. Rinse with (cold) tap water for a minimum of 3 minutes.
5. Using tap water, prepare a second enzymatic cl eaning solution a ccording to th e manufacturer’s instruction s, dilution
recommendations, and temperatures in an appropriately-sized sonicator.
6. Completely submerge the Devices in the enzymatic or alkaline cleaner, and ultrasonicate at 40–50 kHz for a minimum of
45 minutes. Multiple ultrasonication cycles totaling a minimum of 45 minutes of ultrasonication time may be used.
Important:
Verify that:
• The Devices are completely immersed and that there are no air pockets to obstruct the flow of the cleaning
agents into the lumens and cavities.
• The Devices do not contact one another.
7. Remove the Devices from the ultrasonicator and rinse using (cold) running tap water for a minimum of 3 minutes. Flush
any lumens or cavities in the water stream.
8. Re-rinse with critical/de-ionized water, for an additional 3 minutes.
9. Carefully and visually inspect the Devices, to ensure all visual debris has been removed.
10. If debris is still present, repeat the Cleaning process. Do not proceed with reprocessing of a soiled Device.
11. Dry the devices using clean, absorbent, non-shedding wipes and/or forced (medical grade) air and/or a dry heat oven at
≥118°C (≥245°F) for a minimum of 30 minutes.
Thermal Disinfection
Important:
Thermal Disinfection is an optional procedure.
• Decontaminate the Devices using a thermal final rinse within an automated washer-disinfector at 200°F (93°C) for 5 to 10
minutes.
• Disinfection with disinfectant solutions or chemicals is not required because the decontamination process includes cleaning
followed by sterilization.
• Thermal rinse alone does not render the Devices safe for patient use.
Drying
1. After completing the cleaning/disinfection cycle, visually inspect all Devices for dryness.
2. If the Devices are still moist or wet, completely dry using:
• Clean, absorbent, lint-free wipes
• Pressurized (medical grade) air
Important:
Devices must be completely dry before packaging for sterilization.
Maintaining, Inspecting, and Testing Procedures
Before and after cleaning, and before use, always perform an initial and systematic, visual, and functional examination of all the Devices.
Never use Devices with obvious signs of excessive wear, damage, or that are incomplete or otherwise non-functional.
Maintaining, Inspecting, and Testing the Devices
1. Reassemble the Devices where applicable; verify that all screws have been returned.
2. Visually examine working surfaces, pivots, springs or torsional parts, holes and cannulations for:
• Corrosion, stains, or rust
• Pitting
• Weakness and deterioration
• Debris
• Cracks, bending, deformation, or distortion
3. Verify that all Devices are complete:
Page 8

8
There are no missing, loose, or damaged parts; including set screws, springs, curved springs, pins, and prongs.
4. Verify the following:
• All markings (laser and otherwise) are legible.
• There are no cracks in/on any part of the Devices, including Device handles.
• There are no handle/shaft separations - all handle-to-shaft connections are secure.
• There are no signs of damage to the working ends or tips.
Working ends or tips must be free of cracks, gouges, and any other damage and should be sharp where applicable.
• There are no signs of damage to the threads.
• Sharp edges are sharp to the touch (not dull), have no nicks, or any other damage.
• Mating ends are free of damage (nicks, gouges, bends, etc.) that can interfere with the mating function.
5. Functionally examine the Devices by verifying that each Arm Guide Screw fits smoothly in and out through its
corresponding Arm Guide.
Packaging the Devices for Sterilization
1. Place each Device in its designated location in the relevant Medtronic Transportation/Sterilization Cassette.
2. Double-wrap the Medtronic Transportation/Sterilization Cassette containing the Devices, with FDA-approved sterilization
wrap approved for pre-vacuum steam sterilization.
3. When Medtronic Transportation/Sterilization Cassettes are not available, double-wrap each Device individually, with FDAapproved (non-woven/moisture resistant) sterilization wrap or equivalent, approved for pre-vacuum steam sterilization.
Important:
Do not place and sterilize individually wrapped Devices in a Sterilization Case or tray.
Steam Sterilization
WARNING!
• Sterilization is not a substitute for cleaning. All Mazor Robotics Devices must be thoroughly cleaned
prior to sterilization. Refer to Cleaning Procedures.
• All Devices have been validated for steam sterilization. Do not use any other sterilization methods.
• The adequacy of a specific steam sterilization procedure must be tested. It is critical that appropriate
process parameters be validated for each facility's sterilization equipment and product/load
configuration by persons who have training and expertise in sterilization processes to substantiate the
process and its reliability and reproducibility.
• Drying time depends on several variables, including: altitude, humidity, type of wrap, preconditioning,
size of chamber, mass of load, material of load, and placement in chamber. Users must verify that
drying time set in their autoclave yields dry surgical equipment.
CAUTION!
• Do not expose any Devices to temperatures higher than 137°C (279°F).
• Ethylene oxide (EO), gas plasma, gamma irradiation, chemical vapor, or dry heat sterilization methods
are not recommended for sterilization of these devices.
1. Inspect the packaging to ensure no rips, punctures, or seal failures are present in or on the packaging prior to loading into
the sterilizer.
2. Load the Devices into the sterilizer by following the sterilizer manufacturer's recommended loading procedures and load
configurations.
3. Follow the sterilizer manufacturer's recommended procedures to program the sterilizer with any one of the sets of
sterilization cycle parameters in Table 3:
Table 3: Sterilization Parameters
Cycle
Temperature
Exposure Time
Minimum dry time1
Dynamic-air-removal (4 pre-conditioning pulses)
270°F (132°C)
4 Minutes
30 Minutes
Dynamic-air-removal (4 pre-conditioning pulses)
275°F (135°C)
3 Minutes
30 Minutes
Dynamic-air-removal (4 pre-conditioning pulses)
273°F (134°C)
4 Minutes
30 Minutes
Dynamic-air-removal (4 pre-conditioning pulses)
273°F (134°C)
20 Minutes
30 Minutes
Storage
Mazor Devices must be completely dry before storage.
Store both non-sterile and sterilized Mazor Devices in dry, clean conditions, at an ambient room temperature.
Important:
The shelf-life of sterilized Devices is dependent upon the legally marketed sterilization wrap. The health care
facility should establish a shelf life for sterilized Devices based upon the type of sterilization wrap used and the
recommendations of the sterile wrap manufacturer.
1
The minimum dry times were validated using sterilizers having vacuum drying capabilities. Drying cycles using ambient atmospheric
pressure may require longer dry times. Refer to the sterilizer manufacturer's recommendations.
Page 9

9
Transportation
Transportation to Point of Use
• Place the Device in a puncture proof container
• Place tip guards over any sharp or delicate Device tips
• Use holders and brackets to secure items during movement.
• Employ specific containment or labelling procedures, etc.
Shipping to Outside Facility
• Mazor Robotics Devices must be thoroughly cleaned, inspected, and sterilized before being returned to Mazor.
• Any Device that has been in contact with a patient known to have or suspected to have a prion or prion-related disease, such
as Creutzfeldt - Jakob disease, cannot be returned to Mazor and must be quarantined and processed according to the
guidelines for processing Devices contaminated with high risk tissue, at the health care facility.
To report product problems and/or if there is any uncertainty concerning the proper use and reprocessing of Mazor Robotics
Devices, contact Mazor Robotics (see contact details on the document rear cover).
Page 10

10
 Loading...