

Page 1

Service Manual
ValleylabTM LS10
LS Series Single Channel Vessel Sealing Generator
Page 2

Page 3

Service Manual
ValleylabTM LS10
LS Series Single Channel Vessel Sealing Generator
For use with software version 1.1x
Page 4

Preface
This manual and the equipment it describes are for use only by qualified personnel
trained in the particular technique and surgical procedure to be performed. It is intended
as a guide for servicing the Covidien Valleylab LS10, LS Series Single Channel Vessel
Sealing Generator only. Additional information is available in the Valleylab LS10, LS Series
Single Channel Vessel Sealing Generator User’s Guide.
Additional technical information may be available from Covidien Technical Service.
For a complete list of service centers world wide, please refer to the Covidien web site:
http://surgical.covidien.com/service-centers.
Equipment covered in this manual:
Valleylab LS10, LS Series Single Channel Vessel Sealing Generator with software version
1.1x.
Conventions Used in this Guide
Warning
Indicates a potentially hazardous situation which, if not avoided, could result in death or serious
injury.
Precaution
Indicates a hazardous situation which, if not avoided, may result in minor or moderate injury.
Notice
Indicates a hazard which may result in product damage.
Important
Indicates an operating tip or maintenance suggestion.
ii Valleylab LS10, LS Series Single Channel Vessel Sealing Generator Service Manual
Page 5

Limited Warranty
Covidien warrants each covered product listed below to be free from defects in material
and workmanship for normal use and service for the period(s) set forth below. Covidien’s
obligation under this warranty is limited to the repair or replacement, at its sole option,
of any product, or part thereof, which has been returned to it (or its authorized
distributor) within the applicable time period shown below after delivery of the product
to the original purchaser, and which examination discloses, to Covidien’s satisfaction, that
the product is defective. This limited warranty does not apply to any product, or part
thereof, which has been repaired or altered in a way so as, in Covidien’s judgment, to
affect its stability or reliability, or which has been subjected to misuse, neglect, or
accident.
The warranty periods for Covidien products are as follows:
ValleylabTM LS 10, LS Series Single
Channel Vessel Sealing Generator
All purchased or supplemental
software programs or updates
Notwithstanding any other provision herein or in any other document or communication,
Covidien’s liability with respect to this limited warranty and the products sold hereunder
shall be limited to the aggregate purchase price for the products sold to the customer.
This limited warranty is non-transferable and runs only to the original purchaser of the
covered product(s). There are no warranties which extend beyond the terms hereof.
Covidien disclaims any liability hereunder or elsewhere in connection with the sale of
products and for any form of indirect, tort, or consequential damages.
This limited warranty and the rights and obligations hereunder shall be construed under
and governed by the laws of the State of Colorado, USA. The sole forum for resolving
disputes arising under or relating in any way to this limited warranty is the District Court
of the County of Boulder, State of Colorado, USA.
Covidien reserves the right to make changes in covered products built or sold by it at any
time without incurring any obligation to make the same or similar changes to equipment
previously built or sold by it.
THE OBLIGATION TO REPAIR OR REPLACE A DEFECTIVE OR NONPERFORMING PRODUCT
IS THE SOLE REMEDY OF THE CUSTOMER UNDER THIS LIMITED WARRANTY. EXCEPT AS
EXPRESSLY PROVIDED HEREIN, COVIDIEN DISCLAIMS ALL OTHER WARRANTIES,
WHETHER EXPRESS OR IMPLIED, ORAL OR WRITTEN, WITH RESPECT TO
PRODUCTS, INCLUDING WITHOUT LIMITATION ALL IMPLIED WARRANTIES,
WARRANTIES OF MERCHANTABILITY OR FITNESS FOR A PARTICULAR PURPOSE.
One year from date of shipment
90 days from delivery
Valleylab LS10, LS Series Single Channel Vessel Sealing Generator Service Manual iii
Page 6

Software License
Covidien llc, (collectively called “COVIDIEN” herein) owns the entire right, title, and
interest in and to all of the computer programs and all portions thereof, and associated
documentation (collectively, the “Software”) provided to Customer as may be installed in
the Products and equipment addressed herein or provided separately, and it has the sole
right to grant licenses hereunder.
The evaluation allowance herein and any ultimate price paid by Customer for the
products incorporating the Software include as a portion of that evaluation allowance, or
price, a license fee granting Customer only the rights set forth in this Software License.
Customer further acknowledges and agrees that the Software is owned exclusively by
COVIDIEN. The Software is licensed to be used on only one computing device or Product,
and a valid license must be purchased for each computing device on which the Software
is installed.
Single User License Grant: COVIDIEN grants to Customer a limited, nonexclusive, nonsublicensable, nontransferable and revocable license to use the Software, exclusively at
Customer’s location as identified by Customer as the ship-to location of the Product,
solely in machine-readable object code form only on a single central processing unit
owned or leased by Customer or otherwise embedded in equipment provided by
COVIDIEN, and for the sole purpose of Customer’s internal business purpose in the
operation of the Product or equipment purchased from, other otherwise provided by,
COVIDIEN or its affiliates.
Except to the extent expressly authorized in this Software License or by law, Customer
shall not and shall not cause any third party to: (i) decompile, disassemble, or reverse
engineer the Software; (ii) modify or create any derivative works (including, without
limitation, translations, transformations, adaptations or other recast or altered versions)
based on the Software, or alter the Software in any way; (iii) merge the Software with
any other software or product not supplied by Supplier; (iv) use, copy, sell, sublicense,
lease, rent, loan, assign, convey or otherwise transfer the Software except as expressly
authorized by the Agreement; (v) distribute, disclose or allow use of the Software, in any
format, through any timesharing service, service bureau, network or by any other means,
to or by any third parties; (vi) remove or modify any copyright, confidential and/or
proprietary markings, legends or restriction which are in the Software originally supplied
to Customer; or (vii) violate any obligations with regard to COVIDIEN’s Confidential
Information. To the extent that Customer is expressly permitted by applicable mandatory
law to undertake any of the activities listed in the preceding sentence, Customer will not
exercise those rights until Customer has given COVIDIEN thirty (30) days written notice of
Customer’s intent to exercise any such rights unless an order of a government agency of
competent jurisdiction will not so allow.
Except for the limited license rights expressly granted in this Software License, COVIDIEN
reserves all rights in and to the Software and any modifications thereto and derivations
thereof, including, but not limited to, all title, ownership, intellectual property rights and
all other rights and interests. Customer will own only the hardware or physical media on
which the Software is stored or processed, if any.
Customer agrees that the Software, including the specific design and structure of
individual programs, constitute confidential information and trade secrets of COVIDIEN,
whether or not the programs may be copyrighted or copyrightable, and/or patented or
iv Valleylab LS10, LS Series Single Channel Vessel Sealing Generator Service Manual
Page 7

patentable. Customer agrees not to disclose, provide, or otherwise make available such
confidential information, trade secrets or copyrighted material in any form to any third
party. Customer agrees that it will make the Software available only to employees,
contractors, or consultants with a need to know, who are obligated to comply with all
license restrictions contained in this Software License Agreement and to maintain the
secrecy of the Software and all other Confidential Information. Customer is responsible
for the compliance of all users with these obligations.
Customer may, from time to time, request that COVIDIEN incorporate certain features,
enhancements or modifications into the Software. COVIDIEN may, in its sole discretion,
undertake to incorporate such changes and distribute the Software so modified to all or
any of COVIDIEN's customers. All such error corrections, bug fixes, patches, updates or
other modifications provided to COVIDIEN shall be the sole property of COVIDIEN.
This Software License is effective until terminated. Customer may terminate this License
at any time by destroying all copies of Software including any documentation. This
License will terminate immediately upon notice from COVIDIEN if Customer fails to
comply with any provision of this License or any supplier agreement. COVIDIEN may
terminate the Software licenses granted herein and exercise all available rights by giving
written notice, effective immediately, if within ten (10) business days of Customer’s
receipt of a reasonably detailed written request to cure, Customer has not cured all
breaches of this License’s limitations or restrictions. Upon such termination, Customer will
immediately pay all undisputed fees outstanding, cease use of all Software, return or
delete, at COVIDIEN’s request, all copies of the Software in Customer’s possession, and
certify compliance with all of the obligations herein to COVIDIEN in writing.
Limited Warranty: COVIDIEN represents and warrants to Customer that the Software
will perform substantially as described in COVIDIEN's then current documentation for
such Software for the longer of (a) the remaining warranty applicable to the product with
which such Software was delivered (not to exceed one year) or (b) ninety (90) days from
the date such Software was shipped or first made available to Customer for electronic
download from COVIDIEN’s service site. If you notify COVIDIEN of defects during the
warranty period, COVIDIEN will replace the Software or, at its option, refund the
purchase price. Your remedy for breach of this limited warranty shall be limited to
replacement or refund and shall not encompass any other damages. No dealer,
distributor, agent or employee of COVIDIEN is authorized to make any modification or
addition to the warranty and remedies stated above.
Notwithstanding these warranty provisions, all of COVIDIEN's obligations with respect to
such warranties shall be contingent on Customer’s use of the Software in accordance
with this Agreement and in accordance with COVIDIEN's instructions as provided by
COVIDIEN in the documentation, as such instructions may be amended, supplemented,
or modified by COVIDIEN from time to time. COVIDIEN shall have no warranty
obligations with respect to any failures of the Software which are the result of accident,
abuse, misapplication, extreme power surge or extreme electromagnetic field.
This warranty does not apply to any damages, malfunctions, or non-conformities caused
to or by: (i) Customer’s use of Software in violation of the license granted under the
Agreement or in a manner inconsistent with any provided documentation; (ii) use of nonCOVIDIEN furnished equipment, software, or facilities with its equipment or Products; (iii)
Customer’s failure to follow COVIDIEN’s installation, operation, repair or maintenance
instructions; (iv) Customer’s failure to permit COVIDIEN timely access, remote or
Valleylab LS10, LS Series Single Channel Vessel Sealing Generator Service Manual v
Page 8

otherwise, to Products; (v) failure to implement all new Updates to Software provided
under the Agreement; (vi) Products or equipment with their original manufacturer’s serial
numbers altered, defaced or deleted; (vii) Products or equipment that have been altered,
serviced or modified by a party other than COVIDIEN; or (viii) Software that has been
subjected to abnormal physical or electrical stress, misuse, negligence or accident by
Customer or a third party.
DISCLAIMER: EXCEPT AS SPECIFIED IN THIS WARRANTY, ALL EXPRESS OR IMPLIED
CONDITIONS, REPRESENTATIONS, AND WARRANTIES INCLUDING, WITHOUT
LIMITATION, ANY IMPLIED WARRANTY OF MERCHANTABILITY, FITNESS FOR A
PARTICULAR PURPOSE, OR ARISING FROM A COURSE OF DEALING, USAGE, OR TRADE
PRACTICE, ARE HEREBY EXCLUDED TO THE EXTENT ALLOWED BY APPLICABLE LAW.
IN NO EVENT WILL EITHER PARTY BE LIABLE FOR ANY LOST REVENUE, PROFIT, OR DATA,
OR FOR SPECIAL, INDIRECT, CONSEQUENTIAL, INCIDENTAL, OR PUNITIVE DAMAGES
HOWEVER CAUSED AND REGARDLESS OF THE THEORY OF LIABILITY ARISING OUT OF
THIS SOFTWARE LICENSE EVEN IF SUCH PARTY HAS BEEN ADVISED OF THE POSSIBILITY
OF SUCH DAMAGES. IN NO EVENT SHALL ONE PARTY’S LIABILITY TO THE OTHER PARTY,
WHETHER IN CONTRACT, TORT (INCLUDING NEGLIGENCE), OR OTHERWISE, EXCEED
THE PRICE PAID OR TO HAVE BEEN PAID BY CUSTOMER. THE FOREGOING LIMITATIONS
SHALL APPLY EVEN IF THE ABOVE-STATED WARRANTY FAILS OF ITS ESSENTIAL PURPOSE.
SOME STATES DO NOT ALLOW LIMITATION OR EXCLUSION OF LIABILITY FOR
CONSEQUENTIAL OR INCIDENTAL DAMAGES.
U.S. Government Rights. The Software is a “commercial item” developed exclusively at
private expense, consisting of “commercial computer software” and “commercial
computer software documentation” as such terms are defined or used in the applicable
U.S. acquisition regulations. The Software is licensed hereunder (i) only as a commercial
item and (ii) with only those rights as are granted to all other customers pursuant to the
terms and conditions of this License. Customer shall not use, duplicate, or disclose the
Software in any way not specifically permitted by this License. Nothing in this License
requires COVIDIEN to produce or furnish technical data for or to Customer.
If any provision of this Agreement shall be held by a court of competent jurisdiction to be
illegal, invalid or unenforceable, the remaining provisions shall remain in full force and
effect.
This License Agreement contains the entire understanding and agreement between the
parties respecting the Software. This Agreement may not be supplemented, modified,
amended, released or discharged except by an instrument in writing signed by each
party's duly authorized representative. All captions and headings in this Agreement are
for purposes of convenience only and shall not affect the construction or interpretation
of any of its provisions. Any waiver by either party of any default or breach hereunder
shall not constitute a waiver of any provision of this Agreement or of any subsequent
default or breach of the same or a different kind.
The construction and performance of this Agreement will be governed by the laws of the
State of Colorado without reference to its choice of law principles. The parties hereby
submit to the jurisdiction of the courts of the State of Colorado.
vi Valleylab LS10, LS Series Single Channel Vessel Sealing Generator Service Manual
Page 9

Table of Contents
LS Series Single Channel Vessel Sealing Generator . . . . . . . . . . . . i
For use with software version 1.1x . . . . . . . . . . . . . . . . . . . . . . . . . i
Preface . . . . . . . . . . . . . . . . . . . . . . . . . . . . . . . . . . . . . . . . . . . . . . . ii
Conventions Used in this Guide . . . . . . . . . . . . . . . . . . . . . . . . . . . ii
Limited Warranty . . . . . . . . . . . . . . . . . . . . . . . . . . . . . . . . . . . . . . iii
Software License . . . . . . . . . . . . . . . . . . . . . . . . . . . . . . . . . . . . . . iv
Chapter 1. Introduction
Overview and General Features . . . . . . . . . . . . . . . . . . . . . . . . . 1-2
Indications for Use . . . . . . . . . . . . . . . . . . . . . . . . . . . . . . . . . . . . 1-2
Generator Front Panel . . . . . . . . . . . . . . . . . . . . . . . . . . . . . . . . . 1-3
Generator Back Panel . . . . . . . . . . . . . . . . . . . . . . . . . . . . . . . . . 1-4
LigaSure Mode. . . . . . . . . . . . . . . . . . . . . . . . . . . . . . . . . . . . 1-5
LigaSure Instruments. . . . . . . . . . . . . . . . . . . . . . . . . . . . . . . 1-5
Chapter 2. Technical Specifications
Performance Characteristics . . . . . . . . . . . . . . . . . . . . . . . . . . . . 2-2
General. . . . . . . . . . . . . . . . . . . . . . . . . . . . . . . . . . . . . . . . . . 2-2
Dimensions and Weight . . . . . . . . . . . . . . . . . . . . . . . . . . . . 2-2
Operating Parameters . . . . . . . . . . . . . . . . . . . . . . . . . . . . . . 2-3
Transport and Storage . . . . . . . . . . . . . . . . . . . . . . . . . . . . . 2-3
Duty Cycle . . . . . . . . . . . . . . . . . . . . . . . . . . . . . . . . . . . . . . . 2-3
Internal Battery . . . . . . . . . . . . . . . . . . . . . . . . . . . . . . . . . . . 2-3
Audio Volume . . . . . . . . . . . . . . . . . . . . . . . . . . . . . . . . . . . . 2-4
Activation Tone . . . . . . . . . . . . . . . . . . . . . . . . . . . . . . . . . . . 2-4
Alert Tone . . . . . . . . . . . . . . . . . . . . . . . . . . . . . . . . . . . . . . . 2-4
USB Port . . . . . . . . . . . . . . . . . . . . . . . . . . . . . . . . . . . . . . . . . 2-5
Potential Equalization Conductor . . . . . . . . . . . . . . . . . . . . 2-5
Low-Frequency (50/60 Hz) Leakage Current
(IEC 60601-2-2) . . . . . . . . . . . . . . . . . . . . . . . . . . . . . . . . . . . . 2-5
High-Frequency (RF) Leakage Current . . . . . . . . . . . . . . . . . 2-6
Input Power . . . . . . . . . . . . . . . . . . . . . . . . . . . . . . . . . . . . . . 2-6
Power Cord Specification . . . . . . . . . . . . . . . . . . . . . . . . . . . 2-6
Input Frequency. . . . . . . . . . . . . . . . . . . . . . . . . . . . . . . . . . . 2-7
Input Current . . . . . . . . . . . . . . . . . . . . . . . . . . . . . . . . . . . . . 2-7
Backup Power . . . . . . . . . . . . . . . . . . . . . . . . . . . . . . . . . . . . 2-7
ECG Blanking . . . . . . . . . . . . . . . . . . . . . . . . . . . . . . . . . . . . . 2-7
Standards and IEC Classifications . . . . . . . . . . . . . . . . . . . . . . . . 2-8
Symbols. . . . . . . . . . . . . . . . . . . . . . . . . . . . . . . . . . . . . . . . . . . . . 2-9
Valleylab LS10, LS Series Single Channel Vessel Sealing Generator Service Manual vii
Page 10

Class I Equipment (IEC 60601-1) . . . . . . . . . . . . . . . . . . . . . . . . 2-11
Type CF Equipment (IEC 60601-1)/Defibrillator Proof . . . . . . . 2-11
Liquid Spillage (IEC 60601-2-2:2006 Clause 44.3
and IEC 60601-2-2:2009 Clause 201.11.6.3). . . . . . . . . . . . . . . . 2-11
Voltage Transients (Emergency System Mains Transfer) . . . . . 2-11
Electromagnetic Compatibility (IEC 60601-1-2
and IEC 60601-2-2) . . . . . . . . . . . . . . . . . . . . . . . . . . . . . . . . . . . 2-11
Accessories . . . . . . . . . . . . . . . . . . . . . . . . . . . . . . . . . . . . . . . . . 2-18
Output Characteristics . . . . . . . . . . . . . . . . . . . . . . . . . . . . . . . . 2-18
Maximum Output for LigaSure Mode . . . . . . . . . . . . . . . . 2-18
Radio Frequency Identification (RFID) Module Specifications 2-19
Output Power Versus Resistance Graphs . . . . . . . . . . . . . . . . . 2-20
Chapter 3. Setup, Tests, and Adjustments
First-Time Setup . . . . . . . . . . . . . . . . . . . . . . . . . . . . . . . . . . . . . . 3-2
Setting Up the Valleylab Single Channel
Vessel Sealing Generator. . . . . . . . . . . . . . . . . . . . . . . . . . . . . . . 3-2
Valleylab Generator Service Mode . . . . . . . . . . . . . . . . . . . . . . . 3-3
Periodic Safety Check (Routine Maintenance) . . . . . . . . . . . . . . 3-4
Recommended Test Equipment . . . . . . . . . . . . . . . . . . . . . . 3-5
Inspecting the System and Accessories. . . . . . . . . . . . . . . . . 3-6
Inspecting the Internal Components . . . . . . . . . . . . . . . . . . 3-7
Testing the System. . . . . . . . . . . . . . . . . . . . . . . . . . . . . . . . . 3-7
Safety Testing in Accordance with IEC601-1 . . . . . . . . . . . . . . 3-11
Docking to Valleylab Exchange . . . . . . . . . . . . . . . . . . . . . 3-13
Preventive Maintenance Check Sheet. . . . . . . . . . . . . . . . . . . . 3-14
High-Frequency Leakage . . . . . . . . . . . . . . . . . . . . . . . . . . . . . . 3-15
Optional Service Applications . . . . . . . . . . . . . . . . . . . . . . . . . . 3-16
Power Curve Check . . . . . . . . . . . . . . . . . . . . . . . . . . . . . . . 3-16
Sensor Calibration . . . . . . . . . . . . . . . . . . . . . . . . . . . . . . . . 3-18
Instrument Information . . . . . . . . . . . . . . . . . . . . . . . . . . . 3-19
Check System Voltages . . . . . . . . . . . . . . . . . . . . . . . . . . . . 3-19
Configuration Information . . . . . . . . . . . . . . . . . . . . . . . . . 3-20
Retrieving Logs . . . . . . . . . . . . . . . . . . . . . . . . . . . . . . . . . . 3-20
Chapter 4. Principles of Operation
Block Diagram . . . . . . . . . . . . . . . . . . . . . . . . . . . . . . . . . . . . . . . 4-2
Functional Overview . . . . . . . . . . . . . . . . . . . . . . . . . . . . . . . . . . 4-3
Chapter 5. Troubleshooting
General Troubleshooting Guidelines . . . . . . . . . . . . . . . . . . . . . 5-2
Correcting Malfunctions . . . . . . . . . . . . . . . . . . . . . . . . . . . . . . . 5-4
viii Valleylab LS10, LS Series Single Channel Vessel Sealing Generator Service Manual
Page 11

Error and Event Code Strings . . . . . . . . . . . . . . . . . . . . . . . . . . . 5-8
Error List . . . . . . . . . . . . . . . . . . . . . . . . . . . . . . . . . . . . . . . . . 5-8
Events List. . . . . . . . . . . . . . . . . . . . . . . . . . . . . . . . . . . . . . . 5-12
Chapter 6. Replacement Procedures
Replacement Procedures . . . . . . . . . . . . . . . . . . . . . . . . . . . . . . . 6-2
Replacement Parts . . . . . . . . . . . . . . . . . . . . . . . . . . . . . . . . . 6-2
Removing the Front Panel . . . . . . . . . . . . . . . . . . . . . . . . . . 6-3
Reinstalling the Front Panel . . . . . . . . . . . . . . . . . . . . . . . . . 6-4
PCBA Display Replacement . . . . . . . . . . . . . . . . . . . . . . . . . . 6-4
ASSY RFID/Barcode Module Replacement . . . . . . . . . . . . . . 6-4
ASSY Receptacle LigaSure Replacement . . . . . . . . . . . . . . . 6-5
ASSY Cable to Power Supply to Main PCBA Replacement . 6-5
Control Cable Main PCBA to Power Supply Replacement . 6-5
Fuse 250 VAC 8A RoHS Replacement . . . . . . . . . . . . . . . . . . 6-6
Battery - Lithium COIN 3V 16 mm Replacement . . . . . . . . . 6-6
Rubber Foot for Chassis Replacement . . . . . . . . . . . . . . . . . 6-7
USB Cover Replacement . . . . . . . . . . . . . . . . . . . . . . . . . . . . 6-7
Power Cord Replacement . . . . . . . . . . . . . . . . . . . . . . . . . . . 6-7
Power Entry with Cable Replacement . . . . . . . . . . . . . . . . . 6-7
Power Supply Replacement . . . . . . . . . . . . . . . . . . . . . . . . . 6-8
Volume Control Cable Replacement . . . . . . . . . . . . . . . . . . 6-8
Footswitch Cable Replacement. . . . . . . . . . . . . . . . . . . . . . . 6-9
PCBA PROG MAIN Replacement . . . . . . . . . . . . . . . . . . . . . . 6-9
Fan with Cable Replacement . . . . . . . . . . . . . . . . . . . . . . . 6-10
Speaker Replacement . . . . . . . . . . . . . . . . . . . . . . . . . . . . . 6-10
Display Board Cable Replacement . . . . . . . . . . . . . . . . . . . 6-11
Assembly Back Panel Replacement. . . . . . . . . . . . . . . . . . . 6-12
Chapter 7. Maintenance and Repair
Responsibility of the Manufacturer . . . . . . . . . . . . . . . . . . . . . . 7-2
Routine Maintenance and Periodic Safety Checks. . . . . . . . . . . 7-2
Cleaning . . . . . . . . . . . . . . . . . . . . . . . . . . . . . . . . . . . . . . . . . . . . 7-3
Product Service. . . . . . . . . . . . . . . . . . . . . . . . . . . . . . . . . . . . . . . 7-3
Returning the System for Service . . . . . . . . . . . . . . . . . . . . . 7-3
Adjustment to Factory Specification (Calibration). . . . . . . . . . . 7-4
Software Updates. . . . . . . . . . . . . . . . . . . . . . . . . . . . . . . . . . . . . 7-4
Covidien Technical Service. . . . . . . . . . . . . . . . . . . . . . . . . . . . . . 7-4
Chapter 8. Service Parts
Ordering Replacement Parts . . . . . . . . . . . . . . . . . . . . . . . . . . . . 8-2
Valleylab LS10, LS Series Single Channel Vessel Sealing Generator Service Manual ix
Page 12

Replacement Components. . . . . . . . . . . . . . . . . . . . . . . . . . . . . . 8-2
Replacing Cable Assemblies . . . . . . . . . . . . . . . . . . . . . . . . . 8-3
x Valleylab LS10, LS Series Single Channel Vessel Sealing Generator Service Manual
Page 13

Chapter 1
Introduction
This chapter provide an overview of the features and functions of the Valleylab LS10, LS
Series Single Channel Vessel Sealing Generator.
Precaution
Read all warnings, precautions, and instructions provided with this system before use.
Read the instructions, warnings, and precautions provided with electrosurgical instruments before
use. Specific instructions for electrosurgical instruments are not included in this manual.
Valleylab LS10, LS Series Single Channel Vessel Sealing Generator Service Manual 1-1
Page 14

Overview and General Features
The generator is designed to provide a vessel sealing application. It features a simple
interface and automatically detects LigaSure instruments and configures the generator
accordingly. Safety and diagnostic functionality include automatic fail-safe functions.
The generator is a bipolar electrosurgical generator with no neutral electrode needed and
works with LigaSure instruments as a system. Covidien offers a selection of LigaSure
instruments that are fully compatible with this generator. The generator supports only
compatible Covidien LigaSure instruments.
1-2 Valleylab LS10, LS Series Single Channel Vessel Sealing Generator Service Manual
Page 15

Indications for Use
The Valleylab LS10 is an electrosurgical generator containing LigaSure vessel sealing
technology. The vessel sealing function is indicated for use in sealing (fusing) vessels up
to, and including, 7 mm in diameter, tissue bundles, and lymphatics during general
surgery including, but not limited to, surgical specialties such as urologic, vascular, and
colorectal etc.
Refer to each instrument’s instructions for use (IFU) for additional indications, warnings,
and specific contraindications.
The LigaSure system has not been shown to be effective for tubal sterilization or tubal
coagulation for sterilization procedures. Do not use this function for these procedures.
Indications for Use
Introduction
Valleylab LS10, LS Series Single Channel Vessel Sealing Generator Service Manual 1-3
Page 16

Indications for Use
Generator Front Panel
2
1
3
4
LigaSure
5
Power button – Power on: Push and release.
Power off: Push and hold for 3 seconds.
System error indicator - Lights up as shown upon a system error in the
generator. Restart the generator. If the error occurs again, contact local technical
service or Covidien Technical Service.
System error indicator -
•White:
•In motion - System is performing a self test.
•Constant - Ready for use, insert LigaSure instrument.
•Flashing - System in service mode, power cycle system for clinical use.
•Purple - Ready for sealing/seal cycle complete.
•Purple in motion - Sealing in process.
•Amber - Seal cycle incomplete alert. Inspect, regrasp, and reactivate sealing
and complete the seal cycle.
6
Usage limit indicator - When illuminated, indicates the inserted device has
already been used. It has not been recertified by the original manufacturer.
Instruments status or switch stuck indicator -
•Red - Instrument error or hand/footswitch stuck. Instrument may be invalid,
damaged, or incompatible. Check that compatible LigaSure instrument is in
proper working condition and no activation switches are depressed.
Instrument port - Connect LigaSure instruments when the system status indicator
is white.
1-4 Valleylab LS10, LS Series Single Channel Vessel Sealing Generator Service Manual
Page 17

Generator Back Panel
Indications for Use
Introduction
1
9
7
8
23
Volume knob
Footswitch port
Serial label
Potential equalization conductor terminal
AC fuse
AC mains receptacle
ECG blanking connector
USB port
Vent
Warning: Risk of Fire.
Replace Fuse as Marked.
250V, F8.0A (100-240)
4
5
6
Valleylab LS10, LS Series Single Channel Vessel Sealing Generator Service Manual 1-5
Page 18

Indications for Use
LigaSure Mode
The LigaSure vessel sealing mode can be used on arteries, veins, pulmonary vasculature,
and lymphatics up to and including 7 mm in diameter and tissue bundles. This system
provides precise energy delivery and electrode pressure to vessels for a controlled time
period to achieve a complete and permanent fusion of the vessel lumen. The system is
designed to produce minimal sticking, charring, and thermal spread to adjacent tissue.
Warning
Do not attempt to fuse lung tissue with LigaSure mode or instruments without consulting the
respective instructions for use to ensure the use is indicated.
LigaSure Instruments
The LigaSure instruments that complete the Valleylab vessel sealing system include
reusable and single-use instruments for open and minimally-invasive procedures. Refer to
each instrument’s instruction for use (IFU) for additional indications, warnings, and
specific contraindications. The LigaSure function is only available when using Covidien
LigaSure instruments.
The footswitch will be disabled upon insertion for some LigaSure instruments. To
determine which instrument this applies to, conduct the following:
1. Connect a LS0300 (purple) footswitch to the rear panel footswitch connector.
2. Insert a LigaSure instrument into the LigaSure receptacle on the front panel.
3. Attempt to activate the footswitch.
4. If there is an “invalid activation” tone, it may indicate a disabled footswitch for that
particular instrument.
Warning
A failure of the LS10 could result in an unintended increase of output power.
1-6 Valleylab LS10, LS Series Single Channel Vessel Sealing Generator Service Manual
Page 19

Chapter 2
Technical Specifications
All specifications are nominal and subject to change without notice. A specification
referred to as “typical” is within ± 20% of a stated value at room temperature (25° C/77°
F) and a nominal line input voltage.
Precaution
Read all warnings, precautions, and instructions provided with this system before use.
Read the instructions, warnings, and precautions provided with electrosurgical instruments before
use. Specific instructions for electrosurgical instruments are not included in this manual.
Valleylab LS10, LS Series Single Channel Vessel Sealing Generator Service Manual 2-1
Page 20

Performance Characteristics
Performance Characteristics
General
Output configuration Isolated output, bipolar electrosurgical generator
Cooling Natural and forced convection
Display System Status Indicator - circle LED (12 blocks)
shows system status
System Error Indicator - triangle LED with
exclamation mark
Instrument Status Indicator - LED above the LigaSure
receptacle
Usage Limit Indicator - 2 with a line through it
Mounting
A Covidien cart (UC8009) or a stable, flat surface
Dimensions and Weight
Width 300 mm (11.81 inches)
Depth 377 mm (14.84 inches)
Height 105 mm (4.13 inches)
Weight 5 kg (11 lbs)
2-2 Valleylab LS10, LS Series Single Channel Vessel Sealing Generator Service Manual
Page 21

Operating Parameters
Performance Characteristics
Ambient temperature
range
Relative humidity 30% to 75% non-condensing
Atmospheric pressure 700 millibars to 1060 millibars
Warm-up time If transported or stored at temperatures outside the
+10C to +40C (50° F to 104° F)
operating temperature range, allow one hour for the
system to reach room temperature before use.
Transport and Storage
Ambient-temperature
range
Relative humidity 25% to 85% (non-condensing)
Atmospheric pressure 500 millibars to 1060 millibars
Duration of storage If the energy platform is stored for over one year
-30° C to +65° C (-22° F to 149° F)
complete a periodic safety check. Contact Covidien
Service for information.
Technical Specifications
Duty Cycle
Under maximum-output settings and rated-load conditions (30 ohm load) the generator
is suitable for activation times 5 seconds on, 15 seconds off, for one hour. With lesser
settings and loads, you can activate the generator for greater durations without
generating excessive internal temperatures.
Internal Battery
Battery for Real Time
Clock
Valleylab LS10, LS Series Single Channel Vessel Sealing Generator Service Manual 2-3
Battery type – 3 V lithium button cell
Battery life – 5 years
Page 22

Performance Characteristics
Audio Volume
The stated audio levels are at a distance of one meter. Alert tones meet the requirements
of IEC 60601-2-2.
Activation Tone
The audio levels stated below are for activation tones and alert tones at a distance of one
meter.
Volume (adjustable) 45 dBA minimum
Frequency Sealing in process – 440 Hz
Duration Continuous while the system is activated
Alert Tone
Volume
(not adjustable)
Duration
65 dBA minimum
Seal cycle incomplete alert – The LigaSure regrasp alert
is four tones played for 150 ms each with no break between tones. The order and frequency of the tones is
784 Hz, 587 Hz, 784 Hz, 587 Hz
High, low, high, low
Seal cycle complete tone – Two tones played for175 ms
each at 985 Hz with a 175 ms break between the tones
System error tone – Three 200 ms tones separated by
300 ms for each error/system-alert event
2-4 Valleylab LS10, LS Series Single Channel Vessel Sealing Generator Service Manual
Page 23

Performance Characteristics
USB Port
The software provides an asynchronous serial-communications interface for
communicating with an externally-connected device. Equipment connected to the USB
port shall comply with IEC 60950 safety of IT equipment. The USB data port is accessible
behind the USB/ECG Blanking Port cover on the rear panel. This cover is removed using a
tool to access the USB port.
USB B-type connector, configured as a serial/COM port with 115200 bps baud, 8 data
bits, 1 stop bit, no flow control setting in the laptop.
Precaution
USB Port access should only be performed outside the surgical setting with no patient contact.
Replace the port cover before surgical use.
Potential Equalization Conductor
Technical Specifications
A Potential Equalization Conductor providing a direct connection between the Valleylab
Generator and the potential equalization busbar of the electrical installation.
Low-Frequency (50/60 Hz) Leakage Current
(IEC 60601-2-2)
Enclosure source
current, ground open
Source current,
patient leads, all
outputs
Sink current at high
line, all inputs
< 300 μA
Normal polarity, intact ground: < 10 μA
Normal polarity, ground open: < 50 μA
Reverse polarity, ground open: < 50 μA
Mains voltage on applied part: < 50 μA
< 50 μA
Valleylab LS10, LS Series Single Channel Vessel Sealing Generator Service Manual 2-5
Page 24

Performance Characteristics
High-Frequency (RF) Leakage Current
LigaSure leakage Measured with leads
recommended by
Covidien
LigaSure (left
tine)
LigaSure (right
tine)
< 116 mA < 100 mA
< 116 mA < 100 mA
Measured directly at
the system terminals
Input Power
120 Volt 240 Volt
Maximum power at nominal line
voltage:
Idle: 35 VA
Seal: 400 VA
Full regulation range: 90 to 130 Vac Full regulation range: 180 to 240 Vac
Operating Range: 100 to 120 Vac
Mains current maximum:
Idle: 389 mA
Seal: 4.44 A
rms
rms
Maximum power at nominal line
voltage:
Idle: 35 VA
Seal: 400 VA
Operating Range: 210 to 240 Vac
Mains current maximum:
Idle: 194 mA
Seal: 2.22 A
rms
rms
Mains line frequency range (nominal)
50 to 60 Hz
Fuses (2) – 5 mm x 20 mm 8 A, 250 V
fast blow, high breaking capacity
Power plug:
3-prong hospital-grade connector
Mains line frequency range (nominal)
50 to 60 Hz
Fuses (2) – 5 mm x 20 mm 8 A, 250 V
fast blow, High breaking capacity
Power plug:
3-prong locally-approved connector
Power Cord Specification
This system is factory equipped with a 220 VAC hospital-grade NEMA 5-15 power cord.
Should the AC power cord need to be replaced to match another plug configuration, the
replacement plug/cable/receptacle configuration must meet or exceed the following
specifications:
2-6 Valleylab LS10, LS Series Single Channel Vessel Sealing Generator Service Manual
Page 25

Performance Characteristics
100-120 VAC
Cable - SJT16/3, IEC color code, maximum length 15 ft. (5 m)
Plug - minimum 10 A - 125 VAC
Unit receptacle - IEC female, minimum 10 A - 125 VAC
210-240 VAC
Cable - H05VVF3G1.0 VDE, maximum length 15 ft. (5 m)
Plug - minimum 6 A - 250 VAC
Unit receptacle - IEC female, minimum 6 A - 250 VAC
Important
Contact your local Covidien representative for alternative internationally approved power-cord
options.
Technical Specifications
Input Frequency
The system operates within specification at all line-input frequencies between 48 Hz and
62 Hz. The user does not need to reconfigure the system for different line frequencies.
Input Current
The generator draws no more than 8 A at input voltages between 100 V and 240 V.
Backup Power
The generator retains all user-programmed features, calibration, and statistical data when
switched off and unplugged. The energy platform operates within specification when
switched over to a supplied-line power by hospital backup systems.
ECG Blanking
An ECG blanking port is provided to signal other devices that the generator is active. The
receptacle is a 2.5 mm mono jack. It is electrically isolated from the internal ground
referenced electronics with the shell electrically connected to the chassis for ESD
protection. The ECG blanking port is rated: 12 VDC @ 0.2A.
Valleylab LS10, LS Series Single Channel Vessel Sealing Generator Service Manual 2-7
Page 26

Standards and IEC Classifications
Standards and IEC Classifications
The Valleylab LS10 Generator meets all pertinent clauses of IEC 60601-1 second and
60601-2-2 third editions.
F
The system output is floating (isolated) with respect to ground.
DANGER
Explosion risk if used with flammable anesthetics.
To reduce the risk of electric shock, do not remove the cover. Refer
servicing to qualified service personnel.
Unit produces non-ionizing radiation.
Classified with respect to electrical shock, fire, and mechanical hazards only in accordance with UL standard 60601-1; certified to CSA
standard C22.2 No. 601.1.
2-8 Valleylab LS10, LS Series Single Channel Vessel Sealing Generator Service Manual
Page 27

Symbols
Symbols
Catalogue number
Technical Specifications
Consult instructions for use
Manufacturer
Authorized representative in the European community
Date of manufacture
Footswitch
Alternating current
Potential equalization conductor terminal
Valleylab LS10, LS Series Single Channel Vessel Sealing Generator Service Manual 2-9
Page 28
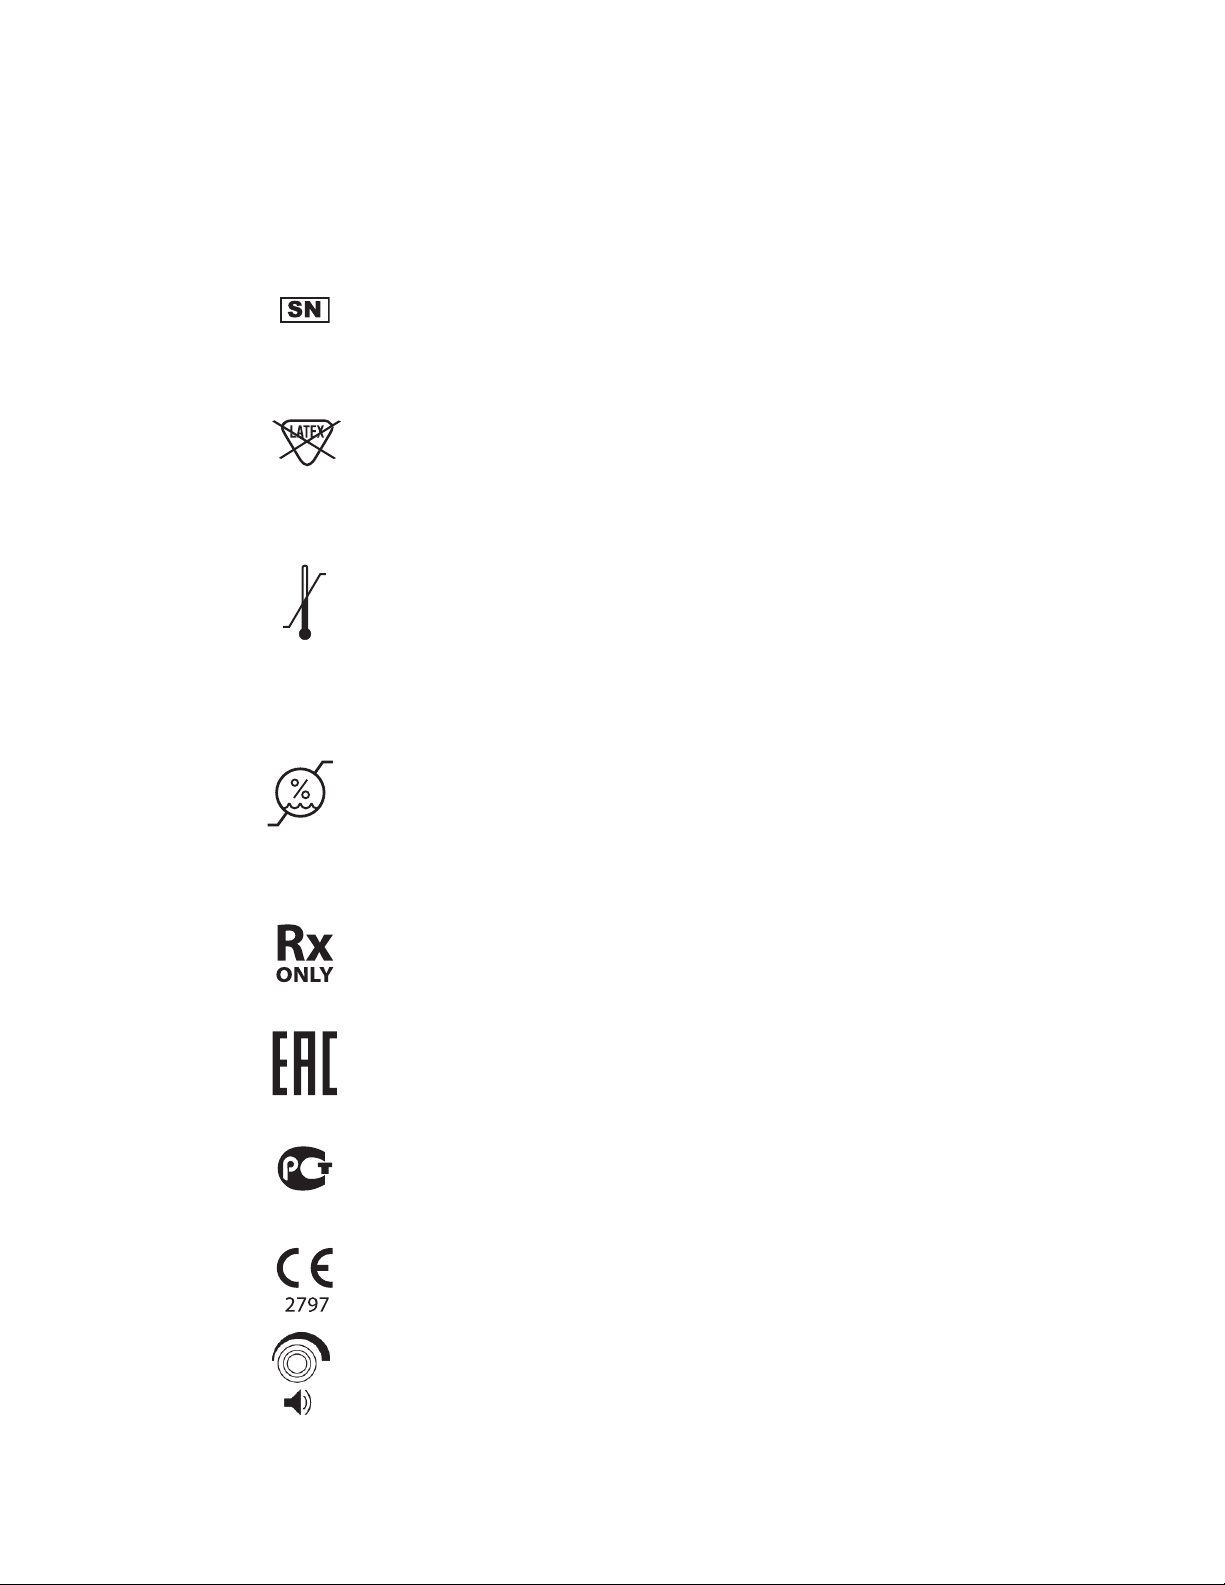
Symbols
-22°F
-30°C
Temperature
limit
149°F
65°C
Serial number
Not made with natural rubber latex
Temperature limitations
25%
Humidity
limitation
ME20
85%
Humidity limitations
For sale by prescription only
Eurasian conformity mark
Russian GOST-R
CE mark and notified body number
Volume adjustment for activation tones
2-10 Valleylab LS10, LS Series Single Channel Vessel Sealing Generator Service Manual
Page 29

Class I Equipment (IEC 60601-1)
Equipment should not be disposed in trash. Dispose of
this product according to local regulation.
Class I Equipment (IEC 60601-1)
Accessible conductive parts cannot become live in the event of a basic insulation failure
due to the way in which they are connected to the protective earth conductor.
Type CF Equipment (IEC 60601-1)/Defibrillator
Proof
This generator provides a high degree of protection against electric shock,
particularly regarding allowable leakage currents. It is type CF isolated (floating)
output and may be used for procedures involving the heart.
This generator complies with IEC 60601-1:1988 + A1:1991 + A2:1995 and IEC 606011:2005 specifications for “defibrillator proof” designation and IEC 60601-2-2:2006 and
IEC 60601-2-2:2009.
Technical Specifications
Liquid Spillage (IEC 60601-2-2:2006 Clause 44.3
and IEC 60601-2-2:2009 Clause 201.11.6.3)
The generator is constructed so that liquid spillage in normal use does not wet electrical
insulation or other components which when wetted are likely to adversely affect the
safety of the equipment.
Voltage Transients (Emergency System Mains
Transfer)
The generator continues to operate normally with no errors or system failures when
transfer is made between line AC and an emergency system-voltage source. (IEC 606011:1988 + A1:1991 + A2:1995 clause 49, IEC 60601-1:2005 clause 11.8, IEC 60601-22:2006 clause 51.101, and IEC 60601-2-2:2009 clause 201.11.8)
Valleylab LS10, LS Series Single Channel Vessel Sealing Generator Service Manual 2-11
Page 30

Electromagnetic Compatibility (IEC 60601-1-2 and IEC 60601-2-2)
Electromagnetic Compatibility (IEC 60601-1-2
and IEC 60601-2-2)
The generator complies with the appropriate IEC 60601-1-2 and 60601-2-2
specifications regarding electromagnetic compatibility.
Notice
The generator requires special precautions regarding EMC and needs to be installed and put into
service according to the EMC information provided in the generator service manual.
Portable and mobile RF communications equipment can affect the generator. Refer to the EMC
information provided in the Valleylab LS10, LS Series Single Channel Vessel Sealing Generator
Service Manual.
The system should not be used adjacent to or stacked with equipment other than specified in the
Valleylab LS10, LS Series Single Channel Vessel Sealing Generator User’s Guide and Service
Manual. If adjacent or stacked use is necessary, the system should be observed to verify normal
operation in the configuration in which it will be used.
The system intentionally applies RF energy for diagnosis or treatment during activation. Observe
other electronic medical equipment in the vicinity during the system activation for any possible
adverse electromagnetic effects. Ensure adequate separation of electronic medical equipment
based on observed reactions.
The use of accessories, other than specified in the Valleylab LS10, LS Series Single Channel Vessel
Sealing Generator User’s Guide and Service Manual, may result in increased emissions or
decreased immunity of the system.
Other surgical equipment that generates RF energy may affect the generator. The generator
should be observed to confirm normal operation when used simultaneously with other
equipment. If an incomplete seal cycle occurs, reactivate the LigaSure instrument.
The generator meets the following requirements:
ESD Immunity (IEC 60601-1-2 sub-clause 36.202 and IEC 61000-4-2)
Radiated Immunity (IEC 60601-1-2 sub-clause 36.202.2 and IEC 61000-4-3)
Electrical Fast Transient/Burst (IEC 60601-1-2 sub-clause 36.202.3.1 and IEC 61000-4-4)
Surge Immunity (IEC 60601-1-2 sub-clause 36.202.3.2 and IEC 61000-4-5)
Emissions (IEC 60601-1-2 sub-clause 36.201.1, IEC 60601-2-2 sub-clause 36 and CISPR
11 Class A)
Harmonic distortion (IEC 60601-1-2 sub-clause 36.201.3.1 and IEC 61000-3-2)
Conducted disturbances (IEC 60601-1-2 sub-clause 36.202.6 and IEC 61000-4-6)
Power frequency magnetic fields (IEC 60601-1-2 sub-clause 36.202.8.1 and IEC 610004-8)
Voltage dips, short interruptions and variations (IEC 60601-1-2 sub-clause 36.202.7 and
IEC 61000-4-11)
This device complies with Part 15 of the FCC Rules. Operation is subject to the following
two conditions:
2-12 Valleylab LS10, LS Series Single Channel Vessel Sealing Generator Service Manual
Page 31

Electromagnetic Compatibility (IEC 60601-1-2 and IEC 60601-2-2)
1. This device may not cause harmful interference.
2. This device must accept any interference received, including interference that may
cause undesired operation.
Attention that changes or modifications not expressly approved by the party responsible
for compliance could void the user’s authority to operate the equipment.
Note: This product has been tested and found to comply with the limits for a Class A
digital device, pursuant to Part 15 of the FCC Rules. These limits are designed to provide
reasonable protection against harmful interference when the equipment is operated in a
commercial environment. This product generates, uses, and can radiate radio frequency
energy and, if not installed and used in accordance with the instructions, may cause
harmful interference to radio communications. However, there is no guarantee that
interference will not occur in a particular installation.
Warning
RFID function may be interfered with by other equipment even if that other equipment complies
with CISPR emission requirements (required by clause 5.2.2.5 b in IEC 60601-1-2:2007.
Technical Specifications
Guidance and manufacturer's declaration - electromagnetic emissions
The Valleylab Generator is intended for use in the electromagnetic environment specified below.
The customer or the user of the system should ensure that it is used in such an environment.
Emissions test Compliance Electromagnetic
environment - guidance
RF emissions
CISPR 11
Group 1 The Valleylab Single Channel
Vessel Sealing Generator must
emit electromagnetic energy
in order to perform its
intended function. Nearby
electronic equipment may be
affected.
The Valleylab Single Channel
Vessel Sealing Generator is a
group 2 equipment. According
to IEC 60601-2-2:2009 clause
202.6.1.1.1 bb) it is tested in
idle mode using CISPR 11
group 1 limits.
Valleylab LS10, LS Series Single Channel Vessel Sealing Generator Service Manual 2-13
Page 32

Electromagnetic Compatibility (IEC 60601-1-2 and IEC 60601-2-2)
RF emissions
CISPR 11
Harmonic emissions
IEC 61000-3-2
Voltage fluctuations/flicker
emissions IEC61000-3-3
Class A The Valleylab Single Channel
Vessel Sealing Generator is
suitable for use in all
Class A
Complies
establishments other than
domestic and those directly
connected to the public lowvoltage power supply network
that supplies buildings used
for domestic purposes.
The essential performance requirement per IEC 60601-1 does not apply to the generator.
Basic Safety is the performance requirement used during immunity testing.
2-14 Valleylab LS10, LS Series Single Channel Vessel Sealing Generator Service Manual
Page 33

Electromagnetic Compatibility (IEC 60601-1-2 and IEC 60601-2-2)
Guidance and manufacturer's declaration - electromagnetic immunity
The generator is intended for use in the electromagnetic environment specified below. The customer
or the user of the system should ensure that it is used in such an environment.
Immunity test IEC 60601 test
level
Electrostatic
discharge (ESD)
IEC 61000-4-2
Electrical fast
transient/burst
IEC 61000-4-4
+/-8 kV contact
+/-15 kV air
+/-2 kV for
power supply
lines
+/-1 kV for
input/output
lines
Surge
IEC 61000-4-5
+/-1 kV
differential
mode
+/-2 kV common
mode
Voltage dips, short
interruptions and
voltage variations
on power supply
input lines
IEC 61000-4-11
<5% U
dip in U
(>95%
T
)
T
for 0,5 cycle
40% U
T
(>60% dip in UT)
for 5 cycles
70% U
T
(>30% dip in UT)
for 25 cycles
<5% U
T
(>95% dip in UT)
for 5 sec
Compliance level Electromagnetic
environment - guidance
+/-8 kV contact
+/-15 kV air
Floors should be wood,
concrete or ceramic tile. If
floors are covered with
synthetic material, the
relative humidity should be at
least 30%.
+/-2 kV for power
supply lines
+/-1 kV for input/
output lines
+/-1 kV differential
mode
+/-2 kV common
mode
<5% U
T
(>95% dip in UT)
for 0,5 cycle
40% U
T
(>60% dip in UT)
for 5 cycles
70% U
T
(>30% dip in UT)
for 25 cycles
<5%U
T
Mains power quality should
be that of a typical
commercial or hospital
environment.
Mains power quality should
be that of a typical
commercial or hospital
environment.
Mains power quality should
be that of a typical
commercial or hospital
environment. If the user of
the generator requires
continued operation during
power mains interruptions, it
is recommended that the
system be powered from an
uninterruptible power supply
or a battery.
(>95% dip in UT)
for 5 sec
Technical Specifications
Power frequency
(50/60 Hz)
magnetic field
IEC 61000-4-8
30 A/m 30 A/m Power frequency magnetic
fields should be at levels
characteristic of a typical
location in a typical
commercial or hospital
environment.
NOTE: UT is the a.c. mains voltage prior to the application of the test level.
Valleylab LS10, LS Series Single Channel Vessel Sealing Generator Service Manual 2-15
Page 34

Electromagnetic Compatibility (IEC 60601-1-2 and IEC 60601-2-2)
Guidance and manufacturer's declaration - electromagnetic immunity
The generator is intended for use in the electromagnetic environment specified below. The
customer or the user of the system should assure that it is used in such an environment.
Immunity
test
Conducted RF
IEC 61000-4-6
Radiated RF
IEC 61000-4-3
IEC 60601 test
level
3 V RMS
150 kHz to
80
MHz
3 V/m
80 MHz to
2.5 GHz
Compliance
level
Electromagnetic environment guidance
Portable and mobile RF communications
equipment should be used no closer to
any part of the generator, including
cables, than the recommended
separation distance calculated from the
equation applicable to the frequency of
the transmitter.
Recommended separation distance
7 V RMS d=1.2 P
7 V/m d=1.2P 80 MHz to 800 MHz
d=P 800 MHz to 2.5 GHz
Where P is the maximum output power
rating of the transmitter in watts (W)
according to the transmitter
manufacturer and d is the recommended
separation distance in meters (m).
Field strengths from fixed RF
transmitters
a
, as determined by an
electromagnetic site survey, should be
less than the compliance level in each
frequency range
b
.
Interference may occur in the vicinity of
equipment marked with the following
symbol:
Continued
2-16 Valleylab LS10, LS Series Single Channel Vessel Sealing Generator Service Manual
Page 35

Electromagnetic Compatibility (IEC 60601-1-2 and IEC 60601-2-2)
NOTE 1 At a 80 MHz and 800 MHz, the higher frequency range applies.
NOTE 2 These guidelines may not apply in all situations. Electromagnetic propagation is
affected by absorption and reflection from structures, objects and people.
a. Field strengths from fixed transmitters, such as base stations for radio (cellular/cordless)
telephones and land mobile radios, amateur radio, AM and FM radio broadcast and TV
broadcast cannot be predicted theoretically with accuracy. To assess the electromagnetic
environment due to fixed RF transmitters, an electromagnetic site survey should be considered.
If the measured field strength in the location in which the generator is used exceeds the
applicable RF compliance level above, the generator should be observed to verify normal
operation. If abnormal performance is observed, additional measures may be necessary, such as
reorienting or relocating the generator.
b. Over the frequency range 150 kHz to 80 MHz, field strengths should be less than 3 V/m.
Recommended separation distances between portable and mobile RF communication
equipment and the generator
Technical Specifications
The generator is intended for use in an electromagnetic environment in which radiated RF
disturbances are controlled. The customer or the user of the system can help prevent
electromagnetic interferences by maintaining a minimum distance between portable and mobile
RF communications equipment (transmitters) and the system as recommended below, according
to the maximum output power of the communications equipment.
Rated maximum
output power of
transmitter (W)
0.01 0.05 0.05 0.1
0.1 0.16 0.16 0.32
1 0.5 0.5 1
10 1.6 1.6 3.2
100 5 5 10
For transmitters rated at a maximum output power not listed above, the recommended
separation distance d in meters (m) can be estimated using the equation applicable to the
frequency of the transmitter, where P is the maximum output power rating of the transmitter in
watts (W) according to the transmitter manufacturer.
Separation distance according to frequency of transmitter (m)
150 kHz to 80 MHz
d=0.5 x P
80 MHz to 800 MHz
d=0.5 x P
800 MHz to 2.5 GHz
d=P
NOTE 1 At 80 MHz and 800 MHz, the separation distance for the higher frequency range
applies.
NOTE 2 These guidelines may not apply in all situations. Electromagnetic propagation is
affected by absorption and reflection from structures, objects and people.
Valleylab LS10, LS Series Single Channel Vessel Sealing Generator Service Manual 2-17
Page 36

Accessories
Accessories
The following accessories are for use with the Valleylab LS10 Generator.
Footswitches
Ligasure single pedal footswitch, LS0300 (purple)
Power Cord Length
AC Cable 100–120 VAC, type SJT16/3 15 ft. or less
AC Cable 220–240 VAC, type H05WVVF3G1.0 VD 15 ft. or less
Equipotential Cord Length
Equipotential Ground Cable, unshielded 15 ft. or less
Serial Port Cord Length
USB A to B Cable 6.6 ft. or less
Output Characteristics
Maximum Output for LigaSure Mode
The accuracy of the measured RF power shall be within 20% of the actual real output
power at the rated load or 12 W, whichever is greater for the range of 10 W to rated
power.
Precaution
To avoid injury to the patient or surgical team, use only instruments rated for use at, or greater than,
the maximum peak voltages listed below. For example, bipolar instruments must have voltage
ratings of 250 V peak or greater, as shown in the “Open Circuit Peak Voltage (max)” column.
Mode Open
Circuit Peak
Voltage
(max)
LigaSure 250 V 500 V 30 Ω 270 W 5.5 A 400 khz
Open
Circuit P–P
Voltage
(max)
Rated
Load
(max)
Power
(max)
Short
Circuit
RMS
Current
(max)
Output
Frequency
2-18 Valleylab LS10, LS Series Single Channel Vessel Sealing Generator Service Manual
Page 37

Radio Frequency Identification (RFID) Module Specifications
Radio Frequency Identification (RFID) Module
Specifications
The RFID module is located above the LigaSure port. The intended use of the RFID
module is to identify the inserted LigaSure instrument and configure the generator with
the data included in the RFID tag.
Contains Transmitter Module FCC ID: 2AAVI-JDK1901
Contains IC ID: 11355A-JDK1901
Radio Type RFID
RF Output Power 68.17 dBuV/m @ 3 meter
Operating Frequency 13.65 MHz
Technical Specifications
Modulation Amplitude Shift Keying (ASK)
Antenna Type PCB Inductive Loop
Antenna Gain 0 dBI
Mode of Operation (Simplex/
Duplex)
Duplex
Valleylab LS10, LS Series Single Channel Vessel Sealing Generator Service Manual 2-19
Page 38

Output Power Versus Resistance Graphs
Output Power Versus Resistance Graphs
Output power versus impedance for LigaSure power
Output power (watts)
Load resistance (ohms)
Power Curve Limits [W]
Load (ohms) nominal high low
5 106.6 137.5 81.7
10 185.6 227.9 142.2
20 250.5 301.0 197.7
30 261.8 314.2 209.2
50 245.3 294.9 187.6
200 88.7 111.8 66.1
500 38.0 49.0 28.2
1000 19.5 25.3 14.5
2-20 Valleylab LS10, LS Series Single Channel Vessel Sealing Generator Service Manual
Page 39

Output Power Versus Resistance Graphs
Power Curve Limits [A]
Load (ohms) nominal high low
5 4.617 5.243 4.041
10 4.308 4.773 3.770
20 3.539 3.880 3.144
30 2.954 3.236 2.641
50 2.215 2.429 1.937
200 0.666 0.748 0.575
500 0.276 0.313 0.237
1000 0.140 0.159 0.120
Technical Specifications
Nominal power curve for an output power of 270 W at rated load with current/voltage
limits per the power curve table.
Power curve represents the operational envelope, which varies.
Valleylab LS10, LS Series Single Channel Vessel Sealing Generator Service Manual 2-21
Page 40

Page 41

Chapter 3
Setup, Tests, and Adjustments
This chapter describes how to set up, test, and calibrate the Valleylab LS10 Generator.
After unpacking or servicing the system, set up the system, perform any required
calibration, and verify correct functionality.
This chapter contains tests that are specific for field testing. There are some tests which
are performed in the manufacturing environment that are not field requirements. Those
tests are not described in this manual.
Valleylab LS10, LS Series Single Channel Vessel Sealing Generator Service Manual 3-1
Page 42

First-Time Setup
First-Time Setup
The generator must be set up using the Valleylab Exchange Remote Software System. For
instructions, refer to the First-time Setup Guide or the Valleylab Exchange Remote
Software System User’s Guide. The First-time Setup Guide and Valleylab Exchange
Remote Software System User’s Guide are available online at www.covidien.com/
valleylabexchange.
Setting Up the Valleylab Single Channel
Vessel Sealing Generator
Warning
Electric Shock Hazard Connect the system’s power cord to a properly grounded receptacle. Do
not use power-plug adapters.
Fire Hazard Do not use extension cords.
Precaution
Do not stack equipment on top of the system or place the system on top of electrical equipment.
These configurations are unstable and/or do not allow for adequate cooling.
Provide as much distance as possible between the electrosurgical system and other electronic
equipment (such as monitors). An activated electrosurgical system may cause interference with
them.
Notice
If required by local codes, connect the system to the hospital equalization connector with an
equipotential cable.
Connect the power cord to a wall outlet having the correct voltage. Otherwise product damage
may result.
1. Place the system on a stable flat surface, such as a table, platform, or Covidien cart.
For details, refer to the procedures for your institution or to local codes.
Provide at least four to six inches of space from the sides and top of the system for
cooling. Normally, the top, sides, and rear panel are warm when the system is used
continuously for extended periods of time.
2. According to the procedures used by your institution, connect an equipotential
grounding cable to the grounding lug on the rear panel of the system. Then, connect
the cable to earth ground.
3. Plug the system power cord into the rear panel receptacle.
4. Plug the system power cord into a grounded receptacle.
3-2 Valleylab LS10, LS Series Single Channel Vessel Sealing Generator Service Manual
Page 43

Valleylab Generator Service Mode
5. Turn on the system by pressing the power switch on (|). Verify the following:
– The System Status Indicator located in the center of the front panel illuminates
white, segment by segment, indicating activity.
– A tone sounds upon completion of self-test.
6. If the self-test is successful, a tone sounds. Verify the following:
– The System Status Indicator located in the center of the front panel illuminates
white.
or
If the self-test is not successful, an alert tone sounds and a red System Error
Indicator appears on the left side of the front panel. Refer to Chapter 5,
Troubleshooting.
Valleylab Generator Service Mode
The service mode provides output checks, log retrieval, configuration data, and
calibration data.
Calibration is not part of preventive maintenance. Calibration is required when
components are replaced. Refer to Chapter 6, Replacement Procedures to determine the
level of required calibration.
Notice
Measurements and calibration must be performed on a non-conductive surface. Do not use
antistatic bench top mats. When performed on a conductive surface, calibration values may not
be accurate.
After completing any calibration section, reboot the system to save the values from that
calibration section.
Setup, Tests, and Adjustments
Valleylab LS10, LS Series Single Channel Vessel Sealing Generator Service Manual 3-3
Page 44

Periodic Safety Check (Routine Maintenance)
Periodic Safety Check (Routine Maintenance)
Perform the following safety check once a year to verify that the system is functioning
properly. Record the test results for reference in future tests. Copy the check sheet at the
end of this chapter for use in recording the results. Keep the completed check sheet for
future reference. If the system fails to meet any of the checks, refer to Chapter 5,
Troubleshooting.
Warning
Electric Shock Hazard When taking measurements or troubleshooting the system, take
appropriate precautions, such as using isolated tools and equipment, using the “one hand rule”,
etc.
Electric Shock Hazard Do not touch any exposed wiring or conductive surfaces while the
system is disassembled and energized. Never wear a grounding strap when working on an
energized system.
Precaution
The system contains electrostatic-sensitive components. When repairing the system, work at a
static-control workstation. Wear a grounding strap when handling electrostatic-sensitive
components, except when working on an energized system. Handle PCBAs by their nonconductive edges. Use an antistatic container for transport of electrostatic-sensitive components
and PCBAs.
Important
When testing RF equipment, follow these test procedures to duplicate manufacturer test data.
Keep test leads to the minimum length usable; lead inductance and stray capacitance can
adversely affect readings. Carefully select suitable ground points to avoid ground loop error in
measurements.
The accuracy of most RF instruments is approximately 1%–5% of full scale. Using
uncompensated scope probes causes large errors when measuring high-voltage RF waveforms.
Full definitions of the periodic safety checks are found throughout this section of the
manual. A summary of the periodic safety checks is:
• Inspect the system and accessories
• Inspect the internal components
• Test the system
• Confirm outputs
• Check leakage current and ground resistance
3-4 Valleylab LS10, LS Series Single Channel Vessel Sealing Generator Service Manual
Page 45

Periodic Safety Check (Routine Maintenance)
Recommended Test Equipment
• 100x isolated oscilloscope voltage probe (optional)
• 50 Ω, 250 W, 1% tolerance, non-inductive resistive loads
• Oscilloscope
• 200 Ω Resistor
• Current transformer - Volt per Amp equal to 0.10 with 10 MHz Bandwidth
• Covidien footswitch pedal (LigaSure)
• Low-frequency test circuit
• Modified LigaSure cable (The LigaSure test cable consists of 2 male 4 mm banana
plugs connected to a full-length LigaSure cable. The cable requires no specific polarity
connection during use and the banana plugs may be of any color.)
• 2 - 150 mm (6 inch) test cable, banana plug
• Functional LigaSure handswitching equipment
• True RMS voltmeter
True RMS Voltmeter Specifications
Requirement Specification
Voltage (RMS) 2.0 to 700.0 mV(rms) (Resolution 0.1
mV(rms))
Voltage (Peak) 1000.0 mV (Resolution 0.1 mV)
Frequency 10 KH to 10 MHz
Accuracy 1% Reading
Max Input Voltage 3.3 Vp-p
Current (with 0.1:1 CT) 7000 mA(rms) (Resolution 1 mA)
Current (with 1:1 CT) 700.0 mA(rms) (Resolution 0.1 mA)
Crest Factor 1.4 to 500 (Resolution 0.1)
Setup, Tests, and Adjustments
Input Impedance 50
Ω
Valleylab LS10, LS Series Single Channel Vessel Sealing Generator Service Manual 3-5
Page 46

Periodic Safety Check (Routine Maintenance)
Inspecting the System and Accessories
Equipment required:
• LigaSure instrument or test leads
Turn off the system, and disconnect the power cord from the wall receptacle.
Rear Panel
1. Check the rear-panel footswitch receptacle for obstructions or damage. Check for a
secure fit by inserting the LigaSure LS0300 footswitch (purple) connector into the
appropriate receptacle.
2. Remove the fuse and verify correct voltage and current rating. Refer to Input Power
on page 2-6.
3. If any footswitch connector is damaged or unusable, return the system to Covidien
Technical Service. For more information, see Covidien Technical Service on page 7-4.
Front Panel
To check the LigaSure receptacle for obstructions or damage, insert a LigaSure instrument
to ensure a secure fit. If the receptacle is damaged, contact Covidien Technical Service
(see page 7-4).
Footswitches
1. Remove the footswitch from the system.
2. Inspect the connector for damage or corrosion.
3. Inspect the footswitch for damage.
4. Reconnect the footswitch to the system.
Power Cord
1. Remove the power cord from the unit and ensure that it is unplugged from the wall
receptacle.
2. Inspect the power cord for damage.
3. Reconnect the power cord to the system and wall receptacle.
3-6 Valleylab LS10, LS Series Single Channel Vessel Sealing Generator Service Manual
Page 47

Periodic Safety Check (Routine Maintenance)
Inspecting the Internal Components
Equipment required:
• Phillips screwdriver
Precaution
The system contains electrostatic-sensitive components. When repairing the system, work at a
static-control workstation. Wear a grounding strap when handling electrostatic-sensitive
components, except when working on an energized system. Handle PCBAs by their nonconductive edges. Use an antistatic container for transport of electrostatic-sensitive components
and PCBAs.
1. Turn off the system and disconnect the power cord from the wall.
2. Remove the seven screws that secure the cover to the chassis. Lift the cover off the
chassis. Set the cover aside for reinstallation.
3. Verify that all connectors are firmly seated.
4. Inspect each PCBA for damaged components, wires, cracks, and corrosion.
5. Replace the cover and secure the cover to the chassis using the seven screws.
Testing the System
Turning on the system initiates an internal self-test to verify the calibration. The self-test
also checks the operation of the speaker, all indicators, and the displays. If the generator
fails any of the following test steps, recalibrate the unit or contact Covidien Technical
Service.
Warning
Use the system only if the self-test has been completed as described. Otherwise, inaccurate power
outputs may result.
1. Turn on the system by pressing the front panel On (|) switch. Verify the following:
– The System Status indicator located in the center of the front panel illuminates
white, segment by segment, indicating activity.
– A tone sounds upon completion of self-test.
2. If the self-test is successful, verify the following:
Setup, Tests, and Adjustments
– The System Status indicator located in the center of the front panel illuminates
white.
or
If the self-test is not successful, an alert tone sounds and a red System Error indicator
appears on the left side of the front panel. Refer to Chapter 5, Troubleshooting.
Valleylab LS10, LS Series Single Channel Vessel Sealing Generator Service Manual 3-7
Page 48

Periodic Safety Check (Routine Maintenance)
3. Insert a handswitching LigaSure instrument to the Front Panel receptacle. Verify the
Instrument Status indicator LED above the receptacle becomes active, indicating the
instrument has been detected.
4. Activate the generator using the handswitch.
5. Adjust the volume control on the rear panel to maximum volume and activate the
generator.
6. If the unit does not activate, contact Covidien Technical Service.
7. Connect a LS0300 footswitch to the connector on the rear panel.
8. Activate the unit by depressing the footswitch.
9. If there is an invalid activation tone, it may indicate a disabled footswitch for that
particular instrument. If the unit fails to activate or there is no audio indication,
contact Covidien Technical Service.
Testing LigaSure Output
Information:
– A computer with USB connections is required to execute the Output Check.
– The Open Circuit Voltage test is performed as an internal check, external input to
the generator is not required. While measuring and recording the maximum
output voltage is not required, it is recommended.
– Please monitor the True RMS meter throughout this test because you will need to
record the measurements from the meter while energy is being delivered.
– The pass/fail criteria, which includes the data sheet for the Output Check can be
found in the service manual section called Preventative Maintenance Check Sheet.
1. Remove the USB port cover from the rear of the generator.
- Press any key to stop activation at any time during this test.
- Press <ESC> to return to the Main menu.
2. Connect the AC cable to the generator and power on the generator.
3. Connect one end of the USB A to B cable to the USB port on the rear panel of the
generator (located behind the removable USB port cover).
4. Connect the other end of the USB A to B cable to a computer.
5. Launch the terminal emulation program on the computer. Configure the terminal
emulation program to: baud rate of 115200 bps, 8 data bits, no parity, 1 stop bit and
no flow control.
6. Hit Enter. This starts Generator Service mode. A list of service options appears on the
screen.
7. From the VLLS10GEN>> prompt, select Test Functions from the four options.
8. From the Test Functions>> prompt, select Check Output from the ten options.
3-8 Valleylab LS10, LS Series Single Channel Vessel Sealing Generator Service Manual
Page 49

Periodic Safety Check (Routine Maintenance)
9. At the Check Output>> prompt, using a modified LigaSure cable, connect a 50 Ω
load and a True RMS Meter/Current transformer to measure output current. Verify
that the measured output is within the limits described in the Preventative
Maintenance Check Sheet.
10. Activate the generator by pressing the Space key.
11. The generator is now delivering RF energy; follow the warnings/precautions at the
start of this section. Record the current being delivered to the load.
12. At the prompt, enter output current recorded in the previous steps in milliamperes
and press Enter. Record the output current in the Preventative Maintenance Check
Sheet provided. Press any key to continue the test.
13. Disconnect the 50 Ω load and connect a 0 Ω (short circuit at the end of the cable) to
the modified LigaSure cable. Connect a 0 Ω load and a True RMS Meter/Current
transformer to measure output current. Verify that the measured output is within the
limits described in the Preventative Maintenance Check Sheet.
14. Activate the generator by pressing Space.
15. The generator is now delivering RF energy; follow the warnings/precautions at the
start of this section. Record the current being delivered to the load.
16. At the prompt, enter output current recorded in the previous steps in milliamperes
and press Enter. Record the output current in the Preventative Maintenance Check
Sheet. Press any key to continue the test.
17. Using the modified LigaSure cable, disconnect the load and perform an open-circuit
test (to perform the optional Peak Voltage measurement, connect the 100x isolated
probe and oscilloscope to the ends of the cable).
18. Activate the generator by pressing Space.
19. The generator is now delivering RF energy; follow the warnings/precautions at the
start of this section. Record the current being delivered to the load.
20. If measured, verify that the output voltage meets the limits in the Preventative
Maintenance Check Sheet.
21. The status of the internal checks performed during this procedure will be displayed on
the terminal: Primary Power Accuracy test, Second Power Accuracy test, Power
Compare test, Primary Current Accuracy test, Secondary Current Accuracy test,
Current Compare test, Current Limit check, Voltage Limit test, Sensor Compare
check, and Dosage check.
22. Verify that the terminal is displaying a pass of the Overall Test results.
23. The output check is complete. Press <ESC> to return to the Main menu.
Setup, Tests, and Adjustments
Valleylab LS10, LS Series Single Channel Vessel Sealing Generator Service Manual 3-9
Page 50

Periodic Safety Check (Routine Maintenance)
High Frequency Leakage
Important:
– A computer with USB connections is required to execute the RF High Frequency
Leakage check.
– Please monitor the True RMS meter throughout this test because you will need to
record the measurements from the meter while the energy was being delivered.
– The pass/fail criteria, which includes the data sheet for the RF Leakage check can
be found in the service manual section called Preventative Maintenance Check
Sheet/High-Frequency Leakage.
1. Remove the USB port cover from the rear of the generator.
2. Connect the AC cable to the generator to power on the generator.
3-10 Valleylab LS10, LS Series Single Channel Vessel Sealing Generator Service Manual
Page 51

Safety Testing in Accordance with IEC601-1
3. Connect one end of the USB A to B cable to the USB port on the rear panel of the
generator (located behind the removable USB port cover).
4. Connect the other end of the USB A to B cable to a computer.
5. Launch the terminal emulation program on the computer. Configure the terminal
emulation program to: baud rate of 115200 bps, 8 data bits, no parity, 1 stop bit and
no flow control.
6. Hit Enter. This starts Generator Service mode.
7. From the VLLS10GEN>> prompt, select Test Functions from the four options.
8. From the Test Functions>> prompt, select Check High Frequency Leakage from the
ten options.
9. From the Check High Frequency Leakage>> prompt, using a modified LigaSure cable,
connect a 200 Ω load and a True RMS Meter/Current transformer from the left tine of
the LigaSure output to the equipotential ground connection on the rear panel.
10. Connect the LS0300 footswitch to the generator.
11. Disconnect the USB A to B cable and press footswitch to activate.
12. Release the footswitch and record the high frequency leakage current in the
Preventative Maintenance Check Sheet. Disconnect the 200 Ω from the left tine and
reconnect to the right tine (see setup diagram above).
13. Activate the generator by pressing the footswitch.
14. Release the footswitch and record the high frequency leakage current in the
Preventative Maintenance Check Sheet.
15. The High Frequency Leakage is complete.
Safety Testing in Accordance with IEC601-1
Equipment required:
• Safety tester
Note: Low-frequency tests are conducted at 10% above line voltage.
Checking Low-Frequency Leakage Current
Check the low-frequency leakage current before returning the to clinical use.
Equipment required:
• DVM
Setup, Tests, and Adjustments
• Leakage current tester
Valleylab LS10, LS Series Single Channel Vessel Sealing Generator Service Manual 3-11
Page 52

Safety Testing in Accordance with IEC601-1
Leakage current test circuit regarding IEC 60601-1
Chassis or Earth Leakage
1. Set the DVM to AC volts (200 mV) and connect the leakage current test circuit.
2. Turn on the system.
3. Measure between the chassis and earth ground.
4. Determine the leakage current using the conventional 1 μA for each 1 mV.
5. Verify under normal conditions (ground closed, normal polarity) the leakage current is
less than 300 μA. If the leakage current is greater than 300 μA, contact Covidien
Technical Service (see page 7-4).
6. Verify single fault conditions (open neutral) the leakage current is less than or equal to
1000 μA. If the leakage current is greater than 1000 μA, contact Covidien Technical
Service (see page 7-4).
Output Receptacle Source Current
1. Set the DVM to AC volts (200 mV) and connect the leakage current test circuit.
2. Turn on the system.
3. Measure between all the output receptacles and earth ground. Record the largest
reading.
4. Determine the leakage current using the conventional 1 μA for each 1 mV.
5. Verify under normal conditions (ground closed, normal polarity) the leakage current is
less than 10 μA. If the leakage current is greater than 10 μA, contact Covidien
Technical Service (see page 7-4).
6. Verify single fault conditions (ground open) the leakage current is less than or equal
to 50 μA. If the leakage current is greater than 50 μA, contact Covidien Technical
Service (see page 7-4).
3-12 Valleylab LS10, LS Series Single Channel Vessel Sealing Generator Service Manual
Page 53

Safety Testing in Accordance with IEC601-1
Output Receptacle Sink Current
1. Set the DVM to AC volts (200 mV) and connect the leakage current test circuit.
2. Turn on the system and connect the end of the leakage current test circuit to mains
voltage through a 120 Ω¾ W resistor.
3. Connect the other side of the IEC leakage load to all of the output receptacles.
4. Determine the leakage current using the conventional 1 μA for each 1 mV.
5. Verify the leakage current is less than or equal to 50 μA. If the leakage current is
greater than 50 μA, contact Covidien Technical Service (see page 7-4).
Ground Bond Testing
1. Connect the system to a ground bond tester.
2. Test between the equipotential ground lug on the rear of the system and the supplied
Covidien power cord, or directly to the middle ground pin of the inlet receptacle.
3. Initiate the test according to IEC standards.
4. Specifications are 0.2 Ω using a Covidien-supplied power cord or 0.1 Ω connected
directly to the middle pin of the inlet receptacle. If the specifications are not met
during the ground bond testing, contact Covidien Technical Service (see page 7-4).
Docking to Valleylab Exchange
The Valleylab Exchange (VLEX) client is used for Remote Device Management on
Covidien’s generators. The Remote Device Management includes the following
functionality:
– Download the latest version of the Valleylab Exchange Client for generators
– Retrieve the logs (pre-update error logs, pre-update event logs, post-update error
logs, post-update event logs)
– Perform software updates on the generator
– Upload the logs collected along with the update results to the Enterprise server
Equipment required:
• USB A to B Cable
Setup, Tests, and Adjustments
• Valleylab Exchange software
1. After completing service or preventive maintenance, the system should be docked to
Valleylab Exchange to log any changes to the system in the master directory.
2. The Valleylab Exchange Remote Software System User’s Guide is available online at
www.covidien.com/valleylabexchange and contains instructions for docking to
Valleylab Exchange. Follow the steps outlined in the guide for loading Valleylab
Exchange software and docking the system to the Valleylab Exchange.
Valleylab LS10, LS Series Single Channel Vessel Sealing Generator Service Manual 3-13
Page 54

Preventive Maintenance Check Sheet
Preventive Maintenance Check Sheet
Unit Serial Number Date of Maintenance
Initial Inspection
Rear panel inspection Accept Y or N
Front panel inspection Accept Y or N
Footswitch inspection Accept Y or N
Power cord inspection Accept Y or N
Internal component inspection Accept Y or N
System Self-Check
System self-check Accept Y or N
Audio
Tone audible at high and low ranges Accept Y or N
Testing LigaSure Output - 50 Ω
0
Ω 4.75A to 5.25A
LigaSure
50 Ω
Open
Circuit
1.937A to 2.429A
250 V peak maximum
3-14 Valleylab LS10, LS Series Single Channel Vessel Sealing Generator Service Manual
Page 55

High-Frequency Leakage
High-Frequency Leakage
Left Tine Right Tine
LigaSure Leakage
LigaSure (measured with
leads recommended by
Covidien)
LigaSure (measured directly
at the system terminals)
<116 mA <116 mA
<100 mA <100 mA
Safety Test in Accordance with IEC601-1
Normal Conditions 0 to 300
Earth Leakage
Patient Leakage
Sink Current
(Mains to Applied Parts)
Ground Bond Test Accept Y, N, or N/A
Open Neutral 0 to 1000 μA
Normal Conditions 0 to 10
Open Ground 0 to 50 μA
Normal Conditions 0 to 50 μA
μA
μA
Setup, Tests, and Adjustments
Valleylab Exchange
Unit Docked to Valleylab Exchange Accept Y, N, or N/A
USB Port Cover reinstalled Y/N
Valleylab LS10, LS Series Single Channel Vessel Sealing Generator Service Manual 3-15
Page 56

Optional Service Applications
Optional Service Applications
Power Curve Check
For data regarding power curve, refer to Output Power Versus Resistance Graphs on page
2-20.
Information:
– A computer with USB connections is required to execute the Power Curve check.
– Please monitor the True RMS meter throughout this test because you will need to
record the measurements from the meter while the energy was being delivered.
– The pass/fail criteria, which includes the data sheet for the Power Curve check can
be found in the Service Manual section called Output Characteristics.
1. Remove the USB port cover on the rear of the generator.
2. Connect the AC cable to the generator and power on the generator.
3. Connect one end of the USB A to B cable to the USB port on the rear panel of the
generator (located behind the removable USB port cover).
4. Connect the other end of the USB A to B cable to a computer.
5. Launch the terminal emulation program on the computer. Configure the terminal
emulation program to: baud rate of 115200 bps, 8 data bits, no parity, 1 stop bit and
no flow control.
6. Hit Enter. This starts Generator Service mode.
7. From the VLLS10GEN>> prompt, select Test Functions from the four options.
8. From the Test Functions>> prompt, select Check Power Curve from the ten options.
9. At the Check Output Curve>> prompt, using a modified LigaSure cable, connect a 5
Ω load and a True RMS Meter/Current transformer to measure output current. Verify
that the measured output is within specification.
10. Activate the generator by pressing the Space key.
11. The generator is now delivering RF energy; follow the warnings/precautions at the
start of this section. Record the current being delivered to the load.
12. At the Check Output Curve>> prompt, using a modified LigaSure cable, connect a 10
Ω load and a True RMS Meter/Current transformer to measure output current. Verify
that the measured output is within specification.
13. Activate the generator by pressing Space.
14. The generator is now delivering RF energy; follow the warnings/precautions at the
start of this section. Record the current being delivered to the load.
15. At the Check Output Curve>> prompt, using a modified LigaSure cable, connect a 20
Ω load and a True RMS Meter/Current transformer to measure output current. Verify
that the measured output.
3-16 Valleylab LS10, LS Series Single Channel Vessel Sealing Generator Service Manual
Page 57

Optional Service Applications
16. Activate the generator by pressing Space.
17. The generator is now delivering RF energy; follow the warnings/precautions at the
start of this section. Record the current being delivered to the load.
18. At the Check Output Curve>> prompt, using a modified LigaSure cable, connect a 30
Ω and a True RMS Meter/Current transformer to verify that the measured output is
within specification.
19. Activate the generator by pressing Space.
20. The generator is now delivering RF energy; follow the warnings/precautions at the
start of this section. Record the current being delivered to the load.
21. At the Check Output Curve>> prompt, using a modified LigaSure cable, connect a 50
Ω and a True RMS Meter/Current transformer to verify that the measured output is
within specification.
22. Activate the generator by pressing Space.
23. The generator is now delivering RF energy; follow the warnings/precautions at the
start of this section. Record the current being delivered to the load.
24. At the Check Output Curve>> prompt, using a modified LigaSure cable, connect a
200 Ω and a True RMS Meter/Current transformer to verify that the measured output
is within specification
25. Activate the generator by pressing Space.
26. The generator is now delivering RF energy; follow the warnings/precautions at the
start of this section. Record the current being delivered to the load.
27. At the Check Output Curve>> prompt, using a modified LigaSure cable, connect a
500 Ω and a True RMS Meter/Current transformer to verify that the measured output
is within specification.
28. Activate the generator by pressing Space.
29. The generator is now delivering RF energy; follow the warnings/precautions at the
start of this section. Record the current being delivered to the load.
30. At the Check Output Curve>> prompt, using a modified LigaSure cable, connect a
1000 Ω and a True RMS Meter/Current transformer to verify that the measured
output is within specification.
31. Activate the generator by pressing Space.
32. The generator is now delivering RF energy; follow the warnings/precautions at the
start of this section. Record the current being delivered to the load.
33. Record the power curve data in the data sheet provided.
34. The Power Curve check is complete.
Setup, Tests, and Adjustments
Valleylab LS10, LS Series Single Channel Vessel Sealing Generator Service Manual 3-17
Page 58

Optional Service Applications
Sensor Calibration
Perform the Sensor Calibration if the generator fails the Output or Power Curve check.
1. Remove the USB port cover on the rear of the generator.
2. Connect the AC cable to the generator and power on the generator.
3. Connect one end of the USB A to B cable to the USB port on the rear panel of the
generator (located behind the removable USB port cover).
4. Connect the other end of the USB A to B cable to a computer.
5. Launch the terminal emulation program on the computer. Configure the terminal
emulation program to: baud rate of 115200 bps, 8 data bits, no parity, 1 stop bit and
no flow control.
6. Hit Enter. This starts Generator Service mode.
7. From the VLLS10GEN>> prompt, select Test Functions from the four options.
8. From the Test Functions>> prompt, select Calibrate Sensors from the ten options.
9. At the Calibrate Sensors>> prompt, using test leads 150 mm (6 inch), connect a 20 Ω
load and a True RMS Meter/Current transformer to measure output current. Press Esc
to return the previous menu or to halt the test.
10. Activate the generator by pressing the Space key.
11. The generator is now delivering RF energy; follow the warnings/precautions at the
start of this section. Record the current being delivered to the load. Press any key to
halt the test or to stop energy delivery.
12. At the prompt, enter the output current recorded in the previous step in milliamperes.
Type the current into the terminal and press Enter.
13. Disconnect the 20 Ω load and connect a 10 Ω load.
14. Activate the generator by pressing the Space key.
15. The generator is now delivering RF energy; follow the warnings/precautions at the
start of this section. Record the current being delivered to the load. Press any key to
halt the test or to stop energy delivery.
16. At the prompt, enter the output current recorded in the previous step in milliamperes.
Type the current into the terminal and press Enter.
17. Disconnect the 10 Ω load and connect a 5 Ω load.
18. Activate the generator by pressing the Space key.
19. The generator is now delivering RF energy; follow the warnings/precautions at the
start of this section. Record the current being delivered to the load. Press any key to
halt the test or to stop energy delivery.
20. At the prompt, enter the output current recorded in the previous step in milliamperes.
Type the current into the terminal and press Enter.
3-18 Valleylab LS10, LS Series Single Channel Vessel Sealing Generator Service Manual
Page 59

Optional Service Applications
21. The sensor calibration is complete. Turn off the power to the generator to save the
calibration parameters. Check the prompt to ensure the calibration was successful. If
unsuccessful, contact Covidien Technical Service.
Instrument Information
1. Remove the USB port cover on the rear of the generator.
2. Connect the AC cable to the generator and power on the generator.
3. Connect one end of the USB A to B cable to the USB port on the rear panel of the
generator (located behind the removable USB port cover).
4. Connect the other end of the USB A to B cable to a computer.
5. Launch the terminal emulation program on the computer. Configure the terminal
emulation program to: baud rate of 115200 bps, 8 data bits, no parity, 1 stop bit and
no flow control.
6. Hit Enter. This starts Generator Service mode.
7. From the VLLS10GEN>> prompt, select Test Functions from the four options.
8. From the Test Functions>> prompt, select Instrument Info from the ten options.
9. At the Instrument Info>> prompt the generator will scan (either barcode or RFID) the
LigaSure instrument inserted into the instrument port and report the instrument’s
accessory ID, SKU, and name.
Check System Voltages
1. Remove the USB port cover on the rear of the generator.
2. Connect the AC cable to the generator and power on the generator.
3. Connect one end of the USB A to B cable to the USB port on the rear panel of the
generator (located behind the removable USB port cover).
4. Connect the other end of the USB A to B cable to a computer.
5. Launch the terminal emulation program on the computer. Configure the terminal
emulation program to: baud rate of 115200 bps, 8 data bits, no parity, 1 stop bit and
no flow control.
6. Hit Enter. This starts Generator Service mode.
7. From the VLLS10GEN>> prompt, select Test Functions from the four options.
Setup, Tests, and Adjustments
8. From the Test Functions>> prompt, select Voltages from the ten options.
9. At the Voltages>> prompt the generator will scan internal low voltage power supply
values:
3.3 V: 3.255
1.8 V: 1.812
5 V: 4.930
48 V: 47.567
Valleylab LS10, LS Series Single Channel Vessel Sealing Generator Service Manual 3-19
Page 60

Optional Service Applications
Sensor +5 V: 5.073
Sensor -5 V: -5.096.
The accuracy of the internal voltages is:
±3% @ 1.8 ± 0.09 VDC rail
±3% @ 3.3 ± 0.17 VDC rail
±4% @ 5.0 ± 0.25 VDC rail
±5% @ 48.0 ± 2.40 VDC rail
±5% @ RF 48.0 (+2.40/-2.60) VDC rail
±4% @ sensor power supply +5 (+0.25/-0.40) VDC rail
±11% @ sensor power supply -5 (+0.40/-0.25) VDC rail
Configuration Information
Information: While this method may be used to retrieve configuration information, it is
recommended to connect the generator to the Valleylab Exchange for complete
configuration information retrieval.
1. Remove the USB port cover on the rear of the generator.
2. Connect the AC cable to the generator and power on the generator.
3. Connect one end of the USB A to B cable to the USB port on the rear panel of the
generator (located behind the removable USB port cover).
4. Connect the other end of the USB A to B cable to a computer.
5. Launch the terminal emulation program on the computer. Configure the terminal
emulation program to: baud rate of 115200 bps, 8 data bits, no parity, 1 stop bit and
no flow control.
6. Hit Enter. This starts Generator Service mode.
7. From the VLLS10GEN>> prompt, select Configuration from the four options.
8. At the Configuration>> prompt the generator displays Configuration data.
Retrieving Logs
Information: While this method may be used to retrieve partial logs, it is recommended
to connect the generator to Valleylab Exchange for complete log retrieval.
1. Remove the USB port cover on the rear of the generator.
2. Connect the AC cable to the generator and power on the generator.
3. Connect one end of the USB A to B cable to the USB port on the rear panel of the
generator (located behind the removable USB port cover).
4. Connect the other end of the USB A to B cable to a computer.
5. Launch the terminal emulation program on the computer. Configure the terminal
emulation program to: baud rate of 115200 bps, 8 data bits, no parity, 1 stop bit and
no flow control.
3-20 Valleylab LS10, LS Series Single Channel Vessel Sealing Generator Service Manual
Page 61

Optional Service Applications
6. Hit Enter. This starts Generator Service mode.
7. From the VLLS10GEN>> prompt, select Logs.
8. From the Logs>> prompt, select Get Error Logs to get error logs or select Get Event
Logs to get recent event logs or select to Exit.
Setup, Tests, and Adjustments
Valleylab LS10, LS Series Single Channel Vessel Sealing Generator Service Manual 3-21
Page 62

Page 63

Chapter 4
Principles of Operation
This chapter provides detailed information about how the Valleylab LS10 Generator
functions and how the internal components interact.
This chapter includes the following information:
• A block diagram that illustrates how the system functions
• A general description of how the system works
• Detailed descriptions of the circuitry for the PCBAs
Valleylab LS10, LS Series Single Channel Vessel Sealing Generator Service Manual 4-1
Page 64

Block Diagram
Block Diagram
4-2 Valleylab LS10, LS Series Single Channel Vessel Sealing Generator Service Manual
Page 65

Functional Overview
The Valleylab LS10, LS Series Single Channel Vessel Sealing Generator is a LigaSure vessel
sealing system. The LigaSure system provides power for vessel sealing. The LigaSure
vessel sealing system provides precise energy delivery and electrode pressure to vessels
for a controlled time period to achieve a complete and permanent fusion of the vessel
lumen.
Power On Self Tests (POST)
The software performs the following Power on Self Tests (POST) on power-up to ensure
the system in operating properly:
1. Real Time Clock (RTC)
2. Non volatile flash
3. Audio CODEC
4. Digital Pot auto-calibration
Functional Overview
5. DSP SPI ready
6. DSP calibration data in range and sent
7. DSP post complete
8. Generator is calibrated
9. AC Power Good and 48 V Switched Good
10. 48 V Switched disabled
11. Insertion micro-switch
12. Host control module
13. VIBE™*
14. System configuration
15. Power-up the result of a watchdog reset
RF Tank Circuitry
The primary purpose of the RF tank circuitry is to convert the +48 DC volts coming from
the commercial power supply into a 400kHz RF signal that is sent to the LigaSure
receptacle output. A full H-bridge topology drives the tank circuitry and is used to
accomplish this voltage conversion. The RF transformer that is a part of the tank circuitry
both steps up the voltage and provides isolation.
The four gate drive signals driving the H-bridge come from the DSP. A full cycle of the
H-bridge output is:
1) High on the “left” side, low on the “right” side
2) Dead time, high on both “left” and “right” side
3) Low on the “left” side, high on the “right” side
Principles of Operation
Valleylab LS10, LS Series Single Channel Vessel Sealing Generator Service Manual 4-3
Page 66

Functional Overview
4) Dead time, low on both “left” and “right” side
This cycle repeats at a 400kHz rate. The two on times are identical in length and the two
off times are identical in length.
The power delivered to the LigaSure receptacle is changed by varying the ratio of the on
time to the off time. This ratio is referred to as the “phase” of the driving signals. The
phase varies between 10° and 160°. In order to keep both the FET devices on one side of
the H-bridge from being on at the same time, there is a minimum amount of dead time
guaranteed by the DSP.
Voltage and Current Sensing
There are two independent and identical voltage and current sensors. One voltage and
one current sensor feed the DSP and the other pair of sensors feed the Host processor.
The voltage and current sensors feeding the DSP are each digitized and read by the DSP.
Having both the voltage and the current allows the DSP to compute the power being
delivered to the tissue, the impedance of the tissue, and the phase between the voltage
and the current. The tissue impedance is used by the algorithms in the DSP to control the
power being delivered to the tissue.
The voltage and current sensors that feed the Host processor first go through an analog
multiplier The single output of the multiplier represents the power being delivered to the
tissue.
The voltage sensor is a highly accurate capacitor that couples the RF voltage into a filter.
The current sensor is a Rogowski coil that generates a voltage across a resistor. That
voltage is coupled into another filter. Each of the filters consists of a low pass filter, a
high pass filter, and an integrator.
VMAD
The Host voltage sensor is a Mean Absolute Deviation circuit used to detect an overvoltage and is sampled by the Host ADC. The maximum allowed voltage is calibrated
during manufacturing and is checked by the Host processor during RF activations. If an
over-voltage condition is detected due to a single fault, a non-recoverable error is
generated.
IMAD
The Host current sensor is a Mean Absolute Deviation circuit sampled by the Host ADC
and an RMS value is calculated from this waveform. The RMS value is compared to the
DSP in order to detect if the primary sensor chain is inaccurate. If the two RMS values do
not agree for a period of time, then a non-recoverable error is generated.
DSP
The main function of the DSP is to control the amount of energy being delivered to the
tissue. The delivery algorithms in the DSP determine the desired amount of energy based
on the tissue’s impedance and time. The DSP determines the actual amount of energy
being delivered to the tissue by sensing the voltage and the current. The DSP adjusts the
phase of the H-bridge driving signals to vary the delivered power and drive the delivered
power towards the desired energy level. In the event of an error, the DSP can disable the
4-4 Valleylab LS10, LS Series Single Channel Vessel Sealing Generator Service Manual
Page 67

drive to the H-bridge to shut down RF energy.
Host Processor
The Host processor provides an independent monitor of the power delivery. The Host
processor compares the output of the analog multiplier with the power level reported by
the DSP over the SPI interface between the two processors. If there is too much
difference between these two levels for a long enough period of time, the Host will send
a message to the DSP to stop the delivery of energy and the Host will also disable the RF
circuitry. The disabling of the RF circuitry is controlled by a single signal that both turns
off the +48 volts feeding the RF tank circuitry and the signal turns off the logic signals
driving the H-bridge.
The Host processor also interfaces to all of the peripheral devices in the system. These are
explained in the following sections.
Speaker
The main feedback to the operator is through the audio generated by the generator. The
Host processor drives an audio DAC, which drives a speaker amplifier, and then a
speaker. The Host processor generates different tones to indicate the initiation of a
sealing cycle, the successful end of a sealing cycle, and error conditions such as a re-grasp
event.
Functional Overview
Volume Control
The volume control is mounted on the rear of the chassis. It is a potentiometer and is
sampled by the ADC in the Host processor. This value is used by the Host Processor to
control the level of the audio driving the speaker.
Display PCB
The display PCBA is visible through the front of the generator. All of the tri-color LEDs
used on the display PCBA have red, green, and blue LEDs in them. Each of the red, green,
and blue LEDs can be turned on or off independently. This allows each location to display
seven different colors as well as being off.
In the center of the front panel there is a circle with 12 tri-color LEDs. In the center of this
circle is a smaller circle with white LEDs. The outer circle of LEDs shows the progress of a
seal cycle by lighting the LEDs sequentially around the circle, similar to a clock face.
Different colors are used to indicate error conditions. The center white LEDs are used as a
reusable instrument status indicator.
To the left side of the front panel is a triangle with an exclamation point in it. This
triangle is lit by red LEDs. When lit it indicates an error condition.
Above the LigaSure receptacle is a single tri-color LED. It indicates when an instrument is
inserted and is recognized by the generator.
Power Button
Principles of Operation
The power button is on the far left of the front panel. When the power button is pressed
for approximately 3 seconds the generator will turn off. A short press of the button will
turn the generator on.
Valleylab LS10, LS Series Single Channel Vessel Sealing Generator Service Manual 4-5
Page 68

Functional Overview
Insertion Detection
A part of the LigaSure receptacle contains a switch that is activated whenever an
instrument is inserted into the LigaSure receptacle. This insertion is detected by the Host
processor. The Host processor then determines the type of instrument that was inserted
by using the barcode and RFID module.
Since the insertion detection switch is located near the RF energy signals in the LigaSure
receptacle, the switch detection circuitry is isolated from the Host processor. These
detection signals cross the isolation boundary via a high voltage isolation module.
Barcode/RFID Module
The Barcode/RFID (VIBE) module is a single assembly containing both a Barcode (Aztec)
scanner and a RFID scanner. It is responsible for detecting LigaSure Device type. The Host
processor communicates with the Barcode/RFID module bi-directionally over an RS-422
link. The Host processor can request the Barcode/RFID module to read a barcode, read an
RFID, or to write an RFID. Both the barcode and the RFID contain information about the
instrument.
Instrument Handswitch
The Host processor needs to detect the activation of a hand switch on an instrument.
Since the hand switch is connected to the RF energy signals in the instrument, the switch
detection circuitry is isolated from the Host processor. These detection signals cross the
isolation boundary via a high voltage isolation module.
Footswitch
The Host processor needs to detect the activation of the foot switch when using certain
instruments. Since the foot switch is in contact with the user, the switch detection
circuitry is isolated from the Host processor.
Fan
The Host processor can both control the speed of the fan and sense the speed of the fan.
The air flow of the fan is first directed over the H-bridge FETs, their drivers, and their heat
sinks. The air flow proceeds to the RF inductor and the RF transformer. Other than the
commercial AC/DC power supply, these components comprise the main source of heat
generation in the generator.
ECG Blanking
The ECG blanking port is controlled by the Host processor. It is activated before RF
energy is applied to tissue and deactivated after the cessation of energy application. It
can be used to protect ECG equipment if that equipment is connected to the patient, or
it can be used to control an evacuation fan. The relay contacts will handle up to 12 volts,
AC/DC, and up to 0.2 amps.
USB Port
The USB port is configured as a serial port into the Host processor. The Host processor
4-6 Valleylab LS10, LS Series Single Channel Vessel Sealing Generator Service Manual
Page 69

can communicate over this port to any PC that has its own USB port configured as a
serial port. There is a USB to serial port converter on the generator PCBA. The Host
processor interfaces to this converter over a normal serial port.
AC to DC Power Supply
The AC/DC power supply is a purchased part. It converts normal power to 48 volts DC
and can supply up to 8.3 amps. Without fan cooling, this supply cannot continuously
supply the 8.3 amps but the generator only draws that amount of current for short
periods of time.
Power Entry Module
The power entry module is located on the rear of the generator. It provides the
connection for a modular power cord. The module also contains the power fuses for the
generator.
Functional Overview
Valleylab LS10, LS Series Single Channel Vessel Sealing Generator Service Manual 4-7
Principles of Operation
Page 70

Page 71

Chapter 5
Troubleshooting
If the system is not functioning properly, use the information in this chapter to perform
the following tasks:
– Identify and correct the malfunction
– If an error was recorded, take the appropriate action to correct the condition
Additional technical information may be available through Covidien Technical Service.
Precaution
Read all warnings, precautions, and instructions provided with this system before use.
Read the instructions, warnings, and precautions provided with electrosurgical instruments before
use. Specific instructions for electrosurgical instruments are not included in this manual.
Valleylab LS10, LS Series Single Channel Vessel Sealing Generator Service Manual 5-1
Page 72

General Troubleshooting Guidelines
General Troubleshooting Guidelines
If the Valleylab LS10 generator malfunctions, check for obvious conditions that may have
caused the problem:
• Check the system for visible signs of physical damage.
• Make sure the fuse drawer is tightly closed.
• Verify that all cords are connected and attached properly.
• If the problem is still unclear, turn the generator off, wait a minute or two, then turn
it back on.
If the malfunction persists, the system may require service. Contact the institution’s
biomedical-engineering department. Covidien Technical Service may be contacted in the
ways indicated.
System Alerts and Troubleshooting
Most system alerts require some action on your part to correct the condition; however,
some are corrected automatically. Use the following list to determine how to correct an
alert condition. After correcting the alert condition, verify that the system completes the
self-test as described in.
Indicators Description Actions
Amber color system
status indicator and
four-pulse tone delivered
Red instrument status
indicator and threepulse tone delivered
Seal cycle incomplete Refer to Chapter 5, Correcting
Malfunctions, Incomplete seal cycle alert section
Invalid instrument or a
stuck handswitch or
footswitch
Check the handswitch and make
sure it is released. If the problem
remains, remove the instrument
and observe the instrument status
indicator.
If it remains red, the footswitch is
depressed. Check the footswitch.
If it turns off, the LigaSure handswitch is stuck or an invalid instrument is inserted. Replace with a
new LigaSure instrument.
5-2 Valleylab LS10, LS Series Single Channel Vessel Sealing Generator Service Manual
Page 73

Indicators Description Actions
Red system error indicator illuminated and
three-pulse tone delivered
System error Power cycle the generator. If error
recurs, system fault is present.
Contact Covidien Technical Service as indicated on page 7-4.
General Troubleshooting Guidelines
Troubleshooting
No audio tone upon attempted activation of
footswitch
Single pulse tone delivered when footswitch
pressed, no energy delivered
Usage limit indicator illuminated
Footswitch fault may
be present
Footswitch activation
disabled for connected
LigaSure instrument
Inserted device has already been used
Confirm instrument is fully inserted in receptacle by removing and
reinserting LigaSure connector.
Confirm the footswitch plug is fully inserted by reconnecting the
plug to ensure pin alignment.
Replace instrument with a footswitch-compatible LigaSure instrument or use handswitch
functionality to activate energy.
Replace with certified Covidien
LigaSure instrument.
White color system status indicator illuminated and flashing
Valleylab LS10, LS Series Single Channel Vessel Sealing Generator Service Manual 5-3
System in service mode Cycle the power to exit service
mode.
Page 74

Correcting Malfunctions
System Functions
Logs
The logs list the activities on the generator such as activation counts, instrument
insertion, and other events.
Service Mode
Service mode functionality requires an external PC and terminal emulation program.
When the system is in service mode, the system status indicator will illuminate white and
flash. Cycle power to exit service mode.
Correcting Malfunctions
If a solution is not readily apparent, use the table below to help identify and correct
specific malfunctions. After the malfunction is corrected, power cycle the generator,
confirm the self-test completes, and returns to ready state.
Situation Possible Cause Solution
Abnormal neuromuscular stimulation (stop sur-
gery immediately)
Generator does not respond when turned on
Metal-to-metal sparking Check all connections to
the generator and LigaSure
instrument and cords for
damage.
Abnormal 50 Hz-60 Hz
leakage currents
Disconnected power cord
or faulty wall outlet
Faulty power cord Replace the power cord.
Fuse drawer is open or fus-
es are blown.
Internal component malfunction
Contact your biomedicalengineering department or
a Covidien Technical Service
representative for assistance.
Check power cord connections (generator and wall
outlet). Connect the power
cord to a functional outlet.
Replace the blown fuse(s).
Close the fuse drawer. Refer to the service manual.
Use a backup generator.
Contact the biomedical-engineering department or a
Covidien Technical Service
representative for assistance.
5-4 Valleylab LS10, LS Series Single Channel Vessel Sealing Generator Service Manual
Page 75

Situation Possible Cause Solution
System is on, but did not
complete the self-test;
system status indicator
does not achieve system
ready for use status (constant white)
Generator is on and instrument is activated, but
system does not deliver
energy
Incomplete seal cycle
alert front panel will illuminate with a solid amber light, a four-pulse
tone sounds, and RF output is disabled
Software malfunction Turn off, then turn on the
generator.
Internal component malfunction
Malfunctioning footswitch
or handswitching instrument
Internal component malfunction
Excessive tissue/eschar on
jaws
Electrodes have come loose
from the instrument jaws
Electrode pins may have
been compromised or bent
during assembly of the instrument and may need to
be replaced
Metal or other foreign object is grasped within jaws
Tissue grasped within jaws
is too thin
Pooled fluids around instrument tip
Use a backup generator.
Contact the biomedical-engineering department or a
Covidien Technical Service
representative for assistance.
Check and reconnect instrument and/or footswitch
connection.
Power cycle the generator.
Replace the instrument if it
continues to malfunction.
Use a backup generator.
Contact the biomedical engineering department or a
Covidien Technical Service
representative for assistance.
Clean jaws with a wet
gauze pad.
Re-insert the electrode into
the instrument jaws making
sure that all the electrode
pins are firmly seated. If not
resolved, replace the LigaSure instrument.
Avoid grasping objects,
such as staples, clips, or encapsulated sutures in the
jaws of the instrument.
Open the jaws and confirm
that a sufficient amount of
tissue is inside the jaws. If
necessary, increase the
amount of tissue and repeat the procedure.
Minimize or remove excess
fluids.
Correcting Malfunctions
Troubleshooting
Valleylab LS10, LS Series Single Channel Vessel Sealing Generator Service Manual 5-5
Page 76

Correcting Malfunctions
Situation Possible Cause Solution
Continuous patient or
video monitor interference
Interference with other
devices only when the
generator is activated
The seal cycle was interrupted before completion.
The handswitch or footswitch was released before
the end tone activated.
Additional time and energy
are needed to complete the
seal cycle
Faulty power cord or display
cables
Electrical equipment is
grounded to different objects rather than a common
ground. The generator may
respond to the resulting
voltage differences between grounded objects.
Malfunctioning monitor Replace the monitor.
Metal-to-metal sparking Check all connections to
Electrically inconsistent
ground wires in the operating room
If interference continues
when the generator is activated, the monitor is responding to radiated
frequencies.
Reactivate the seal cycle
without removing or repositioning the instrument.
Check and replace power
cord and display cables for
the monitor and power
cord for the generator.
Plug all electrical equipment
into line power at the same
location. Contact your biomedical-engineering department or a Covidien
Technical Service representative for assistance.
the generator and LigaSure
instrument and cords for
damage.
Verify that all ground wires
are as short as possible and
go to the same grounded
metal.
Ask the biomedical-engineering department to
check with the manufacturer of the monitor.
Some manufacturers offer
RF choke filters for use in
monitor leads. The filters reduce interference when the
generator is activated.
5-6 Valleylab LS10, LS Series Single Channel Vessel Sealing Generator Service Manual
Page 77

Situation Possible Cause Solution
Pacemaker interference Intermittent connections or
metal-to-metal sparking
Internal Cardiac Defibrillator (ICD) activation
ICD is activated by generator
Check the active electrode
cord connections.
It may be necessary to reprogram the pacemaker.
Always monitor patients
with pacemakers during
surgery and keep a defibrillator available.
Consult the pacemaker
manufacturer or hospital
cardiology department for
further information when
use of the LigaSure system
is planned in patients with
cardiac pacemakers.
Stop the procedure and
contact the ICD manufacturer for instructions.
Correcting Malfunctions
Troubleshooting
Valleylab LS10, LS Series Single Channel Vessel Sealing Generator Service Manual 5-7
Page 78

Error and Event Code Strings
Error and Event Code Strings
The generator records both errors and events. Errors indicate that the system is unstable
and in a state where all system functions are disabled. An event occurs when the system
needs to record an informational event or recoverable warning. Certain events may be
logged for Covidien informational purposes. It is important that these events not be
interpreted as errors or failure conditions that require any action on the part of service
personnel.
Recorded errors and events may be downloaded/viewed using the Chapter 3, Retrieving
Logs section or by docking the system to the Valleylab Exchange Chapter 3, Docking to
Valleylab Exchange.
Some errors are corrected automatically by cycling power. When an error occurs, cycle
(turn off, then turn on) the system. After correcting an error condition, verify the system
completes the self-test. If the error persists, use the troubleshooting guide in this section
to further analyze the issue. Should you be unable to correct the issue, contact Covidien
Technical Service.
Error List
Error Text String Failure Cause Correction Action
DSP RAM Failure RAM is corrupted—possible
hardware failure of RAM.
DSP SPI Comm
Failure
DSP SPI Transmit
Failure
DSP V ADC Offset Excess bias on sensor.
DSP I ADC Offset Excess bias on sensor.
System or SPI
communication error.
System or SPI
communication error.
Possible hardware failure or
unit needs calibration.
Possible hardware failure or
unit needs calibration.
Power cycle to clear. Return for service
if the error persists.
Power cycle to clear. Move generator
away from other devices generating
EMI. Return for service if the error
persists.
Power cycle to clear. Move generator
away from other devices generating
EMI. Return for service if the error
persists.
Ensure no other Electrosurgical Unit
activated while instrument is applied.
Recalibrate unit. Return for service if
error persists.
Ensure no other Electrosurgical Unit
activated while instrument is applied.
Recalibrate unit. Return for service if
error persists.
5-8 Valleylab LS10, LS Series Single Channel Vessel Sealing Generator Service Manual
Page 79

Error Text String Failure Cause Correction Action
Error and Event Code Strings
Troubleshooting
DSP V ADC
Saturation
DSP I ADC
Saturation
DSP Missed SPI
Frames Failure
DSP Timer Accuracy
Failure
DSP SPI Retry Logic
Failure
DSP Application
Flash Failure
High voltage present at the
output. Possible hardware
failure.
High current present at the
output. Possible hardware
failure.
System or SPI
communication error.
DSP Crystal failure. Power cycle to clear. Return for service
System or SPI
communication error.
Failure to read/write to DSP
external flash. Possible
hardware failure.
Ensure no other Electrosurgical Unit
activated while instrument is applied.
Recalibrate unit. Return for service if
error persists.
Ensure no other Electrosurgical Unit
activated while instrument is applied.
Recalibrate unit. Return for service if
error persists.
Power cycle to clear. Return for service
if error persists.
if error persists.
Power cycle to clear. Move generator
away from other devices generating
EMI. Return for service if the error
persists.
Power cycle to clear. Return for service
if error persists.
DSP SPI Comm
Timeout
DSP Irms Limit
Exceeded
DSP Target Sensor
Mismatch Low
DSP Target Sensor
Mismatch High
DSP Voltage Peak
Saturation
System or SPI
communication error.
Current exceeding 5.5A for
more than 450 milliseconds.
Possible hardware failure or
unit needs calibration.
Possible sensor chain
hardware failure or unit
needs calibration.
Possible sensor chain
hardware failure or unit
needs calibration.
High voltage present at the
output. Possible hardware
failure.
Power cycle to clear. Move generator
away from other devices generating
EMI. Return for service if the error
persists.
Output check. Recalibrate sensors.
Return for service if the error persists.
Output check. Recalibrate sensors.
Return for service if the error persists.
Output check. Recalibrate sensors.
Return for service if the error persists.
Output check. Recalibrate sensors.
Return for service if the error persists.
Valleylab LS10, LS Series Single Channel Vessel Sealing Generator Service Manual 5-9
Page 80

Error and Event Code Strings
Error Text String Failure Cause Correction Action
DSP Current Peak
Saturation
DSP RF Single Fault Hardware failure or unit
DSP RF Single Fault
Min Phase
Host SPI
Communications
Failure
Host Digital POT
Calibration Failed
Host Sensor
Miscompare
Host POST Wait for
SPI
High current present at the
output. Possible hardware
failure
needs calibration.
Hardware failure or unit
needs calibration.
System or SPI
communication error.
Possible failure of Digital
calibration potentiometer.
Possible sensor chain failure
or unit needs calibration.
Power on self test failed. DSP
did not initialize and run
properly. Possible hardware
failure.
Output check. Recalibrate sensors.
Return for service if the error persists.
Output check. Recalibrate sensors.
Return for service if the error persists.
Output check. Recalibrate sensors.
Return for service if the error persists.
Power cycle to clear. Move generator
away from other devices generating
EMI. Return for service if the error
persists.
Power cycle to clear. Return for service
if the error persists.
Output check. Recalibrate sensors.
Return for service if the error persists.
Power cycle to clear. Return for service
if the error persists.
Host POST Wait for
Complete
Host POST Hot Swap
Ready
Host unit needs
calibration
Host Voltage Out of
Range
Host Bad Fan Possible fan hardware
Host Country Not
Set
Power on self test failed.
High voltage not available.
Power on self test failed.
High voltage not available.
Unit is not calibrated Output check. Recalibrate sensors.
System Power Supply out of
range.
failure.
Unit not configured correctly.
Need to dock and configure.
Power cycle to clear. Return for service
if the error persists.
Power cycle to clear. Return for service
if the error persists.
Return for service if the error persists.
Power cycle to clear. Check system
power supply voltages. Return for
service if the error persists.
Power cycle to clear. Check fan for
proper operation. Return for service if
the error persists.
Dock to VLEX and set country code.
Return for service if the error persists.
5-10 Valleylab LS10, LS Series Single Channel Vessel Sealing Generator Service Manual
Page 81

Error Text String Failure Cause Correction Action
Error and Event Code Strings
Troubleshooting
Host Region Not Set Unit not configured correctly.
Need to dock and configure.
Host VIBE Init Failed Scanner hardware failure. Power cycle to clear. Ensure RFID/
Host Rtc Failure Possible Real Time Clock
hardware failure, possible
battery failure.
Host Energy Without
Activation
Host Receptacle
Switch Failure
Host Over-voltage High voltage at the output.
Host Configuration
Check Fail
System error, hardware
failure, or unit needs
calibration.
Receptacle hardware failure. Output check. Recalibrate sensors.
Hardware failure or unit
needs calibration.
Hardware failure (NV store)
or improper configuration
setup.
Dock to VLEX and set country code.
Return for service if the error persists.
Barcode VIBE assembly cable is
connected. Return for service if the
error persists.
Dock to VLEX and set time. Change
battery. Return for service if the error
persists.
Ensure no other Electrosurgical Unit
activated while instrument is applied.
Recalibrate unit. Return for service if
error persists.
Return for service if the error persists.
Output check. Recalibrate sensors.
Return for service if the error persists.
Power cycle to clear. Dock to VLEX and
perform configuration checks. Return
for service if it persists.
Host Config Mgmt
Primary and Backup
Fail
Host EBD Session
Message
Registration Fail
Host Dosage Power
Exceeded
Host Check SPI
Ready Fail
Hardware failure (NV store). Power cycle to clear. Return for service
if the error persists.
Possible hardware failure or
improper configuration
setup.
High power at output.
Possible hardware failure or
unit needs calibration.
Possible hardware failure, or
DSP software not executing.
Power cycle to clear. Dock to VLEX and
perform configuration checks. Return
for service if it persists.
Output check. Recalibrate sensors.
Return for service if the error persists.
Power cycle to clear. Move generator
away from other devices generating
EMI. Return for service if the error
persists.
Valleylab LS10, LS Series Single Channel Vessel Sealing Generator Service Manual 5-11
Page 82

Error and Event Code Strings
Events List
Event Text String Reason for entry Corrective Action
Hand Switch Stuck Handswitch button is stuck. Indicates instrument activation button
Foot Switch Stuck Footswitch is stuck. Indicates footswitch activation button
was depressed during POST or
depressed longer than 18 seconds,
release instrument button. Replace
instrument. Return for service if the
instrument is not the cause.
was depressed during POST or
depressed longer than 18 seconds,
release footswitch button. Replace
footswitch. Return for service if the
instrument is not the cause.
Invalid Activation Instrument may be invalid,
damaged, or incompatible.
Invalid Instrument
Inserted
Host POST
Successful
Host POST Failed Power On Self Test has
Host RTC OF Bit Set Real Time Clock oscillator
Device Data Error Invalid RFID data read. RFID instrument data corrupt/not
Instrument inserted that is
not compatible with the
VLLS10.
Power On Self Test cycle
completed successfully.
failed.
has stopped.
May indicated a disabled footswitch
for that particular instrument. Power
cycle. Return for service if the
instrument is not the cause.
Instrument not supported, replace
instrument. Power cycle. Return for
service if the instrument is not the
cause.
The unit has passed the Power On Self
Test, event is for information only. No
corrective action needed.
The unit has failed the Power On Self
Test, power cycle unit. Return for
service if the event persists.
Real Time Clock oscillator detection.
Power cycle. Return for service if the
event persists.
supported. Replace with valid
instrument. Return for service if the
event persists.
Device Data Error Invalid RFID data read. RFID instrument data corrupt/not
supported. Replace with valid
instrument. Return for service if the
event persists.
5-12 Valleylab LS10, LS Series Single Channel Vessel Sealing Generator Service Manual
Page 83

Event Text String Reason for entry Corrective Action
Error and Event Code Strings
Troubleshooting
Device is not
compatible with
generator.
Instrument Inserted Normal operation. Instrument connected to the output
Instrument Removed Normal operation. Instrument disconnected from output
Barcode Instrument
Identified
Hand Switch
Activation Sequence
– Complete
Hand Switch
Activation Sequence
– Regrasp
Incompatible instrument
inserted.
Normal operation. Valid instrument barcode read. Event is
Hand switch activation
resulted in a completed seal.
Hand switch activation
resulted in a “regrasp.” The
seal was not completed due
to a regrasp condition.
Instrument not supported. Replace
with valid instrument. Return for
service if persists.
port. Event is for information only. No
corrective action needed.
port. Even if for information only. No
corrective action needed.
for information only. No corrective
action needed.
Event is for information only. No
corrective action needed.
Event if for information only. See the
section “Check Instrument and
Reactivate” in this manual to correct.
Hand Switch
Activation Sequence
– Reactivate
Footswitch
Activation Sequence
– Complete
Footswitch
Activation Sequence
– Regrasp
Footswitch
Activation Sequence
– Reactivate
Hand switch activation
resulted in a “reactivate.”
The seal was not completed
due to a release of the hand
switch prior to completion of
the seal.
Footswitch activation
resulted in a completed seal.
Footswitch activation
resulted in a “regrasp.” The
seal was not completed due
to a regrasp condition.
Footswitch activation
resulted in a “reactivate.”
The seal was not completed
due to a release of the
footswitch prior to
completion of the seal.
Event if for information only. See the
section “Check Instrument and
Reactivate” in this manual to correct.
Event is for information only. No
corrective action needed.
Event if for information only. See the
section “Check Instrument and
Reactivate” in this manual to correct.
Event if for information only. See the
section “Check Instrument and
Reactivate” in this manual to correct.
Valleylab LS10, LS Series Single Channel Vessel Sealing Generator Service Manual 5-13
Page 84

Error and Event Code Strings
Event Text String Reason for entry Corrective Action
Invalid Switch State
At End of Activation
Host Power Down Normal operation. Unit turned off from front panel. Event
Host Power Drop Off AC power disrupted. AC power interrupted. Event is for
Host Software
Upgrade Complete
Host Software
Upgrade Fail
VIBE Application
Software Upgrade
Complete
It could not be determined
which switch was used
during the activation
sequence nor its final
outcome.
Software upgrade
successful.
Software upgrade failed. Software upgrade failed, retry
VIBE application software
update is successful.
Event is for information only. No
corrective action needed.
is for information only. No corrective
action needed.
information only. No corrective action
needed.
Software upgrade completed
successfully. Event is for information
only. No corrective action needed.
software upgrade. Return for service is
it persists.
Event is for information only. No
corrective action needed.
VIBE Applications
Software Transfer
Complete
VIBE Application
Software Upgrade
Failed
VIBE Bootloader
Software Upgrade
Complete
VIBE Bootloader
Software Transfer
Complete
VIBE Bootloader
Software Upgrade
Failed
VIBE application software
transfer is successful.
VIBE application software
update failed.
VIBE Bootloader software
update is successful.
VIBE Bootloader software
transfer is successful.
VIBE Bootloader software
update failed.
Event is for information only. No
corrective action needed.
Attempt to retry the VIBE application
software update.
Event is for information only. No
corrective action needed.
Event is for information only. No
corrective action needed.
Attempt to retry the VIBE Bootloader
software update.
5-14 Valleylab LS10, LS Series Single Channel Vessel Sealing Generator Service Manual
Page 85

Event Text String Reason for entry Corrective Action
Error and Event Code Strings
Troubleshooting
VIBE Software
Upgrade Transfer
Timeout (External)
VIBE Software
Upgrade Message
Retried
DSP Software
Upgrade Complete
DSP Software
Upgrade Fail
DSP Calibration
Complete
Host Current
Calibration Success
VIBE software upgrade failed
due to timeout of transfer
from external client.
Host attempt to send
another XMODEM packet to
VIBE during software
upgrade.
Software upgrade
successful.
Software upgrade failed. Software upgrade failed, retry
Primary sensor calibration
passed.
Current calibration passed. Unit calibration completed. Event is for
Re-establish connection between
client and generator. Retry VIBE
software update.
Retry the VIBE software update.
Software upgrade completed
successfully. Event is for information
only. No corrective action needed.
software upgrade. Return for service if
it persists.
Unit calibration completed. Event is for
information only. No corrective action
needed.
information only. No corrective action
needed.
Host Current
Calibration Fail
Host V
Calibration Success
Host V
Calibration Fail
Peak
Peak
Current calibration failed. Calibration failed, retry sensor
calibration. Return for service if it
persists.
Voltage peak calibration
passed.
Voltage peak calibration
failed.
Unit calibration completed. Event is for
information only. No corrective action
needed.
Calibration failed, retry maximum
output calibration. Return for service if
it persists.
Valleylab LS10, LS Series Single Channel Vessel Sealing Generator Service Manual 5-15
Page 86

Page 87

Chapter 6
Replacement Procedures
Follow the procedures in this chapter if replacement becomes necessary for the
components listed in this chapter.
Valleylab LS10, LS Series Single Channel Vessel Sealing Generator Service Manual 6-1
Page 88

Replacement Procedures
Replacement Procedures
Warning
Electric Shock Hazard To allow stored energy to dissipate after power is disconnected, wait at
least five minutes before replacing parts.
Precaution
The system contains electrostatic-sensitive components. When repairing the system, work at a
static-control workstation. Wear a grounding strap when handling electrostatic-sensitive
components, except when working on an energized system. Handle PCBAs by their nonconductive edges. Use an antistatic container for transport of electrostatic-sensitive components
and PCBAs.
Notice
Perform all the steps including the recalibration listed below. Failure to recalibrate the system after
replacing components may result in the system becoming inoperable.
To service many of the components of the system, it is necessary to remove the front
panel of the system. The steps listed here are referenced throughout the procedures for
servicing other components.
Replacement Parts
Component Service Level Required
Front Panel Assy
PCBA Display
PCBA PROG MAIN
Battery - Lithium COIN 3V 16 mm
ASSY/RFID/Barcode VIBE
Power Supply
Routine Maintenance
Routine Maintenance
Calibration, VLEX, Routine
Maintenance, Power
Curve Check
VLEX, Routine Maintenance
VLEX, Routine Maintenance
Calibration, Routine
Maintenance, Power
Curve Check
ASSY RECEPTACLE LIGASURE
Routine Maintenance
6-2 Valleylab LS10, LS Series Single Channel Vessel Sealing Generator Service Manual
Page 89

Component Service Level Required
Replacement Procedures
Speaker Assy
Fan with Cable
Power Entry with Cable
Display Cable Board
ASSY Cable Power Supply to Main PCBA
Control Cable Main bd to PS
Volume Control Cable
Footswitch Cable
Power Cords
Rubber foot for chassis
Fuse 250VAC 8A RoHS LITTLEFUSE
USB Cover
Routine Maintenance
Routine Maintenance
Routine Maintenance
Routine Maintenance
Routine Maintenance
Routine Maintenance
Routine Maintenance
Routine Maintenance
Routine Maintenance
N/A
Routine Maintenance
N/A
Replacement Procedures
Removing the Front Panel
1. Turn off the system. Disconnect the power cord from the wall receptacle.
2. Remove the seven screws that secure the top cover to the chassis. Lift the cover off
the chassis. Set the cover and screws aside for reinstallation.
3. Disconnect cable assemblies:
a. Display cable, at P1 of display PCBA on front panel assembly
b. Barcode/RFID module cable, at P26 on main PCBA
c. LigaSure cable, at P1 of main PCBA
d. Insert detect cable, at P29 on main PCBA
4. Remove the five screws that secure the panel to the housing (one on either side and
three on the bottom).
5. Slide the front panel away from the chassis.
Valleylab LS10, LS Series Single Channel Vessel Sealing Generator Service Manual 6-3
Page 90

Replacement Procedures
Reinstalling the Front Panel
1. Slide the front panel assembly on to the front of the chassis, making sure that the
round protrusions in the left and right alignment tabs of the chassis fall into the lower
tab holes on the front panel assembly.
2. Install the two screws of either side of the assembly, as well as the three screws on the
bottom of the assembly.
3. Reconnect cable assemblies:
a. Display cable from P23 on main PCBA to P1 on display PCBA on front panel
b. Barcode/RFID module cable from assembly on front panel to P26 on main PCBA
c. LigaSure cable to P1 on main PCBA
d. Insert detect cable to P26 on main PCBA
4. Place the top cover onto the chassis and secure with seven screws.
assembly
5. See the section Replacement Parts on page 6-2 for the Service Level required after
replacement of this assembly.
PCBA Display Replacement
1. Remove the front panel assembly.
2. Remove the flex cable at J1 connector.
3. Remove the 7 screws that secure the display PCBA to the front panel.
4. Lift the Display PCBA away from the front panel assembly.
5. Place the replacement display PCBA on the front panel assembly, making sure the
power button on the replacement display PCBA is inserted into the spring of the
power button on the front panel without interference.
6. Secure the replacement display PCBA to the front panel assembly using the 7 screws
and a torque screwdriver set to 0.7Nm+/-10%.
7. Secure the flex cable into the J1 connector.
8. Re-install the front panel assembly.
ASSY RFID/Barcode Module Replacement
1. Remove the front panel assembly.
2. Remove the three screws that secure the module to the front panel assembly.
3. Lift the RFID/Barcode module away from the assembly.
4. Install the replacement RFID/Barcode module in place of the removed RFID/Barcode
module. Secure using the 3 previously removed screws and the Phillips screwdriver set
to 0.7Nm+/-10%.
6-4 Valleylab LS10, LS Series Single Channel Vessel Sealing Generator Service Manual
Page 91

5. Reinstall the front panel assembly.
ASSY Receptacle LigaSure Replacement
Important: If possible, login to Valleylab Exchange and dock the unit to capture the
current unit configuration prior to replacing the RFID/Barcode module.
1. Remove the front panel assembly.
Replacement Procedures
2. Remove the three screws that secure the RFID/Barcode module to the front panel
assembly.
3. Lift the RFID/Barcode module and LigaSure Receptacle away from the front panel
assembly.
4. Locate the replacement LigaSure receptacle in place of the removed one.
5. Locate the RFID/Barcode module on top of the LigaSure Receptacle aligning the three
screw holes.
6. Secure the RFID/Barcode module and LigaSure receptacle to the front panel assembly
using the 3 previously removed screws and the Phillips screwdriver set to 0.7Nm+/10%.
7. Login to Valleylab Exchange, PC must be online.
8. Connect LS10 to PC.
9. Follow the prompts to set the country to “None.”
10. Follow the prompts to reset the country.
11. Reinstall the front panel assembly.
ASSY Cable to Power Supply to Main PCBA Replacement
1. Remove the front panel assembly.
Replacement Procedures
2. Using the screwdriver, loosen the two screws securing the power supply cable to the
power supply and disconnect the cable from the power supply.
3. Remove the other end of the cable from P30 on the main PCBA.
4. Insert the replacement power supply cable to the two screws on the power supply,
making sure that the red wire is seated behind the top screw. Secure using the Phillips
screwdriver set to 1.0Nm+/-10%.
5. Secure the other end of the cable to P30 on the main PCBA.
6. Reinstall the front panel assembly.
Control Cable Main PCBA to Power Supply Replacement
1. Turn the system off. Disconnect the power cord from the wall receptacle.
Valleylab LS10, LS Series Single Channel Vessel Sealing Generator Service Manual 6-5
Page 92

Replacement Procedures
2. Remove the seven screws that secure the top cover to the chassis. Lift the cover off
the chassis. Set the cover and screws aside for reinstallation.
3. Disconnect the power supply control cable from the power supply at J3.
4. Disconnect the power supply control cable from the main PCBA at P31.
5. Connect the replacement power supply control cable to the locations listed in the
above 3 steps.
6. Replace the top cover onto the chassis and secure with the seven screws removed in
step 2.
Fuse 250 VAC 8A RoHS Replacement
1. Turn the system off. Disconnect the power cord from the wall receptacle and allow
several minutes for any voltages to discharge.
2. Place the screwdriver blade just behind the inside upper lip of the power entry
connector and push the driver shaft against the bottom chassis to remove the fuses
and fuse holder portion of the power entry assembly.
3. Replace both fuses with 250 VAC, 8A fuses.
4. Push the fuse holder back into the power entry assembly until it is flush with the
assembly.
Battery - Lithium COIN 3V 16 mm Replacement
1. Turn the system off. Disconnect the power cord from the wall receptacle and allow
several minutes for any voltages to discharge.
2. Remove the seven screws that secure the top cover to the chassis. Lift the cover off
the chassis. Set the cover and screws aside for reinstallation.
3. Place the small screwdriver blade or dental pick tool under the battery at the cutout
slot of the battery receptacle housing (aligned with top battery retaining tab). While
prying the battery up using the screwdriver or pick, slide battery out of the retainer
using your thumbnail.
4. Using only an approved battery and observing the + polarity is facing up, insert the
replacement battery into the receptacle housing.
5. Dock to Valleylab Exchange.
6. Login to Valleylab Exchange, PC must be online.
7. Connect LS10 to PC.
8. Wait approximately 1 minute for Valleylab Exchange to synchronize time.
9. Replace the top cover onto the chassis and secure with the seven screws removed in
step 2.
6-6 Valleylab LS10, LS Series Single Channel Vessel Sealing Generator Service Manual
Page 93

Rubber Foot for Chassis Replacement
1. Remove the rubber feet using the screwdriver.
2. Install thread sealant on to the screws of the replacement rubber feet.
3. Using the screwdriver, install the replacement rubber feet to the bottom chassis.
Tighten to 0.3Nm ±10%.
Replacement Procedures
USB Cover Replacement
1. To access the ECG blanking connector, open the latch door on the USB cover.
2. To access the USB connector, remove the two screws and remove the cover.
3. To replace the USB cover, remove the two screws and remove the USB cover.
4. Place the new cover over the cutout, making certain that the two screws holes line up
with the holes in the chassis.
5. Reinstall the two screws.
Power Cord Replacement
1. Turn the system off. Disconnect the power cord from the wall receptacle and allow
several minutes for any voltages to discharge.
2. Remove the power cord from the power entry receptacle.
3. Locate the replacement power cord and insert it into the power entry receptacle.
Power Entry with Cable Replacement
1. Turn the system off. Disconnect the power cord from the wall receptacle.
2. Remove the seven screws that secure the top cover to the chassis. Lift the cover off
the chassis. Set the cover and screws aside for reinstallation.
Replacement Procedures
3. Using the screwdriver, remove the Power Entry with cable wires from the power
supply. View looking forward from the back panel, left to right, red, blue, and green.
4. Using the ratchet and 10 mm socket, remove the nut and lock washer holding the
green ground wire to the lug of the rear panel.
5. Using the screwdriver, remove the two screws holding the Power Entry with cable to
the rear panel and remove the power entry cable from the back panel.
6. Insert the replacement Power Entry with cable through the back panel cutout. Secure
the Power Entry with cable to the back panel using the screwdriver and the two
screws previously removed.
7. Using the screwdriver, secure the Power Entry with cable wires to the power supply at
TB1. View looking forward from the back panel, left to right, red, blue, and green.
Tighten to 1.0Nm ±10%.
Valleylab LS10, LS Series Single Channel Vessel Sealing Generator Service Manual 6-7
Page 94

Replacement Procedures
8. Using the ratchet and 10 mm socket attach the green ground wire to the back panel
lug with the nut and lock washer.
9. Replace the top cover onto the chassis and secure with the four screws removed in
step 2.
Power Supply Replacement
1. Turn the system off. Disconnect the power cord from the wall receptacle.
2. Remove the seven screws that secure the top cover to the chassis. Lift the cover off
the chassis. Set the cover and screws aside for reinstallation.
3. Disconnect the power supply cable from P30 on the main PCBA.
4. Disconnect the power supply control cable from J3 on the power supply.
5. Using the screwdriver, remove the Power Entry with cable wires from the power
supply. View looking forward from the back panel, left to right, red, blue, and green.
6. Remove the four screws holding the power supply to the chassis and lift the module
out of the chassis.
7. Remove the 6 screws holding the chassis mounting bracket to the power supply and
remove the bracket.
8. using the screwdriver, loosen the two screws securing the power supply cable to the
power supply and remove the cable.
9. Obtain the replacement power supply and attach the chassis mounting bracket using
the six screws from step 7. Tighten to 0.7Nm ±10%.
10. Insert the replacement power supply cable to the two screws on the power supply
making certain that the red wire is seated behind the top screw. Secure using the
Phillips torque screwdriver set to 1.0Nm ±10%.
11. Install the power supply into the chassis using the four screws removed in step 6.
12. Using the screwdriver, secure the Power Entry with cable wires to the power supply.
View looking forward from the back panel, left to right, red, blue, and green.Tighten
to 1.0Nm ±10%.
13. Connect the power supply control cable from the main PCBA P31 to the power
supply at J3.
14. Connect the power supply cable from the power supply to P30 on the main PCBA.
15. Replace the top cover onto the chassis and secure with the seven screws removed in
step 2.
Volume Control Cable Replacement
1. Turn the system off. Disconnect the power cord from the wall receptacle.
2. Remove the seven screws that secure the top cover to the chassis. Lift the cover off
the chassis. Set the cover and screws aside for reinstallation.
6-8 Valleylab LS10, LS Series Single Channel Vessel Sealing Generator Service Manual
Page 95

Replacement Procedures
3. Disconnect the volume control cable from the main PCBA at P28.
4. Using the 12 mm wrench, remove the nut and washer securing the cable to the back
panel and remove the cable.
5. Get the replacement volume control cable and disassemble the nut and washer from
the cable.
6. Insert the cable into the cutout in the back panel.
7. Making sure that the white wire is facing up, put the washer and nut over the
threaded stud and tighten with the wrench.
8. Insert the connector into P28 on the main PCBA.
9. Replace the top cover onto the chassis and secure with the seven screws removed in
step 2.
Footswitch Cable Replacement
Replacement Procedures
1. Turn the system off. Disconnect the power cord from the wall receptacle.
2. Remove the seven screws that secure the top cover to the chassis. Lift the cover off
the chassis. Set the cover and screws aside for reinstallation.
3. Disconnect the cable at the main PCBA at P34.
4. Using the screwdriver, remove the seven screws securing the cable to the back panel
and remove the cable.
5. Insert the replacement cable into the back panel ensuring that the white dot on the
circular connector is facing the power entry with cable.
6. Secure the cable to the rear panel using the Phillips torque screwdriver and the four
screws tightened to 0.7Nm ±0%.
7. Connect the cable to P34 on the main PCBA.
8. Replace the top cover onto the chassis and secure with the four screws removed in
step 2.
PCBA PROG MAIN Replacement
Information: If possible, login to Valleylab Exchange and dock the unit to capture the
current unit configuration prior to replacing the Main PCBA.
1. Turn the system off. Disconnect the power cord from the wall receptacle.
2. Remove the seven screws that secure the top cover to the chassis. Lift the cover off
the chassis. Set the cover and screws aside for reinstallation.
3. Remove all cable connections to the main PCBA.
4. Remove the six screws securing the main PCBA to the chassis.
5. Lift the main PCBA out of the chassis and insert the replacement main PCBA in its
place.
Valleylab LS10, LS Series Single Channel Vessel Sealing Generator Service Manual 6-9
Page 96

Replacement Procedures
6. Replace and tighten the six screws.
7. Insert all cable connections to the main PCBA.
8. Login to the Valleylab Exchange, PC must be online.
9. Connect the LS10 to Valleylab Exchange.
10. Follow the prompts to enter the serial number from the label on the rear panel of the
unit.
11. Perform the First Time Setup procedure.
12. Update the unit software if needed.
13. Replace the top cover onto the chassis and secure with the seven screws removed in
step 2.
Fan with Cable Replacement
1. Remove the assembly back panel.
2. Using the screwdriver, remove the four screws securing the fan to the rear panel and
lift the fan away from the rear panel.
3. Get the replacement fan and orient it in the same position as the original fan,
ensuring that the 2 air flow direction arrows on the side of the fan point down and
out and that the cable is oriented to the upper left as viewed from the front panel
looking towards the rear panel.
4. Secure the fan to the rear panel using the torque screwdriver and the four screws
previously removed.
5. Tighten the screws to 1.0Nm ±10%.
6. Reinstall the assembly back panel.
Speaker Replacement
1. Turn the system off. Disconnect the power cord from the wall receptacle.
2. Remove the seven screws that secure the top cover to the chassis. Lift the cover off
the chassis. Set the cover and screws aside for reinstallation.
3. Disconnect the speaker cable at P27 on the main PCBA.
4. Remove the four screws securing the speaker to the chassis. Retain the screws and
any other mounting hardware for reinstallation.
5. Lift the speaker away from the chassis.
6. Obtain the replacement speaker and using the four screws and any other mounting
hardware removed in step 4, install in the same location as the original speaker,
ensuring that the speaker wire connections are oriented towards the power supply
module.
7. Tighten the screws to 0.3Nm ±10%.
6-10 Valleylab LS10, LS Series Single Channel Vessel Sealing Generator Service Manual
Page 97

Replacement Procedures
8. Replace the top cover onto the chassis and secure with the seven screws removed in
step 2.
Display Board Cable Replacement
1. Turn the system off. Disconnect the power cord from the wall receptacle.
2. Remove the seven screws that secure the top cover to the chassis. Lift the cover off
the chassis. Set the cover and screws aside for reinstallation.
3. Disconnect the display board cable from the display board at P1.
4. Remove the display board cable from the main PCBA at P23.
5. Install the replacement display board cable by connecting it in the 2 locations listed in
steps 3 and 4 above.
6. Replace the top cover onto the chassis and secure with the seven screws removed in
step 2.
Replacement Procedures
Assembly Back Panel Replacement
1. Turn the system off. Disconnect the power cord from the wall receptacle.
2. Remove the seven screws that secure the top cover to the chassis. Lift the cover off
the chassis. Set the cover and screws aside for reinstallation.
3. Disconnect the following cables from the main PCBA: P21, P28, P27, and P34.
4. Using the screwdriver, remove the power entry with cable wires from TB1 of the
power supply module.
5. Remove the two screws, lower left and lower right, that secure the back panel to the
chassis and remove the assembly from the chassis.
6. Set the replacement back panel assembly in the same location and orientation as the
removed panel and secure to the chassis using the two screws from step 5. Tighten to
0.7Nm ±10%.
7. Using the screwdriver, secure the power entry with cable wires to TB1 of the power
supply. View looking forward from the back panel, left to right, red, blue, and
green.Tighten to 1.0Nm ±0%.
8. Connect the cables that were disconnected in step 3.
9. Replace the top cover onto the chassis and secure with the seven screws removed in
step 2.
Valleylab LS10, LS Series Single Channel Vessel Sealing Generator Service Manual 6-11
Page 98

Page 99

Chapter 7
Maintenance and Repair
This chapter presents the following information:
• The manufacturer’s responsibility
• Routine maintenance
• Returning the system for service
• Service centers
Precaution
Read all warnings, precautions, and instructions provided with this system before use.
Read the instructions, warnings, and cautions provided with electrosurgical instruments before
use. Specific instructions for electrosurgical instruments are not included in this manual.
Valleylab LS10, LS Series Single Channel Vessel Sealing Generator Service Manual 7-1
Page 100

Responsibility of the Manufacturer
Responsibility of the Manufacturer
Covidien is responsible for the safety, reliability, and performance of the system only if all
of the following conditions have been met:
• Installation and set-up procedures in this manual are followed.
• Assembly, operation, readjustments, modifications, or repairs are carried out by
qualified personnel only.
• The electrical installation of the relevant room complies with local codes and
regulatory requirements, such as IEC and BSI.
• The equipment is used in accordance with the instructions for use.
For warranty information, refer to the Limited Warranty in this manual.
Routine Maintenance and Periodic Safety Checks
When should the system be checked or serviced?
Covidien recommends that at least once a year, qualified service personnel inspect the
system and conduct periodic safety checks (see page 3-4). This inspection should include
adjusting the system to factory specifications.
When should the power cord be checked or replaced?
Check the power cord before each use of the system or at the intervals recommended by
your institution. Check the power cord for exposed wires, cracks, frayed edges, or a
damaged connector. Replace damaged cords.
When should the fuses be replaced?
An internal component malfunction can damage the fuses. The system fuses may need
to be replaced if the system fails the self-test or if the system stops functioning, even
though it is receiving power from a wall outlet. Refer to Fuse 250 VAC 8A RoHS
Replacement on page 6-6 for instructions.
7-2 Valleylab LS10, LS Series Single Channel Vessel Sealing Generator Service Manual
 Loading...