

Page 1
LIFEPAK® 500
Automated External Defibrillator
Operating Instructions
Page 2

Page 3
OPERATING INSTRUCTIONS
LIFEPAK® 500
Automated External Defibrillator
Page 4
IMPORTANT
!USA
Federal (USA) law restricts this device to sale by or on the order of a physician.
This automated external defibrillator (AED) is to be used by authorized personnel only.
Device Tracking
!USA
The U.S. Food and Drug Administration requires defibrillator manufacturers and distributors to
track the location of their defibrillators. The address to which this particular device was shipped is now
listed as the current tracking location. If the device is located somewhere other than the shipping address
or the device has been sold, donated, lost, stolen, exported, or destroyed, or if the AED was not obtained
directly from Medtronic, please either call the device tracking coordinator at 1.800.426.4448 or use one of
the postage-paid address change cards located in the back of this manual to update this vital tracking
information.
Responsibility for Information
It is the responsibility of our customers to ensure that the appropriate person(s) within their organization
have access to this information, including general safety information provided in Section 1.
Revision History
These operating instructions describe LIFEPAK 500 devices with the monophasic defibrillation waveform
(software version 5.5 or later) or the biphasic defibrillation waveform (software version 3.8 or later). Older
devices may not have all the features described in this manual.
Medtronic Emergency Response Systems
11811 Willows Road Northeast
Redmond, WA 98052-2003 USA
Telephone: 425.867.4000
Toll Free (USA only): 800.442.1142
Fax: 425.867.4121
Internet: www.medtronic-ers.com
www.medtronic.com
LIFEPAK and FA ST-PATCH are registered trademarks of Medtron ic Emergency Response Syst ems, Inc. CODE SUMMAR Y,
QUIK-COMBO, QUIK-VIEW, Data Transfer, REDI-PAK, Shock Advisory System, CODE-STAT, and PARTSLINE are trademarks
of Medtronic Emergency Response Systems, Inc. Medtronic is a registered trademark of Medtronic, Inc. Zoom is a registered
trademark and Hayes and ACCURA are trademarks of Zoom Technologies. U.S. Robotics and Sportster are registered
trademarks of U.S. Robotics. Microsoft and Windows are registered trademarks of Microsoft Corporation. EPSON and EPSON
ESC/P are registered trademarks of Seiko Epson Corporation. Specifications are subject to change without notice.
©1996–2005 Medtro nic Emergency Response Systems, Inc. All rights reserved.
Publication Date 12/2005 MIN 3005338-010 / CAT. 26500-001009
ii LIFEPAK 500 Au tomated External Defibr illator Operating Ins tructions
Medtronic E urope S.A.
Medtronic Emergency Response Systems
Rte. du Molliau 31
Case postale 84
1131 Tolochenaz
Switzerland
Telephone: 41.21.802.7000
Fax: 41.21.802.7900
Page 5

TABLE OF CONTENTS
Preface
About Defibrillation ....................................................................................................................................................x
Operator Considerations .........................................................................................................................................x
Indications for Use ....................................................................................................................................................xi
LIFEPAK 500 Automated External Defibrillator .............................................................................................xi
Features of the LIFEPAK 500 Automated External Defibrillator ............................................................xi
Text Conventions ....................................................................................................................................................xiii
1 Safety Information
Terms...........................................................................................................................................................................1-2
General Warnings and Cautions ........................................................................................................................1-2
Symbols ....................................................................................................................................................................... 1-3
2 Getting Ready
Unpacking and Initial Inspection ....................................................................................................................... 2-2
Controls, Indicators, and Connectors............................................................................................................. 2-2
About Batteries....................................................................................................................................................... 2-5
Setting the Clock.................................................................................................................................................... 2-6
Defining Setup Options........................................................................................................................................ 2-7
Factory Default Settings....................................................................................................................................2-12
LIFEPAK 500 Automated External Defibrillator Operating Instructions iii
©1996–2005 Medtronic Emergency Response Systems, Inc.
Page 6

Transferring Setup to Another LIFEPAK 500 AED...................................................................................2-13
Connecting Electrodes to the AED ................................................................................................................2-14
3Using the LIFEPAK500AED
Warnings and Cautions......................................................................................................................................... 3-2
Preparing the AED for Operation .................................................................................................................... 3-2
AED Operation .........................................................................................................................................................3-3
AED Prompts.............................................................................................................................................................3-5
Patient Care Transfer to a Different Device..............................................................................................3-10
Troubleshooting During Patient Care............................................................................................................3-10
4 Data Management
Overview of Data Storage and Retrieval...................................................................................................... 4-2
Sending Data to a Computer by Modem....................................................................................................... 4-5
Sending Data to a Computer by Direct Connection.................................................................................4-8
Sending Data to a Printer.................................................................................................................................... 4-9
5 Maintenance
Maintenance and Testing Scheduling............................................................................................................. 5-2
Inspection.................................................................................................................................................................. 5-2
Cleaning...................................................................................................................................................................... 5-4
Testing........................................................................................................................................................................ 5-4
Battery Maintenance .............................................................................................................................................5-7
Electrode Storage ................................................................................................................................................. 5-13
Service and Repair ................................................................................................................................................5-13
Warranty...................................................................................................................................................................5-14
Supplies, Accessories, and Training Tools...................................................................................................5-14
Specifications..........................................................................................................................................................5-15
Clinical Summary: Defibrillation of Ventricular Fibrillation and Ventricular Tachycardia...........5-21
6 Troubleshooting
Troubleshooting During Patient Care............................................................................................................. 6-2
Appendix A: Shock Advisory System
Appendix B: LIFEPAK 500 Operator’s Checklist
Appendix C: FAST-PATCH Defibrillation Cable Instructions for Use
Appendix D: QUIK-COMBO Defibrillation Cable Instructions for Use
Appendix E: Declarations of Conformity / Electromagnetic Compatibility Guidance
Index
iv LIFE PAK 500 Automated External Defib rillator Operating In structions
Page 7

LIST OF FIGURES
Figure 2-1 LIFEPAK 500 AED controls, indicators, and connectors .................................................................2-2
Figure 2-2 Accessories for the LIFEPAK 500 AED ...................................................................................................2-4
Figure 2-3 Battery installation..........................................................................................................................................2-5
Figure 2-4 Setup transfer connections ...................................................................................................................... 2-13
Figure 2-5 Connecting the QUIK-COMBO electrodes .........................................................................................2-14
Figure 3-1 Anterior-lateral position ...............................................................................................................................3-3
Figure 3-2 Anterior-posterior placement ...................................................................................................................3-4
Figure 4-1 Data stored by the LIFEPAK 500 AED .....................................................................................................4-2
Figure 4-2 Comparison of data stored for the Current Patient and Previous Patient ..............................4-3
Figure 4-3 Data stored when the AED stores a new patient record................................................................4-3
Figure 4-4 Equipment connections for data transfer by modem ......................................................................4-6
Figure 4-5 Equipment connections for data transfer by direct connection to a computer....................4-8
Figure 4-6 Connecting the AED to a printer.............................................................................................................4-10
Figure 4-7 Example of Event Log Report and Event Log Summary................................................................4-12
Figure 4-8 Example of CODE SUMMARY Report ................................................................................................... 4-13
Figure 4-9 Example of CODE SUMMARY Report (cont.) ....................................................................................4-14
Figure 4-10 Example of CODE SUMMARY Report (cont.) ....................................................................................4-15
Figure 4-11 Test Log Report Example ..........................................................................................................................4-16
Figure 5-1 Test load connection .....................................................................................................................................5-6
Figure 5-2 Active life, no patient use ............................................................................................................................5-9
Figure 5-3 Active life, one patient use per year........................................................................................................5-9
Figure 5-4 Active life, patient use every two months ............................................................................................5-9
LIFEPAK 500 Automated External Defibrillator Operating Instructions v
©1996–2005 Medtronic Emergency Response Systems, Inc.
Page 8

Figure 5-5 SLA battery capacity while installed in an AED for 3 months at 20°C (68°F)
without recharging ........................................................................................................................................ 5-11
Figure C-1 FAST-PATCH defibrillation cable for the LIFEPAK 500 AED..........................................................C-1
Figure C-2 Attaching lanyard............................................................................................................................................C-1
Figure C-3 Inserting defibrillation cable into AED.....................................................................................................C-1
Figure C-4 Connecting to FAST-PATCH defibrillation/ECG electrodes......................................................... C-1
Figure C-5 Disconnecting from electrodes ................................................................................................................ C-2
Figure D-1 QUIK-COMBO defibrillation cable for the LIFEPAK 500 AED .......................................................D-1
Figure D-2 Attaching lanyard............................................................................................................................................D-1
Figure D-3 Inserting defibrillation cable into AED .....................................................................................................D-1
Figure D-4 Connecting QUIK-COMBO electrodes..................................................................................................D-2
vi LIFE PAK 500 Au tomated External Defibr illator Operating Ins tructions
Page 9

LIST OF TABLES
Table 2-1 Controls, Indicators, and Connectors .........................................................................................................2-2
Table 2-2 Accessories for the LIFEPAK 500 AED.......................................................................................................2-4
Table 2-3 Modem Phone Number Dial String Characters.......................................................................................2-7
Table 2-4 Modem Selection Numbers............................................................................................................................2-8
Table 2-5 Setup Options and Factory Default Settings........................................................................................2-12
Table 4-1 LIFEPAK 500 AED Data and Retrieval.........................................................................................................4-4
Table 4-2 Required Resources for Sending Data to a Computer by Modem ..................................................4-5
Table 4-3 Required Resources for Sending Data to a Computer by Direct Connection............................4-8
Table 4-4 Required Resources for Printing Data ........................................................................................................4-9
Table 5-1 LIFEPAK 500 AED Inspection .........................................................................................................................5-2
Table 5-2 Recommended Cleaning Methods...............................................................................................................5-4
Table 5-3 Supplies, Accessories, and Training Tools .............................................................................................. 5-14
1
Table 5-4 LIFEPAK 500 AED Specifications
Table 5-5 LIFEPAK 500 AED Battery Charger Specifications.............................................................................5-20
.............................................................................................................. 5-15
Table 6-1 Troubleshooting During Patient Care .........................................................................................................6-2
Table 6-2 Troubleshooting During Modem Data Transfer..................................................................................... 6-3
Table 6-3 Troubleshooting During Printing...................................................................................................................6-4
Table 6-4 Troubleshooting During Setup Transfer....................................................................................................6-5
Table 6-5 LIFEPAK 500 AED Screen Messages...........................................................................................................6-6
Table 6-6 LIFEPAK 500 AED Voice Prompts ................................................................................................................6-8
Table 6-7 LIFEPAK 500 AED Event Types.....................................................................................................................6-9
Table A-1 LIFEPAK 500 AED SAS Performance Table for Adult ECGs..............................................................A-1
Table A-2 LIFEPAK 500 AED SAS Performance Table for Pediatric ECGs ......................................................A-2
LIFEPAK 500 Automated External Defibrillator Operating Instructions vii
©1996–2005 Medtronic Emergency Response Systems, Inc.
Page 10

Table E-1 Guidance and Manufacturer’s Declaration - Electromagnetic Emissions ....................................E-3
Table E-2 Guidance and Manufacturer’s Declaration - Electromagnetic Immunity.....................................E-4
Table E-3 Guidance and Manufacturer’s Declaration - Electromagnetic Immunity.....................................E-5
Table E-4 Recommended Separation Distances........................................................................................................E-6
viii LIFEPAK 500 Automated External Defibrillator Operating Instr uctions
Page 11

PREFACE
Preface
About Defibrillation page x
Operator Considerations x
Indications for Use xi
LIFEPAK 500 Automated External Defibrillator xi
Features of the
LIFEPAK 500 Automated External Defibrillator
Text Conventions xiii
xi
LIFEPAK 500 Automated External Defibrillator Operating Instructions ix
©1996–2005 Medtronic Emergency Response Systems, Inc.
Page 12

Preface
ABOUT DEFIBRILLATION
Defibrillation is a recognized means of terminating certain potentially fatal arrhythmias. A direct current
defibrillator applies a brief, high-energy pulse of electricity to the heart muscle. The LIFEPAK
Automated External Defibrillator (AED) delivers this energy through disposable defibrillation electrodes
applied to the patient's chest.
Defibrillation is only one aspect of the medical care required to resuscitate a patient with a shockable ECG
rhythm. Depending on the situation, other supportive measures may include:
• Cardiopulmonary resuscitation (CPR)
• Administration of supplemental oxygen
• Drug therapy
It is recognized that successful resuscitation is related to the length of time between the onset of a heart
rhythm that does not circulate blood (ventricular fibrillation, pulseless ventricular tachycardia) and
defibrillation. The American Heart Association has identified the following as critical links in the chain of
survival from cardiac arrest:
• Early access
• Early CPR by first responders or bystanders
•Early defibrillation
• Early advanced life support
The physiological state of the patient may affect the likelihood of successful defibrillation. Thus, failure to
resuscitate a patient is not a reliable indicator of defibrillator performance. Often, patients will exhibit a
muscular response (such as jumping or twitching) during energy transfer. The absence of such a response
is not a reliable indicator of actual energy delivery or device performance.
®
500
OPERATOR CONSIDERATIONS
The LIFEPAK 500 AED is a semi-automatic defibrillator that uses a patented Shock Advisory System™.
This software algorithm analyzes the patient's electrocardiographic (ECG) rhythm and indicates whether
or not it detects a shockable rhythm. The LIFEPAK 500 AED requires operator interaction to defibrillate
the patient.
The LIFEPAK 500 AED is intended for use by personnel who are authorized by a physician/medical director
and have, at a minimum, the following skills and training:
•CPR training
• AED training equivalent to that recommended by the American Heart Association
• Training in the use of the LIFEPAK 500 AED
The LIFEPAK 500 AED is intended for use in the hospital and out-of-hospital environments. It has been
tested to RTCA/DO-160C, "Environmental Conditions and Test Procedures for Airborne Equipment"
(refer to Specifications, page 5-15).
x LIFEPAK 500 Automated External Defibrillator Operating Instr uctions
Page 13

Preface
INDICATIONS FOR USE
The LIFEPAK 500 AED is to be used only on patients in cardiopulmonary arrest. The patient must be
unconscious, not breathing normally, and showing no signs of circulation (for example, no pulse, and/or no
coughing, no movement) before the device is used to analyze the patient's ECG rhythm. With
Infant/Child Reduced Energy Defibrillation Electrodes, the specially configured biphasic LIFEPAK 500 AED
may be used on children who are less than eight years old or who weigh less than 25 kg (55 lb).
LIFEPAK 500 AUTOMATED EXTERNAL DEFIBRILLATOR
LIFEPAK 500 AED, Monophasic
Yellow exterior with monophasic waveform.
LIFEPAK 500 AED, Biphasic
Yellow exterior with biphasic waveform.
Preface
LIFEPAK 500 AED, Public Safety
Dark Gray exterior with biphasic waveform.
FEATURES OF THE LIFEPAK 500 AUTOMATED EXTERNAL DEFIBRILLATOR
The optional and configurable features of the LIFEPAK 500 AED are designed to meet a variety of
protocol needs. Authorized operators of this AED should always use the AED in accordance with local
protocols.
Defibrillation Waveform
The LIFEPAK 500 AED is available with one of two defibrillation waveforms: monophasic or biphasic. For a
description of each defibrillation waveform, refer to page 5-16 and page 5-20. The LIFEPAK 500 AED
control and display functions are the same for either defibrillation waveform.
Defibrillation Electrodes
The LIFEPAK 500 AED uses disposable QUIK-COMBO™ pacing/defibrillation/ECG electrodes, with or
without the REDI-PAK™ preconnect system, and FAST-PATCH
The use of these electrodes allows rapid transfer of care to other devices that also use the same type of
Medtronic electrodes.
Infant/Child Reduced Energy Defibrillation Electrodes can be used only with a biphasic LIFEPAK 500 AED
that has been modified specifically to accept these electrodes. (Refer to Item 4, Cable Connector on
page 2-3.) Infant/Child Reduced Energy Defibrillation Electrodes are not transferable to manual
defibrillator/monitors and are not compatible with the QUIK-COMBO Therapy Cable (refer to
Appendix D).
®
disposable defibrillation/ECG electrodes.
LIFEPAK 500 Automated External Defibrillator Operating Instructions xi
©1996–2005 Medtronic Emergency Response Systems, Inc.
Page 14

Preface
Automated Operation
The operator controls AED operation with two or three top-panel buttons (ON/OFF, ANALYZE [optional],
SHOCK). For LIFEPAK 500 AEDs that do not have an ANALYZE button, the AED operates in AUTO
and
ANALYZE 2
The AED guides the operator through operating procedures with a combination of:
• Voice prompts
•Tones
•Flashing LEDs
• Screen messages
The screen messages appear on a two-line liquid crystal display (LCD). Other LCD information includes:
•Real-time clock
• Cumulative shock counter
• Status and service messages
•CPR countdown timer
mode (refer to page 2-9).
Continuous Monitoring
The LIFEPAK 500 AED operates in two modes: ECG analysis and Continuous Patient Surveillance System
(CPSS). During analysis, the AED indicates if it detects a shockable or nonshockable rhythm. The CPSS,
which is active when the AED is not performing an analysis, automatically monitors for a potentially
shockable rhythm.
Motion Detection
The LIFEPAK 500 AED includes a patented system that detects motion. When motion that could distort
the ECG rhythm occurs, the ECG data is automatically excluded from analysis by the motion detection
system.
Data Management
The LIFEPAK 500 AED digitally records patient data, including ECG rhythm and delivered shocks. A digital
audio recording of scene activity is available as an option. Recorded data may be transferred by direct
connection to a printer or computer or by a modem to a remote computer. Three optional, Microsoft
Windows
program transfers, stores, and prints AED reports. The QUIK-VIEW™ 500 data review program includes all
of the Data Transfer 500 functions and the capability to review ECG and audio data on a computer. The
CODE-STAT™ Suite data management system provides comprehensive and varied data storage, review,
and reporting capabilities for quality assessment and system performance analysis.
®
-compatible data management software programs are available. The Data Transfer™ 500
®
Battery Options
A rechargeable sealed lead-acid battery or one of two nonrechargeable lithium batteries (sulfur dioxide or
manganese dioxide) provide power to the AED. The rechargeable battery requires periodic recharging by
an external battery charger.
Automatic Self-Test
The AED performs an automatic self-test every 24 hours and every time you turn on the AED. This
feature tests the most important circuitry in the device to give the user a high degree of confidence that
the AED is ready for use.
xii LIFEPAK 500 Automated External D efibrillator Operati ng Instruc tions
Page 15

Preface
Readiness Display
Most LIFEPAK 500 AEDs with the biphasic waveform include a readiness display on the device’s handle
that can be seen at all times.
test detects that service is required or if the device detects that the battery needs immediate
replacement, the
OK indicator disappears and a service and/or battery indicator appear(s).
OK displays if the automatic self-test is completed successfully. If the self-
Customized Setup
Operation may be customized for a LIFEPAK 500 AED with a readiness display by accessing a setup mode.
Definable operating features include the modem phone number, the time interval allowed for CPR, and
other features. Refer to the LIFEPAK 500 Automated External Defibrillator Setup Instructions
(MIN 3012275) for more information about customized setup options.
Once you have customized the setup, the
setup to other LIFEPAK 500 AEDs.
TRANSFER SETUP feature enables you to quickly transfer the
Optional Accessories
Optional soft and hard carrying cases help to protect the AED and provide a pouch to store electrodes.
Use the Medtronic LIFEPAK 500 AED Trainer to train operators to use the LIFEPAK 500 AED.
Preface
TEXT CONVENTIONS
Throughout this manual, special text characters are used to indicate labels, LCD messages, and voice
prompts:
Operating control labels:
LCD messages:
Voice prompts:
CAPITAL LETTERS such as ON/OFF and SHOCK.
CAPITAL LETTERS such as CONNECT ELECTRODES.
CAPITAL ITALICIZED LETTERS such as PUSH ANALYZE.
LIFEPAK 500 Automated External Defibrillator Operating Instructions xiii
©1996–2005 Medtronic Emergency Response Systems, Inc.
Page 16

Page 17

SAFETY INFORMATION
This section provides important information to help you operate the LIFEPAK 500 Automated
External Defibrillator (AED). Familiarize yourself with all of these terms, warnings, and symbols.
Terms page 1-2
General Warnings and Cautions 1-2
Symbols 1-3
1 Safety Information
LIFEPAK 500 Automated External Defibrillator Operating Instructions 1-1
©1996–2005 Medtronic Emergency Response Systems, Inc.
Page 18

Safety Information
TERMS
The following terms are used either in this manual or on the LIFEPAK 500 AED:
Danger: Immediate hazards that will result in serious personal injury or death.
Warning: Hazards or unsafe practices that could result in serious personal injury or death.
Caution: Hazards or unsafe practices that could result in minor personal injury, product damage, or
property damage.
GENERAL WARNINGS AND CAUTIONS
The following section provides general warning and caution statements. Other specific warnings and
cautions are provided as needed in other sections of this manual.
WARNINGS!
Shock hazard.
The defibrillator delivers up to 360 joules of electrical energy. Unless properly used as described in these
Operating Instructions, this electrical energy may cause serious injury or death. Do not attempt to
operate this device unless thoroughly familiar with these Operating Instructions, and the function of all
controls, indicators, connections, and accessories.
Shock hazard.
Do not disassemble the defibrillator. It contains no operator serviceable components and dangerous high
voltages may be present. Contact authorized service personnel for repair.
Shock or fire hazard.
Do not immerse any portion of this device in water or other fluids. Avoid spilling any fluids on device or
accessories. Do not clean with ketones or other flammable agents. Do not autoclave or sterilize this
device or accessories unless otherwise specified.
Possible fire or explosion.
Do not use this device in the presence of flammable gases or anesthetics. Use care when operating this
device close to oxygen sources (such as bag-valve-mask devices or ventilator tubing). Turn off gas
source or move source away from patient during defibrillation.
Possible electrical interference with device performance.
Equipment operating in close proximity may emit strong electromagnetic or radio frequency
interference (RFI) which could affect the performance of this device. RFI may result in improper device
operation, distorted ECG, failure to detect a shockable rhythm, or cessation of pacing. Avoid operating
the device near cauterizers, diathermy equipment, cellular phones, or other portable and mobile RF
communications equipment. Maintain equipment separation of at least 1.2 m (4 ft) and do not rapidly key
EMS radios on and off. Contact a technical support representative if assistance is required.
Possible electrical interference.
Using cables, electrodes, or accessories not specified for use with this device may result in increased
emissions or decreased resistance to electromagnetic interference which could affect the performance
of this device or of equipment in close proximity. Use only parts and accessories specified in these
operating instructions.
1-2 LIFEPAK 500 Automated External Defibrillator Operating Instructions
Page 19

Safety Information
WARNINGS!
Possible electrical interference.
This defibrillator may cause electromagnetic interference (EMI) especially during charge and energy
transfers. EMI may affect the performance of equipment operating in close proximity. Verify the effects
of defibrillator discharge on other equipment prior to using defibrillator in an emergency situation, if
possible.
Possible device shutdown.
Always have access to a spare, fully-charged, properly maintained battery. Replace the battery when the
device displays a low battery warning.
Possible improper device performance.
Using other manufacturers’ cables, electrodes, or batteries may cause the device to perform improperly
and invalidates the safety agency certification. Use only the accessories specified in these Operating
Instructions.
Safety risk and possible equipment damage.
Monitors, defibrillators, and their accessories (including electrodes and cables) contain ferromagnetic
materials. As with all ferromagnetic equipment, these products must not be used in the presence of the
high magnetic field created by a Magnetic Resonance Imaging (MRI) device. The high magnetic field
created by an MRI device will attract the equipment with a force sufficient to cause death or serious
personal injury to persons between the equipment and the MRI device. This magnetic attraction may also
damage the equipment. Skin burns will also occur due to heating of electrically conductive materials, such
as patient leads and pulse oximeter sensors. Consult the MRI manufacturer for more information.
1 Safety Information
Shock hazard.
Do not insert a hand, foot, or any object other than a battery into the battery well of this device.
CAUTION!
Possible equipment damage.
This device may be damaged by mechanical or physical abuse such as immersion in water or dropping the
device. If the device has been abused, remove it from use and contact a qualified service technician.
SYMBOLS
The symbols below may be found in this manual or on various configurations of the LIFEPAK 500 AED and
accessories:
Defibrillation protected, type BF patient connection
Attention, consult accompanying documents
Warning, high voltage
LIFEPAK 500 Automated External Defibrillator Operating Instructions 1-3
©1996–2005 Medtronic Emergency Response Systems, Inc.
Page 20

Safety Information
Indicator, steady display indicates battery is low, replace battery; flashing (key panel only)
indicates replace battery immediately
Indicator, steady display indicates device requires service; flashing (key panel only)
indicates service is required immediately
OK
Pb
Indicator, appears on the readiness display indicating the self-test completed successfully
Buttons for setting the clock, transferring data, and setting options
Type BF patient connection
Rechargeable battery: recycle battery
Do not dispose of this product in the unsorted municipal waste stream. Dispose of this
product according to local regulations. See http://recycling.medtronic.com for
instructions on disposing of this product.
Battery Charger: green LED indicates power is on
Battery Charger: battery is charging; amber LED indicates fast charge, green LED
indicates trickle charge
Indoor use only
Safety Class II equipment (reinforced insulation)
Data Cable: to printer
Data Cable: to PC
Data Cable: to modem
IOIOIO
YYWW
LOT
1-4 LIFEPAK 500 Automated External Defibrillator Operating Instructions
Setup transfer cable
Lot number (batch code)
Use By date shown: yyyy-mm-dd or yyyy-mm
Single use only
Page 21

Safety Information
0123
!USA
REF
MIN
CAT.
Mark of conformity according to the European Medical Device Directive 93/42/EEC
Canadian Standards Association certification for Canada and the United States
Cable Connector
Biphasic defibrillation shock
The Infant/Child Reduced Energy Defibrillation Electrodes are not compatible with
QUIK-COMBO defibrillation and therapy cables. To use Infant/Child electrodes, connect
Infant/Child electrodes directly to the AED.
For USA audiences only
Reorder number (same as CAT.)
Manufacturer’s item number
Catalog number used for placing orders
1 Safety Information
LIFEPAK 500 Automated External Defibrillator Operating Instructions 1-5
©1996–2005 Medtronic Emergency Response Systems, Inc.
Page 22

Page 23

GETTING READY
This section provides a basic orientation to the LIFEPAK 500 Automated External Defibrillator (AED)
and describes how to prepare the AED for use.
Unpacking and Initial Inspection page 2-2
Controls, Indicators, and Connectors 2-2
About Batteries 2-5
Setting the Clock 2-6
Defining Setup Options 2-7
Factory Default Settings 2-12
Transferring Setup to Another LIFEPAK 500 AED 2-13
Connecting Electrodes to the AED 2-14
2Getting Ready
LIFEPAK 500 Automated External Defibrillator Operating Instructions 2-1
©1996–2005 Medtronic Emergency Response Systems, Inc.
Page 24
Getting Ready
UNPACKING AND INITIAL INSPECTION
Remove the LIFEPAK 500 AED from the shipping container. Examine the AED and accessories for any sign
of damage during shipping. Make sure that all the required supplies and accessories, including electrodes
and batteries, are present. Save the shipping container and foam inserts for use in reshipping the AED.
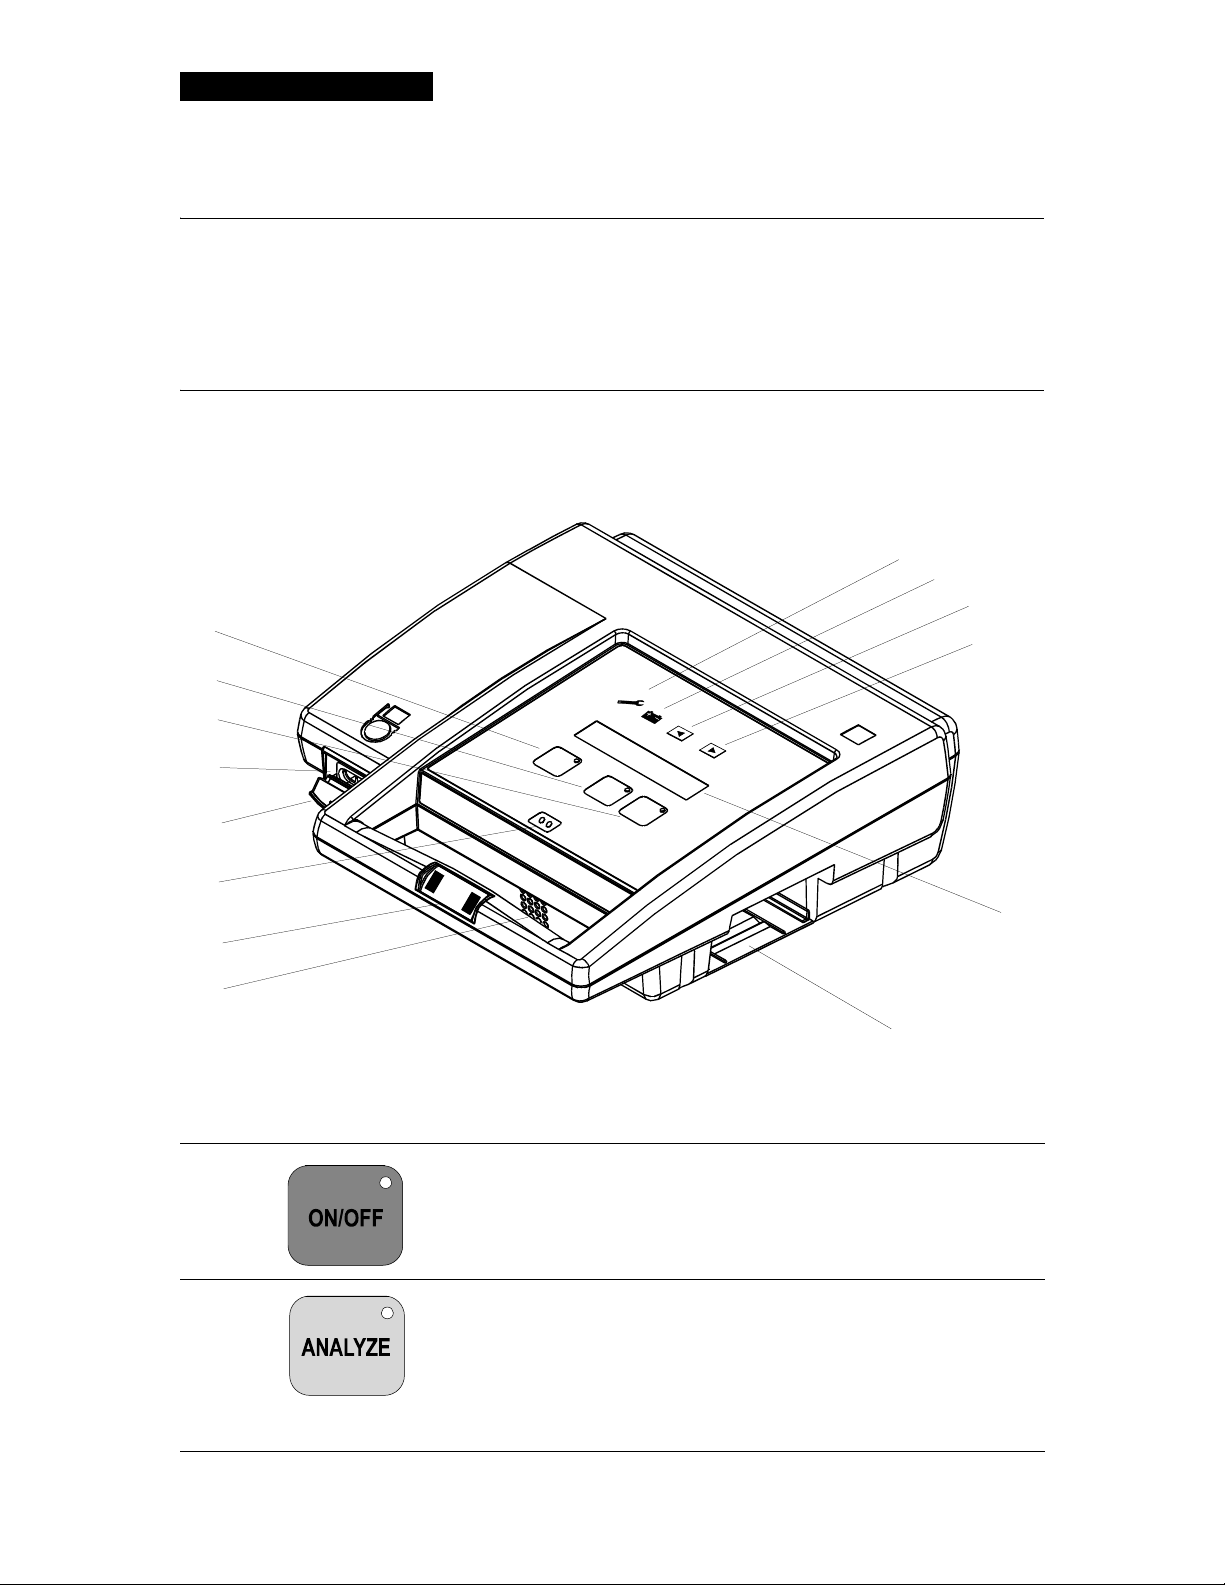
CONTROLS, INDICATORS, AND CONNECTORS
Figure 2-1 and Table 2-1 provide an overview of the LIFEPAK 500 AED controls, indicators, and connectors.
Figure 2-2 and Table 2-2 provide an overview of the accessories.
14
13
12
1
11
2
3
4
5
6
O
K
7
8
Figure 2-1 LIFEPAK 500 AED controls, indicators, and connectors
Table 2-1 Controls, Indicators, and Connectors
1
ON/OFF button turns the power on or off. The LED is lit
Green
whenever the AED is on.
10
9
2 Yellow
ANALYZE button initiates analysis of the patient's ECG
rhythm when pressed. The LED is lit while the AED analyzes the
rhythm. The LED flashes to prompt the operator to press
ANALYZE.
Note: Does not apply to LIFEPAK 500 AEDs that do not have an
ANALYZE button. In this case, the ANALYZE button is replaced
by a blank
2-2 LIFEPAK 500 Automated Exter nal Defibrillator Operating Instructions
MENU button, and analysis occurs automatically.
Page 25
Getting Ready
3
4 Cable Connector
Receptacle
5 Connector Cover
6 Microphone
7 Readiness Display
Orange
the operator to press
SHOCK button delivers energy. The LED flashes to prompt
SHOCK when the AED is fully charged.
Allows connection to the following:
• QUIK-COMBO electrodes (REDI-PAK or LLW)
• Cables for connection to a printer, computer, modem, another
LIFEPAK 500 AED, or FAST-PATCH electrodes
• Test load for testing
•Patient Simulator
If the cable connector has a pink-colored center, Infant/Child
Reduced Energy Defibrillation Electrodes can be used with the AED
by connecting the electrodes directly to the cable connector
receptacle.
Protects cable connector.
Allows input for audio recording.
Displays
OK when the automatic self-test is completed successfully.
If the self-test detects that service is required or if the device
detects that the battery needs immediate replacement, the
OK
indicator disappears and a service and/or battery indicator
appear(s).
8 Speaker
9 Battery Compartment
Provides audio voice prompts and tones.
Accommodates a single removable battery pak that provides power
for the AED.
10 Liquid Crystal Display
Provides operating messages on two 20-character lines.
(LCD)
11 Right arrow
Used to set the clock, transfer data, and set options.
button
12
▲
Up arrow
Used to set the clock, transfer data, and set options.
button
13 Low battery
indicator
14 Service
indicator
*
Accent marks are not included in operating messages for international languages.
Steady display indicates the AED battery is low; flashing, on
keypanel only, indicates replace battery immediately.
Steady display indicates the AED requires service by authorized
service personnel; flashing indicates service is required immediately.
*
2Getting Ready
LIFEPAK 500 Automated External Defibrillator Operating Instructions 2-3
©1996–2005 Medtronic Emergency Response Systems, Inc.
Page 26
Getting Ready
15
16
17
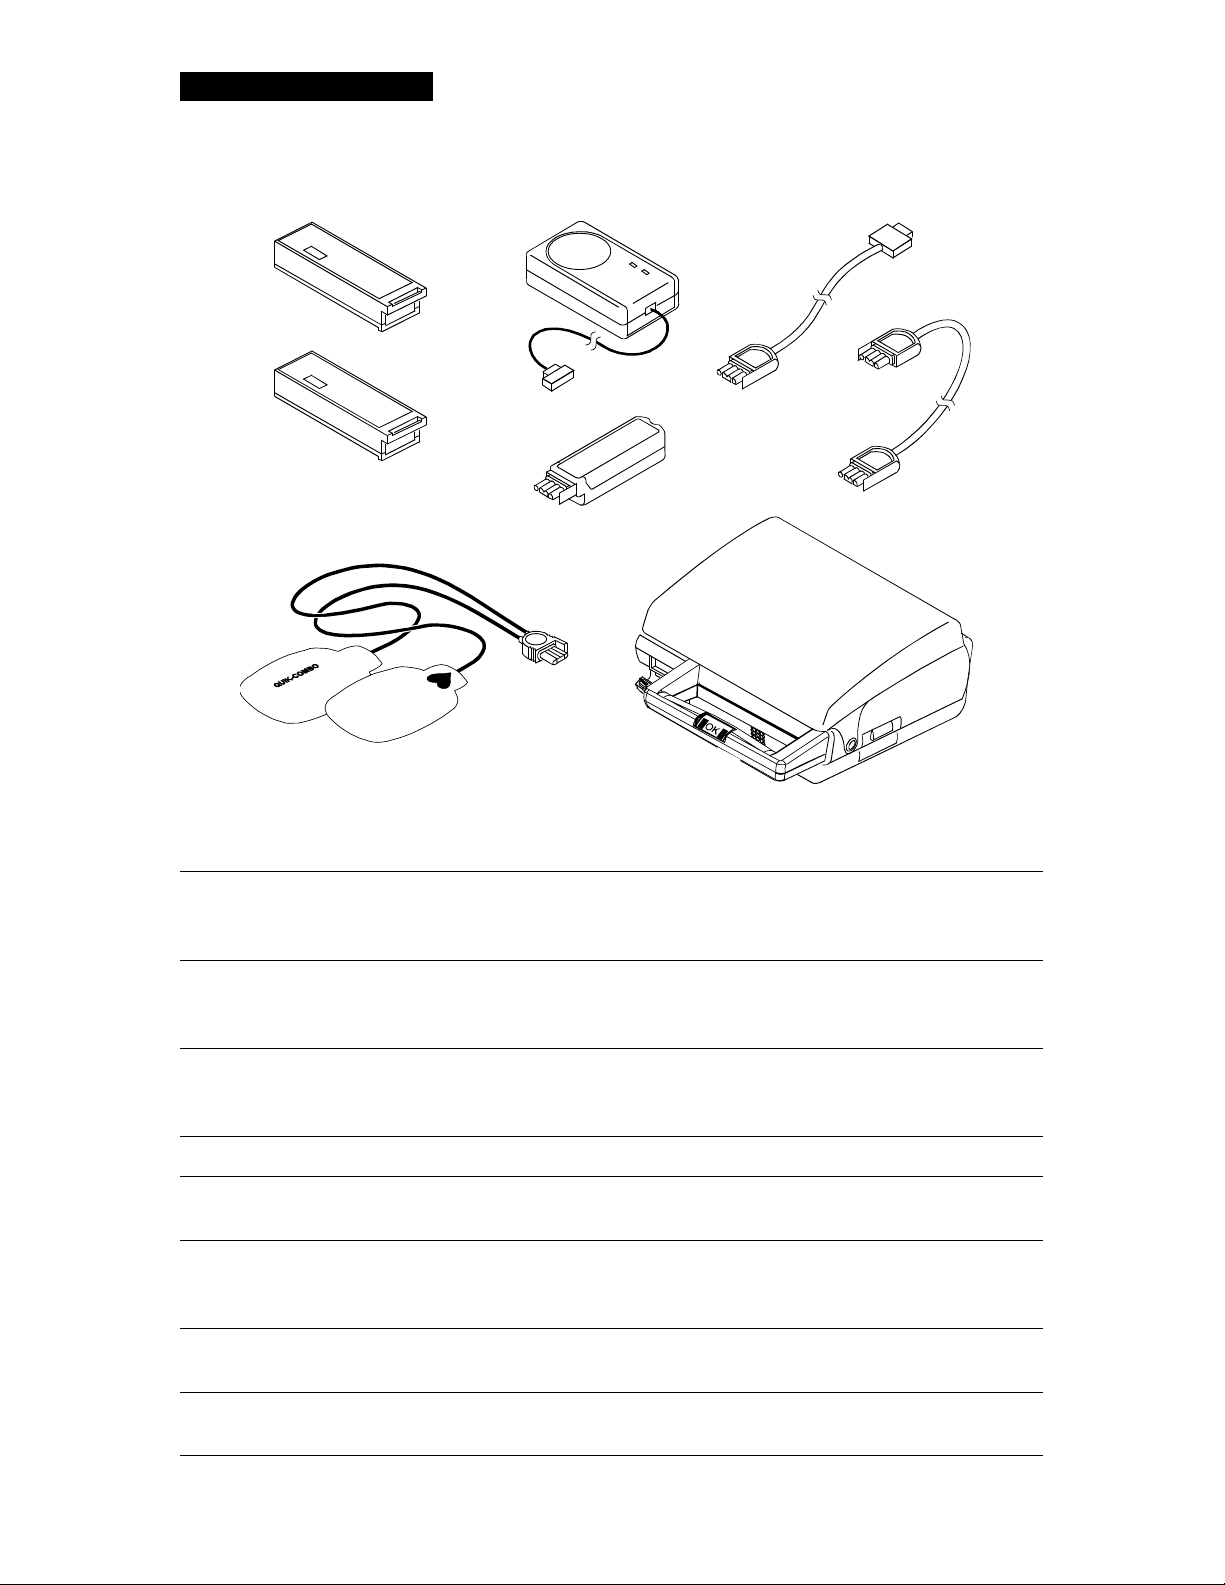
Figure 2-2 Accessories for the LIFEPAK 500 AED
18
20
21
19
22
Table 2-2 Accessories for the LIFEPAK 500 AED
15 LIFEPAK 500
Provides power for the LIFEPAK 500 AED.
nonrechargeable
lithium battery pak
16 LIFEPAK 500
rechargeable SLA
Provides power for the LIFEPAK 500 AED. The SLA (Sealed Lead-Acid)
battery pak is recharged by the battery charger listed in 18.
battery pak
17 QUIK-COMBO
electrodes
Allow delivery of therapy to the patient. Connect to the cable
connector on the AED or to the QUIK-COMBO defibrillation cable (see
Appendix D).
18 Battery Charger Provides power to recharge the rechargeable SLA battery pak.
19 Test Load Provides an external test load for the AED. Connects to the cable
connector on the AED.
20 Data cable One of three available cables shown. Allows transfer of data from AED
to PC, modem, or printer. Plugs into the cable connector on the AED.
Cables are 3-wire cables.
21 Setup Transfer
Cable
Allows transfer of customized device setup from one
LIFEPAK 500 AED to another.
22 Carrying cases Hard and soft carrying cases available. Cases help protect the AED and
provide storage for electrodes.
2-4 LIFEPAK 500 Automated Ex ternal Defibrillator Operating Instructions
Page 27
Getting Ready
ABOUT BATTERIES
Use either of the following battery types to power the LIFEPAK 500 AED:
• LIFEPAK 500 rechargeable sealed lead-acid (SLA) battery pak
• LIFEPAK 500 nonrechargeable lithium sulfur dioxide (LiSO
• LIFEPAK 500 nonrechargeable lithium manganese dioxide (LiMnO
) battery pak
2
) battery pak
2
To save battery life if the LIFEPAK 500 AED is accidentally turned on or left on, the AED has a battery
conservation feature. If the AED is not connected to a patient and no buttons are pressed for 15 minutes,
the AED will automatically turn off.
With a battery installed, the LIFEPAK 500 AED automatically performs daily auto tests when the AED is not
in use. These auto tests, along with normal battery self-discharge, consume battery energy.
For information about maintaining or recharging the batteries, refer to page 5-7.
Battery Installation
WARNING!
Inability to provide therapy.
The LIFEPAK 500 nonrechargeable lithium manganese dioxide battery pak does not fit in all
LIFEPAK 500 AEDs. Use only with AEDs marked -003 inside the battery well.
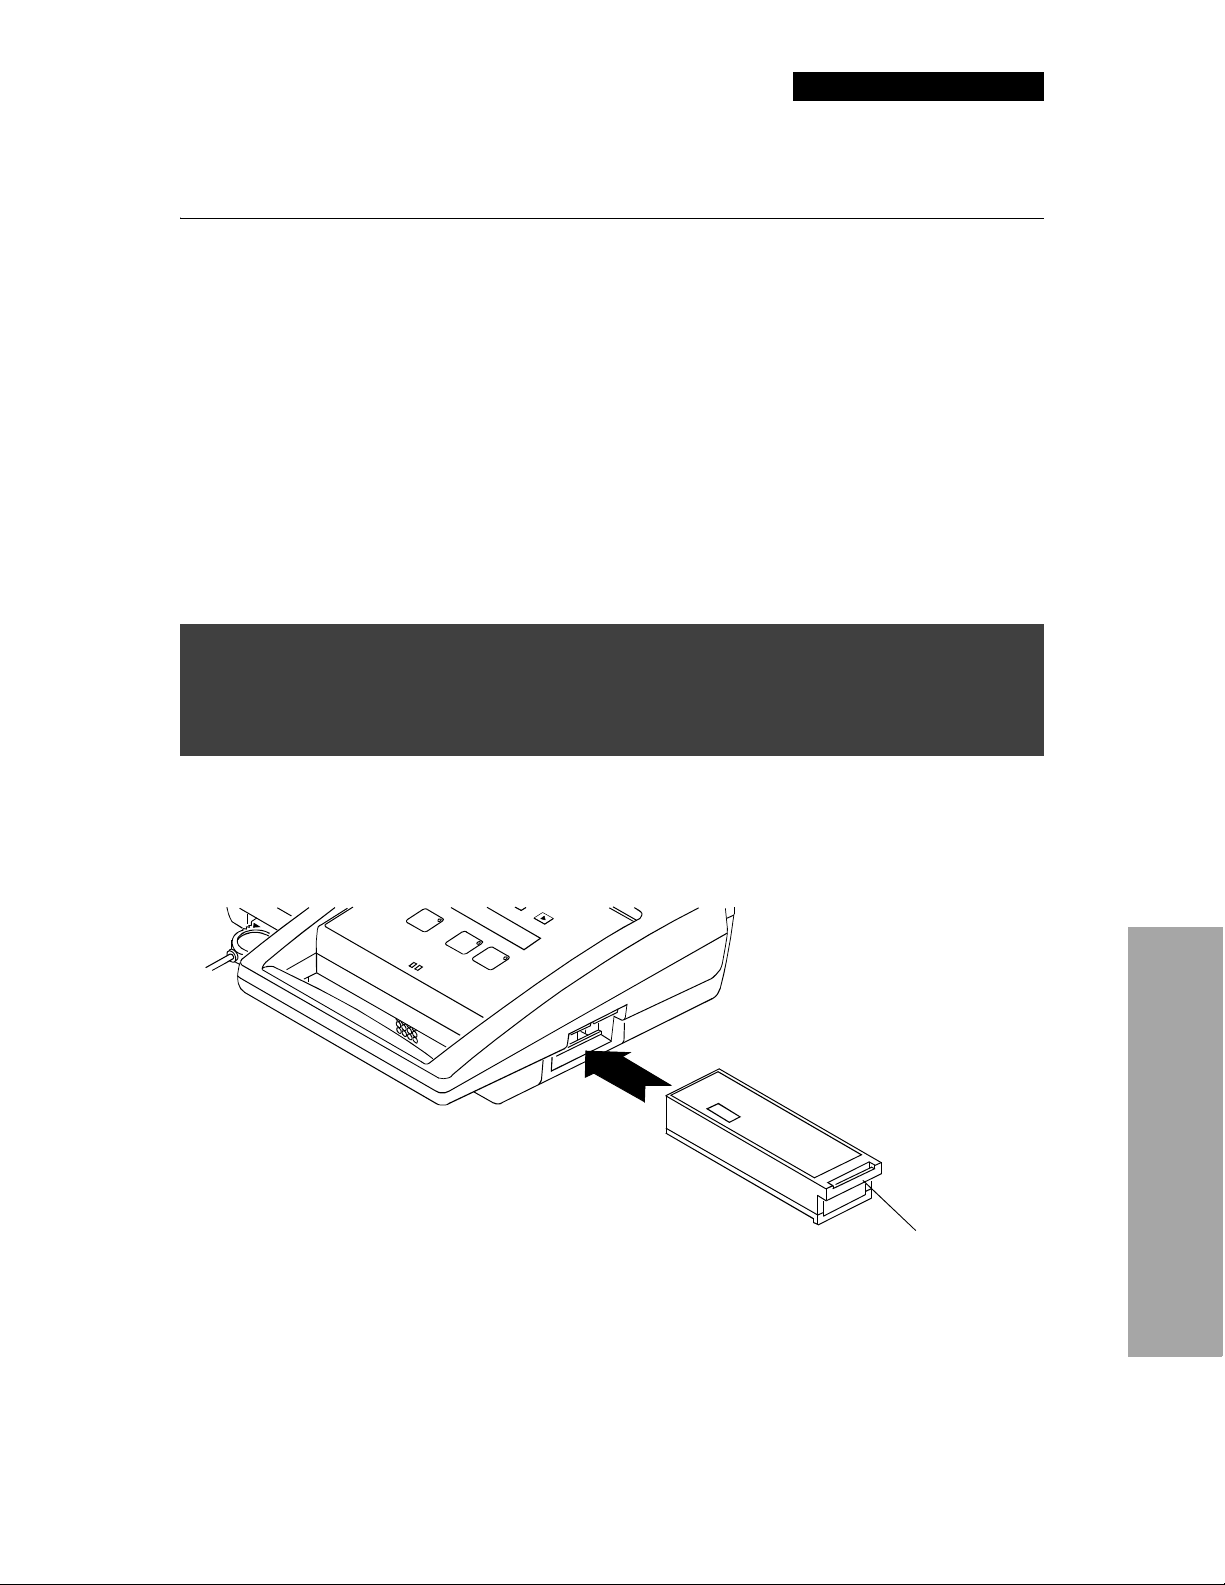
To install a battery:
1 Insert the connector end of the battery into the battery compartment as shown in Figure 2-3.
2 Slide the battery all the way in until it latches securely.
Latch release
2Getting Ready
Figure 2-3 Battery installation
LIFEPAK 500 Automated External Defibrillator Operating Instructions 2-5
©1996–2005 Medtronic Emergency Response Systems, Inc.
Page 28

Getting Ready
Battery Removal
To remove the battery:
1 Turn off the AED.
2 Lift the latch release on the battery and slide it out.
Note: When a battery is removed from the AED, battery and service indicators appear on the
readiness display. After replacing the battery, turn on the device to reset the readiness display.
Low Battery Detection
Whenever the LIFEPAK 500 AED is turned on after it has been off for at least 60 seconds, it takes about 10
seconds to complete a self-test and to indicate a low or replace battery condition.
The AED monitors the battery power level and indicates when the battery should be replaced:
Indicator illuminates on the device key panel and appears on the readiness display and
LOW BATTERY message displays on the LCD; battery is low.
the
Indicator flashes on and off on the device key panel, the
displays, and a voice prompt sounds; battery is low and should be replaced
immediately.
Note: The readiness display battery indicator does not flash.
When the battery power is too low, the AED will automatically turn off. The service and battery indicators
appear on the readiness display.
AUDIO ALERT option is set to ON and the AED detects a low or replace battery condition during an
If the
automatic self-test while it is not in use, audible beeps and the
AUDIO ALERT will repeat every 20 minutes until the battery is replaced or battery power becomes too
The
low to power the AED.
REPLACE BATTERY voice prompt sounds.
REPLACE BATTERY message
SETTING THE CLOCK
You may set the clock at any time except during the interval between patient care and data transfer to a
computer or printer. Setting the clock during this interval will interfere with proper time synchronization.
To change the date and time:
1 Turn on the AED. (Be sure the AED has been off for at least 60 seconds and that nothing is connected
to the AED.)
2 Press and hold the
time setting:
S or X button for approximately three seconds until the AED displays the date and
24MAY04 12:36:09
Blinking
A value blinking on and off indicates that the value can be changed. The day, month, year, hour, and minutes
values can be increased. The seconds value can be reset to zero.
2-6 LIFEPAK 5 00 Automated External Defibrillator Operating Instruction s
Page 29

Getting Ready
3 To set the hour:
• Press the
• Press the
S button to increase the value.
X button to advance to the next field.
4 To set the minutes:
• Press the
• Press the
S button to increase the value.
X button to advance to the next field.
5 To reset the seconds value to zero:
• Press the
S button once.
Note: If the seconds value is less than 30 when reset, the minutes value stays the same. If the
seconds value is greater than 30 seconds when reset, the minutes value increases by one.
• Press the
X button to advance to the next field.
6 Repeat Step 3 as needed to set the day, month, and year.
7 After the date and time are set, press
ON/OFF to turn off the AED.
DEFINING SETUP OPTIONS
The following paragraphs describe the setup options that define some of the operating features for the
LIFEPAK 500 AED. The user should become thoroughly familiar with the operating features particular to
their LIFEPAK 500 AED.
Device ID
The DEVICE ID option assigns a unique identifier that is printed at the top of each report. Up to 20
characters with any combination of displayable characters can be used. The factory default setting is an
automatically generated sequence number.
Modem Phone Number
The MODEM PHONE NUMBER option is the character string that the AED dials when it transfers data by
modem. The dial string may include up to 20 characters as described in Table 2-3. The factory default dial
string is T9W1886279698. This is the dial string required to download data from the LIFEPAK 500 AED to
LIFELINK MD under the LIFENET MD medical control plan. The characters T9W are required if 9 must be
dialed first to access an outside line from the telephone being used. However, if the telephone being used
has direct access (long distance dialing begins with 1), change T9W to blanks.
Table 2-3 Modem Phone Number Dial String Characters
Character Description
P Selects pulse dialing (only allowed as first character)
T Selects tone dialing (only allowed as first character)
, Inserts 2-second pause in dialing string
$ Waits for “bong” (calling card) tone
W Waits for second dial tone
Alphanumeric characters A, B, C, D and 0 through 9 (no special function)
* # ( ) Other characters (no special function)
+ Terminates dial string
2Getting Ready
LIFEPAK 500 Automated External Defibrillator Operating Instructions 2-7
©1996–2005 Medtronic Emergency Response Systems, Inc.
Page 30

Getting Ready
Modem Selection
The MODEM SELECTION option determines the initialization string for the modems listed in Table 2-4.
Select the number that matches your modem. If you select 0, you must define the modem initialization
string in the next option
Table 2-4 Modem Selection Numbers
Number Modem Type
0
No modem selected
1 Hayes™ ACCURA 288 External Fax Modem
Hayes ACCURA 336 External Fax Modem
2U. S. Robotics
U. S. Robotics Sportster 33.6 Modem
3 Motorola Lifestyle 28.8 Data/Fax Modem
4 SupraExpress 33.6 Fax Modem
Hayes ACCURA 144 External Fax Modem
Hayes ACCURA 56K External Fax Modem
Hayes ACCURA 336 External Fax Modem with Voice
Hayes ACCURA 336 External Fax Modem with Simultaneous Voice and Data
Hayes ACCURA 56K Speakerphone Modem
5U. S. Robotics Courier V.Everything
U. S. Robotics 56K Fax Modem (Sportster)
*
You must specify the modem initialization string in the MODEM INIT STRING option.
(MODEM INIT STRING). The factory default is 5.
*
®
Sportster® 28.8 Modem
Note: The selection of commercially available modems changes rapidly. For more information or
assistance regarding compatible modems, contact Medtronic Technical Support. In the USA call
1.800.442.1142. Outside the USA, contact your local Medtronic representative.
Modem Initialization String
The MODEM INIT STRING option defines the modem initialization string for a Hayes compatible modem
(TIA/EIA-602). Up to 75 characters with any combination of displayable characters can be used. The
factory default string is blank.
Note: The AED does not display
MODEM INIT STRING unless the MODEM SELECTION is 0.
Energy Sequence
The ENERGY SEQUENCE option defines the three possible energy levels used by the LIFEPAK 500 AED.
For the LIFEPAK 500 AED with the monophasic defibrillation waveform, energy level 1 is fixed at 200 joules,
energy level 2 has a choice of 200 joules or 300 joules, and energy level 3 is fixed at 360 joules. The factory
default setting for the second energy level is 300 joules.
2-8 LIFEPAK 5 00 Automated External Defibrillator Op erating Instruction s
Page 31

Getting Ready
For the LIFEPAK 500 AED with the biphasic defibrillation waveform, energy level 1 is fixed at 200 joules;
however, choices are available for energy levels 2 and 3. The choices include:
• Energy level 1 (200 joules)
• Energy level 2 (200, 225, 250, 275, 300 joules)
• Energy level 3 (200, 225, 250, 275, 300, 325, 360 joules)
The factory default setting is energy level 1 (200 joules), energy level 2 (300 joules), and energy level 3 (360
joules).
Energy Protocol
The ENERGY PROTOCOL option determines either a fixed or flexible sequence for your energy protocol.
The factory default is flexible sequence.
Flexible sequence means the energy delivered for a shock increments only if an analysis immediately
following a shock results in a
as 200, 300, 360, flexible sequence means that the energy delivered for the first shock is 200 joules. If the
arrhythmia is terminated by shock 1 and the next analysis results in a
energy will not increase for the next shock. However, if the arrhythmia is not terminated by shock 1 and the
next analysis results in a
SHOCK ADVISED decision. For example, if the AED energy sequence is set up
NO SHOCK ADVISED decision, the
SHOCK ADVISED decision, the energy will increase to 300 joules.
Fixed sequence means that the energy delivered after the first shock of 200 joules increments from 200 to
300, and then to 360 joules, regardless of the post-shock ECG rhythm and subsequent analysis decision.
Display Energy
The DISPLAY ENERGY option determines whether or not the energy of the last shock is displayed during
use. The factory default setting is
ON.
Auto Analyze
The AUTO ANALYZE options are OFF, 1, or 2.
AUTO ANALYZE OFF: The operator must press ANALYZE to start every analysis.
AUTO ANALYZE 1: The second and third rhythm analyses of each three-shock set start automatically
without requiring the operator to press
first analysis of a three-shock set and to analyze after a
factory default setting is
AUTO ANALYZE 2: ALL analysis cycles are initiated automatically. LIFEPAK 500 AEDs that do not have an
ANALYZE button operate in this mode.
AUTO ANALYZE 1.
ANALYZE. (The operator must always press ANALYZE to start the
NO SHOCK ADVISED message or CPR cycle.) The
CPR Time
The CPR TIME 1 AND 2 options define a time period during which you are prompted to perform CPR. The
choices are: 0, 15, 30, 45, 60, 90, 120, and 180 seconds and 999 (infinite CPR Time). For all selections except
0 and 999, the AED prompts you to perform CPR and then displays a countdown timer. If CPR Time 999 is
selected, the AED prompts you to perform CPR, but does not display the countdown timer. The AED will
not prompt you to
PUSH ANALYZE, although you may do so at any time to initiate an analysis.
2Getting Ready
CPR Time 1 defines the CPR period following each 3-shock set. CPR Time 2 defines the CPR period following
a
NO SHOCK ADVISED message. Check your local protocol for the appropriate CPR Time.
The
CPR TIME 1 AND 2 factory default settings are 60 seconds each.
LIFEPAK 500 Automated External Defibrillator Operating Instructions 2-9
©1996–2005 Medtronic Emergency Response Systems, Inc.
Page 32

Getting Ready
Note: When a
NO SHOCK ADVISED message occurs immediately after a shock, the CPR period is the
same as CPR Time 1.
Note: CPR Time 0 is not available if
button or on AEDs that do not have an
do not have an
ANALYZE button.
AUTO ANALYZE 2 is selected on AEDs that have an ANALYZE
ANALYZE button. CPR Time 999 is not available on AEDs that
Pulse Prompt
The PULSE PROMPT option only appears on AEDs distributed in the English language.
This option determines which voice prompt (and LCD message) is presented to tell the user to check the
patient for signs of circulation. Checking for signs of circulation is important after a
NO SHOCK ADVISED
decision, after three sequential shocks, and after a CPR interval.
If
PULSE PROMPT 1 is selected, the following voice prompts will be heard and LCD messages displayed to
prompt the user to check for signs of circulation:
FOR PULSE; IF NO PULSE, PUSH ANALYZE
If
PULSE PROMPT 2 is selected, the following voice prompts will be heard and LCD messages displayed to
.
prompt the user to check for signs of circulation:
NORMALLY, START CPR
ANALYZE
.
The factory default setting is
, and CHECK PATIENT; IF NOT MOVING AND NOT BREATHING NORMALLY, PUSH
PULSE PROMPT 1.
CHECK FOR PULSE; IF NO PULSE, START CPR and CHECK
CHECK PATIENT; IF NOT MOVING AND NOT BREATHING
CPSS during CPR
The CPSS DURING CPR option determines whether or not Continuous Patient Surveillance System (CPSS) is
active during CPR Time. The factory default setting is
that have an
ANALYZE button and are configured with AUTO ANALYZE OFF or AUTO ANALYZE 1.
OFF. This setup option is only available with AEDs
If the
CPSS DURING CPR option is ON, the AED "watches" for potentially shockable ECG rhythms (e.g.,
refibrillation) throughout CPR Time. When CPSS detects a potentially shockable ECG rhythm, the AED
prompts
PUSH ANALYZE, and CPR is temporarily interrupted while the user stays clear of the patient
during the analysis. With CPSS on during CPR Time, CPR artifact may or may not be interpreted as a
shockable ECG rhythm. However, when CPSS is off during CPR, the presence of a shockable ECG rhythm
will not be detected until CPR Time is over or the next analysis.
The determination of whether or not the
CPSS DURING CPR option is selected to be turned ON may be
based on the following:
• Post shock CPR protocol
• Effects of interrupting CPR
• Skill and training level of the care providers
If CPSS is turned on during CPR Time, protocols should be developed to manage the possible repeated false
positives of CPSS alerts during CPR. The ability of the personnel in the service to follow such a protocol
should be taken into account. For more information, refer to Appendix A.
2-10 LIFEPAK 500 Automated External Defibrillator Operating Instr uctions
Page 33

Getting Ready
Motion Detection
The MOTION DETECTION option determines whether or not the motion detection system is active during
analysis. The factory default setting is
ON.
When this option is
which may or may not cause artifact on the ECG. Artifact on the ECG may lead to erroneous ECG
interpretations. However, when this option is on, motion that is detected may temporarily inhibit analysis
from proceeding, for example in patients with agonal breathing.
The determination of whether or not the
includes the consideration of:
• Skill and training level of the care providers
• Frequency of the occurrence of agonal breathing
• Other motion artifact during use of the AED
For more information, refer to Appendix A.
OFF, analysis of the ECG is allowed to proceed uninhibited by the presence of motion,
MOTION DETECTION OPTION is selected to be turned off
Asystole Detector
This option enables the ASYSTOLE DETECTOR. When active, the ASYSTOLE DETECTOR notifies the user
that asystole has been detected for a number of consecutive analyses over a period of time. The time
interval determines how long asystole must be detected before the
intervals that can be selected are: 4 to 60 minutes (in one-minute intervals). The factory default setting is
OFF.
ASYSTOLE message appears. The time
Audio Recording
AUDIO RECORDING is only displayed if the option is installed. The AUDIO RECORDING option may be ON or
OFF. If it is ON, the AED records the audio during patient care. If it is OFF, the AED does not record the
audio. The factory default setting is
ON.
Paper Size
The PAPER SIZE option defines the size of the paper for the printer used to print out AED data. The choices
are 8 1/2 x 11 inches and A4. The factory default is 8 1/2 x 11 inches.
Incident ID
An INCIDENT ID number can be entered prior to transferring patient data to a computer through a modem.
You can use up to 20 characters with any combination of displayable characters. The factory default setting
OFF.
is
Audio Alert
The AUDIO ALERT option determines whether or not an audible tone (beeps) sounds when the automatic
self-test detects a low battery condition or a condition that requires service. The factory default setting is
OFF. Regardless of whether the AUDIO ALERT is set to ON or OFF, indicators appear on the readiness
display if a low battery or service condition is detected.
The
AUDIO ALERT option is only available on AEDs with a readiness display distributed in the English
language.
LIFEPAK 500 Automated External Defibrillator Operating Instructions 2-11
©1996–2005 Medtronic Emergency Response Systems, Inc.
2Getting Ready
Page 34

Getting Ready
Transfer Setup
Once the setup in one LIFEPAK 500 AED has been customized, the TRANSFER SETUP option supports the
transfer of this setup to other LIFEPAK 500 AEDs. Setup transfers are possible only between
LIFEPAK 500 AEDs with the same button configuration (for example, 2-button to 2-button) and
defibrillation waveform.
FACTORY DEFAULT SETTINGS
Factory default settings for setup options are summarized in Table 2-5.
Table 2-5 Setup Options and Factory Default Settings
Setup Options Factory Default Settings
Device ID Automatically generated sequence number
Modem phone number T9W1886279698
Modem selection 5
Modem initialization string Blank
Energy sequence 200–300–360 joules
Energy protocol Flexible sequence
Display energy ON
Auto analyze 1
CPR time 1 60 seconds
CPR time 2 60 seconds
Pulse Prompt 1
CPSS during CPR OFF
Motion detection ON
Asystole detector OFF
Audio recording ON
Paper size 8 1/2 x 11 inches
Incident ID OFF
Audio alert OFF
Transfer setup User feature (always active)
For more information on changing setup options, refer to the LIFEPAK 500 Automated External Defibrillator
Setup Instructions (CAT. 26500-001011).
2-12 LIFEPAK 500 Automated External Defibrillator Ope rating Instru ctions
Page 35

Getting Ready
TRANSFERRING SETUP TO ANOTHER LIFEPAK 500 AED
You can transfer the clock setting and all setup information except DEVICE ID from one LIFEPAK 500 AED
to an identical AED using the Transfer Setup option. Identical AEDs are devices that have the same button
configuration, software version, and defibrillation waveform.
Note: Only LIFEPAK 500 AEDs with software version 4.2 or later can transfer and receive setup data.
Attempting to transfer setup data to devices with software version 4.0 may induce erroneous faults
in the receiving device.
To transfer the setup:
1 From within the
setup option. The AED displays the
SETUP MODE, push ANALYZE (or blank “menu” button) to advance to the transfer
TRANSFER SETUP screen:
TRANSFER SETUP
TO SEND PUSH
2 Connect the equipment as shown in Figure 2-4:
• Connect the Setup Transfer Cable to the AED that has the setup you wish to transfer (original AED).
• Connect the other end of the Setup Transfer Cable to the AED that you wish to receive the new
setup (receiving AED).
Note: Both AEDs must have the same button configuration and defibrillation waveform.
Setup
Transfer Cable
LIFEPAK 500 AEDLIFEPAK 500 AED
Figure 2-4 Setup transfer connections
3 Turn on the receiving AED and wait for CONNECT ELECTRODES message to appear.
4 Push the
During setup transfer, the original AED displays the
blank screen.
After the original AED successfully transfers the setup, it displays the
The receiving AED turns itself off, turns itself back on, and then displays the
ELECTRODES
5 To transfer the setup from the original AED to additional AEDs:
• Turn off the receiving AED.
• Disconnect the Setup Transfer Cable from the receiving AED.
• Repeat Steps 2 through 4.
6 When finished, disconnect the Setup Transfer Cable, turn off both AEDs, and prepare them for patient
use.
X button on the original AED to send the setup to the receiving AED.
SENDING message. The receiving AED displays a
SEND COMPLETE message.
CONNECT
message.
2Getting Ready
Note: The original AED does not transfer the device ID to the receiving AED. To change the device ID
on a receiving AED, refer to the LIFEPAK 500 Automated External Defibrillator Setup Instructions
(CAT. 26500-001011).
LIFEPAK 500 Automated External Defibrillator Operating Instructions 2-13
©1996–2005 Medtronic Emergency Response Systems, Inc.
Page 36

Getting Ready
CONNECTING ELECTRODES TO THE AED
You can connect the QUIK-COMBO electrodes with the REDI-PAK preconnect system to the AED before
patient care to save time. To connect the REDI-PAK-type QUIK-COMBO electrodes:
1 Inspect the electrode package and confirm that the expiration date has not passed.
2 Remove the clear plastic pouch to expose the QUIK-COMBO electrode connector.
3 Open the connector cover on the AED as shown in Figure 2-5.
4 Insert the electrode connector firmly into the cable connector on the AED as shown in Figure 2-5.
Cable Connector
Connector Cover
Figure 2-5 Connecting the QUIK-COMBO electrodes
QUIK-COMBO
electrode connector
5 Store the electrodes in the carrying case or the electrode storage tray.
6 Do not open the electrode package until immediately prior to patient use.
If you use QUIK-COMBO electrodes without the REDI-PAK preconnect system, you should:
• Not open the electrode package until immediately prior to patient use.
• Inspect the electrode package and confirm that the expiration date has not passed.
• Store the electrode package in the carrying case or electrode storage tray.
• When ready for patient use, open the electrode package and connect the electrodes to the AED as
shown in Figure 2-5 above.
Note: If you are using FAST-PATCH electrodes, refer to Appendix C. If you want to use Infant/Child
Reduced Energy Defibrillation Electrodes, purchase the Infant/Child Reduced Energy Defibrillation
Electrodes Starter Kit (CAT. 41330-000005 or CAT. 41330-000006).
2-14 LIFE PAK 500 Automated Exter nal Defibri llator Op erating Instr uctions
Page 37

USING THE LIFEPAK 500 AED
3 Using the LIFEPAK 500 AED
This section describes how to use the LIFEPAK 500 Automated External Defibrillator (AED) for ECG
analysis and defibrillation. The actual clinical procedures that you use may vary according to your local
protocol.
Warnings and Cautions page 3-2
Preparing the AED for Operation 3-2
AED Operation 3-3
AED Prompts 3-5
Patient Care Transfer to a Different Device 3-10
Troubleshooting During Patient Care 3-10
LIFEPAK 500 Automated External Defibrillator Operating Instructions 3-1
©1996–2005 Medtronic Emergency Response Systems, Inc.
Page 38

Using the LIFEPAK 500 AED
WARNINGS AND CAUTIONS
WARNINGS!
Shock hazard.
This defibrillator delivers up to 360 joules of electrical energy. When discharging the defibrillator, do not
touch the disposable therapy electrodes.
Shock hazard.
If a person is touching the patient, bed, or any conductive material in contact with the patient during
defibrillation, the delivered energy may be partially discharged through that person. Clear everyone from
contact with the patient, bed, and other conductive material before discharging the defibrillator.
Shock hazard.
To remove an unwanted charge, disconnect the electrode cable from the device, wait for the device to
automatically remove the charge, or turn off the AED.
Possible fire, burns, and ineffective energy delivery.
Do not discharge standard paddles on top of therapy electrodes or ECG electrodes. Do not allow therapy
electrodes to touch each other, ECG electrodes, lead wires, dressings, transdermal patches, etc. Such
contact can cause electrical arcing and patient skin burns during defibrillation and may divert
defibrillating energy away from the heart muscle.
Possible skin burns.
During defibrillation, air pockets between the skin and therapy electrodes can cause patient skin burns.
Apply therapy electrodes so that entire electrode adheres to skin. Do not reposition the electrodes once
applied. If the position must be changed, remove and replace with new electrodes.
Possible skin burns and ineffective energy delivery.
Therapy electrodes that are dried out or damaged may cause electrical arcing and patient skin burns
during defibrillation. Do not use electrodes that have been removed from foil package for more than
24 hours. Do not use electrodes beyond expiration date. Check that electrode adhesive is intact and
undamaged. Replace therapy electrodes after 50 shocks.
CAUTION!
Possible equipment damage.
Before using this AED, disconnect all equipment from the patient that is not defibrillator-protected.
PREPARING THE AED FOR OPERATION
Follow these steps to help ensure that the AED is always ready for use:
• Properly maintain the AED and batteries as described on page 5-7 of this manual.
• Make sure that the defibrillation electrodes are available and properly stored in the AED carrying case or
electrode tray.
• Keep the following supplies readily accessible:
- Spare, properly maintained battery
- Spare defibrillation electrodes
- Supplies to clean and shave the electrode sites on the patient
• Keep the AED and accessories within an optimal temperature range of 15–35°C (59–95°F).
3-2 LIFEPAK 500 Au tomated External Defibrillator Operating Instructions
Page 39

Using the LIFEPAK 500 AED
QUIK-COMBO and FAST-PATCH electrodes are pre-gelled, self-adhesive electrodes that allow handsfree defibrillation. They are designed for use with devices equipped with the appropriate connector or
therapy cable. For more information about these electrodes, refer to the respective electrode operating
instructions.
AED OPERATION
To prepare for ECG analysis and defibrillation:
1 Verify that the patient is in cardiac arrest (the patient is unconscious, not breathing normally and
shows no signs of circulation, for example, no pulse, and/or no coughing, no movement).
2 Press
3 Prepare the patient for electrode placement:
4 Apply the electrodes to the patient's chest:
ON/OFF to turn on the AED (the green LED will light). The CONNECT ELECTRODES message and
voice prompt will occur until the patient is connected to the AED.
• If possible, place the patient on a hard surface away from standing water.
• Remove clothing from the patient's upper torso.
• Remove excessive hair from the electrode sites. If shaving is necessary, avoid cutting the skin.
• Clean the skin and dry it briskly with a towel or gauze.
• Do not apply alcohol, tincture of benzoin, or antiperspirant to the skin.
3 Using the LIFEPAK 500 AED
•Place the
♥or + electrode lateral to the patient's left nipple with the center of the electrode in the
midaxillary line, if possible. (See Figure 3-1.)
• Place the other electrode on the patient's upper right torso, lateral to the sternum and below the
clavicle as shown in Figure 3-1.
• Starting from one end, press the electrodes firmly onto the patient's skin.
A
Anterior
Lateral
QUIK-COMBO Electrodes
Figure 3-1 Anterior-lateral position
A
Anterior
Lateral
FAST-PATCH Electrodes
5 Connect the electrode connector to the AED (if it is not already connected).
6 Follow the screen messages and voice prompts provided by the AED.
If the patient recovers consciousness and/or signs of circulation and breathing return, place the patient in
the recovery position and leave the AED attached.
LIFEPAK 500 Automated External Defibrillator Operating Instructions 3-3
©1996–2005 Medtronic Emergency Response Systems, Inc.
Page 40

Using the LIFEPAK 500 AED
Special Situations for Electrode Placement
When placing electrodes on the patient, be aware of the following special situations.
Obese Patients or Patients with Large Breasts
Apply the electrodes to a flat area on the chest, if possible. If skin folds or breast tissue prevent good
adhesion, spread skin folds apart to create a flat surface.
Thin Patients
Follow the contour of the ribs and spaces when pressing the electrodes onto the torso. This limits air
space or gaps under the electrodes and promotes good skin contact.
WARNING!
Possible interference with implanted electrical device.
Defibrillation may cause implanted electrical devices to malfunction. Place therapy electrodes away from
implanted devices if possible. Check implanted device function after defibrillation.
Patients with Implanted Pacemakers
If possible, place defibrillation electrodes away from the internal pacemaker generator. Treat this patient
like any other patient requiring emergency care. Pacemaker pulses may prevent advisement of an
appropriate shock, regardless of the patient's underlying rhythm.
Patients with Implanted Defibrillators
Apply the electrodes in the anterior-lateral position. Treat this patient like any other patient requiring
emergency care.
Alternate Anterior-Posterior Electrode Position
The electrodes may be placed in an anterior-posterior position as follows:
1 Place either the
♥ or + therapy electrode over the left precordium as shown in Figure 3-2. The upper
edge of the electrode should be below the nipple. Avoid placement over the nipple, the diaphragm, or
the bony prominence of the sternum if possible.
2 Place the other electrode behind the heart in the infrascapular area as shown in Figure 3-2. For patient
comfort, place the cable connection away from the spine. Do not place the electrode over the bony
prominences of the spine or scapula.
ANTERIOR
POSTERIOR
QUIK-COMBO Electrodes
Figure 3-2 Anterior-posterior placement
ANTERIOR
FAST-PATCH Electrodes
POSTERIOR
3-4 LIFEPAK 500 Au tomated External Defibrillator Operating Instr uctions
Page 41

Using the LIFEPAK 500 AED
AED PROMPTS
The following paragraphs describe typical scenarios that might occur during AED operation. Topics
include:
• First analysis cycle
•Shock advised
• Subsequent analysis cycles
• No shock advised
•CPR Time
•Shock counter
• Motion detection
• Continuous Patient Surveillance System - Check Patient Alert
• Electrodes off detection
For a more detailed description of how the AED analyzes the patient ECG, refer to page A-3.
Note: Accent marks are not included in message prompts for international languages.
3 Using the LIFEPAK 500 AED
WARNING!
Possible misinterpretation of data.
Do not analyze in a moving vehicle. Motion artifact may affect the ECG signal resulting in an inappropriate
shock or no shock advised message. Motion detection may delay analysis. Stop vehicle and stand clear of
patient during analysis.
Possible misinterpretation of data.
Do not move the AED during analysis. Moving the AED during analysis may affect the ECG signal resulting
in an inappropriate shock or no shock advised decision. Do not touch the patient or the AED during
analysis.
First Analysis Cycle
When you turn on the power and first apply electrodes to the patient, the AED will either analyze
automatically or prompt you to press
If you hear the
PUSH ANALYZE voice prompt and see the ANALYZE LED flash, press ANALYZE.
When the AED begins to analyze the patient's ECG, the AED beeps twice and alternately displays two
messages:
STAND CLEAR
ANALYZE, depending on the auto analyze configuration.
09:27
ANALYZING NOW
09:27
You will hear the
requires about 9 to 13 seconds. The
LIFEPAK 500 Automated External Defibrillator Operating Instructions 3-5
©1996–2005 Medtronic Emergency Response Systems, Inc.
STAND CLEAR, ANALYZING NOW, STAND CLEAR voice prompt. The ECG analysis
ANALYZE LED (if present) is on during analysis.
Page 42

Using the LIFEPAK 500 AED
Shock Advised
If the AED detects a shockable ECG rhythm, it displays this message:
09:28
SHOCK ADVISED
You will hear the
indicates that the AED is charging.
When charging is complete, the AED alternately displays two messages:
You will hear the
(a loud, high-pitched, two-tone sound). The
• Check that no one is touching the patient.
• Press
• If you do not press
REMOVED
SHOCK ADVISED voice prompt. The AED begins charging for Shock #1. A rising tone
09:28
STAND CLEAR
STAND CLEAR, PUSH TO SHOCK voice prompt followed by the “shock ready” tone
SHOCK LED flashes.
SHOCK to discharge the AED.
SHOCK within 15 seconds, the AED disarms the SHOCK button, and the CHARGE
message appears.
PUSH TO SHOCK
09:28
Subsequent Analysis Cycles
If the option AUTO ANALYZE 1 or 2 is selected, the AED automatically analyzes the patient’s ECG rhythm
after Shock #1 is delivered. If the
Shock #1. (You will also hear the
must press
ANALYZE to begin the analysis.
AUTO ANALYZE option is off, the AED displays PUSH ANALYZE after
PUSH ANALYZE voice prompt and see the ANALYZE LED flash.) You
The second analysis and shock sequence is the same as that described for Shock #1. However, the energy
levels for Shock #2 and Shock #3 depend on the value selected for the
ENERGY PROTOCOL options. When a NO SHOCK ADVISED decision immediately follows a shock, the
energy level will not increase for the next shock if
Note: If
analysis decision.
FIXED SEQUENCE is enabled, the energy level for shocks will increment regardless of the
FLEXIBLE SEQUENCE is enabled.
ENERGY SEQUENCE and the
No Shock Advised
If the AED detects a nonshockable ECG rhythm, it displays this message:
09:28
NO SHOCK ADVISED
You will hear the
delivered.
3-6 LI FEPAK 500 Automated External Defib rillator O perating Instructions
NO SHOCK ADVISED voice prompt. The AED will not charge, and no shock can be
Page 43

Using the LIFEPAK 500 AED
NO SHOCK ADVISED, the AED enters CPR TIME if CPR TIME is set to 15 seconds or more. If CPR TIME
After
is set to 0, the AED displays one of the following message sequences, depending on the
selected in Setup:
PULSE PROMPT
09:28
CHECK FOR PULSE
oror
CHECK PATIENT
3 Using the LIFEPAK 500 AED
09:28
You will hear the corresponding
messages:
voice prompt. Within 10 seconds, the AED displays two alternating
09:28
IF NO PULSE
or
09:28
PUSH ANALYZE
09:28
IF NOT MOVING
09:28
AND NOT BREATHING
09:28
NORMALLY
You will hear the corresponding voice prompt.
CPR Time
At the beginning of CPR TIME, the AED first displays one of the following message sequences, depending
PULSE PROMPT selected in Setup:
on the
10:52
CHECK FOR PULSE
or
You will hear the corresponding voice prompt.
LIFEPAK 500 Automated External Defibrillator Operating Instructions 3-7
©1996–2005 Medtronic Emergency Response Systems, Inc.
CHECK PATIENT
10:52
Page 44

Using the LIFEPAK 500 AED
The AED then alternately displays two messages.
CPR countdown timer
0:59
IF NO PULSE
or
0:59
10:52
10:52
CPR countdown timer
0:57
10:52
START CPR
IF NOT MOVING
0:59
10:52
AND NOT BREATHING
10:520:59
NORMALLY
The CPR countdown timer indicates CPR time remaining.
You will hear the corresponding voice prompt. If
the messages alternate for the remaining
CPR TIME and start an analysis cycle.
If
CPR TIME is set to 999 (infinite CPR TIME), the AED displays the above messages, but does not display
the CPR timer. The messages alternate without further voice prompts. You can press
present) to stop
CPR TIME and start an analysis cycle at any time.
CPR TIME is set to 15, 30, 45, 60, 90, 120, or 180 seconds,
CPR TIME. You can press ANALYZE (if button present) to stop
ANALYZE (if button
After CPR Time
After CPR TIME, the AED displays one of the following message sequences, depending on the PULSE
PROMPT
selected in Setup:
10:52
CHECK FOR PULSE
You will hear the corresponding voice prompt. Within 10 seconds, the AED displays two alternating
messages if
AUTO ANALYZE is off or AUTO ANALYZE 1 is selected:
or
CHECK PATIENT
10:52
10:52
IF NO PULSE
or
10:52
10:52
PUSH ANALYZE
IF NOT MOVING
10:52
AND NOT BREATHING
10:52
NORMALLY
3-8 LIFEPAK 500 Au tomated External Defibrillator Operating Instructions
Page 45

You will hear the corresponding voice prompt.
Using the LIFEPAK 500 AED
3 Using the LIFEPAK 500 AED
Note: If
analysis will begin automatically at the end of CPR Time. You will hear
NOW, STAND CLEAR
AUTO ANALYZE 2 is selected or for LIFEPAK 500 AEDs that do not have an ANALYZE button,
STAND CLEAR, ANALYZING
. Stop CPR immediately and stay clear of patient during the analysis.
Shock Counter
The AED displays the shock counter in the upper-left corner of the LCD:
200J
09:29#1
PUSH ANALYZE
Energy of shock #1
Shock counter
The shock counter indicates how many shocks have been delivered to the patient. Following the shock
counter, the energy for that shock number may be displayed (optional). The shock counter resets
whenever the AED is turned off for at least 60 seconds.
Motion Detection
If the AED is configured with MOTION DETECTION ON and the AED detects motion during the ECG
analysis, the AED alternately displays two messages:
#2
09:44
#2
09:44
MOTION DETECTED
You will hear the
motion ceases within 20 seconds, analysis will continue. If the motion does not cease within 20 seconds,
analysis will stop. You must then push
ANALYZE 2
restart automatically. Refer to troubleshooting on page 6-2 for possible causes and suggested actions.
If the AED is configured with
presence of motion. There is no motion detected verbal or text prompt if motion is present during ECG
analysis.
MOTION DETECTED, STOP MOTION voice prompt, followed by a warning tone. If the
ANALYZE (if button present) to restart analysis. If AUTO
is selected and in LIFEPAK 500 AEDs that do not have an ANALYZE button, analysis will
MOTION DETECTION OFF, the ECG analysis proceeds uninhibited by the
STOP MOTION
Continuous Patient Surveillance System — Check Patient Alert
The Continuous Patient Surveillance System (CPSS) is active immediately after the AED is turned on
when the patient is connected, and after CPR time. In addition, CPSS may be configured to be active
during CPR time.
Note: CPSS is not active if
button.
If the CPSS detects a potentially shockable rhythm, the AED displays this message:
AUTO ANALYZE 2 is selected or in LIFEPAK 500 AEDs without an ANALYZE
09:53
PUSH ANALYZE
LIFEPAK 500 Automated External Defibrillator Operating Instructions 3-9
©1996–2005 Medtronic Emergency Response Systems, Inc.
Page 46

Using the LIFEPAK 500 AED
You will hear the
• Stop all patient and vehicle movement.
• Confirm that the patient is in cardiac arrest.
• Press
• Follow the screen messages and voice prompts provided by the AED.
ANALYZE. Stay clear of the patient and allow the AED to analyze the patient’s rhythm.
PUSH ANALYZE voice prompt accompanied by a warning tone. You should:
Electrodes Off Detection
If the AED detects that the electrodes are not properly connected to the AED or the patient, the AED
displays this message:
09:21
CONNECT ELECTRODES
You will hear the
troubleshooting on page 6-2 for possible causes and suggested actions.
CONNECT ELECTRODES voice prompt followed by three warning beeps. Refer to
Asystole Detector
If the AED has been configured for the asystole detector to be active, the AED displays this message
NO SHOCK ADVISED decisions occur with asystole present and when the asystole detector time
after
interval has been reached.
09:21
ASYSTOLE
You will hear the
ASYSTOLE voice prompt, which will repeat periodically until the next analysis.
PATIENT CARE TRANSFER TO A DIFFERENT DEVICE
To transfer patient care between devices equipped with identical therapy cable connectors:
1 Turn off the device connected to the patient.
2 Leave the defibrillation electrodes on the patient; disconnect the electrodes from the therapy cable or
the device.
3 Connect the therapy electrodes to the next device.
To transfer patient care between devices not equipped with identical therapy cable connectors:
1 Turn off the device connected to the patient.
2 Remove the defibrillation electrodes currently on the patient.
3 Apply defibrillation electrodes that are compatible with the receiving device.
4 Follow the instructions for the receiving device.
TROUBLESHOOTING DURING PATIENT CARE
For troubleshooting during patient care, refer to Table 6-1 on page 6-2.
3-10 LIFEPAK 500 Au tomated External Defibrillator Operating Instructions
Page 47

DATA MANAGEMENT
This section describes how to store and transfer LIFEPAK 500 Automated External Defibrillator (AED)
data to a computer or a modem. Topics include:
Overview of Data Storage and Retrieval page 4-2
Sending Data to a Computer by Modem 4-5
Sending Data to a Computer by Direct Connection 4-8
Sending Data to a Printer 4-9
4 Data Management
LIFEPAK 500 Automated External Defibrillator Operating Instructions 4-1
©1996–2005 Medtronic Emergency Response Systems, Inc.
Page 48

Data Management
OVERVIEW OF DATA STORAGE AND RETRIEVAL
Every time you use the LIFEPAK 500 AED on a patient, data is stored digitally inside the AED. This data
allows post-incident review for quality control, training, and research purposes. Print or transfer this data
as soon as possible to save the information.
The following paragraphs describe how the LIFEPAK 500 AED stores and retrieves data.
Overview of Data Storage
Whenever power is on, the LIFEPAK 500 AED automatically stores the data illustrated in Figure 4-1.
Event Log
Data
Figure 4-1 Data stored by the LIFEPAK 500 AED
CODE
SUMMARY
Data
Continuous
ECG Data
Audio
Recording
• Event Log Data — A chronological log of all events. An event is a specific action by the operator or AED,
such as:
–Power on
– Patient connected
– Analysis started
– Shock advised
– Shock delivered
Refer to page 6-8 for a list of all the event types.
• CODE SUMMARY™ Data — A summary of critical resuscitation events and the ECG rhythm segments
associated with those events.
• Continuous ECG Data — Between 20 and 80 minutes of the patient ECG rhythm from the time of
power-on to power-off. Varies with the configuration of the AED and whether Audio Recording is
installed and enabled. (Refer to Specifications, page 5-15.) Data collection stops when maximum
recording times are exceeded.
• Audio Recording — Approximately 20 minutes of audio data recorded at the scene, such as operator
remarks and AED voice prompts or tones. (The audio recording option must be installed and enabled.)
Data collection stops when maximum recording times are exceeded.
Patient Records
A patient record is created when the AED is connected to a patient and begins to store data. The AED
stores data from the time that you turn the AED on until you turn the AED off. The LIFEPAK 500 AED can
store a maximum of two patient records:
• Current Patient — The most recent patient record stored
• Previous Patient — The patient record stored prior to the Current Patient
The data stored for the Current Patient and Previous Patient is illustrated in Figure 4-2.
4-2 LIFEPAK 500 Automated External Defibrillator Operating Instructions
Page 49

Data Management
Current
Patient
(B)
Previous
Patient
(A)
Figure 4-2 Comparison of data stored for the Current Patient and Previous Patient
Event Log
Data
Event Log
Data
CODE
SUMMARY
Data
CODE
SUMMARY
Data
Continuous
ECG Data
(Continuous
ECG Data
is deleted.)
Audio
Recording
(Audio
Recording
is deleted.)
The AED stores all data for the Current Patient (B). However, the AED only retains the Event Log and
CODE SUMMARY data for the Previous Patient (A).
Information Stored When Creating a New Patient Record
When the AED creates a new patient record, the following occurs:
• The AED stores all data for the newest patient record, Patient C (refer to Figure 4-3). Patient C is now
the Current Patient.
• The AED deletes the ECG and audio recording data for Patient B. The AED retains only the Event Log
and CODE SUMMARY data. Patient B is now the Previous Patient.
• The AED deletes all data for the oldest patient record, Patient A.
4 Data Management
New
Patient
(C)
Patient
(B)
Patient
(A)
Figure 4-3 Data stored when the AED stores a new patient record
Event Log
Data
Event Log
Data
(All data is deleted.)
CODE
SUMMARY
Data
CODE
SUMMARY
Data
Continuous
ECG Data
(Continuous
ECG Data
is deleted.)
Audio
Recording
(Audio
Recording
is deleted.)
Conditions for Creating a New Patient Record
To begin a new patient record, the following conditions must occur:
• The AED must be turned off for at least 60 seconds, then turned on.
• Electrodes must be connected to the patient.
You can turn off the AED briefly without affecting the Current Patient. For example, you can change the
battery. If you restore power in less than 60 seconds, the AED resumes storing data for the Current
Patient.
LIFEPAK 500 Automated External Defibrillator Operating Instructions 4-3
©1996–2005 Medtronic Emergency Response Systems, Inc.
Page 50

Data Management
If you do not connect electrodes to a patient or a simulator, you can turn on the AED and not affect the
Current Patient. For example, you can turn on the AED to test it with the external test load or to transfer
data. As long as you do not connect the electrodes to a new patient or an ECG simulator, the AED does
not create a new patient record.
As soon as you turn on the AED, the AED begins storing data for a new patient record. However, if you do
not connect electrodes to a patient within 3 minutes, the AED stops storing data.
• If you then connect electrodes, the AED resumes storing data and creates a new Current Patient.
• If, however, you turn off the AED without ever connecting the electrodes, the AED does not create a
new Current Patient. The AED will delete the initial 3 minutes of data, and all previously stored data will
remain unchanged. This prevents erasing data each time you turn on the AED to transfer data or
perform maintenance.
Test Log
The LIFEPAK 500 AED also stores a Test Log, a list of the 30 most recent auto-tests and manual tests.
The Test Log lists the test results and any fault codes detected. The Test Log is printed automatically
when data is sent to a printer. As an option, the Test Log may be printed from a computer.
Overview of Data Retrieval
There are three ways you can retrieve data from the LIFEPAK 500 AED:
• Send the data to a computer by modem.
• Send the data to a computer by direct connection.
• Send the data to a printer.
The AED does not delete data after it is transferred. Data is only deleted when new patient records are
created. Table 4-1 describes the stored data and how you can retrieve it.
Table 4-1 LIFEPAK 500 AED Data and Retrieval
Type of Data Retrieval Modem Computer Printer
Event Log Data Yes Yes Yes
CODE SUMMARY data Yes Yes Yes
Continuous ECG
Audio Recording
*
†
Test Log Yes Yes Yes
*
Available for the Current Patient only.
†
To play the audio recordings, a sound card, sound card software, and the QUIK-VIEW 500 data review program or
CODE-STAT Suite must be installed in the computer.
Yes Yes No
Yes
2
Yes
2
No
4-4 LIFEPAK 500 Automated External Defibrillator Operating Instructions
Page 51

Data Management
SENDING DATA TO A COMPUTER BY MODEM
These paragraphs describe the resources, equipment connections, and procedures required to send
LIFEPAK 500 AED data to a computer by modem.
Required Resources
Table 4-2 summarizes the resources required to send data to a computer by modem.
Table 4-2 Required Resources for Sending Data to a Computer by Modem
Description
Required Resources at Local Site
Modem Cable (for use with LIFEPAK 500 AED)
Modem that supports the TIA/EIA-602 command set
Modem power cord or power adapter (if required)
4 Data Management
Telephone cord (with RJ11 connectors)
Analog telephone line
Required Resources at Destination Site
*
Modem that supports the Hayes AT command set
Personal Computer:
– QUIK-VIEW 500 data review program or CODE-STAT Suite data
management system
– Microsoft Windows 3.1 or later for Data Transfer 500, and for
QUIK-VIEW 500 if audio review is not needed. Microsoft Windows 95
for QUIK-VIEW 500 if audio review is needed
– Microsoft Windows 95 or Windows NT 4.0 for CODE-STAT Suite 3.2 or
earlier and Windows 98, Windows ME, Windows 2000 Professional, or
Windows NT version 4.0 with Service Pack 1 for CODE-STAT Suite 4.0
or later.
Cables as required
Analog telephone line
*
Most internal telephone lines for integrated office telephone systems are digital lines. Make sure that you connect the
modem to an external analog telephone line like the type used for fax machines.
*
Setup Options
Make sure that the AED setup options are properly defined for the modem initialization string and
destination phone number. Refer to page 2-8 for information about the modem setup options.
Note: Remember to include in the dial string any special characters that are required to dial the
destination (such as “9” or a pause).
LIFEPAK 500 Automated External Defibrillator Operating Instructions 4-5
©1996–2005 Medtronic Emergency Response Systems, Inc.
Page 52

Data Management
Procedure for Sending Data
Perform these steps to send data:
1 Make sure that the equipment at the destination site is properly connected.
2 Make sure that the destination computer power is on and that the QUIK-VIEW 500 data review
program or CODE-STAT Suite program is ready to receive data.
3 Make sure that the modem is off and that the AED is turned off for at least 60 seconds.
4 At the local site, connect the equipment as shown in Figure 4-4.
• Connect the modem cable to the AED and the modem.
• Connect the telephone cord to the modem and the analog telephone line.
• Connect the modem power cord or power adapter to a power source (if required).
Modem
Modem Cable
LIFEPAK 500 AED
Power adapter
and cord
(if required)
Figure 4-4 Equipment connections for data transfer by modem
5 Turn on the modem.
6 Press
ON/OFF to turn on the AED. You will see:
BATTERY status message
SELF-TEST xx.xx message
7 After a few seconds, you will see the message:
TO SEND PUSH X
• Press X to send the Current Patient.
• Press
• Press both
8 If the incident ID option is
S to send the Previous Patient.
X and S to send the Current and Previous Patients.
ON and an Incident ID has not already been entered for the Current or
Previous Patient, you will see the message:
ENTER CURRENT [ or PREVIOUS] ID?
YES
• Press ANALYZE (or the blank “menu” button) to answer YES; or
• Press
S to change to NO. Then press ANALYZE (or the blank “menu” button) and continue with
step 10.
Analog telephoe
outlet
To power source
4-6 LIFEPAK 500 Automated External Defibrillator Operating Instructions
Page 53

Data Management
9 If you answered YES, you will see the message:
INCIDENT ID
XXXXXXXXX
• Press S to scroll through and select from the alphanumeric characters available.
• Press
X to advance to the next field.
• Repeat this process until the Incident ID is entered.
• Press
Note:
ANALYZE (or the blank “menu” button) to accept the Incident ID.
The last Incident ID entered will always be displayed.
10 Verify Incident ID entered. You will see the message:
XXXXXXXXX
OK TO SEND? YES
• Press ANALYZE (or blank “menu” button) to accept and send the Incident ID.
• Press
• Press
S to change to NO.
ANALYZE (or blank “menu” button) to return to Incident ID screen.
• Follow step 9 beginning with bulleted items to change the Incident ID.
11 After
ANALYZE (or the blank “menu” button) is pressed, the AED transfers the patient data. While the
data is being transferred, the AED displays the following message to indicate progress:
SENDING
XX%COMPLETE
After the AED successfully completes the data transfer, it displays the SEND COMPLETE message.
4 Data Management
12 After the AED displays the
SEND COMPLETE message, check that the low battery indicator is not
displayed.
13 Turn off the AED and prepare it for the next patient use.
Note: If you leave the LIFEPAK 500 AED unattended during data transfer, the AED automatically
turns off after 15 minutes of no activity (after data transfer completed).
If the AED turns off, check the data transfer status:
1 Leave the data cable connected to AED and modem.
2 Turn on AED and look for the
SEND COMPLETE message. If the CANNOT SEND message appears, refer
to Table 6-2 on page 6-3 for troubleshooting tips.
3 If the
SEND COMPLETE message appears:
• Check that the low battery indicator is not displayed.
• Disconnect the data transfer cable.
4 Turn off the AED and prepare it for the next patient use.
LIFEPAK 500 Automated External Defibrillator Operating Instructions 4-7
©1996–2005 Medtronic Emergency Response Systems, Inc.
Page 54

Data Management
SENDING DATA TO A COMPUTER BY DIRECT CONNECTION
These paragraphs describe the resources, equipment connections, and procedures required to send AED
data to a computer by direct connection.
Required Resources
Table 4-3 summarizes the resources required to send data to a computer by direct connection.
Table 4-3 Required Resources for Sending Data to a Computer by Direct Connection
Description
PC Cable (for use with the LIFEPAK 500 AED)
Personal Computer:
– QUIK-VIEW 500 data review program or CODE-STAT Suite data management system.
– Microsoft Windows 3.1 or later for Data Transfer 500, and for QUIK-VIEW 500 if audio review is not
needed. Microsoft Windows 95 for QUIK-VIEW 500 if audio review is needed.
– Microsoft Windows 95 or Windows NT 4.0 for CODE-STAT Suite 3.2 or earlier and Windows 98,
Windows ME, Windows 2000 Professional, or Windows NT version 4.0 with Service Pack 1 for
CODE-STAT 4.0 or later.
Procedure for Sending Data
Perform these steps to send data:
1 Make sure that the AED is turned off for at least 60 seconds.
2 Connect the equipment as shown in Figure 4-5.
3 Make sure that the computer power is on and that the application program is open.
4 Press
Figure 4-5 Equipment connections for data transfer by direct connection to a computer
5 When the computer is finished receiving data, do the following:
6 Turn off the AED and prepare it for the next patient use.
ON/OFF to turn on the AED. The CONNECT ELECTRODES message appears and remains until
data transfer begins.
The computer controls the data transfer. Refer to the application program operating instructions
for information about data transfer commands. The AED will not display any status messages
during the data transfer.
PC Cable
LIFEPAK 500 AED
• Check that the
LOW BATTERY indicator is not displayed.
Computer
• Disconnect the PC cable.
4-8 LIFEPAK 500 Automated External Defibrillator Operating Instructions
Page 55

Data Management
Note: If you leave the LIFEPAK 500 AED unattended during data transfer, the AED automatically
turns off after 15 minutes of no activity (after data transfer completed).
If the AED turns off, check the data transfer status:
1 Check that the computer application program dialog box indicates that the patient record has been
received. If the patient record has not been received, reinitiate procedure for sending data.
2 Turn on AED and check that the low battery indicator is not displayed.
3 Turn off the AED and prepare it for the next patient use.
Troubleshooting During Data Transfer
If you cannot transfer data, refer to the application program operating instructions for troubleshooting
information.
SENDING DATA TO A PRINTER
These paragraphs describe the resources, equipment connections, and procedures required to print AED
data on a printer.
4 Data Management
Required Resources
Table 4-4 summarizes the resources required to print AED data.
Table 4-4 Required Resources for Printing Data
Description
Printer Cable (for use with the LIFEPAK 500 AED)
Printer (EPSON
–EPSON ESC/P
®
LX-300-compatible):
®
protocol for 9-pin printheads
– 25-pin D style connector
Procedure for Printing
Perform these steps to print AED data:
1 Make sure that the AED is turned off for at least 60 seconds.
2 Make sure that the printer is turned on.
3 While holding down the
the AED displays:
BATTERY status message
SELF-TEST xx.xx message
X button, press ON/OFF to turn on the AED. Do not release the X button until
LIFEPAK 500 Automated External Defibrillator Operating Instructions 4-9
©1996–2005 Medtronic Emergency Response Systems, Inc.
Page 56

Data Management
4 Connect the equipment as shown in Figure 4-6.
• Connect the Printer Cable to the AED and the printer.
Printer Cable
LIFEPAK 500 AED
Figure 4-6 Connecting the AED to a printer
Printer
5 After a few seconds, you will see the message:
TO PRINT PUSH X
• Press
• Press
• Press both
X to print the Current Patient.
S to print the Previous Patient.
X and S to print the Current and Previous Patients.
While the data is being transferred, the AED displays the following message to indicate progress:
SENDING
After the AED successfully completes the data transfer, it displays the SEND COMPLETE message.
6 Check that the
LOW BATTERY indicator is not displayed.
7 Disconnect the Printer Cable.
8 Turn off the AED and prepare it for the next patient use.
Troubleshooting During Printing
If the data does not print, refer to Table 6-3 on page 6-4 for troubleshooting tips.
Examples of Printed Reports
The following pages present examples of printed reports:
• Figure 4-7, page 4-12 Event Log Report and Event Log Summary
• Figure 4-8, page 4-13 CODE SUMMARY Report
• Figure 4-11, page 4-16 Test Log Report
You cannot modify the format of the reports that the AED sends directly to the printer.
Event Log Report
This report lists all of the events that occurred during a patient use. The clock time and elapsed time are
listed for each event. The box at the top of the report includes device and patient information. Some of
the entries, such as the patient ID and name, are always blank for reports printed directly from the AED.
(If you send AED data to a computer, the Data Transfer 500 program, QUIK-VIEW 500 data review
program, or CODE-STAT Suite data management system allows you to fill in the blank spaces with
information.)
4-10 LIFEPAK 500 Automated External Defibrillator Operating Instructions
Page 57

Data Management
Event Log Summary
This report summarizes important events for a particular patient record.
CODE SUMMARY Report
This report includes the ECG segments associated with key events such as analysis or shock.
Test Log Report
This report lists the time and results of the Auto Tests (
). If a test fails, the report lists fault codes that can help authorized service personnel troubleshoot
TEST
AUTO TEST) and Test Load Tests (MANUAL
and repair the AED.
4 Data Management
LIFEPAK 500 Automated External Defibrillator Operating Instructions 4-11
©1996–2005 Medtronic Emergency Response Systems, Inc.
Page 58

Data Management
Event Log Report
Incident ID No:
Incident Date: 15MAY04
Operator ID No:
Device Type: LIFEPAK 500
Device Serial No: 00001203
Device ID: RFD#6
25mm/SEC, 1.0 cm/mV
00:00
01:07
01:07
01:10
01:16
01:25
01:25
01:30
01:36
01:39
02:39
03:03
03:03
03:05
03:11
03:21
03:36
03:40
03:46
03:47
03:52
04:10
04:43
04:43
04:47
04:50
04:52
09:47:08
09:48:15
09:48:15
09:48:18
09:48:24
09:48:33
09:48:33
09:48:38
09:48:44
09:48:47
09:49:47
09:50:11
09:50:11
09:50:13
09:50:19
09:50:29
09:50:44
09:50:48
09:50:54
09:50:55
09:51:00
09:51:18
09:51:51
09:51:51
09:51:55
09:51:58
09:52:00
Patient ID No:
Patient Name:
Age
Sex:
Race:
Software REV: 3005360-000 REV. 4.4
Configuration: 000000000
POWER ON
PATIENT CONNECTED
“PUSH ANALYZE”
ANALYSIS 1
SHOCK ADVISED
“PUSH TO SHOCK”
SHOCK 1 - 200J
ANALYSIS 2
NO SHOCK ADVISED
CPR PROMPT
“PUSH ANALYZE”
CHECK PATIENT
“PUSH ANALYZE”
ANALYSIS 3
SHOCK ADVISED
“PUSH TO SHOCK”
CHARGE REMOVED
ANALYSIS 4
NO SHOCK ADVISED
CPR PROMPT
LOW BATTERY
BATTERY REMOVED
POWER ON
BATTERY REPLACED
“PUSH ANALYZE”
ANALYSIS 5
POWER OFF
Event Log Summary
01:10
01:25
FIRST ANALYSIS
FIRST SHOCK
1 SHOCK DELIVERED
Comments:
END OF REPORT
Figure 4-7 Example of Event Log Report and Event Log Summary
4-12 LIFEPAK 500 Automated External Defibrillator Operating Instructions
PAGE 1
Page 59

Incident Date: 15MAY04
Data Management
4 Data Management
Figure 4-8 Example of CODE SUMMARY Report
LIFEPAK 500 Automated External Defibrillator Operating Instructions 4-13
©1996–2005 Medtronic Emergency Response Systems, Inc.
Page 60

Data Management
Incident Date: 15MAY04
Figure 4-9 Example of CODE SUMMARY Report (cont.)
4-14 LIFEPAK 500 Automated External Defibrillator Operating Instructions
Page 61

Incident Date: 15MAY04
Data Management
4 Data Management
Figure 4-10 Example of CODE SUMMARY Report (cont.)
LIFEPAK 500 Automated External Defibrillator Operating Instructions 4-15
©1996–2005 Medtronic Emergency Response Systems, Inc.
Page 62

Data Management
Test Log Report
Device Type: LIFEPAK 500
Device Serial No: 00001203
Device ID: RFD#6
Test History Log:
28 APR 04 03:00:12
28 APR 04 08:30:41
29 APR 04 03:00:09
03 APR 04 03:00:09
01 MAY 04 03:00:09
02 MAY 04 03:00:09
03 MAY 04 03:00:09
04 MAY 04 03:00:09
05 MAY 04 03:00:09
05 MAY 04 08:27:10
06 MAY 04 03:01:40
07 MAY 04 03:00:09
08 MAY 04 03:00:09
09 MAY 04 03:00:09
10 MAY 04 03:00:09
11 MAY 04 03:00:09
12 MAY 04 03:00:09
12 MAY 04 08:30:42
13 MAY 04 03:00:09
14 MAY 04 03:00:09
15 MAY 04 03:00:09
16 MAY 04 03:00:09
17 MAY 04 03:00:09
18 MAY 04 03:00:09
19 MAY 04 03:00:09
19 MAY 04 08:30:40
20 MAY 04 03:00:09
21 MAY 04 03:00:09
22 MAY 04 03:00:09
23 MAY 04 03:00:09
Software REV: 3005360-000 REV .4.4
Configuration: 000000000
SELF TEST: PASS
SELF TEST: PASS
SELF TEST: PASS
SELF TEST: PASS
SELF TEST: PASS
SELF TEST: PASS
SELF TEST: PASS
SELF TEST: PASS
SELF TEST: PASS
SELF TEST: PASS
SELF TEST: PASS
SELF TEST: PASS
SELF TEST: PASS
SELF TEST: PASS
SELF TEST: PASS
SELF TEST: PASS
SELF TEST: PASS
SELF TEST: PASS
SELF TEST: PASS
SELF TEST: PASS
SELF TEST: PASS
SELF TEST: PASS
SELF TEST: PASS
SELF TEST: PASS
SELF TEST: PASS
SELF TEST: PASS
SELF TEST: PASS
SELF TEST: PASS
SELF TEST: PASS
SELF TEST: PASS
Major Fault Log:
No entries found
Minor Fault Log:
No entries found
END OF REPORT
PAGE 1
Figure 4-11 Test Log Report Example
4-16 LIFEPAK 500 Automated External Defibrillator Operating Instructions
Page 63

MAINTENANCE
This section describes how to perform operator-level maintenance and testing on the LIFEPAK 500
Automated External Defibrillator (AED). For troubleshooting information, refer to page 6-2. Topics in this
section include:
Maintenance and Testing Scheduling page 5-2
Inspection 5-2
Cleaning 5-4
Testing 5-4
Battery Maintenance 5-7
Electrode Storage 5-13
Service and Repair 5-13
Warranty 5-14
Supplies, Accessories, and Training Tools 5-14
Specifications 5-15
Clinical Summary: Defibrillation of Ventricular Fibrillation and
Ventricular Tachycardia
LIFEPAK 500 Automated External Defibrillator Operating Instructions 5-1
©1996–2005 Medtronic Emergency Response Systems, Inc.
5-21
5 Maintenance
Page 64

Maintenance
MAINTENANCE AND TESTING SCHEDULING
The LIFEPAK 500 AED performs an automatic self-test every 24 hours. If the automatic self-test detects
a low battery condition or a condition that requires service, the monophasic AED activates an alarm; AEDs
with a readiness display will change the indicators on the display and will not activate an alarm unless
AUDIO ALERT is configured ON. It is important to place the AED where the alarm is likely to be heard, to
periodically inspect the AED, and to check display indicators (refer to the following inspection subsection).
The AED also performs a self-test every time you turn on the AED. These self-tests do not eliminate the
need for regular maintenance. You should do the following on a regular basis and after each time the AED
is used:
• Inspect the AED as described in Table 5-1.
• Clean the AED as described in Table 5-2.
• Check to make sure that all necessary supplies and accessories (such as properly-maintained batteries
and therapy electrodes) are readily accessible.
Your local operator maintenance schedule should consider how familiar the operators are with AED
operation, how often the AED is used, and the age of the AED batteries. If AED batteries are two years old
or older, weekly inspection is recommended. If AED batteries are less than two years old, consider the
following:
• If the AED is used on a weekly basis, daily inspections may be appropriate.
• If the AED is used on a monthly basis, weekly inspections may be appropriate.
• If the AED is used very infrequently, such as once a year, monthly inspections may be appropriate.
INSPECTION
Routinely inspect all devices, accessories, and cables by following the instructions in Table 5-1.
Table 5-1 LIFEPAK 500 AED Inspection
Instruction Inspect for Recommended Corrective Action
Examine the AED case,
connector, battery well, battery
pins, and accessories.
Foreign substances. Clean the device as described in
Table 5-2.
Damage or cracks. Contact authorized service
personnel to troubleshoot and
repair parts.
Battery pins bent or discolored. Contact authorized service
personnel to replace or repair
parts.
Expired batteries or
Replace.
defibrillation electrodes.
5-2 LIFEPAK 500 Automated External Defibrillator Operating Instr uctions
Page 65

Maintenance
Table 5-1 LIFEPAK 500 AED Inspection (Continued)
Instruction Inspect for Recommended Corrective Action
AEDs with readiness display:
Observe readiness display
OK
None needed.
Battery indicator displayed Replace battery immediately.
Service indicator displayed Contact authorized service
personnel to replace or repair
parts.
AEDs without a readiness
display:
With the battery installed, press
ON/OFF to turn on the AED.
BATTERY OK
SELF-TEST
xx.xx message.
None needed.
Illumination and display of each
LED, all indicators, and all LCD
segments.
BATTERY LOW or REPLACE
BATTERY SELF-TEST
xx.xx
Contact authorized service
personnel to repair or replace
parts.
Replace the battery
immediately.
message.
Service indicator
CALL SERVICE
or
message.
Contact authorized service
personnel to troubleshoot and
repair the device.
Examine accessory cables. Foreign substances. Clean the cables as described in
Table 5-2.
Bend and flex the cable and
inspect for cracks, damage,
Replace damaged or broken
parts.
extreme wear, broken or bent
connectors and pins.
Confirm that connectors
engage securely.
Replace damaged or broken
parts.
5 Maintenance
LIFEPAK 500 Automated External Defibrillator Operating Instructions 5-3
©1996–2005 Medtronic Emergency Response Systems, Inc.
Page 66

Maintenance
CLEANING
Clean the LIFEPAK 500 AED and accessories as described in Table 5-2. Use only the cleaning agents listed
in the table.
CAUTION!
Possible equipment damage.
Do not clean any part of the AED or accessories with bleach, bleach dilution, or phenolic compounds. Do
not use abrasive or flammable cleaning agents. Do not steam, autoclave, or gas-sterilize the
LIFEPAK 500 AED or accessories.
Table 5-2 Recommended Cleaning Methods
Items Cleaning Practice Recommended Cleaning Agent
LIFEPAK 500 AED case,
display, crevices, and
accessories
Clean with damp sponge or
cloth.
• Quaternary ammonium compounds
• Rubbing (isopropyl) alcohol
• Peroxide (peracetic acid) solutions
TESTING
This section describes the AED automatic self-tests and the test load test. If testing indicates a problem,
refer to Troubleshooting on page 6-2. If you cannot correct the problem, remove the AED from active
service and contact authorized service personnel.
The AED stores the results of auto tests and the external test load test in a test log. For information
about retrieving test log data, refer to page 4-4.
Service Indicator and Message
The service indicator appears if the automatic self-test detects a problem that requires service.
Service indicator appears on the readiness display and on the key panel
If the service indicator appears on the key panel (but not flashing), you can still use the AED if it is needed
for patient therapy. However, you should contact authorized service personnel to correct the problem as
soon as possible. The service indicator will display until the problem is corrected.
If the automatic self-test detects a problem that requires immediate service (such as a malfunctioning
charging circuit), the service indicator appears on the readiness display, the service indicator on the key
panel flashes, and the CALL SERVICE message appears.
CALL SERVICE
Readiness Display on
Display on Key Panel
Device Handle
5-4 LIFEPAK 5 00 Automated Extern al Defibri llator Ope rating Instructions
Page 67

Maintenance
Turn the AED off and on. If the
CALL SERVICE message disappears, you can still use the AED if it is needed
for patient therapy. However, you should contact authorized service personnel to correct the problem as
soon as possible. If the
CALL SERVICE message reappears, the service indicator on the device key panel
will continue to flash and the message will remain on. Contact authorized service personnel immediately
to correct the problem. You should not use the AED until the problem is corrected.
Power-On Self-Test
Whenever the AED is turned off for at least 60 seconds and then turned on, the AED performs a “cold
start.” During a cold start, the AED performs internal self-tests to check that internal electrical
components and circuits work properly. During the self-test, the AED displays the following messages:
MEDTRONIC
XXXX-XXXX
The xs indicate the software version installed.
BATTERY OK
SELF-TEST xx.xx
If the AED requires service, the service indicator appears. Contact authorized service personnel to
perform service.
Note: If the battery has an adequate charge to deliver therapy, you will see
display and the
BATTERY OK message on the LCD during the self-test. If the battery is low, you will
see a battery indicator on the readiness display, an illuminated battery indicator on the device key
panel, and the
LOW BATTERY message on the LCD. When the LOW BATTERY message first appears,
the device will provide eleven or more shocks for a nonrechargeable battery and six or more shocks
for a rechargeable battery. If the battery is very low, the
battery indicator on the key panel flashes. When the
REPLACE BATTERY message displays and the
REPLACE BATTERY message first appears, the
device will provide three or more shocks.
OK on the readiness
Auto Tests
The AED periodically performs auto tests. During an auto test, the AED displays the following message:
BATTERY OK
SELF-TEST xx.xx
If the AED detects a problem during an auto test that requires service but does not prevent AED use, it
displays the service indicator the next time you turn on the AED.
If the AED (monophasic AEDs only) detects a problem during an auto test that requires immediate
service, it activates an intermittent, audible alarm.
Note: It is important that when the AED is stored with the battery installed, temperature exposure
should not fall below 0°C (32°F) or exceed 50°C (122°F). If the AED is stored outside this temperature
range, the auto tests may erroneously detect a problem and the AED may not operate properly.
Daily Auto Test
Every day at 0300 (3:00 am) the AED automatically performs the following tasks:
• Turns itself on (the
•Performs self-test (
• Stores the results in the Test Log.
•Turns itself off.
ON/OFF LED illuminates briefly).
SELF-TEST message displays).
5 Maintenance
LIFEPAK 500 Automated External Defibrillator Operating Instructions 5-5
©1996–2005 Medtronic Emergency Response Systems, Inc.
Page 68

Maintenance
On a regular basis, the Daily Auto Test will test for low or replace battery conditions.
The Daily Auto Test is not performed if the AED is already turned on at 0300 or if the battery is not
installed. If the AED is turned on while the Daily Auto Test is in progress, the test is halted; the AED will
turn on normally.
Extended Auto Test
The AED automatically turns on and performs the Extended Auto Test on a regular basis at 0300. In the
Extended Auto Test, the AED performs the following tasks:
• Turns itself on (the
•Performs Extended Self-test (
ON/OFF LED illuminates briefly).
SELF-TEST message displays).
• Stores the results in the Test Log.
•Turns itself off.
To use the AED when the Extended Auto Test is in progress, push
ON or connect the electrodes to the
patient. The test will be halted and the AED will operate normally. The Extended Auto Test is not
performed if the AED is already turned on at 0300 or if the battery is not installed.
External Test Load Test
The external test load test checks the AED charging circuits and the operator’s response during a typical
ECG analysis and charging cycle. During this test, the AED charges for a low energy test shock. The usual
messages and audio prompts are provided.
To perform the test load test:
1 Make sure that the AED is turned off.
2 Connect the test load to the cable connector receptacle on the AED.
Cable connector
receptacle
Test load
Figure 5-1 Test load connection
3 Press ON/OFF and observe that the TEST MODE message appears. (The TEST MODE message is
displayed throughout the test.) If the
and try again. If
PUSH ANALYZE message
PUSH ANALYZE voice prompt
5-6 LIFEPAK 500 Auto mated External Defib rillator O perating Instructions
AUTO ANALYZE is off or AUTO ANALYZE 1 is selected, you will see and hear:
TEST MODE message does not display, reconnect the test load
Page 69

Maintenance
4 Press
ANALYZE. If AUTO ANALYZE 2 is selected or you have an AED that does not have an ANALYZE
button, the AED will start analyzing automatically.
You will see and hear:
ANALYZING NOW and STAND CLEAR messages
ANALYZING NOW, STAND CLEAR voice prompts
After a few seconds you will see and hear:
SHOCK ADVISED message
SHOCK ADVISED voice prompt
A rising charging tone that simulates a typical charge time
5 When the AED is fully charged, you will see and hear:
STAND CLEAR and PUSH TO SHOCK messages
STAND CLEAR and PUSH TO SHOCK voice prompts
6 Press SHOCK to discharge the energy into the test load.
7 Confirm that the AED displays the
TEST OK message.
8 Disconnect the test load.
9 Press
ON/OFF to turn off the AED.
10 Prepare the AED for the next patient use.
After the test is complete, the AED records the results in the Test Log. If the AED detects a problem
during the test, the service indicator and
CALL SERVICE message appear. Contact authorized service
personnel to perform service. To repeat the test, turn off the AED and then turn it on again.
BATTERY MAINTENANCE
The LIFEPAK 500 AED can be powered by two types of batteries:
• LIFEPAK 500 nonrechargeable lithium sulfur dioxide (LiSO
battery pak
• LIFEPAK 500 rechargeable sealed lead-acid (SLA) battery pak
Note: Unless stated otherwise, references to nonrechargeable lithium batteries apply to both LiSO
and LiMnO
battery technologies.
2
Either type of battery may be installed. Follow the guidelines described in this section to help maximize
battery life and performance. Use only Medtronic Battery Pak batteries with the LIFEPAK 500 AED.
WARNINGS!
Inability to provide therapy.
The LIFEPAK 500 nonrechargeable lithium manganese dioxide battery pak does not fit in all
LIFEPAK 500 AEDs. Use only with AEDs marked -003 inside the battery well.
Possible AED shutdown.
When the LIFEPAK 500 AED prompts REPLACE BATTERY, replace the battery immediately.
Possible loss of power during patient care.
Using an improperly maintained battery to power the AED may cause power failure without warning.
Maintain batteries as described in these Operating Instructions.
) or lithium manganese dioxide (LiMnO2)
2
2
5 Maintenance
LIFEPAK 500 Automated External Defibrillator Operating Instructions 5-7
©1996–2005 Medtronic Emergency Response Systems, Inc.
Page 70

Maintenance
Note: When a battery pak is removed from the AED, battery and service indicators appear on the
readiness display. After replacing the battery pak, turn on the device to reset the readiness display.
Nonrechargeable Battery Pak
The nonrechargeable lithium battery pak requires less maintenance than the rechargeable SLA battery
pak since it never requires recharging. With the lithium battery pak installed, the LIFEPAK 500 AED
automatically tests it as part of the Daily Auto Test. The AED also performs the battery test during each
charge/discharge cycle and the first time the AED is turned on after a new battery has been installed.
To check the battery level, turn on the AED for at least 10 seconds and look for the
BATTERY status
message during the self-test. If there is no message, turn off the AED for at least one minute and then
turn it on again. The battery status message should appear following the self-test. Do not check the
status of more than two lithium batteries within a 15-minute period. The AED may not accommodate
more frequent battery checks.
When optimally maintained, a new LiSO
to 14 hours of “on time” or 312 discharges. A new LiMnO
battery pak has a capacity of 7.5 Amp hours, which is equivalent
2
battery pak has a capacity of 10.0 Amp hours,
2
which is equivalent to 18 hours of “on time” or 416 discharges. Just turning the AED on (“on time”) uses up
battery capacity.
Each year, battery capacity decreases while the battery is in the AED because of the battery’s normal
self-discharge rate and the energy used by the AED auto tests. After four years with no patient use of the
AED, approximately 35% of the useful life of the LiSO
useful life of the LiMnO
battery remains (LiSO2: 4.9 hours of “on time” or 109 discharges and LiMnO2:
2
battery remains and approximately 50% of the
2
8.9 hours of “on time” or 208 discharges). Any patient use of the AED, “on time” and shocks, will reduce
the battery’s useful life further.
The life expectancy of an LiSO
battery pak can be described in terms of the battery pak’s shelf life and
2
active life. Shelf life is the length of time the battery pak can be stored separately from the AED before its
capacity is depleted. An unused LiSO
battery pak has a five-year advertised shelf life. If an LiSO2 battery
2
pak is stored in an environment with temperatures ranging between 15°–35°C (59°–95°F), it will have
some, but limited, battery capacity remaining at the end of five years. However, after the five year date,
we recommend that the battery be discarded and not used.
Active life is the battery capacity when the battery pak is installed in an AED. The active life of an LiSO
2
will not be the same as its shelf life. Active life can range from 12 months to four years. The length of time
is determined by several factors, such as:
• AED Usage (patient use and operator-initiated testing)
• AED Storage Environment (temperature)
•AED Automatic Self-tests
5-8 LIFEPAK 500 Automated External Defibrillator Operating Instr uctions
Page 71

Maintenance
Figures 5-2
Figure 5-2 Active life, no patient use Figure 5-3 Active life, one patient use per year
through 5-4 illustrate the effect of these factors with three different usage levels.
Figure 5-4 Active life, patient use every two months
The time for any particular battery to transition from a low battery to a battery depleted state varies
greatly and is unpredictable due to differences in battery usage conditions. The transition time from low
battery to battery depleted may be as short as 2 days. As a result, we recommend that you increase the
frequency of your AED inspections, the longer a battery has been in an AED, in particular after two years.
It is recommended to replace LiSO
batteries that have been installed in an AED for two years or more,
2
regardless of usage.
LIFEPAK 500 Automated External Defibrillator Operating Instructions 5-9
©1996–2005 Medtronic Emergency Response Systems, Inc.
5 Maintenance
Page 72

Maintenance
To properly maintain nonrechargeable lithium battery paks:
• Do not attempt to recharge (lithium battery paks cannot be connected to the battery charger used to
recharge the rechargeable SLA battery paks).
• Do not use beyond the expiration date marked on the battery label.
• Do not expose to temperatures greater than 50°C (122°F).
• Do not allow electrical connection between the battery contacts.
• Store individual battery paks and AEDs with batteries installed in an environment with temperatures
between 15° and 35°C (59° and 95°F). Higher temperatures accelerate the loss of charge.
WARNING!
Possible explosion, fire, or noxious gas.
Attempting to recharge a LIFEPAK 500 nonrechargeable lithium battery pak can cause an explosion or
fire or release noxious gas. Dispose of expired or depleted lithium battery paks as described in these
operating instructions.
CAUTION!
Possible battery damage.
Electrical connection between battery contacts can blow an internal fuse and permanently disable the
battery.
Discharging Nonrechargeable Batteries
Before disposing of lithium battery paks, make sure that they are fully discharged. To discharge a lithium
battery pak, follow this procedure:
1 Place the battery pak with the label side up on a firm, flat surface such as a table top or floor.
2 Locate the small slot on the corner marked by the arrow:
Slot
LIFEPAK 500
BATTERY PAK
NON-RECHARGEABLE
Nonrechargeable
lithium battery pak label
3 Place the tip of a flat-tipped screwdriver on the slot.
4 Using a hammer, strike a moderate blow straight down on the top of the screwdriver handle. Make sure
that the tip of the screwdriver breaks the label and penetrates approximately 3 mm (1/8 inch). This will
strike an internal pin, initiate full discharge, and permanently disable the battery.
5 Set the battery pak aside. Wait for at least 1 week to make sure that the battery pak is fully discharged
before disposing.
Disposing of Nonrechargeable Batteries
After fully discharging a lithium battery pak as described previously, dispose of the battery pak. Follow
your national, regional, and local regulations for disposal. Contact a local Medtronic representative for
more information.
5-10 LIFEPAK 500 Automated External Defibrillator Ope rating Instructions
Page 73

Maintenance
In the USA, Environmental Protection Agency and Department of Transportation regulations allow
disposal of lithium batteries with ordinary household waste provided that they are fully discharged. Be
sure to comply with any other local or regional regulations before disposal. For more information or
assistance, contact your local Medtronic representative or call 1.800.442.1142.
Rechargeable Battery Pak
The rechargeable SLA battery pak requires more maintenance than a lithium battery pak since it must be
recharged periodically. The SLA battery pak should be recharged monthly or after each use. SLA battery
paks are most appropriate when the LIFEPAK 500 AED is used on a frequent basis and for those who use
the AED with a simulator for training. With an SLA battery pak installed, the LIFEPAK 500 AED
automatically turns on to test it as part of the Extended Auto Test. To check the battery level, turn on the
AED and look for the
SLA batteries within a 15-minute period.
When optimally maintained, a new SLA battery pak can provide approximately 3 hours of “on time” or 59
discharges during 3 months of use without recharging the battery. Just turning the AED on (“on time”)
uses up battery capacity. Each month, battery capacity decreases while the battery is in the AED because
of the battery’s normal self-discharge rate and the energy used by the AED self-tests. Figure 5-5 shows
the expected capacity of the SLA battery pak without recharging over 3 months as a result of AED selftests and battery self-discharge only. For example, after one month with no patient use of the AED,
approximately 20% of the useful life of the battery has been depleted. Any patient use of the AED (“on
time” and shocks) will reduce the capacity further. Even when properly maintained, SLA battery paks
should be replaced every two years or after 200 charge cycles, whichever comes first.
BATTERY OK message during the self-test. Do not check the status of more than 3
Capacity
100%
80%
60%
40%
Low battery indicator on
20%
New
Energy consumed by the
device auto tests &
battery self discharge
Figure 5-5 SLA battery capacity while installed in an AED for 3 months at 20°C (68°F) without recharging
1
Months
23
Energy available to use
to operate the device
To properly maintain SLA battery paks:
• Recharge after each use or once a month, whichever comes first. Maintain a battery recharge record.
• Use only the Medtronic battery charger designed for use with the LIFEPAK 500 AED. Do not use any
other charger.
5 Maintenance
LIFEPAK 500 Automated External Defibrillator Operating Instructions 5-11
©1996–2005 Medtronic Emergency Response Systems, Inc.
Page 74

Maintenance
• Recharge until the battery charger charge LED is green. This indicates that the battery charger has
completed the fast-charge cycle. Undercharging can cause battery damage.
• Recharge only at temperatures between 15° and 35°C (59° and 95°F).
• Never expose battery paks to temperatures greater than 50°C (122°F).
• Battery paks are best when used and stored between 0° and 35°C (32° and 95°F). Higher temperatures
accelerate the loss of charge and wear out the battery pak sooner. Lower temperatures reduce battery
capacity.
• Do not allow electrical connection between the battery contacts.
WARNINGS!
Possible loss of power during patient care.
Stored batteries lose charge. Failure to charge a rechargeable battery before use may cause device
power failure without warning. Always charge a stored battery before placing it in active use.
Possible loss of power during patient care.
Using an improperly maintained battery to power the defibrillator may cause power failure without
warning. Use the LIFEPAK 500 battery charger to charge the rechargeable battery pak.
CAUTIONS!
Possible battery damage.
Recharge the battery until the battery charger charge LED is green. Undercharging can cause battery
damage.
Possible battery damage.
Charging batteries outside the temperature range of 15°–35°C (59°–95°F) may cause improper charging
and shorten battery life.
Possible battery damage.
Electrical connection between battery contacts can blow an internal fuse and permanently disable the
battery.
Recharging a Rechargeable Battery Pak
The battery charger fully charges a connected SLA battery in about 10 hours. The battery charger applies
a high-level, fast charge for the first 10 hours that the battery is connected. If the battery remains
connected, the battery charger applies a low-level trickle-charge to maintain a full charge. Agency
approval markings are provided on the bottom of the battery charger.
To charge a battery:
1 Connect the battery charger to an appropriate ac power source (100 to 240Vac, 50 or 60 Hz). The
green LED (marked by the symbol) appears when the power is connected.
2 Connect the battery to the battery charger.
3 Confirm that the charge LED (marked by the symbol) is amber. This indicates that the battery
charger is applying a fast charge.
4 Wait at least 10 hours. Then, confirm that the charge LED is green. The green LED indicates that the
fast-charge cycle is complete and the battery is receiving a trickle-charge to maintain full charge.
5 Disconnect the battery.
5-12 LI FEPAK 500 Automated External Defibrillator Ope rating Instru ctions
Page 75

Maintenance
A fully charged battery is not harmed if it remains connected to the battery charger. However, if a
battery is disconnected and then reconnected, the battery charger begins the 10 hours of fast charge
again. Additional battery charge cycles without discharging can reduce battery life.
Recycling Rechargeable Batteries
Recycle SLA battery paks locally according to national, regional, and local governmental regulations. If
recycling is not possible, contact a Medtronic representative for information or assistance. In the USA,
call 1.800.442.1142.
To promote awareness of battery recycling, SLA battery paks are marked with this label:
Pb
ELECTRODE STORAGE
For information about defibrillation electrode storage, refer to the operating instructions for the
FAST-PATCH and QUIK-COMBO electrodes.
SERVICE AND REPAIR
WARNING!
Shock hazard.
Do not disassemble the defibrillator. It contains no operator serviceable components and dangerous high
voltages may be present. Contact authorized service personnel for repair.
If the LIFEPAK 500 AED requires service as indicated by testing, troubleshooting, or the service indicator,
contact authorized service personnel. In the USA, call Medtronic Technical Support at 1.800.442.1142.
When you call Medtronic to request service, provide the following information:
• Model number and part number
• Serial number
• Observation of the problem that led to the call
If the device must be shipped to a service center or the factory, pack the device in the original shipping
container. If this is not possible, ship the device in protective packing to prevent shipping damage.
The LIFEPAK 500 AED Service Manual provides detailed technical information to support service and
repair by authorized service personnel.
Product Recycling Information
Recycle the device at the end of its useful life.
• Recycling Assistance
The device should be recycled according to national and local regulations. Contact your local Medtronic
representative for assistance.
5 Maintenance
LIFEPAK 500 Automated External Defibrillator Operating Instructions 5-13
©1996–2005 Medtronic Emergency Response Systems, Inc.
Page 76

Maintenance
•Preparation
The device should be clean and contaminant-free prior to being recycled.
• Recycling of Disposable Electrodes
After disposable electrodes are used, follow your local clinical procedures for recycling.
•Packaging
Packaging should be recycled according to national and local regulations.
WARRANTY
Refer to the product warranty statement included in the accessory kit shipped with the product. For
duplicate copies, contact your local Medtronic representative. In the USA, call 1.800.442.1142.
SUPPLIES, ACCESSORIES, AND TRAINING TOOLS
Table 5-3 lists supplies, accessories, and training tools for the LIFEPAK 500 AED. For information about
ordering, contact your local Medtronic representative. In the USA, call 1.800.442.1142.
Table 5-3 Supplies, Accessories, and Training Tools
Description Part Number
LIFEPAK 500 nonrechargeable lithium sulfur dioxide battery pak, yellow 3005380-026
LIFEPAK 500 nonrechargeable lithium sulfur dioxide battery pak, yellow,
3005380-027
(FAA TSO-C97 aircraft certified)
LIFEPAK 500 nonrechargeable lithium sulfur dioxide battery pak, yellow,
3005380-028
(CAA BS2BS2G9 aircraft certified)
LIFEPAK 500 nonrechargeable lithium sulfur dioxide battery pak, dark gray 3005380-042
LIFEPAK 500 nonrechargeable lithium manganese dioxide battery pak, yellow 3200390
LIFEPAK 500 nonrechargeable lithium manganese dioxide battery pak, yellow
3201856
(FAA TSO-C142 aircraft certified)
LIFEPAK 500 rechargeable SLA battery pak 3005379
QUIK-COMBO pacing/defibrillation/ECG electrodes with REDI-PAK preconnect
3008497
system
QUIK-COMBO pacing/defibrillation/ECG electrodes (.6 m [2 ft] lead wire) 3010188-011
QUIK-COMBO defibrillation cable (not compatible with Infant/Child electrodes) 3011215
Infant/Child Reduced Energy Defibrillation Electrodes (not compatible with the
3202380
QUIK-COMBO defibrillation cable, monophasic LIFEPAK 500 AED, or biphasic
LIFEPAK 500 AEDs without the pink connector)
LIFEPAK 500 battery charger 3011200
Medtronic Test Load 3005389
QUIK-COMBO Patient Simulator 803499-09
FAST-PATCH defibrillation cable kit 3010699
FAST-PATCH disposable defibrillation/ECG electrodes 3010188-013
Medtronic Patient Simulator (English) (For use with FAST-PATCH defibrillation cable.) 803499-08
5-14 LI FEPAK 500 Auto mated Exter nal Defibri llator Op erating Instructions
Page 77

Maintenance
Table 5-3 Supplies, Accessories, and Training Tools (Continued)
Description Part Number
CODE-STAT Suite data management system 3011520
Data Transfer 500 information management program 3005332
LIFEPAK 500 Carrying Case (soft) 3005343
LIFEPAK 500 Carrying Case (hard) 3005384
LIFEPAK 500 Electrode Storage Tray kit 3010697
AED Instruction Card 3011111
LIFEPAK AED TRAINER 3012714
AED TRAINER training electrodes 3006007
Wall mount bracket 3009767
Spare battery pouch kit 3010698
Cables:
LIFEPAK 500 Printer Cable 3005381-002
LIFEPAK 500 Modem Cable 3005381-001
LIFEPAK 500 PC Cable 3005381-000
Setup Transfer Cable 3010779
Literature:
LIFEPAK 500 AED Operating Instructions 3005338
LIFEPAK 500 AED Setup Instructions 3012275
Therapy Electrodes Operating Instructions 3200346
LIFEPAK 500 AED Service Manual 3005339
Defibrillation: What You Should Know 805662
Training and Implementation Guide for use with the LIFEPAK 500 automated external
3011020
defibrillator
AED Challenge Interactive Computer Training Tool 3011019-000
SPECIFICATIONS
Table 5-4 lists the specifications for the monophasic, biphasic, and public safety (DPS) LIFEPAK 500 AEDs.
The specifications apply to all LIFEPAK 500 AEDs unless otherwise noted.
Table 5-5 lists the specifications for the LIFEPAK 500 AED Battery Charger
Table 5-4 LIFEPAK 500 AED Specifications
AED
Input ECG via QUIK-COMBO or FAST-PATCH disposable electrodes. Standard
Electrical Protection Input protected against high voltage defibrillator pulses per IEC 60601/
1
All specifications at 20°C (68°F) unless otherwise stated. All performance specifications assume the device has been
stored (two hours minimum) at the operating temperature prior to operation.
1
placement: anterior-lateral. Alternate placement: anterior-posterior.
EN 60601.
5 Maintenance
LIFEPAK 500 Automated External Defibrillator Operating Instructions 5-15
©1996–2005 Medtronic Emergency Response Systems, Inc.
Page 78

Maintenance
Safety Classification Internally powered equipment IEC 60601-1/EN 60601-1, 5.1.
Waveform Monophasic: Monophasic pulse (Edmark) per AAMI DF2-1989, 3.2.1.5.1
Biphasic and DPS: truncated exponential, with voltage and duration
compensation for patient impedance.
2
Output Energy Accuracy ±15% into 50 ohms (monophasic)
±10% into 50 ohms (biphasic)
±15% into 25 to 100 ohms (biphasic)
Output Energy Sequence Monophasic: 200, 200, 360 joules (360 joules thereafter) or 200, 300, 360
joules (360 joules thereafter).
Biphasic and DPS: Three levels, user configurable from 200 to 360 joules,
delivered (Level 1, Level 2, Level 3, Level 3...).
Charge Time With a new, nonrechargeable battery pak, or a new, fully charged
rechargeable battery pak:
200 joules in less than 9 seconds.
360 joules in less than 15 seconds.
Controls
ON/OFF
ANALYZE
SHOCK
Turns device power on or off.
Starts ECG analysis. (Optional).
Delivers defibrillation energy. Active only when Shock Advisory System
advises defibrillation.
Clock Set
Two switches
▲ and X are provided to set the clock.
Display Two-line, 20-character per line dot matrix liquid crystal display.
Readiness Display Biphasic and DPS: Indicates
OK when self-test completed successfully.
Low Battery Indicator Low battery icon:
At least 11 discharges remaining with nonrechargeable battery pak.
At least 6 discharges remaining with rechargeable battery pak.
Service Indicator Service icon.
Displayed Messages Messages prompt user through complete operating sequence.
Audible Tones Coded tones assist user through device operation and alert operator of
display messages.
Voice Prompts Prompt user through complete operation sequence.
Color Monophasic and biphasic: Yellow.
DPS: Dark Gray.
2
Specifications apply from 25 to 200 ohms. Voltage compensation is limited to the voltage that would result in delivery of 360
joules into 50 ohms.
5-16 LI FEPAK 500 Automated External D efibrillator Operati ng Instruc tions
Page 79

Maintenance
EVENT DOCUMENTATION
Type Internal digital memory.
Memory Capacity 20 minutes audio recording (optional).
ECG and event log of operator/device actions:
– At least 20 minutes if unit is configured with audio recording and audio
recording setup option is
ON.
– At least 80 minutes if configured with audio recording and audio
recording setup option is
OFF.
– At least 60 minutes if not configured with audio recording.
Report Types CODE SUMMARY report, Event Log report, Test Log report.
Capacity 300 Event Log events.
30 Test Log device tests (assuming no fault codes).
Communications Options:
– Direct connection to personal computer
– Modem connection to personal computer using Hayes AT-Compatible
modem.
®
– Print direct with EPSON
ESC/P protocol for printers with 9-pin
printheads.
Data Review LIFENET™ system compatible. Options:
– DATA TRANSFER™ 500 information management program
– QUIK-VIEW™ 500 data review program
– CODE-STAT™ Suite data management system, v 2.0 or above.
ENVIRONMENTAL
Operating Temperature
Storage Temperature
0°–50°C
-30°–65°C
-30°–65°C
*
(32°–122°F).
*
(-22°–149°F) without battery and electrodes.
*
(-22°–149°F) with battery and electrodes, maximum total
exposure time limited to one week.
Atmospheric Pressure Monophasic and biphasic: MIL-STD-810E 760 to 429 mmHg (0 to
15,000 ft above sea level).
DPS: MIL-STD-810E, Method 500.3, Procedure II (Operation):
-609.6m to 4,572m (-2000 ft to 15,000 ft).
Relative Humidity 10 to 95% (non-condensing).
Dust/Water Resistance Monophasic and biphasic: IEC 60529/EN 60529 IPX4 (Splash-proof) with
electrodes or connector cover installed.
DPS: IEC 60529/EN 60529 IP54 (Dust/Splash-proof) with electrodes or
connector cover installed.
5 Maintenance
Shock MIL-STD-810E, Method 516.4, Procedure 1 (40 g, 6–9 ms pulse, 1/2 sine
each axis).
*
Note: See page 5-7 for information on caring for batteries.
LIFEPAK 500 Automated External Defibrillator Operating Instructions 5-17
©1996–2005 Medtronic Emergency Response Systems, Inc.
Page 80

Maintenance
Vibration Monophasic: MIL-STD-810E, Method 514.4, Category 10
Biphasic: MIL-STD-810E, Method 514.4, Helicopter- Category 6
(3.75 G
) and Ground Mobile - Category 8 (3.15 G
RMS
). RTCA/DO-160C,
RMS
Table 8-2 Fixed Wing - Turbojet Engine Classification C’ (Fuselage). Test
level per Figure 8-5 C. 1 hour in each of three axes.
DPS: MIL-STD-810F, Method 514.5, Helicopter
Operational: Sine/Random (1.58 G
Storage: Sine/Random (3.10 G
Jet Aircraft Random (3.54 G
Turboprop Random (4.87 G
RMS
RMS
RMS
) 1 hour per axis
RMS
) 1 hour per axis
), 30 min. per axis
), 1 hour per axis
Aircraft RTCA/DO-160D (Environmental Conditions and Test Procedures for
Airborne Equipment), Section 21, Category M, (Radiated Emissions).
ESD Electrostatic Discharge: Exceeds EN60601-1-2 (8kV contact, 15kV air)
Salt Fog DPS: MIL-STD-810E, Method 509.3
HALT DPS: Highly Accelerated Life Test (HALT), random vibration/
temperature step stress, 6 degrees of freedom up to 46 G
-70
°C to 110°C ( -158°F to 230°F) at PCB level.
GENERAL
Rechargeable SLA battery pak
Type
Capacity
Sealed lead-acid, 8V, 2.5 amp hours.
Typical: 59 full discharges or 3 hours of “on time” at 20°C (68°F) with a
new, fully charged battery.
Minimum: 43 full discharges with a new, fully charged battery.
Battery Charge Time
Recommended
Replacement Interval
We ig h t
10 ±1 hours. Battery charging limited to 15°–35°C (59°–95°F).
Two years or 200 battery charge/discharge cycles, whichever comes
first using recommended battery maintenance procedures.
0.9 kg (1.9 lb).
Nonrechargeable battery pak
Lithium sulfur dioxide
) battery
(LiSO
2
Type
Sealed lithium, 12V, 7.5 amp-hours.
RMS
and
Certification
FAA: TSO-C97 (Battery 3005380-027)
CAA: BS2G239 (Battery 3005380-028)
5-18 LI FEPAK 500 Automated External Defibrillator Ope rating Instructions
Page 81

Maintenance
Capacity
Shelf Life
We ig h t
Lithium manganese
dioxide (LiMnO
) battery
2
Type
Certification
Capacity
Shelf Life
We ig h t
Physical Characteristics
Height
Typical: 312 full discharges or 14 hours of “on time” with a new battery.
Minimum: 230 full discharges with a new battery at 20°C.
0°–58°C (32°–136°F) is a minimum of 197 full discharges with a new
battery.
Five years
Four years (TSO-C97 for aircraft use)
0.5 kg (1.2 lb)
Sealed lithium, 12V, 10 amp-hours.
FAA: TSO-C142 (Battery 3201856)
Typical: 416 full discharges or 18 hours of “on time” with a new battery.
Minimum: 306 full discharges with a new battery.
Five years
0.5 kg (1.2 lb)
10.2 cm (4.0 in)
Width
Dep th
We ig h t
26.7 cm (10.5 in)
29.5 cm (11.6 in) including handle.
2.76 kg (6.1 lb) without battery or electrodes (monophasic).
2.41 kg (5.3 lb) without battery or electrodes (biphasic).
Defibrillation protected, type BF patient connection.
DEFIBRILLATOR
Waveform Monophasic pulse (Edmark) per AAMII DF2-1989
5 Maintenance
LIFEPAK 500 Automated External Defibrillator Operating Instructions 5-19
©1996–2005 Medtronic Emergency Response Systems, Inc.
Page 82

Maintenance
Waveform Biphasic truncated exponential waveform
Phase 1
Phase 2
Patient
Impedance (Ω)
25
50
100
Table 5-5 LIFEPAK 500 AED Battery Charger Specifications
Phase 1 Duration (ms)
Min
5.1
6.8
8.7
9.5
Max
6.0
7.9
10.6
11.2
Phase 2 Duration (ms)
Min
3.4
4.5
5.8
6.3
Max
4.0
5.3
7.1
7.4
GENERAL
Safety Classification
Class II (double insulation), IEC 60601/EN 60601, 5.1
Input 100–240V 0.7–0.4A 50/60 Hz
Output 9.9Vdc for 10 hours, 9.2V trickle charge thereafter
Output Protection Current limited, short circuit protected
ENVIRONMENTAL
Operating Temperature 15°–35°C (59°–95°F)
Water Resistance IEC 60529/EN 60529 IPX0 (Indoor Use Only)
Min
74.8
63.9
50.7
46.3
Tilt (%)
Max
82.9
71.0
56.5
51.6
5-20 LI FEPAK 500 Automated External Defibrillator Ope rating Instru ctions
Page 83

Maintenance
CLINICAL SUMMARY: DEFIBRILLATION OF VENTRICULAR FIBRILLATION AND
VENTRICULAR TACHYCARDIA
Background
Medtronic conducted a multi-centered, prospective, randomized and blinded clinical trial of biphasic
truncated exponential (BTE) shocks and conventional monophasic damped sine wave (MDS) shocks.
Specifically, the equivalence of 200J and 130J BTE shocks to 200J MDS shocks was tested.
1
Methods
Ventricular fibrillation (VF) was induced in 115 patients during evaluation of implantable cardioverter
defibrillator function and 39 patients during electrophysiologic evaluation of ventricular arrhythmias.
After 19±10 seconds of VF, a customized defibrillator delivered an automatically randomized shock.
Efficacy was based on success of this shock. To demonstrate equivalence of test shocks to control
shocks, the 95% upper confidence limit of the difference in efficacy (95UCLD), control minus test, was
required to be less than 10%.
Results
Ventricular Fibrillation
The efficacy of the 200J BTE shocks was demonstrated to be at least equivalent to the efficacy of 200J
MDS shocks (95UCLD=2%). The difference is success rates of 200J MDS minus 200J BTE shocks was -10%
(exact 95% confidence interval from -27% to 4%). The 130J BTE shocks were not demonstrated
equivalent to 200J MDS shocks (95UCLD=22%). However, neither was their efficacy significantly lower
than that of the 200J MDS shocks (statistical power limited by small sample sizes). For all shock types,
hemodynamic parameters (oxygen saturation and systolic and diastolic blood pressure) were at or near
their pre-induction levels by 30 seconds after successful shocks.
Shock
Ventricular Fibrillation
1st Shock Success
Exact 95% Confidence Interval
200J MDS 61/68 (90%) 80–96%
200J BTE 39/39 (100%) 91–100%
130J BTE 39/47 (83%) 69–92%
5 Maintenance
1
S.L. Higgins et al., “A comparison of biphasic and monophasic shocks for external defibrillation.” Prehospital Emergency
Care, 2000; 4(4): 305-13.
LIFEPAK 500 Automated External Defibrillator Operating Instructions 5-21
©1996–2005 Medtronic Emergency Response Systems, Inc.
Page 84

Maintenance
Ventricular Tachycardia
Seventy-two episodes of ventricular tachycardia (VT), induced in 62 patients, were treated with
randomized shocks. High rates of conversion were observed with biphasic and monophasic shocks.
Sample sizes were too small to statistically determine the relationship between success rates of the
waveforms tested.
Shock
Ventricular Tachycardia
1st Shock Success
Exact 95% Confidence Interval
200J MDS 26/28 (93%) 77–99%
200J BTE 22/23 (96%) 78–100%
130J BTE 20/21 (95%) 76–100%
Conclusions
In this double-blinded study, the efficacy of the 200J BTE shocks was demonstrated to be at least
equivalent to the efficacy of 200J MDS shocks for defibrillation of short duration, electrically-induced VF.
However, the comparison of efficacy of 130J biphasic and 200J monophasic shocks for VF was inconclusive.
All waveforms tested provided a high rate of termination of VT. The VT sample sizes were too small to
statistically determine the relationship between VT success rates of the waveforms tested.
Compared to conventional shocks for VF, we found no positive or negative effect of biphasic shocks for
VF on hemodynamic parameters following the defibrillating shock. It is possible that, compared to 200J
monophasic shocks, 200J biphasic shocks will in some cases enable earlier termination of VF. Therefore,
we conclude that biphasic shocks for VF delivered at conventional energy levels have the potential to
improve outcome in resuscitation of patients with cardiac arrest.
5-22 LIFEPAK 500 Automated Ex ternal Defibrillator Operating Instr uctions
Page 85

TROUBLESHOOTING
6 Troubleshooting
This section describes how to troubleshoot LIFEPAK 500 automated external defibrillator (AED) operating
problems. This section also describes screen messages, voice prompts, and event types.
Troubleshooting During Patient Care page 6-2
Troubleshooting During Modem Data Transfer 6-3
Troubleshooting During Printing 6-4
Troubleshooting During Setup Transfer 6-5
LIFEPAK 500 AED Screen Messages 6-6
LIFEPAK 500 AED Voice Prompts 6-8
LIFEPAK 500 AED Event Types 6-9
If you cannot correct the problem, follow these steps:
• Remove the AED from active service.
• Contact authorized service personnel for service and repair.
LIFEPAK 500 Automated External Defibrillator Operating Instructions 6-1
©1996–2005 Medtronic Emergency Response Systems, Inc.
Page 86

Tro ub le sh oot in g
TROUBLESHOOTING DURING PATIENT CARE
Table 6-1 Troubleshooting During Patient Care
Observation Possible Cause Corrective Action
1
CONNECT ELECTRODES
message appears.
2
MOTION DETECTED and
STOP MOTION messages
appear during analysis.
LOW
3
BATTERY
message or
indicators appear on
readiness display and key
panel.
REPLACE
4
BATTERY
voice prompt
or indicator on
key panel flashes.
5 Service indicators
appear on
readiness display
and key panel (
SERVICE
CALL
message not
displayed).
Inadequate connection to
AED.
Electrode does not adhere
properly to the patient.
• Check for complete insertion of
connector to AED.
• Press electrodes firmly on patient’s
skin.
• Clean, shave, and dry the patient’s
skin as recommended.
Electrodes are dry, damaged,
• Replace the electrodes.
or out-of-date.
Patient movement. • Stop CPR during analysis.
• When patient is being manually
ventilated, press
complete exhalation.
Patient movement because of
agonal respirations.
• Press
ANALYZE immediately after
exhalation or wait until agonal
respirations are slower or absent.
Electrical/radio frequency
interference.
• Move hand-held communication
devices or other suspected devices
away from the AED when possible.
Vehicle motion. • Stop vehicle during analysis.
• Move patient to stable location when
possible.
Low battery. • If using AED, continue to use and
replace battery at earliest
convenience. When this indicator first
appears, approximately 20% of
battery energy remains.
• If AED not is in use, replace the
battery immediately.
Very low battery. • Replace battery immediately.
A fault requiring service. • Continue to use the AED if it is
needed. Contact authorized service
personnel as soon as possible to repair
the AED.
ANALYZE after
6-2 L IFEPAK 500 Automated External Defibrillator Op erating Instructions
Page 87

Troubleshooting
Table 6-1 Troubleshooting During Patient Care (Continued)
Observation Possible Cause Corrective Action
6 Troubleshooting
6 Service indicator
on key panel
A fault requiring immediate
service.
flashing and
CALL SERVICE
message appears.
7 AED displays no messages
after you repeatedly press
ON/OFF.
8
CHARGE REMOVED
message appears.
Depleted battery.
AED needs service.
Electrode disconnects from
patient or AED.
SHOCK button not pressed
within 15 seconds.
9 Displayed time is incorrect. Time is incorrectly set in the
AED.
10 Date printed on report is
incorrect.
11 Displayed messages are
faint or flicker.
12 Voice prompts sound faint
Date is incorrectly set in the
AED.
Low battery power.
Out of Temperature Range.
Low battery power. • Replace the battery immediately.
or distorted.
13 AED operates but LCD is
blank.
Operating temperature is too
low or too high.
LCD not operating properly. • Contact authorized service personnel.
14 AED turns off or will not
Depleted battery. • Replace the battery immediately.
turn on.
Disconnected battery. • Install battery.
• Turn AED off and on. If the
SERVICE
message appears again,
CALL
remove the AED from active service.
Immediately contact authorized
service personnel to repair the AED.
• Replace the battery immediately.
• Contact authorized service personnel.
• Replace electrode and follow AED
voice prompts.
• Press SHOCK within 15 seconds after
PUSH TO SHOCK message
the
appears.
• Change the AED time setting.
• Change the AED date setting.
• Replace the battery immediately.
• Operate the AED between 0
°C (32°–122°F).
50
° and
Table 6-2 Troubleshooting During Modem Data Transfer
Observation Possible Cause Corrective Action
1 BUSY and WILL RE-DIAL IN
XX SECONDS
messages.
Destination number is busy,
the AED is preparing to retry.
• Wait for the AED to retry the data
transfer.
• AED will retry up to three times.
TRY AGAIN, TO SEND PUSH
2
CANNOT SEND
or
Transmission failed. • AED will retry up to three times.
messages.
Wrong phone number. • Check the destination phone number
and
MODEM PHONE NUMBER setup
option.
LIFEPAK 500 Automated External Defibrillator Operating Instructions 6-3
©1996–2005 Medtronic Emergency Response Systems, Inc.
Page 88

Tro ub le sh oot in g
Table 6-2 Troubleshooting During Modem Data Transfer (Continued)
Observation Possible Cause Corrective Action
TRY AGAIN, TO SEND PUSH
CANNOT SEND
or
messages. (continued)
CONNECT ELECTRODES
3
message.
4
LOW BATTERY
message or
indicators
appear on readiness display
and key panel.
REPLACE
5
BATTERY
voice prompt
or indicator on
key panel flashes.
Cable is not properly
• Check connections.
connected.
Modem is not connected to an
analog telephone line.
Incorrect modem selected in
Setup menu.
Custom Modem Init String is
• Confirm that the telephone line is
analog (not digital).
• Check modem selected in
OPTIONS
• Check
menu.
MODEM INIT STRING.
SETUP
incorrect.
Dial string for destination site
is incorrect.
Computer power at
• Check the AED
NUMBER
MODEM PHONE
setup option.
• Make sure the computer power is on.
destination is not on.
Computer application
program is not ready.
Connection failed or is busy.
• Make sure the program is ready to
receive data.
• Resend the data.
AED has tried to send data
three times.
AED was turned on before
modem.
• Turn off the AED for one minute.
Then, turn on the modem before the
AED power and resend the data.
Low battery. • If using AED, continue to use and
replace battery at earliest
convenience. Approximately 20% of
battery energy remains when
indicator first appears.
• If AED not in use, replace the battery
immediately.
Very low battery. • Replace battery immediately.
Table 6-3 Troubleshooting During Printing
Observation Possible Cause Corrective Action
1 Printer does not print.
No printer power. • Make sure the printer cord is
connected.
• Make sure the printer switch is on.
No printer paper. • Check the printer paper.
Printer cable not connected. • Check the printer cable connections.
6-4 LIFEPAK 500 Automated Ex ternal Defibrillator Operating Instr uctions
Page 89

Troubleshooting
Table 6-3 Troubleshooting During Printing (Continued)
Observation Possible Cause Corrective Action
6 Troubleshooting
Printer does not print.
(continued)
2 Printed report does not line
up properly on paper.
3
CONNECT ELECTRODES
message.
Wrong type of printer. • Check the printer to make sure that it
is EPSON ESC/P-compatible.
Wrong paper size selected. • Make sure correct paper size is
selected (8 1/2 x 11 or A4) in
menu.
The X button was not held
down when the AED was
OPTIONS
• Hold down the X button while turning
on the AED.
turned on.
4
LOW BATTERY
message or
indicators
appear on readiness display
and key panel.
Low battery. • If using AED, continue to use and
replace battery at earliest
convenience. Approximately 20% of
battery energy remains when
indicator first appears.
• If AED is not in use, replace the
battery immediately.
REPLACE
5
BATTERY
Very low battery. • Replace battery immediately.
voice prompt
or indicator on
key panel flashes.
Table 6-4 Troubleshooting During Setup Transfer
Observation Possible Cause Corrective Action
SETUP
Original AED displays
CANNOT SEND message.
Setup Transfer Cable is not
properly connected.
• Check the connections between the
Setup Transfer Cable, the original
AED, and the receiving AED.
Wrong cable is connected. • Connect the Setup Transfer Cable to
the original AED and the receiving
AED.
Receiving AED is not on. • Make sure the receiving AED is on.
Receiving AED was turned on
with electrodes connected or
while AED was connected to
• Turn the receiving AED off and on
with the Setup Transfer Cable
connected.
computer or modem.
Receiving AED failed to receive
transmission.
• Turn the receiving AED off and on
with the Setup Transfer Cable
connected.
LIFEPAK 500 Automated External Defibrillator Operating Instructions 6-5
©1996–2005 Medtronic Emergency Response Systems, Inc.
Page 90

Tro ub le sh oot in g
Table 6-5 LIFEPAK 500 AED Screen Messages
Screen Message Description
ANALYZING NOW
ASYSTOLE
ASYSTOLE DETECTOR
AUDIO RECORDING
AUTO ANALYZE
BATTERY OK
BUSY
CALL SERVICE
CANNOT SEND
CHARGE REMOVED
CHECK FOR PULSE
CHECK PATIENT
CONNECT ELECTRODES
CPR TIME
XX SEC
CPSS DURING CPR
DEVICE ID
XXXXXXXXX
ENERGY SEQUENCE
#2-XXX
IF NO PULSE
IF NOT MOVING AND NOT
BREATHING NORMALLY
LOW BATTERY
MODEM INIT STRING
XXXXXXXXXXXXXXXXXXXXXX
MODEM PHONE NUMBER
XXXXXXXXXXXXXXXXXXXXXX
MODEM SELECTION
# XX
The AED is analyzing the patient ECG rhythm.
The AED has analyzed the patient’s ECG and detected persistent
asystole.
Setup mode message for asystole time option.
Setup mode message for the audio recording option.
Setup mode message for auto analyze options.
The battery voltage is ok.
While attempting to transfer data by modem, the AED detected
that the destination phone number was busy.
The AED detected a fault requiring immediate service during selftests.
The AED could not transfer the setup, print a report, or transfer
data through a modem.
The SHOCK button has been disarmed.
AED prompt after each standard three-shock sequence or NO
SHOCK ADVISED
message when PULSE PROMPT 1 is selected in
Setup.
AED prompt after each standard three-shock sequence or NO
SHOCK ADVISED
message when PULSE PROMPT 2 is selected in
Setup.
The AED has detected that the electrodes are disconnected.
Setup mode message for the CPR timer option.
Setup mode message for CPSS during CPR option.
Setup mode message for device ID option.
Setup mode message for energy sequence option.
AED prompt that follows the CHECK FOR PULSE message.
AED prompt that follows the CHECK PATIENT prompt when PULSE
PROMPT 2
is selected in Setup.
The battery voltage is low.
Setup mode message for the modem initialization string option.
Setup mode message for the modem phone number option.
Setup mode message. You may select the configuration for one of
nine Hayes AT-compatible modems.
6-6 LIFEPAK 500 Automated Exter nal Defibri llator Operating Instructions
Page 91

Table 6-5 LIFEPAK 500 AED Screen Messages (Continued)
Screen Message Description
Troubleshooting
6 Troubleshooting
MOTION DETECTED
MOTION DETECTION
NO SHOCK ADVISED
PUSH ANALYZE
PUSH TO SHOCK
REPLACE BATTERY
SELF-TEST XX.XX
SEND COMPLETE
SENDING
SENDING
XX% COMPLETE
SETUP MODE
nnnnnnnnnnnnnnnnnnn
SHOCK ADVISED
STAND CLEAR
START CPR
STOP MOTION
TEST MODE
TEST OK
TO PRINT PUSH X
TO SEND PUSH X
TRANSFER SETUP TO
SEND PUSH
TRY AGAIN
WILL RE-DIAL IN
XX SECONDS
X
The AED detects motion during ECG analysis, thereby inhibiting
analysis.
Setup mode message for motion detection option.
The AED has analyzed the patient ECG and detected a nonshockable
ECG rhythm.
Press ANALYZE to begin ECG analysis.
The AED is fully charged and ready to provide therapy. This is the
AED prompt to press
SHOCK to discharge.
The battery voltage is very low.
The self-test is being performed and software version xx.xx is
installed.
The AED successfully transferred data.
The AED is transferring the setup to another AED.
The AED is transferring data by modem or to a printer. The transfer
is xx% complete.
The AED is in the setup mode. The nnnnnnnnnnnnnnnnnnn is the
Device Configuration code.
The AED has analyzed the patient ECG rhythm and detected a
shockable ECG rhythm.
The AED prompt to move everyone away from the patient.
The AED prompt that follows the IF NO PULSE message.
See MOTION DETECTED.
The AED has entered the test mode.
The external test load test has been successfully completed.
The AED is connected to a printer and ready to print a report.
The AED is connected to a modem and ready to transfer data.
Setup mode message for the Transfer Setup feature.
The AED is ready for you to retry transferring data by modem.
While attempting to transfer data by modem, the AED detected
that the destination phone number was busy. The AED will try again
in xx seconds.
LIFEPAK 500 Automated External Defibrillator Operating Instructions 6-7
©1996–2005 Medtronic Emergency Response Systems, Inc.
Page 92

Tro ub le sh oot in g
Table 6-6 LIFEPAK 500 AED Voice Prompts
Voice Prompt Description
ANALYZING NOW, STAND
CLEAR
ASYSTOLE
CHECK FOR PULSE
CHECK PATIENT
CONNECT ELECTRODES
IF NO PULSE, START CPR
IF NO PULSE, PUSH ANALYZE
IF NOT MOVING AND NOT
BREATHING NORMALLY
MOTION DETECTED, STOP
MOTION
NO SHOCK ADVISED
PUSH ANALYZE
REPLACE BATTERY
SHOCK ADVISED
STAND CLEAR
STAND CLEAR, PUSH TO
SHOCK
The AED is analyzing the patient ECG rhythm.
The AED has analyzed the patient ECG and detected persistent
asystole.
Check the patient for a pulse.
AED prompt after each standard three-shock sequence or NO SHOCK
ADVISED
message when PULSE PROMPT 2 is selected in Setup.
The AED detects that the electrodes are disconnected.
If patient pulse is not present, start CPR.
If patient pulse is not present, press ANALYZE.
AED prompt that follows the CHECK PATIENT prompt when PULSE
PROMPT 2
is selected in Setup.
The AED detects motion during ECG analysis.
The AED has analyzed the patient ECG and detected a non-shockable
ECG rhythm.
Press ANALYZE to begin ECG analysis.
The battery voltage is low and must be replaced immediately.
The AED has analyzed the patient ECG and detected a shockable ECG
rhythm.
Move away and do not touch patient.
The AED is fully charged and ready to provide therapy. This is the AED
prompt to move everyone away from the patient, then press
SHOCK
to discharge.
6-8 LIFEPAK 500 Automated External Defib rillator O perating Instructions
Page 93

Table 6-7 LIFEPAK 500 AED Event Types
Possible Event Types
*
Event Log Report
POWER ON
PATIENT CONNECTED
ANALYSIS X
SHOCK X - XXXJ
CPR PROMPT
CHECK PATIENT
CHARGE REMOVED
BATTERY REMOVED
BATTERY REPLACED
MOTION DETECTED
ANALYSIS STOPPED
OUT OF EVENT MEMORY
OUT OF ECG MEMORY
OUT OF SCENE AUDIO MEMORY
POWER OFF
Event Log Summary
FIRST ANALYSIS
FIRST SHOCK
# SHOCK(S) DELIVERED
*
These events and all voice prompts may appear in the Event Log Report.
Troubleshooting
6 Troubleshooting
LIFEPAK 500 Automated External Defibrillator Operating Instructions 6-9
©1996–2005 Medtronic Emergency Response Systems, Inc.
Page 94

Page 95

APPENDIX A
SHOCK ADVISORY SYSTEM
This section describes the basic function of the Shock Advisory System (SAS).
Appendix A
LIFEPAK 500 Automated External Defibrillator Operating Instructions
©1996–2005 Medtronic Emergency Response Systems, Inc.
Page 96

Page 97

Shock Advisory System
OVERVIEW OF THE SHOCK ADVISORY SYSTEM
The Shock Advisory System (SAS) is an ECG analysis system built into the LIFEPAK 500 AED that advises
the operator if it detects a shockable or nonshockable rhythm. This system makes it possible for
individuals not trained to interpret ECG rhythms to provide potentially lifesaving therapy to victims of
ventricular fibrillation or pulseless ventricular tachycardia. The Shock Advisory System contains the
following features:
• Electrode contact determination
• Automated interpretation of the ECG
• Operator control of shock therapy
• Continuous Patient Surveillance System
• Motion detection
Electrode Contact Determination
The patient's transthoracic impedance is measured through the defibrillation electrodes. If the baseline
impedance is higher than a maximum limit, it is determined that the electrodes are not in sufficient
contact with the patient or not properly connected to the AED. ECG analysis and shock delivery are
inhibited. The operator is advised to connect electrodes any time electrode contact is inadequate. If you
continue to get a
dry. Shave excessive hair and apply a new set of electrodes.
CONNECT ELECTRODES message, remove electrodes and make sure skin is clean and
Appendix A
Automated Interpretation of the ECG
The Shock Advisory System is designed to recommend a shock if it detects the following:
• Ventricular fibrillation — with a peak-to-peak amplitude of at least 0.08 mV
• Ventricular tachycardia — defined as having a heart rate of at least 120 beats per minute, QRS width of
at least 0.16 seconds, and no apparent P waves.
Pacemaker pulses may prevent advisement of an appropriate shock, regardless of the patient’s
underlying rhythm. The Shock Advisory System is designed to recommend no shock for all other ECG
rhythms, including asystole, pulseless electrical activity, idioventricular rhythms, bradycardia,
supraventricular tachycardias, and normal sinus rhythms.
ECG analysis is performed on consecutive 2.7-second segments of ECG. The analysis of two out of three
consecutive segments must agree before a decision (
The LIFEPAK 500 AED’s SAS performance for adult and pediatric ECGs is summarized in the following
tables.
Table A-1 LIFEPAK 500 AED SAS Performance Table for Adult ECGs
Rhythm Class
Shockable:
ECG Test
Sample Size
168 >90% sensitivity 100.0% [98.6%]
1
Performance Goal2,
coarse VF
Shockable:
65 >75% sensitivity 84.6% [77.3%]
shockable VT
Nonshockable:
NSR
144 >99% specificity
for NSR (AHA)
SHOCK ADVISED or NO SHOCK ADVISED) is made.
Observed Performance
3
Sensitivity or Specificity [LCL]
4
100.0% [98.4%]
LIFEPAK 500 Automated External Defibrillator Operating Instructions A-1
©1996–2005 Medtronic Emergency Response Systems, Inc.
Page 98

Shock Advisory System
Table A-1 LIFEPAK 500 AED SAS Performance Table for Adult ECGs (Continued)
Rhythm Class
ECG Test
1
Sample Size
Performance Goal2,
Observed Performance
3
Sensitivity or Specificity [LCL]
4
Nonshockable:
43 >95% specificity 100.0% [94.8%]
asystole
Nonshockable:
531 >95% specificity 95.7% [94.3%]
all other rhythms
Intermediate:
29 Report only 86.2% [74.3%] sensitivity
fine VF
1.
From Medtronic ECG database. Each sample is run 10 times asynchronously.
2.
Association for the Advancement of Medical Instrumentation. DF39-1993 Standard for Automatic External Defibrillators
and Remote-Control Defibrillators. Arlington, VA: AAMI;1993.
3.
Automatic External Defibrillators for Public Access Defibrillation: Recommendations for Specifying and Reporting
Arrhythmia Analysis Algorithm Performance, Incorporating New Waveforms, and Enhancing Safety. AHA Task Force on
Automatic External Defibrillation, Subcommittee on AED Safety and Efficacy. Circulation, 1997, Vol. 95, 1677-1682.
4.
LCL = 90% exact one-sided lower confidence limit
VF = ventricular fibrillation
VT= ventricular tachycardia
NSR = normal sinus rhythm
The LIFEPAK 500 defibrillator was also tested using ECGs acquired from hospitalized pediatric patients
ranging in age from < 1 day old to 17 years old. The results are summarized in Table A-2.
Table A-2 LIFEPAK 500 AED SAS Performance Table for Pediatric ECGs
Rhythm Class
Shockable:
ECG Test
Sample Size
1
Performance Goal
90 >90% sensitivity 98.9% [95.7%]
Observed Performance
2
Sensitivity or Specificity [LCL]
3
coarse VF
Shockable:
11 >75% sensitivity 54.5% [31.8%]
shockable VT
Nonshockable:
424 >99% specificity 100.0% [99.5%]
NSR
Nonshockable:
95 >95% specificity 100.0% [97.6%]
asystole
Nonshockable:
433 >95% specificity 98.8% [97.9%]
all other rhythms
Intermediate:
4 Report only 100.0% [56.2%] sensitivity
fine VF
Intermediate:
7 Report only 42.9% [17.0%] specificity
other VT
1.
From Medtronic ECG database.
2.
Automatic External Defibrillators for Public Access Defibrillation: Recommendations for Specifying and Reporting
Arrhythmia Analysis Algorithm Performance, Incorporating New Waveforms, and Enhancing Safety. AHA Task Force on
Automatic External Defibrillation, Subcommittee on AED Safety and Efficacy. Circulation, 1997, Vol. 95, 1677-1682.
3.
LCL = 90% exact one-sided lower confidence limit.
A-2
LIFEPAK 500 Automated External Defibrillator Operating Instructions
Page 99

Shock Advisory System
Control of Shock Therapy
Operator Control of Shock Therapy
The Shock Advisory System causes the AED to charge automatically when it detects the presence of a
shockable rhythm. When a shock is advised, the operator remains in control of when the shock is
delivered.
Continuous Patient Surveillance System
The Continuous Patient Surveillance System (CPSS) automatically monitors the patient's ECG rhythm for
a potentially shockable rhythm while the electrodes are attached and the AED is turned on. CPSS is not
active during ECG analysis.
Motion detection is not active during the CPSS. Therefore, there is a chance that motion distortion in the
ECG rhythm may be interpreted by CPSS as a potentially shockable rhythm.
Motion Detection
The Shock Advisory System detects patient motion independent of ECG analysis. A motion detector is
designed into the LIFEPAK 500 AED.
OFF.
or
MOTION DETECTION can be configured in the setup mode to be ON
Appendix A
Motion can be caused by CPR, rescuer movement, patient movement, vehicle movement, or other
causes. If variations in the transthoracic impedance signal exceed a maximum limit, it is determined that
patient motion of some kind is present. ECG analysis is inhibited until the motion ceases. The operator is
advised any time motion is detected during an analysis by a displayed message, a voice prompt, and an
audible alert. If the motion does not cease within 20 seconds, analysis attempts will stop until the
operator presses the
ANALYZE button again. For LIFEPAK 500 AEDs without an ANALYZE button,
analysis restarts automatically. If the motion does cease within 20 seconds, ECG analysis proceeds
automatically.
There are two reasons why ECG analysis is inhibited when motion is detected:
1 Such motion may cause artifact in the ECG signal. This artifact can cause a nonshockable ECG rhythm
to look like a shockable rhythm. For example, chest compressions during asystole can look like
shockable ventricular tachycardia. Artifact can also cause a shockable ECG rhythm to look like a
nonshockable rhythm. For example, chest compressions during ventricular fibrillation can look like an
organized and, therefore, nonshockable rhythm.
2 The motion may be caused by a rescuer's interventions. To reduce the risk of inadvertently shocking a
rescuer, the motion alert prompts the rescuer to move away from the patient. This will stop the
motion and ECG analysis will proceed.
LIFEPAK 500 Automated External Defibrillator Operating Instructions A-3
©1996–2005 Medtronic Emergency Response Systems, Inc.
Page 100

 Loading...