


KAPPA 700/600 SERIES
PACEMAKERS
Software Model 9953A
Vision™ Programmer Software
Pacemaker Programming Guide for EP Studies Function


Using the EP Studies Function
with Medtronic.Kappa™ 700/600
Series Pacemakers
Caution: Federal law (USA) restricts this device to
sale by or on the order of a physician.
Software
TM
Supplement to the
Medtronic.Kappa
700/600 Series
Pacemaker
Programming Guide
™
4

Medtronic, Medtronic.Kappa, Medtronic.Vision, and Marker Channel are all trademarks of
Medtronic, Inc.
5

About this Supplement
This booklet covers using the EP (electrophysiologic) Studies
function of the 9790 series programmer with Medtronic.Kappa™
700/600 Series pacemakers. This booklet is a supplement to the
Pacemaker Programming Guide
Refer to the Pacemaker Programming Guide for instructions on
setting up and operating your 9790 series programmer.
About this Supplement
for these pacemakers.
For information about using
the 9790 programmer with
Medtronic.Kappa™ 700/600
Series pacemakers, refer to
the
Pacemaker Programming
.
Guide
KAPPA®700/600 SERIES
PACEMAKERS
Model 9953 1.3
Pacemaker Programming Guide
EP Studies Supplement
iii
6

Additional Information
Additional Information
Instructions in this booklet reference certain procedures and
functions that are described in the
for the Medtronic.Kappa™ 700/600 Series pacemakers. The table
below lists this information and its location.
Adjusting the live rhythm display Chapter 4
Interrogating the pacemaker Chapter 2
Clinician-selected diagnostic data collection Chapter 5
Printing reports Chapter 2
Resetting an ERI or Electrical Reset Chapter 7
Programming the pacing mode Chapter 7
Viewing saved ECG strips Chapter 4
Pacemaker Programming Guide
iv
7
EP Studies Supplement

Table of Contents
1. About the EP Studies Function
2. Starting the EP Studies Function
Table of Contents
About this Supplement iii
Additional Information iv
Intended Use and General Warning 1-2
Intended Use 1-2
General Warning 1-2
Precautions and Considerations 1-3
EP Studies Access and Protocol Options 1-6
EP Studies Access 1-6
Protocol Options 1-6
The PES Protocol 1-7
The Burst Protocol 1-8
The VOO Burst Protocol 1-9
Using VOO Backup Pacing 1-10
What VOO Backup Pacing Does 1-10
Requirements for Starting EP Studies 2-2
Start-up Procedure 2-3
Before You Proceed 2-6
Protocol Timing Limitations 2-6
Viewing Information About Achievable Stimulus
Amplitudes 2-7
Adjusting the Live Rhythm Display 2-8
Protocol ECG Strip and Printed Report 2-8
3. Setting Up and Executing a PES Protocol
Setting Up a PES Protocol 3-2
A. Selecting the PES Protocol Option 3-2
B. Setting Up the Stimulation Sequence 3-3
C. Setting Up Additional Test Values 3-4
Executing the PES Protocol 3-6
EP Studies Supplement
8
v

Table of Contents
4. Setting Up and Executing a Burst Protocol
Setting Up a Burst Protocol 4-2
A. Selecting the Burst Protocol Option 4-2
B. Setting Up the Burst Parameters 4-3
C. Setting Up Additional Test Values 4-3
Executing the Burst Protocol 4-5
Setting Up and Executing a VOO Burst 4-6
Setup Procedure 4-6
Executing a VOO Burst 4-7
5. Programmable Parameter Definitions and Values
PES Parameter Information 5-2
PES Parameter Definitions 5-2
PES Parameter Values 5-5
Burst Parameter Information 5-6
Burst Parameter Definitions 5-6
Burst Parameter Values 5-8
Index
vi
9
EP Studies Supplement

About the EP Studies
Function
This chapter introduces the EP Studies function with
important Intended Use, General Warning, and
Precaution statements. Included is a description of
each of the stimulation protocols and the backup
ventricular pacing option.
1
Intended Use and General
Warning
Precautions and
Considerations
EP Studies Access and Protocol
Options
The PES Protocol
The Burst Protocol
1-2
1-3
1-6
1-7
1-8
10
The VOO Burst Protocol
Using VOO Backup Pacing
EP Studies Supplement
1-9
1-10
1-1

About the EP Studies Function
Intended Use and General Warning
Intended Use and General Warning
EP (Electrophysiologic) Studies is a special function of the
Medtronic® 9790 series programmer that allows you to use the
patient’s implanted pacemaker to noninvasively deliver high-rate
cardiac stimulation. Programmable mode, interval, and delay
parameters allow you to set up protocols for delivering either
programmed electrical stimulation (PES) or burst stimulation.
Intended Use
The EP Studies function is intended for use in measuring or
assessing conduction properties of the heart and inducing or
terminating tachyarrhythmias. The EP Studies function covered
in this supplement applies only to the pacemakers listed below.
Table 1-1.
Medtronic.Kappa™ 700 Series KDR700/720/730 Series
Medtronic.Kappa™ 600 Series K
Applicable Pacemaker Models
KD700 Series
VDD
K
700 Series
SR
K
700 Series
DR
600 Series
General Warning
The EP Studies function is intended for use only by those trained
in electrophysiologic studies. The stimulation options of this
function should be applied only under conditions of careful
patient monitoring and control. High-rate stimulation of the
ventricles can result in ventricular fibrillation. An external
defibrillator should be placed on standby and be kept
immediately available during the use of the EP Studies function.
11
1-2
EP Studies Supplement

About the EP Studies Function
Precautions and Considerations
The following precautions and important considerations apply to
using the EP Studies function.
Loss of Diagnostic EGM Collection
Starting EP Studies disables EGM collection if it applies to a
programmed clinician-selected diagnostic and clears the EGM
from the pacemaker memory.
If diagnostic data is interrogated prior to starting EP Studies, the
collected EGM is available on the programmer throughout the
patient session, but is lost when you end the session. You should
view and print the collected data before ending the session.
EGM collection remains off until it is reprogrammed to the
desired type (see “Ending the Patient Session” on page 1-5).
Using EP Studies does not affect automatic (non-selectable)
diagnostic data collection functions.
Precautions and Considerations
12
Using VOO Backup Ventricular Pacing
The VOO Backup option delivers
ventricles during atrial stimulation. These pacing stimuli may
compete with intrinsic ventricular activity. Refer to page 1-10 for
information about using the VOO Backup pacing option.
asynchronous
pacing to the
Pacemaker Battery Condition
At reduced pacemaker battery capacity, execution of a PES or
burst protocol can result in a significant temporary decrease in
pacemaker battery voltage. See “Viewing Information About
Achievable Stimulus Amplitudes” on page 2-7).
EP Studies Supplement
1-3

About the EP Studies Function
Precautions and Considerations
Selecting an Appropriate Amplitude Setting
Selecting an amplitude setting of 7.5 volts for high-rate
stimulation is not recommended. While this setting can provide
the maximum available output, its use can result in a significant
temporary decline in output voltage. An output setting of 6.0 volts
or less, as shown in the Achievable Amplitudes window (see
below), will reduce battery drain and can provide a more constant
output during protocol delivery.
Pulse amplitude information based on battery and lead
measurements interrogated from the pacemaker can be displayed
by selecting the button labeled “Amplitudes” on the protocol
setup screen. The chart listing achievable amplitudes versus rate
is intended as a guide for selecting stimulus amplitude settings
(see “Viewing Information About Achievable Stimulus
Amplitudes” on page 2-7).
Positioning the Programming Head
During delivery of a PES protocol or burst stimulation, the
programming head must be held steady in its proper position
over the patient’s pacemaker. Movement of the programming
head can result in abrupt termination of the stimulation sequence.
13
1-4
EP Studies Supplement
Lifting the programming head at any time during the use of an EP
Studies function causes the pacemaker to return to its
permanently programmed state.
Interruption of Marker Telemetry
The communication between the programmer and pacemaker
momentarily interrupts the transmission of marker telemetry.
This interruption can result in missing markers on the trace
display and the chart recording.
Symbols appearing on the recording above the ECG trace indicate
the point at which communication occurred.
= Programming or interrogation command to the pacemaker.
▼
= Telemetry response from the pacemaker.
▲

Communication
Symbols
Missing Marker
About the EP Studies Function
Precautions and Considerations
Figure 1-1.
ECG Recording Example Showing a Missing Marker
Ending the Patient Session
Reprogramming the Pacing Mode –
pacemaker from a rate responsive mode as required to access the
EP Studies function, reprogram the pacemaker to the desired
mode and parameter settings prior to ending the session.
Reprogramming Diagnostic Data Collection –
stated, using EP Studies disables
collection, if programmed on (see “Loss of Diagnostic EGM
Collection” on page 1-3). EGM collection will remain off unless
you reprogram the desired EGM collection type option.
Reprogram this option
you finish using EP Studies, but
after
you end the patient session.
If you programmed the
As previously
clinician-selected
diagnostic EGM
before
14
EP Studies Supplement
1-5

About the EP Studies Function
EP Studies Access and Protocol Options
EP Studies Access and Protocol Options
EP Studies Access
The EP Studies function is available for the applicable pacemakers
(Table 1-1) only if 9953A software has been installed on your
programmer.
To verify whether or not this software has been installed, select
the Tests icon in the tool palette (during a session). If the software
has been installed, “EP Studies” appears on the Tests menu.
Tests Icon
EP Studies
Option
15
1-6
If the 9953A software has not been installed, contact your
Medtronic representative.
Protocol Options
The EP Studies function provides three protocol options for
delivering cardiac stimulation.
PES Protocol
Burst Protocol
VOO Burst
Protocol
Sections on the following pages describe each of these protocols.
Refer to Chapter 5 for a complete list of the programmable
parameters and value options.
EP Studies Supplement

The PES Protocol
Selecting the PES protocol displays parameter options for setting
up a programmed stimulation sequence that includes:
■
■
■
■
■
About the EP Studies Function
The PES Protocol
A drive train of up to 30 stimuli (S1).
Up to three premature stimuli (S2, S3, and S4).
An optional delay period with or without pacing stimuli.
A “Scan” option that causes the PES sequence (and delay
period) to automatically repeat. You can set the interval of the
last premature stimulus to decrease with each repetition.
Optional asynchronous backup ventricular pacing during
atrial stimulation (dual chamber models).
S1 drive train
(2 to 30 events)*
Start of the PES sequence is
synchronized to a paced or
sensed event.
Figure 1-2.
Premature stimuli
(up to three)
*In this example, the S1 drive train is delivered in
a dual chamber mode.
Elements of the PES Protocol
Optional delay period (1 to 20 sec)
with or without pacing
S2 S3 S4
16
EP Studies Supplement
1-7

About the EP Studies Function
The Burst Protocol
The Burst Protocol
Selecting the Burst protocol displays options for setting up a
manually-delivered asynchronous burst. Options include:
■
An adjustable burst interval of 148 to 1945 ms (30 to 400 ppm).
■
Chamber selection (AOO or VOO mode) for dual chamber
models.
■
An optional delay period with or without pacing stimuli.
■
Optional asynchronous backup ventricular pacing during
atrial stimulation (dual chamber models).
Manually delivered burst
(press and hold button)*
The burst is synchronized to
a paced or sensed event.
Figure 1-3.
Optional delay period (1 to 20 sec)
with or without pacing
Adjustable interval
(148 - 1945 ms)
*With dual chamber models, stimuli
can be delivered to the atrial chamber
or the ventricular chamber.
Elements of the Burst Protocol
17
1-8
EP Studies Supplement

The VOO Burst Protocol
The VOO Burst option applies only to dual chamber models and
provides for quick setup of a basic stimulation protocol for the
ventricles.
■
The burst interval is adjustable from 148 to 1945 ms (30 to
400 ppm).
■
No chamber selection. The burst mode is fixed as VOO.
■
The option to select a delay period does not apply.
Manually delivered burst to the ventricles
only (via press and hold button)
About the EP Studies Function
The VOO Burst Protocol
18
The burst is synchronized to
a paced or sensed event.
Figure 1-4.
Elements of the VOO Burst Protocol
Adjustable interval
(148 - 1945 ms)
EP Studies Supplement
1-9

About the EP Studies Function
Using VOO Backup Pacing
Using VOO Backup Pacing
Caution:
the ventricles (during atrial stimulation). These pacing stimuli
may compete with intrinsic ventricular activity.
Note:
S2S3S4 Mode, and Burst Mode to AOO. Selecting VOO Backup for
a PES protocol also enables it for the burst protocols.
The VOO Backup option delivers
Setting the VOO Backup option to On restricts the S1 Mode,
asynchronous
pacing to
What VOO Backup Pacing Does
VOO Backup pacing applies only to dual chamber pacemakers. Its
purpose is to provide ventricular pacing support during atrial
stimulation. Ventricular pacing otherwise is disabled during the
execution of atrial stimulation and the inhibited delay period, if
selected.
During Atrial Stimulation –
burst), each ventricular pacing pulse is synchronized to an atrial
stimulus with an intervening AV interval of 50 ms. To ensure that
the backup pacing rate does not exceed 105 ppm, the pacemaker
automatically selects a ratio between the ventricular and atrial
outputs to keep pacing rate within the range shown in Table 1-2.
Table 1-2.
A-to-A Interval (ms) Ratio (A-to-V Rate) Vent. Rate (ppm)
≥
570 1:1 30 - 105
VOO Backup Ventricular Pacing Rate
During atrial stimulation (PES or
19
1-10
EP Studies Supplement
313 - 563 2:1 53 - 96
211 - 305 3:1 66 - 95
156 - 203 4:1 74 - 96
148 5:1 81
During an Inhibited Delay –
during an inhibited delay period unless VOO Backup is enabled.
If VOO Backup is enabled, the atrial output remains inhibited, but
the ventricles are paced synchronously in the VDI mode at the
programmed lower rate.
Pacemaker output is turned off

Starting the EP Studies
Function
This chapter describes the requirements and
procedure for starting the EP Studies function and
covers some information that applies to both PES and
burst protocols.
Refer to Chapters 3 and 4 for information on how to set
up and execute a PES or burst protocol, respectively.
Refer to the warning and precautions in Chapter 1
before using the EP Studies function.
2
Requirements for Starting EP
Studies
Start-up Procedure
Before You Proceed
2-2
2-3
2-6
20
EP Studies Supplement
2-1

Starting the EP Studies Function
Requirements for Starting EP Studies
Requirements for Starting EP Studies
Note the following requirements and restrictions before you begin
the EP Studies start-up procedure.
Pacing Mode Restrictions
Access to the EP Studies protocols is not permitted if the present
pacing mode is a
DOOR, VVIR, VDIR, VOOR, AAIR, ADIR, AOOR) or a
mode (ODO, OVO, OAO).
If one of these modes is presently programmed, you must
reprogram the pacemaker to another mode prior to selecting the
EP Studies option.
rate responsive
Pacemaker Operating-Status Restrictions
Any of the following operating conditions also prevents access to
the EP Studies protocols.
mode (DDDR, DDIR, DVIR,
non-pacing
21
2-2
EP Studies Supplement
■
ERI (Elective Replacement Indicator)
at ERI status, you cannot access the EP Studies protocols
unless you can clear this condition (ERI/POR Reset
parameter).
■
Electrical reset (POR)
you must clear this condition (ERI/POR Reset parameter)
before you select the EP Studies function.
■
Implant Detection
protocols during the 30-minute Implant Detection period that
begins with lead connection during pacemaker implantation.
— If an electrical reset has occurred,
— You cannot access the EP Studies
— If the pacemaker is
Positioning the Programming Head
During the start-up procedure, the programmer must perform an
interrogation and transfer, or “download,” a set of instructions to
the pacemaker. This process (called “initialization”) can take up to
30 seconds, during which you must hold the programming head
steady over the patient’s pacemaker.

Start-up Procedure
To start the EP Studies function, complete the following four
steps. This procedure assumes you have already started the
patient session.
Position the programming head and continue to hold it
1.
steady for the remainder of this procedure.
Select the Tests icon in the tool palette.
2.
Starting the EP Studies Function
Start-up Procedure
2
3
From the displayed menu options select
3.
When you see the message window shown below, select
4.
Continue
Start-up Messages” on page 2-5.
Continue to hold the programming head steady until the
“initializing” process is complete and the EP Studies Setup
screen is displayed (see next page).
. If you see another message, refer to “Explanation of
EP Studies Supplement
EP Studies
Select Cancel if
you wish to exit
this procedure.
.
2-3
22

Starting the EP Studies Function
Start-up Procedure
To set up a PES protocol,
see Chapter 3.
To set up a burst protocol,
see Chapter 4.
For parameter definitions
and value options, see
Chapter 5.
If you successfully started the EP Studies function
Note:
previously during the patient session, the PES or Burst
protocol screen will be set up as you left it. The screen shown
above is displayed only the first time you select the EP Studies
function during a session.
This completes the start-up procedure. Refer to “Before You
Proceed” on page 2-6 before setting up a PES or burst protocol.
23
2-4
EP Studies Supplement

Starting the EP Studies Function
Start-up Procedure
Table 2-1.
1. EP Protocols - Initialization Restricted
Operation of the EP Studies function is restricted by any of the
following situations:
• The pacemaker is programmed to rate responsive mode or a
non-pacing mode.
• The pacemaker operating status is ERI or Electrical Reset (POR).
• The 30-minute Implant Detection period has not ended.
Action: As indicated in the text of the respective message, you must
program the pacing mode temporarily to a different setting or
program the ERI/POR Reset command. If Implant Detection is
operating, you must wait until the 30-minute period has ended or
program the following values: Lead Monitor (Atrial and Ventricular)
to Monitor Only or Adaptive and Implant Detection to Off/Complete.
The ERI/POR Reset command is located under “Additional
Features” on the Therapy Parameters screen. Lead Monitor is
located under Pace/Sense Lead Polarity (Atrial and Ventricular) on
the Therapy Parameters screen.
2. Interrogation - Not Complete
An interrogation for diagnostic data collected by the pacemaker has
not occurred. If a clinician-selected diagnostic data option with EGM
collection has been programmed, the collected EGM is cleared
when you start EP Studies.
Action: You must select Cancel and perform an interrogation for
Collected Data before you continue, otherwise the collected EGM
will be lost before you have a chance to view or print it.
Explanation of Start-up Messages
24
3. EP Protocols - Cannot be Initialized
The EP Studies initialization process was not successful, perhaps
due to interruption of the programming process by interference or
movement of the programming head.
Action: Assure that the programming head is properly positioned,
then select the Retry button.
EP Studies Supplement
2-5

Starting the EP Studies Function
Before You Proceed
Before You Proceed
Note the following information before you proceed to set up and
execute a PES or burst protocol.
Protocol Timing Limitations
Delivery of a PES or burst protocol requires a coordinated series
of automatic programming commands, telemetry responses, and
processing factors that result in a certain amount of elapse time.
Start of the protocol –
selection of the
sequence. This time lag accommodates the protocol programming
command (as indicated by the ▼ and ▲ symbols above the ECG
trace) and synchronization of the first protocol stimulus.
Delay period accuracy –
second shorter to two permanent pacing intervals longer than the
selected time.
Burst Count –
burst stops upon release of the
VOO backup pacing –
transition that occurs following delivery of the last stimulus in a
PES or Burst sequence can extend that ventricular pacing interval
up to 1000 ms longer than the permanent lower rate interval.
START PES
One or two additional pulses will occur before a
A second or two can elapse between
button and the start of the stimulation
The delay period can be from one
BURST Press & Hold
If VOO Backup is enabled, the mode
button.
25
2-6
EP Studies Supplement

Amplitudes
Starting the EP Studies Function
Before You Proceed
Viewing Information About Achievable
Stimulus Amplitudes
To view the window shown below, which presents achievable
stimulus amplitudes versus rate, select the (information)
button labeled “Amplitudes” in the lower left corner of the setup
screen.
26
The message “Warning - Old Data” indicates that recent
Note:
pacing parameter changes may have changed the Achievable
Amplitudes information since it was last viewed. Select the
Yes
button if you want the programmer to update the Achievable
Amplitude data. Select
if you are not using this information.
No
The projected achievable amplitudes are based on the following:
■
Measured battery impedance (an indicator of battery
condition) and lead impedance.
■
The use of single chamber pacing at a pulse width of 1.0 ms
(without VOO Backup Pacing) during protocol execution.
This information is intended as a guide for selecting protocol
stimulus amplitude settings that should not significantly reduce
pacemaker battery output which could abort the protocol
execution.
EP Studies Supplement
2-7
Starting the EP Studies Function
Before You Proceed
Adjusting the Live Rhythm Display
Prior to executing a protocol, verify that the live rhythm display
at the top of the screen shows the desired traces. To adjust the
traces, select the
Note:
protocol, the live rhythm display adjusts to these default settings:
■
Lead II ECG trace with Markers
■
Atrial EGM if the S1 Mode or Burst Mode is an atrial mode or
Ventricular EGM if the mode is ventricular and dual chamber.
button.
Adjust
Each time you select the EP Studies function or a different
27
2-8
EP Studies Supplement
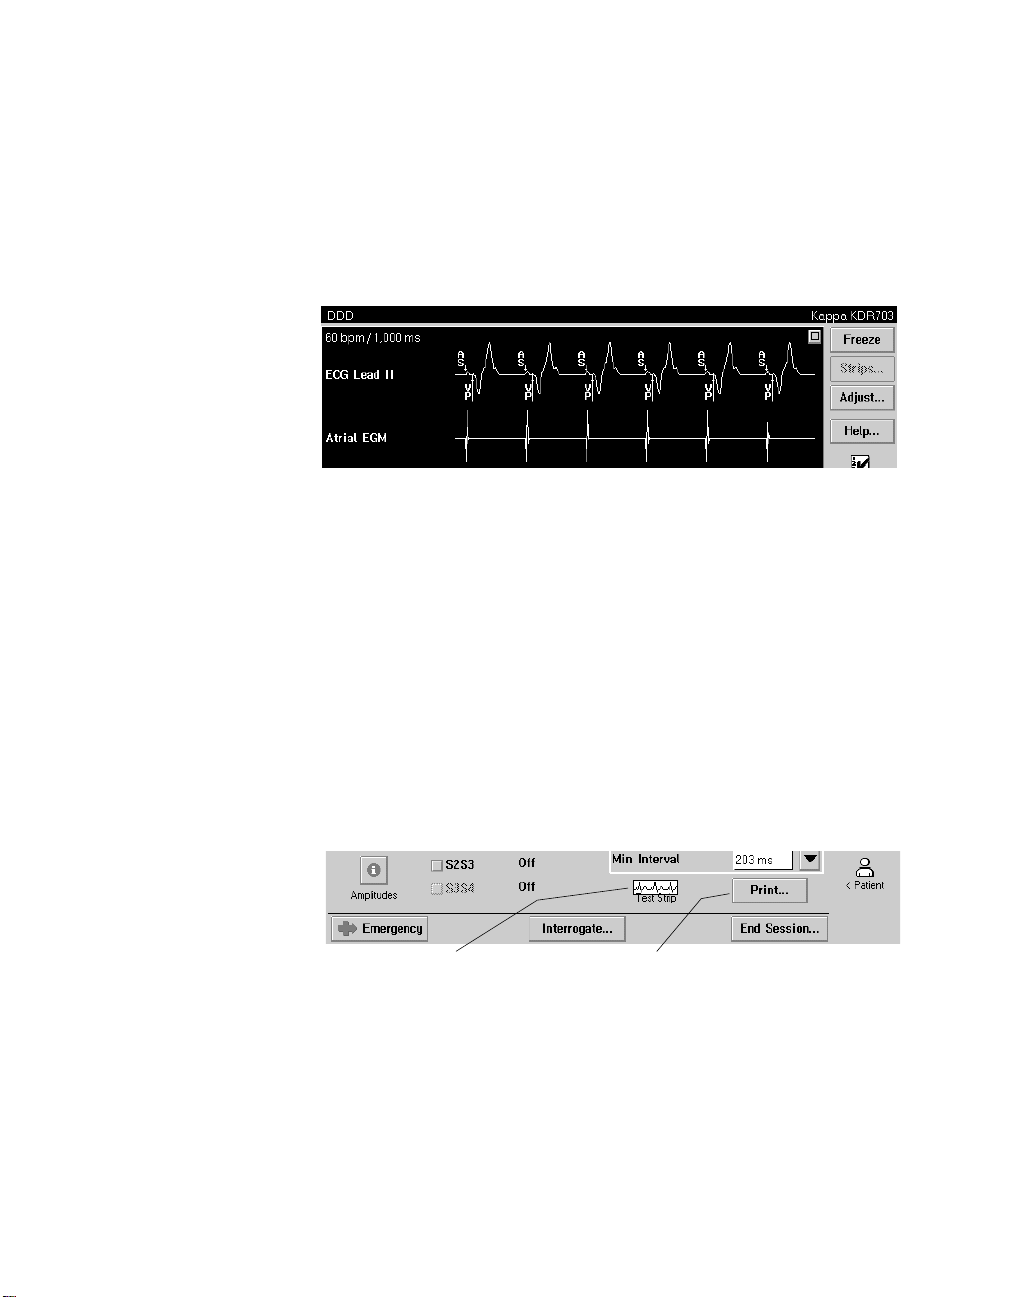
Protocol ECG Strip and Printed Report
During execution of a PES or burst protocol, the programmer
automatically collects and saves a 10-second ECG strip and the
protocol parameter test values.
Test Strip Icon Print Button
To view the saved ECG strip, select the Test Strip icon (or the
➤
button in the Tool Palette). The Test Strip icon appears
Strips
only when a strip is available for viewing.
To view options for printing a protocol report, select the
➤
button. The report includes the protocol parameter test
values and an ECG strip. The programmer saves only the
most recent use of the PES, Burst, and VOO Burst protocols.
Print

Setting Up and
Executing a PES
Protocol
This chapter describes the steps for setting up and
executing a PES protocol.
Refer to Chapter 4 for instructions on setting up a
burst stimulation sequence.
Refer to Chapter 5 for information on each of the PES
parameters.
Setting Up a PES Protocol
3
3-2
28
Executing the PES Protocol
EP Studies Supplement
3-6
3-1
Setting Up and Executing a PES Protocol
Setting Up a PES Protocol
Setting Up a PES Protocol
This procedure begins at the EP Studies - PES - Setup screen. Refer
to Chapter 2 if you have not yet selected the EP Studies function.
Refer to Chapter 5 for information on the protocol parameters.
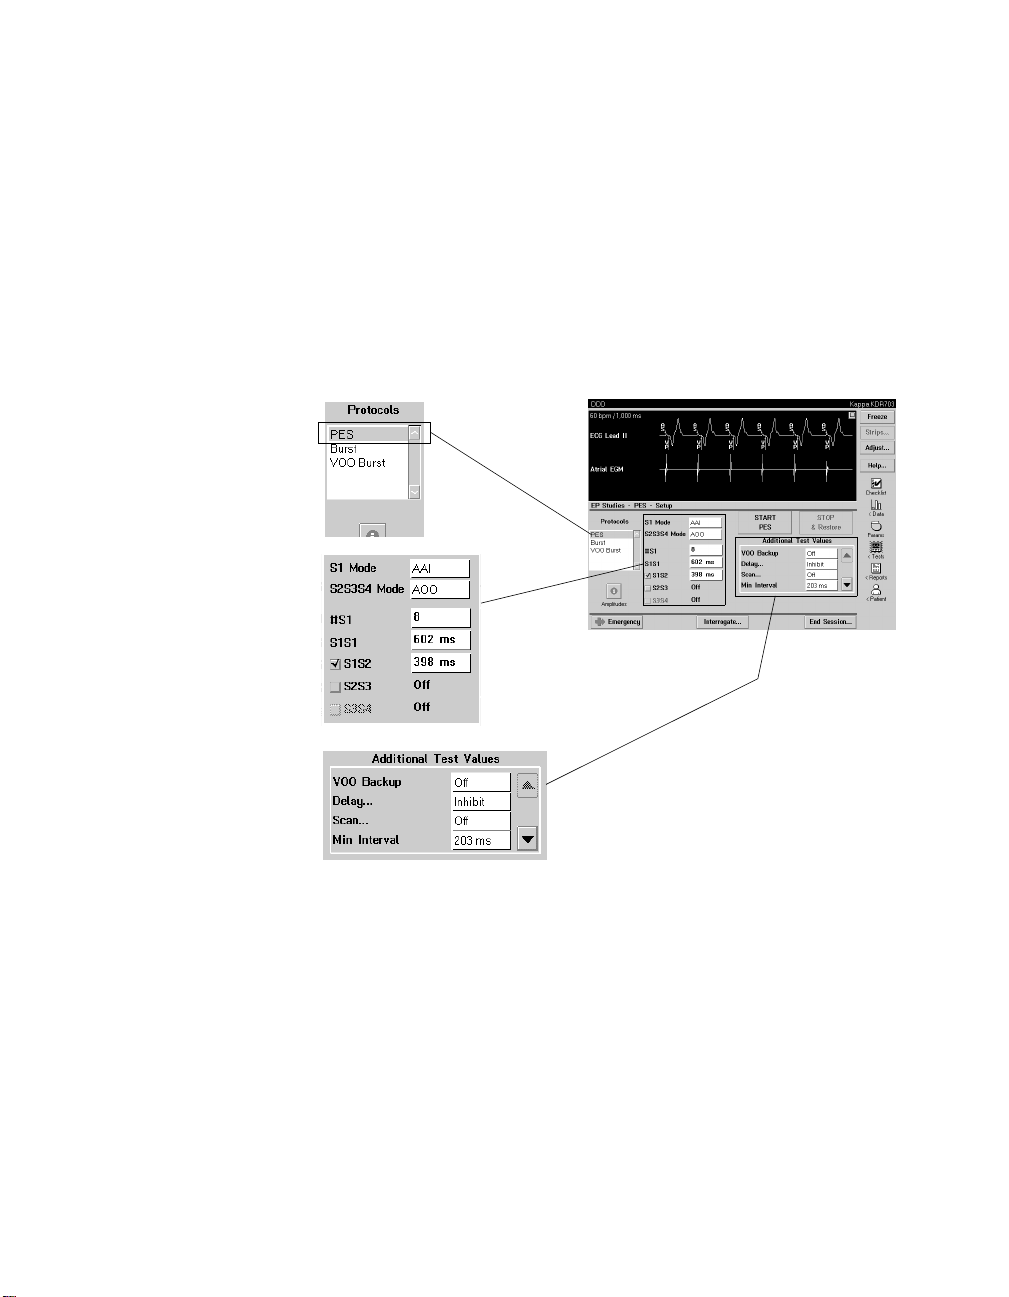
This procedure is divided into the three tasks illustrated below.
A. Select PES from the
Protocols list to display
the PES setup options.
B. Select the desired values
to set up the stimulation
sequence.
C. Select the desired
settings in the Additional
Test Values box.
3-2
29
Figure 3-1.
EP Studies Supplement
The Basic Tasks for Setting Up a PES Protocol
A. Selecting the PES Protocol Option
If the PES - Setup screen shown above is not displayed, select
➤
from the Protocols list.
PES
The settings you select on this screen will remain selected if
you choose to exit the EP Studies function or select another
protocol option.
Setting Up and Executing a PES Protocol
Setting Up a PES Protocol
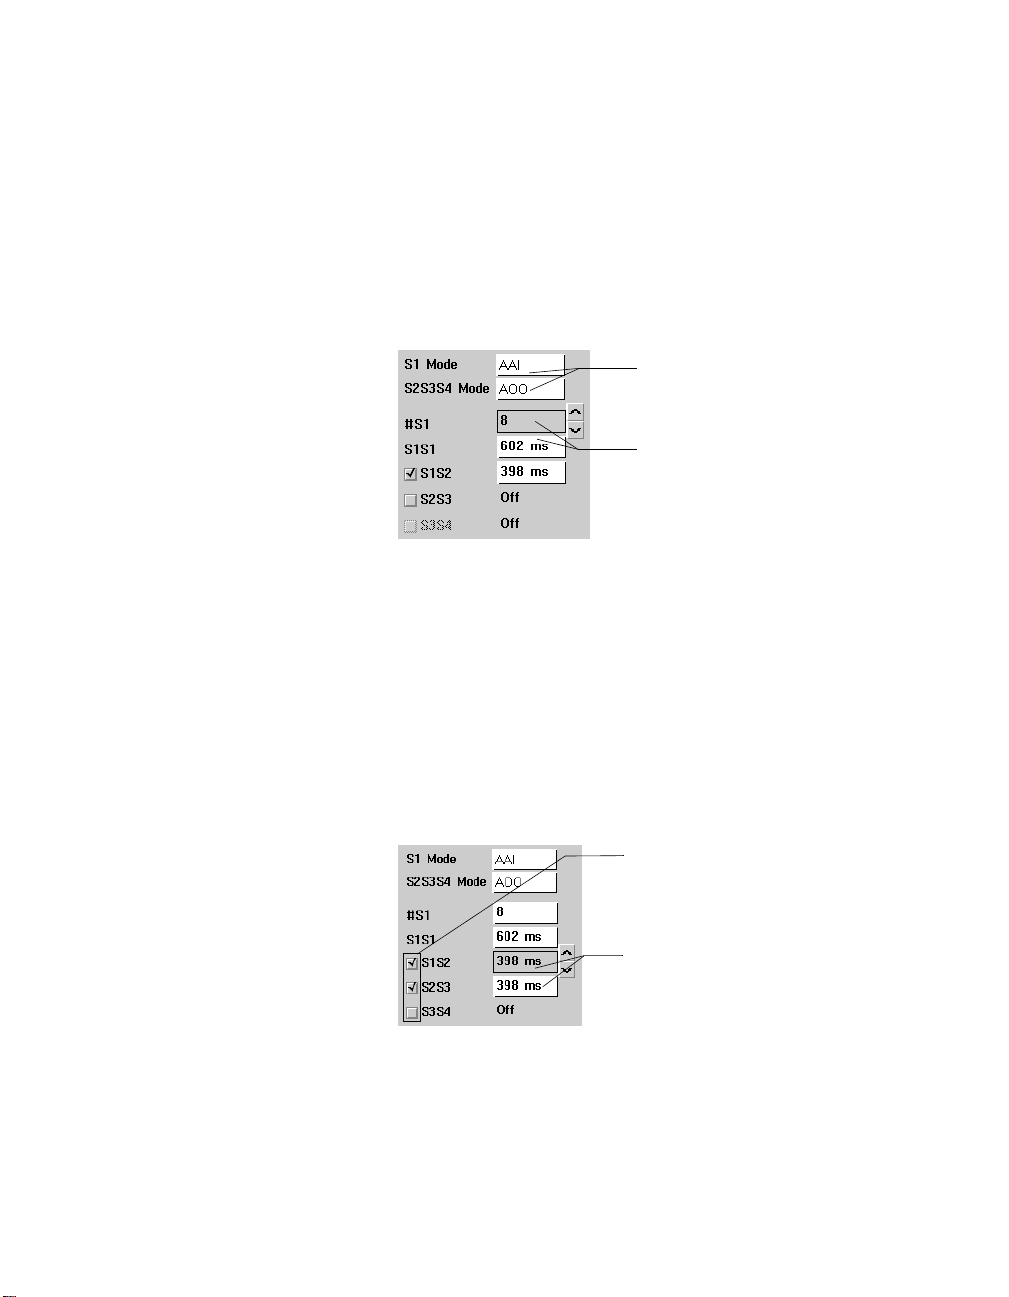
B. Setting Up the Stimulation Sequence
Set up the stimulation sequence by selecting a value for each of the
parameters in steps 1 through 7 below.
1.
S1 Mode
— Select the desired mode for delivery of the S1
drive train.
In steps 1 and 2, select the mode field
to display the mode options.
In steps 3 and 4, select the parameter
field to activate the change buttons.
Select the up (∧) or down (∨) button to
increase or decrease the value.
S2S3S4 Mode
2.
— Select the desired mode for delivery of the
premature stimuli.
— Set the number of S1 events in the S1 drive train.
#S1
3.
— Select a value for the S1S1 interval.
S1S1
4.
It may be necessary to adjust the Min Interval setting
Note:
(Additional Test Values) before you do steps 4, 5, 6, and 7.
— Enable S2 if desired and set a value for the S1 to S2
S1S2
5.
interval.
In steps 5, 6, and 7, select the checkbox to enable or disable the respective
stimulus.
30
6.
7.
Select the value field of the enabled
stimulus to activate the change
buttons.
— Enable S3 if desired and set a value for the S2 to S3
S2S3
interval.
— Enable S4 if desired and set a value for the S3 to S4
S3S4
interval.
EP Studies Supplement
3-3
Setting Up and Executing a PES Protocol
Setting Up a PES Protocol
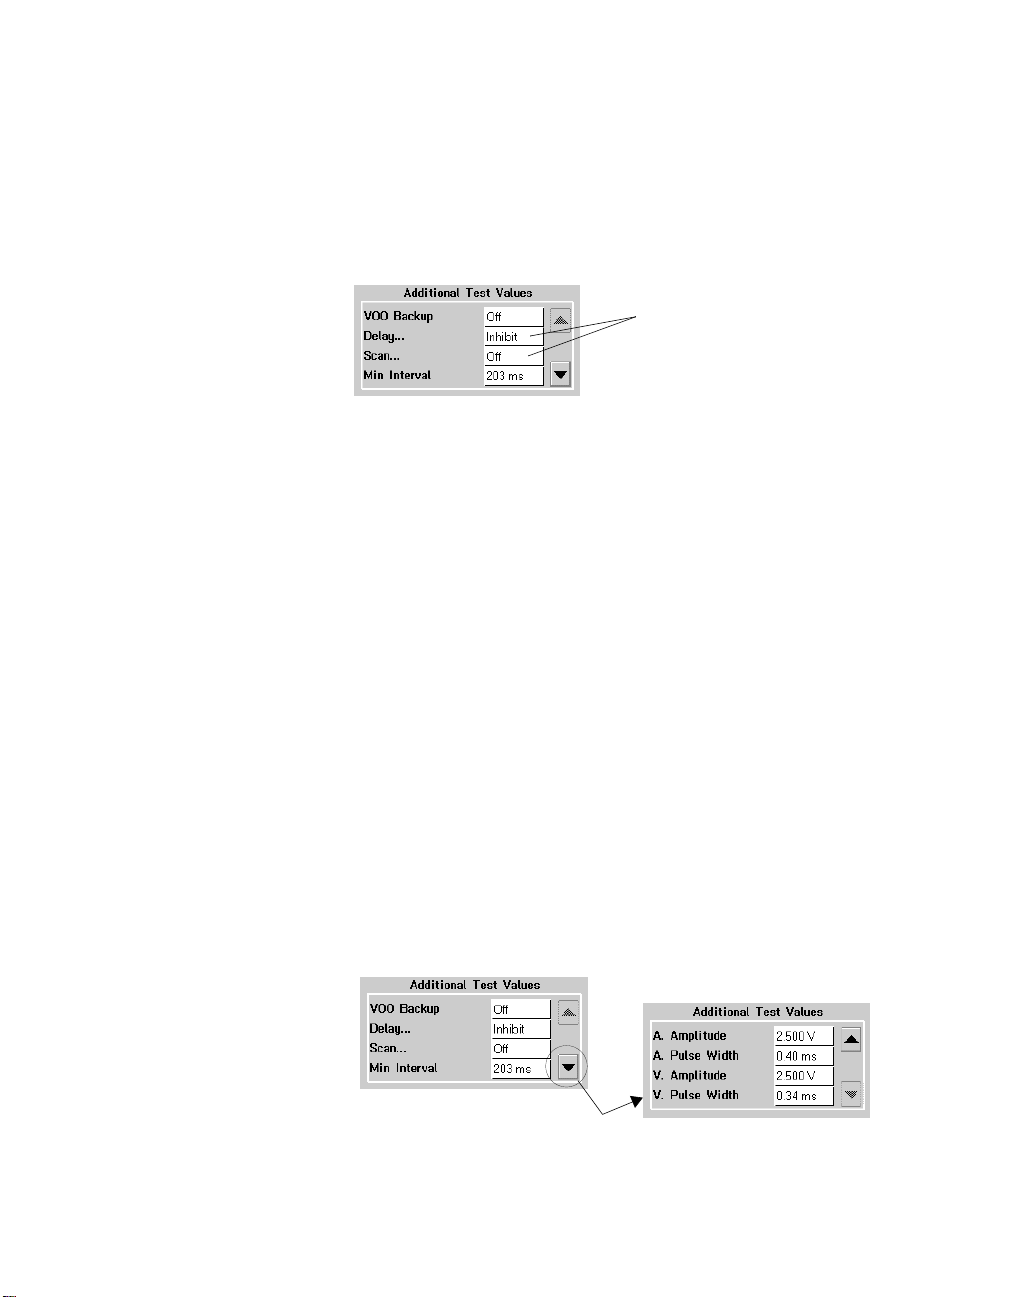
C. Setting Up Additional Test Values
Select a value for each of the parameters displayed in the
1.
Additional Test Values box:
Select the parameter
value field to display
its value options.
a. VOO Backup
(dual Chamber models) — Selecting the On
option forces S1 Mode and S2S3S4 Mode to AOO. You
cannot change these mode settings without first changing
VOO Backup to Off.
The selected setting also applies to the Burst protocol.
b. Delay (Ty p e
and
Period
) — Select
Delay
window that lets you select the Delay Type (Off, Pace, or
Inhibit) and the Delay Period (1 to 20 sec.).
Choose the desired Type and Period by selecting the
respective value field.
c. Scan
(and
Scan Decrement
)— Select
window that lets you select the Scan option (Off or On)
and the decrement value (0 to 48 ms).
Choose the desired Scan and Scan Decrement options by
selecting the respective value field.
d. Min Interval
— Changing this value may affect the
present settings for S1S1, S1S2, S2S3, and S3S4.
Select the page down arrow to display additional
2.
parameters.
to open a
to open a
Scan
31
3-4
EP Studies Supplement

Setting Up and Executing a PES Protocol
Setting Up a PES Protocol
Select the desired values for Amplitude and Pulse Width.
3.
The selected values also apply to the burst protocols.
Caution:
Condition of the pacemaker battery should be
considered in the selection of a test amplitude. If the stimulus
amplitude during execution of the protocol is not within 90
percent of the selected test value, the protocol will stop. A
pop-up window will state that the protocol has been aborted
because the test amplitude is not being achieved.
Selecting the
Disable Check
button in the pop-up window
disables the amplitude check for any additional PES or Burst
tests conducted during the present EP Studies session.
To view information about achievable amplitudes based on
battery and lead impedance measurements, select the
button labeled “Amplitudes.”
This completes the setup procedure. Refer to the next section for
information on executing the protocol.
32
EP Studies Supplement
3-5

Setting Up and Executing a PES Protocol
Executing the PES Protocol
Executing the PES Protocol
After you have completed the protocol setup procedure, use the
following steps when you want to execute the protocol.
Position the programming head and observe that the live
1.
rhythm display shows the patient’s ECG, markers, and the
desired EGM trace.
Caution:
position for the duration of the protocol. The loss or
interruption of telemetry during execution of the protocol will
abruptly terminate the protocol without warning.
To initiate the protocol, select the
2.
The sequence begins with synchronization of the first S1
stimuli to a paced or sensed event. The status bar at the top of
the screen indicates whether the protocol is “stimulating” or
“delaying” and shows a countdown of the seconds remaining
in the delay.
Note:
during the protocol delivery. The new settings take effect on
the next automatic or manual execution of the protocol.
If you selected Scan, the protocol will continue to repeat until
you select the
Continue to hold the programming head steady in
START PES
You can adjust the S1 count (#S1) and stimulus intervals
STOP & Restore
button.
button.
START PES
Button
STOP &
Restore
Button
33
3-6
EP Studies Supplement
To stop the protocol, select the
3.
Lifting the programming head also stops the protocol and
returns the pacemaker to its permanently programmed state.
STOP & Restore
button.

Setting Up and
Executing a Burst
Protocol
This chapter describes the steps for setting up and
executing a burst protocol.
Refer to Chapter 3 for instructions on setting up a PES
protocol.
Refer to Chapter 5 for information on each of the burst
parameters.
4
Setting Up a Burst Protocol
Executing the Burst
Protocol
Setting Up and Executing a VOO
Burst
4-5
4-6
4-2
34
EP Studies Supplement
4-1

Setting Up and Executing a Burst Protocol
Setting Up a Burst Protocol
Setting Up a Burst Protocol
This procedure begins at the EP Studies -Burst - Setup screen.
Refer to Chapter 2 if you have not yet selected the EP Studies
function. Refer to Chapter 5 for information on the protocol
parameters.
This procedure is divided into the three tasks illustrated below.
A. Select Burst from the
Protocols list to display
the burst setup options.
B. Select the burst mode (if
applicable) and the burst
stimulus interval.
C. Select the desired
settings in the Additional
Test Values box.
4-2
35
Figure 4-1.
EP Studies Supplement
The Basic Tasks for Setting Up a Burst Protocol
A. Selecting the Burst Protocol Option
If the Burst - Setup screen shown above is not displayed,
➤
select
The settings you select on this screen will remain selected if
you choose to exit the EP Studies function or select another
protocol option.
from the Protocols list.
Burst

Setting Up and Executing a Burst Protocol
Setting Up a Burst Protocol
B. Setting Up the Burst Parameters
Choose the desired burst setting(s).
Burst Mode
1.
— If the pacemaker is a dual chamber model,
select the desired setting for Burst Mode.
In step 1, select the mode field to
display the mode options.
In step 2, select the up (∧) or down (∨)
button to increase or decrease the
interval value.
2.
Interval
— Select the desired interval for the burst stimuli.
C. Setting Up Additional Test Values
Select a value for each of the parameters displayed in the
1.
Additional Test Values box:
Select the parameter
value field to display
its value options.
a. VOO Backup
option forces Burst Mode to AOO. You cannot change this
mode setting without first changing VOO Backup to Off.
(dual Chamber models) — Selecting the On
36
The selected setting also applies to PES protocol.
b. Delay
(Type and Period) — Select
Delay
to open a
window that lets you choose the Delay Type (Off, Pace, or
Inhibit) and the Delay Period (1 to 20 sec.).
Choose the desired Type and Period by selecting the
respective value field.
EP Studies Supplement
4-3

Setting Up and Executing a Burst Protocol
Setting Up a Burst Protocol
Select the page down arrow to display additional
2.
parameters.
Select the desired values for Amplitude and Pulse Width.
3.
The selected values also apply to the PES and VOO Burst
protocols.
Caution:
Condition of the pacemaker battery should be
considered in the selection of a test amplitude. If the stimulus
amplitude during execution of the protocol is not within 90
percent of the selected test value, the protocol will stop. A
pop-up window will state that the protocol has been aborted
because the test amplitude is not being achieved.
Selecting the
Disable Check
button in the pop-up window
disables the amplitude check for any additional PES or Burst
tests conducted during the present EP Studies session.
To view information about achievable amplitudes based on
battery and lead impedance measurements, select the
button labeled “Amplitudes.”
This completes the setup procedure. Refer to the next section for
information on executing the protocol.
37
4-4
EP Studies Supplement

Setting Up and Executing a Burst Protocol
Executing the Burst Protocol
After you have completed the protocol setup procedure, use the
following steps when you want to execute the protocol.
Position the programming head and observe that the live
1.
rhythm display shows the patient’s ECG, markers, and the
desired EGM trace.
Executing the Burst Protocol
Caution:
position for the duration of the protocol. The loss or
interruption of telemetry during execution of the protocol will
abruptly terminate the protocol without warning.
To deliver the burst, select the
2.
and continue pressing for as long as you want the burst to
continue.
The burst starts with synchronization of the first stimulus to a
paced or sensed event. The status bar at the top of the screen
indicates the burst stimulus count.
Note:
stimulus interval, you can adjust the interval setting during
the delay period, if one has been selected.
To stop the burst, release the
3.
Continue to hold the programming head steady in
BURST Press & Hold
BURST Press
& Hold Button
STOP &
Restore
Button
In preparation for executing another burst at a different
BURST Press & Hold
button.
button
38
To interrupt the delay period, select the
button.
Lifting the programming head also stops the burst and
returns the pacemaker to its permanently programmed state.
EP Studies Supplement
STOP & Restore
4-5

Setting Up and Executing a Burst Protocol
Setting Up and Executing a VOO Burst
Setting Up and Executing a VOO Burst
VOO Burst is a simplified protocol that is quick and easy to set up.
This protocol applies only to dual chamber models.
Setup Procedure
To setup the VOO Burst protocol, complete the following three
steps. For details about selecting parameter settings, refer to the
applicable parts of the Burst setup procedure starting on page 4-2.
Select
1.
2.
3.
The interval setting you select on this screen will remain selected
if you choose to exit the EP Studies function or select another
protocol option. Since Amplitude and Pulse Width are common to
all protocols, these parameters will be at their most recent settings.
VOO Burst
the Protocols list to
display the setup
options.
Select the desired burst
stimulus interval.
Select the desired
settings for Amplitude
and Pulse Width.
from
39
4-6
EP Studies Supplement

Setting Up and Executing a Burst Protocol
Setting Up and Executing a VOO Burst
Executing a VOO Burst
After you have completed the protocol setup, use the following
steps when you want to execute the protocol.
Position the programming head and observe that the live
1.
rhythm display shows the patient’s ECG, markers, and the
desired EGM trace.
Caution:
position for the duration of the protocol. The loss or
interruption of telemetry during execution of the protocol will
abruptly terminate the protocol without warning.
To deliver the burst, select the
2.
and continue pressing for as long as you want the burst to
continue.
The burst starts with synchronization of the first stimulus to a
paced or sensed event. The status bar at the top of the screen
indicates the burst stimulus count.
To stop the burst, release the
3.
Lifting the programming head also stops the burst and
returns the pacemaker to its permanently programmed state.
Continue to hold the programming head steady in
BURST Press & Hold
BURST Press
& Hold Button
BURST Press & Hold
button.
button
40
EP Studies Supplement
4-7


Programmable
Parameter Definitions
and Values
This chapter describes each of the programmable
parameters used by the PES and burst protocols.
Included are the programmable values or options for
each of these parameters.
5
PES Parameter Information
Burst Parameter
Information
EP Studies Supplement
5-6
5-2
5-1
42

Programmable Parameter Definitions and Values
PES Parameter Information
PES Parameter Information
PES Parameter Definitions
S1S1 S1S2 S2S3 S3S4
S1 Mode
S2S3S4 Mode
#S1
S1S1
S1S2
S1 Mode, # S1
(Drive Train)
The mode used for delivering the S1 drive train.
The first S1 interval is synchronized to a sensed or paced event. If the
permanent mode is a dual chamber mode, the first interval is
synchronized to a ventricular event.
For dual chamber pacemakers, this mode (AOO or VOO) determines
the chamber in which the S2, S3, and S4 premature stimuli are
delivered.
The number of events in the S1 drive train.
Both paced and sensed events are counted.
Only events in the paced chamber are counted. If the S1 mode is a dual
chamber mode, events are counted in the chamber specified by the
S2S3S4 Mode.
The interval at which S1 stimuli are delivered.
The interval between the last event of the S1 drive train and delivery of
the S2 stimulus.
S2S3S4 Mode
(Prematures)
43
5-2
S2S3
EP Studies Supplement
The interval between S2 and S3.

Programmable Parameter Definitions and Values
PES Parameter Information
S3S4
VOO Backup
Delay... Type
Delay... Period
The interval between S3 and S4.
If the pacemaker is a dual chamber model, this parameter provides for
asynchronous backup ventricular pacing during the execution of atrial
stimulation and the Inhibit delay period, if selected.
The settings for S1 Mode and S2S3S4 Mode are forced to AOO. These
settings cannot be changed while VOO Backup is enabled.
During atrial stimulation, each ventricular pacing pulse is synchronized
to an atrial stimulus with an intervening AV interval of 50 ms. The
pacemaker automatically selects a ratio between the ventricular and
atrial outputs to keep pacing rate within the range of 30 to 105 ppm (see
Table 1-2 on page 1-10).
During an Inhibit delay period, ventricular pacing is delivered
synchronously in the VDI mode at the programmed lower rate
Selects the type of delay period (Off, Pace, or Inhibit) that follows
delivery of the stimulation sequence.
Off — No delay period will occur.
Pace — The pacemaker operates in the present permanent mode and
rate during the delay period. Amplitude and pulse width are at the PES
protocol settings.
Inhibit — Pacemaker output is inhibited during the delay period, unless
VOO Backup is enabled (see VOO Backup above).
The number of seconds following the stimulation sequence during which
the pacemaker operates according to the selected Delay Type of Pace
or Inhibit. Delay period does not apply if Delay Type is Off.
44
Scan
Scan... Decrement
Min Interval
Setting Scan to On causes the PES sequence including the delay period
(if selected) to repeat automatically until the protocol is terminated.
Applies only if Scan is set to On. Scan Decrement sets the amount by
which the interval of the last premature stimulus in the sequence is
reduced each time the sequence repeats. Scan Decrement does not
apply to S1 interval.
As a safety feature, this parameter sets the minimum interval that can
be used in the delivery of a PES protocol.
Increasing this parameter value after you have selected intervals for the
protocol stimuli will adjust any of these intervals if they do not comply
with the new Min Interval setting.
EP Studies Supplement
5-3

Programmable Parameter Definitions and Values
PES Parameter Information
Amplitude (A and V)
The pulse amplitude at which stimuli in a protocol are delivered. The
selected value applies to all protocols (PES, Burst, and VOO Burst.)
Pulse Width (A and V)
The pulse width at which stimuli in a protocol are delivered. The
selected value applies to all protocols (PES, Burst, and VOO Burst.)
a
Atrial Amplitude and Atrial Pulse Width do not apply to the VOO Burst protocol.
a
a
45
5-4
EP Studies Supplement

Programmable Parameter Definitions and Values
PES Parameter Values
PES Parameter Information
S1 Mode
S2S3S4 Mode
#S1
S1S1
S1S2
S2S3
S3S4
VOO Backup
Delay Type
Delay Period
Dual Chamber Models:
AAI, AAT, AOO, ADI, VVI, VVT, VOO, VDI,
• and DDD, DDI, DOO, VDD if the permanent mode is DDD
• and DDI, DOO if the permanent mode is DDI
• and VDD if the permanent mode is VDD
Single Chamber Models:
AAI, AAT, AOO, ADI, or VVI, VVT, VOO, VDI (based on programmed
mode)
Dual Chamber Models: AOO, VOO
Single Chamber Models: AOO or VOO (based on permanent mode)
2 to 30
148 to 1945 ms (in 7 or 8 ms steps)
148 to 1945 ms (in 7 or 8 ms steps)
148 to 1945 ms (in 7 or 8 ms steps)
148 to 1945 ms (in 7 or 8 ms steps)
Off, On (dual chamber models)
Off, Pace, Inhibit
1 to 20 seconds
Scan Decrement
Min Interval
Amplitude (A and V)
Pulse Width (A and V)
46
Scan
Off, On
0 to 48 ms (in 8 ms steps)
148 to 398 ms
0.250, 0.500, 0.750, 1.000, 1.250, 1.500, 1.750, 2.000, 2.250, 2.500,
2.750, 3.000, 3.250, 3.500, 3.750, 4.000, 4.500, 5.000, 5.500, 6.000,
7.500 V
0.03, 0.06, 0.09, 0.12, 0.15, 0.21, 0.27, 0.34, 0.40, 0.46, 0.52, 0.64,
0.76, 1.0, 1.25, 1.5 ms
EP Studies Supplement
5-5

Programmable Parameter Definitions and Values
Burst Parameter Information
Burst Parameter Information
Burst Parameter Definitions
Burst Interval
Burst Mode
Of the following parameters, only Interval, V Amplitude,
Note:
and V Pulse Width apply to the VOO Burst protocol.
47
5-6
Burst Mode
Interval
VOO Backup
EP Studies Supplement
The mode used for delivering the burst stimuli (not programmable in
single chamber models).
The interval at which the burst stimuli are delivered.
If the pacemaker is a dual chamber model, this parameter provides for
backup ventricular pacing during atrial stimulation and the Inhibit delay
period, if selected.
The setting for Burst Mode is forced to AOO. This setting cannot be
changed while VOO Backup is enabled.
During atrial stimulation, each ventricular pacing pulse is synchronized
to an atrial stimulus with an intervening AV interval of 50 ms. The
pacemaker automatically selects a ratio between the ventricular and
atrial outputs to keep pacing rate within the range of 30 to 105 ppm (see
Table 1-2 on page 1-10).
During an Inhibit delay period, ventricular pacing is delivered
synchronously in the VDI mode at the programmed lower rate

Programmable Parameter Definitions and Values
Burst Parameter Information
Delay... Type
Delay... Period
Amplitude (A and V)
Pulse Width (A and V)
Selects the type of delay period (Off, Pace, or Inhibit) that follows
delivery of the burst stimulation.
Off — No delay period will occur.
Pace — The pacemaker operates in the present permanent mode and
rate during the delay period. Amplitude and pulse width are at the burst
protocol settings.
Inhibit — Pacemaker output is inhibited during the delay period, unless
VOO Backup is enabled (see VOO Backup above).
The number of seconds following the stimulation sequence during which
the pacemaker operates according to the selected Delay Type of Pace
or Inhibit. Delay period does not apply if Delay Type is Off.
The pulse amplitude at which stimuli in a protocol are delivered. The
selected value applies to all protocols (PES, Burst, and VOO Burst.)
The pulse width at which stimuli in a protocol are delivered. The
selected value applies to all protocols (PES, Burst, and VOO Burst.)
48
EP Studies Supplement
5-7

Programmable Parameter Definitions and Values
Burst Parameter Information
Burst Parameter Values
Of the following parameters, only Interval, V Amplitude,
Note:
and V Pulse Width apply to the VOO Burst protocol.
Burst Mode
Interval
VOO Backup
Delay Type
Delay Period
Amplitude (A and V)
Pulse Width (A and V)
Dual Chamber Models:
AOO, VOO
Single Chamber Models:
Fixed based on permanent mode (VOO, AOO)
148 to 1945 ms (in 7 or 8 ms steps)
Off, On (dual chamber models)
Off, Pace, Inhibit
1 to 20 seconds
0.250, 0.500, 0.750, 1.000, 1.250, 1.500, 1.750, 2.000, 2.250, 2.500,
2.750, 3.000, 3.250, 3.500, 3.750, 4.000, 4.500, 5.000, 5.500, 6.000,
7.500 V
0.03, 0.06, 0.09, 0.12, 0.15, 0.21, 0.27, 0.34, 0.40, 0.46, 0.52, 0.64,
0.76, 1.0, 1.25, 1.5 ms
49
5-8
EP Studies Supplement

Index
I
Symbols
#S1 3-3, 5-2
A
access to EP Studies 1-6
Achievable Amplitudes 2-7
additional test values 3-4, 4-3
button 2-8
Adjust
adjusting the ECG display 2-8
amplitude 5-4, 5-7
selecting a value 1-4
applicable pacemaker models 1-2
B
backup pacing, VOO 2-6, 3-4, 4-3, 5-3, 5-6
description
backup ventricular pacing.
VOO
battery condition, pacemaker 1-3, 2-7
burst interval 4-3, 4-6, 5-6
burst mode 4-3, 5-6
burst parameter values 5-8
See backup pacing,
burst parameters
amplitude 5-7
burst mode 5-6
delay period 5-7
delay type 5-7
interval 5-6
pulse width 5-7
VOO backup 5-6
BURST Press & Hold
burst protocol
adjustable interval 1-8
delay period 1-8
description 1-8
executing a 4-5
parameter definitions 5-6
parameter values 5-8
setting up a 4-2
setup screen 4-2
Adjust
Amplitudes (Achievable Amplitudes) 2-7
BURST Press & Hold
Print
START PES
STOP & Restore
2-8
2-8
button 4-5, 4-7
4-5, 4-7
3-6
3-6, 4-5
50
EP Studies Supplement
I-1

Index
D
delay period 1-7, 1-8, 3-4, 4-3, 5-3, 5-7
delay type 3-4, 4-3, 5-3, 5-7
E
ECG display, adjusting the 2-8
ECG strip
missing markers 1-4
saving an 2-8
symbols 1-4
elective replacement indicator.
electrical reset 2-2
ending a patient session 1-5
EP protocols initialization 2-3
EP Studies
intended use 1-2
option 1-6
pacing mode restrictions 2-2
protocol timing limitations 2-6
requirements for starting 2-2
setup screen 2-3
starting 2-2
start-up procedure 2-3
ERI, pacemaker 2-2
error messages 2-5
executing a
burst protocol 4-5
PES protocol 3-6
VOO burst protocol 4-7
See ERI
F
fibrillation 1-2
I
implant detection 2-2
initialization, EP protocols 2-3
intended use, EP Studies 1-2
intervals
burst 4-3, 5-6
S1S1 3-3, 5-2
S1S2 3-3, 5-2
S2S3 3-3, 5-2
S3S4 3-3, 5-3
VOO burst 4-6, 5-6
M
marker telemetry 1-4
markers, missing 1-4
messages, EP Studies start-up 2-5
minimum interval 3-4, 5-3
missing markers 1-4
P
pacemaker
battery condition 1-3
ERI 2-2
loss of data collection 1-3
pacemakers, applicable models 1-2
pacing, backup ventricular.
VOO
pacing, VOO backup.
parameter definitions
burst protocol 5-6
PES 5-2
parameter values
burst 5-8
PES 5-5
VOO burst 5-8
PES parameter
definitions 5-2
values 5-5
See backup pacing,
See backup pacing, VOO
51
I-2
EP Studies Supplement

Index
PES parameters
#S1 5-2
amplitude 5-4
delay period 5-3
delay type 5-3
min interval 5-3
pulse width 5-4
S1 mode 5-2
S1S1 interval 5-2
S1S2 interval 5-2
S2S3 interval 5-2
S2S3S4 mode 5-2
S3S4 interval 5-3
scan 5-3
scan decrement 5-3
VOO Backup 5-3
PES protocol
delay period 1-7
description 1-7
executing a 3-6
parameter definitions 5-2
parameter values 5-5
Scan option 1-7
setting up a 3-2
setup screen 3-2
POR.
See electrical reset
positioning the programming head 1-4
precautions 1-3 to 1-5
backup ventricular pacing 1-3
ending a patient session 1-5
positioning the programming head 1-4
starting the EP Studies function 1-3
button 2-8
Print
printing a session report 2-8
procedure, starting EP Studies 2-3
programmed electrical stimulation.
See PES
programmer, 9790 1-2
programming head
positioning the 1-4
precaution 1-4
protocol timing limitations 2-6
protocols
available options 1-6
burst
adjustable interval 1-8
delay period 1-8
description 1-8
executing a 4-5
parameter definitions 5-6
parameter values 5-8
setting up a 4-2
setup screen 4-2
PES
delay period 1-7
description 1-7
executing a 3-6
parameter definitions 5-2
parameter values 5-5
Scan option 1-7
setting up a 3-2
setup screen 3-2
VOO burst
adjustable interval 1-9
description 1-9
executing a 4-7
parameter values 5-8
setting up a 4-6
setup screen 4-6
pulse width 5-4, 5-7
52
EP Studies Supplement
I-3

Index
R
restrictions for starting EP Studies
pacemaker status 2-2
pacing mode 2-2
S
S1 mode 3-3, 5-2
S1S1 interval 3-3, 5-2
S1S2 interval 3-3, 5-2
S2S3 interval 3-3, 5-2
S2S3S4 mode 3-3, 5-2
S3S4 interval 3-3, 5-3
Scan decrement 3-4, 5-3
Scan option 1-7, 3-4, 5-3
screen
burst protocol setup 4-2
EP Studies setup 2-3
PES setup 3-2
VOO burst setup 4-6
selecting
an amplitude setting 1-4
the Burst protocol option 4-2
the PES protocol option 3-2
the VOO Burst protocol option 4-6
setting up a
burst protocol 4-2
PES protocol 3-2
VOO burst protocol 4-6
START PES
start-up procedure 2-3
STOP & Restore
symbols, ECG strip 1-4
button 3-6
button 3-6, 4-5
Test Strip option 2-8
Tests icon 1-6
tests, EP Studies option 1-6
timing limitations, protocol 2-6
tool palette 2-3
U
using the programming head 1-4
V
values
burst parameters 5-8
PES parameters 5-5
VOO burst parameters 5-8
ventricular fibrillation 1-2
VOO backup pacing.
VOO backup ventricular pacing.
pacing, VOO
VOO burst interval 5-6
VOO burst parameter values 5-8
VOO burst protocol
adjustable interval 1-9
description 1-9
executing a 4-7
parameter values 5-8
setting up a 4-6
setup screen 4-6
See backup pacing, VOO
W
warning, general 1-2
See backup
T
Test icon 2-3
I-4
53
EP Studies Supplement


World Headquarters
Medtronic, Inc.
710 Medtronic Parkway
Minneapolis, MN 55432-5604
USA
Internet: www.medtronic.com
Tel. 763-514-4000
Fax 763-514-4879
Japan
Medtronic Japan
Solid Square West Tower 6F,
580 Horikawa-cho, Saiwai-ku,
Kawasaki, Kanagawa 210-0913
Japan
Tel. 81-44-540-6112
Fax 81-44-540-6200
Medtronic USA, Inc.
Toll-free in the USA: 1-800-505-4636
(24-hour consultation for physicians and
medical professionals)
Canada
Medtronic of Canada Ltd.
6733 Kitimat Road
Mississauga, Ontario L5N 1W3
Tel. 905-826-6020
Fax 905-826-6620
Toll-free in Canada: 1-800-268-5346
Europe/Africa/Middle East
Headquarters
Medtronic Europe S.A.
Route du Molliau
CH-1131 Tolochenaz
Switzerland
Internet: www.medtronic.co.uk
Tel. 41-21-802-7000
Fax 41-21-802-7900
Medtronic E.C. Authorized
Representative/Distributed by
Medtronic B.V.
Wenckebachstraat 10
6466 NC Kerkrade
The Netherlands
Tel. 31-45-566-8000
Fax 31-45-566-8668
Asia
Medtronic International Ltd.
Suite 1602 16/F, Manulife Plaza
The Lee Gardens, 33 Hysan Avenue
Causeway Bay
Hong Kong
Tel. 852-2891-4068
Fax 852-2591-0313
Australia
Medtronic Australasia Pty. Ltd.
Unit 4/446 Victoria Road
Gladesville NSW 2111
Australia
Tel. 61-2-9879-5999
Fax 61-2-9879-5100
*197909001*
© Medtronic, Inc. 2001
All Rights Reserved
UCX197909001 197909001
December 2001
 Loading...