

Medtronic Guardian Real-time User Manual

CONTINUOUS GLUCOSE MONITORING SYSTEM
User Guide

Guardian® REAL-Time
Continuous Glucose Monitoring System
User Guide
©2006, Medtronic MiniMed, Inc. All rights reserved.
This product is covered by U.S. Patent No. 6,809,653. Other U.S. and/or foreign patents may be pending.
Guardian
®
, Medtronic CareLink® and Sen-serter® are registered trademarks of Medtronic MiniMed, Inc.
CareLink Personal™, ComLink™, and Medtronic MiniLink™ are trademarks of Medtronic MiniMed, Inc.
Energizer
®
is a registered trademark of Eveready Battery Company.
Glucagon Emergency Kit
®
is a registered trademark of Eli Lilly and Company.
Cavicide ® is a registered trademark of Metrex Research Corporation, an indirect subsidiary of Sybron Dental Specialties, Inc.
LifeScan
®
, OneTouch®, OneTouch® Ultra® and OneTouch® UltraLinkTM are trademarks of LifeScan, Inc.
6025254-015 070408
REF CSS72, CSS7100, CSS7100K, CSS7707

Contacts:
ಘ
Africa:
Medtronic Africa (Pty) Ltd.
Tel: +27 (0) 11 677 4800
Australia:
Medtronic Australasia Pty. Ltd.
Tel: 1800 668 670 (product orders)
Tel: 1800 777 808 (customer help)
Belgie/Belgique:
N.V. Medtronic Belgium S.A.
Tel: 02-456-0900
Brasil:
Medtronic Comercial Ltda.
Tel: +(11) 3707-3707
Canada:
Medtronic of Canada Ltd.
Tel: 1-800-284-4416 (toll free/sansfrais)
Ceska Republika:
Medtronic Czechia s.r.o.
Tel: +420 296 579 580
China:
Medtronic (Shanghai) Ltd.
Tel: +86 40 0820 1981
or 80 0820 1981
Danmark:
Medtronic Danmark A/S
Tel: +45 32 48 18 00
Deutschland:
Medtronic GmbH
Geschäftsbereich Diabetes
Telefon: +49 2159 8149-370
Telefax: +49 2159 8149-110
24-Stdn-Hotline: 0800 6464633
East Asia:
Medtronic International Ltd.
Tel: +852 2891 4300
Eire:
Accu-Science LTD.
Tel: +353 45 433000
España:
Medtronic Ibérica S.A.
Tel: + 34 91 625 05 42
Fax: +34 91 625 03 90
24 hour: +34 901 120 335
Europe:
Medtronic Europe S.A. Europe, Middle
East and Africa Headquarters
Tel: +41 (0) 21-802-7000
France:
Medtronic France S.A.S.
Tel: +33 (0) 1 55 38 17 00
Hellas:
Medtronic Hellas S.A.
Tel: +30 210677-9099
Italia:
Medtronic Italia S.p.A.
Tel. +390 2 24137 261
Servizio assistenza tecnica: No verde
24h: 800 712 712
Tel. 06-328141
Fax 06-3215812
Japan:
Medtronic Japan Co. Ltd.
Tel: +81-3-6430-2019
Latin America:
Medtronic, Inc.
Tel. (1305)-500-9328
Fax (1786)-709-4244
Latvija:
Ravemma Ltd.
Tel: +371 7273780
Magyarország:
Medtronic Hungária Kft.
Tel: +36 1 889 0600
Malaysia:
Medtronic International Ltd.
Tel: (+65) 6436-5094
or (+65) 6436-5097
Middle East and North Africa:
Regional Office
Tel: +961-1-370 670
Nederland, Luxembourg:
Medtronic B.V.
Tel: +31 (0) 45-566-8290
New Zealand:
Medica Pacifica
Tel: +0800 106 100
24-hr After-Hours:
+0800 633 487
Norge:
Medtronic Norge A/S
Tel: +47 67 10 32 00
Fax: +47 67 10 32 10
POCCƐƧ:
Medtronic B. V.
Tel: +7 095 5807377/1161
Polska:
Medtronic Poland Sp. z.o.o.
Tel: +48 22 4656 900
Portugal:
Medtronic Portugal Lda
Tel: +351 21 7245100
Fax: +351 21 7245199
Puerto Rico:
Medtronic Puerto Rico
Tel: 787-753-5270
Republic of Korea:
Medtronic Korea, Co., Ltd.
Tel: +82.2.3404.3600

Schweiz:
Medtronic (Schweiz) AG
Tel: + 41 (0)31 868 0160
24-Stunden-Hotline 0800 633 333
Fax Allgemein: +41 (0)31 8680199
Serbia & Montenegro:
Novolab Serbia & Montenegro
Epsilon Research Ltd.
Tel: +381 63 219 827
Singapore:
Medtronic International Ltd.
Tel: (+65) 6436-5094
or (+65) 6436-5097
Slovenija:
Zaloker & Zaloker d.o.o.
Tel: +34 91 625 0400
Slovenská Republika:
Medtronic Slovakia o.z.
Tel: +421 2 68 20 69 12
Suomi:
Medtronic Finland OY
Tel: +358-9-755 25 00
Sverige:
Medtronic AB
Tel: +46 8 568 585 00
Fax: +46 8 568 585 01
Taiwan:
Medtronic-Mediland Ltd.
Tel: +886.2.2517.0308
Thailand:
Medtronic (Thailand) Ltd.
Tel: (+65) 6436-5094
or (+65) 6436-5097
Turkiye:
Medtronic Medikal Teknoloji
Ticaret Ltd. Sirketi.
Tel: +90 216 4694330
USA:
Medtronic Diabetes Global
Headquarters
Tel: 800-826-2099
24-hour Help Line: 818-576-5555
To order supplies 800-843-6687
United Kingdom:
Medtronic Ltd.
Tel: +44 1923-205167
Yisrael:
Agentek
Tel: +972 3649 3111
Österreich:
Medtronic Österreich GmbH
Tel: +43 (0) 1 240 44-0
24 – Stunden – Hotline 0820 820 190

ಘ
Contents
Chapter 1: Introduction ........................................................................... 1
Assistance ........................................................................................................... 2
Emergency kit ....................................................................................................... 2
Your system ......................................................................................................... 3
Accessories .......................................................................................................... 4
Conventions used in this guide ................................................................................... 5
User safety .......................................................................................................... 6
Indications: CSS7100 .......................................................................................... 6
Indications: CSS7100K (pediatric version) ................................................................. 6
Contraindications .............................................................................................. 7
Safety Warnings ................................................................................................ 7
Sensor ....................................................................................................... 7
Transmitter ................................................................................................ 7
Meter ........................................................................................................ 7
Precautions ..................................................................................................... 7
Avoid extreme temperatures ............................................................................ 7
Sensor ....................................................................................................... 8
Meter ........................................................................................................ 8
Adverse reactions .............................................................................................. 8
Damage due to radiation ..................................................................................... 8
Compliance information ........................................................................................... 9
RF interference from other devices ....................................................................... 10
Chapter 2: The basics ............................................................................ 11
The monitor ........................................................................................................ 11
Installing the battery ............................................................................................. 12
The monitor buttons ............................................................................................. 15
Contents v

An important message about alarms and alerts .............................................................. 16
The monitor screen ............................................................................................... 17
The HOME screen ............................................................................................. 17
Icons ............................................................................................................ 17
Sensor icon ................................................................................................ 17
Battery icon .............................................................................................. 18
Time of day icon ......................................................................................... 18
Alert icon ................................................................................................. 18
Alarm icon ................................................................................................ 18
Scroll bar ...................................................................................................... 18
Screen backlight .............................................................................................. 18
Alarm/alert types ................................................................................................. 19
Operating modes .................................................................................................. 19
Normal mode .................................................................................................. 19
Special mode (Alerts) ........................................................................................ 19
Attention mode (Alarms) .................................................................................... 20
Menus ............................................................................................................... 20
MAIN MENU .................................................................................................... 20
SENSOR MENU ................................................................................................. 20
CAPTURE EVENT .............................................................................................. 20
UTILITIES MENU ............................................................................................... 21
The STATUS screen ............................................................................................... 22
Chapter 3: Entering your settings ............................................................. 23
Basic steps ......................................................................................................... 23
Setting the time and date ....................................................................................... 24
Selecting the language ........................................................................................... 26
Setting your Alarm/Alert Type .................................................................................. 26
Entering your glucose monitoring settings .................................................................... 27
Turning on the sensor ........................................................................................ 27
Selecting the BG units ...................................................................................... 28
Turning on the Glucose Alerts .............................................................................. 28
Setting the Glucose Limits .................................................................................. 28
Setting the Glucose Limits start time ..................................................................... 30
Setting the High Snooze ..................................................................................... 31
Setting the Low Snooze ..................................................................................... 32
vi Contents

Setting the Predictive glucose alert ....................................................................... 32
Setting the Rate Alerts ...................................................................................... 34
Setting the AUC Limits ...................................................................................... 35
Setting the Alarm Snooze ................................................................................... 35
Setting the Cal Reminder ................................................................................... 36
Entering the transmitter identification number ......................................................... 36
Setting up the Missed Data option ......................................................................... 37
Setting the sensor glucose graph timeout ................................................................ 37
Reviewing your settings .......................................................................................... 38
Using the Sensor Demo ...................................................................................... 38
Chapter 4: Setting up your transmitter, sensor and meter ............................... 39
Basic steps ......................................................................................................... 39
Setting up the transmitter ...................................................................................... 40
MiniLink charger .............................................................................................. 40
Installing a new charger battery ...................................................................... 40
Charging the transmitter ............................................................................... 41
Inserting the sensor .............................................................................................. 42
Before you begin ............................................................................................. 43
Make sure that the transmitter is fully charged .................................................... 43
Make sure that the sensor is ready to be inserted .................................................. 43
Where to insert the sensor ............................................................................. 43
Do NOT insert the sensor in ............................................................................ 43
How to prepare the insertion site ..................................................................... 44
Connecting the transmitter to the sensor ..................................................................... 46
Starting the sensor ............................................................................................... 47
Entering the first meter blood glucose ........................................................................ 47
Meter option ....................................................................................................... 48
Meter rules ................................................................................................... 49
Add, delete, review meter IDs ............................................................................ 50
Chapter 5: Using your system .................................................................. 51
Calibrating your system .......................................................................................... 51
Guidelines for calibrating the system ..................................................................... 52
Capturing Events .................................................................................................. 54
Entering non-calibration meter BG measurements ..................................................... 55
Contents vii

Entering insulin injection information .................................................................... 55
Entering information about carbohydrates ............................................................... 56
Entering exercise information .............................................................................. 57
Entering Other markers ..................................................................................... 58
Reading the sensor glucose graphs ............................................................................. 58
Opening and viewing the graphs ........................................................................... 59
The graphs ..................................................................................................... 60
Examples of real-time sensor glucose graphs ............................................................ 61
3-hour graph .............................................................................................. 61
6-hour graph .............................................................................................. 62
12-hour graph ............................................................................................ 63
24-hour graph ............................................................................................ 64
How to check for rapid changes in sensor glucose .......................................................... 65
The rapid change arrows .................................................................................... 65
Checking the status of the system ......................................................................... 67
Checking the monitor battery status ...................................................................... 67
Checking the sensor status ................................................................................. 68
Checking the transmitter status ........................................................................... 69
How to make glucose alerts silent ......................................................................... 70
Viewing the sensor update history ............................................................................. 71
Viewing your current settings ................................................................................... 72
Disconnecting the transmitter and removing the sensor ................................................... 72
Disconnecting the sensor from the transmitter ......................................................... 72
Removing the sensor ......................................................................................... 73
Using your system in water ...................................................................................... 73
Chapter 6: Utilities ............................................................................... 75
The data management feature ................................................................................. 75
Sensor glucose information ................................................................................. 76
Meter blood glucose information .......................................................................... 77
The Alarm Clock .................................................................................................. 78
Reviewing your current Alarm Clock reminders ......................................................... 79
Deleting Alarm Clock reminders ........................................................................... 79
The Block feature ................................................................................................. 80
The Lock Keypad feature ........................................................................................ 80
Running the Selftest .............................................................................................. 81
viii Contents

User settings ....................................................................................................... 82
Saving your settings .......................................................................................... 82
Restoring your settings ...................................................................................... 83
Clearing your settings ....................................................................................... 83
Viewing your User Settings history ........................................................................ 84
Chapter 7: Therapy software ................................................................... 85
CareLink Personal™ ............................................................................................... 85
Reports ......................................................................................................... 85
Logbook ........................................................................................................ 86
Chapter 8: Troubleshooting and alarms/alerts .............................................. 87
About alarms and alerts ......................................................................................... 87
What to do when you get an alarm/alert ..................................................................... 88
Sensor alerts ....................................................................................................... 89
WEAK SIGNAL .................................................................................................. 89
LOST SENSOR .................................................................................................. 89
LOW TRANSMTR ............................................................................................... 89
CHARGE TRANSMTR .......................................................................................... 90
CHANGE SENSOR .............................................................................................. 90
SENSOR END ................................................................................................... 90
CAL ERROR .................................................................................................... 90
METER BG NOW ............................................................................................... 91
METER BG BY .................................................................................................. 91
LOW SG ........................................................................................................ 91
HIGH SG ....................................................................................................... 91
LOW PREDICTED .............................................................................................. 91
HIGH PREDICTED .............................................................................................. 91
FALL RATE ..................................................................................................... 92
RISE RATE ...................................................................................................... 92
SENSOR ERROR ................................................................................................ 92
LOW BATTERY ................................................................................................. 92
Viewing your sensor alert history .............................................................................. 93
System alarms ..................................................................................................... 94
A (Alarm) (nn) ................................................................................................. 94
BATT OUT LIMIT .............................................................................................. 94
Contents ix

BUTTON ERROR ............................................................................................... 94
CHECK SETTINGS ............................................................................................. 94
E (Error) (nn) .................................................................................................. 94
FAILED BATT TEST ............................................................................................ 95
OFF NO POWER ............................................................................................... 95
RESET ........................................................................................................... 95
WEAK BATTERY ............................................................................................... 95
Viewing your system alarm history ............................................................................. 95
Troubleshooting the MiniLink transmitter and charger ..................................................... 97
Checking battery status of the charger and transmitter .............................................. 97
Troubleshooting the transmitter ........................................................................... 99
Connecting the tester ................................................................................... 99
Disconnecting the tester .............................................................................. 100
Troubleshooting the monitor .................................................................................. 100
My monitor will not display my BG measurement from my meter .................................. 100
Reconnect old sensor ....................................................................................... 101
Find lost sensor ............................................................................................. 101
What happens if I leave the monitor battery out for more than ten minutes? .................... 101
Why doesn't my monitor battery last very long? ....................................................... 102
What is a CHECK SETTINGS alarm? ....................................................................... 102
My screen looks distorted .................................................................................. 102
I dropped my monitor ...................................................................................... 102
I submerged my monitor in water ........................................................................ 103
I cannot get to the User Settings screen ................................................................ 103
Chapter 9: System maintenance .............................................................. 105
Replacing the battery ........................................................................................... 105
Storing the system .............................................................................................. 105
Storing the monitor ......................................................................................... 105
Storing the MiniLink transmitter .......................................................................... 105
Storing the Sen-serter ...................................................................................... 105
Cleaning the system ............................................................................................ 106
Cleaning the monitor ....................................................................................... 106
Cleaning the Sen-serter .................................................................................... 107
Cleaning the transmitter .................................................................................. 107
Cleaning the transmitter .................................................................................. 108
x Contents

Chapter 10: System specifications ........................................................... 109
Alarm/alert types ............................................................................................... 110
Alarm/alert messages and codes ............................................................................. 110
Alarm/alert history ............................................................................................. 110
Backlight .......................................................................................................... 110
Screen and menu timeout ...................................................................................... 110
Sensor glucose graph timeout ................................................................................. 111
High and low Glucose Limits (CSS7100) ...................................................................... 111
High and low Glucose Limits (CSS7100K) .................................................................... 111
Daily totals ....................................................................................................... 112
Default screen ................................................................................................... 112
Default settings .................................................................................................. 112
ENTER BG meter values ........................................................................................ 119
Meter ID entries ................................................................................................. 119
Power supply ..................................................................................................... 119
System safety checks ........................................................................................... 119
Monitor size ...................................................................................................... 119
Monitor weight ................................................................................................... 120
TIME/DATE SET screen .......................................................................................... 120
STATUS screen ................................................................................................... 120
Guidance and manufacturer's declaration ................................................................... 121
MiniLink specifications .......................................................................................... 127
Symbol table ..................................................................................................... 128
Appendix A: Sensor accuracy ................................................................. 131
Performance results in adults ................................................................................. 132
Accuracy of Guardian RT readings ............................................................................ 133
Precision of Guardian RT readings ............................................................................ 137
Low and High Alerts in adults ................................................................................. 138
The Low Glucose Alert ..................................................................................... 138
The High Glucose Alert ..................................................................................... 139
Guardian RT Sensor Performance and Calibration Stability As a Function of Time ................... 141
Effects of calibration frequency .............................................................................. 144
Time-Elapsed Plots ......................................................................................... 145
Performance results in children and adolescents .......................................................... 148
Accuracy of Guardian RT readings ....................................................................... 148
Contents xi

Low and High alerts in children and adolescents ........................................................... 152
The Low Glucose Alert ..................................................................................... 152
The High Glucose Alert ..................................................................................... 153
Glossary ............................................................................................ 155
Index ................................................................................................ 161
xii Contents

Introduction
1
Thank you for choosing Medtronic Diabetes (legally known as Medtronic MiniMed, Inc.) as your diabetes management
partner.
Your new Guardian
®
REAL-Time Continuous Glucose Monitoring (CGM) System is a big step forward in diabetes
management for people with diabetes mellitus because it:
• provides continuous or periodic monitoring of glucose levels in the fluid under your skin;
• provides real-time glucose values so that you can track glucose concentration patterns and possibly identify
episodes of low and high blood glucose;
• stores glucose data so that it can be analyzed to track patterns and/or downloaded to PC software for analysis
of historical glucose values; and
• alerts you in real time if a glucose level falls below or rises above pre-set values.
Pre-set values are not intended to be used directly for making therapy adjustments, but rather to provide an
indication of when a meter blood glucose measurement may be required. All therapy adjustments should be based
on measurements obtained using a home glucose meter and not on Guardian REAL-Time CGM System values.
Therefore, we strongly recommend that you work closely with your healthcare professional when you start your
Guardian REAL-Time CGM System, and for ongoing support.
Introduction 1

In this chapter:
• Assistance
• Emergency kit
• Your system
• Accessories
• Conventions used in this guide
• User Safety
• Compliance information
Assistance
Medtronic Diabetes provides a 24 Hour HelpLine for assistance. The HelpLine is staffed with representatives who
are trained in the setup and operation of the Guardian REAL-Time CGM System and are able to answer related
questions. When calling the HelpLine, please have your Guardian monitor available. The monitor serial number and
the 24 Hour HelpLine phone number are on the back of your monitor.
Department
Telephone number
24 Hour HelpLine (calls within the United States) 800.646.4633
24 Hour HelpLine (calls outside the United States) +1.818.576.5555
Web site www.medtronicdiabetes.com
Emergency kit
You should keep a diabetes emergency kit with you at all times - and be sure a family member, friend or co-worker
knows where it is. Your emergency kit may include these items:
• Fast-acting glucose tablets and Glucagon Emergency Kit
®
• Urine ketone monitoring supplies and blood glucose monitoring supplies
• Insulin syringe and insulin (with dosage instructions from your healthcare professional)
• Guardian REAL-Time CGM System Wallet Card and extra AAA alkaline batteries for your monitor (Energizer
®
brand is recommended)
• Transparent dressing
2 Introduction
Your system
This section describes the parts of your Guardian REAL-Time CGM System.
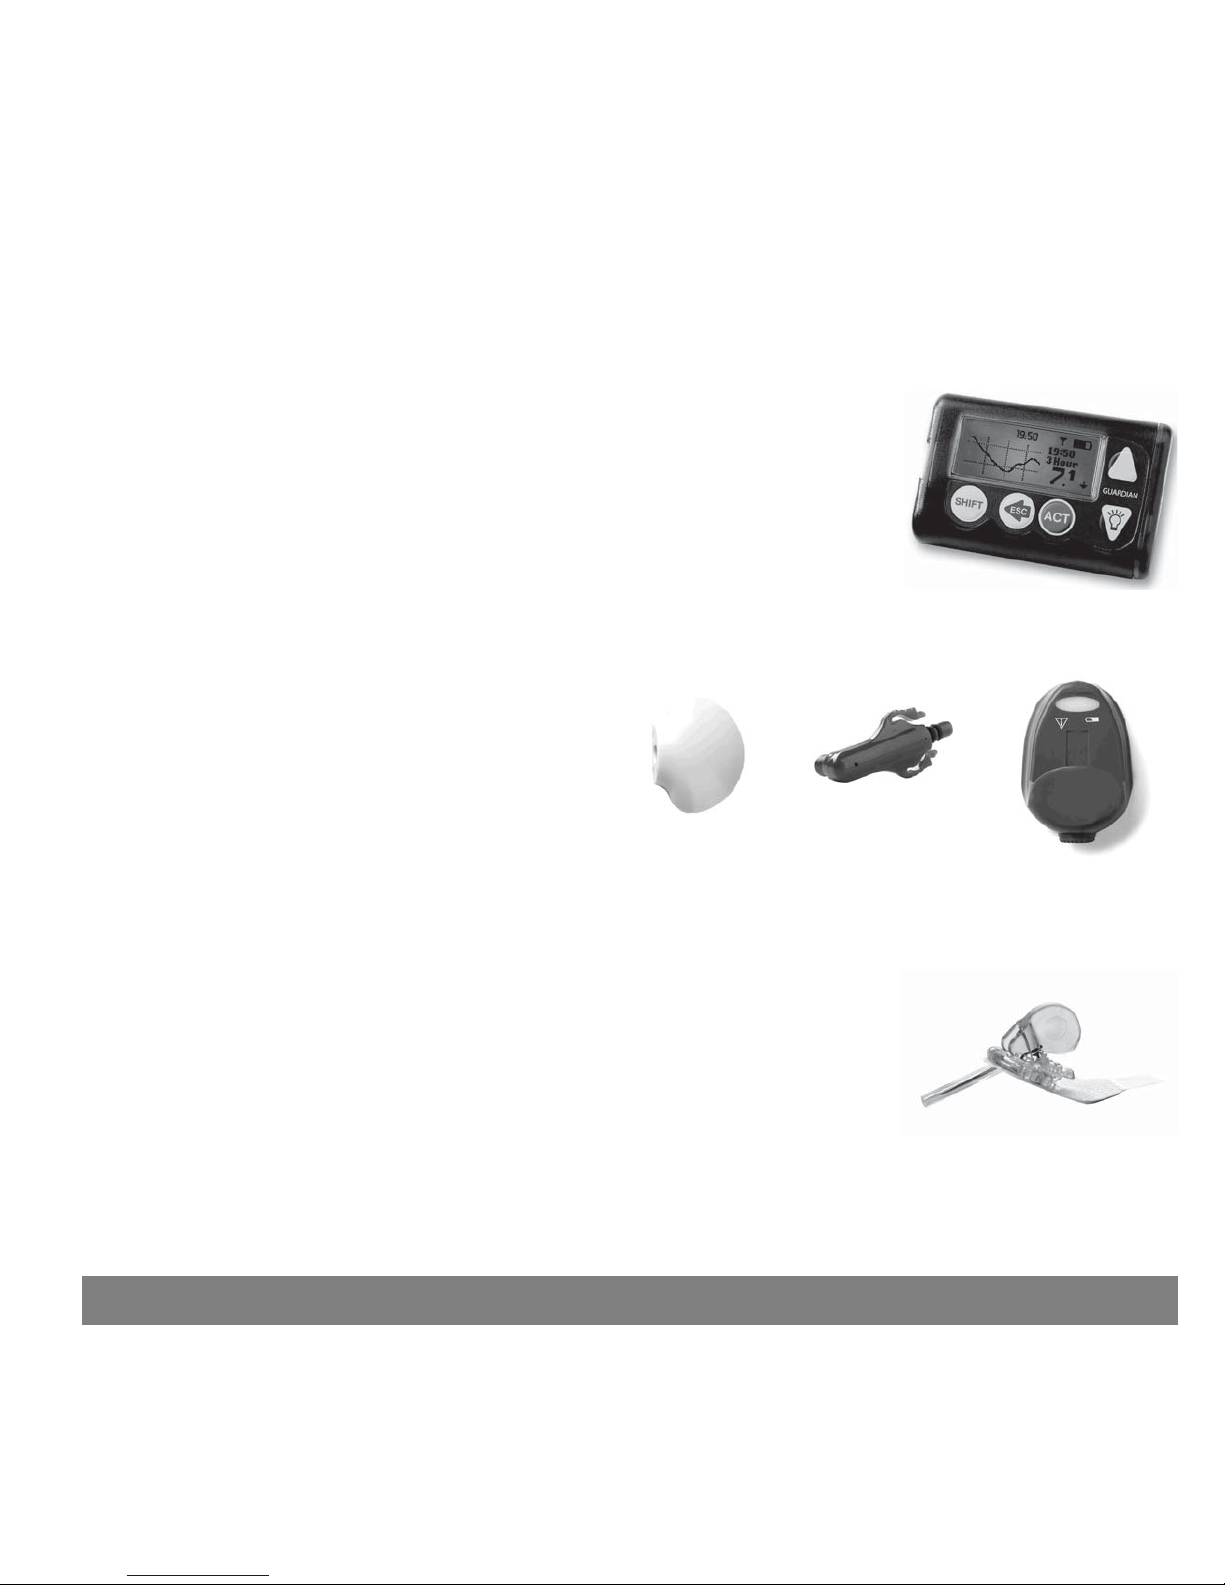
• Monitor — Your monitor (CSS7100/CSS7100K) shows real-time glucose
measurements, tells you about changes in glucose levels, provides historical
information, and displays system information such as low battery alerts.
ಘ
• Transmitter — The Medtronic MiniLink™
transmitter (MMT-7703) is a small
rechargeable device that connects to the
glucose sensor that is inserted into the body.
When connected to the sensor, the MiniLink
transmitter automatically initializes the
sensor, collects glucose data, and wirelessly
sends the data to your monitor. It comes with
a blue tester (MMT-7706) and a charger
(MMT-7705).
Transmitter Tester Charger
ಘ
• Sensor — The sensor (MMT-7002/MMT-7003) is a membrane-covered electrode
inserted through the skin into the fatty layer underneath with a device called
the Sen-serter
®
. The sensor tells the transmitter how much glucose is in the
interstitial fluid at the insertion site. The transmitter sends this data to the
ಘ
Introduction 3

monitor and the monitor screen shows you the reading.
• CareLink USB Upload Device — The Medtronic Diabetes CareLink USB (MMT-7305) is a radio frequency (RF)
device that plugs into your computer's USB port and uploads Guardian REAL-Time CGM System data to your
diabetes management software.
Accessories
Medtronic offers the following accessories to help you better use and more easily wear your monitor.
• Meter — Your Guardian REAL-Time can be used with an optional blood glucose meter powered by MWT1
technology (where or if available) that you can program to automatically transmit blood glucose test results to
your Guardian monitor. MWT1 is the wireless Radio Frequency (RF) technology that is used to transmit
information from the meter to the monitor. (You can also use a non-RF meter with your monitor, and manually
enter your BG measurements.)
• Holster — To wear the monitor on your belt.
• Monitor clip — To wear the monitor underneath your clothing.
• Leather case — Fine leather lined with nylon. Styling complements business and formal wear. Velcro flap
provides easy programming access. Wear it vertically with the built-in belt clip.
To order supplies, call 800-646-4633, +1-828-362-5958 (outside U.S.), refer to the contacts list at the beginning of
this user guide, or visit our web site at www.medtronicdiabetes.com.
4 Introduction
Conventions used in this guide
The conventions used in this guide are defined in the following table.
Conventions
Meaning
Press Push and release the button.
Hold Press and keep pressure on the button.
Press ESC, ACT
Press the ESC button, then press the ACT button. When two buttons are
separated by a comma (,) it means to press the first button, then press the
next button.
Select
Choose an item or a value from a menu or screen. Use the and buttons
to make your selections.
Button names Always bold and uppercase; for example, UP, DOWN, ACT.
Screen and menu names Always uppercase; for example, MAIN MENU, STATUS screen.
Menu items Always bold; for example, 12-Hour Setup, On, Off
CAUTION
A potential hazard that, if not avoided, may cause damage to your Guardian
REAL-Time CGM System.
WARNING
A potential hazard that, if not avoided, may cause death or serious injury. It
may also describe potential serious adverse reactions and safety hazards.
Menu item selections
The items on a menu you need to select to go to another menu or a screen.
Each menu item is separated by the (>) symbol. For example:
MAIN MENU > Utilities > Alarm
The actual steps used to complete menu item selection shown above are:
1
ಘ
Open the MAIN MENU.
2
ಘ
Select Utilities, press ACT.
3
ಘ
Select Alarm, press ACT.
To make the steps for getting to a specific menu or screen easier to
understand, the menu item selections do not include the steps for pressing
the ACT button.
Introduction 5

User safety
This section includes important safety information such as indications, contraindications, safety warnings, potential
adverse reactions, and how to protect the system from radiation exposure damage.
Indications: CSS7100
The Guardian REAL-Time CGM System (CSS7100) is indicated for continuous or periodic monitoring of glucose levels
in the fluid under the skin, in adults (18 years and older) with diabetes mellitus, for the purpose of improving
diabetes management. It alerts if a glucose level falls below, or rises above, pre-set values. Values are not intended
to be used directly for making therapy adjustments, but rather to provide an indication of when a meter blood
glucose measurement may be required. All therapy adjustments should be based on measurements obtained using
a home glucose meter and not on Guardian REAL-Time CGM System values.
The Guardian REAL-Time CGM System provides real-time glucose values that allow users to track patterns in glucose
concentrations and to possibly identify episodes of low and high blood glucose. It also stores the data so that it can
be analyzed to track patterns. Glucose data can be further downloaded to PC software for analysis of historical
glucose values. The Guardian REAL-Time monitor can be programmed to automatically receive fingerstick blood
glucose calibration values transmitted from the LifeScan OneTouch
®
UltraLinkTM Meter or the BD Paradigm Link
®
glucose meters (calibration values from these meters can also be manually entered). Calibrations from all from
other glucose meters must be manually entered into the monitor.
The MiniLink transmitter is indicated for use as a component of select Medtronic Diabetes continuous glucose sensing
systems and Medtronic Diabetes sensor-enabled pump systems.
Indications: CSS7100K (pediatric version)
The Guardian REAL-Time system (CSS7100K) is indicated for continuous or periodic monitoring of glucose levels in
the fluid under the skin, in children and adolescents (ages 7 through 17) with diabetes mellitus, for the purpose of
improving diabetes management. It alerts if a glucose level falls below, or rises above, pre-set values. Values are
not intended to be used directly for making therapy adjustments, but rather to provide an indication of when a
meter blood glucose measurement may be required. All therapy adjustments should be based on measurements
obtained using a home glucose meter and not on Guardian REAL-Time CGM System values.
The Guardian REAL-Time CGM System (CSS7100K) provides real-time glucose values that allow users to track
patterns in glucose concentrations and to possibly identify episodes of low and high blood glucose. It also stores the
data so that it can be analyzed to track patterns. Glucose data can be further downloaded to PC software for analysis
of historical glucose values. The Guardian REAL-Time monitor can be programmed to automatically receive
6 Introduction

fingerstick blood glucose calibration values transmitted from the LifeScan OneTouch® UltraLinkTM Meter or the BD
Paradigm Link
®
glucose meters (calibration values from these meters can also be manually entered). Calibrations
from all other glucose meters must be manually entered into the monitor.
The MiniLink transmitter is indicated for use as a component of select Medtronic Diabetes continuous glucose sensing
systems and Medtronic Diabetes sensor-enabled pump systems.
Contraindications
Glucose monitoring therapy is not recommended for people who are unwilling or unable to perform a minimum of
two meter blood glucose tests per day and to maintain contact with their healthcare professional. Successful
monitor therapy requires sufficient vision or hearing to allow recognition of the monitor signals and alarms.
Safety Warnings
Sensor
The sensor can create special needs about your medical conditions or medications. Please discuss these conditions
and medications with your healthcare professional before using the sensor.
Transmitter
Product contains small parts and may pose a choking hazard for young children.
The transmitter should be disconnected from the sensor while traveling on an aircraft or if it interferes with another
transmitting device.
Meter
Do not use an RF-capable meter to send blood glucose measurements to your monitor while traveling on an aircraft
or if it interferes with another transmitting device.
Precautions
Although the monitor has multiple safety alarms, it cannot tell you about all potential problems. You must test your
blood glucose levels at least two times per day. If your blood glucose is out of range, then check your blood glucose
using your blood glucose meter.
Avoid extreme temperatures
• Avoid exposing the system to temperatures above 108°F (42°C) or below 34°F (1°C).
• Do not steam, sterilize, or autoclave your monitor, transmitter, or sensor.
Introduction 7

Sensor
Make sure the sensor is firmly attached before exercising or doing other physical activity.
Meter
Blood glucose measurements taken when your glucose levels change rapidly should not be used to calibrate your
system. If your meter is set up to automatically transmit fingerstick blood glucose calibration values to your system,
it is recommended that you turn off this feature before taking a fingerstick measurement when your blood glucose
may be changing rapidly.
CAUTION: Any changes or modifications to the devices not expressly approved by Medtronic may damage the
system and could void your warranty.
Adverse reactions
Operation of the sensor feature requires the insertion of a glucose sensor into the skin. Bleeding, swelling, bruising,
or infection at the sensor insertion site are possible risks of sensor use. Contact your healthcare professional and
your local representative in the event of any adverse reaction. The optional occlusive dressing should be removed
if irritation from or reaction to the dressing develops. The sensor should be removed if redness, pain, tenderness
or swelling develop at the insertion site.
Accuracy of the glucose sensor readings provided by the Guardian REAL-Time CGM System was not evaluated in
patients with medical conditions, such as insulin resistance and cystic fibrosis. Also, the impact of medications was
not specifically evaluated; therefore, device performance may vary in these situations.
Damage due to radiation
If you are going to have an X-ray, CT scan, MRI or be exposed to other types of radiation, REMOVE YOUR MONITOR,
TRANSMITTER, and SENSOR and leave them outside the radiation area. The Guardian REAL-Time CGM System monitor
and transmitter are designed and tested to tolerate common electromagnetic interference, including microwave
ovens and airport security systems.
8 Introduction

Compliance information
CAUTION: Changes or modifications not expressly approved by the party responsible for compliance could void
the user’s authority to operate the equipment.
The monitor, meter, and transmitter comply with the United States Federal Communications Commission (FCC) and
international standards for Electromagnetic Compatibility. For the specific regulations and test results for your
area, please contact your local representative.
The transmitter should be disconnected from the sensor while traveling on an aircraft, or if it interferes with another
transmitting device. Do not use an RF-capable meter to send blood glucose measurements to your monitor while
traveling on an aircraft. Manually enter your blood glucose reading into your monitor.
These devices comply with Part 15 of the FCC Rules. Operation is subject to the following two conditions:
1
ಘ
These devices may not cause harmful interference
2
ಘ
These devices must accept any interference received, including interference that may cause undesirable
operation.
These standards are designed to provide reasonable protection against excessive radio frequency interference and
prevent undesirable operation of the device from unwanted electromagnetic interference.
These devices generate, use, and can radiate radio frequency energy and may cause interference to radio or
television communications, even if installed and used according to the instructions. If these devices do cause
interference, try to correct the interference by one or more of the following measures:
• Reorient or relocate the monitor, meter and/or transmitter.
• Increase the separation between the monitor, meter, transmitter and the device that is receiving or emitting
interference.
The transmitter and meter send information to the monitor using radio frequency. If other radio-frequency devices
are in use, such as cell phones, cordless phones and wireless networks, they may prevent or interrupt communication
between the monitor and the meter and/or the monitor and transmitter. This interference will not cause any
incorrect data to be sent and will not cause any harm to your monitor, transmitter or meter. Moving away from or
turning off these other devices will usually allow communication. See the Troubleshooting and alarms/alerts
chapter to correct interference problems you may have. The transmitter does not interfere with any radio frequency
signals transmitted from outside sources.
Introduction 9

RF interference from other devices
Common consumer electronic devices that transmit in the same frequency band used by the MMT-7703 MiniLink
transmitter may prevent the Guardian REAL-Time monitor from receiving the glucose information sent by the
transmitter. Most cellular (mobile) phones and 900 MHz cordless phones, when transmitting or receiving, may cause
significant interruption of transmitter-receiver communication. It is likely that other devices operating in similar
frequency ranges will have a similar effect. This interference, however, will not cause any incorrect data to be sent
and will not cause any harm to your transmitter
The Guardian REAL-Time monitor includes a programmable WEAK SIGNAL alert that notifies you when one or more
expected transmissions were not received as expected by the receiving device. (The receiving device will also issue a
LOST SENSOR alert if communication is interrupted for approximately 40 minutes.)
Communication problems can usually be resolved by:
• ensuring that there is less than 6 feet (1.8 meters) between the receiving device and transmitter, to include
RF glucose meters;
• turning off or moving away from other RF transmitting devices; or
• reorienting or relocating the transmitter or receiving device, or both.
Communications problems may also occur due to cellular telephone interference. Testing conducted with several
different cellular telephones indicates that, while a glucose value is being transmitted, using a cell phone within
12 inches (31 cm) of receiving devices, transmitters or RF glucose meters can interfere with reception of the
transmitted values. In the event of such interference, normal communication can be re-established by:
• turning the cell phone off; or
• keeping the cell phone at least 12 inches away from the receiving device, transmitter or glucose meter when
a glucose measurement is being transmitted.
If you have questions, please contact your local representative for assistance. Refer to the enclosed Medtronic
Diabetes International Contact list for the HelpLine in your area.
10 Introduction
The basics
2
In this chapter:
• The monitor
• Installing the battery
• The monitor buttons
• Alarms/alerts
• Operating modes
• Menus
CAUTION: Never use sharp objects to press the buttons on your monitor as this can damage the buttons or
compromise the seal on the monitor. Some examples of sharp objects that can damage the buttons or the seal
are fingernail files, pens, pencils, paper clips, knives, scissors, and keys.
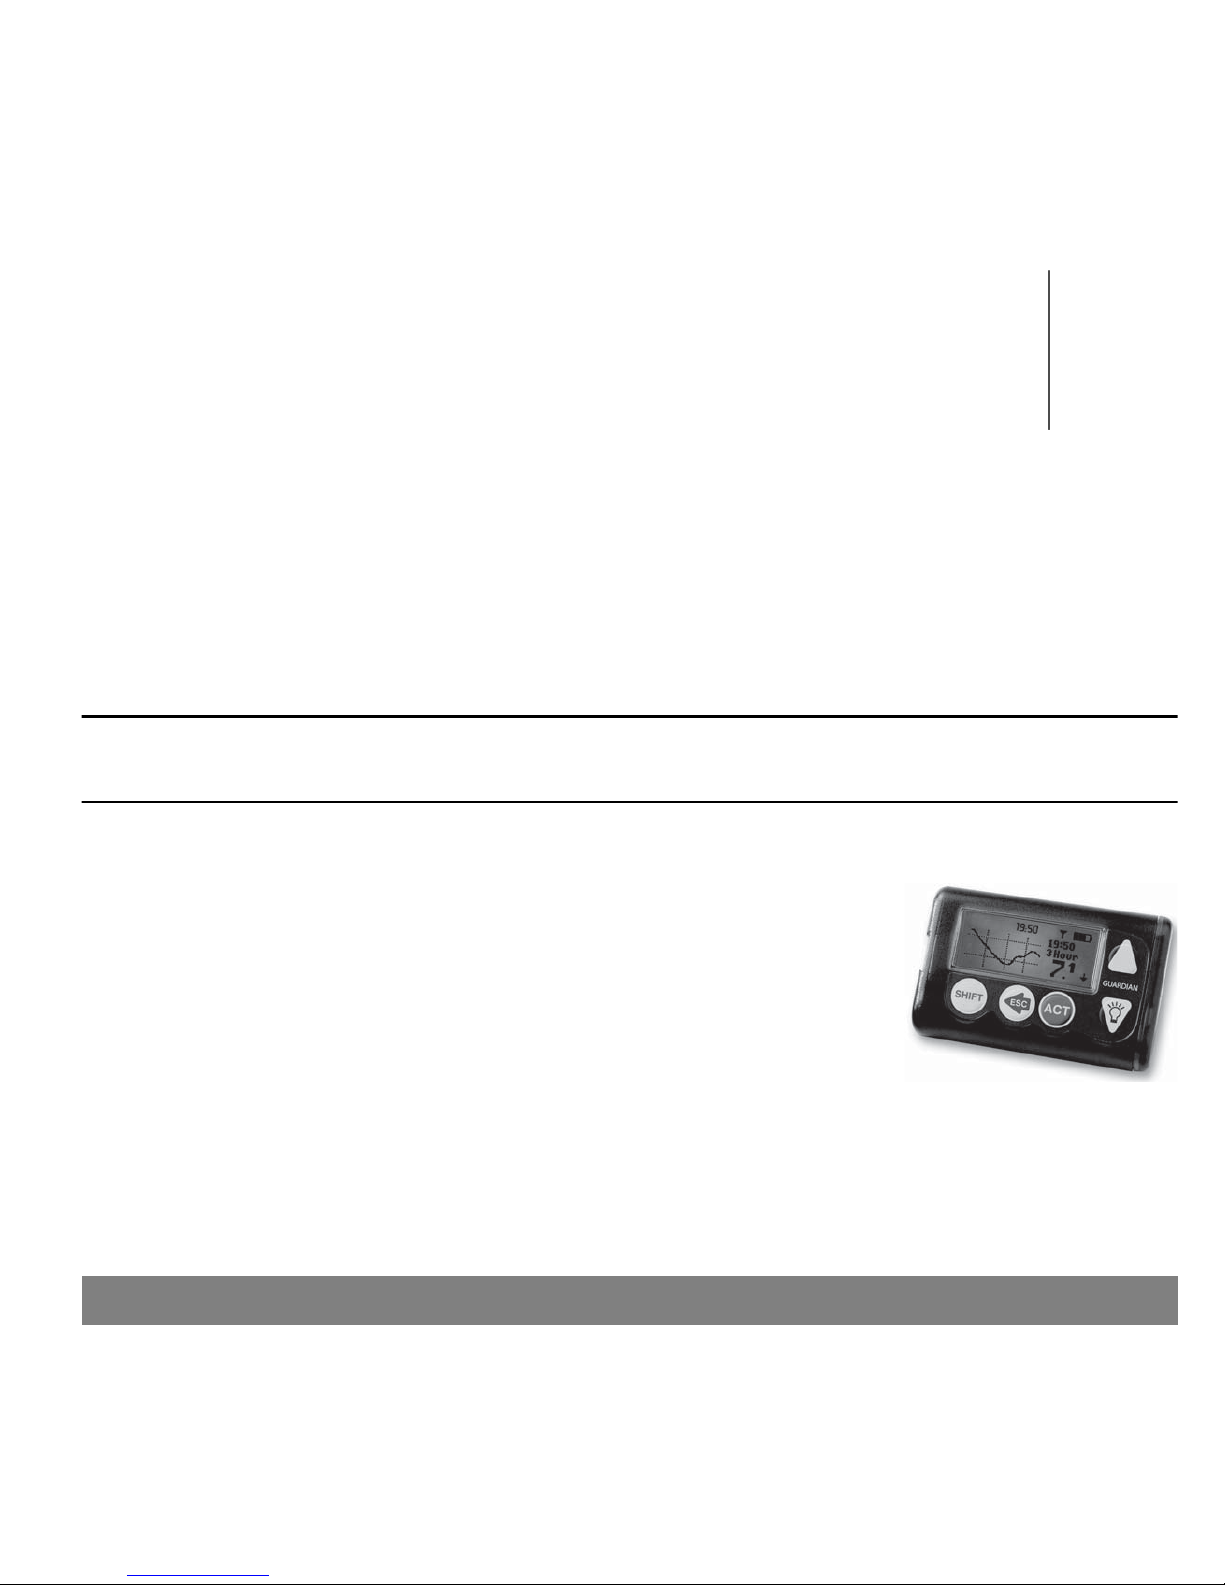
The monitor
The screen shows information such as your real-time sensor glucose measurements,
alarm/alert messages, current settings, and status readings. The buttons are used
to select menu items, enter values, and perform actions.
ಘ
The basics 11

Installing the battery
CAUTION: Do not use a rechargeable or carbon zinc battery in your monitor. For best results, a new AAA
Energizer alkaline battery is recommended.
Medtronic has designed an important safety measure into the monitor: It measures battery strength during
installation. If you install a new, full-strength battery, the monitor accepts it. However, if you install a battery that
does not have full power, or take too long to switch batteries, the monitor will show one of the following alarms:
• WEAK BATTERY — The battery is weak but usable. Follow the instructions on the screen to clear the alarm,
then either install the weak battery, or install another new battery. Your monitor will work with the weak
battery, but the battery life will be reduced.
• FAILED BATT TEST — The battery is not strong enough to power your monitor; your monitor will not work with
that battery. Clear the alarm and install a new battery.
• BATT OUT LIMIT — May occur if the battery is removed from the monitor, and more than 10 minutes passes
before the new battery is inserted. If this alarm occurs, continue installing the new battery.
Battery life varies widely depending on the way you use your monitor. Some of the use factors that affect battery
life include:
• the alert type you choose
• the number of alerts you receive
• how much you use the backlight
• how long you display the graphs
12 The basics
ಗ
To install the battery:
1
ಘ
If your new battery has been stored in a refrigerator or other cold environment, you must let it warm up to
room temperature before installing it in your monitor.
2
ಘ
Before you remove the old battery, make sure that you set the monitor on the HOME (idle) screen and clear
any alarms (ESC, ACT).
3
ಘ
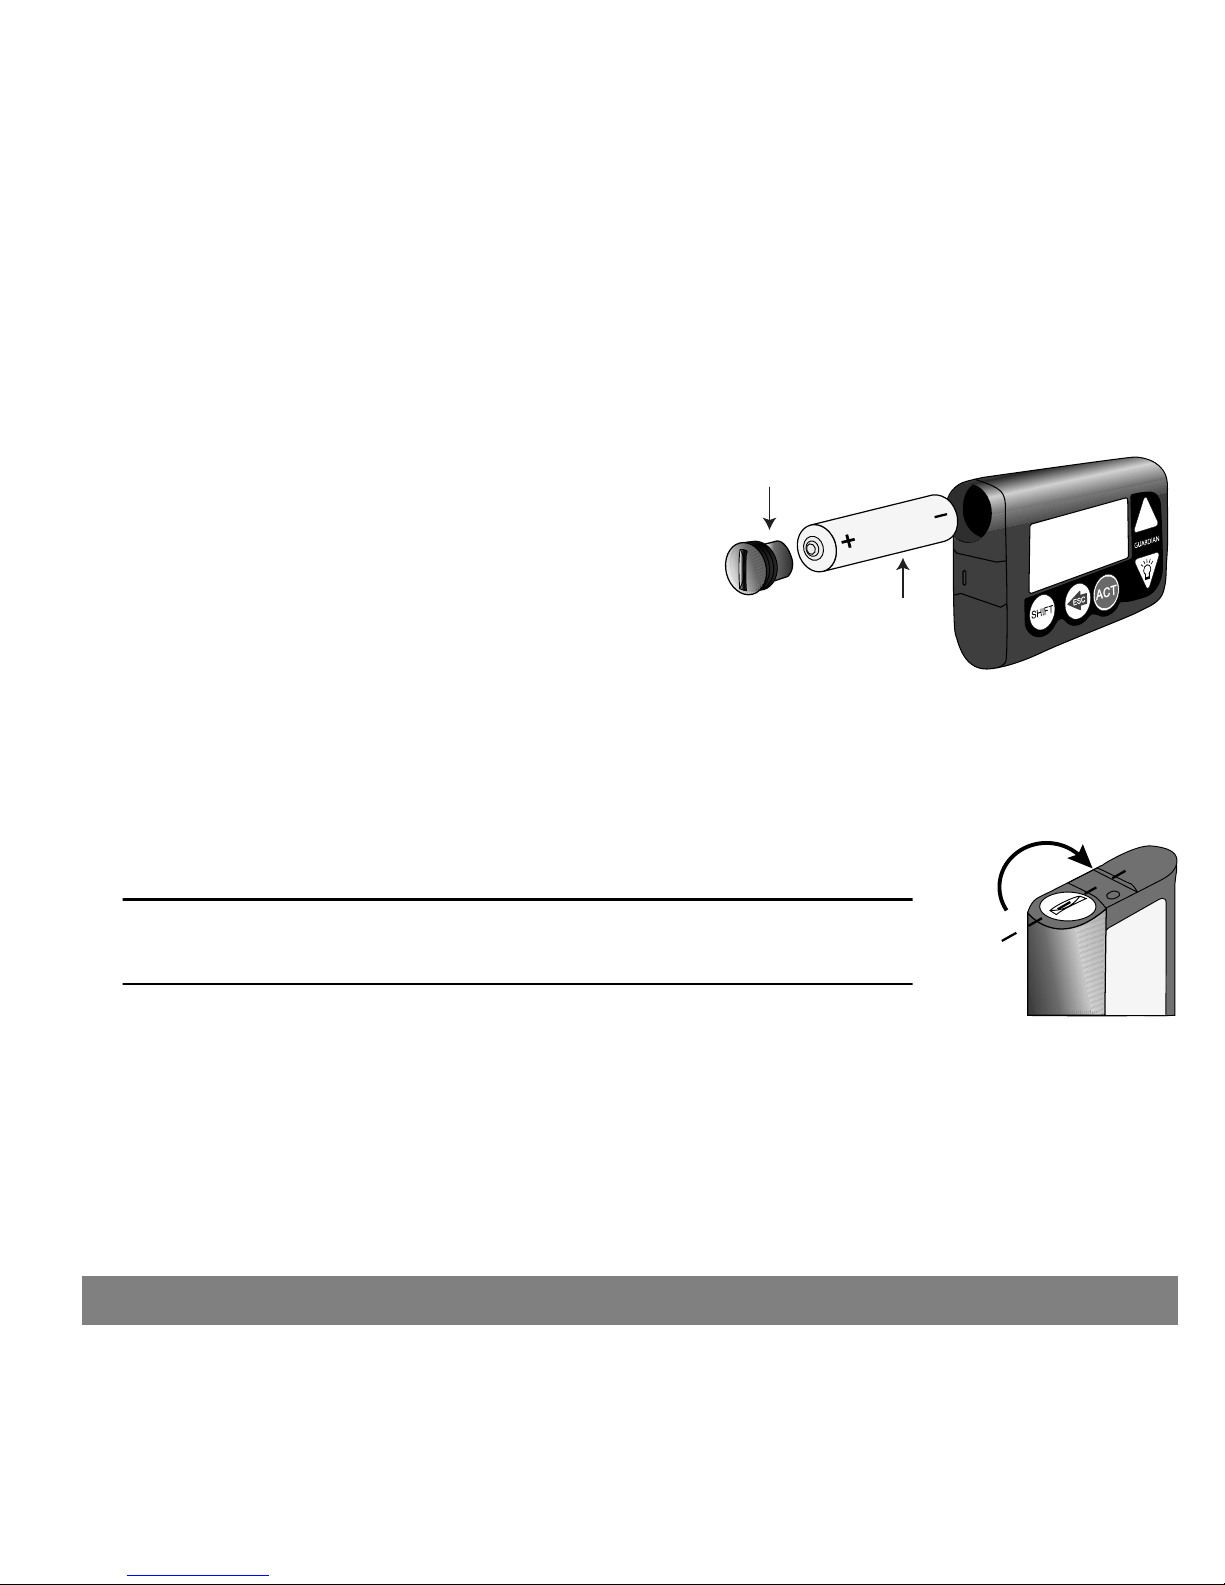
Use the edge of a coin to remove the battery cap. Turn the
cap counter-clockwise.
Battery cap
Battery
ಘ
4ಘRemove the old battery and throw it away according to the laws of your state or country. Insert the new battery
into the monitor negative end [(-) symbol] first. Check the label on the back of the monitor to make sure that
the battery is inserted correctly.
5
ಘ
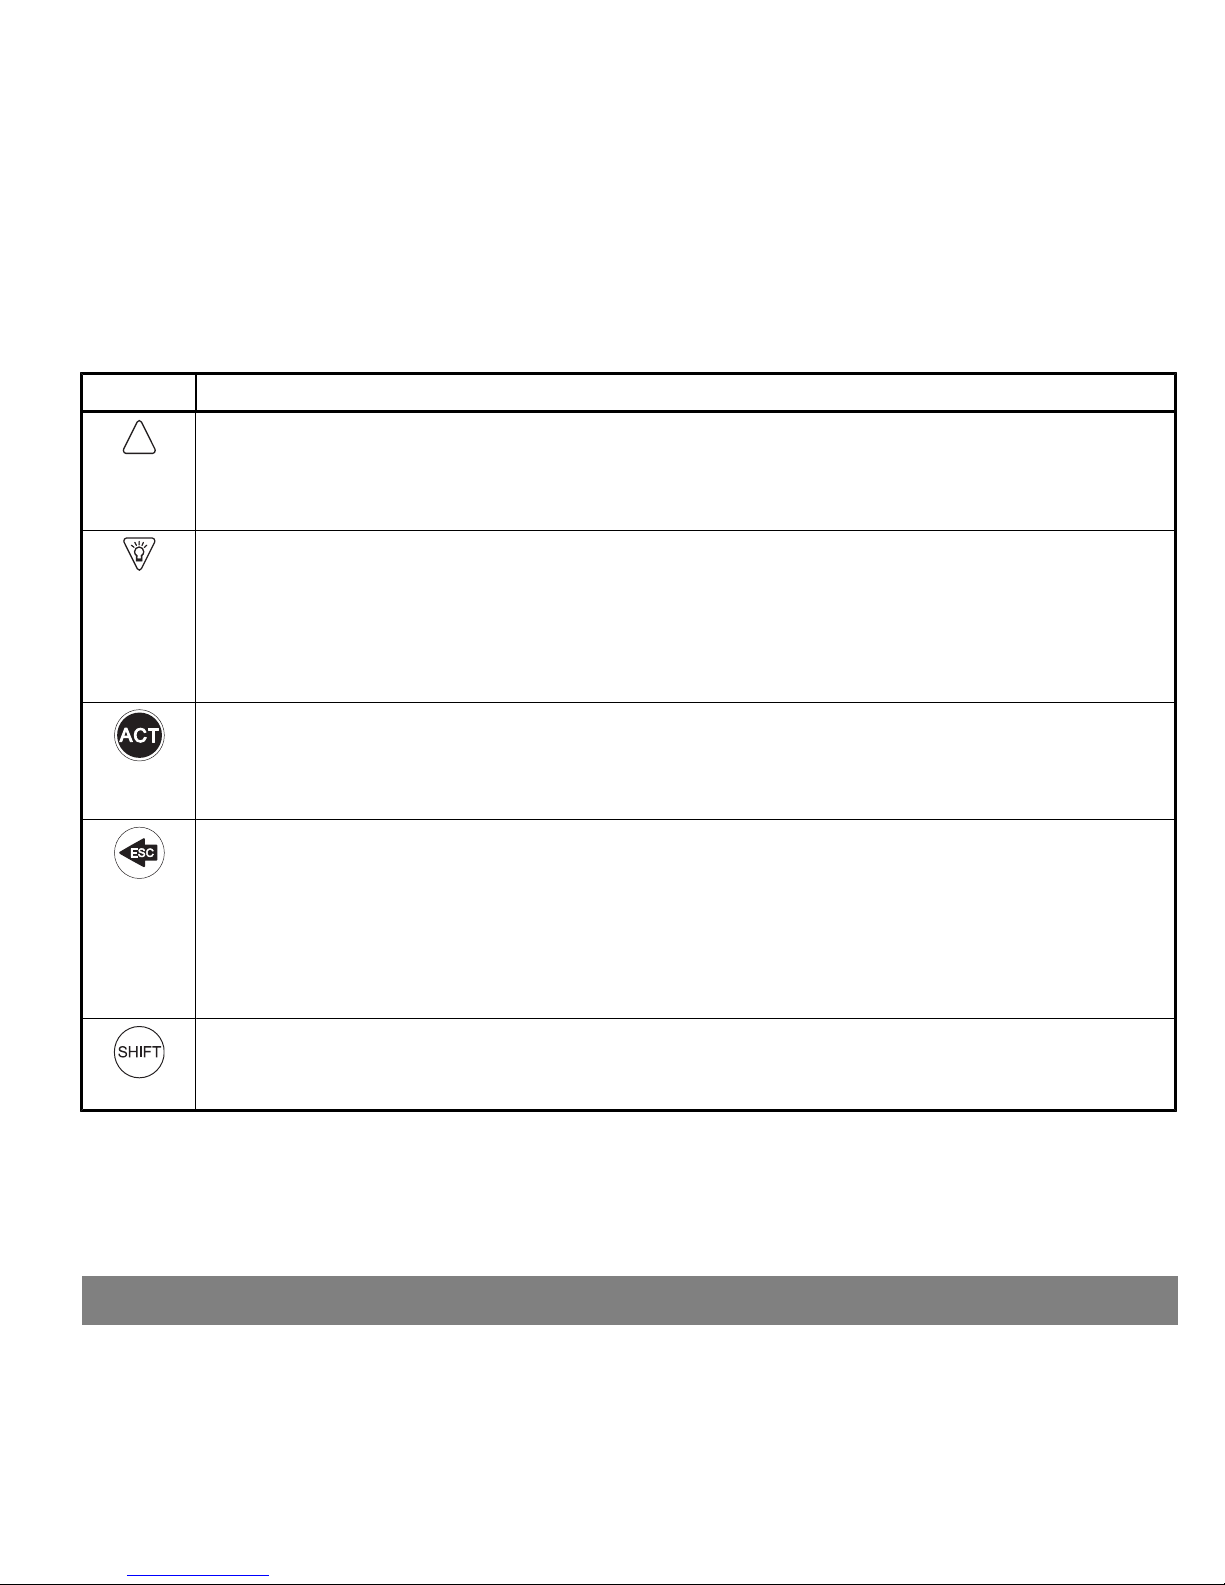
Place the battery cap in the monitor and tighten until the slot is aligned with the
monitor as shown at right.
CAUTION: Do not over-tighten the battery cap. You should not turn the cap more
than four half-turns. If you over-tighten the cap you may not be able to remove
it, and you can damage your monitor.
one half-turn
ಘ
The basics 13

When the monitor turns on, several screens appear, the monitor shows the version number, then the HOME
screen appears. If you are replacing a battery for a monitor that has very recently been in use, the only screen
you will see before the HOME screen is the one showing the version number.
ಘ
6ಘIf the HOME screen appears, then go to the next step. If the HOME screen does not appear:
a. Make sure that the battery is inserted correctly. If not, remove the battery and install it properly as
described in the previous steps.
b. If the monitor still does not turn on, or if you receive a FAILED BATT TEST alarm, then remove the battery
and replace it with a new one.
c. If the monitor still does not turn on, then call the HelpLine.
7
ಘ
Make sure that the time showing on the HOME screen is correct. If more than 10 minutes have passed since you
removed the battery, you will be prompted to check the time and date.
8
ಘ
Press ESC until the STATUS screen appears. Make sure that no alarms or alerts are active. If an alarm or alert
is active, then follow the instructions on the screen to clear the alarm or alert.
14 The basics
The monitor buttons
This section describes how to use the buttons on your monitor.
Button
Description
• Scroll up through menus when selecting menu items.
• Increase the value of a setting when entering or changing settings.
• Select different graphs when viewing the sensor glucose graphs.
• Move the cursor to the right in the graph when viewing the sensor glucose graphs.
• Scroll down through menus when selecting menu items.
• Decrease the value of a setting when entering or changing settings.
• Move the cursor to the left in the graph when viewing the sensor glucose graphs.
• Turn the backlight on when the HOME screen is showing.
• Turn the backlight on when viewing screens other than the HOME screen (hold down SHIFT and
press DOWN).
• Accept the selected menu item.
• Choose a setting when entering or changing settings.
• Open the MAIN MENU from the HOME screen.
• Clear alarms/alerts (press ESC, then press ACT).
• Return to previous screen or menu.
• Open the following screens and graphs from the HOME screen:
• The sensor glucose graphs.
• The STATUS screen and SENSOR STATUS screen.
• The SENSOR DEMO screens (if the feature is turned On).
• Move the cursor to the far right side of the graph when viewing the sensor glucose graphs.
• Clear alarms/alerts (press ESC, then press ACT).
• Turn the backlight on when viewing screens other than the HOME screen (hold down SHIFT and
press DOWN).
• Access the User Settings (hold down SHIFT and press ACT).
The basics 15

An important message about alarms and alerts
Your Guardian REAL-Time system tells you about events and conditions that affect your diabetes management in
two ways:
• With alarms about events and/or conditions that affect the ability of your system
to work properly. An alarm means you must do something immediately to make sure
your system keeps working properly. When an alarm occurs, a closed circle icon
appears at the top left of your monitor screen.
closed circle
ಘ
• With alerts about your glucose levels or about conditions that affect the way your
system measures your glucose levels. An alert means your glucose levels are
changing or you must do something within a certain amount of time to make sure
your system’s glucose monitoring stays accurate. When an alert occurs, an open circle icon appears at the top
left of your monitor screen.
open circle
ಘ
Certain alerts are called alarms on your screen. When this happens, the most important information is whether the
circle icon on your screen is open (alert) or closed (alarm). See the Troubleshooting and alarms/alerts chapter for
details on alarms and alerts.
16 The basics
The monitor screen
The screen shows five lines of text at one time. The first is the operating mode. The second is the current open
menu or function. The last three lines show either information or text that you can select for the current function.
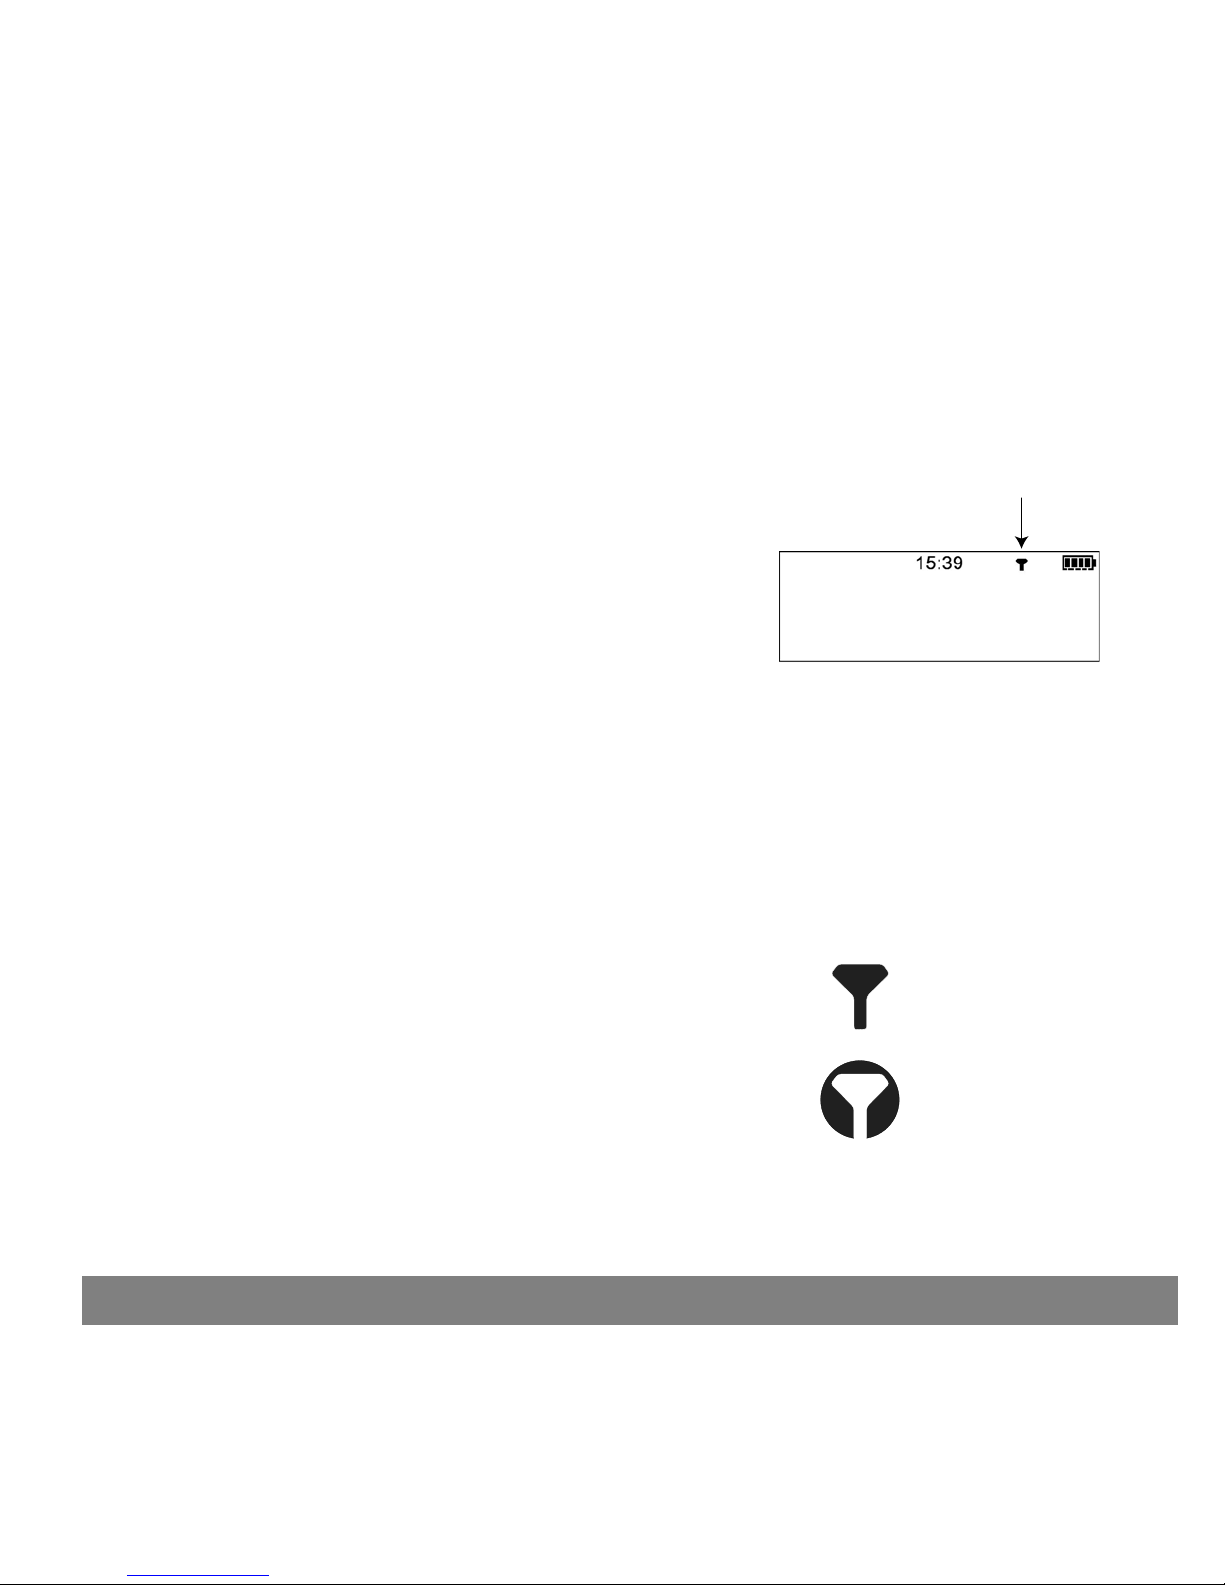
The HOME screen
Start from the HOME screen to get to the menus and screens you
use to set up the system. Use the HOME screen to view the time and
the sensor icon, which tells you if the transmitter and monitor are
communicating. If you do not press any buttons for approximately
30 seconds, the monitor automatically returns to the HOME screen.
Time
Sensor icon
Battery
icon
ಘ
When the monitor is on, the time and the battery icons always show across the top of the HOME screen. The sensor
icon will not show until you start the sensor and establish communication between the monitor and transmitter. If
the time and battery icons do not show, the monitor is not working.
Icons
The icons that show on the monitor screen are described below.
Sensor icon
A dark sensor icon means that the sensor is on and the monitor is receiving
sensor data. A light-colored sensor icon with a dark circle around it means
that the sensor is on, but the monitor is not receiving sensor data. For
information about the sensor and transmitter, see the Setting up your
sensor, transmitter and meter chapter.
Sensor is on and the monitor
is receiving sensor data
Sensor is on but the monitor
is not receiving sensor data
ಘ
The basics 17
 Loading...