

Medtronic MMT-7821, MMT-7020, GUARDIAN CONNECT, MMT-7736L, MMT-7715 User Manual
...
GUARDIAN
CONNECT
SYSTEM USER GUIDE


Contacts:
Africa: Medtronic Africa (Pty) Ltd.
Tel: +27 (0) 11 677 4800
Albania: Net Electronics Albania
Tel: +355 697070121
Argentina: Corpomedica S.A.
Tel: +(11) 4 814 1333
Medtronic Directo 24/7:
+0800 333 0752
Armenia: Exiol LLC
Tel: +374 98 92 00 11
or +374 94 38 38 52
Australia: Medtronic Australasia Pty. Ltd.
Tel: 1800 668 670
Azerbaijan: Isomed
Tel: +994 (12) 464 11 30
Bangladesh: Sonargaon Healthcare Pvt Ltd.
Mobile: (+91)-9903995417
or (+880)-1714217131
Belarus: Zarga Medica
Tel: +375 29 625 07 77
or +375 44 733 30 99
Helpline: +74995830400
België/Belgique: N.V. Medtronic Belgium S.A.
Tel: 0800-90805
Bosnia and Herzegovina: "Novopharm“ d.o.o.
Sarajevo
Tel: +387 33 476 444
Helpline: 0800 222 33
Epsilon Research Intern. d.o.o.
Tel: +387 51 251 037
Helpline: 0800 222 33
Brasil: Medtronic Comercial Ltda.
Tel: +(11) 2182-9200
Medtronic Directo 24/7:
+0800 773 9200
Bulgaria: RSR EOOD
Tel: +359 888993083
Helpline: +359 884504344
Canada: Medtronic of Canada Ltd.
Tel: 1-800-284-4416 (toll free/sans-frais)
Chile: Medtronic Chile
Tel: +(9) 66 29 7126
Medtronic Directo 24/7:
+1 230 020 9750
Medtronic Directo 24/7 (From Santiago): +(2)
595 2942
China: Medtronic (Shanghai) Ltd.
24 Hour Help (Cell):
+86 400-820-1981
24 Hour Help (Land):
+86 800-820-1981
Colombia: Medtronic Latin America Inc. Sucursal
Colombia
Tel: +(1) 742 7300
Medtronic Directo 24/7 (Landline):
+01 800 710 2170
Medtronic Directo 24/7 (Cellular):
+1 381 4902
Croatia: Mediligo d.o.o.
Tel: +385 1 6454 295
Helpline: +385 1 4881144
Medtronic Adriatic d.o.o.
Helpline: +385 1 4881120
Danmark: Medtronic Danmark A/S
Tel: +45 32 48 18 00
Deutschland: Medtronic GmbH
Geschäftsbereich Diabetes
Telefon: +49 2159 8149-370
Telefax: +49 2159 8149-110
24-Stdn-Hotline: 0800 6464633
Eire: Accu-Science LTD.
Tel: +353 45 433000
España: Medtronic Ibérica S.A.
Tel: +34 91 625 05 42
Fax: +34 91 625 03 90
24 horas: +34 900 120 330
Estonia: AB Medical Group Eesti OU
Tel: +372 6552310
Helpline: +372 5140694

Europe: Medtronic Europe S.A. Europe, Middle East
and Africa HQ
Tel: +41 (0) 21-802-7000
France: Medtronic France S.A.S.
Tel: +33 (0) 1 55 38 17 00
Hellas: Medtronic Hellas S.A.
Tel: +30 210677-9099
Hong Kong: Medtronic International Ltd.
Tel: +852 2919-1300
To order supplies:
+852 2919-1322
24-hour helpline: +852 2919-6441
India: India Medtronic Pvt. Ltd.
Tel: (+91)-80-22112245 / 32972359
Mobile: (+91)-9611633007
Patient Care Helpline:
1800 209 6777
Indonesia: Medtronic International Ltd.
Tel: +65 6436 5090
or +65 6436 5000
Israel: Medtronic
Tel. (orders):
+9729972440, option 3 + option 1
Tel. (product support):
+9729972440, option 2
Helpline (17:00 – 08:00
daily/weekends – Israel time):
1-800-611-888
Italia: Medtronic Italia S.p.A.
Tel: +39 02 24137 261
Fax: +39 02 24138 210
Servizio assistenza tecnica:
Nº verde: 800 60 11 22
Japan: Medtronic Japan Co. Ltd.
Tel: +81-3-6776-0019
24 Hr. Support Line: 0120-56-32-56
Kazakhstan: Medtronic BV in Kazakhstan
Tel: +7 727 311 05 80 (Almaty)
Tel: +7 717 224 48 11 (Astana)
Круглосуточная линия поддержки:
8 800 080 5001
Kosovo: Yess Pharma
Tel: +377 44 999 900
Helpline: +37745888388
Latin America: Medtronic, Inc.
Tel: 1(305) 500-9328
Fax: 1(786) 709-4244
Latvija: RAL SIA
Tel: +371 67316372
Helpline (9am to 6pm):
+371 29611419
Lithuania: Monameda UAB
Tel: +370 68405322
Helpline: +370 68494254
Macedonia: Alkaloid Kons Dooel
Tel: +389 23204438
Magyarország: Medtronic Hungária Kft.
Tel: +36 1 889 0688
Malaysia: Medtronic International Ltd.
Tel: +603 7946 9000
Middle East and North Africa: Regional Office
Tel: +961-1-370 670
Montenegro: Glosarij d.o.o.
Tel: +382 20642495
México:
Medtronic Servicios S. de R. L. de C.V.
Tel (México DF): +(11) 029 058
Tel (Interior): +01 800 000 7867
Medtronic Directo 24/7 (from México DF):
+(55) 36 869 787
Medtronic Directo 24/7:
+01 800 681 1845
Nederland, Luxembourg: Medtronic B.V.
Tel: +31 (0) 45-566-8291
Gratis: 0800-3422338
New Zealand: Medica Pacifica
Phone: 64 9 414 0318
Free Phone: 0800 106 100
Norge: Medtronic Norge A/S
Tel: +47 67 10 32 00
Fax: +47 67 10 32 10

Philippines: Medtronic International Ltd.
Tel: +65 6436 5090
or +65 6436 5000
Poccия: ООО «Медтроник»
Tel: +7 495 580 73 77
Круглосуточная линия поддержки:
8 800 200 76 36
Polska: Medtronic Poland Sp. z o.o.
Tel: +48 22 465 6934
Portugal: Medtronic Portugal Lda
Tel: +351 21 7245100
Fax: +351 21 7245199
Puerto Rico: Medtronic Puerto Rico
Tel: 787-753-5270
Republic of Korea: Medtronic Korea, Co., Ltd.
Tel: +82.2.3404.3600
Romania: Medtronic Romania S.R.L
Tel: +40372188017
Helpline: +40 726677171
Schweiz: Medtronic (Schweiz) AG
Tel: +41 (0)31 868 0160
24-Stunden-Hotline: 0800 633333
Fax Allgemein: +41 (0)318680199
Serbia: Epsilon Research International d.o.o.
Tel: +381 113115554
Medtronic Serbia D.o.o
Helpline: +381 112095900
Singapore: Medtronic International Ltd.
Tel: +65 6436 5090
or +65 6436 5000
Slovenija: Zaloker & Zaloker d.o.o.
Tel: +386 1 542 51 11
24-urna tehnična pomoč:
+386 51316560
Slovenská republika: Medtronic Slovakia, s.r.o.
Tel: +421 26820 6942
HelpLine: +421 26820 6986
Sri Lanka: Swiss Biogenics Ltd.
Mobile: (+91)-9003077499
or (+94)-777256760
Suomi: Medtronic Finland Oy
Tel: +358 20 7281 200
Help line: +358 400 100 313
Sverige: Medtronic AB
Tel: +46 8 568 585 20
Fax: +46 8 568 585 11
Taiwan: Medtronic (Taiwan) Ltd.
Tel: 02-21836000
Toll free: +886-800-005285
Thailand: Medtronic (Thailand) Ltd.
Tel: +662 232 7400
Türkiye: Medtronic Medikal Teknoloji
Ticaret Ltd. Sirketi.
Tel: +90 216 4694330
USA: Medtronic Diabetes Global Headquarters
24 Hour HelpLine: +1-800-646-4633
To order supplies: +1-800-843-6687
Ukraine: Med Ek Service TOV
Tel: +380 50 3311898
or +380 50 4344346
Лінія цілодобової підтримки
:
0 800 508 300
United Kingdom: Medtronic Ltd.
Tel: +44 1923-205167
Österreich: Medtronic Österreich GmbH
Tel: +43 (0) 1 240 44-0
24 – Stunden – Hotline: 0820 820 190
Česká republika: Medtronic Czechia s.r.o.
Tel: +420 233 059 111
Non-stop helpLine (24/7):
+420 233 059 059
Zákaznický servis (8:00 - 17:00):
+420 233 059 950


Introduction
Thank you for choosing Medtronic as your diabetes management partner.
The Guardian
™
Connect Continuous Glucose Monitoring (CGM) system helps you
manage your diabetes by:
• recording your glucose values throughout the day and night
• displaying your glucose values in a convenient and discrete manner using your
smartphone
• alerting you to glucose events using your smartphone
• showing the effects that diet, exercise, and medication can have on your glucose
levels
• giving you additional tools, such as alerts and the ability to record diet, exercise,
and insulin intake, to help you prevent high and low glucose levels
This user guide is designed to help you understand the setup and operation of your
Guardian Connect system.
System description
The Guardian Connect system includes the Guardian Connect app (CSS7200),
Guardian Connect
transmitter (MMT-7821),
Guardian
Sensor (3) (MMT-7020),
charger (MMT-7715), tester (MMT-7736L), one-press serter (MMT-7512), and oval
tape (MMT-7015). This guide describes how to set up and use the system.
CGM is a tool that lets you continuously view your sensor glucose values. The
Guardian Connect system uses a glucose sensor, the Guardian Sensor (3), placed
below your skin, to continuously measure the amount of glucose in your interstitial
fluid. The Guardian Connect transmitter collects these glucose measurements, which
are then converted to sensor glucose values. These sensor glucose values are then
displayed on the Guardian Connect app. The Guardian Connect app can also
provide alerts based on senor glucose levels.
Note:
This product should only be used with supported mobile devices. You can access the
supported mobile device list in the FAQ section at https://
www.medtronicdiabetes.com/customer-support/guardian-connect-faqs
Indications for Use
The Guardian Connect system is indicated for continuous or periodic monitoring of
glucose levels in the interstitial fluid under the skin, in patients (14 to 75 years of age)
with diabetes mellitus.
-1-
English

The
Guardian Connect
system provides real-time glucose values and trends through a
Guardian Connect app installed on a compatible consumer electronic mobile device. It
allows users to detect trends and track patterns in glucose concentrations. The
Guardian Connect app alerts if a Guardian Sensor (3) glucose level reaches, falls below,
rises above, or is predicted to surpass set values.
The
Guardian
Sensor (3) glucose values are not intended to be used directly for making
therapy adjustments, but rather to provide an indication of when a finger stick may be
required. All therapy adjustments should be based on measurements obtained using a
home glucose monitor and not on values provided by the Guardian Sensor (3).
The Guardian Connect system is comprised of the following devices: Guardian Connect
app,
Guardian
Sensor (3), and the
Guardian Connect
transmitter.
Guardian Sensor (3)
The Guardian Sensor (3) is intended for use with Medtronic Diabetes glucose-sensing
systems, to continuously monitor glucose levels in persons with diabetes. The Guardian
Sensor (3) is indicated for 7 days of continuous use. It is indicated for use as an
adjunctive device to complement, not replace, information obtained from standard blood
glucose monitoring devices. The sensor is intended for single use and requires a
prescription.
Guardian Connect transmitter
The Guardian Connect transmitter is intended for use with the Guardian Connect system.
The
Guardian Connect
transmitter powers the glucose sensor, collects and calculates
sensor data, and sends the data via Bluetooth version 4.0 to the Guardian Connect app
installed on a compatible mobile device. The transmitter is only compatible with the
Guardian Sensor (3). The transmitter is indicated for multiple uses on a single patient as
a component of the
Guardian Connect
system.
The Guardian Connect transmitter requires a prescription.
Guardian Connect app
The Guardian Connect app is intended for use only by patients using a compatible mobile
device, and who have sufficient experience to adjust mobile device audio and notification
settings. The app displays sensor glucose data, and also provides a user interface for
sensor calibration, entering data such as exercise and meals, and uploading information
to the CareLink Personal website. It allows users to detect trends and track patterns in
glucose concentrations. The Guardian Connect app provides alerts if a Guardian Sensor
(3) glucose level reaches, falls below, rises above, or is predicted to surpass set values.
-2-

The
Guardian Connect
app is available over-the-counter (OTC) but requires the
Guardian Sensor (3) and Guardian Connect transmitter to function.
Charger
The charger is used to charge your transmitter battery. For best results, recharge
your transmitter between each use to ensure full transmitter battery life.
Tester
The tester is intended for use with the Guardian Connect transmitter. It is a device
used as a watertight cleaning plug during transmitter cleaning. It is also used for
simulating a sensor to test that the transmitter is working properly.
One-press serter
The serter is used as an aid for inserting the sensor. It is indicated for single-patient
use and is not intended for multiple patient use.
Oval tape
The tape is indicated for use with Medtronic glucose sensor products. It is indicated
for one-time use.
User Safety
This section includes important safety information such as indications,
contraindications, safety warnings, potential adverse reactions, and how to protect
the system from radiation exposure damage.
Contraindications
Continuous glucose monitoring is not recommended for people who are unwilling or
unable to perform a minimum of two meter blood glucose tests per day or for people
who are unable or unwilling to maintain contact with their healthcare professional.
Successful CGM use requires sufficient vision or hearing to allow recognition of the
alerts generated by the
Guardian Connect
app.
Do not use serter on products other than the Enlite
®
Sensor or Guardian Sensor (3).
Medtronic cannot guarantee the safety or efficacy of this product if used with other
products.
-3-
English

Safety Warnings
App and Mobile Device
• Missing alerts from the Guardian Connect app may result in undetected low and high
glucose levels. Follow the instructions and safety warnings in this user guide to make
sure you receive alerts as intended.
• You must allow notifications for the
Guardian Connect
app during setup. Also, do not
turn off notifications for the Guardian Connect app in your mobile device settings. If
notifications are off, you will not receive any alerts (including the Urgent Low glucose
alert) even if the audio override feature is on.
• Do not use the Guardian Connect app unless you understand how your mobile
device settings work. If your mobile device settings are not set up correctly, you may
not receive sensor glucose alerts.
• Make sure
Bluetooth
is on, even if your mobile device is in Airplane mode. If
Bluetooth is off, you will not get sensor glucose information or alerts.
• Do not use the Guardian Connect app if your mobile device screen or speakers are
damaged. If your mobile device is damaged, you may not get sensor glucose alerts
and sensor glucose information may not be shown correctly.
• If you turn off the override feature in the Guardian Connect app, the alerts will be
based on the ringer setting of your mobile device. If your ringer is set to Do Not
Disturb, silent, or a low volume, you may not hear sensor glucose alerts.
• Alerts for the Guardian Connect app will sound through your headphones when
headphones are connected. If you leave your headphones connected when not in
use, you may not hear sensor glucose alerts.
• Do not close the Guardian Connect app. If the app is closed, you will not get sensor
glucose information or alerts.
• Your mobile device may close the Guardian Connect app automatically when you are
using another app, such as a game. If the Guardian Connect app is closed, you will
not get sensor glucose alerts. Check the Guardian Connect app occasionally to make
sure it is running.
• If your mobile device restarts, the Guardian Connect app will not restart
automatically. If you do not open the app again, you will not get sensor glucose
alerts. Always make sure to open the app after your mobile device restarts.
• Do not let your mobile device shut down due to low battery, or you will not get sensor
glucose alerts. Make sure you have a charger available so you can charge your
battery if needed.
-4-

• When you snooze a sensor glucose alert, you won't get that alert again during
the length of the snooze time you set. Make sure to set the snooze to a short
enough time so that you can be sure to get an alert again if your glucose level
doesn’t improve.
• Do not make therapy decisions based on sensor glucose values because sensor
glucose and blood glucose (BG) values may be different. Confirm your glucose
level with your blood glucose meter before making treatment decisions, such as
dosing insulin before a meal or taking carbs to treat a low.
• Do not root or jailbreak your mobile device. Rooting or jailbreaking means to
change the software of your mobile device in a way the manufacturer did not
intend. If you change your mobile device in this way, you may not get sensor
glucose alerts and your sensor glucose information may not be shown correctly.
Transmitter
• Do not use the transmitter adjacent to other electrical equipment that may cause
interference with the normal system operation. For more information on other
electrical equipment that may compromise normal system operation, see
Exposure to magnetic fields and radiation, on page 7.
• Do not use the device if you see any cracking, flaking, or damage to the housing.
Cracking, flaking, or damage to the housing are signs of deterioration.
Deterioration of the housing can affect the ability to properly clean the transmitter
and result in serious injury. Call the 24 Hour HelpLine and discard the device
according to local regulations for battery disposal (nonincineration), or contact
your healthcare professional for disposal information.
• Do not discard the transmitter in a medical waste container or expose it to
extreme heat. The transmitter contains a battery that may ignite and result in
serious injury.
• Do not allow children to put small parts in their mouth. This product poses a
choking hazard for young children.
• Do not change or modify the device unless expressly approved by Medtronic
Diabetes. Modifying the device can cause serious injury, interfere with your ability
to operate the device, and void your warranty.
Charger
• Dispose of the charger according to the local regulations for battery disposal, or
contact your healthcare professional for disposal information. The charger may
ignite upon incineration.
-5-
English

Tester
• Do not use the tester if it comes in contact with blood. Touching blood can cause
infection. Dispose of the tester according to the local regulations for medical waste
disposal, or contact your healthcare professional for disposal information.
Serter
• Read this entire user guide before attempting to insert the sensor. The one-press
serter (MMT-7512) does not work the same as other Medtronic insertion devices.
Failure to follow directions or using a different serter may result in improper insertion,
pain, or injury.
• Wear gloves when inserting the sensor into someone other than yourself to avoid
contact with patient blood. Minimal bleeding may occur. Contact with patient blood
can cause infection.
• Never point a loaded serter toward any body part where insertion is not desired. An
accidental button-push may cause the needle to inject the sensor in an undesired
location, causing minor injury.
Sensor
• Taking medications with acetaminophen or paracetamol including but not limited to
Tylenol
®
, fever reducers, cold medicine while wearing the sensor may falsely raise
your sensor glucose readings. The level of inaccuracy depends on the amount of
acetaminophen or paracetamol active in your body and may be different for each
person. Always use blood glucose meter readings to verify your glucose level before
making therapy decisions.
• The Guardian Sensor (3) should only be used with the one-press serter. Medtronic
cannot guarantee the safety or effectiveness of this product if used with other
products.
• The Guardian Sensor (3) was developed for use with and the performance evaluated
with the approved system only. The sensor should not be used as part of unapproved
systems, as it may provide inaccurate sensor glucose readings.
• The sensor is designed to work with approved transmitters only. It is not
interchangeable with transmitters and recorders that are not compatible with the
sensor. Connecting your sensor to a transmitter or recorder that is not approved for
use with the sensor may cause damage to the components or inaccurate sensor
glucose values.
• A retractable needle is attached to the sensor and minimal blood splatter may occur.
If you are a healthcare professional or caregiver, wrap sterile gauze around the
sensor to minimize contact with blood. Keep as much distance as possible between
you and the patient when removing the needle.
-6-
• Keep the needle housing within sight at all times to avoid an accidental
needlestick or puncture.
• Always inspect the packaging for damage prior to use. Sensors are sterile and
non-pyrogenic, unless the package has been opened or damaged. Do not use
the sensor if the sterile package has been opened or damaged. Use of an
unsterile sensor can cause site infection.
• Watch for bleeding at the insertion site (under, around, or on top of the sensor).
If bleeding occurs, do the following:
1
Apply steady pressure, using sterile gauze or a clean cloth placed on top of the
sensor, for up to three minutes. The use of unsterile gauze can cause site
infection.
2
If bleeding stops, connect the transmitter (or recorder) to the sensor.
If bleeding does not stop, do not connect the transmitter to the sensor because
blood can get into the transmitter connector, and could damage the device.
If bleeding continues, causes excessive pain or discomfort, or is significantly
visible in the plastic base of the sensor, do the following:
1
Remove the sensor and continue to apply steady pressure
until the bleeding stops. Discard the sensor in a sharps
container.
2
Check the site for redness, bleeding, irritation, pain,
tenderness, or inflammation. Treat based on instructions
from your healthcare professional.
3
Insert a new sensor in a different location.
Contact the 24 Hour HelpLine if you experience any adverse reactions associated
with the transmitter or sensor. Adverse reactions can cause serious injury.
Exposure to magnetic fields and radiation
• Do not expose your sensor or transmitter to Magnetic Resonance Imaging (MRI)
equipment, diathermy devices, or other devices that generate strong magnetic
fields (for example, x-ray, CT scan, or other types of radiation). Always remove
your sensor and transmitter before entering a room that has x-ray, MRI,
diathermy, or CT scan equipment. Exposure to a strong magnetic field has not
been evaluated and can cause the device to malfunction, result in serious injury
or be unsafe. If your sensor or transmitter is exposed to a strong magnetic field,
discontinue use and contact the 24 Hour HelpLine for further assistance.
plastic base
-7-
English

Precautions
• You must test your blood glucose levels at least two times per day, or as indicated by
the system. If the app indicates that your sensor glucose is not within your glucose
target range, check your blood glucose using your blood glucose meter.
• Do not use any other sensor. Other sensors are not intended for use with the
transmitter, and will damage the transmitter and the sensor.
• Only use the green colored tester (MMT-7736L) with the transmitter. Do not use any
other tester. Other testers are not intended for use with the transmitter, and will
damage the transmitter and the tester.
• Always use the tester when cleaning the transmitter. Do not use any other tester with
the transmitter. Use of another tester can allow water to get into the transmitter or
can prevent proper cleaning. Water can damage the transmitter.
• Do not twist the tester or sensor while attached to the transmitter. Twisting the tester
or sensor will damage the transmitter.
• Do not allow the tester to come in contact with any liquid when not connected to the
transmitter. A wet tester can damage the transmitter.
• Do not allow the transmitter to come in contact with any liquid when not connected to
a sensor or to the tester. Moisture will damage the transmitter and a wet transmitter
can damage the sensor.
• Do not clean the o-rings on the tester with any substances. Cleaning the o-rings can
damage the tester.
• Wash your hands with soap and water before inserting the sensor to help prevent
site infection.
• Wear gloves when inserting the sensor into someone other than yourself to avoid
contact with patient blood.
• Do not insert the sensor through tape. Inserting the sensor through tape may cause
improper sensor insertion and function.
• Only use alcohol to prepare the insertion site, to ensure that residue is not left on the
skin.
• Rotate the sensor insertion site so that sites do not become overused.
• Discard used sensors and needle housings in a sharps container after each use to
avoid accidental needlestick or puncture.
• Do not clean, resterilize, or try to extract the needle from the needle housing. An
accidental needlestick or puncture may occur.
• Do not reuse sensors. Reuse of a sensor may cause damage to the sensor surface
and lead to inaccurate glucose values, site irritation, or infection.
-8-

Where to insert the sensor
CAUTION: Avoid the 2 inch (5.0 cm) area around the navel to help ensure a
comfortable insertion site and to help with sensor adhesion.
Choose an insertion site that has an adequate amount of subcutaneous fat. Shown
here are the best body areas (shaded) for sensor insertion.
Note: Assistance may be needed for sensor insertion into the
back of the upper arm. Some users found it difficult to
insert the sensor into their arm by themselves.
Do not insert the sensor in muscle or areas constrained by
clothing or accessories, areas with tough skin or scar tissue, sites subjected to
rigorous movement during exercise, or in sites under a belt or on the waistline for
best sensor performance and to avoid accidental sensor removal.
Potential risks related to sensor use
General risks with sensor use include:
• Skin irritation or other reactions
• Bruising
• Discomfort
• Redness
• Bleeding
• Pain
• Rash
• Infection
• Raised bump
• Appearance of a small “freckle-like” dot where needle was inserted
• Allergic reaction
• Fainting secondary to anxiety or fear of needle insertion
• Soreness or tenderness
• Swelling at insertion site
• Sensor fracture, breakage or damage
• Minimal blood splatter associated with sensor needle removal
• Residual redness associated with adhesive or tapes or both
• Scarring
-9-
English

Radio Frequency (RF) communication
This device complies with the United States Federal Communications Commission (FCC)
and international standards for electromagnetic compatibility. This device complies with
Part 15 of the FCC Rules. Operation is subject to two conditions: (1) This device may not
cause harmful interference, and (2) this device must accept any interference received,
including interference that may cause undesired operation.
This device has been tested and found to comply with the limits for a Class B digital
device, pursuant to Part 15 of the FCC rules. These limits are designed to provide
reasonable protection against harmful interference in a residential installation. This
device generates, uses, and can radiate radio frequency energy and, if not installed and
used in accordance with the instructions, may cause harmful interference to radio
communications. However, there is no guarantee that interference will not occur in a
particular installation. If this device does cause harmful interference to radio or television
reception, which can be determined by turning the device off and on, the user is
encouraged to try to correct the interference by one or more of the following measures:
• Reorient or relocate the receiving antenna.
• Increase the separation between the device and the receiver.
• Decrease the distance between the transmitter and the compatible mobile device to
20 feet (6.1 meters) or less.
• Increase the separation between the transmitter and the equipment that is receiving
or emitting interference.
Note: Harmful interference is defined by the FCC as follows. Any emission, radiation
or induction that endangers the functioning of a radio navigation service or of
other safety services or seriously degrades, obstructs or repeatedly interrupts
a radio communications service operating in accordance with FCC rules.
Changes or modifications made to this equipment not expressly approved by Medtronic
Diabetes could void the user's authority to operate the equipment.
Directive 1999/5/EC
Medtronic declares that this product is in conformity with the essential requirements of
Directive 1999/5/EC on Radio and Telecommunications Terminal Equipment.
For additional information, contact Medtronic MiniMed at the address or phone number
provided on the back cover.
IEC60601-1-2:2007; Special EMC Precautions for Medical Electrical Equipment
1
Special Precautions regarding Electromagnetic Compatibility (EMC): This body worn
device is intended to be operated within a reasonable residential, domestic, public or
work environment, where common levels of radiated “E” (V/m) or “H” fields (A/m)
-10-
exist; such as cellular phones, WiFi,
Bluetooth
, electric can openers, microwave
and induction ovens. This device generates, uses, and can radiate radio
frequency energy and, if not installed and used in accordance with the provided
instructions, may cause harmful interference to radio communications.
2
Portable and mobile RF communications equipment can affect Medical Electrical
Equipment as well. If you encounter RF interference from a mobile or stationary
RF transmitter, move away from the RF transmitter that is causing the
interference.
Assistance
Medtronic provides a 24 Hour HelpLine for assistance. When calling the HelpLine,
please have the serial number of your device available. The serial number and the 24
Hour HelpLine phone number are listed on the back of your device.
Department Telephone number
24 Hour HelpLine (calls within the United States) 800 646 4633
24 Hour HelpLine (calls outside the United States) +1 818 576 5555
Website www.medtronicdiabetes.com
Emergency kit
Keep an emergency kit with you at all times to make sure that you always have
necessary supplies. Tell a family member, co-worker, or friend where you keep your
emergency kit.
It is important that you test your blood glucose more frequently while you are
traveling. Issues encountered during travel, such as stress; changes in time zones,
schedules, activity levels, and meal times; and eating different types of food, can all
affect your diabetes.
Your emergency kit should include these items:
• Fast-acting glucose tablets
• Blood glucose monitoring supplies
• Ketone monitoring supplies
• Insulin syringe and rapid-acting insulin (with dosage instructions from your
healthcare professional)
• Adhesive dressing
•
Glucagon
™
emergency kit
How to use this guide
The following table describes terms and conventions used in this guide.
-11-
English
Convention Description
Toggle Indicates that the same feature on the screen can be used to switch between two
options. For example, "Toggle an alert on" means that you slide a switch right to turn
on an alert. To turn it off, you need to slide the same switch left.
Bold Indicates an item on the screen that you select with your finger or tap to open.
>
A shorthand to indicate a series of selections you make on the screen. For example,
Alert Settings > Rate Alerts means that you need to tap Alert Settings, and then on
the next screen tap Rate Alerts.
Note Provides additional helpful information.
CAUTION Notifies you of a potential hazard which, if not avoided, may result in minor or moderate
injury or damage to the equipment.
WARNING Notifies you of a potential hazard which, if not avoided, could result in death or serious
injury. It may also describe potential serious adverse reactions and safety hazards.
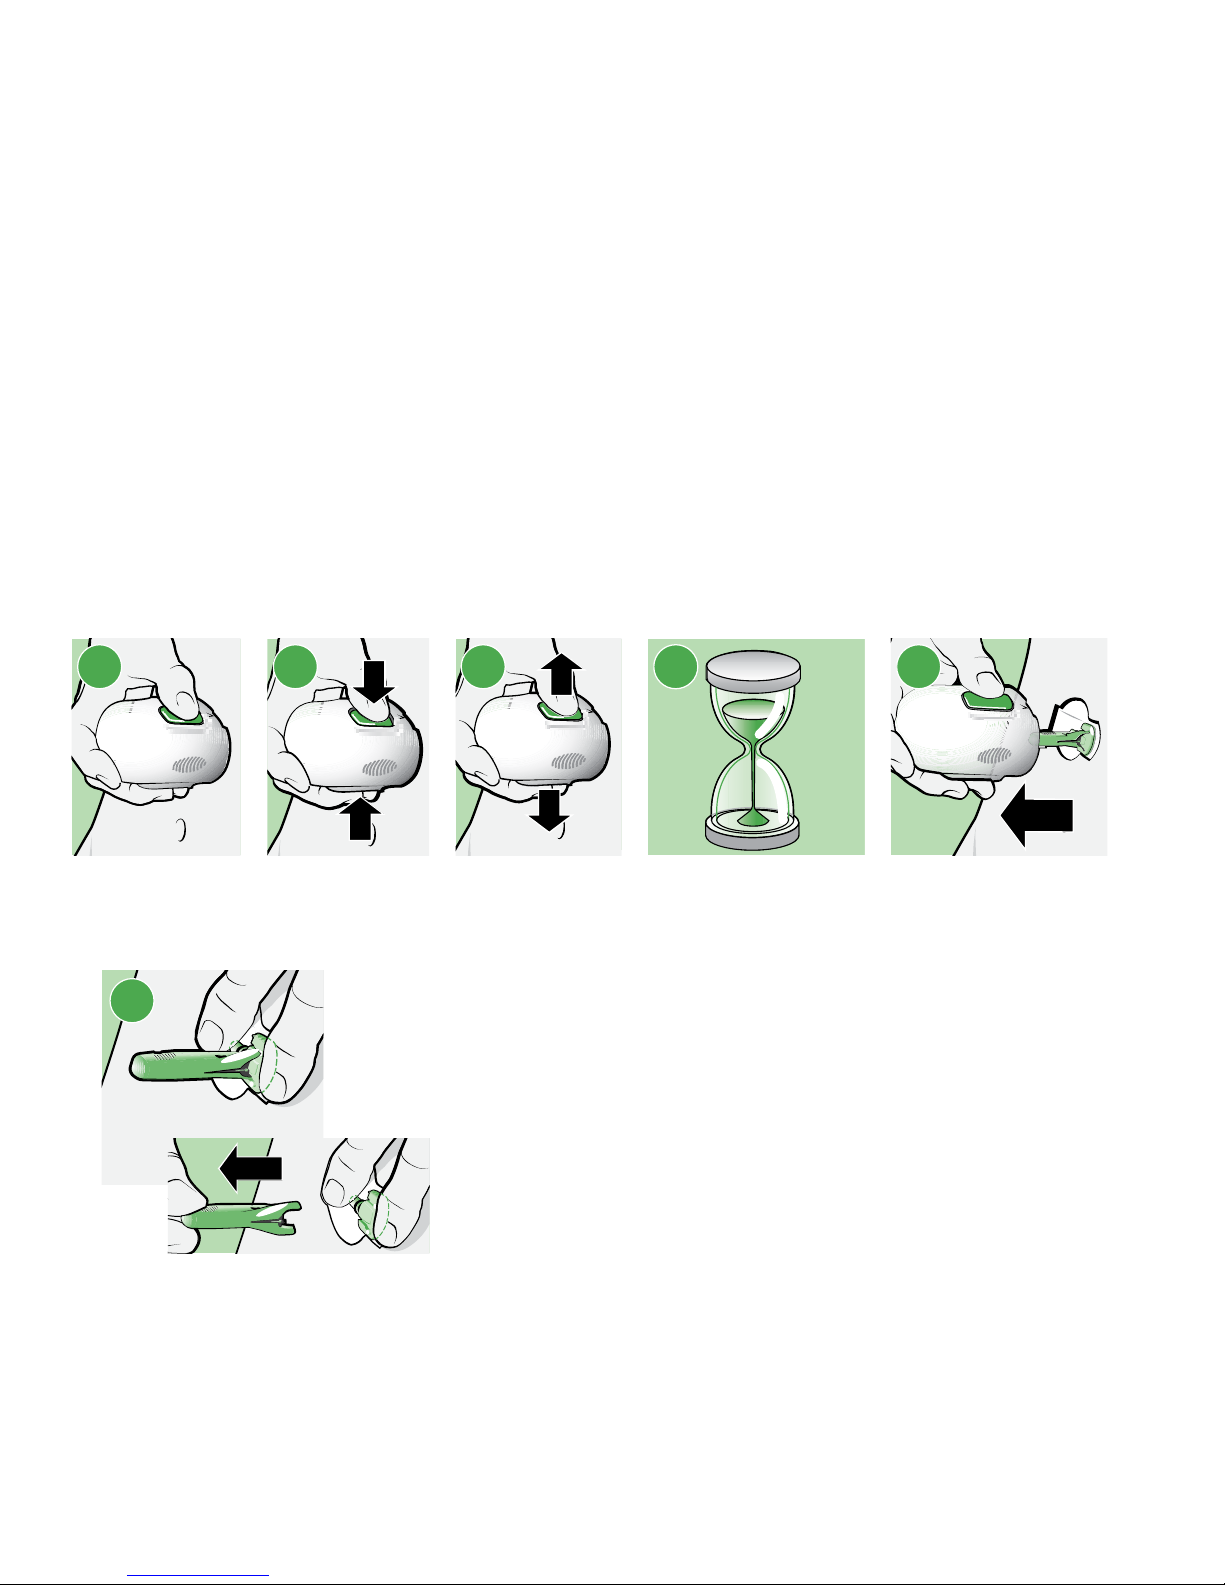
Preparing your transmitter
The transmitter contains a non-replaceable, rechargeable battery that you can recharge
as needed with the charger. The transmitter will need to be charged before you use it.
The charger has a green light that shows the charging status and a red light that
communicates any problems during charging. If you see a red light, see the
Troubleshooting section. The charger needs one AAA alkaline battery.
Note: If the battery is installed incorrectly or is low, the charger will not work. Repeat the
battery installation steps using a new battery.
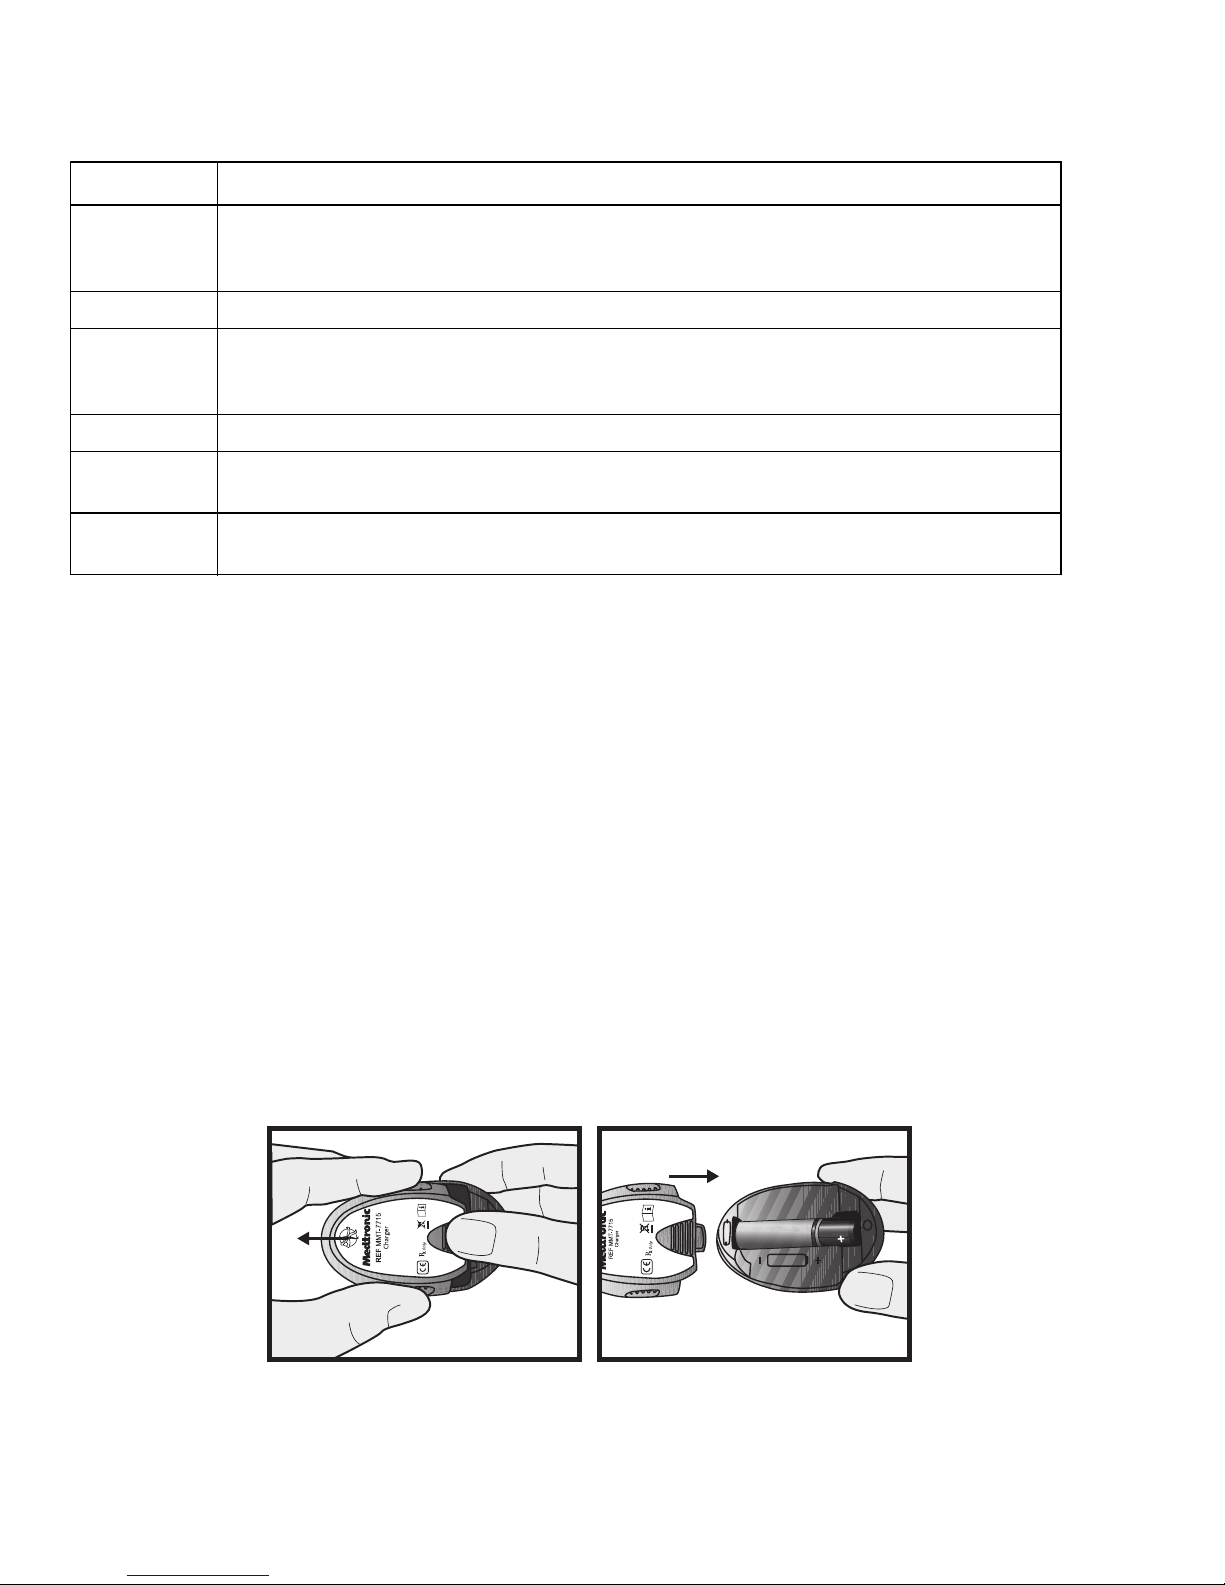
Installing a battery in the charger
To install a battery in the charger:
1
Push the battery cover in and slide it off (as shown in the image in step 3).
2
Insert a new AAA alkaline battery. Make sure the + and - symbols on the battery align
with these same symbols shown on the charger.
3
Slide the cover back on the charger until it clicks into place.
-12-

Charging the transmitter
CAUTION: Always charge the transmitter before inserting your sensor. A
depleted transmitter does not function. A fully charged transmitter
works at least seven days without recharging. A depleted
transmitter can take up to two hours to recharge.
CAUTION: Do not store the transmitter on the charger. If the transmitter is left
on the charger for more than 60 days, the battery will be
permanently damaged.
To charge the transmitter:
1
Push the transmitter and the charger together to connect
the transmitter to the charger.
2
Within 10 seconds after the transmitter is connected, a
green light on the charger will flash for one to two seconds
as the charger powers on. For the rest of the charging time,
the green light on the charger will continue to flash in a
pattern of four flashes with a pause between the four
flashes.
3
When charging is complete, the green light on the charger
will stay on, without flashing, for 15 to 20 seconds and then
turn off.
4
After the green charger light turns off, disconnect the
transmitter from the charger. The green light on the
transmitter will flash 10 times and then turn off.
Guardian Connect app setup
When you open the app for the first time, it walks you through the setup process.
Simply follow the instructions on your screen.
WARNING:
You must allow notifications for the Guardian Connect app during
setup. Also, do not turn off notifications for the Guardian Connect
app in your mobile device settings. If notifications are off, you will
not receive any alerts (including the Urgent Low glucose alert)
even if the audio override feature is on.
Pairing your transmitter
Follow the instructions on your screen to pair your transmitter to your mobile device.
-13-
English
New sensor setup
Follow the instructions on how to insert the sensor. Then follow the on-screen instructions
to complete the sensor start up.
Note: You must connect your transmitter to your sensor before completing setup.
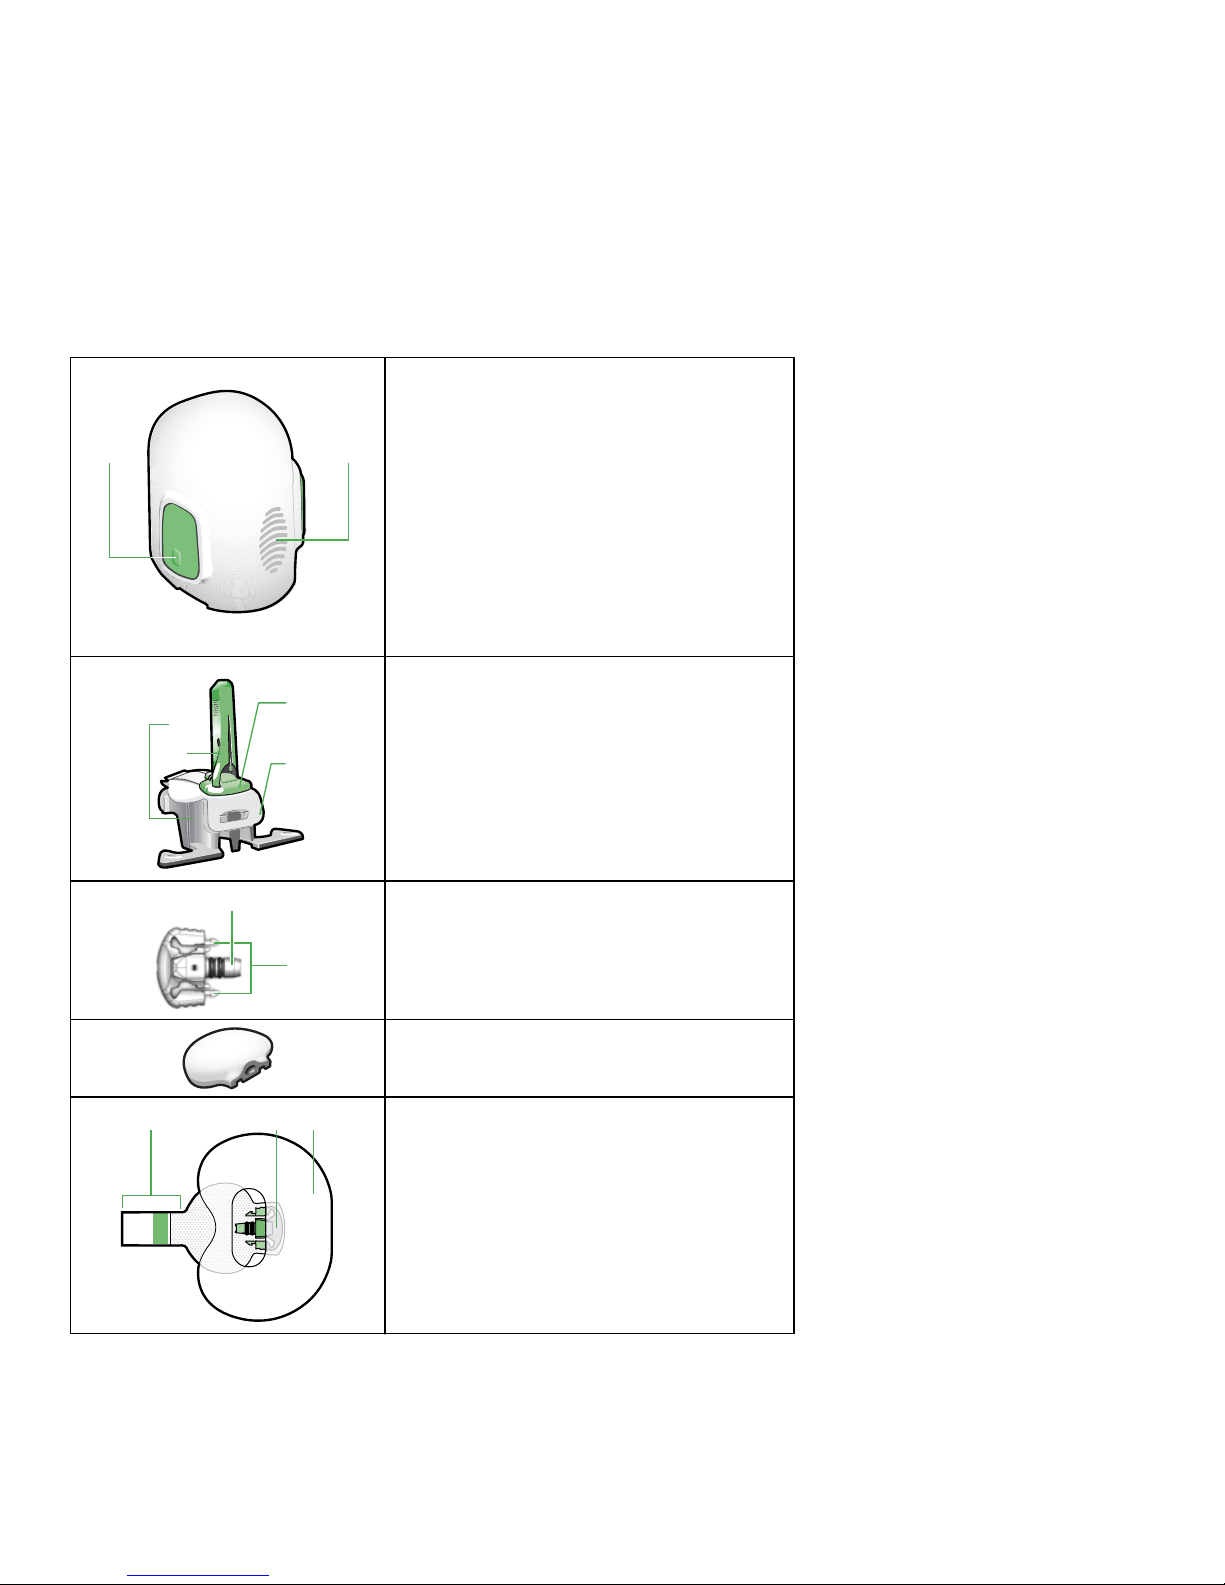
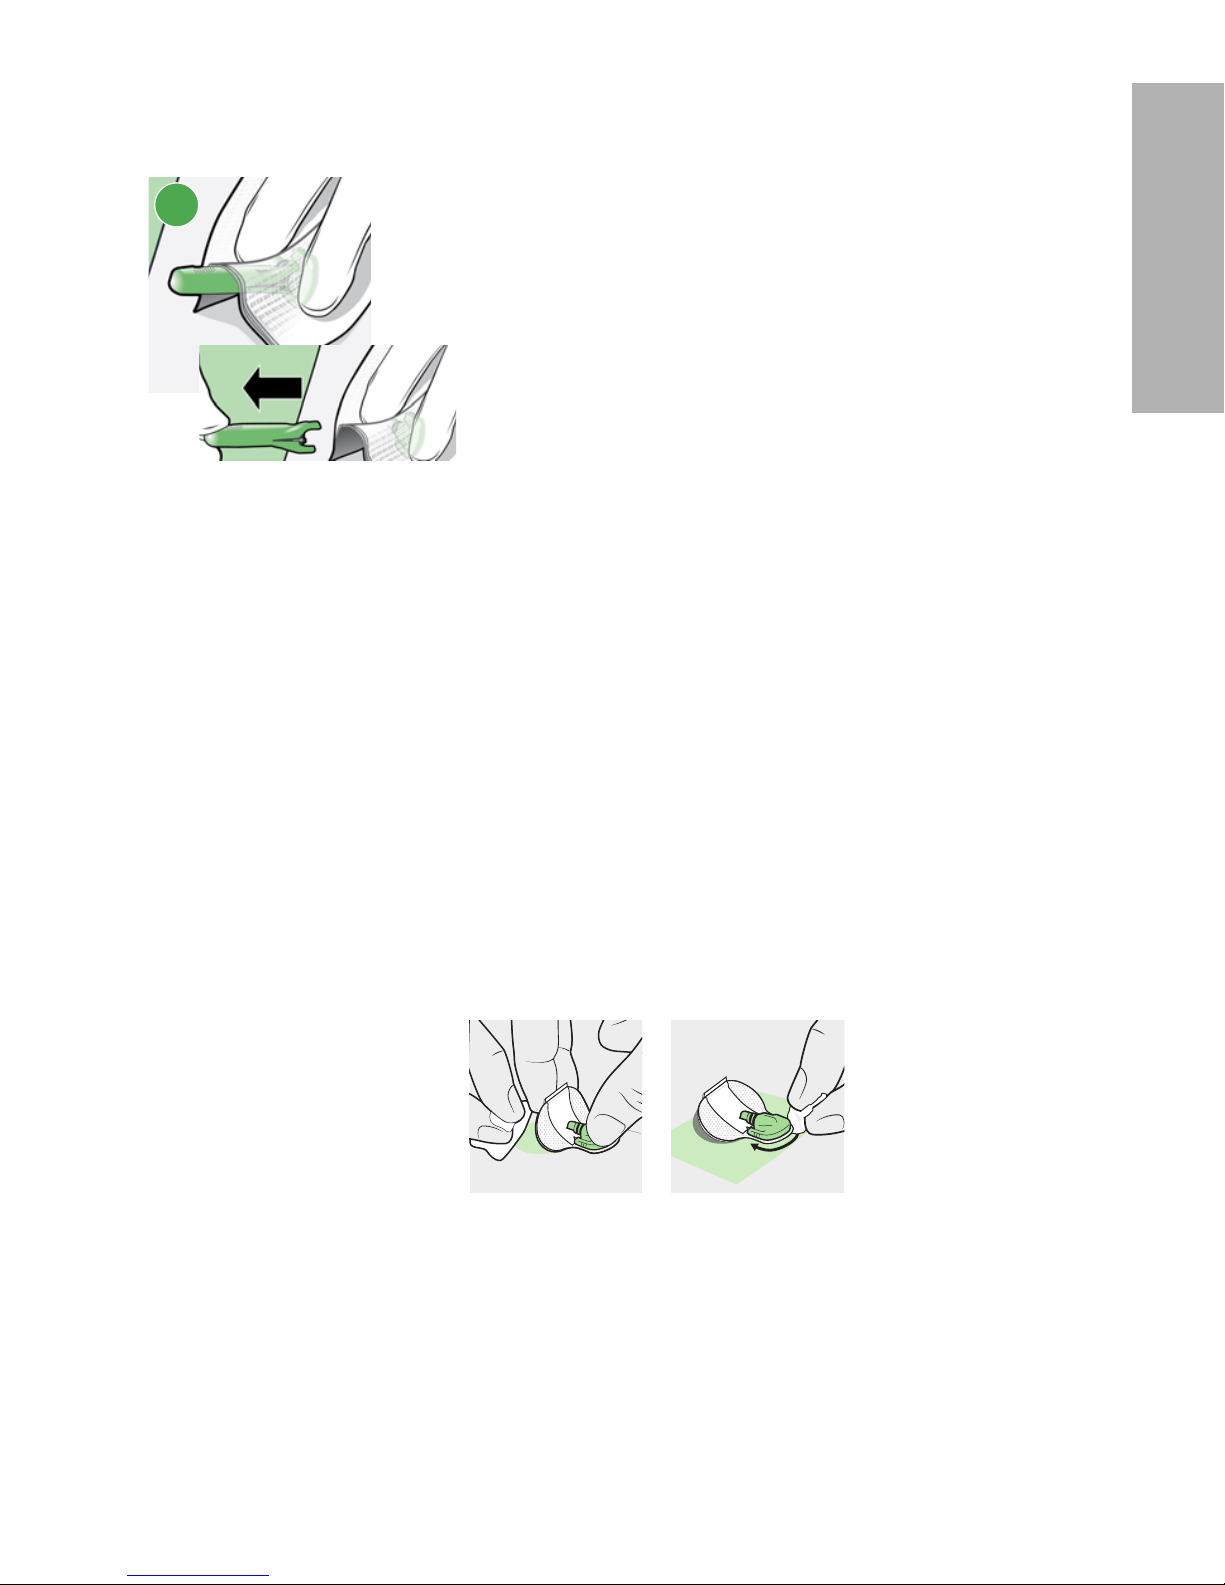
Components
A B
One-press serter
A. bump on both buttons
B. thumbprint marking
C
D
A
B
Glucose sensor assembly
A. pedestal
B. needle housing
C. sensor
D. clear liner
A
B
Sensor base
A. sensor connector
B. sensor snaps
Transmitter
A CB
Tape and sensor components
A. adhesive tab
B. sensor base
C. oval tape
-14-
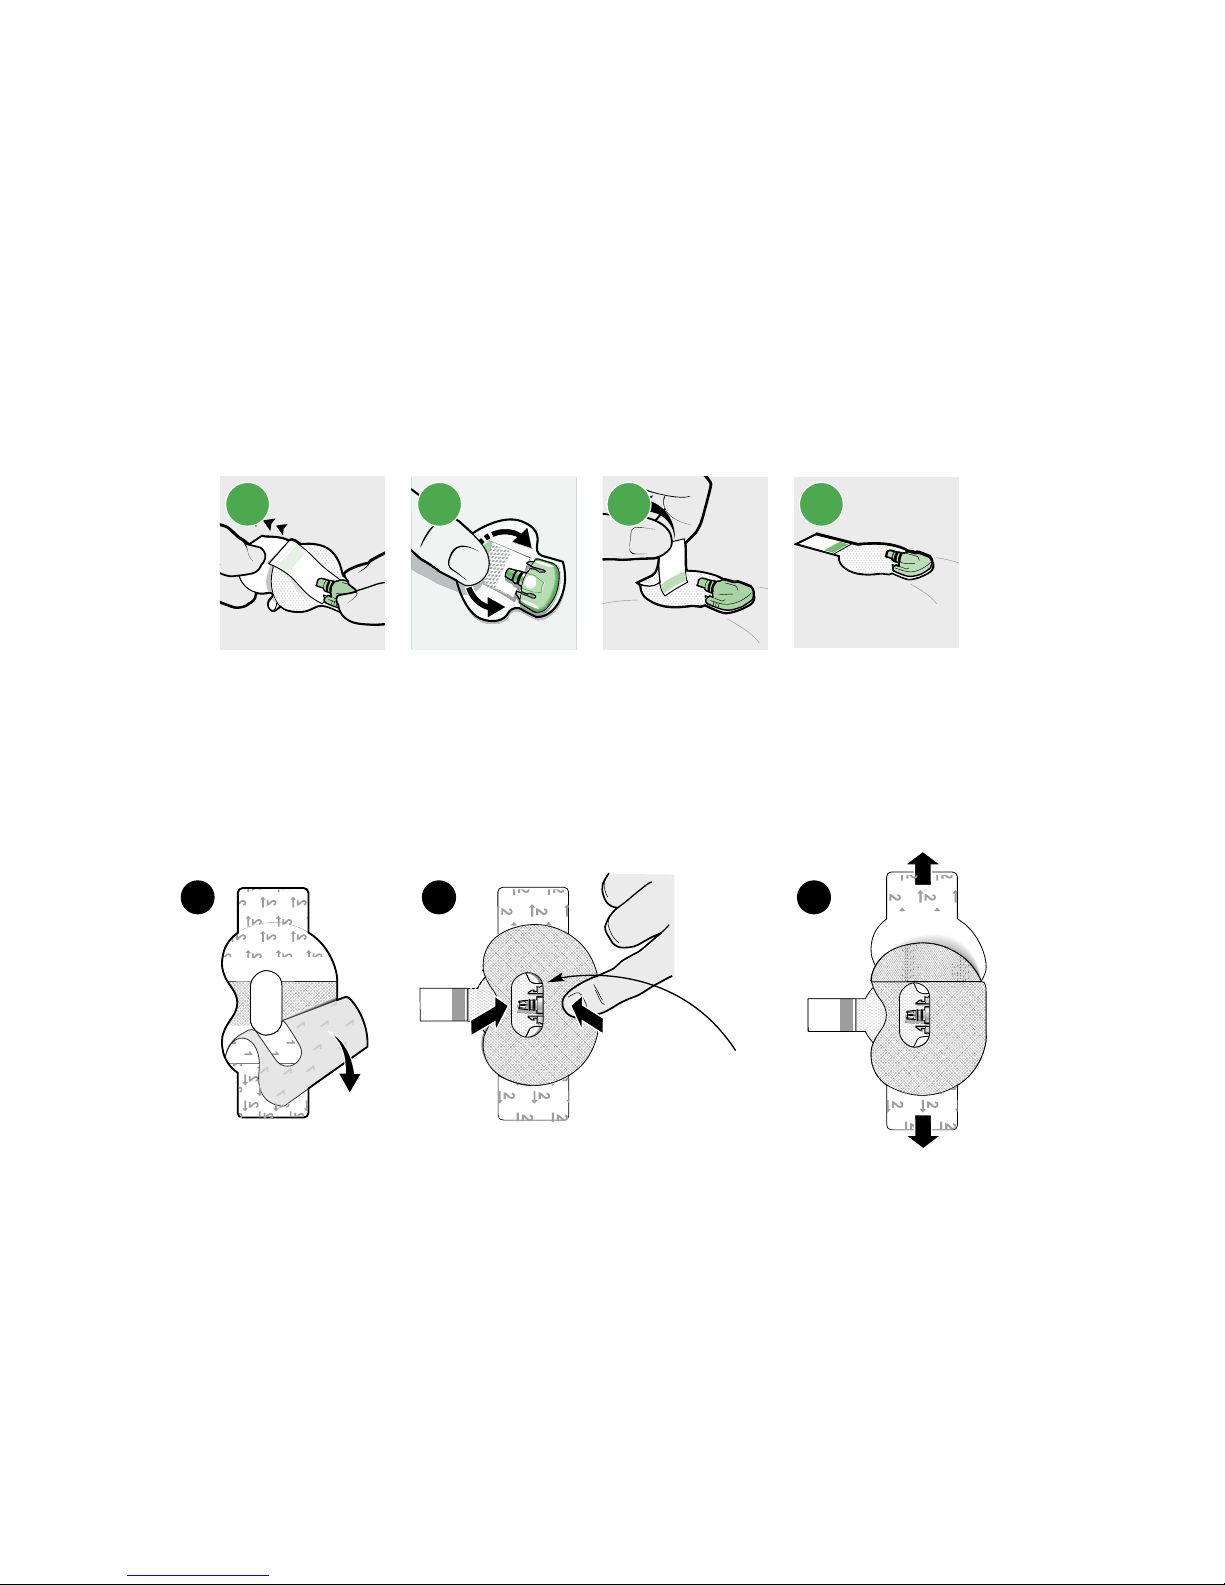
Inserting the sensor
WARNING: Wear gloves when inserting the sensor into someone other than
yourself to avoid contact with patient blood. Minimal bleeding may
occur. Contact with patient blood can cause infection.
1
Wash your hands.
2
Choose an insertion site on the abdomen or back of the upper arm that has an
adequate amount of fat.
Note: Assistance may be needed for sensor insertion into the back of the upper
arm. Some users found it difficult to insert the sensor into their arm by
themselves.
3
Clean the insertion site with alcohol. Let the area air dry.
4
Open the sensor package.
2 3 41
5 Hold the pedestal and remove the glucose sensor assembly from the package.
Place the pedestal on a flat surface.
Note: The pedestal and glucose sensor assembly are the established definitions
in the component table.
6
Make sure that the adhesive tab of the sensor is tucked under the sensor
connector and sensor snaps.
5 6
7 Holding serter correctly
Place your thumb on the thumbprint marking to hold the serter without touching
the buttons.
-15-
English
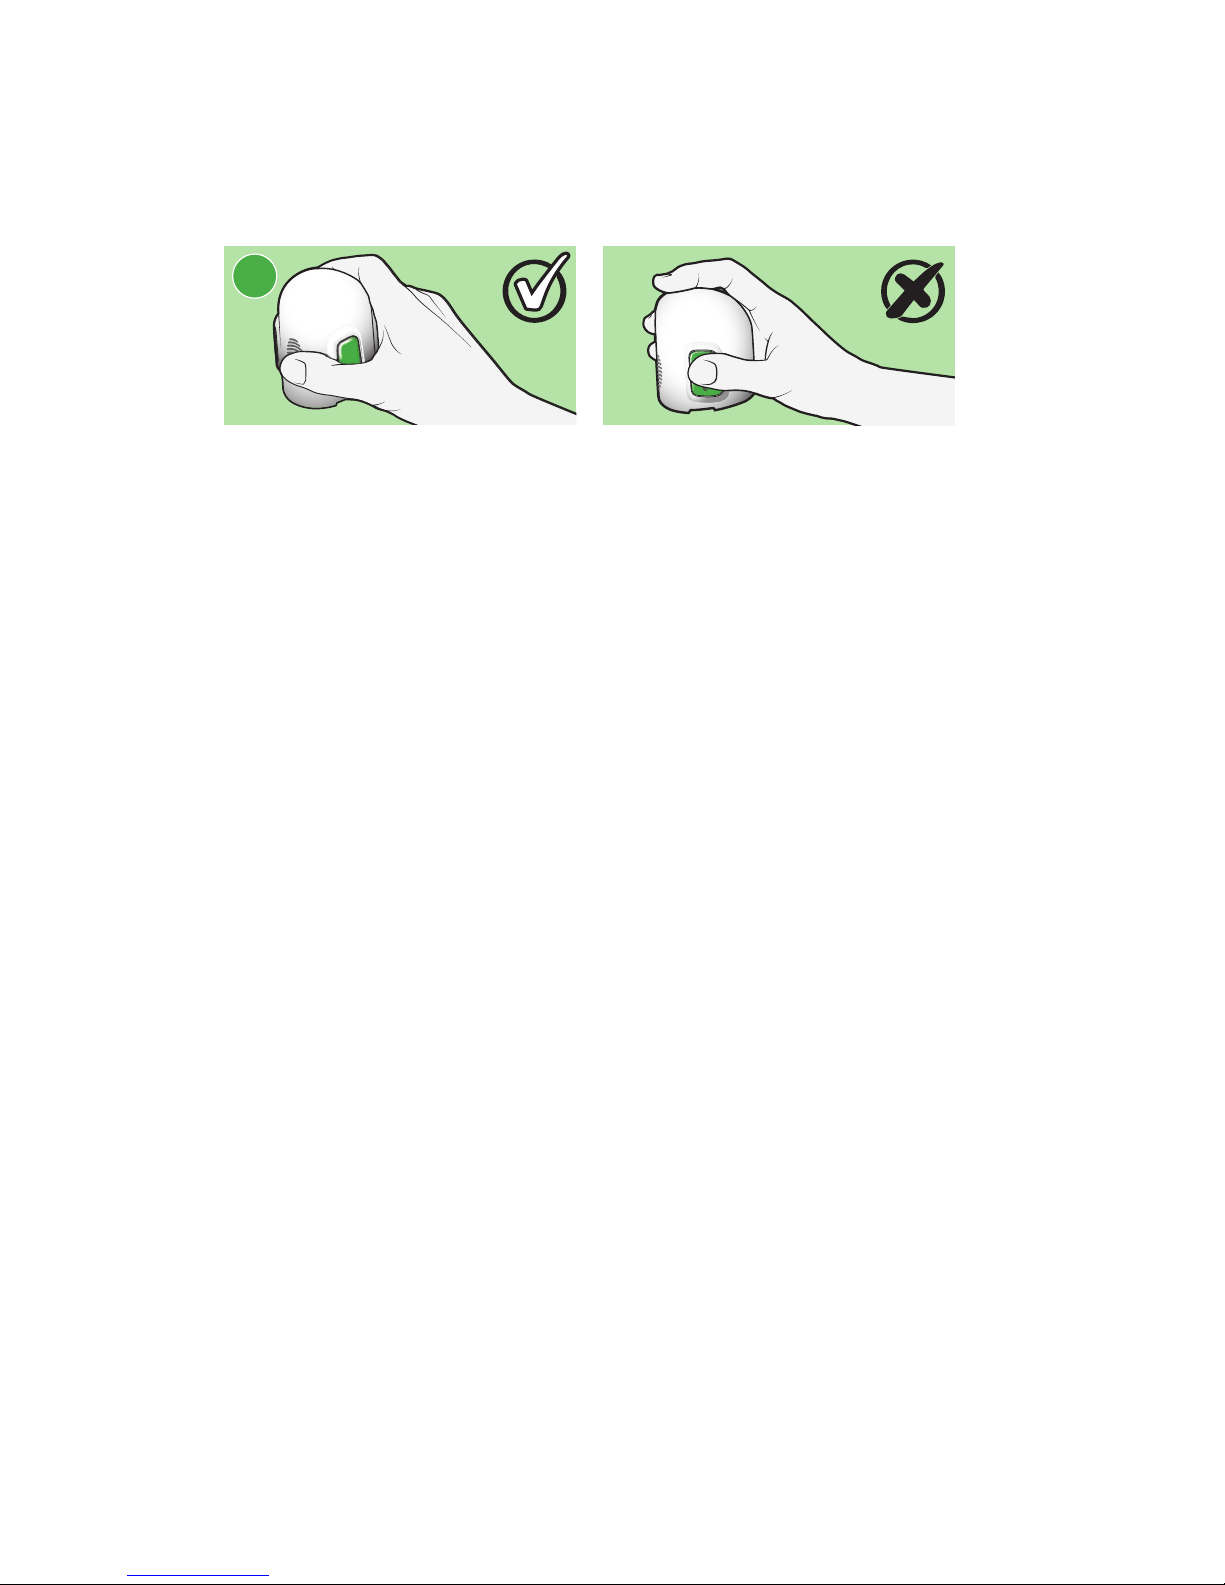
Holding serter incorrectly
Your fingers should not be touching the buttons.
7
-16-
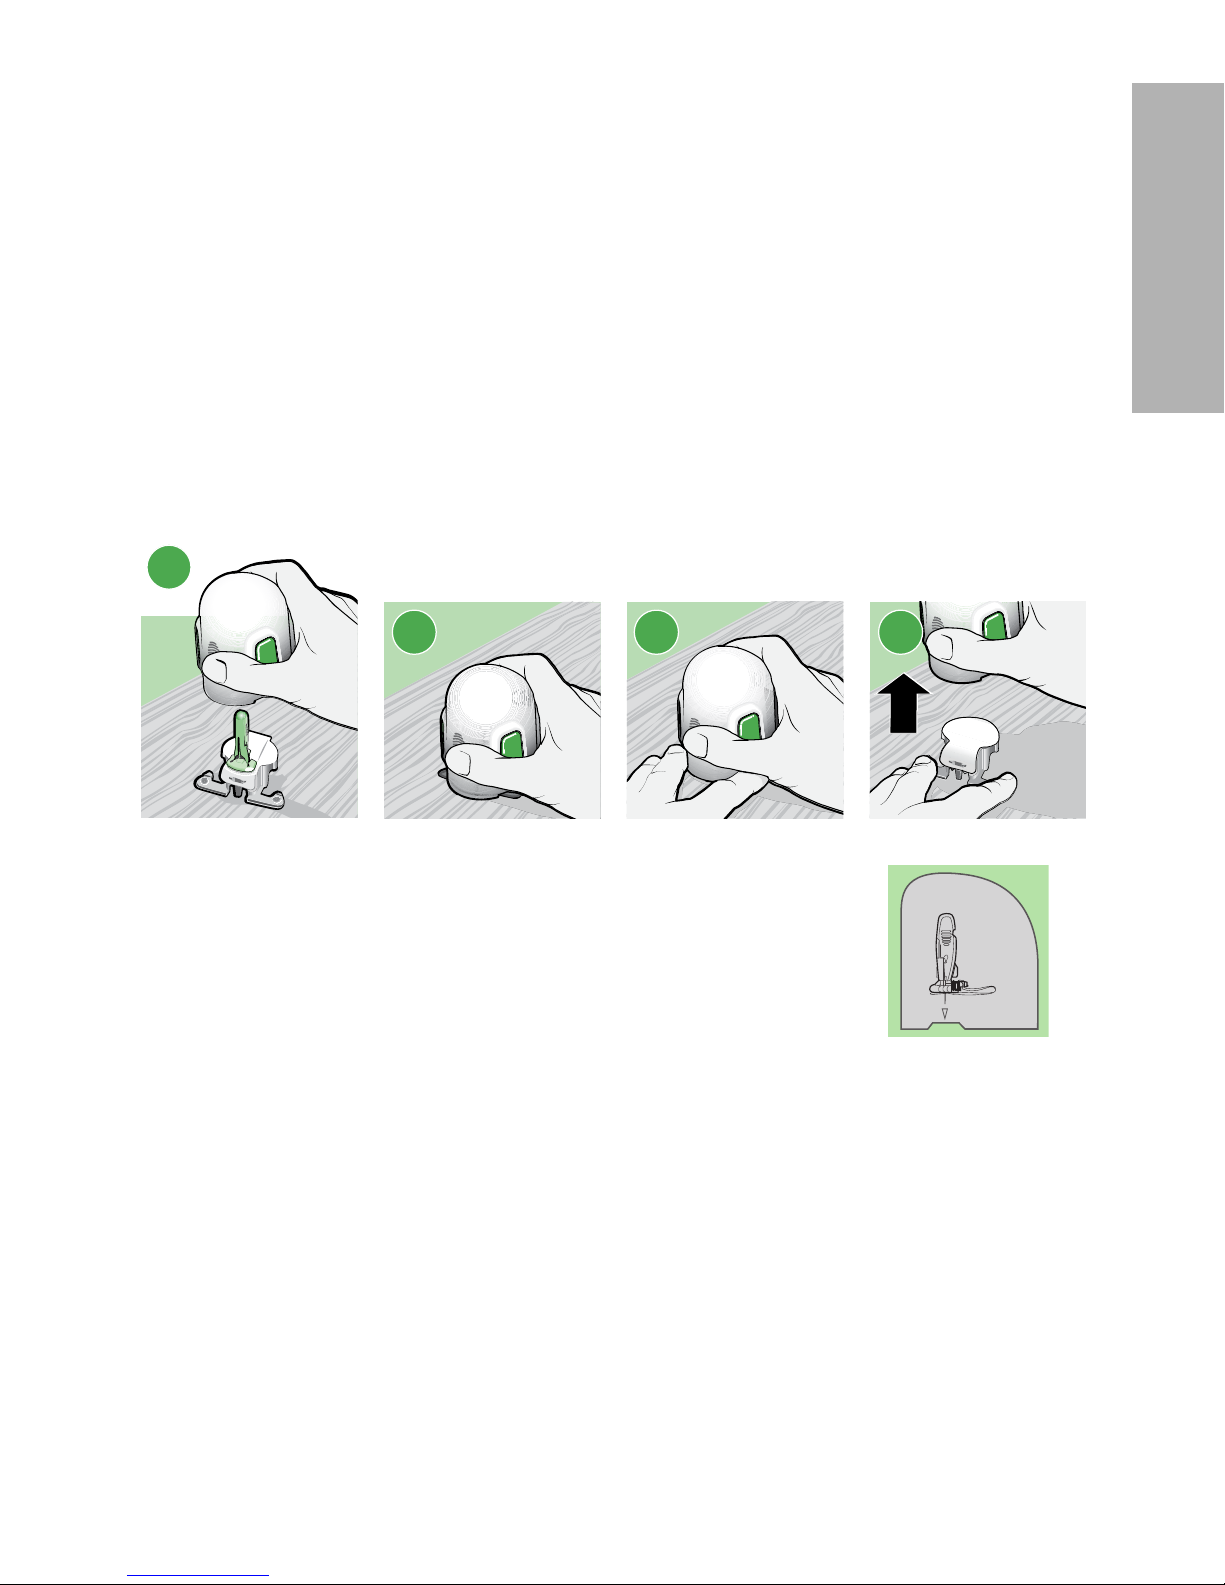
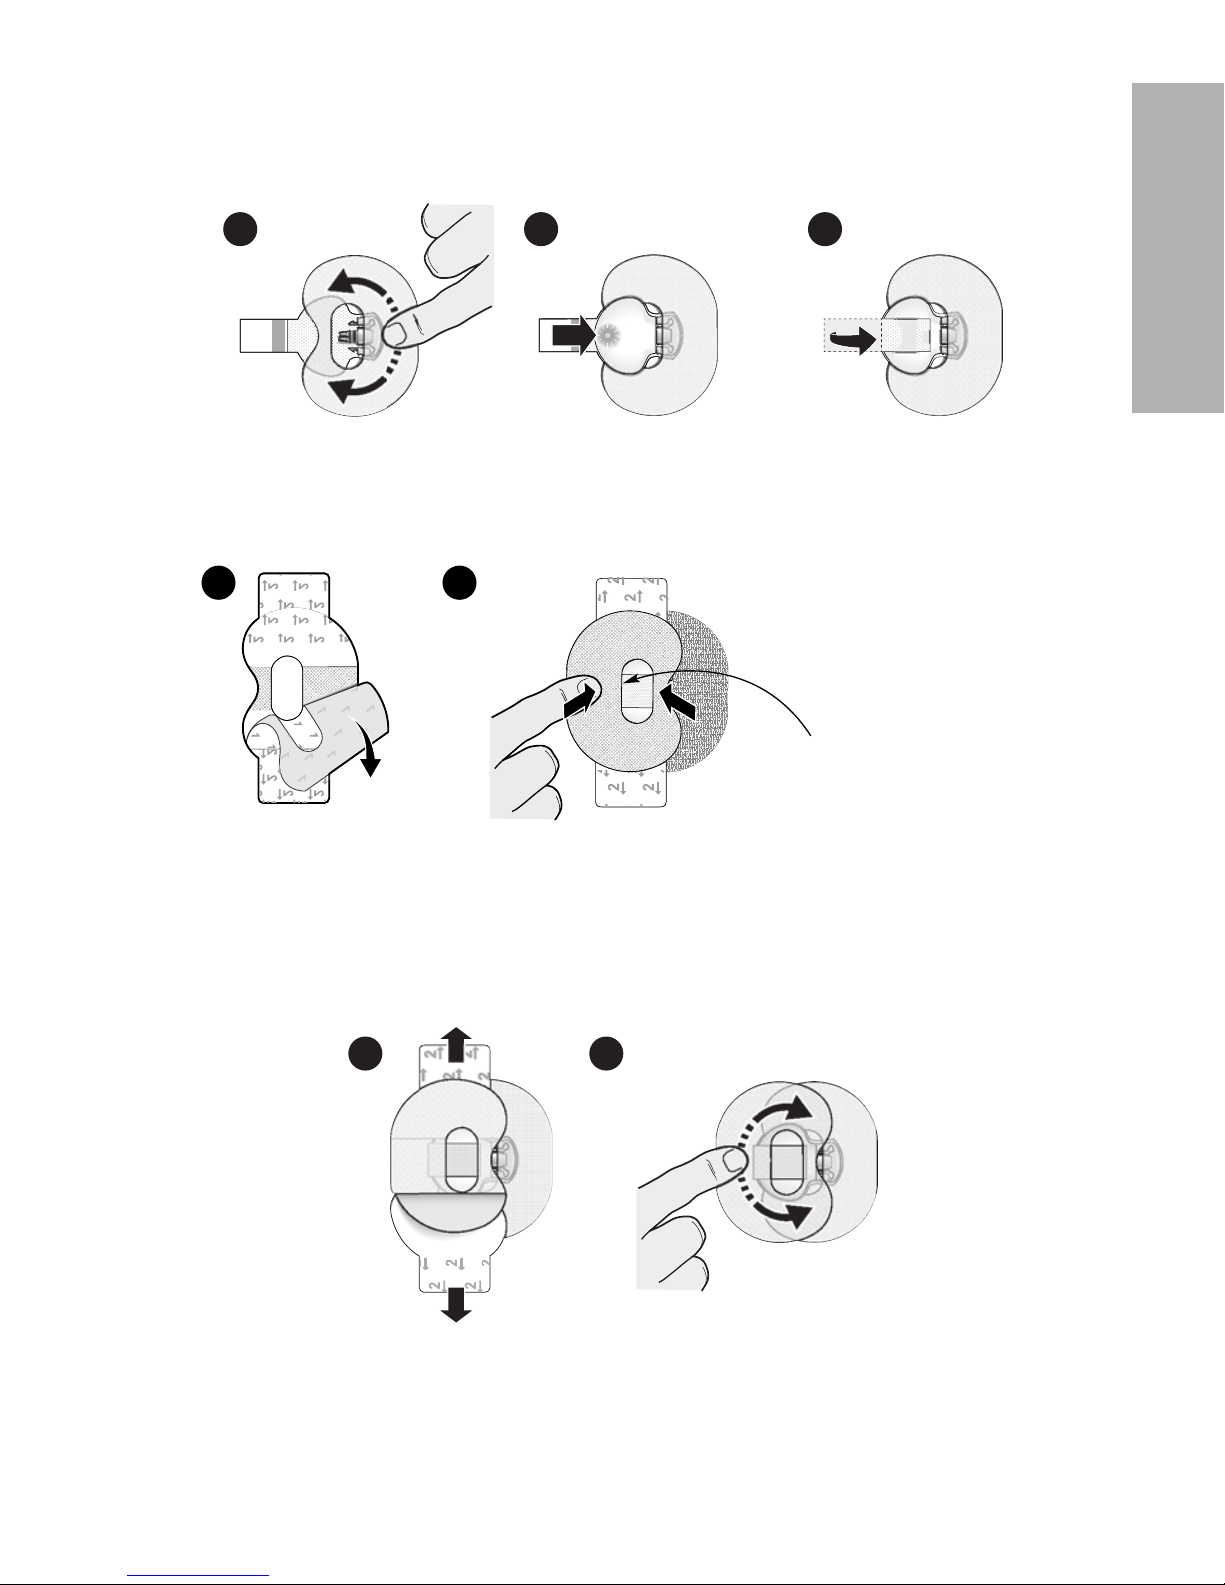
8
a. Grip the serter, placing your thumb on the thumbprint marking, without
holding the buttons.
b. Carefully push the serter down onto the pedestal until the base of the serter
sits flat on the table and you hear a click.
9
a. To detach the serter from the pedestal, place the thumb of one hand on the
thumbprint marking and grip the serter without touching any buttons. With
your other hand, place two fingers on the pedestal arms.
b. Slowly pull the serter straight up without holding the buttons. Do not detach
the pedestal from the serter in midair, as this might damage the sensor.
8a
8b 9a 9b
Note:
The arrow on the side of the serter aligns with the needle inside the serter.
WARNING: Never point a loaded serter toward any body part where
insertion is not desired. An accidental button-push may
cause the needle to inject the sensor in an undesired
location, causing minor injury.
-17-
English
10
a. Hold the serter steady against your cleaned insertion site, without pushing the
serter too deeply into your skin.
Note: Failing to hold the serter securely flat against your body during insertion
may let the serter spring back after pressing the buttons, and result in
improper insertion of the sensor.
b. Press the bump on both buttons at the same time, while holding the serter flat
against your body.
c. Release the bump on both buttons at the same time, while holding the serter flat
against your body.
d. Continue holding the serter flat against your body for at least five seconds to let
the adhesive stick to your skin.
e. Slowly lift the serter away from your body, making sure that the buttons are not
pressed.
10b10a 10c 10d 10e
11 If you inserted the sensor into yourself, complete step 11a. If you are a healthcare
professional or caregiver who inserted the sensor into a patient, complete step 11b.
11a
Patient:
a. Gently hold the sensor base against the skin at
the sensor connector and the opposite end of sensor base. Hold the needle housing at the top and
slowly pull straight out, away from the sensor.
OR
-18-
11b
Healthcare professional or caregiver:
b. Wrap sterile gauze around the sensor (as shown
in image 11b). Gently hold the sensor base against
the skin at the sensor connector and the opposite
end of sensor base. Hold the needle housing at the
top and slowly pull straight out, away from the sensor.
WARNING: Watch for bleeding at the insertion site. If bleeding occurs under,
around, or on top of the sensor, apply steady pressure using
sterile gauze or a clean cloth placed on top of the sensor for up to
three minutes. The use of unsterile gauze can cause an infection. If
bleeding does not stop, remove the sensor and apply steady
pressure until the bleeding stops.
Note: Medtronic adhesives are pressure-sensitive. Pressing the adhesive
against the skin ensures that the sensor remains adhered to the skin
throughout the wear period.
Note:
After insertion, use of adhesive products such as Skin Tac
™
in addition to
the tape is optional. If optional adhesive products are used, apply to the
skin under the adhesive pad prior to removing the liner. It can also be
applied to the adhesive pad or the skin around the sensor base. Allow for
product to dry.
-19-
English
12
a. Hold the sensor in place and gently remove the adhesive liner from under the
adhesive pad. Do not remove the adhesive liner from the rectangular adhesive
tab. This tab will be used to secure the transmitter in a later step.
b. Firmly press the adhesive pad against the skin to make sure that the sensor
remains adhered to the skin.
13
a. Untuck the adhesive tab from under the connector.
b. Straighten the sensor adhesive tab so that it lies flat against the skin.
12a 12b 13a 13b
Applying oval tape
1
Remove the liner marked 1.
2
Apply the tape as shown and press down firmly.
3
Remove the liner marked 2 from each side.
1 2 3
Wide part of tape covers
half of sensor base.
4 Smooth the tape.
5
Connect the transmitter to the sensor.
Note: Wait for the green light on the transmitter to flash. If the green light does not
flash, see Troubleshooting, on page 56.
6
Cover the transmitter with the adhesive tab.
-20-
Note: Do not pull the tab too tightly.
4 5 6
7 To apply a 2nd tape, remove the liner marked 1.
8
Apply the 2nd tape in the opposite direction to the first tape and place it on the
transmitter. Press down firmly.
7 8
Wide part of tape covers end of
the transmitter and also the skin.
9 Remove the liner marked 2 from each side.
10
Smooth the tape.
Note: Be sure to regularly check your sensor site. If the device is not secure,
apply an additional off–the–shelf adhesive.
9 10
-21-
English

Reagents
The sensor contains two biological reagents: glucose oxidase, and human serum albumin
(HSA). Glucose oxidase is derived from Aspergillus niger and manufactured to meet
industry requirements for extraction and purification of enzymes for use in diagnostic,
immunodiagnostic, and biotechnical applications. The HSA used on the sensor consists
of purified and dried albumin fraction V, derived from pasteurized human serum which is
cross-linked via glutaraldehyde. Approximately 3 μg of glucose oxidase and
approximately 10 μg of HSA are used to manufacture each sensor. HSA is approved for
IV infusion in humans at quantities much larger than in the sensor.
Storage and handling
CAUTION: Do not freeze the sensor, or store it in direct sunlight, extreme
temperatures, or humidity. These conditions may damage the sensor.
Only store sensors at room temperature between 36 °F to 80 °F (2 °C to 27 °C).
Discard sensor after the “Use by date” indicated on the label, if the package is damaged,
or the seal is broken.
Connecting the transmitter to the sensor
To connect the transmitter to the sensor:
1
After the sensor is inserted, see Applying oval tape, on page 20 for details on
applying the required tape before connecting the transmitter.
2
Hold the rounded end of the inserted sensor to prevent it from moving during
connection.
3
Hold the transmitter as shown. Line up the two notches on the
transmitter with the side arms of the sensor. The flat side of the
transmitter should face the skin.
4
Slide the transmitter onto the sensor connector until the sensor
arms snap into the notches on the transmitter. If the transmitter
is properly connected, and if the sensor has had enough time to
become hydrated, the green light on the transmitter will flash 6
times.
Note: If the transmitter does not flash, see Troubleshooting, on page 56.
5
When the transmitter light flashes green after connecting to the sensor, use the app
to start the sensor, follow the prompts on the app to select new or existing sensor.
-22-

6 Attach the adhesive tab of the sensor to the
transmitter.
7
For instructions on how to apply a second tape, see
Applying oval tape, on page 20.
Completing your app setup
Continue to follow the on-screen instructions to enable
notifications and setup alerts. For more information, see
Alert settings, on page 36.
WARNING:
You must allow notifications for the Guardian Connect app during
setup. Also, do not turn off notifications for the Guardian Connect
app in your mobile device settings. If notifications are off, you will
not receive any alerts (including the Urgent Low glucose alert)
even if the audio override feature is on.
-23-
English
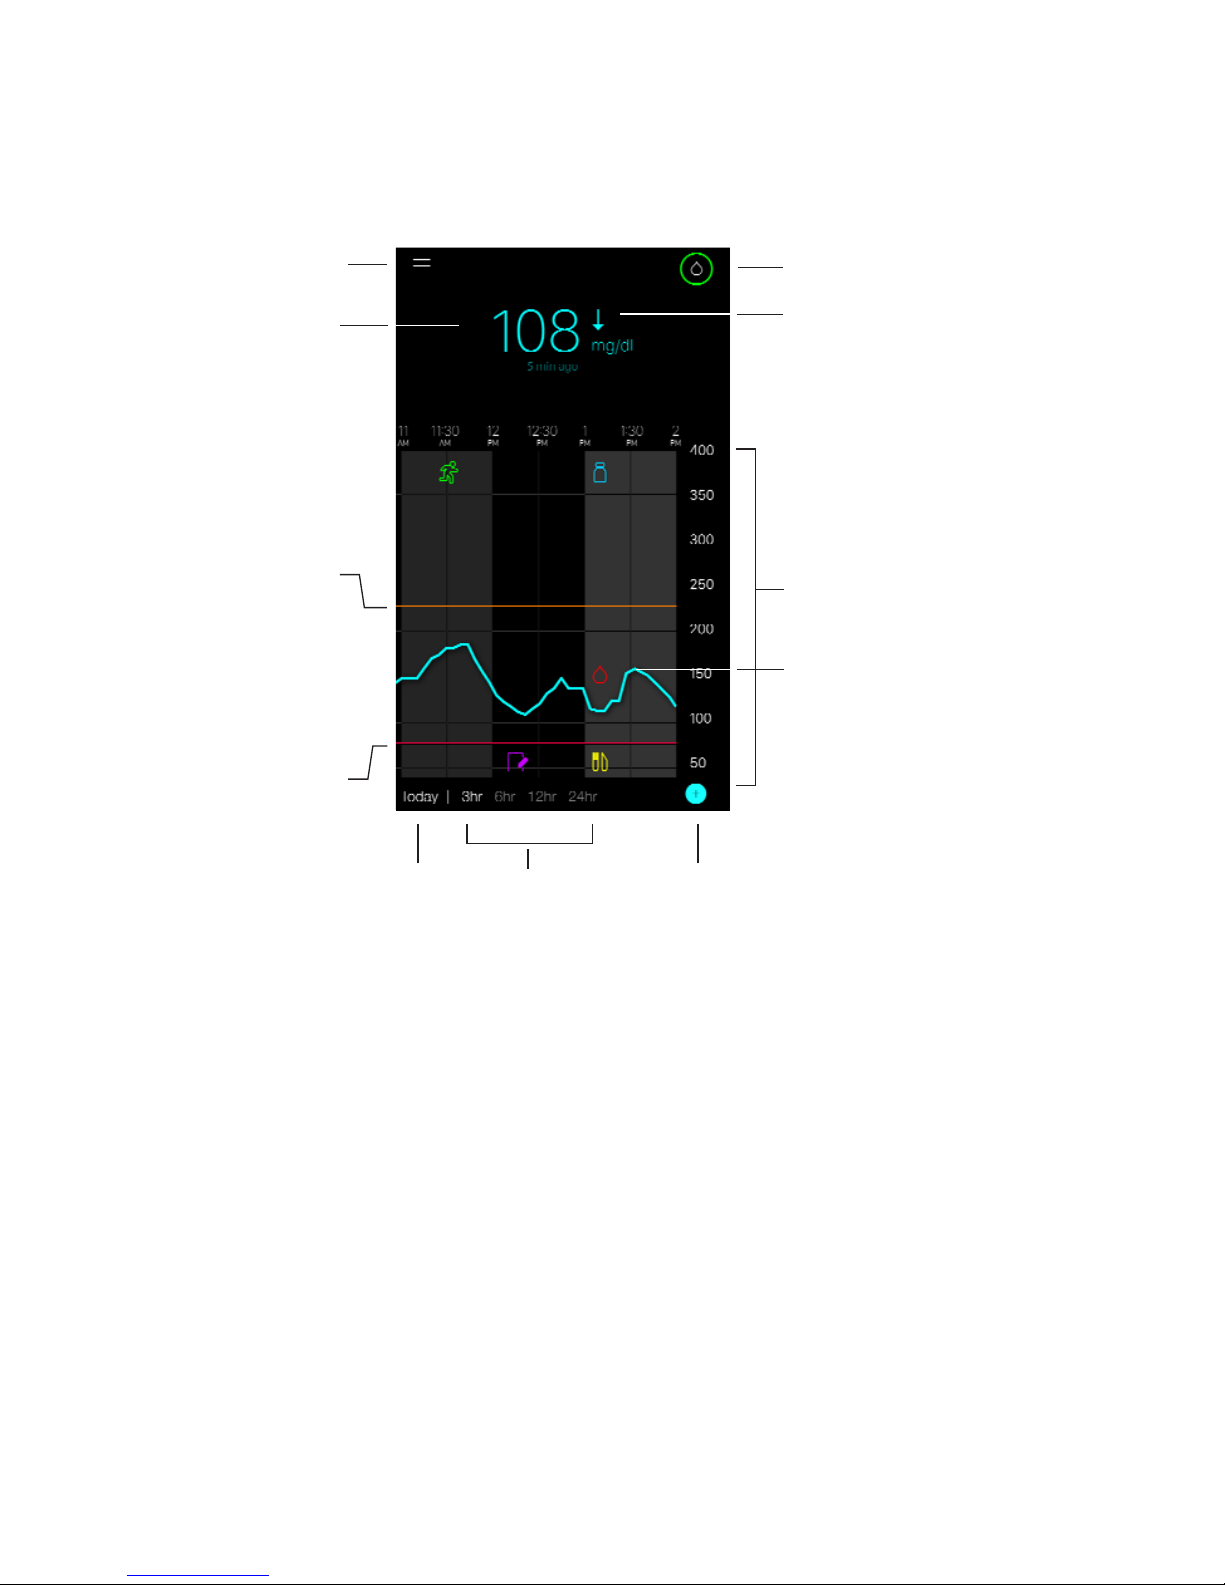
Home screen
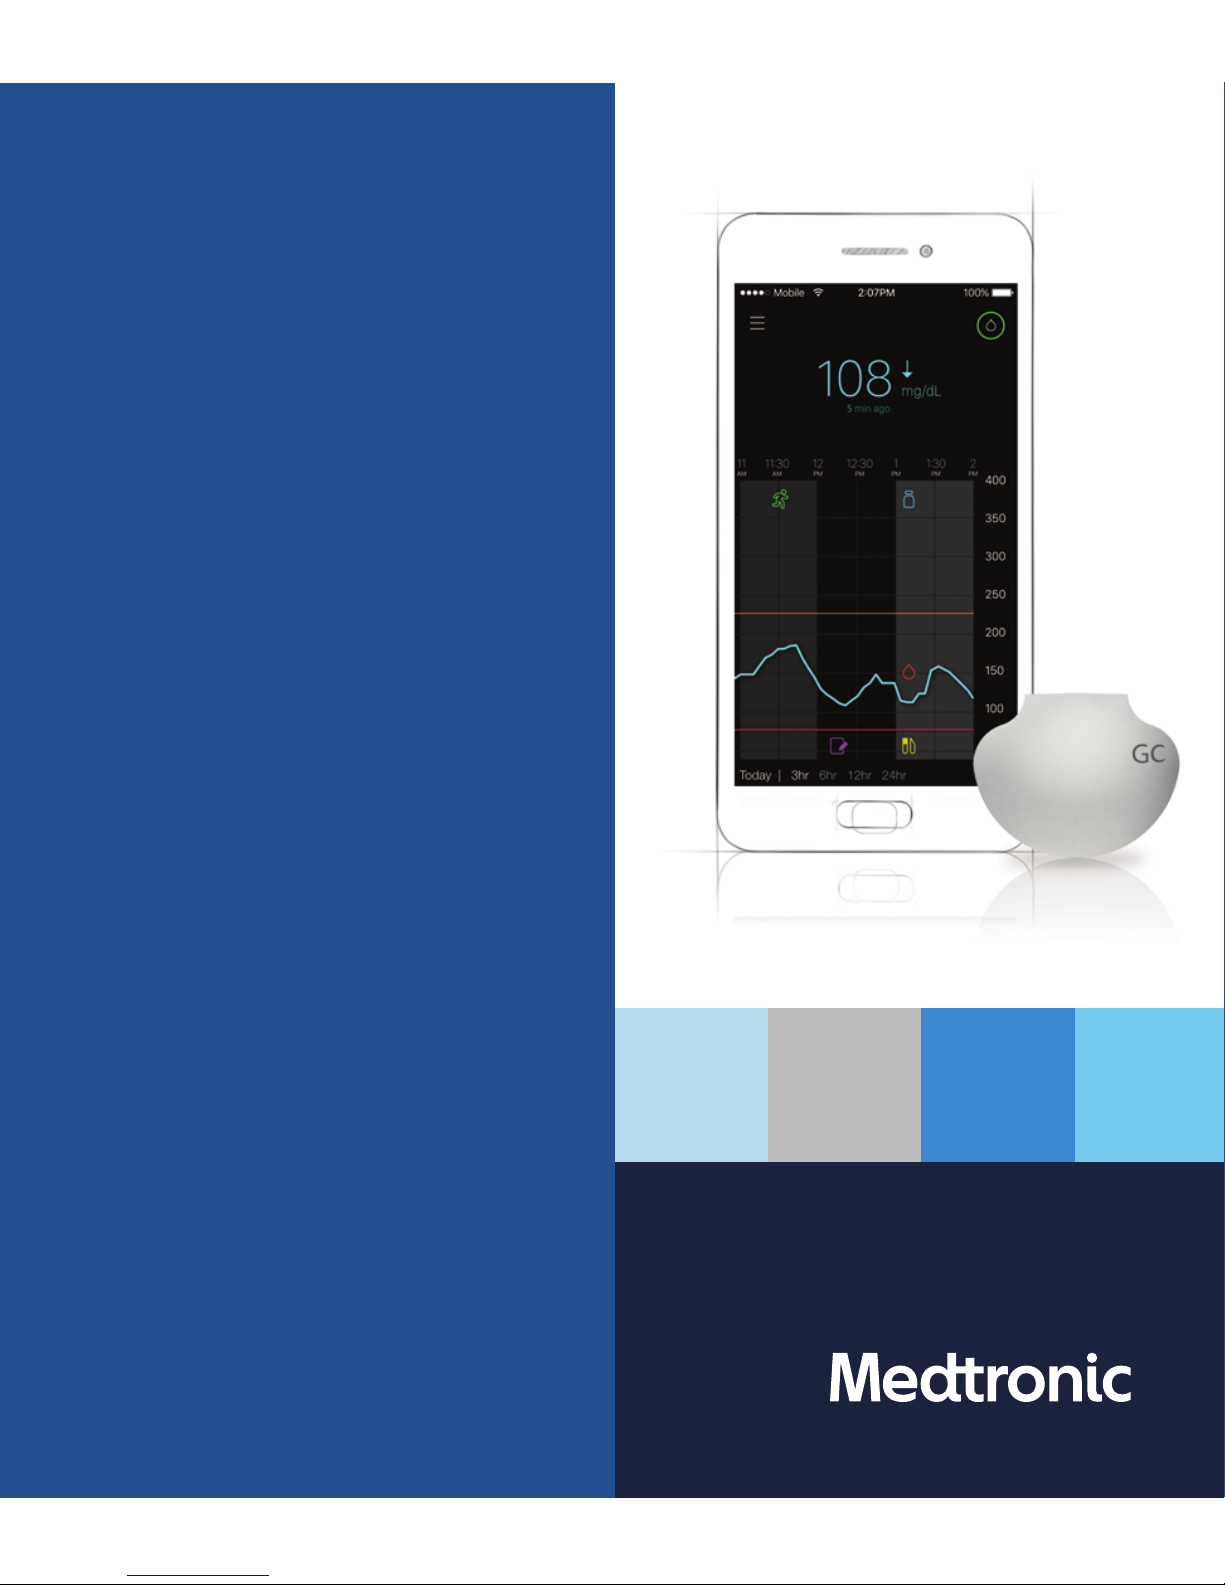
The following figure shows the Home screen of the app.
calibration
day indicator
add event
time
interval
low sensor
glucose
alert limit
high sensor
glucose
alert limit
continuous sensor
glucose trace
sensor glucose graph
rate of change arrow
menu screen
current sensor
glucose reading
Note: When you open your app for the first time, there will be no sensor information
displayed on the Home screen. Your first sensor glucose reading appears after
you have successfully paired your transmitter and calibrated your sensor.
-24-
 Loading...