

Page 1

Bravo
TM
Reflux Testing System
User Guide
DOC-4009-04
Page 2

Page 3

Table of Contents
Table of Contents
Introduction......................................................................................................... 1
Description ............................................................................................. 1
Two Capsule Types ................................................................................ 1
Indications for Use ................................................................................. 1
Contraindications ................................................................................... 2
Warnings and Precautions ...................................................................... 2
Intended Use Environment ..................................................................... 3
Storage ................................................................................................... 3
Electromagnetic Compatibility .............................................................. 3
Patient Information (Benefits and Risks) ............................................... 4
System Components for Capsule–pH Calibration Not Required ........... 5
System Components for Capsule–pH Calibration Required .................. 6
System Workflow .................................................................................. 8
Bravo pH Recorder ............................................................................................. 9
Description ............................................................................................ 9
Backlight ................................................................................................ 9
Patient Buttons ..................................................................................... 10
Clinician Buttons and Menus ............................................................... 11
Status LED ........................................................................................... 12
General Guidelines ............................................................................... 12
Charging the Recorder ......................................................................... 12
Turning the Recorder On and Off ........................................................ 13
Setting the Date and Time .................................................................... 13
Choosing Study Settings ...................................................................... 14
Performing a Bravo pH Study without pH Calibration .................................... 16
Preparing the Delivery Device ............................................................. 16
Setting up the Vacuum ......................................................................... 18
Starting Recording ............................................................................... 19
Placing the Capsule .............................................................................. 20
Stopping a pH Study ............................................................................ 25
Performing a Bravo pH Study with pH Calibration ......................................... 26
Calibrating Capsules ............................................................................ 26
Setting up the Vacuum ......................................................................... 32
Starting Recording ............................................................................... 33
Placing the Capsule .............................................................................. 34
Stopping a pH Study ............................................................................ 38
Reviewing Instructions with Patients ............................................................... 39
Bravo Reflux Testing System i User Guide
Page 4

Table of Contents
Uploading pH Data ........................................................................................... 41
Recorder Maintenance ...................................................................................... 42
Safety and Technical Checks ............................................................... 42
Cleaning the Recorder .......................................................................... 42
Cleaning the Case and Strap ................................................................ 42
Servicing the Battery ............................................................................ 42
Troubleshooting ................................................................................................ 43
Delivery Device Disassembly Procedure ............................................. 43
Recorder Troubleshooting .................................................................... 45
Appendix A: Technical Data ............................................................................ 48
Bravo Recorder .................................................................................... 48
Recorder Servicing ............................................................................... 49
USB Cable ........................................................................................... 49
Charger ................................................................................................ 49
Battery ................................................................................................. 49
Essential Performance of Bravo Recorder ........................................... 49
Electromagnetic Compatibility Declaration (EN / IEC 60601-1-2) .... 50
Bravo Capsule Specifications .............................................................. 54
Bravo Delivery Device Specifications ................................................. 54
Appendix B: Symbols on Package Labeling .................................................... 55
Bravo Reflux Testing System ii User Guide
Page 5

Introduction
Description
The BravoTM Reflux Testing System is intended to be used for gastroesophageal
pH measurement and monitoring of gastric reflux:
• First, the Bravo recorder (an ambulatory, programmable data recorder) and the
delivery device containing the Bravo capsule are prepared.
• Following either endoscopy or manometry, a Bravo capsule is positioned and
attached in the patient’s esophagus using the delivery device.
• The data is collected by the capsule and transmitted to the recorder for the duration
of the study.
• The data is then uploaded from the recorder to the software application on the PC or
workstation. The software application is used to record, store, view, and analyze
gastroesophageal pH data, enabling physicians to interpret study results.
Two Capsule Types
There are two types of Bravo capsules that can be used with the Bravo Reflux Testing
System:
• capsule–pH calibration not required: this capsule does not require any pH
calibration. This capsule does not have a soaker bulb. It works only with the colored
recorder (not the white recorder or the black receiver). The data it collects can only
be viewed and analyzed with Reflux software version 6.1 or later.
• capsule–pH calibration required: this capsule requires pH calibration. This capsule
has an attached soaker bulb that needs to be removed before pH calibration. The
capsule works with all versions of the recorder. The data it collects can be viewed
and analyzed with AccuView 5.2 or Reflux software version 6.0 or higher.
Indications for Use
The Bravo Monitoring System is intended to be used for gastroesophageal pH
measurement and monitoring of gastric reflux in adults and children from 4 years of age.
The Bravo capsule can be attached following either endoscopy or manometry. The Reflux/
Accuview software application is intended to record, store, view, and analyze
gastroesophageal pH data.
Bravo Reflux Testing System 1 User Guide
Page 6

Contraindications
!
Patients with bleeding diathesis, strictures, severe esophagitis, varices, obstructions,
pacemakers or implantable cardiac defibrillators are contraindicated.
Warning
Patients are restricted from undergoing an MRI study for 30 days from
the start of a pH study. The Bravo Reflux Testing System is not
compatible for use in an MRI magnetic field. Use of the Bravo Reflux
Testing System in an MRI magnetic field will result in damage to the
system and possible patient injury.
Warnings and Precautions
• Bravo pH capsule with delivery device: Potential complications include, but are
not limited to:
• aspiration of the capsule if inadvertently pulled back up into the upper
esophagus by the delivery device. There is a possibility that this may occur in a
procedure in which the capsule did not attach to the esophageal mucosa.
• tears or perforations in the mucosal and submucosal layers of the esophagus
causing bleeding and requiring possible medical intervention.
• gastrointestinal endoscopy: Potential complications include, but are not
limited to: perforation, hemorrhage, aspiration, fever, infection, hypertension,
respiratory arrest, and cardiac arrhythmia or arrest.
• nasal intubation: Potential complications include, but are not limited to: sore
throat, discomfort, and nasopharyngeal damage resulting in bleeding and soft
tissue damage.
• Bravo pH capsule: Potential complications include, but are not limited to:
• pain or discomfort (including chest pain) associated with the capsule, failure of
the capsule to detach from the esophagus, or failure to attach the capsule to the
esophagus, which may necessitate intervention with upper endoscopy.
• premature detachment of the capsule.
• The safety and efficacy of the Bravo pH capsule with delivery device has not been
established for pediatric use on patients below the age of 4.
• The Bravo pH capsule with delivery device is a single-use, disposable device. Reuse
or any other misuse of a Bravo pH capsule with delivery device (such as sharp
bending or kinking) results in an increased potential for damage to the delivery
device and capsule, and possible patient injury.
• Prior to use, all equipment for the pH study should be examined carefully to verify
proper function.
• Unauthorized maintenance by inadequately trained personnel would result in an
unacceptable risk (e.g., excessive temperatures, fire, or explosion).
Bravo Reflux Testing System 2 User Guide
Page 7

• A thorough understanding of the technical principles, clinical applications and risks
associated with the Bravo recorder is necessary before using this product. Read the
entire manual before using the system for the first time.
• No modification of this equipment is allowed.
• Patients are restricted from undergoing an MRI study within 30 days of the pH
study.
• The Bravo capsule contains a trocar needle that is made of stainless steel. Use
caution in patients with known sensitivities or allergies to the metals that are
contained including chromium, nickel, copper, cobalt, and iron. Tests last from 48 to
96 hours.
• Prior to the pH study, the patient should not eat or drink for a minimum of 6 hours.
• If excretion of the Bravo pH capsule from the patient has not been positively
verified, and the patient develops unexplained postprocedure abdominal pain,
vomiting, or other symptoms of obstruction, the patient should contact the physician
for evaluation and possible abdominal X-ray.
• Undergoing an MRI while the Bravo pH capsule is inside the patient’s body may
result in serious damage to the patient’s intestinal tract or abdominal cavity. If the
patient did not positively verify the excretion of any Bravo pH capsule, the patient
should contact the physician for evaluation and possible abdominal X-ray before
undergoing an MRI examination.
Intended Use Environment
Hospital, clinic, gastroenterology center and home environment.
Storage
Store all components in a controlled room temperature environment:
• capsules at 15–45 °C (59–113 °F)
• recorder at 0–40 °C (32–104 °F)
Electromagnetic Compatibility
Electrical equipment for medical use requires special electromagnetic compatibility
(EMC) precautions and should be installed and serviced according to the documentation
of device. Portable and mobile communication equipment can affect electrical equipment
for medical use. For additional information on electromagnetic compatibility, see
Electromagnetic Compatibility Declaration (EN / IEC 60601-1-2) on page 50.
Bravo Reflux Testing System 3 User Guide
Page 8

Patient Information (Benefits and Risks)
Benefits
Bravo Reflux Testing System provides a more tolerable and convenient way to
evaluate your reflux symptoms when compared to catheter-based pH monitoring
systems.
The capsule is temporarily attached to the wall of your esophagus. The capsule
transmits pH information wirelessly to a small recorder that you wear. Data can be
transmitted approximately 2 meters (6 feet), which means that you can take the
recorder off to shower and sleep without interrupting the test.
You can engage in your usual activities during the test, which can provide your
doctor with a more accurate picture of your acid exposure compared to data collected
using catheter-based systems.
Risks
The Bravo pH test is not for everyone. If you have bleeding diathesis, strictures,
severe esophagitis, varices, obstructions, a pacemaker, or an implantable cardiac
defibrillator, you should not undergo a Bravo pH test.
Potential complications include, but are not limited to, the following events:
• perforation
• premature detachment of the pH capsule
• failure of the pH capsule to detach from the esophagus within several days after
placement or discomfort associated with the pH capsule, requiring endoscopic
removal
• tears in the mucosal and submucosal layers of the esophagus, causing bleeding
and requiring possible medical intervention
Potential complications associated with gastrointestinal endoscopy include:
• perforation or hemorrhage
• aspiration
• fever or infection
• hypertension
• respiratory arrest
• cardiac arrhythmia or arrest
Note
All pH testing procedures carry some risks. This information should not
be used as a substitute for talking with your doctor about diagnosis and
treatment.
Bravo Reflux Testing System 4 User Guide
Page 9

System Components for Capsule–pH Calibration Not Required
2
1
3
4
5
6
7
The Bravo Reflux Testing System consists of the following items:
1 Bravo pH recorder (referred to as recorder in this user guide)
2 case and shoulder strap
3 USB cable
4 charger
5 Reflux software (version 6.1 or higher), delivered separately either on media or
pre-installed on a bundled PC workstation (referred to as PC in this user guide)
6 Bravo pH capsule with delivery device (referred to as capsule in this user guide)
7 vacuum pump (the legal manufacturer of this item is: Medela AG, Baar,
Switzerland)
Bravo Reflux Testing System 5 User Guide
Page 10

System Components for Capsule–pH Calibration Required
The Bravo Reflux Testing System consists of the following items:
1 Bravo pH recorder (referred to as recorder in this user guide)
2 case and shoulder strap
3 USB cable
4 charger
5 Reflux software, delivered separately either on media or pre-installed on a
bundled PC workstation (referred to as PC in this user guide)
6 Bravo pH capsule with delivery device (referred to as capsule in this user guide)
7 vacuum pump (the legal manufacturer of this item is: Medela AG, Baar,
Switzerland)
8 pH 1.07 and pH 7.01 calibration buffer solutions
9 calibration stand
10 sterile water (to be supplied by the user)
Bravo Reflux Testing System 6 User Guide
Page 11

2
1
3
4
5
6
7
8
9
Bravo Reflux Testing System 7 User Guide
Page 12

System Workflow
When using the Bravo Reflux Testing System, you follow this general workflow:
1 Setting up the recorder: this includes charging the battery, setting the date and
time, and defining the default settings for studies. You only need to do it once
(though values can be changed later as needed). See Setting the Date and Time on
page 13.
2 Performing a procedure: this includes preparing the delivery device and placing
the capsule in the patient. If you are using the
see Performing a Bravo pH Study without pH Calibration on page 16. If you are
using the capsule–pH calibration required, see Performing a Bravo pH Study with
pH Calibration on page 26.
capsule–pH calibration not required,
3 Instructing the patient: this includes reviewing information about the study with
the patient, such as instructions on using the recorder and filling out the patient
diary. See Performing a Bravo pH Study with pH Calibration on page 26.
4 Data upload: this includes transferring the study data from the recorder to the PC
for analysis in the application software at the end of the study duration. See
Uploading pH Data on page 41.
You must also become familiar with the basic workings of the recorder, including normal
maintenance functions such as recharging and cleaning. See Bravo pH Recorder on page 9
and Recorder Maintenance on page 42.
Bravo Reflux Testing System 8 User Guide
Page 13

Bravo pH Recorder
on/off button
LCD screen
symptom
buttons
recorder
status LED
Figure 1. Bravo recorder, front
view.
case
Description
The Bravo pH recorder is
lightweight and compact. It
fits into a case that comes
with a strap and a belt clip.
Patients wear the recorder
(over the shoulder or
attached to a belt)
throughout the study period.
There are two different
models of the recorder. The
white recorder supports
capsules that require
calibration. The colored
recorder supports capsules
that do not require
calibration. Both recorder
models have similar settings and the same patient user interface.
Backlight
The recorder has a backlit LCD screen and a row of symptom buttons. The backlight turns
off automatically (select the backlight duration in Preferences). Pressing any key turns on
the backlight. Only when the backlight is on can any of the recorder functions be used (for
example, menu access for recorder setup, or symptom buttons for patient use).
Bravo Reflux Testing System 9 User Guide
Page 14
Patient Buttons
3
meal
supine
heartburn*
regurgitation*
chest pain*
* The default values of these buttons can be
set in the software application.
regurgitation icon
Figure 3. Regurgitation symptom icon as it
appears on the recorder screen
before and after pressing the
button.
after pressing button
When the recorder is placed in the case and is in record mode (that is, during a study), the
on/off button and USB port are covered. The patient can use the three symptom buttons
(Chest Pain, Regurgitation, and Heartburn) and the two event buttons (Meals and Supine)
to record events during a study (see Figure 2).
Figure 2. Symptom and event buttons.
During a study, the patient pushes
any button to turn on the backlight.
Once the backlight is on, pressing
a symptom button causes a beep to
occur, the button’s LED to light up
briefly, and its icon is inverted
briefly on the screen (see
Figure 3). If the button is one of
the event buttons, a beep occurs
and the button’s LED starts
blinking, indicating the event’s
start time. The blinking continues until the patient presses the button again when the event
ends. (That is, the patient presses any button to first turn on the backlight, and then presses
the event button to signal the end of the event.)
Note
Meal and Supine buttons can be used for patient input during the
study.
Bravo Reflux Testing System 10 User Guide
Page 15

Clinician Buttons and Menus
You, the clinicians, have access to the menu to program the recorder for a study. The main
menu appears after the welcome screen when the recorder is turned on.
While in the menu, you use the symptom buttons to navigate. The buttons have different
meanings depending on the screen. For example, you may be prompted to press
Skip, Cancel, etc. The recorder screen shows an arrow pointing to the appropriate button:
Escape/back. Goes back (returns to previous level in the menu).
For the purpose of this document, ESC is used to indicate either escape/back
button.
Escape/back: same functionality as the above.
In addition, it is also used to set the date and time.
For the purpose of this document, ESC is used to indicate either escape/back
button.
Scroll. Moves to the next option for a setting.
Enter/next. Saves the settings on that screen and returns to the previous location
in the menu.
For the purpose of this document, Enter is used to indicate either Enter/next
button.
Enter/next: same functionality as the above.
For the purpose of this document, Enter is used to indicate either Enter/next
button.
Yes, No,
Note
Instructions are provided using the name of the function (such as Yes).
The corresponding physical button for the action varies, so always refer
to the recorder screen to see which buttons are used.
The Settings menu is not accessible once recording has started.
Bravo Reflux Testing System 11 User Guide
Page 16

Status LED
There is a small LED below the symptom buttons. The LED
indicates the capsule transmission status and the state of the
recorder by the color and duration or frequency of the flash.
LED Status Meaning
off (no light)
blinking blue
blinking red
steady red
steady green
steady green
steady orange
Not recording any capsule transmissions. Data
from previous study has been uploaded.
Receiving transmission from the paired capsule
(recording).
A transmission error has occurred.
Recorder is upgrading or has not turned on
correctly.
Study completed but data has not yet been
uploaded to the software application.
Data is being uploaded.
(Applicable to capsule–pH calibration
required, only) User pressed OK after
Calibration completed message was
displayed.
General Guidelines
When working with the recorder:
• All values in Settings (for example, study duration, number of capsules) and
Preferences (for example, date and time format and interface language) stay in
effect for all studies until you change them.
• Fully recharge the battery before each study (see Charging the Recorder on
page 12).
• Clean the recorder after each study (see Cleaning the Recorder on page 42).
Charging the Recorder
The recorder is delivered with the battery fully discharged. It must be recharged before
using. A fully discharged recorder battery may take up to 7 hours to charge.
• Connect the recorder to the charger and plug it into an electrical outlet, or
• Connect the recorder to a USB cable and connect it to your PC. Do not use this
method for charging more than one recorder simultaneously.
Bravo Reflux Testing System 12 User Guide
Page 17

Turning the Recorder On and Off
Set Date/Time
DD-MM-YY
hh:mm AM/PM
►
1. Press and hold the on/off button (see Description on page 9) for 5 seconds until the
recorder screen turns on.
The recorder automatically performs an internal diagnostic check, which includes
checking the batteries and verifying the time and date.
• The recorder screen displays a brief welcome message showing the software and
hardware versions.
• If the date or time is not available, the recorder automatically displays the screen
to set the date and time.
• If the battery has reached the end of its life, the recorder displays: Recorder
battery needs replacement. Contact customer support.
• If the main battery is low, the recorder displays: Charge battery.
• If date, time, and battery condition is good, the main menu is displayed!
Note
The cursor’s default position shows the next logical step in your
workflow.
2. To turn off the recorder, press and hold the on/off button for 2–3 seconds until Turn
OFF the Recorder?
appears on the recorder screen.
Note
The backlight remains on during the Settings process (and Calibration
process, if applicable).
When recording or the main screen is displayed, the backlight turns off
after the predefined time (default 30 seconds; see Choosing Study
Settings on page 14). Press any key to turn it back on. If you are not
sure if the recorder is turned on, press the on/off button once.
Setting the Date and Time
You must set the date and time the first time you turn on the recorder or if the battery has
fully discharged. Once the date and time are set (and as long as the battery does not fully
discharge), the recorder maintains the correct date and time, even when it is turned off.
However, if the battery was fully discharged before turning the recorder on, the screen will
automatically display the
To set the date and time:
1. The first part of the date (for example, the day field) is
highlighted. Use below the icon displayed on
the screen and ( on the screen) to change it to
the correct date. Press ( on the screen) to move to the next field.
Bravo Reflux Testing System 13 User Guide
Set Date/Time screen.
Page 18

2. Repeat this process for the rest of the date (for example, month and year).
pH Capsules #1
Study Duration: 48hr
Preferences:
►
3. Repeat this process to set the time. When you are done, press
returned to the main menu.
If time and date are correct, press
ESC and return to the main menu.
Choosing Study Settings
1. From the main screen, select Settings. This screen
appears:
2. Set the number of capsules as follows:
a. With the cursor on pH Capsules #1, press
Enter.
b. Use to select the number of capsules.
c. Press
3 Set the study duration as follows:
a. With the cursor on Study Duration, press Enter.
b. Use to select the study duration (24, 48, or 96 hours).
c. Press
Enter. You move on to the next setting: Study Duration.
Enter. You move on to the first screen of the next setting: Show pH
Value
.
Note
At any time you may select Settings from the Main screen and
access Preferences to review and set the parameters.
Enter . You are
4. The
Bravo Reflux Testing System 14 User Guide
Preferences screen allows you to define setting that affect all studies.
• Show pH Value: If Yes, the current pH value appears on the recorder screen
during studies. If No, pH values are only displayed for the first 30 minutes of a
study. The factory default is
• Button Beep: If
Yes, the recorder beeps when the patient presses a symptom
No.
button. The factory default is Yes.
• Capsule LED Blink: If
Yes, the recorder capsule LED blinks when the capsule
signals are received. The factory default is Yes.
• Set Date/Time: Once set, the recorder maintains the correct date and time. You
should only have to change this again if there is a time change (for example,
going on or off of Daylight Savings), or if the recorder battery is allowed to fully
discharge.
Page 19

• Date Format: You can set the date format to MM-DD-YY or DD-MM-YY (factory
default).
• Time Format: You can set the time format to
(military)
(factory default).
12-hour (AM/PM) or 24-hour
• Language: Select the language for the recorder interface. The choices are
English (factory default), Danish, Dutch, Finnish, French, German, Italian,
Norwegian, Portuguese, Spanish, and Swedish.
• Backlight Duration: Set the time that the recorder screen backlight stays on
after a button is pressed. The choices are 15, 30 (factory default), 45, or 60
seconds.
5. To return one level up in the menu tree, press
Note
Once you have set preferences, you do not need to reset them
unless:
• you want to change something, or
• the recorder battery is fully discharged.
ESC.
Bravo Reflux Testing System 15 User Guide
Page 20

Performing a Bravo pH Study without pH Calibration
!
!
The actions of performing the study (testing the vacuum, placing the capsule, and
instructing the patient) should be performed in one continuous sequence as follows.
Note
There are two types of Bravo pH capsules.
• If you are using a capsule–pH calibration not required, follow
this procedure.
• If you are using a capsule–pH calibration required, follow the
procedure Performing a Bravo pH Study with pH Calibration on
page 26.
Warning
If performing a two-capsule procedure, both capsules must be the
same type (requiring pH calibration or not requiring pH calibration).
Preparing the Delivery Device
1. Check the expiration date on the capsule (next to on the label).
2. Without bending or kinking the delivery device, carefully remove the Bravo
delivery device with pH capsule from the external shipping box and then from the
inner pouch (Figure 4).
Caution
Avoid bending or kinking the delivery device. Sharp bending or kinking
can damage the delivery device, which will require the device to be
discarded before use.
Figure 4. Remove Bravo pH capsule with delivery device from pouch.
Bravo Reflux Testing System 16 User Guide
Page 21

3. Remove the capsule’s plastic cover and the magnetic clip (Figure 5). The capsule
Open the plastic cover.
Remove magnetic clip.
automatically turns on when the magnetic clip is removed. Set the magnetic clip
aside.
Note
Keep the magnetic clip at least 2 meters away from the delivery device
so that it will not interfere with the capsule. If a procedure is delayed,
you can replace the magnetic clip on the capsule to return it to an
inactive state until needed. Do not discard the magnetic clip until after
the procedure has been performed.
Figure 5. Remove Bravo pH capsule shipping components.
Note
This capsule type does not have a soaker bulb in the delivery device.
Bravo Reflux Testing System 17 User Guide
Page 22

4. After opening the capsule package, make sure that the capsule trocar needle has not
trocar
needle
suction
chamber
Place finger over
suction chamber.
Remove finger.Connect vacuum
hose.
abc
vacuum
hose
vacuum port
advanced (Figure 6).
Figure 6. Make sure that the trocar needle has not advanced too far into the
chamber.
Setting up the Vacuum
1. Make sure that the vacuum flow knob is turned to maximum.
2. Connect the vacuum hose (supplied with the vacuum pump) to the vacuum port on
the delivery device handle (Figure 7a).
Figure 7. Verify the vacuum function.
3. With your gloved finger covering the suction chamber (Figure 7b), verify that the
vacuum gauge reading is at least 550 mmHg. Make a note of the gauge reading.
Bravo Reflux Testing System 18 User Guide
Page 23

!
Note
At higher altitudes, the pressure
readings may be lower. For
different altitudes, use this table
for the minimum recommended
vacuum pressure. Contact
Medtronic customer support for
additional information.
Altitude
feet meters
0 0 550
2000 610 530
4000 1220 510
6000 1830 490
Minimum
Pressure
mmHg
4. Remove your finger from the suction chamber. Verify that the vacuum gauge
reading drops (Figure 7c) by at least 50 mmHg (500 mmHg or lower).
Caution
If the vacuum readings fail these minimum
levels, remove the delivery device and perform
the same action on the vacuum tube alone:
• Cover the tube with your finger. The
vacuum gauge should read at least
575 mmHg. Remove your finger. The
vacuum gauge should drop drastically (to
zero or close to zero). If so, the vacuum
unit is functioning properly. Perform the
procedure with a different delivery device.
• If the vacuum fails to reach 575 mmHg or
fails to drop to close to zero, the vacuum
unit may require service. Contact
Medtronic customer support.
5. Turn off the vacuum and detach the tubing from the delivery device.
6. Proceed to Starting Recording.
Starting Recording
1. If the recorder is turned off or in sleep mode, turn it on. 3
2. From the main menu, select Start Study and press Enter.
If the recorder detects that existing data from a previous study and has not yet been
uploaded, this message appears:
Cancel and connect to PC.
• To stop and upload the existing data, press Cancel. Follow the directions (see Uploading
pH Data on page 41). When the data is uploaded, start the new study again by selecting
Start Study from the main menu.
• To continue (overwrite the existing data without uploading it), press Next and then press
Yes to confirm that you want to overwrite the last study data.
Bravo Reflux Testing System 19 User Guide
Last study data not uploaded! To upload, press
Page 24

3. The recorder starts searching for the capsule’s signal. This message appears:
Clearing data... and then Waiting for pH capsule 1.
4. When the recorder identifies the capsule, this message appears: Does this pH
capsule ID number match the delivery device number?
• The capsule ID is printed on the packaging label. Capsules–pH calibration not
required
ID. If the ID matches, press
have a 5-digit ID; capsules–pH calibration required have a 4-digit
Yes. If not, press No and the search begins again.
• If the recorder still does not recognize the capsule or displays a capsule
mismatch error message, repeat the procedure. If the problem persists after three
attempts, see Recorder Troubleshooting on page 45.
• For two-capsule studies, the process is repeated.
When capsule/recorder pairing is complete, the recorder automatically starts
recording and the screen displays the symptom buttons (Figure 8).
Figure 8. Recorder screen displaying symptom buttons in Record mode.
5. Verify that the recorder is recording pH values and that the capsule status LED on
the recorder is blinking.
Note
There are 30 minutes to attach the capsule to the patient’s esophagus
before actual pH data starts to record for the configured study time
duration.
6. Proceed to Placing the Capsule.
Placing the Capsule
1. Oral placement of the Bravo capsule can be performed either using:
a. endoscopic measurement: using an endoscope, determine the desired location
for the capsule in the esophagus. Typically, the capsule is placed 6 cm above
the squamo-columnar junction. Measure and record the distance traveled by
the endoscope to the desired location.
b. manometric measurement: using a transnasal manometry catheter, determine
the desired location for the capsule in the esophagus. Typically, the capsule is
placed 5 cm above the proximal aspect of the landmarks (LES). Use a
correction factor of approximately 4 cm to account for the longer pathway that
the manometry catheter has to travel through the nasopharynx.
2. Remove the endoscope or manometry catheter from the patient.
3. With the vacuum off, complete the following steps:
Bravo Reflux Testing System 20 User Guide
Page 25

a. Mark the distance determined in step 1 on the delivery device. The depth
!
!
pH sensor
pH capsule
suction chamber
depth markings
vacuum
hose
markings on the delivery device are indexed from the capsule’s pH sensor
(Figure 9).
b. Carefully advance the delivery device through the mouth (with the capsule
facing the patient’s tongue) to the desired location in the esophagus.
Caution
If lubricants are used to ease placement insertion, do not cover
the suction chamber with lubricant. This could interfere with the
attachment of the capsule.
Figure 9. Capsule depth markings are indexed from pH sensor.
c. Holding the delivery device as straight as possible in a relaxed horizontal
position, stabilize it by the patient’s mouth to make sure that it does not move.
Warning
Do not advance the delivery device into the trachea or lungs.
Advancing the delivery device into the trachea or lungs can cause
possible injury to the patient.
4. Endoscopically check the esophageal inlet to verify the desired placement of the
delivery device in the esophagus. Carefully remove the delivery device immediately
if it has entered the trachea.
5. After proper positioning of the delivery device:
a. Attach the vacuum hose to the handle (Figure 7).
Bravo Reflux Testing System 21 User Guide
Page 26

b. Turn on the vacuum source and verify that the gauge reading is the same as
!
!
!
you noted during vacuum setup.
Caution
If the minimum vacuum level (550 mmHg) is not obtained,
reposition the Bravo delivery device to achieve proper vacuum.
Do not allow the delivery device to move during vacuum level
acquisition. Failure to immobilize the delivery device can result in
less than optimal attachment or non-attachment that will require the
vacuum level acquisition process to be repeated.
6. After the vacuum level of at least 550 mmHg has been reached and the vacuum
stabilizes, allow 30 seconds for the tissue to fill the suction chamber.
Caution
Do not proceed without waiting a full 30 seconds. Failure to wait a
full 30 seconds may result in insufficient or no tissue filling the
suction chamber. This can result in the capsule not being securely
attached or not attached to the patient’s esophagus.
7. Remove the safety tab.
8. Swiftly press the plunger
on top of the handle all the
way down until it stops at
its locking position. This
advances the trocar needle
into the suction chamber
(Figure 10).
Warning
Press down on the plunger with a swift and smooth motion to actuate
the delivery device mechanism. Pressing down on the plunger too
slowly may result in the capsule not properly attaching to the patient’s
esophagus or not detaching from the delivery device.
Do not rotate the plunger while depressing it!
Note
• Your hand may feel the delivery mechanism actuate, and you may
hear a click when this occurs.
• Remove your thumb after the plunger locks and before you begin
rotating it 1/8 of a turn.
Bravo Reflux Testing System 22 User Guide
Page 27

Press the plunger down to the locking position and release it.
Rotate the plunger clockwise until the white line on the plunger lines up with the white upward
arrow.
Figure 10. Attach the capsule to the patient’s esophagus.
9. Using your thumb, rotate the plunger from the side one-eighth (1/8) of a turn
clockwise to release the capsule from the delivery device (Figure 11). The plunger
springs up so that a white line is visible on the sixth rib of the plunger (Figure 12).
Figure 11. Release the capsule from the delivery device.
Bravo Reflux Testing System 23 User Guide
Page 28

If the plunger does not automatically spring up, push it up gently with your thumb.
!
!
!
Do not cover the hole
at the bottom of the
handle with your
hand.
The plunger should spring back up
automatically. Verify that the
plunger springs back to the white
line marking the plunger’s sixth rib.
If the plunger does not automatically
spring up, use your thumb to lightly
push it up.
a
b
These steps release the capsule from the delivery device.
Figure 12. Release the capsule from the delivery device, cont.
Warning
Do not rotate or otherwise force the plunger beyond the white line on
the barrel. Rotating or forcing the plunger beyond this may result in
possible damage to the delivery device. This may also interfere with
the detachment of the capsule from the delivery device, and cause
possible injury to the patient.
Note
Following correct rotation of the plunger, the white marking should now
be visible on the sixth rib of the plunger. If not, use your thumb to raise
the plunger until the white marking is visible.
Warning
If problems occur with capsule detachment, see Delivery Device
Disassembly Procedure on page 43.
.
.
10. Turn off the vacuum source. Remove the delivery device and discard it according to
local waste management regulations.
Bravo Reflux Testing System 24 User Guide
Warning
Do not remove the delivery device from the patient with the vacuum
source on. Removing the device with the vacuum source on can result
in dislodgement of the capsule or possible injury to the patient’s
esophagus.
Page 29

11. Endoscopically confirm the capsule’s attachment.
!
Caution
Avoid contacting the capsule with the endoscope. Contact between the
endoscope and capsule may result in the dislodgement of the capsule.
12. Confirm that the recorder is recording pH values and that the capsule status LED on
the recorder is blinking in blue.
Note
The recorder's backlight display turns off after 30 seconds (default) to
conserve battery life. Press any key to activate the recorder's screen
during a study.
13. Proceed to Reviewing Instructions with Patients on page 39.
Stopping a pH Study
The study completes automatically when the recorder no longer collects pH data and the
recorder screen turns off. The study data is stored in the recorder until it is cleared.
To stop a study manually (before its intended completion):
1. Press the on/off button for several seconds until this message is displayed:
sure you want to stop the pH study?
2. Select your action:
• If you do nothing or select
• If you select
upload, connect recorder to PC.
Remember: if you stop the study, you must upload this data before the recorder can
be used for the next study.
Yes, this message is displayed: Last study data not uploaded! To
No, the study continues uninterrupted.
Are you
Bravo Reflux Testing System 25 User Guide
Page 30

Performing a Bravo pH Study with pH Calibration
!
The actions of performing the study (calibrating the capsule, testing the vacuum, placing
the capsule, and instructing the patient) should be performed in one continuous sequence
as follows.
Calibrating Capsules
Calibration is the process of making sure that the capsule is reading pH levels properly.
You must go through calibration for each capsule.
Note
There are two types of Bravo pH capsules.
• If you are using a capsule–pH calibration not required, follow
the procedure Performing a Bravo pH Study without pH Calibration
on page 16.
• If you are using a capsule–pH calibration required, follow this
procedure.
Warning
If performing a two-capsule procedure, both capsules must be the
same type (requiring pH calibration or not requiring pH calibration).
Note
If you need to change the number of capsules or the study duration,
select Settings from the main menu and make the necessary
changes.
Existing Data
If data exists from a previous study and has not yet been uploaded, you must first do so
before you can start calibration. The record screen shows the message:
not uploaded! To upload, connect to PC.
•
To stop calibration and upload the existing data, press Cancel. Follow the directions
Last study data
in Reflux software (see Uploading pH Data on page 41.) When the data is uploaded,
start the new study again by selecting
• To continue (overwrite the existing data without uploading it), press Next and then
Calibrate from the main menu.
press Yes to confirm that you want to overwrite the last study data. The message
Clearing data... appears, and then the recorder continues with the calibration
process.
Starting Calibration
If the message about existing data does not appear, begin calibration as follows:
1. Select
Start Study from the main menu.
Bravo Reflux Testing System 26 User Guide
Page 31

The message This capsule requires calibration. Calibrate? appears on the screen,
!
along with current settings (Date/Time, # of Capsules, and Study Duration). Press
Yes to start calibration or No to return to the main screen.
Note
The backlight stays on during calibration, except during the 10-minute
pre-soak stage.
This message appears: Place pH Capsule #1 in pH 7.01 and press Start to
calibrate.
2. Position the calibration stand on a level surface and place a clean calibration tube
into each of the four holders. Place the recorder on the calibration stand (Figure 16).
3. Check the expiration date on the buffer fluid bottles (next to on the label).
4. Fill each of the four tubes in the calibration stand halfway (enough to be able to
cover the capsule when it is inserted) as follows. The buffer solutions should be at
room temperature (20–25 °C, 68–77 °F).
• tube 1: pH 7.01 buffer solution
• tube 2: sterile water
• tube 3: pH 1.07 buffer solution
• tube 4: sterile water
5. Check the expiration date on the capsule (next to on the label).
6. Without bending or kinking the delivery device, carefully remove the Bravo
delivery device with pH capsule from the external shipping box and then from the
inner pouch (Figure 13).
Caution
Avoid bending or kinking the delivery device. Sharp bending or kinking
can damage the delivery device, which will require the device to be
discarded before use.
Bravo Reflux Testing System 27 User Guide
Page 32

Open the plastic cover.
Remove magnetic clip.
Remove soaker bulb.
Figure 13. Remove Bravo pH capsule with delivery device from pouch.
7. Remove the capsule’s plastic cover, the reference sensor cover (soaker bulb cover),
and the magnetic clip (Figure 14). Set the magnetic clip aside.
Note
Keep the magnetic clip at least 2 meters away from the delivery device
so that it will not interfere with the capsule. If a procedure is delayed,
you can replace the magnetic clip on the capsule to return it to an
inactive state until needed. Do not discard the magnetic clip until after
the procedure has been performed.
Figure 14. Remove Bravo pH capsule shipping components.
Bravo Reflux Testing System 28 User Guide
Page 33

.
trocar
needle
suction
chamber
Note
The capsule automatically turns on when the magnetic clip is removed.
In addition, if the recorder is turned on, you can see the capsule status
LED blinking on the recorder.
8. Check the soaker bulb for fluid and set aside.
Note
Even if the soaker bulb doesn’t show the presence of liquid, the
capsule can calibrate as usual. Perform the capsule calibration as per
instructions. If the capsule fails to calibrate, contact your customer
support representative.
9. After opening the capsule package, make sure that the capsule trocar needle has not
advanced (Figure 15).
Figure 15. Make sure that the trocar needle has not advanced too far into the
chamber.
Bravo Reflux Testing System 29 User Guide
Page 34

10. Without bending or kinking the delivery device, place the delivery device handle
!
!
calibration tube
delivery device
handle
into the calibration stand (Figure 16).
Figure 16. Delivery device in calibration stand.
11. Carefully place the capsule into the pH 7.01 buffer solution calibration tube as
indicated on the recorder screen.
Caution
When placing the capsule into the calibration tube, do not allow either
part of the pH sensor (the short silver-colored antimony and long clear
reference sensor) to catch on the edge of the calibration tube, as this
can damage the pH sensor. Avoid the tube edge while carefully
lowering the capsule into the solution. Any damage to the pH sensor
will require the delivery device to be discarded before use.
12. Make sure that the capsule is completely covered with the buffer solution. Gently
agitate the capsule to remove any air bubbles.
Caution
After agitating to remove air bubbles, do not move the capsule again or
move the calibration stand during the calibration process.
13. On the recorder, press
This message appears: Waiting for pH capsule 1.
14. When the recorder identifies the capsule, this message appears: Does this pH
capsule ID number match the delivery device number?
• The capsule ID is printed on the packaging label. If the ID matches, press
not, press No and the search begins again.
• If the recorder still does not recognize the capsule or displays an error message,
repeat the procedure. If the problem persists after three attempts, see Recorder
Troubleshooting on page 45.
Bravo Reflux Testing System 30 User Guide
Start. The recorder starts searching for the capsule’s signal.
Yes . If
Page 35

15. Press Yes. This message appears: Initiating 10 minute pre-soaking.
!
Note
If you press Skip, the recorder goes directly to the next step, and the
action (skipping pre-soak) is written to the recorder log.
If you did not skip (that is, if you pressed Yes), the backlight goes out.
It automatically turns back on at the end of the 10 minute pre-soak
period.
When the pre-soak period ends (or is canceled by pressing
appears: pH 7.01 calibrating.
At the end of this calibration period, the recorder beeps and this message appears:
Rinse the pH capsule in sterile water and press Next.
16. Rinse the capsule in sterile water. Press Next. This message appears: Place capsule
#1 in pH 1.07 and press Start to calibrate.
17. Place the capsule in the pH 1.07 solution and press Start.
At the end of this calibration period, the recorder beeps and this message appears:
pH capsule ID xxxx calibrated. (where xxxx is the capsule ID).
Caution
If either part of the calibration process (pH 7.01 or 1.07) fails, see
Recorder Troubleshooting on page 45.
Skip), this message
18. Press
19. Proceed to Setting up the Vacuum on page 32.
Bravo Reflux Testing System 31 User Guide
OK. The calibration data is saved and the recorder main menu appears with the
cursor ready at Start study.
Note
If you are performing a two-capsule procedure, the recorder guides you
through the same calibration process for the second capsule.
After the first capsule is calibrated, it can remain outside the buffer
solutions for up to 60 minutes before use.
Note
If you are not going to place the capsule in the patient immediately,
return the capsule to the pH 7.01 buffer solution. It may remain there
for up to 8 hours. Rinse the capsule in sterile water before use.
Page 36

Setting up the Vacuum
Place finger over
suction chamber.
Remove finger.Connect vacuum
hose.
abc
vacuum
hose
vacuum port
1. Make sure that the vacuum flow knob is turned to maximum.
2. Connect the vacuum hose (supplied with the vacuum pump) to the vacuum port on
the delivery device handle (Figure 7a).
Figure 17. Verify the vacuum function.
3. With your gloved finger covering the suction chamber (Figure 7b), verify that the
vacuum gauge reading is at least 550 mmHg. Make a note of the gauge reading.
Note
At higher altitudes, the pressure
readings may be lower. For
different altitudes, use this table
for the minimum recommended
vacuum pressure. Contact
Medtronic customer support for
additional information.
Altitude
feet meters
0 0 550
2000 610 530
4000 1220 510
6000 1830 490
Minimum
Pressure
mmHg
4. Remove your finger from the suction chamber. Verify that the vacuum gauge
reading drops (Figure 7c) by at least 50 mmHg (500 mmHg or lower).
Bravo Reflux Testing System 32 User Guide
Page 37

!
Caution
If the vacuum readings fail these required
minimum levels, remove the delivery device
and perform the same action on the vacuum
tube alone:
• Cover the tube with your finger. The
vacuum gauge should read at least
575 mmHg. Remove your finger. The
vacuum gauge should drop drastically (to
zero or close to zero). If so, the vacuum
unit is functioning properly. Perform the
procedure with a different delivery device
(after performing calibration).
• If the vacuum fails to reach 575 mmHg or
fails to drop to close to zero, the vacuum
unit may require service. Contact Medtronic customer support.
5. Turn off the vacuum and detach the tubing from the delivery device.
6. Proceed to Starting Recording.
Starting Recording
1. If the recorder is turned off or in sleep mode, turn it on.
2. From the main menu, select Start Study and press Enter.
If the recorder detects a conflict with the capsule ID, this message appears:
ID mismatch. Use pH capsule ID: xxxx.
See Recorder Troubleshooting on page 45.
Capsule
3. Verify that the recorder is recording pH values.
Note
The recorder's backlight display turns off after 30 seconds (default) to
conserve battery life. Press any key to activate the recorder's screen
during a study.
4. Proceed to Placing the Capsule on page 34.
Bravo Reflux Testing System 33 User Guide
Page 38

Placing the Capsule
!
pH sensor
pH capsule
suction chamber
depth markings
vacuum
hose
1. Oral placement of the Bravo capsule can be performed either using:
a. endoscopic measurement: using an endoscope, determine the desired location
for the capsule in the esophagus. Typically, the capsule is placed 6 cm above
the squamo-columnar junction. Measure and record the distance traveled by
the endoscope to the desired location.
b. manometric measurement: using a transnasal manometry catheter, determine
the desired location for the capsule in the esophagus. Typically, the capsule is
placed 5 cm above the proximal aspect of the landmarks (LES). Use a
correction factor of approximately 4 cm to account for the longer pathway that
the manometry catheter has to travel through the nasopharynx.
2. Remove the endoscope or manometry catheter from the patient.
3. With the vacuum off, complete the following steps:
a. Remove the capsule from the buffer solution and rinse it in sterile water.
b. Mark the distance determined in step 1 on the delivery device. The depth
markings on the delivery device are indexed from the capsule’s pH sensor
(Figure 18).
c. Carefully advance the delivery device through the mouth (with the capsule
facing the patient’s tongue) to the desired location in the esophagus.
Caution
If lubricants are used to ease placement insertion, do not cover
the suction chamber with lubricant. This could interfere with the
attachment of the capsule.
Figure 18. Capsule depth markings are indexed from pH sensor.
Bravo Reflux Testing System 34 User Guide
Page 39

d. Holding the delivery device as straight as possible in a relaxed horizontal
!
!
!
position, stabilize it by the patient’s mouth to make sure that it does not move.
Warning
Do not advance the delivery device into the trachea or lungs.
Advancing the delivery device into the trachea or lungs can cause
possible injury to the patient.
4. Endoscopically check the esophageal inlet to verify the desired placement of the
delivery device in the esophagus. Carefully remove the delivery device immediately
if it has entered the trachea.
5. After proper positioning of the delivery device:
a. Attach the vacuum hose to the handle (Figure 17).
b. Turn on the vacuum source and verify that the gauge reading is the same as
you noted during vacuum setup.
Caution
If the minimum vacuum level (550 mmHg) is not obtained,
reposition the Bravo delivery device to achieve proper vacuum.
Do not allow the delivery device to move during vacuum level
acquisition. Failure to immobilize the delivery device can result in
less than optimal attachment or non-attachment that will require the
vacuum level acquisition process to be repeated.
6. After the vacuum level of at least 550 mmHg has been reached and the vacuum
stabilizes, allow 30 seconds for the tissue to fill the suction chamber.
Caution
Do not proceed without waiting a full 30 seconds. Failure to wait a
full 30 seconds may result in insufficient or no tissue filling the
suction chamber. This can result in the capsule not being securely
attached or not attached to the patient’s esophagus.
7. Remove the safety tab:
Bravo Reflux Testing System 35 User Guide
Page 40

8. Swiftly press the plunger on top of the handle all the way down until it stops at its
!
Press the plunger down to the locking position and release it.
Rotate the plunger clockwise until the white line on the plunger lines up with the white upward
arrow.
locking position. This advances the trocar needle into the suction chamber
(Figure 19).
Warning
Press down on the plunger with a swift and smooth motion to actuate
the delivery device mechanism. Pressing down on the plunger too
slowly may result in the capsule not properly attaching to the patient’s
esophagus or not detaching from the delivery device.
Do not rotate the plunger while depressing it!
Note
• Your hand may feel the delivery mechanism actuate, and you may
hear a click when this occurs.
• Remove your thumb after the plunger locks and before you begin
rotating it 1/8 of a turn.
Figure 19. Attach the capsule to the patient’s esophagus.
9. Using your thumb, rotate the plunger from the side one-eighth (1/8) of a turn
clockwise to release the capsule from the delivery device (Figure 20). The plunger
springs up so that a white line is visible on the sixth rib of the plunger (Figure 21).
Figure 20. Release the capsule from the delivery device.
Bravo Reflux Testing System 36 User Guide
Page 41

If the plunger does not automatically spring up, push it up gently with your thumb.
!
!
!
Do not cover the hole
at the bottom of the
handle with your
hand.
The plunger should spring back up
automatically. Verify that the
plunger springs back to the white
line marking the plunger’s sixth rib.
If the plunger does not automatically
spring up, use your thumb to lightly
push it up.
a
b
These steps release the capsule from the delivery device.
Figure 21. Release the capsule from the delivery device, cont.
Warning
Do not rotate or otherwise force the plunger beyond the white line on
the barrel. Rotating or forcing the plunger beyond this may result in
possible damage to the delivery device. This may also interfere with
the detachment of the capsule from the delivery device, and cause
possible injury to the patient.
.
Note
Following correct rotation of the plunger, the white marking should now
be visible on the sixth rib of the plunger. If not, use your thumb to raise
the plunger until the white marking is visible.
Warning
If problems occur with capsule detachment, see Delivery Device
Disassembly Procedure on page 43.
.
10. Turn off the vacuum source. Remove the delivery device and discard it according to
local waste management regulations.
Bravo Reflux Testing System 37 User Guide
Warning
Do not remove the delivery device from the patient with the vacuum
source on. Removing the device with the vacuum source on can result
in dislodgement of the capsule or possible injury to the patient’s
esophagus.
Page 42

11. Endoscopically confirm the capsule’s attachment.
!
Caution
Avoid contacting the capsule with the endoscope. Contact between the
endoscope and capsule may result in the dislodgement of the capsule.
12. Confirm that the recorder is recording pH values and that the capsule status LED on
the recorder is blinking in blue.
Note
The recorder's backlight display turns off after 30 seconds (default) to
conserve battery life. Press any key to activate the recorder's screen
during a study.
13. Proceed to Reviewing Instructions with Patients on page 39.
Stopping a pH Study
The study completes automatically at the end of the study duration (defined in Settings).
The recorder stops collecting pH data and the recorder screen turns off. The study data is
stored in the recorder until it is cleared.
To stop a study manually (before its intended completion):
1. Press the on/off button for several seconds until this message is displayed:
sure you want to stop the pH study?
2. Select your action:
• If you do nothing or select No, the study continues uninterrupted.
• If you select
upload, connect recorder to PC.
Remember: if you stop the study, you must upload the data to unlock the recorder
before you can continue.
Yes, this message is displayed: Last study data not uploaded! To
Are you
Bravo Reflux Testing System 38 User Guide
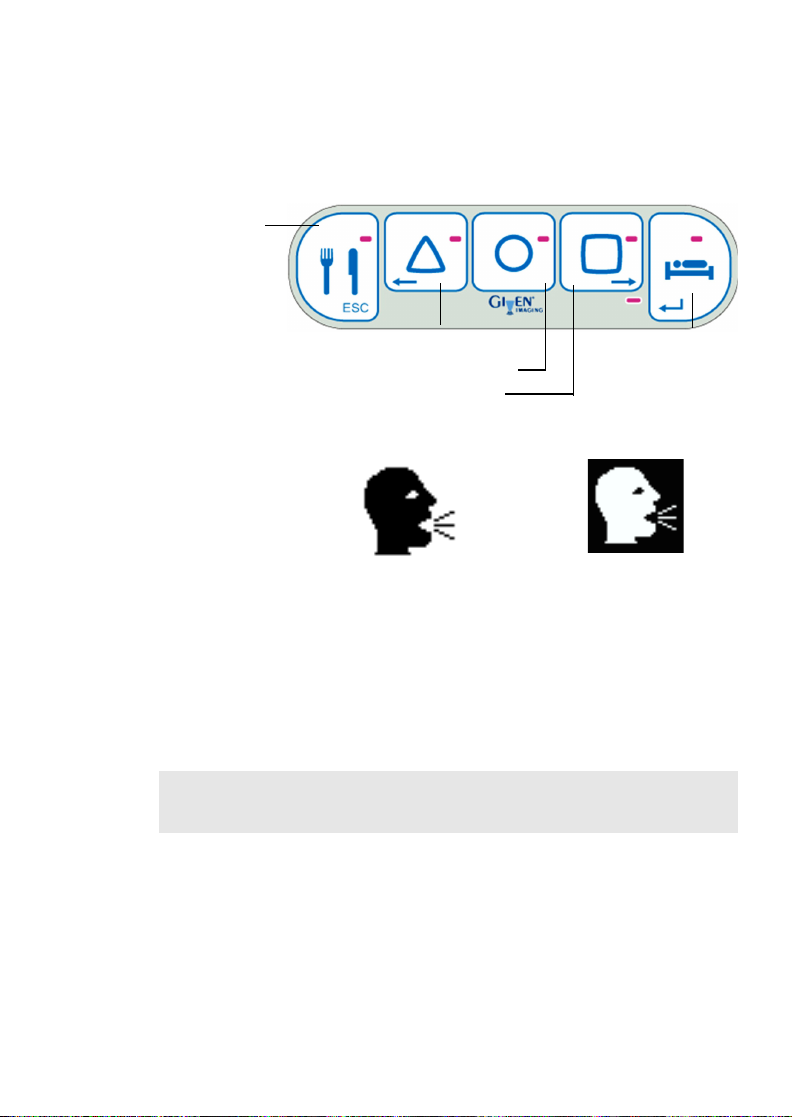
Page 43

Reviewing Instructions with Patients
meal
supine
regurgitation
capsule LED
chest pain
heartburn
When this
button is
pressed...
This icon
appears
on the
screen
After capsule placement the patient may stay at the clinic/hospital, or return home.
Review the following information with the patient.
1. Familiarize the patient with the recorder. Instruct the patient to press the appropriate
button at the first sensation of the symptom (chest pain, regurgitation, or heartburn).
Note
The default meaning of recorder symptom buttons can be changed
from the Reflux software (refer to the user guide for details). If you are
using the buttons for other symptoms, make sure to explain the
function of each symptom button to the patient.
Figure 22. Default values of symptom buttons.
2. Explain that the patient must first press any button to turn on the backlight, and then
press the appropriate symptom or event button.
3. Show the patient that the indicator light on the symptom button (Figure 22)
illuminates for 3 seconds confirming that a symptom button was pressed.
4. Explain the beep sound (if the recorder was programmed to beep when a symptom
button is pressed).
5. Explain the use of the Patient Diary. Patients need to write down eating, lying down
(supine), and other user-defined periods, using the time on the recorder’s screen for
the start and end times.
User-defined periods allow the patient to record a period of time when they are
engaged in an activity that the physician determined may affect pH readings, such as
smoking, exercising, or wheezing.
Bravo Reflux Testing System 39 User Guide
Page 44

6. Instruct the patient to make sure that the recorder is always monitoring the capsule:
!
• The patient must stay within 2 meters of the recorder during the study except, as
necessary, for bathing. The recorder is not water resistant and should not be
worn in the shower or in other wet environments.
• When resting or lying down, place the recorder on a night stand near the bed, the
buttons turned toward the patient both for convenience of reaching it for
possible symptom recording as well as for optimal reception.
• If a night stand is not near the bed, the patient should clip the recorder to the
pillow, making sure the buttons face the patient.
• If the recorder is too far from the capsule, it beeps for up to 30 seconds and the
capsule number icon disappears from the screen (
for single-capsule
procedures, for two-capsule procedures). This indicates that the
transmission from the capsule to the recorder has been interrupted. The patient
should hold the recorder on the chest until
or appears.
• This beep can also occur if there are other electronic or electrical devices
operating at the same frequencies as the recorder. Instruct the patient to move
away from these other devices; if the capsule number icon appears, the problem
may have been caused by interference from another device.
• Instruct the patient to contact the doctor if or
disappears from the
recorder screen or if there are any problems or questions during the study.
7. Place the recorder in the case and show the patient how to adjust the shoulder strap.
Warning
The recorder must be worn over clothing.
If wearing the recorder with the shoulder strap, the patient must stay
clear of moving equipment or machines that are potentially hazardous.
If the strap becomes entangled with a moving part, it could cause the
patient to be pulled into a dangerous position. This could result in
possible patient injury.
Do not allow children to wear or play with the recorder shoulder strap
either with or without the case. It is intended only for the prescribed use
by an adult. Use of the shoulder strap by a child could result in possible
injury. Instead, it is recommended to use the belt clip for children.
8. Instruct the patient about what to expect when the capsule detaches.
9. Instruct the patient to return the recorder at the completion of the study.
Bravo Reflux Testing System 40 User Guide
Page 45

Uploading pH Data
Note
To perform multiple uploads from the same recorder, disconnect the
recorder from the USB and reconnect it again between uploads.
Note
The analysis software that can be used to view and analyze data from a
pH study depends on which capsule type was used:
• capsule–pH calibration not required: Reflux software version 6.1
or higher
• capsule–pH calibration required: AccuView 5.2 or Reflux
software version 6.0 or higher
1. Connect the Bravo recorder to your PC using the supplied USB cable.
2. Open the Reflux software by double-clicking the icon on your desktop.
3. Click Upload. A progress
bar appears. Once the
upload is complete, the
Edit Information & Diary
screen appears.
The capsule ID
automatically appears in
ID field. You can use
the
this ID or replace it with
the patient ID.
If you are using Reflux
software v6.1, the software
detects the number of
capsules and the capsules
pH calibration type. It
applies the appropriate
protocol in the
field.
4. Complete the Information and Diary fields and click OK.
Bravo Reflux Testing System 41 User Guide
Protocol
Page 46

Recorder Maintenance
!
Safety and Technical Checks
There are no required safety or technical checks, and no periodic maintenance for the
recorder.
The recorder contains no serviceable components apart from the battery. If the recorder
requires repair or is nonfunctional, contact customer support.
Cleaning the Recorder
Clean the recorder after each study.
1. Turn off the recorder.
2. Wipe the exterior surface of the recorder with 70–90% isopropyl alcohol.
3. Allow any alcohol to dry thoroughly before using the recorder.
Caution
Do not allow liquid to get into the recorder body or inside the front
cover. The recorder is not fluid resistant. Allowing any fluid (alcohol,
water, etc.) inside of the recorder can damage the recorder and cause
it to malfunction.
Cleaning the Case and Strap
Wipe the case and strap with any commonly-used disinfectant.
Servicing the Battery
The recorder operates on one internal rechargeable lithium battery. When the battery has
been recharged 275 times, a message appears on the screen reminding you to replace the
battery.
Contact customer support to have the battery replaced.
Bravo Reflux Testing System 42 User Guide
Page 47

Troubleshooting
!
!
Delivery Device Disassembly Procedure
If the capsule is attached to the patient’s esophageal tissue, but will not release from the
delivery device, we recommend this procedure.
Caution
When performing the following steps to remove the capsule, it is
extremely important to minimize movement of the capsule and the
patient. Any movement could cause tissue injury at the site of the
capsule attachment.
1. If available, insert an endoscope and confirm tissue has been pinned and the capsule
has not been released from the delivery device. Use care when inserting the
endoscope, and avoid force upon the capsule and the delivery device. Remove
endoscope. If an endoscope is not available, proceed to step 2.
2. See Figure 23. Secure delivery device near biteblock or near nasal passage using a
hemostat clamp. An assistant should continue to firmly hold the shaft of the delivery
device with a hemostat until the release procedure (described below) is completed.
Note
For the following steps, moderate force may be needed to
disassemble the Bravo delivery device handle.
.
Warning
During the disassembly of the handle, position the handle away from
the patient’s face while protecting the patient’s mouth and nose, and
away from the eyes of the patient and nearby staff. Plastic parts may
break off during handle disassembly, resulting in possible injury to the
patient and clinical staff.
Figure 23. Delivery device secured at mouth (or nose, if applicable) using a
hemostat with hand. Keep a firm grip on the hemostat throughout the
release procedure.
Bravo Reflux Testing System 43 User Guide
Page 48

3. With gloved hands, place one hand onto the handle portion and one hand on the
suction port part as shown. Firm force may be needed to induce separation of these
two parts. When the two parts have separated, go to step 4.
Note
Be careful not to transfer force or motion to the capsule portion of the
delivery device.
Figure 24. Break handle as indicated.
.
4. See Figure 25. Withdraw the handle a minimum of 4 cm. When performing this
action, the wire that secures the capsule is also withdrawn and will automatically
release the capsule.
Note
If it is difficult to withdraw the handle and you feel resistance, release
the hemostat to allow the handle to be retracted. Make sure not to pull
on the shaft to avoid transferring force to the capsule.
Figure 25. Withdraw the handle 4 cm minimum. THIS ACTION WILL RELEASE
THE CAPSULE. If the wires are difficult to withdraw, remove the
hemostat. This will release the capsule at distal end.
5. When the capsule releases from the delivery device, remove the delivery device
from the patient.
6. If possible, use an endoscope to confirm that the capsule remained attached to the
esophageal tissue.
Bravo Reflux Testing System 44 User Guide
Page 49

Recorder Troubleshooting
Following is a list of problems you may encounter while operating the recorder. If you
cannot resolve the problem with the solution provided, or you do not see the problem
listed, contact your product customer support.
Problem Cause Solution
Initial Startup
Recorder displays message:
ERROR
Recorder displays message:
REPLACE BATTERY
Recorder is locked (no buttons
work) and displays message:
Last study data not uploaded!
To upload, connect recorder to
PC.
Calibration (for capsules–pH calibration required only)
Recorder displays message:
Calibration done. To use,
press Cancel. To start
new, press Yes.
Recorder displays message:
Charge battery.
Recorder displays message:
Capsule 1 Calibration Error
Error 1: Unexpected pH
value
Error 2: Slope too low Difference in mV between
Error 3: Slope too high Difference in mV between
Error 4: Signal unstable Recorder cannot detect stable
General recorder problem. Contact customer support to
Battery voltage low. Contact customer support to
A study is done but the data
has not yet been uploaded
from the recorder.
Calibration has already been
performed but the calibration
data has not yet been used in a
study.
Recorder battery is below 30%
capacity.
(various) Press Help to display error
Capsule sends what appears
to be a pH value, but it is
outside expected range (pH
7.01 to 1.07).
signals read by capsule during
calibration (that is, difference
between pH 7.01 and pH 1.07
solutions) is lower than
expected.
signals read by capsule during
calibration is greater than
expected.
signal from capsule within 60
seconds during calibration.
arrange servicing for recorder.
arrange battery replacement
for recorder.
Connect the recorder to the PC
and follow the instructions on
the recorder screen.
Perform the study with this
calibration data or redo
calibration.
Connect recorder to charger.
Allow to fully recharge (may
take several hours).
message.
For each of these calibration
messages, try:
1. Replace buffer solution.
2. Try calibrating a new pH
capsule.
If error persists, contact
customer support.
Bravo Reflux Testing System 45 User Guide
Page 50

Problem Cause Solution
Recorder displays message:
Listening for caps... and does
not progress further.
Start Study
Recorder displays message:
Charge battery.
Recorder displays message:
Settings for two capsules but
only capsule xxxx found. Start
recording?
Recorder displays message:
Capsule ID mismatch.
Use capsule ID: xxxx.
Recorder displays message:
Capsule ID mismatch.
Use capsule ID: 0000.
No pH display on recorder screen Capsule out-of-range. Move recorder closer to
Data Transfer
Recorder displays the
disconnect icon
Data upload fails. Communication error. Disconnect the recorder from
do not
Capsule out-of-range. Try each of these:
1. Move recorder closer to
capsule.
2. Replace buffer solution.
3. Try calibrating a new pH
capsule.
If error persists, contact
customer support.
Recorder battery is below 90%
capacity.
Recorder was configured for
two-capsule study, but is now
only detecting signal of one
capsule.
This can also happen if the two
capsules are not the same type
(one requires calibration and
one doesn’t).
Capsule was not calibrated
using this recorder, or there
may be interference with
another capsule in the area.
Capsules–pH calibration
required have a four-digit ID.
Capsules–pH calibration not
required have a five-digit ID.
Calibration data is missing or
invalid.
Capsule not in contact with
fluid.
Recorder is connected to PC
software application and data
is being transferred.
Connect recorder to charger.
Allow it to fully recharge (may
take up to 7 hours).
If you continue recording, you
will only collect data for the
capsule identified in this error
message.
Otherwise, press ESC, perform
calibration with another
capsule, and continue.
Try each of these:
1. Select the recorder that
was calibrated to the
capsule being used
2. Move recorder closer to
capsule (place recorder on
patient’s chest).
3. Remove patient from the
area (100 meters) and try
again.
Recalibrate the capsule. Make
sure that you get the message
pH capsule #1 calibrated.
capsule.
Place capsule in buffer
solution.
This is normal. Do nothing (do
not disconnect recorder from
USB cable until this icon is no
longer displayed, indicating
that data transfer has finished).
the USB cable and then
reconnect it.
Bravo Reflux Testing System 46 User Guide
Page 51

Problem Cause Solution
Patient Interface
Long beep and patient display
flashes battery symbol
Long beep (up to 30 seconds)
and the capsule indicator or
disappears from the
display
Indicator light does not blink
when a symptom button is
pressed
Indicator light blinks but recorder
does not beep when a symptom
button is pressed
Patient display does not show
time
Patient display shows time, but
not pH reading
Patient display shows Hi (H) pH level momentarily out-of-
Patient display shows Lo (L) pH level momentarily out-of-
Recorder overheats On rare occasions, the
Battery low. Recharge.
Signal from capsule lost. Move recorder closer to
Interference from 433 MHz
electromagnetic sources.
Indicator light or button not
functioning.
Recorder was programmed not
to beep when symptom button
is pressed.
Battery is depleted. Contact customer support to
Recorder was programmed not
to display pH reading.
range (too high).
range (too low).
recorder may become too
warm for patient comfort.
capsule until capsule indicator
reappears.
Move recorder away from all
possible sources of radio
waves.
Manually record symptoms.
Contact customer support to
arrange servicing for recorder.
Program recorder to beep
when symptom button is
pressed. See Choosing Study
Settings on page 14.
arrange battery service.
Reprogram recorder to display
pH reading. See Choosing
Study Settings on page 14.
Continue with study (no action
required).
Continue with study (no action
required).
Stop the recorder. Repeat the
study with a different recorder.
Bravo Reflux Testing System 47 User Guide
Page 52

Appendix A: Technical Data
Bravo Recorder
Power Supply: One lithium polymer battery (3.7 volt)
Size: Height: 90 mm (3.5 in.)
Weight: 150 g (5.3 oz)
Operating, Transporting, and Storage
Temperature:
Operating and Storage Pressure: 70kPa-106kPa
Operating, Transporting, and Storage
Humidity:
Number of Channels: 1 or 2 capsules
Symptom Buttons: Chest pain
Memory: Code: 128 Kilobytes, 16 K Sram
Recording Time (study duration): 24, 48, or 96 hours (selectable)
Capsule Sampling Interval: 6 seconds, transmits every 12 seconds
Measuring Range: pH level
pH accuracy:
Transmission of Data: USB
Communication Frequency: 433.9 MHz
Bandwidth of the Receiving Section: Maximum 600 KHz
Protection from Electric Shock: Internally powered BF equipment
Mode of Operation: Continuous
Water Ingress Protection: Ordinary
Capsule Transmission Duty Cycle: Every 12 seconds
Width: 100 mm (3.9 in.)
Depth: 30 mm (1.2 in.)
0–40 °C (32–104 °F)
0 - 85% relative humidity (noncondensing)
Regurgitation
Heartburn
Data: 8 Mbytes
1.0–8.0 for capsules–pH calibration required;
2.0–8.0 for capsules–pH calibration not required
pH accuracy capsules–pH calibration required
+/- 0.5 pH @ pH4, +/-1.0 pH @ pH1-pH8
pH accuracy capsules–pH calibration not required
+/- 0.5 pH @ pH4, +/-1.0 pH @ pH2-pH8
Bravo Reflux Testing System 48 User Guide
Page 53

Recorder Servicing
The recorder does not require routine servicing of internal components, unless the
recorder becomes damaged. For service, contact the appropriate customer support
representative.
USB Cable
Length: 1 meter
Charger
Input: 100 to 240 V (0.45-0.2 Amp, 50/60 Hz)
Output: 5 V 5 V (3 Amp, 15 W max)
Type: GEM 1 8 I 0 5
Manufacturer: MEAN WELL
Battery
Weight +
Rated capacity 1070 mAh to 110 mAh
Nominal voltage 3.7 V
Max. operating voltage range 2.75 V to 4.2 V
Expected cycle life 500 cycles
Temperature range charge 0°C to 45°C
Humidity 65 +
25 g
discharge -20°C to 60°C
20% RH
Essential Performance of Bravo Recorder
The Bravo System records and provides pH data of the distal esophagus with defined
accuracy per system specification. It allows a trained operator to identify any significant
defects in the provision of these data.
Bravo Reflux Testing System 49 User Guide
Page 54

Electromagnetic Compatibility Declaration (EN / IEC 60601-1-2)
!
This equipment has been tested and found to comply with EN / IEC 60601-1-2.
Compliance with EN / IEC 60601-1-2 shows the equipment is reasonably protected
against harmful interference in a typical medical installation. Tables 1, 2, and 3 apply to
Given Imaging in-line powered and battery-powered external devices.
Caution
Bravo recorder needs special precautions regarding EMC and needs to be
installed and put into service according to the EMC information provided in
the accompanying documents.
Portable and mobile RF communications equipment can affect Bravo
recorder.
The use of accessories, transducers and cables other than those specified,
with the exception of transducers and cables sold by the manufacturer of the
Bravo recorder as replacement parts for internal components, may result in
increased emissions or decreased immunity of the Bravo recorder.
The Bravo recorder should not be used adjacent to or stacked with other
equipment. If adjacent or stacked use is necessary, the Bravo recorder
should be observed to verify normal operation in the configuration in which it
will be used.
Use of accessories, transducers, and cables with the Bravo recorder other
than those specified may result in increased emissions or decreased
immunity of the Bravo recorder.
The Bravo recorder may be interfered with by other equipment, even if that
other equipment complies with CISPR emission requirements.
Table 1. Electromagnetic emissions
Bravo recorder is intended for use in the electromagnetic environment specified below. The customer or
the user of Bravo recorder should assure that it is used in such an environment.
Emissions test Compliance Electromagnetic environment – guidance
Non-ionizing
electromagnetic
emissions
CISPR 11
Non-ionizing
electromagnetic
emissions
CISPR 11
Harmonic
emissions
EN 61000-3-2
Voltage
fluctuations/flicker
emissions EN
61000-3-3
Group 1 (Bravo
pH recorder)
Class B (Bravo pH
recorder)
Not Applicable
(Battery-powered
devices)
Not Applicable
(Battery-powered
devices)
The Bravo recorder uses RF energy only for its internal function. Therefore, its RF emissions are very low and are not likely to cause any interference in nearby electronic equipment.
The Bravo recorder is suitable for use in all establishments, including
domestic establishments and those directly connected to the public lowvoltage power supply network that supplies buildings used for domestic
purposes.
Bravo Reflux Testing System 50 User Guide
Page 55

Table 2. Electromagnetic immunity
Bravo recorder is intended for use in the electromagnetic environment specified below. The customer or the user of
Bravo recorder should assure that it is used in such an environment.
Immunity test EN 60601 test
Electrostatic discharge
(ESD): EN 61000-4-2]
Electrical fast transient/
burst: EN 61000-4-4
Surge: EN 61000-4-5 N/A
Voltage dips, short
interruptions and
voltage variations on
power supply input
lines: EN 61000-4-11
Power frequency (50/
60 Hz) magnetic field:
EN 61000-4-8
[All devices]
±8 kV contact
±15 kV air
N/A
N/A <5% U
N/A 40% U
N/A 70% U
N/A <5% U
level
30 A/m 30 A/m
Compliance
level
±8 kV contact
±15 kV air
±2 kV for power
supply lines
±1 kV for input/
output lines
±1 kV differential
mode
±2 kV common
mode
T
(>95% dip in UT)
for 0.5 cycle
T
(60% dip in UT)
for 5 cycles
T
(30% dip in UT)
for 25 cycles
T
(>95% dip in UT)
for 5 sec
Electromagnetic environment – guidance
Floors should be wood, concrete, or ceramic
tile. If floors are covered with synthetic material,
the relative humidity should be at least 30%.
Not Applicable. Battery-powered device with
signal line not longer than 1 meter.
Not Applicable. Battery-powered device with
signal line not longer than 1 meter.
Not Applicable. Battery-powered device.
Power frequency magnetic fields should be at
levels characteristic of a typical location in a
typical commercial or hospital environment.
Bravo Reflux Testing System 51 User Guide
Page 56

Table 2. Electromagnetic immunity (continued)
Bravo recorder is intended for use in the electromagnetic environment specified below. The customer or the user of
Bravo recorder should assure that it is used in such an environment.
Immunity test EN 60601 test
level
Compliance
level
Electromagnetic environment – guidance
Recommended separation distance
Portable and mobile communication equipment
should be used no closer to any part of the
Bravo System, including cables, than the
recommended separation distance (d)
calculated from the equation applicable to the
frequency of the transmitter.
6 V
Conducted RF
IEC 61000-4-6
Radiated RF
IEC 61000-4-3
where P is the maximum output power rating of the transmitter in watts (W) according to the transmitter manufacturer
and d is the recommended separation distance in meters (m).
Field strengths from fixed transmitters, as determined by an electromagnetic site survey,a should be less than the
compliance level in each frequency range.
Interference may occur in the vicinity of equipment marked with
the following symbol:
rms
150 kHz to 80
MHz
10 V/m
80 MHz to 2.7
GHz
NOTE 1: At 80 and 800 MHz, the higher frequency range applies.
NOTE 2: These guidelines may not apply in all situations. Electromagnetic propagation is affected by absorption and
reflection from structures, objects and people.
a
Field strengths from fixed transmitters, such as base stations for radio (cellular/cordless) telephones and land mobile
radios, amateur radio, AM and FM radio broadcast and TV broadcast cannot be predicted theoretically with accuracy.
To assess the electromagnetic environment due to fixed transmitters, an electromagnetic site survey should be
considered. If the measured field strength in the location in which the device is used exceeds the applicable
compliance level above, the device should be observed to verify normal operation. If abnormal performance is
observed, additional measures may be necessary, such as re-orienting or relocating the Bravo System.
b
Over the frequency range 150 kHz to 80 MHz, field strengths should be less than 1 V/m.
b
3 V
/ 6 V
rms
150 kHz to 80
rms
MHz
10 V/m
d = 1.2 P
412.224 - 455.616 MHz range is exclusion
band for the Bravo recorder in Rx mode.
The Bravo recorder in Rx mode has no
immunity against electromagnetic energy in this
band in order to perform its intended function.
The nearby electronic equipment may affect
the system.
Recommended separation distance:
d = 1.2 P, 80–800 MHz range
d = 2.3 P, 800–2700 MHz range
Bravo Reflux Testing System 52 User Guide
Page 57

Table 3. Recommended separation distances between portable and mobile electromagnetic communication
Bravo recorder is intended for use in an electromagnetic environment in which radiated
electromagnetic disturbances are controlled. The customer or the user of the Bravo recorder can help
prevent electromagnetic interference by maintaining a minimum distance between portable and
mobile communication equipment (transmitters) and the Bravo recorder as recommended below,
according to the maximum output power of the communication equipment.
Rated maximum output
power of Transmitter W
80 to 412.224
equipment and Bravo recorder
MHz
412.224 to
455.616 MHz
455.616 to 800
MHz
800 MHz to 2.5 GHz
d = 1.2 P d = 1.2 P d = 1.2 P d = 2.3 P
0,01
0,1
1
10
100
For transmitters rated at a maximum output power not listed above, the recommended separation distance d in meters
(m) can be estimated using the equation applicable to the frequency of the transmitter, where P is the maximum output
power rating of the transmitter in watts (W) according to the transmitter manufacturer.
NOTE 1: At 80 and 800 MHz, the separation distance for the higher frequency range applies.
NOTE 2: These guidelines may not apply in all situations. Electromagnetic propagation is affected by absorption and
reflection from structures, objects and people.
NOTE 3: In the band 412.224 to 455.616 MHz, Bravo recorder in Rx mode has no immunity against electromagnetic
energy in order to perform its intended function. Nearby electronic equipment may affect the system. Immunity within
this band is provided in upload mode of operation only.
0.12 0.12 0.12 0.23
0.38 0.38 0.38 0.74
1.2 1.2 1.2 2.3
3.8 3.8 3.8 7.4
12 12 12 23
Table 4. Transmitter requirements
Description Specification
Operating frequency
Transmission type
Effective radiated power
433.9 MHz
Amplitude shift key (ASK)
29.7 µW
Bravo Reflux Testing System 53 User Guide
Page 58

Bravo Capsule Specifications
Materials
Cap Makrolon®
Shell Makrolon®
Reference sensor polyethylene terephthalate
Filler material 2 component epoxy
Dimensions
Output &
Transmission
Storage & Operation
Length 28 mm
Width 6.5 mm
Height 6.0 mm
Format Amplitude-shift keying
Frequency 433.92 MHz
Rate 60 ms every 12 seconds
Storage temperature 15–45°C (59–113 °F)
Operation temp. 20–40°C (68–104°F)
Storage humidity 0 - 85% RH
Operation humidity 0-100 RH
Storage & operation pressure 70kPa-106kPa
Bravo Delivery Device Specifications
Materials
Proboscis & Boot Aliphatic, polyether-based TPU
Nest Acrylonitrile Butadiene Styrene
Foam Polyethelyne (PE)
Tube Polyamide (PA)
Cable gauge 2.4 mm (7 Fr)
Bravo Reflux Testing System 54 User Guide
Page 59

Appendix B: Symbols on Package Labeling
Refer to the device to see which symbols apply to this product.
Symbol Symbol
number
MDD 93/42/
EEC, Annex
1
XII
ISO 15223-1
2
,
Clause 5.1.2
ISO 15223-1
2
,
Clause 5.3.1
ISO 15223-1
2
,
Clause 5.4.4
ISO 15223-1
2
,
Clause 5.4.3
www.medtronic.com/manuals
ISO 15223-1
2
,
Clause 5.1.5
Symbol title Description
CE marking To indicate conformity with the
provisions of MDD 93/42/EEC
Directive.
Authorized
representative in
Indicates the authorized representative
in the European Community.
the European
Community
Fragile, handle
with care
Indicates a medical device that can be
broken or damaged if not
handled carefully.
Caution Indicates the need for the user to
consult the instructions for use for
important cautionary information such
as warnings and precautions that
cannot, for a variety of reasons, be
presented on the medical device itself.
Consult
instructions for use
Indicates the need for the user to
consult the instructions for use.
Batch code Indicates the manufacturer's batch
code so that the batch or lot can be
identified.
ISO 15223-1
Clause 5.1.7
2
,
Serial number Indicates the manufacturer's serial
number so that a specific medical
device can be identified.
ISO 15223-1
Clause 5.1.6
2
,
Catalogue number Indicates the manufacturer’s catalogue
number so that the medical device can
be identified.
Bravo Reflux Testing System 55 User Guide
Page 60

ISO 15223-12,
Clause 5.1.1
IEC 60601-1
Table D.1,
Symbol 4
Directive
2012/19/EU,
Annex IX
4
ASTM F2503
ISO 15223-1
Clause 5.3.4
ISO 15223-1
Clause 5.3.7
CAN/CSAC22.2 No.
6
60601-1
Manufacturer Indicates the medical device
manufacturer, as defined in EU
Directives 90/385/EEC, 93/42/EEC and
98/79/EC.
3
Direct current To indicate on the rating plate that the
,
equipment is suitable for direct current
only.
Separate
collection for
Do not throw in trash. Dispose
according to local regulations.
electrical and
electronic
equipment
5
Magnetic
Resonance (MR)
Keep away from magnetic resonance
imaging (MRI) equipment.
unsafe
2
,
Keep dry Indicates a medical device that needs
to be protected from
moisture.
2
,
Temperature limit Indicates the temperature limits to
which the medical device can be safely
exposed.
CSA certification
Mark
Products bearing this mark have been
tested and certified in accordance with
applicable U.S. and Canadian electrical
safety
standards.
ISO 15223-1
Clause 5.1.4
ISO 15223-1
Clause 5.4.2
2
,
Use by date Indicates the date after which the
medical device is not to be used.
2
,
Do not re-use Indicates a medical device that is
intended for one use, or for use on a
single patient during a single
procedure.
IEC 60601-1
Table D.1,
Type BF applied
,
part
To identify a type BF applied part
complying with IEC 60601-1.
3
Symbol 19
Bravo Reflux Testing System 56 User Guide
Page 61

IEC 60601-
7
1-2
Non-ionizing
electromagnetic
radiation
To indicate generally elevated,
potentially hazardous, levels of non-
ionizing radiation, or to
indicate equipment or systems e.g. in
the medical electrical area that include
RF transmitters or that intentionally
apply RF electromagnetic energy for
diagnosis or treatment.
IEC 60601-1
Table D2
ISO 15223-1
Sec 5
3
,
Refer to instruction
manual or booklet
2
Humidity limitation Indicates the range of humidity to which
the medical device can be safely
exposed.
EN60529
8
Protection against
fluid ingress: Dripproof
Indicates the IP rating of a device. The
values show the protection level against
environmental particulate and liquid
ingress respectively.
ISO 15223-1
2
Sec 5
Atmospheric
pressure limitation
Indicates the range of atmospheric
pressure to which the medical device
can be safely exposed.
1
93/42/EEC, Medical Device Directive.
2
ISO 15223-1, Medical devices — Symbols to be used with medical device labels, labelling
and information to be supplied.
3
IEC 60601-1, Medical electrical equipment — Part 1: General requirements for basic
safety and essential performance.
4
Directive 2012/19/EU, Waste electrical and electronic equipment (WEEE).
5
ASTM F2503, Standard Practice for Marking Medical Devices and Other Items for Safety
in the Magnetic Resonance Environment.
6
CAN/CSA-C22.2 No. 60601-1 Medical Electrical Equipment - Part 1: General Require-
ments for basic safety and essential performance.
7
IEC 60601-1-2, Medical electrical equipment — Part 1-2: General requirements for basic
safety and essential performance — Collateral standard: Electromagnetic compatibility —
Requirements and tests.
8
EN 60529, Degrees of protection provided by enclosures (IP Code)
Bravo Reflux Testing System 57 User Guide
 Loading...