

Page 1
PATIENT PROGRAMMER
®
Medtronic
Activa
Activa
Activa
Activa
DBS™ Therapy user manual
®
PC Model 37601
®
RC Model 37612
®
SC Model 37602
®
SC Model 37603
37642
! USA
Rx only
2008
Page 2

Medtronic®, Activa®, and SoftStart/Stop® are
trademarks of Medtronic, Inc., registered in the U.S.
and other countries.
DBS™ is a trademark of Medtronic, Inc.
! USA
FCC Information
The following is communications regulation information
on the Model 37642 Patient Programmer.
FCC ID: LF537741
This device complies with Part 15 Rules. Operation is
subject to the following two conditions: (1) this device
may not cause harmful interference and (2) this device
must accept any interference received, including
interference that may cause undesired operation.
IMPORTANT: Changes or modifications to this
product not authorized by Medtronic, Inc., could
void the FCC Certification and negate your
authority to operate this product.
This device complies with Industry Canada licenseexempt RSS standard(s). Operation is subject to the
following two conditions: (1) this device may not cause
interference, and (2) this device must accept any
interference, including interference that may cause
undesired operation of the device.
Page 3
Label symbols
Explanation of symbols on products and
packaging. Refer to the appropriate product
to see symbols that apply.
Conformité Européenne (European
Conformity). This symbol means that the
device fully complies with AIMD Directive
90/385/EEC (NB 0123) and R&TTE
Directive 1999/5/EC.
Consult instructions for use
Manufacturer
-XX °C
-XX °F
XX °C
XXX °F
Temperature limitation
Keep dry
Ingress protection rating IP22, per
60601-1-11
Serial number
PIN No.
REP
EC
PIN number
Authorized representative in the
European community
37642 2015-04 English
Label symbols
3
Page 4
For USA audiences only
IEC 60601-1/EN60601-1, Type BF
Equipment
Non-ionizing electromagnetic radiation
Antenna jack
MR
MR
Magnetic Resonance (MR) Conditional
Magnetic Resonance (MR) Unsafe
System meets the applicable (CAN/CSAC22.2 No. 60601-1) electrical safety
standard requirements.
Do not dispose of this product in the
unsorted municipal waste stream.
Dispose of this product according to local
regulations. See http://
recycling.medtronic.com for instructions
on proper disposal of this product.
Chinese Standard (SJ/T11364-2006)
Logo: Electronic Information Products
Pollution Control Symbol. (The date in this
logo means the environmental protection
use period of the product.)
Label symbols
4
English 37642 2015-04
Page 5

Table of contents
Label Symbols 3
Glossary 10
1
Introduction 18
How to use this manual 18
For important safety information 20
Purpose of your patient programmer 20
Purpose of the neurostimulation system
(indications) 21
Precautions 21
2 Using your patient
programmer 26
How the patient programmer works 26
Multiple neurostimulators 29
Simple and advanced therapy
modes 29
Summary of keys 32
Using the Navigator key 36
The Therapy screen 38
37642 2015-04 English
Table of contents
5
Page 6

Synchronizing the patient programmer
and your neurostimulator 41
Turning your therapy on or off 44
The neurostimulator battery 46
About rechargeable batteries 46
Checking the nonrechargeable battery
status 47
Possible nonrechargeable battery status
conditions 48
Customizing your patient
programmer 50
Changing preferences 51
Patient programmer alert 57
Patient programmer accessories 58
Carrying case and patient programmer ID
label 58
Detachable antenna 60
Using the detachable antenna 61
3 Adjusting therapy settings with
Advanced mode 66
Adjusting your therapy settings 66
Therapy settings 68
Changing therapy settings in Advanced
Table of contents
mode 69
6
English 37642 2015-04
Page 7

Selecting a new group 73
Returning your therapy to original
settings 77
Understanding therapy parameter
limits 81
4 MRI examinations 84
If you have an MRI appointment 84
Responsibilities of the patient in preparing
for the MRI appointment 84
Preparing your neurostimulation system
for the MRI scan 85
Turning off therapy before the MRI
scan 86
Using the patient programmer to turn off
therapy 87
Using the clinician programmer to turn off
therapy 88
Turning therapy back on after the MRI
scan 89
Activating settings to allow therapy on
during the MRI scan 90
Using the patient programmer to activate
a new group 91
37642 2015-04 English
Table of contents
7
Page 8

Using the clinician programmer to activate
a new group 92
Returning therapy to your original group
setting after the MRI scan 94
5 Important information about your
rechargeable
neurostimulator 98
The rechargeable neurostimulator
battery 98
Check and charge: make it a habit 100
Checking the rechargeable
neurostimulator battery 102
Low battery status 103
Rechargeable battery overdischarge 105
Charging the neurostimulator battery 106
Patient programmer alert 108
6 Troubleshooting 110
Patient Programmer screens 110
Warning screens 110
Communication screen 113
Information screens 114
Table of contents
8
English 37642 2015-04
Page 9

Possible problems and solutions 121
7 Maintenance 128
Patient programmer batteries 128
Checking the patient programmer
batteries 129
Replacing the patient programmer
batteries 132
Cleaning and care 134
Safety and technical checks 135
Battery and patient programmer
disposal 136
Declaration of conformity 136
Specifications 137
8 Assistance for the patient
programmer 140
Index 142
37642 2015-04 English
Table of contents
9
Page 10

Glossary
Active Group - Available in Advanced mode
only, the active group is the current group
selected for your neurostimulator. See
"Group" for more information.
Amplitude - The strength or intensity of an
electrical pulse.
Caution - A statement describing actions that
could result in damage to or improper
functioning of a device.
Charging system - Equipment used to
charge the battery inside a rechargeable
implanted neurostimulator.
Clinician - A healthcare professional such as
a doctor or nurse.
Clinician programmer - A device used by a
clinician to send instructions to a
neurostimulator.
Contraindication - A condition or
circumstance when a person should not
have a neurostimulation system.
Glossary
10
English 37642 2015-04
Page 11

Cycling - See Stimulation cycling.
Deep Brain Stimulation (DBS) - The
delivery of electrical pulses to a targeted
area or areas of the brain.
Discharged battery status (rechargeable
battery only) - The rechargeable battery is
depleted and should be charged as soon
as possible. When the battery is in a
discharged state, therapy is not available.
Electrode - A metal piece near the tip of the
lead. Electrodes deliver electrical pulses to
a targeted area or areas of the brain.
Electromagnetic interference (EMI) - A
strong field of energy near electrical or
magnetic devices that could prevent the
neurostimulator from functioning properly.
EOS (End of Service) - A notification that the
neurostimulator has reached its end of
service. At EOS, the neurostimulator no
longer delivers the electrical pulses that
provide therapy.
37642 2015-04 English
Glossary
11
Page 12

ERI (Elective replacement indicator) - A
notification that the neurostimulator is
nearing its end of service.
Group - A group is a collection of therapy
settings on your patient programmer that
your doctor creates for you. Each group
may be defined for a different activity,
symptom, or time of day. Available in
Advanced mode only, this feature allows
you to adjust your therapy for different
situations or for personal preference.
Group status row - The Parameter row on
the Therapy screen displays the active
group.
Implantable neurostimulat or (INS) - See
Neurostimulator.
Indication - The purpose of the
neurostimulation system and the medical
condition for which it may be implanted.
Lead - The lead is a set of thin wires covered
with a protective coating. It carries the
therapy signal to the electrodes that deliver
Glossary
12
stimulation to the brain tissue.
English 37642 2015-04
Page 13

Magnetic Resonance Imaging (MRI) - A
type of medical procedure that scans your
body using magnetic fields to provide
detailed pictures of your anatomy.
Neurostimulation system - Components
that deliver, control, and maintain electrical
pulses to provide therapy to the brain.
Neurostimulator - The neurostimulator is the
implanted device that generates and
controls your DBS therapy.
Overdischarge (rechargeable battery only)
- The rechargeable battery cannot be
recharged when it is overdischarged. Once
the battery is in a discharged state, if it is
not recharged it continues to lose charge.
Eventually, the battery loses enough
charge to permanently affect the
neurostimulator. If this occurs, the battery
is overdischarged.
Parameter - One of three therapy settings
that adjust the electrical pulse: amplitude,
pulse width, and rate of the electrical
stimulation.
Glossary
37642 2015-04 English
13
Page 14

Parameter/Group row - The bottom row on
the Therapy screen showing the
parameter and active group settings (only
available in Advanced mode).
Parameter settings - See Therapy settings.
Patient programmer - A hand-held device
that allows you to turn your therapy on and
off. It may also be used to adjust some
therapy settings.
Precaution - See Caution.
Preferences - Adjustable settings on your
patient programmer including audio,
contrast, and text or icon display format.
Preferences do not affect your therapy.
Pulse width - The length or duration of an
electrical pulse.
Rate - The number of electrical pulses
delivered each second.
Glossary
14
English 37642 2015-04
Page 15

SoftStart/Stop - This feature, programmed
by your clinician, starts and stops your
therapy gradually by slowly increasing or
decreasing to the programmed amplitude
or until turned off.
Status row - The top row on the Therapy
screen. This row displays if your therapy is
on or off.
Stimulation - The delivery of electrical
pulses to an appropriate area of the brain.
Your therapy is actually mild electrical
stimulation.
Stimulation cycling - This feature turns your
stimulation on and off at regular intervals
and is programmed by your doctor.
Synchronize - The process of sending and
receiving information between the patient
programmer and neurostimulator.
Therapy - Treatment of a disease or
condition. When neurostimulation therapy
is prescribed, a neurostimulation system is
used to deliver stimulation to one or more
areas of the brain.
Glossary
37642 2015-04 English
15
Page 16

Therapy screen - The main screen displayed
on the patient programmer.
Therapy settings - Your therapy can be
adjusted by changing the rate, amplitude,
or pulse width of the electrical stimulation.
Your clinician programs all therapy
settings. You may be able to adjust some
therapy settings within clinician-defined
limits. Available in Advanced mode only.
Warning - A statement describing an action
or situation that could harm the patient.
Warning screen - A screen displayed on the
patient programmer that alerts you to a
problem with the programmer, antenna, or
neurostimulator.
Glossary
16
English 37642 2015-04
Page 17

1 Introduction
Page 18

How to use this manual
Refer to this manual after you receive an
implanted neurostimulator. Ask your doctor to
explain anything that is unclear.
A glossary is provided at the beginning of
•
this manual to describe terms that may be
unfamiliar to you.
Chapter 1 "Introduction", on page 17,
•
describes how to use this manual, the
purpose of the patient programmer, and
provides general precautions related to
using your patient programmer.
Chapter 2 "Using your patient
•
programmer", on page 25, describes the
patient programmer and how to perform
specific tasks.
Chapter 3 "Adjusting therapy settings with
•
Advanced mode", on page 65, explains
Introduction 1
18
English 37642 2015-04
Page 19

how to use your patient programmer to
adjust your therapy settings.
Chapter 4 "MRI examinations", on
•
1
page 83, provides information about
what you should do if you have an MRI
examination.
Chapter 5 "Important information about
•
your rechargeable neurostimulator", on
page 97 emphasizes the importance of
checking and recharging your
neurostimulator battery (for rechargeable
devices only).
Chapter 6 "Troubleshooting", on
•
page 109, describes patient programmer
warning and information screens, how to
solve possible problems, and who to
contact if your device is lost or broken.
Chapter 7 "Maintenance", on page 127
•
describes how to care for your patient
1
Your doctor has programmed your implanted
neurostimulator to provide the correct therapy
settings for your medical condition and will activate
Advanced mode if appropriate.
37642 2015-04 English
Introduction 1
19
Page 20

programmer, including how to change the
batteries.
For important safety information
Please see your DBS Patient Therapy Guide
and DBS Therapy-specific Patient Booklet for
important safety information, related warnings
and precautions, and additional information
about your therapy.
Purpose of your patient programmer
The Medtronic Model 37642 Patient
Programmer is designed to operate with the
following Medtronic neurostimulators:
Activa PC Model 37601 (nonrechargeable
•
battery)
Activa RC Model 37612 (rechargeable
•
battery)
Activa SC Model 37602 (nonrechargeable
•
battery)
Introduction 1
20
English 37642 2015-04
Page 21

Activa SC Model 37603 (nonrechargeable
•
battery)
Purpose of the neurostimulation system (indications)
Refer to the indications sheet that is
packaged with your patient programmer for
the purpose of the neurostimulation system
and related information.
Precautions
Patient control devices may affect other
implanted devices—Do not place the patient
control device (ie, patient programmer) over
another type of active implanted medical
device (eg, pacemaker, defibrillator, another
type of neurostimulator). The patient control
device could unintentionally change the
operation of the other device.
Patient programmer handling—To avoid
damaging the patient programmer, do not
immerse the device in liquid; do not clean it
37642 2015-04 English
Introduction 1
21
Page 22

with bleach, nail polish remover, mineral oil,
or similar substances; and do not drop it or
handle it in a way that might damage it.
Patient programmer use—The device is not
certified for use in the presence of a
flammable or anesthetic mixture with air or
with oxygen or nitrous oxide. The
consequences of using the device near
flammable atmospheres are unknown.
Patient programmer modification—Do not
modify this equipment. Modification of this
equipment can result in damage to the
programmer, causing the programmer to
malfunction or become unusable.
Communication interference from EMI—
When using your patient programmer to
communicate with your neurostimulator,
move away from equipment that may
generate electromagentic interference (EMI)
or turn off the likely source of EMI. EMI may
disrupt communication between the patient
programmer and neurostimulator. Examples
of EMI sources are computer monitors,
cellular telephones, and motorized
Introduction 1
22
English 37642 2015-04
Page 23

wheelchairs. For more information about EMI,
refer to your DBS Therapy-specific patient
booklet.
37642 2015-04 English
Introduction 1
23
Page 24

Introduction 1
24
English 37642 2015-04
Page 25

2 Using your patient programmer
Page 26

How the patient programmer
works
The patient programmer is used to control
and monitor your implanted neurostimulator
or neurostimulators. For example, you will
use your patient programmer to:
Turn your therapy on or off.
•
Check the neurostimulator and patient
•
programmer battery status.
Alert you when you need to check the
•
status of the neurostimulator battery.
Change therapy settings.
•
Note: Make sure to keep your patient
programmer with you at all times in the event
that you need to adjust your therapy or turn
your therapy off.
1
Your clinician will turn this feature on or off and also
set the time of day that it will alert you.
2
Your clinician will set up the therapy settings you will
be able to adjust depending on your specific therapy
Using your patient programmer 2
requirements. Discuss this with your doctor.
2
1
26
English 37642 2015-04
Page 27

The patient programmer communicates with
your neurostimulator by sending signals to
and receiving signals from your implanted
neurostimulator.
When you use the patient programmer, hold
it directly over your implanted neurostimulator
so that the programmer screen is facing out.
The back of the patient programmer should
be as close to the neurostimulator as
possible, as shown in Figure 2.1.
37642 2015-04 English
Using your patient programmer 2
27
Page 28
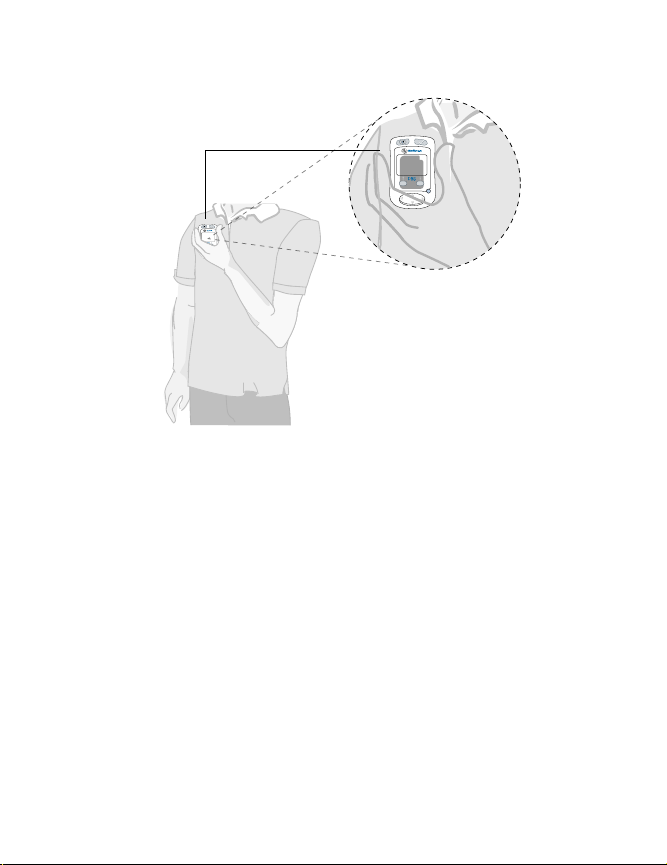
Patient programmer
Hold patient programmer
directly over your
implanted
neurostimulator
Figure 2.1 Place the patient programmer
directly over your neurostimulator.
A detachable antenna is available for use
with your neurostimulator system. The
detachable antenna makes it easier to view
the patient programmer screen while
adjusting your therapy settings or checking
the neurostimulator battery status. See
"Using the detachable antenna" on page 61
for more information.
Using your patient programmer 2
28
English 37642 2015-04
Page 29

Multiple neurostimulators
Some patients have decided with their
doctors to have two neurostimulators
implanted.
If you have two neurostimulators implanted,
you can use one patient programmer to
communicate with both neurostimulators, but
only with one neurostimulator at a time. The
patient programmer only displays information
about the neurostimulator with which it is
currently synchronized.
The patient programmer must be turned off
prior to sychronizing with the other
neurostimulator or you may not be viewing
the desired information.
Simple and advanced therapy
modes
There are two therapy modes available for
your patient programmer: Simple mode and
Advanced mode. Your doctor will discuss
which mode you will use.
37642 2015-04 English
Using your patient programmer 2
29
Page 30

Simple mode uses the therapy settings
•
selected by your doctor. Only your doctor
can adjust your therapy settings.
Advanced mode uses therapy settings
•
selected by your doctor and also may
allow you to change certain therapy
settings and/or select preset therapy
groups.
Using your patient programmer 2
30
English 37642 2015-04
Page 31

Table 2.1 Tasks available for Simple and
Advanced therapy modes
Tasks Simple Advanced
Check neurostimulator battery Yes Yes
Check patient programmer
battery
Check status of neurostimulator
(on or off)
Turn audio on or off. This does
not change the Patient alert.
Adjust time Yes Yes
Adjust screen contrast Yes Yes
Adjust therapy settings No
Change active group No
a
This advanced feature is determined by your doctor.
Yes Yes
Yes Yes
Yes Yes
Yes
Yes
a
a
For details about Advanced mode, see
"Adjusting therapy settings with Advanced
mode" on page 65.
37642 2015-04 English
Using your patient programmer 2
31
Page 32

Summary of keys
Therapy On/Off
Check
Selection
Power/Backlight On/Off
Navigator key
Figure 2.2 Keys used to operate the patient
programmer.
Refer to Table 2.2 for a description of the
patient programmer keys.
Using your patient programmer 2
32
English 37642 2015-04
Page 33

Table 2.2 Summary of keys
Key Function
Turns your therapy on or off.
The patient programmer (or
Therapy
On/Off
Check
•
detachable antenna) must be held
directly over the neurostimulator
while pressing the Therapy On/Off
key.
After using the Therapy On/Off key,
•
verify your therapy status by viewing
the displayed Therapy screen.
Press this key to turn your therapy on
or off.
Synchronizes the neurostimulator and
patient programmer.
Activates a selected group (Advanced
mode only).
Activates the “Return to Clinician
Settings” (Advanced mode only).
The patient programmer (or detachable
antenna) must be held directly over the
neurostimulator while pressing the
Check
Press this key to synchronize the
patient programmer and
neurostimulator.
key.
Using your patient programmer 2
37642 2015-04 English
33
Page 34

Table 2.2 Summary of keys (continued)
Key Function
Turns the patient programmer and the
Power/
backlight
On/Off
backlight on or off. The backlight
provides more light to the display.
Press and release this key once to
turn the patient programmer power on
or off.
Press and hold this key to turn the
backlight on or off.
Using your patient programmer 2
34
English 37642 2015-04
Page 35

Table 2.2 Summary of keys (continued)
Key Function
Selects parameter setting for the left or
Selection
right side of body (Therapy screen).
Increases or decreases setting values
(Parameter screen).
When increasing or decreasing values,
hold the patient programmer (or
detachable antenna) directly over the
neurostimulator and press the
appropriate Selection key.
You have two options to increase or
decrease the settings with the Selection
key.
Press and release the Selection key
•
multiple times to increase or
decrease the settings.
Press and hold the Selection key to
•
increase or decrease the settings
which will change approximately
every half-second.
Press the Selection key under an
option displayed on the screen to
select that option.
37642 2015-04 English
Using your patient programmer 2
35
Page 36

Table 2.2 Summary of keys (continued)
Key Function
Moves the selection box up or down on
the Therapy screen or to the next
Navigator
available screen.
The Options
on the Therapy screen indicates that the
row continues on the next screen.
Press the left
key to navigate to the next screen.
Press the up
this key to move the selection box to the
next row.
icon at the end of a row
or right arrows on this
or down arrows on
Using the Navigator key
The Navigator key moves the selection box
on the patient programmer screen to the right
or left and up or down (Figure 2.3).
Using your patient programmer 2
36
English 37642 2015-04
Figure 2.3 Navigator key.
Page 37

To move the selection box across a row
•
that continues onto the next screen, press
the left
or right arrows on the
Navigator key.
To move the selection box to a new row,
•
press the up
and down arrows on
the Navigator key.
The image below is an example of how
the Options
Options
icon is displayed. The
icon is displayed at the end of
a row when that row has additional items
to view to the right or left (Figure 2.4).
Selection
box
Figure 2.4 The Options icon and selection box.
Options
icon
When moving the selection box with the
Navigator key, you do not need to hold the
patient programmer over your
neurostimulator.
37642 2015-04 English
Using your patient programmer 2
37
Page 38

The Therapy screen
The Therapy screen displays your
neurostimulator settings and battery status.
In Simple mode:
•
The Therapy screen shows whether your
neurostimulator is on or off and the status
of the neurostimulator battery. The Simple
mode screen appears the same for Activa
PC, RC, and SC models (Figure 2.5).
Status row
Battery row
Figure 2.5 The Therapy screen in Simple mode
for Activa PC, RC, and SC models
In Advanced mode:
•
The Therapy screen shows whether your
neurostimulator is on or off, the battery
status, and the specific parameters set for
your therapy.
Using your patient programmer 2
38
English 37642 2015-04
Page 39

In most cases, the Advanced mode
A
screen appears differently for Activa SC
models than the Activa PC and Activa RC
models (Figure 2.6). In most cases, one
Activa PC or RC neurostimulator
stimulates two sides of the brain. In
contrast, one Activa SC neurostimulator
stimulates one side of the brain.
dvanced mode
Status row
Battery row
Parameter/group row
Activa PC and RC Activa SC models
Figure 2.6 The Therapy screen in Advanced
modes Activa PC, RC, and SC models.
Using your patient programmer 2
37642 2015-04 English
39
Page 40

Table 2.3 Therapy screen icons
Row Icons Description
Status
Therapy is on
Therapy is off
Using your patient programmer 2
Battery
(Activa RC)
Neurostimulator battery charge
level (rechargeable)
a
Needs Charge Full Charge
Battery
(Activa PC
Neurostimulator battery status
(nonrechargeable)
and SC
models)
Battery OK Battery near
end of service
Parameter/
b
group
Active group
Amplitude
c
Pulse width
Rate
a
For complete rechargeable battery information, see
Chapter 5 "Important information about your
rechargeable neurostimulator".
b
The Parameter/group row only appears in Advanced
mode.
40
English 37642 2015-04
Page 41

Table 2.3 Therapy screen icons
Row Icons Description
c
If only one group is available, this row displays only
the parameter setting icon.
Synchronizing the patient
programmer and your
neurostimulator
In order to check your neurostimulator status,
change therapy settings, or turn your
neurostimulator on and off, you must first
synchronize the patient programmer and the
neurostimulator.
Complete the following steps to synchronize
the patient programmer and neurostimulator.
1. Locate the Check
key.
2. Hold the patient programmer (or antenna)
directly over the neurostimulator with the
screen facing outward.
3. Press the Check
key.
37642 2015-04 English
Using your patient programmer 2
41
Page 42

Note: Pressing the Check key also
turns on the patient programmer
(Figure 2.7).
Use the
Check key
to synchronize
Figure 2.7 Press the Check key to synchronize
your neurostimulator and patient programmer.
4. After pressing the Check key, the
Communication screen appears briefly.
Figure 2.8 Communication screen.
Using your patient programmer 2
42
English 37642 2015-04
Page 43

a. If synchronization is successful, the
Therapy screen appears (Figure 2.9).
Figure 2.9 Therapy screen (Simple mode).
b. If synchronization is not successful,
the Position antenna screen or the
Poor communication screen appears
(Figure 2.10 and Figure 2.11). See
Table 6.3 on page 115 for information
on how to proceed when these
screens appear.
Figure 2.10 Position antenna screen
Figure 2.11 Poor communication screen.
37642 2015-04 English
Using your patient programmer 2
43
Page 44

Note: See Chapter 6 "Troubleshooting" for
more information about synchronizing the
patient programmer and neurostimulator.
Turning your therapy on or off
Complete the following steps to turn your
therapy on. Be sure to talk to your doctor
about turning your therapy on or off before
following this procedure.
1. Synchronize the patient programmer and
neurostimulator.
a. Hold the patient programmer (or
antenna) directly over your
neurostimulator with the screen facing
outward.
b. Press the Check
screen appears.
The Status icon on the Therapy screen
indicates whether your therapy is turned
on or off (Figure 2.12).
Using your patient programmer 2
44
English 37642 2015-04
key. The Therapy
Page 45

Therapy is turned On Therapy is turned Off
Figure 2.12 Therapy status is displayed.
2. Press the Therapy On/Off key .
If your therapy is currently off, pressing
the Therapy On/Off key will turn the
therapy on.
If your therapy is currently on, pressing
the Therapy On/Off key will turn the
therapy off.
The display flashes Off when the therapy
is turned off. If the display is set to icon
mode, a warning symbol (
) flashes
when the therapy is turned off.
Figure 2.13 Therapy off in icon mode.
37642 2015-04 English
Using your patient programmer 2
45
Page 46

Note: See "Changing preferences" on
page 51 for more information about icon
mode.
The neurostimulator battery
Your neurostimulator battery may be either a
rechargeable battery or a nonrechargeable
battery. Check with your doctor if you do not
know what type of neurostimulator battery
you have.
About rechargeable batteries
The rechargeable neurostimulator battery
needs to be checked daily to make sure the
charge level is adequate for your therapy.
Note: For complete information about the
rechargeable neurostimulator battery, see
Chapter 5 "Important information about your
rechargeable neurostimulator" on page 97.
Using your patient programmer 2
46
English 37642 2015-04
Page 47

Checking the nonrechargeable
battery status
1. Synchronize the patient programmer and
neurostimulator.
Note: For information on checking and
charging the rechargeable
neurostimulator battery, see
Chapter 5 "Important information about
your rechargeable neurostimulator".
a. Hold the patient programmer (or
antenna) directly over your
neurostimulator with the screen facing
outward.
b. Press the Check
key. The Therapy
screen appears (Figure 2.14).
Therapy is turned On Therapy is turned Off
Figure 2.14 Therapy status is displayed.
37642 2015-04 English
Using your patient programmer 2
47
Page 48

2. Check the current status reading for the
battery:
Simple Mode: Press the left or right
–
arrow on the Navigator key to
display the Battery status screen
(Figure 2.15).
Advanced mode: press the up or
–
down
select the Battery row. Press the left
or right arrow on the Navigator key
to display the Battery status screen
(Figure 2.15).
Figure 2.15 Battery Status screen.
arrow on the Navigator key to
Possible nonrechargeable battery
status conditions
The patient programmer displays an
information screen if the neurostimulator
battery needs your attention (Table 2.4).
Using your patient programmer 2
48
English 37642 2015-04
Page 49

See Chapter 6 "Troubleshooting" for more
information about battery-related screens.
Table 2.4 Nonrechargeable neurostimulator
battery screens
If the Therapy screen displays
ERI, the neurostimulator battery
is close to its end of service
a
ERI condition
Nonrecharge-able
battery status is low
date.
You should call your doctor
to report.
This information screen
appears when you synchronize
your neurostimulator and
patient programmer when the
nonrechargeable battery status
is low. This means that your
therapy will not be available
soon.
Press any key to clear this
message. Call your doctor to
report this message.
37642 2015-04 English
Using your patient programmer 2
49
Page 50

Table 2.4 Nonrechargeable neurostimulator
battery screens (continued)
If the EOS screen displays,
then the battery is at end of
service (EOS), therapy has
EOS condition
a
If your nonrechargeable neurostimulator battery is
approaching ERI condition, your doctor may set up
an alert on the patient programmer to remind you to
check your neurostimulator battery voltage once a
day. For more information see, "Patient programmer
alert" on page 57.
stopped, and the
neurostimulator needs to be
replaced.
Call your doctor immediately.
Customizing your patient
programmer
You can adjust the audio and display settings
for your patient programmer by changing the
preferences. Preferences can be reached
from the Status row of the Therapy screen.
Changing the preferences for the patient
programmer do not affect your therapy.
Using your patient programmer 2
50
English 37642 2015-04
Page 51

See Table 2.5 for a list of the available
preference settings.
Table 2.5 Preference icons
Icons Preference
Audio
Contrast
a
Time
Time and number format
Text or icon only display
a
The Patient alert feature is based on the time set in
your patient programmer. For more information, see
"Patient programmer alert" on page 57 .
Changing preferences
Complete the following steps to adjust the
patient programmer preferences.
1. Synchronize the patient programmer and
neurostimulator.
a. Hold the patient programmer (or
antenna) directly over your
37642 2015-04 English
Using your patient programmer 2
51
Page 52

neurostimulator with the screen facing
outward.
b. Press the Check
key. The Therapy
screen appears (Figure 2.16).
Status row
Simple mode Advanced mode
Figure 2.16 Access preferences from the
Status row.
2. If in Advanced mode, press the down
arrow on the Navigator key to move the
selection box to the Status row.
3. Press the left
or right arrow on the
Navigator key to move the selection box
to the desired preference (Figure 2.17).
Using your patient programmer 2
52
English 37642 2015-04
Page 53

Select preference
(audio)
Figure 2.17 Desired preference (audio in this
example).
4. Press the down arrow on the
Navigator key to move the selection box
to the Change row (Figure 2.18).
Change row
Figure 2.18 Change row (audio in this example).
5. Follow the steps in Table 2.6 to change
the selected preference.
37642 2015-04 English
Using your patient programmer 2
53
Page 54

Table 2.6 Changing programmer preferences
Audio preference
a. Press the left
on the Navigator key to move
the selection box to audio on
or off .
b. Continue to step 6 through step 8
on page 56.
Note:The Patient alert will play
even if the Audio preference is
turned off.
Contrast preference
or right arrow
Using your patient programmer 2
54
English 37642 2015-04
a. Press the left
on the Navigator key to move
the selection box to the contrast
slider bar.
b. Press the Selection keys to make
the contrast lighter
c. Continue to step 6 through step 8
on page 56.
or right arrow
or darker .
Page 55

Table 2.6 Changing programmer preferences
(continued)
Time preference
a. Press the left
on the Navigator key to move
the selection box to the hour,
minutes, or time of day (A or P).
b. Press the Selection keys to
increase or decrease the
displayed time.
c. Continue to step 6 through step 8
on page 56.
Time and number format
preference
or right arrow
a. Press the left
on the Navigator key to move
the selection box to a 12-hour
clock or to a 24-hour clock.
b. Continue to step 6 through step 8
on page 56.
37642 2015-04 English
or right arrow
Using your patient programmer 2
55
Page 56

Table 2.6 Changing programmer preferences
(continued)
Text on
Text off/icon
only
Text or icon display format
a. Press the left
on the Navigator key to move
the selection box to the Text on
or Text off/icon only display
setting.
b. Continue to step 6 through step 8
on page 56.
Note:The text displayed on the
patient programmer will always
be in English.
or right arrow
6. Press the up arrow on the Navigator
key to return the selection box to the
Status row.
7. Press the left
or right arrow on the
Navigator key to return to the Therapy
screen.
8. Hold the patient programmer or antenna
directly over your neurostimulator and
press the Check
key to save the
preference change.
Using your patient programmer 2
56
English 37642 2015-04
Page 57

Patient programmer alert
Your doctor may set up an alert on the
patient programmer to remind you to check
your neurostimulator battery once a day
(rechargeable neurostimulator batteries only).
Note: For nonrechargeable neurostimulator
batteries, your doctor may set up this alert for
you when your battery is near its end of
service.
The default setting for the alarm is 11:00 a.m.
However, your doctor may change this to a
different time of day if appropriate.
The alert time is based on the time set for the
patient programmer. To adjust this time, see
Table 2.6 on page 54.
The patient programmer alert beeps for 30
seconds, with a pause every 10 seconds.
The Patient alert screen displays while the
alarm is beeping (see Figure 2.19). The
Patient alert sounds even if the audio
preference is turned off.
37642 2015-04 English
Using your patient programmer 2
57
Page 58

Figure 2.19 Patient alert screen.
This alert repeats every 15 minutes until the
neurostimulator battery status has been
checked.
To check battery status, see "Checking the
nonrechargeable battery status" on page 47
or "Checking the rechargeable
neurostimulator battery" on page 102.
Patient programmer
accessories
Carrying case and patient
programmer ID label
A carrying case and identification label are
included with your patient programmer. Two
AAA alkaline batteries that provide the power
for your patient programmer are also
included.
Using your patient programmer 2
58
English 37642 2015-04
Page 59

The carrying case has a pouch to hold the
patient programmer and the quick reference
guide.
Figure 2.20 Insert the patient programmer into
the case.
You can attach the patient programmer to a
belt using the loop on the back of the case.
37642 2015-04 English
Using your patient programmer 2
59
Page 60

Place the provided identification label on the
back of your patient programmer just in case
the patient programmer is lost (Figure 2.21).
Figure 2.21 Place the adhesive label on the
back of the patient programmer.
Detachable antenna
A detachable antenna (Model 37092) is
useful for viewing the patient programmer
screen while you are adjusting therapy. When
the antenna is connected to the patient
programmer, hold the antenna or attach it to
your clothing directly over the neurostimulator
to adjust settings or check the
neurostimulator battery.
Using your patient programmer 2
ID label
60
English 37642 2015-04
Page 61

Using the detachable antenna
1. Place the antenna directly over your
neurostimulator (Figure 2.22).
Figure 2.22 Place the antenna directly over your
neurostimulator.
2. Pull the fabric of your clothing through the
large opening in the antenna. Then,
wedge the fabric in the narrow slit to
secure the antenna in place (Figure 2.23).
37642 2015-04 English
Using your patient programmer 2
61
Page 62

ab
Figure 2.23 Pull the fabric through the slit (a)
and wedge in place (b).
3. Push the antenna plug firmly into the
antenna jack (
) on the patient
programmer (Figure 2.24).
Figure 2.24 Insert the antenna plug into the
antenna jack.
Using your patient programmer 2
62
English 37642 2015-04
Page 63

After the antenna is connected, follow the
instructions for using the patient programmer.
When you have finished using the patient
programmer, grasp the antenna plug and pull
it out.
Caution: Do not pull directly on the
antenna cable to disconnect the cable
from the programmer because this may
damage the antenna cable.
37642 2015-04 English
Using your patient programmer 2
63
Page 64

Using your patient programmer 2
64
English 37642 2015-04
Page 65

3 Adjusting therapy settings with Advanced mode
Page 66

Adjusting your therapy settings
You may find that on some days, in order to
receive the most effective therapy, you need
to adjust your therapy several times. On other
days you may not need to adjust it at all. Your
doctor will provide complete guidelines about
when you may want to adjust your therapy.
Ask your doctor to print a report with your
•
programmed settings.
When a therapy setting is changed, you
•
will see the change on the Therapy
screen.
If your patient programmer audio is turned
•
on, you will hear one tone that means the
change was effective.
Three rapid tones means that the change
•
could not be confirmed or that the
synchronization was not successful.
Verify the current therapy settings by
•
pressing the Check
the Therapy screen.
key and viewing
Adjusting therapy settings with Advanced mo de 3
66
English 37642 2015-04
Page 67

Tips for adjusting your therapy:
Always adjust the therapy settings to the
•
lowest possible setting that provides
symptom relief.
High therapy settings use more
–
rechargeable battery charge which may
force you to charge the battery more
frequently.
High therapy settings may shorten the
–
service life of the nonrechargeable
battery.
Before changing any therapy settings with
•
your patient programmer, you need to
synchronize the patient programmer with
the neurostimulator.
Note: If you have two neurostimulators
implanted, you can use one patient
programmer to communicate with both
neurostimulators, but only with one
neurostimulator at a time. To
communicate with another
neurostimulator, turn the patient
programmer off and then press the Check
Adjusting therapy settings with Advanced mo de 3
37642 2015-04 English
67
Page 68

key to synchronize while holding over
the desired neurostimulator.
If you experience uncomfortable therapy
•
or unwanted side effects when increasing
the amplitude, pulse width, or rate,
decrease the setting to a comfortable
therapy setting. You may also use the
Therapy On/Off
therapy.
key to stop the
Therapy settings
If your neurostimulator is set to Simple mode,
you will not be able to adjust your therapy
settings. Your doctor can adjust your settings
when necessary.
Notes:
To increase amplitude, pulse width, or
•
rate, your therapy must be turned on.
To decrease amplitude or pulse width,
•
your therapy may be turned on or off.
To decrease rate, your therapy must be
•
turned on.
Adjusting therapy settings with Advanced mo de 3
68
English 37642 2015-04
Page 69

For each group, only one parameter can
•
be changed. For example, group A may
allow you to change only the amplitude of
the therapy and group B may allow you to
change only the rate of the therapy.
A group may also be programmed for
•
view only and you will not be able to
adjust any settings. Discuss your settings
with your doctor. For more information
about groups, see "Selecting a new
group" on page 73.
Changing therapy settings in
Advanced mode
The ability to change therapy settings is only
available in Advanced mode.
You can only change the settings of the
active group. If you want to change settings
available for a non-active group, you will
need to make that group active first. See
"Selecting a new group" on page 73 for
complete instructions.
37642 2015-04 English
Adjusting therapy settings with Advanced mo de 3
69
Page 70

1. Synchronize the patient programmer and
neurostimulator.
a. Hold the patient programmer (or
antenna) directly over your
neurostimulator with the screen facing
outward.
b. Press the Check
screen appears.
2. Press the down
Navigator key to move the selection box
to the Parameter row (Figure 3.1).
Activa PC and RC models Activa SC models
Figure 3.1 Parameter row for Activa PC, RC,
3. Press the Selection key directly under the
displayed setting you want to adjust
(Figure 3.2).
Adjusting therapy settings with Advanced mo de 3
70
English 37642 2015-04
key. The Therapy
arrow on the
Parameter row
and SC models.
Page 71

Parameter row for Activa PC and RC
Two sides of the brain
Setting for
the left side
of your body
Parameter row for Activa SC Models
One side of the brain
Setting for
the left side
of your body
Setting for
the right side
of your body
Setting for
the right side
of your body
Figure 3.2 Select the appropriate Selection key
on Activa PC, RC, and SC models.
Adjusting therapy settings with Advanced mo de 3
37642 2015-04 English
71
Page 72

4. Press the Selection keys again to
increase or decrease the selected therapy
setting as needed (Figure 3.3).
Indicates left
side of body
1
Decrease setting
Figure 3.3 Increasing or decreasing a therapy
Notes:
Hold the patient programmer or
–
detachable antenna over your
neurostimulator when increasing or
decreasing your settings. The therapy
settings will immediately change as
you press the Selection keys.
1
If you attempt to increase or decrease the therapy
setting beyond the available limits, an information
Adjusting therapy settings with Advanced mo de 3
72
screen appears, see Table 3.1 on page 81.
English 37642 2015-04
Increase setting
setting.
Page 73

Press and hold down the Selection
–
key to increase or decrease the setting
which will change approximately every
half-second.
5. Press any arrow on the Navigator key to
return to the Therapy screen.
6. Repeat steps 2-5 for the other side of your
body if desired.
Note: If you have multiple
neurostimulators, the patient programmer
must be turned off prior to synchronizing
with the other neurostimulator.
Selecting a new group
The group feature is only available in
Advanced mode.
Caution: Select the group that your
clinician has recommended for your
specific needs.
1. Synchronize the patient programmer and
neurostimulator.
37642 2015-04 English
Adjusting therapy settings with Advanced mo de 3
73
Page 74

a. Hold the patient programmer (or
antenna) directly over your
neurostimulator with the screen facing
outward.
b. Press the Check
key. The Therapy
screen appears.
2. Press the down
arrow on the
Navigator key to move the selection box
to the Parameter row (Figure 3.4).
Parameter row
Activa PC and RC models Activa SC models
Figure 3.4 Parameter row.
3. Press the right arrow on the Navigator
key to display the available groups.
(Figure 3.5).
Adjusting therapy settings with Advanced mo de 3
74
English 37642 2015-04
Page 75

Figure 3.5 Group screen.
4. Press the up or down arrow on the
Navigator key to move the selection box
the desired group (Figure 3.6).
Figure 3.6 Select the desired group.
5. Resynchronize the patient programmer
and neurostimulator.
a. Hold the patient programmer (or
antenna) directly over your
neurostimulator with the screen facing
outward.
b. Press the Check
key to sychronize
with the patient programmer and
activate the selected group.
37642 2015-04 English
Adjusting therapy settings with Advanced mo de 3
75
Page 76

6. The Communication screen briefly
appears, followed by the Therapy screen
(Figure 3.7).
Figure 3.7 Communication screen.
The Therapy screen will display your new
therapy parameters and group setting
(Figure 3.8).
Parameter/
Group row
Activa PC and RC
models
Figure 3.8 Therapy screen with new group
setting.
Activa SC models
Adjusting therapy settings with Advanced mo de 3
76
English 37642 2015-04
Page 77

Returning your therapy to
original settings
If you have changed your therapy settings
and want to return to the settings selected by
your doctor, follow these steps:
1. Synchronize the patient programmer and
neurostimulator.
a. Hold the patient programmer (or
antenna) directly over your
neurostimulator with the screen facing
outward.
b. Press the Check
screen appears.
2. Press the down
Navigator key to move the selection box
to the Parameter row (Figure 3.9).
key. The Therapy
arrow on the
37642 2015-04 English
Adjusting therapy settings with Advanced mo de 3
77
Page 78

Parameter row
Activa PC and RC models Activa SC models
Figure 3.9 Parameter row.
3. Press the right arrow on the Navigator
key to display the available groups. The
Group settings screen appears
(Figure 3.10).
Figure 3.10 Group settings screen.
To change from the current group
settings back to the doctor default
settings:
a. With the selection box highlighting the
current group, press the right
on the Navigator key. The Group
reset screen appears (Figure 3.11).
Adjusting therapy settings with Advanced mo de 3
arrow
78
English 37642 2015-04
Page 79

Figure 3.11 Group reset screen.
b. Press the Check key.
To change an inactive group back to
the doctor default setti ngs:
a. Press the up
or down arrow on
the Navigator key to move the
selection box to the desired inactive
group (Figure 3.12).
Figure 3.12 Select new group.
b. Press the right arrow on the
Navigator key. The Group options
screen appears (Figure 3.13).
37642 2015-04 English
Adjusting therapy settings with Advanced mo de 3
79
Page 80

Figure 3.13 Group options screen.
c. Press the down arrow on the
Navigator key to move the selection
box to the Clinician setting option
(Figure 3.14).
Figure 3.14 Change group to clinician settings.
d. Press the right arrow on the
Navigator key to display the Group
reset screen (Figure 3.15).
Figure 3.15 Group reset screen
e. Press the Check key.
Adjusting therapy settings with Advanced mo de 3
80
English 37642 2015-04
Page 81

4. The patient programmer beeps when the
group settings are changed (if the audio is
turned on).
Understanding therapy
parameter limits
Each therapy parameter will have a default
limit set by your doctor. If you attempt to
change a therapy parameter outside these
set limits, you will see one of the screens
shown in Table 3.1.
Table 3.1 Parameter limit screens
Lower limit You tried to decrease a parameter
(amplitude, pulse width, or rate)
below the lowest value allowed.
Press any arrow on the Navigator
key to clear the screen.
37642 2015-04 English
Adjusting therapy settings with Advanced mo de 3
81
Page 82

Table 3.1 Parameter limit screens
(continued)
Upper limit You tried to increase a parameter
(amplitude, pulse width, or rate)
above the highest value allowed.
Press any arrow on the Navigator
key to clear the screen.
Adjusting therapy settings with Advanced mo de 3
82
English 37642 2015-04
Page 83

4 MRI examinations
Page 84

If you have an MRI appointment
MR Conditional—Depending on what
MR
kind of neurostimulation system components
that you have implanted, you may be eligible
for one of the following types of magnetic
resonance imaging (MRI) scans:
MRI scans of the head only (this is
•
referred to as head-only eligible).
MRI scans of any part of your body (this is
•
referred to as full-body eligible).
Note: You should inform your clinician
managing your neurostimulation system that
an MRI examination has been prescribed for
you and that you need him or her to
determine what type of MRI scan you are
eligible to receive.
Responsibilities of the patient
in preparing for the MRI
appointment
Bring the following to every MRI appointment:
MRI examinations 4
84
English 37642 2015-04
Page 85

Your patient identification (ID) card for
•
your neurostimulation system if you
received one from Medtronic.
Note: If you have two neurostimulation
systems implanted in your body, bring
both ID cards to your MRI appointment.
Your MRI scan eligibility sheet if you were
•
given one from your clinician managing
your neurostimuation system.
Your patient programmer.
•
For more information about how MRI can
affect your neurostimulation system and what
you should do if you have an MRI
appointment, refer to the DBS Patient
Therapy Guide.
Preparing your
neurostimulation system for
the MRI scan
Your implanted neurostimulation system (ie,
therapy) may need to be turned off prior to
your MRI scan or reprogrammed to allow the
37642 2015-04 English
MRI examinations 4
85
Page 86

system to safely remain on during your MRI
scan. This will depend on the neurostimulator
model implanted in your body, the therapy
settings of your neurostimulator, and the type
of MRI scan you are eligible to receive.
Your clinician managing your
neurostimulation system will inform you
whether your system should be on or off
during the MRI scan.
If therapy should be turned off prior to your
MRI scan, refer to "Turning off therapy before
the MRI scan" on page 86.
If therapy can remain on during your MRI
scan, refer to "Activating settings to allow
therapy on during the MRI scan" on
page 90.
Turning off therapy before the
MRI scan
If your clinician managing your
neurostimulation system indicates that
therapy should be off during the MRI scan,
therapy can be turned off with the patient
MRI examinations 4
86
English 37642 2015-04
Page 87

programmer (see page 87) or the clinician
programmer (see page 88).
Using the patient programmer to
turn off therapy
If you brought your patient programmer to the
MRI appointment, you can turn off therapy
before your MRI scan and outside of the MRI
scanner (magnet) room.
For instructions on turning off therapy, go to
"Turning your therapy on or off" on page 44.
During the MRI scan, keep therapy off.
Caution: Do not turn therapy back on
before your MRI scan. Leaving therapy on
during the scan could increase the
potential for unintended stimulation.
After the MRI scan and outside of the MRI
scanner (magnet) room, you can turn therapy
back on using your patient programmer or
you can return to the clinician managing your
neurostimulation system to have therapy
turned back on (refer to "Turning therapy
back on after the MRI scan" on page 89).
MRI examinations 4
37642 2015-04 English
87
Page 88

Note: Do not take the patient programmer
into the MRI scanner (magnet) room. If you
brought the recharger with you to the MRI
appointment, do not take the recharger into
the MRI scanner (magnet) room either.
Using the clinician programmer to
turn off therapy
Your clinician managing your
neurostimulation system can turn off therapy
before your MRI examination using the
clinician programmer.
Do not turn therapy back on before your MRI
scan.
Caution: Do not turn therapy back on
before your MRI scan. Leaving therapy on
during the scan could increase the
potential for unintended stimulation.
The clinician may give you an MRI scan
eligibility sheet to bring to your MRI
appointment. Give the eligibility sheet to the
MRI clinician.
During the MRI scan, keep therapy off.
MRI examinations 4
88
English 37642 2015-04
Page 89

After the MRI scan and outside of the MRI
scanner (magnet) room, you can turn therapy
back on using your patient programmer or
you can return to the clinician managing your
neurostimulation system to have therapy
turned back on (refer to "Turning therapy
back on after the MRI scan" on page 89).
Turning therapy back on after
the MRI scan
Turn therapy back on when the MRI scan is
complete and you are outside of the MRI
scanner (magnet) room.
Therapy can be turned on with the patient
programmer or the clinician programmer:
If you do not have your patient
•
programmer with you, go to the clinician
managing your neurostimulation system
to turn on therapy using the clinician
programmer.
If you brought your patient programmer to
•
the MRI appointment, turn therapy back
on using the patient programmer. For
37642 2015-04 English
MRI examinations 4
89
Page 90

instructions on turning on therapy, go to
"Turning your therapy on or off" on
page 44.
Note: If a power-on-reset (POR) screen
appears on the patient programmer, see
Table 4.1 on page 95.
Activating settings to allow
therapy on during the MRI scan
Depending on your therapy settings, your
clinician managing your neurostimulation
system may create a new group that should
be activated prior to your MRI scan. This will
allow your system to safely remain on during
the scan.
If your clinician managing your
neurostimulation system creates a new group
setting so that therapy can remain on during
your MRI scan, the new group can be
activated with the patient programmer (see
page 91) or the clinician programmer (see
page 92).
MRI examinations 4
90
English 37642 2015-04
Page 91

Using the patient programmer to
activate a new group
If you brought your patient programmer to the
MRI appointment, you can activate the new
group before your MRI scan and outside of
the MRI scanner (magnet) room. This will
allow you to keep therapy on during your MRI
scan.
For instructions on activating a new group, go
to "Selecting a new group" on page 73.
During the MRI scan, keep therapy on, but do
not return therapy to your original group
setting.
Caution: Do not return therapy to your
original group setting before your MRI
scan. Returning therapy to your original
group setting could increase the potential
for unintended stimulation during the
scan.
After the MRI scan and outside of the MRI
scanner (magnet) room, you can return
therapy to your original group setting using
37642 2015-04 English
MRI examinations 4
91
Page 92

your patient programmer or you can return to
the clinician managing your neurostimulation
system to reprogram therapy to your original
group setting (refer to "Returning therapy to
your original group setting after the MRI
scan" on page 94).
Note: Do not take the patient programmer
into the MRI scanner (magnet) room. If you
brought the recharger with you to the MRI
appointment, do not take the recharger into
the MRI scanner (magnet) room either.
Using the clinician programmer to
activate a new group
The clinician managing your neurostimulation
system can activate the new group before
your MRI examination using the clinician
programmer. This will allow you to keep
therapy on during your MRI scan.
Do not change therapy to your original group
setting before the MRI scan.
Caution: Do not return therapy to your
original group setting before your MRI
MRI examinations 4
92
English 37642 2015-04
Page 93

scan. Returning therapy to your original
group setting could increase the potential
for unintended stimulation during the
scan.
The clinician may give you an MRI scan
eligibility sheet to bring to your MRI
appointment. Give the eligibility sheet to the
MRI clinician.
During the MRI scan, keep therapy on, but do
not return therapy to your original group
setting.
After the MRI scan and outside of the MRI
scanner (magnet) room, you can return
therapy to your original group setting using
your patient programmer or you can return to
the clinician managing your neurostimulation
system to reprogram therapy to your original
group setting (refer to "Returning therapy to
your original group setting after the MRI
scan" on page 94).
37642 2015-04 English
MRI examinations 4
93
Page 94

Returning therapy to your
original group setting after the
MRI scan
Return therapy to your original group setting
when the MRI scan is complete and you are
outside of the MRI scanner (magnet) room.
Group settings can be changed with the
patient programmer or the clinician
programmer:
If you do not have your patient
•
programmer with you, go to the clinician
managing your neurostimulation system
to return therapy to your original group
setting using the clinician programmer.
If you brought your patient programmer to
•
the MRI appointment, return therapy to
your original group setting using the
patient programmer. For instructions on
returning therapy to your original group
setting, go to "Selecting a new group" on
page 73.
MRI examinations 4
94
English 37642 2015-04
Page 95

Note: If a power-on-reset (POR) screen
appears on the patient programmer, see
Table 4.1.
Table 4.1 POR screens
Screen Description and action
Error code POR: Your therapy has
stopped.
Call your clinician to restart
Warning POR
(hazard triangle
symbol in the
upper left corner)
your therapy.
37642 2015-04 English
MRI examinations 4
95
Page 96

Table 4.1 POR screens (continued)
Screen Description and action
The neurostimulator has b ee n
reset. Your therapy has stopped.
1. Press any arrow on the
Informational
POR (small "i"
icon in the upper
left corner)
Navigator key to clear the
screen
2. Reset the time, if prompted
(for instructions, see
Table 2.6). Before resetting
the time, confirm the patient
programmer or antenna is
directly over the
neurostimulator.
3. Press the up arrow on the
patient programmer. This
action will clear the POR.
4. Press the Therapy on/off
key to turn your therapy on.
Call your clinician to report the
reset.
MRI examinations 4
96
English 37642 2015-04
Page 97

5 Important information about your rechargeable neurostimulator
Page 98

The rechargeable
neurostimulator battery
The following chapter explains the
importance of maintaining the battery charge
level of your rechargeable neurostimulator.
Warning: It is very important to check
your neurostimulator battery every day. If
the therapy provided by your
neurostimulator should stop abruptly this
could cause your symptoms to return. In
some cases, your symptoms may return
at a greater intensity than before your
implant. In rare situations, this could result
in a medical emergency.
It is important for you to recharge your
battery on a regular, frequent basis as
recommended by your doctor to make
sure that the neurostimulator battery
remains charged. Depending on your
therapy settings this may mean charging
your battery once a day or once a week,
1
1
This information only applies to implantable
Important information about your rechargeable neurostimulator 5
98
neurostimulators that use a rechargeable battery.
English 37642 2015-04
Page 99

ask your doctor for his recommendation. If
you have technical problems while
charging your battery, contact your doctor,
nurse, or Medtronic patient services.
If you notice that your symptoms return,
check your battery status first. If it
indicates that your battery is not charged,
recharge your battery immediately. Please
follow your doctor's advice for taking
medications when your neurostimulator is
not working. Medications may help control
your symptoms while or until your battery
is charged. Please contact your doctor
immediately if your symptoms get worse
and do not return to where they were
when your neurostimulator was working,
or if your device battery is not indicating a
need to recharge, please contact your
doctor immediately. Your doctor can
check the status of your neurostimulator
system and monitor your condition.
Note: For contact information, see
Chapter 8 "Assistance for the patient
programmer" on page 139.
37642 2015-04 English
Important information about your rechargeable neurostimulator 5
99
Page 100

Check and charge: make it a
habit
Because this is so important, make it a
priority to check and charge your
neurostimulator battery on a regular
schedule. See Table 5.1 on page 107 for
rechargeable battery alert screens that
indicate a low battery charge level.
Recommendations:
Check your battery charge level at the
•
same time every day (your doctor can set
the patient programmer alert for this time).
Combine checking your battery charge
•
level with something else you do every
day in order to make it a convenient habit.
Make sure to bring your neurostimulator
•
recharging system with you when you
travel or are hospitalized (even for
overnight).
Allow enough time to fully charge the
•
neurostimulator. Depending on the charge
Important information about your rechargeable neurostimulator 5
100
level of the battery when you begin
English 37642 2015-04
 Loading...