

Page 1
Use the arrow
buttons to
scroll to Continue.
Press the Select
button .
CONNECT TO PUMPCONNECT TO PUMP
?
OKOK
SkipSkip
?
OKOK
Go Back
Connect to a
MiniMed Pump?
Select “Connect
Device” on your Pump.
Go BackGo Back
CONNECT TO PUMP CONNECT TO PUMP
CancelCancel
Searching...
Turn the page over to complete setup.
¬
QUICK REFERENCE GUIDE
93
mg
dL
Before Meal Before Meal
12:24 PM l 10/1312:24 PM l 10/13
BolusBolus
ReminderReminder
NotesNotes
Uses only C
ONTOUR
®
N
EXT
Blood Glucose Test Strips
from Bayer
CONNECT TO PUMPCONNECT TO PUMP
New Device
See User Guide to connect
new device. Select Search
below when ready.
Search
93 mg/dL
12:24
PM
Active Insulin 1.5 u
Bolus Basal
Active Insulin 1.5 U
Bolus Basal
12:24
PM
* Wall charger may not be included in all meter kits. Contact Customer
Service for information on obtaining a wall charger.
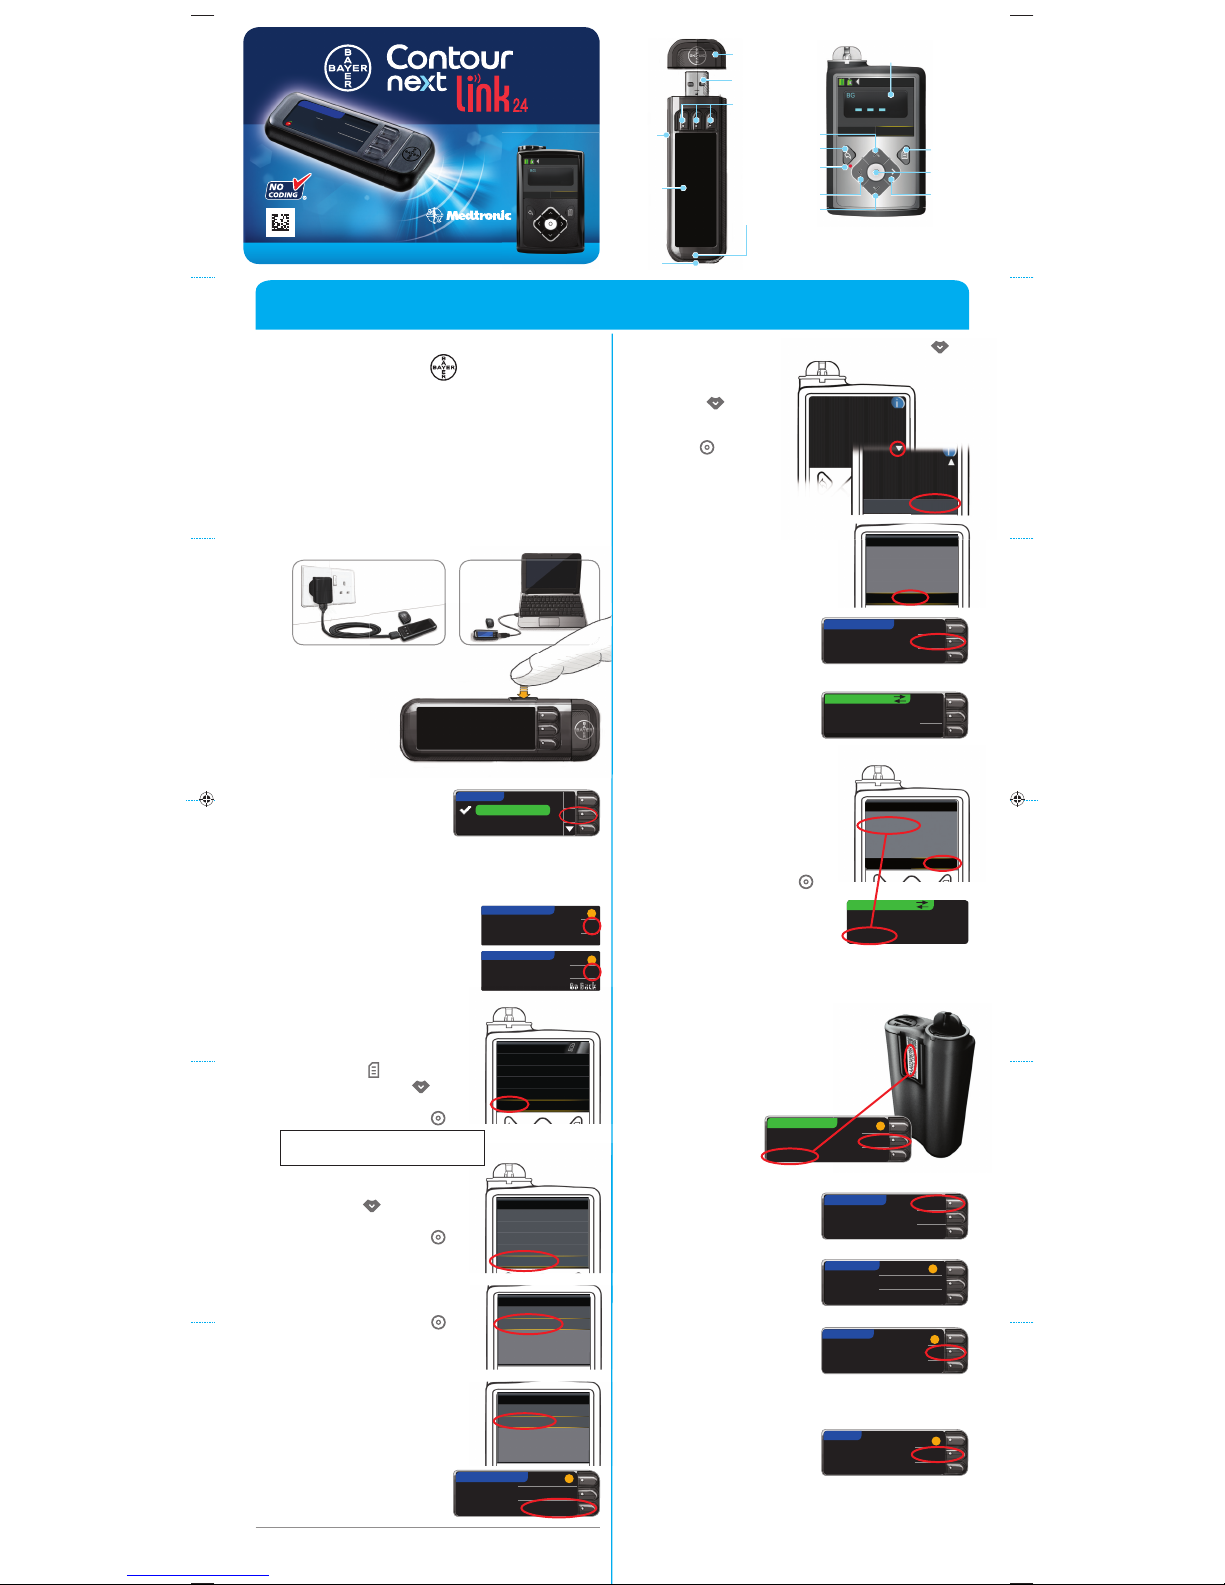
Initial Setup of Meter and Connection
to MiniMed
®
630G Insulin Pump
1
Remove the cap with on it to reveal the
USB connector.
The CONTOUR®NEXT LINK 2.4 meter from Bayer has
a permanent rechargeable battery.
Charge your meter with the wall charger* or by
plugging the USB connector into a computer. Be
sure the computer is turned on.
Your meter will briefly display “Do Not Test–Charging”
and the test strip port light will flash. You cannot do
ablood glucose test while the battery ischarging.
When charging is finished, the test strip port light will
turn off. Unplug your
CONTOUR NEXT LINK 2.4
meter
totest.
Charging Meter
2
To begin setup,
hold down the
topMenu button
for several
seconds until the
meter turns on.
Unplug Meter From Charging
Source Before Beginning Setup
Connect to Pump
3
Scroll down to select
your language.
Press OK.
5
Connect to a MiniMed Pump?
Press OK.
6
Press OK.
7
Put the meter down and pick
up your pump.
Press any button to turn the
screen on; then press the
Menu button .
Use the down arrow to
scroll toUtilities.
Press the Select button .
8
In the Utilities menu, use the
down arrow to scroll to
Device Options.
Press the Select button .
Menu
Insulin Settings
Sensor Settings
Event Markers
Reminders
Utilities
Utilities
Self Test
Carb Unit
Manage Settings
Sensor Demo
Device Options
9
In the Device Options menu,
scroll to Connect Device.
Press the Select button .
Device Options
Manage Devices
Connect Device
10
Place the meter and pump next
to each other.
Select Auto Connect on your
pump.
11
Read the pump screen, using the down arrow to
scroll to the next page.
12
Place the meter and pump next
to each other.
Select Search on the pump.
SearchSearch
CancelCancel
CONNECT TO PUMPCONNECT TO PUMP
Select “Search” on
your Pump and meter.
The search may take up
to2minutes.
13
Check to see if Device SN
(serial number) on the pump
matches the Device SN on
the meter.
If they match, scroll to
Confirm on the pump.
Press the Select button .
CONNECT TO PUMP CONNECT TO PUMP
Use Pump to confirm Device
SN:
BGJ133333F
Confirm Device SN
GTJ133333F found SN:
BGJ133333F
ConfirmCancel
14
Turn the pump over.
Make sure that the SN on the
back of the pump matches
the pump serial number now
on the meter screen.
Press Next.
?
NextNext
DeleteDelete
MiniMed Pump
connected:
AA12345678
15
Select Always and press
OK on next screen.
AlwaysAlways
Ask MeAsk Me
NeverNever
Automatically send
results to the
Pump?
SEND OPTIONSSEND OPTIONS
16
Select the Date Format.
Month/Day/YearMonth/Day/Year
Day.Month.YearDay.Month.Year
SELECTSELECT
DATE FORMATDATE FORMAT
?
17
Press OK.
Note: If time and date
are incorrect, you must
change them on the
pump.
OKOK
Date / Time is
set by Pump.
DATE / TIMEDATE / TIME
?
18
Press Accept to select
AutoLog is Off.
AutoLog allows you to
mark a test result as
Fasting, Before Meal, or After Meal. See your user
guide to learn more.
AcceptAccept
Turn OnTurn On
AutoLog is Off.
AUTOLOGAUTOLOG
?
Wireless Blood Glucose
Monitoring System
Connect Device
Manual Connect
Auto Connect
?
Manual ConnectManual Connect
Auto ConnectAuto Connect
CONNECT TO PUMPCONNECT TO PUMP
4
Press OK if the correct language is displayed.
Press NO if the incorrect language is displayed.
If pump screen goes blank, press
any button to turn it back on.
When the pump links to the meter, the SN on
the meter screen will change to a different serial
number. This number is the pump SN.
PUMP CONNECTEDPUMP CONNECTED
®
Select Auto Connect on
your meter.
Select Search on the
meter.
10:30 AM | 10/13/11
are in search mode.
Auto Connect
Before using Auto
Connect, be sure no other
nearby MiniMed devices
Cancel
Continue
mg/dL
English
Deutsch
Español
LANGUAGELANGUAGE
OKOK
81928479 Rev. 06/15
Display
Screen
USB
Connector
Selection/
Scrolling
Buttons
Tes t
Strip
Port
Display
Screen
Test
Strip
Port
Light
Top
Menu
Button
Protective
USB Cap
Meter
Pump
Menu
Select
Right
Up
Back
Notification
Light
Left
Down
p
,
t
on
the
.
rom Charging
eginning
Se
Se
tu
tu
p
NOTE: Check the units of measure
of your meter.
See your meter user guide for
complete instructions.
Page 2
Bayer Health Care LLC
Mishawaka, IN 4 6544 USA
References
1
FDA Public Health Notification: Use of Fingerstick Devices
on More than One Person Poses Risk for Transmitting
Bloodborne Pathogens: Initial Communication (2010).
http://www.fda.gov/MedicalDevices/Safety/
AlertsandNotices/ucm224025.htm
2
CDC Clinical Reminder: Use of Fingerstick Devices on More
than One Person Poses Risk for Transmitting Bloodborne
Pathogens (2010). http://www.cdc.gov/injectionsafety/
Fingerstick-DevicesBGM.html
WARNING:
• The meter, lancing device and lancets are for single patient use. Do not share them with anyone, including other
family members. Do not use on multiple persons.
1,2
• Use a new lancet each time you test because it is no longer sterile after use.
• All parts of the kit are considered biohazardous and can potentially transmit infectious diseases, even after you
have performed cleaning and disinfection.
• Always wash your hands well with soap and water and dry them well before and after testing, handling the
meter, lancing device, or test strips.
For complete instructions on cleaning and disinfection, please see your meter user guide.
Press Send
or Don't Send.
167
mg
dL
SentSent
10:30 AM l 11/1310:30 AM l 11/13
167
mg
dL
YOUR RESULTSYOUR RESULTS
BolusBolus
Reminder Reminder
NotesNotes
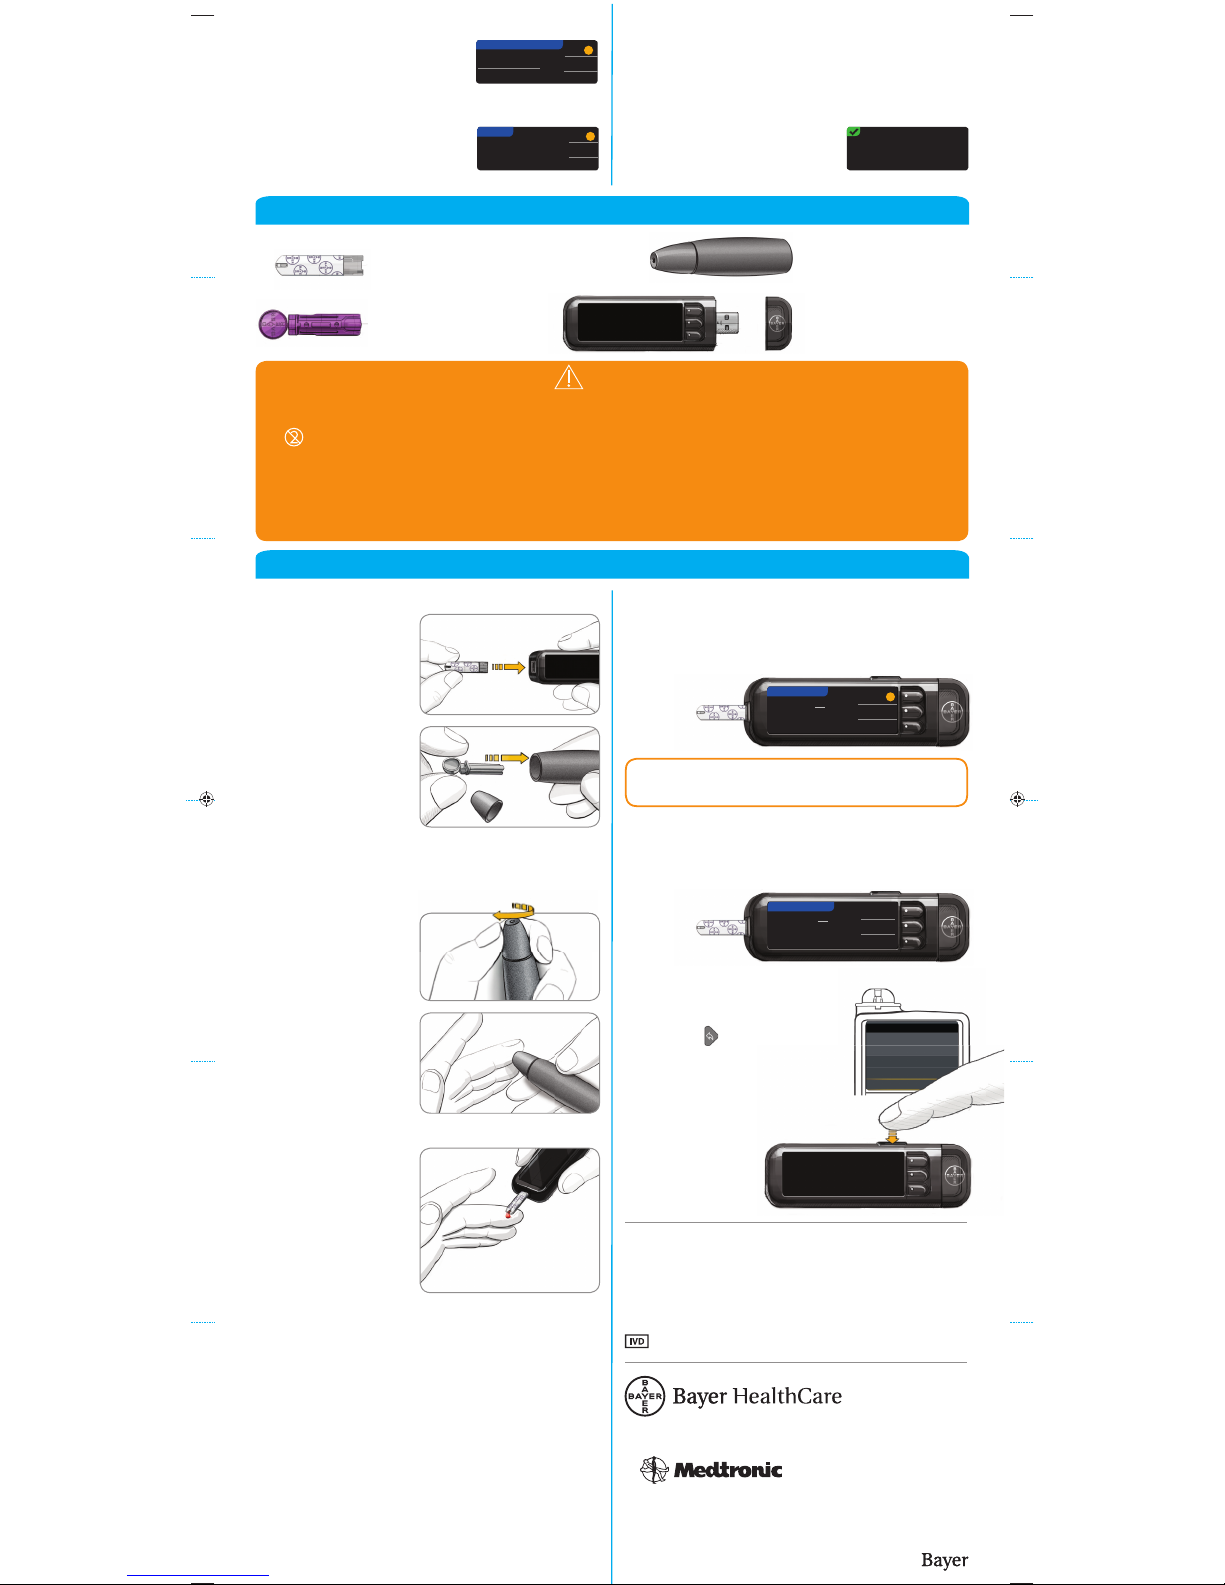
2
Remove the lancing
device endcap.
Insert the lancet
firmly into the
lancing device
until it comes to
a full stop.
1
Insert the test
strip and wait for
the APPLY BLOOD
message.
3
Replace the
endcap. Rotate
the endcap dial
to adjust the
puncture depth.
4
Obtain your
blood drop.
5
Touch the tip of
the test strip to the
drop of blood. If
the first blood drop
is not enough, the
meter will beep
twice and display
STRIP UNDERFILLED.
You have about
30seconds to
apply more blood
to the same strip.
7
Select Bolus to send a bolus to your pump. Select
Reminder to set a reminder for your next test. Select
Notes to add more information to the result.
9
Remove the test strip and the meter
will turn off in
3 minutes. Or
hold down the
Menu button
to turn off
themeter.
8
Pick up your pump.
Press and hold the Back
button to get to the home
screen. Your blood sugar
result should display on the
pump screen.
Obtain Blood Drop
Testing Blood Drop
Bolus, Reminder, and Notes
Turn Meter Off
Confirm That Result Was Sent to Pump
See your CONTOUR®NEXT LINK 2.4 user guide,
lancing device insert and MiniMed insulin pump user
guide for full instr uctions.
Bayer, the Bayer Cross , CONTOUR and the No Codin g logo
are registe red tradema rks of Bayer. All other t rademarks a re
the proper ty of their respective own ers.
6
If Always was selected in Send Options during Setup,
results will be sent directly to your pump. If Ask
Me was selected in Send Options during Setup, you
can choose to send your result to your pump after
eachblood
sugar test.
Testing Your Blood
Sending Results to Your MiniMed Pump
20
Accept or Change your Target
range.
The Target range is your goal
for your blood sugar test results.
?
AcceptAccept
ChangeChange
TARGETTARGET
70 - 18070 - 180
21
Your system setup is now
complete and ready to run a
blood sugartest.
Go to Step 1 below.
Setup is complete.
Insert strip to start a
test.
?
SendSend
Don't SendDon't Send
BG
167 mg/dL
Calibrate Sensor
Bolus
Done
19
Accept or Change High and
Low Alerts.
The meter alerts you with
a sound when your blood
sugar level is above or below your set levels.
AcceptAccept
ChangeChange
?
HIGH AND LOW ALERTSHIGH AND LOW ALERTS
High: 250 High: 250 mg/dLmg/dL
Low: 70 Low: 70 mg/dLmg/dL
NOTE: If AutoLog is ON, you are asked to mark your
result as Fasting, Before Meal, or After Meal before
your result displays. If your result is above your
High Alert setting or below your Low Alert setting,
you willsee your result without having to make an
AutoLog selection.
© 2015 Bayer. All rights reser ved.
NOTE: Alerts can only be set outside your selected
Target Range(s). Targets can only be set inside your
selected Alert level(s). For additional information,
you may contact Customer Service. See contact
information for Customer Service below.
CAUTION: Always check the display on your pump to
ensure that the glucose result shown agrees with the
glucose result shown on the meter.
Bayer Customer Ser vice is available 24 hours per day,
7 days per week at:
1-8 00- 34 8-810 0
www.diabetes.bayer.com
For In Vitro Diagnostic Use.
The lancing device graphics are for illustration
purposes only. Your lancing device may look
different. Refer to your lancing device insert
for detailed instructions on preparing the
lancing device.
Lancing Device
from Bayer
C
ONTOUR
®
NEXT
Test Strip from Bayer
Lancet from Bayer
C
ONTOUR
®
NEXT LINK 2.4
Blood Glucose Meter
from Bayer
Materials for Testing
 Loading...