

Page 1

SynchroMed™ II
Clinician Programmer
Clinician Programming Guide
A810
SynchroMed
Includes information about the Model A901 Communication Manager
app and the Model A902 Patient Data Service app
Application version 1.1
Application version 1.1
™
II infusion systems
Page 2

Page 3

QUICK APPLICATION OVERVIEW
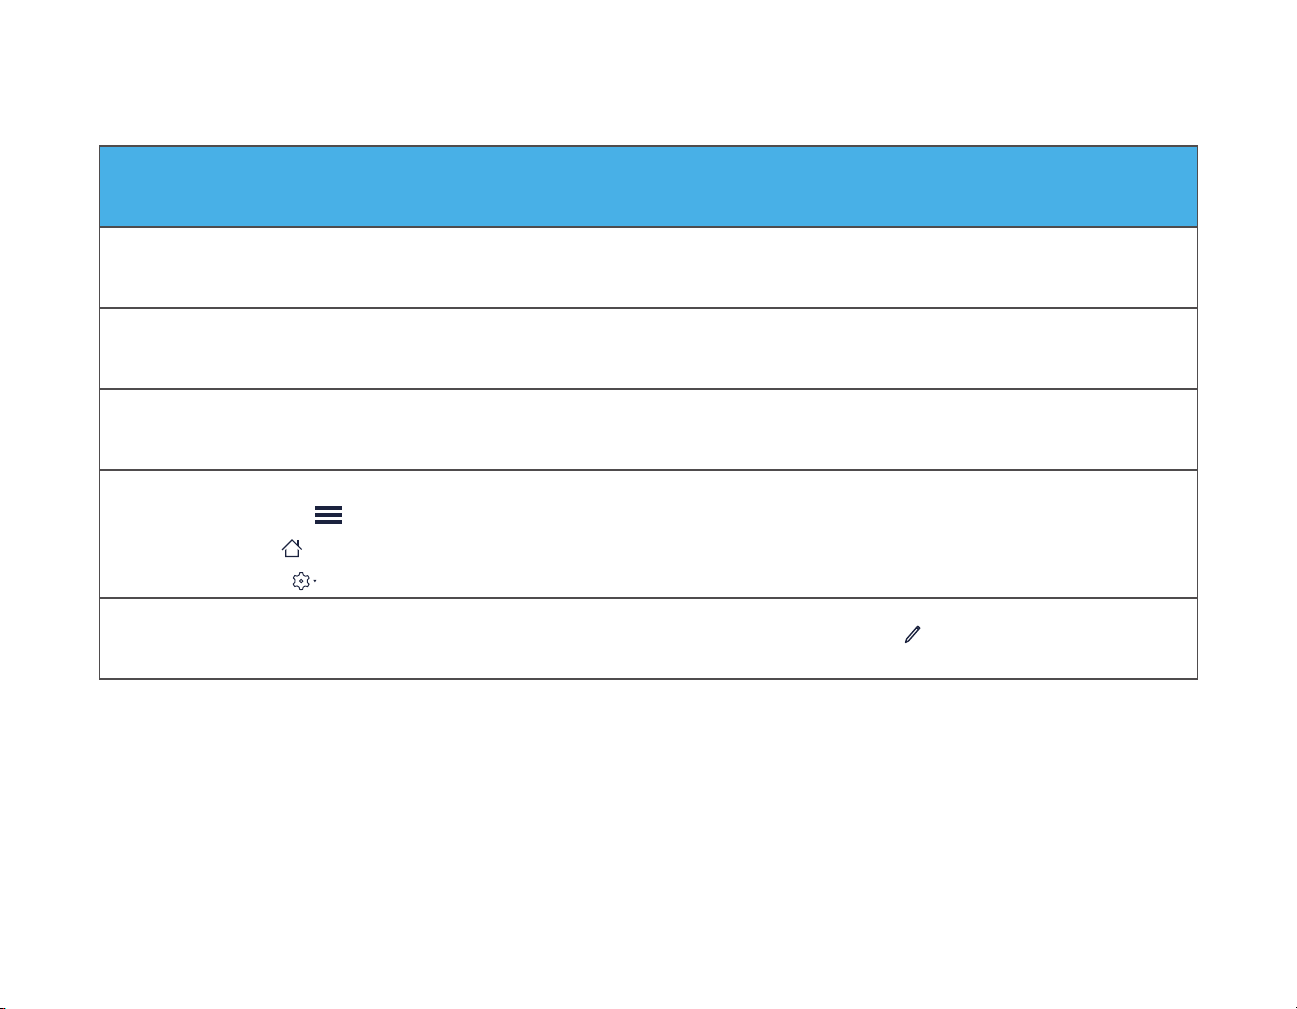
HOME and Settings buttons
Task menu - Tap to access
additional screens or
navigate
Selected workow
Workow navigator
Tap to change infusion
modes
Edit button - Tap to
edit an element or
value
Previous / Next buttons
Alerts button
Figure 1. Quick Application Overview
Page 4
SCREEN OVERVIEW
These features are shown in Figure 1.
Screen Overview Description
Workow - After reviewing current pump settings, the user must choose a workow. Workows contain a series of screens used to
complete programming tasks. See “Workows” on page 19.
Navigation - Users can navigate through the app by swiping left or right, tapping the task in the workow navigator, tapping the
PREVIOUS and NEXT buttons, or selecting tasks using the task menu button. See “Navigation” on page 20.
Finish screen - The Finish screen is the last screen in every workow and contains a side-by-side comparison of all program settings.
The user must review all settings to conrm pending changes prior to updating the pump. See “FINISH SCREEN” on page 42.
Action bar - The action bar runs along the top of all screens and contains buttons and indicators. See “Action Bar” on page 20.
■ Task menu button (
■ HOME button (
■ Settings button (
Editing an element - There are a few different types of editable elds; some values may be updated using a dropdown menu while
other values are edited by tapping the input box and using a keypad to edit. Tapping the edit button (
) - Tap to access additional screens or navigate
) - Tap to return to the Home screen
) - Tap to open a menu that includes additional options.
) puts an element in edit mode.
Page 5

Label Symbols
Explanation of symbols in this manual.
Conformité Européenne (European Conformity). This symbol means that the device fully complies with AIMD
Directive 90/385/EEC (NB 0123).
Authorized Representative in the European Community
Manufacturer
For USA audiences only
Page 6

Trademarks
Medtronic and Medtronic logo are trademarks of Medtronic. Third party brands are trademarks of their respective owners. All other brands
are trademarks of a Medtronic company.
Refer to the appropriate indications, drug stability, and emergency procedures manual for indications
and related information.
Refer to the appropriate drug labeling for indications, contraindications, warnings, precautions, dosage
and administration information, and screening procedures.
Refer to the device implant manual for device description, package contents, device specications, and
instructions for use.
Refer to the literature provided by the clinician tablet manufacturer for information regarding wireless
use.
Page 7

TABLE OF CONTENTS
Communicating via BLUETOOTH® after pairing .............................16
Communicator status on clinician tablet .......................................... 16
DEVICE DESCRIPTION ...................................... 9
Model 8880T2 Communicator ........................................ 9
Model A901 Communication Manager App ....................9
Model A902 Patient Data Service App ............................9
Abbreviations and Terminology.......................................9
DATA SECURITY AND NETWORK
CONNECTIVITY ................................................ 10
Data Security ................................................................ 10
Network connectivity ..................................................... 10
Installing application updates ....................................... 11
Returning the clinician tablet ........................................ 11
PROGRAMMER SETUP ................................... 11
The Clinician Programmer App ..................................... 11
Main Menu Screen ....................................................... 11
When the app is in the background ................................................. 12
Preparing the Tablet for Programming .......................... 13
Communicator Preparation ........................................... 14
USB connector cable - when to use ................................................ 14
Installing updates to the communicator ........................................... 14
Communicator icons in tablet status bar .........................................15
HOME SCREEN ................................................ 17
Pump Time ...................................................................17
Re-Interrogate .............................................................. 17
Active Alarms ................................................................ 17
Workows ..................................................................... 19
PROGRAMMING SCREENS ............................ 19
Screen Features ........................................................... 19
Navigation ..................................................................... 20
Action Bar ..................................................................... 20
Settings ...........................................................................................20
PATIENT SCREEN ............................................ 22
PUMP SCREEN ................................................ 23
CATHETER SCREEN ....................................... 23
DRUGS SCREEN .............................................. 24
RESERVOIR SCREEN ..................................... 25
INFUSION SCREEN ......................................... 26
Pairing the Communicator with a Clinician Tablet and
Interrogating the Pump ................................................. 15
2020-07-01 English
Selecting an Infusion Mode .......................................... 26
Dose/Rate Panel .......................................................... 28
7
Page 8

Infusion Display Panel .................................................. 28
Screen Elements .......................................................... 28
Conguring a Pattern .................................................... 30
Conguring a Weekly Plan ........................................... 31
ENDING A SESSION ........................................ 45
DEMO MODE .................................................... 47
DRUG LIBRARY ...............................................47
BOLUS SCREEN .............................................. 31
Recommended bolus .................................................... 32
Setting up a Prime Bolus .............................................. 32
Setting up a Bridge Bolus ............................................. 35
Setting up a Single Bolus ............................................. 36
Setting up a Roller Study .............................................. 36
Canceling or Continuing a Bolus in Progress ............... 37
MYPTM™ SCREEN .......................................... 38
Programming the Pump for Patient-Activated Dosing .. 38
ALARMS SCREEN ........................................... 40
DISCONTINUE SCREEN .................................. 41
Permanently Shutting Down a Pump ............................ 41
Shutting Down an Unusable Pump ............................... 42
FINISH SCREEN ............................................... 42
Reviewing Changes ...................................................... 42
Updating the Pump ....................................................... 43
If telemetry is interrupted during a pump update ............................. 45
REPORTS ......................................................... 48
ALERTS ............................................................ 49
PATIENT DATA SERVICE APP ........................ 50
PDF Auto-Delete Feature .............................................50
TROUBLESHOOTING ...................................... 50
Pump Troubleshooting .................................................. 50
Communicator Troubleshooting .................................... 50
DEVICE LONGEVITY ....................................... 52
PUMP ACTIVITY LOGS .................................... 53
2020-07-01 English
8
Page 9

DEVICE DESCRIPTION
The Medtronic Model A810 SynchroMed™ II Clinician
Programmer application (app) is intended for use by clinicians in
the programming of the Model 8637 SynchroMed II Programmable
Pump for intrathecal applications. This manual contains
information for clinicians in programming and troubleshooting the
SynchroMed II Infusion system.
The clinician tablet, the communicator, the Patient Data Service
app, and the Communication Manager app are required to use the
A810 SynchroMed II Clinician Programmer application.
Model A902 Patient Data Service App
The Model A902 Patient Data Service app is intended for use by
clinicians to access reports for patients whose Medtronic devices
have been programmed using the clinician programmer apps on
the clinician tablet.
For instructions on using the Patient Data Service app, refer to
“PATIENT DATA SERVICE APP” on page 50.
Abbreviations and Terminology
Model 8880T2 Communicator
Caution: Do not attempt telemetry near equipment that
may generate electromagnetic interference (EMI) such as
radio frequency identication (RFID) equipment. EMI can
interfere with telemetry during programming. If EMI disrupts
programming, move the programming components away
from the likely source of EMI.
The Model 8880T2 Communicator is intended for use by clinicians
to use in conjunction with the clinician tablet and clinician
programmer app for telemetry communication with Medtronic
Neuromodulation implantable therapy devices.
Refer to the Model 8880T2 Communicator Technical Manual for
operating instructions and specications.
Model A901 Communication Manager App
The Model A901 Communication Manager App manages telemetry
communication between the clinician tablet, communicator, and
infusion pump.
Table 1. Abbreviations used in this manual
Abbreviation Denition
App Software application
Demo mode Demonstration mode
ERI Elective replacement indicator
EOS End of service indicator
LED Light-emitting diode
USB connector
cable
Universal serial bus connector cable
Table 2. Terminology used in this manual
Term Description
Action Bar The top row containing buttons and
indicators on the clinician programmer app
screen when in a workow.
Clinician
Programmer App
The Medtronic therapy software application
intended for clinicians to program
Medtronic devices.
2020-07-01 English
9
DEVICE DESCRIPTION
Page 10
Term Description
Tablet or
Clinician Tablet
Tablet Status Bar The top-most row of indicators on the
The tablet hardware and operating system.
tablet screen. The tablet status bar is not a
part of the clinician programmer app.
DATA SECURITY AND NETWORK CONNECTIVITY
Data Security
The clinician programming system uses and stores data about
the patient’s health and implanted medical device. This data is
protected by application-level encryption and encryption provided
by the clinician tablet. The clinician programming system does not
provide data protection for data exported to another destination.
Exported data should be handled in accordance with your facility’s
security policy for data handling and storage.
■ Medtronic recommends that you always save exported data
to the default reports location on the clinician tablet.
Network connectivity
Network connectivity is required for initial app registration and
for installation of Medtronic app updates and communicator
rmware updates. Network connectivity is not required for pump
programming. To protect your clinician programming system,
Medtronic recommends you implement the following security
measures:
■ Secure your clinician tablet by disabling network
connectivity during any programming session.
■ Use a managed, trusted Wi-Fi connection when network
connectivity is needed.
■ Connect the clinician tablet to the network periodically to
check for update notications.
2020-07-01 English
10
DA TA SECURITY AND NETWORK CONNECTIVITY
Page 11
Caution: Connecting the clinician tablet to a network that
includes other equipment could result in unforeseen risks to
patients, operators, or third parties. Changes to your network
such as adding, disconnecting, and upgrading equipment;
upgrading or installing software; or changing network
congurations could also introduce additional risks. Analyze,
evaluate, and control any identied risks.
If you suspect a cybersecurity event has occurred, stop using the
app (if possible) and contact your IT Security team or Medtronic
Technical Services to document and respond to the suspected
incident.
If your clinician tablet is lost or stolen, contact Medtronic
Technical Services or your Medtronic representative. See the
Troubleshooting section or the back cover for contact information.
Installing application updates
Medtronic periodically updates the therapy app and will not install
updates without notifying the user. Network connectivity is required
to update the app. When notied that an app update is available,
follow the instructions provided by Medtronic to install it.
Returning the clinician tablet
If you need to return the clinician tablet for disposal or
replacement, contact Medtronic Technical Services or your
Medtronic representative. See the Troubleshooting section or the
back cover for contact information. Instructions will be provided for
preparing the clinician tablet for return.
PROGRAMMER SETUP
The Clinician Programmer App
Note: In this manual, gures of the app screens are examples.
What is displayed on the actual screens may differ.
To nd and open the app
1. Navigate to Apps on the clinician tablet.
2. Find the SynchroMed II app icon (Figure 2).
Figure 2. SynchroMed II app icon
3. Tap the SynchroMed II app icon to open. The main menu
screen is displayed.
Main Menu Screen
The SynchroMed II app opens onto the main menu screen. The
application will return to this screen when a session is ended. On
the main menu screen:
■ Tap DEMO to use Demo mode.
■ Tap CONNECT to start a session with a pump.
■ Tap REPORTS to view reports for a patient without having
to start a session.
2020-07-01 English
11
PROGRAMMER SETUP
Page 12

When the app is in the background
When you navigate away from the clinician programmer app
while in a session, the app is placed in the background and is
represented as a oating widget on the tablet.
The oating widget is an overlay that oats on top of the screen to
remind you that you are still in a programming session.
■ Press and drag the oating widget to move it on the tablet
screen.
■ Tap on the oating widget to access the app and resume
the session.
2020-07-01 English
12
PROGRAMMER SETUP
Page 13
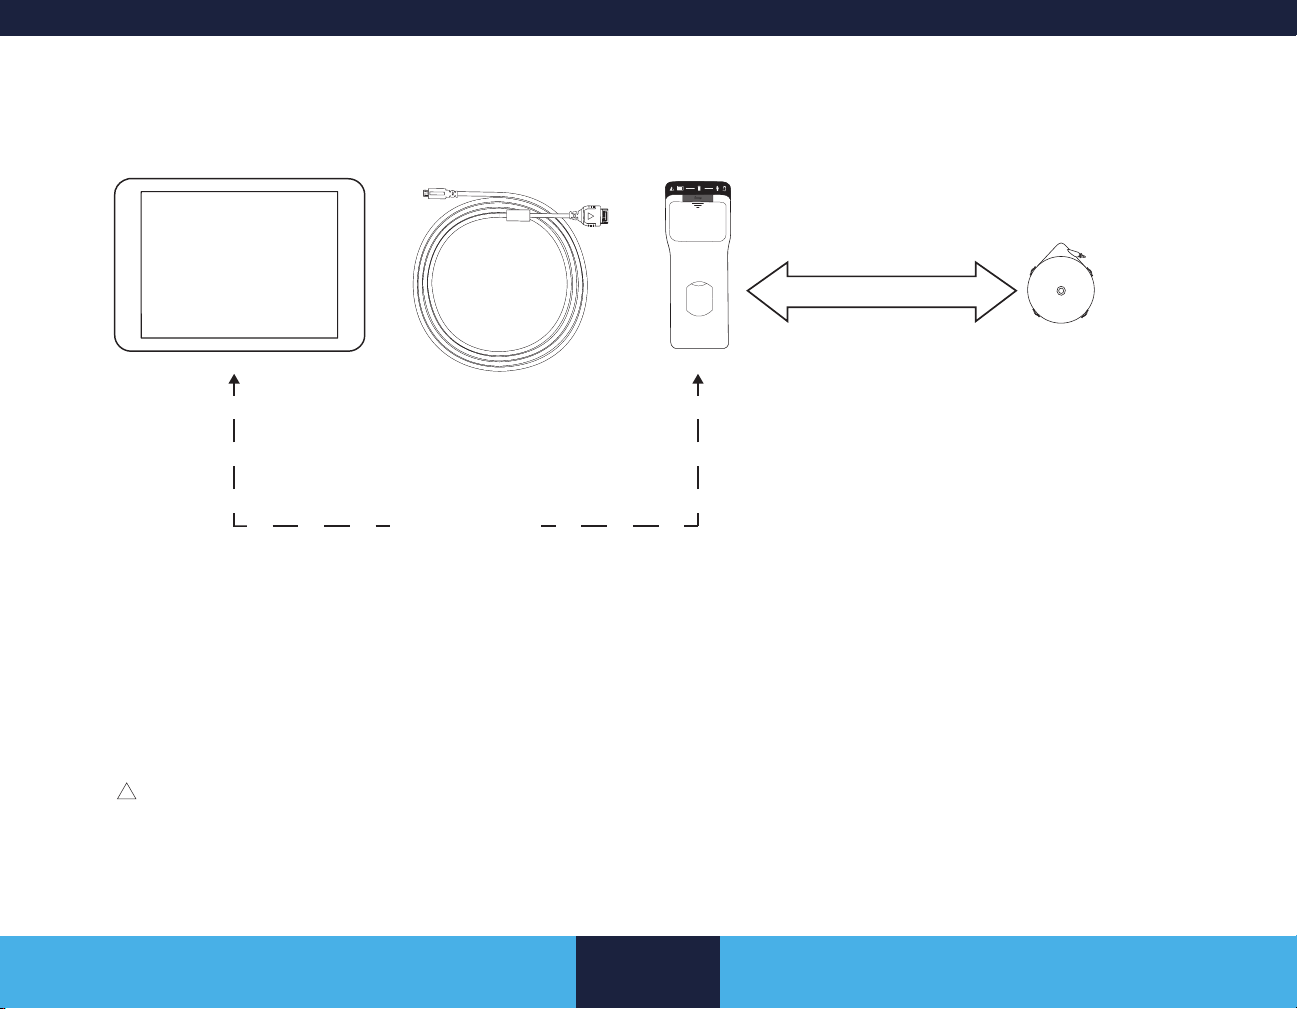
System Components
Clinician tablet with clinician
programmer app
The USB connector cable is required
when pairing the communicator to
the clinician tablet. After pairing,
communication can occur via USB
connector cable or BLUETOOTH.
After pairing, the communicator and the clinician
tablet with the clinician programmer app can
communicate wirelessly via the BLUETOOTH wireless
USB connector cable Communicator
Move the Communicator
over the implanted device
and tap CONNECT on the
Clinician Programmer
BLUETOOTH
technology.
Figure 3. Components for programming the pump
SynchroMed II Pump
Telemetry
Software Application.
Preparing the Tablet for Programming
Caution: Do not use multiple programmers simultaneously
during the same programming session. The consequences
of using multiple programmers simultaneously within the
same programming session is unknown.
2020-07-01 English
Before starting a programming session:
■ Check the clinician tablet battery status and ensure the
appropriate clinician programmer app has been installed.
– The tablet’s battery level is shown on the tablet
status bar (top-most row of indicators on the tablet).
– Recharge the tablet if the battery level is low.
13
PROGRAMMER SETUP
Page 14

■ Check the communicator battery status. Change batteries
if the LED light for the communicator battery level indicator
on the communicator is amber or ashing red.
■ Conrm that the clinician tablet is paired to the correct
communicator.
■ A communicator must be paired to the clinician tablet
before an implantable device can be found and a
programming session can start.
■ After the communicator has been paired with the
clinician tablet using the USB connector cable,
BLUETOOTH wireless communication between the
communicator and the clinician tablet can be used.
■ If the communicator is not connected to the clinician
tablet with the USB connector cable, the clinician
tablet attempts to communicate via BLUETOOTH
wireless technology to the communicator that was
last used with the clinician tablet.
■ The communicator can only remain paired with one
clinician tablet at a time.
■ If you need more detailed information about the
communicator (e.g. how to connect the USB connector
cable and information about the Communicate button and
LED indicators), refer to the Model 8880T2 Communicator
Technical Manual.
Communicator Preparation
Check the battery level of the communicator before updating or
communicating with the pump.
The following describes the colors used for the battery LED
indicator (on the top right side of the communicator):
■ Green for 10 seconds: Communicator has been turned on.
Battery level is acceptable and all communicator functions
are enabled.
■ Amber: Communicator has been turned on. Batteries
should be replaced soon.
■ Flashing red: Communicator has been turned on. Batteries
should be replaced immediately.
For communicator troubleshooting instructions, refer to
“Communicator Troubleshooting” on page 50.
USB connector cable - when to use
The following situations require the use of the USB connector
cable:
■ First-time pairing of the communicator to a clinician tablet.
■ Firmware updates to the communicator.
■ Environments where multiple devices are using
BLUETOOTH wireless technology and creating
interference.
■ Environments where BLUETOOTH wireless technology is
prohibited.
Installing updates to the communicator
If you receive a notication of an update for the communicator:
■ Use the USB connector cable to install the update from the
clinician tablet to the communicator.
■ Install the update in advance of a programming session.
The update will take several minutes to complete.
2020-07-01 English
14
PROGRAMMER SETUP
Page 15

Communicator icons in tablet status bar
Table 3 shows the icons that appear in the clinician tablet status
bar (top-most row) indicating communicator communication status
with the clinician tablet.
Table 3. Communicator icons in tablet status bar
Icon Details
The communicator is in the process of connecting to
the clinician tablet.
The communicator is communicating with the clinician
tablet via the USB connector cable.
The communicator requires the USB connector cable
to communicate with the clinician tablet.
The communicator is communicating with the clinician
tablet via BLUETOOTH wireless technology.
3. On the pop-up message that appears, which asks to open
the Communication Manager app when the USB device is
connected:
a. Tap to use the USB device by default. This selection
prevents this pop-up message from appearing again.
b. Tap OK.
4. From the initial screen, tap CONNECT. Pairing commences
and the following LED lights will display green on the
communicator:
– LED light between the tablet icon and the
communicator icon will be a solid green.
– LED arrow lights on the Communicate button will
ash green indicating that you can interrogate the
device.
At this point, the communicator is paired with the clinician tablet
and subsequent use of the communicator with the clinician tablet
can use the BLUETOOTH wireless technology.
Pairing the Communicator with a Clinician Tablet and Interrogating the Pump
A Communicator must be paired to the programmer before a
session can be started with an implantable device.
To pair the communicator with a clinician tablet
1. Connect the USB connector cable to the communicator and
the clinician tablet.
2. Ensure the communicator is turned on (slide the Power
button, then release).
2020-07-01 English
To interrogate a pump
Caution: Check the power status of the programmer and
communicator before starting a programming session. Loss
of power during a programming session will restart the
programmer and can lead to a loss of pending changes.
Warning: To use the nonsterile programmer system
components in a sterile eld, place a sterile barrier between
the patient and system components to prevent infection. Do
not sterilize any components of the programmer system.
Sterilization may damage the components.
Warning: Before interrogating or updating the pump, conrm
that the time and date on the programmer are correct.
Incorrect time and date can result in incorrect programming
and estimated dates.
15
PROGRAMMER SETUP
Page 16

1. Open the SynchroMed II app.
2. Tap CONNECT on the main menu screen.
3. Place the communicator over and as close as practical to
the implantable pump.
Note: The target symbol on the back of the communicator
indicates the location of the internal antenna. The target
should be facing and centered over the implantable device.
Warning: To ensure successful telemetry, hold the
communicator steady over the implanted pump until
conrmation is received that telemetry was successful.
If the communicator is not held over the pump
properly, telemetry may not be established or may be
interrupted, which can result in unintended or incomplete
programming.
4. Progress is displayed while communication with the
implantable device is established.
5. The HOME screen is displayed with the current system
settings (refer to Figure 4 on page 18).
Note: Do not leave the clinician tablet unattended during an active
programming session. End the session properly by tapping the
Settings button (
) and tapping END SESSION.
Communicating via BLUETOOTH® after pairing
Make sure the communicator is turned on and within range of the
clinician tablet. See the 8880T2 Technical Manual for details. The
communicator automatically communicates via the BLUETOOTH
wireless technology with the clinician tablet it is paired to. The
following icon
the communicator is communicating with the clinician tablet via the
BLUETOOTH wireless technology.
will appear on the clinician tablet status bar when
Communicator status on clinician tablet
When the communicator is paired to the clinician tablet, swipe
down from the top of the tablet to view the following during a
programming session:
■ The battery level of the communicator.
■ The connection status of the communicator to the clinician
tablet. Refer to Table 3 on page 15.
Note: An icon that shows the connection status is also
displayed in the tablet status bar.
2020-07-01 English
16
PROGRAMMER SETUP
Page 17

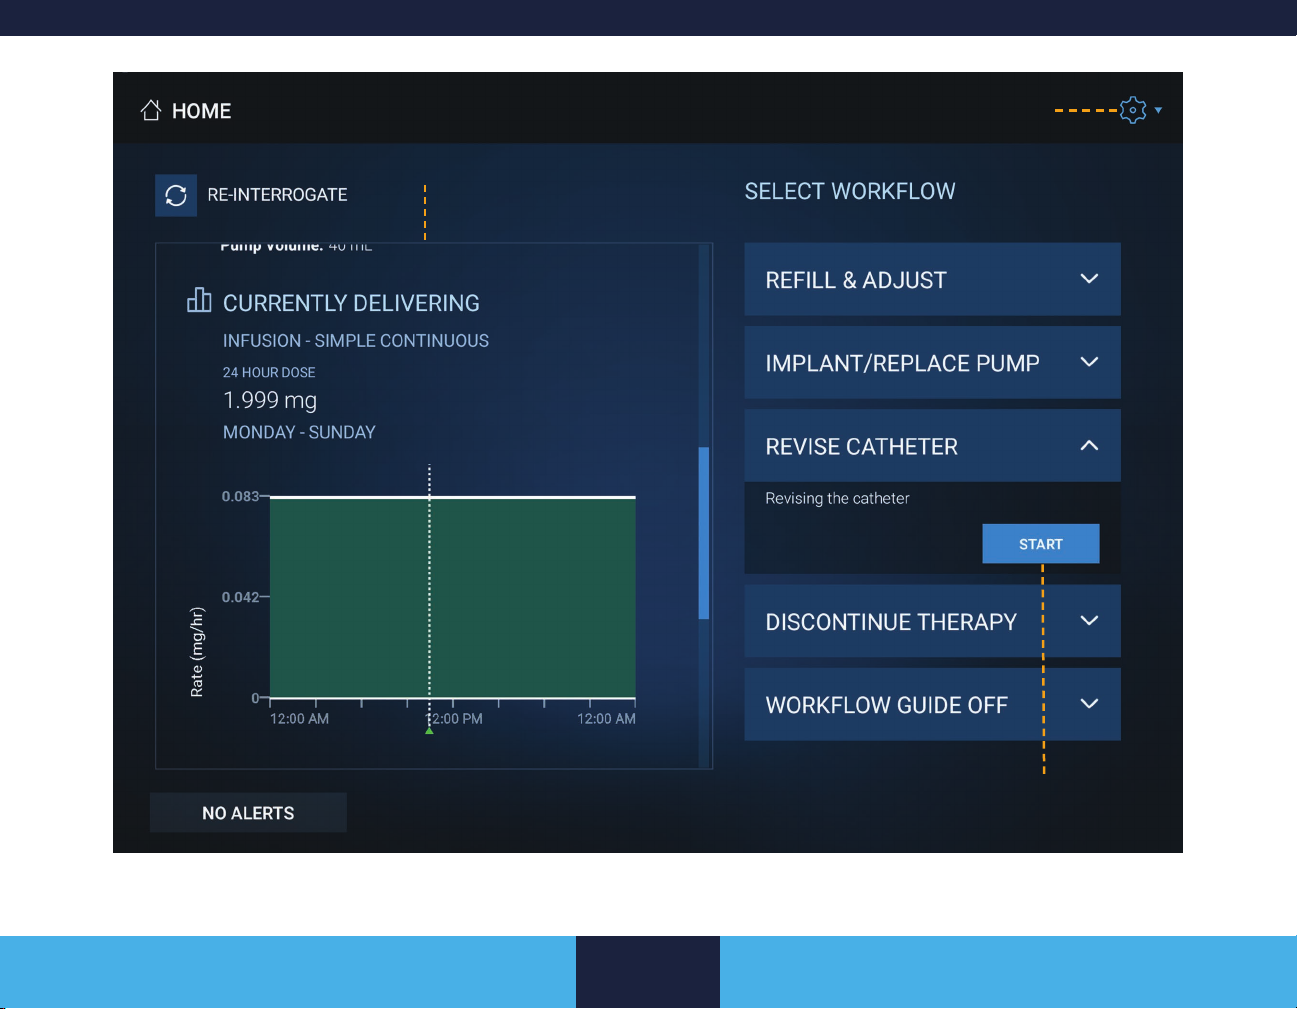
HOME SCREEN
The Home screen (Figure 4 on page 18) displays the current
pump settings retrieved from the pump at interrogation and the
SELECT WORKFLOW panel. Pending settings, or changes made
during the session, do not appear on the Home screen until the
pump is updated or re-interrogated.
The Home screen shows patient and pump information, current
drug information, and reservoir settings. The CURRENTLY
DELIVERING section shows which dose was actively being
delivered at the time the pump was last interrogated or updated.
■ If a bolus is active, the panel displays the bolus type (prime,
single, bridge, roller study, or patient activated) and the time
remaining.
■ If an infusion mode is active, the panel displays the
current infusion pattern, the dose per day, and a graphic
representation of the 24 hour infusion pattern.
The SELECT WORKFLOW panel shows all workows. For more
information, refer to “Workows” on page 19.
Pump Time
Pump time is read during interrogation and is used for infusion
settings. Changing the tablet time during a programming session
will change the pump time.
Warning: The pump is synchronized to the time of the last
programmer used to update the pump. Before updating the
pump, consider the following situations that may affect the
actual time that the patient receives the intended therapy:
■ Current time on programmer is incorrect.
■ Patient lives in a different time zone than that to
which the programmer is set.
■ Patient is traveling to a different time zone.
■ A change into or out of Daylight Saving Time is going
to occur soon, or has recently occurred.
Prior to making a change in programmer time, verify
whether the patient has recently received or will soon
receive a programmed bolus or high-rate step. Changing
the programmer time forward or backward will affect
programmed steps or boluses. Receiving a bolus or step at
an unintended time may result in a clinically-signicant or
fatal drug overdose or underdose.
Re-Interrogate
Tapping RE-INTERROGATE reads the pump and updates the
Home screen to reect the current pump state. For instructions
on interrogating the pump, refer to “To interrogate a pump” on
page 15.
Note: Only the pump that was interrogated at the start of the
programming session can be re-interrogated. To interrogate a
different pump, end the programming session and start a session
with another pump.
Active Alarms
If an alarm is active when the pump is interrogated, an ACTIVE
ALARM button will be shown on the Home screen. Tapping the
ACTIVE ALARM button will open the Active Alarm window.
To silence an alarm
1. Tap the ACTIVE ALARM button.
2. Tap the SILENCE PUMP ALARM toggle button to silence
active alarms.
2020-07-01 English
17
HOME SCREEN
Page 18
Displays system status information
available at interrogation
Settings button
Figure 4. Home screen example
2020-07-01 English
18
Tap to start a workow
HOME SCREEN
Page 19

3. Update the pump. Refer to “FINISH SCREEN” on
page 42.
Note: Alarms will be silenced after the pump is updated.
Workows
A workow is a series of screens that work together to complete
a programming task. Workows contain the standard screens
needed for a task; a screen that is not part of the current workow
can be accessed using the task menu.
Each workow box contains a description of the workow and a
START button. If the current programming scenario does not t
any displayed workow, select the WORKFLOW GUIDE OFF
workow to program the pump without any workow guidance.
During interrogation, the application reads the pump status and
automatically selects a recommended workow. Recommended
workows will have a “RECOMMENDED” label above the
description and START button.
To start a workow
1. Tap the desired workow box.
2. Tap the corresponding START button displayed in the
expanded area.
To add tasks to a workow
1. Tap the task menu ( ) button.
2. Tap the task you want to add.
Note: The added screen appears in the workow navigator.
For more information, refer to “Navigation” on page 20.
PROGRAMMING SCREENS
Programming the pump involves reviewing and modifying the
settings programmed in the implantable pump. Information
and settings may be from an earlier session or may be the
default values set during manufacturing. When programming
is completed, the pump needs to be updated with the new
information.
All programming screens will have the same layout and standard
features (Figure 5 on page 21). The following features are
available:
■ Action bar – The action bar spans across the top of all
programming screens. For more information, refer to
“Action Bar” on page 20.
■ Workow Navigator – The workow tasks spans below
the action bar. For more information, refer to “Navigation”
on page 20.
■ Alerts – The alerts button is in the bottom left corner of
the programming screen. When an alert is active for that
screen the button changes color and shows the number of
active alerts. For more information, refer to “ALERTS” on
page 49.
Screen Features
Note: Throughout this manual, gures showing the programmer
screen are examples. Information displayed on the screen may
differ slightly.
Programming screens have common features to provide quick and
consistent data entry. The following features are included:
■ Pending changes – A solid green bar at the beginning of
the input box or the value displayed in green text indicate
that a setting has pending changes—that is, the changes
2020-07-01 English
19
PROGRAMMING SCREENS
Page 20
have not been transferred to the pump. The green bar or
green text remains until the pump is updated.
■ Range – For most numeric entries, a valid range appears
below the keypad. If you enter a value above or below the
range, an error message will appear.
■ Edit – A purple element indicates the value is able to be
edited. The item header and graphical representation turn
purple when the programmer can edit an element.
Navigation
There are multiple ways to navigate through workow tasks. Tasks
can be completed in any order, although some tasks depend on
previous information to complete.
There are four basic ways to navigate through the workow
screens:
■ The workow navigator contains each task in the workow
with the current task underlined. Tap on the task to go
directly to that screen.
■ The PREVIOUS and NEXT buttons move forward or
backward through the workow.
■ Swiping the screen left or right will navigate through the
workow.
■ The task menu is accessed by tapping the task menu
button. The menu can be used to add screens to a workow
or navigate to a workow task. Screens that are not part
of the workow are available from this menu. Accessing a
task in this way will add it to the workow if it is not already
included.
Action Bar
The action bar appears at the top of all screens for a programming
session. Table 4 describes the buttons and indicators that appear
on the action bar.
Table 4. Buttons on the action bar
Button Details
Task menu button
■ Tap to access additional screens or
navigate along a workow.
■ A workow must be selected for the task
menu button to appear.
HOME button
■ Tap to return the app to the Home screen.
■ Navigating to the Home screen does
not end a session or clear any pending
information.
Settings button
■ Tap to open a menu that includes
additional options.
Settings
The Settings button ( ) opens a menu with additional app
options. If selected from the main menu screen, only the Drug
Library and About options are available.
■ Add Task – Opens a list of programming screens that are
not included in the current workow. Tap a screen name to
add it to the workow.
■ Notes – Opens the NOTES eld. The NOTES eld allows
for entry and review of information (e.g. implant location
2020-07-01 English
20
PROGRAMMING SCREENS
Page 21
Action bar
Task menu
Header
Workow navigator
Previous / Next buttons
Alerts button
2020-07-01 English
Figure 5. Navigating the app
21
PROGRAMMING SCREENS
Page 22

and pump orientation). For more information on Notes, refer
to “PATIENT SCREEN” on page 22.
■ Logs – Reads the pump logs and opens the Pump Activity
Logs. Pump logs are displayed in reverse chronological
order and are used in troubleshooting issues. For
more information, refer to “PUMP ACTIVITY LOGS” on
page 53.
■ Reports – Opens the REPORTS screen which provides
the ability to view, print, send, and save reports. For more
information, refer to “REPORTS” on page 48.
■ End Session – Closes the current programming session
and returns to the main menu screen. Any pending changes
entered during the programming session will be lost and the
pump will not be updated.
■ Drug Library – Opens the drug library screen which stores
drug names and associated concentrations. Drug Library
entries are available for quick use in the Drugs screen. For
more information, refer to “DRUG LIBRARY” on page 47.
■ Calculator – Opens the tablet calculator app. Tap the
oating Session in Progress widget to return to the
programming session.
■ Help – Opens a Help Overlay on top of the current
programming screen.
■ About – Opens a dialogue box which provides the software
version, serial number, unique device identier (UDI), CE
mark, and other information about the application, clinician
tablet, communicator, and implanted device.
PATIENT SCREEN
The Patient screen displays patient information such as name,
patient ID, and contact information.
Information from the Patient screen is stored in the pump memory
and is accessible any time the pump can be read. Enter or
edit patient information if the patient is new or information has
changed. Patient name and ID number will be displayed in the
action bar during a session and patient information will be used
in the Patient Data Service app and appear on reports. For more
information, refer to “REPORTS” on page 48.
The NOTES eld is an open input box for additional notes such
as implant location and pump orientation. Information in the
NOTES eld will be displayed on reports. The NOTES eld can
be accessed on the Patient screen, or by selecting Notes from
the Settings (
screens. If a note is entered or updated (i.e. has pending changes)
an orange exclamation point will appear on the Notes icon.
To enter patient or contact information
1. Tap the input box or drop-down list.
2. Enter or select information.
Note: Enter information in at least two of the following
elds: FIRST NAME, LAST NAME, and PATIENT ID to
keep patient data unique.
3. Tap the hide keyboard button (
when nished.
) menu. It is also displayed as a button on certain
) to hide the keyboard
2020-07-01 English
22
PATIENT SCREEN
Page 23

PUMP SCREEN
The Pump screen shows detailed information about the pump
– the implanted pump name, volume, model number, serial
number, calibration constant, estimated replacement date, and the
estimated pump time. For information on estimated replacement
and device longevity, refer to “DEVICE LONGEVITY” on
page 52.
During the rst programming session at implant, make sure
the model number and calibration constant retrieved during
interrogation match the following:
■ Model number on the package label
■ Calibration constant on the package label
■ Model number etched on the pump
CATHETER SCREEN
The Catheter screen shows information about the implanted
catheter. Catheter information must be entered for new implants or
when a catheter has changed. The Catheter screen calculates the
TOTAL IMPLANTED VOLUME from the entered values. These
values are vital for the correct calculation of infusion rate and
dosage.
Warning: Use the catheter length recorded at implant or
catheter revision for calculating catheter volume. The actual
implanted catheter length and catheter model number are
required to accurately calculate catheter volume. A universal
value does not exist that can be used as a substitute for this
knowledge. An inaccurate calculation of the catheter volume
can result in a clinically signicant or fatal drug underdose or
overdose.
To enter catheter information
1. Tap the CATHETER MODEL NUMBER drop-down list.
2. Select the catheter model.
Note: If the catheter model is not listed, select the
appropriate Other option and enter the model information.
3. Tap the CATHETER IMPLANTED VOLUME input box.
Note: When determining the implanted volume for a twopiece catheter, enter the pump segment rst.
4. Enter the necessary information.
5. Tap the CONFIRM button.
6. If the catheter is a two-piece model, repeat steps 3 through
5 for the tip segment.
2020-07-01 English
23
PUMP SCREEN
Page 24

If only total implanted volume is known
Note: Use this procedure if the total implanted volume is known
but no other information is known.
1. Tap the CATHETER MODEL NUMBER drop-down list.
2. Select Other (volume).
3. Tap the CATHETER IMPLANTED VOLUME input box.
4. Enter a value for total implanted volume.
5. Tap the CONFIRM button.
If catheter model and implanted volume are
unknown
If the catheter model and implanted volume are unknown, contact
Medtronic for assistance.
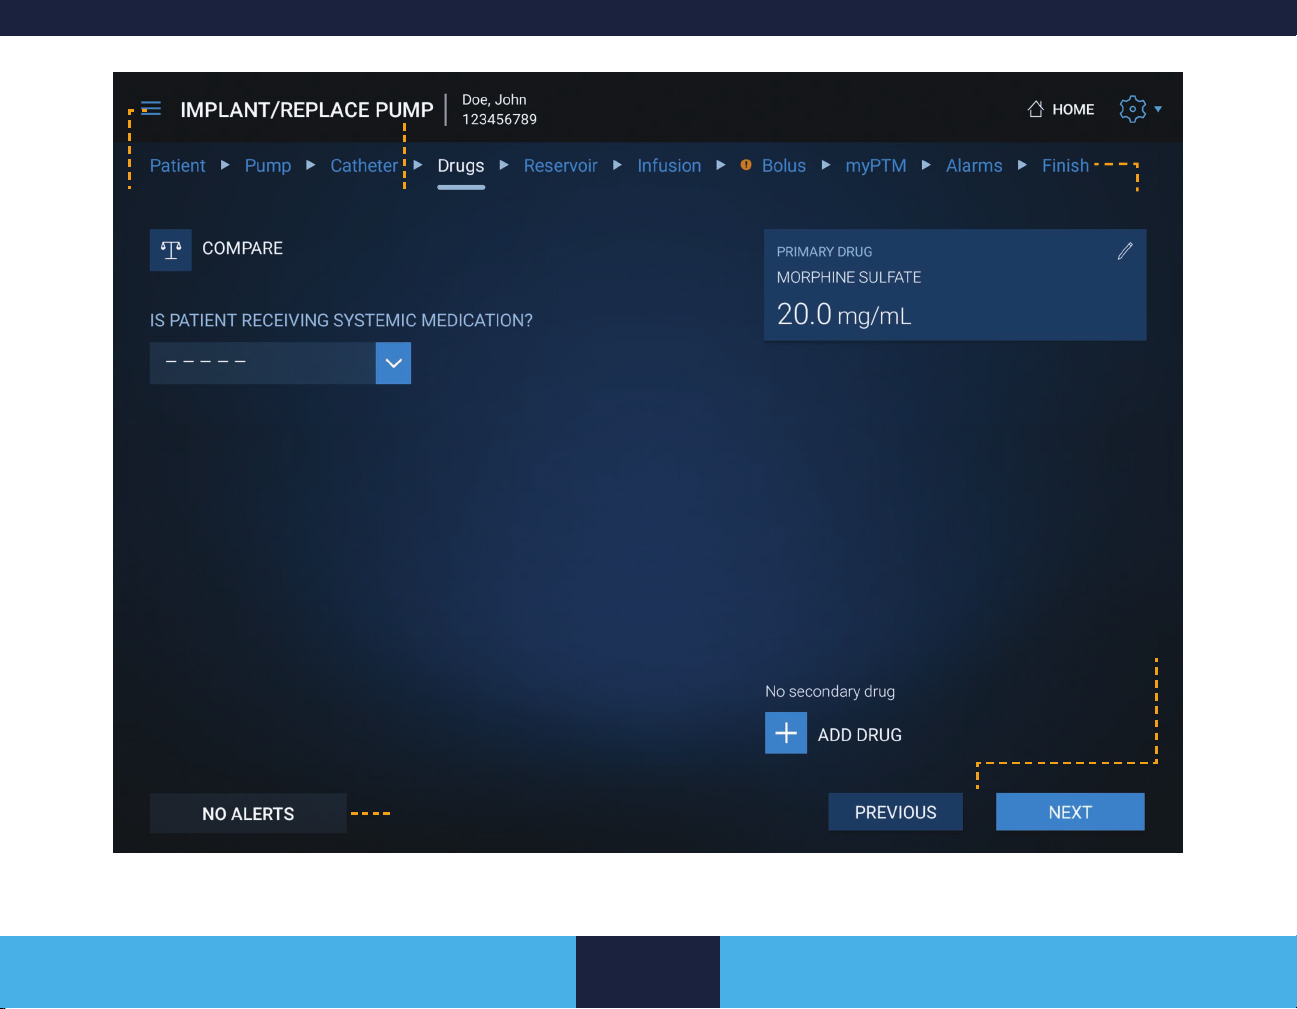
DRUGS SCREEN
The Drugs screen is used to maintain the prescribed drug
information. Drug volume and concentration for the primary drug
are required and need to be entered accurately. The primary
drug is used for infusion and bolus calculations and will have a
PRIMARY DRUG heading in the drug box.
Any drug can be modied by tapping the drug box and editing any
of the settings. Tapping the COMPARE button opens a DRUG
SUMMARY screen which shows the name and concentration of
the current and pending drugs.
Warning: Rinse the reservoir twice between solutions
when changing drug or decreasing drug concentrations
in the pump reservoir (refer to appropriate rell kit manual
for specic procedures). A signicant amount of drug may
be present in the pump reservoir after emptying the pump.
This residual volume cannot be removed by emptying the
pump. Rinsing the reservoir between solutions minimizes
the amount of drug in this residual volume but does not
eliminate it. Failure to account for residual drug in the pump
reservoir can result in a concentration that is different than
intended and a clinically signicant or fatal drug underdose
or overdose. Program a bridge bolus after rinsing the
reservoir twice. The bridge bolus advances the remaining old
drug (the drug left in the pump tubing, catheter access port,
and catheter after emptying and relling the pump) to the
catheter tip at the specied ow rate.
2020-07-01 English
To edit or add a drug entry
1. Tap the edit button ( ) on the drug box or the ADD DRUG
button.
2. Modify or enter the drug name.
3. Select a unit from the drop-down list.
24
DRUGS SCREEN
Page 25

4. Tap the CONCENTRATION input box.
5. Use the keypad to enter a value for concentration.
6. If you want to make this drug the primary drug, tap the box
next to Primary Drug at the end of the row.
Note: If the Primary Drug box is grayed out, the drug is
already marked as the primary drug.
7. Tap the CONFIRM button.
To delete a drug entry
1. Tap the drug box to open the dialogue box.
2. Tap the DELETE DRUG button.
3. Tap DELETE DRUG in the pop-up.
Note: A drug cannot be deleted if it is marked as the
primary drug.
RESERVOIR SCREEN
The Reservoir screen displays the current reservoir volume
information. The pump graphic will show the current or pending
reservoir volume and the max reservoir volume. The REFILL
PUMP BEFORE date is shown on the Reservoir screen. The
REFILL PUMP BEFORE date is an estimate based on the low
reservoir alarm threshold, reservoir volume, and infusion settings
(including physician-activated bolus and maximum number of
patient-activated doses available to the patient per day)
Notes:
■ The REFILL PUMP BEFORE date may not be displayed on
this screen if infusion settings are not complete.
■ The REFILL PUMP BEFORE date is based on the infusion
dose per day and the maximum number of patient-activated
doses available to the patient per day. Extra drug may
remain at rell if all doses are not used.
To change the reservoir volume
1. Tap the edit button ( ) on the reservoir volume input box.
Note: Pump graphic and header turn purple.
2. Enter a volume within the specied range or drag the
arrows (
3. Tap CONFIRM.
) on the pump graphic to the correct level.
2020-07-01 English
25
RESERVOIR SCREEN
Page 26

INFUSION SCREEN
The Infusion screen is used to program the infusion pattern,
which is displayed both graphically and numerically (Figure 6 on
page 27). Settings can be modied by adjusting the graphic or
by editing the values.
The following terminology is used for elements on the Infusion
screen:
Table 5. Terminology used on the Infusion screen
Base Rate The rate of drug delivered continuously
throughout the day unless interrupted with a step/
bolus. Previously known as basal rate.
24 Hour
Dose
Base Dose The dose of drug delivered continuously
Minimum
Rate
Pattern Planned time and rate(s) of infusion that is
The Infusion screen is made up of two parts:
■ Dose/Rate panel – Shows the 24 hour dose information
for the displayed pattern and the dose/rate information for
the base rate and all steps.
■ Infusion display panel – Shows the infusion settings
in graphic format. Includes the options for changing the
infusion mode and additional views of the infusion settings.
The total dose of drug delivered over a 24 hour
period.
throughout the day unless interrupted with a step/
bolus.
The lowest infusion setting that will not damage
the pump system. It infuses at a rate of
approximately 0.006 mL/day.
repeated daily. Multiple patterns are available
only in Flex mode.
Selecting an Infusion Mode
Infusion setup is based on an infusion mode. There are three
infusion modes available from the infusion setup. Changing
modes is available at any time during infusion setup, but changing
modes may cause pending infusion settings to be lost.
Three modes are available:
■ Simple Continuous – Delivers a continuous infusion of
a specied dose per day. Tapping the COMPARE button
opens an INFUSION SUMMARY screen which shows the
current and pending infusion settings.
■ Flex – Delivers a sequence of up to 13 independent steps
of varying doses, rates, and durations for each 24 hour
period. The programmable base rate stops when a step
begins and resumes when the step ends.
■ Minimum Rate – Delivers the drug infusion at a rate of
approximately 0.006 mL/day.
Note: The infusion modes Temporary Stop and Permanent
Shutdown are available only from the Discontinue screen.
For more information, refer to “DISCONTINUE SCREEN”
on page 41.
When the pump is in Shelf State, the infusion mode is set to
Minimum Rate.
To change an infusion mode
1. Tap the edit button ( ) next to the infusion mode title.
2. Tap the SELECT button under the desired infusion mode.
3. Tap CHANGE MODE in the pop-up.
4. Enter the desired 24 Hour Dose using the keypad or by
dragging the arrows (
5. Tap DONE.
6. Review the information and tap CONFIRM.
) on the Infusion display panel.
2020-07-01 English
26
INFUSION SCREEN
Page 27

Edit infusion mode
Infusion display panel
Dose/Rate panel
Edit button
Figure 6. Using the Infusion screen
2020-07-01 English
27
INFUSION SCREEN
Page 28

Dose/Rate Panel
The Dose/Rate panel contains the following information:
■ 24 Hour Dose box - Shows the total dosage value for a 24
hour period.
– When the 24 hour dose is unlocked, modifying the
24 hour dose distributes the value proportionally
across the base rate and all steps for the 24 hour
period.
– When the 24 hour dose is locked, modifying a step
or the total daily dose will adjust the base rate to
preserve the locked total daily dose. The base rate is
not editable when the 24 hour dose is locked.
■ Lock 24 Hour Dose - The lock icon (
Flex mode.
■ Percent Change - Displayed when the infusion settings
change, the percent change is based on the primary drug.
It is not available if the primary drug was changed or drugs
were added or deleted.
■ Base input boxes - Show the base rate and base dose
over a 24 hour period.
■ Step input box(es) - Show the rate and dose for each step
over a 24 hour period. As steps are added to the infusion
setup, input boxes with the dose/rate will be added to the
panel.
) is available only in
Infusion Display Panel
The Infusion display panel elements are shown in Figure 7 on
page 29.
In the Infusion display panel, the vertical axis shows the rate in
units per hour and the horizontal axis shows a 24 hour cycle. A
step’s top boundary represents the rate, and the side boundaries
represent start and end times. Tap outside of the selected element
to deselect.
Below the mode title are tabs for the different views:
■ Daily view – Shows a daily pattern from 12:00 am to 12:00
am the next day. If one pattern is congured, the tab reads
Every Day and shows the daily infusion pattern. If two
patterns are congured, the two patterns are displayed in
the header as the days the patterns are active (eg, Tue-Fri
and Sat-Mon).
■ Transition view – Shows a scrolling 24 hour view of the
daily infusion pattern.
■ 7 Day view – Shows patterns over 7 days, from Monday to
Sunday. This view will display all patterns used throughout
the week.
■ Edit Patterns – Shows the pattern dial which sets the
concurrent days assigned to the infusion patterns. This is
only available in Flex mode. Refer to “Conguring a Weekly
Plan” on page 31.
Screen Elements
The Infusion screen uses colors to indicate element state.
■ If elements are not selected or being edited, elements in
the Infusion display panel are green colored and elements
in the Dose/Rate panel boxes are blue and green.
■ If an element is in edit mode (
If the edit button (
Infusion display panel, arrows (
borders. On the Dose/Rate panel, select an input box to bring up a
keypad or scrolling picker.
) is tapped, the element is in edit mode. On the
), the element turns purple.
) appear on the step or base rate
2020-07-01 English
28
INFUSION SCREEN
Page 29

Step
Lock 24 Hour Dose
Step details
Figure 7. Selecting infusion step
2020-07-01 English
29
INFUSION SCREEN
Page 30

Conguring a Pattern
An infusion pattern can be congured by changing the 24 hour
dose, the base rate, or any steps. There are two ways to congure
an element in edit mode, using the Infusion display panel or
numerically using the Dose/Rate panel. The Infusion display panel
and numerical entry are linked, so any changes made will be
reected in both areas.
To modify the 24 Hour Dose
1. Tap the edit button ( ) on the 24 HOUR DOSE.
2. If editing numerically:
a. Select the PRIMARY DRUG input box and enter the
new value using the keypad.
b. Tap DONE.
3. If editing using the Infusion display panel, tap and drag the
arrows (
4. If you want to lock the 24 Hour Dose, tap the lock button
(
LOCK.
Note: Locking the 24 Hour Dose is only available in Flex
mode.
5. Review the information and tap CONFIRM.
To modify the base rate
1. Tap the edit button ( ) on the BASE RATE or the base rate
in the Infusion display panel.
2. If editing numerically, select the input box for the value to be
changed: rate or dose. Enter the value using the keypad.
3. If editing using the Infusion display panel, drag the arrows (
) to the desired value.
4. Tap DONE.
) to the desired value.
) or select the check box next to 24 HOUR DOSE
5. Review the information and tap CONFIRM.
To add a step to a pattern
Note: Steps are only available in Flex mode.
1. Tap ADD STEP button.
2. If editing numerically, select the input box for each value:
start time, duration, dose, or rate. Enter the value using the
keypad.
3. If editing using the Infusion display panel:
a. Tap and drag the left arrows (
time.
b. Tap and drag the right arrows (
time or duration.
c. Tap and drag the top arrows (
4. Tap DONE.
5. Review the information and tap CONFIRM.
) to the desired start
) to the desired end
) to the desired rate.
To modify a step
1. Tap the edit button ( ) on the step or the step in the
Infusion display panel.
2. If editing numerically, select the input box for the value to be
changed: start time, duration, dose, or rate. Enter the value.
3. If editing using the Infusion display panel, tap and drag the
left, right, or top arrows for the value to be changed.
4. Tap DONE.
5. Review the information and tap CONFIRM.
To delete a step
Note: The base rate cannot be deleted.
1. Select the step by tapping the input box or the step in the
Infusion display panel.
2020-07-01 English
30
INFUSION SCREEN
Page 31

2. Tap the trash can icon at the end of the step header.
3. Tap CONFIRM.
Conguring a Weekly Plan
Flex mode allows for two infusion patterns to be congured, also
known as a weekly plan. A weekly plan consists of two infusion
patterns referred to as Pattern 1 and Pattern 2. Pattern 2 can be
added at any time by tapping Edit Patterns. Pattern 1 and Pattern
2 are both congured in the Infusion display panel.
Note: A maximum of 13 steps total are allowed for both Pattern 1
and Pattern 2. For example, if Pattern 1 has seven steps, Pattern
2 can have a maximum of six.
The 7 Day view allows you to view both infusion patterns at the
same time.
To set a weekly plan
1. Tap Edit Patterns.
2. Slide the dial so the patterns start and end on the desired
days. The pattern days are displayed on the left side of the
screen.
Note: The days in a pattern must be consecutive.
3. Tap OK.
BOLUS SCREEN
A bolus is a specic amount of drug (dose or volume) delivered
once for a prescribed length of time (duration). The Bolus screen
is used to select and calculate the bolus dose and duration. Bolus
calculation is achieved by answering a series of setup questions
(Standard mode) or using Advanced mode to determine the
desired specications.
The Bolus screen has four bolus options:
■ Prime Bolus — Designed to rapidly deliver a specic
volume of uid to ll the components of the system that do
not have drug in them. This bolus is commonly used prior
to implant to ll the internal pump tubing or after an implant
to prime either the catheter or the internal pump tubing and
catheter. For more information, refer to “Setting up a Prime
Bolus” on page 32.
■ Bridge Bolus — Delivers the drug remaining in the internal
pump tubing and catheter at a rate appropriate for the drug
concentration. This bolus is used when a concentration in
the pump reservoir is changed and the drug remaining in
the internal pump tubing and catheter must be accounted
for to prevent a drug underdose or overdose. For more
information, refer to “Setting up a Bridge Bolus” on
page 35.
■ Single Bolus — Delivers a specied dose over the duration
selected. For more information, refer to “Setting up a Single
Bolus” on page 36.
■ Roller Study — Delivers a set volume to verify the pump
roller is functioning properly. For more information, refer to
“Setting up a Roller Study” on page 36.
2020-07-01 English
31
BOLUS SCREEN
Page 32

Note: Boluses take precedence over programmed infusion
patterns and patient-activated boluses. The infusion pattern will
resume when the bolus is completed.
Recommended bolus
The application will automatically recommend a bolus in some
workow situations or in a specic set of circumstances. For
example:
■ Prime Bolus is recommended when the pump is in shelf
state or as part of a pump implant, pump replacement, or
catheter revision.
■ Bridge Bolus is recommended when a drug name, unit, or
concentration is changed.
Consult the appropriate drug package for prescribing information.
A bolus cannot be programmed if a bolus is already in progress or
if Temporary Stop is the current or pending infusion mode.
Setting up a Prime Bolus
A prime bolus is commonly used prior to implant to ll the internal
pump tubing and catheter access port or after an implant to prime
either the catheter or the internal pump tubing, catheter access
port, and catheter. When the bolus nishes, the pump returns to
the programmed infusion pattern.
Warning: Mixing of drug and non-drug (sterile water/CSF)
uids occurs at the high ow rates used during a priming
bolus. This mixing can result in patients receiving drug
prior to the end of the priming bolus, as well as a period
of reduced drug concentration following the priming bolus,
and can lead to adverse events involving drug overdose,
underdose, and withdrawal. These adverse events will vary
depending on the drug being infused, and could include lack
of therapeutic effectiveness, confusion or altered mental
state, sleepiness, nausea, respiratory depression, coma or
death. Refer to “Emergency Procedures” in the indications,
drug stability, and emergency procedures manual and the
appropriate drug labeling for specic drug underdose and
overdose symptoms and actions. Follow these guidelines
regarding priming bolus:
■ Use the priming bolus procedure to ensure that
therapy is initiated while the patient is under medical
supervision.
■ To reduce the risk of overdose during a priming
bolus, consider priming the pump before connecting
the catheter to the pump (back table prime) during
an initial system implant or a pump replacement.
■ For a full system priming bolus: Avoid high
concentration drug solutions with a low total daily
dose as the risk for overdose and underdose can be
more pronounced.
■ For a full system priming bolus: Priming bolus default
parameters have been carefully selected based on
extensive modeling and testing. To ensure optimal
initiation of therapy, modications to these values are
not recommended.
■ For a full system priming bolus: Based on the
therapeutic index of the drug and the sensitivity of
2020-07-01 English
32
BOLUS SCREEN
Page 33

the patient, some individuals may need additional
monitoring until the delivered drug reaches the
intended concentration. Do not increase the
programmed daily dose within the rst 48 hours
following a priming bolus as the delivered drug may
not have reached the intended concentration during
this time.
■ Medtronic recommends monitoring patients after
any priming bolus procedure involving intrathecal
therapy.
– Opioids: Patients should be monitored with
pulse oximetry for a minimum of 24 hours in
a facility equipped with emergency airway
management, oxygen, naloxone for treatment of
opioid overdose and other emergency services.
– Baclofen: Patients should be monitored in
a facility that provides experienced nursing
observation, with the ability and personnel for
emergency airway management and ventilator
support readily available. Patients should be
monitored for a minimum of 8 hours or until they
demonstrate stable neurological, respiratory and
cardiac function.
– Ziconotide: There are no labeling guidelines for
patient monitoring after starting or restarting
ziconotide therapy. Published guidance
recommends an overnight admission.
■ Educate caregivers and family members to
recognize the signs and symptoms associated
with intrathecal drug overdose, underdose, and
withdrawal. Instruct them to contact the patient’s
physician if they notice any of these signs or
symptoms and to seek emergency assistance as
necessary.
The following patient populations were identied as having
increased risk of adverse events from drug overdose and
underdose:
■ Elderly patients.
■ Patients with compromised respiratory, renal,
hepatic, or cardiac function.
■ Patients exposed to other agents, such as systemic
opioids, alcohol, sedatives, antihistaminics, or
psychotropic drugs that can potentiate the central
nervous system depressant effects of intrathecal
morphine.
■ Opioid-naïve or opioid-sensitive patients undergoing
new pump and catheter implants, especially those
prescribed high concentration drug solutions with low
daily doses.
■ Patients who are sensitive to baclofen and require
low daily doses.
■ For baclofen patients undergoing pump or catheter
revision, a delay in achieving the intended
therapeutic dose could occur and may result in
temporary return of symptoms such as increased
spasticity or baclofen withdrawal.
Note: Other clinically relevant patient populations may exist
in addition to these examples.
When programming a priming bolus, make sure to select the
correct drug location. The prime volume will vary depending on the
location of the drug within the system and the type of procedure.
Refer to the following priming information.
2020-07-01 English
33
BOLUS SCREEN
Page 34

■ Full system implant or pump replacement with
aspirated catheter: Prime the internal pump tubing and
catheter.
Note: To reduce the risk of overdose, consider using a
priming bolus of 0.300 mL to ll the internal pump tubing
and catheter access port with drug before connecting the
catheter and implanting the pump (back table prime). Then
program a catheter only prime after implant.
■ Pump replacement with non-aspirated catheter: Use a
priming bolus of 0.300 mL to ll the internal pump tubing
with drug before connecting the catheter and implanting the
pump (back table prime). Do not prime the catheter.
■ Catheter replacement or catheter contrast study: Prime
the catheter only.
■ Catheter revision:
– Spinal (tip) segment revision: Prime the new
spinal catheter segment.
– Pump segment revision: Prime the new pump
catheter segment and the aspirated spinal segment
(unrevised spinal segment must be aspirated).
If a prime bolus is not recommended or further action is needed,
a message will appear in the bolus suggestion panel with
information why the bolus should not be programmed. For
example:
■ Do Not Prime appears if the responses indicate the drug
is not in a correct location for performing a prime bolus (eg,
only in the catheter or lling the whole system).
■ Action Needed appears if the responses indicate a gap in
drug location or the drug is only located in the catheter or
catheter access port (CAP). If the question responses are
correct, follow the instructions to proceed with the task.
Standard mode is the default mode for conguring a prime bolus,
but a bolus can also be congured using Advanced mode. Tapping
the toggle button between Standard and Advanced will change
conguration modes. Advanced mode allows the user to select
a specic prime location (full, cap + catheter, pre-implant, etc) or
enter a custom volume and duration. Do not use Advanced mode
if you are unsure where the drug is located in the pump tubing and
catheter. Contact Medtronic for assistance with using Advanced
mode.
To set up a prime bolus using standard mode
1. Review catheter length/volume.
2. Verify drug location.
Warning: If this is a pump replacement and the catheter
has not been replaced and has not been aspirated, the
pump tubing should be primed before connecting the
catheter and implanting the pump. Do not program a prime
bolus after the catheter has been connected to the pump.
Programming a prime bolus in this situation can result in a
clinically signicant or fatal overdose.
3. If a prime bolus is the recommended selection, tap the
START CONFIGURATION button to open the dialogue box
and proceed to step 4.
4. If no bolus is selected by default, tap the NEW BOLUS
button. The SELECT A BOLUS dialogue box opens. Tap
the SELECT button under PRIME BOLUS.
5. Answer each scenario question. The answer will appear in
the SCENARIO panel.
6. Tap NEXT after selecting each answer.
7. When all questions are answered, conrm drug locations
using the picture of the pump reservoir and tubing.
2020-07-01 English
34
BOLUS SCREEN
Page 35

Warning: If the catheter is new or has been aspirated
and the pump was primed before implant, prime only the
catheter after connecting the catheter and implanting
the pump. Do not include the internal pump tubing and
catheter access port volume in the prime bolus. Inaccurate
drug locations can result in a clinically signicant or fatal
overdose.
8. Tap NEXT.
9. The programmer will calculate a bolus volume and duration
based on the scenario answers.
Note: Tap SHOW CALCULATION to show the calculation
details.
10. Tap CONFIRM.
Note: Delivery of the prime bolus begins when the pump is
updated in the Finish screen.
Warning: If the pump is being primed before implant, allow
the prime to nish before connecting the catheter to the
pump. If the prime is not nished, drug can be bolused into
the catheter and can result in a clinically signicant or fatal
overdose.
Setting up a Bridge Bolus
A bridge bolus advances the drug remaining in the internal pump
tubing, catheter access port, and catheter to the catheter tip at
the specied ow rate. Bridge bolus is generally performed after
emptying and relling the pump when a drug or drug concentration
changes. When the bridge bolus nishes, the pump returns to the
programmed infusion pattern.
Warning: Rinse the reservoir twice between solutions
when changing drug or decreasing drug concentrations
in the pump reservoir (refer to appropriate rell kit manual
for specic procedures). A signicant amount of drug may
be present in the pump reservoir after emptying the pump.
This residual volume cannot be removed by emptying the
pump. Rinsing the reservoir between solutions minimizes
the amount of drug in this residual volume but does not
eliminate it. Failure to account for residual drug in the pump
reservoir can result in a concentration that is different than
intended and a clinically signicant or fatal drug underdose
or overdose. Program a bridge bolus after rinsing the
reservoir twice. The bridge bolus advances the remaining old
drug (the drug left in the pump tubing, catheter access port,
and catheter after emptying and relling the pump) to the
catheter tip at the specied ow rate.
The rate for a bridge bolus is specied according to the 24 hour
dose - the bolus duration is calculated based on the amount of
time required to replace the internal pump tubing, catheter access
port, and catheter contents at the specied rate.
Note: The bridge bolus infusion is delivered in a Simple
Continuous pattern regardless of the current infusion pattern. If the
current infusion pattern is Flex, consider the effects of averaging
the 24 hour dose, especially on patients who receive one or more
large bolus doses throughout the day with a relatively low base
infusion rate. Compare the hourly rate of the desired 24 HOUR
DOSE DURING BRIDGE with the patient’s normal infusion pattern
throughout the day to ensure that an appropriate dose is selected.
Standard mode is the default mode for conguring a bridge bolus,
but a bridge bolus can also be congured using Advanced mode.
Tapping the toggle button between Standard and Advanced will
change conguration modes. Advanced mode requires that the
previous drug information be entered and allows the user to select
2020-07-01 English
35
BOLUS SCREEN
Page 36

a specic volume (full system, catheter, etc) or enter a custom
volume and dose. Do not use Advanced mode if you are unsure
where the drug is located in the pump tubing and catheter. Contact
Medtronic for assistance with using Advanced mode.
To set up a bridge bolus using standard mode
1. If a bridge bolus is the recommended selection, tap the
START CONFIGURATION button to open the dialogue box
and proceed to step 4.
2. If no bolus is selected by default, tap the NEW BOLUS
button. The SELECT A BOLUS dialogue box opens. Tap
the SELECT button under BRIDGE BOLUS.
3. Use the arrow (
DURING BRIDGE value.
Note: Custom Value must be within the specied range.
4. Tap NEXT.
5. The programmer will show the bridge bolus information and
drug scenario for review.
Note: Bolus volume and duration are system generated
values based on the drug concentration, selected 24
HOUR DOSE DURING BRIDGE, and the physical volume
of the internal tubing, catheter access port, and catheter.
Calculated values may change when different values are
entered.
6. Review bolus settings.
7. Tap CONFIRM.
Notes:
■ Delivery of the bridge bolus begins when the pump is
updated in the Finish screen.
■ Patient-activated dosing is disabled for the duration
of the bridge bolus.
) button to select the 24 HOUR DOSE
Setting up a Single Bolus
A single bolus is a one-time therapeutic dose of drug. In the bolus
setup, dose and duration values are entered and the system will
calculate the rate. The SINGLE BOLUS DOSE panel shows the
dose for primary and additional drugs. When the single bolus is
nished, the pump returns to the programmed infusion pattern.
To set up a single bolus
1. Tap the NEW BOLUS button. The SELECT A BOLUS
dialogue box opens.
2. Tap the SELECT button under SINGLE BOLUS.
3. Enter the dose.
4. Enter the duration.
Note: The rate will be calculated based on the dose and
duration inputs.
5. Tap the CONFIRM button.
Notes:
■ Delivery of the single bolus begins when the pump is
updated in the Finish screen.
■ The RATE is displayed as the dose per hour, even
when the duration is less than an hour. For example,
if the dose is 8 mcL and the duration is 30 min, the
rate is 16 mcL/hr.
Setting up a Roller Study
A roller study is a short prime bolus to examine the functionality
of the pump and is not designed to deliver therapeutic dose.
The duration, volume, and dose are all generated by the pump
system. When the roller study is nished, the pump returns to the
programmed infusion pattern.
2020-07-01 English
36
BOLUS SCREEN
Page 37

Note: The pump has the ability to detect a motor stall. If you
suspect an undetected motor stall occurred, contact Medtronic for
assistance on performing a roller study.
To set up a roller study
Warning: To prevent overdose or underdose, do not perform
a roller study without understanding the implication on
therapy. If unsure, contact Medtronic for assistance.
If a bolus of approximately 0.010 mL could cause an
overdose, aspirate approximately 1-2 mL of uid from the
catheter access port to ensure removal of drug from the
catheter access port and catheter.
1. Tap the NEW BOLUS button. The SELECT A BOLUS
dialogue box opens.
2. Tap the SELECT button under ROLLER STUDY.
Notes:
■ Pending conguration is displayed with system
generated values.
■ Delivery of the roller study begins when the pump is
updated in the Finish screen.
Canceling or Continuing a Bolus in Progress
If a bolus is detected at pump interrogation, the Bolus screen
shows the type of bolus in progress, time remaining on bolus, and
CANCEL BOLUS button. The dose, rate, duration, and scheduled
end time for the active bolus are shown in a panel on the right side
of the screen.
When Temporary Stop or Minimum Rate is selected on the
Discontinue screen, any active bolus will be automatically stopped
when the pump is updated.
■ When Minimum Rate is selected, the bolus is canceled by
default. Bolus delivery can be continued by tapping the
UNDO BOLUS CANCELLATION button.
■ When Temporary Stop is selected, the bolus is canceled by
default. Bolus delivery cannot be continued and the UNDO
BOLUS CANCELLATION button is disabled.
To cancel a bolus in progress
Warning: If a bolus is canceled the drug remaining in the
pump and catheter may need to be accounted for to prevent
a clinically signicant or fatal drug underdose or overdose.
1. Tap the CANCEL BOLUS button.
2. Update the pump. Refer to “FINISH SCREEN” on
page 42.
To continue a canceled bolus
If the pump has been updated with a canceled bolus, the bolus
cannot be continued. Continuing a bolus is only available
when a bolus has been canceled and the change has not been
communicated to the pump.
1. If the Bolus screen shows a canceled bolus, tap the UNDO
BOLUS CANCELLATION button.
2. Update the pump. Refer to “FINISH SCREEN” on
page 42.
Note: When the pump is updated, the bolus is not
canceled.
2020-07-01 English
37
BOLUS SCREEN
Page 38

MYPTM™ SCREEN
The Medtronic Personal Therapy Manager (PTM) is an accessory
to the Medtronic SynchroMed II Infusion System. The Personal
Therapy Manager can be used only with the SynchroMed II
Infusion System and allows the patient to activate delivery of
physician-programmed supplemental doses of medication.
The myPTM™ screen requires the use of the PTM accessory.
For PTM setup instructions and applicable warnings, cautions,
indications, and contraindications, refer to the accompanying PTM
manual. Do not enable the Personal Therapy Manager if you do
not have the PTM accessory. Contact the appropriate Medtronic
representative for additional information.
Programming the Pump for Patient-Activated Dosing
Before the PTM can be used, the pump must be programmed to
enable the PTM. This initial programming is performed using the
clinician programmer.
Notes:
■ To enable patient-activated dosing, the pump must be
programmed to Simple Continuous mode.
■ The dose/day entered on the Infusion screen is the base
rate of the infusion prescription except when a physicianactivated or patient-activated bolus is active.
■ Physician-activated boluses (priming, single, and bridge
boluses) take precedence over patient-activated dosing
requests and programmed infusion modes. Patients are
unable to activate a dose during physician-activated
boluses.
■ A record of patient-activated dosing requests is displayed
under Logs on the clinician programmer, in addition to the
Personal Therapy Manager reports.
■ If appropriate, program other pump parameters before
programming the pump for patient-activated dosing.
The following terminology is used for programming the patientactivated dose:
Table 6. Terminology used on the myPTM screen
Lockout
Duration
Dose
Restriction
or Dose
Restriction
Interval
(DRI)
Minimum time between patient activated doses.
The Lockout Duration can range from 10 minutes
to 23 hours and 30 minutes. The lockout duration
cannot be shorter than the patient-activated dose
duration.
Maximum number of patient-activated doses
in a specied period of time. DRI is a rolling
window of time that never resets. When a bolus
is requested, the PTM will conrm that the
maximum number of boluses for the specied
interval has not been exceeded before it delivers
the new bolus.
For example, if the Dose Restriction is 4/24 hrs,
and it’s currently 3 pm, the PTM will count the
number of boluses that have been delivered
since 3 pm of the previous day (24 hours prior).
If the patient has received 4 boluses during
that time, the new bolus will not be delivered.
If, however, the patient has received 3 or fewer
boluses in the past 24 hours, the new bolus will
be delivered.
2020-07-01 English
38
MYPTM™ SCREEN
Page 39
Max
Activations
within 24
Hours
Increase
in dose
percentage
Maximum number of bolus doses in a day
(midnight to midnight).
Calculated maximum increase in daily dose over
the Simple Continuous 24 hour dose if all the
patient activated doses were to be used on a
given day.
To program the pump for patient-activated dosing
1. Using the clinician programmer, verify that Simple
Continuous mode is selected and a base rate or 24 Hour
Dose is entered on the Infusion screen.
2. On the myPTM screen, tap the ENABLE MYPTM button.
3. Enter the patient-activated dose.
Notes:
■ Patient activated dosing is based on the primary
drug.
■ Tapping the COMPARE button opens a myPTM
SUMMARY screen which shows the current and
pending myPTM settings.
■ To view calculations for a secondary drug, tap the
MAX 24 HOUR DOSE input box. Secondary drug
information is available after patient-activated dosing
setup is complete and is displayed for reference only.
4. Tap CONFIRM.
5. Review the dose and default duration values in the
DOSE AND DURATION element. Make any necessary
adjustments by tapping the appropriate input boxes and
entering new values.
Notes:
■ Some dose and duration combinations may not be
possible because of the pump system design.
■ The default setting is the time required to deliver the
dose at the maximum infusion rate.
6. Tap CONFIRM in the DOSE AND DURATION element to
move on to setting patient restrictions.
7. Set the LOCKOUT DURATION.
8. Select the DOSE RESTRICTION.
9. Select the MAX ACTIVATIONS WITHIN 24 HOURS.
10. Tap CONFIRM.
11. Review the calculated dosages displayed:
■ The maximum 24 hour dose (if all patient boluses
are delivered)
■ Increase in dose percentage (if all patient boluses
are delivered)
12. When you are nished setting pump parameters, update
the pump. Refer to “FINISH SCREEN” on page 42.
Note: Any update to the pump will start the Lockout
Interval. Patient-activated dose requests during this period
will be denied.
2020-07-01 English
39
MYPTM™ SCREEN
Page 40

ALARMS SCREEN
The Alarms screen summarizes alarm information and allows the
user to view and edit alarm settings. Pump alarm tones sound
from the pump. There are three different types of alarms:
■ Low Reservoir Alarm – An alarm that sounds when
the calculated reservoir volume falls below the specied
threshold. The app recommends a default volume of 2.0
mL. This input box sets the threshold for a low reservoir
alarm.
■ Critical Alarm – A critical alarm is a two-tone alarm with
available values in 10 minute intervals from 10 minutes (the
default) to 2 hours. Critical alarms signal a pump condition
with imminent termination of therapy. This input box sets
the interval for critical alarms.
■ Non-critical Alarm – The non-critical alarm is a single-tone
alarm with available values in 1-hour intervals from 1 hour
(the default) to 6 hours. Non-critical alarms signal a pump
condition that requires a clinician’s attention but does not
mean termination of therapy. This input box sets the interval
for non-critical alarms.
The Alarms screen also shows the rell pump before date, max
volume, and current volume in the graphic. The REFILL PUMP
BEFORE date is an estimate based on the low reservoir alarm
threshold, reservoir volume, and infusion settings (including
physician-activated bolus and maximum number of patientactivated doses available to the patient per day). The CURRENT
VOLUME is set on the Reservoir screen and displayed on the
Alarms screen to aid setting the low reservoir alarm.
The EXAMPLES for each alarm is a list of events that cause
critical and non-critical alarms. These are only examples and not
necessarily conditions that are present in the pump.
To set the Low Reservoir Alarm volume
1. Tap the edit button ( ) on LOW RESERVOIR ALARM input
box.
2. The low reservoir alarm displays a default value of 2.0 mL.
Enter a value within the specied range using the keypad or
the arrows (
Warning: To maintain ow rate accuracy, program the
pump to alarm before the volume of drug remaining in
the pump reservoir decreases below 1.0 mL. At volumes
less than 1.0 mL, ow rate decreases rapidly and
stops as the volume reaches 0 mL. This can result in
underinfusion and a return of underlying symptoms, drug
withdrawal symptoms, or a clinically signicant or fatal drug
underdose.
3. Tap CONFIRM.
) on the pump graphic.
To set alarm interval
1. Tap the edit button ( ) on the input box.
2. Tap the arrow (
3. Tap CONFIRM.
) button and select the desired interval.
To demonstrate pump alarm tones
1. Tap the edit button ( ) on the input box.
2. Place the communicator over the pump.
3. Tap the PLAY SOUND button (
4. Tap CONFIRM.
).
2020-07-01 English
40
ALARMS SCREEN
Page 41

DISCONTINUE SCREEN
The Discontinue screen is used to stop a pump from providing
therapy, either temporarily or permanently. The screen provides
a summary of the infusion settings after a discontinue method is
selected. There are four discontinue methods available:
■ None — This option does not stop the pump. It can be used
to continue therapy if the Discontinue screen is mistakenly
added to the workow. This is the default selection.
■ Minimum Rate — This option delivers the drug infusion at
a rate of approximately 0.006 mL/day. The infusion rate is
designed to provide a nontherapeutic dose without stopping
the pump and is an alternative to stopping the pump.
■ Temporary Stop — This option stops the pump mechanism
completely but alarms remain enabled. Therapy can only be
restarted by selecting a new infusion pattern and updating
the pump. This method should only be enabled for 48 hours
maximum to avoid damage to the internal pump tubing. A
critical pump alarm will sound after 48 hours.
■ Permanent Shutdown — This option permanently stops
the pump and associated therapy, and disables alarms.
The pump cannot be restarted. A password is required for
this option if the pump is not at End of Service. Contact
Medtronic to obtain the password.
Caution: If therapy is discontinued for an extended period,
ll the pump reservoir with preservative-free saline. For
programmable pumps, program the pump to minimum
rate mode (0.006 mL/day). Rell the pump as needed to
ensure the pump always contains uid in the reservoir and
uid pathway. Stopping the pump for extended periods
or allowing the pump reservoir to empty completely can
damage the system and require surgical replacement.
To set Minimum Rate
1. Select MINIMUM RATE. The 24 Hour Dose shows the
0.006 mL/day rate.
2. In the Finish screen, update the pump. Refer to “FINISH
SCREEN” on page 42.
To stop the pump temporarily
1. Select TEMPORARY STOP. 24 HOUR DOSE shows a
0.00 programmed rate.
2. In the Finish screen, update the pump. Refer to “FINISH
SCREEN” on page 42.
3. After the pump update, a device alert appears. Tap OK.
Caution: To prevent damage to the pump, do not stop drug
delivery for more than 48 hours.
To restart the pump after Temporary Stop
1. On the Infusion screen, tap CONTINUE THERAPY.
2. In the Finish screen, update the pump. Refer to “FINISH
SCREEN” on page 42.
Permanently Shutting Down a Pump
Stopping the pump permanently requires a password. Before
performing this procedure, contact Medtronic to obtain the
password.
After the update has completed, interrogate the pump to verify
settings.
To perform a permanent pump shutdown
1. Select PERMANENT SHUTDOWN.
2020-07-01 English
41
DISCONTINUE SCREEN
Page 42

2. Enter the password.
3. Tap CONFIRM.
4. In the Finish screen, update the pump. Refer to “FINISH
SCREEN” on page 42.
5. Tap the OK button to acknowledge the alert.
Note: After permanent shutdown, the pump workow
returns to the Home screen. All alarms are disabled, the
navigation bar is disabled, and no other workow tasks can
be performed.
Shutting Down an Unusable Pump
A pump becomes unusable when it reaches End of Service (EOS)
or rarely for other reasons. For device longevity information, refer
to “DEVICE LONGEVITY” on page 52.
When pump interrogation detects an unusable pump, an alert
is displayed. The unusable pump alert includes a SHUT DOWN
PUMP button to shutdown the pump immediately and a HOME
button to open the Home screen.
Note: The SHUT DOWN PUMP button silences all pump alarms.
To shutdown the pump
1. Tap the SHUT DOWN PUMP button.
2. Make sure the communicator is over the pump.
Note: After permanent shutdown, the pump workow
returns to the Home screen. No other workow tasks can
be performed.
FINISH SCREEN
The Finish screen provides an overview of the changes made
on each screen for review before communicating updates to the
pump (Figure 8 on page 46). Relevant notications or alerts
are shown with their corresponding workow tasks. At the bottom
of the screen, the UPDATE button updates the pump with the
pending settings.
Reviewing Changes
Review pending changes carefully before updating the pump.
■ Settings with pending changes have a PENDING
notication in green.
■ Screens with an active alert have a box with the number
and types of active alerts.
To review pending changes
1. Review the pending settings in each row by scrolling down
on the Finish screen. Table 7 lists important items to check
before updating the pump.
2. If an alert is active, review each alert to make sure
the update can proceed. If necessary, return to the
corresponding screens and make changes.
3. If no alerts are active, proceed to “Updating the Pump” on
page 43.
Table 7. Reviewing pending settings
Finish
Screen Row
Patient Make sure changed information appears as
What to Check
expected.
2020-07-01 English
42
FINISH SCREEN
Page 43

Finish
What to Check
Screen Row
Catheter Make sure the catheter volume is acceptable.
Reservoir Make sure the Reservoir volume setting
matches the actual volume of drug in the
reservoir.
Drugs Make sure each listed drug has an appropriate
concentration.
Infusion Make sure the infusion pattern is acceptable.
Make sure the 24-Hour Dose for all drugs are
acceptable.
Make sure the percentage change in 24-hour
dose is acceptable.
Make sure the change from current 24-Hour
Dose to pending 24-Hour Dose is acceptable.
Bolus Make sure any alerts are addressed.
If a bolus is pending, make sure the dose,
duration, and rate are acceptable.
Alarms Conrm that the Low Reservoir Alarm volume
is acceptable.
Combined
Therapy
Check for replacement estimate (ERI/EOS)
alerts.
Make sure the Rell pump before date is
acceptable.
Make sure the Bolus 24-Hour dose is
acceptable.
Make sure the Infusion 24-Hour dose is
acceptable.
Make sure the Total 24-Hour dose is
acceptable.
Updating the Pump
The UPDATE button is found at the bottom of the Finish screen
and initiates telemetry to program the pending settings to the
pump. Pending settings will not be programmed to the pump if
the update does not complete. If the update is started but not
completed, the pump may be in an unknown state and the user
will be notied with a high-level alert. Refer to “If telemetry is
interrupted during a pump update” on page 45 for more details.
The UPDATE button is disabled in the presence of certain alerts
that must be resolved before the update can proceed. In this
case, the UPDATE button is colored red and shows the number of
issues that must be resolved. Other alerts will allow you to update
the pump, although you may be prompted to acknowledge these
alerts before the update proceeds.
The UPDATE button is not enabled unless settings have been
changed since the last update and critical pump settings have
been completed in earlier workow screens. The following critical
pump settings must have valid values before updating the pump:
■ Primary drug (name, concentration value, and
concentration units)
■ Reservoir volume
■ Total catheter volume
■ Infusion pattern
■ 24-hour dose
■ Low reservoir alarm volume
■ Critical and non-critical alarm intervals
2020-07-01 English
43
FINISH SCREEN
Page 44

Warning: Following a pump replacement or catheter
revision, consider dosing requirements carefully. If therapy
has been interrupted for a prolonged period of time, the
patient may become drug naive. Overdose may occur if the
drug is introduced at the previous dosage.
Warning: Do not send a patient home if:
■ There is a pump memory error.
■ There is an unresolved alarm condition.
■ Telemetry was interrupted during pump update or
interrogation.
■ Pump status was not conrmed.
Failure to correct pump memory errors, alarm conditions, or
incomplete telemetry can result in incorrect or incomplete
programming, unknown or unexpected pump status, and a
clinically signicant or fatal drug underdose or overdose.
Warning: Before interrogating or updating the pump, conrm
that the time and date on the programmer are correct.
Incorrect time and date can result in incorrect programming
and estimated dates.
Caution: No more than one hour should elapse between
determining pump status and transmitting a new infusion
prescription to the pump. If more than one hour has elapsed,
repeat pump interrogation to determine pump status
(because the volume of drug in the pump reservoir may
have changed, causing a change in pump status). Note that
interrogating the pump will automatically start a new session
and unsaved data will be lost.
Warning: The pump is synchronized to the time of the last
programmer used to update the pump. Before updating the
pump, consider the following situations that may affect the
actual time that the patient receives the intended therapy:
■ Current time on programmer is incorrect.
■ Patient lives in a different time zone than that to
which the programmer is set.
■ Patient is traveling to a different time zone.
■ A change into or out of Daylight Saving Time is going
to occur soon, or has recently occurred.
Prior to making a change in programmer time, verify
whether the patient has recently received or will soon
receive a programmed bolus or high-rate step. Changing
the programmer time forward or backward will affect
programmed steps or boluses. Receiving a bolus or step at
an unintended time may result in a clinically-signicant or
fatal drug overdose or underdose.
To update the pump
Warning: To use the nonsterile programmer system
components in a sterile eld, place a sterile barrier between
the patient and system components to prevent infection. Do
not sterilize any components of the programmer system.
Sterilization may damage the components.
Note: If updating the pump with a new prescription is delayed,
drug that has moved into the internal pump tubing or catheter
during the delay needs to be accounted for.
1. Tap the UPDATE button. The CONFIRM CHANGES
dialogue box opens.
2. If the changes are not correct, tap the CANCEL button to
return to the Finish screen.
3. If the changes are correct, tap the acknowledgment check
box.
4. Place the communicator over and as close as practical
to the implantable pump and tap the CONFIRM button.
2020-07-01 English
44
FINISH SCREEN
Page 45

Telemetry begins and a telemetry progress window opens.
Do not remove the communicator until the update is
complete.
Note: The target symbol on the back of the communicator
indicates the location of the internal antenna. The target
should be facing and centered over the implantable device.
Warning: To ensure successful telemetry, hold the
communicator steady over the implanted pump until
conrmation is received that telemetry was successful.
If the communicator is not held over the pump
properly, telemetry may not be established or may be
interrupted, which can result in unintended or incomplete
programming.
5. After telemetry is complete, remove the communicator from
the pump.
6. Tap OK in the dialogue box.
7. Verify pump settings have been updated.
If telemetry is interrupted during a pump update
When telemetry is interrupted, either by user action or system
action, the pump state is unknown, and the pump may or may not
be stopped. The system responds to interrupted telemetry with a
high-level alert.
To continue updating the pump, tap the CONTINUE UPDATE
button. If the application is closed and the pump is left in an
unknown state, start a programming session with the pump and
check all of the current pump settings.
ENDING A SESSION
After the pump update is complete, the application will return to
the Home screen and display the new pump information. The
current session will remain open on the application until the
session is ended.
To end a session
1. Tap the Settings ( ) button in the action bar.
2. Select End Session.
3. Tap the END SESSION button on the pop-up message.
2020-07-01 English
45
ENDING A SESSION
Page 46

Marks pending changes
Navigates to screen
Scroll bar shows pending
changes and active alerts
Figure 8. Finish screen with changes pending
2020-07-01 English
46
ENDING A SESSION
Page 47

DEMO MODE
Demo mode allows access to all programming features without
interrogating or updating a device. When the programmer is in
Demo mode it is not communicating with a real device and does
not require the use of a communicator.
Demo mode can be used to work with the programmer for training
and demonstrative purposes and to familiarize yourself with the
programmer interface before a programming session.
If Demo mode is selected, the programmer remains in Demo
mode until the session is ended.
DRUG LIBRARY
The Drug Library stores drug names and associated
concentrations that have been programmed to the pump. Drug
Library entries are available for quick use when adding or editing
drugs. New drug library entries become available after the pump
is updated. Entering a drug name lters the drug library to show
similar results.
The Drug Library is available by tapping the Settings (
in the action bar and selecting Drug Library. Tapping the CLOSE
button exits the Drug Library.
) button
To start Demo mode
1. From the main menu screen, select DEMO.
2. Check that DEMO appears in orange on the action bar of
the app.
To exit Demo Mode
1. Tap the Settings ( ) button.
2. Select End Session.
Note: The app will return to the main menu screen.
To add a drug entry
1. Use the keyboard to enter the drug name.
Note: Verify spelling as drug library entries are re-used.
2. Tap the Units drop-down list to select a unit.
3. Tap the Concentration input box and use the keyboard to
enter the drug concentration.
4. Tap the ADD DRUG button at the end of the row.
To delete a drug
1. Tap the ‘X’ at the end of the drug row.
Note: A drug cannot be retrieved after being deleted from
the Drug Library. If a deleted drug is needed again, it
must be entered again or restored to the programmer by
completing a programming session with a pump that has
the desired drug.
2020-07-01 English
47
DEMO MODE
Page 48
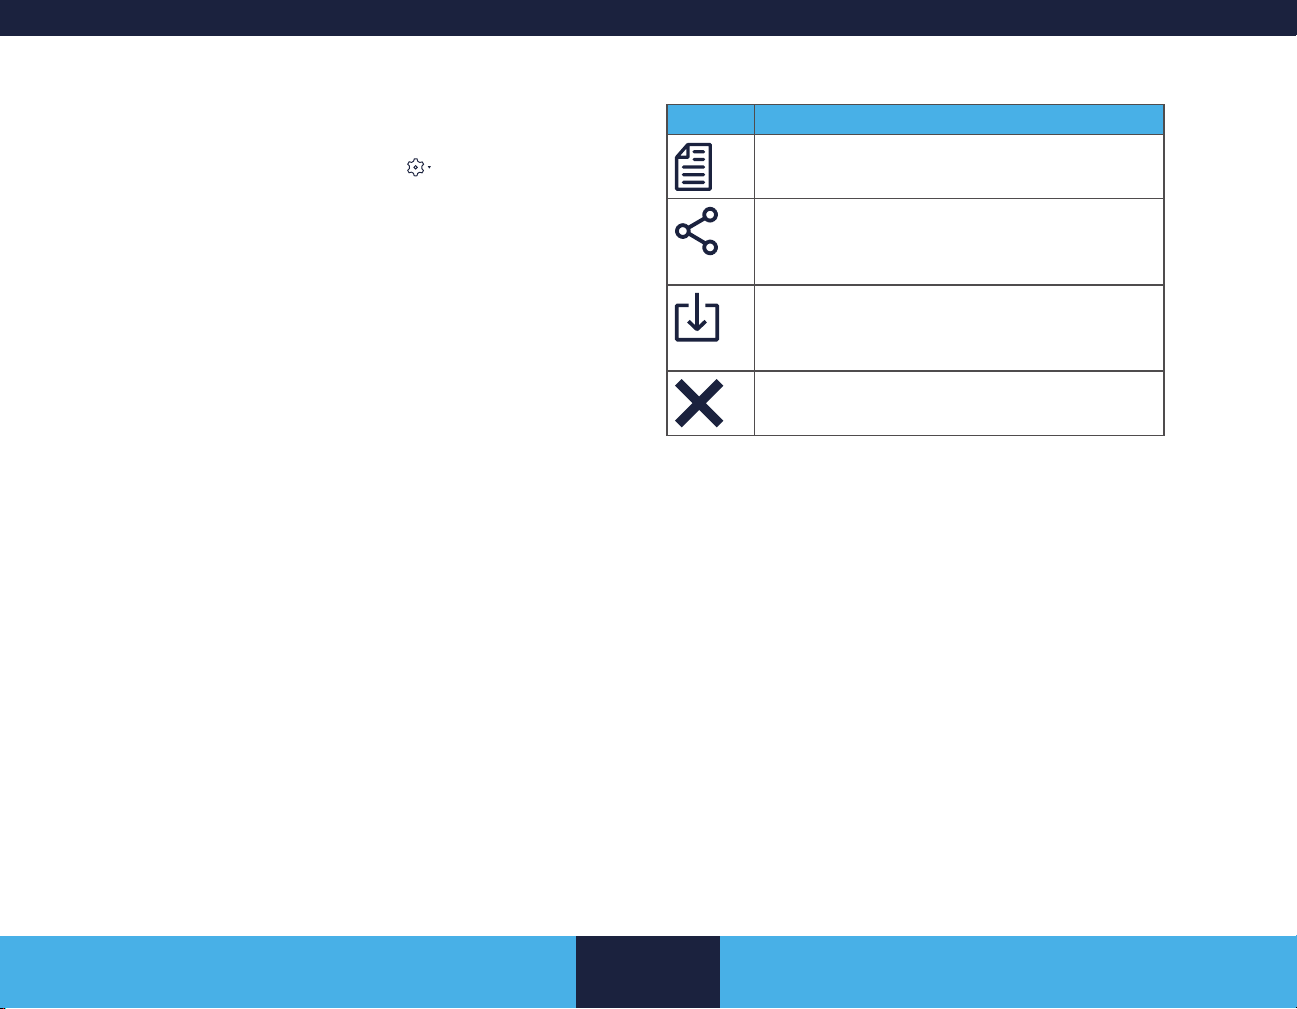
REPORTS
The Reports screen provides the ability to view, print, and save
session reports. Reports is available from the main menu screen
or at any time by tapping the Settings (
Reports. Printed or saved reports provide a permanent record
of what was changed or modied during a programming session.
Tapping CLOSE returns the user to the current programming
screen.
These reports are available:
■ Patient Report contains information relevant to the patient.
■ Session Short Report contains information about the
settings that were programmed into the pump at the last
update.
■ Session Long Report is similar to the Session Short
Report, but also contains additional information about each
update that occurred during a session, clinician notes, and
device session history. If logs were accessed during the
session, log events are available on the report.
■ Rell Report provides a list of all patients who have a
patient record on the programmer that is associated with
an implantable pump. This report can be ltered by a range
of dates for the next rell date. The Rell Report is also
available through the Patient Data Service app. For more
information, refer to “PATIENT DATA SERVICE APP” on
page 50.
Reports can be ltered by tapping the FILTERS button. During a
programming session, reports can be ltered by rell or session
date. When a session is not in progress, reports can be ltered by
patient name, patient ID, session date, and rell date.
Selecting a report shows the following actions:
) button and selecting
Table 8. Report actions
Icon Details
View Report
■ Tap to view a PDF of the report.
Share Report
■ Tap to send a report to another app or
destination.
Download Report
■ Tap to save a PDF of the report to a pre-
set location on the tablet.
Delete Report
■ Tap to delete the report from the tablet.
When an action is selected, a pop-up to remove patient identifying
information appears. Checking the box will black out all patient
identifying information on that version of the report and the report
will no longer include the patient’s name in the title.
2020-07-01 English
48
REPORTS
Page 49

ALERTS
Alerts are messages that provide instructions or indicate
conditions that require action. Alerts are activated in response
to a variety of conditions, and are therefore presented differently
depending on the circumstances. Some alerts are informational
and may not require any action. For other alerts of a more critical
nature, you may be prompted to acknowledge or resolve them.
There are three types of alerts (Table 9).
Table 9. Alerts
Alert Type Description
Low level
(blue)
Medium level
(orange)
High level
(red)
INFORMATION Indicates information about
functionality or status.
CAUTION Indicates a caution and
that the message must be
acknowledged or resolved.
WARNING Indicates a warning about
the presence of a potentially
hazardous condition that
must be acknowledged or
an issue that needs to be
resolved before the pump can
be updated.
or your acknowledgment before an update can proceed. For
information on updating the pump, see “FINISH SCREEN” on
page 42.
To view and acknowledge alerts
1. Tap the ALERTS button.
2. A separate pop-up box appears for each alert. The type of
alert (eg, INFORMATION) is shown in the heading of the
pop-up box. Swipe left or right to view individual alerts.
3. Tap ‘X’ (or anywhere outside of the alert pop-up box) to
close the alert pop-up box.
Note: The ALERTS button shows a count of active alerts
related to the current screen. When all alerts are resolved
or cleared, the ALERTS button will read “NO ALERTS.”
As you navigate through a workow, alerts may activate by
expanding over the bottom of the screen and the PREVIOUS/
NEXT buttons. The following actions are available:
■ Tap the < arrow to minimize the alert
■ Tap the alert to view the entire text
The Finish screen displays alerts that you should be aware of
before updating the pump. Some alerts may require resolution
2020-07-01 English
49
ALERTS
Page 50

PATIENT DATA SERVICE APP
The Patient Data Service app can be used to access reports
(generated from patient data records) for all patients whose
Medtronic devices have been programmed using the clinician
programmer apps on the clinician tablet. The Patient Data Service
app icon (Figure 9) is located on the clinician tablet’s home
screen.
Patient Data Service
Figure 9. Patient Data Service app icon
The search function of the Patient Data Service app can lter
reports by categories such as patient, date, or device. Selecting a
patient report in the search results opens the REPORTS screen
with additional options (such as generating and displaying a PDF
le of the report). Refer to “REPORTS” on page 48.
TROUBLESHOOTING
For assistance or for questions, contact:
■ US only: Medtronic Technical Services at 1-800-707-0933.
■ Outside US: Your regional representative listed in this
manual.
This section covers noninvasive troubleshooting and error
messages relating to the Model A810 Clinician Programmer.
Approach troubleshooting conservatively. Prior to performing
invasive procedures, ensure that all noninvasive procedures
have been considered and contact the appropriate Medtronic
representative listed at the end of this manual.
Pump Troubleshooting
Interrogate the pump for current settings before beginning
troubleshooting. If pump alarms are active, interrogate the pump
to determine the cause of the active alarm. For instructions on
interrogation, refer to “To interrogate a pump” on page 15.
PDF Auto-Delete Feature
The PDF auto-delete feature automatically deletes PDF reports
from the tablet’s local storage after a designated amount of time.
The auto-delete setting affects all PDF reports for all patients who
have had their device programmed by the clinician tablet.
Note: The PDF auto-delete feature does not delete patient data
records from the Patient Data Service app.
The auto-delete feature is automatically enabled with a default
number of days. Tap the Settings (
of the Patient Data Service app to change the PDF auto-delete
settings if desired.
2020-07-01 English
) button on the initial screen
Communicator Troubleshooting
The programmer automatically attempts to connect to the most
recently used communicator. If the previous connection was
through BLUETOOTH wireless technology, the programmer
and communicator attempt to reestablish connection using
BLUETOOTH. If the original connection was through a USB
connector cable and the cable is unplugged, the programmer tries
to connect through BLUETOOTH wireless technology.
Use the following list of problems and possible solutions to resolve
other problems with communication.
50
PATIENT DATA SERVICE APP
Page 51

Cannot pair the communicator with the tablet
When attempting to connect through BLUETOOTH:
■ Make sure the communicator is turned on and
within range of the clinician tablet. See the 8880T2
Technical Manual for details.
■ Make sure BLUETOOTH is enabled on the clinician
tablet.
The communicator cannot communicate wirelessly
with the clinician tablet during a programming session
Possible reasons:
■ You are in an environment where multiple devices
are using BLUETOOTH wireless technology and
thereby creating interference.
■ You have moved into an environment where the
BLUETOOTH wireless technology is prohibited.
Possible solutions:
■ Use the USB connector cable to connect the
communicator to the clinician tablet.
■ Make sure the BLUETOOTH wireless technology is
enabled on the clinician tablet.
The communicator cannot communicate with the
implantable device
Metal surfaces can interfere with the communication
between the communicator and the implantable device.
■ If the communicator is on a metal table or a metal
tray, move the communicator to a nonmetal surface.
■ There could be radio-frequency (RF) interference.
■ Move the communicator closer to the implanted
device.
■ The communicator must remain within 9 centimeters
(approximately 3.5 inches) of the implanted device.
The communicator is damaged
Use a different communicator:
■ Ensure the damaged communicator is turned off
before using another communicator.
■ If using a replacement communicator prior to starting
a programming session, use the USB connector
cable and pair the replacement communicator to the
clinician tablet.
Refer to “To pair the communicator with a clinician tablet”
on page 15.
Or if replacing the communicator while in a programming
session, use the USB connector cable to connect the
communicator to the clinician tablet and continue with the
programming session.
Communicator battery level is low
■ Open the battery case and replace the batteries. If
needed, instructions for replacing the communicator
batteries are in the Model 8880T2 Communicator
Technical Manual.
■ After replacing the communicator batteries, the
clinician programmer app will connect with the
communicator using the BLUETOOTH wireless
technology and resume the session.
2020-07-01 English
51
TROUBLESHOOTING
Page 52

The clinician tablet, the clinician programmer app, or
the communicator is unresponsive
Turn off the power for the clinician tablet or the
communicator, then turn the power on.
DEVICE LONGEVITY
Device longevity is the calculated number of service months
remaining based on actual usage rates. All SynchroMed II pumps
will need to be replaced after 7 years of service. When a pump
reaches end of service, it is designed to automatically shut off with
adequate warning.
Refer to the device implant manual for more information about
device longevity.
Two pump alarms are associated with the end of service:
■ Elective Replacement Indicator (ERI) is a non-critical
alarm that is activated when the pump nears the end of its
service life (EOS). ERI indicates the pump will continue to
operate within specications for 90 days (for ow rates up
to 1.5 mL per day). The pump reaches end of service and
stops 90 days after ERI. Refer to the pump implant manual
for more information about the 90 day period between ERI
and EOS.
■ End of Service (EOS) is a critical alarm that is activated
if the pump is not replaced within 90 days of ERI. The
EOS activation indicates the pump has reached the end
of its service life. At EOS, the pump stops, but telemetry is
available until the pump battery is depleted.
ERI and EOS are displayed on several programmer screens:
■ Before ERI, the Home, Pump, and Finish screens display
an Estimated Replacement eld, showing the estimated
month and year that ERI will occur. After ERI, these screens
display an EOS eld, showing the month and year that EOS
will occur.
Note: The estimated replacement date is based on current
programmed delivery and may be less than expected in
pumps with high ow rates. If the ow rate is reduced, a
2020-07-01 English
52
DEVICE LONGEVITY
Page 53

new date is calculated which may be signicantly different
from the current value.
■ The Session Short Report and Session Long Report
include an Estimated Replacement (estimated month and
year that ERI will occur) or EOS entry which is identical to
the entry in the workow screens.
■ The ERI and EOS alarms are recorded in the Pump Activity
Log.
Since the pump stops automatically at EOS, it is important to
replace the pump in the 90-day period between ERI and EOS.
PUMP ACTIVITY LOGS
Pump Activity Logs are pump conditions that are recorded
and displayed in reverse chronological order. Be sure to reinterrogate the pump and retrieve the Pump Activity Logs as part
of troubleshooting.
Table 10 lists potential pump activity log event text along with
actions, if required.
There are three different ways to view events:
■ Patient Events - Shows up to 80 of the most recent events
logged when any patient function is requested.
■ System Events - Shows up to 30 of the most recent events
logged by the system.
■ All Events - Shows both Patient and System events.
Each entry includes the following elements:
■ Event time - Date and time the event occurred.
■ Event - An event description or number (events with only
an event number are for diagnostic purposes).
■ Event Type - Identies whether the event is a patient or
system event.
Note: The date and time of pump activity log events is relative
to the current time on the programmer. If the pump time and
programmer time are different, consider the difference when
determining when an event actually occurred.
2020-07-01 English
To view the Pump Activity Logs
1. Re-interrogate the pump.
2. Tap the Settings (
3. Select Logs.
53
PUMP ACTIVITY LOGS
) button in the action bar.
Page 54

Table 10. Event log messages and actions
Code Message Action
00 Critical Alarm - End of Service
(EOS) Occurred
01 Critical Alarm - Pump Reset Contact Medtronic
03 Critical Alarm - Pump Motor
Stall Occurred
04 Critical Alarm - Stopped Pump
Duration Exceeded 48 Hours
05 Critical Alarm - Critical Pump
Memory Error
06 Critical Alarm - Empty Reservoir
Alarm
07 Critical Alarm - Pump Defaulted
to Minimum Rate
08 Critical Alarm - Infusion
Handshake Error
12 Non-Critical Alarm - Infusion
History Cleared
13 Silent Alarm - Pump Safety
Count in Effect
14 Programming step (3-5) None required
15 Pump Permanently Shut Down None required
16 Programming step (7-7) None required
18 Event Status cleared None required
19 User Silenced an Active Audible
Alarm
Replace the pump
If stall recovery
has not occurred,
contact Medtronic
If desired, restart
pump and verify ow
rate
Contact Medtronic
Rell pump and
update rell-related
parameters
Contact Medtronic
None required
None required
Contact Medtronic
None required
Code Message Action
21 Programming step (2–2) None required
22 Programming step (1-1) None required
23 Programming step (5-0) None required
24 Programming step (4-9) None required
26 Programming step (6-6) None required
28 System Event Log Cleared None required
29 Patient Activation Event
Counters Cleared
30 Stack Overow Error Contact Medtronic
1A Pump Motor Stall Recovery None required
2A Programming step (8-0) None required
2B Critical Alarm - Pump Reset
Due to Low Battery
2C Critical Alarm - Pump Reset
Due to Firmware Error
2D Critical Alarm - Pump Reset
Due to Telemetry Command
2E Time Check Error None required
2F Stack Pointer Error Contact Medtronic
0A Non-Critical Alarm - Low
Reservoir Alarm
0B Non-Critical Alarm - Next Rell
Date Alarm
0C Non-Critical Alarm - Adjusted
Rell Date Alarm
None required
Contact Medtronic
Contact Medtronic
Contact Medtronic
Rell pump and
update rell-related
parameters
Rell pump and
update rell-related
parameters
Rell pump and
update rell-related
parameters
2020-07-01 English
54
PUMP ACTIVITY LOGS
Page 55
Code Message Action
0D Non-Critical Alarm - Elective
Replacement Indicator (ERI)
0E Non-Critical Alarm - Non-
Critical Memory Error
0F Non-Critical Alarm - Hybrid Trim
Parameters Error
88 myPTM
89 Rejected myPTM
TM
Bolus Request None required
TM
Bolus
Request
Replace pump
within 90 days of
ERI
Contact Medtronic.
Verify that all
programmed
data are correct
and pump status
appears normal
Contact Medtronic
None required
2020-07-01 English
55
PUMP ACTIVITY LOGS
Page 56

2020-07-01 English
56
Page 57

Manufacturer
Medtronic, Inc.
710 Medtronic Parkway
Minneapolis, MN 55432
USA
www.medtronic.com
Tel. +1-763-505-5000
Authorized Representative
in the European Community
Medtronic B.V.
Earl Bakkenstraat 10
6422 PJ Heerlen
The Netherlands
Tel. +31-45-566-8000
Europe/Africa/Middle East Headquarters
Medtronic International Trading Sàrl
Route du Molliau 31
Case Postale 84
CH - 1131 Tolochenaz
Switzerland
www.medtronic.eu
Tel. +41-21-802-7000
Asia-Pacic
Medtronic International Ltd.
50 Pasir Panjang Road
#04-51 Mapletree Business City
Singapore 117384
Singapore
Tel. +65-6870-5510
*M968017A021*
© Medtronic 2020
All Rights Reserved
M968017A021 Rev A
2020-07-01
 Loading...