

Page 1

CLINICIAN APP
FOR SACRAL
NEUROMODULATION
THERAPY
Clinician Programming Guide for
InterStim™ systems
with Model 97800 InterStim X
neurostimulator
A51300
Application version 1.0
Page 2

Page 3

SYMBOLS
Explanation of symbols in this manual
Refer to the appropriate product for symbols that apply.
Manufacturer
Authorized representative in the European
community
For USA audiences only
Magnetic Resonance (MR) Conditional
Importer
Page 4

Medtronic and the Medtronic logo are trademarks of
Medtronic. Third party brands are trademarks of their
respective owners. All other brands are trademarks of a
Medtronic company.
Android
TM
is a trademark of Google LLC.
The handset, as congured, does not support voice
communication and therefore cannot be used to make
any calls (including emergency calls).
Page 5

Information available for the system:
The information for prescribers manual provides information
about contraindications, warnings, precautions, adverse events,
sterilization, patient selection, individualization of treatment, and
component disposal.
For customers in Japan, the appropriate package insert
provides information about indications, safety, contraindications,
warnings, precautions, and adverse events.
The indications sheet provides information about indications
and related information. For customers in Japan, the
appropriate package insert provides information about
indications.
The system eligibility, battery longevity, specications manual
provides information about neurostimulator selection, battery
longevity calculations, and battery characteristics.
The system overview and compatibility insert provides
information about component compatibility.
MRI guidelines provide information about any MRI conditions
and MRI-specic contraindications, warnings, and precautions
for MRI scans with the neurostimulation system.
Product manuals, such as programming guides, recharging
guides, and implant manuals provide device descriptions,
package contents, device specications, product-specic
warnings and precautions, and instructions for use.
The clinical summary provides information about the
clinical study results for the neurostimulation system.
Refer to the literature provided by the clinician handset
manufacturer for information regarding wireless use.
Refer to the Communicator technical manual for warnings,
precautions, device description, package contents, device
specications, instructions for use, and maintenance
information.
Page 6

TABLE OF CONTENTS
GENERAL WARNINGS AND CAUTIONS ....9
OVERVIEW ................................................ 10
Intended Use ........................................................10
About This Guide ................................................10
QUICK TIPS ............................................... 11
Using the Workow Navigator ........................... 11
Indicators and Icons ........................................... 11
GETTING STARTED .................................. 13
Accessing the Clinician App .............................. 13
Creating a Password ...........................................13
Menu Screen ........................................................ 14
Demo Mode .......................................................... 14
Using the Communicator to Pair the Handset and
Neurostimulator ..................................................15
Setting Implant Date............................................16
WORKFLOWS ............................................ 18
Starting a Workow .............................................18
Conguring the Implanted Neurostimulator
(Congure Implant Workow) ............................ 18
Setting up implant conguration .....................................19
Entering patient information ............................................19
Checking device and system status ................................19
Therapy Parameter Settings ..............................21
Maximum settings .............................................................28
Optimizing device settings ...............................................28
6
A51300 English 2021-11-01
Page 7

Selecting Cycling feature and time ..................................29
Performing an Integrity Measurement (Check
Impedance Workow) .........................................30
Electrode polarity ..............................................................31
Checking Neurostimulator MRI Eligibility (View
MRI Status Workow) .........................................32
MRI - PREPARING FOR AN MRI SCAN .... 33
WORKING WITH PROGRAMS .................. 37
Standard Programs ............................................. 37
Custom Programs ...............................................37
Enabling programs for patient use ..................................40
Reviewing a Therapy Programming Session ... 40
Ending a programming session .......................................41
Using the Stop Therapy feature .......................................41
DIAGNOSTICS ........................................... 42
Usage Graph ........................................................ 42
To view the usage graph: .................................................44
Event Log ............................................................. 44
Usage report ........................................................46
REPORTS .................................................. 47
Accessing a Downloaded Report ...................... 47
ADDITIONAL FEATURES .......................... 49
About Screen ....................................................... 49
Managing Devices .............................................. 49
Software Information ..........................................50
Data security ......................................................................50
Network connectivity ........................................................50
2021-11-01 English A51300
7
Page 8

Installing application updates ..........................................51
Installing communicator updates ....................................51
Returning the handset ......................................................51
Model A901 Communication Manager Application ........52
Model A902 Patient Data Service Application ................52
TROUBLESHOOTING ............................... 53
8
A51300 English 2021-11-01
Page 9

GENERAL WARNINGS AND CAUTIONS
GENERAL WARNINGS AND CAUTIONS
WARNINGS:
Wound contact — Do not use the communicator on an
unhealed wound. The communicator is not sterile, and
contact with the wound may cause an infection. Keep a
sterile bandage or barrier between the wound and device.
Sterile eld — When using the communicator in a
sterile eld, place the communicator in a sterile bag. The
communicator is not sterile and cannot be sterilized.
CAUTIONS:
Telemetry signal disruption from EMI — Do not attempt
telemetry near equipment that may generate electromagnetic
interference (EMI). EMI may cause a disruption in clinician
programmer function.
Unresponsive app or handset — Use the recommended
troubleshooting steps if the clinician app or handset becomes
unresponsive. An unresponsive app or handset may result
in an inability to complete the implant procedure or other
programming sessions.
Note: Other Warnings and Cautions are found throughout
this manual.
2021-11-01 English A51300
9
Page 10

OVERVIEW
OVERVIEW
The Medtronic Model A51300 clinician application (app)
is intended for use with the HH90 Handset and TM90
Communicator to program, adjust, and troubleshoot the
Medtronic Model 97800 InterStim X neurostimulator.
Intended Use
The clinician app is intended to program neurostimulators for
sacral neuromodulation therapy.
About This Guide
This programming guide contains information a clinician
needs to set up, use, and troubleshoot the clinician app on
the handset. This guide provides instructions on how to use
the clinician app to program an implanted neurostimulator.
■ Before using the clinician app for the rst time, refer
to the information provided with the handset for initial
handset setup.
■ All patient-related instructions on using the patient app
on the handset are included in the A52300 Patient
Therapy App Patient User Guide for InterStim systems
with Model 97800 InterStim X neurostimulator.
■ Patient-related instructions on using the communicator
are included in the TM90 Communicator Instructions for
Use provided with the device.
10
A51300 English 2021-11-01
Page 11

QUICK TIPS
QUICK TIPS
See the following information for helpful tips to aid you in
using the clinician app, and to help you better understand the
contents of this programming guide.
Using the Workow Navigator
The workow navigator is displayed at the top of every
screen when you are in a workow and represents the
screens/ tasks that can be completed on each screen. A title
that is highlighted and underlined in the workow navigator
indicates your position in that workow. For more information
on workows, see “WORKFLOWS” on page 18.
You can use the workow navigator in the following ways:
■ Swipe to the left or right to view previous or subsequent
screens within a workow.
■ Tap on a title to jump to a different screen.
A title that is highlighted and underlined indicates your position within a
workow.
Figure 1. Workow navigator
Indicators and Icons
The following is a list of the icons found in the clinician app
along with their associated descriptions.
Notes:
■ The following is not an all-inclusive list of all the icons
found in the clinician app, but rather a list of the more
2021-11-01 English A51300
11
Page 12

QUICK TIPS
important icons or those that appear most frequently
within the app.
■ If an icon or button appears gray within the clinician app,
that option is not available.
Icon Icon description
Tap for additional screen options.
Indicates that the neurostimulator device
has been previously paired.
Tap to access the About screen, Manage
Devices screen, or end a programming
session. This icon appears only when in a
workow or on the Home screen.
Indicates that the clinician app is operating
in Demo mode.
Displays the current electrode congurations
settings for a program.
Tap to check battery level.
Tap to check impedance.
12
Tap to exit the current screen and go back to
the one you were previously on.
Indicates the program is enabled for patient
use, and is visible to the patient.
Indicates the program is not enabled for
patient use, and is not visible to the patient.
Tap to end the current programming session
and exit the app.
A51300 English 2021-11-01
Page 13

GETTING STARTED
GETTING STARTED
Before using the clinician app to program the neurostimulator,
see the following sections for basic information about:
■ Accessing the clinician app
■ Creating a password
■ Using the menu screen
■ Operating in Demo mode
■ Pairing to the implanted neurostimulator
Accessing the Clinician App
You can access the clinician app by locating the InterStim X
Clinician icon on the main screen of the handset (Figure 2).
Tap the icon to open and begin using the clinician app.
InterStim X
Clinician
Figure 2. A51300 Clinician app icon for the Model 97800
InterStim X neurostimulator
Note: The rst time you open the app, it will request
permission for data storage and session overlay. Tap OK to
continue. Then tap ALLOW on the next message.
Creating a Password
The clinician app requires a password to use the app. A
password is required to be entered under the following
conditions:
■ Upon launch of the app
■ After 30 minutes of inactivity
Note: When you launch the clinician app for the rst time,
you will be asked to enter the default password. Contact
2021-11-01 English A51300
13
Page 14

GETTING STARTED
Medtronic support for the default password. You will need to
obtain the default password before creating your own unique
password.
To create a password:
1. Enter the Medtronic default password in the appropriate
eld. Contact Medtronic support to obtain the default
password if you haven’t already.
2. Tap OK to continue to the next screen.
3. Enter your unique password in the appropriate eld.
Note: The password is case-sensitive and must contain
at least six characters.
4. Conrm your new password by entering it a second
time in the appropriate eld and tap CREATE when
nished.
Note: For information on resetting a forgotten
password, see “TROUBLESHOOTING” on page 53.
5. Select your region using the options provided on the
handset.
6. Tap NEXT to continue on to the Menu screen.
14
Menu Screen
Upon entering your password, you are taken to the Menu
screen. On the Menu screen, you can access Demo mode,
connect the communicator and neurostimulator to the
handset, or access patient reports.
Demo Mode
Demo mode allows you to simulate using the clinician app
without being paired to an actual neurostimulator device.
DEMO is displayed next to the screen title when the clinician
app is operating in Demo mode.
A51300 English 2021-11-01
Page 15

GETTING STARTED
Using the Communicator to Pair the Handset and Neurostimulator
All programming functionality takes place within the Connect
option on the Menu screen. Tapping this option allows you
to begin the process of using the communicator to pair the
implanted neurostimulator to the clinician app on the handset.
To pair the handset and implanted neurostimulator using
the communicator:
1. Press
on.
2. Navigate to the Menu screen, and tap CONNECT.
3. Place the communicator near the handset.
4. The communicator will attempt to connect to the
handset. The blue LED indicator on the communicator
will continuously blink to indicate it is on and in
discovery mode.
5. If you have previously paired the communicator to the
handset, the communicator will automatically attempt
to connect to the handset. If the blue LED indicator on
the communicator is solid and no longer blinking, the
communicator is now connected to the handset, skip to
step 8.
Note: If you are having trouble connecting
the communicator to the handset, see
“TROUBLESHOOTING” starting on page 53.
6. If the communicator has not been previously paired to
the handset, tap SWITCH COMMUNICATOR on the
handset.
7. Select the appropriate communicator device according
to the serial number shown on the Connection screen,
and tap CONTINUE. The blue LED indicator on the
communicator will be solid and no longer blinking. This
signies the communicator is now connected to the
handset.
on the communicator to turn the communicator
2021-11-01 English A51300
15
Page 16

GETTING STARTED
Note: The serial number, e.g. NPA-xxxxxxx, is located
on the back of the communicator, and should match
what is listed on the Connection screen.
CAUTION: Ensure you are connecting to the proper
communicator by conrming the serial number on
the device. Failure to do so could extend the implant
procedure or programming session.
8. Ensuring the communicator is on, place the
communicator over the implanted neurostimulator site
and tap FIND DEVICE on the handset.
9. Select the appropriate neurostimulator device
according to the serial number and tap CONTINUE. If
the neurostimulator serial number is not listed on the
Connection screen, tap RETRY.
Notes:
■
displayed next to the serial number of the
neurostimulator device indicates which device has
been most recently paired to the handset.
■ Connecting to a new INS may take some time. If the
INS has not nished connecting after a few minutes,
press Cancel and try again.
■ If you are having problems pairing to the
neurostimulator, refer to “TROUBLESHOOTING” on
page 53.
16
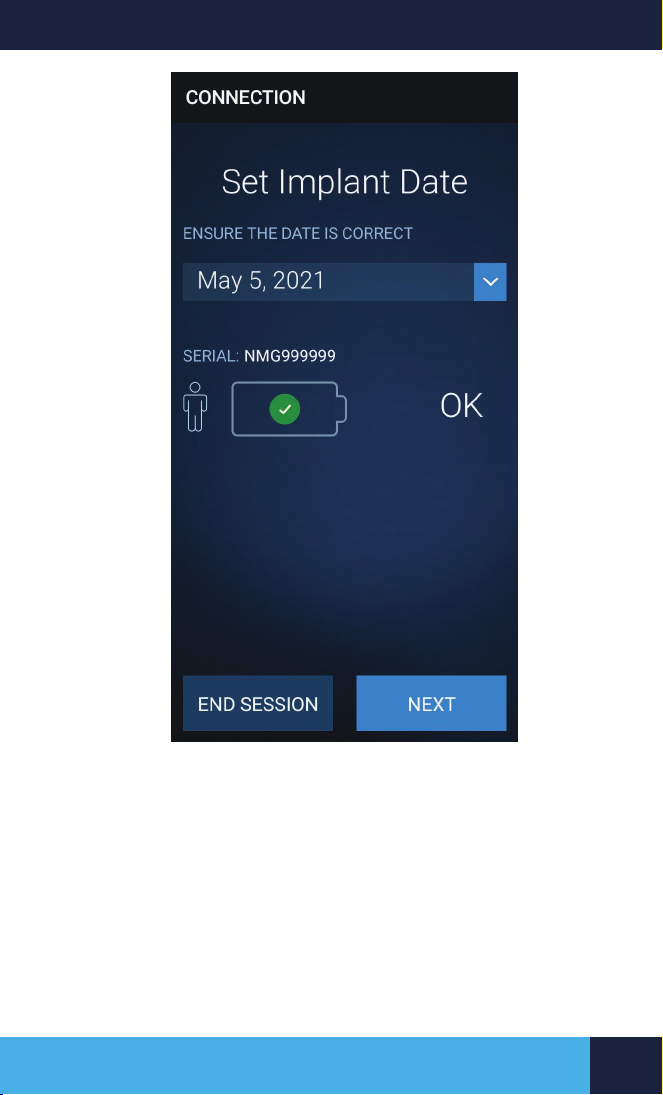
Setting Implant Date
Set implant date in the eld shown on the screen in Figure 3.
To view implant date, navigate to the About screen.
A51300 English 2021-11-01
Page 17
GETTING STARTED
Figure 3. Set Implant Date screen (serial number shown is for
example only).
2021-11-01 English A51300
17
Page 18

WORKFLOWS
WORKFLOWS
Workows are used to assist you in navigating programming
sessions. Workows for programming an implanted
neurostimulator include:
■ Congure implant
■ Check impedance
■ View MRI status
Starting a Workow
Starting a workow allows you to complete tasks for a
programming session. You can access workows on the
Home screen.
To start a workow:
1. Tap the name of a workow to see an expanded view
and description.
2. Tap START to proceed with the desired workow.
Conguring the Implanted Neurostimulator
(Congure Implant Workow)
The Congure Implant workow allows you to congure
the neurostimulator for a patient. The main features of the
Congure Implant workow include:
■ Manage implant conguration
■ Manage patient information
■ Congure therapy parameters
■ Check therapy and/or electrode impedance
■ Check battery status
■ Enable programs for patient use
■ Create custom programs
■ View a diagnostic report
■ View the summary screen
18
A51300 English 2021-11-01
Page 19

WORKFLOWS
Setting up implant conguration
The Congure Implant screen allows you to enter information
required for determining the patient’s MRI eligibility, such as
lead model, device implant location, lead tip location, and
the presence of abandoned product from removed systems.
Even partial systems can have MRI interactions such as RF
heating.
WARNING: Ensure the implant conguration is up-to-date
and accurate. If component information is entered incorrectly,
the patient could be unnecessarily restricted from having an
MRI scan or could be allowed to have an inappropriate MRI
scan, which could cause serious or permanent patient injury.
Entering patient information
The Patient screen allows you to enter optional patient
information (name, patient ID, gender, and date of birth).
Checking device and system status
The Status screen provides information about the
neurostimulator and allows you to check the battery level
of the neurostimulator and system impedance. Notice the
battery and impedance rows; tap the battery and impedance
icons for details. Table 1 displays the device status icons
for impedance check and their associated description and
meaning.
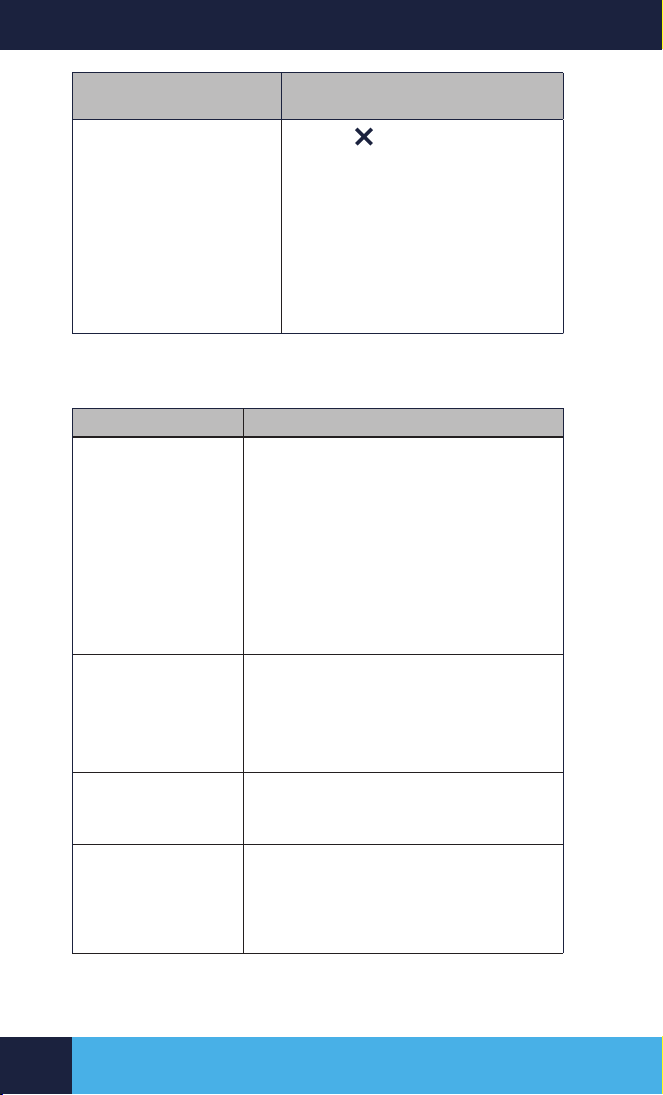
Table 1. Neurostimulator impedance check icons and
descriptions
Icon Description Meaning
Orange circle with
exclamation point
Green circle with
check mark
Status is suspect.
Requires further
investigation.
Status is good. No
further investigation
needed.
2021-11-01 English A51300
19
Page 20

WORKFLOWS
Note: A question mark appears in the impedance row if an
impedance check has not been performed. Electrodes with
impedance measurements outside the nominal impedance
range will display an orange icon.
Checking battery level
Use the following steps to check the battery levels of the
neurostimulator, handset, and communicator:
1. Navigate to the CONFIGURE IMPLANT workow.
2. Tap START.
3. Navigate to the Status screen and tap
next to the
battery level to see the current battery levels.
4. Tap DONE to exit the Battery screen when nished.
Table 2. Neurostimulator battery descriptions shows battery
levels for the neurostimulator.
Table 2. Neurostimulator battery descriptions
Battery Status Battery Level
OK
20
LOW
Battery is approaching End of Service, see
below.
Notication: End of Service
End of Service
Therapy will be stopped and the
neurostimulator will need to be replaced.
You will not have access to the clinician
application after you have received this
notication.
Notes:
■ Do not implant the neurostimulator if the battery status
displays LOW or End of Service prior to implant.
■ If the neurostimulator battery level is LOW, a low battery
notication displays on the Home screen. The notication
persists until the neurostimulator is replaced; however,
A51300 English 2021-11-01
Page 21

WORKFLOWS
you have the ability to dismiss the notication at any
time.
Impedance measurements
You can check impedance on the Status screen of the
Congure Implant workow, or within the Check Impedance
workow.
Note: Electrodes with impedance measurements outside
the nominal impedance range will display an orange icon.
See “Table 1. Neurostimulator impedance check icons and
descriptions” on page 19 for details.
To check impedance from the Congure Implant
workow:
1. Select the CONFIGURE IMPLANT workow.
2. Tap Start.
3. Navigate to the Status screen.
4. Tap
5. Tap
6. Tap DONE when nished.
.
again to initiate an impedance check.
Notes:
■ Tapping
Impedance screen where you can view the current
impedance values of the respective electrode pairs
and neurostimulator case.
■ You can tap the status icon on any electrode to view
the current impedance values.
on the status screen will take you to the
Therapy Parameter Settings
You can adjust therapy parameter settings as needed for a
program in order to provide optimal therapy. You can access
therapy parameter settings by navigating to the Therapy
screen in the Congure Implant workow.
During a programming session, the clinician app modies the
specied therapy parameters to program the neurostimulator.
2021-11-01 English A51300
21
Page 22

WORKFLOWS
Table 3 lists the available therapy parameter settings along
with their descriptions.
Table 3. Therapy parameter descriptions
Therapy
Description
parameter
setting
Amplitude Amplitude is the intensity or strength of the
Pulse
Width
Rate Rate is the number of times per second a pulse is
Optional settings: The following are optional therapy parameters
that can be modied if optimal therapy is not provided through
default standard programs.
stimulation measured in milliamps (mA). By
increasing amplitude, you are increasing the
intensity of the stimulation and by decreasing it, you
are reducing the intensity. The goal is to use the
lowest effective amplitude that will provide optimal
patient symptom relief, minimize patient discomfort,
and maintain neurostimulator battery life to the best
possible extent.
A typical setting for amplitude is based on patient
comfort, which is determined during a programming
session. Available amplitude range is 0-12.5 mA.
Pulse width is the time or duration of the stimulation
pulse measured in microseconds (μsec). Increasing
pulse width increases pulse duration and
decreasing pulse width decreases pulse duration.
For example, when a patient feels the stimulation
too intensely in one body location, increasing the
pulse width spreads the stimulation and makes it
less intense in that location.
Default setting for pulse width is 210 μsec.
delivered, measured in pulses per second (pps)
or Hertz (Hz). Increasing the rate feels more like a
“utter” or “vibration” and decreasing the rate gives
more of a “tapping” or “thumping” sensation. You
can use patients’ preferences for the sensation they
are most comfortable with, to guide you in selecting
an appropriate rate.
Default setting for rate is 14 pulses per second.
22
A51300 English 2021-11-01
Page 23

WORKFLOWS
Therapy
Description
parameter
setting
Amplitude
limit
Cycling Cycling is a feature used to control how often
Selecting an Amplitude Limit sets the boundary for
how high the amplitude value can be raised above
the programmed therapy amplitude value by the
patient. After a programming session, patients can
control therapy amplitude using the patient app, but
within the programmed Amplitude Limit set by the
clinician.
When Amplitude Limit is not dened, patients can
increase therapy amplitude to the maximum therapy
amplitude value allowed.
therapy is running. When the Cycling feature is off,
therapy is continuously running. When the Cycling
function is turned on, it automatically turns the
neurostimulator on and off at clinician-determined
intervals (from 2 seconds to 24 hours). When
Cycling On time is over, therapy turns off and
continues to stay off until Cycling Off time ends.
When Cycling Off time is over, therapy turns on
again and continues to stay on until Cycling On time
ends. This process repeats itself until the Cycling
feature is disabled or therapy is stopped. By default,
the Cycling feature is turned off.
Note: Due to a carryover effect, the patient
may continue to experience symptom
improvement during the Cycling Off time.
2021-11-01 English A51300
23
Page 24

WORKFLOWS
Therapy
Description
parameter
setting
SoftStart/
Stop
This feature is intended to increase patient comfort
by providing a gentle or “soft” start as stimulation
begins and reduces the risk that the patient will be
startled by the start of a stimulation cycle. Using the
SoftStart/Stop feature helps avoid any unpleasant
sensation at the onset of stimulation. Programmable
ramp times for this feature (up and down) are 1, 2,
4, 8, 15, or 30 seconds. By default, SoftStart/Stop is
turned On with a ramp time of 4 seconds.
Therapy Parameter Settings Instructions For Use
To turn on therapy by setting the amplitude:
1. Select the CONFIGURE IMPLANT workow.
2. Tap START.
3. Navigate to the Therapy screen, and tap the program
you would like to congure (Figure 4).
4. Use the arrows to set the amplitude. Hold the Up or
Down arrows to adjust the amplitude by increments of
0.5 mA.
Note: If the patient is experiencing discomfort, therapy
can be stopped at any time. Tap
to stop therapy.
5. Tap DONE when nished.
24
A51300 English 2021-11-01
Page 25

WORKFLOWS
Indicates that the program is visible to
the patient.
Displays the electrode conguration for
the program.
Figure 4. Therapy screen
2021-11-01 English A51300
25
Page 26

WORKFLOWS
To set pulse width:
1. Select the CONFIGURE IMPLANT workow.
2. Tap START.
3. Navigate to the Therapy screen, and tap the program
you would like to congure (Figure 4).
4. Tap
.
5. Select Pulse Width from the list of options.
6. Use the arrows to set the pulse width.
CAUTION: Consider default settings for rate
and pulse width when conguring therapy settings.
Unsuitable stimulation could result in patient discomfort.
7. Tap UPDATE.
8. Tap DONE when nished.
9. Tap DONE again to return to the Therapy screen.
To set rate:
1. Select the CONFIGURE IMPLANT workow.
2. Tap START.
3. Navigate to the Therapy screen, and tap the program
you would like to congure (Figure 4).
4. Tap
.
5. Select Rate from the list of options.
6. Use the arrows to set the rate.
CAUTION: Consider default settings for rate
and pulse width when conguring therapy settings.
Unsuitable stimulation could result in patient discomfort.
7. Tap UPDATE when nished.
8. Tap DONE when nished.
9. Tap DONE again to return to the Therapy screen.
26
A51300 English 2021-11-01
Page 27

WORKFLOWS
To view electrode settings:
1. Select the CONFIGURE IMPLANT workow.
2. Tap START.
3. Navigate to the Therapy screen, and tap the program
you would like to congure (Figure 4).
4. Tap
.
5. Select Electrodes from the list of options. The
Electrode screen displays the current electrode settings
for the selected program.
6. Tap DONE when nished.
Notes:
■ Electrode settings for programs 1-7 are set up by
default and cannot be changed.
■ You can also view electrode settings for programs on
the Therapy screen (Figure 4).
To set amplitude limit:
1. Select the CONFIGURE IMPLANT workow.
2. Tap START.
3. Navigate to the Therapy screen, and tap the program
you would like to congure (Figure 4).
4. Tap
.
5. Select Amplitude Limit from the list of options.
6. Tap the On/Off switch to enable amplitude limit.
Note: Tap the On/Off switch again to disable.
7. Use the arrows to set the amplitude limit.
8. Tap UPDATE when nished.
9. Tap DONE when nished.
10. Tap DONE again to return to the Therapy screen.
2021-11-01 English A51300
27
Page 28

WORKFLOWS
Notes:
■ When the On/Off switch is turned on, the amplitude limit
will default to the current amplitude setting.
■ The amplitude limit cannot be set at a value lower than
the current amplitude setting for an active program.
Maximum settings
The system cannot use certain combinations of amplitude,
pulse width, and rate because the neurostimulator has
reached the limit of its therapy range. If this happens, a
Maximum Settings Reached alert will appear, and an orange
icon will appear to the left of the parameter value, indicating
that stimulation is not being provided at the level that is
shown on screen.
To resolve this condition, perform one of the following
actions:
■ Slowly reduce the stimulation parameter until the icon
disappears.
■ Reduce other parameter values to set a desired value
higher. For example, if high amplitude is desired, reduce
the rate or the pulse width.
For additional information on troubleshooting these types of
errors, refer to “Maximum Settings Reached troubleshooting”
on page 60.
28
Optimizing device settings
The clinician app offers features that you can optionally use
to increase patient comfort and when certain parameters
are used, extend neurostimulator battery life. These features
include:
■ Cycling
■ SoftStart/Stop
See “Therapy Parameter Settings” on page 21 for more
information on setting additional therapy parameters.
A51300 English 2021-11-01
Page 29

WORKFLOWS
Selecting Cycling feature and time
The Cycling feature automatically turns the neurostimulator
On and Off at clinician-determined intervals from 2 seconds
to 24 hours. Cycling, by default, is disabled.
Note: When using both SoftStart/Stop and Cycling features,
only SoftStart/Stop times that are less than or equal to
the Cycling On and Cycling Off times are available for
programming.
To enable SoftStart/Stop:
1. Navigate to the CONFIGURE IMPLANT workow.
2. Tap START.
3. Navigate to the Therapy screen, and tap the program
you would like to congure (Figure 4).
4. Tap
5. Tap SoftStart/Stop from the list of options.
6. Tap the On/Off switch to enable SoftStart/Stop.
7. Use the arrows to congure the SoftStart/Stop time for
8. Tap UPDATE.
9. Tap DONE when nished.
10. Tap DONE again to return to the Therapy screen.
.
Note: To disable, tap the On/Off switch again.
the implanted neurostimulator.
To enable Cycling:
1. Select the CONFIGURE IMPLANT workow.
2. Tap START.
3. Navigate to the Therapy screen, and tap the program
you would like to congure (Figure 4).
4. Tap
.
5. Tap Cycling from the list of options.
6. Tap the On/Off switch to enable Cycling.
2021-11-01 English A51300
29
Page 30

WORKFLOWS
Note: Tap the On/Off switch again to disable.
7. Use the arrows to set the Cycle On time and Cycle
Off time for the implanted neurostimulator. The length
of Cycle On time and Cycle Off time is measured in
seconds.
8. Tap UPDATE.
9. Tap DONE when nished.
10. Tap DONE again to return to the Therapy screen.
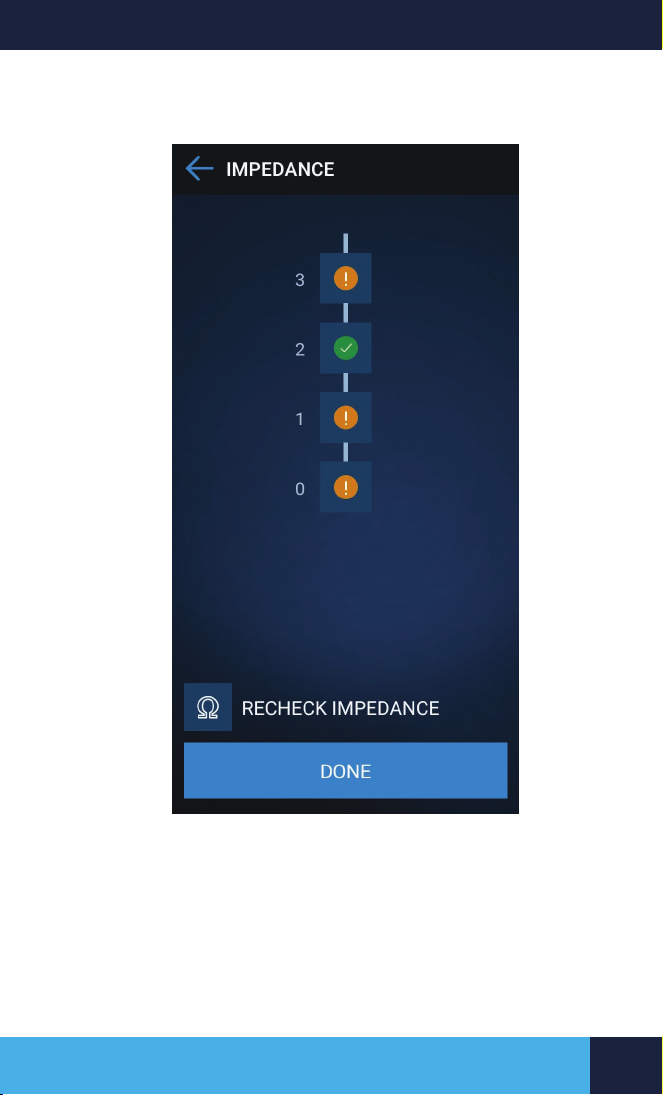
Performing an Integrity Measurement
(Check Impedance Workow)
An impedance measurement can be run to check system
integrity. Run an impedance check at the beginning of every
programming session.
To check impedance from the Check Impedance
workow:
1. Select the CHECK IMPEDANCE workow.
2. Tap START.
3. Tap
4. Tap DONE when nished.
to check electrode impedance (Figure 5).
Notes:
■ Tapping
Impedance screen where you can view the previous
impedance measurement of the electrodes.
■ You can tap the status icon on any electrode to view
the individual impedance values.
on the status screen will take you to the
30
A51300 English 2021-11-01
Page 31
WORKFLOWS
Tap the numbered circle icons to view impedance
measurement values for the corresponding electrode.
Figure 5. Impedance screen
Electrode polarity
The stimulation pulse is delivered from the neurostimulator
to the nerve through the electrodes on the leads. For
the stimulation pulse to reach the nerve, you select the
electrodes on the lead that best provide the stimulation and
2021-11-01 English A51300
31
Page 32

WORKFLOWS
assign a negative or a positive polarity. At least one electrode
(or the neurostimulator case) must be designated as positive
and at least one electrode must be designated as negative.
The negative electrode is called the active electrode; a pulse
ows from the active or negative electrode to the positive.
Thus, changing an electrode to active changes the location of
the stimulation pattern.
Conguring electrodes depends on how the leads and
electrodes are placed in relation to the nerve that is being
stimulated. Approach conguration systematically, using a
variety of electrode congurations and mapping sensory
responses to each conguration. The four electrodes on a
lead can be congured with or without the neurostimulator
case:
■ Unipolar—Using any combination of electrodes with at
least one electrode as negative and the neurostimulator
case as positive.
■ Bipolar —Using any combination of electrodes with at
least one electrode as positive, one negative, and the
case off.
Note: The neurostimulator case can only be congured as
positive. When the case is selected, lead electrodes can only
be selected as negative.
32
Checking Neurostimulator MRI Eligibility
(View MRI Status Workow)
The Model 97800 InterStim X neurostimulator may be
eligible for MRI scans. Follow the instructions beginning on
page 33 to assess neurostimulator eligibility and to prepare
the neurostimulator for an MRI scan.
A51300 English 2021-11-01
Page 33

MRI - PREPARING FOR AN MRI SCAN
MRI - PREPARING FOR AN MRI SCAN
Magnetic Resonance (MR) Conditional: Depending on
what kind of neurostimulation system components the patient
has implanted, the patient may be eligible for one of the
following types of magnetic resonance imaging (MRI) scans:
■ MRI scans of the head only (this is referred to as head-
scan only eligible).
■ MRI scans of any part of the body (this is referred to as
full-body scan eligible).
Use the clinician app on the patient’s handset to activate
MRI mode, assess MRI eligibility, and prepare the patient’s
InterStim system for an MRI scan. For the MR conditions and
MRI-specic warnings and precautions for conducting an
MRI scan, refer to the MRI Guidelines for InterStim systems
Manual.
WARNING: Do not conduct an MRI scan on a patient
before assessing MRI eligibility. Instruct the patient to inform
the MRI clinician that the patient has an implanted device,
and to activate MRI mode before the scan. Conducting an
MRI scan on a patient who is ineligible for an MRI scan could
result in device damage or serious or permanent patient
injury.
CAUTION: Deactivate MRI mode when the MRI scan
is complete and the patient is outside the MRI scanner
(magnet) room. Failure to deactivate MRI mode and return
amplitude to the previous therapy level may result in a return
of symptoms.
2021-11-01 English A51300
33
Page 34

MRI - PREPARING FOR AN MRI SCAN
Instruct the patient prior to the MRI scan to:
■ Bring the handset and communicator to the MRI
appointment, however not to take any patient control
device into the MRI scanner (magnet) room.
■ Bring the patient identication (ID) card provided by
Medtronic for the implanted neurostimulation system.
■ Tell the MRI clinician that they have an implantable
device.
■ Activate MRI mode before MRI scan, outside the MRI
scanner (magnet) room. MRI mode turns therapy off and
prepares the system for MRI scanning. Because therapy
is off, symptoms may return.
Notes:
-Remind the patient to make sure the handset and
communicator are charged prior to the MRI appointment.
-Even though the patient’s implanted system is eligible for
certain MRI scans, the patient’s scan-type eligibility depends
on factors including:
■ The area of the patient’s body that needs to be scanned
■ The ability of the MRI facility to meet all the required
conditions for scanning
34
Viewing the patient’s MRI scan-type eligibility and
activating MRI mode:
1. From the Home screen, tap VIEW MRI STATUS.
2. From the Eligibility Identication screen, conrm that the
information for the patient’s implanted components (ie,
neurostimulator and lead model) and their location are
current and accurate. Tap CONFIRM.
Note: If the information for the implanted components
and their location is not up-to-date and accurate, the
resulting MRI scan-type eligibility may be incorrect.
3. Place the communicator over the device and tap
ACTIVATE to activate MRI mode. Activating MRI mode
A51300 English 2021-11-01
Page 35

MRI - PREPARING FOR AN MRI SCAN
turns therapy off.
4. Determine which one of the following messages
appears on the MRI eligibility screen:
− MRI Conditional Full Body Scan Eligible
− MRI Conditional Head Scan Eligible with Transmit/
Receive Head Coil
− MRI eligibility cannot be determined
Note: If the handset screen says MRI eligibility cannot
be determined, further assessment is necessary.
Review reasons for result on screen.
5. See Table 4 for examples of the MRI eligibility
messages. The screen conrms the patient’s MRI scan-
type eligibility and whether MRI mode is activated.
6. If you will not be present at the MRI facility or are not
activating MRI mode prior to the patient’s MRI scan,
explain to the patient how to activate MRI mode using
the handset at the MRI exam.
Note: You may also complete the MRI scan-type
eligibility form provided in the MRI Guidelines for
InterStim systems Manual and give the form to the
patient so that they can take it to their MRI exam.
Table 4. SCAN ELIGIBILITY screen displays
Scan
Eligibility
MR Conditional
Full Body Scan
Eligible
Screen image, text and description
MRI Mode is Activated
MR Conditional Full Body Scan Eligible
2021-11-01 English A51300
35
Page 36

MRI - PREPARING FOR AN MRI SCAN
Scan
Screen image, text and description
Eligibility
MR Conditional
Head Scan
Eligible with
Transmit/
Receive Head
Coil
MR Conditional Head Scan Eligible with
Cannot be
Determined
MRI mode is activated but scan-type eligibility
cannot be determined. Review reasons for
eligibility result on screen.
MRI Mode is Activated
Transmit/Receive Head Coil
MRI Mode is Activated
MRI eligibility cannot be determined
Notes:
Refer to the MRI Guidelines for InterStim systems Manual for
more information about determining MRI eligibility.
The “consult instruction for use” symbol (
) when shown
with MRI scan eligibility means “consult the MRI guidelines
for this neurostimulation system.”
Deactivating MRI mode and turning therapy on after the
patient’s MRI scan:
1. Connect to the neurostimulator as usual.
2. From the Home screen, tap VIEW MRI STATUS.
3. Tap DEACTIVATE at the bottom of the screen.
4. Tap DEACTIVATE a second time when prompted.
5. Tap YES when prompted to return to previous therapy
settings, if desired.
Note: If the Home screen is not shown after completing
step 1, refer to “TROUBLESHOOTING” on page 53.
36
A51300 English 2021-11-01
Page 37

WORKING WITH PROGRAMS
WORKING WITH PROGRAMS
Standard and custom programs are available within the
clinician app. These features allow you to provide optimal
therapy for the patient. Standard programs provide pre-
dened electrode congurations. If default electrode settings
from standard programs provide less than optimal therapy,
custom programs allow you to manually dene electrode
settings.
Standard Programs
Programs marked 1-7 under Program Library on the Therapy
screen of the Congure Implant workow signify standard
programs with pre-congured electrode settings. Only one
program, either standard or custom, can be active at a time.
The active program name is displayed at the top of the
Therapy screen under ACTIVE PROGRAM.
Note: Upon switching from one active program to another,
therapy amplitude automatically resets to zero.
Custom Programs
If the electrode settings for standard programs (1-7) do not
provide optimal therapy results, you have the option to create
custom programs using custom electrode settings. Programs
A-D signify custom programs that you can create using
custom electrode conguration settings. You can create up to
four custom programs.
To create a custom program:
1. Select the CONFIGURE IMPLANT workow.
2. Tap START.
3. Navigate to the Therapy screen.
4. Scroll to the bottom of the screen, and tap
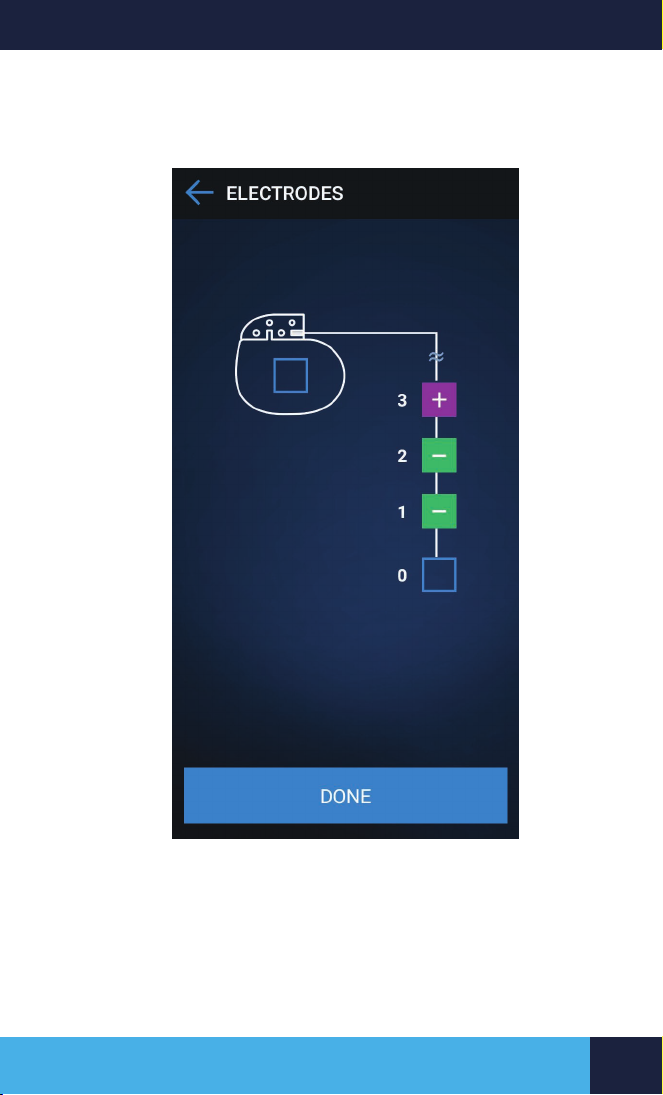
5. Tap
6. Set the electrode conguration by tapping in the box
to congure the electrodes for the custom
program.
2021-11-01 English A51300
.
37
Page 38

WORKING WITH PROGRAMS
for each electrode you want to congure. Tap once for
a positive (+) electrode, tap again for a negative (-)
electrode, and once more to clear (Figure 6).
Notes:
■ Therapy must be off before modifying electrode
conguration settings.
■ There must be at least one positive (+) electrode
and one negative (-) electrode for a viable electrode
conguration.
■ If the case is set to positive (+), the lead electrodes
used must be negative (-).
7. Tap UPDATE after the electrode congurations have
been set.
8. Tap DONE when the update is complete.
9. Adjust the parameter settings as desired. For
step by step instructions, see “Therapy Parameter
Settings Instructions For Use” on page 24 for more
information.
10. Tap DONE again to return to the Therapy screen.
38
A51300 English 2021-11-01
Page 39
WORKING WITH PROGRAMS
Tap inside the individual numbered boxes to congure electrodes for custom
programs.
Figure 6. Set electrode congurations for custom programs
Deleting a custom program
In the event that a custom program is no longer needed or
used, it can be deleted at any time.
2021-11-01 English A51300
39
Page 40

WORKING WITH PROGRAMS
To delete a custom program:
1. Navigate to the CONFIGURE IMPLANT workow.
2. Tap START.
3. Navigate to the Therapy screen, and tap the custom
program you would like to delete.
4. Scroll to the bottom of the screen, and tap
Note: You cannot delete a custom program if the
custom program is active.
.
Enabling programs for patient use
In order for patients to use a program, the program needs to
be enabled for patient use.
To enable a program for patient use:
1. Navigate to the CONFIGURE IMPLANT workow.
2. Tap START.
3. Navigate to the Therapy screen, and tap the program
you would like to enable.
4. On the bottom of the screen, tap the Enable for patient
use switch once to make the program enabled for
patient use.
Note: Tap the Enable for patient use switch again to
disable the program for patient use.
5. Tap DONE when nished.
program indicating that the program is visible to the
patient.
is displayed next to the
40
Reviewing a Therapy Programming Session
The last screen in the Congure Implant workow is the
Summary screen. The Summary screen displays the active
program setting and a list of patient enabled programs for a
programming session.
A51300 English 2021-11-01
Page 41

WORKING WITH PROGRAMS
Note: On the Summary screen, you can also view a session
report. For more information, see “REPORTS” on page 47.
Ending a programming session
After completing the necessary programming tasks in a
workow, end the programming session.
CAUTION: End programming session — Do not leave a
programming session open in the clinician app once therapy
has been congured. Not ending a programming session may
result in patient access to the clinician app, resulting in the
patient being able to congure inappropriate therapy.
To end a programming session:
1. Tap
2. Tap End Session.
3. Conrm that you would like to end the programming
session by tapping END SESSION.
Note: Alternatively, you can also tap
screen to end a programming session.
in the corner of the screen.
on the Home
Using the Stop Therapy feature
The Stop Therapy feature allows you to discontinue therapy
at any time while in the Congure Implant workow.
To stop therapy:
1. Select the CONFIGURE IMPLANT workow.
2. Tap START.
3. Navigate to the Therapy screen, and tap the program
you would like to congure.
4. Tap
5. Tap DONE to return to the Therapy screen.
.
Note: For instructions on turning therapy back on,
see “To turn on therapy by setting the amplitude:” on
page 24.
2021-11-01 English A51300
41
Page 42

DIAGNOSTICS
DIAGNOSTICS
The clinician app allows you to view the following diagnostics
to analyze a patient’s therapy:
■ Usage graph
■ Event log
■ Usage report
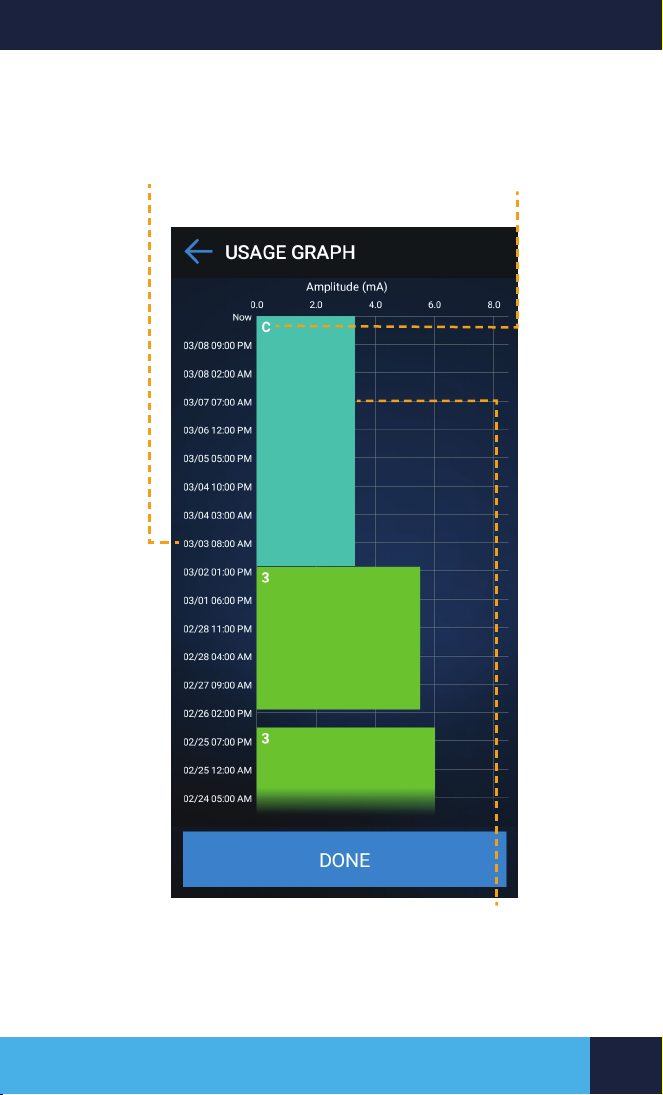
Usage Graph
The usage graph represents daily patient activity while using
the therapy (Figure 7). The usage graph displays programs
used, the amplitude setting and adjustments, as well as the
duration of time each program was used. Each program is
represented in the graph through the use of different colors
and program numbers.
42
A51300 English 2021-11-01
Page 43
DIAGNOSTICS
Time-stamp on the y-axis represents
the duration of the program used.
Indicates the program used.
Amplitude values on the x-axis represent the amplitude value each program is
set to.
Figure 7. Usage graph
2021-11-01 English A51300
43
Page 44

DIAGNOSTICS
To view the usage graph:
1. Select the CONFIGURE IMPLANT workow.
2. Tap START.
3. Navigate to the Diagnostics screen, and tap
Notes:
■ Amplitude adjustments are only displayed for
amplitude values that have been programmed for 30
minutes or more.
■ The graph displays up to the last 30 days of patient
data.
.
Event Log
The event log provides the following information (Figure 8):
■ Date and time of therapy changes
■ Amplitude adjustments (if programmed for 30+ minutes)
■ Program changes
■ Power-on-resets (POR)
■ Change in therapy status (ON/OFF)
44
A51300 English 2021-11-01
Page 45

DIAGNOSTICS
Indicates changes in amplitude.
Indicates changes in programs.
Figure 8. Event log
2021-11-01 English A51300
45
Page 46

DIAGNOSTICS
To view the Event log:
1. Select the CONFIGURE IMPLANT workow.
2. Tap START.
3. Navigate to the Diagnostics screen.
4. Tap
.
Usage report
The usage report displays data from both the usage graph
and event log.
To generate a usage report:
1. Select the CONFIGURE IMPLANT workow.
2. Tap START.
3. Navigate to the Diagnostics screen.
4. Tap GENERATE USAGE REPORT.
Note: You can access the generated report by
navigating to REPORTS on the Menu screen.
46
A51300 English 2021-11-01
Page 47

REPORTS
REPORTS
The clinician app allows you to generate reports that track
data once the neurostimulator has been implanted and
congured for chronic therapy. Access reports by tapping
REPORTS on the Menu screen.
Table 5. Reports and descriptions
Report Description
Session report • Displays the patient’s active
Usage report • Includes information from the
Medtronic data report • Generated from the Device tab
program settings.
• Generates automatically anytime
the clinician ends a programming
session.
event log and usage graph.
• Generated from the Diagnostics
screen.
on the About screen.
• Used by Medtronic to
troubleshoot the system.
To view, download, or delete reports:
1. Navigate to the Menu screen and tap REPORTS.
2. From the list of options, tap the type of report that you
would like to view.
3. Tap the desired report to view a list of options.
a. Tap
b. Tap
c. Tap
to view a report.
to download a report.
to delete a report.
Accessing a Downloaded Report
If you need to download a report, see the following
instructions on how to download the report and access it
using your computer.
2021-11-01 English A51300
47
Page 48

REPORTS
To download and access a report:
1. Navigate to the Menu screen and tap REPORTS.
2. From the list of options, tap the type of report that you
would like to view.
3. Tap the desired report to view a list of options.
4. Tap
to download. A pop-up displays that the report
has been saved to the Reports folder.
5. Plug the handset into a computer using the micro USB
cable that came with the handset.
6. Navigate to the Reports folder from your computer
drive. The Reports folder stores the reports that were
downloaded from the clinician app.
Note: Generated reports will remain on the handset for
24 hours before being deleted automatically.
48
A51300 English 2021-11-01
Page 49

ADDITIONAL FEATURES
ADDITIONAL FEATURES
See the following sections for information on the additional
features of the clinician app.
About Screen
You access the About screen by tapping in the corner of
the screen and selecting About from the list of options. The
About screen provides the following information:
■ Handset and app information such as model numbers,
serial number, version numbers, etc.
■ Neurostimulator device information such as model
number and serial number.
■ Communicator information such as rmware version
number and serial number.
■ General licensing information
Managing Devices
The Manage Devices screen allows you to view, add or
remove a neurostimulator device. The Manage Devices
screen can be accessed in the following ways:
1. From the Menu screen:
a. Tap
b. Tap Manage Devices from the list of options.
2. After a device has already been connected:
a. Tap
b. Tap Manage Devices from the list of options.
3. Tap DONE when nished.
Note: Tap
device. You will be redirected to either the Home screen
or Menu screen depending on your selection.
.
.
to remove a device, or to add a new
2021-11-01 English A51300
49
Page 50

ADDITIONAL FEATURES
Software Information
The following is important information regarding Medtronic
therapy application software.
Data security
InterStim system clinician apps use and store data about
the patient’s health and implanted medical device. Data is
protected by encryption within the application and encryption
provided by the handset. The system does not protect data
exported to another destination. Exported data should be
handled in accordance with your facility’s security policy for
data handling and storage.
■ Medtronic recommends that you always save exported
data to the default reports location on the handset.
Network connectivity
Network connectivity is required for initial app registration and
for installation of Medtronic app updates and communicator
rmware updates. Network connectivity is not required for
neurostimulator programming. To protect patient information,
Medtronic recommends you implement the following security
measures:
■ Secure the handset by disabling network connectivity
during any programming session.
■ Use a managed, trusted Wi-Fi connection when network
connectivity is needed.
■ Connect the handset to the network quarterly to check
for update notications.
■ Connect the handset to the network long enough for all
updates to install successfully.
Note: Connecting the handset to a network that includes
other equipment could result in unforeseen risks to patients,
operators, or third parties. Changes to your network (such as
adding, disconnecting, and upgrading equipment; upgrading
50
A51300 English 2021-11-01
Page 51

ADDITIONAL FEATURES
or installing software; or changing network congurations)
could also introduce additional risks.
■ If your handset is lost or stolen, contact Medtronic right
away using the contact information listed on the back
cover of this manual.
■ If you suspect a cybersecurity event has occurred,
stop using the app (if possible), and contact your IT
department or Medtronic support to document and
respond to the suspected incident.
If you have any further questions related to cybersecurity,
contact your IT department or Medtronic support.
Installing application updates
The clinician app along with other related apps are provided
pre-installed on the Android
cannot be installed on a personal cellular phone. Medtronic
periodically updates the therapy app and will not install
updates without notifying the user. Network connectivity is
required to update the app. When notied that an app update
is available, follow the instructions provided by Medtronic
to install the update. Remain connected to the network until
the update successfully installs and then conrm the correct
software version in the About screen.
®
platform-based handset and
Installing communicator updates
When you receive a notication to install a communicator
rmware update, connect the handset to a network and follow
the instructions.
Returning the handset
If you need to return the handset for disposal or replacement,
contact Medtronic using the contact information listed on the
back cover of this manual. Instructions will be provided for
preparing the clinician handset for return.
2021-11-01 English A51300
51
Page 52

ADDITIONAL FEATURES
Model A901 Communication Manager Application
The Model A901 Communication Manager app works with
the Model A51300 Clinician Programming app to manage
telemetry communication between the handset and the
neurostimulator. You do not need to open or use this app.
Model A902 Patient Data Service Application
The Model A902 Patient Data Service app works with the
Model A51300 Clinician Programming app to store patient
and therapy device records that are used when generating a
report. You do not need to open or use this app.
52
A51300 English 2021-11-01
Page 53

TROUBLESHOOTING
TROUBLESHOOTING
The clinician app displays notications you may encounter
while using the app. If you are experiencing problems with
the handset, check the app screen and follow the instructions
to correct the issue. If you experience an issue not described
in this section, contact your Medtronic support representative.
Table 6. Clinician app, handset, and communicator
scenarios and solutions
Scenario Explanations and possible
solutions
I am unable to connect
to the communicator
The communicator is not
powered on. You will need to
turn on the communicator to
communicate with the implanted
neurostimulator.
Once the communicator is
powered on, follow the connection
steps to attempt to reconnect to
an existing communicator. See,
“Using the Communicator to Pair
the Handset and Neurostimulator”
on page 15 for instructions.
Note: For information on
features and functions of the
communicator, refer to the TM90
Communicator Instructions For
Use.
The communicator is not charged
or is in the process of charging.
You will need to charge the
communicator using the charger
provided with the product
package.
Once charged, follow the
connection steps to attempt
to reconnect to an existing
communicator. See, “Using
the Communicator to Pair the
Handset and Neurostimulator” on
page 15 for instructions.
2021-11-01 English A51300
53
Page 54

TROUBLESHOOTING
Scenario Explanations and possible
solutions
The communicator is not paired to
the handset.
Follow the connection steps to
attempt to reconnect to an existing
communicator. See, “Using
the Communicator to Pair the
Handset and Neurostimulator” on
page 15 for instructions.
Note: The communicator must be
paired to the handset rst before
attempting to connect to the
neurostimulator.
You received a replacement
communicator. You will need to
connect the new communicator
to the handset and the implanted
device.
1. Open the clinician app.
2. Make sure the communicator
is on.
Note: For information on
features and functions of the
communicator, refer to the TM90
Communicator Instructions For
Use.
3. A screen will be displayed
showing that the communicator
is not found. Tap SWITCH
COMMUNICATOR to connect.
4. Select the communicator you
would like to pair to. The serial
number of the communicator
should match the serial number
shown on the screen.
5. If the communicator you
would like to connect to is not
shown, tap RETRY. Follow the
remaining instructions on the
handset to nish pairing the
device.
6. If the issue persists, contact
Medtronic support.
54
A51300 English 2021-11-01
Page 55

TROUBLESHOOTING
Scenario Explanations and possible
solutions
I am unable to
communicate with
the implanted
neurostimulator
Uncomfortable or
intolerable therapy
The handset has no
power or has lost power
The handset will not
charge
The communicator is out of range.
1. Reposition the communicator
over the neurostimulator and
tap RETRY. Make sure the
communicator is ush with the
skin.
2. If the issue persists, contact
Medtronic support.
The patient is experiencing
side effects from the therapy
(stimulation).
1. Turn the therapy (stimulation)
down or off.
See “Therapy Parameter Settings”
on page 21 for instructions.
2. If the issue still persists, contact
Medtronic support.
The handset battery is depleted.
Recharge the handset battery
using the charger.
The handset is damaged or
malfunctioning.
Contact Medtronic support.
The charger is disconnected from
the handset.
Connect the charger to the
handset.
An incompatible charger is
connected to the handset.
Connect the appropriate charger to
the handset.
Charger is defective.
Contact Medtronic support. The
charger will need to be replaced.
The handset is damaged or
malfunctioning.
Contact Medtronic support.
2021-11-01 English A51300
55
Page 56

TROUBLESHOOTING
Scenario Explanations and possible
solutions
The patient is not
receiving therapy
I cannot nd the clinician
app on the handset
I have forgotten my
password
The handset or clinician
app is unresponsive
The therapy might be off.
Turn on the therapy.
The neurostimulator battery may
be depleted.
The neurostimulator will need to
be replaced.
A lead is damaged or has become
disconnected.
Check the impedance on the
lead. If impedance is out of range,
the lead may be damaged. If
impedance is in range, select a
different program. If the issue
persists, contact Medtronic
support.
The clinician app may not have
downloaded properly.
Contact Medtronic support.
The password needs to be reset.
To reset the password
1. Tap the “Forgot Password” icon.
2. Take note of the six-character
code. You will need to provide
this code to Medtronic support
in order to complete the steps to
reset your password.
Note: This code is valid for 24
hours. After 24 hours, you will
need to refresh the code.
3. Contact Medtronic support to
complete the steps to reset your
forgotten password.
If the handset or the clinician app
is unresponsive:
1. Turn the handset Off, then turn
the power back On and make
sure the handset is charged.
2. If that doesn’t resolve the issue,
use another handset, if available
3. If the issue persists, contact
Medtronic support.
56
A51300 English 2021-11-01
Page 57

TROUBLESHOOTING
Scenario Explanations and possible
solutions
I can’t nd my
downloaded report
I want to unpair
or disconnect the
neurostimulator from the
apps.
Downloaded reports can be
found in the Reports folder on the
handset.
You can access a downloaded
report by navigating to the
Reports folder on the handset
or by connecting the handset
to a PC and navigating to the
Reports folder through the PC.
See “Accessing a Downloaded
Report” on page 47 for more
information.
Note: Generated reports will
remain on the handset for 24
hours before being deleted.
Disconnecting or unpairing a
connected neurostimulator is done
using the Manage Devices feature.
To disconnect:
1. Tap
to open a list of options,
and select Manage Devices.
Note: the Manage Devices
feature can also be accessed by
tapping
on the Menu screen.
2021-11-01 English A51300
57
Page 58
TROUBLESHOOTING
Scenario Explanations and possible
solutions
2. Tap .
3. Tap REMOVE DEVICE to
conrm that you want to unpair
or disconnect the device from
the clinician and patient apps.
Note: Removing the device from
the clinician app will disconnect
the device from the patient
therapy app. All data will also be
erased from the app.
Table 7. Clinician app system notications and solutions
App notication Explanations and solutions
Permission required Permission is needed to use the
System error The system has encountered an
Low battery The neurostimulator battery is low and
Neurostimulator
End of Service
clinician app.
1. Tap EXIT.
2. Go to settings and select the clinician
app.
3. Tap PERMISSIONS.
4. Slide from Off to On.
5. If the problem persists, contact
Medtronic support.
unexpected problem.
1. Restart the clinician app.
2. If the problem persists, contact
Medtronic support.
therapy will be unavailable soon.
Consider replacing the neurostimulator.
The neurostimulator has reached end
of service.
The neurostimulator is no longer able to
provide therapy. You will need to replace
the neurostimulator to continue therapy.
58
A51300 English 2021-11-01
Page 59

TROUBLESHOOTING
App notication Explanations and solutions
Communicator
connection lost
Communicator low
battery
Data lost Data has been lost.
Power on Reset
detected
The communicator may be turned off,
out of range, or the battery may be
depleted.
1. Ensure the communicator is on.
Move the communicator closer to the
handset, and attempt to reconnect
following the instructions presented
on the screen.
Note: If you are connecting to the
communicator for the rst time,
see,“Using the Communicator to Pair
the Handset and Neurostimulator” on
page 15 for instructions.
2. If the issue persists, the
communicator or handset may need
to be charged. Recharge the battery
using the charger that came with the
product.
3. If you are still experiencing issues,
contact Medtronic support.
The communicator battery is below
25% and needs to be charged.
The communicator battery LED indicator
will be yellow when the battery is
low. Charge the communicator using
the charger that came in the product
package.
Note: If the communicator battery is
below 10%, it will need to be charged
above 10% before use.
1. Check neurostimulator conguration
and therapy programs.
2. If the problem persists, contact
Medtronic support.
Device reset has occurred. Please
check the neurostimulator battery level.
1. Check the neurostimulator battery
level.
2. Go to therapy programming to turn
therapy on if needed.
3. If the problem persists, contact
Medtronic support.
2021-11-01 English A51300
59
Page 60

TROUBLESHOOTING
App notication Explanations and solutions
Invalid key Your password key has expired.
Refer to “I have forgotten my password”
on page 56 and follow the steps
shown in that section.
Update required Updating the device will rewrite all
Maximum settings
reached)
settings.
Click UPDATE to update the
neurostimulator, or END SESSION to
not update.
The neurostimulator battery is unable
to produce the levels of energy
required for the current stimulation
settings.
See “Maximum Settings Reached” on
page 60.
Maximum Settings Reached
Considerations for troubleshooting
If a Maximum Settings Reached message appears during
a programming session, the following are considerations for
troubleshooting to return the system back to its expected
functionality:
1. Take an impedance measurement to see if there is an
open or a short circuit in the system.
2. If the Maximum Settings Reached message appears
after a parameter has been changed, consider lowering
that parameter.
3. Consider changing the electrodes that are currently
providing stimulation.
4. If you are still experiencing issues, contact Medtronic
support.
60
A51300 English 2021-11-01
Page 61

2021-11-01 English A51300
61
Page 62
Manufacturer
Medtronic, Inc.
710 Medtronic Parkway
Minneapolis, MN 55432
USA
www.medtronic.com
Tel. +1-763-505-5000
Authorized Representative
in the European Community
Medtronic B.V.
Earl Bakkenstraat 10
6422 PJ Heerlen
The Netherlands
Tel. +31-45-566-8000
Europe/Africa/Middle East Headquarters
Medtronic International Trading Sàrl
Route du Molliau 31
Case Postale 84
CH - 1131 Tolochenaz
Switzerland
www.medtronic.eu
Tel. +41-21-802-7000
Asia-Pacic
Medtronic International Ltd.
50 Pasir Panjang Road
#04-51 Mapletree Business City
Singapore 117384
Singapore
Tel. +65-6870-5510
© Medtronic 2021
All Rights Reserved
M017455C001 Rev A
2021-11-01
*M017455C001*
 Loading...