

Page 1

Filename Date Time
UC200xxxxxx EN
4.625 x 6 inches (117 mm x 152 mm)
Wireless External Neurostimulator 97725
ImplantManual.xsl - IPGTemplate.fm
Medtronic Confidential
Template version: 05-31-2012
User manual
! USA
Rx only
M946491A001 Rev X
2013-04
Page 2

Filename Date Time
UC200xxxxxx EN
4.625 x 6 inches (117 mm x 152 mm)
ImplantManual.xsl - IPGTemplate.fm
Medtronic Confidential
Template version: 05-31-2012
M946491A001 Rev X
2013-04
Page 3

Filename Date Time
UC200xxxxxx EN
4.625 x 6 inches (117 mm x 152 mm)
ImplantManual.xsl - IPGTemplate.fm
Template version: 05-31-2012
Explanation of symbols on product or package labeling
Refer to the appropriate product for symbols that apply.
Consult instructions for use
Do not reuse
Use by
Sterilized using ethylene oxide
-XX °C
-XX °F
EO
Do not resterilize
2
STERILIZE
Manufacturer
Date of manufacture
XX °C
Temperature limitation
XXX °F
Magnetic Resonance (MR) Unsafe
MR
Non-ionizing electromagnetic radiation
STERILE
Medtronic Confidential
Serial number
Chinese Standard (SJ/T11364-2006) Logo: Electronic Information Products
Pollution Control Symbol. (The date in this logo means the environmental
protection use period of the product.)
System meets the applicable Canadian (CAN/CSA-C22.2 No. 60601-1) and
US (UL 60601-1:2003) electrical safety standard requirements.
IEC60601-1/EN60601-1, Type BF equipment
M946491A001 Rev X
2013-04 English 1
2013-04
Page 4

Filename Date Time
UC200xxxxxx EN
4.625 x 6 inches (117 mm x 152 mm)
Conformité Europ éenne (European Conformity). This symbol means that the
device fully complies with MDD 93/42/EEC (NB 0123) and R&TTE Directive
1999/5/EC.
Authorized Representative in the European Community
REP
EC
For USA audiences only
Do not use of the package is damaged.
Do not dispose of this product in the unsorted municipal waste stream.
Dispose of this product according to local regulations. See http://
recycling.medtronic.com for instructions on proper disposal of this product.
ImplantManual.xsl - IPGTemplate.fm
Medtronic Confidential
Template version: 05-31-2012
2 English 2013-04
2013-04
M946491A001 Rev X
Page 5

Filename Date Time
UC200xxxxxx EN
4.625 x 6 inches (117 mm x 152 mm)
ImplantManual.xsl - IPGTemplate.fm
Template version: 05-31-2012
Medtronic Confidential
Medtronic® and SoftStart/Stop® are trademarks of Medtronic, Inc., registered in the US and
other countries.
®
Bluetooth
! USA
is a registered trademark of Bluetooth SIG, Inc.
FCC Information
The following is communications regulation information on the Model 97725 Wireless External
Neurostimulator.
FCC ID: LF597725
This device complies with Part 15 of the FCC Rules. Operation is subject to the following two
conditions: (1) this device may not cause harmful interference, and (2) this device must accept
any interference received, including interference that may cause undesired operation.
IMPORTANT: Changes or modifications to this product not authorized by Medtronic,
Inc., could void the FCC Certification and negate your authority to operate this
product.
This device complies with Industry Canada license-exempt RSS standard(s). Operation is
subject to the following two conditions: (1) this device may not cause interference, and (2) this
device must accept any interference, including interference that may cause undesired
operation of the device.
M946491A001 Rev X
2013-04 English 3
2013-04
Page 6

Filename Date Time
UC200xxxxxx EN
4.625 x 6 inches (117 mm x 152 mm)
ImplantManual.xsl - IPGTemplate.fm
Template version: 05-31-2012
Table of contents
Purpose of the device 5
Description 5
Package contents 5
Accessories 5
Device specifications 5
Declaration of Conformity 9
Instructions for use 10
Pairing the wireless external neurostimulator to a programmer or controller 10
Using the wireless external neurostimulator during test stimulation 10
Replacing the wireless external neurostimulator batteries 11
Changing the batteries during test stimulation 11
Changing the batteries before test stimulation 12
Connecting the wireless external neurostimulator to the leads 14
Connecting the wireless external neurostimulator to the 4-contact lead(s) 14
Connecting the wireless external neurostimulator to the 8-contact lead(s) 16
Preparing the wireless external neurostimulator for test stimulation 18
Removing the wireless external neurostimulator after test stimulation 18
Device care and storage 18
Safety and technical checks 19
Refer to the indications sheet for indications and related information.
Medtronic Confidential
Refer to the appropriate information for prescribers booklet for contraindications,
warnings, precautions, adverse events summary, individualization of treatment,
patient selection, use in specific populations, resterilization, and component
disposal.
Refer to System Eligibility, Battery Longevity, Specifications reference manual for
neurostimulator selection, battery longevity calculations and specific
neurostimulator specifications.
! USA
Refer to the clinical summary booklet for information on the clinical study
results of the neurostimulation system and individualization of treatment.
4 English 2013-04
2013-04
M946491A001 Rev X
Page 7

Filename Date Time
UC200xxxxxx EN
4.625 x 6 inches (117 mm x 152 mm)
ImplantManual.xsl - IPGTemplate.fm
Template version: 05-31-2012
Medtronic Confidential
Purpose of the device
The Medtronic Model 97725 Wireless External Neurostimulator (ENS) is used to evaluate a
Medtronic Neurostimulation System during lead placement or test stimulation.
Description
The Medtronic Model 97725 Wireless External Neurostimulator is a disposable, sterile, singleuse device equipped with Bluetooth wireless technology, and is part of a neurostimulation
system.
Package contents
Wireless external neurostimulator with batteries inserted
▪
Spare AAA alkaline batteries (2)
▪
Product literature
▪
! USA
Warranty card
▪
Accessories
Wireless external neurostimulator boot (packaged separately)
▪
Device specifications
The Model 97725 Wireless External Neurostimulator (Figure 1 and Figure 2) is a multiprogrammable device that delivers stimulation through 1 or more leads. The stimulation
settings are stored in programs to target pain areas. A program is a specific combination of
pulse width, rate, and intensity settings acting on a specific electrode combination (up to 16
electrodes per program). Up to 4 pain areas can be targeted by programs. When stimulating
more than one pain area, the pulses are delivered sequentially—first a pulse from one
program, then a pulse from the next program.
Pulse width, intensity, cycling, and electrode polarity for each program within a group can have
different values. Rate, rate limits, pulse width limits, and inten sity limits for each program within
a group have the same values.
M946491A001 Rev X
2013-04 English 5
2013-04
Page 8
Filename Date Time
UC200xxxxxx EN
4.625 x 6 inches (117 mm x 152 mm)
ImplantManual.xsl - IPGTemplate.fm
Medtronic Confidential
Template version: 05-31-2012
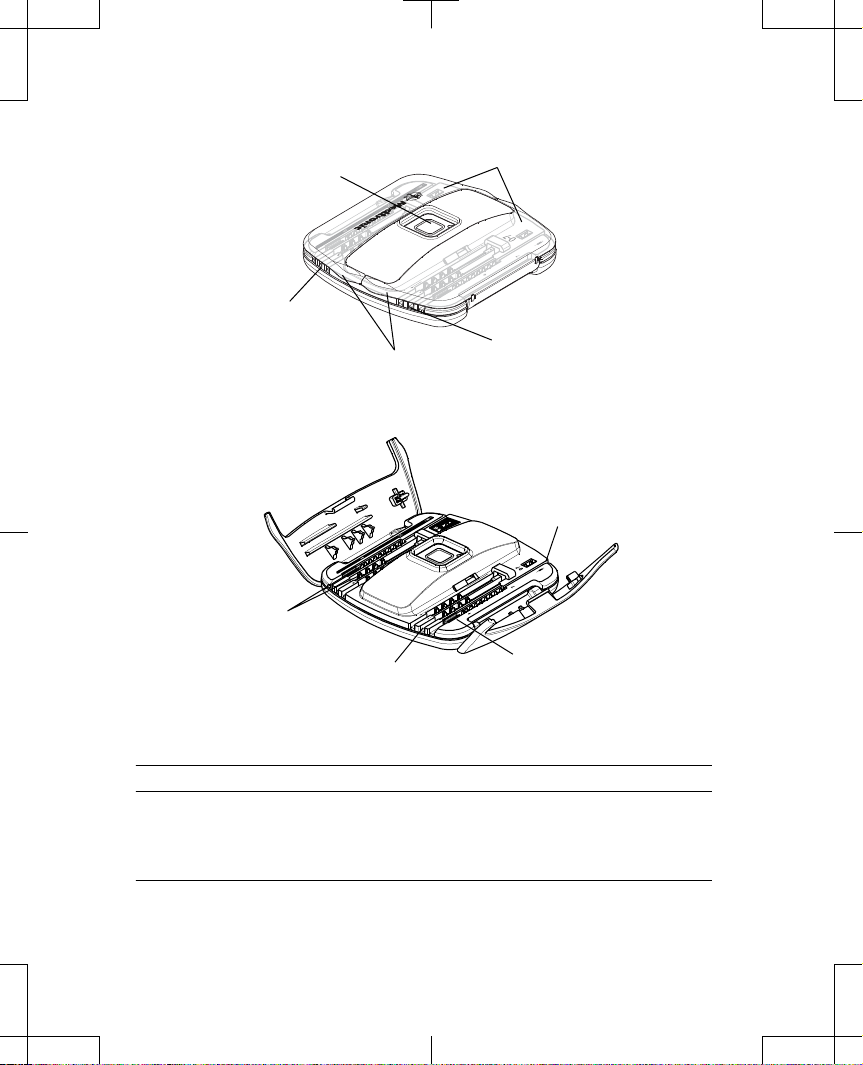
ENS button
Lead housing
compartment,
black (electrodes 8-15)
Lift tabs
Lead doors
Lead housing
compartment,
white (electrodes 0-7)
Figure 1. Model 97725 Wireless External Neurostimulator (doors closed).
8 - contact
lead groove
Electrical
contacts
4 - contact
lead groove
Retainer clip
Figure 2. Model 97725 Wireless Exernal Neurostimulator (doors open).
Table 1. Operating values for the Model 97725 Wireless External Neurostimulator
Programmable parameter
Operating values and ranges
a
Number of defined groups 1-3 (optional)
Number of programs per pain
1-3
area
Number of programs
12
6 English 2013-04
2013-04
M946491A001 Rev X
Page 9

Filename Date Time
UC200xxxxxx EN
4.625 x 6 inches (117 mm x 152 mm)
ImplantManual.xsl - IPGTemplate.fm
Medtronic Confidential
Template version: 05-31-2012
Table 1. Operating values for the Model 97725 Wireless External Neurostimulator
(continued)
Programmable parameter
Operating values and ranges
a
Number of pain areas 1-4
Electrode configuration 2 to 16 electrodes as anode, cathode, or off
Maximum intensity per
electrode
0-25.5 mA (0.1-mA increment)
Program intensity 0-100 mA
Intensity – limits Enabled or disabled at maximum 25.5 mA per electrode
Pulse width 60 to 1000 µs (10-µs increment)
Pulse width – limits Enabled or disabled at maximum 1000 µs
Rate
10 to 1200 Hz
b
(1-Hz increment between 10 and 30 Hz; 5-Hz
increment between 30 and 250 Hz; 10-Hz increment between
250 and 500 Hz; 20-Hz increment between 500 and 1000 Hz;
50-Hz increment between 1000 and 1200 Hz.)
Rate ratio A fraction of the master rate (1/1, 1/2, 1/3, 1/4, 1/5)
Rate - limits Enabled or disabled at maximum 1200 Hz
SoftStart/Stop Off, on: 1, 2, 4, or 8 second ramp duration
Cycling
Off: 0.1 s to 30 min; on: 5 s-30 min (increment: 0.1 s from 0.1-1
s, 1 s from 1 s-1 min, 1 min from 1-30 min)
a
Interlocks and out-of-regulation detection will prevent the use of some parameter combinations.
b
The maximum rate available for the external neurostimulator is limited to 600 Hz when two pain areas are
simultaneously active, 400 Hz when three pain areas are simultaneously active, and to 300 Hz when four
pain areas are simultaneously active.
Table 2. Physical characteristics of the Model 97725 Wireless External
Neurostimulator
a
Description Value
Capacity
Leads 4 quadripolar; 2 octapolar
Electrodes 32 electrodes, supporting 16 active
Length 79 mm (3.1 in)
Height
79 mm (3.1 in)
M946491A001 Rev X
2013-04 English 7
2013-04
Page 10

Filename Date Time
UC200xxxxxx EN
4.625 x 6 inches (117 mm x 152 mm)
ImplantManual.xsl - IPGTemplate.fm
Medtronic Confidential
Template version: 05-31-2012
Table 2. Physical characteristics of the Model 97725 Wireless External
Neurostimulator
Description
Value
a
(continued)
Width 74 mm (2.9 in)
Thickness 20 mm (0.8 in)
Weight (with batteries) 71 g (2.5 oz)
Battery life
7 days minimum for alkaline batteries
b
Power source AAA alkaline batteries (2)
Operating type Continuous
Degree of protection against
electrical shock
Automatic shut off
c
Temperature limitation
Identification code
a
All measurements are approximate.
b
Battery life is based on a 7-day trial using two active programs, 20-90 second controller Bluetooth sessions,
and a 180-minute clinician Bluetooth session. For program 1: impedance = 620 Ω, Amp = 10.6 mA, PW =
330 µs, Rate = 60 Hz. For program 2: impedance = 560 Ω, Amp = 10.5 mA, PW = 330 µs, Rate = 60 Hz.
c
Use the clinician programmer or controller to turn on the external neurostimulator once the condition is
resolved.
d
Store the external neurostimulator at room temperature.
Table 3. Material of components in the Model 97725 Wireless External Neurostimulator
Component
Type BF
Lead door(s) open
d
-20 °C to 54 °C (-4 °F to 130 °F)
NLJ
and boot accessory packages
Material Material contacts
human tissue
Housing
Base Polycarbonate Yes
Lead doors Polycarbonate Yes
Hinge pin Stainless steel No
Contacts Gold- and nickel-plated beryllium copper No
Retainer clip Thermoplastic elastomer (TPE) Yes
8 English 2013-04
2013-04
M946491A001 Rev X
Page 11

Filename Date Time
UC200xxxxxx EN
4.625 x 6 inches (117 mm x 152 mm)
ImplantManual.xsl - IPGTemplate.fm
Medtronic Confidential
Template version: 05-31-2012
Table 3. Material of components in the Model 97725 Wireless External Neurostimulator
and boot accessory packages (continued)
Component
Material Material contacts
human tissue
External neurostimulator
boot
Boot Silicone Yes
Adhesive
Medical acrylic microporous-coated
adhesive
Yes
Declaration of Conformity
Medtronic declares that this product is in conformity with the essential requirements of
Directive 1999/5/EC on Radio and Telecommunications Terminal Equipment and Directive
93/42/EEC on Medical Devices.
For additional information, contact the appropriate Medtronic representative listed on the
inside back cover of this manual.
M946491A001 Rev X
2013-04 English 9
2013-04
Page 12

Filename Date Time
UC200xxxxxx EN
4.625 x 6 inches (117 mm x 152 mm)
ImplantManual.xsl - IPGTemplate.fm
Template version: 05-31-2012
Medtronic Confidential
Instructions for use
The wireless external neurostimulator is used to evaluate lead placement and stimulation
settings.
w
Warning: This device was designed for single patient use only. Do not reuse, reprocess,
or resterilize this product. Reuse, reprocessing, or resterilization may compromise the
structural integrity of the device and/or create a risk of contamination of the device, which
could result in patient injury, illness, or death.
#
Caution: The device is not certified for use in the presence of a flammable anesthetic
mixture with air or with oxygen or nitrous oxide. The consequences of using the device
near flammable atmospheres are unknown.
#
Caution: Do not modify this equipment. Modification of this equipment can result in
damage to the device, causing the device to malfunction or become unusable.
#
Caution: Do not use the device in the proximity of equipment that generates
electromagnetic interference (EMI). EMI may cause a disruption in device function.
Examples of common medical sources of EMI are magnetic resonance imaging (MRI)
and lithotripsy. Powerful computer monitors, cell phones, x-ray equipment, and other
monitoring equipment may also generate EMI.
Notes:
Before placing the external neurostimulator into operation, ensure the external
▪
neurostimulator has had time to equalize to the current temperature and environment.
For more information on EMI and x-ray use with the external neurostimulator, refer to the
▪
Information for Prescribers Booklet.
Turn off and dispose of the external neurostimulator after defibrillation. For more
▪
information on the effects of defibrillation on the neurostimulator, refer to the Information
for Prescribers Booklet.
Pairing the wireless external neurostimulator to a programmer or controller
For instructions on pairing the external neurostimulator to the clinician programmer, refer to
the appropriate programming guide. For instructions on pairing the external neurostimulator
to the controller, refer to the appropriate controller patient guide.
Using the wireless external neurostimulator during test stimulation
When programming during test stimulation, keep the clinician programmer within 3 meters (10
feet) of the external neurostimulator. The external neurostimulator does not attach to the
programmer.
Using the ENS button
The ENS button is used to place the external neurostimulator into discovery mode to establish
communication with a clinician programmer or controller. It can also be used when you need
to immediately turn off the external neurostimulator. The ENS button is not an on/off control.
10 English 2013-04
2013-04
M946491A001 Rev X
Page 13

Filename Date Time
UC200xxxxxx EN
4.625 x 6 inches (117 mm x 152 mm)
You must use either the clinician programmer or controller to turn on the external
neurostimulator.
Press and hold the ENS button for at least 3 seconds to turn off the external
▪
neurostimulator.
Understanding the LED light on the wireless external neurostimulator
When the external neurostimulator is turned on for the first time, the light-emitting diode (LED)
shines continuously for a few seconds. When the LED begins to blink, the external
neurostimulator has completed initiation, has entered discovery mode, and can be paired to
a clinician programmer or controller.
Notes:
The external neurostimulator will remain in discovery mode for 90 seconds, or until it
▪
successfully pairs with a programmer or controller, at which point the LED will stop
blinking and turn off.
The LED blinks whenever the external neurostimulator is in discovery mode, or when it
▪
receives data from a clinician programmer or controller.
Refer to the appropriate programming guide or controller patient manual for more
▪
information.
ImplantManual.xsl - IPGTemplate.fm
Template version: 05-31-2012
Medtronic Confidential
Replacing the wireless external neurostimulator batteries
The external neurostimulator includes batteries inserted in the device, which should last the
length of test stimulation (see Table 2 for more information on battery longevity). Replace the
external neurostimulator batteries when the batteries are low or depleted. The battery level is
shown on the clinician programmer and controller screens. For instructions on checking the
external neurostimulator batteries, refer to the appropriate programming guide or the controller
patient manual.
#
Cautions:
When replacing batteries during test stimulation, save the programming settings
▪
before removing the batteries. If programming settings are not saved, stimulation
history may no longer be available, and the stimulation settings may not reflect
recent programming settings.
Do not leave depleted batteries in the external neurostimulator. The batteries may
▪
corrode and cause damage to the electronic components.
Notes:
Before inserting batteries, check for signs of battery leakage. If any residue is present,
▪
do not use.
When replacing batteries outside the sterile field, use the spare alkaline batteries
▪
provided in the external neurostimulator package. The spare batteries are not sterile.
Changing the batteries during test stimulation
1. If the external neurostimulator is on, use the clinician programmer or controller to turn
the external neurostimulator off.
M946491A001 Rev X
2013-04 English 11
2013-04
Page 14
Filename Date Time
UC200xxxxxx EN
4.625 x 6 inches (117 mm x 152 mm)
ImplantManual.xsl - IPGTemplate.fm
Template version: 05-31-2012
Medtronic Confidential
2. Remove the tape or external neurostimulator boot from the external neurostimulator,
keeping lead assembly and lead exit site secure. For instructions on removing the
external neurostimulator boot from the external neurostimulator, refer to the boot's
instructions for use.
3. Remove the leads from the external neurostimulator.
a. Lift the lift tabs to open the lead doors.
b. Gently lift each lead from the electrical contacts in the lead groove.
4. Proceed to step 2 in "Changing the batteries before test stimulation".
Changing the batteries before test stimulation
1. If the external neurostimulator is on, use the clinician programmer or controller to turn
the external neurostimulator off.
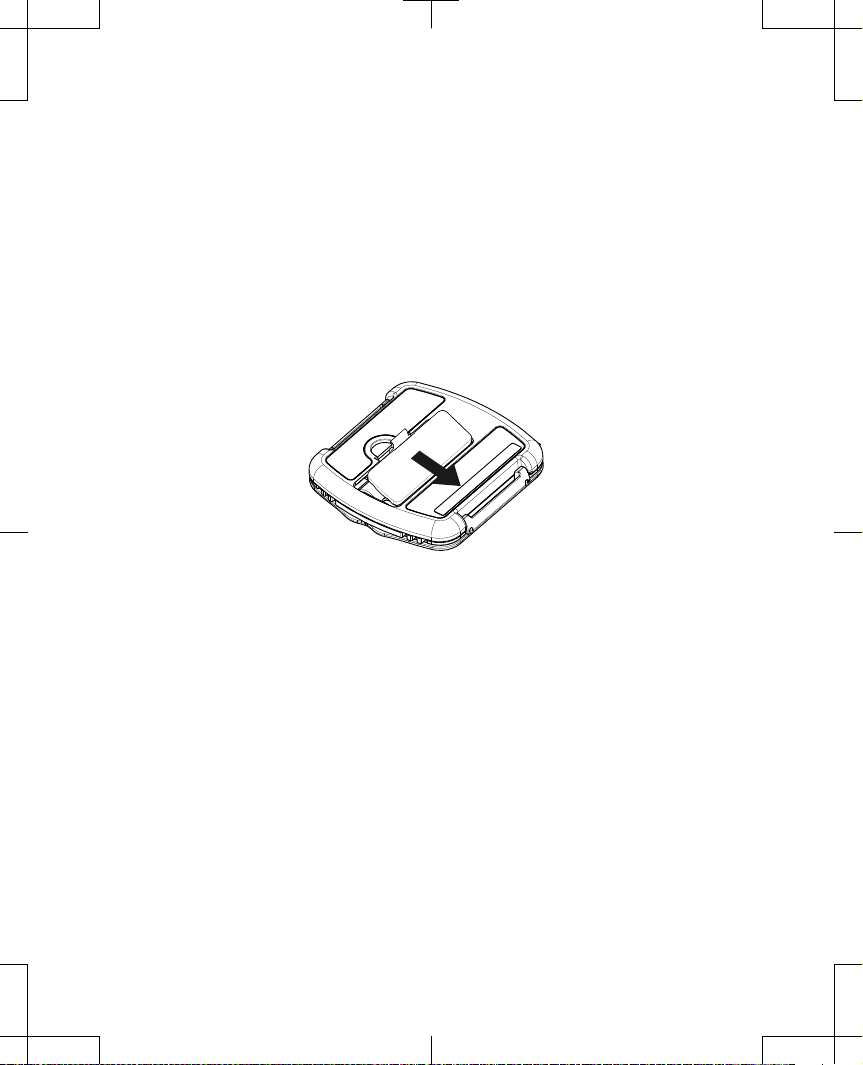
2. Press back lightly on the latch of battery compartment cover, swing the cover open, then
remove the cover (Figure 3).
Figure 3. Removing battery cover.
3. Remove the depleted batteries, and insert new, Medtronic-supplied AAA alkaline
batteries. Correct battery polarity is indicated inside the battery compartment
(Figure 4).
12 English 2013-04
2013-04
M946491A001 Rev X
Page 15

Filename Date Time
UC200xxxxxx EN
4.625 x 6 inches (117 mm x 152 mm)
ImplantManual.xsl - IPGTemplate.fm
Template version: 05-31-2012
Medtronic Confidential
Note: For optimal performance, use the same AAA alkaline batteries as those supplied
by Medtronic.
Figure 4. Inserting new batteries.
4. Replace the battery compartment cover, then press the cover until it snaps into place
(Figure 5).
Figure 5. Replace battery cover.
Notes:
After the batteries are installed and the battery compartment cover is closed, the
▪
external neurostimulator may take up to 6 seconds for device initiation. Stimulation
is not available until device initiation is complete.
Dispose of depleted batteries according to local requirements.
▪
5. Place the leads in the external neurostimulator. Refer to "Connecting the wireless
external neurostimulator to the 4-contact lead(s)" on page 14 or "Connecting the
wireless external neurostimulator to the 8-contact lead(s)" on page 16 for instructions
in placing the leads in the external neurostimulator.
2013-04 English 13
M946491A001 Rev X
2013-04
Page 16

Filename Date Time
UC200xxxxxx EN
4.625 x 6 inches (117 mm x 152 mm)
Note: If replacing batteries during test stimulation, ensure identical seating of the leads
inside the lead grooves.
6. Use the programmer to turn stimulation on.
7. Test lead insert ion to confirm that the leads have been fully inserted into th e lead grooves.
For instructions on testing lead insertion, refer to the appropriate programming guide.
8. Secure the external neurostimulator to the patient. Refer to "Preparing the wireless
external neurostimulator for test stimulation" on page 18 for instructions on securing
the external neurostimulator to the patient.
ImplantManual.xsl - IPGTemplate.fm
Template version: 05-31-2012
Medtronic Confidential
Connecting the wireless external neurostimulator to the leads
The external neurostimulator has two lead housing compartments that each fit two 4-contact
leads and one 8-contact lead. The leads are placed in lead grooves, which are numbered 0-7
on the white side and 8-15 on the black side (Figure 1). Leads are placed in both of the lead
housing compartments.
If using four 4-contact leads, two are placed in each housing compartment.
▪
If using two 8-contact leads, one is placed in each housing compartment.
▪
If using two 4-contact leads and one 8-contact lead, the 4-contact leads are placed in
▪
one housing compartment and the 8-contact lead must be placed in the other.
Notes:
The 4-contact leads and the 8-contact leads enter the external neurostimulator in the
▪
same direction.
The procedure for connecting the external neurostimulator is the same for leads and
▪
extensions.
Connecting the wireless external neurostimulator to the 4-contact lead(s)
Check battery status before connecting the external neurostimulator to the leads. Refer to the
appropriate programming guide for information on checking battery status.
#
Caution: Before connecting components, wipe off any body fluids and dry all
connections. Fluids in the connection may result in intermittent stimulation or loss of
stimulation.
1. Wipe the lead contacts with dry sterile gauze.
2. Lift the lift tab on the appropriate lead housing compartment to open the clear lead door
(Figure 6a).
3. Disconnect the long stylet handle from the 4-contact lead and withdraw the long stylet
from the 4-contact lead.
4. Insert the short stylet into the 4-contact lead and connect the short stylet handle to the
4-contact lead.
5. Make sure the lead contacts and the electrical contacts inside the lead grooves are dry
and clean.
14 English 2013-04
2013-04
M946491A001 Rev X
Page 17

Filename Date Time
UC200xxxxxx EN
4.625 x 6 inches (117 mm x 152 mm)
ImplantManual.xsl - IPGTemplate.fm
Template version: 05-31-2012
Medtronic Confidential
6. Align the short stylet and proximal end of the lead against the inside end of a 4-contact
lead groove of the connector (Figure 6a).
Short stylet handle
ab
Lead groove numbering
Door latch
Electrical contacts
Lead groove
Figure 6. External neurostimulator with a 4-contact lead.
7.
Check that the lead contacts align with the electrical contacts inside the lead groove and
that the short stylet handle aligns with the stylet-shaped portion of the lead groove
(Figure 7).
Short stylet handle
Lead grooveElectrical contacts
Figure 7. Align the lead contacts with the electrical contacts in the lead groove.
2013-04 English 15
M946491A001 Rev X
2013-04
Page 18

Filename Date Time
UC200xxxxxx EN
4.625 x 6 inches (117 mm x 152 mm)
Note: The lead and short stylet fit only one way into the external neurostimulator lead
housing.
8. Press the lead and short stylet gently into the lead groove (Figure 6b). If an additional 4contact lead is used, repeat step 1 and steps 3 to 8.
9. Push the door(s) closed until the latch snaps firmly into place.
Note: Do not force the doors closed; they should close easily. If they do not, disassemble
the components and repeat steps 2 to 9.
10. Confirm correct seating by viewing the leads through the closed doors.
11. Refer to the appropriate programming guide and lead manual to reestablish
communication with the external neurostimulator and the clinician programmer, verify
proper connection, and identify optimal stimulation parameters.
ImplantManual.xsl - IPGTemplate.fm
Template version: 05-31-2012
Medtronic Confidential
Connecting the wireless external neurostimulator to the 8-contact lead(s)
Check battery status before connecting the external neurostimulator to the leads. Refer to the
appropriate programming guide for information on checking battery status.
#
Caution: Before connecting components, wipe off any body fluids and dry all
connections. Fluids in the connection may result in intermittent stimulation or loss of
stimulation.
1. Wipe the lead contacts with dry sterile gauze.
2. Lift the lift tab on the appropriate lead housing compartment to open the clear lead door
(Figure 8a).
3. Make sure the lead contacts and the electrical contacts inside the lead grooves are dry
and clean.
4. While holding the 8-contact lead, disconnect the stylet handle from the lead (proximal
end), and partially withdraw the stylet.
Note: If connecting an extension or a lead without a stylet, proceed to step 5.
5. Align the proximal end of the lead against the inside end of an 8-contact lead groove of
the connector (Figure 8a).
16 English 2013-04
2013-04
M946491A001 Rev X
Page 19

Filename Date Time
UC200xxxxxx EN
4.625 x 6 inches (117 mm x 152 mm)
ImplantManual.xsl - IPGTemplate.fm
Medtronic Confidential
Template version: 05-31-2012
Stylet handle
ab
Lead groove numbering
Door latch
Electrical contacts
Lead groove
Retainer clips
Figure 8. External neurostimulator with an 8-contact lead with the stylet partially
withdrawn.
6. Check that the lead contacts align with the electrical contacts inside the lead groove
(Figure 9).
Stylet handle
Lead grooveElectrical contacts
Figure 9. Align the lead contacts with the electrical contacts in the lead groove.
Note:
The lead fits only one way into the external neurostimulator lead housing.
7.
Press the lead gently into the lead groove and the retainer clip (Figure 8b). If an
additional 8-contact lead is used, repeat step 1 and steps 3 to 7.
8.
Push door(s) closed until the latch snaps firmly into place.
2013-04 English 17
M946491A001 Rev X
2013-04
Page 20

Filename Date Time
UC200xxxxxx EN
4.625 x 6 inches (117 mm x 152 mm)
Note: Do not force the doors closed; they should close easily. If they do not, disassemble
the components and repeat steps 2 to 8.
9. Confirm correct seating by viewing the leads through the closed doors.
10. Refer to the appropriate programming guide and lead manual to reestablish
communication with the external neurostimulator and the clinician programmer, verify
proper connection, and identify optimal stimulation parameters.
ImplantManual.xsl - IPGTemplate.fm
Template version: 05-31-2012
Medtronic Confidential
Preparing the wireless external neurostimulator for test stimulation
Check battery status and test lead insertion before attaching the external neurostimulator to
the patient. Refer to the appropriate programming guide for information on checking battery
status and testing lead insertion.
1. Place a gauze bandage on the skin where the lead and external neurostimulator will be
placed on the patient.
Note: If using the wireless external neurostimulator boot, refer to the boot's instructions
for use.
2. Tape the lead and external neurostimulator separately to the skin.
3. Tape the entire assembly to the skin, allowing for strain relief.
Notes:
Ensure that the ENS button faces away from the patient.
▪
Avoid placing bandaging over the ENS button in a way that obstructs it from use.
▪
4. Proceed with the trial evaluation.
Removing the wireless external neurostimulator after test stimulation
1. Verify that the external neurostimulator is off.
2. Remove all tape from the lead and external neurostimulator.
3. Lift the lift tabs to open the lead doors.
4. Gently lift each lead from the electrical contacts in the lead groove.
5. Dispose of the external neurostimulator according to environmental regulations.
Device care and storage
Keep new AAA alkaline batteries available. For optimal performance, use the same
▪
batteries as those supplied by Medtronic.
Use the clinician programmer or the controller to check the external neurostimulator
▪
battery level daily. For instructions on checking the external neurostimulator batteries,
refer to the appropriate programming guide or the controller patient manual.
Replace low or depleted batteries.
▪
Handle the device and system components with care. Do not drop, strike or step on the
▪
device or system components.
Do not dismantle or tamper with the device.
▪
18 English 2013-04
2013-04
M946491A001 Rev X
Page 21

Filename Date Time
UC200xxxxxx EN
4.625 x 6 inches (117 mm x 152 mm)
Clean the outside of the device with a damp cloth when necessary. Mild household
▪
cleaners will not damage the device or labels.
Store the external neurostimulator at room temperature. Avoid extreme hot or cold
▪
temperatures and direct sunlight.
The device and system components are not waterproof. Do not allow moisture to get
▪
inside the device or system components.
Dispose of depleted batteries and devices according to local requirements.
▪
ImplantManual.xsl - IPGTemplate.fm
Template version: 05-31-2012
Medtronic Confidential
Safety and technical checks
Periodic safety and technical checks or periodic maintenance of the external neurostimulator
are not required.
The external neurostimulator contains no serviceable components. If the external
neurostimulator requires repair or is nonfunctional, send it to the appropriate address.
USA
Medtronic, Inc.
Neurological Division
MS N600
PO Box 1250
Minneapolis, MN 55440-9087
Europe, Africa, Middle East, and Asia-Pacific countries
Medtronic EOC
Medical Equipment Service Europe
Earl Bakkenstraat 10
6422 PJ Heerlen
The Netherlands
Tel. 31-455664880
Fax 31-455668028
M946491A001 Rev X
2013-04 English 19
2013-04
Page 22

Filename Date Time
UC200xxxxxx EN
4.625 x 6 inches (117 mm x 152 mm)
Contacts:
Asia:
Medtronic International Ltd.
Tel. 02919-1362
Fax 02907-3998
Medtronic Asia Ltd.
Tel. (02)-548-1148
Fax (02)-518-4786
Australia:
Medtronic Australasia Pty. Ltd.
97 Waterloo Road
North Ryde, NSW 2113
Australia
Tel. +61-2-9857-9000
Fax +61-2-9878-5100
Toll free 1-800-668-6700
Austria:
Medtronic Österreich GmbH
Tel. 01-240440
Fax 01-24044-100
Belgium:
Medtronic Belgium S.A.
Tel. 02-456-0900
Fax 02-460-2667
Canada:
Medtronic of Canada Ltd.
Tel. (1-905)-460-3800
Fax (1905)-826-6620
Czech Republic:
Medtronic Czechia s.r.o.
Tel. 2-965-795-80
Fax 2-965-795-89
Denmark:
Medtronic Danmark A/S
Tel. 45-32-48-18-00
Fax 45-32-48-18-01
Finland:
Medtronic Finland Oy/LTD
Tel. (09)-755-2500
Fax (09)-755-25018
France:
Medtronic France S.A.S.
Tel. 01-5538-1700
Fax 01-5538-1800
Germany:
Medtronic GmbH
Tel. (02159)-81490
Fax (02159)-8149100
Greece:
Medtronic Hellas S.A.
Tel. 210-67-79-099
Fax 210-67-79-399
ImplantManual.xsl - IPGTemplate.fm
Template version: 05-31-2012
Hungary:
Medtronic Hungária Kft.
Tel. 1-889-06-00
Fax 1-889-06-99
Ireland:
Medtronic Ireland Ltd.
Tel. (01)-890-6522
Fax (01)-890-7220
Italy:
Medtronic Italia SpA
Tel. 02-241371
Fax 02-241381
Tel. 06-328141
Fax 06-3215812
Japan:
Medtronic Japan
Tel. 03-6430-2016
Fax 03-6430-7110
Latin America:
Medtronic, Inc.
Tel. (1305)-500-9328
Fax (1786)-709-4244
Norway:
Medtronic Norge AS
Tel. 067-10-32-00
Fax 067-10-32-10
Poland:
Medtronic Poland Sp. z.o.o.
Tel. (022)-465-69-00
Fax (022)-465-69-17
Portugal:
Medtronic Portugal, Lda.
Tel. 21-724-5100
Fax 21-724-5199
Russia:
Medtronic Russia
Tel. (8495) 580-7377
Fax (8495) 580-7378
Slovakia
Medtronic Slovakia, o.z.
Tel. 0268 206 911
Fax 0268 206 999
Spain:
Medtronic Ibérica, S.A.
Tel. 91-625-0400
Fax 91-650-7410
Sweden:
Medtronic AB
Tel. 08-568-585-00
Fax 08-568-585-01
Medtronic Confidential
2013-04
M946491A001 Rev X
Page 23

Filename Date Time
UC200xxxxxx EN
4.625 x 6 inches (117 mm x 152 mm)
ImplantManual.xsl - IPGTemplate.fm
Medtronic Confidential
Template version: 05-31-2012
Switzerland:
Medtronic (Schweiz) AG
Tel. 031-868-0100
Fax 031-868-0199
The Netherlands:
Medtronic B.V.
Tel. (045)-566-8000
Fax (045)-566-8668
U.K.:
Medtronic U.K. Ltd.
Tel. 01923-212213
Fax 01923-241004
USA:
Medtronic, Inc.
Tel. (1763)-505-5000
Fax (1763)-505-1000
Toll-free: (1-800)-328-0810
M946491A001 Rev X
2013-04
Page 24

Filename Date Time
UC200xxxxxx EN
4.625 x 6 inches (117 mm x 152 mm)
Manufacturer
Medtronic, Inc.
710 Medtronic Parkway
Minneapolis, MN 55432-5604
USA
www.medtronic.com
Tel. 1-763-505-5000
Fax 1-763-505-1000
Authorized Representative
in the European Community
Medtronic B.V.
Earl Bakkenstraat 10
6422 PJ Heerlen
The Netherlands
Tel. 31-45-566-8000
Fax 31-45-566-8668
Europe/Africa/Middle East
Headquarters
Medtronic International Trading Sàrl
Route du Molliau 31
Case Postale 84
CH-1131 Tolochenaz
Switzerland
www.medtronic.eu
Tel. 41-21-802-7000
Fax 41-21-802-7900
Asia-Pacific
Medtronic International Ltd.
Suite 1106-11, 11/F, Tower 1, The Gateway
25 Canton Road, Tsimshatsui
Kowloon
Hong Kong
Tel. 852-2891-4068
Fax 852-2591-0313
Contacts for specific countries are listed inside this cover.
ImplantManual.xsl - IPGTemplate.fm
Template version: 05-31-2012
REP
EC
Medtronic Confidential
*M946491A001*
2013-04
© Medtronic, Inc. 2013
All Rights Reserved
M946491A001
M946491A001 Rev X
 Loading...