


SynchroMed® II
Programmable pumps
Implant manual
Rx only
8637
2003

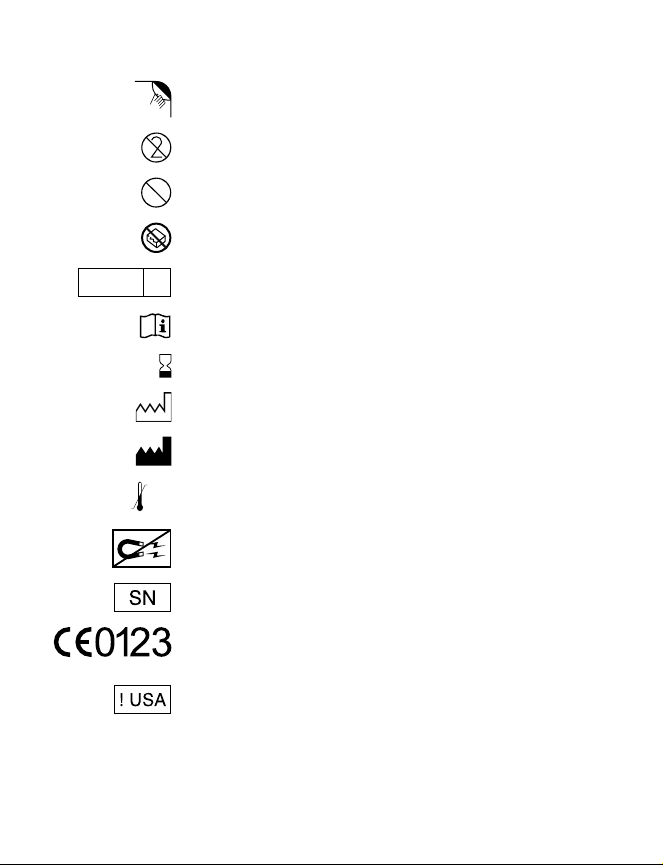
Explanation of symbols on product or package labeling
Refer to the appropriate product for symbols that apply.
Open here
Do not reuse
Do not resterilize
2
STERILIZE
Do not use if package is damaged
Sterilized using ethylene oxide
-XX °C
-XX °F
EO
Consult instructions for use
Use by
Date of manufacture
Manufacturer
XX °C
Temperature limitation
XXX °F
Keep away from magnets
Serial number
STERILE
Conformité Européenne (European Conformity). This symbol means
that the device fully complies with AIMD Directive 90/385/EEC (NB
0123).
For USA audiences only
8637 2016-06-01 English 3

EC
Authorized representative in the European community
REP
4 English 8637 2016-06-01

Medtronic® and SynchroMed® are trademarks of Medtronic, Inc., registered in the U.S. and
other countries.
®
Prialt
is a registered trademark of Azur Pharma International Limited.
8637 2016-06-01 English 5

6 English 8637 2016-06-01

Table of contents
Description 9
Package contents 10
Patient identification card 10
Device specifications 11
Device longevity 14
Flow rate accuracy 15
Measurement error 15
Fluid volume 15
Environmental conditions 16
Declaration of Conformity 18
Instructions for use 19
Preparing for pump implant 19
Sterile procedure 20
Emptying the pump 20
Preparing to fill the pump 21
Filling the pump 21
Priming the pump before implant (if applicable) 22
Replacing an implanted pump 22
Preparing the pump pocket 23
Refer to the indications, drug stability, and emergency procedures reference
manual for indications and related information.
Refer to the appropriate information for prescribers booklet for contraindications,
warnings, precautions, adverse events summary, individualization of treatment,
patient selection, use in specific populations, and component disposal.
Refer to the appropriate drug labeling for indications, contraindications, warnings,
precautions, dosage and administration information, and screening procedures.
! USA
Refer to the clinical summary booklet for information on the clinical study
results of the infusion system and adverse events summary.
8637 2016-06-01 English 7

Implanting the pump 23
Programming the pump 24
Updating the patient record 26
Monitoring the patient 26
Refilling the pump or accessing the catheter access port 26
Technical support 27
8 English 8637 2016-06-01
Description
The implantable Medtronic Model 8637 SynchroMed II programmable pump is part of an
infusion system that stores and delivers a prescribed drug to a specific site. The implanted
infusion system consists of a Model 8637 SynchroMed II pump and a catheter.
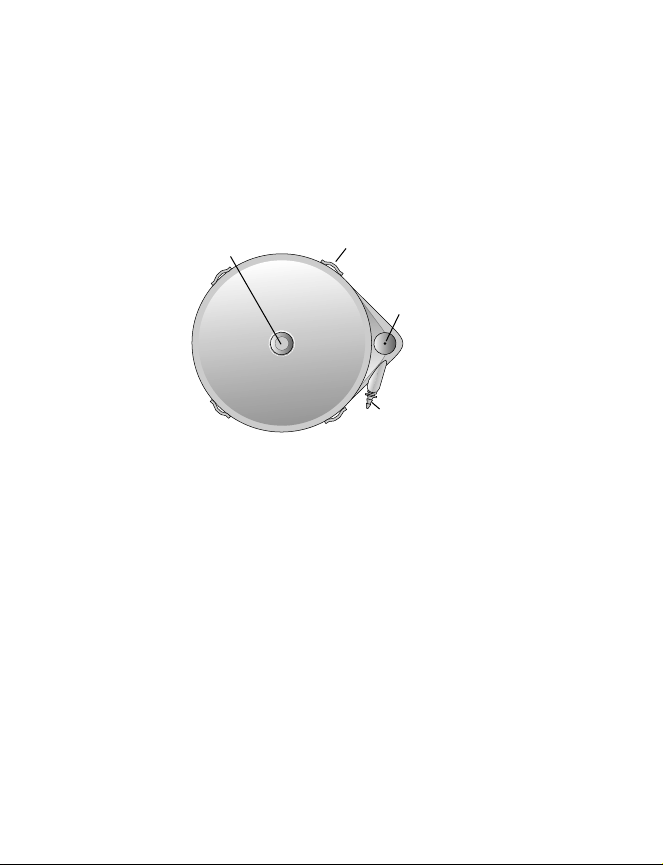
The catheter connects to the pump catheter port. The pump is anchored in the pump pocket
using the suture loops on the outside of the pump (Figure 1).
Reservoir fill port
Figure 1. Pump exterior view.
The drug is stored in the pump reservoir (Figure 2). Per a programmed prescription, the
drug moves from the pump reservoir, through the internal pump tubing, catheter port, and
catheter, to the infusion site. The catheter access port (CAP) allows injection of drug
directly into the implanted catheter for drug administration and diagnostic purposes. Drug
injected into the CAP bypasses the pump mechanism and goes directly through the
catheter port into the implanted catheter to the infusion site. The CAP allows entry of a 24gauge noncoring needle to prevent accidental injection during refill procedures (which use
the 22-gauge noncoring needle supplied in the refill kit).
The manufacturer and model code recorded on a radiopaque identifier are visible using
standard x-ray procedures.
Suture loop
Catheter access port
Catheter port
8637 2016-06-01 English 9

Reservoir fill port
Radiopaque
identifier
Catheter access port
Pump reservoir
Figure 2. Pump interior view.
Internal pump tubing
Package contents
Pump
▪
Needle, 22-gauge (black sheath)
▪
Needle, 24-gauge (purple sheath)
▪
Product literature
▪
Registration form
▪
Patient identification card
▪
! USA
Warranty card
▪
Patient identification card
A patient identification card is packaged with this device. Advise the patient to carry the
identification card at all times.
! USA
The patient identification card packaged with the device is temporary; a permanent
card is mailed to the patient when Medtronic receives the registration form.
! USA
The implant registration form registers the device warranties and creates a record of
the device in the Medtronic implant data system.
10 English 8637 2016-06-01

Device specifications
Table 1. Shipping and operating values for the Model 8637 SynchroMed II pump
Shipping Operating
Fluid in reservoir Sterile water —
Shipping flow rate 0.006 mL/day —
Infusion modes Simple continuous Single bolus
Alarms
Critical alarm
Non-critical alarm
Disabled
Disabled
Priming bolus
Bridge bolus
Simple continuous
Flex
Minimum rate
Stopped pump
Enabled with an interval
programmed
Enabled with an interval
programmed
8637 2016-06-01 English 11

Table 2. Device specifications for the Model 8637 SynchroMed II pump
8637-20 8637-40
Pump
Thickness (including septum)
Weight (empty/full)
Displacement volume
Diameter (including CAP)
19.5 mm
165/185 g
91 mL
87.5 mm
26.0 mm
175/215 g
121 mL
87.5 mm
Pump reservoir
Volume
Residual volume
Fill volume at shipping
20.0 mL
1.4 mL
17.5 mL
40.0 mL
1.4 mL
37.5 mL
Internal pump tubing
Volume
b
0.140 mL 0.140 mL
Reservoir fill port
Septum puncture life 500 punctures 500 punctures
Catheter access port
Septum puncture life 500 punctures 500 punctures
Flow rate
Maximum programmable
Minimum programmable
Stopped pump maximum
c
c
24 mL/day
0.048 mL/day
0.030 mL/day
24 mL/day
0.048 mL/day
0.030 mL/day
leakage
Bacterial retentive filter
Pore size 0.22 μm (micron) 0.22 μm (micron)
Power source
Battery
Longevity
Lithium hybrid cathode
Rate dependent
(Figure 3)
Lithium hybrid cathode
Rate dependent
(Figure 3)
Transmitter
Carrier frequency
Output level (at 300 m)
175 kHz
-48 dBuV/m
175 kHz
-48 dBuV/m
a
12 English 8637 2016-06-01

Table 2. Device specifications for the Model 8637 SynchroMed II pump
(continued)
a
8637-20 8637-40
Radiopaque identifier NGP NGV
Reservoir pressure 20.68 kPa to 34.75 kPa 20.68 kPa to 34.75
a
All measurements are approximate.
b
When priming the pump before implant, use a priming bolus of 0.300 mL to fill the internal pump
tubing with drug before connecting the catheter and implanting the pump (back table prime). The
total prime volume is greater than the internal pump tubing volume to ensure that the entire fluid
path in the pump is flushed and primed before implant.
c
Actual limits depend on pump calibration constant and selected infusion mode.
Table 3. Material of components in the Model 8637 SynchroMed II sterile package
Component Material Material contacts
human tissue
kPa
Material contacts
drug
Pump
Exterior Titanium Yes No
Reservoir Titanium No Yes
Reservoir valve Titanium No Yes
Tubing Silicone rubber No Yes
Reservoir fill port
septum
Catheter access
port septum
Silicone rubber Yes Yes
Silicone rubber Yes Yes
Catheter port Titanium Yes Yes
Bacterial
retentive filter
Polyvinylidene
fluoride
No Yes
Suture loops Titanium Yes No
Propellant Inert gas No No
Needles Stainless steel Yes Yes
8637 2016-06-01 English 13

Device longevity
Device longevity is a function of flow rate. Flow rates affect the battery voltage and motor
revolutions (Figure 3).
10
9
8
7
6
5
4
Typical Device Longevity (years)
3
2
1
0
0 0.1 0.2 0.3 0.4 0.5 0.6 0.7 0.8 0.9 1.0 1.1 1.2 1.3 1.4 1.5
Flow Rate (mL/day)
Figure 3. Typical device longevity based on flow rate.
Device longevity is the calculated number of service months remaining based on actual
usage rates.
when the pump nears the end of its service life (EOS). At ERI, the pump continues to
operate within specifications. The ERI thresholds allow the pump to operate for a minimum
of 90 days, at rates up to 1.5 mL/day, between ERI activation and EOS (Figure 4). When
activated, ERI is date stamped and displayed by the programmer after interrogating the
pump. The EOS activation indicates the pump has reached the end of its service life. At
EOS, the pump stops, but telemetry is available until the pump battery is depleted.
1
An elective replacement indicator (ERI) message displays on the programmer
1
Device longevity sources include bat tery life (voltage), device life (year s), and motor life (revolutions).
14 English 8637 2016-06-01

ERI
EOS
Device Longevity (months)
Time Since Implant 90 Days
Figure 4. ERI and EOS.
Flow rate accuracy
The flow rate accuracy of the pump is within ±14.5% of the programmed flow rate at
0.048-24 mL/day, 37 °C, 50% reservoir volume, and 300 meters above sea level.
Measurement error, fluid volume, and changes in environmental conditions (eg, body
temperature and atmospheric pressure) all affect the flow rate. The effects of these
changes on flow rate are cumulative if the conditions exist simultaneously.
Measurement error
The apparent flow rate based on clinical measurements can vary due to measurement error
(eg, syringe measurement accuracy, human error, and the volume of fluid in the extension
tubing and filter).
Fluid volume
The flow rate of the pump varies slightly with the volume of fluid in the pump reservoir. The
pump flow rate decreases as the reservoir volume approaches 1 mL. The pump flow rate
decreases rapidly and then stops as the reservoir volume decreases from 1 mL to 0 mL.
Therefore, the pump should be refilled prior to reaching 1 mL or less. Typically, the flow rate
8637 2016-06-01 English 15

decreases by about 4% as the volume is reduced from the half-full volume to a volume of 1
mL. The usable volume is the reservoir volume minus 1 mL (Figure 5).
130%
120%
110%
100%
90%
Flow Rate Accuracy
80%
70%
1 mL 20 or 40 mL
Usable Volume
Volume in Reservoir (mL)
Figure 5. Flow rate accuracy as a function of fluid volume in reservoir.
Environmental conditions
Body temperature
The flow rate of the pump varies with body temperature. The flow rate increases as the
temperature increases above 37 °C and decreases as the temperature decreases below
37 °C (Figure 6).
16 English 8637 2016-06-01

120%
115%
110%
105%
100%
33 34 35 36 37 38 39 40 41
95%
Flow Rate Accuracy
90%
85%
80%
Temperature (Celsius)
Figure 6. Flow rate accuracy as a function of temperature (typical effect).
Atmospheric pressure
Patients living or traveling (eg, airline flights, mountain climbing) at altitudes above sea level
are exposed to lower atmospheric pressures. Within days of exposure to the lower
pressures, the flow rate of the pump can increase and then stabilize at the higher flow rate.
In circumstances where a potential increase in flow rate may pose a risk to a patient,
reprogramming the infusion prescription offsets this higher flow rate (Figure 7).
In rare instances, exposure to the lower atmospheric pressure can cause the pump to
deliver more than 14.5% of the programmed flow rate while the patient is exposed to the
lower pressure. Consider changes in drug concentrations or changes to pump programming
for patients exposed to lower pressures.
8637 2016-06-01 English 17

120%
115%
110%
105%
100%
95%
Flow Rate Accuracy
90%
85%
80%
0
500 1000 1500 2000 2500 3000 3500 4000 4500
Altitude (meters)
Figure 7. Flow rate accuracy as a function of altitude (typical effect).
Declaration of Conformity
Medtronic declares that this product is in conformity with the essential requirements of
Directive 90/385/EEC on Active Implantable Medical Devices.
For additional information, contact the appropriate Medtronic representative listed on the
inside back cover of this manual.
18 English 8637 2016-06-01

Instructions for use
Implanting physicians should be experienced in pump and catheter implant procedures and
should be thoroughly familiar with all product labeling.
Cautions:
Do not implant a pump that was dropped onto a hard surface or shows signs of
▪
damage. Implanting a pump that has been dropped or damaged can result in lack
of intended therapy, and require additional surgery to replace the pump.
Do not implant the pump unless pump operation has been confirmed. Failure to
▪
confirm pump operation before implant can result in additional surgery to replace
the pump.
Do not prematurely activate the pump reservoir valve. Activation of the pump
▪
reservoir valve seals the pump reservoir valve closed. Unusual resistance or the
inability to inject the entire fill volume may indicate activation of the pump
reservoir valve. If the valve closes, a portion of the reservoir contents must be
delivered or removed before filling can be completed. Procedural delays can
occur. To prevent activation of the pump reservoir valve during emptying and
filling procedures:
completely aspirate all contents of the pump reservoir before filling.
–
do not allow air into the pump reservoir through an open needle in the
–
septum or an unclamped extension.
do not exceed the maximum reservoir volume indicated in the pump
–
labeling.
To use the nonsterile clinician programmer in a sterile field, place a sterile barrier
▪
between the patient and the programming head to prevent infection. Do not
sterilize any part of the clinician programmer. Sterilization may damage the
programmer.
Preparing for pump implant
1. Assemble equipment and supplies.
Sterile items
The pump package containing the pump, 22-gauge noncoring needle (for filling the
▪
pump), and 24-gauge noncoring needle (for flushing the catheter access port)
Empty 20-mL syringes (for emptying the pump)
▪
0.22-µm (micron) filter
▪
Syringe containing prescribed fluid (volume not to exceed the reservoir volume of
▪
the pump)
10-mL syringe with 1–2 mL of sterile, preservative-free saline (for flushing the
▪
catheter access port)
8637 2016-06-01 English 19

Nonsterile items
Medtronic clinician programmer
▪
2. Before opening the shelf package, use the clinician programmer to interrogate the
pump and verify pump battery status and current settings.
a. Confirm that there are no active alarm events.
Note: If the pump is still in Shelf Mode, audible alarms are disabled. The pump
must be interrogated to determine if an alarm has been activated.
b. Confirm that the pump calibration constant displayed on the screen matches the
calibration constant printed on the shelf package.
Warning: The calibration constant displayed on the programmer screen
after reading the pump status must match the calibration constant printed on
the shelf package. If calibration constants differ, contact the appropriate
Medtronic representative listed on the inside back cover of this manual.
Using an incorrect calibration constant can result in a clinically significant or
fatal drug underdose or overdose.
3. Attach a "FOR YOUR RECORDS" label (enclosed in the shelf package) to the
patient's record. This label displays the pump model number, reservoir size, calibration
constant, and serial number.
Note: Updating the pump with the new parameters can be performed at this time or
after the implant procedure. Refer to "Programming the pump" on page 24 for
instructions.
Sterile procedure
1. Open the sterile pump package and remove the pump.
2. Remove the protective cap from the catheter port (a small amount of water might be
present in the protective cap).
Emptying the pump
1. Assemble the 22-gauge noncoring needle and the empty syringe.
2. Insert the needle into the reservoir fill port until the needle touches the metal needle
stop.
3. Withdraw the sterile water from the pump into the empty syringe (the pump is shipped
nearly full).
Note: If the volume of fluid in the pump reservoir exceeds the volume of the syringe
used for emptying, remove the filled syringe and needle. Attach an empty syringe and
needle, and repeat until the pump reservoir is empty.
4. Empty the pump reservoir until air bubbles no longer appear in the syringe, ensuring
all water and air is removed from the pump reservoir.
5. Remove the syringe and needle from the reservoir fill port.
20 English 8637 2016-06-01

Preparing to fill the pump
1.
If using Prialt
labeling for instructions for use of this drug with the pump.
2. For all indicated drugs refer to Table 4 to determine the fill method.
Notes:
A change in concentration is not recommended at the time of replacement.
▪
The pump reservoir capacity is 20 mL or 40 mL. Because some sterile water
▪
remains in the pump reservoir, the final concentration of drug varies based on the
fill method.
Table 4. Expected concentration of drug in pump reservoir based on fill method
Pump reservoir
capacity
8637-20 93% 98% 99%
8637-40 97% 99% 100%
3. If you are rinsing the pump reservoir before filling, rinse and discard the appropriate
volume based on the fill method shown in Table 4.
1
(preservative-free ziconotide sterile solution), refer to the drug
Filling without
rinsing
Rinsing with
3 mL of drug
Rinsing with
10 mL of drug
Filling the pump
1. Attach the filter to the syringe containing the prescribed fluid.
2. Attach the needle to the syringe containing the prescribed fluid and filter, and purge
the air from the fluid pathway.
3. Read the actual fill volume in the syringe.
4. Insert the needle into the reservoir fill port, and inject the prescribed fluid slowly into
the pump reservoir.
5. If the reservoir valve is activated before the pump is filled completely, discontinue
injection, remove the needle from the reservoir fill port, and return to "Emptying the
pump" on page 20, step 4.
6. When filling is complete, remove the needle from the reservoir fill port.
7. Flush the catheter access port using a 24-gauge noncoring needle and a syringe filled
with 1 to 2 mL of saline (or a heparinized solution for vascular applications, if not
contraindicated).
a. Gently insert the needle into the catheter access port until the needle touches the
metal needle stop.
b. Inject fluid into the catheter access port until fluid is observed at the catheter port.
c. Remove the needle from the catheter access port.
1
Prialt is a brand name drug for zicon otide. Prialt is listed here for USA audiences only.
8637 2016-06-01 English 21

Priming the pump before implant (if applicable)
Warning: If the pump is being primed before implant, allow the prime to finish before
connecting the catheter to the pump. If the prime is not finished, drug can be bolused
into the catheter and can result in a clinically significant or fatal overdose.
Note: Refer to the clinician programmer guide for information on how to program the priming
bolus.
For a full system implant or a pump replacement with aspirated catheter
To reduce the risk of overdose, consider using a priming bolus of 0.300 mL to fill the
1.
internal pump tubing with drug
pump (back table prime).
2. If implanting a new pump, proceed to "Preparing the pump pocket" on page 23.
3. If replacing an implanted pump, proceed to "Replacing an implanted pump" on
page 22.
For a pump replacement with non-aspirated catheter
1.
Use a priming bolus of 0.300 mL to fill the internal pump tubing with drug before
connecting the catheter and implanting the pump (back table prime).
Warning: If this is a pump replacement and the catheter has not been replaced
and has not been aspirated, the internal pump tubing should be primed
connecting the catheter and implanting the pump. Do not program a priming
bolus after the catheter has been connected to the implanted pump.
Programming a priming bolus in this situation can result in a clinically significant
or fatal overdose.
2. Proceed to "Replacing an implanted pump" on page 22.
before connecting the catheter and implanting the
before
Replacing an implanted pump
1. If applicable, remove the suture at the catheter connector.
2. Disconnect the implanted pump from the implanted catheter. To avoid damage to the
pump connector, leave the connector attached to the catheter.
Note: If you are replacing a SynchroMed EL Model 8626, 8626L, 8627, or 8627L
Implantable Pump, interrogate the replaced pump for catheter volume information that
may be stored in the pump. If you are replacing a SynchroMed II Model 8637
Implantable Pump, interrogate the replaced pump for catheter volume information.
Enter the catheter volume information into the clinician programmer.
3. If not replacing the catheter, slowly aspirate 1 to 2 mL of fluid from the catheter using a
1-mL tuberculin syringe. Leave the syringe in place to avoid CSF loss. Aspirating
directly from the catheter clears the catheter of drug and confirms catheter patency.
Note: Conditions might exist under which the catheter is not patent or is not aspirated.
If the catheter is not patent it must be replaced. Refer to the appropriate catheter
implant manual for catheter replacement instructions.
22 English 8637 2016-06-01

Warning: During vascular applications, do not aspirate blood through the
catheter access port or catheter. Blood sampling or aspiration through the
catheter access port is contraindicated in vascular applications. Residual blood
from aspiration or blood sampling can occlude the catheter or pump and inhibit
drug delivery, resulting in a loss of or change in therapy, which may lead to a
return of underlying symptoms, drug withdrawal symptoms, or a clinically
significant or fatal drug underdose, and require surgical revision or replacement.
4. Proceed to "Implanting the pump" on page 23.
Preparing the pump pocket
Prepare the subcutaneous pocket using an incision in the lower abdomen.
Ensure that the subcutaneous pump pocket allows the pump to be implanted within 2.5 cm
from the surface of the skin and in an area where sutures will not be directly over the
reservoir fill port or catheter access port.
Caution: Select a location in the lower abdomen that is:
away from bony structures (eg, 3 to 4 cm) to minimize discomfort at the pump
▪
site.
away from areas of restriction or pressure to minimize the potential for skin
▪
erosion and patient discomfort.
away from existing scar tissue.
▪
For programmable pumps, select a location that is also:
a minimum of 20 cm away from another programmable device to minimize
▪
telemetry interference and incorrect or incomplete programming.
in an area accessible to the patient for proper operation of a patient control device
▪
(if applicable).
In the pediatric population, care must be taken to select an appropriate location by
taking into consideration:
available body mass.
▪
presence of ostomies.
▪
growth and development.
▪
Implanting the pump
1. Connect the implanted catheter to the pump according to the catheter implant manual
instructions.
2. Place the filled pump into the prepared pocket.
8637 2016-06-01 English 23

Cautions:
Implant the pump no more than 2.5 cm from the surface of the skin in order
▪
to maintain access to the reservoir and catheter access ports. Implantation
of the pump is contraindicated if the pump cannot be implanted 2.5 cm or
less from the surface of the skin.
Place the pump in the prepared pocket so:
▪
the reservoir fill port is anteriorly oriented and the reservoir fill port and
–
catheter access port will be easy to access after implant.
no sutures to the skin will be directly over the reservoir fill port or the
–
catheter access port.
the catheter is not kinked or twisted and is secured well away from the
–
pump ports.
Improper component placement can result in inaccessible pump ports,
inadequate drug delivery, component damage, or procedural delays, and
require surgical revision or replacement.
3. Suture the pump in the subcutaneous pocket using the following steps:
a. Suture first to the fascia in the bottom of the subcutaneous pocket.
b. Use these two sutures and the lower suture loops on the pump to draw the pump
into the pocket.
c. Tie the sutures.
d. Suture the remaining two loops at the top of the pump pocket.
e. Tie the sutures, securing the pump into the pocket.
4. Irrigate the pump pocket.
5. Close the incisions per normal procedure and apply dressing.
Programming the pump
For a full system implant or a pump replacement with aspirated catheter
Enter the following into the clinician programmer: patient information, catheter model
1.
number, implanted catheter length (in centimeters), drug name and concentration, and
the volume of prescribed fluid placed in the pump reservoir at implant.
Note: If you are replacing a SynchroMed EL Model 8626, 8626L, 8627, or 8627L
Implantable Pump, interrogate the replaced pump for catheter volume information that
may be stored in the pump. If you are replacing a SynchroMed II Model 8637
Implantable Pump, interrogate the replaced pump for catheter volume information.
Enter the catheter volume information into the clinician programmer.
Warning: Use the catheter length recorded at implant or catheter revision when
calculating catheter volume. The actual implanted catheter length and catheter
model number are required to accurately calculate catheter volume.
value does not exist that can be used as a substitute for this knowledge.
An inaccurate calculation of the catheter volume can result in a clinically
significant or fatal drug underdose or overdose.
A universal
24 English 8637 2016-06-01

2. Program the implanted pump to deliver a priming bolus. Refer to the clinician
programmer guide for information on how to calculate and program the priming bolus.
If the pump was primed before implant, enter the catheter volume as the total
a.
prime volume.
Warning: If the catheter is new or has been aspirated and the pump was
primed before implant, prime
catheter and implanting the pump.
volume in the total prime volume calculation. An inaccurate calculation of
the total prime volume can result in a clinically significant or fatal overdose.
b.
If the pump was not primed before implant, enter the sum of the internal pump
tubing volume and the catheter volume as the total prime volume.
Note: Priming bolus default parameters have been carefully selected based on
extensive modeling and testing. To ensure optimal initiation of therapy,
only the catheter after connecting the
Do not include the internal pump tubing
modifications to these values are not recommended.
3. Set the Low Reservoir Alarm (to at least 1 mL).
4. Program the pump with new parameters.
Note: Refer to the clinician programmer guide for instructions on programming the
pump.
5. Print out the patient's prescription and pump settings (pump status).
For a pump replacement with non-aspirated catheter
1.
Enter the following into the clinician programmer: patient information, catheter model
number, implanted catheter length (in centimeters), drug name and concentration,
and the volume of prescribed fluid placed in the pump reservoir at implant.
Note: If you are replacing a SynchroMed EL Model 8626, 8626L, 8627, or 8627L
Implantable Pump, interrogate the replaced pump for catheter volume information that
may be stored in the pump. If you are replacing a SynchroMed II Model 8637
Implantable Pump, interrogate the replaced pump for catheter volume information.
Enter the catheter volume information into the clinician programmer.
Warning: Use the catheter length recorded at implant or catheter revision when
calculating catheter volume. The actual implanted catheter length and catheter
model number are required to accurately calculate catheter volume.
universal value does not exist that can be used as a substitute for this
knowledge.
clinically significant or fatal drug underdose or overdose.
An inaccurate calculation of the catheter volume can result in a
2. Program the implanted pump to deliver the prescribed infusion.
A
8637 2016-06-01 English 25

Warning: If this is a pump replacement and the catheter has not been replaced
and has not been aspirated, the internal pump tubing should be primed
connecting the catheter and implanting the pump. Do not program a priming
bolus after the catheter has been connected to the implanted pump.
Programming a priming bolus in this situation can result in a clinically significant
or fatal overdose.
3. Set the Low Reservoir Alarm (to at least 1 mL).
4. Program the pump with new parameters.
Note: Refer to the clinician programmer guide for instructions on programming the
pump.
5. Print out the patient's prescription and pump settings (pump status).
before
Updating the patient record
1. Place the prescription and pump settings (pump status) in the patient's records.
2. Determine the refill date from the printout.
3. Schedule a refill appointment.
Monitoring the patient
Medtronic recommends monitoring patients after any priming bolus procedure involving
intrathecal therapy.
Opioids: Patients should be monitored with pulse oximetry for a minimum of 24 hours
▪
in a facility equipped with emergency airway management, oxygen, naloxone for
treatment of opioid overdose and other emergency services.
Baclofen: Patients should be monitored in a facility that provides experienced nursing
▪
observation, with the ability and personnel for emergency airway management and
ventilator support readily available. Patients should be monitored for a minimum of 8
hours or until they demonstrate stable neurological, respiratory and cardiac function.
Ziconotide: There are no labeling guidelines for patient monitoring after starting or
▪
restarting ziconotide therapy. Published guidance recommends an overnight
admission.
Based on the therapeutic index of the drug and the sensitivity of the patient, some
individuals may need additional monitoring until the delivered drug reaches the intended
concentration.
Refilling the pump or accessing the catheter access port
When refilling a Medtronic pump, use the appropriate Medtronic refill kit and associated refill
kit instructions for use.
When accessing the catheter access port of a Medtronic pump, use the appropriate
Medtronic CAP kit and associated CAP kit manuals and instructions for use.
26 English 8637 2016-06-01

Technical support
To obtain a copy of the refill kit or CAP kit instructions for use, or to receive additional
technical support:
US only: Contact Medtronic Technical Services at 1-800-707-0933. Technical support
▪
service is available 24 hours a day for clinicians managing patients with Medtronic
implantable infusion pumps.
Outside of the US: Contact your local representative by using the phone numbers
▪
listed on the last pages of this manual.
8637 2016-06-01 English 27

Contacts:
Asia:
Medtronic International Ltd.
Tel. 02919-1300
Fax 02891-6830
Medtronic Asia Ltd.
Tel. (02)-548-1148
Fax (02)-518-4786
Australia:
Medtronic Australasia Pty. Ltd.
97 Waterloo Road
North Ryde, NSW 2113
Australia
Tel. +61-2-9857-9000
Fax +61-2-9878-5100
Toll-free 1-800-668-670
Austria:
Medtronic Österreich GmbH
Tel. 01-240440
Fax 01-24044-100
Belgium:
Medtronic Belgium S.A.
Tel. 02-456-0900
Fax 02-460-2667
Canada:
Medtronic of Canada Ltd.
Tel. (1-905)-460-3800
Fax (1905)-826-6620
Czech Republic:
Medtronic Czechia s.r.o.
Tel. 2-965-795-80
Fax 2-965-795-89
Denmark:
Medtronic Danmark A/S
Tel. 45-32-48-18-00
Fax 45-32-48-18-01
Finland:
Medtronic Finland Oy/LTD
Tel. (09)-755-2500
Fax (09)-755-25018
France:
Medtronic France S.A.S.
Tel. 01-5538-1700
Fax 01-5538-1800
Germany:
Medtronic GmbH
Tel. (02159)-81490
Fax (02159)-8149100
Greece:
Medtronic Hellas S.A.
Tel. 210-67-79-099
Fax 210-67-79-399
Hungary:
Medtronic Hungária Kft.
Tel. 1-889-06-00
Fax 1-889-06-99
Ireland:
Medtronic Ireland Ltd.
Tel. (01)-890-6522
Fax (01)-890-7220
Italy:
Medtronic Italia SpA
Tel. 02-241371
Fax 02-241381
Tel. 06-328141
Fax 06-3215812
Japan:
Medtronic Japan
Tel. 03-6776-0017
Fax 03-6774-4645
Latin America:
Medtronic, Inc.
Tel. (1305)-500-9328
Fax (1786)-709-4244
Norway:
Medtronic Norge AS
Tel. 67-10-32-00
Fax 67-10-32-10
Poland:
Medtronic Poland Sp. z.o.o.
Tel. (022)-465-69-00
Fax (022)-465-69-17
Portugal:
Medtronic Portugal, Lda.
Tel. 21-724-5100
Fax 21-724-5199
Russia:
Medtronic Russia
Tel. (8495) 580-7377
Fax (8495) 580-7378
Slovakia:
Medtronic Slovakia, o.z.
Tel. 0268 206 911
Fax 0268 206 999
Spain:
Medtronic Ibérica, S.A.
Tel. 91-625-0400
Fax 91-650-7410
Sweden:
Medtronic AB
Tel. 08-568-585-00
Fax 08-568-585-01

Switzerland:
Medtronic (Schweiz) AG
Tel. 031-868-0100
Fax 031-868-0199
The Netherlands:
Medtronic B.V.
Tel. (045)-566-8000
Fax (045)-566-8668
Turkey:
Medtronic Turkey
Tel. +90 216 636 1000
Fax +90 216 636 1008
U.K.:
Medtronic U.K. Ltd.
Tel. 01923-212213
Fax 01923-241004
USA:
Medtronic, Inc.
Tel. (1-763)-505-5000
Fax (1-763)-505-1000
Toll-free: (1-800)-328-0810

Manufacturer
Medtronic, Inc.
710 Medtronic Parkway,
Minneapolis, MN 55432-5604,
USA
www.medtronic.com
Tel. +1-763-505-5000
Fax +1-763-505-1000
REP
Authorized Representative
in the European Community
Medtronic B.V.
Earl Bakkenstraat 10,
6422 PJ Heerlen,
The Netherlands
Tel. +31-45-566-8000
Fax +31-45-566-8668
Europe/Africa/Middle East Headquarters
Medtronic International Trading Sàrl
Route du Molliau 31,
Case Postale 84
CH - 1131 Tolochenaz,
Switzerland
www.medtronic.eu
Tel. +41-21-802-7000
Fax +41-21-802-7900
Asia-Pacific
Medtronic International Ltd.
Suite 1106-11, 11/F, Tower 1, The Gateway,
25 Canton Road, Tsimshatsui,
Kowloon,
Hong Kong
Tel. +852-2919-1300
Fax +852-2891-6830
Contacts for specific countries are listed inside this cover.
EC
*M221311A060*
© Medtronic, Inc. 2016
All Rights Reserved
M221311A060 Rev A
 Loading...