

Refill Kit 8555
for use with Medtronic Implantable Infusion Pumps
Instructions for Use
Rx only
2000

Explanation of symbols on product or package labeling
Refer to the appropriate product for symbols that apply.
Open here
Do not reuse
Sterilized using ethylene oxide
-XX °C
-XX °F
EC
XXX °F
LOT
REP
EO
Consult instructions for use
Use by
Date of manufacture
Manufacturer
XX °C
Temperature limitation
Lot number
Authorized representative in the European community
Conformité Européenne (European Conformity).
This symbol means that the device fully complies with
European Directive AIMD 90/385/EEC.
For USA audiences only
STERILE
2017-06-01 English 3

Medtronic, IsoMed, SynchroMed, and Medtronic logo are trademarks of
Medtronic.
®
MiniMed
is a registered trademark of Medtronic MiniMed, Inc.
4 English 2017-06-01

Table of contents
Introduction 7
Package contents 7
Indications 7
Contraindications 7
Warnings 7
Precautions 10
Adverse events 11
Instructions for use 12
For SynchroMed pump 12
Sterilization 12
Preliminary procedures 12
Emptying the SynchroMed pump 13
Refilling the SynchroMed pump 16
Programming the SynchroMed pump 19
After the refill procedure 19
For IsoMed pump 19
Sterilization 19
Preliminary procedures 19
Emptying the IsoMed pump 20
Refilling the IsoMed pump 23
Reservoir rinse procedure 26
Performing a reservoir rinse 26
Calculations for IsoMed pumps (fixed rate) only 26
Scheduling a refill 26
Calculating the time required for the drug to advance to the catheter
tip 27
Calculating flow rate 28
Calculating infusion solution 28
Calculating IsoMed pump flow rate accuracy 29
Technical support 30
Emergency procedures 31
Baclofen injection overdose 31
Baclofen injection underdose/withdrawal 33
Morphine intrathecal/epidural overdose 35
Emergency procedure to empty pump reservoir 37
Special notice 38
Refer to the Indications, Drug Stability, and Emergency Procedures
reference manual for indications and related information.
Refer to the appropriate information for prescribers booklet for
contraindications, warnings, precautions, adverse events summary,
individualization of treatment, patient selection, use in specific
populations, and component disposal.
Refer to the appropriate drug labeling for indications,
contraindications, warnings, precautions, dosage and administration
information, and screening procedures.
2017-06-01 English 5

Limited Warranty 39
Medtronic® Neuromodulation MODEL 8555 REFILL KIT LIMITED
WARRANTY (U.S. Customers Only) 39
6 English 2017-06-01

Introduction
These instructions include only the procedure for refilling the pump reservoir.
Refer to the appropriate pump technical manual for implanting instructions.
Package contents
The Model 8555 Refill Kit contains eight (8) sterile packs and each pack
contains the following sterile components that are not made with natural
rubber latex:
0.22-micron filter
▪
22-gauge noncoring needles (2)
▪
Template
▪
Extension set with a y-connector and a clamp
▪
Indications
The Model 8555 Refill Kit is intended for use in refilling Medtronic implantable
infusion pumps with the exception of Medtronic MiniMed infusion pumps.
Contraindications
Medtronic refill kits are contraindicated for all catheter access port
procedures.
Warnings
Calculating catheter volume - Use the catheter length recorded at implant
or catheter revision when calculating catheter volume. The actual implanted
catheter length and catheter model number are required to accurately
calculate catheter volume. A universal value does not exist that can be used
as a substitute for this knowledge. An inaccurate catheter volume calculation
can result in a clinically significant or fatal drug underdose or overdose.
Changing drug or decreasing drug concentrations - Rinse the reservoir
twice between solutions when changing drug or decreasing drug
concentrations in the pump reservoir. A significant amount of drug may be
present in the pump reservoir after emptying the pump. This residual volume
cannot be removed by emptying the pump. Rinsing the reservoir between
solutions minimizes the amount of drug in this residual volume but does not
eliminate it. Failure to account for residual drug in the pump reservoir can
result in a concentration that is different than intended and a clinically
significant or fatal drug underdose or overdose. For programmable infusion
pumps, program a Bridge Bolus after rinsing the reservoir twice.The Bridge
Bolus advances the remaining old drug (the drug left in the pump tubing,
catheter access port, and catheter after emptying and refilling the pump) to
the catheter tip at the prior flow rate.
Refer to "Performing a reservoir rinse" on page 26 of this manual. Refer to
the Programming Guide for bridge bolus procedures.
Connections - Firmly secure all connections. Failure to secure connections
can allow drug to leak onto the surrounding skin and may result in inadequate
therapy or infection.
Contrast medium (pumps with a catheter access port) - Do not inject any
contrast medium into the pump reservoir. Injecting contrast medium into the
pump reservoir can impair pump operation.
Drug information - Refer to the appropriate drug labeling for indications,
contraindications, warnings, precautions, dosage and administration
information, and screening procedures. Refer to the appropriate drug labeling
for specific drug underdose or overdose symptoms and methods of
management. Failure to refer to the drug labeling can result in inappropriate
patient selection and management, inadequate therapy, intolerable side
2017-06-01 English 7

effects, or a clinically significant or fatal drug underdose or overdose. Consider
the possibility of a drug error if the patient experiences unusual side effects.
Failure to do so can result in misdiagnosis of patient symptoms.
Drug interaction and side effects - Inform patients of the appropriate
warnings and precautions regarding drug interactions, potential side effects,
and signs and symptoms that require medical attention, including prodromal
signs and symptoms of inflammatory mass. Failure to recognize the signs and
symptoms and to seek appropriate medical intervention can result in serious
patient injury or death.
Drug overdose symptoms and management - Refer to the emergency
procedures included at the end of this manual and the appropriate drug
labeling for specific drug overdose symptoms and methods of management.
Drug underdose/overdose - Inform patients and caregivers of the signs and
symptoms of a drug underdose and overdose. Inform patients and caregivers:
to be aware and report any unusual signs or symptoms at any time
▪
during or after a refill or catheter access port procedure.
to be alert for any burning sensations in the area of the pump pocket
▪
during their refill or catheter access port procedure.
to especially watch for signs of underdose and overdose.
▪
to stay alert for signs or symptoms that may indicate changes to their
▪
prescribed drug concentration or programmed dose.
to seek emergency assistance as necessary. Refer to the refill kit or
▪
CAP kit manual or the Indications, Drug Stability and Emergency
Procedures for SynchroMed and IsoMed Implantable Infusion
Systems Reference Manual for emergency procedures associated
with drug underdose and overdose.
Failure to recognize these signs and symptoms and to seek appropriate
medical intervention can result in serious patient injury or death.
Implantation and system management - Implantation and ongoing system
management must be performed by individuals trained in the operation and
handling of the infusion system and must be in compliance with procedures
described in the appropriate technical instructions. Inadequate training or
failure to follow instructions can require surgical revision or replacement, and
result in a clinically significant or fatal drug underdose or overdose.
Infusion solution calculations - Correct calculation of the infusion solution is
of critical importance in preventing overinfusion or underinfusion.
Refer to "Calculating infusion solution" on page 28 for instructions.
Injection error during a pump refill procedure - Be certain you are
accessing the correct port when injecting fluids into the reservoir fill port of an
implanted pump. ALWAYS:
identify the pump model and reservoir volume.
▪
identify the location of the reservoir fill port.
▪
use the instructions, noncoring needles, appropriate template, and
▪
other accessories provided in the appropriate kit.
verify the location of the correct port during needle insertion according
▪
to the instructions provided AND using other medical procedures as
appropriate.
refer to the appropriate drug labeling for indications, contraindications,
▪
warnings, precautions, adverse events, and dosage and
administration information.
Pocket fill is the improper injection into the subcutaneous tissue, which
includes the pump pocket. Pocket fill can result in significant tissue
damage or a loss of or change in symptom control, drug withdrawal
symptoms, or a clinically significant or fatal drug underdose or overdose.
Observe the patient after the pump refill procedure for any signs or
symptoms that could indicate a pocket fill or any other drug-related
adverse event due to the refill procedure. Seek emergency assistance
as necessary. Refer to the refill kit manual or the Indications, Drug
Stability and Emergency Procedures for SynchroMed and IsoMed
8 English 2017-06-01

Implantable Infusion Systems Reference Manual for emergency
procedures associated with drug underdose and overdose.
Inadvertent injection into the catheter access port may result in a
clinically significant or fatal drug overdose. Observe the patient after the
pump refill procedure for any signs or symptoms that could indicate a
drug-related adverse event due to the pump refill procedure.
Intraspinal therapy - For intraspinal therapy, use ONLY a preservative-free
sterile solution indicated for intraspinal use. Nonindicated fluids containing
preservatives or endotoxins can be neurotoxic in intraspinal applications.
Using nonindicated fluids can result in adverse events including, but not
limited to, extreme pain, cramps, seizures, and death.
Mixing drugs - The effects that drug mixtures have on pump operation are
unknown. Drugs can precipitate when mixed. These precipitates can inhibit
pump flow or block the catheter, resulting in loss of therapy or a clinically
significant or fatal drug underdose.
Overinfusion - Overinfusion is defined as the delivery of more drug volume
than the programmed rate, exceeding the pump’s flow rate accuracy
specification. Pump reservoir contents aspirated during a refill procedure that
are less than expected may indicate that the pump has overinfused.
Overinfusion may or may not be associated with clinically relevant symptoms.
When the pump delivers more drug volume than the programmed rate,
patients may experience overdose symptoms, and the pump reservoir will
deplete more quickly than expected. Patients may experience underdose or
withdrawal symptoms if the drug is depleted prior to the scheduled refill date
from an overinfusing pump. At each refill visit, question and examine the
patient for signs and symptoms of overdose, underdose, and withdrawal.
The low reservoir alarm of an overinfusing pump will not sound if the
pump reservoir is prematurely depleted. The low reservoir alarm is
calculated from the pump’s programmed delivery rate and is not a direct
measurement of the actual drug volume in the pump reservoir. Multiple
factors may increase the likelihood of overinfusion, including: nonindicated
drug formulations, overfilling of the pump reservoir, operation of the pump
with no fluid in the reservoir, catheter occlusion, and pump stops or motor
stalls lasting more than 48 hours.
Refer to the appropriate drug labeling for specific drug underdose or
overdose symptoms and methods of management. If overinfusion is strongly
suspected, contact Medtronic. Reducing the dose and/or concentration is not
recommended as a solution for overinfusion. If immediate discontinuation of
therapy is clinically appropriate for the patient, program the pump to minimum
rate mode, and aspirate any remaining drug from the reservoir. Five
occurrences of overinfusion have been identified in Medtronic’s prospective,
long-term multi-center registry study (Product Surveillance Registry) as of
January 2016, resulting in a rate estimate of less than 0.14% (approximately
1 in 700).
Overpressurization (IsoMed Pumps) - Do not overfill the pump reservoir.
Overfilling the pump reservoir can result in overpressurization and
overinfusion. Overinfusion can lead to a clinically significant or fatal drug
overdose. Overpressurization can damage the pump. To prevent overfilling:
Always identify the pump model and reservoir volume before filling or
▪
refilling;
Always empty the pump reservoir completely before filling or refilling;
▪
and
Do not exceed the maximum reservoir volume indicated in the pump
▪
labeling.
Patient travel - Patients should notify their clinicians of any travel plans.
Clinicians need this information to coordinate patient care and pump refills
and help prevent a loss of or change in therapy, which may lead to a return of
underlying symptoms, drug withdrawal symptoms, or a clinically significant or
fatal drug underdose.
Pocket fill - If it is suspected or known that all or part of the drug was injected
into the pocket during the refill procedure, monitor the patient closely for signs
and symptoms of overdose in an appropriate facility for a sufficient amount of
2017-06-01 English 9

time or until the symptoms have resolved. Refer to “Emergency Procedures”
in the Indications, Drug Stability, and Emergency Procedures manual, the refill
instructions for use, and the appropriate drug labeling for specific drug
underdose and overdose symptoms and methods of management.
Pump reservoir pressure (IsoMed Pumps) - Do not use an open syringe
when emptying the pump. The pump reservoir contents are under significant
pressure and can eject through an open syringe when emptying the pump.
Ejection of pump contents under pressure can result in procedural delays and
a potential risk to the clinician or patient.
Refill - Patients must return to the clinic for refills at the prescribed times.
Failure to return to the clinic for refills at the prescribed times can result in the
actual flow rate of the pump being less than expected, resulting in a loss of or
change in therapy, which may lead to a return of underlying symptoms, drug
withdrawal symptoms, or a clinically significant or fatal drug underdose.
Failure to return at the prescribed times can also damage the pump, requiring
surgical replacement.
Refill kit components - The appropriate Medtronic refill kit MUST be used
during all refill procedures for Medtronic implantable infusion pumps. Using
components other than Medtronic components or a kit other than the
appropriate refill kit can damage Medtronic components, requiring surgical
revision or replacement, and allow drug leakage into surrounding tissue,
resulting in tissue damage or loss of or change in therapy, which may lead to
a return of underlying symptoms, drug withdrawal symptoms, or a clinically
significant or fatal drug underdose or overdose.
Reservoir fill port injections - Do not use excessive force when accessing
the reservoir fill port. Excessive force can result in damage to the needle or
pump requiring surgical revision or replacement, and leakage into surrounding
tissue, resulting in tissue damage or loss of or change in therapy, which may
lead to a return of underlying symptoms, drug withdrawal symptoms, or a
clinically significant or fatal drug underdose or overdose.
User instructions - Comply with all product instructions for initial preparation
and filling, implantation, programming (if applicable), refilling, and accessing
the catheter access port (if present) of the pump. Failure to comply with all
instructions can lead to technical errors or improper use of implanted infusion
pumps and result in additional surgical procedures, a return of underlying
symptoms, drug withdrawal symptoms, or a clinically significant or fatal drug
underdose or overdose.
Precautions
Aseptic technique - Use strict aseptic technique when accessing the
reservoir fill port or the catheter access port of an implanted pump. Failure to
use aseptic technique can contaminate fluids or tissues and result in local or
systemic infection.
Compatibility, all components - Follow these guidelines when selecting
system components:
Medtronic components: For proper therapy, use only components
▪
that are compatible with the appropriate indication.
Non-Medtronic components: No claims of safety, efficacy, or
▪
compatibility are made with regard to the use of non-Medtronic
components with Medtronic components. Refer to the non-Medtronic
documentation for information.
Component packaging - Before shipment the components in the sterile
package were sterilized by the process indicated on the package label. Do not
use or implant a component if the following circumstances have occurred:
The storage package or sterile seal has been pierced or altered
▪
because component sterility cannot be guaranteed and infection may
occur.
The component shows signs of damage because the component may
▪
not function properly.
10 English 2017-06-01

The use-by date has expired because component sterility cannot be
▪
guaranteed and infection may occur; also, device battery longevity
may be reduced and may require early replacement.
Infection - Use extreme caution when accessing the reservoir fill port or
catheter access port of the implanted pump if local or systemic infection is
suspected. Avoid contaminating the system or further spreading the infection.
Local or systemic infection may require pump revision or removal.
Reservoir valve activation (programmable pumps) - Do not prematurely
activate the pump reservoir valve. Activation of the pump reservoir valve
seals the pump reservoir valve closed. Unusual resistance or the inability to
inject the entire fill volume may indicate activation of the pump reservoir
valve. If the valve closes, a portion of the reservoir contents must be
delivered or removed before filling can be completed, and procedural delays
can occur. To prevent activation of the pump reservoir valve during emptying
and filling procedures:
completely aspirate all contents of the pump reservoir before filling;
▪
do not allow air into the pump reservoir through an open needle in the
▪
septum or an unclamped extension; and
do not exceed the maximum reservoir volume indicated in the pump
▪
labeling.
Single use only - Do not reuse any component. Components are intended
for single use only. Reusing components can result in inadequate therapy
and an increased risk of infection.
Storage temperature: kits and accessories - Do not store or transport the
kit device components or accessories above 57 °C (135 °F) or
below –34 °C (–30 °F). Temperatures outside this range can damage device
components.
Therapy discontinuance - If therapy is discontinued for an extended period,
fill the pump reservoir with preservative-free saline in intraspinal applications
or with the appropriate heparinized solution (if not contraindicated) in vascular
applications. For programmable pumps, program the pump to infuse at the
minimum flow rate. Refill the pump as needed to ensure the pump always
contains fluid in the reservoir and fluid pathway. Stopping the pump for
extended periods or allowing the pump reservoir to empty completely can
damage the system and require surgical replacement.
Vesicant drug (vascular applications) - Do not spill or leak vesicant or
cytotoxic drug into adjacent tissue during pump procedures. Spillage or
leakage of vesicant drug into adjacent tissue can result in significant local
tissue damage.
Vesicant/cytotoxic drugs at implant - Do not spill or leak vesicant or
cytotoxic drug into adjacent tissue during pump procedures. Spillage or
leakage of vesicant drug into adjacent tissue can result in significant local
tissue damage. If the drug to be used is a vesicant or has the potential to
cause local tissue damage, do not put the drug into the pump until after
implantation. Fill the pump and catheter with saline (a heparinized solution
may be used if not contraindicated) instead of the drug.
Adverse events
The adverse events associated with the use of this device may include, but
may not be limited to, the following:
Meningitis (intraspinal applications)
▪
Infection
▪
Reservoir contamination
▪
Overpressurization of the reservoir
▪
Injection into pocket or subcutaneous tissue
▪
Activation of reservoir valve
▪
2017-06-01 English 11

Instructions for use
Become thoroughly familiar with all product literature before using this refill kit.
Refer to the appropriate section based on the pump.
SynchroMed pump - go to page 12.
▪
IsoMed pump - go to page 19.
▪
For SynchroMed pump
Sterilization
All components of the kit are sterile. Do not resterilize. Should sterility of the
kit be in question, discard and use a new kit.
Preliminary procedures
1. Gather the following sterile equipment:
From the refill kit:
Extension set with a y-connector and a clamp
▪
0.22-micron filter
▪
22-gauge noncoring needle
▪
Template
▪
Locally supplied:
10-mL filling syringe, optional
▪
20-mL empty syringe(s)
▪
Fenestrated drape
▪
Syringe containing prescribed fluid
▪
Cleansing agent
▪
Sterile gloves
▪
Alcohol pads or swabs
▪
Adhesive bandage, optional
▪
2. Refer to the appropriate drug labeling for indications, contraindications,
warnings, precautions, dosage and administration information, and
screening procedures.
3. Prepare the programmer for use. Refer to the appropriate programming
guide for instructions.
4. Confirm the:
pump model
▪
reservoir volume (ie, expected volume)
▪
location of the pump
▪
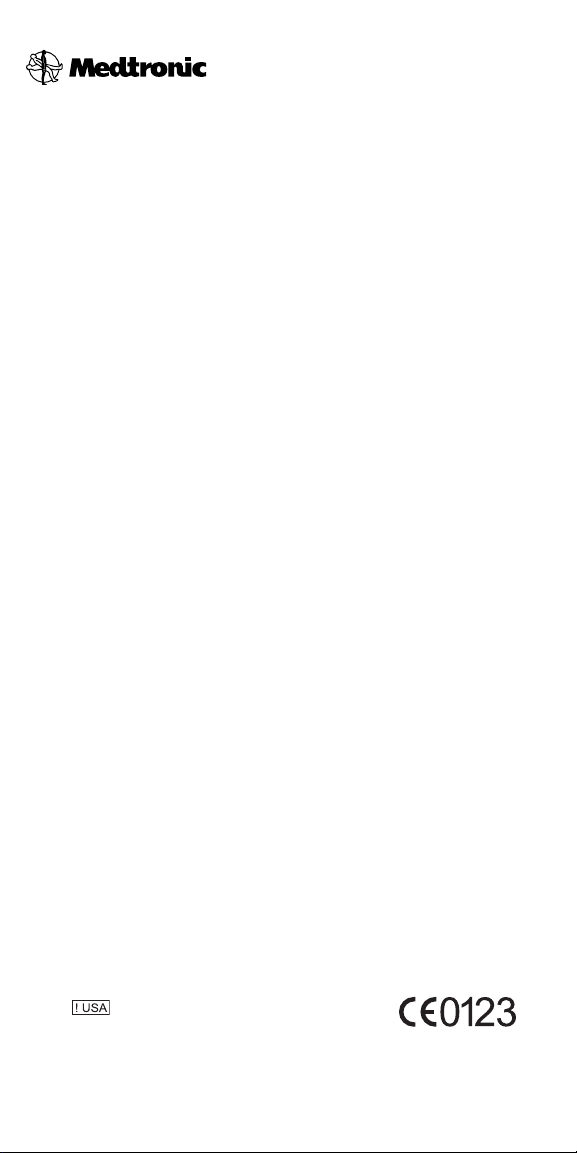
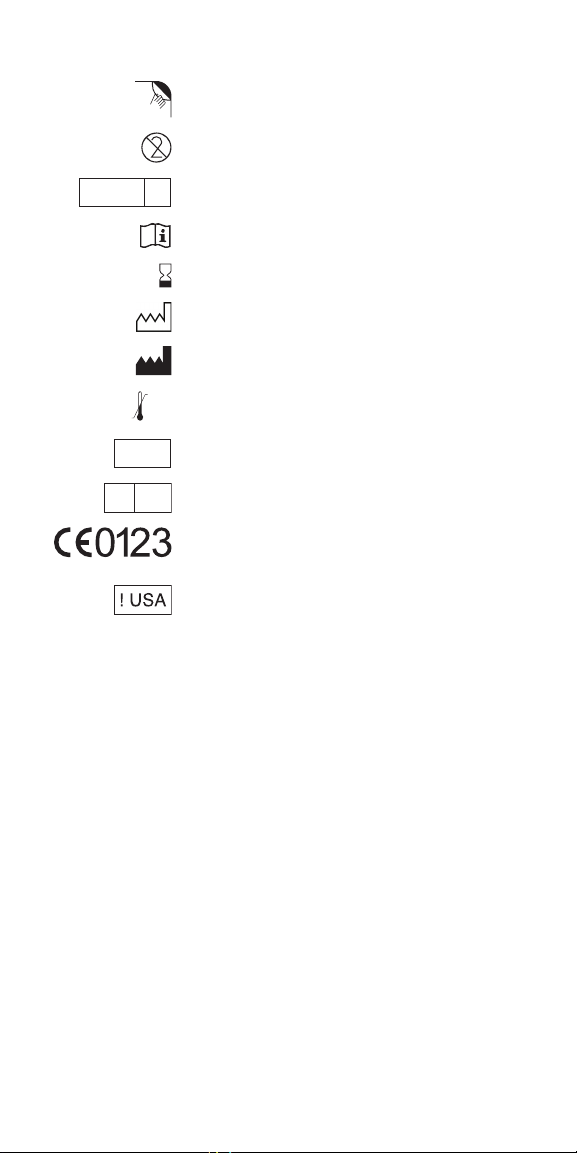
Note: The model and reservoir volume can be confirmed by the
programmer. Alternatively, a radiopaque identifier in the pump shows
the pump model and identifies Medtronic as the pump manufacturer on
12 English 2017-06-01
a standard x-ray (Figure 1). A three-letter code designates the pump
model.
Radiopaque identifier
Medtronic symbol
Model designator
Figure 1. A radiopaque identifier on a SynchroMed II pump.
5.
Confirm that the volume of the prescribed fluid does not exceed the
reservoir volume of the pump.
Emptying the SynchroMed pump
1. Prepare the injection site by cleansing the area.
2. Open the kit. Put on sterile gloves.
3. Place the drape, exposing the pump site.
4. Using sterile procedures, assemble the needle, extension set, and
empty syringe as follows:
a. Connect the empty syringe to the extension set (Figure 4).
b. Connect the needle to the extension set.
5. Palpate the pump and identify the location of the catheter access port
and the edges of pump.
Factors that may make it difficult to locate the pump include, but are not
limited to:
deep implant
▪
patient position (eg, a seated patient)
▪
scar tissue at the pump implant site
▪
seroma
▪
the pump is tilted in the pocket
▪
obesity
▪
pump movement within the pocket
▪
weight gain after implant
▪
weight loss after implant
▪
If you have difficulty identifying the pump features, you may seek
assistance from another clinician. If deemed necessary by the clinician,
x-ray and fluoroscopy can be used to assist in locating or determining
the orientation of the pump.
6. Place the template on the skin over the pump, and align the refill
template correctly based on the model of the pump that is being refilled
(Figure 2). Align the edges of the template with the edges of the pump.
2017-06-01 English 13

Use the center circle of the template to insert the needle into the
reservoir fill port.
Align the
left edge
of the
template
with the
left edge
SynchroMed EL
of the
pump
Aligning the refill
template with the
SynchroMed EL pump
Figure 2. Aligning the refill template according to the pump model.
Close the clamp.
7.
8. Gently insert the 22-gauge needle perpendicular to the surface of the
pump through the
reservoir fill port until the needle touches the bottom of the reservoir fill
port (Figures: 3 – 4).
Note: The pump may be tilted within the pocket and therefore the
needle angle may not be perpendicular to the patient's body.
During proper needle insertion, you will feel the needle:
pass through the patient's skin and subcutaneous tissue,
▪
hit the silicone septum,
▪
(Scar tissue, if present, can feel similar to the septum.)
pass through the septum, and
▪
hit the metal bottom of the reservoir fill port.
▪
(The top of the pump is metal and hitting the top of the pump can feel
similar to hitting the bottom of the reservoir fill port.)
If excessive resistance is encountered during needle insertion, reassess
placement. Do not force the needle. The feel of abnormal resistance
during the procedure may be an indication that the needle is not in the
center of the reservoir fill port.
center of the template and into the center of the
Aligning the refill
template with the
SynchroMed II pump
Align the
right edge
of the
template
with the
right edge
of the
SynchroMed II
pump
14 English 2017-06-01

Septum
Needle
Bottom of the
reservoir fill port
Figure 3. View inside of a SynchroMed programmable pump while the
Figure 4. Close the clamp and insert the needle into the reservoir fill port.
Note:
location, reassess its position. Factors that may contribute to difficulty
inserting the needle into the reservoir fill port include, but are not limited
to:
the pump is flipped in the pocket
▪
deep implant
▪
patient position (eg, a seated patient)
▪
patient movement (eg, spasticity, difficulty hold still)
▪
localized muscle spasms at the pump implant site
▪
scar tissue at the pump implant site
▪
seroma
▪
the pump is tilted in the pocket
▪
obesity
▪
pump movement within the pocket
▪
weight gain after implant
▪
weight loss after implant
▪
9. Open the clamp and slowly withdraw the fluid from the reservoir into the
empty syringe.
needle is fully and properly inserted.
Needle
At any point during the procedure, if in doubt about the needle
Subcutaneous tissue
Empty syringe
Y-connector
Closed clamp
Extension set
Te mp l at e
Reservoir fill port
2017-06-01 English 15

Note: If the withdrawn fluid has an unexpected appearance (eg,
evidence of blood), this may indicate that the needle is not properly
inserted into the pump.
10. If the syringe maximum capacity is reached before the reservoir is
completely empty, more than one syringe will be needed to empty the
pump.
a. Close the clamp.
b. Remove the full syringe.
c. Attach an empty syringe.
d. Verify that the needle is in the pump reservoir fill port.
e. Repeat step 9, then continue to step 11.
11. Completely empty the pump. When the pump is empty, the bubbles will
stop forming, and negative pressure in the syringe can be felt.
12. Close the clamp and remove the syringe from the extension set.
Note: Keep the needle in the reservoir fill port and the clamp closed for
the pump refill procedure that follows.
13. Note the amount withdrawn from the pump for entry in the patient's
record.
14. Compare the amount withdrawn from the pump to the expected volume.
See the pump programmer for the expected volume. The amount
withdrawn should approximately equal the expected volume. If a less
than expected volume is observed, potential causes of the volume
discrepancy could include: inaccurate volume measurements,
incomplete pump aspiration, incorrect volume entry into clinician
programmer at refills, unrecognized partial pocket fill, aspiration of pump
medication by patient or caregiver, or overinfusion.
Note: Immediately following the refill procedure:
record the amount withdrawn and the expected volume in the
▪
patient's record.
record any volume discrepancy and compare volume discrepancies
▪
from visit to visit.
15. Discard the fluid and syringe as appropriate for the fluid content in
accordance with institutional policies and applicable regulations.
Refilling the SynchroMed pump
Warning: Overinfusion is defined as the delivery of more drug volume
than the programmed rate, exceeding the pump’s flow rate accuracy
specification. Pump reservoir contents aspirated during a refill procedure
that are less than expected may indicate that the pump has overinfused.
Overinfusion may or may not be associated with clinically relevant
symptoms. When the pump delivers more drug volume than the
programmed rate, patients may experience overdose symptoms, and
the pump reservoir will deplete more quickly than expected. Patients
may experience underdose or withdrawal symptoms if the drug is
depleted prior to the scheduled refill date from an overinfusing pump. At
each refill visit, question and examine the patient for signs and
symptoms of overdose, underdose, and withdrawal.
The low reservoir alarm of an overinfusing pump will not sound if
the pump reservoir is prematurely depleted.
is calculated from the pump’s programmed delivery rate and is not a
direct measurement of the actual drug volume in the pump reservoir.
Multiple factors may increase the likelihood of overinfusion, including:
nonindicated drug formulations, overfilling of the pump reservoir,
operation of the pump with no fluid in the reservoir, catheter occlusion,
and pump stops or motor stalls lasting more than 48 hours.
Refer to the appropriate drug labeling for specific drug underdose or
overdose symptoms and methods of management. If overinfusion is
strongly suspected, contact Medtronic. Reducing the dose and/or
concentration is not recommended as a solution for overinfusion. If
immediate discontinuation of therapy is clinically appropriate for the
patient, program the pump to minimum rate mode, and aspirate any
The low reservoir alarm
16 English 2017-06-01

remaining drug from the reservoir. Five occurrences of overinfusion
have been identified in Medtronic’s prospective, long-term multi-center
registry study (Product Surveillance Registry) as of January 2016,
resulting in a rate estimate of less than 0.14% (approximately 1 in 700).
Warning:
Pocket fill
includes the pump pocket. Pocket fill can result in significant tissue
damage or a loss of or change in symptom control, drug withdrawal
symptoms, or a clinically significant or fatal drug underdose or
overdose. Observe the patient after the pump refill procedure for any
signs or symptoms that could indicate a pocket fill or any other drugrelated adverse event due to the refill procedure.
Inadvertent injection into the catheter access port may result in a
clinically significant or fatal drug overdose. Observe the patient after the
pump refill procedure for any signs or symptoms that could indicate a
drug-related adverse event due to the pump refill procedure.
Warning: If it is suspected or known that all or part of the drug was
injected into the pocket during the refill procedure, monitor the patient
closely for signs and symptoms of overdose in an appropriate facility for
a sufficient amount of time or until the symptoms have resolved. Refer
to “Emergency Procedures” in the Indications, Drug Stability, and
Emergency Procedures manual, the refill instructions for use, and the
appropriate drug labeling for specific drug underdose and overdose
symptoms and methods of management.
Warning: Swelling at the injection site may indicate that the needle tip
is not properly located within the pump reservoir, and the result could
be pocket fill. Pocket fill can result in significant tissue damage or a loss
of or change in symptom control, drug withdrawal symptoms, or a
clinically significant or fatal drug underdose or overdose. Absence of
swelling does not in all cases demonstrate that the needle tip is properly
located. If swelling is present, stop injecting and observe the patient for
any signs or symptoms that could indicate a pocket fill or any other
drug-related adverse event.
1. If changing drug or drug concentrations, refer to "Performing a reservoir
rinse" on page 26. Otherwise, proceed to the next step.
2. Confirm that the refill volume of the prescribed fluid does not exceed the
reservoir volume of the pump.
3. Purge the air from the syringe containing the prescribed fluid.
4. Attach the filter to the syringe with the prescribed fluid.
5. Purge all air from the filter.
6. Attach the syringe with the prescribed fluid and filter to the extension set
(Figure 5).
Note: An optional 10-mL filling syringe may be used to lower the force
required to depress the syringe while filling the pump (refer to the
procedure in "Refilling the IsoMed pump" on page 23).
7. Before and during injection, verify that the needle remains fully inserted
to the bottom of the reservoir fill port. Do not apply tension to the
extension tubing because the needle may be pulled out from the
reservoir.
8. Open the clamp and as the clamp is opened, observe the following
indications that the needle continues to be properly positioned:
▪
▪
9. Slowly depress the plunger on the syringe to inject the prescribed fluid
into the pump reservoir. While injecting the prescribed fluid, verify that
the needle remains properly located within the reservoir (Figure 5).
is the improper injection into the subcutaneous tissue, which
The bubbles in the extension set are immediately drawn into the
pump.
The plunger may move slightly when the drug is initially drawn into
the pump.
2017-06-01 English 17

a. Periodically withdraw and observe a portion of the drug to confirm
that the drug has the expected appearance.
b. After confirming that the needle remains in the reservoir, resume
injecting fluid.
Syringe with prescribed fluid
Figure 5. Open the clamp and inject into the pump reservoir.
Caution: If you encounter unusual resistance before the maximum
reservoir volume is injected or you are unable to inject fluid, the
reservoir valve may have been activated. Activation of the pump
reservoir valve seals the pump reservoir valve closed. If the valve
closes, a portion of the reservoir contents must be delivered or
removed before filling can be completed, and procedural delays
can occur.
To prevent activation of the pump reservoir valve during emptying
and filling procedures:
completely aspirate all contents of the pump reservoir before
▪
filling;
do not allow air into the pump reservoir through an open needle
▪
in the septum or an unclamped extension; and
do not exceed the maximum reservoir volume indicated in the
▪
pump labeling.
10. If you have activated the reservoir valve, complete steps a – g below.
Otherwise, proceed to step 11.
a. Discontinue injection.
b. Close the clamp.
c. Remove the syringe with prescribed fluid and attached filter.
d. Attach an empty 20-mL syringe to the extension set.
e. Open the clamp, and aspirate until all fluid/air is removed.
f. Close the clamp and remove the syringe containing the aspirate
from the extension set and discard the syringe.
g. Repeat steps 2 – 10.
Note: For pumps with a reservoir valve, the amount of time before the
valve will release is dependent on the duration and the amount of
pressure applied after the valve is first activated. The more pressure
exerted, the longer it may take to release the valve.
11. When filling is complete, close the clamp and carefully remove the
needle from the reservoir fill port.
Filter
Open clamp
18 English 2017-06-01

Note: If you are unsure whether drug was injected correctly into the
pump, completely aspirate the pump to verify that all of the injected
drug can be removed.
12. Remove the cleansing agent from the patient’s skin using an alcohol
pad.
13. Apply an adhesive bandage, if desired.
14. Discard all components of the kit.
Programming the SynchroMed pump
1. If the drug concentration or drug has been changed, program a bridge
bolus. Refer to the programming guide for the pump software.
2. If any prescription information has changed, enter the changed
information into the clinician programmer: for example drug name, drug
concentration, infusion information, or volume of prescribed fluid in the
pump reservoir.
3. Update the pump.
After the refill procedure
1. Record the amount withdrawn and the expected volume in the patient's
record.
2. Record any volume discrepancy and compare volume discrepancies
from visit to visit.
3. Print out the desired refill-related reports, and place the final pump
settings in the patient file.
4. Determine the refill date from the printout, and schedule a refill
appointment.
For IsoMed pump
Sterilization
All components of the kit are sterile. Do not resterilize. Should sterility of the
kit be in question, discard and use a new kit.
Preliminary procedures
1. Gather the following sterile equipment:
From the refill kit:
Extension set with a y-connector and a clamp
▪
0.22-micron filter
▪
22-gauge noncoring needle
▪
Template
▪
Locally supplied:
10-mL filling syringe
▪
20-mL empty syringe(s)
▪
Fenestrated drape
▪
Syringe containing prescribed fluid
▪
Cleansing agent
▪
Sterile gloves
▪
Alcohol pads or swabs
▪
Adhesive bandage, optional
▪
2. Refer to the appropriate drug labeling for indications, contraindications,
warnings, precautions, dosage and administration information, and
screening procedures.
2017-06-01 English 19

3. Confirm the:
pump model
▪
reservoir volume
▪
location of the pump
▪
flow rate
▪
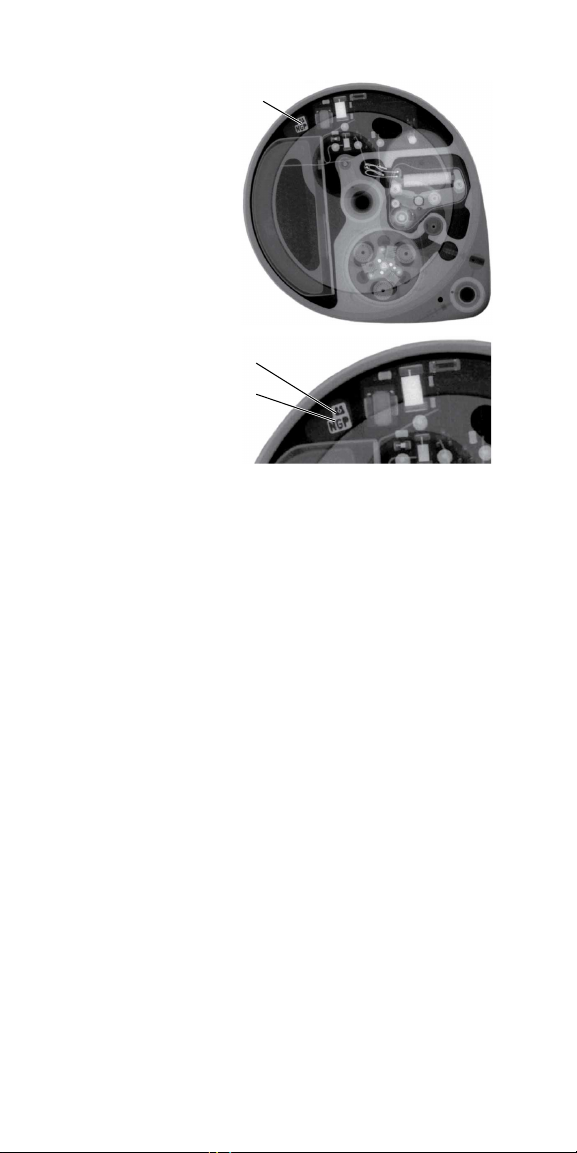
Note: The pump model, reservoir volume, and flow rate can be
determined from an x-ray of the pump (Figure 6).
Medtronic logo
Reservoir volume (20mL)
X-ray identification tag
Medtronic engineering revision level (1)
Figure 6. Locate the x-ray identification tag for an IsoMed pump.
4.
Confirm that the volume of the prescribed fluid does not exceed the
reservoir volume of the pump.
Flow rate (1.5 mL/day)
Model (8472)
Emptying the IsoMed pump
1. Prepare the injection site by cleansing the area.
2. Open the kit. Put on sterile gloves.
3. Place the drape, exposing the pump site.
4. Using sterile procedures, assemble the needle, extension set, and
empty syringe as follows:
a. Connect the empty syringe to the extension set (Figure 8). A syringe
or lidded syringe may be used.
b. Connect the needle to the extension set.
5. Palpate the pump and identify the location of the catheter access port
and the edges of pump.
Factors that may make it difficult to locate the pump include, but are not
limited to:
deep implant
▪
patient position (eg, a seated patient)
▪
scar tissue at the pump implant site
▪
seroma
▪
the pump is tilted in the pocket
▪
obesity
▪
pump movement within the pocket
▪
weight gain after implant
▪
weight loss after implant
▪
If you have difficulty identifying the pump features, you may seek
assistance from another clinician. If deemed necessary by the clinician,
x-ray and fluoroscopy can be used to assist in locating or determining
the orientation of the pump.
6. Place the template on the skin over the pump, and align the refill
template (Figure 7) correctly. Align the rounded edges of the template
with the edges of the pump. Use the center circle of the template to
insert the needle into the reservoir fill port.
20 English 2017-06-01

Figure 7. A pump template, which shows the center circle. The center circle
7. Close the clamp.
8. Gently insert the 22-gauge needle perpendicular to the surface of the
pump through the
reservoir fill port until the needle touches the bottom of the reservoir fill
port (Figure 8).
Note: The pump may be tilted within the pocket and therefore the
needle angle may not be perpendicular to the patient's body.
During proper needle insertion, you will feel the needle:
▪
▪
▪
▪
If excessive resistance is encountered during needle insertion, reassess
placement. Do not force the needle. The feel of abnormal resistance
during the procedure may be an indication that the needle is not in the
center of the reservoir fill port.
is used to help locate the reservoir fill port.
Warning: With IsoMed pumps, inserting the needle at the edge of
the reservoir fill port may result in a pocket fill. Pocket fill can
result in significant tissue damage or a loss of or change in
symptom control, drug withdrawal symptoms, or a clinically
significant or fatal drug underdose or overdose. Excessive
resistance may indicate that the needle is improperly positioned.
Do not force the needle excessively. Forcing the needle
excessively may cause damage to the pump and needle, and
cause injury to the patient.
center of the template and into the center of the
pass through the patient's skin and subcutaneous tissue,
hit the silicone septum,
(Scar tissue, if present, can feel similar to the septum.)
pass through the septum, and
hit the metal bottom of the reservoir fill port.
(The top of the pump is metal and hitting the top of the pump can
feel similar to hitting the bottom of the reservoir fill port.)
2017-06-01 English 21

Empty syringe
Y-connector
Closed clamp
Needle
Figure 8. Close the clamp and insert the needle into the reservoir fill port.
Note:
At any point during the procedure, if in doubt about the needle
location, reassess its position. Factors that may contribute to difficulty
inserting the needle into the reservoir fill port include, but are not limited
to:
the pump is flipped in the pocket
▪
deep implant
▪
patient position (eg, a seated patient)
▪
patient movement (eg, spasticity, difficulty hold still)
▪
localized muscle spasms at the pump implant site
▪
scar tissue at the pump implant site
▪
seroma
▪
the pump is tilted in the pocket
▪
obesity
▪
pump movement within the pocket
▪
weight gain after implant
▪
weight loss after implant
▪
9. When using a syringe with a plunger, maintain light pressure on the
syringe plunger when emptying the pump. Open the clamp and slowly
withdraw the fluid from the reservoir into the empty syringe. If backflow
is not observed, remove the needle from the reservoir fill port, and
repeat steps 6 – 9. If backflow still does not occur, and the Expected
Volume is greater than 2 mL, contact your Medtronic representative.
10. If the syringe maximum capacity is reached before the reservoir is
completely empty, more than one syringe will be needed to empty the
pump.
a. Close the clamp.
b. Remove the full syringe.
c. Attach an empty syringe.
d. Verify that the needle is in the pump reservoir fill port.
e. Repeat step 9, then continue to step 11.
11. Completely empty the pump. Wait approximately 5 seconds after fluid
stops flowing into the syringe to ensure that all fluid is removed and the
pump is empty.
12. Close the clamp and remove the syringe from the extension set.
Note: Keep the needle in the reservoir fill port and the clamp closed for
the pump refill procedure that follows.
13. Note the amount withdrawn from the pump for entry in the patient's
record.
Extension set
Te mp l at e
Reservoir fill port
22 English 2017-06-01

14. Compare the amount withdrawn from the pump to the expected volume.
To determine the expected volume, refer to the flow rate accuracy
calculation (see "Calculating IsoMed pump flow rate accuracy" on
page 29). The amount withdrawn should approximately equal the
expected volume.
Note: A flow rate accuracy of ±25% or less is within the expected flow
rate accuracy. If a significant discrepancy is found, contact a local
Medtronic representative.
15. Discard the fluid and syringe as appropriate for the fluid content in
accordance with institutional policies and applicable regulations.
Refilling the IsoMed pump
Warning:
Pocket fill
includes the pump pocket. Pocket fill can result in significant tissue
damage or a loss of or change in symptom control, drug withdrawal
symptoms, or a clinically significant or fatal drug underdose or
overdose. Observe the patient after the pump refill procedure for any
signs or symptoms that could indicate a pocket fill or any other drugrelated adverse event due to the refill procedure.
Inadvertent injection into the catheter access port may result in a
clinically significant or fatal drug overdose. Observe the patient after the
pump refill procedure for any signs or symptoms that could indicate a
drug-related adverse event due to the pump refill procedure.
Warning: If it is suspected or known that all or part of the drug was
injected into the pocket during the refill procedure, monitor the patient
closely for signs and symptoms of overdose in an appropriate facility for
a sufficient amount of time or until the symptoms have resolved. Refer
to “Emergency Procedures” in the Indications, Drug Stability, and
Emergency Procedures manual, the refill instructions for use, and the
appropriate drug labeling for specific drug underdose and overdose
symptoms and methods of management.
Warning: Swelling at the injection site may indicate that the needle tip
is not properly located within the pump reservoir, and the result could
be pocket fill. Pocket fill can result in significant tissue damage or a loss
of or change in symptom control, drug withdrawal symptoms, or a
clinically significant or fatal drug underdose or overdose. Absence of
swelling does not in all cases demonstrate that the needle tip is properly
located. If swelling is present, stop injecting and observe the patient for
any signs or symptoms that could indicate a pocket fill or any other
drug-related adverse event.
Note: IsoMed pump reservoir contents are under significant pressure and
require the use of a 10-mL filling syringe to inject drug into the reservoir. The
filling syringe is attached to the angled, non-valved end of the y-connector.
The straight end with the blue cap has a one-way valve to prevent reservoir
is the improper injection into the subcutaneous tissue, which
2017-06-01 English 23

backflow from flowing into the syringe with the prescribed fluid. The straight
end is intended only for the filtered syringe containing fresh drug (Figure 9).
Angled end
Straight end with blue cap
Extension set
Needle connection
Clamp
Figure 9. Extension set.
If changing drug or drug concentrations, refer to "Performing a reservoir
1.
rinse" on page 26. Otherwise, proceed to the next step.
2. Confirm that the refill volume of the prescribed fluid does not exceed the
reservoir volume of the pump.
3. Purge the air from the syringe containing the prescribed fluid.
4. Attach the filter to the syringe with the prescribed fluid.
5. Purge all air from the filter.
6. Attach the 10-mL filling syringe and the syringe with the prescribed fluid
and the filter to the extension set as follows (Figure 10):
a. Connect the syringe with prescribed fluid and filter to the straight,
valved end of the y-connector (after removing the cap).
b. Connect the 10-mL filling syringe to the angled, non-valved end of
the y-connector.
7. Before and during injection, verify that the needle remains fully inserted
to the bottom of the reservoir fill port. Do not apply tension to the
extension tubing because the needle may be pulled out from the
reservoir.
8. With the clamp closed, slowly depress the plunger on the syringe with
the prescribed fluid to inject the prescribed fluid into the 10-mL filling
syringe. Refer to Figure 10 (arrows indicate direction of fluid flow).
Maintain light pressure on the filling syringe plunger during the filling
process.
24 English 2017-06-01

Syringe with prescribed fluid
Filling syringe
Filter
Y-connector
Closed clamp
Te mp l at e
Reservoir fill port
Figure 10. Fill 10-mL filling syringe with prescribed fluid (arrows indicate
Open the clamp and slowly depress the plunger on the filling syringe to
9.
inject the prescribed fluid into the pump reservoir. While injecting the
prescribed fluid, verify that the needle remains properly located within
the reservoir.
a. Periodically withdraw and observe a portion of the drug to confirm
that the drug has the expected appearance.
b. After confirming that the needle remains in the reservoir, resume
injecting fluid. Refer to Figure 11 (arrows indicate fluid flow).
Maintain light pressure on the filling syringe plunger during the filling
fluid flow).
process.
Syringe with prescribed fluid
Filter
Open clamp
Te mp l at e
Reservoir fill port
Figure 11. Open the clamp and inject into the pump reservoir.
10.
Close the clamp and repeat steps 8 – 9 until the syringe with prescribed
fluid is empty.
11. When filling is complete, close the clamp, release the pressure on the
filling syringe plunger, and carefully remove the needle from the
reservoir fill port.
2017-06-01 English 25

Note: If you are unsure whether drug was injected correctly into the
pump, completely aspirate the pump to verify that all of the injected drug
can be removed.
12. Remove the cleansing agent from the patient’s skin using an alcohol
pad.
13. Apply an adhesive bandage, if desired.
14. Discard all components of the kit.
Reservoir rinse procedure
Performing a reservoir rinse
To prevent drug overdose or underdose when changing concentrations or
changing solutions in the pump reservoir, always rinse the reservoir twice
between solutions to remove the drug that remains in the reservoir after
emptying the pump. This remaining volume is known as the residual volume.
The procedure for performing a reservoir rinse is outlined below. Use the
components of the appropriate refill kit to perform the rinse and follow the
applicable empty and refill procedures for that kit.
1. Empty the pump completely.
2. Fill the pump with 10 mL of sterile preservative-free Sodium Chloride
Injection, USP.
3. Empty the pump completely.
4. Repeat steps 2 and 3.
5. Fill the pump to capacity with the prescribed fluid.
6. For programmable infusion pumps, program a bridge bolus. Refer to the
programming guide for the pump software.
Calculations for IsoMed pumps (fixed rate) only
Note: Flow rate is affected by changes in altitude and temperature. The
viscosity of the infusion solution as well as the arterial pressure at the location
of the catheter tip in vascular applications can also affect flow rate. Refer to
"Calculating flow rate" on page 28, to determine the significance of the
change.
Scheduling a refill
A refill appointment should be scheduled with your patient. Before scheduling
the appointment, calculate the number of days before the reservoir will need
to be refilled (Refill Interval).
Caution: At refill the pump should contain at least 2 mL of fluid. The flow
rate of the pump decreases rapidly and stops as the volume in the
reservoir decreases from 2 mL to 0 mL. This can result in the potential
loss of therapeutic effect or drug withdrawal symptoms.
1. Calculate the refill interval.
Fill Volume (mL) - 2 mL Refill Interval (days)
Flow Rate (mL/day)
=
Example:
Fill Volume: 20 mL
Flow Rate: 0.5 mL/day
20 mL - 2 mL
0.5 mL/day
26 English 2017-06-01
36 days=

Note: The patient should be scheduled to return within 36 days.
2. Schedule the refill appointment with your patient.
Calculating the time required for the drug to advance to the catheter tip
When the pump is emptied and refilled with a change in concentration or a
change in solution, it is important to calculate the time required for the new
solution to advance to the catheter tip. The time required for the new solution
to advance from the reservoir to the catheter tip is calculated based upon the
volume of fluid in the implanted catheter and pump tubing. Four values are
needed for the calculation: catheter volume per length, implanted catheter
length, pump internal volume, and flow rate.
1. Calculate the flow rate in µL/hour.
Flow Rate (mL/day) x 1000 µL/mL Flow Rate (µL/hour)=
24 hours/day
2. Calculate implanted catheter volume in µL.
Implanted
Catheter
Length
(cm)
3. Calculate the time required for drug to advance to the catheter tip in
hours.
Catheter
Volume per
Length
(µL/cm)
=x
Implanted
Catheter
Volume
(µL)
Implanted
Catheter
Vol u me
(µL)
Flow Rate (µL/hour)
Example:
Pump Model Number: 8472-20-10
Labeled Flow Rate: 1.0 mL/day
Pump Internal Volume: 300 µL
Implanted Catheter Length: 65 cm
Catheter Model Number: 8711
Catheter Volume: 2.22 µL/cm
1.
1.0 mL/day x 1000 µL/mL
24 hours/day
2. 65 cm x 2.22 µL/cm = 144 µL
+
Pump
Internal
Vol u me
(µL)
Time Required for
=
Drug to Advance
(Hours)
42 µL/hour=
2017-06-01 English 27

144 µL + 300 µL
3.
42 µL/hour
Note: The pump internal volume (internal tubing volume) for all models
of the IsoMed pump is 300 μL.
10.5 hours=
Calculating flow rate
The actual flow rate of the IsoMed pump may vary from the labeled flow rate
due to different environmental conditions, drug therapies, and routes of
administration. The flow rate is affected by changes in altitude and
temperature. The viscosity of the drug solution and the body fluid pressure at
site of delivery also affect flow rate.
For intrathecal applications, the average clinically measured flow rate
▪
accuracy was 99% of the labeled flow rate (90% confidence interval of
96%-100%) for intrathecal delivery of analgesics (106 patients).
For intravascular applications, the average clinically measured flow rate
▪
accuracy was 91% of the labeled flow rate (90% confidence interval of
88%-91%) for intrahepatic arterial delivery of chemotherapy with 1000
units/mL of heparin (67 patients).
If the patient will be exposed to environmental conditions that differ from
typical conditions of use, or if the patient or therapy requires precise
knowledge of the labeled flow rate, refer to "Flow Rate Accuracy" in the pump
technical manual to determine the impact of these variables on the flow rate.
Calculating infusion solution
The infusion solution consists of the drug and sterile saline, mixed or diluted
according to the procedure that follows.
1. Calculate the number of days until the pump is empty.
Reservoir Volume (mL)
Flow Rate (mL/day)
Days Until Pump is Empty
=
(days)
2. Calculate amount of drug required in mg.
Days Until
Pump is
Empty
(days)
3. Calculate volume of drug required in mL.
Amount of Drug Required
(mg)
Drug Concentration
(mg/mL)
4. Calculate the volume of sterile saline required in mL.
28 English 2017-06-01
Prescribed
Daily Drug
Dose
(mg/day)
=
Amount of
Drug
=x
Required
(mg)
Volume of Drug Required
(mL)

Reservoir
Volume
(mL)
Example:
Pump Model Number: 8472-20-10
Labeled Flow Rate: 1.0 mL/day
Reservoir Volume: 20 mL
Prescribed Drug: Morphine
Prescribed Daily Drug Dose: 4.0 mg/day
Drug Concentration: 10 mg/mL
Volume of
Drug
Required
(mL)
Volume of
Sterile Saline
=-
Required
(mL)
1.
2. 20 days x 4.0 mg/day = 80 mg of morphine
3.
4. 20 mL - 8 mL = 12 mL of sterile saline
20 mL
1.0 mL/day
80 mg
10 mg/mL
20 days=
8 mL of 10 mg/mL morphine=
Calculating IsoMed pump flow rate accuracy
If the actual volume withdrawn when emptying the pump varies significantly
from the expected volume, verify that the Refill Interval has not been
exceeded and calculate the flow rate accuracy. If the flow rate accuracy
differs significantly from the expected (labeled) rate, taking into consideration
the environmental and therapy factors that may affect the flow rate, contact
your Medtronic representative.
Calculate flow rate accuracy according to the procedure that follows.
1. Calculate the expected dispensed volume in mL.
=x
=-
Expected
Dispensed
Volume
(mL)
Expected
Vol u me
(mL)
Days
Since
Refill
(days)
2. Calculate the expected volume in mL.
Refill
Volume
(mL)
Flow Rate
(mL/day)
Expected
Dispensed
Vol u me
(mL)
2017-06-01 English 29

3. Calculate the flow rate accuracy.
Refill
Vol u me
(mL)
Refill
Vol u me
(mL)
Example: Underinfusion
Actual Volume: 12 mL
Days Since Refill: 16 days
Refill Volume: 20 mL
Flow Rate: 1.0 mL/day
1. 16 days x 1.0 mL/day = 16 mL
2. 20 mL - 16 mL = 4 mL
-
Actual
Vol u me
(mL)
Expected
Vol u me
(mL)
=x 100-
Flow
Rate
Accuracy
(%)
3.
20 mL - 4 mL
Example: Overinfusion
Actual Volume: 4 mL
Days Since Refill: 10 days
Refill Volume: 20 mL
Flow Rate: 1.0 mL/day
1. 10 days x 1.0 mL/day = 10 mL
2. 20 mL - 10 mL = 10 mL
3.
20 mL - 10 mL
50%=x 10020 mL - 12 mL
160%=x 10020 mL - 4 mL
Technical support
A toll-free technical support service is available 24 hours a day for
clinicians managing patients with Medtronic implantable infusion pumps.
Telephone Customer Service at: 1-800-707-0933.
30 English 2017-06-01

Emergency procedures
Baclofen injection overdose
Consult the patient's medical record or with the patient's physician to
confirm the drug or drug concentration within the pump reservoir.
Symptoms
Drowsiness, lightheadedness, dizziness, somnolence, respiratory
depression, hypothermia, seizures, rostral progression of hypotonia,
and loss of consciousness progressing to coma.
There is no specific antidote for treating overdoses of intrathecal
baclofen injection.
Actions
See table on the following page.
2017-06-01 English 31

Table 1. Intrathecal baclofen injection overdose emergency
Maintain airway/breathing/circulation.
Intubation and respiratory support may be necessary.
Empty pump reservoir to stop drug flow.
Record amount withdrawn.
procedures
FOR INTRATHECAL
OVERDOSE:
If not contraindicated, withdraw
30 – 40 mL CSF by lumbar
puncture or through the catheter
access port to reduce the
concentration of baclofen in the
CSF. Use only a 24-gauge or
smaller, 1.5- or 2.0-inch (3.8- or
5.1-cm), needle for withdrawal
from the catheter access port.
Notify patient's physician managing intrathecal baclofen injection
FOR SUBCUTANEOUS
OVERDOSE:
Proceed immediately to the next
step.
a
(eg, pocket fill)
therapy.
Continue to monitor closely for symptom recurrence.
Report incident to Medtronic, Inc.
a
Use a 25-gauge needle for withdrawal from a SynchroMed or SynchroMed EL
catheter access port. Use a 24- or 25-gauge needle for withdrawal from a
SynchroMed II or IsoMed catheter access port.
32 English 2017-06-01

Baclofen injection underdose/withdrawal
Consult the patient's medical record or with the patient's physician to
confirm the drug or drug concentration within the pump reservoir.
Symptoms of underdose
Pruritus without rash, hypotension, paresthesia, fever, and altered
mental state. Priapism may develop or recur if treatment with intrathecal
baclofen is interrupted.
Symptoms of withdrawal
Exaggerated rebound spasticity and muscle rigidity, rhabdomyolysis,
and multiple organ failure. The condition may resemble autonomic
dysreflexia, sepsis, malignant hyperthermia, and neuroleptic-malignant
syndrome.
Actions
See table on the following page.
2017-06-01 English 33

Table 2. Intrathecal baclofen injection underdose/
withdrawal emergency procedures
Initiate life-sustaining measures if indicated.
If a patient receiving intrathecal baclofen injection presents with the
signs and symptoms suggestive of withdrawal (see previous page),
the following is consistent with that suggested by a panel of
therapy-experienced clinicians convened to explore this issue.
1. Immediately contact a physician experienced in intrathecal
baclofen injection, preferably the physician managing the
therapy for the patient in question; follow the recommendations
of this physician. This step is important even if the patient's
signs and symptoms seem mild.
2. If a physician experienced in intrathecal baclofen injection is
unavailable, consider instituting one or more of the following
options, unless otherwise contraindicated:
high-dose oral* or enteral baclofen
▪
restoration of intrathecal baclofen injection infusion
▪
intravenous benzodiazepines by continuous or intermittent
▪
infusion, titrating the dosage until the desired therapeutic
effect is achieved
* Note: Oral baclofen should not be relied upon as the sole
treatment for intrathecal baclofen injection withdrawal syndrome.
Report incident to Medtronic, Inc.
a
Refer to the drug manufacturer’s package insert for a complete list of
indications, contraindications, warnings, precautions, adverse events, and
dosage and administration information.
b
Coffey RJ, Edgar TS, Francisco GE, et al. Abrupt withdrawal from the
intrathecal baclofen: recognition and management of a potentially lifethreatening syndrome. Arch Phys Med Rehabil. 2002;83:735-741.
a,b
34 English 2017-06-01

Morphine intrathecal/epidural overdose
Consult the patient's medical record or with the patient's physician to
confirm the drug or drug concentration within the pump reservoir.
Symptoms
Respiratory depression with or without concomitant central nervous
system depression (ie, dizziness, sedation, euphoria, anxiety, seizures,
respiratory arrest).
Actions
See figure on the following page.
Respiratory resuscitation and intubation may be necessary.
Maintain airway/breathing/circulation.
Give naloxone 0.4 – 2 mg intravenously.
a,b,c
FOR INTRATHECAL/EPIDURAL OVERDOSE: FOR SUBCUTANEOUS
OVERDOSE:
If not contraindicated, withdraw 30 – 40 mL of
CSF through the catheter access port or by lumbar
puncture to reduce CSF morphine concentration.
Use only a 24-gauge
(3.8 or 5.1 cm), needle for withdrawal from the
d
or smaller, 1.5 or 2.0 inch
catheter access port.
Empty pump reservoir to stop drug flow.
Record amount withdrawn.
(eg, pocket fill)
Proceed immediately
to the next step.
No ResponseResponse
Continue to monitor closely for symptom recurrence.
Since the duration of the effect of IV naloxone is
shorter than the effect of intrathecal/epidural and
subcutaneous morphine, repeated administration
may be necessary.
a
Continue to perform
life-sustaining
measures.
No Recurrence Recurrence
Repeat naloxone every 2 – 3 minutes to maintain
adequate respiration.
see naloxone package insert.
If no response is observed after 10 mg of naloxone, the
diagnosis of narcotic-induced toxicity should be questioned.
a,b
For continuous IV infusion,
b
a,b
Notify patient’s physician managing intrathecal pain therapy.
Figure 12. Morphine intrathecal/epidural overdose emergency
a
Preservative-free morphine sulfate sterile solution manufacturer's
package insert.
procedures.
2017-06-01 English 35

b
Naloxone hydrochloride manufacturer's package insert.
c
Refer to the drug manufacturer's package insert for a complete list of
indications, contraindications, warnings, precautions, adverse events,
and dosage and administration information.
d
Use a 25-gauge needle for withdrawal from a SynchroMed or
SynchroMed EL catheter access port. Use a 24- or 25-gauge needle for
withdrawal from a SynchroMed II or IsoMed catheter access port.
36 English 2017-06-01

Emergency procedure to empty pump reservoir
Equipment
22-gauge noncoring needle
▪
20-mL syringe
▪
3-way stopcock or extension set with clamp
▪
Antiseptic agent
▪
Cautions:
Do not use an open syringe when emptying the IsoMed Pump. The
▪
pump reservoir contents are under significant pressure and can eject
through an open syringe when emptying the pump. Ejection of pump
contents under pressure can result in procedural delays and a
potential risk to the clinician or patient.
Do not spill or leak vesicant or cytotoxic drug into adjacent tissue
▪
during pump procedures. Spillage or leakage of vesicant drug into
adjacent tissue can result in significant local tissue damage.
1. Assemble the needle, syringe, and stopcock or extension set.
2. Locate the pump by palpation. The reservoir fill port is located in the
CENTER of the pump.
If you have difficulty identifying the pump features, you may seek
assistance from another clinician. If deemed necessary by the clinician,
x-ray and fluoroscopy can be used to assist in locating or determining
the orientation of the pump.
3. Prepare the injection site by cleansing the area using an antiseptic
agent.
4. Gently insert the 22-gauge noncoring needle into the center of the
reservoir fill port until the needle touches the bottom of the reservoir fill
port (Figure 13).
During proper needle insertion, you will feel the needle:
pass through the patient's skin and subcutaneous tissue,
▪
hit the silicone septum,
▪
(Scar tissue, if present, can feel similar to the septum.)
pass through the septum, and
▪
hit the metal bottom of the reservoir fill port.
▪
(The top of the pump is metal and hitting the top of the pump can
feel similar to hitting the bottom of the reservoir fill port.)
If excessive resistance is encountered during needle insertion, reassess
placement. Do not force the needle. The feel of abnormal resistance
during the procedure may be an indication that the needle is not in the
center of the reservoir fill port.
Septum
Needle
Bottom of the
reservoir fill port
Figure 13. View inside of a SynchroMed programmable pump while the
needle is fully and properly inserted.
Subcutaneous tissue
2017-06-01 English 37

5. For SynchroMed programmable pumps: Open the clamp or stopcock
and slowly withdraw the fluid from the reservoir into the empty syringe.
For IsoMed nonprogrammable pumps: Maintain light pressure on the
syringe plunger when emptying the pump. Open the clamp or stopcock
and slowly withdraw the fluid from the reservoir into the empty syringe. If
backflow is not observed, remove the needle from the reservoir fill port
and repeat steps 2 – 5. If backflow still does not occur, and the Expected
Volume is greater than 2 mL, contact your Medtronic representative.
6. Depending on pump reservoir volume, more than one syringe may be
needed to empty the pump. Close the clamp or stopcock when changing
syringes.
7. Completely empty the pump.
For SynchroMed programmable pumps: When the pump is empty,
the bubbles will stop forming, and negative pressure in the syringe can
be felt.
For IsoMed nonprogrammable pumps: Wait approximately 5 seconds
after fluid stops flowing into the syringe to ensure that all fluid is
removed and the pump is empty.
8. Remove the needle from the reservoir fill port.
9. Record in patient chart the amount of fluid emptied from the pump
reservoir.
Special notice
The Medtronic Model 8555 Refill Kit is designed to be used for refilling
Medtronic implantable infusion pumps with the exception of Medtronic
MiniMed infusion pumps. Medtronic cannot warrant or guarantee the refill kit
because, despite the exercise of all due care in design, component selection,
manufacture, and testing prior to sale, the components of the refill kit may be
easily damaged before or during use by improper handling or other
intervening acts.
38 English 2017-06-01

Medtronic® Neuromodulation
MODEL 8555 REFILL KIT
LIMITED WARRANTY
A. This Limited Warranty provides the following assurance to the purchaser
of the Medtronic Model 8555 packaged herein, hereafter referred to as
the “Product”:
(1) Should the Product fail to function within normal tolerances due to a
defect in materials or workmanship prior to its "Use By" date,
Medtronic will at its option: (a) issue a credit to the purchaser equal
to the Purchase Price, as defined in Subsection A(2), against the
purchase of the replacement Product or (b) provide a functionally
comparable replacement Product at no charge.
(2) As used herein, Purchase Price shall mean the lesser of the net
invoiced price of the original, or current functionally comparable, or
replacement Product.
B. To qualify for the Limited Warranty set forth in Section A(1), the following
conditions must be met:
(1) The Product must be used prior to its "Use By" date.
(2) The unused portion of the Product must be returned to Medtronic
within thirty (30) days after discovery of the defect and shall be the
Property of Medtronic.
(3) The Product must not have been altered or subjected to misuse,
abuse or accident.
(4) The Product must be used in accordance with the labeling and
instructions for use provided with the Product.
C. This Limited Warranty is limited to its express terms. In particular:
(1) Except as expressly provided by this Limited Warranty,
MEDTRONIC IS NOT RESPONSIBLE FOR ANY DIRECT,
INCIDENTAL OR CONSEQUENTIAL DAMAGES BASED ON ANY
DEFECT, FAILURE OR MALFUNCTION OF THE PRODUCT,
WHETHER THE CLAIM IS BASED ON WARRANTY, CONTRACT,
TORT OR OTHERWISE.
(2) This Limited Warranty is made only to the purchaser who uses the
Product. AS TO ALL OTHERS, MEDTRONIC MAKES NO
WARRANTY, EXPRESS OR IMPLIED, INCLUDING, BUT NOT
LIMITED TO, ANY IMPLIED WARRANTY OF MERCHANTABILITY
OR FITNESS FOR A PARTICULAR PURPOSE WHETHER
ARISING FROM STATUTE, COMMON LAW, CUSTOM OR
OTHERWISE. NO EXPRESS OR IMPLIED WARRANTY TO THE
PATIENT SHALL EXTEND BEYOND THE PERIOD SPECIFIED IN
A(1) ABOVE. THIS LIMITED WARRANTY SHALL BE THE
EXCLUSIVE REMEDY AVAILABLE TO ANY PERSON.
(3) The exclusions and limitations set out above are not intended to,
and should not be construed so as to contravene mandatory
provisions of applicable law. If any part or term of this Limited
Warranty is held to be illegal, unenforceable or in conflict with
applicable law by a court of competent jurisdiction, the validity of the
remaining portions of the Limited Warranty shall not be affected, and
all rights and obligations shall be construed and enforced as if this
Limited Warranty did not contain the particular part or term held to
be invalid. This Limited Warranty gives the patient specific legal
rights. The patient may also have other rights which vary from state
to state.
(4) No person has any authority to bind Medtronic to any representation,
condition or warranty except this Limited Warranty.
1
(U.S. Customers Only)
1
This Limited Warranty is provided by Medtronic, Inc., 710 Medtronic Parkway,
Minneapolis, MN 55432-5604. It applies only in the United States. Areas outside the
United States should contact their local Medtronic representative for exact terms of the
Limited Warranty.
2017-06-01 English 39

40 English 2017-06-01

Contacts:
Asia:
Medtronic International Ltd.
Tel. 02919-1300
Fax 02891-6830
Medtronic Asia Ltd.
Tel. (02)-548-1148
Fax (02)-518-4786
Australia:
Medtronic Australasia P/L
5 Alma Road
Macquarie Park NSW 2113
Australia
Tel. +61-2-9857-9000
Fax +61-2-9878-5100
Toll-free 1-800-668-670
Austria:
Medtronic Österreich GmbH
Tel. 01-240440
Fax 01-24044-100
Belgium:
Medtronic Belgium S.A.
Tel. 02-456-0900
Fax 02-460-2667
Canada:
Medtronic of Canada Ltd.
Tel. (1-905)-460-3800
Fax (1905)-826-6620
Czech Republic:
Medtronic Czechia s.r.o.
Tel. 2-965-795-80
Fax 2-965-795-89
Denmark:
Medtronic Danmark A/S
Tel. 45-32-48-18-00
Fax 45-32-48-18-01
Finland:
Medtronic Finland Oy/LTD
Tel. (09)-755-2500
Fax (09)-755-25018
France:
Medtronic France S.A.S.
Tel. 01-5538-1700
Fax 01-5538-1800
Germany:
Medtronic GmbH
Tel. (02159)-81490
Fax (02159)-8149100
Greece:
Medtronic Hellas S.A.
Tel. 210-67-79-099
Fax 210-67-79-399
Hungary:
Medtronic Hungária Kft.
Tel. 1-889-06-00
Fax 1-889-06-99
Ireland:
Medtronic Ireland Ltd.
Tel. (01)-890-6522
Fax (01)-890-7220
Italy:
Medtronic Italia SpA
Tel. 02-241371
Fax 02-241381
Tel. 06-328141
Fax 06-3215812
Japan:
Medtronic Japan
Tel. 03-6776-0017
Fax 03-6774-4645
Latin America:
Medtronic, Inc.
Tel. (1305)-500-9328
Fax (1786)-709-4244
Norway:
Medtronic Norge AS
Tel. 67-10-32-00
Fax 67-10-32-10
Poland:
Medtronic Poland Sp. z.o.o.
Tel. (022)-465-69-00
Fax (022)-465-69-17
Portugal:
Medtronic Portugal, Lda.
Tel. 21-724-5100
Fax 21-724-5199
Russia:
Medtronic Russia
Tel. (8495) 580-7377
Fax (8495) 580-7378
Slovakia:
Medtronic Slovakia, o.z.
Tel. 0268 206 911
Fax 0268 206 999
Spain:
Medtronic Ibérica, S.A.
Tel. 91-625-0400
Fax 91-650-7410
Sweden:
Medtronic AB
Tel. 08-568-585-00
Fax 08-568-585-01
Switzerland:
Medtronic (Schweiz) AG
Tel. 031-868-0100
Fax 031-868-0199
The Netherlands:
Medtronic B.V.
Tel. (045)-566-8000
Fax (045)-566-8668
Turkey:
Medtronic Turkey
Tel. +90 216 636 1000
Fax +90 216 636 1008
U.K.:
Medtronic U.K. Ltd.
Tel. 01923-212213
Fax 01923-241004
USA:
Medtronic, Inc.
Tel. (1-763)-505-5000
Fax (1-763)-505-1000
Toll-free: (1-800)-328-0810

Manufacturer
Medtronic, Inc.
710 Medtronic Parkway,
Minneapolis, MN 55432-5604,
USA
www.medtronic.com
Tel. +1-763-505-5000
Fax +1-763-505-1000
REP
Authorized Representative
in the European Community
Medtronic B.V.
Earl Bakkenstraat 10,
6422 PJ Heerlen,
The Netherlands
Tel. +31-45-566-8000
Fax +31-45-566-8668
Europe/Africa/Middle East Headquarters
Medtronic International Trading Sàrl
Route du Molliau 31,
Case Postale 84
CH - 1131 Tolochenaz,
Switzerland
www.medtronic.eu
Tel. +41-21-802-7000
Fax +41-21-802-7900
Asia-Pacific
Medtronic International Ltd.
Suite 1106-11, 11/F, Tower 1, The Gateway,
25 Canton Road, Tsimshatsui,
Kowloon,
Hong Kong
Tel. +852-2919-1300
Fax +852-2891-6830
Contacts for specific countries are listed inside this cover.
EC
*M221382A014*
© Medtronic, Inc. 2017
All Rights Reserved
M221382A014
 Loading...